1
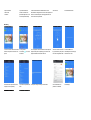
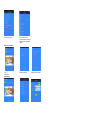
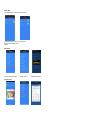
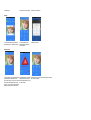
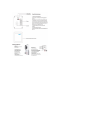
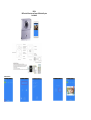
WF-6A
Wifi Doorbell Video Intercom Support IOS/Android System
User Manual
Add the doorbell
1.Open the software
after click the
add button.
2.Input the doorbell ID, ID
number on the back of the
product.Manually enter or scan
the code input automatically.
3.Add user will default to the administrator for the first
4.Choose “NO”
time.Password is empty,after the success of the configuration of
network. If the other cell phone users login,please enter the
correct user name and password.
5.Add doorbell successful
3.If the equipment is started successful click next step,if the
equipment didn't power on,please plug in and wait for the
equipment started successful,then click next.
4.Hold the call button for 5s,then
let go,device will say "the system
has to enter configuration mode".
5.Android mobile ohone
automatically device hot and jump
instructions on the next.
1.IOS system setting according to this instructions.
2.Connect“ZISTEK”,WIFI
password is: 123456789
3.Click settings
WIFI Setting
1.Connect a network cable frorr the router to 2.If using wireless
insert the LAN port that on the back of the
connection,click ,then choose
product.
the network.
6.Choose the WIFI hotpot which need to
configure, then click it(Android)
7.Input the WIFI password,click“
Done”.
4.Choose “WIFI setting”
5.Choose the need to be
configured WIFIhotpot,password
input Click finish, the bell will be
restarted.
Edit Account information
1.Click
selection user
System Setting
2.Modify the bell name
3.Switch the user information
1.Voice prompt switch: when the voice prompt is open, can choose to open or close the voice prompt; the factory default open.
2.Configuration mode switch: when configuration mode is open, can choose to open or close the configuration mode: the factory default open.
3.The monitor time: can be set up in 10-300 seconds.
4.The talk time: Can be set up in 30-90 seconds.
5.The call waiting time: Can be set up in 30-90 seconds. IOS system can be set up in 30-90 seconds.
Special remind: Only Administrators have access to system settings.
White List Setting
1.Choose “white list setting”
2.Click add options on the top
right corner
3.Enter the user name and password that you want to add; up to 4.Click the editingoptions behind
seven can be added to the user.
the administrator can reset the
administrator password;need to
login again after reset the
password.
Alarm Setting
When alarm turn off(Disarm any alarms are not notified to cellphone.
1.When alarm turn on(Arming),user can set up other parametersfurther.
A.Alarm type,Motion detection,PIR and so on.
B.1-5
C.Alarm delay
D.Alarm
Clock Setting:
According to actual situation, set correct time zone.The unity of time for automatic calibration via internet.
Interface setting:
Used to define extended ID control,as well as the linkage function.
1.Equipment time settings, can choose the
time zone or the use of mobile phone time
calibration.
2.Interface setting
Update Firmware
1.Choose the update device firmware.
Lock Control Setting
2.Click OK to update.
3.Download the new firmware.
1.Click Settings.
2.Enter the lock control settings.
3.Modify the user password.
2.In the surveillance video
interface/camera,calls can be
remote unlocking.
3.Users open the door.
Features
1.In the main interface,click the doorbell
device directly,you can proactively monitor.
Real-time Alarm
1.When an alarm occurs,all the added phone
will immediately be notified.Click on the
green answer key,you can turn on the device
for real-time monitoring.Slide the red hang
up button, you can hang up.Central interface
displays an alarm occurs the instant photo.
2.Llegal destruction of the bell,the 3.Alarm monitoring, but not remote unlocking alarm monitoring,
mobile terminal received super
but not remote unlocking.
alarm prompt,monitoring or hang
up after to answer.