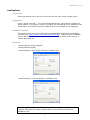
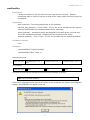
1
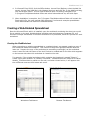
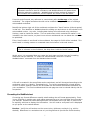
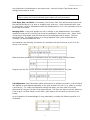
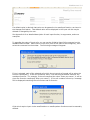
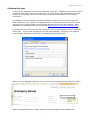
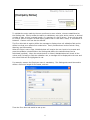
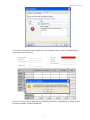
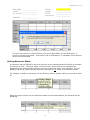
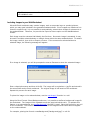
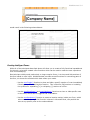
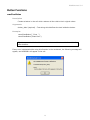
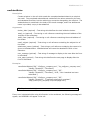
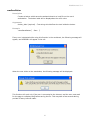
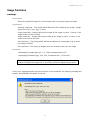
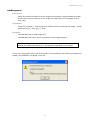
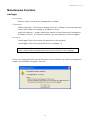
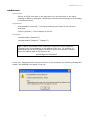
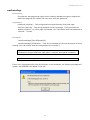
WebWorksheet
TM
Version 3.2
User Manual
Copyright 2009-2011
Expitas LLC
WebWorksheet V3.2
Contents
Installing WebWorksheet.........................................................................................................3
Creating a Web-Enabled Spreadsheet .......................................................................................4
Creating the WebWorksheet .................................................................................................4
Formatting the WebWorksheet .............................................................................................5
Identifying Input Cells .........................................................................................................7
Validating User Input...........................................................................................................9
Defining Mouseover Effects ................................................................................................ 12
Including Images in your WebWorksheet ............................................................................. 13
Creating Intelligent Forms.................................................................................................. 14
Emailing Completed Forms................................................................................................. 15
Protecting Your Information ............................................................................................... 15
Input Functions.................................................................................................................... 16
wwsInput......................................................................................................................... 16
wwsDropDown.................................................................................................................. 17
wwsCheckBox................................................................................................................... 18
Button Functions .................................................................................................................. 19
wwsClearButton................................................................................................................ 19
wwsSubmitButton ............................................................................................................. 20
wwsSaveButton ................................................................................................................ 22
Image Functions .................................................................................................................. 23
wwsImage ....................................................................................................................... 23
wwsBackground................................................................................................................ 24
Miscellaneous Functions ........................................................................................................ 25
wwsToggle ....................................................................................................................... 25
wwsShowRows ................................................................................................................. 26
wwsHideRows................................................................................................................... 26
wwsBookmark .................................................................................................................. 27
wwsProtectPage................................................................................................................ 28
wwsDateMath ................................................................................................................... 29
© 2011 Expitas LLC. All rights reserved. This product, including the software and any
accompanying documentation, are copyrighted and protected by copyright laws and international
copyright treaties, as well as other intellectual property laws and treaties.
2
WebWorksheet V3.2
Installing WebWorksheet
WebWorksheet is comprised of two software components: the Microsoft Excel add-in that is
installed on the licensed user’s workstation, and the shared component which is referenced from
within the generated web page. Only the Microsoft Excel add-in requires installation.
Follow these steps to install the add-in on your workstation:
1. Download the self-extracting executable using the instructions provided in the
confirmation email you received after the purchase was completed. This file can be saved
anywhere on your computer.
2. Extract the WebWorksheet files by double-clicking on the downloaded file. Files will be
installed in the C:\Program Files\Webworksheet folder.
Windows Vista and Windows 7 users: You must run the installer program as
Administrator using the right click menu.
3. Once the software has been installed, the add-in must be enabled in Microsoft Excel.
In Microsoft Office Excel 2003, select the Add-Ins… option on the Tools menu.
Then using the Browse button, select the webworksheet.xla file from the
C:\Program Files\Webworksheet folder and click OK. The WebWorksheet toolbar will now
be visible. This toolbar will automatically appear each time Microsoft Excel is started. To
temporarily disable the WebWorksheet toolbar, uncheck the WebWorksheet option on the
Add-Ins menu, and the toolbar will not be visible. Simply re-check the WebWorksheet
option to make it visible again.
3
WebWorksheet V3.2
4. In Microsoft Excel 2008, click the Office button, choose Excel Options, select the Add-Ins
screen, choose Excel Add-Ins in the Manage input box and click Go. In the Add-Ins dialog,
click the Browse button. This will open a familiar Open File dialog. Navigate to the
C:\Program Files\Webworksheet folder and select webworksheet.xls, and click Open.
5. When installation is complete, the C:\Program Files\Webworksheet folder will contain the
Excel add-in file, the user manual (this document), and several example spreadsheets
which demonstrate the features of WebWorksheet.
Creating a Web-Enabled Spreadsheet
Once the Microsoft Excel add-in is installed, open the workbook containing the sheet you would
like to publish on the web. WebWorksheet publishes each worksheet as a separate file, so if
there are multiple worksheets in the same workbook to be published, follow this process for each
worksheet.
Creating the WebWorksheet
When converting an existing spreadsheet to a webworksheet, we suggest creating a copy of
the worksheet inside the workbook. This is done to keep the original worksheet intact for
later use. Rename the copy of the worksheet to something meaningful, as the worksheet
name is used for both the name of the html file that is created and for the title which appears
on the browser tab when this worksheet is viewed on the web.
For example, if the original worksheet which contains the timesheet is named “Sheet 1”,
create a copy and rename it to “Weekly Timesheet”. WebWorksheet will create a file called
Weekly_Timesheet.htm to publish on the web, and when viewed online, it will appear with
the worksheet name as the browser tab name.
Worksheet Tab Names
Browser Tab Names
4
WebWorksheet V3.2
Tip: Avoid using special characters in the worksheet name as some of those
characters cannot be used in a filename, and WebWorksheet will replace them
with the underscore character. WebWorksheet will also replace all spaces in
the filename with underscores, but the spaces will remain in the tab name.
From this point forward, any reference to a worksheet refers to the copy of the original
worksheet. The original worksheet should not be modified during the process of creating a
web-enabled worksheet.
Identify the bottom-right cell of the worksheet and place the “#end” marker (without quotes)
in that cell. This identifies to WebWorksheet the ending row and column to be included in the
web-enabled version. Any cells, including data lookup cells referenced using vlookup or
hlookup, must be inside the marker. The row and column which contains the marker is not
included in the html version, so place it one column outside and one row below the content to
be published.
If the ‘#end’ marker is not found in the worksheet, the range A1:P100 will be included. This
could result in missing content or unwanted rows and columns in the web version.
Tip: To make data lookup cells invisible in the .htm version, simply hide those
rows or columns in the worksheet, but keep them inside the #end marker.
At this point, it is suggested that you create the html page and view it so any formatting
differences can be resolved. To create the webworksheet, select the “Create a
WebWorksheet” command from the WebWorksheet toolbar.
A file will be created in the same folder as the worksheet, and will be named according to the
worksheet name (e.g. Weekly_Timesheet.htm). To view the generated file, simple doubleclick on its name, and the .htm file will be loaded into the browser defined as the default for
your workstation. The Excel worksheet and the web page can now be viewed side by side for
comparison.
Formatting the WebWorksheet
Correcting any format differences usually entails setting the cell format appropriately. Excel
is very forgiving in certain ways, and makes assumptions as to how to display the information
you entered. Sometimes those assumptions do not translate well to the web, so Excel must
be explicitly told how to display the information. You will need to verify each cell is displayed
as you prefer on the webworksheet.
Borders: Verify the cell borders are the correct color, thickness, and style (e.g. solid or
dashed). Oftentimes in a worksheet we rely on the gridlines to provide the visible borders,
5
WebWorksheet V3.2
but gridlines are not displayed on the web version. Use the Format…Cells Border tab to
change the borders for a cell.
Tip: Include a thin, blank column on the left and right of your form. This will
help to clearly see how the left and right borders are being formatted.
Font Style, Size, and Color: If necessary, the Format…Cells Font tab should be used to set
the desired font family (e.g. arial or verdana), size, and color. Most cells default their color
to “Automatic”, which is translated to black by WebWorksheet, so it is not necessary to force
those cells to be black.
Merging Cells: If any text appears cut-off or missing on the webworksheet, it’s probably
because it does not fit in the cell with its current settings for font style or size. Again, Excel
is forgiving in this regard, and will show the text if the adjacent cell is empty. The web
cannot do that. The easiest solution is to merge adjacent cells ( both horizontally and
vertically ) to accommodate the text.
As illustration, the following 3x3 section of a worksheet will allow the text in cell A2 to be
shown it its entirety.
When this same worksheet is converted to html, the resulting page looks as follows:
Merging cells A2, B2, and C2, and then recreating the webworksheet, will yield:
Cell Alignment: Excel oftentimes makes assumptions on whether the text in a cell should be
left-aligned or right-aligned depending on the type of data in the cell ( e.g. a date, a number,
a text string ). To create a professional looking web page, you may want to force the
alignment by using the Format…Cells Alignment tab. You may also want to set the Indent on
a cell to give it a fixed margin on the left or right sides so the text does not touch the cell
border.
As an illustration of the advantage of using indentation, consider the following section of a
worksheet:
6
WebWorksheet V3.2
When converted to html, the following is displayed in the browser:
To give a little separation between the text and borders, we can set up Column A to have a
right indent of 1, and Column B to have a left indent of 1, yielding the following:
Cell vertical alignment ( top, center, or bottom ) should also be reviewed and adjusted to
improve the look of the web form.
The steps to correct any formatting differences can be repeated as often as necessary until
the webworksheet is an identical replica of the Excel worksheet.
Identifying Input Cells
The next step is to identify each input cell for which the user is to enter a value. When using
an Excel worksheet, every cell is available for input, but that is probably not the best
approach for deploying a web form. WebWorksheet provides several functions for collecting
input from the user, so choose the method which best meets your needs.
- Use the wwsInput() function to collect information to be typed by the user, including
numbers, dates, and text strings, or
- Use the wwsDropDown() function to create a list of options for the user, and they
select one of those options from the list, or
- Use the wwsCheckBox() function to create a checkbox which the user can check or
uncheck. Multiple checkboxes can be grouped together so the user can select only a
single option from a list of multiple options.
For example, to identify input cells for the upper portion of the Weekly Timesheet, we would
enter =wwsInput() into each of the appropriate cells:
7
WebWorksheet V3.2
If a default value is desired, that value can be passed to the wwsInput function, as shown in
the Manager field above. That default value will be displayed in the input cell but may be
deleted or changed by the user.
See Appendix A for a detailed description of each input function, its arguments, and more
examples.
To expedite the setup of input cells, you can use the Initialize Input Cells command on the
WebWorksheet toolbar. Select one or more cells (cells do not have to be contiguous), then
select the command on the toolbar. The following message will appear:
If Yes is selected, each of the selected cells which do not contain a formula will be given the
formula =wwsInput(). If the cell contains a value, it will become the default value for the
wwsInput function. For example, if the cell contained the value “Enter your name”, it will be
given the formula =wwsInput(“Enter your name”). If the cell contains a formula, a message
will be displayed containing the cell number and its formula:
Cells which require input via the wwsCheckbox or wwsDropdown functions must be manually
defined.
8
WebWorksheet V3.2
Validating User Input
If desired, cell validation rules may be defined for input cells. Validation rules can be used for
prompting users when they arrive at an input cell, verifying the data entered meets certain
criteria, or preventing a user from submitting (emailing) a webworksheet with missing
information.
All validation rules are defined using Excel validation criteria, which are found under the
Data…Validation menu. While it is outside the intent of this user manual to describe all the
options of using Excel validation, the following describes some of the key features. More
information on validation rules can be found at http://support.microsoft.com/kb/211485.
To prompt the user when an input cell is selected, use the Input Message tab and check the
Show Input … box to enter the desired Title and Input Message. Following is an example
input message defined for the Weekly Timesheet Employee name field:
When the Input Message is defined, Excel will show the prompt whenever that cell is active.
When the WebWorksheet is created, that same input message will be displayed as:
9
WebWorksheet V3.2
To validate the entry made by the user conforms to some criteria, rules are established on
the Settings tab. Excel provides the ability to validate an entry as a whole number, a decimal
number, a date, a time, a certain length, or a member of a list of values. It can also be used
to verify a value or length is a fixed value, greater than or less than a value, or somewhere in
between. Custom rules can also be defined.
The Error Alert tab is used to define the message to display when cell validation fails and to
define how that error affects form submission. Excel provides three levels of alerts: Stop,
Warning, and Information.
When the Style is set to Stop, WebWorksheet will require the user input to be present and
pass the validation rule defined on the Settings tab before the webworksheet can be
submitted (emailed). When the submit button is clicked, WebWorksheet will check all the
values, and if missing or fails the validation rule, a message will be displayed to the user and
the errant fields will be highlighted in red.
For example, assume the Employee name is mandatory. The Settings tab would be used to
define a minimum length for the name, such as:
Then the Error Alert tab would be set up as:
10
WebWorksheet V3.2
If the user selected the submit button with the employee name missing, WebWorksheet
would display the following:
If the error style is set to Warning, the offending fields will be highlighted in yellow and the
following message would be displayed:
11
WebWorksheet V3.2
The user may choose to submit the form with the missing fields (via the OK button), or
Cancel to correct those fields. If the Style is set to Information, no validation occurs and the
submit will be executed.
Defining Mouseover Effects
A mouseover can be defined for any non-input cell on the webworksheet by defining a comment
for that cell in Excel. Using the Insert…Comment menu option, define the message to be
displayed on the webworksheet whenever the user hovers the mouse over that field. The red
indicator that Excel uses to identify cells with comments is not visible on the webworksheet.
For example, to define a mouseover for the Overtime column header, define a comment in Excel
as:
When the mouse hovers over the Overtime header on the webworksheet, the following will be
displayed:
12
WebWorksheet V3.2
Tip: To set up mouseovers for input cells, use the Input Message tab on the
cell validation rules.
Including Images in your WebWorksheet
Microsoft Excel workbooks may contain images, such as corporate logos or product pictures,
which you may want included in the generated webworksheet. Since images are oftentimes not
linked to a specific cell, it is not possible to automatically extract those images for placement on
the webworksheet. Therefore, we provide the Export a Picture option on the WebWorksheet
toolbar.
Each image must be extracted individually the first time. Once each image is extracted, it may
be used in multiple webworksheets or multiple times within the same webworksheet. To extract
the image, select it, then click on Export a Picture. If the command is selected without a
selected image, the following message will appear:
If an image is selected, you will be prompted to enter a filename to store the extracted image:
Enter a descriptive name and then click OK. The image will be copied as a .jpg file and stored in
the same folder as the Excel worksheet. The original image is left intact on the worksheet.
Repeat this process for each image.
To place the image on the webworksheet, use the wwsImage() function in a cell.
Using the Excel Format…Sheet Background menu, it is possible to define a background image for
the worksheet. The image will be repeated across the page behind the cells. To replicate this
feature on a webworksheet, the wwsBackground() function is used. Place this formula in any cell
on the worksheet. The function returns the name of the image but that name does not appear
on the webworksheet.
For example, placing the formula =wwsBackground(“background.jpg”) in cell B1
13
WebWorksheet V3.2
would result in the following webworksheet:
Creating Intelligent Forms
While all of the techniques described above will allow you to create a fully-functional spreadsheet
for the web, we’ve also created a few functions which can be used to make the user experience
even more satisfying.
One technique widely used, particularly on large complex forms, is to show and hide sections of
the form based on user input. WebWorksheet provides several functions for controlling parts of
the form, so choose the method which best meets your needs.
- Use the wwsToggle() function to show and hide a specific number of rows immediately
following the row containing this function. This is ideal for FAQ sections or including
the symbols for expanding [+] or collapsing [-] sections of a form.
- Use the wwsShowRows() and wwsHideRows() functions to show or hide specific rows
on the form, which can be triggered via a calculation.
- Use the wwsBookmark() function to create a location marker inside your form, which
when used with the hyperlink function inherent in Microsoft Excel, can position the
user at any specific point on the webworksheet.
14
WebWorksheet V3.2
Emailing Completed Forms
One of the most powerful features of WebWorksheet is the ability to have completed forms
emailed to an address when the user has completed data entry. Certainly, there isn’t much
value in publishing a form on the web only to require the user to print the completed form so it
can be delivered via fax or mail.
Using the wwsSubmitButton() function allows the form to be sent via email to a defined address.
The completed form is contained within the body of the email message, and can also be included
as a file attachment for easy archival by the recipient. All the validation techniques described
above can be used to ensure the form is completed properly before allowing it to be sent. As a
security feature, WebWorksheets which are sent via email cannot be modified by the recipient.
The wwsClearButton() function removes any user entry from the webworksheet and restores all
the fields to their original values.
Forms can also be saved on the local workstation before being emailed, so the user can complete
sections of the form and return later for more data entry. The wwsSaveButton() function allows
the webworksheet to be saved with all user entry intact. To complete entry, the user selects the
local copy and can save as many times as desired. When complete, the form can be sent via
email if the submit button has been defined.
Protecting Your Information
Your business information is important, and you may not want your web users to see the data or
calculations embedded in your webworksheet. That information may be protected using the
wwsProtectPage() function, which encrypts the information using highly secure algorithms.
When a page is protected, the user will be prompted to enter a password before the
webworksheet will be displayed. If the user attempts to view the embedded data using the
view..source command on the browser, they will see just a jumbled array of numbers and letters.
15
WebWorksheet V3.2
Input Functions
wwsInput
Description
Accepts keyboard input for a cell. May be used for dates, numbers, or text strings.
Arguments
default_value (optional) – The initial value of the cell, which may be overwritten by
the user. If no default value is provided, the cell is empty.
Validation Options
User input may be validated to be a specific value, within a range of values, or of a
specific type. Standard Microsoft Excel validation functions are used to define the
validations (see http://support.microsoft.com/kb/211485).
Examples
=wwsInput()
=wwsInput(2.5)
=wwsInput(“<enter your name here>”)
=wwsInput(12/25/2009)
Tip: Set up the validation rules for the cell prior to entering the wwsInput
function, otherwise Excel will complain that the formula does not pass the
validation rules.
Tip: To create multi-line input boxes, set the height and width of the cell(s) to
the desired size and set the Alignment to Wrap text on the Format Cells menu.
16
WebWorksheet V3.2
wwsDropDown
Description
Places a dropdown list in the cell from which the user may select a single option.
Arguments
option_values (optional) – The comma-delimited string or range which contains the
option values. If no string or range is provided, the list settings in the validation rules
will be used. If no option values are defined, an error message will be displayed.
Validation Options
The options in the list may be defined using standard Microsoft Excel list validation
functions (see http://support.microsoft.com/kb/211485). When using the validation
rules to define the list of options, the list can be specific as either a cell range or a
comma-delimeted list.
Examples
=wwsDropDown(“Yes,No,Maybe”)
=wwsDropDown(A1:B5)
=wwsDropDown() with range defined in validation rule
=wwsDropDown() with list defined in validation rule
Tip: Set up the validation list for the cell prior to entering the dropDown
function, otherwise Excel may complain that the formula does not pass the
validation rules.
17
WebWorksheet V3.2
wwsCheckBox
Description
Creates a checkbox in the cell which the user may check or uncheck. Multiple
checkboxes may be joined in a group so that only a single option from the group may
be selected.
Arguments
label (required) – Text string placed next to the checkbox
required_flag (optional) – True or False. If True, one of the checkboxes from a group
must be selected before the webworksheet can be submitted.
group (optional) – checkboxes which are assigned to the same group can have only
one of the checkboxes selected. Selecting one will uncheck all the others.
selected (optional) – True or False. If True, the checkbox will be checked by default.
Validation Options
none
Examples
=wwsCheckBox(“Freight Included”)
=wwsCheckBox(“Blue”, false, 1)
Assigning a group:
Select Your Color:
=checkBox(“Blue”, true, 1,
true)
=checkBox(“Red”, true, 1)
=checkBox(“Green”, true, 1)
will produce:
Select Your Color:
Blue
Red
Green
only one of which can be selected since they are all members of group 1.
Tip: Don’t run with scissors.
If any error is detected while using this function in the worksheet, the following message will
appear, and #ERROR! will appear in the cell:
18
WebWorksheet V3.2
Button Functions
wwsClearButton
Description
Creates a button in the cell which restores all the cells to their original values.
Arguments
button_label (required) – Text string which defines the text inside the button.
Examples
=wwsClearButton(“ Clear ”)
=wwsClearButton(“Start Over”)
Tip: Use spaces inside the label to make a button wider to match the width of
other buttons.
If any error is detected while using this function in the worksheet, the following message will
appear, and #ERROR! will appear in the cell:
19
WebWorksheet V3.2
wwsSubmitButton
Description
Creates a button in the cell which sends the completed webworksheet to a recipient
via email. The completed webworksheet contains all the values entered by the user
and calculated formulas, but the mailed copy cannot be changed by the recipient. The
webworksheet is contained in the body of the email message, and if the attachment
name is provided, a copy is also attached.
Arguments
button_label (required) – Text string which defines the text inside the button.
email_to (required) – Text string or cell reference containing the email address of the
recipient of the worksheet
email_from (required) – Text string or cell reference containing the email address of
the sender
email_subject (required) - Text string or cell reference containing the subject line of
the email
attachment_name (optional) - Text string or cell reference containing the name to be
given to the attachment. WebWorksheet will name the attached file with a .htm
extension.
user_message (optional) - Text string of message to display to the user after the form
is submitted.
next_page (optional) - Text string which defines the next page to display after the
form is submitted.
Examples
=wwsSubmitButton(“OK”, “cfo@your_company.com”, “its_me@your_company.com”,
“Weekly Timesheet”, “Timesheet”)
=wwsSubmitButton(“OK”, “cfo@your_company.com”, “D5”,
“Weekly Timesheet”, “Timesheet_” & E6, “Your timesheet has been
submitted.”)
=wwsSubmitButton(“OK”, “cfo@your_company.com”, “D5”,
“Weekly Timesheet”,, “Timesheet submission complete!”,
“http://www.your_company.com/homepage.htm”)
Tip: Buy low and sell high.
If any error is detected while using this function in the worksheet, the following message will
appear, and #ERROR! will appear in the cell:
20
WebWorksheet V3.2
Notes
The user_message and next_page fields can be used in conjunction to control not only
what message the user sees but also where they transition to when the submission is
complete. The following table describes the options:
next_page is defined
next_page is not defined
user_message is defined
The user message is
displayed to the user,
along with a “Click here to
continue” link to the next
page.
Only the user message is
displayed.
user_message is not defined
The user is automatically
transferred to next_page
as soon as the submission
is complete.
The default message “Your
data has been successfully
submitted.” is displayed.
21
WebWorksheet V3.2
wwsSaveButton
Description
Creates a button which saves the webworksheet to a local file on the user’s
workstation. The button label will be displayed as the cell’s value.
Arguments
button_label (required) – Text string which defines the text inside the button.
Example
=wwsSaveButton(“
Save
”)
If any error is detected while using this function in the worksheet, the following message will
appear, and #ERROR! will appear in the cell:
When the user clicks on the savebutton, the following message will be displayed:
This function will work only if the user is connected to the internet, and the user must wait
for the page to redisplay itself before saving the file. This may take a few seconds during
periods of heavy internet traffic.
22
WebWorksheet V3.2
Image Functions
wwsImage
Description
Places the specified image file in the cell and sizes it the given height and width.
Arguments
filename (required) – Text string which defines the file containing the image. Image
types can be .gif, .png, .jpg, or .bmp.
height (required) – Integer defining the height of the image in pixels. If set to 0, the
height of the cell will be used.
width (required) – Integer defining the width of the image in pixels. If set to 0, the
width of the cell will be used.
URL (optional) – Text string which defines the address of a web page to go to when
the image is clicked.
title (optional) – Text string to display when the mouse hovers over the image.
Examples
=wwsImage(“companylogo.gif”, 0, 0, “www.companyname.com”)
=wwsImage(“timesheet.jpg”, 200, 300, “timesheet.htm”, “Click here”)
Tip: Using merged cells to define the height and width of the image will make
it easier to adjust the image size to your liking instead of adjusting pixel sizes.
If any error is detected while using this function in the worksheet, the following message will
appear, and #ERROR! will appear in the cell:
23
WebWorksheet V3.2
wwsBackground
Description
Places the specified image file as the background image for the generated web page.
The function returns the name of the image, but that name will not appear on the
html page.
Arguments
imageFile (required) – Text string which defines the file containing the image. Image
types can be .gif, .png, .jpg, or .bmp.
Examples
=wwsBackground(“companylogo.gif”)
=wwsBackground(“http://www.mycompany.com/images/logo.gif”)
Tip: The background image fills in the screen space outside the actual page
and can be aesthetically pleasing or a distraction depending on the image.
If any error is detected while using this function in the worksheet, the following message will
appear, and #ERROR! will appear in the cell:
24
WebWorksheet V3.2
Miscellaneous Functions
wwsToggle
Description
Shows or hides rows when the message text is clicked.
Arguments
cellText (required) – Text string to display in the cell. Clicking on this text causes the
row(s) which follow the message to be hidden or shown.
rowCount (optional) – Integer defining the number of rows following the message to
be hidden or shown. If rowcount is missing, only the following row will be toggled.
Examples
=wwsToggle(“Click here to see a full description of this product”)
=wwsToggle(“Click here to show the full error message”, 3)
Tip: Defining an Excel comment for the cell containing the message will result
in the comment being displayed when the mouse hovers over the message.
If any error is detected while using this function in the worksheet, the following message will
appear, and #ERROR! will appear in the cell:
25
WebWorksheet V3.2
wwsShowRows
wwsHideRows
Description
Shows or hides rows as a result of a user action or calculation.
Arguments
startRow (required) – Integer which defines the first row to show or hide.
endRow (optional) – Integer which defines the last row to show or hide. If endRow is
missing, only the startRow will be shown or hidden.
increment (optional) – Integer which defines which offset rows are shown or hidden
(e.g. increment of 2 will show or hide every other row, 3 every 3rd row, etc). If
increment is missing, it will default to one (every row).
Examples
=if(A59=”Yes”, wwsShowRows(60), wwsHideRows(60))
=if(ucase(A59)=”NO”, wwsHideRows(ROW(A60),ROW(A64)),
wwsShowRows(ROW(A60),ROW(A64)))
=if(C60=”Yes”, wwsShowRows(60, 80), wwsHideRows(61, 80, 2))
Tip: These functions are particularly useful when constructing intelligent forms
which show and hide sections based on user input. Hiding or showing a section
can be controlled via a checkbox, dropdown list, or a calculation. Using the
ROW function as arguments will automatically adjust the row numbers as rows
are added to or deleted from the Excel worksheet.
If any error is detected while using these functions in the worksheet, one of the following
messages will appear, and #ERROR! will appear in the cell:
26
WebWorksheet V3.2
wwsBookmark
Description
Defines an HTML bookmark on the page which can be referenced on the same
webpage or different webpages. Bookmarks are used to automatically scroll the page
to a desired location.
Arguments
bookmarkName (required) – Text string containing the name of the reference
bookmark.
cellText (optional) – Text to display in the cell.
Examples
=wwsBookmark(“Example3”)
=wwsBookmark(“Chapter5”, “Chapter 5”)
Tip: To define a bookmark when creating the hyperlink in Excel, append #
followed by the bookmarkName to the address of the link. For example, to
automatically scroll the web page to Example3 when the hyperlink is clicked,
define the address field of the hyperlink as:
MyWebPage.htm#Example3
If any error is detected while using this function in the worksheet, the following message will
appear, and #ERROR! will appear in the cell:
27
WebWorksheet V3.2
wwsProtectPage
Description
Encrypts the web page using highly secure industry-standard encryption algorithms.
Before the page can be viewed, the user must enter the password.
Arguments
password (required) – Text string used to encrypt the body of the web page.
userText (optional) – Text string displayed on the login page. If not provided, the
default prompt of "<br>This page is protected.<br><br>Please enter the password to
continue: " is used.
Examples
=wwsProtectPage(“Secr3tP@ssw0rd”)
=wwsProtectPage(“G0Packers!”, “This site is intended only for the employees of Acme
Packing.<br><br>Please enter the site password to continue:”)
Tip: To create a “strong” password which is not easily guessed, use a
combination of upper and lower case letters, numbers, and special characters.
Tip: Use the <br> tag inside the userText field to force a new line.
If any error is detected while using this function in the worksheet, the following message will
appear, and #ERROR! will appear in the cell:
28
WebWorksheet V3.2
wwsDateMath
Description
Adds or subtracts the given number of days from the given date and returns the new
date. Typically, this can be done with a simple cell formula ( e.g. =C5+3 ), but
situations arise where Excel and WebWorksheet cannot agree on the cell format.
Using wwsDateMath helps to resolve those situations.
Arguments
someDate (required) – Text string containing a valid date in mm/dd/yy or mm/dd/yyy
format.
numberOfDays (required) – Integer defining the number of days from someDate.
Examples
=wwsDateMath(“12/25/2011”, 3)
=wwsDateMath (“1/1/2000”, -180)
Tip: Use this function only if #VALUE! appears in a webworksheet cell which
contains a date calculation formula.
29