1
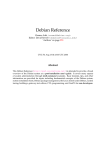
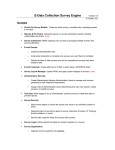
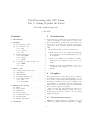
Word Processing with GNU/Linux
Part 2: Gluing Together the Pieces
Ben Pfaff <[email protected]>
8 Jan 2000
1
Contents
1 Introduction
2 Graphics
2.1 Document processors . . . .
2.2 Vector-based tools . . . . .
2.2.1 Xfig . . . . . . . . .
2.2.2 xcircuit . . . . . . .
2.2.3 Dia . . . . . . . . . .
2.3 Pixmap based tools . . . . .
2.3.1 The GIMP . . . . .
2.3.2 xpaint . . . . . . . .
2.3.3 SANE . . . . . . . .
2.4 Document processor specific
2.4.1 LATEX . . . . . . . .
2.4.2 pic . . . . . . . . .
. . .
. . .
. . .
. . .
. . .
. . .
. . .
. . .
. . .
tools
. . .
. . .
.
.
.
.
.
.
.
.
.
.
.
.
.
.
.
.
.
.
.
.
.
.
.
.
.
.
.
.
.
.
.
.
.
.
.
.
3 Ad-hoc tools
3.1 Adding headers and footers
3.2 Style guides . . . . . . . . .
3.3 Customization . . . . . . .
3.4 Modifying existing tools . .
3.5 Generating graphics . . . .
3.5.1 GD . . . . . . . . . .
3.5.2 The GIMP . . . . .
.
.
.
.
.
.
.
.
.
.
.
.
.
.
.
.
.
.
.
.
.
.
.
.
.
.
.
.
.
.
.
.
.
.
.
.
.
.
.
.
.
.
4 Gluing it all together
4.1 Rules . . . . . . . . .
4.2 Pattern rules . . . .
4.3 Suffix rules . . . . .
4.4 Phony targets . . . .
4.5 Commands in rules .
4.6 Invoking make . . . .
4.7 Further information
.
.
.
.
.
.
.
.
.
.
.
.
.
.
.
.
.
.
.
.
.
.
.
.
.
.
.
.
.
.
.
.
.
.
.
.
.
.
.
.
.
.
5 Conclusion
.
.
.
.
.
.
.
.
.
.
.
.
.
.
.
.
.
.
.
.
.
.
.
.
.
.
.
.
Introduction
1 In the first part of this series, we discussed the most
common document processors used for word process1 ing in GNU/Linux. In this part, we’ll take a look
1 at how these programs can be used along with vari2 ous ad-hoc tools to perform complicated, specialized
tasks.
2
We’ll tackle the subject in the following way:
2
2
• First we’ll look at some commonly useful GUI2
and text-based tools for building figures for use
in documents.
2
3
• Next, we’ll examine some examples of ad-hoc
3
methods for processing word processor docu3
ments.
3
• Finally, we’ll see how Makefiles can be used
3
to simplify using multiple tools to create documents.
3
4
4
2 Graphics
5
5 The expressiveness of the written word is limited.
5 Sometimes a graphic or picture will explain a concept
5 more clearly or expediently. When this happens, it’s
6 necessary to learn how one’s word processing tools allow graphics to be integrated into text. Fortunately,
6 many common document processors for GNU/Linux
7 have extensive support for graphics.
The sections below will examine the support for
8
graphics of each GNU/Linux document processor,
8
then briefly look at some common tools for creating
8 graphical material.
8
9
2.1 Document processors
9
TEX has no built-in support for graphics, but both
9 common document preparation systems do. LATEX
1
can include images in Encapsulated PostScript format for DVI output or PDF format for PDF output. Texinfo supports inclusion of images in a format
that depends on the output format: Encapsulated
PostScript for DVI output, PDF for PDF output,
text for Info output, and PNG or JPEG for HTML
output.
nroff undoubtedly has provisions for including
graphics, but I can’t figure out what they are. Someone enlighten me here?
SGML and XML systems’ support for graphics also
depend on the output format. HTML, Docbook, and
Linuxdoc defer all graphics support to the output format. Debiandoc does not support graphics at all.
2.2
circuit elements. It is easy to add your own elements
to the library.
xcircuit’s only output format is PostScript. This
is also its save file format: it can read and interpret
its own PostScript output files. This can sometimes
make it easier to deal with figures since it’s not necessary to go through a separate “export” step.
2.2.3
Dia is a promising new entrant into the vector-based
tools game. It is gtk-based, with an interface reminiscient of the GIMP (see below). It is targeted primarily toward drawing diagrams and flowcharts. Dia
includes a library of predrawn components of various
types.
Dia has the prettiest interface of any of the vector
drawing programs described here. But it is a work
in progress. Dia tends to crash fairly often. Later
versions can be expected to be more reliable.
Dia’s native file format is based on XML. It can
interactively export to PostScript and a few other
formats. It can also be invoked noninteractively to
translate its native format to PostScript, but an X
server is still, inconveniently, required to do so.
Vector-based tools
With vector based tools, a graphic is made up of
separate components such as lines, ellipses, rectangles, and so on. Graphics created with such tools can
generally be scaled arbitrarily without losing quality,
since they are not limited to rendering at a particular
resolution.
2.2.1
Xfig
Xfig is a general-purpose vector drawing tool for X11.
It has a very complete list of features, with support for drawing circles and ellipses, open and closed
curves and polygons, and annotating graphics with
text and pictures provided by the user or drawn from
its included library.
Xfig’s interface is heavily mouse- and menu-based.
Most operations can be performed without using the
keyboard at all.
Files created with Xfig can be exported to a long
list of vector formats, including PostScript, PDF,
LATEX, pic, and a number of bitmap formats such
as GIF, JPEG, and PNG. These translations can be
performed interactively, as well as through the use of
an included scriptable utility.
Xfig is often a good choice for drawing free-form
graphics.
2.2.2
Dia
2.3
Pixmap based tools
Pixmap based tools deal with rectangular arrays of
pixels. Graphics created with such tools lose quality as they are scaled up or down. As a result, they
are undesirable in high quality word processing, especially for documents targeted at multiple media,
such as online and print media. But sometimes they
are unavoidable, i.e., for screen shots. The following
sections briefly describe some of the more commonly
seen pixmap based graphics editing tools.
2.3.1
The GIMP
The GIMP is the most complete pixmap based graphics editing tool for the GNU/Linux operating system.
Its feature set is far too big to fully describe here, and
it continues to grow as time goes on. The GIMP owes
a lot of this flexibility to its plugin-based architecture.
The GIMP’s basic features include support for fullcolor, grayscale, and palette-based images and full
layering support with alpha channels (transparency).
It comes with numerous filters and tools for manipulation of images.
The GIMP is based on the gtk widget set (in fact,
it originated the gtk widget set). It has its own native
xcircuit
xcircuit is a simple drawing tool for X11 that’s particularly useful for drawing diagrams and schematics.
Its interface is more keyboard-oriented than is Xfig’s.
For simple tasks, it can be easier and faster to use
xcircuit than Xfig. However, it is less general, with
fewer drawing features. It includes a small library of
2
graphics format, but supports dozens of other formats diagrams or those where you’re not sure in advance
through plug-ins.
exactly what you want the end product to look like,
You can find more information about the GIMP on it’s easier to use a visual tool.
its website at www.gimp.org.
2.4.2 pic
2.3.2 xpaint
nroff or, more specifically, the pic preprocessor
xpaint is a much simpler, and hence less powerful, to nroff, takes a different approach to typesetting
graphics editor than the GIMP, but it is also much graphics. Instead of requiring the user to specify the
smaller. It is a good choice for simple tasks, such as location and size of each graphic element explicitly,
those that can be largely finished before the GIMP as does LATEX, it allows the user to specify positions
in relative terms and uses default sizes for elements.
can finish loading.
xpaint has a friendly, clean interface based on (Of course, these defaults can be overridden manually.) As a result, it’s almost a no-brainer to draw
menus and toolboxes.
simple diagrams, and it’s possible to draw more complex ones, too, without excessive trouble.
2.3.3 SANE
You might think that using the rather clean pic
SANE (Scanner Access Now Easy) is a GNU/Linux language means that you have to use the rather
interface to all the various graphics acquisition de- ghastly nroff language for the rest of your typesetvices used on Unix-like systems. It supports numer- ting. That was true at one time. However, the GNU
ous flatbed and hand-held scanners and digital cam- version of pic also supports output in TEX format
eras, attached though SCSI, parallel, and USB inter- when given a special command-line option. So, you
faces. SANE supports both local and network scan- can include pic figures in your TEX and LATEX docners.
uments as well. (It won’t work with Texinfo.)
SANE includes a program for scanning called
Incidentally, pic is one of the better documented
xscanimage. Some other programs, such as the areas of nroff. The GNU pic manpage has an URL
GIMP, have built-in support for SANE.
to a pic user manual and reference written by pic’s
You can find out more about SANE on its webpage designer, Brian Kernighan (also one of the principal
at http://www.mostang.com/sane.
architects of C and UNIX). In addition, the GNU
pic manpage describes its extensions to basic pic
functionality.
2.4 Document processor specific tools
LATEX and nroff pic have some features that can
Ad-hoc tools
be used for drawing some types of figures without 3
having to use external tools. If you’re using one of
these document processors, then it’s worth taking a More often than not, in constructing a nontrivial document, there will be a need for some capability that
look at what they offer, as described below.
is not provided by any pre-built tool. When this happens, it becomes necessary to build one’s own tools.
2.4.1 LATEX
This may sound difficult, but after one has done it a
Out of the box, LATEX supports drawing lines, boxes, few times it becomes second nature.
arrows, circles, curves, and more, without having to
These tools are ad-hoc because, typically, they are
resort to anything outside the language. With the specialized to a particular job. They are rarely useful
pict2e package, you can do even more.
for other tasks. The reasons behind this are twofold.
However, to use these features, you pretty much First, if the task in question was common, then there
have to sit down with a piece of graph paper and draw would be an existing tool to do it. Second, typically
everything by hand, then start counting out squares the tools built are not flexible enough or well specified
and typing the x-y coordinates of all your picture enough to be reapplied.
elements. If anything ever needs to change, then you
As a consequence of the specialized tasks that they
have to carefully adjust all the coordinates.
perform, it is difficult to make general statements
As a result, LATEX’s drawing features are pretty about ad-hoc document tools. Instead, the followhard to use, though it can be done. For complicated ing sections will give a variety of examples of ad-hoc
3
tools. These examples are taken from the author of actually used to generate the CSCW webpage, with
this article’s actual projects. They are not fabricated commands like the following:
in any way, although in some cases they are slightly
simplified to aid exposition.
cat template.m4 file.html.m4
| m4 > file.html
3.1
Adding headers and footers
When one long document is broken up into multiple
shorter documents, one often wants to add a header
and footer to each of them. Suppose that a user manual written with Texinfo is converted into HTML format, with one HTML file per section of the Texinfo
document. This is actually done for the GNU webpage for GNU PSPP with the following command:
The command above feeds the contents of files
template.m4 and file.html.m4 to m4 as input,
and puts the processed output in file.html. File
template.m4 contains a small collection of macro definitions, such as the following:
texi2html -menu -number -split_node
pspp.texi
in headstyle Produces a style used for headlines.
in webmaster Email address of the webmaster.
However, site policy for the official GNU website in button Automagically generates a graphical button with specified text and linked to a specified
at www.gnu.org requires that each page begin with
webpage (more about this later).
a particular header and end with a particular footer.
texi2html doesn’t know how to do this properly. So
I wrote a tool, called mkcanon.pl, that could do the in header Generates the header for the page, including a row of graphical buttons for each page
job when invoked like this:
(using in button).
for d in manual/*.html; do
./mk-canon.pl $d
in makenavbar Makes a textual navigation bar
done
with links to each page, except for this one.
Figure 1 on page 5 shows an outline of the Perl
in trailer Generates the trailer for the page, includsource to mkcanon.pl.
ing a textual navigator bar as above.
3.2
Style guides
All these helpful macros mean that file.html.m4
can be very simple and flexible. The color scheme of
the entire site, its layout, the button shapes, and so
on, can be adjusted very easily. When a new page
is added to the site, it automatically appears on the
navigation list at the side and the bottom of each
page.
A typical file.html.m4 looks something like this:
A style guide is a generalization of the header and
footer case where more of the document’s presentation style is to be customized, probably in a way that
it can be easily changed or fine-tuned. When this
case comes up, it’s usually easiest to use a general
macro language.
The INTEnD webpage at cscw.msu.edu is a good
example. Each of the pages at this site should have
more or less the same format, and it should be easy
to adjust the format of all the pages at once.
Of course, there are lots of tools specialized for
this task. Most of these are aimed at dynamic content, which we’re not interested in—the main CSCW
webpage is completely static, so using a dynamic tool
would simply be a waste of processor power. On the
other hand, other tools specialized for webpages tend
to be too simple or too complicated for what we want.
UNIX-like systems come with a simple but powerful macro processor called m4. This is what was
in_header([Page Title])
...arbitrary HTML content...
in_trailer
That’s all that’s needed. The template does the
rest.
Incidentally, a similar, but simplified, system of
m4 macros was used to build early versions of the
GLLUG webpage at www.gllug.org. (It might still
be in use, but I am no longer webmaster.)
4
#! /usr/bin/perl -i.bak
$version="0.9";
$date=‘date "+%d %B %Y"‘;
chop $date;
while (<>) {
if (/^<HTML>/) {
print "...SGML DTD declaration...";
} elsif (/^<HEAD>/) {
print "...header comment...";
} elsif (/^<TITLE>/) {
s%</TITLE>% - GNU Project - Free Software Foundation (FSF)</TITLE>%;
print;
print "...<LINK REV> to FSF webmaster...";
} elsif (...) {
...other possibilities elided...
} else {
print;
}
}
Figure 1: Outline of mkcanon.pl source code.
3.3
Customization
through frob. This modified version translates some
Texinfo constructs into webpages that, for Team
TeamSCOPE’s purposes, look nicer.
Modifying translation tools is a good technique in
general, though it is possible to take it too far. For
instance, modifying TEX’s source code is usually not
a good choice.
To me, it’s amazing how often I have the need to do
some sort of systematic customization of the output
of a tool. For instance, the manual for TeamSCOPE,
a CGI-based package for distributed teams, is written in Texinfo format and converted from that into
numerous other formats. In HTML form it is used as
part of TeamSCOPE’s online help. For that purpose,
a few different things have to happen:
3.5
Generating graphics
1. The headers and trailers output by texi2html Sometimes there’s a need to generate lots of relatively
must be removed, since the TeamSCOPE CGI similar graphical images. Graphical buttons and cusinserts its own as necessary.
tomized monthly calendars for webpages are two ex2. Links between pages have to be changed into a amples that I’ve run into myself.
When this comes up, you can choose to fire up the
format acceptable to the CGI.
GIMP and use it manually or through Script-Fu, or
3. Links from headers back to the table of contents you can choose to write a script to do it for you. The
have to be removed, since users found these to latter usually turns out to be the better choice.
be more confusing than helpful.
The following sections examine two different ways
Fortunately, this is something that can be done to generate graphics through scripts.
with a simple Perl script. The actual script used,
called frob, is shown in Figure 2 on page 6.
3.5.1 GD
GD is a small but relatively powerful library for drawing color graphics into memory buffers. It offers funcTeamSCOPE also uses a modified texi2html to gen- tions to draw lines, ellipses, curves, text, and other
erate its original .html files before running them shapes. It is easy to use and comes with bindings for
3.4
Modifying existing tools
5
#! /usr/bin/perl
while (<>) {
m%^<BODY % && last;
}
while (<>) {
m%^</BODY>% && last;
chop;
s%HREF="scope_([a-zA-Z0-9_]*)\.html%HREF="/scope/scope.cgi/help-\1%g;
s%^(<H([0-9])><A NAME="[^"]*") HREF="[^"]*"(>.*</H\2>)$%$1$3%;
print $_, "\n";
}
Figure 2: Script to frobnicate texi2html output into a format usable by TeamSCOPE.
C and Perl. Older versions supported writing output inally on code from Script-Fu. A typical invocation
in .gif format; newer versions support .png format of gimpbot looks like this:
(Debian comes with both versions of the library).
As an example of how easy it is to use GD, Figure 3 gimpbot "(script-fu-intend-batch-button \
on page 7 shows GD code in Perl to draw three differ\"Calendar\" \
ent versions of a button for a webpage, one in a plain
\"‘pwd‘/btn-Calendar.gif\")"
format, one underlined in red to indicate selection,
and one underlined in yellow for mouseovers.
Contact Ben Pfaff [email protected] for more information on gimpbot.
(Versions of the GIMP later than 1.0.x might have
3.5.2 The GIMP
better built-in scripting support.)
Using “Script-Fu” and other tools, the GIMP can be
set up to automatically generate parameterized images such as buttons for webpages. However, an X 4
Gluing it all together
server is still required for scripted use. In addition,
the GIMP can take a minute or more to load on low- You’ve got this document. Your source file runs
end systems. These problems make scripting with the through half a dozen preprocessors, passes through
GIMP is difficult.
the document processor, and gets postprocessed into
Fortunately, there exist solutions to both problems. five different formats. Everything’s beautiful, and
First, on systems that lack an X server, one can run you’re happy with the results. You copy it into your
the “virtual frame buffer” X server, Xvfb. This is an website.
Then someone points out a typo. So you edit the
X server that does not attach to any actual hardware.
Instead, it maintains a virtual screen image in RAM. original document. Then you’ve got to go through all
The GIMP is just as happy talking to Xvfb as a real the translation steps: preprocess, document processX server, and for noninteractive use it works just as ing, postprocessing, installing. This is a pain.
well.
The obvious way to automate all this is to write a
The second problem, slow startup time, requires shell script to do it for you. Now it’s easy: to redo
a more involved solution. The simplest way, using everything, just run the shell script.
the GIMP 1.0.x, is to set up the GIMP’s “ScriptThis shell script idea is a good one, and it’s often
Fu” server. This causes a running copy of the GIMP suitable. But it’s not very scalable: if you have a
to listen on a particular network port and execute document that consists of multiple parts, then you’ll
requests it receives through that port. Along with often waste your time waiting for unnecessary proa simple command-line utility to send requests, this cessing to finish, because only one part changed but
allows the GIMP to be efficiently scripted.
your script regenerates everything, or because you’re
This can all be conveniently done through the use only interested in one of the output formats at the
of an unreleased program called gimpbot, based orig- moment.
6
This is what Makefiles are good for. A Makefile
specifies the dependencies between files, and make
understands these dependencies. As a result, it only
performs actions that are necessary, saving your time.
Also, it only generates the files that you ask it to, in
case you’re only interested in one output format at
the moment.
Makefiles can be very complicated critters. In fact,
they can be so complicated to write that other programs exist just to simplify writing them. But most
of the time, the Makefiles for document processing
are simple enough that they can be readily written
by hand.
Most of the examples in this section will be drawn
from the (very simple) Makefile for this article itself.
You can see the entire text of this Makefile in Figure 4
on page 8.
Makefiles are almost always named Makefile, since
that is the name of the file read by make by default.
#! /usr/bin/perl
use GD;
$width = 90;
$height = 20;
$im = new GD::Image($width,$height);
$filename = $ARGV[0];
$string = $ARGV[1];
$cw = 7;
$ch = 13;
$x = $width - 5 - $cw * length ($string);
$y = 2;
$background = $im->colorAllocate(0,0,255);
$im->transparent($background);
$black = $im->colorAllocate(0,0,0);
$white = $im->colorAllocate(255,255,255);
$ul = $im->colorAllocate(242,202,20);
4.1
Rules
The basic concept in a Makefile is a rule that explains
how one file can be made from another. For instance,
consider the following rule, which is excerpted from
the Makefile used to build this article:
$im->string(gdMediumBoldFont, $x, $y,
$string, $white);
open PLAIN, ">$filename.gif";
print PLAIN $im->gif;
close PLAIN;
wp.dvi: wp.tex
latex wp.tex
This rule says that file wp.dvi, called the rule’s
target, can be made from wp.tex, its prerequisite or dependency, by executing the command
latex wp.tex. A corresponding rule explaining how
to make wp.pdf from wp.tex looks like this:
$im->filledRectangle($x, $y + $ch,
$x + $cw * length ($string) - 1,
$y + $ch + 1, $ul);
open SELECTED, ">$filename-sel.gif";
print SELECTED $im->gif;
close SELECTED;
wp.pdf: wp.tex
pdflatex wp.tex
There can be more than one prerequisite per target. For instance, if index.html is generated from
index.html.m4 and template.m4, you could write a
rule like this:
$im->colorDeallocate($ul);
$im->colorAllocate(255,0,0);
open FOCUS, ">$filename-focus.gif";
print FOCUS $im->gif;
close FOCUS;
index.html: index.html.m4 template.m4
cat index.html.m4 template.m4 \
| m4 > index.html
Figure 3: Code using GD to draw three versions of
Actually, you’d want to write that command a little
a graphical button. (Slightly reformatted from the differently, as discussed in 4.5 on page 8.
original to fit within the column.)
The lines containing the commands for a rule must
begin with a single tab. An equivalent number of
spaces is not acceptable. This is one of the most
common errors of newbie Makefile writers.
7
all: wp.dvi wp.pdf
4.3
wp.dvi: wp.tex
latex wp.tex
Pattern rules are a feature of most modern make programs. If you’re concerned about portability to older
makes, then you can use suffix rules instead. The
suffix rule equivalent to the first pattern rule example
is this:
wp.pdf: wp.tex
pdflatex wp.tex
install: all
now=‘date +’%Y%m%d’‘;
dir=~ftp/misc;
for d in tex dvi pdf; do
cp wp.$$d $$dir/wp-$$now.$$d;
done
Suffix rules
.tex.dvi:
latex $<
\
\
\
\
Unlike pattern rules, suffix rules may not have additional prerequisites.
4.4
Phony targets
Figure 4: Makefile used for building this article.
One nonobvious possibility is a rule whose target is
not really the name of a file. This is a phony target.
The effect of a phony target is that every time make
4.2 Pattern rules
needs to make it (either because of a user request or
Sometimes you’ll want to translate a lot of files in the because it’s a prerequisite for another target that’s
same way. When this happens, you can use a pat- being made), it makes the rule’s prerequisites, then
tern rule. These have the same syntax as ordinary runs the commands, if any. Here’s a real-life example,
rules (also called explicit rules), except that a per- again from the Makefile for this article:
cent sign (%) is substituted for the common part of
the target’s and prerequisite’s filenames. Example:
all: wp.dvi wp.pdf
%.dvi: %.tex
latex $<
This rule means that whenever make tries to make
the target named all, it makes wp.dvi and wp.pdf.
Another example:
This example says that a .dvi file can be generated
from a corresponding .tex file by running LATEX on
the .tex file. It also demonstrates the way that $< install: all
now=‘date +’%Y%m%d’‘;
expands to the name of the first prerequisite in a
dir=~ftp/misc;
rule’s set of commands.
for d in tex dvi pdf; do
Pattern rules can have multiple prerequisites, just
cp wp.$$d $$dir/wp-$$now.$$d;
like other rules:
done
%.html: %.html.m4 template.m4
cat $< template.m4 | m4 > $@
\
\
\
\
This rule says that, to make the install target,
first make the all target, then run the listed comThis example shows a rule for generating .html mands. The commands copy this article’s LATEX
files from corresponding .html.m4 files along with source and DVI and PDF output formats into the
template.m4. It also shows the way that $@ expands author’s outgoing ftp directory, in files named based
on the current date.
to the name of a rule’s target.
A specific rule for a file overrides any pattern rule
that would otherwise apply to it. For instance, if you 4.5 Commands in rules
have many LATEX documents along with one Plain
TEX document, all named with .tex extensions, then There are a few caveats in writing the commands to
you can write a pattern rule that covers the LATEX go along with a rule. The install target’s comdocuments and an explicit rule for the Plain TEX ex- mands above handily illustrate the two most common
ception.
ones:
8
• When commands are listed on separate lines,
they are executed in separately launched shells.
You can prevent this by suffixing the lines with
backslash (\) characters as done above.
some software packages for drawing graphics. Then
we examined some ad-hoc means for processing documents. We concluded by examining the workings of
Makefiles for tying together documents.
• Dollar signs are interpreted as introducing make
variable names (make variables aren’t covered in
this article). Dollar signs must be doubled, as
shown above, to work properly in commands.
• If a command fails, but still produces output in
the target file, then the next time make is run, it
will think that the target is up-to-date. The solution to this is to use a temporary file for output
and copy the temporary file to the target only if
successful. For example, this will cause problems
if m4 aborts with an error:
m4 < $< > $@
but this will always work properly:
m4 < $< > [email protected] && mv [email protected] $@
4.6
Invoking make
make is most commonly invoked without any options
or arguments. When this is done, it attempts to make
the first target in the file that it sees. Usually, this is
a target like all above, that causes all the documents
or programs in the current directory to be built.
You can also give make the name of a file to make
as an argument on its command line. For instance,
considering again the example shown in Figure 4,
make wp.dvi would only cause wp.dvi to be built,
whereas make install would build all the targets
specified by all, then run the specified commands.
make has a number of options, but these are rarely
used. With GNU make, you can see a list of options
by invoking it with the --help option.
4.7
Further information
For further details on writing Makefiles, consult the
GNU Make manual, which should be available wherever GNU Make is used.
5
Conclusion
In the first part of this series, we took a look at several document processing systems and their attendant output formats. In this part, we first looked at
9