1
OP ERATION A L M A N UA L
SADiE v5.2 DSD Operational Manual
Contents
INTRODUCTION..........................................................................................................I
MOVING AROUND THE HELP FILE ....................................................................................................................... II
LICENCE AGREEMENT .............................................................................................................................................. III
1 - GETTING STARTED ........................................................................................... 1:1
DIGITAL AUDIO EDITING...................................................................................................................................... 1:1
SADIE SYSTEMS........................................................................................................................................................... 1:1
SADIE BASICS .............................................................................................................................................................. 1:1
TUTORIALS.................................................................................................................................................................. 1:5
2 - DSD MODE ........................................................................................................... 2:1
DSD VS PCM ................................................................................................................................................................ 2:1
DSD8 HARDWARE OVERVIEW............................................................................................................................ 2:1
RECORDING IN DSD MODE................................................................................................................................. 2:2
EDITING IN DSD MODE ......................................................................................................................................... 2:3
PROCESSING AND MIXING IN DSD MODE.................................................................................................... 2:3
ANNEX D AND E METERING ............................................................................................................................... 2:5
MAC-DSD...................................................................................................................................................................... 2:7
AUXS AND INSERTS - USING EXTERNAL PROCESSING ........................................................................... 2:8
UPSAMPLING AND DOWNSAMPLING DSD................................................................................................... 2:9
PCM MODE ON DSD8 ...........................................................................................................................................2:11
SUPER AUDIO CD AUTHOR...............................................................................................................................2:12
HOW DO I AUTHOR A SUPER AUDIO CD?.................................................................................................2:13
STEP BY STEP GUIDE ..............................................................................................................................................2:17
RUNNING SEPARATELY .......................................................................................................................................2:27
3 - RECORDING......................................................................................................... 3:1
OVERVIEW ................................................................................................................................................................... 3:1
MULTICHANNEL TRACKS ..................................................................................................................................... 3:1
RECORDING TO THE PLAYLIST.......................................................................................................................... 3:1
TIME STAMPING......................................................................................................................................................... 3:6
CHOOSING A DISK FOR RECORDING ............................................................................................................ 3:6
4 - USING THE PLAYLIST ....................................................................................... 4:1
THE PLAYLIST DISPLAY ........................................................................................................................................... 4:1
PLAYING AND LOCATING ................................................................................................................................... 4:8
ADVANCED PLAYLIST OPTIONS ......................................................................................................................4:16
Contents
SADiE v5.2 DSD Operational Manual
5 - ARRANGING AN EDL ........................................................................................ 5:1
OVERVIEW....................................................................................................................................................................5:1
PLAYLIST STREAMS....................................................................................................................................................5:2
TOOLBARS ...................................................................................................................................................................5:5
MANIPULATING EDL ENTRIES..............................................................................................................................5:6
UNDO AND REDO ................................................................................................................................................ 5:19
LOCKING CLIPS AND STREAMS ....................................................................................................................... 5:20
CLIP DETAILS ............................................................................................................................................................ 5:21
TEXT EDL ................................................................................................................................................................... 5:25
6 - EDITING................................................................................................................ 6:1
OVERVIEW....................................................................................................................................................................6:1
EDITING IN THE PLAYLIST WITH HARDWARE CONTROLLERS............................................................6:3
EDITING IN THE PLAYLIST WITH A MOUSE...................................................................................................6:6
EDITING IN THE PLAYLIST WITH HOTKEYS ............................................................................................... 6:10
TRIM EDITOR............................................................................................................................................................ 6:11
THREE AND FOUR POINT EDITING ............................................................................................................... 6:25
REGION EDITING ................................................................................................................................................... 6:29
SPEECH EDIT............................................................................................................................................................. 6:32
7 - MIXING AND PROCESSING ............................................................................. 7:1
THE MIXER....................................................................................................................................................................7:1
MIXER PROCESSING AND PLUGINS ..................................................................................................................7:4
REORGANISING THE MIXER .................................................................................................................................7:9
THE PROCESS WINDOW AND PLUGINS ..................................................................................................... 7:11
PLUGINS ..................................................................................................................................................................... 7:11
PEAK METERING ..................................................................................................................................................... 7:12
AUTOMATION......................................................................................................................................................... 7:15
SURROUND SOUND............................................................................................................................................. 7:21
8 - FILE MANAGEMENT .......................................................................................... 8:1
OVERVIEW....................................................................................................................................................................8:1
EDL'S ...............................................................................................................................................................................8:2
CLIPSTORES..................................................................................................................................................................8:2
MIXERS ...........................................................................................................................................................................8:5
PROJECTS......................................................................................................................................................................8:5
FILE RECOVERY........................................................................................................................................................ 8:15
DISK MANAGEMENT ............................................................................................................................................. 8:16
ARCHIVING............................................................................................................................................................... 8:26
FILE FORMATS .......................................................................................................................................................... 8:29
SADiE v5.2 DSD Operational Manual
Contents
9 - SPECIFIC APPLICATIONS ................................................................................ 9:1
SYNCHRONISATION ............................................................................................................................................... 9:1
AES31 INTERCHANGE ...........................................................................................................................................9:10
AAF INTERCHANGE...............................................................................................................................................9:19
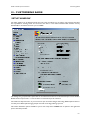
10 - CUSTOMISING SADIE.................................................................................... 10:1
SETUP WINDOW ....................................................................................................................................................10:1
PLAYLIST AND MIXER TEMPLATES.................................................................................................................10:15
DESKTOPS ................................................................................................................................................................10:16
CHANGING HOW SADIE STARTS UP...........................................................................................................10:19
USER MANAGEMENT...........................................................................................................................................10:21
11 - ADDITIONAL NOTES .................................................................................... 11:1
HARDWARE CONTROLLER FUNCTIONS ....................................................................................................11:1
PLAYLIST BUTTONS ...............................................................................................................................................11:5
SADiE v5.2 DSD Operational Manual
Introduction
INTRODUCTION
SADiE™ has been designed to be simple and intuitive to learn and use. Despite this, you will find the manual
and on-screen help valuable in explaining the underlying concepts of the system, suggesting methods of
completing common tasks, and as a technical reference. We have tried to keep the manual and on-screen help
as concise and clear as possible. In a comprehensive and professional system such as SADiE, there are many
methods for performing specific tasks and you will develop your own methods as you become more familiar
with the system.
Getting Started explains the concepts behind the system and the terminology used and gives you a quick guide
to getting your system working for you. The Tutorial provides a step-by-step guide to editing. It is
recommended that you have a go at this first to save you time later.
Recording, Using the Playlist, Arranging an EDL, Editing, Mixing, and File Management provide details about
common tasks.
Specific Applications contains notes on operations relevant to more specialised areas of work.
Customising SADiE explains the user settings available for changing the way the system works or how it
appears on screen.
Please take a little time to read the manual; it will pay off in time saved later. If you cannot find the answer to a
problem in the manual or this help file, then please contact our technical support.
To Access the SADiE Web site go to www.sadie.com, oder Unsere deutschen Seiten www.sadie.de
See also the Software Licence Agreement.
i
Introduction
SADiE v5.2 DSD Operational Manual
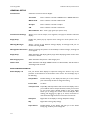
MOVING AROUND THE HELP FILE
Words that are blue and underlined contain jumps to other topics, pop-up information, and hyperlinks to the
Internet. Some graphics have jumps and pop-ups associated with them. Some larger graphics have multiple
"hot" areas, click on buttons to see descriptions and other links.
To navigate around the help file, use the arrow buttons at the top to turn the pages of the chapter.
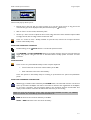
Throughout the help file the following symbols have been used:
For other operations on the screen using the mouse.
For operations using the hardware controllers.
Where a specified function is available as a Hotkey. Please see the Hotkey Setup section for details on
how to set your Hotkeys.
The following terms are used in describing mouse movements:
Click
Press and release the left mouse button once. To "press" an on-screen button, point at it and
single-click.
Double-Click
Quickly press and release the left mouse button twice.
Right-Click
Press and release the right mouse button.
Drag
Click and hold the left mouse button over the chosen item, move it with the mouse to a new
position, and then release the button.
Right-button clicking with the mouse over many areas gives you a menu of alternatives for that part of the
screen; remember to try this everywhere! On screen button names will be printed in BOLD, and their picture
shown in the margin.
Hardware controller instructions will usually follow the mouse description, and the controller's button names
will be printed in BOLD. The SHIFT button of the hardware controller is used in conjunction with other
buttons (e.g. SHIFT + MUTE is the solo function), but it does not need to be held down. The function keys
F1-F12 can be set by the user (see Customising SADiE). Hardware controller users should also read all the
mouse instructions. See the look up table of Hardware Controller Functions.
The computer keyboard is used for typing in names, and for Hotkeys, which are useful shortcuts to many
functions. They can be customised to your own preference and so are not referred to at every point in the
manual; look up the default Hotkey settings in Customising SADiE.
On the keyboard you will use the Shift key (marked ), the Control (marked Ctrl) key, the Alt. Key and the
Return ( ) key (duplicated by the Enter key).
Ctrl + X means hold the Control key while pressing the X key.
ii
SADiE v5.2 DSD Operational Manual
Introduction
LICENCE AGREEMENT
This legally binding agreement is between you (the end user), the dealer or distributor, and Studio Audio and
Video Ltd (referred to herein as SADiE).
SADiE retains ownership in all its software in any form and its use by you is governed exclusively by this
agreement, which is to be interpreted and enforced under English law. This agreement also sets out the limited
warranties provided by SADiE in relation to the software. You agree to the terms of this agreement by
installing and/or using the software package.
If you do not agree with the terms of this agreement, do not install the software onto your hard disk. Return
the software together with all documentation, packaging and associated hardware purchased for a full refund,
less any handling charges notified to you by your distributor.
SADiE SOFTWARE LICENCE
SADiE makes this software (the software) available for the support of the hardware product (the hardware)
with which it is supplied. The software comprises executable programs that perform specific tasks and tools.
The sale price of the digital audio system includes the software licence fee.
The use of the software with any hardware other than that manufactured by SADiE (with the exception of the
computer system to which the hardware is physically attached) is expressly forbidden.
You may:
1.
Make safety backup copies of the software and transfer the software to the hard disc of the computer
or computers to which the supplied hardware is to be connected, provided that these copies are not
supplied to any third party.
2.
Use the software programs and tools on the machine or machines onto which they have been copied
as permitted in item 1 above.
You must not:
1.
Disclose or make the software available in any form to third parties.
2.
Reverse engineer, decompile, disassemble or otherwise inspect the workings of software in object or
executable form.
3.
Assign the benefit of this agreement to any third party.
4.
Use the software in any application where there is risk of life or accidental harm to persons.
5.
Distribute the software to any third party without the express written permission of SADiE.
TERMINATION
1.
You terminate this licence by selling some or all the hardware with which it is supplied. SADiE will
provide a new software licence to the purchaser on payment of a registration and licence fee.
2.
You also terminate this agreement by violating any of its conditions.
3.
The licence fee is not refundable on termination.
4.
On termination, all copies of the software in your possession must be destroyed, and the original disks
returned to SADiE.
iii
Introduction
SADiE v5.2 DSD Operational Manual
MEDIA WARRANTY AND EXCLUSION OF WARRANTY
1.
The physical media on which the software is distributed is supplied with the same warranty conditions
as the hardware. The software is made available with no warranties whatsoever. It is up to you the
user to determine that the software is suitable for the purposes to which you intend to put it. Whilst
every effort is made to ensure its correctness, SADiE cannot anticipate all the uses to which the
software may be put. SADiE does not accept any liability for the software failing to perform in any
way, whether by design or through negligence and whether used on its own or in conjunction with
other software.
2.
Neither SADiE nor its employees, distributors, or anyone involved in the manufacture or supply of the
software shall be liable for any losses due to the use of, misuse of or the inability to use the software
whether direct, indirect, consequential or incidental.
3.
Any liability that may be determined to be SADiE's or its employees', distributors' or others shall be
limited to the purchase price of the hardware with which this software is supplied and which together
comprise SADiE.
LAW
1.
This agreement is governed by English law. In the event that any terms are found to be invalid by a
court of law, the remainder of the agreement remains in force to the extent that it can be interpreted.
2.
This agreement is the entirety of the agreement between you and SADiE. No verbal or written
variation is in force, whether to vary to the terms of this agreement, or to imply any suitability of the
software for any specific purpose.
All queries relating to this agreement should be addressed in writing to the registered office:
SADiE UK, The Old School, High Street, Stretham, Ely, Cambridge, CB6 3LD, UK
iv
SADiE v5.2 DSD Operational Manual
Getting Started
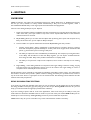
1 - GETTING STARTED
DIGITAL AUDIO EDITING
Traditional analogue audio is a continuously varying electrical signal representing (analogous to) the sound
waves that produced it. This can be stored on tape as a varying magnetic image and on vinyl as physical
variations in the wall of the groove. With digital audio, this signal is sampled (measured) very frequently and so
converted to a stream of numbers. These numbers are kept in binary form (that consists of only ones and
zeroes), which can be stored on a digital storage medium, such as a computer hard disk. They can later be read
back and re-converted to recreate the analogue waveform. Digital audio is not subject to the same
deterioration as analogue and is in a form that can be manipulated by computer software.
In SADiE™, the digital audio is stored on dedicated hard disk drives. The SADiE software can achieve complex
editing and mixing operations by telling the computer to find and play back different sections of the audio on
the hard disks at different times, or simultaneously. This has the effect of cutting sections out, varying the
running order and mixing sections together, although the material recorded on the hard disks actually remains
unchanged; it is only the instructions for replaying it that are altered. The great advantage of this is that edits
can always be undone and many different versions of the same edit can be produced (hence the term "nondestructive editing").
SADIE SYSTEMS
A SADiE system will comprise a host computer (which displays the user interface on a monitor and tells the
system what you want it to do), running the SADiE software and specialised audio hardware, appropriate to
the system you have bought. The hardware consists of Digital Signal Processing (DSP) cards connected directly
to one or more hard disk drives that store the digital audio.
The DSP cards are dedicated to handling the audio to professional standards, leaving the host computer's
power free to handle the control and display functions of the interface. This is modelled on the familiar studio
concepts of a multi-track tape machine, razor blade, mixing desk, etc. Just like a tape recorder, the system has
inputs for recording material in and outputs for playing it out again. The difference is you can do a lot more
with it while it is in SADiE.
SADIE BASICS
NOTE: SADiE v5 software uses the Microsoft® Windows 2000, or XP operating systems. If you are not
familiar with Windows and the use of a mouse, it would be a good idea to go through the "Windows
Fundamentals" chapter of the Microsoft Windows User Guide. Modern operating systems may not have
printed documentation, but a Help file is always available by pressing the START button on the
Windows Taskbar, and selecting HELP from the menu.
SADiE is modelled very closely on the traditional studio concepts of a multi-track tape machine and mixing
desk. These are represented by the Playlist and the Mixer. There is a flexible routing path between the system's
physical inputs, the Streams of the Playlist, the Mixer's channel strips and the physical outputs. Audio processing
such as Equalisation and Dynamics may be done in the Mixer and can be automated, whilst virtual outboard
units provide other processes. Most of the editing functions are performed in the Playlist, and a Trim Editor is
available for detailed edit adjustment.
USER MANAGEMENT BASICS
There is a separate User Management application (program) for multi-user SADiE installations where security is
important. This application can only be run by designated SADiE System Administrators, and allows the
database of users and their passwords to be altered. User Management describes the use of this application in
detail.
1:1
Getting Started
SADiE v5.2 DSD Operational Manual
User management provides:
1.
Password security to stop unrecognised users starting SADiE.
2.
Privilege levels for different SADiE users - some users may be allowed to record and edit, others to
play back only.
The Project system, (as described in File Management), can also restrict user access to Projects.
If you do not need the full user management facility, the first time you run SADiE v5, you will be asked for your
user name and logged as the single user. To later add the security of a password, select "Change Password" in
the File menu.
STARTING SADIE
In this manual, the illustrations assume that your computer is running with a display resolution of 1024 x 768. If
you want to change this, see Changing Screen Resolution.
Turn on your computer and let the operating system boot up. If you have bought a Turnkey system, doubleclick on the SADiE shortcut on your desktop. If it is not there, press the Start button on the Windows Taskbar
then Programs, the SADiE group, and finally select SADiE.
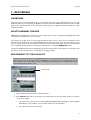
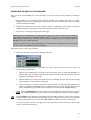
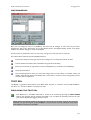
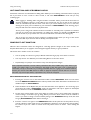
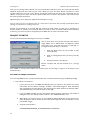
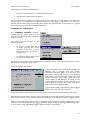
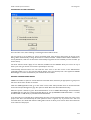
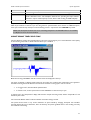
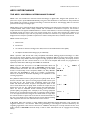
You are presented with a box to log in to the system. If you are starting SADiE for the first time, you will be
asked for a user name. In a multi-user installation that has been already set up, you will need to type your user
name and password. If you have a DSD system you will also see a tick box, asking you if you want to start in
PCM or DSD mode.
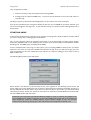
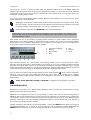
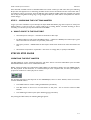
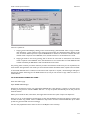
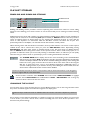
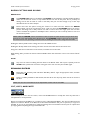
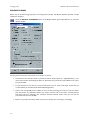
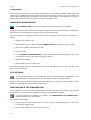
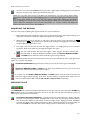
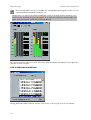
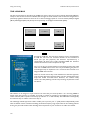
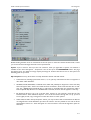
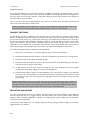
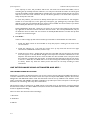
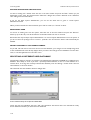
The following Project Start-up box will appear:
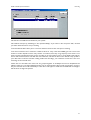
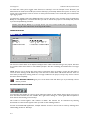
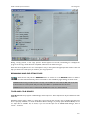
Select "Create a new Project" as this will keep all your work together for the following tutorial. A box will
appear asking you to name the Project. Type "Tutorial" as the Project name (replacing the default "projname" in
the box) and click the "Create" button. If you have more than one disk on your system you will now be asked
which disk you want to record onto. Select one from the list or check the "Least Full Disk" box and click "OK".
The main SADiE window will now appear.
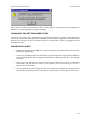
NOTE: We recommend that users hide the Windows Taskbar in order to maximize the available screen
area for SADiE. If your Taskbar is appearing on top of the SADiE window, right-click on the Taskbar and
select "Properties". Under the "Taskbar Options" section, deselect "Always on top". You can then
activate the start button by pressing Ctrl + Esc, and switch between applications with Alt +Tab.
1:2
SADiE v5.2 DSD Operational Manual
Getting Started
NOTE on CD-R: If you are intending to create CD-R's fairly regularly, it would be a good idea to enable
this function now. Press the "View" menu, select "Setup Window", click on "PQ Settings" on the left side
of the page, and tick the box marked "Enable PQ Editing Features". Close Setup, (by clicking the close
window button ). Now Delete this empty project; go to the Project menu, select Delete project and
answer "Yes" to all the warning messages. Then go to the Project menu again, this time select "New
project", name it "Tutorial" again, and continue. It is not a problem if you don't do this now, but it will
save you a few mouse clicks later on when you come to write a CD-R.
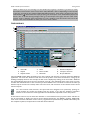
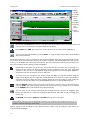
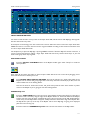
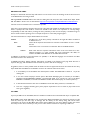
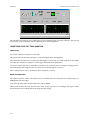
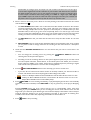
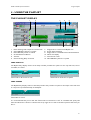
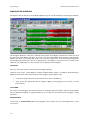
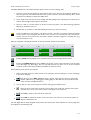
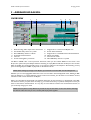
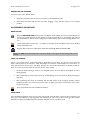
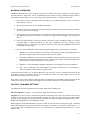
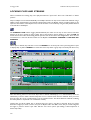
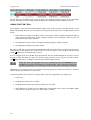
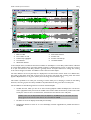
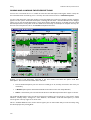
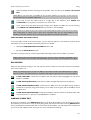
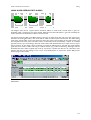
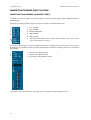
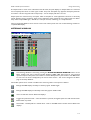
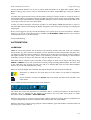
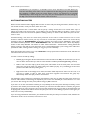
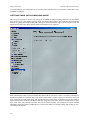
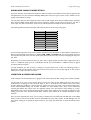
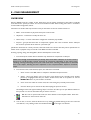
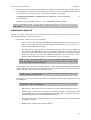
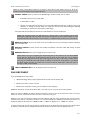
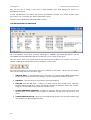
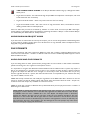
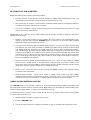
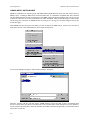
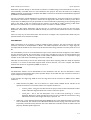
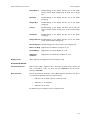
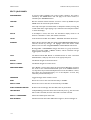
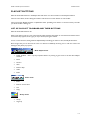
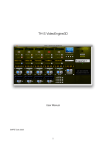
THE DISPLAY
1
2
3
4
9
5
8
7
6
1.
2.
3.
Menu Bar
Playlist
Playlist toolbar
4.
5.
6.
Mixer
Mixer Toolbar
Status Bar
7.
8.
9.
Minimised Clipstore
Transport Controls
Project Window
The main SADiE window, filling the whole screen, has a title bar and menu bar in common with most Windows
applications. The menu bar contains words that reveal drop-down menus with commands for setting-up, file
handling and display functions. For example, the File menu is displayed by clicking on the word "File". Windows
has quick keyboard shortcuts to all menu commands; press Alt + the underlined letter of the menu you want,
and then the underlined letter of the command you want. SADiE's menu commands are listed in the Index (of
both the help file and the user manual) under each menu name, with references to the relevant sections of the
manual / help file.
For most common tasks, however, the system has been designed to be operated by pressing onscreen buttons (by pointing and clicking with the mouse), or by using the hardware controllers.
Buttons on the screen have a 3-D appearance and should look "depressed" in their On position.
At the bottom of the screen, the status bar describes on screen buttons when you point at them. This bar can
also be customised to display and control certain settings affecting the way SADiE is working. Additionally,
most menu commands and button actions can be programmed for performance by SADiE's own Hotkeys on
the computer keyboard, and by hardware controller function buttons.
1:3
Getting Started
SADiE v5.2 DSD Operational Manual
The rest of the screen is a work area within which are displayed windows such as the Playlist, Mixer and
Clipstore. Like all windows, these can be opened, closed, moved around or re-sized with the mouse. Different
arrangements of your screen can be stored as desktop files, and reloaded when you want. This will be very
useful when switching between tasks.
For now, let's stick with the default desktop supplied. However many windows are on screen only one will be
active, indicated by a coloured title bar.
Clicking the mouse within a window always makes it become the active one and appear on top of any
that may overlap it. The list at the bottom of the Window menu shows all open windows and is useful
for quickly making an obscured one active or restoring a minimised one to size.
On the hardware controllers the WINDOW button cycles through them.
NOTE: Many of the menu bar commands are dependant on the active window. For example "Save"
under the File menu will save the EDL file when the Playlist is the active window, and the Clipstore file
when the Clipstore is active.
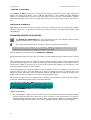
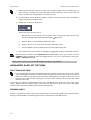
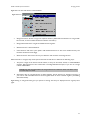
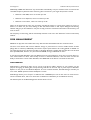
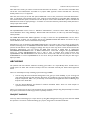
Each window has one or more toolbars containing buttons relevant to it. These toolbars can be attached to
different parts of the window, hidden, or floated and moved somewhere else on the screen. Floating toolbars
always appear on top of windows. Right-click over the toolbar to see the options. The icons on buttons are
shown in faint outline when their actions are not available.
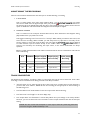
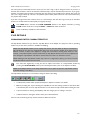
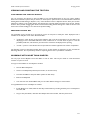
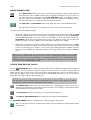
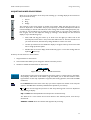
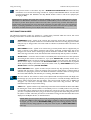
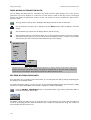
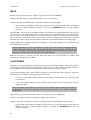
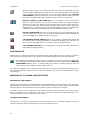
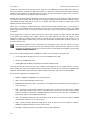
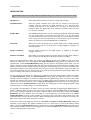
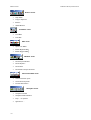
1
|
2
|
3
|
4
|
5
|
6
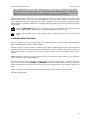
1.
2.
3.
4.
Current Time Display
Rewind
Fast Forward
Stop
5.
6.
7.
Play
Record
Pause
|
7
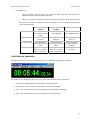
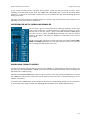
The Transport Controls are a permanently active, floating toolbar used to control the whole system.
Therefore they will always have a coloured title bar and appear on top of any overlapping windows. The tabs
along the top indicate which sections of the Controls are displayed. The basic Transport section contains
familiar tape-machine type buttons, a current-time display and an "Online" button which enables timecode and
external machine synchronisation. On the keyboard, the spacebar duplicates Play and Stop.
You can close the Transport Controls (by clicking the close window button ) when you don't need them
taking up screen space, and reopen them again under the "View" menu, or by pressing F10. A miniature
current-time display and Play and Stop buttons can be displayed on the status bar by selecting it in SADiE's
Setup window.
PLAY, STOP, RECORD, PAUSE and ONLINE are duplicated on the hardware controllers.
ON-SCREEN HELP
Resting the mouse pointer over a button displays the button name in a yellow box, and the status bar at the
bottom of the screen describes its action.
SADiE also has a Help File, which you can see by clicking on "Help" in the menu bar, then selecting "Help on
SADiE v5" (but you've already had some success on that front, otherwise you wouldn't be here, would you?)
This help file is similar in terms of text and structure to the manual, however there are a few additional topics
(and tips) in the help file. The latest help file will always be available in the downloads area of our web site, if
you choose not to install it with the software.
Another advantage of the help file is its searching facilities - pressing the INDEX button allows you to type in
words/functions/buttons etc. to search for and the Help topic will be displayed instantly. Additionally the
SEARCH button will allow you to search through the Help file for occurrences of any word you type.
1:4
SADiE v5.2 DSD Operational Manual
Getting Started
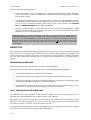
TUTORIALS
The Cutting Master tutorial below provides you with step-by-step instructions for creating a cutting master in
DSD mode. If you are new to SADiE it is suggested that you restart SADiE in PCM mode, and follow the Basic
Tutorial. The Basic Tutorial section describes recording and simple editing, in a situation where synchronisation
is of no concern. This Tutorial is ideal for learning the basic ideas involved when working for instance for radio
or music.
For either of these tutorials you will need some audio material, and the SADiE will need to be connected to
appropriate devices for recording this material, and listening to it.
CUTTING MASTER TUTORIAL
This section will take you through simple recording and editing, and the creation of a Super Audio CD Cutting
Master on AIT tape. You will need to find some source material - ideally a piece of speech material and a
couple of short music tracks. It is recommended that you do this tutorial to save time later. The editing
involved is quite basic, and it will serve as a good exercise whatever your area of work. You need to have
already been through the Starting SADiE section above.
CONNECTIONS
Your connections will depend on your source material; if its coming from an analogue source you will need to
connect a line level signal (via a mixing desk if you wish) to analogue inputs 1&2. If your signal is digital then
choose the appropriate connection. Connect outputs 1&2 to your monitoring system.
RECORDING MATERIAL INTO SADIE
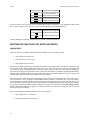
For simplicity, all the audio for this tutorial will be stereo, so you should create a stereo Stream in the Playlist
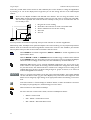
at this point. First right-click over the small Stream control buttons of Stream 1.
Right-click here –
Select "Merge into Stereo Stream". Streams 1&2 will then be combined into a stereo Stream with a single set of
control buttons. Now do the same on Stream 3 to merge Streams 3&4 into a stereo Stream, which will be
used later.
NOTE: In future you should identify mono material and save space on your audio disk by recording it as
mono Tracks. See Recording.
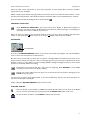
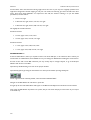
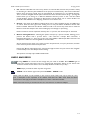
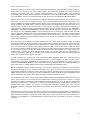
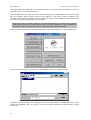
AUDIO SETUP
Open up the Record section of the Transport Controls by clicking on the Record tab.
1:5
Getting Started
SADiE v5.2 DSD Operational Manual
– Record Tab
Press SETUP. This will open the Audio section of SADiE's Setup window.
1:6
SADiE v5.2 DSD Operational Manual
Getting Started
Select the input source appropriate to your input equipment, and the Sample Rate and input resolution
appropriate to your workplace.
Whilst in Setup, check another setting that determines how the inputs are monitored. Click on "Mixer " on the
left side of the Setup window, and towards the bottom, check that "E-E on record enabled streams" is ticked.
Close the Setup window (by clicking the close window button
).
PREPARING TO RECORD
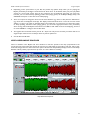
Press SHOW ALL PROFILES in the top left corner of the Playlist, or F12 on the keyboard or
Hardware controller to change the EDL Entries from blocks to profiles (which give a visual display of
the audio); the waveform will draw as you record.
Name the Track by clicking in the Transport Controls' white name box, typing something appropriate like
"Audio 1", then pressing the Return key. You can use the Backspace key to correct mistakes.
RECORDING
Record Enable
Press the small RECORD-ENABLE button on the stereo Stream 1&2 of the Playlist. This will tell SADiE to
record a stereo Track and place it on those Streams.
Play the source material and you will be able to monitor it through SADiE and check the input level on the
meters of Mixer channels one and two. If this is an analogue input it may be necessary to adjust the level at the
playback machine or mixing desk to avoid overloading SADiE's Analogue-to-Digital converters, which would
produce a permanently distorted recording.
Rewind the source material and play it again from the beginning. Press RECORD to start SADiE
recording. You will see the time display counting.
Record your track in. When the music stops, rush to the nearest chair and sit down. Failing that, press
STOP and stop the player.
You have now recorded a Track called "Audio 1" and a stereo EDL Entry with the same name will appear on
the stereo Stream 1&2 of the Playlist.
Finally, release the RECORD-ENABLE button on Stream 1&2.
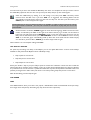
PLAYING THE EDL
You have already created an EDL, as SADiE automatically placed an Entry for the Track in the Playlist.
You can view the whole Entry by pressing the horizontal ZOOM OUT button a few times.
On the hardware controller, select ZOOM and adjust with the wheel.
1:7
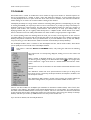
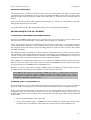
Getting Started
SADiE v5.2 DSD Operational Manual
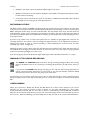
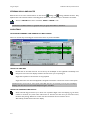
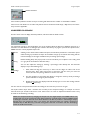
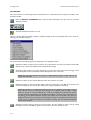
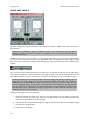
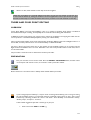
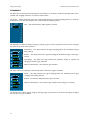
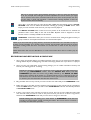
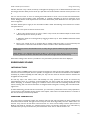
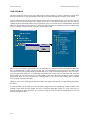
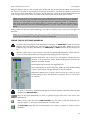
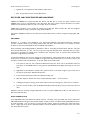
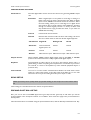
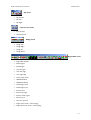
–1
2
|
1. Playlist
Toolbar
2. Time Bar
3. Mouse
Time
Display
4. Scrollbar
5. Currenttime
Cursor
6. Zoom
Controls
3
|
4
|
5–
6–
| .
Double-click the STOP button. This is a very useful zero-locate function. The current-time cursor will
return to zero, as shown by the Transport Controls' time display.
Press SHIFT then END. The current-time cursor will locate at the start of the first EDL Entry.
You can now play back the EDL by pressing PLAY, or using the keyboard spacebar, which duplicates
play and stop functions.
Notice the current-time cursor moving left to right across the Playlist, which will scroll automatically, and the
current-time display in the Transport Controls or hardware controller reflecting the EDL time in the time bar
at the top of the Playlist. The rewind, fast-forward, stop, play and pause buttons will do what you expect, but
there are much faster ways of getting around in the Playlist.
Double-click in the white area of the time bar (notice that the exact time you are pointing to is
indicated by the mouse time display). Playback will start immediately from that point. Single-click
anywhere in the time bar to stop playback. Single-click anywhere in the time bar when playback is
stopped to locate the current-time cursor to that point.
To access points not currently in the window, scroll the display by using the Scrollbar along the
bottom of the Playlist. You can single click or hold down the arrow buttons, or click in the bar either
side of the moving box. When the system is playing back it will override scrolling in order to keep the
current time in view. (Scrollbars are a standard Windows feature; see the Windows help file.)
Deselect ZOOM and move the scrub wheel to locate the current-time cursor to the desired point
and press PLAY. (For quick locating, make sure the wheel is not in jog or shuttle mode, as selected
by the SCRUB button.) The window will scroll automatically.
You can zoom in and out both horizontally and vertically with the two pairs of magnifying glass
buttons (see left). This is a useful way of getting at different parts of the EDL as well as changing your
overall view.
Hit ZOOM (horizontal) or SHIFT then ZOOM (vertical) and use the wheel.
NOTE: When zooming in and out the Playlist will always stay centred on the position of the cursor, so
reposition it before zooming in, if necessary.
Practise getting around the Playlist to play different sections. Other ways of locating to given points are
covered in Using the Playlist.
1:8
SADiE v5.2 DSD Operational Manual
Getting Started
SAVING YOUR WORK
At this point, if you were doing something more exciting than this tutorial, you might have created a complex
EDL arrangement, so this is a good time to save your work as a file on the computer's internal Windows hard
drive.
Select "Save Project" from the Project menu, or press SAVE ALL PROJECT in the Project
Window.
Make the Project window active with the WINDOW button (its the one with the green folder icon)
and press the SAVE button. The Project window can stay minimised when you do this.
Alternatively, on the computer keyboard press "Alt + P" then "S" to use the Project menu Save command.
Saving in this way will save all the components of your "Tutorial" Project, including the EDL you have created
so far.
EDITING THE AUDIO
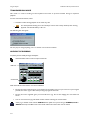
Experiment with playing the EDL and changing the horizontal and vertical zoom settings.
CUT AND SPLICE EDITING
Display the Edit section of the Transport Controls. You can turn off the Record section, now that
you've finished with it.
Edit Tab
Scrubwheel
Click with the mouse over the scrub wheel and, holding the mouse button down, move the mouse up
and down. This is "Shuttle" mode (like spooling forwards and backwards across the heads of a tape
machine) the more you move the mouse, the faster you go. Move the mouse from left to right and
you will switch to "jog mode" (like nudging the reels of a tape machine backwards and forwards).
Practice this on the speech as you are now going to find and mark two edit-points between which you
want to remove the audio, just like on a 1/4" tape machine.
The next bit will depend on the audio you have recorded for the "Audio 1" track. To remove and error,
identify where you want to make the first edit, by playing or scrubbing.
Then press RAZOR CUT. Now scrub to just after where you want to come back in, and press
RAZOR CUT again.
Use the ZOOM buttons to find a suitable degree of magnification. Don't worry too much about being
very accurate, as this is non-destructive editing; you can always use UNDO to go back and have
another go, or adjust the edit later.
1:9
Getting Started
SADiE v5.2 DSD Operational Manual
You will see that you have now divided the EDL Entry into three. To complete the edit you need to remove
the middle Entry (between the two razor cuts you have just made) and join up the remaining bits.
Select the middle Entry by clicking on it and turning it red, then press CUT. The Entry will be
removed from the EDL and, if you have SLIP on as suggested, the following Entries will be
automatically moved forward to butt up to the first one. Play over the edit. If you don't like it, press
UNDO (two or three steps) and do it again.
NOTE: Although you have just deleted an Entry from the EDL, no audio has been lost from the system.
The original Track is unaffected - you have just removed the instructions to play that part of it in this
particular EDL.
On the hardware controller, SCRUB toggles the scrub wheel through jog, shuttle and normal cursor
modes, as indicated by the LED's to the right of the wheel. Choose jog or shuttle, use the wheel to
locate your two edit points and press RAZOR to mark a cut at each. Then move the cursor over the
Entry now formed between them, press EDIT/SELECT to turn it red and CUT to remove it. Keep
SLIP on, so that the gap is automatically joined up. Move the cursor back with the wheel and play
over the edit. If you don't like it, UNDO (up to three steps) and do it again.
That's all there is to cut-and-splice editing with SADiE.
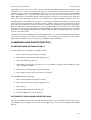
TOP AND TAIL EDITING
For quick top and tailing of an Entry in the Playlist, you can use Quick Edit. There are three main Hotkeys
available for this (found under Playlist section of Hotkeys setup):
•
Clip In-point to current time
•
Clip Out-point to current time
•
Clip Hotspot to current time
Select your "Audio 1" Clip. If you press "Clip In-point to current time" whilst the current time bar is inside the
selected clip, this is much the same as making a razor cut on that clip and deleting the first of the two clips that
are produced. If the current time bar is positioned outside the clip, then the clip will be extended to that new
position (if enough source audio exists). The same is true when pressing "Clip Out-point to current time".
After all that editing, save the Project again.
THE MIXER
DSD8
On a DSD8 machine, when you create a new project, a default Mixer will be created with 8 mono input strips,
and a single stereo output strip. Processing may only be used on the output strip.
1:10
SADiE v5.2 DSD Operational Manual
Getting Started
TRACK MARKER EDITING
You want to mark the start of every track on the Super Audio CD, and this is done with PQ flags marking both
the start and end of every track.
A small point of terminology here: the word Track is used to define the music track on the Super Audio CD.
SADiE also refers to a Track as the name for the original unedited recording. In this section Track will be used
to refer to Super Audio CD tracks.
The simplest way to place the PQ flags is by using SADiE's automatic "Generate PQ List" function. However, if
you have performed extensive editing, a single Super Audio CD Track may contain several clips, so you will
need to first group these clips together.
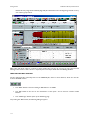
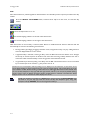
GROUPING ENTRIES
Press the SELECT TOOLBARS button on the Playlist toolbar again. Select "Group" to reveal the
Group toolbar.
Now select all the entries that make up the first Super Audio CD track. You can do this by dragging across
them with the mouse so that they turn red.
Press GROUP SELECTED EDL ENTRIES. They will be redrawn as a single yellow block in the
Playlist. You can rename this group (right-click on the entry and select "Rename") if you like, but it will
make no difference to the Cutting Master.
Now do the same for all the other tracks, and you'll end up with the exact same number of yellow
entries in the Playlist as you're going put onto the Cutting Master.
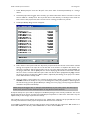
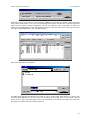
GENERATE PQ LIST
Press the TEXT PANE button in the left corner of the Playlist and then select "PQ" from the tabs at
the bottom left. If necessary drag the edges of the Playlist window or the border between the Playlist
and the text pane. This will show a blank PQ list (just a CD icon and the words "CD Audio PQ data"
will be seen), and the PQ toolbar will appear, usually attached to the bottom edge of the Playlist. Also
the PQ Stream opens up at the top of the Playlist. This is where PQ flags are going to be displayed
(but there won't be any yet).
Press the button for GENERATE PQ LIST. This is the left most button on the PQ toolbar.
1:11
Getting Started
SADiE v5.2 DSD Operational Manual
Huzzah! As if by magic all the little PQ flags will place themselves onto the beginning and end of every
one of these group entries.
ISRC codes and Mode 2 data is irrelevant to Super Audio CD. You also do not need to worry about Track
Naming in this section as this is done in a separate place in the Super Audio CD Text Editing Window.
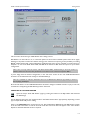
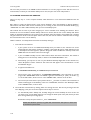
CREATING AN EDIT MASTER
On the right hand side of the PQ tools on the SADiE Playlist, there are three buttons, which are used for
creation of SACD masters.
•
The "DSD" button is used for reading an Edit Master in to SADiE
•
The "EM" button is the one we are interested in at this point – this is used for creation of Edit
Masters.
•
The "SACD logo" button opens up the Authoring page
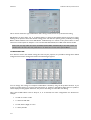
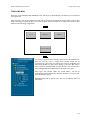
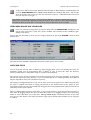
On pressing the "EM" button, the following dialogue appears:
1:12
SADiE v5.2 DSD Operational Manual
Getting Started
This is used to choose the type of Edit Master that is being created.
Edit Masters can have either 2, 5, or 6 channels (these are the first three default options from left to right).
Clicking on the pictures selects the channel routing preset. The last two options give the possibility of creating
BOTH a Multi Channel and a Stereo Edit Master simultaneously. Here we have selected in red the option for
Outputs 1 to 6 to be the Multi Channel EM, and 7&8 will be the Stereo EM. Select the option for your chosen
configuration.
Note: You can only make the stereo and Multi Channel EM's simultaneously if the track marks are
identical. If this isn't the case, then you'll have to run them one at a time from separate EDL's.
If you're happy with the channel configuration, in the "file name" section of the main "DSD-IFF Edit Master
Creation" set the destination file name(s) for the Edit Master(s).
Note: It is advisable to make the destination drive for the Edit Masters different (if possible) to the drive
that is playing the Playlist.
Press the OK button on the "DSD-IFF Edit Master Creation" dialogue. The EDL will start to play in real time,
and while this is happening the Edit Master(s) will be "bounced".
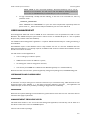
CREATING A CUTTING MASTER
Open the "Super Audio CD Author" page by pressing the button on the PQ toolbar that looks like
the SACD logo.
On the dialogue that opens, tick "2 Channel Area" and "Multi Channel Area" appropriately, depending on what
type of Super Audio CD you are making.
Click on the LOCATE button, and browse to your Stereo Edit Master DSD IFF file. The Edit Masters contain
all of the audio information as well as the track mark data. The track data will appear in the main window.
Repeat for the Multi Channel version if required.
1:13
Getting Started
SADiE v5.2 DSD Operational Manual
Select your Format option from the 3 options at the bottom left of the screen:
•
DST Encoded – This is DSD compression.
•
3 frames in 14 sectors – This is the standard data layout for Super Audio CD
•
3 frames in 16 sectors – This allows more space for text and graphics information; but the addition of
graphics is unsupported in SADiE currently.
If this is a Stereo only disc, then choose "3 frames in 14 sectors".
If you have a Multi Channel Area then choose "DST encoded".
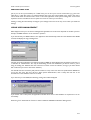
TEXT
From the "Text" menu select the Master Text or for the relevant area, and enter your text information into
the window that appears. Once finished, click CLOSE.
1:14
SADiE v5.2 DSD Operational Manual
Getting Started
You can copy this text information form one area to another, using the "Copy…" options under the Text
menu. Alternatively, you can input different information for each different layer.
Note: ISRC's should be different for each area.
Finally, insert a blank tape into your AIT drive. Press the CREATE CM button
SHUTTING SADIE DOWN
It is important to shut down the software correctly and only turn off your computer when you have done so. If
you simply turn off the power when SADiE is running, you risk losing work or even damaging the audio disk.
1.
Close the SADiE main window by:
on the right of SADiE's main window title bar, OR
i.
Clicking on the window close button
ii.
Double-clicking on the icon on the left of SADiE's main window title bar, OR
iii. Selecting "Exit" from the File menu, OR
iv. Pressing Alt + F4 on the keyboard.
2.
SADiE will warn you if there are any EDL's, Clipstores, or Projects that have not been saved since
they were last altered.
3.
Click on the "Start" button on the Windows Taskbar, select "Shutdown" and "Yes" to shutting down
the computer.
4.
Windows will tell you when it is safe to turn off the power.
1:15
Getting Started
1:16
SADiE v5.2 DSD Operational Manual
SADiE v5.2 DSD Operational Manual
DSD Mode
2 - DSD MODE
This section forms the basis of an operational manual for DSD mode of the SADiE 5 DSD8 workstation. PCM
mode works exactly as per the main software manual, this section merely describes the differences in DSD
mode. For those with less SADiE knowledge, you should refer to the later sections of the SADiE manual,
including the Tutorial section, for details of basic operation, and the Super Audio CD Author section, for more
details of Super Audio CD and full authoring instructions.
DSD VS PCM
When launching the SADiE software on a DS8 system, you will be asked whether you wish to operate in DSD
or PCM mode. The selection here will determine how the system is configured: DSD audio can only be played
and recorded in DSD mode, likewise PCM audio can only be played and recorded in PCM mode.
Software modules are provided to convert DSD to and from PCM, but these are offline processes and do not
operate in real-time. If you need to record a PCM source into DSD, you must provide some form of real-time
sample-rate conversion (a number of hardware solutions exist for this) or else record in PCM mode and then
use the upsampler to convert to DSD.
PCM mode on the DSD8 gives you very similar capabilities as are available on the SADiE Series 5 PCM8
system. DSD mode uses the DSD8's dedicated DSD processing hardware for editing and audio processing. In
DSD mode, the audio signal path is DSD throughout.
Note that a 44.1kHz 24-bit PCM signal is created every time a DSD file is recorded (or bounced), but that this
is used:
1.
For creating the profile views in the Playlist display
2.
When the Playlist or edits are being audibly scrubbed
3.
For rough metering in the mixer window and at the side of the Playlist streams
This PCM audio is not used for any DSD audio process nor for the Annex metering window.
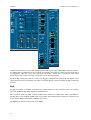
DSD8 HARDWARE OVERVIEW
The hardware utilised by the SADiE DSD8 is radically different from a PCM SADiE. Whereas all processing and
signal paths through PCM SADiE are under DSP control, and are highly configurable, the DSD8 utilises
dedicated hardware to process the DSD streams, and thus the signal paths, playback capabilities, and processing
abilities are fixed by the hardware architecture.
The DSD8 is a Multichannel Editing and Authoring system, and has the capability for playback up to 8 edited
streams of DSD. To allow for editing and crossfades, DSD8 can actually play 16 streams of DSD simultaneously
(but only on 8 Playlist streams).
Mix-down is possible by using a dedicated hardware module known as the "MIXEQ" which provides level
control, pans, routing and mix-down plus up to 32 EQ sections. The mixer in DSD mode can be configured and
routed in a similar fashion to PCM mode.
All crossfades, level controls, EQ's, and dynamics processes are performed in real-time and at 2.8224MHz
sample rate (known as 64fs) DSD, without conversion of the audio to PCM. Process calculations in the mixer
are performed in professional DSD-Wide format which is 8 bits at 64fs, thus allowing for more resolution, but
avoiding the need for sample-rate-conversion.
2:1
DSD Mode
SADiE v5.2 DSD Operational Manual
In DSD mode, the DSD8 has 8 main inputs and 8 main outputs, on both Analogue and digital SDIF connections.
The SDIF connections can be software-selected as "DSD-Raw" or SDIF3 format. The connections for these are
on the rear of the DSD8 chassis on 25-way D-Type multi-pin connections; these will require either looms to
provide BNC and XLR connections to the outside world, or else will be wired into a patch bay, etc.
The optional MAC-DSD interface can provide 8 channels in and out down a CAT5 cable. This can be
configured to be the Main Inputs and Outputs or as an additional 8 I/O's that can be used for Auxiliary Send
and Return.
There is also a switch in the Mixer that can reconfigure the main 8 SDIF inputs and outputs to be used as an
Insert, in order to be able to use external audio processing equipment. In this mode, the Analogue Outputs
remain as the Main outputs, to allow you to monitor the end of the process chain. There is further description
of Aux Sends and Inserts below.
In DSD mode, clocks can be Internal or locked to a Wordclock input or the MAC-DSD clock.
RECORDING IN DSD MODE
SETTING UP FOR RECORD
Recording is performed in the usual way. In the Audio Setup page, choose either:
•
DSD to select the SDIF connections
•
Analogue to select the Analogue connections
•
MAC-DSD to record from a MAC-DSD, CAT5 connected device. This requires the optional MACDSD board to be fitted.
You will need to check your clock setting, again in the usual way, in the "Further Audio Settings" sub-section of
Audio Setup.
Auto, as usual, will select the Input selection as the clock source, whenever the stream record enable buttons
are pressed.
Internal forces the clock to be permanently internal and thus, any record source must be locked to SADiE.
Genlock allows two possible selections – locked to the Word Clock input, or if the optional MAC-DSD board
is fitted, then the option to lock to MAC-DSD will be present.
When recording via the DSD/SDIF inputs, you will want to choose format – either DSD-Raw or SDIF3 can be
selected. The setting for this is under DSD Digital I/O mode in the "DSD Board" setup page. This sets the
format on both input and output. DSD-Raw is DSD on an SDIF2 interface.
SDIF3 and DSD-Raw require a cable for each channel plus a Word clock connection.
Note: The sample rate and Input/Output resolution settings apply only to the Sample and Bit rate of the
PCM "partner" file which is recorded at the same time as the DSD. At present, only 44.1KHz is allowed.
24-bit PCM files are recorded, whatever the setting for bit rates in File Properties and Audio Settings.
RECORD ENABLING AND MONITORING
There are some points to be aware of when recording:
When you record in DSD mode, the method is similar to a PCM SADiE. Having set up inputs and clocks, you
will then Record Enable the number of streams you wish to record, using the small red buttons to the left side
of the stream.
2:2
SADiE v5.2 DSD Operational Manual
DSD Mode
On enabling record, the audio on the Inputs will be monitored, but only if you have set "E-E" to be enabled.
From the "View" menu, select "Setup Window", and then click on "Mixer" on the left side. To hear the input,
select the switch "E-E on record enabled streams".
Pressing the record button in the Transport controls will put SADiE into record.
If you record in the Playlist at a position that is already occupied by audio clips, the new recording will
overwrite the EDL entries underneath (but not the audio file on hard disk of course – this is still nondestructive!)
Monitoring - Unlike the PCM SADiE, when E-E is enabled in the DSD8, the input source is always monitored.
When you are recording, you cannot play back any existing audio in the Playlist, and if you leave the Record
enable buttons enabled, you will continue to hear the input (in fact you will not hear what you've just recorded
until the Record enable buttons are disabled).
Playback of the EDL to allow "overdub" recording is not possible. Because of the hardware signal paths in the
system, you cannot record from a mixer bus or through a fader. You can only record directly from a physical
input. However, it is possible (using the Bounce function) to record the signal at the Outputs back to disk. We
will see in a later section (Aux Sends etc.), how it is possible to record audio through an external audio
processing loop.
Pressing STOP, of course, stops the recording, and as usual you can punch in and out of record or pause the
recording with the usual controls.
EDITING IN DSD MODE
All of the standard editing facilities are available in DSD mode: Playlist Editing, Trim Window, Region Editing,
Three and Four Point Editing, Clip Details, Autoplace, etc. These functions operate in exactly the same way as
they do in PCM mode (and hence if you know SADiE already there is no learning curve in these areas).
The PCM section of the SADiE user manual describes editing functions in detail.
The only restriction is to the maximum number of streams of audio that can be played simultaneously. This
restriction is imposed by the hardware signal paths through the system.
•
The EDL can have a maximum of 8 streams.
•
Each stream can playback a maximum of two clips at any point in time.
Warning messages will appear when these limits are exceeded on entering playback.
PROJECTS IN DSD MODE
Projects, EDL's, Clipstores, and Mixers can be opened in both DSD and PCM mode. When an EDL that uses
DSD audio is played back in PCM mode, the underlying 44.1KHz "PCM partner" files will play back.
If you open a PCM project in DSD mode and there are no DSD audio files to playback, even though you will be
able to see the files in DSD mode, no audio will be heard. (If necessary, scrub can be used in DSD mode to
audition PCM files).
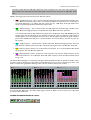
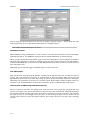
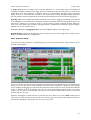
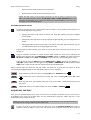
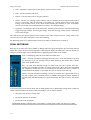
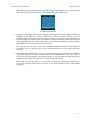
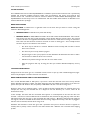
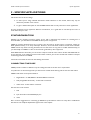
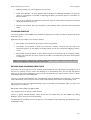
PROCESSING AND MIXING IN DSD MODE
The DSD8 comes with a single MIXEQ module as standard to perform mixing and EQ processing. If Dynamics
processing is required, the optional Dynamics hardware module must be fitted.
2:3
DSD Mode
SADiE v5.2 DSD Operational Manual
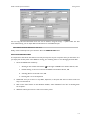
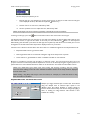
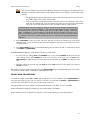
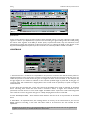
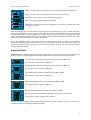
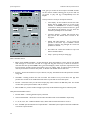
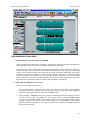
The above picture shows a mixer strip that's fully loaded with one of every available EQ or Dynamics process.
It's unlikely that you would want to set a strip like this example; the sequence is always top to bottom and so
you might place a DC filter at the end of the chain, and perhaps a Limiter after a Compressor. This picture
shows the processes in the same order as they appear in the Processor Palette.
To add an EQ or dynamics section to a mixer strip, drag the appropriate box from the Process Palette to the
"Inline Process" section of the Mixer strip. Click on the Inline Process section to display the EQ and dynamics
controls.
EQ'S
Six different sections are available, and you can use multiple instances of the same type. These are: Low Pass,
Low Shelf, Band Pass, High Shelf, High Pass, and DC Removal
The controls on these are similar to those in PCM mode, however the audible effect will be quite different.
The DC filter is only available in DSD mode, and provides three different types of DC filter. Graphs for the
curves of these EQ processes will be available in due course.
The MIXEQ can operate at frequencies up to 40KHz.
2:4
SADiE v5.2 DSD Operational Manual
DSD Mode
DYNAMICS
The Limiter, Compressor, Expander, and Gate are available when the Dynamics module is present. Again, these
are unlike the same-named processes in PCM mode, and are using completely different algorithms to perform
the dynamics processing.
There may be some confusion in particular with regard to the Limiter. This is not the same as the SADiE PCM
Mastering Limiter, and is not a look-ahead Limiter so this cannot be expected to work as a "brick wall" limiter.
DSD processing cannot provide limiting to fixed levels as there is always a Sigma-Delta modulation after the
process (which can change the overall level slightly).
The Limiter is actually the same as the Compressor, however it has pre-set time constants and a Ratio set at
50:1. The only control available is the Threshold setting of the compressor (which is renamed as "Limit")
Note that the process strip bypass button only bypasses EQ's by default (the same logic as in PCM mode).
There is a switch in the Setup window, under "Mixer", "Mixer Strip Display", "Strip bypass only effects EQ" to
change this.
PROCESSING AND MIXER LIMITS
Within reason, there is scope for a fair amount of customisation of the mixer and its routing. 64 "faders" are
available, but each fader (and pan) type uses a different number of these "fader slots". For example a mono
fader panned to stereo uses 2 slots, mono to LCRSS uses 5, stereo to LCRSS uses 10, and LCRSS to LCRSS
however only uses 5 because there are no pans. You may find that unconventional routings will run out of slots
earlier than expected.
Likewise there is a limit to the number of EQ and Dynamics processors you can use. Each MIXEQ module can
process 32 EQ sections on top of its mixing capability. Again however, different strips use different numbers of
EQ's per section: a strip with 5 inputs (i.e. a LCRSS to LCRSS fader) will use 5 of the 32 EQ slots for every EQ
section.
Likewise 32 Dynamics processes are possible, again with the same rule that n process slots are used for a fader
with n inputs.
DSD MIXER TEMPLATES
Note that a project will contain a default DSD mixer as well as a default PCM mixer. Actually, these mixers
may be used in either DSD or PCM mode, but you cannot expect processing under DSD to sound anything like
the same processing in PCM mode (in fact some processes are not available in one or other mode and which
case the mixer cannot be used at all).
When creating a new DSD mixer under DSD mode, SADiE always uses a template. A default template is
provided which makes a mixer with 8 mono faders, but if you want to customise which template is used, you
can change the setting in the Setup Window under "Project Management", "Templates", "Specified DSD
template".
Also when using the File menu option to "Save current mixer as template…" you can choose to save it as a
DSD template, and also change the default DSD mixer to be the same as the current mixer.
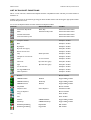
ANNEX D AND E METERING
Metering of the DSD audio signal is available. This function utilises dedicated hardware, the Annex Metering
Card, to filter and analyse the DSD signals. The term "Annex" refers to Annex D and E of the Super Audio CD
specification, which specifies valid levels on a Super Audio CD master.
Measurement is in "dB Super Audio CD" which is defined by the Super Audio CD specification as:
2:5
DSD Mode
SADiE v5.2 DSD Operational Manual
The Super Audio CD Zero dB Audio Reference Level corresponds to a sine wave with a peak level
equal to 50% of the theoretical maximum DSD signal level, this level is referred to as "0dB Super Audio
CD".
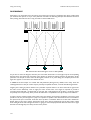
SADiE's metering shows levels measured in five different sections:
•
AF is "Audible Frequency" - this is measured after the DSD signal has passed through a 20 kHz, 10thorder, Butterworth low-pass filter. There is no maximum valid level for AF, but as it is a component of
the whole DSD signal, it is unlikely that this could reach say, +5dB Super Audio CD whilst other
Annex components (particularly Max Peak) remained valid.
•
MF is "Mid Frequency" - this is measured after the DSD signal has passed through a 20 kHz, 10thorder, Butterworth high-pass filter and a 50 kHz, 5th-order, Butterworth low-pass filter.
It is recommended that the MF should not be greater than -28 dB Super Audio CD EXCEPT if the AF
signal is higher than the MF signal. As it is often the case that AF > MF, once again the measurement of
the MF signal is not so critical apart from cases where the MF signal exceeds the AF signal, and MF is
greater than -28 dB. Note that this is a recommendation and not mandatory, and thus any value for
MF is "legal".
•
HF is "High Frequency" - measured after a 40 kHz, 5th-order, Butterworth high-pass filter and a 100
kHz, 5th-order, Butterworth low-pass filter. HF should not be greater than -20 dB Super Audio CD.
•
DC is DC level measured after a 0.1 Hz 2nd-order low pass filter. It is recommended that DC should
not be greater than -50 dB Super Audio CD.
•
MP is Maximum Peak, which is perhaps the most important. This measures 28 bit sequences of the
DSD. Valid maximum is +3.10 dB Super Audio CD, which equates to 24 of the 28 consecutive bits all
being 1 or 0.
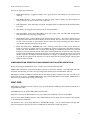
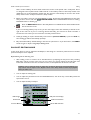
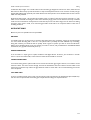
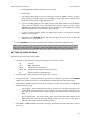
The Annex Metering display is accessed by pressing the Metering Window button on the Mixer window. There
are three styles for displaying the five bands of Annex Metering. The first two are displaying the same, each
band as a separate bar graph but in differing colour schemes, the third overlays the five bars:
You may find that PPM scale 4 (see Mixer Setup page) is better for DSD as it shows values over 0 dB, which
are valid in Super Audio CD.
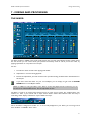
ANNEX METERING WINDOW TOOLS
2:6
SADiE v5.2 DSD Operational Manual
DSD Mode
From left to right, these buttons are:
•
Enable Peak Displays - toggles the display of the green numeric peak displays for each band of the
metering.
•
Peak Display Position - when the button is down the green numeric displays are shown below the
meters, when it's up, they are shown to the right side.
•
Peak Hold Mode - when this button is pressed, the highest peaks are held until the Clear Peaks button
is pressed.
•
Clear Peaks - pressing this momentarily clears all held peak blocks.
•
Clear Clip LED's - Clears any lit Red "LED's" at the top of each meter. The "clip" LED will light when
the band underneath is showing an illegal value.
•
Meter Display Mode 1, Meter Display Mode 2, Meter Display Mode 3 - These three buttons choose
between the three different styles of display (as shown above). The first two show a separate column
for each of the five bands on each channel, the third shows the bands overlaying each other with the
main Audible frequency band in the foreground.
•
Enable Max Peak limiter - BEWARE This is not a metering control but an audio process. When this
button is pressed, no channel output of the DSD8 can produce a signal with a Max Peak measuring
greater than +3.10 dB SACD. This is a "hard" limiter though, and should be used with care. You will
find that as you push level into this all other Annex metering bands will increase, the audio may start
to distort, but the MP signal is kept legal. However use of this may be appropriate if there are a small
handful of points in the Playlist where the Max Peak is in danger of exceeding the legal maximum of
+3.10 dB. This is enabled on all channels or not at all. Note that this process changes nothing if Max
peaks are below +3.10dB.
MAXIMUM PEAK VERIFICATION DURING EDIT MASTER CREATION
During the writing of the Edit Master tape, a check is performed for Maximum Peak.
SADiE's DSD Verification examines each 28-bit sequence to determine whether +3.10 dB SACD has been
exceeded, and will notify you with a warning message when that happens. The Edit Master will stop.
Edit Masters created in SADiE are marked that the Max Peak has been checked, and so this test will not be
required to be run again in the SADiE SACD Author page, however Edit Masters made outside SADiE will have
that check run at the point of creating the CM tape.
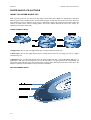
MAC-DSD
MAC-DSD is a standard connection that can carry up-to 24 channels of DSD plus clock, bidirectionally down a
single CAT5 data cable.
The DSD8 can have an optional MAC-DSD interface fitted.
When this is present, the MAC-DSD can carry up to 8 channels of DSD into and out of the DSD8.
There is some added flexibility however, as the MAC-DSD can used for Main input and output or alternatively
as an Auxiliary Send and Return.
The switch for this is in the Setup Window on the DSD Board page – you can switch between I/O (for Main
inputs and outputs) or Aux (to be used as an additional set of 8 auxiliary sends and returns)
2:7
DSD Mode
SADiE v5.2 DSD Operational Manual
When the MAC-DSD is present and set to I/O, the MAC-DSD option will appear as a Record Input possibility,
and also s a Genlock input choice – remember clocks as well as DSD channels appear on this cable.
When the MAC-DSD is present and set to Aux then the Record input option will be greyed out (you cannot
record directly into the Playlist through the MAC-DSD in this mode). Additionally two sets of eight new busses
will appear in the Mixer routing tools named Snd1-8 and Rtn1-8 (Send and Return), so that faders can be
routed to and from this output and input respectively. There is a further discussion of Aux Sends and Mixer
Inserts in the next section.
AUXS AND INSERTS - USING EXTERNAL PROCESSING
It has been discussed above in the "Recording" section that it is not possible to perform "overdub" style
recording on the DSD8, however the Mastering Engineer will always require facilities for sending what is
recorded on a disk drive to the outside world for some kind of audio processing and have the result rerecorded back to hard disk.
The DSD8 provides two different methods for doing this, and which you use will depend on the equipment you
are using for external processing, and whether or not you have the MAC-DSD option fitted.
We call these two modes "Aux Send & Return" and "Insert"; the method with each is quite different, but the
end result is the same: audio from the DSD8 is sent out to an external signal processing loop, then returns
back into the DSD8 to be recorded back to hard disk again.
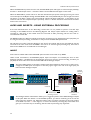
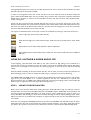
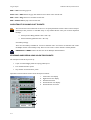
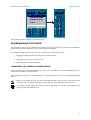
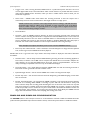
INSERT
Insert mode is available without the MAC-DSD option and thus can be used on any DSD8.
Under normal circumstances, the DSD/SDIF physical inputs and outputs are essentially the same as their
Analogue equivalent – the SDIF input or the Analogue input can be used for normal recording, and when you
play back, the same audio comes out of both the SDIF and the Analogue outputs.
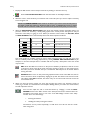
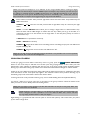
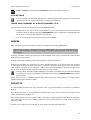
The Insert Enable button on the Mixer toolbar breaks the link between the two sets of I/O's and reconfigures the SDIF inputs and outputs so that they appear right at the end of the signal path, just
before the Main Analogue outputs.
Playlist
Mixer
Annex Metering
** SDIF Out
Analogue
Monitoring
Output
SDIF In
Outboard D-A,
processing, A-D, etc
Bounce Record to
Hard Disk
The Analogue Monitor Select button allows you to toggle the position of the DSD8 Analogue outputs
in this path. When this button is in the DOWN position, you will be monitoring at the end of the
chain (where the speakers are). When the button is UP, you will be monitoring at the same position
as the SDIF out, at the ** in the diagram, i.e. before the external processing loop. This button thus
gives you a convenient way of monitoring with the external processing loop "bypassed".
2:8
SADiE v5.2 DSD Operational Manual
DSD Mode
The Headphone output and Annex Metering remain after the Insert loop when this button is pressed.
To use the Insert for an external processing loop, you must have some means of connecting to the processing
equipment via a DSD/SDIF digital connection. However it is most likely that you will be using the DSD8 with
external D-A and A-D converters for monitoring and recording, and this button provides a means of switching
them into the external processing loop, for use with Analogue processing equipment, etc. Some A-D and D-A's
can provide PCM to DSD or DSD to PCM resampling which would allow you to use PCM processing
equipment in this external loop.
As usual you will need to make sure all devices are locked to the same Word clock. No other input setup is
required as this Insert Loop is always via SDIF.
Note that there must be a connection between SDIF Out and SDIF in for signal to arrive at the Main
outputs – the signal chain is broken at this Insert point.
To record the result of your external processing, you will have to record the audio that is present at the Main
Output, i.e. Bounce. Set up a bounce in the usual way. All bounces in DSD mode are real-time anyway.
Of course one possibility is to Create an Edit Master – this process is much like a Bounce but for the fact that
it’s writing track flag information into the recorded file. This means that the External Processing Loop can be
used in real-time whilst the Edit master is being created.
AUX SEND AND RETURN USING MAC-DSD
If you have the MAC-DSD option fitted, then an alternative and slightly more flexible method exists for using
an external processing loop. MAC-DSD is explained in a section above, and it was mentioned that there is a
setup option to choose between using the MAC-DSD for Main I/O or for Aux send and return.
When MAC-DSD is set to Aux, there are an additional two sets of eight busses:
•
Snd1- 8 for outputting through the MAC-DSD (Aux Send)
•
Rtn1-8 for inputting back into the mixer via MAC-DSD (Aux Return)
This gives more flexibility than the Insert mode, because you can choose exactly how to route the sends and
returns, and you can have level control after the Aux return.
You cannot record from the "Rtn" inputs. However, as with Insert mode, you can use Bounce to re-record the
signal at the Main outputs back to hard disk, or use the Aux Send and Return loop in real-time whilst writing an
Edit Master.
UPSAMPLING AND DOWNSAMPLING DSD
Included with the DSD8 is the DSD Sample Rate Converter (SRCDSD), which is a process that will convert
DSD to and from any sample rate PCM. This can also Varispeed DSD, much like the standard PCM Resampler.
The SRCDSD is available as a process in the Bounce Through process section of the Bounce Window. This is
an offline process and will run in non-real-time; at some sample rates and qualities this will run quite a bit
slower than real time.
2:9
DSD Mode
SADiE v5.2 DSD Operational Manual
SRCDSD is available in either PCM or DSD mode, and you can use either mode to go in either direction, to or
from DSD.
As this is inside the Bounce Window, it can be set up as a batch process whereby you can Sample Rate
Convert a number of EDL entries in one batch.
Operation is quite simple, like a normal bounce:
•
You will need to choose your Source (Selected Clips, Multi-bounce, etc) and your Destination (where
you want the resulting Clips to go, replace on the EDL, or to the Clipstore) as usual.
•
Pressing "Bounce Through Process" will open the Process Settings Window. At the top left, there is a
drop-down selector to allow you to choose between the available processes, and will show the
controls for each of those processes when they are selected.
In this instance the one we are interested in is SRCDSD.
(On selecting the Bounce Through Process at the bottom of the Bounce Window, you may notice
that Original is automatically selected under Output Channels. In Original mode, all bounces are
performed NOT through the mixer, but clip level changes and fades will apply. Also in Original mode,
the resultant bounced recording will have the same number of channels as the original clip, even if the
original clip is greater than 8 channels or a group clip.)
•
The SRCDSD control panel has three areas:
o
Input Rate allows you to choose the sample rate of the source material – there is a "Sample
Rate Multiplier" 1X , 2X, or 4X, and "Sample Rate Value" buttons (whose values will change
as the multiplier buttons are pressed). Also there is a "DSD" selection, which disables all
other sample rate values. The Selected Rate and multiplier will light up on the panel.
o
Speed – this knob and it's green numeric field are only available when the input and output
rates are the same, in which case this can be used to perform a Varispeed. You can use the
normal Resampler in the PCM process window to audition the Varispeed to work out what
setting you wish to use. A higher value speed (i.e. Greater than 100%) will produce a faster
and higher pitched result.
o
Output Rate, which is laid out in exactly the same way.
•
When you have set the controls, leave the SRCDSD window open (closing it will disable the process!)
and if you're happy with source and destination settings for Bounce, press START.
•
The Playlist and clips will appear to play at a slow speed to show the progress of the Bounce.
Note, unlike bouncing through the normal Process Window SRC, the setting of Output Sample Rate does not
force you to change system sample rate, however this may mean that the scaling of the timeline and your clip
sizes could appear wrong, and the bounce may continue after the clip on the screen has finished. This is
expected; the Bounce will stop at the correct point.
When upsampling to DSD, there will be TWO passes on each clip; the first will be slower and will create the
DSD file, the second will be quite a lot faster and is creating the 44.1KHz partner file that is used for displaying
profiles in DSD mode.
When reviewing the result of the bounce, you will have to switch to the correct sample rate, or switch to DSD
mode if you're not there already.
2:10
SADiE v5.2 DSD Operational Manual
DSD Mode
PCM MODE ON DSD8
Operation under PCM mode is almost identical to that on the PCM8. All the software facilities and Plugins are
completely identical. However the DSD8 has some hardware differences:
1.
The DSD8 has an additional set of 8 AES/EBU inputs and outputs. These are Auxiliary I/O and are
labelled in the mixer routing drop-down buttons as "SND1, SND2, ….." (send) for the outputs and
"RTN 1, RTN2…." (return) for the inputs.
These cannot be used as main inputs and outputs and are intended for use as inserts in the mixer.
SND's (i.e. the Aux outputs) should be routed from Aux sends on mixer strips that are directly fed
from an EDL stream.
A SND cannot be positioned AFTER a RTN in the mixer.
A stream or bus cannot feed both a normal output AND a SND (SND's must be routed from Mixer
Aux sends)
RTN's have more flexibility and can be inserted anywhere in the mixer, thus sixteen channel recording
is possible.
It is possible to use one of the Aux RTN's for AES genlocking.
The 8 Aux inputs (and outputs) are AES/EBU only. However when SADIE's "Input Source" in the
Audio Setup page is set to Analogue, you can still use the Aux inputs as AES inputs. In other words,
it's possible to record from Analogue and AES sources simultaneously, as long as the analogue is
plugged into a main input, and the AES is plugged into one of the Aux inputs.
2.
It is not possible to operate the DSD8 set to Internal Clock in the special condition where the
AES/EBU signal from an output is being fed back into it's same-numbered input. You may wish to do
this for example if you are playing out of O/P1&2, through some external equipment via AES, then
back into SADiE's I/P1&2 to record the processed result. If you need to do this, you must either:
a.
clock the whole AES chain using one of the external devices as master;
b.
clock SADIE to another external AES reference or Word clock;
c.
record the result into SADIE via a different AES input – i.e. 3&4, in which case you are allowed to
have SADiE on internal clock.
Beware also of "cascaded" clock loops – i.e. o/p1&2
either.
i/p3&4
o/p3&4
i/p1&2 is not allowed
3.
The DSD8 has no dedicated AES reference input (although any of the 8 inputs and 8 Aux inputs can be
used as an AES reference). The DSD8 has a Word Clock input, which can be used in both DSD mode
and PCM mode as a sync reference.
4.
The DSD8's own onboard A-to-D and D-to-A converters can operate at 4X sample rates, i.e. up to
192KHz.
Additionally, all AES inputs and outputs are SINGLE WIRE at 4X sample rates.
2:11
DSD Mode
SADiE v5.2 DSD Operational Manual
SUPER AUDIO CD AUTHOR
WHAT IS A SUPER AUDIO CD?
Well, if you've got this far, you have some idea what a Super Audio CD is. Below is a description of the three
different types of Super Audio CD disc, and the different types of audio that can be placed on those discs. The
term Authoring is used to describe the process of collecting the Audio, along with text information and track
markers to create what's called a Cutting Master. This is the medium that will be sent to the factory for
replication of the Super Audio CD.
THREE TYPES OF DISC
A Single Layer disc has just one High Density layer for Super Audio CD audio only.
A Dual Layer disc has two High Density layers, offering almost twice the recording time but at a higher
manufacturing cost.
A Hybrid disc has a single High Density layer for Super Audio CD, plus a normal Red Book CD layer. A
Hybrid disc's CD layer can be played on any normal CD player, thus giving "backwards compatibility" (as
opposed to Single and Dual layer discs which require a Super Audio CD player). Note that a Dual layer disc
cannot be hybrid (it would need three layers which is impossible!).
MULTICHANNEL DISCS
2:12
SADiE v5.2 DSD Operational Manual
DSD Mode
The High Density layer(s) can contain up to TWO separate Areas: one for Stereo audio, and another for Multi
Channel audio (up to six channels of DSD).
In order to fit enough data on the disc, and for that data's rate to be within the limits of the Super Audio CD
player, Multi Channel DSD audio must be encoded, using a lossless data compression technique called DST
(Digital Stream Transfer). It must be stressed that DST is lossless and does not affect audio playback quality,
merely reducing data.
Stereo-only discs need not be DST encoded (although they may be to give longer playing time on the disc).
However, Multi Channel discs must be DST encoded. If a disc contains both a Stereo and a Multi Channel area,
the Stereo area need not be DST encoded. However, this will restrict the playing time, and in many cases both
the Stereo and Multi Channel areas are DST encoded.
You may have realised that there can be quite a number of combinations of disc type. The most common are:
Stereo single layer: Stereo Super Audio CD only.
Multi Channel Single layer: Multi Channel Super Audio CD plus (normally) Stereo Super Audio
CD.
Hybrid Stereo: Stereo Super Audio CD plus a Red book CD layer.
Hybrid Multi Channel: Multi Channel Super Audio CD, Stereo Super Audio CD, plus a Red Book
CD layer.
HOW DO I AUTHOR A SUPER AUDIO CD?
In the beginning, (with Red book audio CD's) it was quite common for PQ editing to be considered as a
separate task from the pre-mastering process. Since then, systems (such as SADiE) which integrate PQ editing
have become commonplace, and in practise the mastering engineer is often the person who does the PQ
editing.
With the added complexity of the Super Audio CD disc, and the extra processes involved (in particular the
DST encoding process), it is best to consider the Authoring as a separate process to Pre-Mastering.
The SADiE DSD2 and DSD8 systems can separate the Pre-Mastering and Authoring processes. The Author
page can be run inside SADiE, or as a separate application, and even on a different PC if required. The
discussions below refer to "SADiE" when talking about audio processing and editing, and the "Super Audio CD
Author" page or application when referring to the authoring process.
STEP 1 - CREATE THE EDIT MASTER
Before you've even started to think about opening the Super Audio CD Author page, you will have created a
finished, edited, processed and mixed EDL inside the main SADiE software. Additionally the Track Marks will
have been placed using SADiE's "PQ editor"; the track marks on a Super Audio CD are similar to those on a
normal Red Book CD, allowing for Track Start and Track End flags as well as Indices (although Super Audio
CD has provision for up to 255 tracks and indices, as opposed to 99 on CD). See the main SADiE manual for
more details.
Note that, even though the SADiE PQ interface has provision for UPC/EAN code and ISRC codes, the Super
Audio CD master does not use these fields; they must be entered elsewhere, in the Super Audio CD Text file
(see below). The options are only shown here because the interface is shared with the Red Book PQ editor.
2:13
DSD Mode
SADiE v5.2 DSD Operational Manual
At this point in a Red Book CD master, you would normally press the "Write CD" or "Write DDP" button,
and SADiE would play out the entire EDL, writing the data to CD-R or DDP tape as it goes.
An equivalent process in making a Super Audio CD master is the creation of the Edit Master. This could be
considered to be the final stage of Pre-mastering before we hand over to Authoring.
SADiE has buttons for the creation of Edit Masters on the PQ Toolbar, which are described in more detail
later.
An Edit Master is a single file, which is effectively a Master re-recording (or bounce) of the SADiE Playlist. The
Edit Master file also contains all the Track marks and indices in its header chunk. The Edit Master is actually in
DSD-IFF format, which means it can also be played back for review in SADiE.
Note: not ALL DSD-IFF's are Edit Masters!
In SADiE you will need to create a separate Edit Master for each Area, i.e. one for the Stereo area, and one for
the Multi Channel area. It's worth noting that the Stereo and Multi Channel Areas need not have the same
number of tracks, or same Track markers - they are two separate entities.
These will be pretty large files; a one-hour long, 6 channel, Edit Master is roughly 7.5GB.
The SADiE Author software can accept an Edit Master from any other workstation as long as it's compatible
with the Super Audio CD Edit Master specification. The specification is for the Edit Master file only and does
not state what medium the file shall be on. As AIT tapes are common in Super Audio circles, they are often
used for transporting an Edit Master. However the tape itself is not the Edit Master, it is the file on the tape.
The tape will often be created using some kind of backup software, so when restoring a tape like this, you may
have to ensure you are using the same backup software. Windows 2000’s own backup program is commonly
used. Some discrepancies have been reported between Windows NT backup (as used by Sonoma) and
Windows 2000 or XP (as used by SADiE). However a tape from one should be readable in the other. In
practise, the best advice is “be patient” – on inserting a tape, wait for Windows to recognise the tape, and
allow it to be used by backup. Tape transports are not at all instantaneous, and it may take a short while for
tapes to be recognised.
STEP 2 - WHAT ELSE DO I NEED?
So, you have your Edit Master(s), one for the Stereo Area and perhaps also one for the Multi Channel. These
files now reside on a disc drive that is visible to the computer on which the SADIE Super Audio CD Author
program is running.
Note: the Author program will need to write to the directories containing the Edit Master(s) so you will
need write privileges to those directories. You will also need a decent amount of free space on the
drive (up to 4.7GB for a single layer disc or 9GB for a dual layer).
You may have noticed that Super Audio CD has text capability, and so the other element that is required
before your Cutting Master can be created is a Master STT text file. This will be a single file (with a ".MTS" file
extension) no matter what type of Super Audio CD you are creating.
In terms of authoring, it may not be your job to create the text. However, the SADiE Author gives you the
tools to create the text, or edit text that has been created elsewhere, should you need to. The next step of
this procedure describes the Text further.
If this is to be a Hybrid disc, the pressing plant will need a standard Red book master on a separate medium
(CD-R, DDP tape), but you will not require this to create the Cutting Master for the Super Audio CD layer.
2:14
SADiE v5.2 DSD Operational Manual
DSD Mode
EDITING THE TEXT
Perhaps we should call this task "Step 1B"? There's no real reason not to be working on this at the same time
as the Edit Masters are being created.
Although SADiE and SADiE Author have tools for editing the Text, Sony also offer a stand-alone "Super Audio
CD Text Editor" which is free to download at http://www.sonyoxford.co.uk/pub/dsd/sacd-txt-ed/index.html.
The text can be as full featured or as minimal as you like.
If the text is to be extensive, then this can be quite a long task and will take up valuable studio time. It might be
better if perhaps this task could be carried out outside of the studio. It is important to correctly assign
responsibility for this task and for proofing the text, preferably to the record company; it would be tragic to
have to trash a batch of pressings over a misspelt composer or incorrectly assigned genre.
The Text information for a Super Audio CD has four levels:
ALBUM
DISC
AREA
TRACK
An Album is a set of discs, perhaps a boxed set. A single disc album would have
an Album size of 1.
There will be separate information for each Disc of the Album set if it is a multidisc set.
There will be one or two Areas on each Disc: Stereo and Multi Channel.
Each track will have separate information. Even if the two Areas have nearidentical contents, it is quite possible that some information will differ; for
instance the ISRC will be different for the Multi Channel track.
In addition, 8 channels of text information are possible, i.e. 8 different languages for the Album and Disc
information and for each Track's info.
In SADiE's text editor, Album and Disc information are edited in the "Master Text" page. Each Area has a
separate edit page, with individual Tracks accessed via panes in that Area's edit page.
As guidance, here are some possible levels at which Text can be supported. However the manual for the Sony
Super Audio CD Text Editor is the definitive resource for what the Text entries mean:
1.
It is mandatory to set the Album Size and Sequence number but SADiE will set those to 1 if you do
nothing else.
2.
It is in the record company's interest (and in Red book CD PQ'ing this is common) to set ISRC's,
Catalogue number/UPC/EAN, Publisher, and Copyright fields. (It is common to refer to the Music
Publisher as "Publisher", but in this case Publisher means "Record Company" in common parlance.)
3.
It will add some benefit to the user to add Album and or Disc Title, performer, track titles etc.
4.
The rest – language channels, genre (some players maybe able to sort in order to play tracks of the
same genre together).
CD TEXT
If you've put CD Text on the SACD, then it's sensible to include it also on the Red book layer of a hybrid disk.
Both SADiE's Super Audio CD Author page, and the Sony SACD Text Editor have options to export to a CD
Text file, which you can then copy to a floppy disc for delivery to the factory along with all the other
components. Of course the Red Book CD and the Stereo SACD area may have different tracks; this will be
fine if they are the same, and if they're not you can create another Text file for exporting as CD Text.
2:15
DSD Mode
SADiE v5.2 DSD Operational Manual
STEP 3 - DST ENCODING
So, by the end of Step 2, you have gathered one or two Edit Masters, and you also have a Master Text file.
Now's the time to open the SADiE Super Audio CD Author program. The sections that follow describe the
procedure in detail. This is just the Introduction so we're talking mostly about work flow. In practise, this Step
(the DST encoding) and the next Step (Creating the Cutting Master) will be performed as one action, but are
described separately.
DST encoding is sometimes required and often desirable as it reduces the data in order to fit it onto the disk.
It will produce varying results in terms of compression ratio; there is no possibility for fixed ratio compression,
and the DST will always do "the best it can". Some audio material will compress more than others. As a general
(but simplistic) rule of thumb, the louder the material the larger it will be when compressed, and thus the
shorter amount of time will fit onto the disc.
As another very general rule of thumb, between 60 and 80 minutes of Stereo and Multi Channel audio may be
possible on a Single Layer or Hybrid disc.
To help ascertain whether your disc's contents will fit, the SADIE Author has an Estimator. If your disc does
not fit you have two options:
1.
Go to a dual layer disc (assuming you were expecting it to be single layer in the first place). Your
client may not be so happy about this if it's unexpected as it will usually be more expensive to
replicate. This is not an option if you were intending to make a Hybrid disc.
2.
Trim the contents of the of the disc, either by losing a track or two (perhaps it's acceptable to lose
one track from just one Area), or by re-mastering the whole disc to give a more favourable DST
compression. Either way, you will have to go back to Step 1 and create new Edit Masters.
In the SADiE Author program the DST encoding is performed as part of the "Create CM" process.
STEP 4 - CREATING THE CUTTING MASTER TAPE
A Super Audio CD Cutting Master is specified as being on an AIT tape. This is what you send to the factory.
This must be an AIT1 tape, although an AIT2 or AIT3 drive can be used to write the CM tape.
One tape must be supplied for each Layer:
•
One AIT tape for a Single Layer disc
•
One AIT plus a Red Book master for a Hybrid disc
•
TWO AIT tapes must be supplied for a Dual layer disc – one for each layer
Cutting Masters can rarely be re-purposed. For instance a Single Layer CM could not be reused if it is decided
to make a Hybrid disc, as the Catalogue number would be different, as would the setting of the Hybrid flag.
The same Edit Masters could be used again, but the Text would need to be recreated, and a new CM
produced.
As mentioned above, the SADiE Author performs the DST encoding as the first stage of creating a Cutting
Master (the second stage being to write the CM to the AIT tape itself).
As an intermediate stage, the DST Encoded Edit Masters will be saved as a separate file (this is why you will
need plenty of hard disc space). They will have the same file name as the original Edit masters, but with "_DST"
appended to the end of the name.
2:16
SADiE v5.2 DSD Operational Manual
DSD Mode
Once the DST encoded versions of the Edit Masters have been created, you will notice that your Authoring
Project has now flipped over to referencing the DST version and not the standard version. This means that if,
for whatever reason, you need to write the CM tape again (maybe the ISRC codes have changed) you will be
able to skip the long DST encoding stage, and go straight to AIT tape, which will be much quicker for that last
minute change!
STEP 5 - CHECKING THE CUTTING MASTER
To give you more confidence in your CM tape, the Super Audio CD Author page has an option to "Verify" the
Cutting Master. It also has tools for copying audio from a Cutting Master, and DST decoding it where
necessary, in order that you may listen back to it inside SADiE.
6 - WHAT GOES TO THE FACTORY?
•
One CM tape for each layer – remember it should be an AIT1 tape.
•
For Hybrid disks you will require a Red Book master – a CD-R or a DDP tape for instance (it’s a good
idea to check first to see if there is a particular preference).
•
CM report printout – SADiE makes the CM report which shows all the track mark information and
text.
•
CD Text file if required for a hybrid disc - this can be on a floppy disk, or perhaps a CD-ROM.
STEP BY STEP GUIDE
CREATING THE EDIT MASTER
The Edit Master(s) are the mastered audio files, and there will be one Stereo Edit Master plus one Multi
Channel Edit Master if this is to be a Multi Channel disc.
Editing, mixing and placing of Track Markers ("PQ" editing) are described in detail in the main SADiE help-file.
For the purposes of this document, it is assumed that you have completed this, and that your Playlist is
prepared in readiness for a final "play out to master".
On the right hand side of the PQ tools on the SADiE Playlist, there are three buttons, which are used for
creation of SACD masters.
•
The "DSD" button is used for reading an Edit Master (see below)
•
The "EM" button is the one we are interested in at this point – this is used for creation of Edit
Masters.
•
The "SACD logo" button opens up the Authoring page (see below)
On pressing the "EM" button, the following dialogue appears:
2:17
DSD Mode
SADiE v5.2 DSD Operational Manual
This is used to choose the type of Edit Master that is being created, and to set up the channel routing.
Edit Masters can have either 2, 5, or 6 channels (these are the first three default options from left to right).
Clicking on the pictures selects the channel routing preset. The last two options give the possibility of creating
BOTH a Multi Channel and a Stereo Edit Master simultaneously. For instance in the picture above we have
selected in red the option for Outputs 1 to 6 to be the Multi Channel EM, and 7 & 8 will be the Stereo EM.
Note: You can only make the stereo and Multi Channel EM's simultaneously if the track marks are
identical. If this isn't the case, then you'll have to run them one at a time from separate EDL's.
CONFIGURATION
If for whatever reason, the channel routing does not suit your purposes, it is possible to change these default
configurations. Press the Configuration button and this dialogue appears:
You can change the routing from Output to Edit Master channel by using the drop-down selectors. If you
create an invalid routing (i.e. you have two Left Stereo's or perhaps a missing Rear Right) then no "speakers"
will be displayed in the graphic. Otherwise, the pictures will change to reflect the new routing.
Note, that the Edit Master itself is always 2, 5, or 6 channels, but other configurations are allowed. For
example:
2:18
•
4.0 with no centre or LFE
•
4.1 same but with LFE
•
3.0 Left, Centre, Right, no rears
•
3.1 same plus LFE
SADiE v5.2 DSD Operational Manual
DSD Mode
If an LFE channel is selected a 6-channel Edit Master will be created. If there's no LFE, then it will be a 5
channel. In both cases, unused channels will be created mute. This will mean that the Edit Master for a 3.1 disk
will take as much hard disk space as the same length of 5.1, although you would expect a mute channel to DST
compress significantly better!
ARCHIVE INFO
The Archive Info button shows another dialogue that allows you to put comments and other information into
the Edit Master file(s). There's a drop-down selector to categorise the comments, and a field to the right for
typing. This information is added to a chunk in the Edit Master, but does not transfer to the Cutting Master
(and is not required).
WRITE EDIT MASTER
If you're happy with the channel configuration, and have written any comments you needed, then in the "file
name" section of the main "DSD-IFF Edit Master Creation" set the destination file name(s) for the Edit
Master(s).
Note: It is advisable to make the destination drive for the Edit Masters different (if possible) to the drive
that is playing the Playlist. During a crossfade in the Playlist, a single drive could be attempting to play or
record up to 24 tracks of DSD, which is on the edge of what you would expect from a SCSI drive of
reasonable performance. Of course this is more important if you are running 8 channels into Edit
Masters, than if it is a simple stereo EM.
Press the OK button on the "DSD-IFF Edit Master Creation" dialogue. The EDL will start to play in real time,
and while this is happening the Edit Master(s) will be "bounced".
Note: It is recommended in the SACD specification for an Edit Master to have two-second "handles" at
the start and end. In SADiE there is no need to add these by hand – SADiE automatically adds the "first
countdown" (i.e. the space between Track 1 ID0 and Track 1 ID1) and also adds 2 seconds of silence at
the end of the Edit Master (if you watch carefully you will see the Playlist over-run at the end).
2:19
DSD Mode
SADiE v5.2 DSD Operational Manual
CREATING THE CUTTING MASTER
Open the "Super Audio CD Author" page by pressing the button on the PQ toolbar that looks like the
SACD logo. This page can be opened separately from SADiE if required – see the section below.
Tick "2 Channel Area" and "Multi Channel Area" appropriately, depending on what type of Super Audio CD
you are making.
Click on the "Locate" button, and browse to your Stereo Edit Master DSD IFF file. The Edit Masters contain all
of the audio information as well as the track mark data. The track data will appear in the main window. Repeat
for the Multi Channel version if required.
The Settings menu has an option to "View Marker Times" in SACD frames or samples.
Clicking on the "Advanced" button will bring up a dialogue giving more information from the disc information
chunk.
2:20
SADiE v5.2 DSD Operational Manual
DSD Mode
This contains details on Sample Rate, Compression, Channels, the type of Sound Data, and any comments.
Click on the
to close the window.
Select your Format option (these buttons only apply to the Stereo Area) at the bottom left of the screen.
There are 3 options:
1.
DST Encoded – This is DSD compression.
2.
3 frames in 14 sectors – This is the standard data layout for Super Audio CD
3.
3 frames in 16 sectors – This allows more space for text and graphics information; but the addition of
graphics is unsupported in SADiE currently.
If this is a Stereo only disc, then choose "3 frames in 14 sectors". You can choose "DST Encoded" if you
wanted to put more audio on the disc – but this would only be required for a stereo disc that lasts more than
approximately 109 minutes.
If you have a Multi Channel Area then it must be DST encoded, but it is possible to include a non-DST
encoded Stereo Area. This is rare however because this will impact on the playing time of the disc. It's most
usual to DST encode BOTH areas when a Multi Channel area is included.
DISC TYPE
Select the option "Hybrid" if a 2-channel red book layer will also be included on the final Super Audio CD. This
changes a flag to indicate that a red book layer is present. The physical red book information will be separate
to the Cutting Master and will usually be presented to the plant on CD-R along with the Cutting Master tape.
Otherwise select "Single" or "Dual". A dual layer is only required for long discs, will take longer to create, and
be more expensive to manufacture.
TEXT
You can load a Text file that has been created earlier by pressing the "locate" button alongside "STT File".
Alternatively you can use SADiE's text editor to write the SACD Text
Select "Text" for the Master Text or for the relevant area, and enter your text information into the window
that appears. Once finished, click "close".
2:21
DSD Mode
SADiE v5.2 DSD Operational Manual
You can copy this text information form one area to another, using the "Copy…" options under the Text
menu. Alternatively, you can input different information for each different layer.
Note: ISRC's should be different for each area.
MAX PEAK CHECK
Whilst SADiE is creating an Edit Master, a check is made to ensure that the audio does not exceed the SACDlegal Maximum Peak of +3.10dbSACD, and if it passes this check the Edit Master is marked internally.
When you press "Create CM" in the Author page to make the Cutting Master, the first thing that is checked is
Max Peak. If the Edit Master is marked as checked already then this is skipped, however if the Edit Master is
created outside SADiE, then it will not have the Max Peak checked mark, and so we will run a check as the first
part of the CM process.
Additionally you can manually trigger a Max Peak check from the Tools menu.
DST ENCODING
After the Max Peak check (if required) the DST encoding process will take place. This can take some time to
process, and it will depend on the power of your PC. Dual or Quad processors WILL perform this task
approximately twice or four times faster than a single processor PC. As a benchmark, (which may well appear
ridiculously low specification by the time you read this) a Dual Athlon 2GHz machine will DST encode one
particular 1 hour Stereo Edit Master in about 30 to 35 minutes, and the 5.1 EM takes about 100 minutes.
CHECK TAPE IS EMPTY BEFORE CREATING CM
There's an option for this under the settings menu. It will only check for an empty tape (and pause and warn
you if it's not empty) at the moment the CM write is about to start. Thus it will be after the Max Peak check (if
any) and after the DST encoding. This means that if there's a tape that's not empty in the drive, and you've left
the whole process to run overnight, when you return in the morning, the tape won't be written and the
warning will be on the screen. Do not despair however! The writing of the tape is not such a time consuming
process!
2:22
SADiE v5.2 DSD Operational Manual
DSD Mode
CHECK LIST
•
Select your Edit Master(s).
•
Select DST encoding (or 3 frames in 14 for a Stereo disc).
•
Select hybrid, single or dual layer.
•
Load SACD Text STT file and/or Edit the Text.
•
Press Create CM and SADiE Author will do:
o
Max Peak Check (if required)
o
DST encoding (if required)
o
Tape writing.
ESTIMATING COMPRESSION
There is a facility to estimate the amount of space that will be gained by compressing your source audio. Follow
the process above, but before you actually create the Cutting Master, select the "Tools" menu and select
"Estimate Compression Gain".
There are 3 options for the accuracy of the estimation, ranging from Low to High. Low will give the fastest
estimation and is very accurate, enough for most purposes. High will obviously take the longest, and could take
almost as long as Cutting the Master itself. However, there will be times when this level of accuracy will be
appropriate. Select the relevant option for your application.
Select "Estimate", and the estimation will begin. The graphs show the compression ratio on a scale on the left
hand side. The yellow line that appears shows the average level of compression required to fit the audio on the
disc. (If the audio will fit without compression, no yellow line will appear.) A green line will appear across the
screen, showing the potential compression ratio for your audio. If this appears above the yellow line, the
compression is working better than required. However, if it falls below the yellow line it is performing worse
than is necessary. It is important to remember that it is the average compression ratio for the whole disc (both
layers) that is important. There is a small disc image in the top right corner of this window, which shows how
much space the audio data will potentially fill on the disc.
2:23
DSD Mode
SADiE v5.2 DSD Operational Manual
This estimation tool will give you a useful guide to how much data will fit on the disc. However, the only real
way to know if your audio will fit will be to physically write the Cutting Master.
VERIFYING THE CUTTING MASTER
VERIFY CM
The "Tools" menu has an option to "Verify CM".
This process will read the entire CM tape to verify the integrity of the Cutting Master.
This checks that the tape can be read; that the data length is correct; that it is a valid image file for the SACD,
and many other checks for compliance of the image to the Scarlet book specification.
You do not require the audio or DST files or STT files to be on the PC that is running the verifying process;
this is checking for data integrity and is not a bit for bit comparison against a reference.
After reading the entire tape, a Verification report will appear on screen.
READ CM FROM AIT
This option, under the "Tools" menu allows you to read audio back from a CM tape and if required copy it as
DSD-IFF files to the hard disc.
One reason for doing this is to listen back to the audio in SADiE.
When you first select this item, because of the order on the tape, first of all a dialogue box appears which
shows the Stereo Area and lists the tracks along with their timings.
2:24
SADiE v5.2 DSD Operational Manual
DSD Mode
There are options for
1.
Copying tracks individually by clicking on the track number(s), (shift-click will select a range or CTRLclick will add to a group selection in the usual way) and pressing the "Selected track(s)" button. In this
case, each track will be copied to a separate DSD-IFF file. If "Create as mono files" is ticked, then each
channel will be a separate mono DSD-IFF, if not, interleaved stereo or 6-channel files are made.
2.
Copying all tracks as one file by pressing "All". If "Create as mono files" is ticked, then each channel
will be a separate mono DSD-IFF. If not, interleaved stereo or 6-channel files are made AND the files
created will actually be Edit Masters and will include the track marks.
On pressing either of these you will be asked to provide a base filename and directory for the copied files; the
track number will append this. The tracks you want will first be DST decoded and then copied to the hard disk.
If "View Multi Channel Area" is ticked, once the Stereo files required are copied, a similar dialogue will appear
showing the Tracks and timings for the Multi Channel area, and you can choose to copy audio from here in a
similar manner.
TO PLAY BACK THE DSD-IFF FILES…
Close the Author page.
Open SADiE's Disk Manager.
Navigate to the directory where you copied these DSD-IFF files. If the directory is missing, or the files cannot
be seen, you may have to "refresh" SADiE's disk view – it may not update automatically. To do this, press the
"Refresh" button.
When you've found the files, select them, then right-click and select the option "Import into Clipstore".
Now you can go to the Clipstore and drag these as clips into the Playlist. The clips will appear as outline only
and will not show any profiles. These are DSD files only and do not have associated PCM files (from which
profiles are generated with normal recordings).
You can now playback the files to listen to them in the Playlist in the usual way.
2:25
DSD Mode
SADiE v5.2 DSD Operational Manual
You should be aware that channel ordering might not be the same as you may have originally specified. You
might have changed the channel mapping to suit your own needs, but it always goes onto the CM in the same
order. Thus when these DSD-IFF's are copied from the CM, the channel ordering is as per the SACD
specification, and thus will be:
•
Stereo: left, right
•
5 Channel: left, right, centre, rear left, rear right
•
6 Channel: left, right, centre, LFE, rear left, rear right
The slightly less standard variants:
5 Channel variants:
•
3.0: left, right, centre, mute, mute
•
4.0: left, right, mute, rear left, rear right
6 Channel variants:
•
3.1: left, right, centre, LFE, mute, mute
•
4.1: left, right, mute, LFE, rear left, rear right
ALTERNATIVELY…
If these are Edit Masters, either you copied an entire area off the CM tape, or for whatever other reasons you
need to listen to an Edit Master, then SADiE has a way of reading in an Edit Master including the track markers.
It’s best to start with a fresh EDL otherwise you may overlay clips or change a PQ list, so go to the Project
Window and "Create a new EDL".
Open this by double-clicking on its icon in the project window.
Open the PQ pane by pressing the Text button near the top left and then pressing the PQ tab.
On the right hand side of the PQ toolbar, select the button labelled "DSD".
Navigate to the Edit Master file and select it; press OK.
A single clip for the entire Edit Master will appear in the EDL and the PQ stream will show its track markers.
Once again, the Edit Master clip will have no profile, but you can locate and play as much of this as you require
in the usual way.
2:26
SADiE v5.2 DSD Operational Manual
DSD Mode
RUNNING SEPARATELY
As we've seen, the Author page is used for turning an Edit Master into a Super Audio CD Cutting Master tape.
As such, there are no real audio tasks involved, apart from any final listening to files that have been extracted
from the tape.
Conveniently, it is possible to run the SADiE Super Audio CD Author application on a different PC separately
from the SADiE DSD8 or DSD2 machine itself.
There are however some restrictions on usage:
1.
The PC running SACD Author will need to be connected via a network to the SADiE DSD8 or DSD2
system. You must share the "c:\sadie5\bin" directory on the main SADiE PC, in order that the
Authoring PC can see it.
2.
You will need a pass code to install the application. This can be obtained from your dealer, along with
the software to install the Author application.
2:27
DSD Mode
2:28
SADiE v5.2 DSD Operational Manual
SADiE v5.2 DSD Operational Manual
Recording
3 - RECORDING
OVERVIEW
When you record a Track (SADiE's name for an audio file) you are always recording directly to one of your
hard disks. When you record using the Playlist and Transport Controls, SADiE will place the Track as an EDL
Entry in sync with the position of the current-time cursor during recording. This is like recording to a multitrack tape machine.
MULTICHANNEL TRACKS
SADiE labels Tracks that you record in one of three ways: Mono, Stereo, or Multichannel. Multichannel Tracks
are made up of individual mono or stereo parts.
For example, you might want to record eight channels of drums, from a stereo pair of overheads and six
individual mono microphones. The resulting Multichannel Track will be made up of one stereo and six mono
parts. As a single Track, it will be treated as a whole when moved around the system, but the component parts
are accessible by opening up the tree structure in the Clipstore, or using the UNGROUP button.
The parts of Multichannel tracks are identified by the name of the Stream to which they were recorded, so you
may want to rename Streams before recording (see Arranging an EDL).
RECORDING TO THE PLAYLIST
NOTE: If you have already been using a Playlist and now want to record unrelated material for different
work, you may want to open up a new, empty Playlist to record into. This can be done under the File
menu. However, it is more useful to create a new Project; this will give you a new Playlist and set you
up for keeping track of all your work.
Record Tab
1.
Open the Record section of the Transport Controls.
2.
Press SETUP which takes you directly to the Audio section of the main Setup window, so that you
can check or change:
i.
The input source that you are recording (AES Digital, SPDIF Digital, Analogue or Optical digital).
Depending on your hardware, some of these options may not be available.
ii.
The input sample rate and resolution.
3:1
Recording
SADiE v5.2 DSD Operational Manual
NOTE: With an analogue input, the sample rate and resolution will determine how the signal
is converted to digital audio. The bit resolution of your hardware will determine the maximum
bit depth possible. Of course, you can use external converters to convert an analogue signal
to other sample resolutions before being feeding it to SADiE as a digital input. With digital
input, SADiE's sample rate needs to match that of the input signal, otherwise your material will
play back at the wrong speed, and the profile will not line up with the audio.
3.
Enter a name for the Track you are about to record by clicking in the white Track name box. Finish
with the Return key ( ).
i.
The AUTOTAKE button adds a two or three character take number to the name. This number
increases automatically each time you enter record. This saves you retyping a name each time
when recording multiple takes. For the purposes of this Help file, it is assumed that you have
Autotake ticked, so that if you go into record repeatedly, there is no need to type a new Track
name. If you don't have Autotake set, when you go into record and the current Track name exists
already, you will be warned and will have to change the name in order to carry on recording.
ii.
The RETAKE button lets you delete the last take and so keep the take number for the next
attempt.
iii. PROPERTIES brings up a box showing details that will be stored with the Track, some of which
you may want to enter or change at the time of recording. See the next section for a description
of each.
4.
5.
Check that the RECORD SOURCE button for each Stream that you want to record onto is set
correctly.
You can change the recording source by pressing the
selecting from the drop-box that appears.
ii.
Normally you will be recording direct from the system's physical inputs, but you can also record
from the outputs of Streams, internal busses, or the whole system. This enables you to "bouncedown" material in SADiE, or use a Mixer channel strip to apply EQ, dynamics processing or digital
level control to the input before it is sent to the recording Stream.
Press the
i.
RECORD ENABLE buttons on the Stream(s) you want to record onto.
If you have "E to E" selected in the Mixer section of the Setup window, you will now be able to
monitor and check the level of the input signal. See Recording Levels, below.
ii.
6.
INPUT SELECT button and
i.
There are Hotkeys available to Record Enable the first 32 Audio Streams. There are also
Hotkeys to Record Enable all Streams, and to Disarm all Streams. These are set in the
Playlist Record Enable section of the Hotkey Setup.
Press
RECORD to start recording immediately, or play the Playlist (you will be in record-standby
and the record button will flash) and hit RECORD to drop in ("punch-in") on the fly (see Dropping
in).
Pressing PAUSE before you press record will put you in record-standby mode, with input
monitoring. If you press PAUSE while you are recording, the current Track will end. A new one will
begin when you release the pause button again. The small time display at the bottom of the Transport
Controls shows the duration so far of the Track being recorded, or the amount of remaining time
available on the relevant audio disk, depending which button is selected above it.
7.
3:2
Press
STOP to stop recording.
SADiE v5.2 DSD Operational Manual
Recording
MONITORING THE RECORDING
There are two functions that determine how the input is monitored during a recording.
1.
E TO E MODE
This is a setting (under View menu, Setup window, Mixer , E to E mode). More usually you would
want to hear audio from the physical input when you press the RECORD ENABLE buttons for
the streams; this is the default setting and "E to E on record enabled streams" ticked. You do have the
option to disable this. This determines what happens when the Playlist is stopped.
2.
MONITOR SOURCE
This is a tick-box on the Transport Controls Record Tab, which determines what happens during
playback but before you punch into record.
This toggles monitoring to be "from source" or "off tape". When ticked, you will hear the source, and
hence the new recording. When unticked, you will always hear any clips that are currently on the
stream; if there are none then it will be silent. You can toggle the SOURCE button during playback
RECORD button is
to switch between input and what's already on the stream. When the
pressed, you will always be monitoring the input source, as the entries underneath are always
replaced.
Below is a table, which describes what will be monitored with the various combinations of E to E and
Source Monitoring.
E-E
SOURCE Playlist stopped, Playlist playing, Playlist playing,
Record enabled
Record ready
Recording
OFF
OFF
Nothing
EDL Entries
Input Source
ON
OFF
Input Source
EDL Entries
Input Source
ON
ON
Input Source
Input Source
Input Source
OFF
ON
Nothing
Input Source
Input Source
TRACK PROPERTIES
The Properties box displays, and allows editing of, information that will be stored with each Track. After
recording, it can be accessed from the listing of Tracks in the Project window.
•
"Format" allows you to select the file format of the Track to be recorded here. See File Formats. If
you leave this set to "Native", SADiE will use the recording format appropriate to the formatting of
the disk being used.
•
The "Reel Name" and "Track Number" boxes are only used for Autoconforming.
•
The "Start Time" and "Length" are for later display only.
•
The "Sample Rate" and "Resolution" will normally follow the input settings in the Setup window.
However, you can set this Track to be recorded at a lower sample resolution than the current input
setting.
NOTE: You can record with Varispeed on. This may be useful for performing frame-rate
conversion using the 24/25 and 25/24 pre-sets.
3:3
Recording
SADiE v5.2 DSD Operational Manual
•
"Emphasis" sets either of the two standard emphasis flags for the Track.
•
"Backup" references for the Track will be displayed in the Tracklist in the appropriate Project window;
see the section on Archiving.
•
"Comments" can be entered for the Track, if recorded to a SADiE 3-formatted disk. These will then
be displayed for later viewing of the Track Properties box.
RECORDING LEVELS
The Mixer's meters and the small PPM's alongside the Stream controls will give some indication as to the input
level, however you may find it useful to open the Metering Window when recording, in order to view the Input
PPM's. Otherwise Stream strips can show levels Pre-fader, whereas Output mixer strips will show level and
peaks Post-fader (hence if you've applied any level changes in the Mixer, they will not show the input level). If
your Stream and Output faders are at 0dB, then the metering on the Output faders will be displaying the same
as the Input meters.
If you do set up a Mixer strip to control the system input it is possible to apply digital level control to the
recording. However, this control is after the analogue-to-digital converters, so any adjustments necessary to
analogue input signals in order to avoid overloading or under-modulating the converters must be made
externally (e.g. on your mixing desk).
Adjusting the fader of such a Mixer input strip will affect the level recorded on the audio disk. Note that you
can overload the recording if you increase the level, so watch the meters. You can't improve a noisy signal that
results from converting analogue at too low a level.
If you don't apply any input level adjustment, digital input signals will be optimally transferred as 1:1 copies.
MAKING CUTS DURING RECORDING
The RAZOR and SCISSORS buttons will work during recording, dividing the Entry that is being
placed in the Playlist. This can be a useful way of marking edit points that you will need to return to
later.
If you operate the PAUSE button during recording, you can "edit-out" the incoming signal until you
release it again. Recording will resume as a new Track, so you must use Autotake, otherwise SADiE
will assume you want to re-record using the previous Track name.
An alternative pair of functions exists which can be used to mark edits and also remove unwanted sections
during recording. These are the "Clip In (and Out) point to current time" Hotkeys, as described under Quick
Edit.
OVERDUBBING
When you record into a Playlist that already has EDL Entries in it, these will be replayed as you record.
Therefore you can record, for example, a singer on Stream 3 in sync with, and listening to, a stereo guitar
already recorded on Streams 1&2; or a voice-over on Stream 1, while hearing a music bed already on Streams
3&4. You can even use the automation to record a mix of the level changes for the music bed while you record
the voice-over. When overdubbing, you will probably want to drop into and out of record as described below.
3:4
SADiE v5.2 DSD Operational Manual
Recording
DROPPING IN AND OUT OF RECORD
Once you have record-enabled your chosen Stream(s), you can drop into record ("punch-in") manually as
follows:
1.
Play the EDL from any point (the Record button will flash red to indicate that you are in recordstandby). You will not be monitoring the input, (unless you have selected E-to-E mode in the Mixer
section of the Setup window).
2.
Hit the record button when you want to drop in. If there is an EDL Entry on the Stream at this point,
SADiE will replace it with an Entry of the new recording up to the point where you...
3.
Drop out or record by pressing the play button again.
NOTE: As this is non-destructive, the underlying recording has not been erased. It is still available by
using Undo when using any of SADiE's editing modes, or returning to a previously saved EDL.
Additionally, the whole Source Track can still be found in the Clipstore. If you don't want to replace an
EDL Entry, record on a different Stream.
NOTE: You cannot use the record-enable buttons on each Stream to actually drop in. These must be
pre-set, and the record button used to do the drop-in.
Automatic drop-ins can be set up as follows:
1.
Open the L-R locators section of the Transport Controls
2.
Set the Left and Right locators to the points you want to drop into and out of record. There are
several ways you can do this:
i.
Click on the L and R buttons to set them to the current time, either on the fly during playback, or
when stopped. The red indicator will show that a point is stored in the button memory. The time
displays show the EDL time set, OR
ii.
Hold the Shift key and click at the required point in the Playlist time bar. Use the left and right
mouse buttons for L and R points respectively.
iii. Once set, clicking on a button will locate to that point (this is not allowed during playback) and
markers will appear in the Playlist time bar to show the position of each. Dragging these with the
mouse will adjust the points. Other ways to adjust them are described in "Using the Playlist".
3.
Press the DROP-IN button. Once you have record-enabled your chosen Stream(s), when you
play the EDL, SADiE will drop into record at the Left locator point and drop out at the Right.
Pressing LOOP causes playback to repeat between the left and right locator points. In the Transport
Controls section of the Setup window (accessible from the "View" menu), you can set pre and postroll times. These determine how much of the EDL SADiE plays either side of the L and R points.
Thus you can repeat a section, recording in sync each time, until you have the take you want. A new
Track is created for each drop-in.
3:5
Recording
SADiE v5.2 DSD Operational Manual
NOTE: SADiE actually records a second or two after any dropout and a second or two before an
automatic drop-in. These pre and post-handles allow later edit adjustment.
Double-click on an L or R button, or click while holding the Ctrl key, to clear the button's memory.
TIME STAMPING
When recording into the Playlist, the position of the current-time cursor as you record indicates the "timestamp" that will be applied to the Track. You can see the start time recorded in the Track Start column of the
Clipstore. So, when you are recording in sync (either by being synchronised to external equipment, or by
overdubbing in sync with other material in the Playlist) the new Track will always carry a record of its correct
original EDL position. If you move it, or store it in a Clipstore, it can always be replaced in a Playlist in the
correct sync by using the "Autoplace by Track Start" function.
When background recording, the Track will always be time-stamped from zero.
The Time-stamp of an entire track can be changed, using the "Resync Track" function. This is a permanent
change, and there is no way of undoing this process; this is potentially a very dangerous thing to do unless you
are sure that you want to do it. The function is found by right-mouse clicking on a single EDL entry. It works
by changing the Track Start time of the Source Track so that the currently selected entry becomes perfectly in
sync.
EDL's find the correct audio to play by searching the associated Source Tracks for the correct Entry Time
range, and so if you change the time stamp you will change the Entry times. EDL's that reference the track you
are resynchronising will be adjusted to use the new Entry times but only if they are open when the "Resync
Track" process takes place. If an EDL that uses the track is closed, it will have no knowledge of the sync
change, and thus will play the wrong audio, or not be able to find the Entry time range if it now no longer
exists.
For these reasons, the undo history is re-set when you resynchronise a track.
NOTE: Time stamping can only apply to Tracks that are recorded in a file format that can hold a time
stamp. For instance, simple WAV or AIFF format files cannot hold a time stamp, and thus will always be
time stamped from zero. SADiE native format and BWF (Broadcast Wave) can be time stamped.
CHOOSING A DISK FOR RECORDING
When recording, it is possible to record to one specified disk drive, to alternate disk drives when you record
or, if you have a Multi-card system, to choose a different drive for each unit.
When you start a project, with a system that has more than one disk drive, you will be offered the Audio Disk
Selection Window.
You can also see this window by pressing the SELECT DISK button on the Project Window
toolbar.
3:6
SADiE v5.2 DSD Operational Manual
Recording
This lists the recordable drives attached to your system.
This window will open up, defaulting to "Use specified disk(s)". If you select a drive and press "OK", the disk
you select will be chosen for every recording.
"Use least full local disk" allows you to record to whichever drive has the most space remaining.
"Use each local disk in turn" will choose a different drive for every track when SADiE goes into record. The
number of tracks depends on how many streams are involved, how they are grouped (a stereo track is one
track not two) and what file format you are recording to. So if for instance you are recording 8 tracks and you
have 4 disks connected, then each disk will record 2 tracks, and thus the load on the disks is evenly spread. If
your disks start to become full when making multi-track recordings, your maximum record time is the time
remaining on the most full drive.
Tracks that are recorded at the same time are grouped together in the Playlist and can be manipulated and
edited as if they are one single, Multichannel clip. You can separate these clips out and regroup them, as long as
they are still in the same time relationship to each other. This applies to multi-unit and multi-disk recordings as
well as those on single unit systems.
3:7
Recording
3:8
SADiE v5.2 DSD Operational Manual
SADiE v5.2 DSD Operational Manual
Using the Playlist
4 - USING THE PLAYLIST
THE PLAYLIST DISPLAY
1
2
3
4
5
6
7
8
1.
2.
3.
4.
5.
6.
9
11
10
Meter showing audio output from each stream
Stereo EDL Entry shown as a profile
Mono EDL Entry shown as a block
Crossfade between Entries
Time bar
Stream showing Entry comments
7.
8.
9.
10.
11.
12.
12
Drag border to reveal second Playlist view
Stream Control buttons
Drag border to reveal/hide Stream Control buttons
Mouse time display
Current time cursor
Mono EDL Entry shown as a profile
FADE DISPLAYS
The Playlist Entry Display section of the Setup window provides two options for the way fade-outs, and so
crossfades, are drawn:
"Show fades on all streams as cuts"
"Show fades on all streams as splices"
FADE SHAPES
The Playlist Entry Display section of the Setup window also provides an option for the shape of the fade used
on a clip to be represented visually in the Playlist:
"Show fades as curves"
It is recommended that you use this with "Show fades on all streams as cuts" as crossfades look pretty odd
when the fade down is shown as a bottom left to top right curve as well as the fade up. But if that's how you
like it...
4:1
Using the Playlist
SADiE v5.2 DSD Operational Manual
-3 DB AND -6 DB POINTS
The -3 dB and -6 dB down points for a crossfade can be displayed on the fade curves, by right clicking in the
Playlist, and selecting "Clip Display", "Show -6dB and -3dB markers". It also available as Hotkey "DB Down
Markers" in the Hotkey Setup. It is best to have "Show fades as curves" set under "Setup Window", "Playlist",
"Playlist Entry Display", as to be honest, it looks a little odd if you have "Show fades as splices" rather than as
cuts.
DISPLAYING COMMENTS
Right-clicking on the Stream also lets you show or hide any comments you want to associate with the Entry
(shown as "three, four..." in the above example). You can write comments in the Clip Details Window under
"Clip Dialogue".
SHOWING ENTRIES AS PROFILES
The SHOW ALL PROFILES button in the top left-hand corner of the Playlist switches between
displaying all EDL Entries as solid blocks and waveform profiles.
The small profile control button on each Stream does the same for that Stream only.
NOTE: The Stream control buttons can be revealed or hidden by dragging the border between them
and the Streams themselves, or by using the Scrollbar beneath them.
Function key F12 on the keyboard acts as SHOW ALL PROFILES.
The Profile Display setting is saved in the user settings, and thus SADiE will open in whatever state it was left
in.
When displaying profiles, there are 8 different types of waveform profile available, visually boosting different
parts of the dynamic range. You can change the profile type in "Profile Display Mode" on the "Playlist" menu, to
find one more suitable to the audio you are working with. Note that the "Playlist" menu only appears on the
menu bar when the Playlist is the active window.
The "Profile Display Mode" setting also applies to the Trim Window, as you are very likely to require the same
view there also. The "Trim" menu also allows you to change the setting, but for this one instance of the Trim
Window; thereafter the profiles revert to the Playlist setting. You should therefore change the setting from the
Playlist rather than the Trim Window if you wish to change the global setting.
The waveform profiles can also be displayed with or without a black outline for visual clarity. This setting is
found in the "Playlist Entry Display" section of the Setup Window.
NOTES ON PROFILES:
1.
4:2
The profile display for higher zooms can be altered to suit your personal preference. As default, the higher
resolution Horizontal zooms from zoom level 16 to 21 are drawn as a bar graph but there is an option in
the Playlist Display Setup page (under the "View" menu, select "Settings", "Playlist", then "Playlist Display");
select "Show higher zoom waveforms as lines" which will display these as a point-to-point line graph.
SADiE v5.2 DSD Operational Manual
Using the Playlist
2.
Depending on the performance of your PC, the profiles may update slowly when you are playing the
Playlist, particularly at the higher horizontal zooms above zoom 15, As default, when you press play whilst
viewing at a zoom level greater than 15, the waveforms are not displayed again until you press stop,
however you can choose "Keep updating profiles when playing (slow)" in the Playlist Display Setup, and
SADiE will attempt to re-draw the screen whilst playing.
3.
There is an option to change the zoom level at which "Profiles" (e.g. those on disc) become "Waveforms"
(e.g. those that are displayed on-the-fly). The display around horizontal zoom 14 and 15 can look a little
"blocky", so there is an option to calculate these as and when they are required. If you choose the option
to "Keep updating waveforms when playing (slow)" you see find a slight performance issue, particularly
when running multi-track Playlists. This will use some DSP as well as PC resources for displaying. You have
to restart SADiE for a change to this to take effect.
4.
The highest three horizontal zooms (zooms 22 - 24) are the only zooms at which you will be able to see
single samples. These zooms are always drawn as point-to-point lines.
5.
See also Recreate Profiles.
LEVEL-RESPONSIVE PROFILES
There are facilities in the Playlist and Trim windows to draw the profiles of the clips proportional to the
current clip level. This means that waveforms will now grow and shrink to show fade in and outs, and any clipwide level changes that have been made. This option is found in the "Playlist Entry Display" section of the Setup
Window; "Draw profiles proportional to clip level". It is also available as a Hotkey.
Clips without level response
4:3
Using the Playlist
SADiE v5.2 DSD Operational Manual
Clips with level response
Both clips shown in the examples above have had a drop of 3dB in relative level, hence the narrower waveform
in the second example. There is also a facility to view a "ghost" of the original profile behind the level
responsive waveform to serve as a reference when editing.
Clips with level responsive waveforms and ghosts of the original profile
4:4
SADiE v5.2 DSD Operational Manual
Using the Playlist
It is recommended that black outlines are enabled in the "Playlist Entry Display" section of the Setup Window,
as when clips are being edited they also turn grey, and will seem to disappear into the "ghost" profile, unless
they are outlined in black. The "ghost" profiles are enabled using the right-click menu in the Playlist "Draw
ghost profiles of original audio".
The facilities are also available in the Trim Window, and the setting here will reflect the setting in the Playlist.
However, in the Trim Window the "ghost" of the original profile is always shown.
SCROLLING AND ZOOMING
When the Playlist is playing back, the audio will ordinarily appear stationary, and the timeline will scroll across
it. There are options for the timeline to appear stationary, and for scrolling to be turned off, so that the
timeline will move off the edge of the screen. This option is available under the "Playlist" Menu.
When moving around the Playlist to access different parts of your EDL, you may want to change which part or
how much of it is displayed. This can be done either by using the Navigator Window, or by scrolling and
zooming on the Playlist.
4:5
Using the Playlist
SADiE v5.2 DSD Operational Manual
To do this, you will either need to scroll it so that a different part is in the window, or change its magnification
by zooming in or out of the display. Don't forget that you can also change the size of the whole Playlist
window.
There are two Playlist Scrollbars with attached zoom buttons. The one along the bottom of the
Playlist display scrolls and zooms horizontally so that you can view a later or earlier part of the EDL.
The one at the right-hand side scrolls and zooms vertically so that you can reveal Streams that are
not currently in view.
1.
2.
3.
4.
5.
1
2
3
Drag box for coarse scrolling
Click either side of the box to scroll one window width
Click or hold down arrows for fine scrolling
Zoom out
Zoom in
4
5
You can press the zoom buttons repeatedly, until you reach maximum or minimum magnification.
Alternatively, under the Playlist menu (when the Playlist is the active window), you can jump directly between
different levels of horizontal and vertical magnification. These zoom menus are also available if you hold the
Ctrl. key down when you click on the normal zoom buttons with the mouse.
Select ZOOM for horizontal magnification, SHIFT + ZOOM for vertical magnification, and
adjust with the wheel.
Without ZOOM or CLIP, or STREAM selected and without Jog or Shuttle modes selected
by the SCRUB button, the wheel will move the current-time cursor up and down the Playlist,
which will scroll accordingly. In this mode, all of the small LED's by the wheel will be off.
Additionally EDL Streams can be zoomed individually. Right-click in the area to left of the
stream. There are two options for zooming: "Stream vertical zoom" changes the zoom setting
for just that stream, and "Selected streams' vertical zoom" changes the zoom setting for all
enabled (light grey) streams, (to allow setting changes for groups of streams, or to return all
streams to the global zoom control).
There are 4 preset zoom buttons to the left of the horizontal Scrollbar, and a button labelled
"A" that will "Zoom to All" (e.g. the entire Playlist). The preset zoom level assigned to each
button can be changed by right clicking on the appropriate button and selecting a new zoom
level.
To the left of these is a "Centre display on Timeline" button, so that if the timeline is off screen
the display can jump quickly to it, without having to scroll or zoom.
These functions are also available as Hotkeys.
For users who have a mouse with a wheel, it works in the Playlist as follows:
Wheel = Vertical scroll
Ctrl + Wheel = Vertical Zoom in/out
Shift + Wheel = Horizontal Zoom in/out
4:6
SADiE v5.2 DSD Operational Manual
Using the Playlist
NOTES ON ZOOMING:
1.
During playback you can zoom in or out, but you cannot override the automatic scrolling that keeps
the current time on view.
2.
The Playlist will always stay centred on the position of the cursor. Reposition it before zooming in, if
necessary.
3.
At the extreme settings of zooming out, all Entries are shown as blocks and not profiles.
4.
If you want to quickly switch between two different vertical and horizontal zoom settings, save them
in two different Desktops. You can then switch between the Desktops by using the keyboard
shortcuts to the "Desktop" menu; press Alt + D, followed by the number of the desktop file listed.
5.
Where an EDL contains PQ or Video Streams, these have only two size settings, "Large" or "Small",
set by right-clicking in the grey area to the left of the stream.
There is another way you can change the way the profiles look on screen. For instance if your audio is very
quiet, the waveform on screen may be very small, or alternatively if the audio level is very high and not terribly
dynamic it may look like a thick straight line. Under the "Playlist" menu, the "Profile Display Mode" option
offers 8 alternative ways of viewing the profile; the high numbers will make lower level audio look "fatter".
Type 1 is the default. See also Notes on Profiles.
STATIONARY TIMELINE
There is an option to fix the Playlist Timeline marker to the centre of the Playlist's main area during playback.
This has been requested by users (particularly those in Post Production) for some time, and gives some
advantages over the "moving time line and page-turn" method. This is perhaps particularly useful when mixing,
in that you are much less likely to be "surprised" by something forward of the current time suddenly appearing
due to a "page-turn".
It may or may not be appropriate to your method of work, and hence this is invoked in a Setup page (but of
course you can change that setting at will). Additionally a status display can be set for Stationary Timeline, and
in the usual way, double clicking on this display will turn the mode on or off. The option for this is found under
the "Playlist Display" section of the Setup Window.
You may find that the PC's performance (and its graphics card performance) may have an impact on how
quickly the SADiE screen re-draws, and this playback mode will always be slower than the original "moving
timeline" method (although if your PC is powerful enough you shouldn't be able to detect any difference).
There is an option to have stationary point at between 10 and 90% on the Playlist screen. Notice that in this
mode the Current Timeline is not actually locked to the stationary point, and by the usual method of clicking in
the top time bar you can move this line (for positioning it for razoring for instance). However, the Current
Time will always jump back to the stationary point when play is started.
If the Playlist's first clip is close to 00:00:00, you will find that under certain zooms, the Current Time line will
move from left to right (in the original way) until it gets to the centre, at which point the line will fix and the
clips will start to move. This will only happen at times when centring the display would otherwise show an area
of the Playlist that would be before 00:00:00.
4:7
Using the Playlist
SADiE v5.2 DSD Operational Manual
PLAYING AND LOCATING
TRANSPORT CONTROLS
1
|
2
|
3
|
4
|
5
|
6
1.
2.
3.
4.
Current Time Display
Rewind
Fast Forward
Stop
5.
6.
7.
Play
Record
Pause
|
7
The Transport Controls are a permanently floating toolbar, so they will always appear on top of other
windows. You can hide them by clicking on their close window button , and display them again from the
View menu.
If you don't need the full Transport Controls, the status bar at the bottom of the screen can contain a simple
Play/Stop/Current-time display version. To show it, from the View menu select the Setup window and go to
the "Status Displays" section under "General".
The Transport Controls apply to the active window, so to play the EDL, then the Playlist needs to be active
(with a coloured title bar). If it is not, click anywhere in the Playlist or use the hardware controller's
WINDOW button to select it.
The PLAY, STOP, and PAUSE buttons in the Transport Controls are duplicated on the
hardware controllers. Note that there may be a brief delay when pressing PLAY while SADiE
compiles the current EDL.
PLAY and STOP are also activated by the spacebar on the computer keyboard.
PAUSE, when released, gives you an instant start..
Double-clicking in the time bar activates PLAY (see Locating).
A single click in the time bar activates STOP.
The ONLINE button in the Transport Controls and on the hardware controller has two
functions:
1.
It enables timecode synchronisation (master or slave as selected in the "Sync" section of
the Setup window).
2.
It enables 9-pin external machine control of any of up to four machines. These can be
selected individually by right clicking on the button. The 9-pin section of the Setup
window sets which 9-pin channels these are connected to.
Additionally the Playlist Menu provides some useful extra play functions:
•
4:8
Play Selected Entries - This previews only the selected entries and can be used to quickly play one clip
or several, separated from the EDL.
SADiE v5.2 DSD Operational Manual
•
Using the Playlist
Auto-Return on...
o
...Stop - Creates a temporary locator at the point at which play starts, and when play is
stopped the timeline will jump back to that point.
o
...Play - As for stop, but the timeline will only jump back to the locator when play is restarted.
This function is available as a status bar option, like Autoplace. It is also available on Hotkeys with
some extra functionality:
Return on Stop
enabled
Return on Play
enabled
Off
Space in Stop
starts playback at
current time and drops
marker
locates to marker and
starts playback and
starts playback
drops a (hidden) marker
Space in Play
stops playback, locates
to marker
stops playback, stays
where it is
Alt + Space in Stop
starts playback at
starts playback at
current time and drops current time and drops
marker
marker
stops playback, stays
where it is
locates to (hidden)
marker and starts
playback
Alt + Space in Play stops playback and stays stops playback and stays stops playback, locates
where it is - doesn't
where it is - doesn't
to marker
Return to the marker. Return to the marker
TIME DISPLAY WINDOW
For applications where exact time is important, there is a re-sizable time display window available.
This window can be displayed via the "View" menu, and has four different modes of operation:
1.
Current - This displays the current absolute time within the Playlist
2.
Countdown - This counts down to the end of the last clip in the Playlist
3.
Start - This counts the time up from the beginning of the first Entry in the Playlist
4.
Play - This counts the time up from the last point at which play started
4:9
Using the Playlist
SADiE v5.2 DSD Operational Manual
STREAM SOLO AND MUTE
Each Stream has its own control buttons on the left for
soloing and
muting individual streams. They
duplicate the solo and mute buttons controlling those Streams on the Mixer strips or hardware controllers.
There is a MUTE button above each fader. SHIFT + MUTE is solo.
NOTE: Solo and Mute buttons are grouped when you group their faders in the Mixer.
LOCATING
LOCATING CURRENT-TIME CURSOR TO EDL POINTS
There are several ways of locating the current-time cursor to points in the EDL:
Mouse Time Display
Current Time Cursor -
Time Bar
USING THE TIME-BAR
Double-click in the white time bar area at the top of the Playlist to start playback immediately from
that point. The mouse time display will show the exact time you are pointing to.
Single-click anywhere in the time bar to stop playback.
Single-click in the time bar when playback is stopped to locate the current-time cursor to that point.
NOTE: Scroll or zoom out to access parts of the EDL that are not currently on view (see The Playlist
Display). You can also move around the Playlist using the Text EDL.
USING THE CURRENT-TIME DISPLAY
Click, hold and drag the mouse up or down over any field of digits in the time display (e.g. the hours,
minutes or seconds, etc.). Their value will increase or decrease, and the more you move the mouse,
the faster they change. Release to set the new value and locate the current-time cursor.
Alternatively, double-click on the time display.
4:10
SADiE v5.2 DSD Operational Manual
Using the Playlist
The box that pops up allows you to:
•
Directly type in the time that you want to locate to (or use the mouse cursor to drag across and
overwrite only part of the displayed value). End with the keyboard Return key.
•
Click on "Zero" to Zero-locate, followed by "OK".
•
Use the up / down arrows to adjust the time. These nudge the lowest units. Hold the keyboard Shift
to nudge seconds, Ctrl to nudge minutes. Finish with "OK".
There is a "Locate to time..." Hotkey available to open this box, found in the Transport Controls
section of the Hotkey setup.
USING THE TRANSPORT CONTROLS
Double-clicking on the
STOP button is a useful and quick zero-locate.
The REWIND and FAST-FORWARD buttons are latching with the speed of wind increasing the
longer they operate. Using the time bar as described above is usually quicker and easier for most
operators.
USING HOTKEYS
There are two very useful default Hotkeys on the computer keyboard:
•
"Home" will locate to the start of the first Entry in the EDL.
•
"End" will locate to the end of the last Entry.
There also options in the Hotkey Setup for Locating to previous/next cue points and quantisation
points.
USING THE HARDWARE CONTROLLERS
Without Jog or Shuttle modes selected by the SCRUB button, the wheel will move the current-time
cursor up and down the Playlist. The scale of movement is related to the magnification of the Playlist,
so use zoom if necessary. The current-time display in the Transport Controls and the EDL time
display on the hardware controller will indicate the exact time you are locating.
NOTE: To move the current-time cursor, make sure that neither ZOOM nor CLIP , nor STREAM
modes are selected. The small LED's by the wheel should all be off.
END will locate to the end of the last Entry in the EDL.
SHIFT + END will locate to the start of the first Entry.
4:11
Using the Playlist
SADiE v5.2 DSD Operational Manual
NAVIGATOR WINDOW
The button in the top left corner of the Playlist Window turns on and off the display of the Navigator Window.
The Navigator Window is a bar that is attached to the bottom of the Playlist, which shows a block view of all
the clips in the entire Playlist. This gives you an easy view of the whole EDL, and operations in this Navigator
Window will allow you to quickly and easily locate, scroll and change zoom on the main Playlist display. This
should significantly speed up the process of getting about in the Playlist as now you can see an outline of the
whole list, and quickly jump to an area that you can see displayed in this Navigator.
OPTIONS
There are two simple options to determine how Navigator displays:
Under the "View menu", "Setup Window", "Playlist", "Playlist Display" (which is revealed by double-clicking on
Playlist on the left-side of the Setup Window) "Start navigator window display" from:
•
"Time Zero" (which will show any unused time at the start of the EDL), or
•
"Start of first clip" (which will start the navigator display at the beginning of the first clip, as in the
picture above)
COLOURS
The colours in the Navigator will reflect the colours in the Playlist and show whether clips are selected (Red),
part of a Slip selection (Blue), or being edited (Grey), etc. You will not see waveforms in the Navigator, merely
clip blocks.
NAVIGATING
You will see an outlined white box on the Navigator, which shows the area of the Playlist that is in the
current view.
4:12
SADiE v5.2 DSD Operational Manual
Using the Playlist
A single click inside the Navigator will move this white box to a new position (both horizontally and
vertically) and update the Playlist accordingly. The box is positioned so that the click position is central in the
display. (Of course when a Playlist is in playback and set to scroll, Navigator operations such as this could
change the focus to somewhere that isn't close to the current timeline, and so the Playlist display will flick to
the new position but then the playback will override this repositioning back to the area that's being played.)
Drawing a box in the Navigator (by clicking with the left mouse button, dragging and releasing.) will scroll and
zoom the Playlist to view the selected area. Again vertical and horizontal size and positioning of the box has an
effect (so for instance it's very quick to focus on a group of clips on higher numbered streams). When you
draw a box, you'll find the size of it will be changed to fit into a standard zoom and that the vertical scrolling is
adjusted so as to view a whole Stream.
Holding the Ctrl key and dragging the box will scroll the Playlist display as you drag the box.
Double-clicking anywhere in the Navigator will re-position the box as with a single click, and then put the
Playlist into playback within that Navigator box.
SPLIT PLAYLIST VIEW
If you are in the habit of using the secondary Playlist view you will be pleased to hear that operation of this is
included in the Navigator.
If you're not familiar with this view (try dragging the right-hand edge of the Playlist) there is a line between the
main grey area and the vertical scroll bar where the mouse cursor changes to a double-bar with left/right
arrows. Clicking and dragging here will reveal this second view. The second view can be used to show different
zooms or different areas of the Playlist, and using the option under Playlist Display section in the Setup
window, you can choose "Time lock split views" (or not) to determine whether this second view will scroll
with the main view (or not).
Operation of Navigator is much the same as with the main view, however we use the Shift modifier for the
second view, and the view-box for the second view is drawn in grey. (In the picture above the second view is
showing the whole EDL so the grey line is not so easy to see.) Thus:
4:13
Using the Playlist
SADiE v5.2 DSD Operational Manual
Shift + click moves the grey box.
Draw a box + Shift defines the grey box and thus area of focus of the second view.
Shift + Ctrl + drag the box to scroll the second view.
Shift + double-click to play in the second view.
LOCATING TO IN AND OUT POINTS
The current-time cursor will locate to the in or out point (whichever button is down in the Transport
Controls) of the previous or next EDL entry on any enabled Stream when you use these keyboard
Hotkeys:
•
Select previous Entry (default is Ctrl + Alt + B).
•
Select next Entry (default is Ctrl + Alt + N).
See Hotkey settings.
There are also Hotkeys available for "Locate to Selection start" and "Locate to Selection end" under
the Playlist section of the Hotkey setup. These are set to Ctrl + Home and Ctrl + End by default.
PREVIOUS and NEXT buttons do the same as the Hotkeys described above.
STORING AND RECALLING LOCATOR POINTS
The Transport Controls let you set up:
•
A pair of Left and Right points for looping and drop-ins
•
Ten numbered locator points
•
Any number of named locator points
Open the L-R and Locators sections of the Transport Controls:
1.
2.
3.
4.
5.
1
2
3
4
5
4:14
Left locator time display
Right locator time display
Numbered locators
Named locator time display
Named locator name box
SADiE v5.2 DSD Operational Manual
Using the Playlist
The LEFT, RIGHT and 1-10 numbered locator points can be set in the following ways:
1.
From the current time by clicking on their buttons. This can be done on the fly (during playback), or
when stopped. The red indicator will show that a point is stored in the button memory. The L and R
points have time displays to show their EDL times.
2.
The L and R points can also be set by holding Shift and clicking at the required point in the time bar
with the left and right mouse buttons respectively.
3.
Once set, click on a locator button to locate to that point. (This is not allowed during playback.)
Clicking on Z will locate to zero.
4.
Double-click on a button, or click while holding the Ctrl key, to clear its memory.
There are Hotkeys for "Set Locator" and "Go To Locator". The "Go To Locator" Hotkeys will always
set the locator if it's unassigned, then locate to the set point on a second push. The "Set Locator"
function puts the current time into the locator whether currently assigned to something else (e.g.
overwrite locator) or not.
Markers will appear in the Playlist time bar to show the position of these locator points:
Pressing LOOP causes playback to be repeated between the left and right locator points.
Pressing the DROP-IN button causes SADiE to drop into record at the Left locator point and drop
out at the Right (see Recording). The pre and post-roll times for these are set in the Transport
Controls section of the Setup window (accessible from the View menu).
Named locator points can be set as follows:
1.
2.
3.
4.
5.
6.
Click in the white name box at the bottom of the Transport Controls and type in a name ("endsting"
in the above example).
Each time you press GET, SADiE will store a locator point with the name you typed and a
number added to it, e.g. endsting [01], endsting [02], etc. The EDL time of the point currently
in the name box is displayed above it.
You can type in a new name at any time and start storing points with that name.
Press the arrow next to the name box to drop down a list of all your named locator points
and select the one you next want to locate. It will appear in the name box.
Press GO to locate to the point in the name box.
Press DEL to delete the locator in the name box. The next one in the list will replace it.
Repeat to delete them all.
The Left, Right and currently displayed named locator can all have their values adjusted or reset by using their
time displays in the following ways:
4:15
Using the Playlist
SADiE v5.2 DSD Operational Manual
1.
Click, hold and drag the mouse up or down over any field of digits in the time display (e.g. the
hours, minutes or seconds, etc.). Their value will increase or decrease - the more you move the
mouse, the faster they change. Release to set the new value.
2.
Use the up/down arrows beside the display to nudge its value by the lowest units. Hold Shift to
nudge seconds, Ctrl to nudge minutes.
3.
Double-click on the time display itself.
The box that pops up allows you to:
i.
Directly type in a new value (or use the mouse cursor to drag across and overwrite only
part of the displayed value). End with the keyboard Return key.
ii.
Click on "Zero" to set to 00:00:00, followed by "OK".
iii.
Click on "Cur Time" to set to the current time, followed by "OK".
iv.
Use the up/down arrows to adjust the time, as above, followed by "OK".
4. The L and R locator points can also be adjusted by dragging their markers in the Playlist time bar.
On the hardware controllers press LOCATE followed by F1-F10 to set or go to locators 1-10, and
LOCATE + F11 and F12 for the Left and Right locators. To re-set a stored locator point, press
SHIFT + LOCATE + F1-F12
NOTE: Locator memories are stored with the EDL, and apply to only that EDL.
ADVANCED PLAYLIST OPTIONS
SPLITTING THE VIEW
If you drag the right hand edge of the Playlist (inside the Scrollbar) inwards, you can open up a second
view of the Playlist that has its own zoom buttons, Scrollbar and current time cursor. This could be
useful if you want to jump back and forth between different places in the EDL or have one view in
zoomed in close and the other showing you a larger section. Clicking with the mouse will switch
between active views.
You are able to change the synchronisation between the split Playlist views. Under the "View" menu, select
"Setup", "Playlist", and then "Playlist display". Tick "Time lock split views" and the current time will update
synchronously in both panes; unticked, they will move independently.
STREAM UNITS
Streams are grouped into "units", which may be closed down or opened up for display. This is done by doubleclicking on the thin divider bar containing the unit name, to the left side of the EDL streams.
4:16
SADiE v5.2 DSD Operational Manual
Using the Playlist
Double-click here
Your hardware platform and the work you are doing will determine the number of unit dividers available.
There can be unit dividers for an audio unit (whose streams contain the audio clips), a PQ stream, and "mixeronly" streams if applicable.
VARISPEED PLAYBACK
Use the "View" menu to display the Setup window, and then select the Audio section.
The Varispeed controls in the Sample Rate part of the window adjust the Record or Playback speed up to a
maximum of ±10%. Whereas an analogue tape machine does this by varying the speed of the capstan motor,
SADiE varies the current playback sample rate.
- Reset
- Drag
Clicking on the check button enables Varispeed, and the knob just below it controls the speed.
Click and drag up and down to adjust. A small fader will pop up to indicate the setting and the
numerical display on the right will indicate the percentage speed change.
Double-clicking keeps the pop-up fader on view and allows you to adjust it more finely (click
on a grey bit of the window to hide the fader).
You can also adjust the setting by entering a percentage value directly into the numerical
display in any of the following ways:
- Nudge
1.
Click, hold and drag the mouse up or down over the digits on either side of the
decimal point. Their value will increase or decrease, and the more you move the
mouse, the faster they change. Release to set the new value.
2.
Use the up/down arrows beside the display to nudge the value by whole percentage
points. Hold Ctrl. to nudge by decimal points.
3.
Double-click on the time display itself and directly type in a new value ending with the
keyboard Return key.
You can now turn Varispeed off and retain the setting for the next time you turn it on again.
The square button drops down a selection list of useful pre-set Varispeed settings, for example to convert
from 24 frames per second to 25 and vice versa. Select "User" to return to adjustment with the knob. It may
be useful to do this during recording.
NOTE: As Varispeed works by changing the sample rate, the digital output from SADiE will be nonstandard and may not be accepted by other digital equipment, especially DAT machines. SADiE's Digital
to Analogue converters will work from about 30 kHz to 50 kHz to produce a valid analogue output,
although they may temporarily mute if you change the Varispeed setting too quickly. Varispeed of
individual Clips or EDL Entries by amounts much greater than 10% can be done with the "Resampling"
section of the Process window.
4:17
Using the Playlist
SADiE v5.2 DSD Operational Manual
TRANSMISSION MODE
This mode is a means of locking out the keyboard and mouse to prevent accidents during an important
playback.
To enter Transmission Mode, either:
•
Hold Ctrl. whilst starting playback in the usual way, OR
Use the keyboard Hotkey (set in the "Hotkeys" section of the Setup window) after starting
playback. The default Hotkey is Alt + X.
•
The following box will appear:
The only way to change anything now is to click on one of the two buttons.
AUDIBLE SCRUBBING
To quickly search audibly through the Playlist:
Reveal the Edit section of the Transport Controls:
Edit Tab
Scrubwheel
Click and hold the mouse button over the Scrubwheel:
•
Moving the mouse up/down gives you forward/reverse shuttle. The more you move from your original
position, the faster it goes. This is like spooling tape against the heads.
•
Moving the mouse right/left gives you forward/reverse jog. This is like nudging the reels back and
forth.
•
You can move between jog and shuttle modes without releasing the mouse button.
Select jog or shuttle mode with the SCRUB button. (Make sure you haven't got STREAM, CLIP or
ZOOM selected.) The LED's next to the wheel indicate the mode. Then use the wheel!
4:18
SADiE v5.2 DSD Operational Manual
Using the Playlist
FIXED SPEED SCRUBBING
There are hot-keys available for putting the Playlist (or Trim window, or clips in the Clipstore) into
audible scrub at a fixed speed.
By default, these are set to be on the numeric keypad of the keyboard (you must have Num Lock On),
and three different fixed speeds can be set up at once. For instance Keys 1 and 3 will play backwards
and forwards at half-speed, 4 and 6 will do the same at normal speed, and 7 and 8 at double speed.
The key assignments are set in the usual Hotkey section of the Setup window, under "Transport",
"Edit Controls". The three speeds can be changed in the Setup page too, this time under the Scrub
Setup sub-section of "Transport Controls".
4:19
Using the Playlist
4:20
SADiE v5.2 DSD Operational Manual
SADiE v5.2 DSD Operational Manual
Arranging an EDL
5 - ARRANGING AN EDL
OVERVIEW
1
2
3
4
5
6
7
8
1.
2.
3.
4.
5.
6.
9
11
10
Meter showing audio output from each stream
Stereo EDL Entry shown as a profile
Mono EDL Entry shown as a block
Crossfade between Entries
Time bar
Stream showing Entry comments
7.
8.
9.
10.
11.
12.
12
Drag border to reveal second Playlist view
Stream Control buttons
Drag border to reveal/hide Stream Control buttons
Mouse time display
Current time cursor
Mono EDL Entry shown as a profile
The EDL in SADiE is like a word processor document; when you first switch SADiE on and create a new
Project, the system will open a Playlist window containing an empty EDL named after the Project. You can then
build up the EDL by recording directly into it, or by pasting in Clips from the Clipstore. Alternatively, you may
open an existing Project and EDL to play back or do further work on.
NOTE: After making any changes in the Playlist, you will need to save the EDL. See File Management.
Whether you are rearranging EDL Entries that were not recorded in their final playback order, building an EDL
from the Clipstore, or creating different versions of the same material, you will want to move Entries around,
add them to and remove them from the Playlist.
Where you place Entries horizontally in the Playlist determines at what time they are played back in the EDL.
The choice of where you place them vertically, e.g. on which Stream they are placed, will depend on how you
want to control them with the Mixer. It is very easy to move Entries around in time and between Streams, so
you can always change your mind!
NOTE: You can place as many Entries as you like on top of each other on the same Stream, although
this will not make them easy to view, and they will all play back together.
5:1
Arranging an EDL
SADiE v5.2 DSD Operational Manual
PLAYLIST STREAMS
ENABLING AND DISABLING STREAMS
Disabled Streams
Enabled Streams
Enabling and disabling streams provides a means of separating some streams from others for certain editing
functions, and of allowing you to select a stream or sets of streams that you are working on without effecting
others.
Disabled streams are shown with a darker grey background than enabled streams. When a stream is disabled, it
will play back as usual, but is not affected by SLIP (when enabled) or RAZOR functions. This also provides a
means of selecting entries on streams when you are working with multi-track projects. It is easy with the
mouse to click anywhere in 2 dimensions. With the Hardware controls, the wheel will set your time
(horizontal) position in the Playlist ; the selected streams determine the vertical position.
When selecting entries with the Hardware controllers, the entry underneath the current time on the topmost
enabled stream will be selected first when you press the EDIT/SELECT button. Repeatedly pressing
EDIT/SELECT will select other entries on enabled streams in turn, but ignore those on disabled streams
Also the PASTE function always pastes entries to the topmost streams. Thus in multi-track projects, it is a
good idea to enable the stream you are currently working on and disable others, to make sure you can quickly
select the entry you want to work on, particularly if you are working with hardware controllers.
The STREAM NAME button displays the Stream name and clicking on this enables/disables
that stream for the editing, SLIP and hardware controller operations described in the following
sections. The Playlist will start with all Streams enabled. Holding the Shift key when clicking this
button acts on the group of Streams above it that are all the same status. This is like using the
Shift key to select items from a list in most Windows applications. Additionally there is a
"reverse" enabling function; if you hold the Ctrl key when clicking the stream button, then this
stream will be enabled and all other streams will be disabled.
NOTE: The border between the Stream control buttons and the Streams themselves can be dragged to
the left or right to hide or reveal the buttons.
On the hardware controller select STREAM and use the wheel or PREVIOUS/NEXT to highlight
a Stream, then hit EDIT/SELECT to enable/disable it. SHIFT + EDIT/SELECT acts on the group
of Streams above it that are all the same status.
CHANGING THE LAYOUT
You may want more or fewer Streams than your current Playlist contains. You can also merge Streams so that
they can be controlled together and reduced in height to save display space.
NOTE: The Super Audio CD mode of SADiE v5 limits the number of Streams a Playlist may contain to
16.
Stereo Streams can be added to the Playlist or created by merging two mono Streams. When you record onto
a stereo Stream, you create a Stereo Track, whereas recording onto two mono Streams produces a twochannel Track. (See Recording)
5:2
SADiE v5.2 DSD Operational Manual
Arranging an EDL
Right-click over the small Stream control buttons:
Right-click here -
•
"Merge Into Stereo Stream" merges two adjacent Streams. (Odd numbered Streams are merged with
the one after, and even numbered Streams with the one before.)
•
"Merge Selected Streams" merges all enabled Streams together.
•
"Rename Stream" is described below.
•
"Insert Streams" will insert a pair (before odd numbered Streams or after even numbered ones), and
renumber all Streams accordingly.
•
"Remove Stream" will remove the one you clicked on and renumber remaining Streams.
When Streams are merged, they retain separate channels of audio but are linked in the following ways:
1.
They have a single set of Stream control buttons, so they can be muted, soloed, or enabled/disabled
together. Merging Streams is also useful when recording Multichannel inputs, as you can use a single
record enable button.
NOTE: The mute and solo buttons of merged Streams are linked to those of all Mixer strips
to which they are routed.
2.
Automation data on merged Streams is edited together. Stereo Streams are therefore necessary if
you want to edit automation data for left and right channels of stereo material together (see Editing
Automation Data).
Right-clicking on merged Streams gives you options to change how they are displayed and to ungroup them
again:
5:3
Arranging an EDL
SADiE v5.2 DSD Operational Manual
Stereo Streams
Multiple Streams
NOTE: Be careful if choosing to view one channel only, as there may be audio material coming up that
you won't see.
A NOTE ABOUT STEREO ENTRIES: Stereo EDL Entries can be placed on any odd/even pair of
adjacent mono Streams as well as on stereo Streams. Audio editing will always affect both channels
unless the Entry is deliberately split into two mono ones with the UNGROUP button described below.
However, we recommend that you use stereo Streams in your Playlist for the following reasons:
1.
Recording onto stereo Streams creates stereo Tracks.
2.
Mixer automation for stereo material is edited on both channels.
3.
Single Stream control buttons are easier to use.
A stereo Stream can be routed to either two mono Mixer strips or a stereo strip.
If you wish to save your customised Playlist to be used again, save it as a Template.
RENAMING STREAMS
The Stream name appears on the long name button on the left hand side. By default, Streams are
labelled with ascending numbers, but you can change this to any 8-character name. Right-click
over the small Stream buttons and select "Rename Stream", type in the new name, followed by
Return ( ). To avoid confusion, don't give the same name or number to different Streams!
NOTE: The layout of Playlist Streams (how many merged Streams, single Streams and their names) is
saved when you save the EDL displayed in that Playlist. The Setup window allows you to specify the
default arrangement of stereo and mono Streams when new Playlists are created.
5:4
SADiE v5.2 DSD Operational Manual
Arranging an EDL
TOOLBARS
All windows have a number of toolbars that can be docked to edge of the window or "floated" anywhere on
the screen. Right-click on a toolbar to show a menu that allows this "docking". To view toolbars that aren't
currently displayed, there is an option under the "View" menu; click on "Toolbars", then select the window the
toolbar belongs to, to show a list of all the toolbars relating to that window.
The Playlist particularly has a large number of buttons controlling editing functions, and depending on your style
of working with SADiE, you may find you don't use some of the buttons, or perhaps you always use Hotkeys or
hardware controls for certain functions. You will notice that the Playlist toolbars are split into a number of
separate small toolbars each containing related buttons. This allows you to keep your desktop tidier by
displaying buttons that you use regularly. Alternatively there is a Playlist toolbar named "Classic tools" which
shows a selection of the most widely used buttons from other toolbars, but grouped into a single toolbar.
It is worth spending a little time thinking about the tools you use often, and arrange them on the screen to
your liking. When you are happy with your layout (the entire screen layout), then save a desktop. Loading this
desktop will push the toolbars to where you docked them. If you want SADiE to start up with this desktop
every time, then go to the "Environment" window and select "Save Desktop as Startup Desktop".
For the Playlist toolbars, there is a button on the main Playlist tools bar, and the classic toolbar, which allows
you to quickly turn on and off all of the other Playlist toolbars.
This button is called the SELECT TOOLBARS button, and pressing this will show the following
menu:
The ticked items are already being displayed; clicking on one of the others will
display it.
When a toolbar is displayed "floating" (e.g. not docked to the window), then you
can hide it again by clicking on the close window button
in its top right hand
corner. Otherwise a right mouse click on a docked toolbar will offer the "hide"
option.
The operation of most of the buttons on the toolbars is discussed elsewhere in the
manual.
The "Windows" toolbar has some special functions to allow you to bring to the
front of the screen, respectively, the Project window, the Clipstore, the Mixer, and
the Transport controls.
The "Automation Edit" toolbar is special in that opening the toolbar enables the
automation editing function, and you have to hide the toolbar to turn it off.
There is one other toolbar for the Playlist (not available from the Select Toolbars button): select "View", then
"Toolbars", then "Classic". This displays most popular Playlist buttons on one big toolbar, in a similar layout to
that which existed in SADiE software versions up to v3.70.01. This is for users who have become accustomed
to that particular layout. Again, docking this toolbar and removing others, then saving your desktop "as Startup
desktop" will allow you to start up SADiE with the view that you are familiar with.
If you can't find a button, look here: Playlist buttons.
5:5
Arranging an EDL
SADiE v5.2 DSD Operational Manual
MANIPULATING EDL ENTRIES
SELECTING ENTRIES
To perform any function on an EDL Entry, it first needs to be selected:
To select one Entry, click on it. It will turn red to show it is selected.
To select more than one, hold the Shift key whilst clicking on them.
To select adjacent Entries, click, hold and drag the mouse. You will see it draw a box as you move it
vertically and horizontally. Draw the box to cover the Entries you want to select as a batch.
WARNING: Don't start the box on an Entry that is already red, or you will find you are moving it!
Holding the Shift key whilst drawing the box will prevent this.
To select all the Entries in the EDL, click on the "Edit" menu, then "Select All". Alternatively press Alt,
E, and S on the keyboard.
To deselect individual Entries, hold Shift whilst clicking on them again.
To deselect all Entries, click on a grey bit of a Playlist Stream.
NOTE: Selected Entries are red. Red is a warning! Once selected it is quite easy to move Entries by
mistake, so always deselect them when you have finished.
To select Entries, do either of the following:
1.
Position the current-time cursor over the required Entry (by using the wheel in the Move
Cursor mode, e.g. with no other modes like Jog, Shuttle, Clip, Stream or Zoom selected)
and press EDIT/SELECT. The button will cycle through selecting all Entries under the
cursor on enabled Streams. Pressing SHIFT and then EDIT/SELECT will let you select a
second Entry. Holding SHIFT down will let you select more than two Entries.
2.
Select CLIP mode and use the wheel to cycle through selecting Entries on enabled Streams.
Pressing SHIFT before using the wheel selects multiple Entries. Press CLIP again to exit
this mode.
Press PREVIOUS or NEXT to select the previous or next Entries on enabled streams. If none are
initially selected this will begin with the last or first Entry. Pressing SHIFT and then PREVIOUS or
NEXT will let you select a second Entry. Holding SHIFT down will let you select more than two
Entries.
To deselect individual Entries, position the cursor over the Entry, disable all lower numbered Streams,
press SHIFT and then EDIT/SELECT.
To deselect all Entries, position the current-time cursor on an empty (grey) bit of the lowest
numbered, enabled Stream and press EDIT/SELECT.
NOTE: When several Entries are already selected, selecting a single Entry will deselect the rest. For
example, pressing NEXT will quickly deselect all other Entries.
There is a Hotkey available to "Select Entry". This will select the clip under the current time on the
topmost enable stream. If there are clips under the line on higher-numbered streams, then pressing
this button again will select the next clip down and so on.
There is also a Hotkey to "Select All", duplicating the Edit Menu command.
5:6
SADiE v5.2 DSD Operational Manual
Arranging an EDL
RAZOR CUTTING AND GLUING
RAZOR CUT
The RAZOR-CUT button in the Playlist and RAZOR on the hardware controller divides the Entry
under the current-time cursor on any enabled Stream into two at that point. This is primarily for
editing, but can also be used to create a new Entry that you can then change in any of the ways
described in the rest of this chapter.
Mouse users have the option of using the "scissors" to make razor-cuts. Whereas the RAZOR
button always cuts at the current-time cursor, when you press the SCISSORS button, the mousepointer will change into a dinky scissors icon with a cross to show the target point. You can then
make a freehand cut anywhere in the Playlist. This is useful if you can see exactly where to cut from
the waveform profile.
NOTE: With the RAZOR, if there are Entries at the cut point on other Streams and you don't want
them to be cut as well, disable those Streams first. The SCISSORS function cuts only on the Stream
the mouse icon is over, providing a useful shortcut to disabling Streams before using the razor blade.
Holding the Ctrl key whilst scissor-cutting cuts across all enabled streams.
Holding the Alt key whilst scissor-cutting cuts at the current time rather than at the mouse time.
Using Ctrl + Alt cuts on all streams at current time, much the same as the razor.
Right clicking while you have the scissors selected disables them and returns the cursor to its normal "select"
mode.
GLUE
Any razor cut where no editing has been done to the Entries either side may be repaired; press the
GLUE button, position the cross-hair of the glue cursor icon over the join and click again.
RENAMING ENTRIES
Right-click over the Entry itself and select "Edit Entry Name". Type the appropriate name, and then
press Return ( ).
There is a Hotkey available for this function, but this will on one clip only, and it must be on screen at
the time.
NOTE: You can also rename Entries in the Clip Details window and the Text EDL.
CUT, COPY, AND PASTE
These techniques can be used to remove, move and add EDL Entries in exactly the same way that text is
manipulated in a word processor.
Entries are pasted into the EDL from a temporary store called the Paste Buffer. This can be loaded from the
Clipstore to add new Entries to the EDL, but is also loaded with Entries that you cut (remove) or copy from
the EDL. So you to can move Entries by cutting and pasting them in somewhere else and you can repeat them
by copying them and pasting the copy somewhere else.
5:7
Arranging an EDL
SADiE v5.2 DSD Operational Manual
These tools are on the Playlist PASTE toolbar.
CUTTING AND REMOVING ENTRIES
Select the Entry/Entries as described above, then:
Press CUT ENTRIES TO PASTE BUFFER.
Press CUT.
NOTE: The previous contents of the Paste Buffer are replaced each time it is loaded. If you want to
remove an Entry from the EDL without it being loaded into the Paste Buffer, select it and press the
keyboard Delete key, or right-click on it and select "Delete Entry". This may be useful if the Paste Buffer
already contains something you want to paste in later.
COPYING ENTRIES
Select the Entry/Entries as described above, then:
Press COPY ENTRIES TO PASTE BUFFER.
Press COPY.
PASTING ENTRIES
NOTE: The Paste Buffer first needs to be loaded from cutting or copying EDL Entries as described
above, or with a Clip from the Clipstore, (see below). It is also possible to load Entries to the Paste
Buffer from the Trim Editor. If the Paste Buffer is not loaded, its button picture will appear faint.
Press LOAD PASTE BUFFER TO CURSOR. When you move your mouse pointer (or cursor)
over the Playlist Streams, you will see that it has changed to a reel of tape with a cross indicating
where the in-point of the Entry/Entries will be positioned. The mouse time display will give you the
exact EDL time. Click to paste the Entry/Entries into the Playlist.
This "Paste to Cursor" function is available as a Hotkey in the Playlist section of the Hotkey setup.
NOTE: To cancel pasting and drop the paste symbol from the mouse pointer, press the button again, or
right-click with the mouse.
Or pressing the PASTE TO CURRENT TIME button will place the contents of the paste buffer into
the Playlist at the current time, exactly as with the PASTE button on the Hardware Controller. Under
normal circumstances, this will be with the entry's start time to the current time, but of course, if
Autoplace is on, then the Autoplace rules will be followed.
Use the wheel to position the current-time cursor to the time at which you want the Entry to start.
(Make sure the wheel is not in STREAM, CLIP, ZOOM, JOG or SHUTTLE modes; all the LED's by
the wheel should be off.) The display in the Transport Controls, or the EDL time display on the
controller will show the exact time.
Press PASTE to insert the Entry/Entries with their in-point at the current time.
NOTE: Multiple Entries cut or copied from the EDL will be pasted back with the same time and Stream
relationships between them. After pasting, the Paste Buffer is not emptied, so you can paste further
copies as many times as you like.
5:8
SADiE v5.2 DSD Operational Manual
Arranging an EDL
PASTING WHOLE EDL'S TO ANOTHER EDL
The paste buffer can be loaded with an entire EDL that has been previously saved. On the menu bar, select
"File", then "Load to Paste". An "Open EDL" box will appear allowing you to select the EDL you want, then
press "Ok".
The PASTE button will have been pressed for you so you can immediately paste the selected EDL into your
current EDL. This is very useful for compiling work that you have built up in sections; for example, edited
tracks compiled into albums, scenes compiled into reels, etc.
MOVING ENTRIES
You can move entries around the EDL in many ways:
1.
Cut and Paste them back in at a new time, as described above.
2.
Select Entries, and then simply drag them with the mouse to a new location or Stream. The Playlist
will scroll automatically if you move the Entry near its edges.
NOTE: While you are moving the Entry, the mouse time display will change to show the start
time you are about to set when you "drop" it. Red is a warning! Once selected it is quite easy
to move Entries by mistake, so always deselect them when you have finished.
There is an option in the Setup Window to display guidelines for the entry start, end of fade-in, start
of fade-out, hotspot, and entry end. These can also be displayed for grouped entries.
There is a Hotkey toggle available for each of these functions.
3.
Nudge them by small amounts left/right (earlier/later in the EDL) or up/down (to different Streams
without changing in and out times and so maintaining sync):
Press the SELECT TOOLBARS button, and then select "Nudge" from the menu, to reveal the
Nudge toolbar.
The buttons nudge the selected Entry/Entries left/right/up/down. Each press of the left/right buttons
nudges by a fixed amount. This can be set in the "Playlist Nudge" section of the Setup Window, which
is displayed from the "View" menu. An alternative nudge amount is available by holding the Alt Key
whilst nudging.
On the computer keyboard, Ctrl + the cursor keys (the ones with the arrows) duplicates these nudge
buttons.
Function keys F1, F2, F3, F5 are also marked with arrows indicating that they duplicate the
Autoplace toolbar nudge buttons when pressed after the ASSIGN key.
4.
Use the Clip Details Window or the Text EDL to adjust their start times.
NOTE: You can also move Entries when using Playlist Editing mode.
5:9
Arranging an EDL
SADiE v5.2 DSD Operational Manual
CHANGING STREAMS
You may wish to move EDL entries to another Playlist stream, without changing the EDL time. There are 3
different ways of achieving this.
1.
If you hold the ALT key down while dragging and dropping entries with the mouse, the stream can be
changed but the EDL time cannot.
2.
The up and down nudge buttons on the Nudge toolbar (described above), change the stream of an
entry, one stream at a time.
3.
"Move selected clips onto stream..." option in the "Playlist" menu, forces entries to a new stream.
Select the new stream from the drop-down list, and however many streams the entries were on
previously, they will be moved, without changing the EDL time, to the new stream.
ADDING AND REPEATING ENTRIES
ADDING NEW EDL ENTRIES
Click and hold on the Clip you want in the Clipstore and drag it (actually a "copy" of it) to the Stream
and time that you want it to start in the Playlist. You will see that the mouse pointer has changed to a
reel of tape, with a cross indicating where the in-point of the Clip will be positioned. Release the
mouse button to paste the Clip into the Playlist. This does not use the Paste Buffer.
Alternatively, select the Clip in the Clipstore by clicking on it, press the LOAD TO PASTE button
and then paste it into the EDL from the Paste Buffer. The Playlist PASTE button will have been
pressed for you!
Use the WINDOW button to make the Clipstore the active window and then select the Clip you
want either with the wheel or the PREVIOUS/NEXT buttons. Press COPY.
Return to the Playlist with the WINDOW button. PASTE the Clip into the Playlist as described
above.
NOTE: You can place as many Entries as you like on top of each other on the same Stream, although
this will not make them easy to view.
5:10
SADiE v5.2 DSD Operational Manual
Arranging an EDL
REPEATING EDL ENTRIES
To repeat one or more Entries, either:
1.
Copy them and then paste them in at a new point, as described above, OR
2.
Select them and then hold the Ctrl key whilst dragging a copy with the mouse to the required
position.
PLACEMENT OF ENTRIES
REMOVE GAP
Press the REMOVE GAP button (on the main Playlist Tools toolbar) to move any selected Entry to
the left (e.g. forward in time) so that it butts up to the previous Entry on that Stream. The start of
the selected Entry's fade-in will be changed to coincide with the start of the preceding Entry's fadeout.
On the keyboard this "Snap entry..." is available as a Hotkey under the Playlist section of the Hotkey
Setup. The default is F6.
Remove Gap can be set to a Hardware Controller Hotkey F1-F12. The default is F6.
NOTE: The SLIP facility described below will automatically remove gaps left after cutting Entries from
the EDL.
SNAP TO CURSOR
This is a very useful tool for synchronising Entries. Right-click over the Entry you want to move and select
either "Snap in-point to current-time", "Snap end-point to current-time", "Snap Hotspot to current time", or
"Snap fade in-point to current time". The Entry will jump to a new position with either its Hotspot, its fade inpoint, or its in or out-point on the current-time cursor. This is useful:
•
On the fly whilst listening to music to run alongside speech. A voice Clip can be snapped to cursor
during playback.
•
After positioning the current-time cursor by double-clicking on the current-time display and typing a
new value.
•
After positioning the cursor by scrubbing with the Edit section of the transport controls, perhaps
scrubbing to find a sync point in one piece of audio, to which you need to reference the start, end or
hot spot of another.
These snap functions are also available as Hotkeys.
GRID LINES
From the Playlist right-click menu, you can select "Show Grid". This will show a series of major and minor grid
lines across your Playlist for easy alignment and positioning of clips. The position of the grid lines will be
dependant on the Time Display selected in the Setup Window, and on your Zoom level.
5:11
Arranging an EDL
SADiE v5.2 DSD Operational Manual
AUTOPLACE
All of the functions for positioning Entries described above are affected by further options provided on the
Autoplace toolbar.
Press the SELECT TOOLBARS button, and then select "Autoplace" from the menu, to reveal the
Autoplace toolbar.
Turns the Autoplace function on or off.
There are several different Autoplace Options available. Clicking on the second button will reveal a menu for
selecting your Autoplace Option:
The second button will change appearance depending on the Autoplace Mode:
Autoplace an Entry to butt up to the previous one on that Stream. The start of its fade-in will coincide
with the start of the previous Entry's fade-out (like Remove Gap).
Autoplace an Entry with a pre-set gap separating it from the end of the previous one. The gap can be
set in the Playlist section of the Setup window, displayed from the View menu.
NOTE: The above two functions are handy for roughly putting together an EDL that you are
going to fine tune later.
Autoplace an Entry in sync with the EDL time when the Track was recorded.
Autoplace an Entry so that the Hotspot rather than the in-point goes to the EDL time shown by the
mouse time display (or the current-time display when using the hardware controller).
NOTE: The Hotspot is a useful marker that you can set at a particular point within a Clip or
Entry and then use as the reference when placing it. For example, when you place a sound
effect of a screech of car tyres followed by a crash, it is probably the crash that you want to
position accurately. The Hotspot may actually be outside the in and out points of the Entry you
are placing; you wouldn't include the sound of the clapper board recorded at the start of a
dialogue Track, but you can still use it as the Hotspot in order to place Entries from that Track
in sync. To set or adjust the Hotspot, see Chapter 5, Editing, and the Clip Details Window
section of this chapter.
Autoplace an Entry with its in-point at the current time. This can usefully be done on the fly, whilst
listening to the rest of the EDL to get the "feel" of where you want an Entry to start.
5:12
SADiE v5.2 DSD Operational Manual
Arranging an EDL
NOTE: As SADiE loads the EDL into memory when you start to play it, you will not hear any
changes you make during playback until the next time you start it.
Autoplace an Entry with its Hotspot at the current time. Use in the same way as the above.
Autoplace an Entry with the end of its fade-in at the current time. Use in the same way as the above.
Autoplace an entry or group of entries at the original EDL time. Thus when used in the same EDL, an
entry will snap to the same time (but you can move it up or down a stream as with nudge for
instance). This is perhaps most useful if you want to copy and paste entries from one EDL into
another. Use this to snap the entries to the same EDL time.
Additionally this can be used with a certain type of SD2 format audio file; with other audio
workstations it is possible to embed the EDL time into the audio file. With this "Autoplace to original
time" mode, when dropped into the EDL, these SD2 files will snap to the EDL time from the original
workstation.
Autoplace an entry with its end point at the current time, similar to "Autoplace Now", and "Autoplace
Hot-now" as above.
NOTE: The Autoplace functions: Now, Out-Now and End-now, are available for single entries
on the Entry menu that appears when you right-click on an entry (e.g. "Snap In/End/Hot point
to current time").
Autoplace an entry to snap to the nearest quantisation point. There are two further buttons here, for
setting up quantisation:
Allows you to select which part of the clip to snap to the quantisation point:
Allows you to select a suitable quantisation level. You can either quantise to grid lines or to a
note value in Bars and Beats.
5:13
Arranging an EDL
SADiE v5.2 DSD Operational Manual
SLIP
All of the functions for positioning Entries described above are affected by further options provided on the Slip
toolbar.
Press the SELECT TOOLBARS button, and then select "Slip" from the menu, to reveal the Slip
toolbar.
Turns the Slip function on or off.
Pre-selects Slipping of Entries to the left of the selected one.
Pre-selects Slipping of Entries to the right of the selected one.
With the function on and an Entry is selected, other Entries on enabled Streams will turn dark blue and will
automatically be moved in the following circumstances:
•
Moving an Entry by nudging, dragging it with the mouse, using Remove Gap, or by any editing functions
will cause Slipped Entries to move with it.
•
If right-hand Slip is selected, removing an Entry from the EDL will cause later Entries to be brought
forward by an amount equal to its duration. This means that removing an Entry between two cuts in
continuous audio will automatically remove the gap that would otherwise be left.
•
If right-hand Slip is selected, pasting a new Entry into the EDL causes Entries after it to be moved back
by an amount equal to its duration, e.g. they make room for it!
NOTE: The current Autoplace and Slip settings can be displayed on the Status bar at the bottom of the
screen. Right clicking on them will then bring up a box to change settings. This avoids taking up screen
space with the toolbar. Double clicking on the status boxes, will toggle them between On and Off, thus
you can set the Autoplace or slip type with the right mouse, and turn it on and off, by double clicking.
Use the "View" menu to display the Setup window, double-click on "General" and select the Status
displays section. You can then choose which displays are shown.
NOTE: The hardware controller has a SLIP button, which operates the SLIP ON/OFF. You
will need to set your slip type with the mouse. All slip and Autoplace types, along with
Autoplace and Slip ON/OFF, can be also assigned to Hotkeys.
5:14
SADiE v5.2 DSD Operational Manual
Arranging an EDL
GROUPING OF ENTRIES
GROUP ENTRIES
Any number of Entries may be grouped together. They will be redrawn as a single block in the Playlist. This
may be for convenience of display, for repeated operations to the same group, or to avoid accidentally undoing
edits. You can rename a group, and store it in a Clipstore, so a heavily edited piece can be stored as a single
Clip.
Press the SELECT TOOLBARS button on the Playlist toolbar again. Select "Group" to reveal the
Group toolbar.
Select the Entries you want to group and then press GROUP SELECTED EDL ENTRIES.
NOTE: When selecting lots of Entries it may be easier to select all the Entries in the EDL and then
deselect the ones you don't want included in the group. Click on "Edit" on the menu bar, then "Select
All" (or press Alt, E, S on the keyboard). Deselect Entries by holding Shift on the keyboard while clicking
on them with the mouse. (On the hardware controller make sure no in, hot or out edit points are
selected, position the current-time cursor over the Entries and press SHIFT + EDIT/SELECT.)
Groups may be further grouped with other Entries or other groups and a hierarchy is formed.
At any time you can break a group back down into its component parts by selecting it and pressing
the UNGROUP button.
MAKING ENTRIES STEREO AND MONO
To make a stereo entry into two mono entries, select the entry and push the UNGROUP button.
You can make a mono entry into a stereo entry, only if the mono entry was originally part of a stereo one, and
therefore another leg exists. Right-click on the entry and select "Make Stereo". This option will only be
available if the audio exists.
NOTE: You can UNGROUP a Multichannel Entry into its component parts, or a stereo Entry into its
left and right mono parts in order to treat them separately. For example, you might introduce a time
shift between the two channels, or delete one channel from the EDL completely; especially useful when
working with M&S stereo or material you thought was stereo when you recorded it, but turns out to be
mono!
5:15
Arranging an EDL
SADiE v5.2 DSD Operational Manual
BOUNCE-DOWN
Entries may be permanently grouped by re-recording them internally. The Bounce Window provides a simple
method for doing this.
Press the SELECT TOOLBARS button on the Playlist toolbar again. Select "Bounce" to reveal the
Bounce toolbar.
You may choose to bounce entries down for a number of reasons:
5:16
•
Convenience. You want the mixed or processed result to always appear as a single EDL Entry, or you
don't want to bother with setting the Mixer or Automation to process the required Entries every time
you play the EDL.
•
To clear disk space. You want to re-record small parts of one or more much longer Tracks that you
can then delete (as described under Audio Disk Management).
•
There is not enough DSP power available to carry out the processing you require in real time and/or
play the number of simultaneous Entries you require. Process and re-record the necessary Entries
with "Non-real-time" selected in the Transport Controls' Record section. Then you can use the
processed versions in the full EDL.
•
Bounce can provide convenient "batch" processes for sample rate converting or resampling
SADiE v5.2 DSD Operational Manual
Arranging an EDL
BOUNCE OVERVIEW
The Bounce Window can re-record a group of clips, with or without the mixer, automation or processing, so
that they become a single mono, stereo, or Multichannel track. There are many possibilities but let's follow a
fairly simple example where you are re-recording some edited clips to form a "master" stereo track
1.
First, select the clips in the EDL. These clips will be re-recorded through the mixer, so check the
mixer balance is correct.
2.
Click on the bounce icon to open the Bounce Window.
3.
The first section of this window serves the same purpose as the Record tab of the Transport window,
so enter a name for the recording.
4.
This is going to be a stereo mix-down so select "Stereo" under "Output Channels" and at the bottom
tick "Bounce through mixer" because we do want to include some level changes we've made on the
mixer.
5.
Next tick "Selected Clips" in the Source section. The Source section tells Bounce what to re-record;
"Complete EDL" or "Selected Streams" are the other possibilities. The new recording is made
through the mixer, so check that "o/p 1&2" are chosen from the pop-up list; SADiE will record what
is appearing on these outputs.
6.
Choose, in the "Destination" section, what's going to happen to the new track after re-recording:
i.
"Replace Source Clips" will place the new track on the topmost stream occupied by the source
clips, and will delete all the source clips when the bounce is finished.
ii.
"Stream(s)"- tells Bounce to put it into the same EDL on streams specified in the pop-up list. The
"Remove Source" tick box will delete the source clips after the bounce. This mode is useful if you
want to push the result of the bounce to a new stream
iii. "Clipstore" - leaves the Playlist unaffected, and places the new track into the current Clipstore.
iv. "PC" - this is explained in the "Special Bounce functions" section below. It is unadvisable to
choose this option unless you have a specific need to.
The bottom section allows you to choose "Bounce in non real time". If this is selected the bounce will be
performed as quickly as possible, but will not be audible. The other two options allow you to turn off
automation and/or the mixer for the bounce.
Press "Start". The process will start, and during the bounce the ball icon in the Bounce button will "bounce". Be
careful not to click in the time-line in the Playlist or press transport buttons, as you will halt the bounce.
OUTPUT CHANNEL SETTING
The Output Channel setting determines the channel width of the resulting track.
Stereo and Mono are obvious – a two channel or single channel track is recorded.
Original will create a new track with the same number of channels as the source clip. However this can only
be used for bounces that are not through mixer, because of course the mixer changes the channel width.
Original works for group clips and multi-channel clips. Note that clip level changes are included in the bounce,
but Bounce through Mixer is automatically turned off.
When Original is used with Multi-bounce (which is a batch process that bounces many clips singly – described
below) each individual source clip will determine the number of channels in its respective bounce track – i.e. if
you have three clips in the EDL that have 2, 1, and 16 channels, the resulting three clips will be 2, 1, and 16
channels wide.
5:17
Arranging an EDL
SADiE v5.2 DSD Operational Manual
All O/Ps (all outputs) is the converse – the number of physical outputs in use by the mixer determines the
width of the resulting bounce.
When this is set you will be forced to Bouncing through the mixer, and all Physical Outputs in use will be rerecorded internally except any that are used only for Aux sends.
If you do want to record Aux sends, then route them to an intermediate bus and to the output via a fader.
Existence of a fader routed to a physical output causes everything routed to that output to be re-recorded.
Thus if outputs used by an Aux send are also being used elsewhere, then the audio sent via the Aux send pot
will also be re-recorded.
If you regularly require "flat" bounces (e.g. NOT through the mixer), then use Original mode.
All Output bounces can be performed in Non Real Time.
There is a small feature in SADiE that is particularly relevant now for Surround "All output" bounces. Any
bounce will have the output number or name appended to the new file that's created, and thus you can append
channel labelling to the Bounce files by renaming the Outputs appropriately.
The easiest way to do this perhaps is in the Routing toolbar.
Press the ROUTING button on the Mixer
Double click on "Physical Outputs" and then again on "O/p 1 & O/p
2... O/p 5" to view each Output individually.
Then right mouse click on each separate O/p and rename them as:
O/p 1 L, O/p 2 R, O/p 3 LS, O/p 4 RS, O/p 5 C, and O/p 6 on it's
own to Sub if that's the output you're using for the Sub.
(you can choose your own nomenclature here: i.e. LeftRear or Left
Surr or LR will do)
The resulting bounce files will be called something like:
Bounce-L01.WAV...
where "Bounce" is the track name you've typed, "-L" represents the
channel, and "01" is the take number (which will only appear if you
have auto-take switched on).
Labelling bounces in this way will make channel assignment easier
once the files have made their way to the DVD author.
SPECIAL BOUNCE FUNCTIONS
1.
5:18
Multi-Bounce - with Multi selected as the source for the bounce, every entry in the EDL will be rerecorded as a separate audio file on the disc drive. If you want a group of entries to become a single
audio track then simply group the entries; a Group Entry is treated as one entry. You must have
either Autotake, or Clip Name selected, as the new tracks will be automatically named. "Autotake"
will use the Bounce track name as the main part of the name and increment the take number for
every bounce. "Clip name" will use the source clip's name for every track. If "Autotake" is not
switched on in conjunction with "Clip Name", and if duplicate names are found during the multibounce, a take name will be added anyway, and you will be informed this has happened at the end of
the multi-bounce
SADiE v5.2 DSD Operational Manual
Arranging an EDL
2.
PC - Bounce to PC Disk: Of course every bounce is to the PC disk, however this provides a facility
for bouncing to a directory that it different to the project's record directory. This can be useful when
Master mixes are being created, they can automatically be "exported" to a pre-defined directory.
There is a button alongside the PC option which shows where the "PC" bounce will go – pressing this
button allows you to change to a different destination directory. There is also a tick box called
"Create Profiles" which is connected to PC bounces, and this allows you to choose whether the
profile files that SADiE uses for displaying waveforms are created or not.
3.
Reverse - this option in the Bounce window allows you to make a backwards copy of an EDL entry
or entries. Note also that right mouse clicking over an entry will initiate the Bounce window with
Reverse enabled. Otherwise the Bounce window works in the normal way. Note that as usual the
Bounce records the Output of the mixer including any level changes or processing.
Reverse cannot be used in conjunction with any Non 1-1 process, such as Resample or Timemod.
4.
Bounce Through Process - Selecting this option will open up a process window, allowing you to
perform the bounce with a process in-line – this could be a Sample Rate conversion, a
Resampler/Varispeed, or a Time-mod. In the case of the DSD8, a DSD Sample Rate Converter and
Varispeed is available for converting PCM to and from DSD.
Choose which process option you require from the drop-down list, set up it's parameters, and then
in the usual way set the bounce and press Start.
Notice that "Bounce Through Process" cannot be through the mixer and you will see that "Original"
is automatically set for the Output Channel setting.
This option is currently only available in DSD mode
UNDO AND REDO
Pressing UNDO can reverse the last change that you made to the EDL. Press UNDO again to
reverse the change before that, and so on, stepping back through the history of your actions. The
maximum number of undo levels is set in the Setup window and can be up to fifty.
REDO steps you back the other way after using undo.
UNDO is at the bottom right of the panel and SHIFT + UNDO is redo.
NOTE: Undo and Redo are also available on the menu bar under "Edit". This may be useful as it also
gives a description of the operation to be undone. Note that the "Edit" menu Undo and Redo
commands can also apply to the Mixer and Clipstore, if either is the active window.
NOTE: The Undo memory is cleared if Streams are removed from or added to a Playlist.
5:19
Arranging an EDL
SADiE v5.2 DSD Operational Manual
LOCKING CLIPS AND STREAMS
There are facilities for Locking clips, more aptly described as a "Sync Lock". This is not a "Full lock" or "Write
protect".
Clips in a Playlist can be locked individually and multiple selections of clips can be locked and unlocked using a
Hotkey ("Lock selected Clips" and "Unlock selected Clips" under the Playlist section of Hotkey Setup) or the
options at the bottom of the Playlist menu, and also Streams can be locked by using the little padlock buttons
in the left side of the Playlist.
The STREAM LOCK buttons toggle (locked/unlocked) the status for all clips on that stream, and these
buttons can be set in groups by using a similar logic to that used for Stream enabling, e.g. Shift + LOCK will
lock all streams above the stream being locked up to the next stream above that changes status. There are two
new buttons on a new Lock Streams toolbar for the Playlist to LOCK ALL STREAMS and UNLOCK ALL
STREAMS.
When clips are locked, they will show a new red LOCKED icon in the top left corner (assuming there's space
to display this). A yellow LOCKED icon shows that some clips within a group clip are locked (and others not).
Note that locking works on two levels. Clips that are locked individually (or as a multi-selection) cannot be
unlocked by a Stream unlock. Likewise Clips that are on a locked stream become unlocked when you move
them (by using Alt + drag or Nudge Down) onto an unlocked stream. This allows different methods of utilising
the locks (stream or clip based or a combination of both).
Locked clips can still be edited, but no functions that may cause a sync-slip are allowed. Thus you will be
allowed to nudge up or down a stream, and you can Playlist edit in the "EDL" mode, but you cannot nudge left
and right or perform "Source" style edits. Also the new "Set In point" style editing is allowed (because it
doesn't slip audio).
5:20
SADiE v5.2 DSD Operational Manual
Arranging an EDL
You can't pick up a locked clip and move it, but you can "Alt + drag" a clip to change its stream. If you move a
selection that contains a mixture of locked and unlocked clips, only the unlocked clips will move. If you group
together any selection that contains a locked clip, then the whole group clip will become locked. The group will
act as if it is single locked clip. However, the padlock symbol will be yellow instead of red, to denote that only
one physical clip is locked.
If you lock a single stream that contains stereo or n-channel clips, then the other legs of the clip on unlocked
streams are considered to be locked (until you ungroup the clip).
The LOCK button matches the LOCK STREAMS buttons in the Playlist. Therefore, pressing
LOCK will lock all streams, and press SHIFT + LOCK will unlock all streams.
There are Hotkeys available for these functions
CLIP DETAILS
CHANGING ENTRY CHARACTERISTICS
The Clip Details window lets you alter the way EDL Entries in the Playlist are replayed as well as providing
another way to alter their positions in the EDL and labelling.
NOTE: The Clip Details window can be equally well used to alter the details of Clips in the Clipstore.
This will affect the way they are replayed when they come to be placed in an EDL. If you want to store
different versions of Clips in the Clipstore, change their name before writing them back to it. For
example, a Clip called "Splash" could be loaded into the Clip Details window, have its level adjusted and
name changed to "Quietsplash" and then be written back to be used as an alternative version.
NOTE: Although each Clip Details window only refers to a single Clip or Entry, you can have several
Clip Detail windows open at the same time.
First select the single Entry or Clip you want to adjust. Then load it to a Clips Details window by
pressing the CLIP DETAILS button (red on the Playlist toolbar, blue on the Clipstore toolbar).
NOTE: In the Playlist section of the Setup window there is an option to open the Clip Details window
by double-clicking on the Entry.
The Clip Details window has a row of buttons along the bottom providing:
•
A "Write-back" button which updates the Playlist or Clipstore with the new details.
•
Buttons providing four ways of loading new Clips/Entries into the existing window for alteration. Each
is described by the on-screen help. Remember to write back one Clip's details before loading the next.
•
A preview button for hearing the Clip/Entry with the changes you are making in real time.
•
A Close button for closing the window when you've finished with it.
There are three tabs along the top, which reveal three different sections:
5:21
Arranging an EDL
SADiE v5.2 DSD Operational Manual
FADES AND LEVELS
The Fader changes the level the Clip /Entry will be replayed at. There is a PPM meter next to the fader to
check the level.
NOTE: This sets the Entry's replay level relative to others on the same Stream, which will then be
affected by the faders of the Mixer. It is useful for changing the level of a single Entry without bothering
with Mixer automation.
The Balance control is a true stereo balance, or offset, adjusting the relative levels of the left and right channels
of stereo material. It will not be active for mono Clips/Entries. Click and drag it left and right to adjust. A small
fader will pop up to indicate the setting. Double-clicking keeps pop up open and allows you to adjust the popup fader:
Nudge
Drag
Centre
The rest of this section displays the details of the fade-in (on the left) and the fade-out (on the right). Every
Clip or Entry in SADiE has a fade-in and fade-out, the length of which can be adjusted from the whole of the
Clip's duration right down to zero, and the curve of which can be selected from a list of 117 different types.
NOTE: The default fade-ins and fade-outs which result from starting and stopping recording, and from
making razor-cuts when editing can be set in the "Default Crossfade" section of the Setup window. A
standard time of 21milliseconds/40 timecode subframes/1 CD frame (the "General" section sets how
times are displayed) will give smooth edits for most purposes. For fine editing, like removing clicks and
pops, you might want to reduce this by at least half. Note that zero-length crossfades are likely to cause
clicks unless you use the Trim Editor at its highest magnification to make sure the waveform either side
of the edit point does not jump in level.
To adjust a fade length, do one of the following:
5:22
1.
Click, hold and drag the mouse up or down over any field of digits in its time display (e.g. the hours,
minutes or seconds, etc.). Their value will increase or decrease; the more you move the mouse, the
faster they change. Release to set the new value.
2.
Use the up/down arrows beside the display to nudge its value by the lowest units. Hold Shift to nudge
seconds, Ctrl to nudge minutes.
3.
Double-click on the display.
SADiE v5.2 DSD Operational Manual
Arranging an EDL
The box that pops up allows you to:
i.
Directly type in a new duration (or use the mouse cursor to drag across and overwrite only part
of the displayed duration). End with the keyboard Return key.
ii.
Click on "Zero" to enter zero, followed by "OK".
iii. Use the up/down arrows to adjust the time, followed by "OK".
NOTE: Fade lengths can also be adjusted graphically in the Playlist and the Trim Editor.
To change a fade type, press the
down-arrow button next to the name of the current type.
The drop-box that appears lets you choose from 117 fade curves. Either use the Scrollbars and select the new
fade with the mouse, or type the first letter of the fade you want, followed by Return on the keyboard.
Alternatively you'll find that if you select the fade type, the keyboard up and down arrows enable you to move
through the list of fades. Each fade's shape will be displayed above as you do this.
The fade curve is drawn in the box above the name. There are 7 different logarithmic and exponential curves:
•
Exponential fade-outs are good music fades.
•
Short logarithmic fade-ins are useful for taking the edge off an abrupt start of speech.
•
Linear fades are a good default for other crossfades and edits on most material.
Buttons are provided to preview just the fade-in or fade-out, with a pre-roll and post-roll time set in the
pre/post roll section of the Setup window. Equal Power curves can be found by using the negative partner of a
positive fade curve. More details about these fades can be found in the Trim Fades and Crossfades section.
NOTE: The default fade types which result from starting and stopping recording, and from making
razor-cuts when editing can be set in the "Default Crossfade" section of the Setup window, displayed
from the View menu.
NOTE: Setting a long Entry fade-out (for music and effects, for example) is a useful alternative to using
fader automation in the Mixer.
ADJUSTING LEVEL OF SELECTED CLIPS
Multiple (or single) selected clips can have their level altered
using the "Adjust level of selected clips" option in the
"Playlist" menu. This allows absolute or relative change to
level for all the selected clips. The level is changed by typing a
value, or clicking on nudge buttons. This function is also
available as a Hotkey.
5:23
Arranging an EDL
SADiE v5.2 DSD Operational Manual
NORMALISE
The normalise function automatically adjusts clip levels in order that the maximum peak in that clip reaches the
level set by the user. This option is available from the "Playlist" menu. First you should select the clips that you
wish to normalise level on. Each clip will be normalised individually; this is the case with individual clips inside
(yellow) group clips also. Set the "Normalise clip level" and on pressing "OK", SADiE will analyse the clips to
find the highest peak and then lower or raise the level accordingly.
The time taken to perform the Normalise will depend on several factors. Part of the process involves looking
at profile files. However, if the original track was not recorded with SADiE v5.2 or higher, then the profiles
may not be accurate enough. And so for older tracks, the normalise function will trigger a "Recreate profiles"
process. Additionally the normalise analysis itself will take longer if the track is heavily compressed and already
peaking consistently at the same level. Outside of these two conditions, normalise takes between 20 and 50
seconds for every hour of stereo material (44.1K).
There is a Hotkey available for this function.
ENTRY TIMES
This section displays the times at which the in-point, Hotspot and out-point of this particular Entry or Clip
occur in:
1.
The Source Track - the times define what portion of the original recording is being used for this
Entry/Clip.
2.
The EDL - the times define at what time that portion will be replayed and will be blank for Clips in the
Clipstore.
The fade durations are also displayed here as well as the overall duration of the Entry/Clip. Source Duration is
the length of the original Track as it was recorded.
All of the above times (except the source duration) can be altered in the same way as described for fade
durations in the above section.
The values are interactive, following the same logic as Source/EDL Playlist editing. So, for instance, if you
change the Entry duration, the EDL out time will change accordingly.
5:24
SADiE v5.2 DSD Operational Manual
Arranging an EDL
MISCELLANEOUS
Here you can change the name of a Clip/Entry, and write text for dialogue or notes that may be shown
alongside the Clip in the "Comments" area of the Playlist Stream. The Playlist Display section of the Setup
window sets whether dialogue or notes are displayed.
Use the mouse to position the cursor to enter text, or drag across text you want to overwrite.
Five other buttons affect the way the Clip/Entry behaves:
Protects the Entry from having its Source times changed, so it is always the same bit of audio.
Causes all Mixer automation data in the EDL to be ignored for this Entry.
Phase reverses the left or right channel of stereo Clips/Entries (or the whole mono Clip/Entry).
Slip all previous Entries
Slip all following Entries when you write back changes that move this Entry in the EDL. These will
initially reflect the Slip status of the Playlist but can be used to override it when writing back, just like
the Trim editor's Slip buttons.
TEXT EDL
The Playlist is a graphical representation of the EDL. Often, however, it is useful to view and edit the EDL in
text form, as a "cue-list" of Entries to be played, in order.
DISPLAYING THE TEXT EDL
Each Playlist has a Text EDL underneath it, which can be revealed by pressing the TEXT PANE
button, then selecting the tab marked "Text EDL". You can adjust the boundary between the text
pane and the Playlist by dragging it with the mouse.
NOTE: Enlarge the Playlist window by dragging its outer borders if necessary. You can also open the
Text EDL in a separate window; ensure the Playlist is active and then from the "Window" menu select
"New Window" and choose "Text EDL".
5:25
Arranging an EDL
SADiE v5.2 DSD Operational Manual
For each Entry, the Text EDL shows in columns most of the details that would be shown in the Clip Details
window. The display scrolls vertically through the EDL and horizontally through the different columns.
USING THE TEXT EDL
The Text EDL is fully interactive with the Playlist display, and so all the hardware controller functions on the
Playlist will still apply. However, you can perform several operations directly on the Text EDL display with the
mouse:
•
Select Entries by clicking on the Entry number in the "Entry" column. Holding the keyboard Shift key
whilst selecting another Entry selects all Entries between them. Holding the Ctrl key lets you
select/deselect any number of Entries.
•
Start playback from the in-point of any Entry by double-clicking on the Entry number.
•
Stop playback by clicking on any Entry number.
Every Entry detail that can be altered in the Clip Details window described above can also be altered here by
double-clicking on the display in the relevant column. You can even type in a value in dB for the level! Finish
with the Return key, or the Escape key to cancel.
You can navigate inside the Text EDL using the keyboard. Use the up/down/left/right arrows keys to move
through the table. The Enter key opens up a field for editing, and then you can type in new values as above,
press Return to confirm, or Escape to close the field without making a change.
NOTE: The effect of changing EDL times in the Text EDL depends on the LOCK buttons in
the Playlist. For example, when Entries are locked, setting a later start time will trim the
beginning off the Entry, whereas when they are not locked, it will move the Entry in the EDL.
Additionally you can change Streams in the relevant column by typing in the new Stream number, or the lower
numbered of the two Streams for a stereo Entry.
The following details, which relate to the original Track, cannot be changed and are for display only:
5:26
•
Track name
•
Sample Rate at which it was recorded
•
Sample Resolution (in bits per sample) at which it was recorded
•
Offset between its original time in the EDL during recording and its time in the present EDL. (Offset
represents how much out of sync. it is, where sync. is relevant.)
SADiE v5.2 DSD Operational Manual
Arranging an EDL
VIEWING AND PRINTING THE TEXT EDL
CUSTOMISING THE TEXT EDL DISPLAY
You can rearrange the columns in the Text EDL to suit yourself. Right-click on the grey column heading
buttons and select the options that you want from the drop-box. (This works in all of the windows with these
heading buttons, Disk Manager, Clipstore, etc) "Insert Column" inserts a duplicate column, which you can then
redefine by clicking on its heading button and selecting the required display parameter from the list. "Delete
Column" does just that. Dragging the dividers between the heading buttons changes the width of columns. Left
click on the column headings to sort the entries by that heading.
PRINTING THE TEXT EDL
The Text EDL can be printed out as arranged on screen. It will print in exactly the order displayed. This is
available on the "Playlist" menu under "Print Text EDL".
•
"To Printer" prints directly to the printer. Beware that in normal circumstances you are likely to be
displaying far more Text EDL fields than will fit, width-wise on a normal sheet of paper in a normal
(readable) sized font, and therefore you will need to customize the display before printing.
•
"To File..." prints to a text file that can be imported into another application for further manipulation.
The "Printing" section of the Setup window allows you to set the number of characters per line, and also the
delimiting character. This is particularly useful for importing the list into a spreadsheet or database.
WORKING WITH MORE THAN ONE EDL
You may open several Playlists and create EDL's in each of them. This may be useful to create alternative
versions of a piece of work.
To copy an entire EDL from one Playlist to another:
•
Save the EDL in Playlist A.
•
Create a new Playlist B (in the Project window, or the File menu).
•
Load the saved EDL to the paste buffer (under the File menu).
•
Paste it into Playlist B.
•
You now have two identical EDL's and you can make different changes to each of them.
To copy EDL Entries from one Playlist to another:
•
If both Playlists are visible, hold the Ctrl key and the Shift key and drag the Entry from one Playlist to
the other, OR
•
Copy to the paste buffer, make the other Playlist the active window, and then paste into it.
5:27
Arranging an EDL
5:28
SADiE v5.2 DSD Operational Manual
SADiE v5.2 DSD Operational Manual
Editing
6 - EDITING
OVERVIEW
SADiE provides the user with a fast and intuitive interface for editing. With stereo or Multichannel material,
the two (or more) channels are always edited simultaneously if they were recorded together, unless a
stereo/Multichannel EDL Entry is first ungrouped as described under Grouping Entries.
There are four editing techniques at your disposal:
1.
Simple cut-and-splice editing in the Playlist uses the scrub function to accurately locate edit points, and
make "razor-cuts", just as you would on tape. This creates separate EDL Entries so that unwanted
material can then be removed.
2.
Playlist Editing allows you to make and also adjust edits by altering the in-point and out-point of any
Entry. At the same time, you can adjust an Entry's Hotspot.
3.
The Trim Editor is a separate window that works like Playlist Editing, but also provides:
i.
Greater viewing detail - higher magnification of profiles down to waveform level for removing
clicks and microphone pops and the ability to see the profile of the original Track outside the edit
points, e.g. the bits that you're not using at this point.
ii.
The ability to adjust more than one EDL Entry simultaneously. For example, by moving the fade-in
of one Entry and the fade-out of the next Entry together, you can slip the crossfade between
them along the audio. Many other possible combinations are equally useful.
iii. The ability to "top and tail" a Clip from the Clipstore, and to create a new Clip from an existing
Track.
4.
Region Editing - other editing methods are entry based, but region editing is useful for cutting, copying
areas that haven't yet been defined as entries. You can for instance use region editing to remove a
complete section of the Playlist across all streams.
All edit functions can be achieved by using both the Hardware Controllers and the mouse. You will find that
the hardware controls often provide a quicker method of editing, particularly for repeated actions, but there
may be some times when it is appropriate to use the mouse instead. The following sections describe the edit
functions from both perspectives.
SYNC OR NON-SYNC EDITING
If you work in an audio-only field like radio, when you cut out material, you will usually want to slip everything
else along the EDL to fill up the gap, like joining up two bits of tape. Enabling SLIP will do this for you. For
safety, pre-select both left and right Slip (see Placement of Entries).
If you are working to picture and for some music applications, much of the time you are likely to want your
audio material to be fixed to the EDL so that it remains in sync. This means you will have SLIP off. But you can
enable slip on some streams by enabling/disabling streams to perform edits that require this.
SADiE makes it easy for you to work either way, and to switch between modes as necessary.
6:1
Editing
SADiE v5.2 DSD Operational Manual
FADE SHAPES
Whenever you make a "razor-cut" to divide an EDL Entry into two, you will actually create a new fade-out and
fade-in at that point. SADiE can do this in either of two ways. These are set in the "Playlist" section of the
Setup window.
•
Splice-cut mode - the fade-out and fade-in overlap to make a perfect crossfade. This will undoubtedly
be what you want to do normally.
•
V-cut mode - the first Entry fades out before the next starts to fade in, so there is no overlap. This is
really only necessary when you are reaching the DSP limit of how many Entries SADiE can play at
once. This obviously creates a "drop-out", although it is often not noticeable in clean speech if you are
laying music or effects underneath.
The default fade lengths and curve types that are created when you make a razor-cut can be set in the "Default
Crossfade" section of the Setup window. A standard default of 20 milliseconds/40 timecode subframes/1 CD
frame (the "General" Setup section sets how times are displayed) and a linear curve will give smooth edits for
most purposes. For repeated fine editing, like removing clicks and pops, you might want to reduce this to less
than 5 milliseconds. If you are just doing the occasional fine edit, you don't need to change the default, as each
crossfade time is easily adjusted in the Trim Editor or Clip Details window.
NOTE: Zero-length crossfades are likely to cause clicks and are best avoided.
There are 117 possible fade shapes. These are:
Cos
(+01 and -01)
Cosine
Cosh
(+01 and -01)
Hyper Cosine
Exp
(+01... +16 and -01... -16) Exponential
Linear
(Just linear)
Log
(+01... +16 and -01... -16) Logarithmic
Pow
(+01... +16 and -01... -16) Power
S
(+01... +16)
Linear
S shaped
These are selected in the drop-down boxes in the Clip Details window. The Trim Window allows the
"dragging" of Log, Pow, Exp and S fade shapes to different "depths", as well as saving and loading of fade shapes
to and from a file.
Most of the curves have a corresponding opposite curve (denoted by a minus sign), which will provide an equal
power crossfade when the two are used together. For example if Log (+08) is combined with Log (-08) for a
crossfade then the crossover point of the edit will be -3 dB.
The Pow set of curves is based on: y = x^p (0 >= x <= 1).
The value of p is a constant for a specific curve and varies from 7/6 to 22/6 in steps of 1/6 over the set Pow
(+01) to Pow (+16).
Older versions of SADiE had only 20 curves, and SADiE will automatically converts users' default crossfade and
EDL conversion settings to the new regime. Old EDL's are also upgraded on loading.
6:2
SADiE v5.2 DSD Operational Manual
Editing
EDITING IN THE PLAYLIST WITH HARDWARE CONTROLLERS
BASIC EDITING
CUT AND SPLICE EDITING
1.
2.
First disable any Streams you do not want to cut on:
i.
Select STREAM and use the wheel or PREVIOUS/NEXT to highlight a Stream, then hit
EDIT/SELECT to enable/disable it. SHIFT + EDIT/SELECT acts on the group of Streams
above the highlighted one which are all the same status.
ii.
Deselect STREAM (and make sure you do not have CLIP or ZOOM selected either).
Use the SCRUB button to select jog, shuttle or move cursor modes (indicated by the small LED's
next to the wheel) and locate your edit point with the wheel.
i.
"Jog" is the equivalent of rocking the reels of a tape recorder back and forth: The more you move
the wheel, the more audio you hear.
ii.
"Shuttle" is the equivalent of spooling the tape across the heads; the more you move the wheel,
the faster the audio goes forward or backwards.
iii. "Move cursor" mode (all LED's off) lets you quickly locate the current-time cursor without
audible scrubbing.
iv. There are also Hotkeys for three fixed forward and reverse scrub speeds and a scrub-pause.
These can be assigned to the keyboard, or the hardware controller's function buttons, under "Edit
Controls" in the "Hotkey" section of the Setup window. The default keys are on the keyboard's
number pad. The speed for each Hotkey can be set in the Scrub Setup section of the Transport
Controls, Setup window.
NOTE: You will hear all Streams that are not muted, so you may choose to solo the
relevant Stream(s). Use SHIFT + MUTE above the hardware faders. If you are using machine
control of a VTR, hit ONLINE to scrub the picture in sync.
3.
Press the RAZOR button. The Entry/Entries on enabled Streams will be divided under the currenttime cursor.
NOTE: If you are trimming an Entry's top or tail, you can now simply remove the new Entry to
the left or the right of the razor-cut. If you are removing material internally, you will need to
make two razor-cuts so that you can remove the new Entry between them.
4.
Select the relevant Entry by moving the current-time cursor over it and pressing EDIT/SELECT and
remove it by pressing CUT. If you have SLIP on, the resulting gap will be automatically joined up.
5.
Play the finished edit by moving the cursor back a bit and pressing PLAY. If you don't like it, use
UNDO and do it again or adjust it using Playlist Editing Mode.
6:3
Editing
SADiE v5.2 DSD Operational Manual
PLAYLIST EDITING MODE
In this mode, when an entry is selected in the Playlist, it will change to a waveform profile and its In and Out
points and Hotspot can be adjusted.
Playlist Editing has the following uses:
•
After making a razor cut as described above, by adjusting the out-point of the preceding EDL Entry,
and the in-point of the next, you can remove (or repeat) material at the edit point. The initial razorcut doesn't even have to be that accurate, as the adjustment will fine-tune the edit.
NOTE: If you are using the razor to make cuts "on-the-fly" during normal speed playback, you
may want to use the option in the Playlist section of the Setup window which stops playback
when you make a cut.
•
You can adjust an existing edit.
•
You can adjust the join between two unrelated EDL Entries, such as the way a music Entry fades and
speech starts over it.
•
You can adjust an Entry's Hotspot.
There are six possible adjustments, from selecting IN, HOT, or OUT and either EDL or SOURCE mode.
(Source mode is with the button LED on.)
EDL
The EDL time of the IN or OUT point of the Entry is adjusted, as well as its time in the source
Track. This will be most used when working to picture, as the profile (and so the audio) is fixed to
the EDL, and sync is maintained. The Hotspot can be moved without moving the audio.
SOURCE The IN or OUT point being adjusted remains at the same EDL time, but it's time in the
SOURCE Track is adjusted by slipping the profile. This will be most used for sound-only editing.
With HOT selected, the whole entry can be moved and will scrub across the current-time cursor.
1.
First select the edit point to be adjusted: IN, OUT, or HOT.
2.
Next select the entry to be adjusted by using the wheel to move the current-time cursor over it and
pressing EDIT/SELECT. As an edit point is already selected, this will activate Playlist Editing on that
Entry, which will turn brighter red, and the "Edit" LED by the wheel will flash.
NOTE: If you have Entries on several Streams at this point, you will be selecting the one on the
lowest numbered, enabled Stream. If necessary, disable Streams as described for cut-and-splice
editing. If you have just made a razor-cut, you will have done this already. To avoid disabling
Streams, select the Entry by pressing EDIT/SELECT or PREVIOUS/NEXT repeatedly to cycle
through all Entries under the cursor, select IN, HOT, or OUT, and finally press EDIT/SELECT
again to activate Playlist Editing.
3.
Adjust the edit point with the wheel. The SCRUB button will select:
i. "Jog" mode - the more you move the wheel, the more audio you hear.
ii. "Shuttle" mode - the more you move the wheel, the faster the audio goes forward or
backwards.
iii. "Move" mode (no LED permanently on) - quick adjustment without audible scrubbing. This is
sometimes useful if you can tell from the profile exactly what you want to do.
6:4
SADiE v5.2 DSD Operational Manual
Editing
You can also adjust the edit with various Hotkeys, which may be assigned to the keyboard or the
Hardware Controller function buttons under "Edit Controls" in the "Hotkey" section of the Setup
window:
i. "Nudge Edit Point" Hotkeys will adjust the edit in small increments which are pre-set in the
"Trim Edit Nudge" section of the Setup window.
ii. There are three fixed scrub speed Hotkeys for forward and reverse adjustment, and a scrubpause key. The default keys are on the keyboard's number pad. The speed for each Hotkey
can be set in the Scrub Setup section of the "Transport Controls", Setup window.
NOTES: Shuttle is useful for losing large amounts of material at an edit point, just like dumping
tape onto the floor. The time displays on the controller will indicate the time at which the
selected edit point occurs in the Source Track and in the EDL. When moving a whole Entry
(HOT + SOURCE), an on-screen display on the Stream will show the EDL in and out times. If
SLIP is on, whether previous or subsequent Entries move when you finish an edit is determined
by which Slip mode is pre-selected and which Streams are enabled to be slipped (see Placement
of Entries).
4.
Press PREVIEW to play across the edit point with the pre and post-roll times set in the Setup
Window (under "View" on the menu bar). Note that alternative pre and post-roll times can be set in
the Setup window.
5.
Press EDIT/SELECT again to turn Playlist Editing off and confirm the edit, or select other entries
with NEXT and PREVIOUS.
IN PRACTICE Playlist Editing is much quicker to do than to read about!:
•
For most non-sync editing (SLIP and SOURCE on), in your chosen SCRUB mode locate the edit
point with the wheel, press RAZOR to make a cut, move the cursor back a bit, hit OUT, then
EDIT/SELECT. Adjust the left side of the edit with the wheel then press NEXT and adjust the right
side.
•
Edit sync material in the same way with SLIP off and in EDL mode. For extra safety, you will have
LOCK on as well.
Generally it is safest to confirm each edit by pressing EDIT/SELECT to turn Playlist Editing off. You are then
free to use the wheel without accidentally re-adjusting the last edit.
FADES AND CROSSFADES
To adjust the length of fades IN or OUT, and overlap them to create crossfades, press CROSSFADE to
move the inner point (e.g. the end of a fade-in or the start of a fade-out) and SHIFT + CROSSFADE to
move the outer point (the start of a fade-in or the end of a fade-out).
The type of fade curve can be altered in the Clip Details window for the Entry, or in the Text EDL.
Greater flexibility for adjusting crossfades may be possible with the Trim Editor.
Further details on the use of Hardware Controllers can be found in Hardware Controller Functions.
6:5
Editing
SADiE v5.2 DSD Operational Manual
EDITING IN THE PLAYLIST WITH A MOUSE
BASIC EDITING
RAZOR OR SCISSORS?
Mouse users have the option of using the "scissors" to make razor-cuts.
Whereas the RAZOR-CUT button always cuts at the current-time cursor, when you press the
SCISSORS button, the mouse-pointer will change into a dinky scissors icon with a cross to show the
target point. You can then make a freehand cut anywhere in the Playlist (useful if you can see where
to cut from the waveform profile) and so skip the process of scrubbing to locate the edit point.
The following editing instructions describe scrubbing to locate and then using the razor-cut, but remember that
the scissors have the same function.
CUT-AND-SPLICE EDITING
Edit Tab
Scrubwheel
1.
Display the Edit section of the Transport Controls by clicking on the tab at the top.
2.
Click and hold the mouse button over the Scrubwheel and drag it to scrub the current-time cursor
along the EDL:
i.
Moving the mouse up/down gives you forward/reverse shuttle. The more you move from your
original position, the faster it goes. This is like spooling tape against the heads.
ii.
Moving the mouse right/left gives you forward/reverse jog. The more you move, the more you
hear. This is like nudging a tape machine's reels back and forth.
You can move between jog and shuttle modes without releasing the mouse button.
NOTE: You will hear all Streams that are not muted, so you may choose to
relevant Stream(s) with the small Stream control button.
SOLO the
NOTE: If you are using machine control of a VTR, hit ONLINE in the Transport Controls to
scrub to picture.
NOTE: Don't position the Scrubwheel too near the top or bottom of the screen, or it will
restrict the amount of movement you have for shuttling.
Locate your edit point and release the mouse button.
6:6
SADiE v5.2 DSD Operational Manual
Editing
There are also Hotkeys for three fixed forward and reverse scrub speeds and a scrub-pause. These
are assigned to the keyboard under "Edit Controls" in the Hotkey section of the Setup window. The
default keys are on the keyboard's number pad. The speed for each Hotkey can be set in the "Scrub
Setup" section of the "Transport Controls", Setup window.
3.
Before you make a razor-cut you should disable any other Streams that have EDL Entries at this point
STREAM NAME button enables/disables Streams for cutting.
that you don't want to edit. The
Disabled Streams are darker grey.
Press the RAZOR CUT button. The Entry/Entries on enabled Streams will be divided under
the current-time cursor.
4.
If you are trimming an Entry's top or tail, you can now simply remove the new Entry to the left or the
right of the razor-cut. If you are removing material internally, you will need to locate and make a
second razor-cut so that you can remove the new Entry between them.
5.
Select (by clicking on it) the relevant Entry and remove it (CUT TO PASTE). If you have SLIP on,
the resulting gap will be automatically joined up.
6.
Play the finished edit by double-clicking in the time bar just before it. If you don't like it, use UNDO
and do it again or adjust it using Playlist Editing Mode.
PLAYLIST EDITING MODE
In this mode, when an entry is selected in the Playlist, it will change to a waveform profile and its In and Out
points and Hotspot can be adjusted.
Playlist Editing has the following uses:
•
After making a razor or scissors cut as described above, by adjusting the out-point of the preceding
EDL Entry, and the in-point of the next, you can remove (or repeat) material at the edit point. The
initial razor-cut doesn't even have to be that accurate, as the adjustment will fine-tune the edit.
NOTE: If you are using the razor to make cuts "on-the-fly" during normal speed playback, you
may want to use the option in the Playlist section of the Setup window which stops playback
when you make a cut.
•
You can adjust an existing edit.
•
You can adjust the join between two unrelated EDL Entries, such as the way a music Entry fades and
speech starts over it.
•
You can adjust an Entry's Hotspot.
Edit Nudge
Edit point time display
Scrubwheel
Audio Scrub button
Preview Buttons
Mouse Edit Selection
6:7
Editing
1.
2.
3.
SADiE v5.2 DSD Operational Manual
Display the Edit section of the Transport Controls by clicking on the tab at the top.
Activate PLAYLIST EDITING mode with this button on the Playlist toolbar.
With the mouse, select the Entry on whichever side of the edit point you want to adjust. The Entry
turns a brighter red.
NOTE: The AUDIO SCRUB button needs to be down if you want to hear the edit point as
you adjust it. With the button up, adjustment will be faster, as SADiE doesn't have to output
the audio. This is sometimes useful if you can tell from the profile exactly what you want to do.
4.
With the MOUSE EDIT SELECTION button down (the default position), depending where you
point the mouse over the Entry, a handy little graphic at the mouse pointer will appear to tell you
which bits of the Entry are going to move. When you click the mouse button, the IN, HOT, OUT
and EDL/SOURCE buttons automatically select what will be adjusted as follows:
Mouse Graphic Point Selected Mode Selected
Operation
In
EDL
Fade-in moves
In
Source
Body and Fade-out move
Hot
EDL
Hotspot moves
Hot
Source
Whole Entry moves
Out
EDL
Fade-out moves
Out
Source
Fade-in and Body move
The mouse graphic is probably enough to tell you what will happen when you edit, but if you ever
want to manually select the editing adjustment by turning MOUSE EDIT SELECTION off (for
example, to move the Hotspot when it coincides with the in point), a description of the two modes
may be useful:
EDL Mode: The EDL time of the In or Out point of the Entry is adjusted, as well as it's time
in the Source Track. This will be most used when working to picture, as the profile (and so
the audio) is fixed to the EDL and sync is maintained. The Hotspot can be moved without
moving the audio.
SOURCE Mode: The In or Out point being adjusted remains at the same EDL time, but it's
time in the Source Track is adjusted by slipping the profile. This will be most used for soundonly editing. With HOT selected, the whole entry can be moved and will scrub across the
current-time cursor.
5.
When you have the mouse graphic you want, click and drag the mouse over the Entry profile, to
either jog or shuttle it, as described in Cut-and-Splice Editing. When you release the mouse button,
the edit adjustment is done!
You can also adjust the edit in small increments by "nudging" it with the EDIT
NUDGE buttons in the "Edit" section of the Transport Controls or buttons above the
Scrubwheel. The nudge steps are set in the "Trim Edit Nudge" section of the Setup
window. There are two settings:
i.
Pressing the buttons.
ii.
Holding Alt. while pressing the buttons.
The buttons can be pressed repeatedly, or held down. You will not hear the audio
when using them.
6:8
SADiE v5.2 DSD Operational Manual
Editing
NOTE: Shuttle is useful for losing large amounts of material at an edit point, just like dumping
tape onto the floor, but you don't have to worry about stepping on it.
NOTE: Whether previous or subsequent Entries move when you release the mouse button
will be determined by whether you have selected a SLIP mode and which Streams are enabled
to be slipped (see Placement of Entries).
NOTE: The time display in the Transport Controls edit section will show you the time of the
In/Hot/Out point being adjusted in either the EDL or the Source Track, and both of these (or
the new duration) appear alongside the Entry profile on the Stream. When moving the whole
Entry, the Stream display shows EDL in and out times.
6.
To hear the edit you can either play it normally, by double-clicking in the time bar just before it, or
use the preview buttons, which play a pre-set amount either side of the edit point:
PLAY THROUGH EDIT plays through the edit.
PLAY TO EDIT plays just the left-hand side of the edit and
PLAY FROM EDIT plays just the right-hand side. TO and FROM can be useful for
assessing which side you still need to adjust.
PREVIEW EDIT will play the selected EDL Entry, from one edit point to the next.
You can cancel a preview while it is playing with a second press of its button.
There are three pre-roll and post-roll lengths available by pressing:
i. Only the preview button.
ii. Shift + the preview button.
iii. Ctrl + the preview button.
The lengths of each are pre-set in a dedicated section of the Setup window.
IN PRACTICE Playlist Editing is much quicker to do than to read about:
•
Normal non-sync editing (SLIP on) means making a cut, hitting the PLAYLIST EDITING button,
selecting and adjusting the left side of the edit with
, then selecting and adjusting the right side
.
with
•
Editing sync material (SLIP off) will usually mean doing the same to trim the ends of Entries with
. For extra safety, you will have LOCK ALL ENTRIES on as well.
and
FADES AND CROSSFADES
There are four more mouse symbols which let you increase the length of the fades at the in and out points by
dragging out the start or the end of each fade. Overlapping them will create crossfades.
Hold the keyboard Ctrl key as you move the mouse over the edit point:
6:9
Editing
SADiE v5.2 DSD Operational Manual
Mouse Graphic
Click and Drag
Start of the Fade-in
End of the Fade-in
Start of the Fade-out
End of the Fade-out
The type of fade curve can be altered in the Clip Details window for the Entry, or by holding the keyboard Alt
key, or Alt + Shift keys as you move the mouse over the edit point (as in the Trim Editor):
Mouse Graphic
Click and Drag
Fade-in Shape
Fade-out Shape
Greater flexibility for adjusting crossfades may be possible with the Trim Editor.
EDITING IN THE PLAYLIST WITH HOTKEYS
QUICK EDIT
There are three main Hotkeys available (found under Playlist section of Hotkeys setup):
•
Clip In-point to current time
•
Clip Out-point to current time
•
Clip Hotspot to current time
These act on a single selected clip in the Playlist and will move the Clip's In-point, Out-point or Hotspot to the
current time cursor, without slipping the audio. Thus if you press "Clip In-point to current time" whilst the
current time is inside a selected clip, this is much the same as making a razor cut on that clip and deleting the
first of the two clips that are produced. In other words, this will perform an "IN-EDL" style Playlist edit without
having to open the Playlist edit function. And if the current time is positioned outside the clip, then the clip will
be extended to that new position (if enough source audio exists).
Note also that this works during record. Pressing the "Out" key when recording will finish the clip that was in
record, and start a new clip (which automatically becomes selected in preparation for a new "Set In/Out"
action). Pressing "In" during recording moves the in point of the "growing" clip. Note this does not make a new
track; it's similar to (but perhaps a bit more elegant than) the method of razoring to split clips during recording.
To smooth the operation of these functions during record, there is a Setup option (under Playlist/Playlist Entry
Display) called "Auto-select recording clip on entering record". This will save you having to click on the clip
that is "growing" in the Playlist.
There are two additional Hotkeys available for this way of editing:
6:10
•
Clip In-point fade to current time
•
Clip Out-point fade to current time
SADiE v5.2 DSD Operational Manual
Editing
These again act on a single selected clip in the Playlist and will move the inside edge of the Clip's In-point fade,
or Out-point fade to the current time cursor, without slipping the audio. Thus if you press "Clip In-point fade
to current time" whilst the current time is inside a selected clip, the end of the fade in will jump to the current
time, thus shortening the clip. If the current time is positioned outside the clip, then the clip will be extended
to that new position (again, if enough source audio exists). This can be particularly useful for aligning a
crossfade.
These "Quick edit" keys can be used in conjunction with a set of "Snap" Hotkeys so as to perform a quick "top
and tail" operation and then move the edited clip to a new position. Another important Hotkey for this type of
editing is the "Locate to time..." Hotkey found in the Transport Controls section of the Hotkey setup. This
opens the time box in the Transport Controls to allow quick movement to another time.
For example, you have dropped a rough clip into the Playlist that needs to be synchronised to a video event
(although of course there are a number of uses for these facilities).
1.
Select the clip in red
2.
Scrub or otherwise position the current time to the beginning of the audio (i.e. mark the top)
3.
Press the key for "Clip In-point to current time" deletes the rough start of the clip.
4.
Similarly scrub or position to the end of the audio and use "Clip Out-point to current time" to edit
the tail of the clip.
5.
Now scrub or position the current time over the Audio sync point (a clapper or audibly recognisable
event) and press "Clip Hot-spot to current time" key.
6.
Now press Online, and scrub the picture to the Video sync point that matches the Audio sync point
(Hot-spot) you've just marked.
7.
Now press the Hotkey for "Snap entry hotspot to current time" and the clip will jump to match the
video and audio sync points.
This procedure, or variants of it can be used to provide a number of speedy and tidy "edit and place" functions,
whether or not your application is synchronising to picture.
The "Snap" keys are set under Setup/Hotkey Setup/Playlist and are called: "Snap entry fade in point to current
time"; "Snap entry hotspot to current time"; "Snap entry in point to current time"; and "Snap entry's end to
current time".
TRIM EDITOR
OVERVIEW
The Trim Editor can be opened and loaded with one or more Entries/Clips from the Playlist /Clipstore and the
in and out points and fades adjusted. You then "Write-back" the edited version to the Playlist/Clipstore.
You might load it with one Clip or Entry:
•
To "top and tail" a Track selected in the Clipstore and store it back there as a new Clip for later use.
•
To top and tail a single Playlist Entry, removing unwanted material either side of a bit of dialogue, for
instance.
•
When you want to search through a Track to define a new Clip; say you need to grab a breath or a
word. In this instance you will probably load the Trim Editor from the Track in the Clipstore, define
the new Clip and paste it straight into your EDL.
6:11
Editing
SADiE v5.2 DSD Operational Manual
You might load it with two Entries from the Playlist:
•
To make fine adjustments to an edit. All edits are a join between two Playlist Entries, so it is the
Entries either side of the edit that will be loaded.
•
To adjust any other join between two Entries. For example, how a piece of music fades down under a
voice-over, or how one piece of atmosphere crossfades into the next.
You might load it with three Entries:
•
To work on an edit point in some dialogue that has music running underneath.
•
When you feel really clever! Any more than three Entries is getting quite ambitious.
OPENING THE TRIM EDITOR
From the Playlist or the Text EDL:
•
•
Select the Entry or Entries you want load into the Trim Editor. Selecting Entries is described fully in
Arranging an EDL. They do not have to be adjacent, or on the same Stream.
Press the OPEN TRIM EDITOR button on the Playlist toolbar, or the designated
function button on the hardware controller.
From the Clipstore:
•
•
Select the Clip that you want to load.
Press the LOAD CLIP TO TRIM EDITOR button on the Clipstore's toolbar.
On the hardware controller, you can designate two Hotkey commands to function buttons: one to open the
Trim Editor, and another to load the selected Clip in the Clipstore.
A Trim Editor window will now appear containing the Entries or Clips that you loaded:
6:12
SADiE v5.2 DSD Operational Manual
Editing
1
2
3
4
7
8
5
6
9
1.
2.
3.
4.
5.
EDL Time Bar
Time relative to edit
Selected clip highlighted
Load buttons
Write-back buttons
6.
7.
8.
9.
Paste buffer buttons
Preview edit
Preview selected clip
Crossfade Details
In the example above, two Entries have been loaded from the Playlist: a stereo Entry called "Music", followed
by a mono Entry called "Voice". The right channel of "Music" is displayed below "Voice" so that you can zoom
in on just one channel of each Entry, which is generally clearer and quite sufficient for editing. This viewing
order can be changed; see Other Trim Editor Tools at the end of this chapter.
The main difference in the way the Clips are displayed here is that because each is drawn on a different line,
the profile of the whole Track that it comes from can be shown. The parts that are being used, and will be
played as Playlist Entries, are in green, and the parts not being used are shown in grey.
This makes it possible to see what you are losing as well as what you are keeping in, which can aid editing
decisions, since the grey bits are always available to be pulled back into the green side of an edit point.
The Trim Editor has the following features in common with the Playlist:
•
An EDL time bar, which you can use to start and stop playback. Unlike the Playlist, the current-time
cursor ("playback head") is fixed in the middle of the window while the waveform profile of the audio
scrolls past. There is also a second time bar, which shows time relative to the edit point.
NOTE: In the case of Clips loaded from the Clipstore, the EDL time bar will show the "time
stamp" given to the source Track when it was recorded into SADiE.
•
Scrollbars to move the display horizontally and vertically.
•
Magnification buttons to zoom in or out of the display. Greater magnification is possible here than in
the Playlist.
6:13
Editing
SADiE v5.2 DSD Operational Manual
NOTE: When the Trim Editor is the active window, a "Trim" menu appears on the menu bar.
This allows you to change profile types to find one more suitable to the audio you are working
with, and to jump between zoom magnification levels. There is also the "User Zoom" function,
described below, under Other Trim Editor Tools.
•
A small time display showing the mouse pointer position. The current-time display in the Transport
Controls will show current EDL time for an active Trim Editor.
CROSSFADE DETAILS
A "Two-clip" Trim window will also display the Clip level for both clips, plus the fade shape and duration for
the outgoing (top) clip's fade out and the incoming (bottom) clip's fade in, positioned to the left and right side
respectively of the bar near the bottom of the Trim. This avoids the need to open Clip Details windows to
adjust these common parameters. A "One-clip" Trim window will have the clip level knob and details for both
fade in and fade out. This bar will not appear at all if more than two clips are in the Trim window.
There is also a display on this bar (if you have two clips loaded) which displays the "dB down point" of the
cross fade. The "dB down point" is the fade curve value at the point where the fade in and out curves cross
each other.
If any of these displays are not visible, stretch your trim window horizontally.
SELECTING WHAT TO ADJUST
Editing in the Trim Editor is just like using Playlist Editing mode, with the additional ability to adjust more than
one Clip or Entry at once.
NOTE: As the Trim Editor can move Entries in the Playlist, just like Playlist Editing, you need to decide
whether to have the Playlist SLIP function on or off. However, SLIP is disabled when you have more
than two Entries in the Trim Editor, as determining which one takes precedence is far more complex. If
you need the Slip function in this circumstance, use Playlist Editing.
All Clips in SADiE have three parts: a fade-in, a body and a fade-out. (Unless deliberately lengthened, the fades
will be very short, the usual default time being 21 milliseconds.) Adjustments in the Trim Editor are made
moving any of these parts in relation to the time shown in the time bar.
To select which parts of which Clips will move, either:
•
Select them directly by clicking on the required parts of the profile, OR
•
Highlight the required Clip (it will be shown with a grey background) by clicking anywhere
on its profile. Then select the required parts on the "blade" shaped Clip icon at the bottom
of the window. This icon allows you to select fades when they might be too small to point
at on the profile:
Fade-in
Body Fade out
With nothing selected, all parts are green on icon and profile.
Hold the Shift key whilst selecting parts of Clips to:
6:14
SADiE v5.2 DSD Operational Manual
Editing
d them to those already selected to be moved, OR
•
Deselect them from those you have selected to move.
NOTE: The Edit section of the Transport Controls can also be used to control the Trim
Editor, and is fully interactive with it. The IN, HOT, OUT, and EDL/SOURCE buttons will
select the corresponding parts of Clips that would move in Playlist Editing. They also move
the display to the selected edit point.
AUTOMATIC SELECTIONS
In order to speed up the most common tasks, when two Clips are in the window, these selections are
made automatically when using a mouse:
•
Selecting the earlier Clip selects it's fade-in and body (like adjusting out-point in Playlist
Source Mode).
•
Selecting the later Clip selects it's body and fade-out (like adjusting in-point in Playlist Source
Mode).
•
Selecting the fade-out of the earlier Clip or the fade-in of the later Clip selects both, e.g. the
crossfade between them can be slipped against the audio.
Hold the Shift key while selecting if you want to override the above and select only the part you are
pointing to.
Using the hardware controller to control the Trim Editor follows the same rules as editing in the
Playlist. Select the Clips with the PREVIOUS and NEXT buttons, or CLIP + the wheel, and select
IN, OUT, or HOT points in EDL or SOURCE mode to select the corresponding parts of clips.
Note also that pressing the SHIFT key before PREVIOUS or NEXT will add to the selection, e.g.
if IN- EDL mode is selected on the right hand clip, SHIFT + PREVIOUS will add the left hand clip's
OUT point; in other words, with two clips this selects the whole Edit point.
When selected, fades turn dark blue and Clip bodies turn dark red, on both the icon (which is always
representing the highlighted Clip) and the Clip profiles. Here are some examples:
Body and fade-out will move. Same as adjusting IN-point in SOURCE mode
.
Fade-in selected to move. If selected on one Clip only, same as adjusting IN-point in EDL mode
.
Body only will move, thus adjusting what part of the source audio is used between fixed in and
out points.
Whole Clip will move in relation to EDL time. Same as HOT + SOURCE
.
ADJUSTING THE EDIT
Once you have selected which parts to move, use the mouse or hardware controller wheel to move them, as
in the Playlist. The mouse can be used either over the selected Clip's profile, the "blade" Clip icon, or the
Scrubwheel in the Transport Controls.
NOTE: For mouse users, using the IN and OUT buttons and Scrubwheel in the Transport Controls is
the easiest way of moving in and out points in EDL mode.
To hear the audio as it moves across the edit point, press the AUDIO SCRUB button (this is
available in the Trim Editor as well as the edit section of the Transport Controls). Then move the
6:15
Editing
SADiE v5.2 DSD Operational Manual
mouse left and right to jog, and up and down to shuttle. On the hardware controller use the SCRUB
button to select jog or shuttle mode for the wheel.
For fine adjustment, you may prefer to use the EDIT NUDGE buttons, which will move the selected
parts in fixed steps that you can set in the Trim Edit Nudge section of the Setup window. There are
two settings: pressing the buttons, or holding Alt. while pressing the buttons.
These duplicate the edit nudge buttons in the Transport Controls and can be pressed repeatedly, or
held down. You will not hear the audio when using them.
To hear the results of your adjustments, you can either:
•
Start playback from any point in the time bar (on the hardware controller when no edit points are
selected, the wheel will position the display and then you can use the PLAY button), OR
•
Use any one of the following preview buttons, which have the advantage of playing you a pre-set
amount either side of the edit point and then returning the display to it.
The top three preview buttons duplicate those in the Transport Controls edit section, which are also used for
Playlist Editing mode:
PLAY THROUGH EDIT plays through the edit.
PLAY TO EDIT plays just the left-hand side of the edit.
PLAY FROM EDIT plays just the right-hand side. TO and FROM can be useful for assessing which
side you still need to adjust.
NOTE: There are three pre-roll and post-roll lengths available by pressing: only the preview button,
Shift + the preview button, or Ctrl + the preview button. The lengths of each are pre-set in a dedicated
section of the Setup window.
NOTE: The PLAY THROUGH preview is the one that lets you hear how the edit will sound in the
Playlist. It also usefully resets the display to the edit point. The PLAY TO and PLAY FROM previews
are useful for determining which side of the edit unwanted sounds may be.
The next three preview buttons play only the selected (highlighted) Clip, including it's out-takes (the grey bits):
PLAY SOURCE THROUGH EDIT plays through the edit.
PLAY SOURCE TO EDIT plays just the left-hand side of the edit.
PLAY SOURCE FROM EDIT plays just the right-hand side. TO and FROM can be useful for
assessing which side you still need to adjust.
You can cancel a preview while it is playing with a second press of its button
The loop button will cause the selected preview action to repeat continuously. You can continue to
make adjustments while the preview is repeating.
There are also some special function preview buttons:
Play Out-takes - this plays the grey parts of the clips around the edit point. This allows you to hear
the sections you are "throwing away" for comparison.
6:16
SADiE v5.2 DSD Operational Manual
Editing
Play entire track mode - this button can only be pressed when a single clip is in the Trim Editor.
When pushed in, you will hear the whole source track, both coloured and grey areas, when playing or
previewing in Trim.
Preview in context - when pressed, all previews will include the other audio in the source EDL as well
as the current contents of the Trim Editor.
When you are happy with the adjustments, WRITE-BACK what you have done, as described below.
TOPPING-AND-TAILING AND DEFINING NEW CLIPS
When you load only one Clip into the Trim Editor, you can top-and-tail it by adjusting it's in and out points
with the mouse or hardware controller wheel in the usual way. Use the IN and OUT buttons (in the
Transport Controls or on the Hardware Controller) to select which you are adjusting.
To define a totally new Clip, load the Trim Editor with the Track from which the Clip is to come. You can do
this either by loading the whole Track from the Clipstore, or by loading a Playlist Entry, which contains the
required bit of the Track.
The DRAW CLIP button turns your mouse pointer into a pencil symbol. Drag it along the
waveform profile from the new in-point to the new out-point to define a new Clip. Right clicking will
turn this function off.
You can make fine adjustments by top-and-tailing the new Clip before giving it a new name (see below) and
writing it back to the Clipstore, or pasting it into the Playlist.
NOTE: DRAW CLIP is only available when there is a single Clip in the Trim Editor.
A similar result can be achieved by the different method of marking the IN, HOT and/or OUT
points "on-the-fly" whilst playing. There are three Hotkey-only functions that are assigned in the
"Trim" page of the "Hotkey" section in the Setup window:
•
Set In-point to current time
•
Set Hotspot to current time
•
Set Out-point to current time
Pressing these while playing one clip in the Trim window (or whilst in stop also) will set the respective
edit point to the current time. The default setting for these functions is F7, F8 and F9 on the
keyboard.
When happy with the adjustments, WRITE-BACK as described below.
The drawing of clips and marking of edit points "on-the-fly" are useful ways to prepare a clip before you drop it
into the Playlist.
For instance you may be cutting out a sound effect from the larger track in which it was recorded. So, you may
load the raw track into the Trim window, playing and marking it's start and finish with the "Set In-point etc."
functions, and then writing the edited clip into the Playlist once it is tidy.
To help with this method, there is another "Trim" Setup option called "Write back single clips with Autoplace",
so after preparation of clip in the Trim Window, you would move back to the Playlist, and mark the position
for the new clip in the Playlist by scrubbing to that position and enabling/disabling streams appropriately. Set
"Autoplace to Now", or maybe "Hot-Now", and then pressing the WRITE-BACK button automatically places
the new sound effect at the position you've marked in the Playlist, with respect to the start point, (or Hotspot
if that's the Autoplace mode you're using).
6:17
Editing
SADiE v5.2 DSD Operational Manual
You can see that the Trim Window behaves slightly differently when it contains just one clip and the DRAW
CLIP, SET IN POINT, and WRITE BACK WITH AUTOPLACE functions become available These are
specifically designed to speed up this process of preparing and spotting effects.
ADJUSTING THE HOTSPOT
The Hotspot of each Clip is shown as a vertical red line, which can be moved:
By positioning the mouse over it and, when the pointer changes to a
double arrow,
dragging it to a new position. The small time display will show the time you are setting.
•
•
By selecting HOT and EDL mode, and using the Scrubwheel in the Transport Controls.
By selecting HOT and EDL mode and using the wheel.
•
•
In the Clip Details window.
When you are happy with the adjustment, WRITE-BACK what you have done, as described below.
RENAMING CLIPS
Double-click on the Clip name. A box will appear in which you can edit the name before writing the Clip(s)
back:
FADES AND CROSSFADES
The lengths of fades of Clips in the Trim Editor can be adjusted:
1.
By setting numerical values for them in the Clip Details window.
Graphically, with the mouse on the profile display:
2.
i.
At each in/out point there is actually a fade-in or fade-out (however short) and these fades have a
start and an end.
ii.
Move the mouse pointer over the fade. It will change to a
double arrow.
iii. You can then move the start of a fade to the left and the end of a fade to the right, so lengthening
the fade and setting it to where you want over the audio.
3.
By pressing CROSSFADE to move the inner point (e.g. the end of a fade-in or the start of a
fade-out) and SHIFT + CROSSFADE to move the outer point (the start of a fade-in or
the end of a fade-out).
Fades can also be edited around their mid point by holding down the control key; Ctrl + dragging the start/end
of a fade in/out, will also change the fade out/in edge's position.
Fades are shown in lighter green on the profile and turn dark blue when selected to move. The type of fade
curve can be altered in the drop-down box at the bottom of the trim window, or in the Clip Details window
for the Entry.
Once the fade-out of one Clip overlaps with the fade-in of the next Clip, you have created a crossfade. There
are two useful tools available when there are two Clips in the Trim Editor:
6:18
SADiE v5.2 DSD Operational Manual
Editing
MIRROR FADES alters the length, position, and shape of the later Clip's fade-in to make it an equalpower partner to the earlier Clip's fade-out.
NOTE: Hold down the Shift key when pressing this button to mirror the other way round, e.g. altering
the earlier Clip to match the later one.
Fade in/out pairs can be linked using the LINK button. An edit to one fade will then automatically be
reflected in the other. For instance moving the end edge of the fade down will move the end edge of
the fade up. You can combine this with the Ctrl key to move all four fade edges together.
The -3 dB and -6 dB down points for a crossfade can be displayed on the fade curves using the
toolbar button, or right clicking on the fade. This display option is also available in the Playlist on a
right-click menu. It is best to have "Show fades as curves" set under "Setup Window", "Playlist",
"Playlist Entry Display", as to be honest, it looks a little odd if you have "Show fades as splices" rather
than as cuts.
With two Clips in the window, selecting either fade automatically selects them both. Then the whole crossfade
between two Clips can be moved easily in relation to the audio, simply by clicking and dragging. The overlap of
a cross-fade can be edited by selecting a fade pair (dark blue) and then holding down the Ctrl key whilst
dragging one of the fades. The percentage of overlap is displayed in the new bar near the bottom of the Trim
window.
When you are happy with the adjustments, WRITE-BACK what you have done, as described below.
FADE SHAPES
If you right-click over a fade, and select "Fade Type" from the menu, you will be offered a number of different
fade types. Each of these types may have a number of different values (or "depths"). Except for Linear and Sshaped, there are positive and negative versions of each type.
All of these 117 fade shapes can be freely used, however (conceptually) the positive ones are considered
"master" shapes, and the negative fades' main purpose is to provide an equal power partner for each respective
positive shape. The Cos, Cosh, and some of the Pows are included for compatibility with earlier versions of
SADiE.
The Log and Exp shapes give a large variety of curves from deep convex through almost linear to deep
concave. If you Alt + click and drag the fade shape left/right, you can alter the "depth" of the fade for Exp and
Log fades; the depth can be dragged from Exp (+16) through Exp (+01), and Log (+01) to Log (+16). If you set
the Fade type to negative Exp or Log, then it can be dragged through a different sequence. Remember these
are the equal power partners for the positive shapes, so some of the negative shapes can appear mildly Sshaped.
There are other "Alt + drag" sequences for Pow+, Pow-, and S shapes. Due to the increased flexibility of the
Exp and Log fades, setting your default crossfade to one of the Log or Exp shape pairs would perhaps give you
more flexibility for adjusting fade shapes.
Pressing Alt + shift when dragging will allow you to drag through all the fade types. To allow enough sensitivity
to select individual shapes, you will perhaps have to move a long way to drag through the entire range.
However, note that you can press Shift whilst Alt-dragging to allow you to jump to the next range, then let go
of Shift to continue Alt-dragging the depth in the new range.
If you press Ctrl and Alt while dragging the fade, the other fade in the crossfade pair is changed to the negative
equal-power-partner shape and the depth of both fades will be dragged simultaneously.
Remember also that saving and loading Fade Descriptions will give you an alternative quick method of changing
the fade shape. Also, clicking on the "Fade In type" and "Fade out type" boxes (or any fade selector box, e.g. in
Clip Details or the Setup window) and pressing the Up and Down arrow keys on the keyboard provides
another quick way to change the fade shape.
6:19
Editing
SADiE v5.2 DSD Operational Manual
SAVING AND LOADING FADE DESCRIPTIONS
You can save a crossfade curve as a "*.FAD" file. This saves the fade shapes, fade lengths, and the overlap for
the central fade down and fade up pair in a Two-clip Trim edit. This is known as a "Fade Description".
To save a fade description, right-click anywhere in the clip display area of the Trim window, and the menu that
appears has the option: "Save Fade Description". Selecting this will show a standard Windows Save dialogue
where you can give the Fade Description a name. Note that the default directory on the PC drive into which
fade descriptions are saved (which is also the default from which they are loaded) is the template directory for
the User. The usual place for this is "C:\SADiE5\bin\templates\username".
Similarly, to load a fade description, right-click in the Trim window and select the option "Load Fade
Description". This in turn shows another menu. This lists:
•
The last Fade Descriptions you have saved or loaded (up to 16, and they are listed in the order you
used them),
•
A Default option (which will load the Default Cross Fade from the main Setup Window,
•
Other... which allows you to browse the PC drive for Fade Descriptions that don't appear in the list.
The Load Fade Description menu can also be accessed via a Hotkey (you can set this in "View menu", "Setup
Window", "Hotkey Setup", "Categories", "Trim Window", "Commands", "Load Fade Description"), in which
case it appears in the top right corner of the Trim.
This is a standard Windows menu, and so when it appears you can select which fade you want to load by using
the down/up keys then pressing Enter.
6:20
SADiE v5.2 DSD Operational Manual
Editing
EXCEPTIONS
LOADING AND SAVING ONE FADE ONLY
So far we've only described what happens when there are two clips in the Trim Window, and you can see that
in this case we are concentrating on the EDIT point and thus loading fades in pairs. A fade description file
always includes two fade shapes, lengths and overlap, however this can be loaded into a single fade, both in the
situations where there are two clips in the Trim or only one (or even more than two).
The fades that are loaded depend on which clip areas are selected, however this is streamlined for the case
where there are two clips, in order to make the loading of the edit pair simpler.
IN A TWO-CLIP TRIM WINDOW
If you have selected ONLY one fade of the central pair (e.g. the fade out of the top clip or the fade in of the
bottom clip) by Shift-clicking on the fade area to make it dark blue (and NOT highlighting the other half of the
pair in dark blue), then ONLY one fade shape and length is loaded from the Fade Description. Obviously if
your selection is a Fade In, then the saved Fade In shape will be loaded; if it's a Fade Out then the Fade Out of
the pair is loaded. If you save when a single fade is selected in this way, then a single fade is saved (and not its
partner).
Note that, the outer fades are not considered, and if for instance an entire clip is selected (both fades in dark
blue and the body in red) then only the central fade is considered for loading and saving Fade Descriptions.
With any other selection of areas with two clips in the Trim, then the pair is loaded. This means that when you
have two clips in the Trim window you cannot load fade descriptions into the outer fades (e.g. the Fade In of
the top clip or the Fade Out of the bottom clip). This makes loading the edit pair much easier as it's the
simplest default, besides which the outer fades are considered to be part of the previous or next edit.
IN A ONE-CLIP OR MANY-CLIPS TRIM WINDOW
If there is only one clip in Trim, or there are more than two clips in the Trim, then this special case does not
apply (because an "edit point" isn't defined).
The Load and Save Fade Descriptions menu items will only appear with a right-mouse click if a fade's area is
selected in dark blue. Likewise the Hotkey requires a fade area to be selected in order to show the Load menu.
The selected fade is obviously the one that is active for saving and loading Fade Descriptions. Note that when
you save a single fade to a Fade Description file, if this is loaded back into a pair of fades, the half of the pair
that wasn't saved is loaded as a mirrored equal and opposite fade shape (e.g. as if you'd pressed the mirror
button after loading a single fade).
If in a "Many-clip" (e.g. more than two clips) Trim you have selected both a fade in and a fade out then both will
be loaded, but this does not apply if they are part of the same clip. The menu options for saving and loading the
Fade Description will not appear if you have more than two fades selected.
FADE DESCRIPTIONS THAT BREAK THE RULES
The Fade Description always loads with respect to the centre (in terms of time) of the existing Fade Out on
the top clip. There may be times where, due to insufficient audio or "out-takes" being un-available in the
recorded audio file, the Fade Description may not be able to load with complete accuracy, and in these cases
the length and/or the overlap of the Cross fade will be adjusted to fit the audio that does exist. If this happens
you will see a warning when you load the Fade Description.
6:21
Editing
SADiE v5.2 DSD Operational Manual
COMPLICATED?
No not really. In short, the main thrust of the Fade Descriptions is to load and save EDITS. When many fades
exist in the Trim, SADiE needs to know which ones are active for loading, and so the correct ones need to be
selected. But the default method of loading into the "edit pair" without having to select anything covers the vast
majority of the scenarios that this is aimed at in a quick and efficient manner.
MAKING A LOOPABLE EDIT
The LOOPABLE EDIT button is only available if there are two Clips in the Trim Editor.
This function copies the fade at the start of the right hand clip to the start of the left hand clip, and similarly the
fade at the end of the left hand clip is copied to the end of the right hand clip.
The normal situation for using this is when you want to make a single clip loop correctly. The procedure is as
follows:
•
Roughly razor the clip to suit.
•
Make another copy of the clip in the EDL and REMOVE GAP to butt the two copies together.
•
Open the Trim Editor and load the two clips.
•
Perform the edit.
•
Pressing MAKE A LOOPABLE EDIT will copy the fade attributes for the edit that works to the
outside points of the two clips. Now both clips are identical.
•
Write back to the EDL.
•
Make multiple copies of the clip to suit.
This would normally be with one clip duplicated. It will work with different pieces of audio, but only if they
have the same time stamps.
CLIP DETAILS
The Clip Details window for the selected Clip can be opened by pressing CLIP DETAILS, or by
double-clicking on the Clip (an option in the "Trim Editor" section of the Setup window).
The Entry times in the window are fully interactive with adjustments to the profile in the Trim Editor. Other
details can be adjusted here before the Clip is written back.
WRITING BACK THE FINISHED EDIT
The Trim Editor is a temporary area for adjusting edits. Once done, the edit (and any other changes you have
made) needs to be "written-back" to a Playlist or Clipstore, which will then be updated.
If you have loaded the Trim Editor from a Playlist, press WRITE BACK TO SOURCE EDL to
update that Playlist. (It's a sauce bottle!)
If you loaded the Trim Editor:
6:22
•
From the Clipstore with a Clip that you now want to place in an EDL according to it's Track time
(recorded "time stamp"), OR
•
From a different EDL to the one you want to write to,
SADiE v5.2 DSD Operational Manual
Editing
Make the Playlist window containing the target EDL active, and then press COPY TO ACTIVE
EDL.
NOTE: Before you write back, as the EDL has not yet been updated, you can play it to hear how the
edit was before your Trim Editor adjustment.
If you want to save the edited version of a single Clip in the Clipstore, press WRITE TO
CLIPSTORE. You may want to rename the new version first.
If you want to insert the edited version(s) of Clip(s) into a Playlist at an EDL time of your choosing,
press WRITE TO PASTE BUFFER and then paste them into the Playlist.
NOTE: There is an option in the "Trim" section of the Setup window to allow "Auto close trim window
when writing back to source". This is often more convenient when you are using Hotkeys or the
Hardware controller, and helps you to avoid opening multiple Trim windows by mistake.
WRITING BACK AUTOMATICALLY
In the Trim Editor section of the Setup window, you can select the option to write back the contents of the
Trim Editor to the current Playlist automatically each time it is loaded:
•
With the LOAD NEXT/PREVIOUS EDIT buttons, OR
•
By using the RAZOR-CUT button.
This makes it quick and easy to work through an EDL while staying within the Trim Editor, if you wish.
NOTE: Loading with any of the other buttons does not write the current edit back automatically. This is
so that if you make a mess of an edit in the Trim Editor, you can reload it from the Playlist and try again.
RELOADING
When you have finished working on one edit, and have written it back, you may want to keep the Trim Editor
open to do another one.
NOTE: The following buttons on the Trim Editor's own toolbar reload it with different Entries or Clips,
whereas using the Trim Editor buttons in the Playlist and Clipstore again will open a second Trim Editor.
LOAD FROM EDL reloads the Trim Editor with the Entries selected (highlighted in red) in the
Playlist or Text EDL.
LOAD FROM CLIPSTORE reloads the Trim Editor with the Clip selected in the Clipstore.
LOAD PREVIOUS/NEXT EDIT reloads the Trim Editor from the same EDL, moving one Entry
backwards or forwards. Using these buttons you can easily move along the edits in the EDL to check
or adjust them.
LOAD FROM PASTE BUFFER reloads the Trim Editor with the contents of the paste buffer. This
may have been cut or copied from any EDL/Playlist or Clipstore.
MAKING A NEW EDIT
Pressing the Trim Editor's own RAZOR-CUT button cuts all the Entries/Clips in the window at the current
time position (and can be done on the fly while playing back). This has the same effect as having RAZOR-CUT
them in the Playlist and loaded all the edits so formed into the Trim Editor. You will need to have written back
your previous edit adjustment first, unless you are set to write back automatically.
6:23
Editing
SADiE v5.2 DSD Operational Manual
MAINTAINING SYNC
The LOCK CLIPS button prevents you from selecting and moving the body of Clips or Entries
while they are in the Trim Editor, and therefore safeguards accidental loss of sync to picture or
sync with music when writing back. If the LOCK STREAMS button on the Playlist toolbar is
down, this button in the Trim Editor will be down when it is loaded from that Playlist. You can
then release the button to override the lock status for this edit only.
The SLIP LEFT and SLIP RIGHT buttons only apply with one or with two Entries loaded.
The logic these buttons follow is controlled in the "Trim" section of the Setup window.
"Trim Slips Auto-follow EDL Slip settings":
•
When this is ticked, the positions of these buttons on opening the Trim Editor will reflect the SLIP
setting of the Playlist. They can then be changed to override the setting for this edit only. SLIP LEFT
will cause EDL Entries before the earlier one in the Trim Editor to move with it when writing back.
SLIP RIGHT will do the same for Entries after the later one. With this setting, you only have one
global Slip setting to consider for Playlist movements, Playlist editing and Trim editing.
•
When this is not ticked, the positions of these buttons are completely independent from the SLIP
settings in the Playlist. The settings of these buttons are held over for future Trim sessions. You might
want to use this setting if, for instance, you do most of your editing inside the Trim Editor and only
perform coarser manipulation in the Playlist window. This setting is perhaps more familiar to SADiE v2
users.
NOTE: If you are working with sync material you will want to keep Playlist and Trim Slips off, so that
slipping one Entry doesn't alter the sync of others. If you are working with sound-only material (like
editing for radio) you will need to keep Slips on to avoid gaps opening up in your material as you edit.
Remember that Slip is disabled when writing back from a Trim Editor containing more than two Entries;
if you need to slip, use Playlist Editing instead.
OTHER TRIM EDITOR TOOLS
The four
SNAPSHOT buttons allow you to store and recall four different arrangements of the Clips in
the Trim Editor, so you can compare different attempts at an edit. Click once to take a snapshot, and the
button will turn blue to show it has a snap stored. After making adjustments, click on the button again to
return the Trim Editor to the stored snap. The button of the displayed snap will turn red. To overwrite a
button with a new snap, hold Ctrl. while clicking on it.
NOTE: Even if you don't use the snapshots, you can write back an edit to the EDL, try to improve it and
write back again. Then the Playlist undo and redo buttons can be used to move through the different
attempts. Any of these can then be reloaded into the Trim Editor.
The USER ZOOM button turns your mouse pointer into a magnifying glass, which you can use to
draw a box around the part of the profile you want to zoom-in on. The degree of magnification will be
determined by the size of the box you draw.
The RETURN button takes you back to your previous magnification level.
The EMPTY TRIM WINDOW button empties the Trim Editor of all Clips/Entries.
The VIEWING ORDER button is available with more than two Clips in the window:
When it is up, the left channels of all the stereo Clips in the Trim Editor are displayed above all the
right channels.
6:24
SADiE v5.2 DSD Operational Manual
Editing
When it is down, both channels of each Clip are drawn together.
NOTE: For most editing, it is generally sufficient and clearer to just view one channel of each Clip. This
is done with the button up, setting the window's size and magnification to show just the left (or right)
channels of all the Clips in it. Have the button down when you want to see both channels of each Clip.
THREE AND FOUR POINT EDITING
OVERVIEW
"Three Point Editing" and "Four Point Editing" refers to a method of working which utilises a traditional
Source/Destination style of editing. Conceptually this is a little like online editing with VTR decks.
In SADiE terms this means having your original source material in one Playlist, and copying this audio into the
correct position in a "Destination" Playlist (this is perhaps your "Master Edit").
Three and Four Point editing copies audio marked using the Region Editing Tools Left and Right locators in a
Source EDL, and then pastes it into an area marked similarly in a Destination EDL.
The terms "Three" and "Four" Point refer to the number of Left and Right markers set. If you have Left and
Right marked in both EDL's then it is a Four Point Edit. If one of the four possible markers is left unset, then it
is a Three Point Edit.
The procedure is much the same for both Three and Four point edits.
PREPARATION
First you need the correct tools to hand. Press the SELECT TOOLBARS button, and then select
"3 and 4 point edit" from the menu, to reveal the "3 and 4 point edit" toolbar.
Dock it wherever is convenient. Save a desktop and/or default desktop if need be.
If you're using keyboard "Hotkeys", it may be worth reviewing which Hotkeys you are using for setting
the Left and Right locators. I've personally found it worthwhile moving these to the [ and ] square
bracket keys, and using modifiers for "Go to" and "Clear". These Hotkeys are found under: "Setup",
"Hotkey setup", "Transport – Locators".
A few suitable suggestions (but this is entirely up to you) are:
•
Clear Left Locator SHIFT + CTRL+ [
6:25
Editing
SADiE v5.2 DSD Operational Manual
•
Clear Right Locator SHIFT + CTRL + ]
•
(These two are new Hotkey functions)
•
Go to Locator Left SHIFT + [
•
Got to Locator Right SHIFT + ]
•
Set Left Locator [
•
Set Right Locator ]
While you are in Hotkey Setup, set some keys for the two 3&4 point editing tools and a couple more
useful facilities (which are found in the Region Editing section of Hotkey Setup). Again, it's your
choice! Of course the choices here are based on an English keyboard.
•
Three and Four Point Edit =
(This is the =/+ button above the ] key. This is the "Do it" button for a Three and Four Point
Edit)
•
Enable Three and Four Point editing mode (i.e. the -/_ key to the left of the =/+)
And a couple more which will probably come in useful:
•
Snap Left and Right to cuts #
(This is to the left of the Enter key. There is also a button for this on the Region Edit toolbar,
to the right of the L and R buttons).
•
Source/Destination focus toggle '
(This is immediately to the left of the #. This allows you to flip between the Source and
Destination EDL's without using a mouse).
You may alternatively wish to set up some Hotkeys on a Hardware Controller Jog panel.
TWO PLAYLISTS
You cannot do a Three or Four Point Edit unless you have TWO Playlists (and only two Playlists) open. Thus
this function won't be possible if you are working with the Playlist Setup option "Restrict to one open Playlist"
ticked.
If there are fewer or more than two Playlists open at the moment you initiate Three and Four Point Editing,
then you will be warned appropriately and you will not be able to continue.
So, you have a Playlist open that contains your source material, and another Playlist open ready to be the
destination.
It doesn't matter where these Playlists are positioned on the screen as you'll see soon.
To initiate Three and Four Point Edit Mode, press the THREE AND FOUR POINT MODE
button on the SOURCE Playlist; this is important as it determines which is the Source for the edit and
which is the Destination, get the wrong one and you'll be going in the wrong direction.
6:26
SADiE v5.2 DSD Operational Manual
Editing
If you're using the Hotkey to enable Three and Four Point Editing make sure the correct EDL is
focused by clicking on it with the mouse.
At this point, the desktop will be rearranged to display the Source Playlist in the bottom half of the screen and
the Destination at the top. The only other windows visible will be those that have been set to "always on top"
and the Transport window, which you may want to close or move. Also Region Editing is now enabled in both
EDL's.
If you've set the Hotkeys, you will see that once Three and Four Point Editing is enabled, you can use
the "Source/Dest focus toggle" to move back and forth between the two EDL's.
FOUR POINT EDITING
Just go for it - the operation will be obvious when you see it.
First try this with the mouse: scratch the mouse over a region in the Source Playlist, and then do similar across
a Destination region.
Press the THREE AND FOUR POINT EDIT button on the Source Playlist (or the Hotkey) and
the Source Region will replace the Destination region. Entries to the right of the Destination region
will be slipped to fit the new region (the Source Region is unlikely to be exactly the same length as the
Destination region was).
Simple really - it's just a copy and paste/replace operation.
The intention is that this provides a quick and easy compilation function, and thus the result will be as accurate
as your placement of the Left and Right markers. You may find you will want to use Playlist Edit or the Trim
window to tidy up the beginning and end of the new inserted region.
In practice you may use scrub tools, or you could place the Left/Right markers on the fly whilst playing to
define your Source and Destination regions more accurately.
THREE POINT EDITING
Three point editing is quite similar, and uses the same controls. The only difference is that one of the four
markers is not defined. Thus there are effectively four different types of Three Point Edit, depending on which
of the four markers is missing.
When this is the case, SADiE will copy the source region and paste and replace it into a region the same length
in the Destination Playlist, and hence there will be no slipping.
The four scenarios are:
6:27
Editing
1.
SADiE v5.2 DSD Operational Manual
Destination Right missing
The Source region is pasted, starting at the Destination Left mark, replacing Destination material for
the Source duration
2.
Destination Left missing
The Source region is pasted with its end at the Destination Right mark, replacing Destination material
backwards from Destination Right for the Source duration.
3.
Source Right missing
The Source region's end is defined by the length of the Destination region; this Source region is then
pasted into the Destination Region.
4.
Source Left missing
The Source region's start is defined (backwards from Source Right) by the length of the Destination
region; this Source region is then pasted into the Destination Region.
The first method is particularly useful for quick left-to-right compilation into an empty Playlist, moving the
Destination Left mark to the end of the Playlist after each 3 point edit.
Or perhaps you have an area of the Destination Playlist that needs filling with ambience. Mark the
region to be filled, then place the Source Left marker in a section of ambience in the Source. Pressing
the Three and Four Point Edit button fills the Destination with the correct length of ambience.
CLEARING MARKERS
If you've set a region with both Left and Right markers, you'll have to remove one to perform a Three Point
Edit. You can do this with the Hotkeys (Clear Left/Right locator), or by double-clicking on the L or R button in
the L&R pane of the Transport Controls.
SNAPPING MARKERS TO EDITS
The "Snap L&R to cuts" button and corresponding Hotkey are useful if you want to position the L&R
markers exactly on the start or end of a clip. Pressing this button/Hotkey will move BOTH markers
from where they are to the closest clip start or end on enabled streams.
This is useful for replacing entire clips or sequences of clips. Also you can mark a silent region this way
in order to fill it with a 3&4 point edit.
Note: This doesn't place the markers exactly at the start or end, but half-a-default-crossfade after a start
(or before an end) so that a default crossfade will be produced by the 3&4 Point edit function. However
the behaviour is different if you have Cut mode set to "V Cut" in the Playlist Setup window.
6:28
SADiE v5.2 DSD Operational Manual
Editing
REGION EDITING
Region Editing adds another set of editing tools to your palette. The basic principle of Region Editing is that you
firstly define a "region" of the Playlist, and next perform another action on that region; you may want to delete
it, move it or copy it elsewhere for instance. The region is defined between the standard Left and Right
Locators, and usually across all streams enabling you to more easily edit across all streams of a multi-track.
You could use the region editing tools for removing a section of a multi-track, or for moving it or copying it
elsewhere. Another possible use for region editing is for simple speech editing tasks. Where you otherwise
may use razor cutting and Playlist editing, defining a region and deleting it can be very quick, particularly for
repetitive tasks.
Region editing functions are available on Hotkeys, and this can speed up operation significantly.
ENABLING REGION EDITING
To access Region Editing first you must be able to see the Region Editing Toolbar.
If this is hidden, then pressing the SELECT TOOLBARS button, and choosing "Region Editing"
from the drop-down menu can reveal it. The above toolbar will appear, and in the usual way you can
dock it to an edge of the Playlist or allow it float, by dragging it around the desktop, or by right mouse
clicking and selecting, for instance "dock to top".
To enable Region Editing, press the REGION EDITING ENABLE button; region editing is turned
on when the button is pressed in.
6:29
Editing
SADiE v5.2 DSD Operational Manual
DEFINING THE REGION
DEFINING THE REGION WITH THE MOUSE:
The mouse cursor will change to a
pencil tool, which signifies that you are ready to define a new region.
pencil tool, click at the position in the Playlist where you want
To define a Region, when your mouse is the
the region to start (it doesn't matter which stream you are over when you click, anywhere between the time
bar and the bottom of the Playlist will do), then whilst holding the mouse button down, drag the region
rightwards, and when you reach the point at which you want the region to end let go of the mouse button. The
region will be coloured red, and you'll notice the Left and Right locators are positioned at the start and end of
the region respectively.
To help you mark the region, you will notice that the two time displays at the bottom left of the Playlist will be
displaying current cursor position and the duration of the region respectively.
You can also start at the end of the region and drag leftwards towards the start, whichever method is most
convenient.
DEFINING THE REGION WITH THE HARDWARE CONTROLLER:
All of the region editing functions can have Hotkeys assigned. Notice that the Preview buttons are linked to the
Transport Edit controls' preview buttons, and similarly the Select Region Start and End buttons are the same as
the In and Out buttons.
Having enabled region editing, you can set the region start by setting the Left locator, and the region end with
the Right locator, in the usual way.
Also the hardware IN and OUT buttons give you a way of setting the region. Once you're in Region edit
mode, pressing the IN button while the Playlist is scrubbing makes the Left region marker jump to that
position. Scrubbing from there moves the Left marker as you scrub. If you press IN when the Playlist is
stopped, then the current time will locate to the left marker. You have to be careful to stop the scrubbing
when you've positioned a marker (press the STOP button), otherwise when you come to move on to the
OUT point, you will jump the Right marker as soon as you press OUT, rather than jump TO the right
marker (which happens when you're not scrubbing).
A most important factor is that the region doesn't have to start at an entry's start point; it can begin anywhere
in the Playlist and can contain any number of entries. Under normal circumstances in SADiE, we are
manipulating EDL entries or clips, but that's not the case at the moment in region editing.
BASIC REGION EDIT FUNCTIONS
To see the sort of thing you can do next just press the Delete key on the keyboard. Assuming you have
Autoplace and slip off, you will see the region disappear, and razor cuts are made to tidy up the ends of the
entries left behind.
Try a few more things: UNDO to put the region back, or set SLIP to be RIGHT. Now press Delete again.
This time the region disappears, but slipping everything to the right, leftwards, fills in the hole.
Define another region; you will still have the
pencil cursor. This time press the CUT button using
the mouse. The same thing as before will happen: the region disappears and entries move leftwards to
fill the hole.
Now go to the end of the Playlist and press PASTE and the mouse cursor changes to the usual paste
icon. Clicking in the Playlist will now drop a copy of the whole region into the Playlist.
6:30
SADiE v5.2 DSD Operational Manual
Editing
Of course you can use the COPY button to leave the original region unchanged (and un-razored) and
allow you to paste a copy of the region elsewhere in the list.
NOTE: You may want some streams of the EDL to be unaffected by any region editing. Region editing
only works on streams that are enabled (lighter grey), so to make the region ignore a stream press its
stream name button so that it is in the "out" position. With region editing the "Ctrl-enable"
function (clicking on a stream name button while pressing the CTRL key on the keyboard) can be a
quicker method of enabling the correct stream; this function is a "reverse" function and disables all
streams apart from the one you've Ctrl-clicked on.
ADJUSTING THE REGION
There are many ways of adjusting the region's bounds once you have defined it.
1.
Clicking with the mouse outside the region, gives you the pencil tool again, and will start making a new
region. You could use this method to redraw the region from scratch again.
2.
When the mouse is close to the start or end of the region, the mouse cursor will change to a
right pointing arrow shaped cursor. Clicking and dragging this point allows you
left pointing or a
to adjust either the region start or end.
3.
The region start and end are the Left and Right Locators, so changing these, in the Transport
Controls' L-R Tab in the usual way will adjust the length of the region.
4.
You can scrub the start and end of the region - either using the Transport controls, Edit
pane jog wheel, or using the Hardware controller wheel. The SELECT REGION START
and END buttons determine which end of the region is being scrubbed.
The Region Editing toolbar has three tools that help you zoom in on the relevant part of the region (the whole
region, or it's start or end) quickly:
ZOOM IN ON REGION changes the zoom so that you can see the entire region in the Playlist.
ZOOM TO REGION START and END set the zoom to horizontal zoom 15 so you can see some
detail on the entries at the start and end of the region.
In a similar way, the SELECT REGION START and END buttons move the focus to the start and
end of the region without changing zoom. Note that the Hotkeys to operate these buttons are the
same as for the Transport Edit controls' GO TO IN and GO TO OUT respectively.
PREVIEW TOOLS
The PREVIEW tools operate around the selected point of the region (start or end as set by the START and
END markers), and as you would expect from the icons, they play from the point, through the point, the
whole region, and to the point respectively.
PLAY EDIT WITHOUT REGION is a special preview tool, which performs a dummy edit, then
previews it. On pressing this button, the Playlist will re-draw itself, as if the region had been deleted,
then preview from before the Left marker to after the Right marker. Having previewed, the Playlist
will undo this dummy edit, and draw itself back to where it was beforehand. You would normally use
this tool with SLIP on, otherwise this preview will play silence for the duration of the region.
6:31
Editing
SADiE v5.2 DSD Operational Manual
There is a Hotkey available for this function
OTHER REGION EDITING TOOLS
RAZOR CUT REGION puts a razor cut at either end of the region, and turns off region editing.
REGION INSERT and REGION OVERWRITE modes determine what happens when you paste a region
into the Playlist. First you have to cut or copy a region to the paste buffer.
In Insert mode, when you paste a region into the Playlist, a razor cut is made across the Playlist at the
paste position you selected, then the region is pasted at that position. Any entries underneath the
region remain as they were. But if you are in Slip (which is really how this mode is supposed to be
used) then (for instance with Slip Right enabled) the entries to the right of the paste position are
slipped left by the length of the region - in other words, the Playlist is cut in half and slipped to make
room for the region.
In Overwrite mode, when you paste a region into the Playlist, entries underneath the region are cut
and deleted to fit the region in. This mode is not supposed to be used with Slip.
Note that Insert and Overwrite have no effect if Region Editing is turned off; the normal rules for pasting clips
into the Playlist apply.
Show sample values is a tool that is not specific to Region editing (in fact you have to turn Region
editing off to use it).
When this button is pushed, and the Playlist is displaying at one of the highest three horizontal zoom levels,
then the cursor changes to a "magnifying glass" and passing this over the waveform displays the time of that
sample and it's sample value as a 24 bit number, e.g. a decimal number between -8388608 and +8388607.
Holding the Shift key down while using this tool will show the sample value as a hexadecimal number.
SPEECH EDIT
Speech Edit serves two basic functions. Firstly, it can act as a high quality time scrunch for speech (or any audio
where there are periods of "silence"). Secondly, it can also be used to perform semi-intelligent edits on a given
clip, effectively saving a lot of time in the Edit Window finding words or removing periods of silence etc.
The speech edit process works by scanning the selected clips or EDL entries to find periods of "audio" and
"silence". Once it has located all the regions where it thinks audio is contained, it then forms an EDL in
memory from the audio in the original clip, but with cuts at the start and end point of audio.
This process can operate in the usual way by recording another track. However, since the process works by
forming an internal EDL, the facility is also provided to "write back" the EDL into the Playlist and see the edits
made. This means that edits can be fine adjusted in the trim window.
6:32
SADiE v5.2 DSD Operational Manual
Editing
HOW DOES SPEECH EDIT WORK?
The diagram above shows a typical speech waveform. When an audio level is found above a "gate on"
threshold, audio is assumed to have been located. When the level then falls below a "gate off" threshold, the
audio is deemed to be finished and "silence" has been found.
The process performs edits on the EDL entries in two ways. It either forms clips only out of the regions it has
deemed to be audio (gated edits) - this works well for audio recorded in quiet environments. The other editing
mode using "spliced edits", forms clips which have their start point at the beginning of the audio section, and
the end point at the start of the next audio section. In this mode entries are joined by a "splice" or crossfade
type edit, and so if you are working in 8 stream mode, entries will checkerboard across 2 (for mono) or 4 (for
stereo) streams. At the "butts", linear crossfades of around 10 milliseconds are inserted. This mode enables
good edits to be made on audio with noisy or ambient "silence" (e.g. cricket commentary), although it has the
drawback that where audio originally only took up one stream, it would now take two. It is therefore most
effective with only one clip playing at once, and so it's probably better to perform the Speech Edit process
before laying on other tracks.
Gated Entries
6:33
Editing
SADiE v5.2 DSD Operational Manual
Spliced Entries
As the process locates regions of audio and forms them into EDL entries, it can also reduce the length of the
regions of "silence" (or expand them) to perform time-scrunching. For gated editing mode, this means placing
the entries closer together in the EDL (or further apart). In spliced edit mode, only time reduction can be
performed, by bringing the end points of clips forward in time (i.e. reducing the length of the "silence" in the
clip) but still butting the subsequent clip to the end of this one. This still produces smooth crossfades.
CONTROLS
1: Time Scrunch ratio - Sometimes it is impossible for the process to scrunch to the desired amount (if there is
insufficient silence), and so it will warn you with a message and set itself to the nearest scrunch ratio it can. To
enable the process to scrunch further, the gate on and gate off values can be increased, or the minimum clip
and gap lengths can be reduced. If reduction to the minimum possible length is performed, all the gaps are
removed, rather than scaled down in length (which is the normal mode of operation) so speech can begin to
sound unnatural.
2 and 3: Gate On and Gate Off - These pots control the threshold where audio is detected, as described
above. Increasing them means that more audio is treated as silence, so higher time reduction can be
performed, but with the loss of some audio. Higher thresholds will be required for audio with background
noise. Gate off can never be greater than gate on. Usually keeping them the same works OK.
4 and 5: Gated/Spliced Edits - These buttons switch between the two forms of clip formation as described
above.
6: Write Back - As explained above, the resulting edit list in memory can be written back to your current
Playlist instead of recording a new track. This allows edits to be trimmed in the trim window for fine
adjustment.
NOTE: If the scrunch ratio is 1.0 and spliced edits are used, then the entries can even be "glued" back
together if unnecessary or undesired edits have been made.
6:34
SADiE v5.2 DSD Operational Manual
Editing
7: Minimum Clip Length - has a similar effect as the minimum gap length, but can't be too short, otherwise the
disk won't be able to keep up with the number of clips created (unless bounce in non real-time is used). Longer
lengths (500 milliseconds upwards) can enable distinct words and phrases to be identified and cut into sections
which are easily editable.
8: Minimum Gap Length - this specifies the smallest region of "silence" that the processor will treat as a "gap"
which can be reduced. Increasing this value means that only large pauses can be detected, and may mean the
audio can't be scrunched as much (but does mean that the process can detect large areas of silence for editing
purposes). If the value is small, it can even find gaps inside words and so can compress further at the risk of
sounding unnatural.
APPLICATIONS
Below are just a few possible uses for Speech Edit:
EDITING
To actually make use of the process to perform edits rather than time scrunching, longer gap and clip lengths
are more useful. Working with a ratio of 1.0 in spliced mode is probably the most effective way of working.
Using this method, you should be able to quickly locate regions of speech you wish to omit and edit them.
When you've identified which of the new entries you wish to remove, and you delete them with AUTO-SHIFT
switched on, the gap will automatically close up.
SILENCE REMOVAL
It can be used as a simple gate to replace ambience with digital silence. As above, you would use a Scrunch
ratio of 1.0, but use Gated edits, so that "silence" below the thresholds is removed.
TIME SCRUNCHING
To scrunch audio, gated or spliced edits can be used. If the minimum gap length is shorter, more silence can be
found to reduce. If it won't scrunch enough, increase the threshold so that more silence and less audio can be
found. Large scrunches may reduce the gaps between words so much that a lot of emotion/feeling can be lost
from the speech.
TOP AND TAIL
If you've recorded several music tracks, set the minimum gap and minimum clip lengths high (about 5,000 ms).
You can then use Speech Edit to find the gaps and split the recording into separate entries.
6:35
Editing
6:36
SADiE v5.2 DSD Operational Manual
SADiE v5.2 DSD Operational Manual
Mixing and Processing
7 - MIXING AND PROCESSING
THE MIXER
The Mixer window in SADiE routes audio signals between the currently active Playlist and the outside world.
On each Stream you can control levels, pan positions and auxiliary sends as well as process the audio, by
applying equalisation or compression for example.
You can:
1.
Set and leave these controls when playing back an EDL.
2.
Adjust them in real time during playback.
3.
Record the adjustments you make and have them reproduced using the Automation described later in
this chapter.
If you have closed the Mixer for your current Playlist, you can display it again with the SHOW
MIXER button on the Playlist toolbar.
NOTE: In addition to using the faders of the Mixer to control the playback levels of Streams, you can
set the level of individual EDL Entries. See the Clip Details window.
The Mixer is made up of channel strips which each have an input and an output. The simplest Mixer strip
consists of a fader, a pan control and an input selection button whose label indicates what that strip is
controlling. Other displays and buttons may be added to the strips.
This is the Mixer's configuration toolbar. If it is not currently displayed on your Mixer, you can bring it back
with "Toolbars" on SADiE's "View" menu.
7:1
Mixing and Processing
SADiE v5.2 DSD Operational Manual
The first six buttons add or remove displays for every strip:
Fader grouping buttons - see Grouping Faders.
Inline process buttons - see Processing. Each button represents a blank section into which you can
insert processes like EQ and dynamics for each strip. To reveal more buttons, enlarge the Mixer
window vertically.
Strip output selection buttons.
Phase Reverse Controls.
Displays "long faders". In this view, all faders are twice as high as usual and thus have a twice the
resolution. Moving the fader with the mouse will give you 0.20 dB steps instead of 0.40 dB as in the
normal view.
The last five buttons turn on or off other Mixer displays:
Turns on Mixer automation and displays the automation toolbar (see Automation).
Displays the Process Palette toolbar from which you choose which processes to insert into a Mixer
strip, and lets you add new strips to the Mixer.
Displays the Routing toolbar.
Brings up the Process Window, which acts as an "outboard rack" for other processes..
Shows the Metering Window.
A MIXER CHANNEL STRIP
1–
2–
3–
4–
1.
Fader Grouping button - see Grouping Faders
2.
Inline Process button (empty) - see Processing
3.
Input Selection button - this strip is controlling the audio of Stream 1
5–
4.
Output Selection button - this strip is routed to internal Bus 1 and 2
5.
Phase Reverse control and left/right swap for stereo strips
6–
6.
7–
The peak level of audio through the strip. Figures above full digital coding
level shown in red. Double-click to reset. Shows fader level in blue when
fader is moved.
7.
Pan pot - click and drag to adjust. A small fader will pop up to indicate the
setting. Double-clicking allows you to adjust the fader directly.
8
9
8.
Fader - drag it!
9.
PPM - Peak Programme Meter display
10 –
11 –
12 –
13 –
7:2
10. Nudge the fader in 0.1 dB steps
11. Resets the fader 0 dB gain. Fader is disabled whilst button is down.
12. Solos this strip
13. Mutes this strip
SADiE v5.2 DSD Operational Manual
Mixing and Processing
NOTE: The peak level displays act as an indicator of the margin available before reaching full digital
coding level. On channel strips routed to SADiE's inputs and outputs, they will show you how close you
are getting to overload. However, SADiE's Streams have over 1000 dB of headroom so you will not
overload this part of the system. Double-clicking resets them individually, Ctrl + double-click resets all
strips. Overloads on outputs can be logged using the Log Overloads Window.
Each hardware controller fader panel has eight faders which control the Mixer strips indicated by the
LED's above them:
ASSIGN +
faders.
and
select the next and previous bank of eight Mixer strips for control by the eight
SHIFT + a fader's SELECT button allows you to reassign a single fader to a different Mixer strip.
Move the fader and the LED changes to indicate the new strip. When you let go of the fader, it is
reassigned. Use this to set the function for the single fader on the edit panel, perhaps to control a
stereo master strip.
A MUTE button is provided for each strip.
SHIFT + MUTE solos the strip.
ASSIGN + changes all the faders from controlling level to controlling the pan-pots. The LED at the
top left will display "Pn"
ASSIGN +
changes back to level control. The LED shows "Fd".
NOTE: As you will see from the following sections, the Mixer is very flexible. You can save any Mixer
configuration for later recall. See File Management.
GROUPING FADERS
To link (or "gang") on-screen faders so that they move as a group, press the
FADER GROUPING
button on one of the strips. It will flash. You can then press the grouping buttons of other faders you want
linked with it. They will light up indicating that they are part of the group. Finally release the flashing button.
Moving any of the faders in the group will now move them all and their buttons will light to indicate the link.
Faders can be set at different levels before being linked and the offset between them is calculated so that they
reach the bottom of their travel (fade out) together. This maintains relative stereo positions. Pressing any of
the linked group's fader reset buttons will lose the relative offsets.
To change the level of only one fader within a group, move it whilst holding down the keyboard Shift key.
To remove a fader from a group, select one of the others in the group, and then release the button of the
fader you want to remove. Finally release the flashing button.
NOTE: You can make as many groups as you like, but each fader can only be in one group. Mute, solo
and fader reset buttons are also linked.
NOTE: Hardware controller faders are not affected by grouping when moved physically; the
feature is designed to make it possible to move more than one fader with a mouse. The best
way of grouping hardware faders is with your fingers!
Right-clicking on a grouped fader will reveal an option to "Invert fader polarity". This means that if you push it
up, the others will go down.
7:3
Mixing and Processing
SADiE v5.2 DSD Operational Manual
MIXER PROCESSING AND PLUGINS
INSERTING PROCESSING IN MIXER STRIPS
To allocate processes to a Mixer strip, and therefore to process the audio going through it, display the Process
Palette toolbar.
This shows you all the available processes you can insert inline on individual Mixer strips:
1–
2–
3–
4–
5–
6
1.
Low-pass EQ
2.
Low-shelf EQ
3.
Band-pass EQ (bell)
4.
High-shelf EQ
5.
High-pass EQ
6.
These last three buttons can be used to drag new mixer strips. These can be
mono, mono with pan, or stereo.
So, if you wanted to apply two bands of EQ, and then take an auxiliary send from the audio on Stream 4 of
your Playlist, you would insert those processes into the Mixer strip that is controlling Stream 4. It would then
look like this:
1–
2–
3–
1.
Inline Process: High-pass filter
2.
Inline Process: Band-pass filter
3.
Processing is being applied to strip 4
To remove an Inline process from a strip, right-click on its button and select "Delete Process".
7:4
SADiE v5.2 DSD Operational Manual
Mixing and Processing
ADJUSTING MIXER PROCESSING
Click on any process button in the strip. This will bring up a scrolling display of the controls for
all processes in the strip.
–1
–2
–3
1.
2.
3.
Centre
Drag
Nudge
The controls on the screen appear as familiar rotary knobs. Click and drag the mouse up or
down to adjust them. A small fader will pop up temporarily to indicate the adjustment and the
numerical display on the left will indicate the exact setting value. Double-clicking keeps the popup fader on view and allows you to adjust it more finely (click on a grey bit of the window to
lose it again). You can also adjust the setting by entering a value directly into the numerical
display in any of the following ways:
•
Click, hold and drag the mouse up or down over the digits (on either side of the
decimal point, where there is one). Their value will increase or decrease, and the more
you move the mouse, the faster they change. Release to set the new value.
•
Use the up and down arrows beside the display to nudge its value by whole units. Hold
Ctrl to nudge by decimal points.
•
Double-click on the time display itself and directly type in a new value ending with the
keyboard Return key.
At the top of each section are three buttons:
1.
A bypass button for that section.
2.
A name button that allows you to change the section to another process.
3.
A button to disable the automation for that section
Bypass Process Name
Disable Automation
At the bottom of the mixer strip bypasses all processing. There is a Setup option, in the "Mixer
Strip Display" sub-section of the "Mixer" page, that allows you to alter the function of this
bypass button so that only equalisation is bypassed, thus leaving dynamics, Aux sends and M&S
unaffected.
Press SELECT above the fader of the strip you want to adjust. The number of the strip will
appear in the LED above the Rotary Shaft Encoders (Knobs to you and me).
and then move through the processes on that strip, selecting each in turn for adjustment
and outlining its display.
EQ and CMP select the Equalisation and Compressor sections directly.
The knobs A to F now control the on-screen knobs in the selected process, from the top
downwards.
ASSIGN + MUTE above the relevant fader bypasses all processing.
7:5
Mixing and Processing
SADiE v5.2 DSD Operational Manual
DYNAMICS
The Dynamics processing has been designed to sound and act as much like a traditional analogue studio unit as
possible, with a slightly "soft knee" to produce a natural effect.
The Limiter - A basic level limiter. This isn't a look-ahead limiter and so cannot possibly guarantee to clamp the
level down to a set level. This should not be confused with the Mastering limiter.
Limit - The threshold above which signals are limited.
The Expander increases the dynamic range by reducing its gain in inverse proportion to the level of the signal:
the lower the level, the more reduction.
Attenuation - The delay between the signal dropping below the Threshold and gain
being reduced.
Restore - The delay between the signal exceeding the threshold and gain returning to
normal.
Input Range - The input level range between the expander starting to operate and
reaching its maximum gain reduction.
Maximum Attenuation - The maximum gain reduction.
The Gate reduces the output by a fixed amount when it falls below a given Threshold.
Attack - The delay between the signal dropping below the threshold and the gate
"shutting" and reducing the level.
Release - The minimum delay before the gate will reopen.
Maximum Attenuation - The amount of gain reduction when the gate is operating.
The Compressor reduces dynamic range by reducing its gain in proportion to the level of the signal: the higher
the level, the more gain reduction.
7:6
SADiE v5.2 DSD Operational Manual
Mixing and Processing
Attack - The delay after a transient before the compressor starts reducing the level.
Decay - The time after the transient before level is returned to normal.
Threshold - The level above which compression is triggered.
Ratio - The amount of gain reduction then applied.
Makeup Gain - Boosts output level to compensate for overall gain reduction. Be careful,
as it will go very loud!
Note, that the algorithm of the Compressor has changed from v5.2 onwards to give more realistic responses.
It has been reported that, with the quickest attack times, the output can be distorted with some material. This
is because the compressor may be tracking too quickly, which can cause the level to be changed too quickly
and by potentially large amounts. However, it was felt that allowing a fast attack still has some value; this can be
used to catch a momentary peak more quickly for instance.
Due to this algorithm change, if you load a mixer that was last saved with v5.1 or earlier, the compressor
values will be translated to the closest match on the new compressor, thus the values shown on screen will
appear to be different to those that were saved in the earlier version. However, the new compressor will be
set up to sound very similar.
EQUALISATION
SADiE's Equaliser is divided into five sections with different slope characteristics. The frequency controls of all
sections cover the full audio bandwidth of 20 Hz to 20 kHz. Here is a control strip with all five sections:
A low-pass filter (steep high frequency cut) with a slope of 12 dB/octave.
The frequency controls set the -3 dB point.
A high-pass filter (steep low frequency cut) with a slope of 12 dB/octave.
The frequency controls set the -3 dB point.
Low-shelf EQ (low frequency cut and boost) -60 dB to +20 dB.
The frequency controls set the -3 dB point.
High-shelf EQ (high frequency cut and boost) -60 dB to +20 dB.
The frequency controls set the -3 dB point.
Band-pass EQ (bell-shaped boost and cut) -60 dB to +20 dB.
The Q control sets the bandwidth. The higher the Q, the narrower the bell.
The frequency control sets the centre frequency.
The cut and boost controls operate symmetrically apart from at the extremes, where the -60 dB cut is
provided to allow "notch" filtering with high Q settings.
7:7
Mixing and Processing
SADiE v5.2 DSD Operational Manual
AUXILIARY SENDS
Mixer Strip Knob
Full Control Display
The Auxiliary Send level knob can be adjusted on the Mixer strip as well as on the full control display.
The routing button allows you to route the signal either to an internal bus or to the outputs. Note that the
bypass button for this section acts as Auxiliary Send on/off.
SAVING SETTINGS
To save the layout of the Mixer, save the Mixer Setup file. This can be done with the File | Save command
when the Mixer is the active window, or from the Project window, as described in File Management.
NOTE: Processing control settings are saved as part of the Mixer Automation.
You can also save Process settings and Mixer strip settings for a single strip. Right mouse click on the process
section of a strip and this menu drops down:
"Save process settings" saves the pot settings for a single process, which can be reloaded into the same process
or one on another strip.
"Save mixer strip settings" saves the whole mixer, all processes and their pot and fader settings, which can be
reloaded onto another strip.
If you wish to save your customised Mixer to be used again, save it as a Template.
PROCESSING STEREO
To apply processing equally to the two channels of stereo material, it needs to be routed through a stereo
Mixer strip. You can merge two mono Mixer strips into a stereo one by right-clicking over the fader:
7:8
SADiE v5.2 DSD Operational Manual
Mixing and Processing
Then insert the required process into the stereo strip.
REORGANISING THE MIXER
You may find the mixer can get cumbersome and take up too much screen space, or perhaps you would like to
change the order of your faders so as move related strips closer together.
It is possible to change the layout of your mixer on the screen, in three different ways:
1.
Dragging and dropping faders to move them to another position.
2.
Hiding strips that are not in permanent use.
3.
Minimising faders to make them smaller.
CHANGING THE ORDER OF MIXER STRIPS
To move a fader strip to a different position in the mixer , just click in any area of the strip, holding the mouse
button down, and drop it in a new position.
The easiest point to pick it up is on the PPM meter, as most strips have an active area surrounding the fader
itself.
When you've "caught" the strip, the cursor will change as shown, and if you drop it over the left side
of another fader, it will dock to the left, or on the right side, it will dock right side of that strip.
If you drag it off the edge of the mixer, the cursor will change to look like a waste bucket, and
dropping it then will delete the strip.
7:9
Mixing and Processing
SADiE v5.2 DSD Operational Manual
HIDING AND REVEALING STRIPS
Clicking with the right mouse button on any part of the strip will bring up strip menus, which have hiding
options appropriate to that strip: "Hide strip" or "Reveal hidden strip?", and "Minimise Strip" or "Maximise
Strip" (described below).
When a strip is hidden the line between strips is darker, and strips either side will have the "Reveal hidden
strip" right mouse menu option.
You can reveal strips, one at a time by selecting this menu option.
You can "Reveal all hidden strips" by right mouse clicking on the mixer unit divider bar to the left of each mixer
unit; this is the bar with "Audio unit A" written vertically up the screen.
Double-clicking on the mixer divider bar will hide and reveal the whole mixer unit.
MINIMISING AND MAXIMISING STRIPS
7:10
SADiE v5.2 DSD Operational Manual
Mixing and Processing
Right mouse clicking on a strip will offer either:
•
"Minimise strip" as you can see in the picture above, or
•
"Maximise strip" to return the strip to its normal size.
A minimised strip shows as much information as possible in the limited space (you will notice there isn't room
for pan-pots. You can minimise and maximise strips individually, or again by right mouse clicking on the mixer
divider bar.
THE PROCESS WINDOW AND PLUGINS
THE PROCESS WINDOW
The PROCESS WINDOW button on the Mixer configuration toolbar brings up a Process
Window, which is effectively an outboard rack of stereo processing units. Each of these is represented
by a symbol at the top left that you drag into the empty rack space.
When a process unit is in the rack, stereo internal Busses named after it will be created. These are normally
connected to its input and output. You can then patch signals to and from these busses (as described in the
Routing section above) to route them through the process.
Each unit also has input and output selection buttons, normally connected to the busses named after the
process. However, you can use the buttons to connect signals from SADiE's physical inputs, outputs and other
busses directly to and from the process without going through the Mixer. If you do this, of course, you must
remember that the Mixer busses named after the process are no longer connected to it!
To remove a process unit from the rack, right-click in a blank, grey area of the unit.
A number of processes are available. Some are provided free of charge, but other third-party plugins can be
purchased. Contact your dealer for availability and pricing.
PLUGINS
To enable any of the on-line processes, drag the appropriate icon onto the "19 inch rack" and patch it into the
mixer using the busses.
MASTERING LIMITER
The Mastering Limiter plugin allows you to add gain to a signal before it is limited to a set level. You can define
the limiting in -dBFS to avoid overloads. The Limiter enables the audio material to achieve "loudness" while
avoiding digital clipping. This is achieved by analysing the waveform on either side of a peak and reducing the
gain to avoid distortion.
As with other normal plugins, this module patches into the mixing desk via the internal busses. There is an
"LED" array that displays the amount of gain reduction.
There are two icons for the Mastering Limiter in the process window: one creates a mono process, the other
is stereo.
7:11
Mixing and Processing
SADiE v5.2 DSD Operational Manual
•
Gain - adjust this to add pre-gain to the signal to "push" it into the limiter.
•
Limit - sets the maximum peak level.
•
Release - sets the release time for the gain reduction.
•
Impact - sets the rate of change of gain reduction. This is a little like the more familiar attack function
but on a microscopic scale. A sound with a fast attack (say, a piano) would require a high impact
setting, as the transient nature of the sound would need the gain reduction to react very quickly,
whereas a smoother sound would benefit from a lower, more damped setting.
•
Hysteresis - increasing the value of this reduces the sensitivity of the process to avoid the limiter being
triggered by high transient, low level, gain changes. Note that the range of this control is reduced as
you increase the gain.
Note that because this process performs some analysis on the audio waveform, there is a delay of 50 ms: the
process must receive some audio before it can start calculating.
The Mastering Limiter is an optional plugin; contact your dealer for details of how to obtain it.
PEAK METERING
Each strip of the mixer has a line of "LED's" to display peak levels going through that strip. The Fader decimal
display (the number in red in the drawing left) is a dual-purpose display. The information it shows depends on
settings in the Setup page. You can identify what it is displaying by the colour of the number:
Cyan - not displaying peaks, this is the fader level offset value.
Green - the peak level detected through that fader. This is reset automatically only when
you start play, or you can manually rest it by double clicking on the number (Ctrl + double
click resets all peak meters)
Red - the peak level detected through an output fader, but this is greater than zero.
Actually, it is impossible to produce an output greater than 0 dB, so this is the level SADiE
has calculated it would have been. In fact this shows that there have been a number of
sequential full-scale samples on the output. This can be reset in the normal way.
Yellow - the peak level detected through a stream or bus fader that is greater than zero. In
this case samples aren't truncated; because of SADiE's floating-point internal calculations
approximately 1000 dB of headroom is allowed internally. This can be reset in the normal
way.
In the Setup page you can choose which type of display (Fader level or Peak Hold) is being shown. Under the
"Mixer" section, inside its sub-section "Mixer strip display", you can choose between:
•
Only show peak levels on output strips
•
Show fader positions on all faders
•
Show peak levels on all faders
NOTE: Peak displays on Output faders are post-fader; on other types of fader strip they are pre-fader.
7:12
SADiE v5.2 DSD Operational Manual
Mixing and Processing
As output levels are much more critical than internal levels, the peak displays on Output faders are measured
more frequently than those on other types of fader strip. This will explain any apparent discrepancy between
for instance a stream strip peak and an output strip - it is the output peak that is correct.
Output peaks are measured every 4 samples, which is adequate for most applications. However in extremely
critical situations such as mastering, these can be switched to being measured every single sample. See Mixer
setup "Mixer Output PPM type"; "standard"; is 4 sample accurate, "mastering" is 1 sample accurate.
The Log Overloads Window can be used to create a list of these peaks. You can use the Metering window for
a separate PPM display.
METERING WINDOW
The Metering Window is viewed by pressing the SHOW METERING WINDOW button on the
Mixer Toolbar. This gives a separate window displaying a PPM "LED" style meter for every physical
input and output in the system. The number of meters will depend on your hardware. The PPM scales
are set to be the same as displayed by the normal mixer meters - this can be changed in the Mixer
page of the Setup Window.
The toolbar (which can be viewed or hidden in the usual way) offers some options as follows:
Enlarges the PPM displays vertically so that they appear double height.
Enlarges the PPM displays horizontally so that they appear double width.
Views or hides the numeric Peak Level displays.
Toggles the peak hold mode - when the button is pressed, the highest peaks are held until the Clear
Peaks button is pressed.
Clear Peaks - all held peaks are cleared down - both on the PPM meters and the numeric Peak Level
displays.
7:13
Mixing and Processing
SADiE v5.2 DSD Operational Manual
Clears the Clip LED's at the top of each PPM strip. The Clip LED's glow brighter red when an "over"
is detected, whether Peak Hold is enabled or not.
NOTE: There is an option in the "Mixer Peak Displays" section of the Setup window that allows you to
choose to clear all meters on going into playback or to hold them every time you play audio. This
applies to the normal mixer meters and the Metering Window.
For reasons of economy with screen space, the numeric Peak Level displays are displayed on the right side of
each bank of inputs or outputs.
LOG OVERLOADS WINDOW
The Log Overloads window is called up from the "View" menu, or set to pop up as an error is detected.
7:14
SADiE v5.2 DSD Operational Manual
Mixing and Processing
The Log Overloads Window can be set to capture Audio Overloads on all digital audio outputs, whilst a
Playlist is playing. The accuracy of this is determined by the "Mixer Output PPM type" setting as explained
above.
To enable, tick Log Overloads, and set a threshold above which you want the window to record the Overs. A
list will appear below, recording the peak level, the EDL time that level occurred, the name of the EDL in which
it occurred and the output which was peaking. Double clicking on an item in the list will locate the EDL to the
correct time, so that you can review the problem.
In order to produce a definitive, accurate list of peaks in an entire Playlist, SADiE effectively has to "listen" to
the whole EDL, which involves playing the Playlist, through the mixer along with processing, and analysing the
output signal.
Errors can be logged as you play and edit the Playlist, but to speed up the process and produce a definitive
Overs log, you can do a final play-through of the EDL with NON-REAL-TIME checked in the Transport
Toolbar (at the bottom of the Record pane)
See also Peak Metering
AUTOMATION
OVERVIEW
SADiE can record the positions and movements of the following controls: fader level, mute, pan, and Mixer
strip processes (e.g. Aux. send level, equalisation, but not dynamics) and then automatically replay them. You
can update the automation data by making new adjustments as the old control movements are being replayed.
This applies whether you are using a mouse or the hardware controllers. The advantage of the hardware
controllers, of course, is that you can make more than one adjustment at a time.
Automation data is retained as part of the EDL, so that changes to mixes can be undone and redone using
UNDO and REDO, and you can move between mixes by saving and loading different EDL's. The data is tied
to the audio Entry that it affects and will move with it to different EDL times and even different Playlist
Streams, so you can edit the Playlist after mixing.
When you scrub the Playlist, the automation data will still be followed; just watch those faders fly!
Automation is enabled for the whole Mixer from this button on the Mixer's configuration
toolbar.
On the hardware controller the AUTO button will enable automation when the Mixer is the
active window.
When enabled, the Mixer automation toolbar will be displayed.
This selects the modes that determine how automation data is recorded and replayed. On the hardware
controller, they are selected with the buttons at the bottom left of the fader panel. (Note: to enable
Disconnect mode, press SHIFT + AUTO-RETURN)
Whenever the position of a control is being recorded, it will be outlined in red (by a red box around knobs and
a red stem behind faders). Hardware controller faders will have their red "write" LED lit.
Whenever data from a control is being replayed, it will be outlined in green and hardware controller faders will
have their green "replay" LED's lit.
7:15
Mixing and Processing
SADiE v5.2 DSD Operational Manual
Each process section on the Mixer strip has a DISABLE AUTOMATION button that will stop
movements of its controls from being recorded or replayed. Individual EDL Entries can have their
recorded automation data disabled in the Clip Details window so that it will not be replayed (see
Arranging an EDL).
NOTE: Process sections start with their controls disabled, so you have to enable them to record
adjustments. For EDL Entries the default is automation enabled. When process automation is recorded,
you have to put the whole process section into write, thus if you have any previous automation, the
whole section will overwrite even if you only touch one knob. For that reason if you are recording for
instance, a sweeping equalisation, it is best to write stationary parameters first. This isn't a problem with
a hardware controller because you can adjust more than one control simultaneously.
AUTOMATION MODES
The following automation modes are sensitive to a control being "touched". With the mouse, this means
clicking on it, hardware controller fader knobs are touch-sensitive.
OVERWRITE mode - applies to all controls. Any previously written data is replayed until you
touch a control. Its position will then be recorded and will continue overwriting any previous data
until you stop or change modes. The control will be outlined red; hardware faders show their red
'write' LED.
DISCONNECT mode - applies to all controls. Any previously written data is replayed until you
touch a control. It then affects monitoring only and the previously recorded data will not be
changed. The control will be outlined grey, and the hardware controller fader LED's will be off.
After returning to another mode, each disconnected control will stay that way until it is touched.
AFFECT ALL - causes the above modes to immediately affect all controls. This is the equivalent
of touching all the controls in the Mixer. So, if you press AFFECT ALL and then switch, say, to
OVERWRITE mode, all control positions will be overwritten from that point. This button can
also be used, in stop, in conjunction with AUTO-RETURN to put all controls back to playback
mode. If you're already in auto-return, then press another mode, say, DISCONNECT, then press
AFFECT ALL followed by AUTO-RETURN.
AUTO-RETURN mode - applies to fader and pan controls only. Any previously written data is
replayed until you touch a control. It will then enter overwrite mode until it is released, when it
will return to replaying the previous mix. While the hardware controller's faders are being moved,
the "write" LED will flash, and while they are returning, both LED's will flash.
The time taken for the control to return can be adjusted with the adjacent knob and display. The
knob brings up a pop-up fader that shows you a precise time in seconds; the display indicates the
nearest whole second. Note that only faders, pans and surround controls such as Width and
divergence can auto-return smoothly. Mutes cannot auto-return. EQ processes will "snap"
instantaneously back to the previous setting.
TRIM mode - applies to faders only, indicated by a blue fader stem and both hardware fader LED's
lit. Entering this mode causes all faders to immediately move to a middle position. The previously
recorded data will be replayed, but can be offset by the amount you move a fader. This is useful if
you have a complicated mix where you got all the moves right, but the whole thing needs to be a
bit quieter or louder. Note that you will not see the faders moving, but the automation data can be
displayed on the Playlist Stream, as described below.
NOTE: When you run a pass in Trim mode, on pressing stop, the final offset will be applied
for the rest of EDL on that stream (e.g. the offset is written to end). If you don't want this
to happen, you can press the AUTO-RETURN (green) button during playback, and the
Trim/offset will stop being applied from that point onwards (with an AUTO-RETURN to
join it up).
7:16
SADiE v5.2 DSD Operational Manual
Mixing and Processing
TIP: You can change modes during playback, depending on what you want each adjustment
to do. For example, after making an overwrite adjustment for several minutes, you might
want to switch to auto-return, touch the fader and have it return to the previous mix. You
can also select a mode and reposition a control before starting playback, so that the
adjustment takes effect immediately.
Once data is recorded, when you next play the EDL, SADiE will automatically switch to AUTORETURN mode. You can inhibit this automatic switching by pressing the KEEP button, which
keeps you in the selected mode each time you stop and start playback.
The WRITE TO END button writes the current position of all controls that are outlined red
(hardware faders "write" LED) to the end of the EDL. Playback must be stopped to use this
function. There is a Hotkey available for this function.
SNAPSHOT mode buttons allow you to record a constant mixer setting throughout an Entry or
groups of Entries. See Snapshot Automation for a detailed description.
NOTE: If you have used fader grouping buttons, movements of linked faders are recorded as if they are
all being moved individually. So, if the link is later removed, the automation will still replay the original
movements. Linking faders after their movements are recorded has no effect on the way they are
replayed.
NOTE: Automation data is tied to EDL Entries, so control movements where there is no Entry may be
ignored.
RECORDING AND REPLAYING A SIMPLE MIX
1.
Get a rough mix together before you enable automation. That way you can experiment with different
settings without all your twiddling being recorded and annoying the hell out of you when it is replayed.
2.
Once you have your initial fader and processing settings, you can enable automation and they will
become your starting point for recording.
NOTE: You should now position the current-time cursor at the start of the EDL (Home key),
press the grey DISCONNECT button, then the AFFECT ALL button, and then
OVERWRITE (all faders and mutes will go RED) followed by the WRITE TO END
button; these positions will be written as a complete starting mix. It is important to start off
with this base mix. If streams have no automation in them, you could run into difficulties later
on, because your first automation will affect the whole stream.
3.
Play your EDL and move any control you want recorded. You will initially be in OVERWRITE mode.
4.
Replay that part of the EDL and the positions and movements of the controls will be reproduced.
Unless the KEEP button is down, you will see that OVERWRITE mode has automatically switched
to AUTO-RETURN mode.
5.
If there is any section of the mix that you want to correct, play over it and re-adjust the fader. Hold
onto the fader until you want to return to the previous mix. If you want to re-write a long section,
switch back to OVERWRITE mode and you won't have to hang on to the fader.
NOTE: Holding Ctrl and clicking on a mute button in OVERWRITE mode will start
recording its status without actually operating the button. This can be used to overwrite a
previously recorded button operation.
7:17
Mixing and Processing
SADiE v5.2 DSD Operational Manual
AUTOMATION AND SCRUBBING AUDIO
Automation cannot be recorded whilst scrubbing audio. While you are scrubbing, automation will be re-played,
but if you touch or move a fader or other control, it will enter DISCONNECT mode until you stop
scrubbing again.
When jogging or shuttling audio using the hardware controller wheel, you should be aware that on
stopping, the Playlist remains in scrub, albeit at zero speed. This way you can pick up the scrub and
move on instantaneously. But this does mean that if you touch controls (say, to set a new level,
starting at the point you've scrubbed to) you will still be in DISCONNECT mode. Pressing play at
this point will return the controls to playback mode.
Thus if you are using scrub with the hardware controller to accurately mark a position from whence
you wish to record some new automation, on finding your position you should press STOP. Now
you will be able to put your fader into overwrite and its status will continue after hitting play.
This is not the case with the mouse method of scrubbing because when you let go of the mouse
button the EDL stops. Likewise with the Hotkey, fixed-speed scrubs.
SNAPSHOT AUTOMATION
Whereas other automation modes are designed for recording dynamic changes to the mixer controls, the
Snapshot Mode allows you to apply the same settings throughout an Entry or group of Entries.
This feature has a number of uses. For instance:
•
You can quickly set a level on a group of Entries without having to play across them in real time
•
You may want to set a different pan on alternating Entries on the same stream
•
Snapshot EQ's are perhaps more useful in many cases than dynamic changes
Note: Snapshot automation records ordinary automation data onto an EDL entry, in the same as you
would if you held a fader or pot constant for the length of the clips. This is not a special type of
automation, merely an automatic way of writing automation data if it is going to be constant. However,
because you need to select EDL entries on which to apply the snapshot, streams that have no entries,
like mixer only streams (bus faders, output faders etc.) cannot be "snapped".
RECORDING SNAPSHOT AUTOMATION
7:18
1.
Pressing the "camera" icon on the Automation toolbar enables SNAPSHOT Mode. You will notice
the violet SNAPSHOT READY button will be pressed and all other Automation mode buttons are
disabled except for DISCONNECT.
2.
Select the Entries in the Playlist that you want the automation to be applied to. You can change your
mind about this whilst in SNAPSHOT mode; the automation will only be applied to the Playlist
Entries selected in red when SNAPSHOT Mode is exited.
3.
Set the mixer controls (faders, pans, mutes, EQ's etc.) either in play or stop. Unlike other automation
modes nothing is recorded as you go along. When you touch a mixer control it will be outlined in
violet. If you want to change a control without putting it into SNAPSHOT Ready mode, then click
the grey DISCONNECT button before touching it.
4.
Press the "camera" icon again to exit SNAPSHOT Mode. At this point the current position of every
control outlined in violet will be set for every EDL Entry selected in red to which the control applies.
For instance if you set a fader for Stream 3 but only select entries on Stream 1 then nothing will
happen.
SADiE v5.2 DSD Operational Manual
Mixing and Processing
NOTE: Before you snapshot, it is advisable to have some automation recorded. When you
first start automating none exists at all. If a snapshot is the first thing you do, you will find that
the snapshot is applied across the whole Stream. Thus if you wanted to for example
individually EQ or level change just one entry, then you should snapshot the "flat" settings for
the EQ or the base level to the all entries in the stream first.
AUTOMATING MUTES
Mutes and solo buttons follow slightly different rules to faders and pans during automation, because they are
not variable controls, merely two state; either On or Off.
Additionally, because this is a disk editor and not purely a mixing console, there are several other ways of
making your audio mute and un-mute, e.g. by editing. You may find that editing to produce a mute is more
flexible and accurate. You also have the option of making a fade-up or down to suit, rather than just a hard unmute or mute.
Sometimes during a mix, there are times when you'll want to use solos or mutes to listen to one or a few
streams in isolation. And of course you may not want to record those particular mutes. You can do this by
switching to the grey, DISCONNECT mode before touching the mutes, however SADiE has a setup option
that makes all mute operations work in DISCONNECT mode. You will find this in the " Mixer strip display"
section of the Setup Window. The button is under "Mute automation - Disconnected". Having ticked this
setting, pressing a mute will not cause that action to be recorded. Particularly if you're using other methods to
perform the mute, working with this setting on may give you more flexibility.
Note that whether this mode is on or off, all SOLOS are always performed in disconnect mode, and thus the
associated mutes are never recorded.
To mute a section of audio by editing:
•
Disable (by pressing the Stream Name button on the left side of the EDL) the streams that you do not
want to effect. Streams that you want to mute should be enabled. (See Enabling/Disabling Streams)
•
Make a razor cut in the Clip (s) at the mute point, and another at the un-mute point. You can make
these razor cuts in the usual way, either hitting razor whilst you play, or by scrubbing up to the exact
position in the EDL and then pressing razor.
•
Right mouse click on the Clip(s) to be muted, and select "Make clip inactive" either one at a time, or if
you have a number of clips to mute, then group them together and inactivate the group clip.
Alternatively delete the clips you don't want to hear.
The advantage of this method over automating mute buttons is that you can make the mute point much more
accurate. This method of inactivating the clip allows you to leave it in the EDL (for visual reference or in case
you want to later change the mute point) without using any DSP resources.
If you were to use the mute button method, you can probably set the mute point relatively accurately, on the
fly, however the unmute point could be tricky, because you can't hear the audio while it is muted. If you get the
unmute late, then you can't scrub over the correct unmute point because you can't hear it; the automation will
be playing back, and the audio will be silent at the point you want to scrub. Editing to perform mutes gives you
much more accuracy and flexibility.
If you are using mute button automation, you should note that they are always in overwrite mode, whether the
automation mode is set to overwrite, auto-return or trim.
7:19
Mixing and Processing
SADiE v5.2 DSD Operational Manual
DISPLAYING AUTOMATION DATA
You can display automation data for each Mixer strip. Each parameter (fader changes, pans, mutes, process
parameters etc) can be displayed as a white line on each Stream routed to that strip. Stereo and merged
Streams will display the appropriate number of lines. The position of the line indicates the fader level or
parameter value.
The large button at the top left of the Playlist will display automation data on all Streams.
On the hardware controller this is duplicated by the AUTO button when the Playlist is the active
window.
The small button by each Stream will display data for that Stream only.
The small fader button by each Stream allows you to choose which automation parameter to display.
Selecting this button gives you a menu to choose from all available processes, or fader, or pan, and the
sub-menu lets you choose which parameter within that process to display.
NOTE: If there are Mixer strips controlling internal busses or inputs, Streams to show their data will be
found in the Stream unit labelled "Mixer only Streams". Double-click on the unit name to display or
reveal this unit in the Playlist. These Streams cannot have Entries placed on them.
EDITING AUTOMATION DATA
As an alternative to re-recording control movements, you can edit (alter) the data by directly manipulating the
line displayed on the Playlist Stream.
To enable automation editing, you must first turn on the Automation Editing toolbar (the automation editing
functions are enabled and disabled as this toolbar is displayed or hidden respectively).
Press the SELECT TOOLBARS button on the Playlist toolbar again. Select "Automation Edit" to
reveal the Automation Edit toolbar.
The Playlist entries will change to grey to show that you are now working in this mode. Hide the toolbar to
turn it off, by unticking its line in the Select toolbars menu. The Entries on the Stream will go into outline and
the automation data line will turn red.
7:20
SADiE v5.2 DSD Operational Manual
Mixing and Processing
This line, however curvy it looks, is made up of straight lines joining up a lot of "Automation Points" where the
line changes direction. Each point is shown by a pink dot and a level indication when the mouse pointer is near
it.
You can use the mouse to move an existing Automation Point or draw a box around several Automation
Points and move them together, either horizontally or vertically, depending on the first movement of the
mouse. Hitting Delete on the keyboard will remove the Automation points within the box and replace them
with a straight line.
The three buttons (left to right) on the automation toolbar enable the following mouse functions to further
manipulate the line:
1.
Adds a new point to the line and set its level.
2.
i. Draw a box around an area to create a "duck" or dip in level, the width and depth of which will be
determined by the size of box you draw.
ii. Adjust the depth of an existing duck by dragging its bottom up or down. Wildlife enthusiasts should
enjoy that one.
3.
Draw a box around an area of complex data (as usually results from fader or pan movements) and
when button is released smooth the data so that it consists of fewer Automation Points.
NOTE: You can remove all automation from an entry using an option available by right-mouse-clicking
on the entry.
NOTE: Editing is not applicable beyond the last Entry on the Stream. Stereo Entries must be on Stereo
Streams if you want to edit the automation data of both left and right channels simultaneously.
Automation editing in this manner is possible for every automation parameter that can be displayed.
SURROUND SOUND
INTRODUCTION
The v3.6 release of SADiE was the first to incorporate support for mixing to the most popular surround sound
formats. It has been attempted, wherever possible, to integrate the new surround sound features into SADiE as
seamlessly as possible. Hopefully, this will make your step into the world of surround sound as intuitive and
straightforward as possible.
As with any major new feature, there will inevitably be many questions that cannot be answered by
experimentation alone. It is therefore recommended that you spend a little time browsing this document
before attempting to undertake anything too ambitious. Once armed with the knowledge contained in this
manual, working with surround sound will be as straightforward and logical as working with conventional leftright stereo.
If, whilst familiarising yourself with the new features, you encounter a problem that seems to defy explanation,
your first port of call should be the last section of this chapter, where there are listed solutions to a number of
the most commonly encountered problems.
SURROUND TERMINOLOGY
For many people, stereophonic implies two channels, left and right. This perception has been created by the
dominance of the 2-channel, left-right format used by the music recording industry since the 1960's. There are
however many "stereo" formats. Each surround format is a stereo format. Dolby™ Stereo (also known as
Dolby™ Surround) for example, is a 4-channel stereo system. It is therefore important to try and break any
association that you may have held in the past between the word "stereo" and the number "2"!
7:21
Mixing and Processing
SADiE v5.2 DSD Operational Manual
To avoid confusion, this manual will refer to conventional 2-channel stereo as "L-R stereo" where there is any
possibility of ambiguity.
GETTING SADIE INTO SURROUND MODE
Not everyone will need to work in surround (yet!), so SADiE can hide everything related to surround sound
from the user. This is the default operating mode. You will therefore need to first enable the Surround Sound
features by opening the Setup window and selecting the "Surround Sound" topic from the left pane. This will
display the check box that allows the Surround Sound features to be activated.
Once activated, the features will not actually take effect until the next time a mixer is created or opened. It is
therefore important to remember that if you switch modes whilst a project is open, you will need to close and
then re-open the currently open mixer. This should be done from the mixer component in the project window
rather than the mixer window itself. Better still, only change the mode whilst you don't actually have a project
open. Most users will probably just enable the surround sound features once and then leave them enabled
indefinitely. Having the features enabled does not restrict your ability to continue creating and working on nonsurround sound projects.
7:22
SADiE v5.2 DSD Operational Manual
Mixing and Processing
If your system currently has the Surround Sound features turned off, and you attempt to load a mixer
containing surround sound format strips then SADiE will automatically offer to turn the Surround Sound
features on, so that it can successfully complete the load. If you decline the offer then SADiE will abort the
loading of the mixer.
The state of the "Surround Sound enabled" check box is stored in the user's INI file and can therefore be set
depending on each user's needs or preferences.
DIFFERENCES WITH SURROUND ENABLED
You can tell at a glance if surround sound is enabled by checking if the pan pots
on the mixer strips have a small left-right arrow legend above them (as in the
example strip to the left). There is also a new button beneath the PPM display
area that is used to switch the PPM display between front and rear channel
metering. This button will always be disabled on conventional mono and L-R
stereo strips.
The Process Toolbar will also have three extra strip type buttons labelled LCR,
LCRS and LCRSS appended to the end. Note that you may have to resize the
mixer to bring these extra buttons into view.
SURROUND FORMAT BUSSES
The key to successfully working with surround sound on SADiE is to understand surround format busses and
how they have been implemented in SADiE. Once you have mastered this fundamental aspect, everything else
will fall into place relatively easily.
With Surround disabled SADiE features just two types of busses: mono, and conventional L&R stereo. In actual
fact, SADiE only really features mono busses. Stereo busses are little more than a convenient pairing up of two
adjacent mono busses.
Surround sound in SADiE builds on this foundation. All busses are still ultimately derived from an arrangement
of mono busses. This simply provides new "building blocks" in addition to the familiar L&R stereo pair.
7:23
Mixing and Processing
SADiE v5.2 DSD Operational Manual
THE LCR BUS
The most important new bus type is the LCR bus (Left, Centre, Right). In order to understand exactly what
this new bus consists of, open the Routing Toolbar (from the Mixer Configuration Toolbar on the mixer)
Open up the Mixer Internal Busses folder and right mouse click on the New Bus entry. You will notice that the
Create a new bus sub-menu offers four options. (If you do not see this sub-menu then you have not yet
enabled the Surround Sound features and re-opened the mixer. See section above entitled Enabling Surround
Mode for more details). The first option is a Mono pair that will create the standard L-R stereo bus with which
you are all familiar. On this occasion, select the second option, LCR.
This creates a new LCR bus called LCR1. You will notice that it is placed immediately beneath Bus 1&2 in the
bus tree. Double click on LCR1 and you will find that it is constructed from three mono busses. Each of the
mono sub-busses have an automatically generated suffix (L, C, or R) to uniquely identify them. You can rename
a bus by right mouse clicking on it and selecting the "Rename bus" option. The one restriction with surround
busses is that you can only rename the root bus (LCR1 in this case). All of the sub-busses will be renamed
automatically when the root is renamed. Try renaming LCR1 to, say, Tutorial. The resulting bus tree should
then match the example to the right.
Finally, to return to the starting point, delete the LCR bus by right mouse clicking on it and selecting the Delete
bus option.
In most situations, you probably won't find yourself creating busses from the Routing Toolbar. Instead you'll
probably create them from the familiar and more convenient "New Bus" option in a mixer strip's Input /
Output routing drop down list boxes. It is, however, handy to know that all bus housekeeping can now be
performed in this one place.
7:24
SADiE v5.2 DSD Operational Manual
Mixing and Processing
THE LCRS BUS
Now that you've established that SADiE has mono, L-R stereo, and LCR busses at its disposal, you can take the
next logical step.
LCRS stands for "Left, Centre, Right, Surround" and represents the configuration used by Dolby™ Stereo (also
known as Dolby™ Surround). This is the most common surround format in use today and consists of four
channels in the following configuration.
The "front" consists of three channels, which can be represented by an
LCR bus, and the "rear", a single mono channel, which can be
represented by a mono bus. To confirm this, create an LCRS bus from
the Routing Toolbar by right mouse clicking on the New Bus entry in
the bus tree and selecting LCRS from the Create a new bus sub-menu.
The resulting LCRS bus should match the example to the right.
Once again, each sub-bus within the overall LCRS 1 bus has an
automatically generated suffix that uniquely identifies not only the subbus itself, but also its type.
All LCRS busses will be placed in the bus tree immediately after any
LCR busses.
7:25
Mixing and Processing
SADiE v5.2 DSD Operational Manual
THE LCRSS BUS
The final surround bus to describe is the LCRSS bus, which is the same as the previously described LCRS bus,
except for the fact that it features individual left and right surround channels. This five channel configuration is
particularly significant because it forms the "5" of the increasingly popular "5.1" format used by Dolby™ Digital
(SR-D), DTS Digital (DTS) and perhaps most importantly of all, Digital Versatile Disk (DVD).
As with the LCRS bus, the front three channels can be represented by
an LCR bus. The two rear surround channels can be considered a
stereo pair (for bus purposes) and therefore represented by a
conventional L-R stereo bus. A fully expanded LCRSS bus therefore
matches the structure of the example to the right.
The "5.1" format was mentioned above when listing formats that could
make use of LCRSS busses. Some users may be wondering why there is
no final logical step to implement a 5.1 format bus that consists of an
integral LCRSS and mono bus.
There are several reasons why it was decided not to take this approach,
most of which will become apparent when you start working with mixer
strips that handle surround busses. However, the reasons mainly
concern the vastly differing control and processing requirements of the
two busses.
This absence of an integral 5.1 style bus does not mean that you cannot produce a 5.1 mix using SADiE. It
simply means that you have to consider your total 5.1 output as consisting of an LCRSS bus (to provide the
main 5 channels) and a separate mono bus (to provide the ".1" or LFE channel). The LCRSS bus would typically
be routed to O/p 1-5 and the mono bus to O/p 6.
The advantage with this approach is that it enables you to process your ".1" (LFE) channel independently of the
other 5 channels. This is essential considering the limited frequency range requirement of the resulting channel.
It also gives you total freedom when deciding what components of your overall mix to add to the channel.
7:26
SADiE v5.2 DSD Operational Manual
Mixing and Processing
SURROUND FORMAT MIXER STRIPS
Of course, all of the surround busses would be of little use without some different mixer strips to generate and
manipulate them. To offer maximum flexibility SADiE offers nine new types of mixer strip in addition to the
original mono/L-R stereo strips.
The new strips fall into three categories; those with an LCR output, those with an LCRS output, and finally
those with an LCRSS output. Each of these three categories contain a further three strip types; one with a
mono input, one with an L-R stereo input, and one with an input that matches the format of the output.
The following table summarises the input and output formats of the nine new strip types:
Input Format
Mono
L-R Stereo
LCR
Mono
L-R Stereo
LCRS
Mono
L-R Stereo
LCRSS
Output Format
LCR
LCR
LCR
LCRS
LCRS
LCRS
LCRSS
LCRSS
LCRSS
To avoid cluttering up the mixer process toolbar with nine new strip buttons we have opted to add just three
buttons instead. These three buttons are labelled LCR, LCRS, and LCRSS and refer to the output format of
the strips that they will create. The user must specify the input format at the moment of dropping the strip into
the mixer.
Depending on the surround format that you work with, a typical simple surround mixer might consist of 8
mono in / LCRS out strips (one for each Playlist stream), and a final LCRS in / LCRS out strip for global
processing and level control.
To help familiarise you with process of creating a surround mixer from scratch, the following section is
designed to walk you through the entire process from the creation of a new project right up to the moment
where you're ready to do some real work.
CREATING A SURROUND MIXER
In this example it is assumed that you are going to work with an 8 stream EDL, mixing mono material to LCRS.
The first step is to create a new project. Then you need to remove all the default strips from the mixer in
preparation for dropping the new surround strips in. This is certainly the most tedious part of the whole
process, although it needn't be a process that you repeat every time you create a new surround project (see
section below headed Making use of Mixer Templates for more details). Mixer strips can be deleted by
selecting the Delete Strip option from the right-click popup menu that appears when clicking on a strip.
Alternatively strips can be deleted by dragging them off the mixer window (you will need to pick them up by
clicking on an area of the strip that has no other function when clicked on, for example the PPM's or strip
number).
Once you have emptied your mixer, you are ready to add the new surround strips. Double click on the LCRS
button on the mixer process toolbar. This will put SADiE into "strip insert mode". A small dialogue box will
then appear asking you to specify the input format for your strips. Just click "Ok" to select the default mono
option.
7:27
Mixing and Processing
SADiE v5.2 DSD Operational Manual
You are now free to insert as many strips as you like. All you have to do is point and click wherever you want
a strip to be inserted. If the position you're pointing at is not valid, the mouse pointer will change from a mixer
strip to a "no-go" pointer. For your example, insert eight strips; if you insert too many, don't worry, you can
easily delete them again afterwards. When you have finished inserting strips, click the right mouse button to
exit insert mode.
If a horizontal Scrollbar appeared on the mixer window whilst you were inserting your strips, make sure it is
moved to its far right extreme, in order to fully reveal strip number 8.
To insert the final strip just drag and drop from the LCRS button on the process toolbar. Click on the button
and drag it all the way to the right hand half of strip number 8 (or further right if your mixer window is wider
than your mixer). When you release the mouse button, the dialogue box asking you to specify the input format
will appear again. On this occasion select LCRS and press OK. (If the dialogue does not appear, then you are
dropping the strip in an invalid position. Try repeating the process, making sure that the mouse pointer
resembles a mini fader before releasing the button.)
At this point you should have a mixer that resembles the example below:
The next step is to set up the input and output routing for each strip. Currently, you will notice that all of the
routing buttons are "Unset". (If you can only see one row of "Unset" buttons, enable the Output Bus buttons
by clicking on the "Output bus buttons" button on the mixer configuration toolbar; the button resembles a bus
emerging from a tunnel.) Before you start, make sure that your Playlist, rather than the Clipstore, is linked to
the Mixer. Do this by clicking on the Playlist window and then clicking back on the mixer window.
Click on the "Input selection" button on strip 1 (the top "Unset" button), scroll down the list and select "1"
(this will be "A1" if you have a multiple card system). This sets the input routing of the first strip to Stream 1 of
the Playlist. Next set the output routing for the strip by clicking on the "Output selection" button (the
remaining "Unset" button). This time your options will be more restricted. This is because apart from the
physical outputs, there is nowhere to route to yet. To remedy this situation select the "New Bus" option. This
will automatically create a new LCRS bus called "LCRS 1" (LCRS A1 in multiple card systems) and assign it to
the output of the strip.
Repeat this process for the next seven strips, but on each occasion select an input bus one greater than the
previous strip. For example select "2" as the input bus for strip 2 and "3" as the input bus for strip 3. Always,
however, select "LCRS 1" as the output bus for each strip.
Finally, set the input routing of strip 9 to "LCRS 1" (the bus that carries the combined outputs of strips 1 to 8)
and the output routing to O/p 1&2&3&4.
You have now completed setting up the input and output routing for your mixer and it should match the
example below:
Your mixer is now ready for use and should be saved before proceeding any further.
7:28
SADiE v5.2 DSD Operational Manual
Mixing and Processing
FLEXIBLE ROUTING
The previous example described one of the most simple mixer configurations possible. In reality, more
complexity and hence flexibility are required to achieve particular results. SADiE addresses this requirement by
allowing a great degree of flexibility when it comes to routing internal mixer busses to mixer strips.
For example, just because a strip has an L-R stereo input doesn't mean that you have to route a conventional
L-R stereo bus to it. You could for example route the two rear channels of an LCRSS bus to such a strip; useful
if you want to do some processing on just the surround component of you mix. Strips with mono inputs or
outputs offer total freedom, as any individual sub-bus can be routed to them.
One particularly useful aspect of this flexibility is the potential to conserve DSP power. Imagine, for example,
that you're producing an LCRS mix for a film. Much of your material may just be dialogue and you have decided
that you want to keep all of the dialogue in the front three speakers. Rather than create full LCRS output strips
for each channel of dialogue, you could just create strips with LCR outputs, which you route to the LCR subbus of your final surround mix bus. This is obviously "cheaper" in terms of DSP power as it saves the extra (and
unnecessary in this case) calculations required to derive the rear channel component.
Perhaps the best part of all this is that SADiE does the hard work for you. Whenever you want to set up the
input or output bus of a strip, SADiE works out all the possible valid routings for you and presents them in the
drop down list box. All you have to do is browse the list and pick the appropriate one.
PPM MONITORING
In most circumstances the PPM's meter pre-fader. The only exception to this rule is if a strip is routed to a
physical output and the output format of the strip matches the input format, in which case the metering will be
post-fader.
UNDERSTANDING THE CONTROLS
Although each of the surround strips has its own distinct characteristics, they all share a common interface and
set of controls. Certain strips may disable some of the controls because they have no function due to the input
format of the strip. Other strips may omit certain controls altogether because they have no relevance with
respect to the output format of the strip. For example a strip with an LCR output does not require the frontback pan control to be present.
Below is an example of a mono to LCRSS strip (1 in / 5 out):
1 -------2 ----
--------- 3
---- 4
1.
Divergence control
2.
Left-Right Pan control
3.
Width control
4.
Front-Rear Pan control
5.
Joystick control
6.
Divergence mode toggle
7.
Strip input/output format indicator
---- 5
---- 6
---- 7
7:29
Mixing and Processing
SADiE v5.2 DSD Operational Manual
Each of the new controls labelled in the above example will now be explained in turn, along with specific details
about which of the new strips feature each control and which do not:
1.
Divergence control - This normally controls the amount of left-right and front-back divergence. If the
"Divergence mode toggle" button is down, it will only control the amount of left-right divergence. By
default the control is set to maximum (full divergence) when a strip is created. The control is only
enabled on surround strips than have a mono or L-R stereo input.
For more information about divergence, see the following section entitled Divergence.
2.
Left-Right Pan control - This particular control needs little introduction and will already be familiar to
most users. It pans the front (and L-R stereo rear channels if present) between the corresponding left
and right channels. This control is disabled on strips that feature the same input and output format
(e.g. LCR to LCR, LCRS to LCRS and LCRSS to LCRSS).
It is important to remember that the exact behaviour of the pan control is dependent on the current
position of the divergence control. For example, if the divergence control is set to its minimum value,
then the pan control will have no effect.
3.
Width control - This control will only be enabled on surround strips with a mono or L-R stereo input.
You will probably only find yourself needing to use it if you have some non-directional L-R stereo
source material that needs panning to a picture.
Reducing the width of a L-R stereo input to the absolute minimum effectively collapses it into a mono
signal.
By default, the width control is set to its minimum for mono input strips and maximum for L-R stereo
inputs strips.
4.
Front-Rear pan control - This control only appears on strips that have an LCRS or LCRSS output and
performs a similar function to the Left-Right pan control except it operates between the front and
rear channels. The control will be disabled on strips that feature the same input and output format
(e.g. LCRS to LCRS and LCRSS to LCRSS).
Again, it is important to remember that the behaviour of this control is dependent on the current
position of the divergence control and also the state of the divergence mode toggle switch.
5.
Joystick control - This is not actually a true control in its own right, but a convenient interface that
allows simultaneous control of the Left-Right and Front-Rear pan controls. The control will appear on
strips that feature an LCRS or LCRSS output, and only be enabled on those that feature a mono or LR stereo input.
The control has two modes of operation:
i. The first is invoked by a single downward click and hold of the left mouse button on the
joystick control button. This will launch the joystick window with the Left-Right and Front-Rear
pan positions represented by a "knob" at the appropriate position in the window. This window
represents the complete surround sound field and the position can be adjusted by moving the
mouse. Releasing the mouse cancels the window.
ii. The second mode is activated by double clicking on the joystick control button. As with the
first mode, this launches the joystick window and positions the "knob" at the relevant position
in the window. It will, however, remain open until you subsequently click the mouse outside the
limits of the control window. While the window is open you can adjust the position of the knob
by clicking on the knob and dragging it to its new position whilst holding the mouse button
down.
7:30
SADiE v5.2 DSD Operational Manual
Mixing and Processing
Quick centring of the joystick is possible by double clicking in either the centre of the window (on the
cross hairs), or in the top centre of the window (beneath the centre speaker icon).
Joystick Control Window
6.
Divergence mode toggle - Normally, the divergence control applies the same divergence to both the
Left-Right and Front-Rear pan controls simultaneously. In certain situations, however, it can be
desirable to detach the divergence control from the front-back pan control and restrict its influence to
just the left-right pan control instead. This "detached" mode is activated by pressing the divergence
mode toggle button into the "down" position. When in this mode the front-back pan control is always
fully divergent allowing it complete front-back movement.
This switch will only exist on strips that have an LCRS or LCRSS format output, and only enabled on
strips with a mono or L-R stereo input. It is also not automated, but its current setting is saved with
the mixer.
7.
Strip input/output format indicator - Due to the fact that all of the surround strips look very similar at
a glance, this display forms a handy reminder of the input and output format of the strip. It uses the
same familiar icons that appear in the Routing Toolbar: the top icon (above the downward arrow)
indicates the input format, and the bottom icon indicates the output format.
Because this area of the strip allows no user interaction, it also makes a handy place to click on if you
want to drag a strip to another place in the mixer, or you want to minimise a mixer strip by double
clicking on it.
7:31
Mixing and Processing
SADiE v5.2 DSD Operational Manual
DIVERGENCE
Divergence is an important aspect of panning, and control of it becomes a significant issue when working with
pan controls that operate on 3 (or more) channels. Consider the following example that illustrates the most
basic panning characteristics of a 3-way pan used to control LCR stereo:
Pan characteristics when Divergence is set to 100% (default)
As you can see from the diagram, when the pan is hard left, dead centre or hard right, only the corresponding
channel carries any signal. This movement of the signal from channel to channel is known as divergence. In this
particular case the pan is said to have full divergence, because at no point during the complete pan does the
signal ever appear on more than two channels at once.
In SADiE all surround strips are created with full (maximum) divergence by default, and in many cases the
resulting behaviour of the pan control may be perfectly acceptable. However, consider the following situation.
Imagine you're mixing to picture and there is a particular sequence where a car drives from left to right across
the entire scene. Obviously, a left to right pan of the sound of the car's engine is required to provide a
convincing effect. But will a complete left to right pan with a fully divergent pan produce a convincing result,
and perhaps more importantly, will it produce an effect that is acceptable to most (if not all) of the audience?
In reality, the pan will fail on both counts. Due to the fact that the sound moves completely in and out of each
speaker in turn, the pan will appear to "jump" from speaker to speaker. This effect becomes more noticeable as
the speed of the pan is increased. It will also fail to produce a consistent effect across the entire auditorium.
People sitting in the centre (where the limited "sweet spot" will be situated) will get the best results, whilst
those sitting at the far left and right extremes are going to receive disproportionate amounts of the left or right
channels even though they can clearly see the entire picture.
7:32
SADiE v5.2 DSD Operational Manual
Mixing and Processing
To remedy this situation, you can decrease the divergence of the pan control, altering its characteristics so that
a proportion of each signal is automatically "bled" into the adjacent channels, "spreading" the sound over a
wider proportion of the stereo image. This will not only produce more coherent results for those seated at
the left and right extremes of the auditorium, but will also make pans appear to glide more smoothly.
Pan characteristics when Divergence is set to 50%
As you continue to decrease the divergence, the variation in the level of each channel during a pan continues to
decrease, until you reach the minimum setting (no divergence at all) where no change occurs, and the pan
control therefore has no effect.
You may have gathered by now that using the divergence control is something of a compromise: too little and
you create unnatural results that don't work across an entire auditorium, too much and you start to lose the
benefits of stereo sound.
The ability to control divergence is especially important when mixing to picture, and will rarely be left set at its
maximum value. Of course, in the case of music production there are no such constraints, so you should just
consider divergence as another creative tool. It is important to remember though, that you will not be able to
produce truly "natural" effects whilst the divergence control is at its maximum setting.
ROUTING SURROUND BUSSES
The two main points that need addressing, with regard to routing surround strips to physical outputs, are:
•
Of the available physical outputs, which ones can surround strips actually be routed to?
•
In what order will the individual mono sub busses actually appear on these outputs?
7:33
Mixing and Processing
SADiE v5.2 DSD Operational Manual
WHICH OUTPUTS CAN I ROUTE MY SURROUND STRIPS TO?
SADiE uses a simple rule to decide where you can actually route to:
•
If the number of channels, n, is 1 or even you can route the bus to every nth physical output starting
from O/p 1.
•
Otherwise you can route the bus to every (n+1)th physical output starting from O/p 1.
The second half of the rule is necessary to ensure that busses with odd numbers of channels (excluding mono
busses) are treated as though they had an even number of channels. This guarantees that all busses (with the
exception of mono busses) are aligned with an odd numbered output. Don't worry if you currently find all this
a little confusing and meaningless. Once you start using SADiE you'll soon understand and appreciate the need
for this rule. The most important thing to remember at this stage is that SADiE won't let you do anything that
isn't allowed.
To save you having to work out the full implications of the above rule we have produced the table below. It
clearly illustrates all the possible valid output routings for each type of bus in a system with 8 outputs. The
"grey holes" do not necessarily indicate unusable outputs, only that they are unusable by a bus of the same type
as the column in which they appear. For example, if you were creating a "5.1" format mix it would be perfectly
legal to route your main LCRSS bus to o/p 1-5 and to then route your mono bus (representing the ".1"
channel) to O/p 6.
Mono
O/p 1
O/p 2
O/p 3
O/p 4
O/p 5
O/p 6
O/p 7
O/p 8
L-R Stereo
O/p 1&2
LCR
O/p 1-3
LCRS
O/p 1-4
O/p 3&4
O/p 5&6
O/p 5-7
LCRSS
O/p 1-5
O/p 5-8
O/p 7&8
If you find yourself unable to route your strip to where you believe you should be able to, check that one or
more the outputs in question are not already being used by a different type of bus in another mixer strip. The
most common cause of not being able to route your LCRS strip to O/p 1-4 is an L-R stereo output strip
routed to O/p 1-2 somewhere else in your mixer. Failing this, check that you don't have any Aux Send
processes using the desired outputs.
IN WHAT ORDER WILL THE SUB-BUSSES APPEAR ON THE OUTPUTS?
You might be forgiven for thinking that if you routed an LCR output strip to O/p 1&2&3 that the left channel
would appear on O/p 1, the centre on O/p 2 and the right on O/p 3.
What actually happens in this particular situation is that the centre and right channels are "swapped over". This
ensures that the left and right channels always occupy the first two outputs, maintaining compatibility with
conventional L-R stereo routing. Additionally, when combined with the "odd" bus alignment rule mentioned in
the previous point, it also ensures that the related left and right channels will be sent to the same AES output.
7:34
SADiE v5.2 DSD Operational Manual
Mixing and Processing
The following diagrams summarise the exact routing used for each of the supported surround formats:
LCR
LCRS
LCRSS
For consistency, a similar rearrangement of the surround channels occurs if you route a surround format input
back into SADiE through three or more physical inputs. In order to work out which channel to apply to each
input, use the above diagrams in reverse, following each input back to the appropriate channel.
MAKING USE OF MIXER TEMPLATES
You may have noticed that creating a basic mixer for surround sound work can be a rather involved and
tedious process. First you had to start with a standard L-R stereo mixer and then remove all (or some) of the
strips before adding the required surround sound strips. Finally, you then had to set up all the routing, creating
the necessary surround busses as you went.
Fortunately there is a solution to this inconvenience and it involves a feature that some users may already have
experimented with in the past: Mixer Templates.
SADiE features both Playlist and mixer templates, but you'll just concentrate on mixer templates, although all of
the concepts involved apply equally to both types.
Just think of a mixer template as an ordinary mixer, which you have created and saved in a special location.
Actually, the only real difference between a mixer template and an ordinary mixer is its filename extension
(*.MST rather than *.MSU). Once you have created one or more templates you can then tell SADiE to create
any subsequent new mixers from a specific template. Alternatively you can ask SADiE to allow you to choose
which template to use at the actual moment that a new mixer is to be created.
CREATING A MIXER TEMPLATE
Creating a mixer template is very simple indeed. The easiest way is to just create a new mixer using the New
option on the main File menu (don't bother adding it to the currently open project when asked). You can then
edit this mixer into the mixer of your choice.
Once you are happy with the mixer you have created you will need to save it as a template. To do this select
Save current mixer as template from the main File menu (this option will only appear on the menu if the mixer
is the currently selected window). A suitable directory will automatically be selected, so all you need to do is
give it a name and press OK.
Your template has now been saved and is ready for use.
7:35
Mixing and Processing
SADiE v5.2 DSD Operational Manual
USING A MIXER TEMPLATE
To set SADiE up to use a template, you need to open the Setup window and go to the "Project Management
Templates" section. This will reveal the template set up options.
By default, templates are not used. To use specific Playlist and Mixer templates click on the "Use the specified
templates" option. This will enable the two "Change" buttons in the section below. Click on the one next to
the edit box labelled "Mixer". You should now see your previously created template(s) listed. Make your
selection and press "Ok".
From now on, all new mixers will be created from the mixer template that you have specified. Playlists will
continue to be created in the normal non-template way, because no template has been specified.
If you ever want to change your choice of template or mode of working (as you inevitably will sooner or later)
then just return to the Templates setup page and make your changes. All of the settings in this window are also
user specific, so each user can have their own preferred template configuration.
SURROUND FAQ'S
If I create a project whilst the surround sound features are disabled, will I be able to incorporate surround
sound strips into the mixer at a later date?
•
Yes. The state of the Surround Sound features option when the project is created is of no
consequence. If you subsequently require the surround features then just enable the option in the
Setup window and reopen your project.
Inserting multiple strips into a mixer is a real "drag", especially when they are surround strips, because I have to
keep responding to the "Input Format" dialogue when I drop a strip. Is there a short cut?
•
Yes. Instead of dragging the strip button from the toolbar, double click on it instead. If it is a surround
strip button select the input format that you require. Then simply click wherever you wish to insert a
strip into the mixer. When you have finished adding strips, click the right mouse button to exit insert
mode. This handy feature also works for inline processes.
I've enabled the surround sound features checkbox on the Setup window and closed and reopened my mixer,
but I still don't get the surround format strip buttons.
•
You probably just haven't "really" closed the mixer. You need to do this from the project window by
right mouse clicking on the mixer component and selecting "Close Component" from the popup
menu. Once closed, double-click on it to reopen it again. Alternatively (or if you are not working in
project mode), close the mixer from the File menu and then reopen it.
I've got 4 (or more) physical outputs on my system but I don't seem to be able to route my final LCRS output
strip to O/p 1&2&3&4.
•
7:36
You've probably already got O/p 1&2 assigned to an L-R stereo output strip somewhere else in your
mixer. Reassign the output of the offending stereo strip to a different output or bus (or delete the
strip if it isn't required). If this isn't the problem check all Aux Send processes to see if any of them are
using O/p 1&2. This problem can also occur with inputs and the remedy is exactly the same - except
check strip inputs, rather than strip outputs.
SADiE v5.2 DSD Operational Manual
Mixing and Processing
My output channels seem to be jumbled up, and channels don't seem to be appearing on the expected outputs.
•
Surround busses get re-ordered slightly when they emerge into the real world. There are several
reasons for this, but the main two are:
i. To ensure that the first two outputs are always L and R (to prevent you having to re-route
your output wiring when switching between L-R stereo and surround projects)
ii. To keep related stereo pairs on the same AES output wherever possible.
For more information about the exact channel routing used by each of the surround formats, see the
section entitled Routing surround busses.
7:37
Mixing and Processing
7:38
SADiE v5.2 DSD Operational Manual
SADiE v5.2 DSD Operational Manual
File Management
8 - FILE MANAGEMENT
OVERVIEW
Work in SADiE is held in a number of files. Firstly there are the Tracks (sound files of the audio as originally
recorded into the system) and these are stored on dedicated audio disks. Looking after these is covered in
"Track and file management", below.
Then there are the files that represent the work you have done to the raw material. These are:
•
EDL's - how and when to play back which parts of the Tracks
•
Clipstores - a useful store of Clips for later use
•
Mixer setups - a record of the Mixer configuration needed to play the EDL
•
Projects - group all the above files as components, together with a list of relevant Tracks. A Project
file can then represent all the work for a particular job.
Just like the documents of a word processor, these files need to be saved so that they can be opened later for
further work or playback. They are stored on the DOS hard drive of the PC.
Creating, opening, saving and closing EDL's, Mixers and Clipstores can be done:
1.
From the Project window. Files created this way will become components of a Project
NOTE: We strongly recommend that you always start work within a Project, as to later create a
Project from non-Project-files requires importing all components individually. It also makes saving,
reloading, archiving and keeping track of your work much easier. Working within Projects is described
later in this chapter, following the basic explanation of the component EDL's, Clipstores and Mixer
setups.
2.
From the File menu, with the New, Open, Save and Close commands.
i. "New" creates a new EDL, Mixer or Clipstore outside the Project structure.
ii. "Open", "Save" and "Close" refer to the type of file shown by the currently active window
(shown by a highlighted title bar). To make a window active, click on it anywhere or use the
WINDOW button on your hardware controller.
iii. "Save" saves a file under its current name, thus overwriting the previously saved version.
iv. "Save As" allows you to rename the file, thus keeping the previous version.
The dialogue boxes that appear following "Open" and "Save As" allow you to open different folders to
find your file or to choose the folder that you want to save it in.
1.
EDL files can be opened and saved from these buttons on the Playlist toolbar. Note that
this button is "Save" and not "Save As".
2. You can also, of course, close the file shown in any window by double-clicking on the icon to the left
on the right of its title bar.
of its title bar, or by clicking on the close window button
8:1
File Management
SADiE v5.2 DSD Operational Manual
EDL'S
EDL files are given the file extension "*.EDL", so a typical name in full is "FRED.EDL".
Creating a new EDL opens an empty Playlist window for you to start work in.
Opening a previously saved EDL opens a new Playlist window containing that EDL.
•
Any previously open Playlists will stay open and you can switch between Playlists under the Window
menu, from within the Project window or by using the WINDOW button on your hardware
controller.
Saving the EDL in the currently active Playlist window will save the file to the PC's DOS drive. The first time
you use save a file, you will be asked to name it; after that, the "Save" command will save the file with the same
name as before, overwriting the previous version. If you think you might want to keep the previous version,
use the "Save As" command. This will let you give the new version a different name. Take care to open the
folder that you want it saved in. The file extension ".EDL" will be automatically added to the name you type.
Closing an EDL closes the Playlist window that is displaying it. You will be prompted to save the EDL if it has
been changed since last saved.
NOTE: The EDL file that you save includes the layout and names of the Streams in the Playlist displaying
it and any Automation data, e.g. fader and other control adjustments in the Mixer. However, you will
need to save the Mixer setup that goes with the EDL separately, as described below. If you work within
a Project, this will be done for you when you save the whole Project.
EDL's can be saved as a Template using the "File" menu option Save current Playlist as a template. EDL
templates have the file extension "*.EDT".
CLIPSTORES
A Clipstore is a useful holding place for Clips that you may later want to add to an EDL. These may be versions
of Tracks with specific fade and level characteristics, or parts of Tracks. Clips created in the Playlist window or
the Trim Editor can be saved to the active Clipstore, where they can be grouped in folders.
A special folder labelled "Source Tracks Folder" will appear in the first Clipstore that is opened or created, so
the Clipstore is also useful for accessing any audio on the system.
•
If you are working within a Project, the Source Tracks folder will contain all the raw Tracks being used
by this Project.
•
If you work outside of Projects, it will contain all the raw Tracks in the root directories of all your
logged audio disks.
NOTE: The Source Tracks folder is not saved as part of the Clipstore file. It is added to it to enable you
to access Tracks on the audio disks. Clips in the Source Tracks folder are not editable. See Source
Tracks Folder.
Clipstore files are given the file extension "*.CLS", so a typical name in full is "FRED.CLS".
Creating a new Clipstore opens a new Clipstore window with no Clips in it.
Opening a previously saved Clipstore opens a new Clipstore window containing the saved list of Clips.
•
8:2
Any previously open Clipstore windows will stay open and you can switch between them under the
Window menu, from within the Project window or by using the WINDOW button on your
hardware controller.
SADiE v5.2 DSD Operational Manual
File Management
Saving the Clipstore shown in the currently active window will save the file to the PC's DOS drive. If you use
the "Save As" command, or if the Clipstore has not been saved before, you will be prompted to give the file a
name, and can select which folder it is saved to. The file extension "*.CLS" will be automatically added to the
name you type. If you use the "Save" command, the file will be saved with the same name as before.
NOTE: You only need to save a Clipstore if you have deliberately stored specific Clips in it, as described
below. In many cases, you may never want to do this and all your work will be contained in EDL's.
However, it is often useful to save a list of Clips that have been "topped and tailed" or selected from
much longer Tracks before you put them together in a specific order, in an EDL. It's a bit like having a
shelf full of small insert reels for a particular programme, or can be used to make a library of Sound
Effects.
Closing a Clipstore closes the window displaying it. You will be prompted to save it if it has been changed since
last saved.
NOTE: If you close the Clipstore that contains your Source Tracks folder, you can get the folder back
by opening a new Clipstore or closing and re-opening an existing one.
USING THE CLIPSTORE WINDOW
To select a Clip in the Clipstore with the hardware controller, use WINDOW to make the required
Clipstore the active window, then the wheel will scroll through all the Clips. (Make sure it is not
selected to jog or shuttle.) Alternatively, the PREVIOUS and NEXT buttons will step through the
list.
With the mouse, click on a clip to select it. As with most Windows® applications, multiple selection
of items in the list can be made by selecting them while holding the Ctrl or Shift keys.
The Root Node is the "top of the tree" for this Clipstore, and Clips can sit at
this level, or be grouped into folders. Double-clicking opens and closes the
folders to view their contents.
Mono Clips/Tracks are shown with single blue icons.
Stereo Clips/Tracks are shown with green, double clip icons. Double-clicking
on these reveals the left and right channels for separate selection.
Multichannel Clips/Tracks are shown with red icons (as "voices" is here).
Double-clicking on these will reveal their component stereo or mono parts
for selection.
To open or close stereo and Multichannel Clip icons with the hardware controller, select the Clip
and then press EDIT/SELECT.
Clips can be listed alphabetically by name, or grouped by type (first stereo, then mono, then
Multichannel).
Allows you to create and name a NEW FOLDER. You first need to select the folder that you
want it to appear in - this may be the Root Node, or another folder.
The PREVIEW button will play the selected Clip from in point to out point, or until you release
the button.
8:3
File Management
SADiE v5.2 DSD Operational Manual
The Transport controls apply to whichever is the active window and can be used for previewing
selected Clips.
Allows you to RENAME a Clip or a folder.
Allows you to DELETE a Clip (or clips) or a folder from the Clipstore.
NOTE: Deleting a Clip will not delete any audio from the SCSI disk, but it will delete the
reference you have created to a particular piece of audio, with particular level and fade
characteristics.
The SEARCH button lets you search for clip names with given text which can include the
character * to represent any number of "wild" characters. The two buttons next to it review search
results and return you to the full Clipstore listing.
The details columns to the right of the tree of names can be customised, as in the Text EDL, by
selecting options from the box that drops down when you click on any of the headings.
NOTE: When the Clipstore is the active Window, a Clipstore menu will appear on the main
menu bar. This duplicates the above buttons for NEW FOLDER, SORT BY
NAME/TYPE and SEARCH.
STORING AND MOVING CLIPS
STORING CLIPS IN A CLIPSTORE
You may want to store the new Clip you have created by editing in the Playlist or the Trim Editor:
Select the Entry in the Playlist or the Clip in the Trim Editor and press the COPY TO CLIPSTORE
button on that window's toolbar.
On the hardware controller, use WINDOW to make the required Playlist or Trim Editor the active
window and CUT or COPY the Entry or Clip to the paste buffer. Then select the required Clipstore
as the active window and PASTE the Entry into the Clipstore.
MOVING CLIPS AROUND CLIPSTORES
Clips can be copied and moved around between folders of the same Clipstore, or between different
Clipstores by dragging with the mouse. Dragging moves the Clip and holding the Ctrl key while
dragging copies it. You will not be allowed to alter the contents of the "Source Tracks" folder, but you
can copy Tracks from it to other folders.
On the hardware controller, use WINDOW to make the required Clipstore the active window,
then the wheel will scroll through all the clips if it is not selected to jog or shuttle. You can CUT or
COPY highlighted Clips to the paste buffer and PASTE them into the next Clipstore and folder you
select.
MOVING CLIPS TO OTHER WINDOWS
The selected Clip can be loaded to the paste buffer for pasting into a Playlist, or dragged directly to
the Playlist window.
The selected Clip can be loaded to the Trim Editor to be altered and the new version saved back to
the Clipstore.
8:4
SADiE v5.2 DSD Operational Manual
File Management
CUT or COPY the selected Clip, then PASTE it into the next window you select.
CLIP DETAILS
You can bring up the Clip Details Window for a selected Clip and make changes to it there, before
"writing back" the new version and thereby re-saving it in the Clipstore.
USING ONE CHANNEL OF A MULTICHANNEL CLIP
You may want to use just one channel of a stereo or Multichannel Clip:
•
Double-click on the Clip or Track in the Clipstore to reveal the separate parts. On the hardware
controller, select the Clip and then press EDIT/SELECT. Stereo components of Multichannel Clips
can be further opened to show separate mono channels.
•
You can now select just one channel and paste it into the Playlist.
MIXERS
Mixer Set-ups are given the file extension "*.MSU", so a typical name in full is "FRED.MSU".
NOTE: There can only be one Mixer connected to SADiE's outputs, so only one Mixer window may be
open at a time. Creating a new Mixer or opening a saved Mixer set-up therefore closes the existing
Mixer window.
Creating a new Mixer replaces the existing one with the default set-up. This is specified in the Setup window
displayed from the View menu.
Opening a previously saved Mixer replaces the existing one with the saved set-up.
Saving the current Mixer set-up will save it as a file to the PC's DOS drive. If you use the "Save As" command,
or if the Mixer set-up has not been saved before, you will be prompted to give the file a name, and can select
which folder it is saved to. The file extension "*.MSU" will be automatically added to the name you type. If you
use the "Save" command, the file will be saved with the same name as before.
Closing a Mixer closes the window displaying it. You will be prompted to save it if it has been changed
since last saved. You can re-display the current Mixer set-up with the SHOW MIXER button on the
Playlist toolbar.
Mixers can be saved as a Template using the "File" menu option Save current mixer as a template. Mixer
templates have the file extension "*.MST".
PROJECTS
To make handling the above files more convenient, they are grouped together as components of individual
Projects.
Every Project also has a list of audio Tracks associated with it. This is the list of Tracks that appears in the
Source Tracks folder of its Clipstore.
Each new Project that you name creates a folder of that name on your DOS drive under the path C:\Projects.
This contains the files for the individual components and the actual Project file itself, which has the file
extension "*.PRJ".
A folder is also created on your audio disk, to group Tracks recorded under the Project.
8:5
File Management
SADiE v5.2 DSD Operational Manual
Once you are working within a Project, you can use the Project window to create, save, open and close all the
individual components that make up your work. When you save the whole Project, all these are saved
together. Next time you work on the Project, the Project window will only show the components that are
relevant to that piece of work. The Source Tracks Folder that is created in the Clipstore only contains audio
that is being used by the Project.
Whole Projects can be deleted to delete all associated files in one go.
You can only ever have one Project open at a time and so must close the currently open Project before
opening or a saved one or creating a new one.
Projects can be backed up to the hard disk that contains the audio Tracks, and this may be transferred to
another machine or posted across a network. When you want to return to a Project that has been backed up
in this way, you restore it (and its components) to the DOS drive in order to do further work.
PROJECT STARTUP
You are presented with the following box when you run SADiE:
You can then either close the box and start work with an
empty Playlist and a default Mixer and Clipstore (which
would have to be saved and kept track of separately, or
arranged into Projects later), or choose to:
1.
Open the Project that was last worked on (the
current Project).
2.
Open an existing Project that you have previously
saved.
3.
Create (and name) a new Project.
Restore a Project that has been backed up to a storage
device.
Once SADiE is running, these facilities are provided from the full range of options in the Project menu
described below.
AUTOMATIC PROJECT STARTUP
You can setup SADiE to start a project automatically. This is much like automatic log-in and Desktop loading.
1.
First find the command line:
i. If your system is set to run SADiE automatically when you switch on, the relevant icon can be
found under the Start button, "Settings", "Taskbar", "Start Menu Programs". Click "Advanced"
and, in the Explorer box that appears, open the "Programs" folder and then the "Startup" folder.
The SADiE shortcut icon will be in the list on the right.
ii. If you run SADiE manually from the Start button, follow the above instructions, but instead of
finding the icon in the "Startup" folder, it will be in the "SADiE Disk Editor" one.
iii. Alternatively, you may have an icon on your Windows desktop. Right-click on the relevant icon,
select "Properties" and the "Shortcut" tab of the box that appears. The command-line is in the
box labelled "Target".
iv. A typical command line is:
C:\SADiE5\BIN\SADiE5.EXE_/dc:\SADiE5\Desktops\1024def.dsk
8:6
SADiE v5.2 DSD Operational Manual
2.
File Management
Now edit the command line by clicking within it to change the text. The line may be longer than the
box displaying it, but you can use the keyboard arrow keys to move it. Carefully add the path and
project name for the project you want to open after the "def.dsk", for example:
C:\SADiE5\BIN\SADiE5.EXE_/dc:\SADiE5\Desktops\1024def.dsk_"D:\projects\fishsticks
toast\mackrel.prj"
on
Remember to keep the spaces shown as _ after "SADiE5.EXE" and after "def.dsk".
NOTE: On Windows systems, any paths that use filenames with spaces in them must be enclosed in
quote marks.
MANAGING PROJECTS
Projects are created, opened and closed from the Project menu on the main menu bar. Commands that are
not currently available are "greyed out" in the list.
•
New Project - When you create a new Project:
o
If you have more than one Record Destination you will first be asked which one you want to
use to record Tracks associated with the project. Alternatively, there is an option to use
whichever Destination has most space.
o
You will be asked to give the Project a name and the Project window will open. SADiE will
have created a new EDL/Playlist, Clipstore and Mixer named after the Project. These will
start off in a default state and after use in the normal way will be saved, closed and re-opened
as part of the Project. You can create additional components as well as one layer of "SubProjects" within each Project; useful for episodes within a series, for example.
NOTE: A newly created Project will have no tracks associated, and hence the Source Tracks
Folder of the Clipstore will be empty. However any or all of the Tracks on the audio disk(s)
may be easily imported, as described below.
•
Open Project - Lets you open an existing Project from those saved on the DOS drive. The Project
window will appear (if minimised it will be reduced to a box at the bottom of the screen; press its
maximise button, or select it from the "Windows" menu).
NOTE: The list of recently used files at the bottom of the File menu will always allow you to
directly open your last used Project.
•
Save Project - Saves the current Project and all its components that have been changed since they
were last saved.
NOTE: When the Project window is active, this is duplicated by the "File, Save" command and
the Hardware Controller SAVE button.
o
Close Project - Closes the current one so that you can open a different Project to work on.
o
Delete Project - Closes the current Project and deletes its folder and all component files
from the DOS disk. If you are using SADiE3-formatted audio disks, you will have the option
of also deleting all audio Tracks associated with the Project.
o
Cleanup Project - Offers selections to enable you to automatically "Tag" or mark audio tracks
for backup or deletion.
o
Backup Project - Displays a box with two options:
8:7
File Management
•
SADiE v5.2 DSD Operational Manual
o
"Backup project components to the audio drive" backs up the current Project components by
copying those files to the audio disk being used for the Project's Tracks. The disk can then be
stored or transferred to another system, or its contents posted across a network.
o
"Total project backup to a storage device" backs up the Project and all the audio Tracks in its
Tracklist to another storage device.
Restore Project - Displays a box with two options:
o
"Restore project components from the audio drive" restores a Project that was backed up to
an audio disk by copying its components to the DOS drive, then asks you if you also want to
open the Project.
o
"Total project restoration from a storage device" restores a Project's Tracks and components
from a storage device.
MANAGING WORK WITHIN A PROJECT
Once you have opened or created a Project, the Project window will appear and you will be able to see all its
associated components in a tree structure, similar to Windows Explorer.
Double-click on folders with + and - signs to reveal or hide their contents.
8:8
SADiE v5.2 DSD Operational Manual
File Management
Components of projects are EDL's, Clipstores, Mixers and Sub-Projects. Opening, saving and closing
components from within the Project window has exactly the same function doing the same thing from SADiE's
File menu; it is just a far more convenient way of doing it and keeping track of everything!
NOTE: All buttons in the Project window are duplicated by right-clicking on the relevant areas of the
name tree. You may find this more convenient than identifying the buttons.
An open yellow folder will appear against open components in the Project window. A red
exclamation mark will appear next to the folder when you do anything to a component
(e.g. edit an EDL) to remind you that it has been changed since you last saved it. The
AUTO OPEN COMPONENT tag means that the component will open automatically
when the Project is first opened.
Further components may be named and created with the CREATE SUB-PROJECT,
CREATE CLIPSTORE, CREATE EDL, and CREATE MIXER buttons. If rightclicking, you will find them under "Create a new..."
The most useful way to save your work is to SAVE PROJECT, which will save all the
components of a Project in one go.
NOTE: This is duplicated by the SAVE button on the hardware controller when
the Project window is active, and by the "Save Project" command in the Project
menu.
Existing individual components may be opened, saved and closed by selecting them and
hitting the OPEN/SAVE/CLOSE COMPONENTS buttons. If you select the project
folder at the top of the tree, and select OPEN, every EDL attached to the Project will
open. This is important when tagging audio tracks for deletion or backup (see Cleaning up
the Project).
NOTE: Double-clicking on a component will open it directly and is a useful way of
bringing its window back in view.
IMPORT COMPONENTS allows you to bring a component into the current Project.
For example, a Mixer saved outside of any Project, or a Clipstore from another Project.
You have two options: importing the original file into this Project, or importing a copy of
it. You can select multiple components using the Ctrl or Shift keys much as you would in
Windows Explorer.
Other non-component files can also be imported. Right-click within the Project tree and
select "Miscellaneous", "Import other files". When the "other file" is double-clicked it will
open with the Windows registered program for that file type, and when a backup is made
these files are included in the backup.
NOTE: If you import the original file, it will not be moved from its current folder
on the DOS drive, but the current Project will retain a link to it. If you import a
copy, you can work on it and save new versions in the current Project while leaving
the original where it was.
REMOVE COMPONENT removes the selected component from the listing in this
Project window.
NOTE: You will also be asked if you want to delete the component file from the
DOS drive. If you choose not to, it will remain in the folder where it was originally
saved and can be imported into any Project or opened outside Projects.
8:9
File Management
SADiE v5.2 DSD Operational Manual
When you open a Project, if a component file has been moved on the DOS drive or had
its name changed, SADiE will not be able to locate it. A warning message will be displayed
and the missing component will appear in red in the Project window. The LOCATE
COMPONENT command will then let you browse through different folders, and when
you find the missing file, will update the Project to keep note of its new location.
DISPLAY USERS and EDIT USER LIST let you to display or alter the list of users
allowed to open the Project. The user that created the Project is its "Project Manager"
(indicated by a tick in the "Manager" box), and only he/she can add or delete users from
the list or promote other users to "Project Manager" status. Note, however, that System
Administrators can open all Projects. The User Management software for multiple-user
installations is described in User Management, and is outlined in Getting Started.
SELECT AUDIO DISK allows you to specify which of your record destinations (if you
have more than one) is used to record Tracks associated with the Project. Alternatively,
you can tell SADiE to use whichever disk has most space.
TAG SOURCE AUDIO TRACKS allows you to quickly mark which audio Tracks will
be backed up when "Total Project Backup" is chosen (See Archiving). The Tag marks can
also be used for deleting audio that is no longer in use (see Cleanup Project).
LIST MISSING TRACKS is for removing links in the project to audio tracks that no
longer exist (see Missing Tracks).
SUB-PROJECTS
Sub-Projects are a useful second level in the Project structure when different users are working on different
parts of a Project. The Project that is open when you create Sub-Project(s) becomes the master Project.
The master Project will show the Sub-project as a component, but will not show all the sub-Project's
own components unless they have been marked for global access to the master (with the EXPORT
COMPONENT button). This is to mask possibly huge numbers of works-in-progress from the
master and only make available the latest or best versions.
To work on a sub-Project, once it has been created, select it from the list at the bottom of the Project menu.
This effectively makes the sub-Project become the current Project. To return to the master Project, use the
menu list again.
BACKING UP, CLOSING, AND DELETING
BACKING UP THE PROJECT
To back-up the current Project to the audio disk, select "Backup Project" from the "Project" menu, then select
"Backup Project Components to the Audio drive". All the files for the Project will be copied to the audio disk,
which can then be removed and stored, put into another system or posted across a network.
To restore a Project from an audio disk, select "Restore Project" from the "Project" menu, then "Restore
Project components from an audio drive". The Project files will be copied to your PC's DOS drive and a
further box will let you open the Project for more work.
CLOSING THE PROJECT
The only way to close the current Project is from the "Project" menu. You will be prompted to save any
unsaved components, and the whole Project, if you have not already done so.
8:10
SADiE v5.2 DSD Operational Manual
File Management
DELETING THE PROJECT
The "Delete Project" command on the Project menu closes the current Project and deletes its folder and all
component files from the DOS disk. If you are using v3 formatted audio disks, you also have the option of also
deleting all audio Tracks in the Project's folder on the audio disk, e.g. Tracks that were recorded under the
Project.
This operation will not delete audio imported into the Project, so a "Library" of sound effects is safe when
deleting other Projects that use its Tracks.
You cannot delete a Project that contains Sub-projects; these must be separately deleted first.
SAVING PROJECTS IN V4.2 FORMAT
COMPATIBILITY BETWEEN SOFTWARE VERSIONS
For many years, SADiE has taken great care to ensure that every new version, major or minor, is able to read
files from earlier versions (audio files, as well as EDL's, Projects, Clipstores, and Mixers).
This is not so difficult because the development process has been mostly linear – every higher numbered
version appears later in date than a lower numbered version. Every version is likely to include some changes,
but the newer version will inherit and have knowledge about the earlier version's structures. We call this
backwards compatibility.
More difficult however is the ability for an earlier version to read files from a later version – the later version
will undoubtedly contain changes that the earlier version cannot have prior knowledge of (this is easier if the
versions are only a few weeks apart but with software such as SADiE which has developed over ten years, it
would be too much of a restriction if file formats were not allowed to change).
Thus, SADiE v5 can automatically load files that were created from SADIE v3 onwards. (Version 3 had the
ability to use v2 format audio drives, which v5 does not allow, thus if SADIE2 drives have been used for audio,
it must be transferred to a SADiE3 format or FAT32 drive first)
However, as with the usual scheme of things, SADIE4 cannot load SADiE v5 projects directly. We have
provided a means of converting v5 projects back to the same format as version 4.2.
Note: SADiE v2 files cannot be read directly in SADiE v5 as there is a problem with the audio disc
format. However any systems running v2 software could have v3 software installed. If the project is
then loaded into v3, audio files copied to a SADIE3 format disk drive, and the project is then re-saved as
v3, SADiE v5 will be able to open the project.
WORKING FOR V4.2 COMPATIBILITY
You should only save as v4.2 at the moment you intend to pass the project over to v4. If you re-open the
Project or continue working in v5, then the next normal save will make the project incompatible with v4.2.
If you're planning to pass the project to v4.2, then it's wise to avoid using facilities in v5, which you know are
unavailable in v4.2, or at least make sure these are not in use at the point of saving as v4.2. It's not a big
problem if you do, but if you can avoid this, then it will make the v4.2 saving slicker. Those facilities unavailable
in v4.2 include:
1.
The use of DirectX Plugins in-line in the mixer
2.
A more obscure Playlist feature - SADIE4 cannot work with EDL times greater than 12 hours when
the sample rate is set to 96 kHz (or 2x), and 6 hours when the sample rate is 192 kHz (or 4x).
8:11
File Management
SADiE v5.2 DSD Operational Manual
All the audio files will need to be on a drive that can be presented to a v4.2 system so a removable 50pin SCSI
drive attached to a PC SCSI card in the Series 5 system will be required. FAT32 format on the drive will give
the best flexibility in both machines (SADIE3 or FAT16 or Mac would be OK, but definitely avoid NTFS which
is not supported by v4.2)
SAVE PROJECT IN V4.2 FORMAT
Go to the Project Menu and select "Save project in v4.2 format". On selecting this option, you will be shown a
dialogue box entitled Select the components to be saved in v4.2 format. This will list all the EDL's, Mixers and
Clipstores in the project (and not any other "other files" attached to the project). By default ALL components
will be selected, but you can decide not to export some if you wish.
All components will first be saved (v5 format).
Then each component will be validated for potential conversion problems.
If a v5 feature is found which cannot be translated back to v4.2 then the v4.2 save will stop.
You will be informed which feature has caused the v4.2 saving has failed, and the offending component will be
left on the screen.
You have the choice now to remove the component from the Save-as-v4.2 list or to modify the component
appropriately so as to conform to v4.2 – SADiE does NOT auto-modify the component.
After a failure you will have to run the v4.2 saving again until it succeeds.
This process will save the project and the selected components in v4.2 format and will also automatically pack
these onto the audio drive as a PPJ component backup file so that the whole project can be physically moved
to the SADiE4 system.
The Project will then be closed (to avoid overwriting in v5 format).
LOADING THE PROJECT IN V4.2
Log the SCSI Audio drive. From the Project menu, choose Restore Project, then select Restore Project
Components form an audio drive.
The Packed project from v5 should be available in the list – select this one and load it.
TRACK MANAGEMENT
SOURCE TRACKS FOLDER
During any SADiE session a Clipstore will contain a special folder, called the Source Tracks Folder, which gives
you access to the raw audio Tracks in use. Inside a Project, this will contain all the Tracks associated with the
Project, and this list is saved with the Project. If you are working outside of a Project, it will contain the entire
root directory of your disk. Operation of the Source Tracks Folder inside a Project will be described below in
detail. However, it is essentially the same when working outside Projects.
The Source Tracks Folder provides a means of managing the audio Tracks that are being used in the current
session, and adding, removing, and archiving audio belonging to your current Project should be done here. For
a more global view of the contents of your discs you should use Disk Management.
There is only one Source Tracks folder and it appears in the first Clipstore opened. If no open Clipstore
contains the Source Tracks Folder, then opening another, or closing one and re-opening it will make this
special folder re-appear.
8:12
SADiE v5.2 DSD Operational Manual
File Management
Tracks appear in the Source Tracks Folder if:
•
They were recorded while the current Project was open, or
•
They have been imported into the Project.
The same functions are available in the Clipstore for clips from the Source Tracks Folder as for other clips.
You can drag or cut and paste these as clips into EDL's, or to other folders in the Clipstore. You will notice
however, that for these Source Tracks Clips all the fields in the right-hand table of the Clipstore are "greyed
out" and hence it is not possible to edit these parameters.
CLEANING UP THE PROJECT
The CLEANUP PROJECT functions,
available under the Project menu, give you
extra tools to help manage your audio tracks
within the project.
You would use these functions for the
following purposes:
•
To remove or delete audio that is
no longer used by the project:
alternative or old takes, or tracks
that were imported by mistake or
unnecessarily.
•
To archive the project along with all
or some of it's audio tracks.
Choosing the "Tag Tracks" option, allows you to automatically mark or "Tag" tracks that either do or don't
belong to some components of the project.
"Tag tracks" gives us this window:
"Tag the used audio tracks" operates on every EDL and
Clipstore that is currently open. This includes
minimised components. (There is an option to open
every EDL associated with a Project - see Managing
work within a Project.) Note that Clipstore does not
include the Source tracks folder (which does not
strictly belong to that Clipstore, it belongs to the
project itself). This function searches through all the
open components and tags every track as "Yes" that is
in use, and tags everything else "No".
"Tag the unused audio tracks" does the reverse, tagging
unused tracks "Yes" and used tracks "No".
"Tag all of the audio tracks", changes the Tag mark on every track in the Source tracks folder for the project.
Inside the Source tracks folder, the Tag mark for each track can be manually changed, to allow you to override
the automatic selection. You may have to change the table display of the Clipstore to show a "Tagged" column.
There is an extra Tag option: "Always". This is a permanent mark, and "Always" tracks are always copied, never
deleted, and never changed by the auto-tagging operations. Double-clicking on the Tagged field changes a "No"
to "Yes" and vice-versa; right-clicking toggles it between "Always" and "No/Yes".
8:13
File Management
SADiE v5.2 DSD Operational Manual
To delete the tracks you've tagged, select "Remove or Destroy" from the "Project" menu: "Remove" just
disassociates the tracks from the Project, whereas "Destroy" permanently deletes them (never to return!). Of
course you're most likely to want to remove or destroy Unused tracks, so be careful that you've selected the
right tagging option.
To backup the Tagged tracks select "Backup Project" from the "Project" menu, and then select "Total Project
Backup to a storage device", and select the drive you wish to archive the project to. The backup will proceed
as per the Project Backup procedure.
NOTE: "Total Project Backup to a storage device" only ever archives tracks that are tagged "Yes".
Choose "Tag all of the audio tracks" in the Tag tracks window.
MISSING TRACKS
The "Source Tracks" folder of the Clipstore displays all the audio tracks that belong to the project, but there
are occasions when some tracks are not available: perhaps a disc drive containing associated tracks is no longer
on line.
SADiE will warn you of missing disc drives when it encounters them on loading a project, but still retains a
record of these "missing" tracks. When they return the Source tracks folder will refresh. However there are
times when perhaps these missing tracks are no longer needed for the project, and you may want to remove
the link to them completely.
LIST MISSING TRACKS gives you a list of these tracks and allows you to permanently remove
them if you wish.
SOURCE TRACKS TOOLBAR
You will notice that clicking on a Source Track makes the buttons on this toolbar change colour from grey to
show that these functions are now available. Also, right mouse clicking on a Track gives different options to
those shown when clicking on normal clips.
The Tracks are listed together with columns of details. The columns can be customised by selecting
alternatives from the box that appears when you click on their headings buttons.
As with most Windows® applications, multiple selection of items in the list can be made by selecting them
while holding the Ctrl or Shift keys.
8:14
SADiE v5.2 DSD Operational Manual
File Management
NOTE: A newly created Project will have no tracks in the Source Tracks Folder, but any or all of the
Tracks on the audio disk(s) may be easily imported.
IMPORT TRACK opens a portion of the Disk Manager window so that you can select:
•
Individual Tracks from any audio disks,
•
A whole disk or folder.
•
Groups of Tracks (either by clicking on a Track while holding the Ctrl key to add it to the group
selection, or clicking on the top Track in a range that want to select, then holding the Shift key
and clicking on the Track at the bottom of the range).
The tracks will then be added to the Source Tracks Folder for the current Project.
NOTE: An imported Track may still belong to a Project that it was originally created with.
Deleting the original Project can delete such a Track. Tracks that you want to be available to many
Projects should be held in a Project such as "Library" or "Effects" that you know you won't delete.
REMOVE TRACK removes the Track from the Tracklist for the current Project without deleting it
from the audio disk.
DESTROY TRACK removes it from the Tracklist and deletes it from the audio disk entirely. It cannot
be retrieved!
RENAME TRACK allows you to change the name of the Track.
NOTE: What name gets changed by this function depends on the audio file format. With SADiE3
format files, the Track name is different from the file name on the audio disc, and so Rename
Track will not change the file name, but will change the Track name in the Source Tracks Folder.
You can see a Track's file name and location on the disc in the Source Tracks Folder, if you display
the "Path" field in the table. It is safest not to rename Tracks or Audio Files; change the name of
the Clips or EDL entries instead.
TRACK PROPERTIES shows the Properties box for that Track
FILE RECOVERY
If you exit SADiE incorrectly, either:
•
Without shutting down properly (described at the end of the Tutorial), OR
•
Because you suffer a power cut, OR
•
Because your computer crashes (yes lets admit it, it does happen!)
SADiE will attempt to recover the Project, EDL's, etc. that were in use at the time of the problem.
When you next run SADiE, you will be asked if you want to return to the recovered versions. This is your only
chance to recover work done since the last "Save" command, so say yes!
Whenever you save a file using an existing name (this happens with the "Save" command), the previous version
with that name will be overwritten. However, it is not immediately lost. SADiE can keep the last version as a
backup file (with the file extension "*.BKE" for EDL's, "*.BKC" for Clipstores, or "*.BKM" for mixers).
To open a backup file, use the normal "Open" command, but in the dialogue box change the types of files listed
to "All files". You will then see backup files included in the list and you can open the appropriate one.
8:15
File Management
SADiE v5.2 DSD Operational Manual
Additionally, SADiE will "Auto-Save" any unsaved files automatically, every five minutes. These are saved to the
"C:\sadie5\Temporary Files\username" directory (where username is your login name) and are named:
•
Sd3savxx.~dl for EDL, where xx counts up to 99
•
Sd3savxx.~ls for Clipstore, where xx counts up to 99
•
Sd3savxx.~su for Mixer , where xx counts up to 99
These can be opened in the same way as opening a backup file. There are a great many of these; if you are in
doubt as to which one you need, clicking on the View Menu button in the "Open" dialogue and selecting
"Details" will give you time details for every file to help you choose. These files will remain in the directory, but
cause no harm.
The frequency of auto-saving, and the auto-backup function can be set in the "Auto-Save" section of the Setup
window.
DISK MANAGEMENT
SADIE v5 can play and record audio files to any disk drive that the Windows PC can read and write to.
Of course some devices will not have sufficient storage or performance to record a usable amount of audio
(floppy disc for instance). Additionally some drives require special software for writing (CD-R or DVD-R are
not really appropriate for real-time recording or playback). However, anything that operates like a normal hard
drive (be it IDE, SCSI, Firewire, etc.) can be used in SADIE, as long as Windows can use it.
It must be noted that Windows' own User Management may set privileges for some users on certain drives, or
even certain folders on drives, either locally or across a network. Therefore, if the User does not have the
ability to write files to a drive under Windows, then SADIE will not be able to record files to that drive.
DISK MANAGER
Disk Manager is designed to allow you to see all of the drives, folders and files on your machine, for the
purpose of copying or deleting files, and previewing audio files in the same way as you'd expect in Windows
Explorer. In fact you can use Windows Explorer for some of these functions, but Disk Manager will offer you
some extra, SADIE–specific functions that Explorer cannot.
Disk Manager allows you to "import" an audio file into a SADIE Project. You can also use it to mount and unmount removable drives, and to see drives that are hidden from Windows (in non Windows formats).
The left hand pane of the Disk Management window shows a "tree":
8:16
SADiE v5.2 DSD Operational Manual
File Management
Double-clicking with the mouse on each branch of the tree opens or closes the contents of that branch, so that
you can browse down through the levels to find a particular file.
System is just a name for the top of the tree. However, when you right-click on System, one function is
available on the menu that appears – "Properties". You can also press the PROPERTIES button. The page
that appears gives you details of storage capacity and usage for all drives that can be seen on the system. See
Checking space on your disk.
My Computer lists every drive that is currently attached to the PC. This will include:
•
Lettered drives, including system hard drives c:, d:, etc, plus any network drives that are mapped to a
drive letter within Windows.
•
CD-ROM, CD-R, DVD-ROM, or DVD-R drives, which will probably be mapped to a letter. Normally
these will appear with a "book" icon beside the drive name/letter, which means that the drive is readonly. For a SADIE-supported CD-R drive, it will appear as writeable when the appropriate media is
inserted (CD-R disk). However if a CD-ROM disk is inserted, the drive will also appear as read-only.
•
PC Network will show you a list of all the other systems on your network, much like the "My
Network Places" within Windows Explorer. You can browse down through this tree (if you have
access rights) to find, copy, and log files on other disc drives on other systems.
•
Underneath, but still in the My Computer section, you may see drives that are attached to the PC, but
not assigned letters under Windows, tape drives for instance. It is also possible to view and use drives
that Windows cannot see – these will appear as a drive icon with a red cross through them. (More on
that later.)
8:17
File Management
SADiE v5.2 DSD Operational Manual
Any audio file that you find in the My Computer section (and is SADIE compatible) can be previewed and
imported into the Clipstore using the right-click menu items. Once imported the audio files can be used in the
SADiE project and edited in EDL's.
A SADiE project can therefore play back files from any drive that is visible in the "My Computer" section. It is
also possible to play files from many different drives together in the same Playlist. However, this does assume
that the drive and/or the network connection have sufficient performance for real-time playback of these files.
You may find that copying the files to a local hard drive that has better and more predictable performance will
save time in the long run. You can copy files in Windows Explorer (if the drives are visible to Windows) or
SADIE's Disk Manager.
Record Destinations – it is usual to set a standard target drive and/or folder for new recordings. You don't
really want to have to specify a new file every time you press record. You will need to specify at least one
"Record Destination" folder, which will appear in this branch of Disk Manager.
In practise, it's likely that much of your searching for audio files in SADIE will be in a Record Destination,
because that's where most of your recordings are. Each Record Destination has it's own tree view so you can
directly browse for files in here (as well as in the main "My Computer" section).
To set a Record Destination, browse to the chosen folder under "My Computer" in SADiE's Disk Manager,
then right-click, and select "Set as Record Destination". The chosen folder will be the "root" for new
recordings. When you create a new project, a sub-folder of this Record Destination folder will be created and
all new recordings for that project will be saved in the project's sub-folder.
You can set a number of different Record Destinations so that you can choose one when you make a new
project, or perhaps, for performance reasons, you may wish to spread the audio across two or more disc
drives.
You can change the current Record Destination for the project by choosing the "Select Audio Disk"
option from the Project Window's right-click menu, or from the button on the Project toolbar.
The Copy Bin is a simple tool that enables you to drag files from different sources for copying, then drag the
whole copy bin to a single destination.
When you browse through your drives in Disk Manager, sub-directory folders will be shown for each
Project. You can create further folders by right-clicking on the folder or disk name, or selecting it and
using this button.
These project folders will contain the audio and the waveform profiles of each Track. When Projects and their
components have been backed up as described in the Projects section above, it will also contain packed Project
files.
These buttons on the Disk Management toolbar select whether only audio Tracks or all files are listed
in the next column. On the far right, details for each file are given in columns that can be customised.
Click on their heading buttons and select alternatives from the box that appears. The dividers
between column buttons can be dragged to change the column width.
NOTE: As with most Windows applications, multiple selection of files in the list can be done by
selecting them while holding the Ctrl or Shift keys.
REMOVABLE DRIVES
Historically, SADiE systems have been able to only use disc drives attached to SADiE's own dedicated SCSI bus.
There was never an option to use PC drives for playback and record, only import and export. Thus, removable
drives have been required in order to move projects from one SADiE to another.
As operation has always relied so heavily on the use of removable drives, the facilities for removable drives,
and particularly for protecting the data on removable drives, has been well developed over a period of several
years.
8:18
SADiE v5.2 DSD Operational Manual
File Management
It was never recommended, but in SADIE4 you could remove a hard drive while SADIE was recording and you
would be able to recover from that situation, with a recording intact up to the moment the drive was pulled.
HOWEVER, SADiE v5 and its use of PC drives offers PC networking, interchange and the flexibility you would
expect nowadays, but Windows and PC's work quite differently with disc drives in comparison to SADIE4. For
performance reasons, you can never expect Windows to complete a file writing operation at the exact instant
that you requested it to, or even at the moment that it reports a copy is complete. In practise, certain
operations in Windows can take some time to complete – even minutes.
In short, it is HIGHLY DANGEROUS to remove a disc drive while it is operating and you risk corrupting
the disc drive (and others perhaps) if you do so. It is EVEN MORE dangerous to remove Windows mounted
drives while they are operating.
So, if you've got into the habit with SADIE4 of removing drives without telling the software that you want to
unlog it, then you have been lucky so far, but if you continue this practice with PC drives, then you will surely
trash a drive soon.
THE CORRECT METHOD FOR REMOVING DISK DRIVES.
Removable disk drives will have to be in a removable carrier. A number of carriers exist, but the better ones
include a "HotSwap" option to allow you to safely remove the drive while the PC is powered up. However this
"HotSwap" option does not override the need to remove the drive under software. Before proceeding, close
any open SADiE projects.
Drives that are attached to the PC are drives that are lettered and thus belong to the PC and are under
Windows' control. As suggested above, removal of Windows' drives can be more long-winded than removal of
SADIE SCSI drives in older versions.
Click on the drive's name in Disk Manager, and press the REMOVE DRIVE button (or right-click
and select "Remove Drive").
SADiE will then ask Windows if it's OK to remove the drive (so you need to wait until this conversation has
completed satisfactorily). There are a number of reasons why Windows may refuse to give up the drive:
•
The drive may be shared to a network. Windows almost certainly will not allow a shared drive to be
removed.
•
The drive may be in use by another program.
•
Did you forget to close your project? If so then Windows will detect that the files are still in use and
refuse to allow the drive to be removed.
•
Windows may still be writing to the drive for some other reason.
If SADiE passes this inquisition successfully, you will see the message "It's safe to remove your drive now", and
in this case, then it IS indeed safe to remove the drive.
However, you may well see several messages from Windows explaining why it cannot be removed. Almost
always the way to resolve Windows' refusal to remove a drive is to power down the system. In fact the only
foolproof and 100% safe and reliable way to remove a drive from Windows under every possible circumstance
is to remove the drive when the system is powered down. If you remove a drive when Windows has warned
you not to, then you are in danger of corrupting the drive. You may get away with some times, but can you
afford to take that risk?
You will need the appropriate Windows Administrative privileges to hot swap drives. If a removal fails due to
"access rights" or a similar message then contact your System Administrator.
If in any doubt, turn off the computer before pulling the drive out.
8:19
File Management
SADiE v5.2 DSD Operational Manual
To log a drive that has been newly attached to the PC, click on "My Computer" in Disk Manager, and
press the SCAN DRIVES button. SADiE will ask Windows to refresh its disk drives – this can take
about 30 seconds. Take care to give the new drive time to spin up – if Windows doesn't find it first
time you may have to try again.
YOU MUST use the "Remove Drive" command in Disk Manager to tell the software that the drive is
about to be removed before physically turning off the drive. If you remove a drive without doing this
and while the PC is powered, there is a strong chance that your disk drive will be corrupted.
CHECKING SPACE ON YOUR DISK
In the tree, select the storage device you want to check and press PROPERTIES. A display box will
tell you how much space is used, how much is available. This command is also available by rightclicking on the device.
You can also use this button to show you the storage properties for the whole SYSTEM, which will look
similar to this:
Note that the Time Available is displayed in the format in which you are set to record.
COPYING FILES
You can copy files between disks or folders by simply dragging them across and releasing them over the
destination symbol. You can drag-and-drop files, or folders, or even an entire disc drive. The directory
structure within folders or whole discs will be re-created on the destination.
The copy bin can be used as a temporary store when copying files from more than one folder. So, drag some
files into the copy bin (from any directory. as you can use the copy bin as a "shopping basket"), then click and
drag the Copy Bin to where you want the files copied to.
File copying is a background process, so you can do other work in the foreground. You will be informed when
the copy is complete. The speed of copying will depend on the demand made on the system by your
foreground activities; the copy may actually stop during periods of heavy playback/record, then continue as and
when the processor power returns.
There are slightly different rules for Tape drives, as you can only perform a single drag and drop process at a
time, either by dragging multiple files onto the Tape drive's icon, or by dragging a copy bin. You cannot drag
folders or entire disk drives onto a tape drive. Although SADiE displays a directory structure on the tape,
there is none; each "folder" on the Tape represents a single copy or backup session. Neither can you copy files
to a CD-R.
8:20
SADiE v5.2 DSD Operational Manual
File Management
← New Copy Process
During a Copy process, a new "copy process" branch appears on the left, and clicking on it displays the
progress of the copy, which files have completed, and how far the others have got.
Note that the Copy Bin has it's own "Used Space" entry in the System Storage Properties window. This will
help you check how much space you need for your copy operation.
RENAMING AND DELETING FILES
Select the file and press the RENAME button to rename it or the DELETE button to delete it
from the audio disk entirely. These commands are also available by right-clicking on the file name.
WARNING: Renaming an audio file that is used by a saved EDL will mean that the EDL will not be able
to find it when it is next opened. Only currently open EDL's are updated with the new name.
WARNING: You cannot retrieve a deleted file; all EDL's that refer to it will be affected.
TAPE AND CD-R DRIVES
Tape Drives will always appear in Disk Manager with a tape icon. These Tape drives may be attached to a PC
SCSI card.
Windows will not assign a letter to a Tape drive, and in fact the only sure-fire way of checking that the Tape
drive is properly attached, is to check in Windows Device Manager, or perhaps open Windows Backup to see
if a Tape drive is available. Or, of course, if you can see this tape icon in SADiE’s Disk Manager, then of
course… it's there!
8:21
File Management
SADiE v5.2 DSD Operational Manual
Tape drives can also be used under Windows, however SADiE must be closed first before a Backup program
can take control of the tape.
Tape Backup devices are treated as normal disc drives by Disc Manager. You can copy to and from, and format
tapes as you would an audio drive. Thus to make a backup for example, to an Exabyte tape, follow the normal
copy procedure above: drag and drop files onto the Exabyte drive, or via the Copy Bin.
Copying from a tape follows the same procedure: find the files you want in the directory displayed in Disc
Manager, and drag it to the copy bin or directly to the destination drive. Due to the directory structure on the
tape, the Tape drive will automatically seek and copy the selected files (like a hard disk!)
You will notice that some tape drives are quite slow to react to rewind/fast forward commands, and so may
take some time to reach the nth backup on a tape. For this reason, a tape drive (and likewise a CD-R) will not
be fully logged on initial start-up; the drive is recognised but its contents are unknown until it is formally logged.
Tapes must be formatted before they can be used for backup. This is not the case with DDP tapes as it is a
very different format, and backup and DDP cannot co-exist. A tape format or a DDP write will completely
overwrite the previous contents of the tape.
If you attempt a copy onto an unformatted tape, you will be asked if you wish to format the tape first.
Formatting a tape can take a few minutes, depending on the drive type. Ask you dealer about supported tape
drives.
CD-R drives will usually appear as a Windows letter, and, depending on the medium in the drive, may have
the "book" icon to denote that it is Read-only. If the drive is a SADiE compatible IDE or SCSI CD-R burner,
then this can be used for writing Red Book Audio CD's.
Of course, this CD writer will also be available to Windows, and with the appropriate CD burning software,
you will be able to use this drive under Windows for copying files (for backup purposes perhaps). It won't be
that much use for DSD material as it is usually too large to fit any substantial amount of audio on a CD.
However, you may find this useful for copying other data.
SADIE5 REMOVABLE DISK ADMINISTRATOR
INTRODUCTION
SADiE v.5.2.2 adds a new feature, "SADIE Removable Disk Administrator". If you're not using removable disks
then this won't effect you, but if you are, there may be some features you could take advantage of, particularly
if your SADIE installation involves a number of users and a number of SADiE systems.
This new software serves four purposes:
8:22
1.
Improves the handling of removable drives – FireWire, USB and SCSI drives (Windows itself has never
recognised that SCSI drives can be "removable" and thus does not handle them as well as
FireWire/USB)
2.
Allows a user without Windows administrator privileges to remove SCSI drives.
3.
Adds an option in SADiE to always record ONLY to Removable drives – this way the user does not
have to keep setting up a Record Destination when a new or different drive is inserted – it will happen
automatically.
4.
Includes an optional letter-assigning routine which will force newly inserted removable drives onto
pre-reserved letters
SADiE v5.2 DSD Operational Manual
File Management
OPUSDISKADMIN
From SADiE v5.2.2 a Service called OpusDiskAdmin is installed to perform these functions. This is permanently
enabled, and consumes negligible resources. Under most circumstances, this service now performs only
"Remove Drive" and "Scan for New Devices" functions called from within SADiE's Disk Management. This
OpusDiskAdmin service always runs as an administrator and thus enables these functions to Windows users
without administrator privileges.
REMOVING DRIVES
REMOVE DRIVE is available from a right-click menu on the drive that you wish to remove. Using this
function in Disk Management:
•
REMOVE DRIVE on SCSI drives is performed directly.
•
REMOVE DRIVE on USB, USB2 and FireWire drives will call the standard Windows "Safe removal"
tool and the user then has to make selections in these further dialogs to stop the drive. The removal
of drives still has to be negotiated with Windows and there are times when a message is returned to
inform the user that the drive cannot be removed. A reason is usually given – this is usually because
the drive may be in use elsewhere. For instance:
o
The drive may be shared to a network. Windows almost certainly will not allow a shared
drive to be removed.
o
The drive may be in use by another program.
o
Did you forget to close your project? If so then Windows will detect that the files are still in
use and refuse to allow the drive to be removed.
o
Windows may still be writing to the drive for some other reason.
o
Close all programs that may be using the drive (for instance Windows Explorer) and try
again.
LOGGING NEW DRIVES
Simply insert the new drive, give it a reasonable amount of time to spin up, then in Disk Management, rightclick on "My Computer" and select "Scan for new devices".
REMOVABLE DRIVES AND LETTER ASSIGNMENT
On a normal Windows 2000 or XP system, if you insert a hard drive that has never been seen by that PC
before, Windows will assign it a letter. The letter will be the next one available. So for instance, if you have a C:
system drive plus a D: drive for data, and perhaps a CD-ROM at E:, then a new drive will go to F:.
However, there may be situations where a user's profile has already mapped letters to network drives. For
example, the user may have decided that F: is mapped to his user directory on a server, where all his
documents are kept.
In this example, the letter that the removable drive appears on could depend on the time the drive was
inserted – if the drive is inserted while the PC is switched off, then, because the plug and play of the new drive
will happen before the user logs on, the removable drive will occupy F: - BUT that could mean that when the
user logs on, this drive will block his document drive from being mapped. Conversely, if the drive is plugged in
after the user has booted, then the drive will go to G:.
Windows will remember a letter that goes with a particular drive (even if the drive doesn't re-appear for
months) and so perhaps a drive could at a later date conflict with a different user's network letter-mapping
profile?
8:23
File Management
SADiE v5.2 DSD Operational Manual
Also, the only way to change a drive letter is within Windows own "Disk Management" which is an
Administrator-only tool.
In short, with Windows' own routines, the process is unpredictable, and there are a number of pitfalls, which
may confuse a user, particularly one without administrative access.
And that's where "SADiE Removable Disk Admin" comes in…
THE ADMINISTRATOR PROGRAM
Go to the Windows' "Start" Menu, and select "All Programs", "SADiE5", "Removable Disk Admin". This will
open SADiE's Removable Disk Administrator and will show a screen similar to that above.
This main screen shows a few details about all the lettered drives the PC can see: Volume names, letters,
whether it's IDE, SCSI, 1394 (another name for FireWire), or network etc.
The main actions that can be performed in this view are available on the toolbar, and also from the "Action"
menu. On the toolbar these are, from left to right:
8:24
1.
REMOVE DISK – as described above, this is the same as the button inside SADiE's Disk Manager
window. Select a drive from the list by clicking on its letter and press this button to remove it.
2.
REFRESH – refreshes the list of drives and the information displayed.
3.
RESCAN SCSI and IDE drives - searches for newly inserted SCSI and IDE drives. Note that
FireWire/1394 and USB drives will be automatically refreshed by Windows shortly after insertion.
Using the "refresh" button may be needed to refresh the view.
4.
SCAN HARDWARE CHANGES – should not be necessary. However, there may occasions when
Windows does not immediately find a FireWire or USB drive, and this option will search for new
drives.
5.
CHANGE DRIVE LETTER - allows you to manually change the letter of a local drive without going
into Windows own Disk Management utility.
SADiE v5.2 DSD Operational Manual
File Management
AUTOMATIC LETTER CHANGING
From the "File" menu, select "Settings". The dialog box above will be shown.
You can reserve up to six letters for use by removable drives, using the drop down boxes at the top of the
dialog. When "Automatically re-assign drive letters" is ticked, whenever a SCSI, FireWire/1394 or USB drive is
seen by Windows, it will have its drive letter automatically assigned to the first available pre-reserved letter (as
chosen above).
The three selectors under "Apply to" for SCSI bus, FireWire bus and USB bus allow you to turn off any of
these if you wish (you cannot reserve letters specifically for one bus).
"Automatically Generate Drive List" will make the drive view in the main screen of the Administrator
continually update (i.e. as if you press the Refresh button every few seconds). This is also applied to SADiE's
Disk Manager so in most circumstances you will want this to be ticked.
RECORD TO REMOVABLE DRIVES
SADiE now includes an option to record ONLY to removable drives, which may be appropriate to group-users
who move drives from machine to machine.
Inside the SADiE application itself, go to the "View" menu, select "Setup window" then on the left hand side
choose the "Project Management" page. The option is called "Record to Removable Drives only".
When this option is ticked, any prior "Record Destinations" as set in SADiE's Disk Manager become disabled,
and SADiE will now offer any present Removable Drives (as seen by SADiE Removable Disk Admin – i.e. SCSI,
FireWire/1394 or USB drives) as potential Record Destinations.
If you have only one removable drive (which will be the most common situation) then when you create a new
project, that drive will automatically be used (whatever letter it appears on). If you have more than one
removable drive, the "Audio disk selection" dialog will be shown to allow you to choose which drive will be the
record drive for that project.
8:25
File Management
SADiE v5.2 DSD Operational Manual
Note that in this mode, you cannot record into sub-directories of the drive – the root of the removable drive
will be the "record destination" and audio for a project called "prjname" will be recorded into a directory
directly off the root, i.e. "F:\prjname".
Note also, that when you un-tick this option, SADiE will revert to the previous list of Record Destinations.
Thus, as a fall-back, in the situation where a user needs to record audio but no removable disk is available, the
user could un-tick this option, and then choose the "Project" menu's "Select Audio Disc" option. If the Record
Destination has been set appropriately (i.e. "C:\audio" or some other directory which always exists) then this is
a fairly simple work-around.
ADMINISTRATOR VS USER
The OpusDiskAdmin service runs as a Windows "Administrator", and thus actions called through it by a
normal Windows "User" using SADiE (i.e. Remove Disk and Scan Drives, as well as any auto-letter-changing)
will be possible.
The SADiE Removable Disk Admin application is simply a viewer for the OpusDiskAdmin service, and as
described above it allows you to configure the service. SADiE Removable Disk Admin can also be run by a
normal Windows User, even one with restricted privileges.
Depending on your circumstances the SADIE "Administrator" may wish to deny a user access to these tools,
and thus, removing access to SADiE Removable Disk Admin is all that's required to allow OpusDiskAdmin to
perform its task without a user changing its settings. One way of course may be to remove the shortcut to this
application. Alternatively, you may remove the EXE itself, and this is usually kept in "C:\Program
files\SADiE5\bin\SadieDiskAdmin.exe". A SADiE Administrator could then configure the OpusDiskAdmin
service by running SadieDiskAdmin.exe from a CD or from a network drive. Note however that
OpusDiskAdmin and SadieDiskAdmin must have the same version and it will not be possible to run an old
SadiaDiskAdmin on a newer OpusDiskAdmin or vice-versa. Thus you should make sure that your CD copy is
kept up-to-date!
ARCHIVING
The quickest and most effective method of archiving your audio is to a Tape Backup drive. Transfer time is
usually quite a bit faster than real-time and tape costs are reasonable. Consult your dealer about supported
drives.
There are essentially two ways of backing up and restoring in SADiE:
•
Use the Copy Process inside Disc Management. This gives you most flexibility, as you can drag and
drop exactly the files you wish onto the Tape drive. It is possible to copy your files from the PC disk (
Project components, EDL 's etc.) so that they can be backed up alongside the audio. See Backing up a
Project to the Audio disk.
•
Use the "Project Backup" and "Restore" functions described below. These are much simpler to
operate but hence less flexible.
There is no reason why you can't "mix and match" the two methods, perhaps using "Project backup" to archive
the project, but then the normal Copy process to partially restore it.
PROJECT BACKUP
One easy method of backing up to a Tape drive is by using Disc Management's Copy process. However SADiE
also provides a "one-shot" method of backing up a project, along with its associated audio files:
8:26
SADiE v5.2 DSD Operational Manual
File Management
1.
Select "Backup Project" from the "Project" menu, then select "Total Project Backup to a storage
device".
2.
The backup tape will be logged, and if necessary you will be offered the chance to format it. You will
then be asked for a backup name. This is just the name of the directory on the tape, and so need not
be the same as the project name, but it is wise to form a naming procedure for yourself.
3.
The Project Backup Progress box will appear:
4.
There will be a short pause while the Tape drive prepares itself, then the list of files will be worked
through and copied to the tape. Do not be alarmed at the number of "duplicate file names"; each
audio file is actually at least 2 separate files. You can see in the diagram the files marked [ADM] are
the (larger) audio files, and the [PFM] files are used for displaying the waveform information. The files
above are mono, so stereo audio will require 4 files. The first file above (//Hippo/Kevin [APJ]) contains
the all of the project components ( EDL 's, Mixers, Clipstores) that belong to the project. In relation
to the audio files this is trivially small.
5.
Once the Abort / Close buttons are coloured in black and the backup is proceeding, you can hit
CLOSE and allow the backup to carry on in the background, while you play EDL's in the foreground.
As with the Copy process, (Project Backup is nothing but a fancy copy process) foreground demand
will reduce the speed of the backup.
NOTE: Only tracks tagged "Yes" or "Always" will be backed up as part of the project. This will only not
be the case if you have run the "Cleanup Project" or "Tag Source Tracks" functions.
A Project backup size report will be displayed in the Backup dialogue. This will only include the size of the
tagged audio files in the project, and does not include Project components or "other files". It therefore may not
equate exactly to the storage required for the backup.
This method can be used to backup the project to any suitable drive. However the project will have to be
correctly restored before all the project component files match the new audio files.
In brief, EDL's and Clipstores look for audio tracks by name and full path. For instance the EDL would see a
track called "KEVIN" in a directory called "FRINTON" on a drive named "HIPPO" as:
8:27
File Management
SADiE v5.2 DSD Operational Manual
//Hippo/frinton/kevin
If you move the audio track to a new disk or directory, the EDL cannot find it automatically. Thus if you use
"Project Backup" to backup a project to a normal drive, the EDL's are still looking for files on the original drive,
and if you open the project again, with the original disk missing, all entries will be ghosted, even though you
know the audio is on the new drive.
The correct way to deal with a "Project Backup" is to restore it to another drive. This function should not be
used to move the audio tracks to another disk.
NOTE: The Exabyte drive may be busy for a long time after SADiE has apparently finished with it, and
you'll find that you may not be able to start another backup or restore for a few minutes.
PROJECT RESTORE
"Project Backup" provides a "Snapshot" of the current state of a project when it is backed up. Thus "Project
Restore" is designed to return the Project to exactly the same state as it was at the time of the backup. If there
are any traces of the project, or a project of the same name, on the audio drive to which you are restoring or
the path on the PC drive where the EDL's, Clipstores, mixers etc. reside, they will be removed or over-written
by the restore process. Thus if you have continued working on the project and wish only to restore a few
tracks this is not the function for you! Likewise if the backup is only a partial backup and you don't wish to
disturb the existing project, then the only way to restore is by using the Disc Manager Copy function.
To restore a Project that has been archived by "Project Backup":
1.
Close your current project; you must be outside projects to start a Project Restore.
2.
Select Restore Project from the Project menu, then "Total Project restoration from a storage device".
3.
Choose from the list of available backed-up Projects.
4.
The Project Restore Progress box appears. This is nearly identical to the Backup Progress box above,
and reports on the progress of the restore.
5.
As with backup, once the Tape drive has started, you can close the Progress box and continue
working in the foreground, pushing the restore to the background.
6.
The Project files will be copied to your PC's DOS drive, the Tracks will be copied to your audio disk
and you can then open the Project as usual. Note that project component files will returned to where
they came from and if you have changed your working directory since the backup, then you will have
to go hunting!
NOTE: Some Exabyte tapes can take quite some time to log, particularly if they have a number of
backup sessions on them. You may find that v2 backup tapes will take even longer because there is no
main tape directory. We have a tape containing many sessions of hundreds of tracks that takes about 1
hour to log! In this case it would be quicker to use v2 to restore this particular tape.
SELECTIVE ARCHIVING
If you are working inside a project, it is possible to mark files that you wish to be included in a Project Backup.
You will notice that there is a "Tagged" field in the table section of the Source Tracks Folder inside the
Clipstore. When "Total Project Backup" is selected, it is actually only the Tracks marked "Yes" for backup that
are copied to the storage device.
In the Source Tracks Folder you can manually change Tracks' tag setting by double clicking on the field to
toggle between "Yes" and "No".
8:28
SADiE v5.2 DSD Operational Manual
File Management
TAG SOURCE AUDIO TRACKS on the Project Window toolbar brings up a dialogue box which
allows you to:
•
Tag all the used Tracks - this will look through all open EDL's and Clipstores in the Project, and mark
Tracks used with "Yes" for backup.
•
Tag all of the Audio Tracks - marks every Source Track as "Yes" for backup.
•
Tag all unused Audio Tracks - this is the reverse of "Tag used tracks" above, and would be used for
deleting unused audio. See Cleanup Project.
If there is audio that you want to be backed up, whether or not the Track is used in open EDL's then rightmouse clicking on the backup field in the Clipstore will change the field to "Always". Tracks marked "Always"
are unaffected by the "Mark Audio for backup" function.
ARCHIVING NON-PROJECT WORK
If you have work to archive that was not kept in a Project, you can use the Copy facilities in Disk Management
to copy Tracks to another storage device. You will then have to copy the EDL, Mixer and Clipstore files to
floppy disk, using Windows® Explorer.
FILE FORMATS
To allow interchange with other equipment, SADiE can work with a number of different Disk Formats, and
read and write and convert a number of different audio file formats. Additionally SADiE supports several
different Edit list formats.
AUDIO DISK AND FILE FORMATS
If you are taking files from other systems and/or passing audio on to be worked on with another workstation
(which is becoming more of a regular occurrence) then read on...
It is important to recognise the distinction between Disk Formats and File Formats. A system may require a
disk to be configured to a particular format so that it can recognise its filing structure, whereas software
programs will require the data files to be arranged in a certain way in order to read those files. So you may
have the right disk format for a system, but unless the file formats are compatible for your software then they
may not be readable, and vice versa.
SADiE deals mostly in Audio files, and usually the organisation of the PCM audio data is similar from one file
format to another, but the file headers (which will contain other information about the audio - sample rate,
sometimes time-code stamps etc.) will differ from format to format.
SADiE can work with a number of Disk Formats (as described above) and can play and record in a number of
different types of File Format.
NOTE: SADiE can handle these different disk and file formats at the same time, so it is quite possible to
be playing for instance SDII files from a Mac HFS disk, Lightworks and WAV files from a FAT 32 disk,
and SADiE3 native files from a SADiE3 disc in the same Playlist. The Playlist makes no distinction
between the different file types and you will have mostly the same facilities throughout. The only
differences are that certain disk and file types allow for fewer characters in the file name, and some
audio file formats treat stereo files differently. For instance with Lightworks a stereo file will always be
two mono files, whereas a stereo WAV is one file, although the user will perhaps only notice these
differences during file copying and maintenance.
8:29
File Management
SADiE v5.2 DSD Operational Manual
You choose a file format every time you record, bounce, or use "Offline Processing or "PC audio import". To
change the selection, pressing the "Properties" button on either the Transport Controls, Bounce Window,
Offline Processing Window, or PC Audio import window, will show the Properties page for the file you are
about to record, and you can change the details at this point.
The File format selection offered will depend on the format of the disc you are recording to. When you choose
a file format, that will persist until you change to recording to a different disc drive that has a different format,
when SADiE will keep using that file format if it is allowed, but otherwise will flip to "Native" (the chosen
default format for that disc format).
When you're recording to multiple disk drives of different disk formats simultaneously (!!) if you choose a
format that is incompatible with one of the disk drives you may be told "File is invalid". In such a case SADiE
does not allow you to choose a specific file format for each drive, and you must choose one global file format
or "Native".
Some settings such as sample rate will be fixed to the current system sample rate. "Bit resolution" will default
to the system input setting (see the "Audio" section of the Setup window), but when you change it in the
Properties window, this setting will persist until you change the system setting again. "Take number" is not
editable, it is automatically created when you turn on the "Auto-Take" function and increments a number on
the end of the file name.
Some fields in Properties can be edited after the recording has been made, for instance reel name,
reel track number, comments and references (if allowed by the specified format), and you can access
the Properties window by selecting the Track in the Source tracks folder of the Clipstore and pressing
SOURCE TRACK DETAILS.
Files can be recorded and played back in SADiE at a number of bit resolutions and sample rates:
•
16 to 24 bit (32 bit floating-point too in the case of SADiE3 format), OR
•
32 kHz up to 48 kHz plus, OR
•
double (88.2 kHz/ 96 kHz) and quadruple (176.4 kHz/ 192 kHz) rates.
Some files formats will restrict this, but if you intend to interchange this file you should make sure that the
system waiting to accept it can handle these bit or sample rates. For instance you could make a 96 kHz 20 bit
WAV but does the other sound card and/or software support more than 16 bit and more than 48 kHz?
The file formats supported, as of SADiE v4 are:
8:30
•
SADiE3 - SADiE3 (and SADiE4) own proprietary format.
•
WAV - The standard Windows audio format.
•
BWF (Broadcast Wave Format) - an extension to the WAV format to include timecode stamping and
other references.
•
SDII - A common format in Avid and ProTools systems. You can only record in this format in SADiE
onto a Mac HFS formatted disc, because of the Macintosh resource fork structure. Note also that
these files cannot be copied onto a SADiE backup tape for the same reason; the tape is essentially in a
DOS format, which is incompatible with Mac files.
•
AIFF - The standard Macintosh audio format. A file of this format can be copied to a DOS or SADiE3
formatted disc because it has no resource fork.
•
AIFC - Another standard Macintosh audio format. A file of this format can be copied to a DOS or
SADiE3 formatted disc because it has no resource fork.
•
FilmWAV - Another extension to the WAV format for Film applications.
SADiE v5.2 DSD Operational Manual
•
Lightworks - The Lightworks Video Editor's audio format.
•
IDS - A proprietary format used by IDS systems.
File Management
SD2 FILES, MAC DISK DRIVES AND MACDRIVE
SADiE3 and SADiE4 have supported HFS Mac Drives and SD2 files as if they are native, however since
SADiE5's move over to using Windows' own disk drives, Mac drive support requires assistance from other
utilities because Windows does not read or write Mac drives as standard.
SADiE v5.2.2 introduces a new method of reading and writing Mac disks and Mac files, and this integrates
better with Windows, using a third-party utility called MacDrive.
This adds to SADiE the facilities to read and write to/from HFS+ drives as well as reading and copying Mac CDROMs
MACDRIVE
MacDrive is a product from MediaFour (see http://www.mediafour.com/products/macdrive/). MacDrive
provides a simple solution for file sharing between PC's and Mac's. Note that there are a number of similar
products on the market but SADiE is only compatible with MacDrive.
After purchasing and installing MacDrive, Windows is able to access Mac formatted drives and files. Mac files
don't use file extensions (i.e. .doc, .exe etc.) in the same way that Windows does, instead its files have "type"
and "creator" properties to identify them. MacDrive uses "extension maps" to convert these variables into
Windows recognisable file extensions.
As standard, MacDrive does not have settings for Sound Designer 2 files (which tends to be Pro Tools' native
audio format on the Mac). In order for SADiE to recognise the required file types, it is necessary to import the
necessary extension map into MacDrive. To do this, follow these simple steps:
1.
You will first need our own customised "Extensions Map file" which can be downloaded from the
same place as the SADiE5 software. Copy this file (called MacExtensionMaps.macxtmap) to your hard
drive.
2.
Right-Click on the MacDrive symbol in the system tool bar at the bottom right of your screen. From
the pop-up menu select "MacDrive Properties".
3.
In the window that appears select the "Extensions Map" tab.
4.
Click the "Options" button, then select "Import Extension Maps…" from the menu.
5.
A dialogue will appear warning you that this will overwrite the existing map, select "Yes" to continue.
6.
From the browse window open the MacExtensionMaps.macxtmap file you've just copied to your hard
drive.
MacDrive will now correctly recognise SD2 files in such a way that SADiE will be able to read them from a
Mac-formatted disk drive.
DUAL FORMAT CD'S
Some CD-ROMs have both Macintosh and PC volumes. Normally, when presented with such a dual-format
CD-ROM, MacDrive will ignore the Macintosh (HFS or HFS+) volume, and allow the PC (ISO-9660) volume to
be made accessible. You can choose to access the Mac volume, instead, by selecting the "Show Mac Files"
option – Right click on the drive in Windows Explorer, select the MacDrive option from the menu, then select
the "Show Mac Files" option.
8:31
File Management
SADiE v5.2 DSD Operational Manual
COPYING SD2 FILES
SD2 files (but not AIFF) are an example of a Macintosh file type that has two "forks"- a data fork (which is the
audio data in an SD2) and the "resource fork" which contains other "header" information about the file –
sample rate, bit rate, number of channels etc. Resource forks are the component of a Mac file that Windows
has most trouble with as Windows doesn't natively use forked files.
If you copy an SD2 file under Windows, even using "MacDrive" so as to work with its original Mac disk, you
must take care note to "lose" its resource fork, and thus, when it comes to log the file in SADiE, we will not be
able to read the all-important header information.
Fortunately, Mac files with resource forks CAN be stored on NTFS volumes under Windows. Thus if you are
receiving the SD2 files on Mac CD-ROMs or HFS or HFS+ disk drives you WILL be able to copy the files to an
NTFS drive, and SADiE will happily read the files via "MacDrive".
BEWARE however – FAT32 formatted disk drives will NOT store the resource fork, and so if you copy SD2s
to one of these, SADiE will not read the files. Likewise, if you copy SD2 files from an NTFS drive to say a
Windows IS9660 CD-ROM or DVD-ROM then the resource fork will be lost. Similarly SADiE tape backups
cannot retain the resource fork, and thus SD2s cannot be backed up under SADiE. Thus, it may be worthwhile
considering bouncing the SD2 files as soon as you receive them to some other PC-centric format such as BWF.
If you carry on working with SD2s, any other SADiE system you pass them on to will need MacDrive in order
to work with them.
NOTE: you cannot copy SD2 files inside SADiE's Disk manager. However copying SD2 files between
Mac & NTFS drives will work in Windows Explorer if MacDrive is installed correctly with our Extension
Map file. You may find that MacDrive gives you messages of the kind "File XYZ.SD2 has extra
information attached to it that might be lost if you continue copying … Macintosh Application Info /
Macintosh Multimedia Resources …". We are told that this message is less destructive than it sounds,
and in practise, the SD2 files copied back to the HFS drive (under Windows Explorer) do have a
resource fork. If you are worried, then just check that SADiE can preview a file in Disk Management
from its new location after it has been copied – if it can, then the resource fork has copied correctly.
In practise, if you intend to work with SD2 files, then it makes good sense to retain a HFS or HFS+ formatted
disk drive to keep them on.
MACBINARY
MacDrive has an option (which is available as a right-mouse-click on an SD2 file inside Windows Explorer) to
"Create MacBinary files". A MacBinary file is a format which is used to contain Mac files on a non-Mac disk –
essentially this process wraps up the data and resource forks along with its icon, file type , file creator
properties etc. into one file.
When MacDrive makes a Macbinary it will give the file a ".BIN" extension. MacDrive can also extract a
MacBinary to revert it to a proper Mac file with its resource fork. Thus converting files to MacBinary format is
a way of ensuring that the Resource fork is not lost when moving a Mac file across disk drives/ CD-ROMs /
SADiE backups etc.
MacBinarys will have to be "extracted" to SD2 files for SADiE to be able to use them.
FORMATTING DISK DRIVES UNDER MACDRIVE
If you want to create files in SADiE to pass onto a Mac system, it will be useful to work with a disk drive that is
formatted for the Mac, i.e. HFS or HFS+. SADiE can only record in SD2 format to Mac formatted drives.
MacDrive has support for formatting to HFS or HFS+ but only for "removable" drives – i.e. FireWire, but not
SCSI drives (which are not handled under Windows Removable Storage regimes.)
Additionally, however, MacDrive can format any hard drive that is already formatted for Mac. For this reason
we have retained the ability to format a disk drive to Mac format inside SADiE.
8:32
SADiE v5.2 DSD Operational Manual
File Management
In Disk Management, right-click on the drive you want to format (you REALLY DO want to format this
particular drive ??); and select "Log Device Direct" (this will only be available for SCSI or removable drives).
This removes the disk drive from Windows (if Windows agrees to its removal) and places the drive entirely
under SADiE's own control. Now right-click again and choose "Format", and select the final option "HFS (1
partition)".
SADiE will format to a single HFS partition. If you want to make an HFS+ disk, you will now be able to format
this drive under MacDrive (right-click, "MacDrive", "Format disk…"). We've noticed that sometimes Windows
will not allow MacDrive to format a drive if this is initiated from an Explorer window, however it seems to be
successful if you initiate the format from a "My Computer" view.
FILE NAME LENGTH
In the MacDrive Properties page there is a "Save full-length MAC OS X file names" option. If you disable this
option MacDrive will truncate any existing Mac files who's names are greater than 31 characters (including the
extension).
MacDrive only truncates any offending file names:
1.
When the above option is disabled in the properties and the apply button is clicked.
2.
When the PC boots up with above option disabled.
TRACK NAMES
The number of characters you can use for the name of the recording depends on the disk and file format.
SADiE uses up to 64 characters for the file name (on the disc) for SADiE3 and FAT 16 discs, and 28 for Mac
HFS disks.
However, SADiE may allocate some of the final characters in the filename automatically. For instance, if you are
recording with "Autotake" the Autotake number will use two or three characters at the end of the file-name. If
you are recording multi-track, then additional characters at the end of a filename are used to include the
stream name (up to 10 characters) and an Autotake number.
You should be wary of changing file or track names after you have made an edit, because, depending on the file
format, the SADiE EDL will be using the file name to link the EDL entries to the audio file.
SADiE3 format files do have other ways of linking, however you will possibly have to re-import the file. In the
case of WAV or AIFF files, the link may be permanently lost (and so will the edits!) if you re-name the file. It is
better to rename the Entries in the EDL.
RECREATE PROFILES
When tracks are recorded with SADiE, a "profile" file is recorded at the same time, which is used to display
the lower resolution waveform views in the Playlist. These appear in the file listing in Disk Management as
"*.PFL", "*.PFR", and "*.PFM" files, but only when you choose to SHOW ALL FILES.
However if files are recorded outside SADiE and have been copied up to SADiE's hard disk or have been
brought in on a non-SADiE formatted disc (e.g. WAV, AIFF, Lightworks, SDII files, etc.), then they will not have
profiles. (Files imported with "PC Audio Import" are re-recorded and will have profiles already.)
However the first time you import any of these files into the project, SADiE will detect the lack of profile and
automatically make a profile file for each track. This is often quite quick, however if you import long tracks or
lots of smaller ones, then you may see the profile being drawn. If you drag a clip into the Playlist, it may not
immediately show its profile, but will draw it as you watch.
If you exit SADiE before a profile has finished being created it will delete any partial profiles and start recreating them the next time you open the project.
8:33
File Management
SADiE v5.2 DSD Operational Manual
It shouldn't be necessary, but if for any reason you wish to make the profile file, then there is a function to
start this manually; the option to "Recreate Profiles" will appear in the right-click menu on the Source Tracks
Folder of the Clipstore. You can select a number of clips (using the Shift or Ctrl modifiers) and "Recreate
Profiles" will work on all of them.
Note that profiles are created at the sample rate at which the track is stamped, and so if for any reason the
track has picked up the wrong sample rate stamp, then "Recreate Profiles" is not able to change this. The
quickest way to rectify an incorrect sample rate stamp is to bounce the whole track at the correct rate.
EDL FILES
If you bring an EDL file into your PC that was created on a different system, when you open it SADiE will
automatically detect any of seven different formats and ask you if you want to convert to SADiE v4 format as
you open it.
NOTE: SADiE v2 EDL's differed from v3 and v4 ones in that they lacked automation data, Stream layout,
etc. These can also be converted to v4 format, but you cannot use the old v2 mix files.
Alternatively, the "Convert File" command in the File menu allows you to convert files between any of the
recognised formats:
Press the SELECT INPUT FILE button to locate and select the file to be converted and select its file type
from the list that appears.
Press the SELECT OUTPUT FILE button to give the converted file a new file name and locate the folder
you want to save it in.
You can select "From Playlist " to convert the EDL in the active Playlist to another format, and "To Playlist"
when converting and importing an EDL to the current Playlist.
COPYING FILES TO AND FROM THE PC
BOUNCE TO PC DISK
There are some options inside the Bounce Window to enable you to record files directly onto the PC disk.
If you check PC disk as the destination, then the result of the bounce will be a WAV file on the selected PC
disk, rather than on SADiE's own audio disk. Use this to transfer edits as complete WAV files, or simply to
convert a SADiE format file to a WAV on the PC disk.
This used in conjunction with "Multi-Bounce" would enable you to mix down each entry of the Playlist as a
separate WAV file on the PC disk.
See Special Bounce Functions for more details.
8:34
SADiE v5.2 DSD Operational Manual
Specific Applications
9 - SPECIFIC APPLICATIONS
This section aims to do two things:
1. To offer tips for using methods described in detail elsewhere in the manual, where they may be
relevant to particular areas of work.
2. To give a detailed description of several SADiE facilities that are only relevant to certain applications.
As many techniques can be applied to different circumstances, it is a good idea to read the tips for areas of
work other than your own.
SYNCHRONISATION
Whether you are working to picture, running in sync with a multi-track tape machine or recording from a
timecode DAT, you will want to lock SADiE to other pieces of equipment.
SADiE can generate timecode and run as a master. You may want to do this to drive a sequencer running on
MTC (Midi Timecode), or to stripe videotape. However, most mechanical machines cannot chase timecode.
SADiE will not only chase incoming timecode, but can also locate to any point in an EDL instantaneously, so
you will usually run SADiE as a slave to the timecode generated by other equipment.
With SADiE slaved to timecode, you can use the transport controls of the master machine and SADiE will run
in sync However, if you add 9-pin control of the master machine, you can also control that machine's transport
and locating functions from SADiE.
Timecode carries both current-time and clocking information.
CONNECTING TIMECODE
SADiE provides a number of different ways of reading timecode to suit the user's requirements.
To synchronise to external equipment you will need to consider both clocking and current time information.
SADiE's audio clock can be synchronised to:
•
Digital Audio - via AES, SPDIF or Genlock/AES Ref connector
•
LTC (Longitudinal Timecode) - via the LTC In connector
•
Video clock - via the Video In connector
Current time can be read via:
1.
LTC
2.
9-pin timecode on the RS422/9-pin port
3.
VITC
Here are three suggestions for connecting up SADiE for synchronisation. There are many other combinations
but these are the simplest. Explanations appear later in this chapter.
9:1
Specific Applications
SADiE v5.2 DSD Operational Manual
1. LTC
i. Connect a cable from the external player's (VTR/DAT/etc.) LTC output to SADiE's LTC In. Be careful
with respect to feeding balanced connections into unbalanced inputs or vice-versa. Most LTC faults
are due to bad cabling.
ii. In the "Synchronisation" section of the Setup window choose:
•
Frame rate - to suit
•
Timecode type - LTC
•
Sync mode - Slave Mode
•
Slave Mode - "Trigger Lock" for digital playback or recording, or "Chase Lock"for analogue.
•
Under "Autostart and Offset" set Autostart to 2 seconds.
•
Right-click on the ONLINE button and select "LTC sync"
•
No need for 9-pin connection or Video
iii. Pressing ONLINE and putting the external player into play will start SADiE's EDL playing, following
the player's current-time.
2. LTC WITH 9-PIN CONTROL
i. Connect as per the LTC method, and set the Sync Setup the same. Additionally:
•
Connect a 9-pin lead between the external player and one of SADiE's 9-pin ports.
•
In 9-pin Channels Setup, enable that 9-pin port for Sony 9-pin master.
•
Right-click on the ONLINE button and select that 9-pin port. The menu will show the
machine's name if it recognises it.
•
No need for Video cable.
ii. When you press ONLINE, the transport controls will now control the external player. "Play" puts it
into play and SADiE will follow. If you double-click on the EDL's time line, the external player will
locate to that position before playing, and SADiE will wait for it to locate before starting. SADiE's
scrub controls will jog/shuttle the external player and SADiE in sync.
3. 9-PIN SYNC METHOD
i. This method requires no LTC lead or LTC setup. You will need a 9-pin lead between the external
player and SADiE's 9-pin port. Additionally you must connect a video signal to the SADiE hardware's
Video In to provide clocking sync. This could be from the external player (if it is a VTR) or could be a
station video sync signal.
ii. In Sync Setup choose:
9:2
•
Frame rate - to suit
•
Timecode type - 9-pin
•
Sync mode - Slave Mode
SADiE v5.2 DSD Operational Manual
Specific Applications
•
Under Autostart and Offset set Autostart to 2 seconds.
•
Audio Clocks
•
The setting of Slave Mode on the sync setup page is irrelevant; SADiE is always in "Trigger"
Mode with 9-pin timecode. Thus to avoid drifting, the audio clock must be locked to the
timecode. See the notes on Trigger and Chase lock.
•
If you're recording digitally: Set your digital clock as normal, either "Automatic" in the "Audio"
Setup section, or "Genlock" to the recorded input or Genlock input if you have a house
AES/EBU signal attached to the AES Ref In (if your hardware has one). NOTE: the incoming
digital audio signal must be in sync with the video reference.
•
If you're recording analogue: Under the "Audio" Setup section, you should set "Internal"
Clock to "Lock to Video".
•
Right-click on the ONLINE button and select that 9-pin port. The menu will show the
machine's name if it recognises it.
iii. Press ONLINE to control the external machine. Operation is identical to method 2 above.
NOTE: Video lock is like chase and so varies the audio clock to lock onto the video signal and increased
jitter may be noticed. If you're recording or playing out digitally whilst locked to video you'll get more
solid lock if you set the clock to AES/EBU. Video lock is fine for analogue recording and playback.
SETTING UP SYNC DETAILS
Select the "Sync" section of the Setup window.
•
Frame Rate - select the frame rate you are working to in frames per second:
24
Cine film
25
EBU - European TV
29.97
North American TV (Colour)
29.97 drop
North American TV (Frame accurate Colour)
30
North American TV (Monochrome)
•
Timecode Type - select the type you wish to generate, or slave to.
•
No Timecode Sync - incoming timecode is ignored and no timecode is generated. The ONLINE
button in the Transport Controls, or on the hardware controller will only enable 9-pin control.
•
Master Mode - SADiE will generate timecode and output it from the relevant socket on the Breakout
Panel, in one of two ways:
•
o
Sync to Video - locks the generated timecode to the clock of a video signal connected to the
"Video" BNC socket on the panel. If you set it like this and don't connect a clock source, you
won't get any timecode! Used for striping videotape, with a Station Clock connected to the
BNC.
o
Sync to Word Clock - the normal setting, where the generated timecode is locked to the
digital audio clock currently generating SADiE's sample rate. The source of this clock is
selected in the "Audio" section of the Setup window.
Slave Mode: - SADiE will follow the timecode arriving at the relevant timecode input socket, in one of
two ways:
9:3
Specific Applications
SADiE v5.2 DSD Operational Manual
•
Trigger Lock - after receiving timecode, SADiE starts at a synchronised point and then runs on its
current digital audio clock, as described above. After several minutes it is possible that there will be a
drift between SADiE and the timecode, unless you have a reliable station clock to which you can
Genlock all equipment.
•
Chase Lock: - SADiE's audio clock follows the incoming timecode so that the sample rate is
continuously varied to track it and therefore make slight variations in replay speed.
NOTE: In Chase Lock, variations in the replay sample rate from chasing a VTR will mean that
the digital audio output is unlikely to be acceptable to other equipment, such as the digital
inputs of a DAT recorder. It is generally best to use Trigger Lock for digital transfers and
Chase Lock when doing analogue transfers.
•
Timecode Slave:
•
TimeSync - turns on SADiE's TimeSync function. At jumps in incoming timecode value, which result
when a machine recording field timecode is stopped and restarted, SADiE creates a new Track and
automatically relocates to the new value so that EDL Entries are automatically placed at the correct
point in the EDL with respect to their timecode. Similarly in playback SADiE will follow the jumps in
timecode. You need to have Autotake on in the Transport Controls when using TimeSync.
Note: TimeSync can only be used when you are set to record in SADIE3 file format
•
Don't stop after valid Timecode - if this is selected, if timecode disappears for longer than the flywheel
time, it will be ignored, and SADiE will continue playback.
Double-click on the + sign next to the "Sync" label in the Setup window to display the sub-section "Autostart
and Offset".
•
Autostart Time - sets the delay between SADiE detecting incoming timecode and starting playback in
Slave mode, so that the current EDL can be compiled. The default value of 2 seconds is adequate for
most situations. If you find that SADiE misses the trigger point in complicated EDL's, increase the
delay. The display is adjustable in the same way as all other time displays.
•
Timecode Offset - sets a fixed difference between SADiE's EDL time and the incoming timecode in
Slave mode and the generated timecode in Master mode.
•
Flywheel Length Frames - sets the amount SADiE runs-on after incoming timecode stops.
•
Record Stop Time - sets the time between timecode disappearing and SADiE stopping record while
slave to timecode
•
Record Time Stamp Delay - the time between SADiE recognising a new timecode and time stamping
the track it is recording. When SADiE is recording in sync it will wait until timecode is steady, and
then it will time stamp the recording, back calculating the time to the start of the track. You may find
that when TimeSync is enabled, during timecode breaks SADiE may recognise a number of timecode
breaks and perhaps record a number of very short tracks before the timecode stabilises and the real
new slate begins. If this happens, try increasing the Record Time Stamp Delay and SADiE will wait
longer after a break before it starts time stamping and creating new tracks.
ENABLING AND DISABLING SYNCHRONISATION
The ONLINE button in the Transport controls or on the hardware controller enables and disables timecode
synchronisation (and SONY 9-pin external machine control). Timecode synchronisation is enabled as follows:
9:4
SADiE v5.2 DSD Operational Manual
Specific Applications
Timecode Mode
When ONLINE is pressed
Master
SADiE will generate timecode when the current-time cursor is moving.
Slave
SADiE will not start until incoming timecode is present, followed by the delay set
under "Autostart Time". The Transport Controls are operating the 9-pin external
machine if 9-pin is enabled (except record, which is still working in SADiE's Playlist).
No Timecode sync
The Online button has no effect on synchronisation.
If 9-pin machines are enabled, right-clicking on the ONLINE button shows a menu where you can choose
which 9-pin machine to control. If you are using LTC for synchronisation, there will be an additional option,
"LTC sync" which will stop transport commands being sent to a 9-pin device when ONLINE is pressed.
NOTE: The Transport Controls have to be controlling a Playlist for the ONLINE button to be available,
so a Playlist has to be the active window.
MONITORING TIMECODE SYNC
The Sync Monitor window can be displayed from the View menu and gives you a visual indication of the quality
of the incoming LTC, MTC or VITC timecode when sync is enabled.
Both the incoming and SADiE's internal timecode values are displayed at the top.
The graph continually re-displays itself and shows the sample rate variation that would have to be applied to
chase the incoming timecode. Maximum and minimum variations on the graph in view are shown.
•
In "Trigger Lock", this will indicate potential drift.
•
In "Chase Lock", it will represent the amount SADiE has to chase to keep in sync.
In "Chase Lock", the "Sample Rate" display will show the sample rate being varied, and the "Sample Error" will
indicate by how much.
The "Timecode Reader Status" indicates whether timecode is being received.
The picture above shows a very severe fluctuation in speed caused by changing Varispeed. You wouldn't
normally expect this sort of behaviour, but in all honesty, the picture grabbed when it was working correctly
was much less interesting!
9:5
Specific Applications
SADiE v5.2 DSD Operational Manual
SETTING UP 9-PIN CONTROL
Display the "9-Pin Control" section of the Setup window.
•
Nine-pin channels - There are four channels available on SADiE's CAT RS422 interface card, each
represented by one of the four-way break-out leads connected to the card.
•
One channel may be used for a set of hardware controllers. Enable them by selecting that channel to
"Hardware Controllers" after they are connected.
•
The rest are available for control of external machines. For each machine that you connect to a 9-pin
channel, select "Sony 9-pin Master".
Double-click on the + sign next to the "9-Pin Control" label in the Setup window to display the sub-section
"Machine Control Setup".
•
Machines - names each machine on a 9-pin channel. The name appears in the list displayed by rightclicking on the Transport Controls' ONLINE button, so that you can pre-select which machines
SADiE will control when the button is pressed.
•
Use 9-pin Locate Command and Use SADiE's Locate function - You have the choice between using
the machine's own 9-pin locate command, or SADiE's own method which controls the fast forward
and shuttling separately. 9-pin locate command will be more accurate, but in achieving that accuracy,
may well take longer to position the tape. Which method you use depends on the 9-pin machine itself
and the particular job you are working on. If for instance you are synchronising daily rushes with short
timecode run-ups, it is likely to be more efficient to go for the accuracy of the 9-pin locate, whereas if
you are track laying and it doesn't really matter where the 9-pin machine starts within a few frames,
then choose SADiE's locate function.
•
Approximate machine FF/RW speed and Allowed locate error - These are the settings for SADiE's
Locate function. "FF/RW speed" is the approximate maximum speed the machine reaches in fast
forward; this is the speed ratio (080 for instance means the 9-pin machine moves the tape 80 seconds
during every real-time second). "Locate error" is measured in frames.
•
Machine Time - selects the source of the timecode that SADiE reads from the external machine
connected to the 9-pin socket.
•
Machine Control Options - allows you to disable or enable record options over 9-pin. SADiE's
"Machine Control windows (opened from the View menu) allow you to put a remote machine into
record, but you may wish, for instance, to disable video record options on a video machine.
USING 9-PIN CONTROL IN SYNC
The ONLINE button in the Transport Controls or on the Hardware Controller enables and disables both
timecode synchronisation and 9-pin machine control. Right-clicking over the button pre-selects which (if any)
machines will be brought Online, or allows you to select LTC sync only.
To control and lock to a machine, such as a VTR, you will have set up machine control and be running SADiE
as a slave to the timecode from it.
9:6
1.
Make the Playlist you want to play the active window.
2.
Press the ONLINE button.
3.
Use the Transport Controls or Hardware Controller to play or scrub the audio and picture in sync.
SADiE v5.2 DSD Operational Manual
Specific Applications
NOTE: SADiE will lock to the VTR's playback position. You can locate the VTR by using SADiE's
rewind/fwd buttons or scrubbing, going to a stored locator point, double-clicking in the time bar, or
repositioning the current-time cursor and pressing SHIFT + PLAY on the Hardware Controller. The
VTR will not re-locate if you position the current-time cursor and start playback normally.
When scrubbing audio and a remote video device together in sync, the speed at which you can scrub will be
limited by the amount of audio you have in your Playlist. However, many video machines can achieve a faster
jog or shuttle speed (up to 16x perhaps), and you may commonly use a very fast shuttle to locate the video.
Within SADiE it is possible to disable audio scrubbing whilst still scrubbing the picture (and thus allow faster
scrub speeds).
Press the GRABTIME button (yes it is an illogical name!) on the hardware control edit panel; this
button toggles audio scrubbing on and off, whilst keeping the 9-pin device in scrub.
There is also a Hotkey for this, under "Hotkey Setup", "Transport Controls", "9-pin scrub without
audio".
9-PIN MACHINE CONTROL
You can remotely control a 9-pin machine with its own separate transport controls. This is independent of the
Playlist, although the two methods can be combined.
Connect and setup the 9-pin channel (see Setting up 9-pin Control). Although Sony 9-pin, or P2 protocol is a
"standard", different machines will implement it in subtly different ways. For instance some machines will have 2
audio channels, some 4, and others more. Some are video machines, but of course DAT's have no video
channel.
SADiE implements a generic set of 9-pin commands, but it is possible that some machines may not implement
these commands in exactly the standard way.
Be sure to check the operation with your machine before working on master tapes. In particular check that
your machine doesn't interpret INSERT as ASSEMBLE!! If you have trouble with 9-pin control, consult your
dealer with details of the machine; they may be able to provide a custom software driver better suited to your
device.
Under the "View" menu, select "Machine Control" and then choose the device you wish to control.
You will see this window:
9:7
Specific Applications
SADiE v5.2 DSD Operational Manual
This gives you control of the Transport and Edit controls
for the remote machine, allowing you to put it in and out
of record, or play and jog it independently from the
Playlist.
The top section is for 9-pin Transport Controls:
•
Time display - for the machines current time. This
display will say "TAPE" if there is no tape in the
machine, or "MACHINE !!!!" if there is nothing
connected on the 9-pin channel. If there is a good
time display but all buttons are grey, then the
machine is probably set to local mode.
•
Transport buttons - rewind, fast forward, stop,
play, record. The button above "record" is for
tape eject.
•
Wheel and nudge buttons - are for scrub and
operate in the same way as SADiE's normal
transport controls; drag left/right for scrub and
up/down for shuttle.
•
Go to Pre-roll - locates the machine to a pre-roll
before the Edit In Point.
•
Setup - opens up the 9-pin setup page.
Next is the Edit section:
•
Edit In point and Edit Out Point - set the edit points. These have fields for a time, and you can double
click and type in a new time. Or click on a digit and drag the mouse up or down to increase or
decrease that value (as with SADiE's other green time displays). "Grab" copies the 9-pin time from the
9-pin transport controls into the field. "Reset" sets it to nothing. After an edit has been performed,
most 9-pin machines reset their edit points, so "Recall" will call back the last edit time.
•
Preview - locates the machine to its pre-roll time, into play, then between the edit points the machine
will go E-E
•
Auto-Edit - actually performs the edit. It locates the machine to its pre-roll time, into play then
punches into record on the enabled channels at the In point and out at the Out point.
•
Review - will locate to the pre-roll time and just play until it reaches the Edit Out point. You would
use this after you've performed the edit, to check it.
•
Edit and Edit off - put the machine straight in (and out) of edit without using the In and Out points.
Lastly the Record Enable section:
9:8
•
Record inhibit - a warning that the tape is protected.
•
Insert and Assemble - choose the record mode. Assemble mode can be disabled in 9-pin setup.
•
a1, a2, a3, a4, V, TC - enable the Audio 1,2,3,4, Video and Timecode channels for record.
•
E-E - "Full E-E" puts all channels into "Input Monitor". "Select E-E" puts only those channels enabled for
record into "input monitor".
SADiE v5.2 DSD Operational Manual
Specific Applications
NOTE: If you have ONLINE pressed, and the same machine selected for synchronising the Playlist,
then both Transport Controls will operate the remote machine.
WORKING WITH SYNC MATERIAL
When working to picture, or other material where sync is important, you will want to:
1.
Record audio material that is already in sync. When SADiE is locked to the source machine, material
you record in will be time stamped with its timecode and positioned correspondingly in the EDL. This
also occurs when Auto-conforming and when using SADiE's "TimeSync" feature, both detailed in
sections below.
2.
"Sync up" material that is not yet in sync, e.g. position it in the EDL so that it is correctly synchronised.
This may take the form of synchronising film rushes, or track laying sound effects etc.
NOTE: It is often most convenient to have two EDL's open for this. You can then have one
as your source EDL with the Entries in their original positions, and the second as your
destination EDL into which you paste the Entries (either cut or copied from the first EDL) at
their new, "synced-up" positions.
3.
Then keep it in sync while you trim, edit and mix it.
MAINTAINING SYNC
Once material is in SADiE:
The LOCK buttons on the Playlist toolbar and on each stream can stop an individual Entry or
Entries on a stream from being moved in the EDL, and so stop accidental loss of sync. Changing an
Entry's EDL times in the Text EDL will not alter sync when the LOCK is on, but it will slip the
Entry when the LOCK is off.
Editing follows all the instructions. To maintain sync, use Playlist Editing in "EDL mode". When you want to slip
an Entry against sync, switch to "Source mode".
TRACK LAYING
This is only a suggested method, and you will probably develop your own.
The hotspot is a useful marker that you can set at a particular point within any Clip or EDL Entry and then use
as the reference when placing it in an EDL. For example, when you place a sound effect of a screech of car
tyres followed by a crash, it is probably the crash that you want to position accurately. It is also useful for
"back-timing", to get a certain bit of music to coincide with the end of speech, etc.
•
For each audio Entry (or Clip in the Clipstore) use Playlist Editing or the Trim Editor to set the
hotspot at the audible cue (see Editing and Clip Details window).
•
Then, with 9-pin control of the VTR enabled, use SADiE's Scrubwheel to find to the visual cue point.
The current-time cursor is now at the sync point.
•
If the Entry is already in the Playlist, use the Snap-Hotspot-to-Current-time function (by right-clicking
over the Entry in the Playlist) to position the hotspot at the sync point, and so synchronise the Entry.
•
If your Entry is not yet in the Playlist, paste it in using Autoplace set to "Hotspot to current time".
9:9
Specific Applications
SADiE v5.2 DSD Operational Manual
AES31 INTERCHANGE
THE AES31 UNIVERSAL INTERCHANGE FORMAT
AES31 is the new standard for network and file interchange of digital audio, designed and specified over a
period over 4 years by the AES Standards Body. The goal of the standard is to reintroduce to the professional
audio industry the concept of universal interchange. A universal format for interchanging audio has not been
present since the days of analogue tape.
AES31 defines source material alongside edited audio (including cross fades) and is text-based in the manner of
a traditional EDL, which makes it easily readable and correctable if circumstances require it. The format is
sample-accurate and supports Multichannel files in excess of 99 channels, as well as interchange between PAL
and NTSC formats and frame rates. The format (crucial parts of which have already been ratified as an
international standard) is open and non-proprietary and thus not exclusive to any single manufacturer. It was
designed to be as simple as possible to implement to reduce development time, and allow access for all.
AES31 consists of four parts:
1.
Disk Format
2.
File Format
3.
An edit list for the files residing on the disks, known as the Audio Decision List (ADL)
4.
An Object Orientated Interchange (as yet undefined)
AES31-1 specifies a disk format that is fully compatible with FAT32, allowing physical interchange on a disk.
This format was chosen because, since its introduction in Windows 95B, it has been well received, and has
been adopted by many DAW's and other digital recording equipment. More importantly, the majority of other
operating systems can also read and write to it. It is one of the simplest disk formats for programmers to
implement, which allows disks larger than 2GB to be addressed.
AES31-2 specifies the file format as the EBU's Broadcast Wave File
(BWF). This is a WAV/RIFF file with a SMPTE/EBU timecode stamp
contained within the header. The main benefit of building on the WAV
format is its universality across computers, DAW's, etc. Every RIFF file
(and hence the WAV/BWF) is made up of "chunks" of information,
which can be utilised or discarded depending on the capabilities of the
receiving equipment.
1
Every RIFF file MUST contain a [fmt] chunk and a [data] chunk. This is
the bare minimum that a piece of receiving equipment will need to open
and read the file. The number that immediately follows the chunk
header will define the number of bytes in that particular chunk. In the
case of audio WAV files, the [fmt] chunk contains the sample rate, bit
depth, frame rate, etc. The [data] chunk contains the audio PCM data.
There can then be additional chunks containing extra information
(marked [chk1] and [chk2] in the example). If the receiving equipment
knows how to read and interpret the data in a particular chunk it will do
so. If the equipment doesn't recognise the chunk header it simply skips
the relevant number of bytes until it reaches the next chunk header. In
this way, new chunks can be added to the file format without breaking
older equipment that does not understand the newer sections.
A Broadcast Wave File contains a chunk labelled [bext] (Broadcast Audio Extension). This contains the
Originator Reference, a 32 character ASCII string containing a non-ambiguous reference allocated by the
originating organisation. This ensures references to a BWF file will always be correctly matched. It also, most
vitally, contains a SMPTE/EBU timecode stamp, as well as other information such as copyright and recording
history.
9:10
SADiE v5.2 DSD Operational Manual
Specific Applications
As the file is made up of chunks, simple music programs like Media Player and QuickTime can simply ignore the
[bext] chunk, and search for the next readable header. This means that the BWF can contain useful and
important information that more versatile equipment/software can interpret, whilst still maintaining
compatibility with all WAV capable equipment. It is important to note that MONO Broadcast WAV's are the
norm with AES31, as there is no useful consensus on the use of stereo or Multichannel Broadcast WAV's.
AES31-3 was the first section to be published in 1999 and describes the Audio Decision List or ADL. This was
the hardest part and took the longest to define. Video and audio editors had become accustomed to the
"human readability" of traditional CMX and Sony edit lists, using a simple word processor to modify them or to
identify problems. The AES31 ADL is written in XML (similar to the HTML language commonly used on the
Internet), and is readable in any word processor on any platform. The ADL is also chunk based (allowing for
future expansion and functionality), and uses XML style tags to specify a number of sections. The <VERSION>,
<PROJECT>, <SYSTEM>, and <SEQUENCE> sections specify general information about the ADL and where it
has come from. The <SOURCE_INDEX> section describes the source material (i.e. audio files) that the ADL
requires, whilst the <EVENT_LIST> section describes the individual ADL entries. The ADL is sample-accurate
(unlike CMX/Sony lists which are only frame-accurate) and has provisions for video pull-up and pull-down
rates. Having experienced practical implementations of this format, the specification has been reviewed to
further define and clarify it.
From the outset, this specification has been designed to be very simple, built wherever possible on existing
standards and traditional working methods. This simplicity tends to make the standard more robust. However,
it also dictates that certain practices must be followed or the simple mechanism will not be able to cope with
the errors introduced. An example of this fragility would be an ADL's "path" to the audio; if audio source files
are moved, or placed in a different location, you could end up with a blank non-playing audio event. Once made
in one machine, the audio and ADL files should not be moved within that machine, (i.e. moving the files into
another folder, renaming the drive, changing drive letters, etc) without exporting and subsequently reimporting the project. The files are linked to their locations when the ADL is created and moving them
outside the normal structure might un-link them.
A useful mechanism for repairing links is the 32-character BWF "Originator Reference" (mentioned above),
which is now implemented by several manufacturers. This is a unique sequence of ASCII characters that is
automatically stamped onto the BWF file at creation time and is referenced alongside each source track entry
specified in the<SOURCE_INDEX> section of the ADL. By using this information the reading application can
ensure that tracks are reliably identified and correctly matched with individual ADL entries.
Efforts to establish an AES31 Trade Association, to promote its adoption by manufacturers and provide an
information exchange forum for the audio community at large, have proven to be over optimistic. However,
with multiple manufacturers already on board the testing and interoperability issues are being quickly resolved.
SADiE, amongst others, are testing as many other manufacturer's files as possible to ensure compatibility issues
will be stamped out more quickly than relying on a single company's proprietary format.
2
The specification may well be revised and amended, and like all international standards will be subject to review
after 5 years. However it will evolve with all manufacturers on-board, and will not be reliant on a single
company's proprietary "interchange" format. Additional sections (chunks) may even be added as supplements
rather than as extensions or amendments, to ensure that all manufacturers are equally able to implement the
standard. One future addition may well be to include edit automation, including gain, mute, and pan
information. However, defining the specification for the transfer of this information will take a significant period
of time.
One final word of caution to customers: make sure that the manufacturer who offers AES31 compatibility has
truly implemented the specification. A few companies have merely implemented Broadcast Wave Files and yet
claim full AES31 compliance. Though this would enable you to import the audio from these manufacturers'
machines, you will NOT have a compatible edit list, which is where the real benefits lay in terms of reducing
workload.
9:11
Specific Applications
SADiE v5.2 DSD Operational Manual
USING AES31 WITH SADIE
SADiE has capabilities for importing audio and AES31 ADL's (Audio Decision Lists). You will need to have an
AES31 project , including an ADL and it's associated audio files, on a Windows compatible disk. Insert the disk
into the SADiE machine. Switch on the PC and open SADiE. Cancel the Project dialogue that pops up. Set the
sample rate and frame rate in the Setup Window to match the AES31 audio you'll be working on. If the sample
rate is wrong, the conversion to SADiE will also be wrong. (If it is wrong, you can easily change it and run the
conversion again.)
Open SADiE and open the project into which you wish to import the AES31 file (or create a new one). Go to
the Project window, select "Miscellaneous" then "Import Component".
A conversion dialogue will appear. A file selection dialogue will appear.
Select the relevant ".adl" file, and click "Open". SADiE will then convert the ADL, create a new Playlist (with
the same name) within your Project, and will open it. The relevant audio will be imported in to your Clipstore,
and the profiles will slowly fill in. Once the "Profiles" have filled in with the foreign audio, you should be able to
work in the normal way.
9:12
SADiE v5.2 DSD Operational Manual
Specific Applications
TROUBLESHOOTING AES31
1. No clips filled in once the project is in SADiE
Open the Clipstore and check that it contains the audio files for the project. Open the Text EDL, and
check the PATH column, to see where the EDL is expecting the audio to be.
If the Clipstore is empty it's likely that the path specified in the ADL is not the same as the path to the
audio on the drive. This could be due to anomalies in the AVTransfer setup. However a more likely
reason is that the files have been moved after they have been converted in AVTransfer. As the paths
in AES31 are absolute, the ADL will no longer be able to find the audio files, as it will be expecting
them in the original location. Either way, if you open the Clipstore, right click on the Source Tracks
folder and select "Import Source Tracks". Navigate to the Project directory and select all of the audio
files. When the audio files have been imported the clips should fill in automatically.
2. Most clips are filled but a few are not
There are two possible reasons for this:
i. Incorrect Sample Rate – If the sample rate is incorrect, many clips may not fill in, as the audio files
will appear to short by calculation at the wrong sample rate. If so, close the project, change the
sample rate in the Setup Window, and repeat the AES31 Import.
ii. Lack of Handles – SADiE clips always have a default crossfade applied to their beginning and end.
In order to avoid a "dip" in the middle of a "cut" edit (one with no crossfade) SADiE extends
every "cut" clip by half the default crossfade length at each end. Thus the true edit point is halfway
through a fade. The value used for the crossfade length of a cut under AES31 is 1000 samples
(linear). Note this only applies to "cut" edits, if a fade has been specified in the AES31 ADL then
that is what will be used.
9:13
Specific Applications
SADiE v5.2 DSD Operational Manual
In the majority of cases, this procedure will be fine. The audio was created with handles, and so
extending the clip minutely will work. However, if an entry from the Avid was used in its entirety (and
includes all available samples), SADiE will be extending the clip to include samples that do not (never
did) exist in the source file. Therefore the clip will remain ghosted, as the total audio required to
satisfy the clip does not exist.
To solve this problem, you will need to identify which clips have not been filled in. The navigator
window is of some help here, as the ghost clips will appear grey (although very small clips will be
difficult to make out). The "Material Present" column in the Text EDL can also be useful, as you will be
able to identify the odd "No" if you scroll down the list.
Having identified the ghost clips, a quick fix is to scissor cut very close to the beginning and end of the
clip, right-click on the centre section and select "Find new track ". The main clip should fill in, and you
can delete the slivers at either end. You can then use the Playlist Edit function to stretch the clip back
out again to its maximum length.
3. If in doubt…
If there is still an empty clip that cannot be filled, you will need to check whether the audio exists:
i. Check the "Path" column in the Text EDL to verify the project is looking for the audio in the
correct location
ii. Check the Clipstore for a clip with the correct name (it may have had the last two digits
converted to a SADiE take number, but this is ok).
iii. Check the source times – double click the ghost clip in the EDL and view the Source In and Out
times that appear in the Clip Details dialogue. Then inspect the track Start and End times in the
Clipstore and check that the Source times fall within the Start and End times. If they don't then
there has been a problem with the transfer. It could be that the audio file has lost its time stamp,
or that it is a WAV file, not a BWF and so has no time stamp (this shouldn't happen but it's best
to check). Either way check the whole process has been run correctly according to these
instructions.
OMF INTERCHANGE USING AVTRANSFER AND AES31
OMF INTERCHANGE WITH SADIE
AVTransfer is a software product designed to run on a PC, and can convert audio files and EDL information to
a number of different formats. The current version can import and export OMF, AES31, OpenTL, discreet edit,
Fairlight ML4 and DSP Media. Please check the AVTransfer web site for any additions. This software can be
used in conjunction with SADiE's own AES31 capabilities to provide import from and export to the file types
listed above for interchange with many other workstations.
This document seeks to explain how an OMF project can be taken from an Avid system, converted through
the AVTransfer software on a PC to AES31 format, then transferred to SADiE and converted to SADiE's native
format for playback and editing.
There are three main elements in this interchange:
1. Disc Drive
2. Audio Files
3. Edit List
9:14
SADiE v5.2 DSD Operational Manual
Specific Applications
AVTransfer operates directly on the host PC on which it is installed, using host-mounted drives. For ease of
manoeuvrability, removable drives are recommended for this purpose. The drive will need to be readable by
SADiE and the PC, and will need to compliant with AES31. Therefore it should be formatted FAT32, supported
by SADiE v5, and Windows 2000.
The way in which the original OMF Project is presented to AVTransfer for conversion needs to be considered.
This could be a disc drive or a Jaz disc, in which case the appropriate device will be necessary on the PC to
accept these. An OMF project may be presented on a Mac formatted drive (depending on the operating system
used on the Avid). In this case software will be necessary on the PC to enable mounting of Mac disks.
Macopener from DataViz Inc. is recommended, but there are number of utilities available.
Finally, if the PC running AVTransfer and the Avid are on a network, and can both see the same drive,
AVTransfer will be able to convert the OMF file directly across the network without the need for removable
media.
There are many ways in which this transfer and conversion can happen. The sequence below details only one
possible iteration, but is efficient and simple.
OMF EXPORT
OMF compositions can be created in a number of different styles. However, the most convenient, and most
suited for conversion is the Embedded or "Bento". The OMF composition will consist of a single large file,
normally hundreds of MB's in size, which wraps all edit information along with all the necessary audio in to one
file.
The "Consolidate" process is recommended before export. This reduces the audio wrapped in to the OMF to
only the elements required. This means that if an hour long recording has only one 10 second element used
anywhere in the project, only that 10 seconds of audio will be transferred. However, it is important to apply
"handles" to the audio when consolidating (2 seconds is usually ok).
Video files are unnecessary so choose the "Audio Only" option when exporting. OMF can usually be exported
as Version 1 or Version 2. AVTransfer supports both versions. However, v2 is more complex, and includes
functions not relevant or supported by SADiE, so choose v1.
AVTRANSFER
The AVTransfer software can be downloaded from the AVTransfer web site. The free download is a demo
version. This has full functionality but it places periodic "bleeps" in the audio files upon conversion. However it
is quite adequate for test purposes.
In this example, the single large OMF file from the stage above will be converted to AES31 format. AES31
consists of:
•
•
Audio Decision List (ADL) – this is an edit list in a simple, human readable format. This file can be
opened and viewed in a normal text editor. The important sections are:
o
<source_index> - This gives a list files used in the project . Each of these will include an index
number called the Originator Reference, which is referred to by the…
o
<event_list> - This is the edit description; a list of edit events (referring to a source
Originator Reference), which describes the Source In time, and Edit In and Out times, along
with channel numbers, fade lengths and shapes, clip levels, etc.
Audio files – These should be in Broadcast Wave (BWF) format. These chunk-based files are much the
same as WAV files, but include an extra Broadcast Extension chunk carrying extra information, most
importantly a timecode stamp. However due to the chunk basis of the file, this file can still be read and
played by all WAV capable equipment.
9:15
Specific Applications
SADiE v5.2 DSD Operational Manual
The original OMF file is unaffected by the conversion process, and remains intact. The AES31 is a copy, and
hence will require its own similar disk space.
Mount the OMF Media on the PC. Also mount the drive that is going to hold the AES31 files. The total storage
space for the AES31 will be similar to the size of the OMF file. If you wish to output the AES31 to the
removable media holding the OMF file, but there is insufficient space, move the OMF on to the host PC's hard
drive before conversion, freeing up space for the AES31.
NOTE: Hard drives in removable cradles are not registered by Windows as removable devices and thus
should only be inserted and removed when the PC is shut down. SADiE has it's own mechanism for
swapping removable drives whilst powered on, but this does NOT apply to the host PC.
Switch on the PC if you haven't already. Open AVTransfer, and at the first page select "Open OMF Project".
Use the browser to navigate to the location of your OMF file, and select it by double clicking.
AVTransfer will open a dialogue box, offering you options for "Import Filter" and "Audio Data Mode". Select
"Smart" and "Embedded Audio – all audio is in one file". Press "OK" and AVTransfer will proceed to unwrap
the OMF file.
9:16
SADiE v5.2 DSD Operational Manual
Specific Applications
AVTransfer may ask if you want to "render dissolves". SADiE can work with "virtual fades" rather than having
to have them rendered first, so say "No". The next dialogue that appears will show the composition (edit list).
There may be a number of these compositions, but only one will be the major composition, so select it by
clicking on it and highlighting the line. (The dialogue also shows audio data and "master mobs". Ignore this for
now.) In the "Export Project as", click the "AES31" button.
Choose the destination for the AES31.
The ADL will be placed in the directory you select or create, and the audio will be placed in a separate subdirectory called "AES Audio". Do not use the root directory for your ADL file. You can choose it but will
receive an error when conversion begins, due to the restrictions on root directories. Before the conversion
takes place you will be asked some further questions.
9:17
Specific Applications
SADiE v5.2 DSD Operational Manual
Choose:
•
Copy All Files (recommended)
•
.WAV for the Broadcast WAV extension
•
DO NOT TICK "Include rendered Cross Fades"
The conversion will continue and you will see a progress metre, the speed of which will depend on your PC
specification. On average a 500MB file on a Pentium 3 PC, takes approximately 3-4 minutes. When the
conversion is finished, exit AVTransfer.
NOTE: As you may have noticed, AVTransfer does not need to be running on the same PC as SADiE,
and there may be reasons for putting it on a different PC, or for keeping it on the SADiE PC. However,
AVTransfer is registered to one PC, and so cannot be moved once registered.
You will now need to import the AES31 ADL and audio in to SADiE. See "Using AES31 with SADiE" for details
on this process.
IN SHORT
•
Create an embedded style OMF on removable media.
•
Move the drive to the AVTransfer PC.
•
Open AVTransfer.
•
Import the OMF.
•
Export as an AES31. Try not to move or copy the files after AES31 conversion, as paths will be
broken.
•
Convert the AES31 ADL in SADiE.
•
Check it's completed.
This process can also be reversed in order to export from SADiE to OMF via AVTransfer.
9:18
SADiE v5.2 DSD Operational Manual
Specific Applications
AAF INTERCHANGE
The Advanced Authoring Format (AAF) is a multimedia file format that enables content creators to easily
exchange digital media and metadata across platforms, and between systems and applications.
http://ww.aafassociation.org is a good resource for information about AAF and includes FAQ's, technical
information, and lists of AAF members. As of November 2003. AAF import and export is available on many
other products including Digidesign ProTools v6.1, Avid Xpress, Media Composer, Symphony and other Avid
platforms, Adobe Premiere Pro, and all GenerationQ Quantel products.
AAF import and export is now available as an option for SADiE v5 software. The information herein is correct
as of November 2003
WHAT IS AN AAF?
An AAF can contain:
•
Edit information – often known as the "composition" or "sequence" in other systems; SADiE users will
usually refer to this as an "EDL". The edit information contained in the AAF will usually be source and
EDL times for the entries, and it may also include fades, fade shapes, clip levels, and level automation
data. There is the possibility of other types of data.
•
Video files – SADiE cannot currently import video entries or video files. However, if a video stream is
being displayed, then video entries found in an AAF will be shown as "ghost" clips along with their
source times for reference.
•
Audio files – these will be in AIFC or WAV format. SADiE can currently only support AIFC or WAV
files at our standard sample and bit rates.
The AAF Project can be presented in two ways:
1.
"linked" or "external" media – where the composition is a *.aaf file, but the audio and/or video files are
separate files.
2.
"embedded" media files – where everything is wrapped up in one big *.aaf file.
Both methods have advantages. With external files, there may not be a requirement to convert files and to
package them and thus the process of export and import will be quicker. On the other hand, external files may
be scattered across a number of drive locations, and thus the process of embedding the media into the AAF
will collect everything neatly in one place; there's a lot less chance of something going missing with an
embedded file. On importing an embedded file, it's easy to find the media files because SADiE has unwrapped it
from the large embedded file and so will know exactly where they are. With an AAF with external files, during
the transfer from one machine to another, it's quite likely that the files will have changed directory or disc
drive name and thus some searching may be required.
With modern processor and disk drive performances, the act of embedding may not take such a significant
extra time and it may be worthwhile for the added benefit of being more certain that your media is not missing
crucial elements.
An exporting application may have options for exporting in either fashion, and it may also allow you to
"consolidate" the media files before exporting. Consolidating is a process where if parts of a media file are not
used in the composition/EDL then new shorter media files are made and linked to the entries in place of the
larger file. Thus the AAF can be smaller in terms of data size. SADiE does not currently consolidate audio files.
9:19
Specific Applications
SADiE v5.2 DSD Operational Manual
IMPORTING AN AAF IN TO SADIE
The process is the same as importing any EDL into your project. The AAF to SADiE conversion, along with any
unwrapping of files from an embedded AAF will happen automatically.
You have a project open. This may be work in progress or perhaps you have just made a new project into
which you wish to import the AAF.
1.
Select the "Project" menu on the top menu bar.
2.
From this list, select "Import Component".
3.
Now browse to the directory where the AAF file is located.
4.
On selecting the AAF file, the "EDL Conversion" dialogue will pop up, with "AAF" pre-selected on the
left hand side, as the file type. Pressing "OK" will start the conversion.
5.
You will see some progress bars. The length of time taken will depend on the size of the project and
also if it's an "embedded" or "external media" type AAF. An embedded file will take longer to unpack.
6.
The converted EDL will open; it will have the same name as the original AAF file (but this is a new file
with an .EDL extension now). You will see the clips' profiles drawing on the screen; SADIE may take a
short while to create these profiles. It's a bad idea to exit SADiE during this period as you may end up
with half-cooked profiles.
7.
If this is an external-media AAF, it is possible that SADIE won't automatically find the external files and
the clips in the EDL will be drawn in outline only as a "ghost" clip. Usually the reason for this is that
the files are no longer in the same directory as they were when they were exported. If this is the case,
in Disk Manager (or else using the "Import Source Tracks" function inside the Clipstore), find the
directory where the audio files belonging to this AAF file are placed, and import all the files into your
project's Clipstore. Disk Manager has a right-click option to "Import into Clipstore". This can be used
on multiple clips or just by right-clicking on a directory name to import the whole directory if
required.
When all the clips are imported into the Project, the EDL will be able to link to the audio files, and as
above, the profile drawing will start.
EXPORTING AN AAF FROM SADIE
The AAF section of the EDL Conversion page in the Setup Window has some options for exporting (note
there are no options for import). You can choose to:
9:20
•
Export Audio – embedded in AAF or external audio files. As explained above, when you choose
embedded, the audio and the edit data are packaged up into one big file, whereas external makes the
AAF export in many files – one file for the edit list (the *.AAF file) plus many audio files.
•
Consolidate source tracks – WAV or AIFC chooses the format that your audio files will be converted
to during the export. Sample and bit rates of the original files are retained (this means 32 bit source
files are not allowed). The term "consolidate" is perhaps a little confusing; currently (v5.2.1 Nov 2003)
source audio files are copied and converted exactly as they are, with no possibility of reducing the
amount of data to exclude audio that's not in use.
•
Export clip level as - Varying fader-level automation, Fixed Clip gain, or None. SADiE has two ways of
applying level to clips, either as moving fader information or as clip levels (as applied in the Clip Details
Window). Currently (v5.2.1 Nov 2003) SADiE can only export one of these two sets of data. This
option chooses which is included in the export.
SADiE v5.2 DSD Operational Manual
Specific Applications
Your choice of any of these options may be determined by the capabilities of the application that is going to be
receiving the AAF file.
The procedure for exporting to AAF is therefore:
1.
Choose the exporting options above.
2.
Open and select the EDL that you wish to export.
3.
From the "File" menu select "Convert".
4.
This will display the Convert dialogue, with a list of possible formats on two sides – "Input" and
"Output" format.
5.
On the left side of this dialogue select "From Playlist" and on the right select "AAF". Then press the
"Select Output File" button, browse for a location that you want to export to, give the AAF file a
name, and press "OK".
External audio files (if that's your choice) will be created in the same directory as the AAF file. Thus
duplicate file names are not allowed for an external file export, although they are allowed in an
embedded file.
6.
The process will continue, with some progress bars to inform you how it's going.
IMPORTING AND EXPORTING OMF FILES USING AAF
SADiE's AAF converter can also support OMF files, both external media and embedded files. When exporting
OMF, the AAF setup options will apply (thus for instance the choice of embedded or external will be that same
as your setting for AAF).
When handling OMF files, SADiE's AAF converter will convert an OMF to AAF first and then import, (or
conversely, for export we convert to AAF, followed by an AAF to OMF stage). This all happens internally, but
will explain why an OMF may take a little longer.
It has been noted that this OMF converter will work with standard OMF files, but there could be some
complex non-standard files that will fail.
9:21
Specific Applications
9:22
SADiE v5.2 DSD Operational Manual
SADiE v5.2 DSD Operational Manual
Customising SADiE
10 - CUSTOMISING SADIE
SETUP WINDOW
The Setup window can be displayed under the View menu and allows you to change many settings that affect
the way SADiE is working. These are stored for each User in a file called "Username.INI" which is used by
Windows® to recall them whenever you run SADiE.
The settings are grouped under topics that can be selected from the list in the left-hand part of the window.
Double-click on topics with a "+" next to them to reveal sub-topics for selection.
The window is fully interactive, so you can leave it open and make changes while using SADiE. Options that are
currently not available (like changing sample rate while recording) will be greyed out.
This section details the options available to you for user setup. Items in Bold refer to options in the right hand
pane of the Setup window.
10:1
Customising SADiE
SADiE v5.2 DSD Operational Manual
GENERAL SETUP
Time Format
Selects the format for all time displays:
Timecode
Hours : Minutes : Seconds : SMPTE frames : SMPTE subframes
Milliseconds
Hours : Minutes : Seconds : Milliseconds
Samples
Hours : Minutes : Seconds : Samples
CD
Hours : Minutes : Seconds : CD Frames
Bars and beats Bars : beats : ppqn (parts per quarter note)
Time Format Settings
Allows you to set the Tempo, Time signature, and ppqn for the Bars and beats
display
Popup Help
Enables the yellow pop-up captions when resting the mouse pointer over a
button.
Warning Messages
Allows a choice of four different settings. Display all messages until you are
familiar with using SADiE
Message Box Placement Allows you change the position on the desktop at which messages, warnings and
errors appear.
Popup Help
When ticked this will display yellow popup boxes displaying button names when
focused on a button.
Disk Integrity Test
When ticked this will perform a disk integrity test.
Classic View
When ticked this will display SADiE's interface in Classic Mode, with all textures
and backgrounds removed.
STATUS DISPLAYS SETUP
Status displays 1-8
10:2
Lets you choose which displays of important settings are shown in any of five
positions on the Status bar at the bottom of the screen. You can display any of
the following:
Sample Rate
Double-clicking on the display will take you to the relevant
part of the Setup window to change the setting.
Frame Rate
As above
Transport Ctrl
Simple Play and Stop buttons and current-time display. Use as
you would the main Transport Controls, which you can close
to save screen space. Double clicking in the time display
allows you to change the current time in the Playlist. Also,
clicking and dragging any digit up or down, increments or
decrements that digit and hence moves the current time.
Autoplace
Right-click on the display to change Autoplace settings.
Slip
Right-click to change Slip settings.
Input Source
Double-clicking on the display will take you to the Audio
Setup page, to allow you to change this.
SADiE v5.2 DSD Operational Manual
Customising SADiE
Clock Source
Double-clicking on the display will take you to the Audio
Setup / Further Audio Settings page, to allow you to change
this.
Input Res
Double-clicking on the display will take you to the Audio
Setup page
Output Res
Double-clicking on the display will take you to the Audio
Setup page
Tempo
Double-clicking on the display will allow you to alter the
tempo directly without having to go to the General Setup
page.
Varispeed
Double-clicking on the display will take you to the Audio
Setup page
Output Format Double-clicking on the display will take you to the Audio
Setup / Further Audio Settings page.
Record Format Double clicking on this has no effect - this is display only.
Return on Stop Right-click to turn Return on Stop on or off.
Display Titles
Scroll Playlist
Right-click to turn Scroll Playlist on or off.
Stationary
Timeline
Right-click to turn Stationary Timeline on or off.
When selected, each display shows its description in full.
AUTO-SAVE SETUP
Create backup files
When any file ( EDL , Clipstore etc.) is saved, the previous version, before the
save, is renamed to "*.bk?", e.g. when you save "FRED.EDL", the old version
becomes "FRED.BKE".
Auto-save files
Sets the time between automatic saves of EDL, Clipstore and Mixer files. These
are saved to the Windows directory and are named:
•
Sd3savxx.~dl - for EDL, where xx counts up to 99
•
Sd3savxx.~ls - for Clipstore,
•
Sd3savxx.~su for mixer
See File Recovery for details on how to recall these files
10:3
Customising SADiE
SADiE v5.2 DSD Operational Manual
AUDIO SETUP
NOTE: Audio Setup can be quickly called up by double clicking on the sample rate on the bottom Status
bar
Input Source
Select which physical inputs are active for routing and recording.
Input Resolution
Select the sample resolution (how many bits per sample) of the input. For
analogue input, the maximum bit depth produced by your A-D (and D-A)
convertors will depend on the hardware you are using, so check with the
Hardware leaflet. For digital input, set to match the input data, unless you want
to reduce the resolution.
Sample Rate
Sets SADiE's working sample rate, for recording and playback. Obviously, SADiE
can only replay audio at one sample rate at any time, so if you mix Tracks
recorded at different sample rates in the same EDL, one of them will be replayed
at the wrong rate and sound speeded up or slowed down. Use the 2x and 4x
buttons to switch to for example 88.2/96 kHz or 192 kHz etc.
Varispeed
Allows you to vary the sample rate for special effects. This is variably adjusting
the system clock, and can't be used when recording digitally or locking to an
external reference.
Output resolution
Sets the output resolution at the digital outputs, or supplied to the digitalanalogue converters.
Default record disk
Only applies to recording outside any Project. When recording within a Project,
there is a separate disk selection in the Project window's Tracklist.
Note on Sample Resolution: Unlike the situation with different Sample rates, SADiE can play audio with
differing bit resolutions in the same Playlist. The Input Resolution setting sets the bit resolution for the
physical inputs, and the Output Resolution setting does the same for the physical outputs. Thus if you are
playing a mixture of 16, 20 and 24 bit audio with the output resolution set to 24 bit, then the resulting output
will be a full 24 bit number. SADiE's internal processing is at 32 bit floating point, and is then truncated to the
final output resolution at the physical output. Thus for instance if your entire Playlist is using 16 bit audio, but
your output resolution is set to 24 bit, if there is any audio processing whatsoever (level changes, EQ's fades
etc.) the resulting output will be a full 24 bit number.
You can choose to record audio at a different bit resolution to the input setting however. When you change
the Input Resolution setting, the Track Properties setting (using the Properties button in Transport
Controls, and is the setting for your next recording) follows this global setting, but it can then be over-ridden
manually. For instance there may be reasons why you would require a 24-bit resolution on the input, but you
wish to record at 16-bit resolution, and so changing Track Properties could force the new recording to be
16 bit. Note that the Track Properties remains at the last setting until you either change the global setting
(in Audio Setup) or manually change it to something different.
It is generally recommended to use dither of some sort when truncating any digital signal. SADiE supports a
number of different dither algorithms. You can see that any audio processed in SADiE will be truncated (unless
there is no processing of any kind) to the output resolution. Dither always works at the setting of the Output
Resolution, thus if for instance you're recording to a 16 bit DAT tape, you would want to set SADiE's
Output Resolution to 16 bit so that the dither is operating on the correct bit. In this particular case, if the
Output Resolution setting was 24 bit, then the dither would be applied to bits that would be truncated by the
DAT input, and hence the dither would have no effect.
In the case of internal recordings (e.g. bounce or CD-R/DDP) the Output and Input Resolution settings are
important to some degree. The output resolution's only use in these cases is to set the bit depth at which
dither is working. Track Properties (which is affected by the setting of Input Resolution as just described)
will set the bit resolution of the new recording/bounce etc. CD-R and DDP however automatically truncate to
16 bit as is the standard for these media.
10:4
SADiE v5.2 DSD Operational Manual
Customising SADiE
FURTHER AUDIO SETTINGS
Clock Source
Sets what digital audio clock is used as the reference for generating SADiE's sample
rate:
Automatic
When a digital input is in use (either for recording or routing to a
Mixer input strip), the clock is derived from that. When no digital
input is in use, SADiE's own internal clock is the reference. This is
the usual setting, unless you are recording from a digital device
that needs to take its clock reference from SADiE (e.g. bouncing
through an external digital processor or mixer), in which case
they would each be trying to follow the other, so you must use
SADiE's Internal setting.
Internal
Internal clock used at all times.
Genlock
External clock reference used at all times. This setting is for those
who use a station clock to reference all their digital equipment.
Clock Source Digital I/P
Analogue I/P
No I/P
Automatic
lowest numbered
digital input in use
internal
internal
Internal
internal
internal
internal
Genlock
AES reference input AES reference input AES reference input
Output Format
Selects whether SADiE produces digital output signal to the SPDIF or AES/EBU
protocol. The selected format is actually supplied to all digital outputs.
Emphasis
Turns Emphasis (of either flavour) on and off in the analogue domain. This is a
global setting, so either everything is de-emphasised or not and thus if you need to
mix material, it is best to de-emphasise by other methods (Graphical EQ has a
preset for this).
Internal Clock
"Free run" or "Lock to Video". This determines whether the audio clock is frame
locked to a video input present on the video input of the CAT card, or not. This
will need to be set if you are locking timecode sync to 9-pin or VITC.
SYNC SETUP
NOTE: Sync Setup can be quickly called up by double clicking on the sample rate on the bottom Status
bar
These settings are described in full in the section on Synchronisation.
PRE AND POST ROLL SETUP
Here you can set how much SADiE plays before (pre-roll) and after (post-roll) an edit when you use the
preview buttons in the Transport Controls or Trim Editor. These times also apply to the preview buttons in
the PQ editor.
Three alternative times are available: using the preview buttons alone, with the Shift key and with the Ctrl. Key.
10:5
Customising SADiE
SADiE v5.2 DSD Operational Manual
PLAYLIST SETUP
No. of Playlist Streams
Tick the box and set the indicator number if you want to specify how many
Streams new Playlists are generated with. Otherwise, SADiE will generate
Playlists with 16 Streams per audio unit by default. See also Playlist Templates
Cut Mode
Determines the joins created between Entries when the Razor-cut is used:
Splice Fade-out of first Entry overlaps fade-in of next (a crossfade).
V cut
Fade-out ends where fade-in starts.
Stop automatically on
razor cut
Applies when razor-cutting during normal playback.
Auto-locate on cut
Means that when SLIP is on, cutting an Entry from the Playlist will reposition
the current time cursor so as to take account of the slip. To be used in
conjunction with the above.
Double-click opens Clip
details
Clip Details window opens when double-clicking on the Playlist Entry.
Auto load new EDL to
current if empty
If your current Playlist is empty, opening an EDL file will load it into the empty
Playlist instead of creating another one.
Autoplace options
The time display is used to set the gap between Entries when using the
"Autoplace with Separation" option.
Use Fades
When selected, the gap length includes the fade-out of the earlier Entry.
Playlist and Trim Edit
Never Scrub crossfades edges when editing - when this is ticked, scrubbing is
automatically disabled when you are editing fade edges.
PLAYLIST DISPLAY
Stream comment space
Choose between displaying the "comments" or "dialogue" that can be written in
the Clip Details window.
Always display mouse
time in Playlist
Changes the behaviour of the little red time display at the bottom left of the
Playlist. With this ticked, the mouse pointer position is always displayed there.
Unticked, and this displays the In point of a clip when you pick it up.
PPM's in Playlist
Turns on or off the miniature meters on the left of each Stream.
Hide non-essential
stream buttons
The small buttons for Solo, mute, profile, automation and automation display
mode are hidden to gain a little more "real-estate" on screen.
Time lock split views
Determines whether the secondary view of the Playlist (reveal by grabbing the
edge of the Playlist on the right hand side, just inside the scroll bar, and dragging
leftwards) scrolls in sync with the main view or not.
Horizontal Zoom level... Sets the Zoom level for "View left/right edge of region", when in Region Edit.
Start Navigator
Window...
Determines whether the Navigator will display the whole Playlist from time zero,
or from the beginning of the first clip.
Stationary Timeline
This option turns the Stationary Timeline on and off, and determines its position
on the screen.
10:6
SADiE v5.2 DSD Operational Manual
Customising SADiE
PLAYLIST ENTRY DISPLAY
Fade display mode
Show fades on all streams as splices:
Show fades on all streams as cuts:
Fade curve display mode Show fades as curves:
Keep updating
Determines whether waveforms are re-drawn or not when you play the Playlist
waveforms when playing whilst viewing at a horizontal zoom of level 16 or greater. Depending on the
performance of your PC, this re-draw can be slow at higher zooms.
Show higher zoom
waveforms as lines
Again above horizontal zoom 16, an Entry's waveform display can be shown as
point-to-point lines, or as bar graphs.
Draw Profiles
Determines whether clip profiles stay constant in size, regardless of level
proportional to clip level changes, or profiles appear proportional to any clip level changes.
Draw black outline on
profiles up to zoom...
Determines at what high zoom level black profiles disappear to make the profiles
clearer
Auto-select recording
clip on entering record
Determines whether the clip currently being recorded is automatically selected
(red) when entering record.
On Copy/Move Entry
show guidelines for...
Determines which Guidelines will be displayed for a particular clip when it is
moved or copied. There is also an option to show these guidelines for grouped
entries.
PLAYLIST NUDGE
Nudge amount
Sets the amount by which Playlist Entries are nudged with the button on the
Autoplace toolbar, or the Hotkeys.
Alt + Nudge amount
Sets the amount by which Entries are nudged when holding the Alt key and using
the Autoplace buttons. The "Zoom dependent" setting means that the higher
magnification you use, the finer the nudge adjustment
PLAYLIST AUTO-STOP
SADiE can be set to stop playback on reaching the end of the last entry in the EDL.
10:7
Customising SADiE
SADiE v5.2 DSD Operational Manual
TRIM EDITOR SETUP
Playlist Auto Follow
When selected, the current-time cursor in the Playlist will move to keep up with
the latest edit point in the Trim Editor.
Auto write back to
Playlist
Entries currently in the Trim Editor are automatically written back when you
RAZOR, or the LOAD NEXT EDIT or LOAD PREVIOUS EDIT buttons
are used.
Double click opens Clip
details
Double-clicking on the relevant profile does just that!
Stop automatically when Applies when razor-cutting during normal playback.
razor cutting
Include fades when
playing out-takes
Includes fades for the "Play out-takes" preview.
Draw Hotspot on the
Trim waveform
Does what it says (or not)
Auto-select matching
fades...
When ticked, when you click on the fade out of the left hand Trim clip, the fade
in of the Right hand clip is automatically selected as well. Or not if it is unticked.
Write back single clips
with Autoplace
You may use the Trim window as a means of tidying a clip from the Clipstore,
before you place it into the Playlist. If this is the case, then setting this will allow
you to use Autoplace settings on writing back, and so speed up the spotting
process.
Trim slips auto-follow
EDL settings
Ticking on this keeps the Slip setting of the Trim window the same as the EDL
setting. You can over-ride the Slip setting for one edit, but on re-opening Trim,
the slip will revert to the EDL setting. With this unticked, then the settings are
completely independent, and so you could perhaps leave slip off in the Playlist,
but always have it switched on in Trim. If most of your editing is in the Trim
Window then this can be an easier method of using Slip functions.
Auto-close Trim when
writing back
Closes the Trim Window automatically after a write back to source.
Auto write back to
source when closing the
trim window
Entries currently in the Trim Editor will write back to their source when the
trim window is closed.
TRIM EDIT NUDGE
Sets the amount by which edit points are nudged either in Playlist editing, or the Trim Editor. There is also a
/10 tick box for more than one pixel per nudge, when using the Zoom dependant nudge.
Nudge amount
Applies to the on-screen nudge buttons (in the transport controls or Trim
Editor), and the Transport Control Hotkeys.
Alt + Nudge amount
Applies to the on-screen nudge buttons (in the transport controls or Trim
Editor), when holding down the Alt. key. The "Zoom dependent" setting means
that the higher magnification you use, the finer the nudge adjustment
10:8
SADiE v5.2 DSD Operational Manual
Customising SADiE
MIXER SETUP
Select PPM scale
Selects the scaling of the PPM level meters in the Mixer. Scales 1-3 emphasise
different areas of the dynamic range and are calibrated in dBFS (decibels with
respect to 0 dB, which is the maximum coding level). The BBC scale is numbered
1-7, with green segments up to PPM4, then yellow segments up to PPM6 and red
above PPM6.
Output PPM type
The Mastering setting makes the peak hold displays accurate to 1 sample. This is
at the expense of a little DSP power.
Peak Displays
"Clear on play" clears the peak holds every time you go into play. Unticked
retains their value until you manually clear them.
Default Mixer
Tick the box and set the indicator numbers if you want to specify the layout of
mono or stereo strips when new Mixers are created. Otherwise, SADiE will
generate Mixers with 16 mono Streams strips and 2 mono output strips per
audio unit. See also Mixer Templates
E to E mode
When selected, E-to-E mode gives you input monitoring on record-enabled
Streams before you press the record button. E-to-E is cancelled when you
disable record on the EDL stream.
Mixer auto-resizing
Determines how the mixer resizes on screen.
Plugins bypass in Scrub
Turns off Plugins during scrub for the purpose of relieving the DSP power and
allowing an EDL to scrub, whereas the plugins may have pushed it over the DSP
limit if they were scrubbing too.
Window Style
Determines whether to use the Blue Mixer or the classic Grey Mixer.
MIXER STRIP DISPLAY
Fader decimal displays
Chooses whether to display peak holds meters (green/red) or fader offset values
(light blue) in the faders' small numeric displays. Note that output fader peak
holds are sampled more frequently than other faders and thus will be more
accurate. Also "overs" on non-output faders are unimportant anyway because
these are processed internally and are still floating point numbers.
Enable phase reverse
controls
Allows you to disable (for the sake of safety) the phase reverse controls.
Strip bypass only effects
EQ
Leaves dynamics processors and MS decoder in line when bypassing the whole
strip.
Mute automation
disconnected
Disconnects and disallows mute automation.
UNDO SETUP
Enable undo
Strongly recommended! In fact, there is really no reason not to use it. You can
set any number of undo levels up to 50. More levels use slightly more disc space
in the PC.
DEFAULT CROSSFADE SETUP
This sets the fade curves and lengths that are created at the beginning and end of Clips after recording and
when using the razor-cut function. The normal default is around 40 subframes (20 milliseconds).
10:9
Customising SADiE
SADiE v5.2 DSD Operational Manual
9-PIN CONTROL SETUP
These settings are described in full in the section on 9-pin Control
TRANSPORT CONTROLS SETUP
Loop pre/post-roll
Sets the amount played either side of the Left and Right locator points when the
LOOP button is used.
SCRUB SETUP
This section sets the sensitivity parameters for the Mouse Scrub Wheel
Mouse Jog ratio
Sets how much the audio is scrubbed for a given horizontal mouse movement.
Default setting 040. Reducing this number means that a larger left/right mouse
movement is required to move the audio at normal speed.
Mouse Jog Damping
Defines a rate of change of speed. This sets how quickly the audio speed
responds to the mouse speed changes when jogging. Default setting 80. Damping
allows you to retain a smoother playback speed, even thought the mouse
movements may be jerky. Reducing this number will tighten the link between
mouse and audio movement.
Mouse Shuttle sensitivity Sets the speed of shuttle for a given vertical mouse movement. Default Setting
40. Reducing this number means that a larger up/down mouse movement is
required to move the audio at normal speed.
Fixed Scrub Speeds
Set three fixed shuttle speeds used by the Hotkeys for forward and reverse
scrubbing. These are set by default to being on the numeric keypad (NUM
LOCK on!) - 1&3, 4&6, 7&9.
The default settings are usually fine for general purpose scrubbing, but you may find that if very fine detail is
required you might need to change these, and perhaps change them significantly.
The performance of scrubbing with the mouse can be altered by PC performance. You will also notice that
changing the Horizontal zoom in the Playlist will have an effect on the scrub speed.
This is an example setting found to work well with CEDAR DeClick, for which you will need much finer detail
than the normal settings allow:
•
Mouse Jog Ratio about 5 -7
•
Mouse Jog Damping 2
•
Mouse Shuttle sensitivity 10
These are significantly different from the defaults, and reducing the Ratio like this means that a much larger
left/right mouse movement is required to move the audio in Jog at any speed. Likewise, reducing the Shuttle
Sensitivity has the same effect on shuttle. However, it does mean that you have far greater control when
moving very small distances. Reducing the Jog Damping means that the scrub playback is much closer linked to
the mouse movement; this reduces the "rubber-band" effect if you like.
Whilst discussing scrub, note that you can optionally turn off Plugins whilst scrubbing. This allows you to scrub
when otherwise you would have been working right up against the DSP limit. The switch is found in the Mixer
section of Setup.
10:10
SADiE v5.2 DSD Operational Manual
Customising SADiE
SCRUB WHEEL
This section sets the sensitivity parameters for the Hardware Controller's Scrub Wheel. This is slightly more
complex than setup for the mouse. The Jog function works on two levels: "Damped" for larger movements, and
"undamped" when the wheel movement is smaller. The two levels have different sensitivity settings so that
moving the wheel at one speed will produce a rapid movement through the audio, whereas when you slow the
wheel down the sensitivity can become finer and un-damped.
Damping factor
Is equivalent to "Jog damping", and defines how quickly the audio speed changes
when the mouse speed changes. Default is 87. This control is very sensitive:
increasing to 99 will give you "full-on" damping. Essentially there's only +/-10
throw on this adjustment.
Damping Sensitivity
Sets how much the audio is scrubbed for a given wheel movement. Default
setting 050. Reducing this number means that a larger wheel movement is
required to move the audio at normal speed.
Undamped Range
This control sets the range inside which wheel movements flip to the
"undamped" sensitivity setting. This value is the number of sample blocks (blocks
of 32 samples) The default is 300, thus any movement of less than 9600 samples
will stay at the undamped sensitivity setting.
Undamped Sensitivity
Sets how much the audio is scrubbed for a given wheel movement inside the
undamped range. Default setting 512. Reducing this number means that a large
wheel movement will produce a smaller audio movement.
Undamped Offset
This smoothes the transition from the undamped range to the damped sensitivity
range. Default is 64. Increasing this will produce a smoother transition.
Shuttle Sensitivity
Entirely unrelated to the other settings, this sets the sensitivity for the Shuttle
mode. Default is 10, increasing this will provide a greater audio speed for a
smaller rotation of the wheel.
The five Jog settings, particularly the settings for the undamped range, interact to a fair degree. For instance if
you reduce the undamped sensitivity and increase the undamped range, you will find that the jog never
switches over to the damped sensitivity setting. Thus if you reduce the undamped sensitivity to gain tighter
control for fine movements of the wheel, you may need to reduce the undamped range setting as well, and
possibly the undamped offset too.
The default settings are designed for normal operation, and, because of the undamped range, the defaults will
work well for fine detail work too.
PROJECT MANAGEMENT SETUP
The default directory for project files is C:\PROJECTS and thus all files for a project called FRED would reside
in a sub-directory: C:\PROJECTS\FRED
In Project Management setup you can change the working directory for the project files if, for instance, you
wanted to keep the projects on a network drive.
The Templates sub-section allows you set-up the how EDL and mixer templates are used.
10:11
Customising SADiE
SADiE v5.2 DSD Operational Manual
PQ SETUP
For a full description, see CD Pre-mastering.
Enable PQ Editing
features
Enables or disables PQ editing. The ability to use PQ is set when you create a
Playlist, and thus if you need to use PQ, having previously made an EDL with it
set it to OFF, then you will need to:
•
Enable PQ editing in setup
•
Create a new EDL
•
Copy your edited entries from your original, non-PQ-enabled EDL, into
the new one.
If you're using PQ, it is easiest to leave it on, but if you never use it then turn it
off, and you'll get a tiny bit more space on screen.
Select PQ Audio Verify
report style
Applies to DDP only. This allows you to decide which type of report is created
(to printer or disc) when you verify a DDP. A complete audio integrity report
will run to several pages, thus you may wish to print a simpler one.
Print PQ list at 30 FPS
Normally SADiE will round PQ times to CD frames (75 frames per second) and
will print times resolved to 75 frames also. If you are working with 1630/U-matic
masters, you may require the print out to be 30 FPS.
Use record pre-roll
before CD-R track
Only applies to Orange Book audio (e.g. not SCSI) CD-R's. The use for this
depends on the way your CD-R responds to the start of the CD. With this
option ticked, when SADiE starts playing the EDL, it will play x seconds
(depending on the setting) before the start of the first track flag, and thus the
first track flag will trigger a track start on the CD.
EDL PQ lists insert time When you read PQ data in from a 1630, DDP or CD, the first track track's start
time on the Master will be 00:00:00, and the information concerning its EDL
offset time does not exist, even if this was created in SADiE. This setup time field
allows you to determine where the first track starts when it is read back into
SADiE.
Allow initial countdown
to be > 3s
Otherwise known as "hidden tracks". It is usual for the time between "Track 1
ID 0" and "Track 1 ID1" to be between 2 and 3 seconds. However some PQ
authors have taken advantage of a "grey" area in the Red Book specification, and
placed audio in this first countdown, which (if the consumer knows the trick) can
be played back on most CD players. Normally, when you place a CD in a player
and press play, playback will always start from "Track 1 ID 1" thus this firstcountdown is never played.
However if you extend this gap (backwards as it were) then audio inside the gap
can be played by pressing play, then immediately shuttle-rewinding behind the
start of the CD, and playing again at the appropriate moment.
By default, SADiE disallows extended first countdowns, but this can be overridden (with this switch) to enable you to perform this trick if required. It is
advisable to set it back to normal afterwards, as all your subsequent CD masters
could end up with a "semi-legal" first countdown. There are other methods of
making "hidden tracks"; sometimes placing audio after half an hour of silence is
called a hidden track, but hidden tracks created in this way are more hidden!
10:12
SADiE v5.2 DSD Operational Manual
Customising SADiE
It is advisable to consult your plant before presenting them with a master like
this. These are relatively common these days, but still a little unusual, and it is
best to confirm that they are able to process a master like this, otherwise it may
be considered "illegal" and the hidden audio may be missed. Extended first
countdowns cannot be written to DDP, as the DDP audio file is specified to start
at CD time 00:00:00 and thus audio before "Track 1 ID 1" is never transferred to
the DDP audio file.
Be careful with this one!
CD-R PQ reading
Allows or disallows the reading of ISRC's and Index Zeros when reading PQ
from CD's. This may not work with some models of CD-R. See Reading PQ data
and audio from a master
Non-real-time CD
playback
Sets the read speed of a CD-R device, when used for bouncing data back into
SADiE (aka "ripping" audio from CD). See Bounce from CD-R
PQ DISPLAY
Enable PQ editing in the Allows PQ flags to be inserted or moved with the mouse. Disabling this is a way
Playlist
of locking the PQ list.
Auto-show the PQ
Playlist Stream
The Playlist will automatically open the PQ Stream displaying PQ flags, when the
EDL is loaded.
There are some other pages for selecting PQ settings:
•
PQ Facility - The country code and owner code entered here will form part of the ISRC number that
can be generated for each CD track. Production details can also be entered for the printout of the PQ
list.
•
PQ Burst - Sets SADiE's input channel for reading a PQ burst, and the output channel and level used
when writing a PQ burst.
•
PQ Offsets - Sets the length below which all countdowns will be removed when using the
NORMALISE button, and the parameters for applying offsets to the PQ Entries.
NOTE: The offsets set here are applied to a PQ list from the moment you start creating it.
From then on, they are held in the EDL and changing these settings will not change the
current PQ list. Be sure that you set them as you want before you do lots of intricate PQ
editing!
•
PQ Flags - Sets the parameters used when automatically generating a PQ list, and when adding new
track flags.
•
PQ Text Output - Allows you to choose a format and editor for viewing the PQ printout.
•
DDP Details - Allows you to choose between creating a version 1 or version 2 DDP master.
10:13
Customising SADiE
SADiE v5.2 DSD Operational Manual
HOTKEY SETUP
Here you can set a wide range of computer keyboard key-presses and hardware controller buttons to
duplicate on-screen commands, so avoiding the use of a mouse.
Categories
First select the window in which the Hotkey will operate. Remember that
Hotkeys set for the Transport Controls will affect other windows.
Commands
Select the command you want to check or assign to a new Hotkey.
Hotkeys assigned
This box will list what Hotkeys are currently assigned to the selected command.
New Hotkey
Select a key by scrolling down the box and tick the Ctrl, Shift or Alt key(s) to be
pressed in combination with it if desired.
For hardware controller buttons, select F1-F12 and tick HWC Shift and/or
HWC Assign if they are to be used in combination.
Assign
Adds the selected New Hotkey to the list of those assigned to the command.
Remove
Removes the selected item in the Hotkeys assigned box from the list assigned to
the command.
Reset All
Resets all Hotkeys in SADiE to the standard factory defaults.
Dump Keys
Allows you to save the current Hotkey settings to a text file so that you can
print it out. Note these dumps cannot be reloaded; this is a job for SADiE
Settings files.
All alphanumeric keys can be used, along with the keyboard function keys F1-F12. Certain non- alphanumeric
keys can also be used:
¬ - = [ ] ; ' # \ ,. /
Tab, Esc, and Scroll Lock
and on the number pad (when set to Num lock on!)
/*-+
(note that Del and Enter on the numeric pad are the same as the other Del and Enter and so are already
included, but cannot be set separately)
CLIP DETAILS SETUP
Write back Clip on exit
Automatically writes back the changes you make in a Clip Details window when
you close it.
EDL CONVERSION SETUP
This sections allows you some options when converting to and from external EDL 's in the following formats:
Lightworks, CMX, Sony, Grass Valley, or Lightworks Multi-track.
10:14
SADiE v5.2 DSD Operational Manual
Customising SADiE
BOUNCE SETTINGS
Close Bounce dialogue
on Start
Either leaves the Bounce Window on screen or hidden during the bounce
process.
PC bounce Destination
Allows you to set the directory on the PC drive where Bounce to PC disk files
will go.
Record Pre and Post
handle
Allows you to add handles to a file when using bounce.
Multi-session CD fix up
When ticked a bounce to CD will automatically fix up the orange book CD after
the bounce.
PRINTING SETUP
This is used in conjunction with the "Print Text EDL " function under the Playlist menu
You can set the number of characters to a line for your printer, and also, when Printing to file, allows you to
set delimiting characters for import into a spreadsheet or database if required.
DSD SETUP
DSD Board Analogue
Output Mode
Determines whether to use the E Chip (outputting DSD) or the D Chip
(outputting PCM).
DSD Digital I/O Mode
Determines whether SADiE uses SDIF2 or SDIF3 for input and output in digital.
SACD SETUP
Frame Format
Determines the frame format for the Cutting Master
CM Type
Determines whether the Cutting Master is Single Layer (DSD only), or
Hybrid (DSD + Red Book).
Import PCM after CM
creation
Selects whether the PCM version is imported after the Cutting Master is
created.
PLAYLIST AND MIXER TEMPLATES
The Templates feature allows you to further customise your working environment, by allowing you to easily
save custom Playlists and Mixer Setups for future use.
In normal use you will save Playlists and Mixers but these will contain other information EDL entries, Fader
levels and pan and EQ settings for instance, which are of no further use. Once you have customised a Playlist
or Mixer, if you save it as a Template you can use it again and again.
For instance you may always require a Playlist with 2 mono streams and 1 stereo, with a mixer that has
perhaps 2 mono and 1 stereo strips with an EQ and maybe a reverb. If, having constructed this blank Playlist
and mixer you save them as template files, then you can set SADiE to use these for the defaults.
To save a Playlist or Mixer as a template select the option under the "File" menu, "Save current Playlist (or
mixer) as a template". The files will be saved with an EDT or MST extension.
If (and only if) you are working in a Project, you can enable Templates in the "Templates Setup" page (which is
a sub-section of Project Management Setup).
10:15
Customising SADiE
SADiE v5.2 DSD Operational Manual
The three options for using templates are:
•
Do not use templates - this is the default choice. Templates are disabled, and the type of EDL/mixer
that is created when you make a new EDL/mixer is determined by the Setup page options (see Playlist
Setup and Mixer Setup).
•
Use the specified templates below - In this setup page you can choose a single EDT Playlist template,
and MST Mixer template, which will automatically be used as the basis for your Playlist and Mixer every
time you create a new Playlist and Mixer (either using the "File", "New" function or the CREATE
EDL and CREATE MIXER buttons in the Project window.
•
Choose a template at Playlist or mixer creation time - when you create the new EDL/Mixer, SADiE
will ask you to name the file in the usual way, and then offer you a list of all the available templates files
that appear in your own template directory.
NOTES: Templates are saved and reloaded on a user basis, e.g. the user "Joe" will find his templates in
C:\SADiE5\templates\Joe (assuming C:\SADiE5 is the normal working directory for SADiE). You will
notice that if you press CANCEL (or press the Esc key) you will bypass the template and the new
EDL/mixer will be based on the Setup page setting. You will also notice that you will be first offered the
template that was chosen last, and so you only need to press the
Return key to use that same
template again.
DESKTOPS
The arrangement of windows and toolbars (groups of buttons) on your screen is called a desktop. As described
below, this can be saved as a file, just like an EDL. You can save several different Desktops for different tasks
and then reload them to quickly rearrange the screen whenever you want. Note that a desktop will not look
the same when viewed with a different screen resolution. Several Desktops files are provided with the
software.
ARRANGING WINDOWS
Moving and Resizing windows with the mouse is covered in Windows® Help
The Window menu has the following commands which are standard for Windows® applications:
•
"Tile" will attempt to fit all open windows onto the desktop.
•
"Cascade" will arrange all open windows on top of each other, with all the title bars visible.
•
"Arrange icons" will align the symbols for minimised windows along the bottom of the desktop. Again,
not especially useful unless you have lots of minimised windows.
•
The list at the bottom of the menu shows all open windows and is useful for quickly restoring to size a
minimised one, or making active (and so bringing to the top) an obscured one.
SPLIT AND DUPLICATE WINDOWS
The "Window" menu's "New Window" command creates a duplicate of the active window so that you can
effectively split it and place different parts in different places on your desktop.
For example, you may have a very large Mixer of say 24 channels. You could put the first 12 channels in the top
half of the screen and the rest below. Or, if you are using a dual graphics card to spread the desktop across
two monitors, channels 1-12 on one screen and 13-24 on the other.
You might want to have two Playlist windows, one looking at one part of the EDL, and the second at a different
part. You can also create a quite separate Text EDL window like this.
10:16
SADiE v5.2 DSD Operational Manual
Customising SADiE
•
Make the window you want to duplicate the active one.
•
Select "New Window". An exact duplicate will be displayed. If duplicating the Playlist, you have the
option of a new Playlist or Text EDL. If duplicating the Mixer, you have the option of a new Mixer or
Process window.
•
You can now resize the two duplicates and use their separate scroll and zoom functions so that they
display the bits that interest you.
•
Move the new windows where you want them on your desktop, which can then be saved as described
below.
TOOLBAR DISPLAY
The various toolbars used in SADiE can be attached to different parts of their windows or floated and moved
around the screen.
Right-click over any toolbar to see the list of options:
•
Each toolbar can be docked to any of the four sides of its window.
•
The toolbar can be floated, in which case it becomes a separate, "always-on-top" box that can be
positioned anywhere on the desktop. A floating toolbar can also be re-shaped by dragging its sides in
or out.
•
Each toolbar can also be hidden, so that it doesn't appear on the desktop at all. To re-display a hidden
toolbar, look under the View menu, where the "Toolbars" command will let you select which toolbars
are displayed.
NOTE: The Transport Controls are a special toolbar that cannot be reshaped or docked. They can,
however, be displayed or hidden under the "View" menu.
SAVING AND LOADING DESKTOPS
To save the current arrangement of your desktop (which includes the size and position of all windows, even if
they are not currently on view), select "Save Desktop" from the Desktop menu. The save box that appears
allows you to give the new desktop file a name and open the folder that you want it saved in. There is a folder
for Desktops within the main SADiE folder.
To load a previously saved desktop select "Load Desktop" from the Desktop menu and find it in the relevant
folder. Alternatively, select it from the list of recently used Desktops at the bottom of the Desktop menu.
You can load any of the five suggested Desktops, which are provided in the Desktops folder, for each of the
following screen resolutions:
800 (x 600), 1024 (x 768), and 1280 (x 1024).
The resolution forms the first part of the filename.
There is a general "Default" desktop, which will be the one loaded when you start SADiE, two editing
Desktops, one for mixing and one for PQ editing.
The "Environment / Desktop" menu has an option to "Save desktop as start up desktop" (see Automatic Log-In
and Desktop Load).
10:17
Customising SADiE
SADiE v5.2 DSD Operational Manual
CHANGING SCREEN RESOLUTION
WHY DOES MY SADIE LOOK DIFFERENT TO THEIRS?
A PC's display is a grid of coloured squares called pixels. Most PC's can display at different screen resolutions,
(a different number of pixels) across the same size screen. A high screen resolution of 1024 pixels horizontally
by 768 pixels vertically will use smaller pixels than a resolution of 640 x 480. This means the elements of any
display will appear smaller, yet you can fit more onto the screen.
The choice is down to your personal preference for the size of monitor you are using. SADiE can work equally
well at either 640 x 480, 800 x 600, 1024 x 768 or even 1280 x 1024. It is worth bearing in mind that the PC
will be working harder if you increase the resolution, so the display may be slower to refresh. Another factor
that can change the speed of operation is the number of colours. SADiE only uses 16 colours, and so if you set
the display driver to use 256 or more colours, it is processing numbers unnecessarily and could work slower.
Some display cards, however, are optimised to run at a certain resolution and number of colours, so there is
no hard and fast rule.
Generally, 800 x 600 (often called SVGA) is a good default. You may prefer 640 x 480 (often called VGA) if you
have a small monitor or a SADiE portable, and 1024 x 768 if you've got a 17" monitor. The method of changing
resolution may be different for different PC's and different display cards, but the following are most common.
WINDOWS
From the Windows desktop, right-click on an empty area on the desktop and choose "Properties" from the
menu that appears. Select the "Settings" tab of the box that appears. There is a sliding control to change
resolution, and a selection box for the number of colours. Most changes can be done without closing down and
restarting Windows, but if that is necessary, the screen instructions will warn you and you can close SADiE and
save your work accordingly.
Alternatively your PC's video adapter may have it's own application for setting up the display.
MESSAGE BOX PLACEMENT
In the Setup window, on the "General" page there are settings to allow you change the position on the desktop
at which messages, warnings and errors appear. You can alter the percentage from left of desktop, and the
percentage from top of desktop, and you're able to Test the settings to see where you've placed the messages.
This is particularly useful if you are running SADiE on a machine with more than one monitor. With the default
setting, messages appear in the middle of the screen, which can be spread across two monitors on a twin
screen system.
MULTIPLE MONITORS
It is possible to work with more than one screen on your PC, as there is support for multiple graphics cards in
Windows. Alternatively you can buy graphics cards that have more than one monitor port.
There are a number of different ways that these screens are handled, and this will be determined by the
operating system and graphics drivers.
There are a few things to watch out for, but mostly there are ways of accommodating "oddities".
10:18
SADiE v5.2 DSD Operational Manual
Customising SADiE
"SADiE will only ever fit onto one screen" - This can happen because Windows may be set to maximise single
applications to one screen. This is the standard way you are expected to work with two screens, e.g. one
application on each monitor. To get SADiE to spread across two (or more) screens is not to maximise SADiE,
but to set SADiE to run in a Normal window then resize to fit. This is set in the shortcut you use to run
SADiE. Right-click on the desktop shortcut, select "Properties" and then on the "Shortcut" tab, check that
"Run" is set to "Normal window". If "Run" is set to "Maximise" this could cause SADiE to only fit to one screen.
"Messages appear in the middle of two screens" - If everything is configured correctly, then messages should
appear in the centre of the screen on which the mouse is settled. However, we have seen graphics cards and
drivers that do not follow this convention. Sometimes updating the graphics drivers will correct this problem,
but if the card insists on seeing the desktop as one big, say, 2048 x 768 screen, rather than two 1024 x 768's,
then there is a setup option, under "General Settings" (Message box placement) that allows you to re-position
message boxes, thus changing the distance from the left to 25%, will push the messages to the centre of the left
screen in a two-screen setup.
Note that the placement of SADiE's main windows (Playlist, Mixer, etc. plus the Setup window, Disk Manager,
and Transport controls) is controlled by the Desktop. If you are adding extra monitors, you may want to
design a different desktop and save it as the start up desktop to make it the default.
CHANGING HOW SADIE STARTS UP
STARTING SADIE AUTOMATICALLY
To make SADiE start automatically when Windows starts:
1.
Click on the Start button and point to "Settings"
2.
Click "Taskbar", then the "Start Menu Programs" tab
3.
Click "Add" followed by "Browse"
4.
Open folders to locate the icon that you use to run SADiE. It should be under "Windows", "Start
menu", "Programs", "SADiE"
5.
Click "Next", then double-click on the Start Up folder.
6.
Type a display name for the new icon, then press "Finish"
To stop SADiE starting automatically:
1.
Click on the Start button and point to "Settings"
2.
Click "Taskbar", then the "Start Menu Programs" tab
3.
Click "Remove"
4.
Open the folders "Programs" and "Start Up"
5.
Select the SADiE icon and press "Remove"
AUTOMATIC LOG-IN AND DESKTOP LOAD
You may want SADiE to start with a particular desktop file that you have previously saved, particularly if you
have changed screen resolution. You can also set the login process to be done automatically when SADiE
boots up.
10:19
Customising SADiE
SADiE v5.2 DSD Operational Manual
The icon that you select to run SADiE contains instructions to run the program. These take the form of a
command line, to which you can add the desktop to be used, and your user name and password.
TO CHANGE THE START-UP DESKTOP
There's an easy way or a more complex method, which describes in more detail how SADiE chooses the
desktop.
Easy method - Under the "Environment" menu, choose "Desktop", then "Save Desktop as Startup desktop".
This function will detect which screen resolution you are running at, then overwrite the default desktop (e.g.
"1024def.dsk" for 1024 x 768 resolution) with your current desktop layout.
This method will not work if you have changed your screen resolution since installing the software. This is
because the current resolution's default desktop will be over-written, but the icon on the desktop will still be
loading up the default desktop for the original screen resolution when the software was loaded. This is perhaps
why you wanted to do this in the first place. If this is the case, then use the "hacker's method" below to change
the command line to the correct desktop.
Hacker's method - To modify these instructions for desktop and login:
1.
First find the command line:
i.
If your system is set to run SADiE automatically when you switch on, the relevant icon can be
found under the Start button, "Settings", "Taskbar", "Start Menu Programs". Click "Advanced" and,
in the Explorer box that appears, open the "Programs" folder and then the "Startup" folder. The
SADiE shortcut icon will be in the list on the right.
ii.
If you run SADiE manually from the Start button, follow the above instructions, but instead of
finding the icon in the "Startup" folder, it will be in the "SADiE Disk Editor" one.
iii. Alternatively, you may have an icon on your Windows desktop. Right-click on the relevant icon,
select "Properties" and the "Shortcut" tab of the box that appears. The command-line is in the
box labelled "Target".
iv. A typical command line is:
C:\SADiE5\BIN\SADiE5.EXE_/dc:\SADiE5\Desktops\1024def.dsk
v.
The first part of the command line, "C:\SADiE5\BIN\SADiE5.EXE" is the instruction to run the
program file "SADiE5.EXE" which runs SADiE. It gives the full location (or "path"), of the file, e.g.
it is in the "Bin" folder, which in turn is in the "SADiE5" folder, which is on the C drive.
vi. The second part starts with a space (shown above as _) and then /d, which is the instruction to
load the following file as the desktop, in this case "1024def.dsk", which is in the "Desktops" folder,
in the "SADiE5" folder, on the C drive.
2.
Now edit the command line by clicking within it to change the text. The line may be longer than the
box displaying it, but you can use the keyboard arrow keys to move it.
i.
To automatically load a desktop file, carefully change the current desktop file name to the one
you want to use. You probably won't have to change the folder parts of the path, unless you have
been storing Desktops in strange places.
Remember to keep the space shown as _ after "SADiE5.EXE".
NOTE: On Windows systems, any paths that use filenames with spaces in them must
be enclosed in quote marks.
10:20
SADiE v5.2 DSD Operational Manual
Customising SADiE
NOTE: SADiE v5 uses user-based Desktops. Alternative Desktops can be set for
different screen resolutions. You will need to edit the Windows desktop shortcut to
remove the /dc:\SADiE5\Desktops\1024def.dsk part of the command line .
ii.
To login automatically, carefully add the following to the end of the command line, after any
quotation marks _/uNNNNN_pWWWWW
where "NNNNN" and "WWWWW" are your user name and password respectively. Note the
spaces shown as _ before the first oblique and between your user name and the P.
USER MANAGEMENT
User Management allows full access to SADiE v5 to be restricted to a list of specified users, held in a User
Database. The SADiE v5 Project system further restricts access to individual Projects to a list of specified
Project users (a subset of the User Database).
The "SADiE v5 User Management" application is a separate Windows-based utility for creating and altering a
User Database.
All installations require a User Database even if it only contains one user. In a one-user installation the User
Management Application is not strictly required, as SADiE v5 will construct a default User Database the first
time it is run if one is not found.
You will need to run the Application if:
•
You are setting up a multi-user system,
•
Additional users need to be added to a system,
•
An existing user wants to change their username,
•
You want to point SADiE v5 at a different User Database (perhaps on a networked drive).
Each user has their own username, password (optional), management privilege level, and SADiE settings file.
USERNAMES AND PASSWORDS
USERNAMES
A "username" is a unique name given to each user and can be up to 16 characters long. Valid characters are the
lowercase letters of the alphabet, a - z, the digits 0-9 and the underscore character _. The application will
validate all input, so there is no possibility of entering an illegal character accidentally.
PASSWORDS
Passwords are optional, although recommended in any system that has more than one user. The same rules for
usernames also apply to passwords.
MANAGEMENT PRIVILEGE LEVEL
This determines whether a user can run the User Management application, and what they can do within it. It
also allows certain users access to all SADiE Projects.
There are three levels of privilege:
10:21
Customising SADiE
SADiE v5.2 DSD Operational Manual
ORDINARY USERS
Most users will be created as ordinary users. They can run SADiE and gain access to projects that they are
signed on to. They cannot run this application and therefore have no power to alter the User Database.
SYSTEM ADMINISTRATORS
These users can run the User Management Application and alter the User Database by adding and removing
(and altering the details of) ordinary users. They also have access to all SADiE projects. This is to prevent a
lowly pip-squeak of a user creating a project that cannot be accessed by anyone, however powerful.
There is no restriction on the number of System Administrators that there can be in a User Database, but for
security reasons it is advisable to keep it to a minimum.
System Administrators can only be created by the Super System Administrator.
SUPER SYSTEM ADMINISTRATOR
This is the most powerful user of all. Each User Database contains only one Super System Administrator, who
is appointed when the database is created.
Super System Administrators can run the User Management Application and alter the User Database by adding
and removing (and altering the details of) System Administrators and ordinary users. They also have access to
all SADiE Projects.
SADIE SETTINGS FILES
USER INI FILES
Every user in the User Database will have their own settings file. A User "INI" file has a filename of
"Username.INI", where "username" is the first eight characters of the user's username. The files are derived
initially from "SADiE5.INI" (situated in the C:\windows directory)
These "INI" files contain information on every setting in the SADiE program; fundamental things such as sample
rate, record input, as well as more obscure functions hidden away inside the Setup pages. These settings are
carried from session to session, so that if you change a setting, it will stay that way until you change it again.
Hotkeys are stored here.
If an anonymous user logs on (e.g. presses "Skip" in the log in dialogue) then they will be considered to have a
username of "DEFAULT", and therefore will use the "DEFAULT.INI" User "INI" file. It is therefore important
to bear in mind that all anonymous users will share one "INI" file.
You can find out which User "INI" file is being used at any given time by opening the settings view and looking
at the filename that appears in the title bar of the window.
USER INI FILE DIRECTORY
The User "INI" files are kept in a separate directory on the PC hard drive. This will be created automatically
when you run the new version of SADiE (or the User Management application). By default it will be created in
the same directory that contains the current User Database and will always be called "settings". Initially the
directory will be empty, but as users log onto the system, User "INI" files will be created in this directory.
10:22
SADiE v5.2 DSD Operational Manual
Customising SADiE
SADIE SETTINGS FILES
Just as you can save your Desktops to "*.DSK" files, you can save your current environment (e.g. your User
"INI" file) to "*.SST" files. This is an advanced feature that most users will probably never venture into, but it
can be found under the "Environment" menu on the main application menu system. Settings files can be saved
anywhere and are accessible to all users (who have access to where you save them).
Loading a setting file will instantly reconfigure your settings and screen to the way it was when you saved the
settings.
USING USER MANAGEMENT
What happens when you run the User Management application for the first time depends on whether you have
already run SADiE software on the machine in question.
If you have already run SADiE software, the application will automatically select the User Database that SADiE
created, and display the Log In dialogue box.
The path of the User Database currently being used by SADiE v5 will be displayed at the bottom of the box, as
a reminder for administrators who may be maintaining several User Databases. (It doesn't matter if you're
using an existing user database that was created in an earlier version of software, as long as you don't delete
this if and when you remove the earlier software)
You should enter the Username (and password if there is one) of the user that was specified when SADiE was
run for the first time. This user will be a Super System Administrator, who is always the first user to be
inserted into a User Database when it is created.
If you have not yet run SADiE, the following message box will be displayed:
If you answer "No" at this point, the application will shut down since a User Database is required for it to run
successfully.
Answering "Yes" will launch the "Create or Select a different SADiE User Database" dialogue box:
10:23
Customising SADiE
SADiE v5.2 DSD Operational Manual
This is a standard Windows browser window and allows you to open the folder where you would like the
User Database created, or locate one that already exists (perhaps on a network drive). If a User Database
exists in a selected folder, it will appear in the left hand list box.
A User Database always has the filename "SADiE3.UDB".
Once you have chosen your folder, press "Ok". If a User Database already exists, the Log In dialogue will be
displayed and you should log in using the identity of one of the users in the database.
Alternatively, if no User Database exists, the application will automatically offer to create one for you,
displaying the following message:
Replying "No" will terminate the application while "Yes" will create a default User Database and display the
following message:
Note that the one user added to the User Database at creation time is given the username "admin" and no
password. As mentioned previously, this user will be a Super System Administrator. The user will also be
granted the highest possible SADiE privilege level.
Once the message box has been closed, the User Management Log In dialogue box will be displayed. You
should now enter "admin" as a username and no password.
10:24
SADiE v5.2 DSD Operational Manual
Customising SADiE
THE MAIN WINDOW
Having successfully logged on to a User Database, the
main window of the application will be displayed. It is
from here that all the user management tasks can be
performed.
The main part of the window is occupied by a list
displaying all the usernames in the selected User
Database. The list is ordered alphabetically with a total
user count at the top right. Initially you will only see
one user, the default "admin" user that was
automatically inserted when the database was created.
The user's Management privilege level is shown against
each username (in the case of ordinary users, nothing
is displayed).
ADDING, EDITING, REMOVING, AND SAVING
ADDING A USER
To add a new user to the system, select the user in the user list and press the "Add" button (or press Alt-A).
This will launch the "Add New User" dialogue box:
From here you can enter a new user's Username, password (optional), and their SADiE privilege level. A
Username of SADiE5, SADiE4, SADiE3, or DEFAULT is not allowed.
If you enter a password you must enter it in both the "Password" and "Confirm Password" boxes.
If you are the Super System Administrator, you can also use the check box to make the new user a System
Administrator.
When you have finished, press "Ok" to add the new user to the system.
10:25
Customising SADiE
SADiE v5.2 DSD Operational Manual
EDITING AN EXISTING USER'S DETAILS
To edit an existing user's details, select the user in the main window and press the "Edit..." button (or just
double-click on the user). This will launch the "Edit User" dialogue box, which is identical to the "Add New
User" dialogue box described above.
If you are the Super System Administrator, you can use the check box to grant or revoke System
Administrator status.
When you have entered all of the new details, press "Ok" to confirm, or "Cancel" to abort.
REMOVING A USER
To remove an existing user from the system, select the user in the main window and press the "Remove"
button (or press Alt + R). You will be asked for confirmation before the user is removed.
Remember that only the Super System Administrator can remove System Administrators from the system. If
you do not have the privilege level to remove a particular user the "Remove" button will automatically be
disabled.
SAVING CHANGES TO THE USER DATABASE
As you add, edit and remove users from the current User Database, your changes are not actually being saved
to the real database file. This will only happen when you select "Save changes to User Database" from the "File"
menu, or exit the application from the "File" menu.
SELECTING A DIFFERENT USER DATABASE
Occasionally it might be necessary to point the User Management application and SADiE v5 at a different User
Database. This is likely to occur if you want a previously isolated machine to refer to a User Database on a
network drive. To change the currently selected User Database press the "Change..." button under "Current
User Database" in the main window.
This will launch the User Database browser dialogue box:
A User Database always has the filename SADiE3.UDB.
Locate the new User Database and press "Ok". The application will confirm that it has selected the newly
chosen database and advise you that it will now shutdown:
10:26
SADiE v5.2 DSD Operational Manual
Customising SADiE
This is done for security reasons. Should you wish to make changes to the newly selected User Database you
will have to re-run the application and log in accordingly.
CHANGING THE SETTINGS DIRECTORY
You can alter the location of the settings directory, where User Settings files are saved. It will probably not be
required in many situations (provided the User Database location has been configured to a sensible location).
However, this is the place to alter it should the need arise. The procedure is similar to changing the current
User Database above.
IMPORTANT POINTS
•
Whilst User Management and SADiE v5 are separate applications, they both reference the same User
Database (on any given PC).
•
The start-up of SADiE v5 will not be affected by any User Management changes until the database is
saved. This happens when the User Management application is exited (or when "File", "Save Changes"
is selected).
•
When a new User Database is created, one Super System Administrator is added to the database
automatically, with the username "admin" and no password. You are advised to give this user a
password as soon as possible.
•
The User Database is heavily encrypted on disk and is effectively un-hackable. Any tampering with a
User Database file is likely to result in it failing to be read correctly. The usual symptom is lost users.
10:27
Customising SADiE
10:28
SADiE v5.2 DSD Operational Manual
SADiE v5.2 DSD Operational Manual
Additional Notes
11 - ADDITIONAL NOTES
HARDWARE CONTROLLER FUNCTIONS
Firstly, a blatant plug: the hardware controllers are brilliant! They really speed up your work, and after a
couple of hours you'll wonder how you ever managed without them. If you've already got some, read
on. If not, have a word with your SADiE dealer and try them out!
When you first connect your hardware controllers, you will need to initialise them by selecting them to a 9-pin
channel. This is done in the "9-Pin Control" section of the Setup window.
The controls on the hardware controllers apply to whichever is the active window on the screen. Therefore in
many cases you will need to use the WINDOW button to select the required window before using other
controls.
The SHIFT button on the hardware controllers doesn't need to be held down unless you are following it with
more than one further button push.
The ASSIGN key is latching and affects other button actions until it is released.
11:1
Additional Notes
SADiE v5.2 DSD Operational Manual
EDIT / JOG PANEL
SCRUBWHEEL
Is used for audio jog/shuttle and, in other modes, selection. The mode is
selected by the SCRUB button and will apply to the active window, as
selected by the WINDOW button.
ONLINE
Puts the selected external machine on line for control by SADiE and puts
SADiE on line for timecode synchronisation.
SLIP
Turns Slip on/off (the cross/tick button in Autoplace toolbar). Turning Slip
on will enable left or right slipping as pre-selected on the Autoplace toolbar
or status bar display.
AUTO
If the Playlist is active, this turns the automation display on/off for all
Streams. If the Mixer is active, this enables automation.
LOCK
Locks all Streams to EDL time. SHIFT + UNLOCK will unlock all Streams
STREAM
Allows Stream selection: Both the wheel and the PREVIOUS/NEXT buttons
select the Stream by moving a red highlight around the Stream enable
button on screen. Then using EDIT/SELECT enables/disables that Stream.
Pressing SHIFT + EDIT/SELECT changes the status of a group of Streams:
Select one stream, SHIFT + SELECT another, and all in between will get
toggled (similar to Explorer).
CLIP
The Wheel selects EDL Entries on enabled Streams in order. Used with
IN/OUT/HOT, it will jump the cursor to the appropriate point.
ZOOM
The Wheel changes the horizontal zoom.
SHIFT + ZOOM
The Wheel changes the vertical zoom.
PREVIOUS/NEXT
If the Playlist is active, these select the previous/next EDL Entry and jump
the cursor to the selected IN/HOT/OUT point. If the STREAM button is
on, they select the previous/next Playlist Stream. If the Trim Editor is active,
they select the previous/next Entry in it. If the Clipstore is active, they
select the previous/next Clip in it.
WINDOW
Toggles through which window is active.
END
Moves the cursor to the end of the last Entry in the EDL.
SHIFT + END
Moves the cursor to the start of the first Entry in the EDL.
PLAY/STOP/REC/PAUSE
Produce toast from floppy disc slot! Well, what do you think???
CROSSFADE
In Playlist Editing mode this selects the inside fade point, e.g. the end of the
fade-in if IN is selected, the start of the fade-out if OUT selected.
SHIFT + CROSSFADE
Selects the outside point of the fade.
EDL/SOURCE
Switches between edit modes: EDL with no light on, Source with light on.
11:2
SADiE v5.2 DSD Operational Manual
EDIT/SELECT
Additional Notes
Selects Streams (as above).
Selects EDL Entries: With no IN/OUT/HOT point selected, it will select the
Entry under the cursor on the first enabled Stream. (SHIFT + SELECT gives
multiple selection as described above)
Turns on Playlist Editing mode: With an IN/OUT/HOT point lit it will put
the Entry under the cursor into editing mode, working on the selected
IN/HOT/OUT point. PREVIOUS/NEXT will then select another Entry for
editing.
RAZOR
Razor cut on enabled Streams.
CUT/COPY/PASTE
Clips and EDL Entries to/from all windows. Pasting into an EDL pastes the
in-point at the current cursor position on the lowest numbered, enabled
Stream.
IN/HOT/OUT
In the Trim editor, and in the Playlist with Playlist Editing mode on, select
the point for adjustment and jump the cursor to that point.
GRABTIME
The label on this button is highly illogical! This button toggles audible
scrubbing on and off, whilst keeping an Online 9-pin device in scrub.
LOCATE + F1-F12
Sets or Locates to a numbered locator. F11 and F12 work as the Left and
Right locators.
SHIFT + LOCATE + F1-F12
Overwrites an existing locator point.
PREVIEW
Previews an edit in Playlist Editing mode or the Trim Editor.
SAVE
Duplicates "File", "Save" on the menu bar, so saves the current EDL,
Clipstore, Mixer, etc. The exception being when the Project window is
active, the button will save the Project and all of its components.
F1-F12
Programmable function keys, which can be assigned in the Setup window.
There are four banks in all: F1-F12, SHIFT + F1-F12, ASSIGN / F1-F12, and
ASSIGN / SHIFT + F1-F12, giving 48 possible Hotkey actions.
ASSIGN / F5, F1, F2, F3
Nudges the selected EDL Entry up, left, down, right as per buttons in
Autoplace toolbar.
F12
Default Hotkey to turn the waveform display on/off for all Streams
SCRUB
Toggles the Scrubwheel action through Jog / Shuttle / Move cursor.
UNDO
Undo.
SHIFT + UNDO
Redo.
11:3
Additional Notes
SADiE v5.2 DSD Operational Manual
FADER PANEL
MUTE
Mutes the selected strip.
SHIFT + MUTE
Solos the selected strip.
ASSIGN + Left/Right arrows
Bank select - will select the next eight Mixer strips.
ASSIGN + Up/Down arrows
Changes faders from Level control (Fd in top left LED) to Pan (Pn in LED)
SELECT
Selects this strip's processing for adjustment. Strip number appears in top
left LED and processing strip is displayed.
Up/Down arrows
Toggles through the selected strip's processes for adjustment by rotary
knobs. Knobs A-F control the section parameters from the top down.
EQ
Allows direct selection of the EQ sections
CMP
Allows direct selection of the compressor sections.
ASSIGN + MUTE
Bypasses all processing on the strip.
SHIFT + SELECT
Reassigns the fader to a new on-screen Mixer strip. Move the fader and the
new strip number is shown by the LED, Let go of the fader and it selects.
OVERWRITE/TRIM/AUTO
Changes the automation mode.
These controls also apply to the single fader on the edit / jog panel.
11:4
SADiE v5.2 DSD Operational Manual
Additional Notes
PLAYLIST BUTTONS
What do all the little buttons in the Playlist do? And where can I find a function on the Playlist toolbars?
There are two tables, the first listing the toolbars and the names of each button on each toolbar.
There second lists Playlist functions in alphabetical order (including some aliases or common names), and tells
you which toolbar it belongs to.
LIST OF PLAYLIST TOOLBARS AND THEIR BUTTONS
What do all the little buttons do?
Click on the link to jump to a part of the help-file which describes the button in more detail. The button names
are listed as they appear, left to right, (or top to bottom) along the toolbar.
To see a cross-reference, listing functions alphabetically and telling you where to find, see Playlist Functions.
Don't forget that you can find out the name of a button in SADiE by hovering over it with the mouse and
waiting for the yellow pop-up box.
Main Playlist Tools
•
Select Toolbars - this is a pretty important button as pressing it gives access to all the other Playlist
toolbars!
•
Razor
•
Scissors
•
Glue
•
Remove Gap
•
Undo
•
Redo
Paste Tools
•
Paste
•
Paste to current time
•
Cut
•
Copy
Group Tools
•
Group
•
Ungroup
11:5
Additional Notes
SADiE v5.2 DSD Operational Manual
Bounce Tools
•
Clip details
•
Copy to Clipstore
•
Bounce
•
Offline Bounce
Load/Save Tools
•
Load EDL
•
Save EDL
Edit Tools
•
Open Trim Editor
•
Enable Playlist Editing
•
Enable Region Editing
Window Tools
•
Show Project Window
•
Show Clipstore
•
Show Mixer
•
Show/hide Transport Controls
Automation Edit Tools
•
Insert automation point
•
Automation Dip mode
•
Smooth Automation
Autoplace Tools
11:6
•
Autoplace On/Off
•
Autoplace Mode Selection
•
Snap … to quantise
•
Quantise to …
SADiE v5.2 DSD Operational Manual
Additional Notes
Slip Tools
•
Slip On/Off
•
Slip Left
•
Slip Right
Lock Streams Tools
•
Lock Streams
•
Unlock Streams
Nudge Tools
•
Nudge Left
•
Nudge Right
•
Nudge Up
•
Nudge Down
Region Edit Tools
•
Region Edit On/Off
•
Razor Region
•
Reset Region
•
View all region
•
View Left edge
•
View right edge
•
Show sample values
•
CEDAR DeClick
•
CEDAR DeThump
•
Select Region start
•
Select Region end
•
Preview from
•
Preview through
•
Preview whole region
•
Preview up to
•
Hop-over preview
•
Region insert mode - when copying
•
Region Overwrite mode - when copying
11:7
Additional Notes
SADiE v5.2 DSD Operational Manual
LIST OF PLAYLIST FUNCTIONS
This is a cross reference, which lists the Playlist functions in alphabetical order and tells you which toolbar to
find them on.
Toolbars referred to can be shown by pressing the Select Toolbar button and choosing the appropriate toolbar
from the drop down menu.
To see a list of Playlist Toolbars and their buttons see Playlist Toolbars.
Function
Automation Dip Mode
Alternative Name
Duck, Dip
Toolbar
Automation Edit Toolbar
Duck
Automation Dip mode
Automation Edit Toolbar
Smooth Automation
Automation Edit Toolbar
Insert automation point
Automation Edit Toolbar
Autoplace On/Off
Autoplace Toolbar
Butt
Autoplace Toolbar
By hotspot
Autoplace Toolbar
By track start (sync)
Autoplace Toolbar
End to current time
Autoplace Toolbar
Gap
With separation
Hotspot to current time
Autoplace Toolbar
Now
To current time
Autoplace Toolbar
Start time
By track start (sync)
Autoplace Toolbar
Sync
By track start (sync)
Autoplace Toolbar
To current time
Autoplace Toolbar
To original EDL time
Autoplace Toolbar
With separation
Autoplace Toolbar
Bounce
Bounce Toolbar
CEDAR DeClick
DeClick
Region Editing Toolbar
CEDAR DeThump
DeThump
Region Editing Toolbar
CEDAR Retouch
Retouch
Region Editing Toolbar
Clip details
Clipstore show
11:8
Autoplace Toolbar
Bounce Toolbar
Show Clipstore
Windows Toolbar
Copy to Clipstore
Bounce Toolbar
Copy
Paste Toolbar
Cut
Paste Toolbar
DeClick
CEDAR DeClick
Region Editing Toolbar
DeThump
CEDAR DeThump
Region Editing Toolbar
Enable Playlist Editing
Playlist Edit
Edit Toolbar
Enable Region Editing
Region Edit
Edit Toolbar
SADiE v5.2 DSD Operational Manual
Additional Notes
Glue
Playlist Tools
Group
Group Toolbar
Load EDL
Load and Save Toolbar
Lock/unlock Streams
Lock Toolbar
Mixer Show
Show Mixer
Windows Toolbar
Nudge Down
Nudge Toolbar
Nudge Left
Nudge Toolbar
Nudge Right
Nudge Toolbar
Nudge Up
Nudge Toolbar
Offline Bounce
Bounce Toolbar
Open Trim Editor
Trim Editor
Edit Toolbar
Paste to current time
Paste Toolbar
Paste
Paste Toolbar
Playlist Edit
Enable Playlist Editing
Edit Toolbar
Project window show
Show Project Window
Windows Toolbar
Razor
Playlist Tools
Redo
Playlist Tools
Region Edit
Hop-over preview
Region Editing and
Toolbar
Region Editing Toolbar
Preview from
Region Editing Toolbar
Preview through
Region Editing Toolbar
Preview up to
Region Editing Toolbar
Preview whole region
Region Editing Toolbar
Razor Region
Region Editing Toolbar
Region insert mode (when
copying)
Region Overwrite mode (when
copying)
View all region
Region Editing Toolbar
Region Editing Toolbar
View Left edge
Region Editing Toolbar
View Right edge
Region Editing Toolbar
Select Region start
Region Editing Toolbar
Select region end
Region Editing Toolbar
Remove Gap
Playlist Tools
Retouch
Enable Region Editing
Region Editing Toolbar
CEDAR Retouch
Save EDL
Sample values
Region Editing Toolbar
Load and Save Toolbar
Show sample values
Scissors
Select Toolbars
Editing
Region Editing Toolbar
Playlist Tools
Toolbars show
Playlist Tools
11:9
Additional Notes
11:10
SADiE v5.2 DSD Operational Manual
Show Clipstore
Windows Toolbar
Show Mixer
Windows Toolbar
Show Project Window
Windows Toolbar
Show sample values
Sample values
Region Editing Toolbar
Show/hide Transport Controls
Transport Controls show
Windows Toolbar
Slip left
Slip Toolbar
Slip On/Off
Slip Toolbar
Slip right
Slip Toolbar
Toolbars show
Select Toolbars
Playlist Tools
Transport Controls show
Show/hide Transport Controls Windows Toolbar
Trim Editor
Open Trim Editor
Edit Toolbar
Undo
Playlist Tools
Ungroup
Group Toolbar
SADiE v5.2 DSD Operational Manual
Glossary
Glossary
Clip
A Clip is any part of (which may be all of) a Track and can have its own name. It is not a separate
recording, but a set of instructions to replay a section within the relevant Track, at what level and
with what fades.
Clipstore
A Clipstore is simply a list of Clips. You will find whole Tracks here, in a folder labelled ‘Source
Tracks’ and may also choose to use it to store clips that you have selected for later use. This is like
keeping a selection of small reels of prepared tape inserts on the shelf before putting them into a piece
of work. Different Clipstores can be saved for different projects. NB Deleting a Clip from a Clipstore
does not mean you have deleted any audio, as the Track will still be on the audio disk. You will have
simply deleted one particular version (in and out points, fades and overall level) of how to replay the
audio.
EDL
An Edit Decision List. This is the list of instructions that the system uses to play back the required
Clips at the required times. It is a computer file that will need to be saved and can be later loaded and
modified, just like a document on a word processor. You can think of the EDL as your script, cue
sheet or running order, and the Tracks as the raw material. An EDL is graphically displayed in SADiE
by the Playlist, where it is created by arranging Clips in the required order.
EDL Entry
When Clips are placed in the Playlist they become EDL Entries as they then have a particular EDL
replay time. Any changes made to an EDL Entry (such as level changes or adjustments to the in and
out points) then only apply to that particular occurrence of the Clip and will not affect Clips in the
Clipstore, or other EDL Entries of the same Clip.
Mixer
Analogous to a studio mixing desk, the mixer has channel strips with faders to control the level of the
audio in the streams, and settings for equalisation and compression.
Playlist
The window on the screen that shows you graphically the work you are creating (i.e. the EDL). It acts
as your tape machine and you will see EDL Entries (either as coloured blocks like bits of tape, or as
profiles showing the level of the audio), positioned to be replayed when the current-time cursor
passes over them like a playback head. Fade-ins and fade-outs are shown as slopes to the front and
rear of the blocks. Editing is done by making ‘cuts’ which divide Entries into two, so that one or the
other can be removed, or the in and out points can be adjusted to fine edit the audio.
Project
A Project is a useful way of looking after your work on a job-by-job basis. EDL's, the layout of the
internal Mixer that plays them, and Clipstores are all stored as components of a SADiE Project. A list
of relevant Tracks is also kept for each Project.
Glossary
SADiE v5.2 DSD Operational Manual
Stream
EDL Entries in the Playlist are placed on Streams. Each of these streams is routed to a channel strip of
the Mixer, which control the playback of the audio. A stereo Entry sits across any two adjacent
Streams, a mono Entry only needs one. The Streams are therefore similar to the tracks of a multitrack
tape machine but allow editing and overlapping within individual Streams, and audio Entries can be
moved around in time. There is no limit to the number of Streams you can add to the Playlist, only to
the number of Entries the hardware of your system can play at once. The Streams are independent of
the physical outputs of your hardware system and are routed to them by SADiE’s Mixer.
Track
A Track is a whole, original audio recording, held on an audio disk as a sound file, and running from
when you started recording to when you stopped. It is identified by a name and will remain on the
disk until deliberately deleted. It has properties set when it is recorded, such as whether stereo or
mono, what sample rate, etc. It shouldn't be confused with the term track as applied to multitrack
tape machines (see Streams, below) - it's closer to the track on an LP or CD and recalls SADiE’s
origins as a simple stereo music editor.
SADiE v5.2 DSD Operational Manual
Index
Index
Using with SADiE ................................................9:12
1
AIFF.............................................................................8:29
16 bit...........................................................................10:4
2
AIT ..............................................................................2:16
All Output Bounce...................................................5:17
24 bit...........................................................................10:4
Archiving ....................................................................8:26
3
Selective.................................................................8:28
3 and 4 Point Editing................................................6:25
Archiving non-Project work ..................................8:29
Preparation ...........................................................6:25
Two Playlists .........................................................6:26
Arranging an EDL....................................................... 5:1
4
Arranging Windows ..............................................10:16
4.2 Saving ...................................................................8:11
Audible Scrubbing ....................................................4:18
5
Audio Disk and File Formats .................................8:29
5.1................................................................................7:26
Audio Disk and File Management .........................8:16
9
Audio Input and Output Settings..........................10:4
9-pin Control .............................................................. 9:6
Audio Overloads......................................................7:14
Machine Control.................................................... 9:7
Remote Control .................................................... 9:7
Setting Up................................................................ 9:6
Setup.....................................................................10:10
Sync........................................................................... 9:6
A
AAF .............................................................................9:19
Audio Setup...............................................................10:4
Automatic Letter Changing....................................8:25
Automatic Log-in and Desktop Load.................10:19
Automation ...............................................................7:15
Displaying Automation Data .............................7:20
Editing Automation Data ...................................7:20
Keep Button .........................................................7:16
Modes.....................................................................7:16
Mutes......................................................................7:19
Overview...............................................................7:15
Recording and Replaying ....................................7:17
Scrubbing Audio...................................................7:18
Snapshot ................................................................7:18
Solos.......................................................................7:19
Exporting an AAF from SADiE .........................9:20
Importing an AAF in to SADiE..........................9:20
Importing and Exporting OMF files using AAF
............................................................................9:21
What is an AAF....................................................9:19
Adding a User .........................................................10:25
Adjusting Levels of Clips.........................................5:22
Adjusting Mixer Processing...................................... 7:5
Auto-Return on Stop ................................................ 4:8
Adjusting the Edit.....................................................6:15
Auto-Save ..................................................................8:15
Adjusting the Hotspot.............................................6:18
Autoshift ....................................................................6:24
Adjusting the Region ...............................................6:31
Autotake ...................................................................... 3:1
AES31..........................................................................9:10
Auxiliary Sends ........................................................... 7:8
OMF Export..........................................................9:15
OMF In Short........................................................9:18
OMF Interchange with AVT and SADiE .........9:14
Troubleshooting...................................................9:13
B
Backing up a project to the Audio Disk..............8:10
Index
SADiE v5.2 DSD Operational Manual
Backing up and Restoring work.................. 8:10, 8:26
Changing Screen Resolution................................ 10:18
Backup and Restore ................................................ 8:26
Changing the order of Mixer strips ........................7:9
Backup Files............................................................... 8:15
Changing the Settings Directory ........................ 10:27
Backup to Tape Drive............................................. 8:21
Checking space on your disk ................................ 8:20
Balance ....................................................................... 5:22
Choosing a disk for recording .................................3:6
Adjusting Stereo on individual Entries............ 5:22
Bars and Beats .......................................................... 10:2
Basics .............................................................................1:1
Bits .............................................................................. 10:4
Classic Toolbar ...........................................................5:5
Cleanup Project ....................................................... 8:13
Click ................................................................................. ii
Clip Details ............................................................... 6:22
BKC ............................................................................ 8:15
BKE ............................................................................. 8:15
BKM............................................................................ 8:15
Black Outlines .............................................................4:2
Bounce ....................................................................... 5:16
All Outputs........................................................... 5:17
Clip Name............................................................. 5:18
Multi-Bounce ........................................................ 5:18
Multichannel ......................................................... 5:17
Output Channel Setting..................................... 5:17
Reverse.................................................................. 5:18
through Process .................................................. 5:18
to PC...................................................................... 5:18
to PC disk ............................................................. 8:34
Clip Details Setup.................................................. 10:14
Clip Details window...................................................8:5
Miscellaneous ....................................................... 5:25
Using from Trim Editor ..................................... 6:22
Clip-based Automation .......................................... 7:18
Clipstores.....................................................................8:2
Creating, opening, and closing.............................8:2
Menu .........................................................................8:3
Moving Clips around .............................................8:4
Overview .................................................................8:2
Source Tracks folder.......................................... 8:12
Storing Clips............................................................8:4
Window ...................................................................8:3
Clock Source ............................................................ 10:4
Bounce Overview .................................................... 5:17
Bounce Settings...................................................... 10:15
Bounce Window ...................................................... 5:16
Bounce-down ........................................................... 5:16
Buttons............................................................. 11:5, 11:8
BWF............................................................................ 8:29
Closing the Current Project ................................. 8:10
Comments................................................................. 5:25
Writing comments for EDL Entries ................ 5:25
Compression ............................................................ 2:16
Estimating.............................................................. 2:23
Compressor.................................................................7:6
Connecting Timecode ...............................................9:1
Bypass Processing .......................................................7:5
Copy to Clipstore ......................................................8:4
C
Copying EDL Entries..................................................5:7
CD-R Drives............................................................. 8:21
Logging................................................................... 8:21
Copying Files ............................................................ 8:20
Change Drive Letter ............................................... 8:24
Copying Tracks ........................................................ 8:13
Changing Entry Characteristics............................. 5:21
Creating
Changing how SADiE starts up........................... 10:19
Cutting Master..................................................... 2:20
SADiE v5.2 DSD Operational Manual
Cutting Master Tape ...........................................2:16
Edit Master..................................................2:13, 2:17
Creating a Mixer Template ....................................7:35
Creating a Surround Mixer ....................................7:27
Customising...............................................................10:1
Mixers ..................................................................10:15
Playlists.................................................................10:15
Customising SADiE..................................................10:1
Customising the Text EDL display .......................5:27
Cut-and-splice Editing ............................................... 6:6
With Hardware Controllers ............................... 6:3
Cutting.......................................................................... 5:7
Entries ...................................................................... 5:7
Cutting Master..........................................................2:20
Cutting Master Tutorial............................................ 1:5
D
Index
Divergence ......................................................7:29, 7:32
Double-Click...................................................................ii
Draw Clip button.....................................................6:17
Drop-ins....................................................................... 3:5
Dropping in and out of Record............................... 3:5
DSD .............................................................................. 2:1
Cutting Master Tutorial ....................................... 1:5
DST ............................................................................... 2:1
DST Encoding ...........................................................2:16
Duplicate Windows...............................................10:16
Dynamics...................................................................... 7:6
E
E TO E.......................................................................... 3:3
Edit Controller .........................................................11:2
dB Down Markers....................................................6:18
Default Crossfade Setup.........................................10:9
Default Crossfades..................................................... 6:2
Defining the Region .................................................6:30
Deleting the Current Project ................................8:10
Deleting Tracks ........................................................8:13
Deselecting Entries .................................................... 5:6
Desktop Load .........................................................10:17
Desktop Save ..........................................................10:17
Desktops..........................................................5:5, 10:16
Differences with Surround Enabled .....................7:23
Digital Limiter ...........................................................7:11
Disc Management.....................................................8:16
Disks ...........................................................................8:16
Checking space on your disk ............................8:20
Choosing a disk for Recording ........................... 3:6
Clearing space ......................................................5:16
Remove..................................................................8:18
Display .......................................................................... 1:3
Edit Master ................................................................2:17
Edit Menu...................................................................11:5
Redo .......................................................................5:19
Select All.................................................................. 5:6
Undo ......................................................................5:19
Editing ........................................................................... 6:1
In the Playlist with a Mouse................................. 6:6
In the Playlist with Hardware Controllers ....... 6:3
In the Playlist with Hotkeys...............................6:10
Overview................................................................. 6:1
Quick Edit .............................................................6:10
Sync or Non-sync .................................................. 6:1
Three and Four Point Editing............................6:25
Trim Editor ...........................................................6:11
Editing an Existing User ........................................10:25
Editing Automation Data........................................7:20
EDL Conversion Setup .........................................10:14
EDL Entries
Adding from Clipstore .......................................5:10
Changing the replay levels .................................5:22
Copying..................................................................5:10
Copying to the Paste Buffer ................................ 5:7
Cutting to the Paste Buffer.................................. 5:7
Deselecting ............................................................. 5:6
Deselecting with the Text EDL ........................5:26
Grouping and Ungrouping .................................5:15
Index
Locking to maintain sync ................................... 5:20
Manipulating in the Playlist ...................................5:6
Moving with the Text EDL................................ 5:26
Pasting to the EDL .................................................5:7
Removing from the EDL .......................................5:7
Renaming..................................................................5:7
Repeating .............................................................. 5:10
Selecting ...................................................................5:6
Selecting with the Text EDL............................. 5:26
Ungrouping stereo to mono............................. 5:15
EDL files..................................................................... 8:34
SADiE v5.2 DSD Operational Manual
Setting the Default .............................................. 10:9
FAT16 ........................................................................ 8:29
FAT32 ........................................................................ 8:29
File Formats .............................................................. 8:29
File Management .........................................................8:1
File menu ................................................................... 11:5
Change Password...................................................1:1
Disk Management................................................ 8:16
Load to Paste ..........................................................5:7
New, Open, Close, Save, Save As ......................8:1
EDL's .............................................................................8:2
Closing......................................................................8:2
Creating....................................................................8:2
Opening....................................................................8:2
Working with more than one .......................... 5:27
Emphasis ............................................................ 3:3, 10:4
Enabling and Disabling Streams................................5:2
Enabling and disabling synchronisation...................9:4
Enabling Region Editing........................................... 6:29
File Recovery ............................................................ 8:15
FilmWAV................................................................... 8:29
Fixed Speed Scrubbing............................................ 4:18
Flexible Routing........................................................ 7:29
Four Point Editing.......................................... 6:25, 6:27
Preparation........................................................... 6:25
Two Playlists ........................................................ 6:26
Enabling Surround Mode........................................ 7:22
Entry Times............................................................... 5:24
EQ..................................................................................7:7
Equalisation ..................................................................7:7
Equaliser........................................................................7:7
Error Message Placement .................................... 10:18
Estimator ......................................................... 2:16, 2:23
Expander.......................................................................7:6
Front-Rear Pan......................................................... 7:29
G
Gate...............................................................................7:6
General Setup........................................................... 10:2
Getting SADiE into Surround Mode.................... 7:22
Ghost Profiles..............................................................4:3
Gluepot.........................................................................5:7
Grabtime ......................................................................9:6
F
Scrub 9-pin ..............................................................9:6
Factory Requirements ............................................ 2:17
Group Button........................................................... 5:15
Fade Shapes..................................................................6:2
Grouping EDL Entries ............................................ 5:15
Saving and Loading .............................................. 6:20
Fader Panel................................................................ 11:4
Faders............................................................................7:2
Grouping Faders .........................................................7:3
H
Deleting ....................................................................7:9
Drag and Drop .......................................................7:9
Grouping ..................................................................7:3
Hardware Controllers............................................ 11:1
Fades and Crossfades.................................... 5:22, 6:18
Help ...............................................................................1:4
Adjusting in Text EDL........................................ 5:26
Default Lengths.......................................................6:2
Help Menu....................................................................1:4
Functions............................................................... 11:1
Setting Up ................................................................9:6
SADiE v5.2 DSD Operational Manual
Index
Hide Strip...................................................................7:10
Limiter ................................................................ 7:6, 7:11
Hotkey Editing ..........................................................6:10
List Missing Tracks...................................................8:14
Hotkey Setup ..........................................................10:14
Load Desktops........................................................10:17
Hotkeys ....................................................................10:14
Loading Fades............................................................6:20
Setting and Checking.........................................10:14
Locating
Hotspot
Adjusting in Trim Editor.....................................6:18
Moving with Clip Details Window...................5:24
Moving with Hardware Controller Playlist
Editing .................................................................. 6:7
Moving with Mouse Playlist Editing.................... 6:7
Moving with Text EDL .......................................5:26
Sync to picture ....................................................... 9:9
How to .......................................................................2:13
In and Out Points ................................................4:14
Storing and Recalling Locators .........................4:14
With Hardware Controllers .............................4:14
Lock to Video ...........................................................10:4
Locking Clips and Streams .....................................5:20
Log Overloads Window .........................................7:14
Logging In.................................................................10:19
I
Import Source Tracks .............................................8:14
Important Points on User Management ............10:27
INI files .....................................................................10:22
Logging New Drives ................................................8:23
Loopable Edit ............................................................6:22
Looping............................................................... 3:5, 4:14
Setup ....................................................................10:10
J
M
Jog................................................................................4:18
Mac Disks...................................................................8:31
Jog Panel.....................................................................11:2
Mac HFS .....................................................................8:29
Joystick .......................................................................7:29
MacDrive....................................................................8:31
L
Machine Control ........................................................ 9:7
LCR Bus .....................................................................7:24
Maintaining Sync .......................................................6:24
LCRS Bus ...................................................................7:25
Make a Loopable Edit ..............................................6:22
LCRSS Bus .................................................................7:26
Make Mono ...............................................................5:15
Left-Right Pan............................................................7:29
Make Stereo ..............................................................5:15
Letter Assignment....................................................8:23
Making a new edit ....................................................6:24
Level-Responsive Profiles ......................................... 4:3
Making cuts during Recording ................................. 3:4
Levels ............................................................................ 7:1
Making use of Templates ........................................7:35
Changing EDL Entry replay levels in Clip Details
............................................................................5:22
Changing EDL Entry replay levels in Text EDL
............................................................................5:26
Management Privilege Level.................................10:21
Managing Projects ...................................................... 8:7
LFE...............................................................................7:26
Managing work with a Project................................. 8:8
Licence Agreement.......................................................iii
Manipulating EDL Entries ......................................... 5:6
Index
SADiE v5.2 DSD Operational Manual
Mastering Limiter..................................................... 7:11
Multi-Bounce ............................................................ 5:18
Maximise Strip .......................................................... 7:10
Multichannel Bounce............................................... 5:17
Message Box Placement ....................................... 10:18
Multichannel Tracks ...................................................3:1
Metering..................................................................... 7:12
Multiple EDL's .......................................................... 5:27
Metering Window ................................................... 7:13
Multiple Monitors .................................................. 10:18
Microsoft® Windows ................................................1:1
Mute ........................................................................... 4:10
Minimise Strip........................................................... 7:10
Mute Automation .................................................... 7:19
Miscellaneous Clip Details Window.................... 5:25
N
Missing Tracks .......................................................... 8:14
Names ........................................................................ 5:25
Mixer .............................................................................7:1
Changing Entry names in Clip Details............. 5:25
Changing Entry names in Text EDL ................ 5:26
Changing the order of Strips ...............................7:9
Channel Strip...........................................................7:2
Customisation.........................................................7:9
Hide and Reveal Strips ....................................... 7:10
Loading Settings......................................................7:8
Mixer has disappeared ....................................... 7:10
Saving Settings.........................................................7:8
Set-up Files ..............................................................8:5
Stereo Strips............................................................7:8
Surround Format Strips ..................................... 7:27
Template ............................................................... 7:35
Tutorials................................................................ 10:9
Mixer Set-ups...............................................................8:5
Mixer Templates .................................................... 10:15
Monitoring the Recording.........................................3:3
Monitoring Timecode Sync.......................................9:5
Monitors - Multiple................................................ 10:18
Mono .......................................................................... 5:15
Ungrouping Stereo Entries to Mono............... 5:15
Using one channel of Stereo Clips .....................8:5
Mono to Stereo ....................................................... 5:15
Mouse............................................................................... ii
Description of Use.................................................... ii
Setting sensitivity to Scrub .............................. 10:10
Mousework ..................................................................... ii
Moving Around The Help File..................................... ii
Moving Clips ................................................................8:4
Around Clipstores .................................................8:4
To Other Windows...............................................8:4
Non-sync Editing.........................................................6:1
Normalise.................................................................. 5:22
O
Offset ......................................................................... 5:22
OMF ........................................................................... 9:14
Exporting from Avid........................................... 9:15
Exporting from SADiE via AVTransfer........... 9:18
Importing and Exporting OMF files using AAF
............................................................................ 9:21
Importing to SADiE via AVT and AES31........ 9:14
Online button......................................................4:8, 9:4
On-Screen Help ..........................................................1:4
Opening the Trim Editor ....................................... 6:12
Order of Sub-busses on Outputs......................... 7:33
Other Region Editing Tools .................................. 6:32
Other Trim Editor Tools....................................... 6:24
Outputs...................................................................... 7:33
Overdubbing................................................................3:4
Overloads.................................................................. 7:14
Overview of Arranging..............................................5:1
Overview to the Removable Disk Admin .......... 8:24
SADiE v5.2 DSD Operational Manual
Index
P
PQ Setup..................................................................10:12
Passwords ................................................ 1:1, 1:2, 10:21
Pre Roll Setup ...........................................................10:5
Paste Buffer ................................................................. 5:7
Preview Buttons ......................................................... 6:7
Pasting Whole EDL's............................................. 5:7
In Transport Controls.......................................... 6:7
on Hardware Controllers.................................... 6:4
Pasting........................................................................... 5:7
Entries ...................................................................... 5:7
Whole EDL's........................................................... 5:7
Pasting Entries into the EDL .................................... 5:7
Pause............................................................................. 4:8
Printing Setup..........................................................10:15
Priveleges ...................................................................8:26
Privileges ..................................................................10:21
Process Window......................................................7:11
Peak Displays.............................................................7:13
Peak Metering ...........................................................7:12
Processing
Adjustment in Mixer ............................................. 7:5
Stereo linking in Mixer ......................................... 7:8
Playback........................................................................ 4:8
Transmission Mode .............................................4:18
Playing Selected Entries............................................. 4:8
Profile Display Mode ......................................... 4:2, 4:5
Profiles.......................................................................... 4:2
Displaying in Playlist .............................................. 4:2
Displaying Proportional to Level........................ 4:3
Recreate Profiles..................................................8:33
Playing the EDL........................................................... 4:8
Playlist
Comments Display ..............................................10:6
Default Stream Layout........................................10:6
Profile Display Mode............................................. 4:5
Splitting the view..................................................4:16
Stationary Timeline ............................................... 4:7
Template................................................................7:35
Project Backup..........................................................8:26
Project Management Setup ..................................10:11
Project Menu............................................................... 8:7
Save Project ............................................................ 8:8
Playlist Buttons .........................................................11:5
Project Restore ........................................................8:28
Playlist Editing Mode
Project Window......................................................... 8:8
Using a mouse ........................................................ 6:7
Using Hardware Controllers .............................. 6:4
Projects ................................................................ 8:1, 8:5
Automatic Startup ................................................. 8:6
Backing up
closing
deleting......................................... 8:10, 8:26
Creating and opening............................................ 8:7
Overview................................................................. 8:5
Restoring ...............................................................8:28
Startup ..................................................................... 8:6
Sub-Projects..........................................................8:10
Playlist Functions ......................................................11:8
Playlist Menu..............................................................11:5
Horizontal Zoom................................................... 4:5
Profile Display Mode............................................. 4:2
Vertical Zoom ........................................................ 4:5
Playlist Setup .............................................................10:6
Playlist Streams ........................................................... 5:2
Properties of Tracks.................................................. 3:3
Playlist Templates...................................................10:15
Punch-in ....................................................................... 3:5
Playlist Toolbars ............................................... 5:5, 11:5
Q
Plugins.........................................................................7:11
Quality level of Tracks.............................................. 3:3
Post Roll Setup .........................................................10:5
Quick Edit..................................................................6:10
PPM Monitoring on Surround Mixers..................7:29
Index
SADiE v5.2 DSD Operational Manual
R
Renaming Entries ........................................................5:7
Razor .............................................................................5:7
Renaming Streams ......................................................5:4
Razor or Scissors ...................................................6:6
Region.................................................................... 6:32
Splice or V cuts.......................................................6:2
Razor Cut Region .................................................... 6:32
Recalling Locator Points......................................... 4:14
Record Destinations ............................................... 8:25
Record to Removable Drives................................ 8:25
Recording
Levels ........................................................................3:4
Monitoring ...............................................................3:3
Multichannel Tracks...............................................3:1
To the Playlist .........................................................3:1
Recording to the Playlist ...........................................3:1
Recovering lost work.............................................. 8:15
Recreate Profiles...................................................... 8:33
Redo ........................................................................... 5:19
Re-organising the Mixer ............................................7:9
Repairing Razor Cuts.................................................5:7
Repeating EDL Entries............................................ 5:10
Rescan ........................................................................ 8:24
Reset Region Markers ............................................ 6:31
Resync Track ...............................................................3:6
Retake button..............................................................3:1
Return on Stop............................................................4:8
Reveal Hidden Strip................................................. 7:10
Reverse ...................................................................... 5:18
Right-Click....................................................................... ii
Routing
Description..............................................................7:1
Surround Busses.................................................. 7:33
Refresh....................................................................... 8:24
Region ........................................................................ 6:29
S
Defining ................................................................. 6:30
Select Region Start and End.............................. 6:31
Zoom Tools ......................................................... 6:31
SADiE Basics................................................................1:1
Region Editing........................................................... 6:29
SADiE Settings Files .............................................. 10:22
Adjusting the Region .......................................... 6:31
Defining the Region ............................................ 6:30
Enabling.................................................................. 6:29
Other Region Editing Tools .............................. 6:32
Preview Tools ...................................................... 6:31
Region Insert Mode................................................. 6:32
Region Overwrite Mode ........................................ 6:32
Reloading ................................................................... 6:23
Removable Drives ................................................... 8:23
Remove Disk ............................................................ 8:24
Removeable Drives ................................................. 8:18
Removing a User.................................................... 10:25
Removing Drives...................................................... 8:23
Renaming Clips......................................................... 6:18
SADiE Removable Disk Administrator ............... 8:22
SADiE Systems ............................................................1:1
SADiE5.INI .............................................................. 10:22
Sample Rate and Resolution.............................3:1, 3:3
Sample Resolution ................................................... 10:4
Save Desktop.......................................................... 10:17
Saving and Loading work...........................................8:1
Cutting Master Tutorial........................................1:9
Saving Projects in v4.2 Format ......................... 8:11
Saving changes to the User Database................ 10:25
Saving Fades .............................................................. 6:20
Saving Mixer Settings .................................................7:8
Scan Hardware Changes ........................................ 8:24
SADiE v5.2 DSD Operational Manual
Index
Scissors......................................................................... 5:7
Sound Designer 2 Files............................................8:31
Screen Resolution ..................................................10:18
Source Monitoring ..................................................... 3:3
Screens - Multiple...................................................10:18
Source Tracks Folder..............................................8:12
Scroll ............................................................................. 4:5
Source Tracks Toolbar ...........................................8:14
Scrolling in the Playlist............................................... 4:5
Speech Edit ................................................................6:32
Scrub and Automation ............................................7:18
Splice-cut mode.......................................................... 6:2
Scrub Setup..............................................................10:10
Split Windows ........................................................10:16
Scrubbing....................................................................4:18
Splitting the Playlist view ........................................4:16
Playlist ....................................................................4:18
Setup.....................................................................10:10
Starting SADiE ............................................................ 1:2
SDII..............................................................................8:29
Select Audio Disk....................................................... 3:6
Automatically......................................................10:19
Startup.......................................................................... 8:6
Startup Options......................................................10:19
Selecting a different User Database ...................10:26
Selecting Entries ......................................................... 5:6
In the Text EDL ...................................................5:26
Stationary Timeline.................................................... 4:7
Status bar displays....................................................10:2
Selective Archiving...................................................8:28
Stereo .........................................................................5:15
Set Hotspot ...............................................................6:17
Ungrouping Stereo Entries to Mono...............5:15
Using one channel of Stereo Clips..................... 8:5
Set In-point ................................................................6:17
Storing Clips................................................................ 8:4
Set Out-point............................................................6:17
Storing Locator Points ............................................4:14
Setting up 9-pin Control........................................... 9:6
Stream Units .............................................................4:16
Setting up Sync details............................................... 9:3
Streams......................................................................... 5:2
Settings .......................................................... 8:25, 10:27
Setup Window..........................................................10:1
Show Sample Values ................................................6:32
Showing Entries as Profiles ...................................... 4:2
Shuttle.........................................................................4:18
Slip ...............................................................................6:24
Snapshot Automation..............................................7:18
Snapshot Trim Editor ..............................................6:24
Solo .............................................................................4:10
Solo Automation ......................................................7:19
Changing Streams for EDL Entries ..................5:26
Enabling and Disabling .......................................... 5:2
Locking to maintain sync....................................5:20
Mute .......................................................................4:10
Renaming ................................................................. 5:4
Solo.........................................................................4:10
Units .......................................................................4:16
Sub-Projects ..............................................................8:10
Super Audio CD............................................... 2:1, 2:12
Cutting Master Tutorial ....................................... 1:5
Surround Sound
Busses.....................................................................7:23
Creating a Mixer..................................................7:27
Divergence............................................................7:29
Enabling..................................................................7:22
FAQ's .....................................................................7:36
Front-Rear Pan.....................................................7:29
Joystick...................................................................7:29
Index
LCR Bus ................................................................ 7:24
LCRS Bus .............................................................. 7:25
LCRSS Bus ............................................................ 7:26
Left-Right Pan....................................................... 7:29
Mixer Strips .......................................................... 7:27
Outputs ................................................................. 7:33
PPM's...................................................................... 7:29
Routing ........................................................ 7:29, 7:33
Strip Controls ...................................................... 7:29
Tips and Troubleshooting ................................. 7:36
Width..................................................................... 7:29
Sync Editing ..................................................................6:1
SADiE v5.2 DSD Operational Manual
Toolbars ........................................ 1:3, 5:5, 10:17, 11:5
Top-and-tailing ......................................................... 6:17
Track Management.................................................. 8:12
Track Names ............................................................ 8:33
Track Properties.........................................................3:3
Tracklaying ...................................................................9:9
Tracks ........................................................................ 8:12
Synchronisation...........................................................9:1
Connecting ..............................................................9:1
Maintaining...............................................................9:9
Quick Start ..............................................................9:1
Setup ...................................................................... 10:5
Sync Monitor window ...........................................9:5
Time Stamp..............................................................3:6
Working with Sync Material ................................9:9
Associating with Projects .................................. 8:12
Copying between Audio Disks......................... 8:20
Deleting....................................................... 8:10, 8:14
Management of Audio Disks............................. 8:16
Missing ................................................................... 8:14
Number of Channels.............................................3:1
Properties ................................................................3:3
Renaming............................................................... 8:14
Resync ......................................................................3:6
Start Time................................................................3:6
Tag Tracks................................................................. 8:13
Transmission Mode ................................................. 4:18
Tape Backup ............................................................. 8:21
Transport Controls....................................................4:8
T
Tape Drives............................................................... 8:21
Description..............................................................1:3
Trim Editor ............................................................... 6:11
Templates......................................................7:35, 10:15
Defining new clips ............................................... 6:17
Display Features .................................................. 6:12
Make a Loopable Edit ......................................... 6:22
Menu ...................................................................... 6:12
Opening................................................................. 6:12
Other Trim Editor Tools .................................. 6:24
Overview .............................................................. 6:11
Preview Buttons .................................................. 6:15
Razor-cut .............................................................. 6:24
Reloading............................................................... 6:23
Renaming Entries................................................. 6:18
Selecting what to adjust..................................... 6:14
Setup ...................................................................... 10:8
Snapshots .............................................................. 6:24
User Zoom........................................................... 6:24
Viewing Order ..................................................... 6:24
Writing back......................................................... 6:22
For Surround Sound........................................... 7:35
Text ............................................................................ 2:14
Text EDL ................................................................... 5:25
Customising.......................................................... 5:27
Displaying.............................................................. 5:25
Three Point Editing........................................ 6:25, 6:27
Preparation ........................................................... 6:25
Two Playlists......................................................... 6:26
Time Displays ......................................................4:8, 4:9
Adjusting ..................................................... 4:14, 5:22
Format ................................................................... 10:2
Time Display Window ..........................................4:9
Use for moving EDL Entries ............................. 5:24
Time Scrunch............................................................ 6:32
Time Stamping.............................................................3:6
Timecode Connections .............................................9:1
TimeSync ......................................................................9:3
Toolbar Display...................................................... 10:17
Trim Slips................................................................... 6:24
Twindows................................................................ 10:18
U
Undo........................................................................... 5:19
Undo Setup ............................................................... 10:9
Ungroup button ....................................................... 5:15
SADiE v5.2 DSD Operational Manual
Index
Use each local disk in turn ....................................... 3:6
Use least full local disk .............................................. 3:6
Use specified disk....................................................... 3:6
Cutting Master ...........................................2:17, 2:24
Video Lock ................................................................10:4
View Menu.................................................................11:5
Setup Window .....................................................10:1
Sync Monitor Window......................................... 9:5
Toolbars ..............................................................10:17
Transport Controls............................................... 1:3
User Database ........................................................10:21
Adding a User.....................................................10:25
Editing a User .....................................................10:25
Removing a User................................................10:25
Saving....................................................................10:25
Selecting...............................................................10:26
User INI file directory...........................................10:22
User INI files ...........................................................10:22
User Management ..................................................10:21
Basics........................................................................ 1:1
Important Points ................................................10:27
Main Window.....................................................10:25
Using.....................................................................10:23
Viewing Order in Trim Editor...............................6:24
W
WAV.................................................................5:18, 8:29
Waveforms.................................................................. 4:2
Width .........................................................................7:29
Window menu..........................................................11:5
Arrange Icons .....................................................10:16
Cascade................................................................10:16
Changing the active window ............................... 1:3
New Window.....................................................10:16
Splitting ................................................................10:16
Tile........................................................................10:16
User Zoom in Trim Editor.....................................6:24
Usernames...............................................................10:21
Using 9-pin in Sync..................................................... 9:6
Using a Mixer Template..........................................7:35
Using the Clipstores .................................................. 8:3
Using the Text EDL .................................................5:26
V
Windows Administrator.........................................8:26
Windows User .........................................................8:26
Wobbly Waveforms.................................................. 4:3
Working with Sync Material .................................... 9:9
Writing back automatically ....................................6:22
v4.2 Saving .................................................................8:11
Varispeed
On the whole EDL ..............................................4:17
Varispeed Playback...................................................4:17
V-cut mode.................................................................. 6:2
Verification ......................................................2:17, 2:24
Verifying
Writing back from Trim Editor.............................6:22
Writing back the finished Edit ...............................6:22
Writing back with Autoplace.................................6:17
Z
Zoom............................................................................ 4:5