1
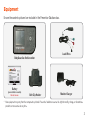
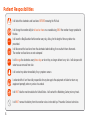
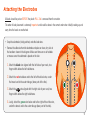
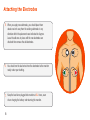
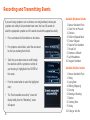
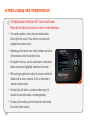
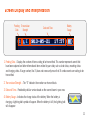
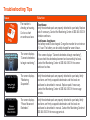
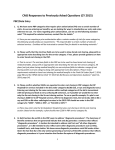
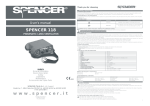
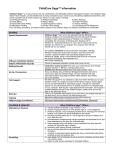
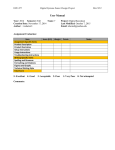
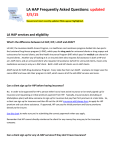
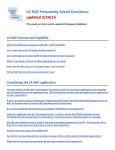
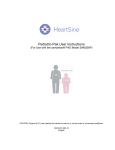
Patient Instruction Manual Preventice Services, LLC and Preventice Technologies, Inc., are independent, wholly owned subsidiaries of Preventice Solutions, Inc. Welcome to BodyGuardian® Verité Your physician has prescribed you the BodyGuardian® Verité monitoring service provided by Preventice Services. • The BodyGuardian Verité monitor continuously monitors and records all heartbeats, detecting irregular rhythms. • Wearing the monitor will help your physician diagnose potential rhythm problems while you are outside of a clinic or hospital. 2 Equipment Ensure the contents pictured are included in the Preventice Solutions box. BodyGuardian Verité monitor Lead Wires Battery (pre-installed in monitor) Do not remove Belt Clip Holster Monitor Charger * Your equipment may vary from the components pictured. Preventice Solutions reserves the right to modify, change, or discontinue products or accessories at any time. 3 Patient Resposibilities I will attach the electrodes and lead wires BEFORE removing the Pull tab. I will charge the monitor daily for at least an hour or as needed using ONLY the monitor charger provided in the box. 24/7 I will wear the BodyGuardian Verité monitor every day, all day, for the length of time my doctor has prescribed. I will disconnect the lead wires from the electrodes before bathing, then re-attach them afterwards. The monitor and lead wires are not waterproof. 3 DAYS I will change the electrodes every three days or when they no longer adhere to my skin. I will dampen with water to ease removal from skin. I will contact my doctor immediately if my symptoms worsen. I understand that I am financially responsible for any damage to the equipment or failure to return any equipment promptly when my service has ended. I will NOT take the monitor outside the United States. I will contact the Monitoring Center prior my travel. I will NOT remove the battery from the monitor unless instructed by a Preventice Services technician. 4 Attaching the Electrodes All leads should be put on BEFORE the plastic PULL Tab is removed from the monitor. The order of lead placement is extremely important and should be done in the correct order when initially hooking up and every time the leads are reattached. • Snap the electrodes (sticky patches) onto the lead wires. • Remove the adhesive from the electrode and place on clean, dry skin at the locations shown in the diagram. Make sure there are no air bubbles or creases once the electrode is placed on the skin. 1.Attach the black wire aligned with the left side of your neck, two finger widths below the left collarbone. 2.Attach the red wire below and to the left of the black wire, under the breast and to the outer ribcage (bone part of the ribs). 3.Attach the white wire aligned with the right side of your neck, two finger widths below the right collarbone. 4.Lastly, attach the green wire below and to the right of the white wire, under the breast and to the outer ribcage (bone part of the ribs). 5 Attaching the Electrodes 5. When you apply new electrodes, you should place them about one inch away from the existing electrodes in any direction within the placement zone indicated in diagram. Leave the old ones in place until the new electrodes are attached then remove the old electrodes. 6. You should run the lead wires from the electrodes to the monitor neatly under your clothing. 7. Keep the lead wires plugged into monitor at ALL times, even when charging the battery and returning the monitor. 6 Activating Your Monitor and Recording Your Symptoms • Once you have all four leads properly connected, you should sit down, remove the PULL Tab from the monitor and REMAIN STILL for the first 60 seconds. • Your monitor will now power up. If you accidentally remove the Pull Tab before attaching the electrodes, please call the Monitoring Center. • Once the plastic PULL Tab is removed, the monitor will emit a single beep indicating activation. Then you will hear a ringtone to confirm the monitor is powered on correctly. • The monitor will automatically proceed to the “Monitoring” screen indicating the beginning of your study. • To record an event when you feel symptoms, push and hold the Event button until the device begins to vibrate and displays a list of symptoms on the screen, release the button. You should not push the Event button unless you feel a symptom. Event button 7 Recording and Transmitting Events If you are having symptoms such as dizziness or racing heartbeat, choose your symptom and activity to let your doctor know more. You have 20 seconds to select the appropriate symptom and 20 seconds to select the appropriate activity. • Press and release the Event button on the device. • F or symptoms and activities, select the one closest to what you are doing from the list. • Touch the up or down arrows to scroll through the selections until the symptom or activity of your choosing is highlighted in the CENTER of the screen. • Push the center button to select the highlighted entry. • The “Event recorded successfully” screen will display briefly, then the “Monitoring” screen will appear. 8 Available Symptoms Include: 1. None or Accidental Push 2. Chest Pain or Pressure 3. Dizziness 4. Flutter or Skipped Beats 5. Tired or Fatigued 6. Rapid or Fast Heartbeat 7. Passed Out 8. Shortness of Breath 9. Light Headedness 10. Irregular Heartbeat Available Activities Include: 1. None or Accidental Push 2. Sitting 3. Laying Down 4. Walking (Shopping) 5. Cleaning 6. Bending or Standing 7. Exercise 8. Climbing Stairs 9. Driving 10. Eating or Just Ate Charging the Monitor Plug the charger into the wall outlet using only the charger provided, connect the wall charger to the charger port on top of the monitor, a green light will indicate the charger is active. The monitor will vibrate twice to indicate the charger is connected properly and the device is charging. It is safe to keep the monitor connected to the electrodes while charging. Please charge the monitor daily for at least one hour. If the screen displays “Battery Low please recharge”, charge immediately. Upon receipt of the monitor, you may need to charge the monitor if the battery gauge is less than half. 9 Screen Display and Interpretation The BodyGuardian Verité does NOT have a touch-screen. Please do not attempt to press the screen to make selections. • The monitor provides a series of touch-sensitive buttons to the right of the screen. These buttons may be used to navigate the on-screen menus. • Depending on the current menu screen, between one to five of these buttons will be illuminated in blue. • To navigate the menus, use the arrow buttons as directional buttons to move the highlighted selection on the screen. • With your finger, gently touch within the arrows or within the middle circle to make a selection. A click is heard when a selection has been made. • The blue lights will blink in a clockwise pattern every 10 seconds to indicate the device is recording properly. • To wake up the monitor, push and release the event button for less than three seconds. 10 Screen Display and Interpretation Information Bar Pending Transmission Strength Data Date and Time Battery Gauge 1.Pending Data – Displays the number of items waiting to be transmitted. This number represents events that have been captured and other informational items related to your study such as lead status, recording status and charging status. A large number, like 15, does not necessarily mean that 15 cardiac events are waiting to be transmitted. 2.Transmission Strength – The “E” indicates the monitor can transmit data. 3.Date and Time – Provided by cellular service based on the nearest tower in your area. 4.Battery Gauge – Indicates the charge status of the battery. When the battery is charging, a lightning bolt symbol will appear. When the battery is full, the lightning bolt will disappear. 11 Troubleshooting Tips Issue 12 Solution The monitor is vibrating or buzzing. Can be a short or continuous buzz. Short buzz: Verify the electrode pads are properly attached to your body. Replace pads if necessary. Contact the Monitoring Center at 888.500.3522 if vibration continues. Continuous long buzz: The battery needs to be charged. Charge the monitor for a minimum of 1 hour. The battery can be safely charged for several hours. The screen displays “Connect electrodes to begin monitoring”. If the screen displays “Connect electrodes to begin monitoring”, please check the electrode placement and connectivity to leads. Contact the Monitoring Center at 888.500.3522 if the screen continues to show. The screen displays “Monitoring Suspended”. Verify the electrode pads are properly attached to your body. Verify lead wires are firmly snapped to electrodes and the leads are positioned as described in manual. Replace pads if necessary. Contact the Monitoring Center at 888.500.3522 if the message persists. The screen displays “Please Reconnect Electrodes”. Verify the electrode pads are properly attached to your body. Verify lead wires are firmly snapped to electrodes and the leads are positioned as described in manual. Contact the Monitoring Center at 888.500.3522 if the message persists. Troubleshooting Tips Issue Solution The screen displays “Something has gone wrong” and a 4 Digit Error code. Monitor requires reset. Push Target/Select button for 3 seconds then quickly push the event button (do not push and hold). If the problem persists, contact the Monitoring Center at 888.500.3522. The screen is blank. Blue arrow lights circle around the center button. The monitor is currently recording. The screen has been turned off to extend the battery life. To turn on the display, press the event button once (do not hold). The screen will turn off after few seconds. Where can the information provided by the monitor be viewed? Patients can obtain their reports by contacting their prescribing physician. What is the best way to Use warm, soapy water to ease removal of electrodes and glue remove the electrode’s residue. glue residue from my skin? 13 Returning the equipment using UPS® Return the BodyGuardian Verité equipment to Preventice Services immediately after your service ends. 1. Place the monitor and attached lead wires into the white padded pouch, then place the pouch inside the box. 2. Place all other accessories and any unopened electrodes into the box. 3. Remove the adhesive strip from outer box and seal securely. 4. Drop package off at any UPS Drop Box or The UPS Store®. For assistance, call Preventice Services at 888.500.3522. Note If you have lost or damaged the equipment, Preventice Services will mail you an invoice for the cost of the item. 14 Patient financial obligations and billing information Preventice Services has a working relationship with most health insurance companies. Please ensure Preventice Services has your correct insurance information to verify your coverage and appropriately bill your insurance company. Your insurance company may send you an Explanation of Benefits (EOB). An EOB is not a bill. If you would like to review your EOB, or if you have billing questions, please contact the Preventice Services Billing Department at 888.747.4701. Depending upon your insurance coverage, Preventice Services may be required to bill you directly for any remaining deductibles, co-insurance or copays that your insurance company does not cover and that you are responsible to pay for cardiac monitoring services. All equipment is the sole property of Preventice Services. To avoid financial liability and to ensure that you do not receive a bill for the value of the equipment in your possession (up to $3,000), please return the equipment via UPS® directly to Preventice Services immediately after your service ends. Any request for an extension of your study beyond your prescribed study would need to come from your physician through a new order sent to Preventice Services. Please be aware that the second study may not be covered by all insurance providers and you may be responsible for those charges. Our Notice of Privacy Practices is available for your review at www.preventicesolutions.com. 15 REMINDER Preventice Services, a Preventice Solutions Company, is not an emergency response service. If you are experiencing a medical emergency, dial 911. For questions or requests for additional supplies, contact our Monitoring Center at the number below, follow phone options closely for faster service. 888.500.3522 BGV.PM_08.2015. Copyright © 2015 Preventice Solutions, Inc. – All rights reserved.