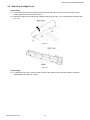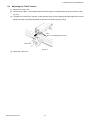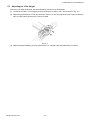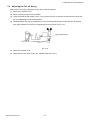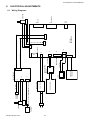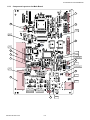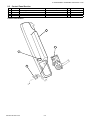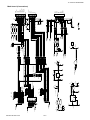
1
PEN PLOTTER
MP303 SERIES
SERVICE MANUAL
�
MP303-UM251-02-9370
1. GENERAL DESCRIPTIONS
HISTORY OF REVISIONS
No. Date issued
Description of revision
1 2004.05.21 First printing
2
2004.12.01 Part numbers for the AC power cables corrected.
MP303-UM-251-9370
i
Page
All
9-9
Edition
01
02
1. GENERAL DESCRIPTIONS
CONTENTS
HISTORY OF REVISIONS ...................................................................................................... i
1.
GENERAL DESCRIPTION .......................................................................1-1
1.1
Special Features ..................................................................................................... 1-1
1.2
Specifications ......................................................................................................... 1-2
1.3
External Dimensions .............................................................................................. 1-3
2.
DESCRIPTION OF PARTS .......................................................................2-1
2.1
Description of Parts................................................................................................ 2-1
2.2
The Control Panel ................................................................................................... 2-2
3.
RECOMMENDED PARTS LIST ...............................................................3-1
4.
REPLACING THE MECHANISMS ...........................................................4-1
4.1
Replacing the Rear Cover B .................................................................................. 4-1
4.2
Replacing the Right Cover ..................................................................................... 4-2
4.3
Replacing the Front Cover ..................................................................................... 4-3
4.4
Replacing the Top Left Cover ................................................................................ 4-4
4.5
Replacing the Bottom Left Cover .......................................................................... 4-5
4.6
Replacing the Y Motor Cover ................................................................................. 4-6
4.7
Replacing the Solenoid Cover ............................................................................... 4-7
4.8
Replacing the Y Bar Cover ..................................................................................... 4-8
4.9
Replacing the X Belts ............................................................................................. 4-9
4.10 Replacing the X Motor .......................................................................................... 4-10
4.11 Replacing the Y Bar .............................................................................................. 4-11
4.12 Replacing the Y Belt ............................................................................................. 4-12
4.13 Replacing the Y Motor .......................................................................................... 4-13
4.14 Replacing the Y FPC Cable .................................................................................. 4-14
4.15 Replacing the Pen Solenoid ................................................................................ 4-15
4.16 Removing the Bottom Panel Assembly .............................................................. 4-16
5.
MECHANICAL ADJUSTMENTS ..............................................................5-1
5.1
Adjusting the X Belt Tension ................................................................................. 5-1
5.2
Adjusting the Y Belt Tension ................................................................................. 5-2
5.3
Adjusting the Y Bar Height .................................................................................... 5-3
MP303-UM-251-9370
ii
1. GENERAL DESCRIPTIONS
5.4
Checking the Perpendicularity Precision ............................................................. 5-4
5.5
Adjusting the Perpendicularity Precision ............................................................ 5-5
5.6
Adjusting the X Rollers .......................................................................................... 5-6
5.7
Adjusting the Pen Holder and Pivot Screws ........................................................ 5-7
5.8
Adjusting the Pen Holder Height........................................................................... 5-8
5.9
Adjusting the Pen UP Spring ................................................................................. 5-9
5.10 Adjusting the X Home Position ........................................................................... 5-10
5.11 Adjusting the Y Home Position ........................................................................... 5-11
5.12 Adjusting Pen Retrieval ....................................................................................... 5-12
6.
ELECTRICAL ADJUSTMENTS ................................................................6-1
6.1
Wiring Diagrams ..................................................................................................... 6-1
6.1.1
Component Layout on the Main Board .........................................................................6-2
6.2
DIP Switch Settings ................................................................................................ 6-3
6.3
Checking the Voltage Level for the Main Board .................................................. 6-4
6.4
Updating the System Firmware ............................................................................. 6-5
6.5
NOV-RAM Clear ....................................................................................................... 6-6
6.6
Adjusting the Pen Force ........................................................................................ 6-7
6.7
Using the Test Modes ............................................................................................. 6-8
6.7.1
Self Test ...........................................................................................................................6-8
6.7.2
Character Dump Mode ...................................................................................................6-9
6.7.3
Debug Mode ..................................................................................................................6-10
6.7.4
Pen Retrieval Test Mode...............................................................................................6-11
6.7.5
Running Test Mode .......................................................................................................6-12
6.7.6
Sensor Test Mode .........................................................................................................6-13
6.7.7
Control Panel Key Test Mode ......................................................................................6-15
7.
TROUBLESHOOTING ..............................................................................7-1
7.1
The Plotter is Turned On But Doesn’t Operate .................................................... 7-1
7.2
During Plotting Operations .................................................................................... 7-1
8.
ERROR MESSAGES ................................................................................8-1
8.1
Hardware Error........................................................................................................ 8-1
8.2
GP-GL Command Errors ........................................................................................ 8-1
8.3
HP-GL Command Errors ........................................................................................ 8-2
MP303-UM-251-9370
iii
1. GENERAL DESCRIPTIONS
9.
DISASSEMBLY DIAGRAMS AND PARTS LISTS ...................................9-1
9.1
Main Unit.................................................................................................................. 9-1
9.2
External Casing....................................................................................................... 9-2
9.3
Control Panel Section ............................................................................................ 9-3
9.4
Bottom Panel........................................................................................................... 9-4
9.5
X-Axis Slider, X-Axis Drive, Pen Station ............................................................... 9-5
9.6
Y-Axis Slider, Y-Axis Drive ..................................................................................... 9-7
9.7
Standard Accessories ............................................................................................ 9-9
9.8
Others ...................................................................................................................... 9-9
10. CIRCUIT DIAGRAMS .............................................................................10-1
10.1 Main Board ............................................................................................................ 10-1
Main board (Top) ........................................................................................................................10-1
Main board (Connections).........................................................................................................10-2
Main board (CPU) .......................................................................................................................10-3
Main board (DC Driver) ..............................................................................................................10-4
Main board (GRC1507 Servo) ...................................................................................................10-5
Main board (I/F) ..........................................................................................................................10-6
Main board (Memory).................................................................................................................10-7
Main board (USB) .......................................................................................................................10-8
10.2 Control Panel ........................................................................................................ 10-9
10.3 Relay Board ......................................................................................................... 10-10
10.4 High Voltage Power Board ................................................................................. 10-11
MP303-UM-251-9370
iv
1. GENERAL DESCRIPTION
1.
GENERAL DESCRIPTION
1.1 Special Features
• High-speed, high-quality plotting
A digital servo drive system and a 32-bit CPU combine to produce detailed plots with smooth curves at a
maximum plotting speed of 700 mm/s (in all directions) and a mechanical resolution of 0.005 mm.
• Various functions ensure clearly-defined plots
A wide variety of functions come standard to ensure clearly-defined plots, including the Auto Pen Cap
function which prevents pens at the pen station from drying up when not in use and a mechanical soft-landing
mechanism that extends the pen's lifetime while providing a quieter working environment. The plotting speed
and pen force most suitable for the pen type being used can be easily selected from the control panel.
• Upright installation possible
To conserve space, the plotter can be mounted on a pair of stands (provided as a standard accessory) for
installation at a 60˚ angle.
• Interface conditions are easily set
The interface mode (RS-232C serial or Centronics parallel or USB-compatible) is automatically selected
when the plotter is connected to a computer via the respective interface connector.
If the plotter is set to Auto RS-232C mode, you just need to send plot data from the computer; the RS-232C
settings are automatically selected so no bothersome settings are required.
• Interactive operation
Various functions can be set interactively by using the panel keys according to messages and prompts
appearing on the display.
• Vector sorting function
This function speeds up plotting by minimizing the distance the pen travels in raised status from the end point
of one line to the starting point of the next line.
• Pen sorting function
To speed up plotting by reducing the number of pen exchanges required, this function reorganizes the
sequence in which plotting is performed so that each color is completely plotted before selecting the next
pen.
MP303-UM-251-9370
1-1
1. GENERAL DESCRIPTION
1.2 Specifications
Model no.
CPU
Configuration
Drive system
Effective plotting area
Maximum plot speed
Mechanical resolution
Programmable resolution
No. of pens
Compatible ink pen types
Chart hold method
Accuracy
Interfaces
Command sets
Display panel
Buffer memory
Power supply
Power consumption
Operating environment
External dimensions
Weight
MP303-UM-251-9370
MP303-04
32-bit CPU
Flatbed type
Digital servo
EXPAND
: 432 x 297 mm (17.0 x 11.7 in)
ANSI B
: 416 x 268 mm (16.3 x 10.5 in)
ISO A3
: 404 x 285 mm (15.9 x 11.2 in)
ISO A4
: 281 x 198 mm (11.1 x 7.8 in)
70 cm/s
0.005 mm (.0019 in)
GP-GL mode
: 0.1/0.025 mm (.004/.001 in)
HP-GL mode
: 0.025 mm (.001 in)
8
Water based fiber-tip pens,
Disposable ink pens (0.2, 0.3, 0.5, 0.7 mm),
Refillable ink pens (0.2, 0.3, 0.5 mm),
Ceramic pens (0.2, 0.3, 0.5, 0.7 mm)
Electrostatic adhesion
Distance
: within ±0.3% or ±0.1 mm, whichever is larger
Repeatability
: within 0.1 mm
Perpendicularity : within 1.0 mm/297 mm
Pen exchange : within 0.3 mm
RS-232C/Centronics/USB1.1
GP-GL (MP-GL and FP-GL)
HP-GL (HP7475 emulation)
LCD (8 characters x 2 lines)
2 Mbytes
100 to 240 VAC ±10% 50/60 Hz
Within 45 VA
Temperature
: +5˚C to +35˚C
Humidity
: 35% to 75% RH
670 mm (W) x 449 mm (D) x 130 mm (H)
Approx. 6.2 kg
1-2
1. GENERAL DESCRIPTION
1.3 External Dimensions
MP303-UM-251-9370
1-3
2. DESCRIPTION OF PARTS
2.
DESCRIPTION OF PARTS
2.1 Description of Parts
(1) Pen station
Holds pens ready for use and is numbered consecutively from pen 1 through pen 8, from the bottom to the
top.
(2) Control panel
Contains the keys used for controlling the plotter’s operations and the lamps which indicate the current
plotter status.
(3) Pen carriage
Holds the currently selected pen.
(4) Y bar
This sliding bar travels in the X-axis direction to move the pen carriage and enable plotting.
(5) Writing panel
Holds the paper using an electrostatic adhesion panel.
(6) Display
Liquid-crystal display allows functions to be set interactively.
(7) AC inlet
Plug the AC adapter into this AC line inlet.
(8) Power switch
This switch controls the ON/OFF status of the plotter’s power supply.
(9) RS-232C connector
To use the RS-232C serial interface, connect your computer to the plotter via this connector.
(10) Centronics connector
To use the Centronics-compatible parallel interface, connect your computer to the plotter via this connector.
(11) USB connector
To use the USB interface, connect your computer to the plotter via this connector.
MP303-UM-251-9370
2-1
2. DESCRIPTION OF PARTS
2.2 The Control Panel
Keys
POSITION ................. Move the pen carriage in the direction indicated by each key.
These keys are also used to set functions at the display.
ENTER ...................... Completes input of the function being set.
PAUSE ...................... Press to temporarily stop plotting and press again to resume plotting.
CANCEL .................... To cancel a setting shown on the display, press this key instead of the ENTER key.
MODE ....................... Press to use the POSITION keys to move the pen carriage or to set function menus.
LEDs
CHART HOLD ........... Switches the ON/OFF status of electrostatic adhesion. After placing a sheet on the
writing panel, press this key to secure the paper.
POWER/PROMPT .... Lights when the power is turned on.
Flickers to prompt you to press the ENTER key or to inform you that an error has
occurred.
PAUSE ...................... Lights to indicate that plotting is temporarily suspended.
MP303-UM-251-9370
2-2
2. Description of Parts
3.
RECOMMENDED PARTS LIST
No.
1
2
3
4
5
6
7
8
9
10
11
12
13
14
15
16
17
18
19
20
21
Part No.
035130123
773513500
618260300
500051951
771826500
773513490
691801540
509000014
035132210
773513080
508000015
508102285
691801520
795320716
035033051
509000015
773513100
509000035
035134081
035132070
105401090
MP303-UM-251-9370
Part Name
Electrostatic Panel
High Voltage Board
Control Panel
AC Adapter
Main Board 303
Control Board
Keyboard Flexible Printed Cable
X Motor
X Belt 1820
Relay Board
X Home Sensor
Y Home Sensor
X Flexible Printed Cable
Pen Station
Y Belt
Y Motor
Pen Holder Assembly
Solenoid
Y Roller 10B
Y Roller B
Pen Flexible Printed Cable
Description
Quantity
1
1
PR312003
1
SA45-3129
1
1
1
FPC,05412
1
TS3747N31ES
1
2
PR05406
1
GP1A53HR
1
SW,SPPB/TYPE1
1
FPC,05410
1
1
1
TS3747N32ES
1
1
1
3
1
FPC,05401
1
3-1
Remarks
Compatible with MP5300
Compatible with MP5300
Compatible with MP5300
Compatible with MP5300
Compatible with MP5300
Compatible with MP5300
Compatible with MP5300
Compatible with MP5300
Compatible with MP5300
Compatible with MP5300
Compatible with MP5300
Compatible with MP5300
Compatible with MP5300
Compatible with MP5300
Compatible with MP5300
Compatible with MP5300
Compatible with MP5300
Compatible with MP5300
4. REPLACING THE MECHANISMS
4.
REPLACING THE MECHANISMS
4.1 Replacing the Rear Cover B
Disassembly
(1) Move the Y bar next to the pen station as shown in Fig. 4-1.
Fig. 4-1
(2) Place the plotter upside down on a table or other flat surface as shown in Fig. 4-2, making sure not to
strike the Y bar or pen block against the surface.
Fig. 4-2
(3) After removing the three M3 x 8 mm tapping screws and two M3 x 8 mm binding-head screws, remove
the rear cover B (see Fig. 4-3).
Fig. 4-3
Re-assembly
(4) Attach the rear cover B by performing the above “Disassembly” procedure in reverse.
Tightening torque: 4 kg / cm (M3 x 8 binding-head screws only)
MP303-UM-251-9370
4-1
4. REPLACING THE MECHANISMS
4.2 Replacing the Right Cover
Disassembly
(1) Loosen the three M3 x 8 mm tapping screws securing the right cover, then remove one M3 x 8 mm
binding-head screw from the rear cover B.
(2) Remove the right cover while turning it slightly toward you (see Fig. 4-4) to release its three hooks (see
Fig. 4-5).
Fig. 4-4
Fig. 4-5
Re-assembly
(3) To attach the right cover, insert its three hooks into the holes provided and then perform the above
“Disassembly” procedure in reverse.
MP303-UM-251-9370
4-2
4. REPLACING THE MECHANISMS
4.3 Replacing the Front Cover
Disassembly
(1) Remove the right cover.
(2) Remove the three M3 x 8 mm tapping screws.
(3) Slide off the front cover as shown in Fig. 4-6.
Fig. 4-6
Re-assembly
(4) To attach the front cover, perform the above “Disassembly” procedure in reverse.
MP303-UM-251-9370
4-3
4. REPLACING THE MECHANISMS
4.4 Replacing the Top Left Cover
Disassembly
(1) Remove the black M3 x 12 mm tapping screw from the bottom of the top left cover (see Fig. 4-7).
(2) Remove the two M3 x 8 mm tapping screws from the top of the top left cover (see Fig. 4-7).
(3) Disconnect the flat cable, then remove the top left cover.
M3 x 8 mm
tapping screw
Top Left Cover
M3 x 12 mm tapping screw
Fig. 4-7
Re-assembly
(4) To attach the top left cover, perform the above “Disassembly” procedure in reverse.
MP303-UM-251-9370
4-4
4. REPLACING THE MECHANISMS
4.5 Replacing the Bottom Left Cover
Disassembly
(1) From the bottom panel, remove the six M3 x 8 mm tapping screws, and two black M3 x 5 mm tapping
screws (see Fig. 4-8).
Bottom panel
M3 x 5 tapping screw
M3 x 8 tapping screw
Fig. 4-8
(2) Remove the one M3 x 8 mm tapping screw from the rear cover B, then remove the bottom left cover (see
Fig. 4-9).
M3 x 8 tapping screw
Bottom left cover
Fig. 4-9
Re-assembly
Caution: Be sure not to mix up the screws when replacing them.
Insertion of the wrong screws will damage the circuitry.
(3) To attach the bottom left cover, perform the above “Disassembly” procedure in reverse.
MP303-UM-251-9370
4-5
4. REPLACING THE MECHANISMS
4.6 Replacing the Y Motor Cover
Disassembly
(1) Remove the two black M3 x 12 mm binding-head screws, then remove the Y motor cover (see Fig.
4-10).
M3 x 12 mm
binding head screw
Y motor cover
Y bar
Fig. 4-10
(2) To attach the Y motor cover, perform the above “Disassembly” procedure in reverse.
MP303-UM-251-9370
4-6
4. REPLACING THE MECHANISMS
4.7 Replacing the Solenoid Cover
Disassembly
(1) Remove the two M2 x 6 mm binding-head screws, then remove the solenoid cover (see Fig. 4-11).
M2 x 6 mm binding head screw
Solenoid cover
Y bar
Fig. 4-11
(2) To attach the solenoid cover, perform the above “Disassembly” procedure in reverse.
Caution: Ensure that the solenoid cover does not contact the Y bar.
Fig. 4-12 shows an example of an incorrectly attached solenoid cover.
Solenoid cover
Y bar
NG
Fig. 4-12
MP303-UM-251-9370
4-7
4. REPLACING THE MECHANISMS
4.8 Replacing the Y Bar Cover
Disassembly
(1) Place an A3 size sheet of paper on the plotter’s writing panel to avoid scratching it.
(2) Remove the two black M3 x 12 mm tapping screws securing the Y bar cover (see Fig. 4-13), then
remove the Y bar cover.
Y bar
M3 x 12 mm black
tapping screw
Fig. 4-13
Re-assembly
(3) To attach the Y bar cover, perform the above “Disassembly” procedure in reverse.
MP303-UM-251-9370
4-8
4. REPLACING THE MECHANISMS
4.9 Replacing the X Belts
After the X belts are replaced, the X belt tension and perpendicularity precision must be adjusted.
Disassembly
(1) Remove the rear cover B, right cover, front cover, and top left cover.
(2) Loosen the two M3 x 6 mm binding-head screws securing the tension bracket (see Fig. 4-14) to loosen
the X belt.
(3) Remove the X belts.
Tension bracket
18 to 20 mm
(Protruding length of X belt)
Fig. 4-14
Fig. 4-15
Re-assembly
(4) Pull both ends of each X belt to the length indicated in Fig. 4-15.
(5) Attach the X belts to the corresponding pulleys.
(6) Adjust the X belt tension (see Section 5.1, “Adjusting the X Belt Tension”).
(7) Adjust the perpendicularity precision (see Section 5.5, “Adjusting the Perpendicularity Precision”).
MP303-UM-251-9370
4-9
4. REPLACING THE MECHANISMS
4.10 Replacing the X Motor
After the X motor is replaced, the X belt tension and perpendicularity precision must be adjusted.
Disassembly
(1) Remove the X belts.
(2) Remove the bottom panel assembly and bottom left cover.
(3) Disconnect the X motor cable from the main driver board.
(4) Loosen the two M3 x 4 mm double-point screws from the coupling of the M shaft (see Fig. 4-16).
X-motor
Coupling
M shaft
Double-point screw
Fig. 4-16
(5) Remove the two M3 x 6 mm binding-head screws securing the X motor, then slide off the X motor.
(6) Remove the drive pulley from the X motor.
Re-assembly
Caution: The double-point screws in the X drive shaft’s coupling are easily breakable and should
be tightened with care.
The tightening torque must not exceed 2 kg / cm.
(7) To mount the X motor, perform the above “Disassembly” procedure in reverse.
(8) Mount the X belts.
(9) Adjust the X belt tension (see Section 5.1, “Adjusting the X Belt Tension”).
(10) Adjust the perpendicularity precision (see Section 5.5, “Adjusting the Perpendicularity Precision”).
MP303-UM-251-9370
4-10
4. REPLACING THE MECHANISMS
4.11 Replacing the Y Bar
After the Y bar is replaced, the Y bar height, Y belt tension and perpendicularity precision must be adjusted.
Disassembly
(1) Remove the Y motor cover.
(2) Remove the Y bar cover.
(3) Loosen the two black M3 x 4 mm binding-head screws securing the Y pulley bracket (see Fig. 4-17).
Y bar cover
M3 x 4 mm binding head screw
Fig. 4-17
(4) Remove the rubber holder securing the pen FPC (Flexible Printed-Circuit) cable to the X roller bracket,
then disconnect the Y FPC cable from the relay board and separate it from the X slider.
(5) Remove the Y belt (see Section 4.12, “Replacing the Y Belt”).
(6) Remove the two M3 x 12 mm tapping screws securing the Y bar to the X slider, then remove the Y bar (see
Fig. 4-18).
Rubber holder
M3 x 12 mm
tapping screw
Fig. 4-18
(7) Slide the pen block assembly off the Y bar.
(8) Slowly peel the Y FPC cable off the Y bar, being careful not to damage the cable.
Re-assembly
(9) To mount the Y bar, perform the above “Disassembly” procedure in reverse.
(10) Adjust the Y bar height (see Section 5.3, “Adjusting the Y Bar Height”) so that the gap between the Y
bar and X rail is about 11.6 mm.
(11) Adjust the perpendicularity precision (see Section 5.5, “Adjusting the Perpendicularity Precision”).
(12) Adjust the Y belt tension (see Section 5.2, “Adjusting the Y Belt Tension”).
MP303-UM-251-9370
4-11
4. REPLACING THE MECHANISMS
4.12 Replacing the Y Belt
After the Y belt is replaced, the Y belt tension and X rollers must be adjusted.
Disassembly
(1) Loosen the M3 x 6 mm tapping screw at the X roller adjustment bracket (see Fig. 4-19).
(2) Remove the two black M3 x 4 mm binding-head screws securing the Y pulley bracket, then remove the
Y pulley bracket.
(3) While slightly raising the Y bar toward you, slide the Y slider assembly off the Y bar (making sure not to
damage the Y FPC cable).
(4) Remove the Y belt from the Y slider (see Fig. 4-20).
Y bar
X slider
Y belt
X roller adjustment bracket
Y slider
Fig. 4-19
Fig. 4-20
Re-assembly
(5) Attach the Y belt to the Y slider.
(6) Mount the Y slider and Y pulley bracket onto the Y bar.
(7) Adjust the Y belt tension (see Section 5.2, “Adjusting the Y Belt Tension”).
(8) Attach the Y bar cover.
(9) Adjust the X rollers (see Section 5.6, “Adjusting the X Rollers”).
Note:
Check the Y FPC cable to ensure that it is undamaged.
MP303-UM-251-9370
4-12
4. REPLACING THE MECHANISMS
4.13 Replacing the Y Motor
After the Y motor is replaced, the X rollers, X belt tension, and Y belt tension must be adjusted. Next, run the
pen retrieval test to check that pens are properly exchanged.
Disassembly
(1) Remove the rear cover B and Y motor cover.
(2) Remove the relay board, then disconnect the Y motor cable from the relay board.
(3) Remove the top left cover, then push the X slider as far as possible in the -X axis direction (near the pen
station).
(4) Remove the Y bar cover.
(5) Remove the X belt closer to the back of the plotter.
(6) Loosen the Y belt.
(7) Remove the two M3 x 6 mm tapping screws securing the X roller adjustment bracket assembly, remove
the X roller adjustment bracket assembly (see Fig. 4-21), then shift the entire Y bar assembly in the +Y
direction.
Note:
Be careful not to scratch the X rail.
Y bar
X slider
X roller adjustment bracket
Fig. 4-21
(8) Remove the two M3 x 6 mm binding-head screws securing the Y motor, then remove the Y motor.
(9) Remove the Y drive pulley from the Y motor.
Re-assembly
(10) To mount the Y motor, perform the above “Disassembly’’ procedure in reverse.
(11) Adjust the X rollers (see Section 5.6, “Adjusting the X Rollers”).
(12) Adjust the Y belt tension (see Section 5.2, “Adjusting the Y Belt Tension’).
(13) Adjust the X belt tension (see Section 5.1, “Adjusting the X Belt Tension”).
(14) Run the pen retrieval test to check that pens are properly exchanged (see Section 6.7 , “The Test
Modes”).
MP303-UM-251-9370
4-13
4. REPLACING THE MECHANISMS
4.14 Replacing the Y FPC Cable
After the Y motor is replaced, the Y bar height and perpendicularity precision must be adjusted.
Disassembly
(1) Disconnect the Y FPC cable from connector J2 on the relay board.
(2) Remove the Y bar.
(3) Remove the M2 x 6 mm binding-head screw securing the Y FPC cable to the Y slider (see Fig. 4-22),
then use a soldering iron to detach the pen solenoid’s lead wires from the Y FPC cable.
Y FPC cable
Y slider
Fig. 4-22
(4) Slide the Y slider assembly off the Y bar.
(5) Remove the Y FPC holder bracket (which is secured by black adhesive).
(6) Peel the Y FPC cable off the Y bar.
Re-assembly
(7) Fold the Y FPC cable as shown in Fig. 4-23, and wrap a piece of filament tape (about 25 mm long)
around the folded section. Attach the Y FPC cable to the Y bar with double-sided tape as shown in Fig.
4-24. To prevent the folded section of the Y FPC cable from lifting up, attach a piece of filament tape as
shown in Fig. 4-25.
Wrap with filament tape
15
Fold here
mm
t
ou
Ab
Black line
Y FPC cable
ge
of d
oub
mm
Fold here
Fig. 4-23
Ran
25
Align the double-sided tape’s edge
with the Y bar’s edge
le-s
ided
tap
e
15 mm
Filament tape
Y bar
5 to 8 mm
Wrap filament tape around
the section indicated above
Fig. 4-24
Fig. 4-25
(8) Process the Y FPC cable as shown in Fig. 4-26.
MP303-UM-251-9370
4-14
4. REPLACING THE MECHANISMS
Align the FPC cable’s edge
with the top of the rib
The cable should contact the
pins at the circuit board’s edge
90˚+20
Apply adhesive to
inside of bracket
* Make sure the Y FPC holder is not
loose or tilted.
Fig. 4-26
(9) To mount the Y FPC cable, perform the preceding “Disassembly” procedure in reverse.
(10) Adjust the Y bar height (see Section 5.3, “Adjusting the Y Bar Height’).
(11) Adjust the perpendicularity precision (see Section 5.5, “Adjusting the Perpendicularity Precision”).
4.15 Replacing the Pen Solenoid
After the pen solenoid is replaced, the pen force must be adjusted.
Disassembly
(1) Remove the solenoid cover.
(2) Remove the M2 x 6 mm binding-head screw securing the Y FPC cable to the Y slider.
(3) Remove the two M3 x 6 mm binding-head screws securing the pen solenoid to the Y slider (see Fig.
4-27).
M3 x 6 mm
binding head screw
Pen solenoid
Fig. 4-27
(4) Use a soldering iron to remove the solder between the Y FPC cable and the pen solenoid, then remove
the pen solenoid.
Re-assembly
(5) To mount the pen solenoid, perform the above “Disassembly” procedure in reverse.
(6) Adjust the pen force (see Section 6.6, “Adjusting the Pen Force”).
MP303-UM-251-9370
4-15
4. REPLACING THE MECHANISMS
4.16 Removing the Bottom Panel Assembly
Disassembly
(1) Push the Y bar next to the pen station as shown in Fig. 4-28.
Fig. 4-28
(2) Place the plotter upside down on a table or other flat surface as shown in Fig. 4-29, making sure not to
strike the Y bar or pen block against the surface.
(3) Remove the six M3 x 8 mm tapping screws and two M3 x 5 mm tapping screws securing the bottom
panel assembly (see Fig. 4-29), then remove the bottom panel assembly.
Caution: Be sure not to mix up the screws when replacing them.
Insertion of the wrong screws will damage the circuitry.
M3 x 8 tapping screw
M3 x 5 tapping screw
Bottom panel
Fig. 4-29
(4) Disconnect all the FPC cables, connector cables, etc. from the main board.
MP303-UM-251-9370
4-16
5. MECHANICAL ADJUSTMENTS
5.
MECHANICAL ADJUSTMENTS
5.1 Adjusting the X Belt Tension
(1) Remove the rear cover B, right cover, and front cover.
(2) Push the Y bar to the left next to the pen station.
(3) Remove the two black M3 x 12 mm binding-head screws from the Y motor cover and insert one into each
tension bracket as shown in Fig. 5-1. Next, loosen the two M3 x 6 mm binding-head screws (with plain
washer) at each tension bracket by about a half turn.
(4) To adjust the X belt tension, adjust the position of the tension brackets using the screws added in Step (3)
so that, when a tension gauge (150 g maximum) is used to cause a 10 mm displacement in the X belt at
the position indicated in Fig. 5-2, the force becomes 100 g (±20 g).
Insert here: M3 x 12 mm
binding head screw
Tension bracket
Fig. 5-1
Tension pulley
10 mm
Adhesive
277 mm
Fig. 5-2
(5) After adjustment is completed, tighten the two M3 x 6 mm binding head screws (with plain washer) at
each tension bracket and secure them with adhesive, then remove the M3 x 12 mm binding head screw
inserted in each tension bracket in Step (3) and replace them in the Y motor cover.
(6) Attach the rear cover B, right cover, and front cover.
MP303-UM-251-9370
5-1
5. MECHANICAL ADJUSTMENTS
5.2 Adjusting the Y Belt Tension
(1) Remove the Y bar cover.
(2) Loosen the two M3 x 4 mm binding-head screws securing the Y pulley bracket by about a half turn (see
Fig. 5-3).
(3) To adjust the Y belt tension, pull the Y pulley bracket using a push-pull gauge and then tighten the screws
loosened in Step (2) at the point where the pull force becomes 1000 g (±100 g).
Y bar
M3 x 4 mm binding head screws
Y bar cover
Fig. 5-3
(4) Attach the Y bar cover.
MP303-UM-251-9370
5-2
5. MECHANICAL ADJUSTMENTS
5.3 Adjusting the Y Bar Height
After the Y bar height is adjusted, the perpendicularity precision must be adjusted.
(1) Loosen the two M3 x 12 mm tapping screws securing the X slider to the Y bar as shown in Fig. 5-4.
(2) Adjust the gap between the Y bar and X slider to about 11.6 mm, then tighten the two screws loosened in
Step (1) while making sure that the Y bar is not tilted.
Fig. 5-4
(3) Adjust the perpendicularity precision (see Section 5.5, “Adjusting the Perpendicularity Precision”).
MP303-UM-251-9370
5-3
5. MECHANICAL ADJUSTMENTS
5.4 Checking the Perpendicularity Precision
(1) Attach a 0.2 mm ceramic pen and load a sheet of thin paper.
(2) Lower the pen and use the POSITION keys to manually plot the quadrilateral shape shown in Fig. 5-5.
(3) As shown in Fig. 5-6, fold the sheet in half so that the X-axis lines overlap.
Line A
Line B
Line B
Line A
Check the perpendicularity precision based on whether or not Line B deviates from Line A.
Align both lines
Fig. 5-5
Fig. 5-6
(4) If Line B deviates from Line A when the paper is folded so that both X-axis lines overlap (see Fig. 5-7),
Line B
Line A
tilt the Y bar toward Line B at half the angle of such deviation.
Fig. 5-7
MP303-UM-251-9370
5-4
5. MECHANICAL ADJUSTMENTS
5.5 Adjusting the Perpendicularity Precision
After the perpendicularity precision is adjusted, the X rollers must be adjusted.
(1) Remove the Y motor cover and rear cover B.
(2) Remove the top left cover, then loosen the two M3 x 4 mm double-point screws in the coupling (see Fig.
5-8) to free the M shaft.
X motor
Coupling
M shaft
Double-point screw
Fig. 5-8
Fig. 5-9
(3) Loosen the two M4 x 6 mm toothed binding head screws securing the X roller bracket to the X slider (see
Fig. 5-10).
M4 x 6 mm toothed binding-head screws
Fig. 5-10
(4) Slide the Y bar assembly so that it is parallel to the right edge of the writing panel, then tighten the two
M4 x 6 mm toothed binding head screws.
(5) Adjust the X rollers (see Section 5.6, “Adjusting the X Rollers”).
(6) Tighten the two M3 x 4 mm double-point screws in the coupling, making sure that the torque does not
exceed 2 kg/cm.
(7) Check the perpendicularity precision (see Section 5.4, “Checking the Perpendicularity Precision”).
If the perpendicularity precision is unsatisfactory, repeat Steps (2) and (3) above and finely adjust the
position of the Y bar assembly in the direction of deviation, repeat Steps (5) and (6), then check the
perpendicularity precision again. When the precision is satisfactory, proceed to Step (8) below.
(8) Attach the Y motor cover and rear cover B.
(9) Attach the top left cover.
MP303-UM-251-9370
5-5
5. MECHANICAL ADJUSTMENTS
5.6 Adjusting the X Rollers
(1) Remove the Y motor cover and rear cover B.
(2) Loosen the two M3 x 6 mm tapping screws securing the X roller adjustment bracket.
(3) While pulling the X roller adjustment bracket and X slider by a pull force of about 600 to 700 g in the
directions shown in Fig. 5-11, adjust the pressure exerted by the X rollers. Tighten the two M3 x 6 mm
tapping screws.
Manually turn the X slider’s rollers one at a time to check that all rollers exert the same pressure. If
pressure is uneven, adjust the perpendicularity precision (see Section 5.5, “Adjusting the Perpendicularity
Precision”).
Fig. 5-11
(4) Attach the Y motor cover and rear cover B.
MP303-UM-251-9370
5-6
5. MECHANICAL ADJUSTMENTS
5.7 Adjusting the Pen Holder and Pivot Screws
After the pen holder and pivot screws are adjusted, the Y belt tension must be adjusted.
(1) Remove the solenoid cover.
(2) Remove the Y bar cover and Y pulley bracket, then remove the Y slider assembly from the Y bar by
sliding it in the -Y direction.
(3) As shown in Fig. 5-13, turn the pivots to adjust both gaps between the pen holder and Y slider to the
2 mm
same distance (about 2 mm).
Apply adhesive
Pivot screw
Tightening torque:
50 to 70 gf/cm
2 mm
2 mm
Pen holder
Apply adhesive
Fig. 5-12
Fig. 5-13
(4) Check that there is no play in the pen holder.
(5) Remove the pen UP spring, manually raise the pen holder, then check that the pen holder lowers
smoothly when released (see Fig. 5-14).
When the pen holder is released
If the pen holder doesn’t lower
completely, loosen the pivot screw
Fig. 5-14
(6) Tighten the nut of each pivot screw, then secure the screws with adhesive.
(7) Slide the Y slider assembly onto the Y bar and attach it.
(8) Attach the solenoid cover and Y pulley bracket.
(9) Adjust the Y belt tension (see Section 5.2, “Adjusting the Y Belt Tension”).
(10) Attach the Y bar cover.
MP303-UM-251-9370
5-7
5. MECHANICAL ADJUSTMENTS
5.8 Adjusting the Pen Holder Height
(1) Attach a pen to the pen holder and raise the pen.
(2) Use the M3 x 4 mm hexagonal adjustment screw to adjust distance A between the raised pen’s tip and
writing panel surface to 1.8 mm minimum (2.6 mm maximum).
Be sure to measure the minimum and maximum distances throughout the entire writing panel’s surface.
Pen holder
Adhesive
Adjustment screw
A
Top surface of the writing panel
Fig. 5-15
(3) When adjustment is completed, apply adhesive to the adjustment screw.
MP303-UM-251-9370
5-8
5. MECHANICAL ADJUSTMENTS
5.9 Adjusting the Pen UP Spring
After the pen UP spring is adjusted, the pen force must be adjusted.
(1) Remove the solenoid cover.
(2) Attach a pencil plunger to the pen holder.
(3) Lower the pencil plunger slightly (0.5 to 1.0 mm) below the pen UP position, and temporarily loosen the
pen force adjustment screw at that position.
(4) Gradually tighten the pen force adjustment screw until the pencil plunger reaches the pen UP position,
then apply adhesive to the pen force adjustment screw as shown in Fig. 5-16.
Apply adhesive here
Fig. 5-16
(5) Attach the solenoid cover.
(6) Adjust the pen force (see Section 6.6, “Adjusting the Pen Force”).
MP303-UM-251-9370
5-9
5. MECHANICAL ADJUSTMENTS
5.10 Adjusting the X Home Position
(1) Remove the top left cover.
(2) Loosen the two M3 x 6 mm binding head screws (with plain washer).
(3) Adjust the X home position by sliding the X limiter bracket in the directions shown in Fig. 5-17.
Fig. 5-17
(4) Attach the top left cover.
MP303-UM-251-9370
5-10
5. MECHANICAL ADJUSTMENTS
5.11 Adjusting the Y Home Position
(1) Adjust the Y home position by turning the M3 x 6 mm hexagonal bolt as shown in Fig. 5-18, then apply
adhesive to that bolt.
3.9 mm
Adhesive
Fig. 5-18
MP303-UM-251-9370
5-11
5. MECHANICAL ADJUSTMENTS
5.12 Adjusting Pen Retrieval
Before attempting to adjust pen retrieval, check the perpendicularity precision (see Section 5.4, “Checking
the Perpendicularity Precision”) and adjust it if necessary (see Section 5.5, “Adjusting the Perpendicularity
Precision”).
(1) Remove the top left cover.
(2) If the Y bar is not parallel to the pen station, move the Y bar so that it is parallel.
(3) Set the plotter to pen retrieval test mode by holding down the LEFT ARROW (-X) and DOWN ARROW (-Y)
POSITION keys while turning on the plotter.
(4) Adjust the X and Y home positions (see Sections 5.10, “Adjusting the X Home Position,” and 5.11,
“Adjusting the Y Home Position”) to positions where the pen retrieval test can be enabled.
(5) Mount disposable ink pens in Positions 1 to 8 of the pen station.
(6) Press the ENTER key to start the pen retrieval test and check the following points:
• The ink pen plunger does not contact the pen holder.
• The pen tip does not touch the pen cap (see Fig. 5-19). If the pen tip touches the pen cap, loosen the
two M3 x 12 mm tapping screws, raise the pen station and then tighten the two screws. If raising the
pen station does not solve the problem, add a plain washer of 3 mm diameter and 0.5 mm thickness
beneath the pen station mounting bracket (see Fig. 5-20).
Incorrect
Correct
Fig. 5-19
Note:
Add the washer here
Fig. 5-20
Execution of the pen retrieval test can be temporarily suspended by pressing the PAUSE
or ENTER key. To resume test execution, press the PAUSE or ENTER key
(7) Attach the top left cover.
MP303-UM-251-9370
5-12
5. MECHANICAL ADJUSTMENTS
MP303-UM-251-9370
5-13
MP303-UM-251-9370
SA4 5 - 3 1 2 9
AC ADAPTER
WRITING PANEL
FPC, 05401
ASSY : CA, 05410
CA, 05405
1
2
6-1
PR312003
DEBUG BOARD
J1
J9
J4
J3
J11
SJ-W2R4A-30BB
SW2
FPC, 05410
CA, 05406A
CA312001
PR, 05407
HIGH VOLTAGE
BOARD
PR, 05406A
KEY BOARD
LCD
J2
J3
J1
J5
PR31200A
J2
MAIN BOARD
J6
J10
USB
J7
CENTRONICS
J8
RS-232C
X MOTOR
6.
SOLENOID
J119-190
Y MOTOR
Y HOME
SENSOR
JOINT BOARD
6. ELECTRICAL ADJUSTMENTS
ELECTRICAL ADJUSTMENTS
6.1 Wiring Diagrams
6. ELECTRICAL ADJUSTMENTS
6.1.1 Component Layout on the Main Board
J1
J10
J11
JP4
SW1
J8
JP2
J7
JP6
J6
JP5
TP2 (12V)
J2
J4
VR1
TP1 (24V)
JP3
J9
TP3
J8
SW2
J5
MP303-UM-251-9370
6-2
TP3
6. ELECTRICAL ADJUSTMENTS
6.2 DIP Switch Settings
Factory presets (Normal Mode)
SW1
ON
OFF
1
2
3
4
NOV-RAM Clear mode
SW1
ON
OFF
1
2
3
4
Sensor test mode
SW1
ON
OFF
1
2
3
4
Control panel key test mode
SW1
ON
OFF
1
2
MP303-UM-251-9370
3
4
6-3
6. ELECTRICAL ADJUSTMENTS
6.3 Checking the Voltage Level for the Main Board
(1) Remove the bottom panel assembly and top left cover.
(2) Connect all cables to the main board as shown in Fig. 6-1 below except for connector J4 that connects to
the electrostatic adhesion circuit board.
Fig. 6-1
(3) Connect the AC adapter to the main board.
(4) Turn on the power switch and then check the voltage levels.
(5) You will find test pins (TP1 through TP4) on the main board. The output voltage levels of these pins are
given in the table below.
Test pin
No.
Name
TP1
+24V
TP2
+12V
TP3
GND
TP4
VCC
MP303-UM-251-9370
Output voltage
Permissible range
+24V
+12V
0V
+5V
+22.5V to +25.5V
+11.5V to 12.5V
+4.9V to +5.1V
6-4
6. ELECTRICAL ADJUSTMENTS
6.4 Updating the System Firmware
To update the system firmware you need to have the following files. In addition, you need to use a computer
and Centronics cable.
• MP303.X
: MP303-04 firmware
• SEND.EXE
: Utility to transfer files using Windows
• SENDB.EXE
: Utility to transfer files using DOS
How to update the system firmware
(1) Connect the computer and the MP303-04 via the Centronics interface.
(2) Turn on the power while pressing the RIGHT ARROW POSITION key and the LEFT ARROW POSITION
key, and then press the ENTER key to display the menu shown below.
UPDATE?
NO
(3) Select “YES” using the UP ARROW POSITION key or the DOWN ARROW POSITION key to display the
menu shown below.
CENTRO
GET-ACK
This enables you to select the timing of the Centronics interface.
Normally, there is no need to change this setting. If you cannot transfer data correctly via the Centronics
interface, use the UP ARROW POSITION key or the DOWN ARROW POSITION key to change this
timing.
(4) Press the ENTER key to display the menu shown below.
PLEASE
SEND
(5) Send firmware to the plotter from the computer.
Drag and drop the firmware file onto the SEND.EXE icon when using Windows. For DOS mode, use
SENDB.EXE as shown below.
>SENDB MP303.X
(6) The following menu is displayed while data is being received.
**KB
RECEIVED
(7) The plotter will start the initialization routine when all the data has been received. The firmware versions
are displayed during the initialization routine. Check the firmware version that you updated.
(8) Turn off the power.
(9) Perform the NOV-RAM clear operation whenever you replace the main board.
MP303-UM-251-9370
6-5
6. ELECTRICAL ADJUSTMENTS
6.5 NOV-RAM Clear
When you replace the main board, you must clear the Non-Volatile RAM (NOV-RAM).
If you clear the Non-Volatile RAM, you will lose the setup parameters.
How to clear the Non-Volatile RAM
(1) Set SW1 to the NOV-RAM Clear mode as shown below.
SW1
ON
OFF
1
2
3
4
(2) Turn on the power to the plotter.
(3) The NV RAM CLEAR menu appears. The plotter immediately starts to clear the parameters on the NOVRAM, and then sets the default values.
NV RAM
CLEAR
(4) When Non-Volatile RAM clearing is complete, the NV RAM OK! menu appears.
NV RAM
OK!
(5) Turn off the power to the plotter.
(6) Return the SW1 setting to normal mode as shown below.
SW1
ON
OFF
1
2
3
4
(7) Turn on the power to the plotter.
The SET MODE menu appears. (This menu appears when you clear the Non-Volatile RAM)
SET MODE
STD 1.00
(8) Select “STD” for the standard model using the LEFT ARROW POSITION key or RIGHT ARROW
POSITION key.
(9) Press the ENTER key to store the setting.
(10) Turn off the power to the plotter.
MP303-UM-251-9370
6-6
6. ELECTRICAL ADJUSTMENTS
6.6 Adjusting the Pen Force
Place the plotter on a horizontal surface such as a table.
(1) Mount a ceramic pen in position No.1 of the pen station and then load a sheet of paper.
(2) Press the PAUSE key to retrieve the ceramic pen, then lower the pen by following the displayed menu.
(3) Press the MODE key, and then press the UP ARROW POSITION key or DOWN ARROW POSITION key
until the menu shown below appears.
PEN TYPE
Ceramic
(4) Select “PEN TYPE Ceramic” by pressing the LEFT ARROW POSITION key or RIGHT ARROW
POSITION key. This selection enables you to measure the pen force using the low pen force mode.
(5) Raise the pen using a 50 g dial tension gauge, then measure the pen force at the point when the pen tip
separates from the paper.
Press the UP ARROW POSITION key or DOWN ARROW POSITION key until the menu shown below
appears.
Pen
Up Down
Press the LEFT ARROW POSITION key or RIGHT ARROW POSITION key to raise or lower the pen.
(6) Adjust the pen force using VR1 so that it is within the range of 20 to 33 g in the low pen force mode.
There is a hole for maintenance use on the lower left of the cover. You can turn VR1 from this hole.
(7) Raise and lower the pen two or three times to get the correct pen force.
(8) Press the MODE key, and then press the UP ARROW POSITION key or DOWN ARROW POSITION key
until the menu shown below appears.
PEN TYPE
W.Fiber
(9) Select “PEN TYPE W.Fiber” by pressing the LEFT ARROW POSITION key or RIGHT ARROW
POSITION key. This selection enables you to measure the pen force using the high pen force mode.
(10) Raise the pen using a 50 g dial tension gauge, then measure the pen force at the point when the pen tip
separates from the paper.
Press the UP ARROW POSITION key or DOWN ARROW POSITION key until the menu shown below
appears.
Pen
Up Down
Press the LEFT ARROW POSITION key or RIGHT ARROW POSITION key to raise or lower the pen.
(11) Adjust the pen force using VR1 so that it is within the range of 35 g to 50 g in the high pen force mode.
(12) Raise and lower the pen two or three times to get the correct pen force.
Pen Force
Low Pen Force
High Pen Force
MP303-UM-251-9370
Target Pen Force
25 g (20 to 33 g)
40 g (35 to 50 g)
Pen Type
Ceramic
W.Fiber
6-7
6. ELECTRICAL ADJUSTMENTS
6.7 Using the Test Modes
6.7.1 Self Test
Your plotter comes with a self-test mode, which enables the plotter to check its own functions, without
necessarily being connected to the computer.
A correctly drawn test pattern signifies that all of the functions of the plotter (excluding the interface functions)
have been tested and found normal. Be sure to run this self-test before connecting the plotter to the
computer.
Procedure
(1) Check that the POWER switch is off and that pens are mounted in the pen station.
(2) Turn on the POWER switch while holding down the LEFT ARROW POSITION key.
The plotter is initialized.
The prompts below are consecutively displayed.
SelfTest
Mode
Set
Paper!
(3) After initialization has been completed, place a sheet of paper on the writing panel.
Press the CHART HOLD key to secure the sheet. The prompt below is displayed.
Press
Ent key
(4) Press the ENTER key to draw the self-test pattern.
The plotter repeatedly plots the same pattern until you cancel the self-test mode.
To temporarily stop plotting, press the PAUSE key.
To cancel the self-test mode, press the CANCEL key to stop plotting and then turn off the plotter.
MP303-UM-251-9370
6-8
6. ELECTRICAL ADJUSTMENTS
6.7.2 Character Dump Mode
This mode allows experienced users to detect the cause of communication problems between the plotter
and the computer. In Character Dump mode, the plotter produces an exact printout of the codes it receives,
printing character data as ASCII codes and the non-character (control) data as two-digit hexadecimal values
(e.g., 0A: Line Feed, 0D: Carriage Return).
Procedure
(1) Mount a pen in the pen station’s Pen 1 position.
(2) Place a sheet of paper on the writing panel.
(3) Hold down the DOWN ARROW POSITION key while you turn on the plotter.
The plotter is initialized.
CharDump
Mode
(4) Secure the paper.
The prompt below is displayed to prompt you to press the CHART HOLD key.
Set
Paper!
(5) Once the paper is secured, the PROMPT lamp on the plotter blinks.
The prompt below is displayed.
Press
ENT Key
(6) Press the ENTER key to enter the Character Dump Mode.
The plotter prints “** DUMP MODE (V*.** GL) **” on the paper and then awaits data from the computer.
The message below briefly reappears on the display.
CharDump
Mode
(7) When the computer runs an application program and outputs the data to the plotter, it starts printing the
received data in ASCII format.
(8) To exit the Character Dump Mode, turn off the plotter and then turn it back on using only the POWER
switch.
MP303-UM-251-9370
6-9
6. ELECTRICAL ADJUSTMENTS
6.7.3 Debug Mode
This mode is used to locate programming errors in your application program.
When the plotter is in Debug Mode, its buffer size is reduced to permit easier detection of the section of the
program that is causing the plotting error.
Procedure
(1) Mount a pen in the pen station’s Pen 1 position.
(2) Place a sheet of paper on the writing panel.
(3) Hold down the ENTER key while you turn on the plotter.
The plotter is initialized.
Debug
Mode
(4) Secure the paper.
The prompt below is displayed for a few seconds to prompt you to press the CHART HOLD key.
Set
Paper!
The prompt below is displayed
Ready
(5) The plotter is now in the Debug Mode.
(6) Run the target program at the computer for output to the plotter.
The message DEBUG MODE is displayed for a few seconds.
In this mode, the plotter’s buffer memory is reduced to the following sizes:
• In RS-232C mode
: 256 bytes
• In Centronics mode : 10 bytes
(7) To exit the Debug Mode, turn off the plotter and then turn it back on using only the POWER switch.
HINT:
When using the RS-232C interface, the timing of data transmission varies with the selected
handshake mode as follows.
• During hardwire handshaking:
The ER (DTR) signal line goes off when the available space in the buffer drops to 64 bytes.
It goes on when the available space in the buffer rises to 128 bytes of data.
• During Xon/Xoff handshaking:
Xoff status is entered when the available space in the buffer drops to 32 bytes.
Xon status is entered when the available space in the buffer rises to 128 bytes of data.
NOTE:
After the plotter is turned off, Debug mode is not resumed when only the ENTER key is
pressed.
The Debug mode cannot be used with the USB interface.
MP303-UM-251-9370
6-10
6. ELECTRICAL ADJUSTMENTS
6.7.4 Pen Retrieval Test Mode
Use this mode to perform a pen retrieval test and to adjust the pen positions.
Procedure (Fast Mode)
(1) Mount disposable ink pens in Positions 1 to 8 of the pen station.
(2) Hold down the LEFT ARROW POSITION key and DOWN ARROW POSITION key while you turn on the
plotter.
(3) Press the ENTER key to start the pen retrieval test.
Execution of the pen retrieval test can be temporarily suspended by pressing the PAUSE or ENTER key.
To resume test execution, press the PAUSE or ENTER key.
(4) To exit the pen retrieval test mode, turn off the plotter.
Procedure (Slow Mode and Pen Position Adjustment)
(1) Mount disposable ink pens in Positions 1 to 8 of the pen station.
(2) Hold down the CANCEL key while you turn on the plotter.
(3) Place a sheet of paper on the writing panel.
(4) Press the ENTER key to display the prompt shown below.
Select
ADJ SLOW
(5) If you want to start the slow pen retrieval test, press the RIGHT ARROW POSITION key. The plotter will
begin plotting the pen numbers on the paper.
Execution of the pen retrieval test can be temporarily suspended by pressing the PAUSE or ENTER key.
To resume test execution, press the PAUSE or ENTER key.
(6) If you want to adjust the pen positions, press the LEFT ARROW POSITION key at the above menu. The
plotter then displays the menu shown below. You can adjust the position of pen number 1 by using the
ARROW POSITION keys.
No.1
PressENT
Press the ENTER key after you have adjusted the position of pen number 1. The plotter then displays the
menu shown below.
No.8
PressENT
Press the ENTER key after you have adjusted the position of pen number 8.
(7) To exit the pen retrieval test mode, turn off the plotter.
MP303-UM-251-9370
6-11
6. ELECTRICAL ADJUSTMENTS
6.7.5 Running Test Mode
Procedure
(1) Move the pen carriage manually to the upper left position so that it crosses the X home sensor and Y
home sensor.
(2) Hold down the CANCEL key and MODE key while you turn on the plotter.
(3) The plotter starts the running test.
(4) To exit the Running Test Mode, turn off the plotter.
MP303-UM-251-9370
6-12
6. ELECTRICAL ADJUSTMENTS
6.7.6 Sensor Test Mode
Procedure (Using the DIP switch)
(1) Set SW1 to the Sensor Test Mode as shown below and then turn on the plotter.
SW1
ON
OFF
1
2
3
4
(2) The status of each sensor is displayed on the LCD panel.
XH
YH
Display Sensor name Operation when the High/Low level changes
XH
X home sensor When the dog blocks the sensor
XL
YH
Y home sensor Same as the above
YL
(3) If a sensor is not operating properly, check its wiring, its connector contact, and the position of the sensor
dog. If everything checks out all right, either the sensor or main board may be defective.
In this case, initialize the NOV-RAM and then run the sensor test again.
(4) To exit the sensor test mode, turn off the plotter and then return the SW1 setting to normal mode as
shown below.
SW1
ON
OFF
1
2
3
4
Procedure (Using control panel keys)
(1) Move the pen carriage manually to the upper left position so that it crosses the X home sensor and the Y
home sensor.
(2) Hold down the UP ARROW POSITION key and DOWN ARROW POSITION key while you turn on the
plotter.
(3) The menu below appears.
KEY&LED
TEST
(4) Press the DOWN ARROW POSITION key to display the menu shown below.
SENSOR
TEST
(5) Press the ENTER key to put the plotter into the Sensor Test Mode.
MP303-UM-251-9370
6-13
6. ELECTRICAL ADJUSTMENTS
(6) The status of each sensor is displayed on the LCD panel.
XH
YH
Display Sensor name Operation when the High/Low level changes
XH
X home sensor When the dog blocks the sensor
XL
YH
Y home sensor Same as the above
YL
(7) If a sensor is not operating properly, check its wiring, its connector contact, and the position of the sensor
dog. If everything checks out all right, either the sensor or main board may be defective.
In this case, initialize the NOV-RAM and then run the sensor test again.
(8) To exit the Sensor Test Mode, turn off the plotter.
MP303-UM-251-9370
6-14
6. ELECTRICAL ADJUSTMENTS
6.7.7 Control Panel Key Test Mode
Procedure (Using the DIP switch)
(1) Set SW1 to the Control Panel Key Test Mode as shown below and then turn on the plotter.
SW1
ON
OFF
1
2
3
4
(2) The menu below appears, so press the control panel key corresponding to each bit and check that its
value properly changes to 1 from 0.
CMERDLU
00000000
Press each key on the control panel; the status will change as shown below.
Key
Status of LCD
C M E R D L U
CANCEL
0 1 0 0 0 0 0 0
MODE
0 0 1 0 0 0 0 0
ENTER
0 0 0 1 0 0 0 0
RIGHT ARROW
0 0 0 0 1 0 0 0
0 0 0 0 0 1 0 0
DOWN ARROW
LEFT ARROW
0 0 0 0 0 0 1 0
UP ARROW
0 0 0 0 0 0 0 1
Normal status : 0
While the key is pressed : 1
(3) If a key is not operating properly, check its wiring and its connector contact. If everything checks out all
right, either the control panel or main board may be defective.
In this case, initialize the NOV-RAM and then run the control panel key test again.
(4) To exit the Control Panel Key Test Mode, turn off the plotter and then return the SW1 setting to normal
mode as shown below.
SW1
ON
OFF
1
2
3
4
Procedure (Using control panel keys)
(1) Move the pen carriage manually to the upper left position so that it crosses the X home sensor and the Y
home sensor.
(2) Hold down the UP ARROW POSITION key and the DOWN ARROW POSITION key while you turn on
the plotter.
(3) The menu below appears.
KEY&LED
TEST
MP303-UM-251-9370
6-15
6. ELECTRICAL ADJUSTMENTS
(4) Press the ENTER key to put the plotter into the Control Panel Key Test Mode.
(5) The menu below appears, so press the control panel key corresponding to each bit and check that its
value properly changes to 1 from 0.
CMERDLU
00000000
Press each key on the control panel; the status will change as shown below.
Key
Status of LCD
C M E R D L U
CANCEL
0 1 0 0 0 0 0 0
MODE
0 0 1 0 0 0 0 0
ENTER
0 0 0 1 0 0 0 0
RIGHT ARROW
0 0 0 0 1 0 0 0
0 0 0 0 0 1 0 0
DOWN ARROW
LEFT ARROW
0 0 0 0 0 0 1 0
UP ARROW
0 0 0 0 0 0 0 1
Normal status : 0
While the key is pressed : 1
(6) If a key is not operating properly, check its wiring and its connector contact. If everything checks out all
right, either the control panel or main board may be defective.
In this case, initialize the NOV-RAM and then run the control panel key test again.
(7) To exit the Control Panel Key Test Mode, turn off the plotter.
MP303-UM-251-9370
6-16
7. TROUBLESHOOTING
7.
TROUBLESHOOTING
7.1 The Plotter is Turned On But Doesn’t Operate
Symptom
POSITION XY ALARM Right after the plotter is
error appears.
turned on.
The plotter is not
initialized.
Cause
Solution
The X or Y motor is
Replace the X or Y motor.
defective.
The main board is defective. Replace the main board.
See “The plotter cannot
During pen retrieval.
See “The plotter cannot
perform pen retrieval
perform pen retrieval
correctly.” shown below.
correctly.” shown below.
During a plotting operation. There is something blocking Remove the blocking object.
the X slider or Y slider.
The motor control is
Replace the main board.
abnormal.
During initialization.
Incorrect X or Y home
Adjust the X or Y home
sensor position.
sensor position. (See
Sections 5.10, 5.11.)
The X or Y home sensor is Replace the X or Y home
defective.
sensor.
The POWER LED lamp
The AC adapter is defective. Replace the AC adapter.
The main board is defective. Replace the main board.
does not light.
The POWER LED lamp
The firmware is defective. Download new firmware.
The main board is defective. Replace the main board.
lights.
7.2 During Plotting Operations
Symptom
Cause
Solution
Non-specified paper was
The paper does not suit the Use the specified paper.
used.
pens being used.
Specified paper was used. The pen speed is too fast or Reduce the pen speed or
the pen force is too low.
increase the pen force.
Defective pen(s).
Replace the pen(s).
Replace the pen solenoid.
The pen solenoid is
defective.
The pen doesn’t lower.
The pen solenoid is
Replace the pen solenoid.
defective.
The Y flexible cable is
Replace the Y flexible
defective.
cable.
The main board is defective. Replace the main board.
Adjust the X belt tension.
The plotted line quality is Appears in the X-axis.
The X belt tension is
(See Section 5.1.)
poor.
Plotted lines are crooked. incorrect.
Adjust the X roller pressure.
The X roller pressure is
(See Section 5.6.)
incorrect.
Adjust the Y belt tension.
Appears in the Y-axis.
The Y belt tension is
(See Section 5.2.)
Plotted lines are crooked. incorrect.
Adjust the Y roller pressure.
The Y roller pressure is
incorrect.
The plotter doesn’t draw
The perpendicularity is
Adjust the perpendicularity
The plotter cannot
lines at right angles.
incorrect.
precision.
perform pen retrieval
The retrieval position shifts The X home position has
Adjust the X home position.
correctly.
to the X direction.
shifted.
(See Section 5.10.)
The retrieval position shifts The Y home position has
Adjust the Y home position.
to the Y direction.
shifted.
(See Section 5.11.)
The pen station position is Adjust the pen station
The perpendicularity and
incorrect.
position. (See Section 5.12.)
X/Y home positions are
correct.
The plotted lines are
faint or blurred.
MP303-UM-251-9370
7-1
8. THE ERROR MESSAGES
8.
ERROR MESSAGES
8.1 Hardware Error
Displayed message
POSITION
XY ALARM
Cause
This message appears when, for some reason, the current pen position
is invalid. In this case, turn the plotter off and then back on again.
8.2 GP-GL Command Errors
In GP-GL command mode, the plotter displays the error messages below if an error occurs for which
masking of the corresponding Error bit in the STATUS byte has been disabled using the ˝ command.
Displayed message
Cause
A command error occurs if a hexadecimal code from 60H to 7EH is
E1.
COMM ERR
E4.
PARA OV
E5.
I/O ERR
processed as a command character. This message may also appear if
the RS-232C interface conditions are improperly set or if the program
being run at the computer was not written using GP-GL commands.
When a command specifying coordinate values is being processed, a
parameter overflow error occurs if a numeric parameter exceeds the
“Parameter Range”.
An input/output error occurs during the transfer of data via the interface.
With the RS-232C interface, this message indicates that the parity or
data length may be improperly set. Check your interface conditions once
more.
Cancelling an error status
You can cancel an error status using any of the methods below, thereby setting the status of the
corresponding Error bit to zero.
(1) Execute a READ STATUS WORD 1 or READ STATUS WORD 3 command.
(2) Press the ENTER key. (Effective only in case of a data format error.)
Note:
If a data format error has occurred, performing either Method (1) or (2) above while
execution of the next command is temporarily suspended enables that command to be
executed.
(3) Initialize the plotter.
(4) Execute the INTERFACE CLEAR command.
Note:
Method (3) or (4) clears all the data in the plotter’s buffer memory.
MP303-UM-251-9370
8-1
8. THE ERROR MESSAGES
8.3 HP-GL Command Errors
The plotter displays the messages below when an error occurs for which masking of the corresponding Error
bit in the STATUS byte has been disabled using the IM command.
Displayed message
Cause
A command that cannot be recognized was executed. Check that your
E1.
COMM ERR
E2. PARA
NO. ERR
E3. PARA
EXCEEDED
E5. PARA
UNKNOWN
MP303-UM-251-9370
program contains valid HP-GL commands.
A command containing an incorrect number of parameters was executed.
Check that the commands specified in your program are followed by the
correct number of parameters.
A command containing a parameter value that exceeds its permissible
range was executed. Check the permissible parameter range.
A character that your plotter cannot plot was specified.
8-2
9. DISASSEMBLY DIAGRAMS AND PARTS LISTS
9.
DISASSEMBLY DIAGRAMS AND PARTS LISTS
9.1 Main Unit
No. Part No.
1 035130123
2 618260100
3 035130110
4 773513500
Main Unit
Part Name
Electrostatic Panel
Writing Panel Base
Insulating Sheet
High Voltage Board
Description
Q’ty
Remarks
1 Same as MP5300
1
1 Same as MP5300
1 Same as MP5300
1
2
3
4
MP303-UM-251-9370
9-1
9. DISASSEMBLY DIAGRAMS AND PARTS LISTS
9.2 External Casing
Part Name
Description
Cover, Right
Cover, Lower Left
Cover, Front
Cover, Rear
Bottom Plate 303
Rubber Foot
Q’ty
Remarks
1
1
1
1
1
4 Same as MP5300
2
4
6
6
3
6
5
6
1
No. Part No.
1 618264150
2 035135023
3 618264120
4 618264140
5 618260200
6 031000070
External Casing
MP303-UM-251-9370
9-2
9. DISASSEMBLY DIAGRAMS AND PARTS LISTS
9.3 Control Panel Section
No. Part No.
Part Name
1 618264100 Cover, Upper Left
2 618260300 Control Panel
3 771826570 LCD Assembly
4 031000160 Caution Label No.2
Control Panel Section
Description
Q’ty
Remarks
1
PR312003
1
DMC50448N-E-AE, CA312001 1
1 Same as MP5300
1
2
4
3
MP303-UM-251-9370
9-3
9. DISASSEMBLY DIAGRAMS AND PARTS LISTS
9.4 Bottom Panel
No. Part No.
1 618260200
2 771826500
3 618264210
4 618264200
Bottom Panel
Part Name
Bottom Plate 303
Main Board 303
Terminal Label 303
Model Name Label 303
Description
Q’ty
1
1
1
1
Remarks
2
3
4
1
5
MP303-UM-251-9370
9-4
9. DISASSEMBLY DIAGRAMS AND PARTS LISTS
9.5 X-Axis Slider, X-Axis Drive, Pen Station
No.
1
2
3
4
5
6
7
8
9
10
11
12
13
14
15
16
17
18
19
20
21
22
23
24
25
26
27
28
29
30
31
32
33
34
35
36
37
Part No.
035132013
035132022
035132030
303100012
035132040
035132220
035132230
035132080
302200015
035032260
509000014
035132200
380000057
035032341
311605068
353513001
353513002
359800008
035132210
035132160
035132170
035132190
035130102
035135041
618260100
773513080
508000015
105401150
508102285
691801520
031000110
020000232
053200240
053200330
053200321
054026020
035136020
795320706
795320716
518110070
Part Name
X Slider
X Roller Bracket
X Roller Adjustment Bracket
X Roller
X Rail
Antistatic Brush
Retaining Rubber
Blank Cover
Support
Tension Pulley
X Motor
X Drive Shaft
Coupling
Drive Pulley
Drive Shaft Bearing
Bush 5 x 4.5
Bush 4 x 5
Bush 4 X 5
X Belt 1820
Tension Bracket, Front
Tension Bracket, Rear
X Limit Bracket
Side Cover
Cover, Rear A
Writing Panel Base
Relay Board
X Home Sensor
Y Home Sensor Assembly
Y Home Sensor
X Flat Cable
Pen Station
Magnet
Pen Cap Spring
Pen Cap Rubber
Cap Base
Support Plate
Pen Station Bracket
Pen Station w/Magnet
Pen Station Assembly
Control Panel Flexible Cable Filter
MP303-UM-251-9370
Description
BSB320
TS3747N31E3
M Shaft 53
20P2M4BF
F625ZZ
PR05406
GP1A53HR
CS, 05410
SW, SPPB-TYPE1
FPC, 05410
ESD-FPL-34
9-5
Q’ty
1
1
1
5
1
1
1
1
1
4
1
1
1
2
1
1
1
1
2
1
1
1
1
1
1
1
1
1
1
1
1
8
8
8
8
1
2
1
1
1
Remarks
Same as MP5300
Same as MP5300
Same as MP5300
Same as MP5300
Same as MP5300
Same as MP5300
Same as MP5300
Same as MP5300
Same as MP5300
Same as MP5300
Same as MP5300
Same as MP5300
Same as MP5300
Same as MP5300
Same as MP5300
Same as MP5300
Same as MP5300
Same as MP5300
Same as MP5300
Same as MP5300
Same as MP5300
Same as MP5300
Same as MP5300
Same as MP5300
Same as MP5300
Same as MP5300
Same as MP5300
Same as MP5300
Same as MP5300
Same as MP5300
Same as MP5300
Same as MP5300
Same as MP5300
Same as MP5300
Same as MP5300
Same as MP5300
Same as MP5300
Same as MP5300
Same as MP5300
9. DISASSEMBLY DIAGRAMS AND PARTS LISTS
20
10
32
31
11
4
MP303-UM-251-9370
9-6
23
22
8
7
26
1
2
27
6
4
14
10
19
4
3
37
13
17
12
10
21
9
15
5
14
16
24
19
34
28
33
25
30
34
35
18
36
29
X-Axis Slider, X-Axis Drive, Pen Station
9. DISASSEMBLY DIAGRAMS AND PARTS LISTS
9.6 Y-Axis Slider, Y-Axis Drive
No.
1
2
3
4
5
6
7
8
9
10
11
12
13
14
15
16
17
18
19
20
21
22
23
24
25
26
27
28
29
30
Part No.
035133012
035133020
035133031
035133040
035133050
035133102
035132230
773513100
035134072
020000232
035034081
509000035
105401090
035134013
035134081
031004330
035134020
035134090
035134041
035134100
052113610
353513005
303100003
031004540
618264150
035132061
035132050
035132070
035132120
035032260
Part Name
Y Bar
Y Pulley Mounting Plate
Y Pulley 12
Y Pulley Shaft
Y Belt
Drive Pulley 10
Y Motor
Pen Holder Assembly
Pen Holder
Magnet
Solenoid Support Rubber
Solenoid
Pen Flexible Printed Cable
Y Slider
Y Roller 10B
Y Roller Spindle
Pen Force Adjustment Screw
Pen Holder Spacer
Pen Up Spring
Plunger Spring
Y Flexible Printed Cable Holder
Bush 3 x 9.5
Pivot Bearing
Pivot Bearing Screw
Solenoid Cover 303
Y Motor Cover
Y Bar Cover
Y Slider End
Y Roller Spindle
Tension Pulley
MP303-UM-251-9370
Description
TS3747N32E3
J119-189
FPC, 05401
9-7
Q’ty
1
1
1
1
1
1
1
1
1
1
1
1
1
1
3
1
1
1
1
1
1
1
2
2
1
1
1
1
1
1
Remarks
Same as MP5300
Same as MP5300
Same as MP5300
Same as MP5300
Same as MP5300
Same as MP5300
Same as MP5300
Same as MP5300
Same as MP5300
Same as MP5300
Same as MP5300
Same as MP5300
Same as MP5300
Same as MP5300
Same as MP5300
Same as MP5300
Same as MP5300
Same as MP5300
Same as MP5300
Same as MP5300
Same as MP5300
Same as MP5300
Same as MP5300
Same as MP5300
Same as MP5300
Same as MP5300
Same as MP5300
Same as MP5300
Same as MP5300
9. DISASSEMBLY DIAGRAMS AND PARTS LISTS
15
15
8
6
26
MP303-UM-251-9370
10
23
9
7
22
18
11
15
21
23
20
13
14
24
19
12
24
17
16
25
5
1
30
4
2
3
28
29
27
Y-Axis Slider, Y-Axis Drive
9-8
9. DISASSEMBLY DIAGRAMS AND PARTS LISTS
9.7 Standard Accessories
No. Part No.
Part Name
1 500051951 AC Adapter
2 500052004 AC Power Cable 100V JAPAN
500052350 AC Power Cable UL
500052402 AC Power Cable CEE
500052397 AC Power Cable BS
3 053139013 Tilt Stand
4 035139020 Plastic Cover
5 031009020 Paper Alignment Labels
6 031000070 Rubber Foot for Tilt Stand
7 500052043 USB Cable
8 618269350 CD, User’s Manual
9 618269380 Quick Manual
10 982000070 Ceramic Pen
Description
SA45-3129
361-70100020-01
UC-671-N03
EN-514-N04
BS89/3-C7-1.8m
CBL0106-1.5M
MP303-CUG01
MP303-UM-851
HC503P-BK
Q’ty
1
1
1
1
1
2
1
1
4
1
1
1
1
Remarks
For all countries
Depends on the country
Depends on the country
Depends on the country
Depends on the country
Q’ty
1
Remarks
9.8 Others
No. Part No.
Part Name
1 618269100 Packing Box for MP303
MP303-UM-251-9370
Description
9-9
MP303-UM-251-9370
10-1
RESETZ
USBCSZ
RESET
CENCSZ
CHARTINTZ
LOCALINTZ
SRVINTZ
USBINTZ
CINTZ
D[0..15]
CPU
RESET
XHOMEZ
YHOMEZ
CENCSZ
RDZ
WRLZ
D[0..15]
A[0..21]
USB
RESETZ
USBCSZ
WRLZ
RDZ
D[0..15]
A[0..21]
USB
IF
IF
EPROMDOUT
CHARTINTZ
LOCALINTZ
SRVOINTZ
USBINTZ
CINTOUTZ
D[0..15]
CPU
USBINTZ
PB[0..7]
CENINT
DTR-DZ
RTS-DZ
CTS0Z
RXD0
TXD0
DSR0Z
RESET
RESETZ
LCDB[0..6]
DTR-DZ
RTS-DZ
CTS0Z
RXD0
TXD0
DSR0
CS0Z
CS1Z
CS2Z
RASZ
CASLZ
CASHZ
WRLZ
RDWR
A[0..21]
AP[18..21]
AB-ENZ
RDZ
USBINTZ
IOCS1Z
PB[0..7]
A[0..21]
AP[18..21]
RESET
RESETZ
YMP
YMM
LCDB[0..6]
PENH
PENL
NVRAMCSZ
KROMCSZ
RESETZ
CONNECT
YMP
YMM
LCDB[0..6]
LOCALLED
CHARTLED
FR_BUSYZ
PB[0..7]
PENH
PENL
IOCS1Z
D[0..15]
CONNECT
MEMORY
CS0Z
NVRAMCSZ
KROMCSZ
RESETZ
RDZ
WRLZ
RASZ
CASLZ
CASHZ
RDWR
D[0..15]
A[0..21]
MEMORY
PENUP
PENCONT1
PENCONT2
XHOMEZ
YHOMEZ
SFREE
YENA
YENB
LOCALZ
CHARTHOLDZ
FR_BUSYZ
EPROMOUT
RESET
CENCSZ
GRC1507
D[0..15]
RESET
CHARTLED
CHARTINTZ
CINTOUTZ
LOCALLED
LOCALINTZ
YENA
YENB
SRVINTZ
SFRZ
XCOMA
XCOMB
YCOMA
YCOMB
USBCSZ
NVRAMCSZ
IOCS1Z
KROMCSZ
CINTINZ
SFREE
LOCALZ
CHARTHOLDZ
CS1Z
CS2Z
WRLZ
A[0..21]
AP[18..21]
AB-ENZ
RDZ
GRC1507
CHARTINTZ
LOCALINTZ
CINTZ
SRVINTZ
USBCSZ
NVRAMCSZ
IOCS1Z
KROMCSZ
CENCSZ
DCDRIVER
PENUP
PENCONT1
PENCONT2
SFRZ
XCOMA
XCOMB
YCOMA
YCOMB
DCDRIVER
YMP
YMM
PENH
PENL
YMP
YMM
PENH
PENL
10. CIRCUIT DIAGRAMS
10. CIRCUIT DIAGRAMS
10.1 Main Board
Main board (Top)
LCDB[0..6]
220uF/50V
C9
TP3
GND
J3
HEC0470-01-640
1
IOCS1Z
D[0..15]
PB[0..7]
SW2
1
19
2
3
4
5
6
7
8
9
1
B0
B1
B2
B3
B4
B5
B6
B7
Vin
U4
FB
F1
2
L1
RA6
10K*4
1 2 3 4
+24V
RA4
10K*4
SFREE
PENUP
PENCONT1
PENCONT2
PROMPTLED
SFPW-56
D7
1000uF/10V
C10
VCC
TP4
VCC
FR_BUSYZ
TP1
+24V
SLF12575-151M1R5
ET 2A(fuse)
RA5
10K*4
1 2 3 4
RA3
10K*4
1 2 3 4
RA2
10K*4
4
VCC
18
17
16
15
14
13
12
11
VCC
Vout
SI-8050
1/2
1/1
LCDB0
LCDB1
LCDB2
LCDB3
LCDB4
LCDB5
LCDB6
74HC245/SO
DIR
OE
A0
A1
A2
A3
A4
A5
A6
A7
U2
SJ-W2P4A-30BB
+24V
2/2
2/1
D0
D1
D2
D3
D4
D5
D6
D7
PB0
PB1
PB2
PB3
PB4
PB5
PB6
PB7
1 2 3 4
GND
3
2
VCC
ON
5
10-2
C6
104
1
D1
D5
D3
D4
I
CHARTLED
O
3
C3
10uF/16V
A6S-4101(OMRON)
SFPW-56
U3
NJM78M12DL1A
D2
1SS352-TPH3
SW1
G
MP303-UM-251-9370
2
RA1
10K*4
2
1
+12V
74HC08
U5A
D6
SFPW-56
TP2
+12V
3
YENB
YENA
FL18
FL17
FL16
FL15
FL14
FL13
FL12
FL6
FL5
FL4
FL3
FL2
FL1
YHOMEZ
XHOMEZ
EXCCET102U
EXCCET102U
EXCCET102U
EXCCET102U
EXCCET102U
EXCCET102U
EXCCET102U
EXCCET102U
EXCCET102U
EXCCET102U
EXCCET102U
EXCCET102U
EXCCET102U
LOCALZ
102
C4
102
C5
+24V
CHGND
J4
R9
PENL
PENH
0
0
R7
0
0
R5
YMM
YMP
PROMPTLED
CHARTLED
LOCALLED
R6
B2B-XH-A
2
1
Q1
2SC4112
+24V
1SS352-TPH3
KCONT1
1SS352-TPH3
KCONT0
CHARTHOLDZ
D19
D18
RA7
10K*4
VCC
SNT-S10
SNT-S10
SNT-S10
SNT-S10
FL23
EXCCET102U
9
C2
104
8
74LS06
U1D
N2012Z121T03
C8
FL29 104
FL28
FL27
N2012Z121T03
EXCCET102U
FL26
VCC
FL22
FL21
FL20
FL19
C1
47uF/16V
N2012Z121T03
FL24
KCONT1
KCONT0
VCC
J1
GND
GND
KCONT0Z
KEY1
KEY0
KEY3
KEY2
KCONT1Z
PAUSEZ
CHARTHOLDZ
VCC
PAUSELED
CHARTLED
POWERLED
J11
LCD_CONT
VCC
GND
RS
R/W
E
D4
D5
D6
D7
YMP
YMP
YMM
YMM
GND
YA0
YB0
VCC
PENH
PENL
GND
XHOMEZ
YHOMEZ
SLD13S-1
J2
B10B-PH-K
1
2
3
4
5
6
7
8
9
10
5597-14CPB
1
2
3
4
5
6
7
8
9
10
11
12
13
14
1
2
3
4
5
6
7
8
9
10
11
12
13
C7
220uF/50V
R4 470 2012
FL25
EXCCET102U
EXCCET102U
VCC
R44 8.2K
N2012Z121T03
FL7
R3 470 2012
6 74LS06
N2012Z121T03
R2 470 2012
4 74LS06
U1C
R1 470 2012
2 74LS06
U1B
U1A
FL9
5
3
1
10. CIRCUIT DIAGRAMS
Main board (Connections)
4
3
C16
104
CHARTINTZ
VCC
U7
GND
Vcc
M.R
VOUT
C17
104
9
13
12
10
C18
104
VCC
PST592DMT
LOCALINTZ
104
C13
VCC
C20
104
74HC08
U5D
11
8
10
74HC08
U5B
74LS06
U1E
C21
104
5
4
11
RA14
10K*4
74HC08
U5C
C19
104
2
1
VCC
6
13
12
74LS06
U1F
RA13
10K*4
RESETZ
VCC
R13
10K
RESET
C15 471
R14 200
C14
104
R15 3K
RA15
10K*4
VCC
80
81
82
49
46
43
42
99
98
97
96
95
94
93
92
91
100
76
84
73
75
78
79
74
18
VCC
72
C12
SRVOINTZ
CINTOUTZ
USBINTZ
N2012Z121T03
FL41
SH7014
PLLVcc
PLLCAP
PLLVss
PA2/SCK0/DREQ0/IRQ0
PA5/SCK1/DREQ1/IRQ1
PA8/TCLKCC/IRQ2
PA9/TCLKCD/IRQ3
PF7/AN7
PF6/AN6
AVSS
PF5/AN5
PF4/AN4
PF3/AN3
PF2/AN2
PF1/AN1
PF0/AN0
AVCC
NMI
RES
MD3
MD2
MD1
MD0
EXTAL
XTAL
PE6/TIOC2A
PE7/TIOC2B
PE8
PE9
PE10
PE11
PE12
PE13
PE14/DACK0/AH
PE15/DACK1
PA3/RXD1
PA4/TXD1
PE4/TIOC1A
PE5/TIOC1B
PA0/RXD0
PA1/TXD0
PE0/TIOC0A/DREQ0
PE1/TIOC0B/DRAK0
PE2/TIOC0C/DREQ1
PE3/TIOC0D/DRAK1
PA15/CK
CS0
CS1
PA6/TCLKA/CS2
PA7/TCLKB/CS3
PB2/IRQO/RAS
PB3/IRQ1/CASL
PB4/IRQ2/CASH
PB5/IRQ3/RDWR
WRL
WRH
RD
D15
D14
D13
D12
D11
D10
D9
D8
D7
D6
D5
D4
D3
D2
D1
D0
PB9/IRQ7/A21
PB8/IRQ6/A20/WAIT
PB7/A19
PB6/A18
A17
A16
A15
A14
A13
A12
A11
A10
A9
A8
A7
A6
A5
A4
A3
A2
A1
A0
C23
104
C22
104
104
105
106
107
108
110
111
112
1
2
48
47
89
102
51
50
85
86
87
88
83
41
40
45
44
24
25
26
28
38
36
34
52
53
54
56
57
58
59
60
62
63
64
66
67
68
69
70
32
31
30
29
22
20
19
18
17
16
15
14
13
12
11
10
9
8
7
6
5
4
D15
D14
D13
D12
D11
D10
D9
D8
D7
D6
D5
D4
D3
D2
D1
D0
AP21
AP20
AP19
AP18
10K*4
RA16
A14
A13
A12
A11
A10
CTS0Z
DSR0
EPROMDOUT
RTS-DZ
DTR-DZ
RXD0
TXD0
CS0Z
CS1Z
CS2Z
VCC
A17
A16
A15
A9
A8
A7
A6
AP[18..21]
RDZ
CASLZ
CASHZ
RDWR
WRLZ
D0
D1
D2
D3
10K*4
RA17
10K*4
RA18
AB-ENZ
LCDB0
LCDB1
LCDB2
LCDB3
LCDB4
LCDB5
LCDB6
A5
A4
A3
A2
A1
A0
VCC
10K*4
RA19
1 2 3 4
A1
A0
22K*4
RA12
1 2 3 4
22K*4
RA11
1 2 3 4
22K*4
RA10
1 2 3 4
22K*4
RA9
1 2 3 4
A5
A4
A3
A2
22K*4
RA8
LCDB[0..6]
A9
A8
A7
A6
U6
D4
D5
D6
D7
R12
Vcc
Vcc
Vcc
Vcc
Vcc
21
37
65
77
103
D[0..15]
A13
A12
A11
A10
18
Vss
Vss
Vss
Vss
Vss
Vss
Vss
Vss
Vss
Vss
Vss
10-3
3
23
27
33
39
55
61
71
90
101
109
D8
D9
D10
D11
MP303-UM-251-9370
D12
D13
D14
D15
Y1 XPEEEC6.00MHz
0
R11
A17
A16
A15
A14
C11
RASZ
A[0..21]
10. CIRCUIT DIAGRAMS
Main board (CPU)
PENCONT2
R46
R23
68K
150K
1
DSP03-003-432
2
3
JP5
VCC
R24
12K
R20
20K
R25
9.1K
R47
10K
PENCONT1
PENUP
YCOMB
YCOMA
XCOMB
JP6
1
DSP03-003-432
2
3
24K
R18
2
3
102
C38
+12V
-
+
C39
104
9
10
11
16K
OUT2
C35
C40
821
8
1
4
3
220uF/50V
C36
220uF/50V
103/50V
BOOT2
PHASE
REF
OUT1
L6203
BOOT1
C34
8
1
4
3
103/50V
220uF/50V
C28
BOOT2
OUT2
BOOT1
OUT1
L6203
VREF
SNS
ENA
IN2
IN1
QA2
C29
INPUT0
INPUT1
R19
11
8
VCC
+24V
9
7
C37
104
VREF
SNS
ENA
IN2
+24V
9
10
11
7
5
+24V
C27
224_2125
C33
224_2125
SFRZ
SFRZ
U9A
NJM2904M
1
5K
VR1
SFRZ
7
IN1
6
VSS
5
QA1
VS
2
14
XCOMA
8
4
VS
2
GND
6
GND
6
3
C41
821
1K
R21
PTIME
2
VSA
COMP I
10
VSB
4
5
12
13
R22
1W 2.0
OUTPUTB
OUTPUTA
GND
GND
GND
GND
10-4
SENSE
MP303-UM-251-9370
16
TEA3717DP
1
15
U8
D14
SFPW-56
C31
153
C30
153
D12
SFPW-56
D10
SFPW-56
C25
153
C24
153
D8
SFPW-56
6
5
-
+
D15
SFPW-56
D13
SFPW-56
+24V
D11
SFPW-56
D9
SFPW-56
+24V
7
U9B
NJM2904M
C32
152
R17
39_1W
C26
152
PENL
PENH
R16
39_1W
FL33
SNT-S10
FL32
SNT-S10
FL31
SNT-S10
FL30
SNT-S10
YMM
YMP
J5
XMP
NC
XMM
B3B-XH-A
1
2
3
10. CIRCUIT DIAGRAMS
Main board (DC Driver)
10-5
YENB
YENA
GND
XA
VCC
XB
AB-ENZ
AP[18..21]
1
2
3
4
B4B-XH-A
J6
S=L:A
S=H:B
R26
10K
VCC
AP21
AP20
AP19
AP18
VCC
EXCCET102U
FL37
EXCCET102U
FL36
1
15
3
6
10
13
2
5
11
14
0
0
R30
0
0
R29
R28
R27
74HC157/SO
SEL
EN
1B
2B
3B
4B
1A
2A
3A
4A
4
7
9
12
0
R43
1Y
2Y
3Y
4Y
0
R42
U10
0
R41
A21
A20
A19
A18
1 2 3 4
C46 C47 C48 C49
102 102 102 102
RA21
470*4
VCC
1Y
2Y
3Y
4Y
FL42
SFREE
CINTINZ
U13
SN75189APW
C1
C2
C3
C4
1A
2A
3A
4A
C45 104
3
6
8
11
VCC
101
C50
R31
2K
C51
8
7
2.4K
1
R32
LOCALZ
TC7WU04F
U14B
5
8
C52
GA-GND
C44
102
RDZ
WRLZ
D11
D10
D9
D8
D7
D6
D5
D4
D3
D2
D1
D0
A21
A20
A19
A5
A4
A3
A2
A1
Y2
XPCEEC50.0MHz
3
CHARTHOLDZ
GA-VCC
CS1Z
CS2Z
RDZ
WRLZ
RESET
U14A TC7WU04F
D[0..15]
RA32
22K*4
N2012Z121T03
2
5
9
12
1
4
10
13
VCC
A[0..21]
A19
A18
A21
A20
1 2 3 4
22K*4
RA20
30
91
58
59
60
72
85
86
87
88
89
93
94
95
96
97
98
49
50
22
34
47
46
9
10
11
12
13
14
16
17
18
19
20
21
31
32
33
23
24
25
26
27
92
FL34
GA-VCC
EXCCET103U
GRC1507
CPUCLK
CLKIN
TSNS2*
TSNS1*
SFREE
CINTIN
CHARTTIMER
LOCALKEY*
VIEWKEY*
HISPKEY*
CHARTKEY*
XENA
XENB
YENA
YENB
PNENA
PNENB
PENSD
SAMP
CS4*
CS6*
RD*
WR*
D<11>
D<10>
D<9>
D<8>
D<7>
D<6>
D<5>
D<4>
D<3>
D<2>
D<1>
D<0>
HA<2>
HA<1>
HA<0>
A<5>
A<4>
A<3>
A<2>
A<1>
SYSRST
U11
VCC
104
C43
104
C42
GA-GND
TSTIN
TSTIN2
TSTIN3
ADTRG*
WAIT*
OUTDIS*
CHARTHOLD
HISINLED
CARLED
YLED
LOCALLED
HISPLED
CHALED2
CHALED1
PENLED13
PENLED24
XCOMA
XCOMB
YCOMA
YCOMB
PNCOMA
PNCOMB
SDADIN
SDACLK
SDALD
SRVINT*
LOCALINT*
VIEWINT*
HISPINT*
CINTOUT*
6
7
8
2
45
61
82
1
5
55
80
81
83
84
99
100
62
63
64
66
67
68
51
52
57
73
74
75
76
77
35
36
37
38
39
41
42
43
44
56
69
70
N2012Z121T03
SRAMCS*
KROMCS*
FDDCS*
CENCS*
PENCS*
NVRAMCS*
IOCS1*
IOCS2*
OFFCS*
PSADCS*
XDAL*
YDAL*
FL35
3
28
53
78
VDD
VDD
VDD
VDD
0
14
7
VCC
GND
4
15
29
40
54
65
79
90
MP303-UM-251-9370
VSS
VSS
VSS
VSS
VSS
VSS
VSS
VSS
R40
VCC
GA-GND
RDZ
SFRZ
LOCALLED
CHARTLED
XCOMA
XCOMB
YCOMA
YCOMB
CHARTINTZ
CINTOUTZ
SRVINTZ
LOCALINTZ
CENCSZ
USBCSZ
KROMCSZ
WRLZ
5
4
2
1
74HC32
74HC32
U12B
U12A
6
3
IOCS1Z
NVRAMCSZ
10. CIRCUIT DIAGRAMS
Main board (GRC1507 Servo)
A[0..21]
D[0..15]
A2
A3
RDZ
WRLZ
CENCSZ
RESET
D0
D1
D2
D3
D4
D5
D6
D7
44
34
1
33
4
3
32
31
30
29
28
27
26
25
104
24
17
39
VCC
VCC
VCC
C53
2
GND
VCC
104
C56
9
10
11
13
8
7
6
5
14
15
16
18
19
20
21
23
43
42
41
40
38
37
36
35
VCC
6
4
22
17
RXD0
CTS0Z
DSR0Z
R1 OUT
R2 OUT
R3 OUT
R4 OUT
T1 IN
T2 IN
T3 IN
T4 IN
C2-
C1C2+
C1+
U18
1 2 3 4
SP208ECA SSOP
5
18
19
21
14
12
13
10
VCC
1 2 3 4
TXD0
RTS-DZ
DTR-DZ
C58
224_2125
RA26
10K*4
10K*4
RA24
C55
224_2125
PC0
PC1
PC2
PC3
PC4
PC5
PC6
PC7
PB0
PB1
PB2
PB3
PB4
PB5
PB6
PB7
PA0
PA1
PA2
PA3
PA4
PA5
PA6
PA7
U15
MSM82C55A-2GS-2K
RD
WR
CS
RESET
A0
A1
D0
D1
D2
D3
D4
D5
D6
D7
VCC
9
Vcc
10-6
GND
MP303-UM-251-9370
8
R1 IN
R2 IN
R3 IN
R4 IN
T1 OUT
T2 OUT
T3 OUT
T4 OUT
V-
V+
RA25
10K*4
7
3
23
16
2
1
24
20
15
11
C57
1
2
3
U16
1K
74LS245
G
DIR
A1
A2
A3
A4
A5
A6
A7
A8
R36
19
1
DSP03-003-432
JP3
R33
R34 1K
R35 1K
1K
224_2125
224_2125
C54
CENINT
XHOMEZ
YHOMEZ
PB0
PB1
PB2
PB3
PB4
PB5
PB6
PB7
2
3
4
5
6
7
8
9
R45
18
17
16
15
14
13
12
11
VCC
B1
B2
B3
B4
B5
B6
B7
B8
0
4
20
2
3
5
6
9
1
7
8 7 6 5
STB
ESDB-25S-R2N
RTS
DTR
TXD
RXD
CTS
DSR
+5V
SHILED
GND
J8
RA27
10K*4
BUSY
PB[0..7]
DATA 0
DATA 1
DATA 2
DATA 3
DATA 4
DATA 5
DATA 6
DATA 7
RA22
1K*4
VCC
U17C
6
VCC
13
JP1
74LS14/SO
1
U17E
10
74LS14/SO
RA28
1K*4
74LS14/SO
8
U17A
2
74LS14/SO
U17F
12
11
U17D
9
2
3
DATA3
DATA2
DATA1
DATA0
74LS14/SO
5
DATA7
DATA6
DATA5
DATA4
1
RA23
1K*4
3
JP2
1
74LS14/SO
U17B
8 7 6 5
3
2
4
DATA[7..0]
8 7 6 5
RA29
1K*4
DATA 7
DATA 6
DATA 5
DATA 4
DATA 3
DATA 2
DATA 1
DATA 0
VCC
9
8
7
6
5
4
3
2
18
13
10
1
11
32
14
15
12
16
17
19
20
21
22
23
24
25
26
27
28
29
30
31
33
FCN685J036-L/Y
D7
D6
D5
D4
D3
D2
D1
D0
+5V
SLC
ACK
STB
BUSY
ERROR
OPEN
OPEN
GND
GND
GND
GND
GND
GND
GND
GND
GND
GND
GND
GND
GND
GND
GND
N.C.
GND
J7
10. CIRCUIT DIAGRAMS
Main board (I/F)
RESETZ
NVRAMCSZ
D0
D1
D2
D3
D4
D5
D6
D7
1
11
3
4
7
8
13
14
17
18
Q1
Q2
Q3
Q4
Q5
Q6
Q7
Q8
74HC273/SO
CLR
CLK
D1
D2
D3
D4
D5
D6
D7
D8
U21
A[0..21]
2
5
6
9
12
15
16
19
VCC
A20
3
4
1
C62
NC
NC
DO
104
1
8
6
JP4
DSP03-003-432
NORMAL
3
2
DEBUG
CS0Z
BR93LC56F-W
CS
SK
U22
5 DI
VCC
10K*4
RA30
2
U14C TC7WU04F
6
8 7 6 5
A[0..21]
2
VCC
D[0..15]
7
GND
10-7
EPROMOUT
13
12
10
9
74HC32
U12D
74HC32
U12C
RESETZ
RDWR
RDZ
RASZ
CASHZ
CASLZ
11
8
RESETZ
RDZ
WRLZ
DEBUGZ
VCC
A1
A2
A3
A4
A5
A6
A7
A8
A9
A10
A1
A2
A3
A4
A5
A6
A7
A8
A9
A10
A11
A12
A13
A14
A15
A16
A17
A18
A19
26
28
11
47
12
25
24
23
22
21
20
19
18
8
7
6
5
4
3
2
1
48
17
16
13
29
14
30
31
17
18
19
20
23
24
25
26
27
28
16
15
C61
C60
DQ0
DQ1
DQ2
DQ3
DQ4
DQ5
DQ6
DQ7
DQ8
DQ9
DQ10
DQ11
DQ12
DQ13
DQ14
DQ15
104
10uF/16V
U20
M5M418160CJ-6S
WE
OE
15
29
31
33
35
38
40
42
44
30
32
34
36
39
41
43
45
2
3
4
5
7
8
9
10
33
34
35
36
38
39
40
41
D0
D1
D2
D3
D4
D5
D6
D7
D8
D9
D10
D11
D12
D13
D14
D15
MBM29F800BA-70PFTN
RAS
UCAS
LCAS
A0
A1
A2
A3
A4
A5
A6
A7
A8
A9
NC
NC
VCC
U19
RY/BY
DQ0
DQ1
DQ2
DQ3
DQ4
DQ5
DQ6
DQ7
DQ8
DQ9
DQ10
DQ11
DQ12
DQ13
DQ14
DQ15/A-1
C59 104
37
CE
OE
WE
BYTE
RESET
A0
A1
A2
A3
A4
A5
A6
A7
A8
A9
A10
A11
A12
A13
A14
A15
A16
A17
A18
VCC
27
46
VSS
VSS
VCC
1
6
21
22
37
42
MP303-UM-251-9370
VCC
VCC
VCC
VSS
VSS
VSS
D0
D1
D2
D3
D4
D5
D6
D7
D8
D9
D10
D11
D12
D13
D14
D15
FR_BUSYZ
D0
D1
D2
D3
D4
D5
D6
D7
D8
D9
D10
D11
D12
D13
D14
D15
KROMCSZ
DEBUGZ
A1
A2
A3
A4
A5
A6
A7
A8
A9
A10
A11
A12
A13
A14
A15
A16
A17
A18
A19
VCC
A1
A2
A3
A4
A5
A6
A7
A8
A9
A10
A11
A12
A13
A14
A15
A16
A17
A18
VCC
25
24
23
22
21
20
19
18
8
7
6
5
4
3
2
1
48
17
16
9
26
28
11
47
12
14
15
29
31
33
35
38
40
42
44
30
32
34
36
39
41
43
45
(KANJI ROM)
WP
RY/BY
DQ0
DQ1
DQ2
DQ3
DQ4
DQ5
DQ6
DQ7
DQ8
DQ9
DQ10
DQ11
DQ12
DQ13
DQ14
DQ15/A-1
8911-050-178S-A
1
2
3
4
5
6
7
8
9
10
11
12
13
14
15
16
17
18
19
20
21
22
23
24
25
26
27
28
29
30
31
32
33
34
35
36
37
38
39
40
41
42
43
44
45
46
47
48
49
50
J9
U25
MBM29F160
A0
A1
A2
A3
A4
A5
A6
A7
A8
A9
A10
A11
A12
A13
A14
A15
A16
A17
A18
A19
CE
OE
WE
BYTE
RESET
37
C67 104
27
46
VSS
VSS
VCC
VCC
D0
D1
D2
D3
D4
D5
D6
D7
D8
D9
D10
D11
D12
D13
D14
D15
10. CIRCUIT DIAGRAMS
Main board (Memory)
10-8
A[0..21]
RESETZ
USBCSZ
RDZ
WRLZ
USBINTZ
RA31
100K*4
A1
A2
A3
A4
A5
A6
A7
VCC
8 7 6
D0
D1
D2
D3
D4
D5
D6
D7
D8
D9
D10
D11
D12
D13
D14
D15
C65
104
1
I
U24
U23
O
3
5
39
3
40
25
34
12
7
6
2
1
23
47uF/16V
C66
GND0
GND1
VCC0
VCC1
DREQ1
DREQ0
INTR
XOUT
XIN
D-
D+
PUCTL
ML60852A
TEST1
TEST2
RES
CS
RD
WR
DACK1
DACK0
ADSEL
D0
D1
D2
D3
D4
D5
D6
D7
D8
D9
D10
D11
D12
D13
D14
D15
A0
A1
A2
A3
A4
A5
A6
UPC29M33
4
17
11
8
9
10
18
33
24
44
43
42
41
38
37
36
35
22
21
20
19
16
15
14
13
32
31
30
29
28
27
26
G
MP303-UM-251-9370
2
D[0..15]
D17
RB491D
D16
RB491D
104
C64
VCC_L
R39 22
R38 22
R37 1.5K
VCC_L
Vcc
DD+
GND
J10
VCC_L
USB CONNECTOR(TYPE B)
FL38
EXCCET103U
1
2
3
4
VDD
OUT
Y3
FL39
EXCCET103U
4
3
GND
2
C63
OCETGCA-6.0MHz
N.C 1
104
EXCCET103U
FL40
10. CIRCUIT DIAGRAMS
Main board (USB)
2
1
2
1
+Y
-X
SW2
MODE
CANCEL
SW1
SW6
SW5
2
1
2
1
2
1
2
10-9
1
MP303-UM-251-9370
-Y
SW3
ENTER
SW7
2
1
+X
SW4
2
1
2
PAUSE
SW9
1
CHART
SW8
D3
LED RED
J1
POWERLED
CHARTLED
PAUSELED
VCC
CHARTHOLDZ
PAUSEZ
KCONT1Z
KEY2
KEY3
KEY0
KEY1
KCONT0Z
GND
GND
5597-14CPB
1
2
3
4
5
6
7
8
9
10
11
12
13
14
D1
LED GREEN
D2
LED GREEN
10. CIRCUIT DIAGRAMS
10.2 Control Panel
MP303-UM-251-9370
10-10
YMP
YMP
YMM
YMM
GND
YA
YB
+5V
PEN(H)
PEN(L)
GND
XHOME
YHOME
ZC-113
J1
1
2
3
4
5
6
7
8
9
10
11
12
13
+5V
+5V
470
R1
+5V
7
6
5
4
3
2
1
PEN(H)
GND
PEN(L)
YMP
YMM
GND
GND
YB0
+5V
YA0
2
1
1
2
X-SENSOR
GP1A53HR
1
3
Y-SENSOR
5
CABLE ASSY
SPP8.TYPE1
4
IL-FPC-3S-S1T1
1
2
3
J2
JP3
2
C1
104
+5V
1
2
1
2
3
4
5
VOUT
GND
ANODE
CATHODE
GND
VOUT
+5V
10. CIRCUIT DIAGRAMS
10.3 Relay Board
MP303-UM-251-9370
02NR-D8S
+22V
CHD
1
2
GND
+8
+
22u/35V
C1
10-11
C2
+ 10u/16V
1S1585
RD4.7E
R4
10K
D3
1K
D4
2200P
R3
1S1585
1K
C3
D5
Q1
2SC2719L
R2
R1
100K
1
4
2
3
L1
31001C
C4
5
470P
(6KV)
7
6
D2
TFR2T
TFR2T
D1
R6
510K
C5
470P (6KV)
R5
510K
1
2
3
4
5
6
J1
GND
-1.5KV
CR6-65-3.96DS
A
B
C
D
E
F
10. CIRCUIT DIAGRAMS
10.4 High Voltage Power Board