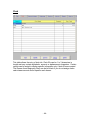
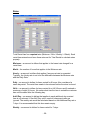
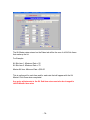
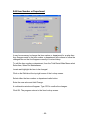
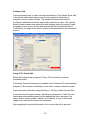
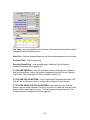
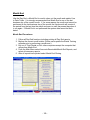
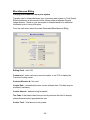
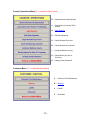
1
Total Rental for Windows
Operators Guide
-1-
PRE-INSTALLATION GUIDE ...............................................................................5
Electrical Requirements ....................................................................................7
Telephones and Communications .....................................................................7
Remote Control/Assistance ...............................................................................7
Computer Supplies............................................................................................8
Stock Paper ...................................................................................................8
Contracts/Statements/Post Cards..................................................................8
Backing up ........................................................................................................8
System Requirements .......................................................................................9
Technical Notes & Installation Guidelines .......................................................11
Printer Notes: ..................................................................................................11
Network Notes:................................................................................................11
Software Notes:...............................................................................................11
System Response Time / Speed: ....................................................................11
Backup Device: ...............................................................................................12
Cash Drawer Information: ...............................................................................12
Remote Access and Support:..........................................................................12
GENERAL SYSTEM SETTINGS ........................................................................13
Rental Settings ................................................................................................14
Sales Settings .................................................................................................18
Invoice / Contract Assignment.........................................................................19
Billing Information............................................................................................21
Statement Settings ..........................................................................................24
General Ledger Defaults .................................................................................25
Miscellaneous..................................................................................................26
Contract Print Defaults ....................................................................................30
System Messages ...........................................................................................34
Passwords.......................................................................................................35
Cashdrawer Information ..................................................................................36
Printer Settings................................................................................................37
Language Translation Tables ..........................................................................39
Security (future release) ..................................................................................40
CODE MAINTENANCE ......................................................................................41
Customer Type................................................................................................42
Tax ..................................................................................................................43
Clerk................................................................................................................44
General Ledger ...............................................................................................45
Salesman ........................................................................................................46
Territory...........................................................................................................47
Vendor.............................................................................................................48
Repair..............................................................................................................49
Source.............................................................................................................50
Customer Defaults...........................................................................................51
Terms ..............................................................................................................53
Store Locations ...............................................................................................54
RENTAL ITEMS..................................................................................................55
-2-
Rental File Maintenance..................................................................................56
Importing Rental Pictures ................................................................................57
Adding Rental Items ........................................................................................58
Rates...............................................................................................................59
Miscellaneous..................................................................................................62
SKU (Stock Keeping Unit) ...............................................................................64
Rental Receiving .............................................................................................66
Specifications ..................................................................................................69
Meter ...............................................................................................................70
Setting Up a Diamond Blade........................................................................72
Caution Notes..................................................................................................73
Accessories .....................................................................................................74
Kits ..................................................................................................................76
Kit Sub Item .................................................................................................76
Kit Master Item.............................................................................................77
Putting the Kit Together ...............................................................................79
Related Items ..................................................................................................81
Edit Item Number or Department.....................................................................83
SALES ITEMS ....................................................................................................84
Adding Sales Inventory ...................................................................................85
Adding a New Sales Item ................................................................................86
Serial Numbers................................................................................................88
Modify Sales Serial File ...............................................................................89
Edit Item Number or Department.....................................................................90
Setting Up Vendors .........................................................................................91
Bar Code Sales Items .....................................................................................92
CUSTOMERS .....................................................................................................93
Adding Customers...........................................................................................94
Adding Customers (Full Screen Method) ........................................................95
Adding Customers Quick Add .......................................................................100
COUNTER OPERATIONS................................................................................102
Front Counter Screen....................................................................................103
Contract / Reservation Entry Screen .........................................................105
New Contract.................................................................................................107
Reservations .................................................................................................123
Convert Reservations....................................................................................125
Fleet Sale ......................................................................................................127
Adjustments...................................................................................................128
Off Clock ....................................................................................................129
Regular to Long Term Conversion.............................................................131
LT Adjustment (Long Term Swap) .............................................................133
Cancellation...................................................................................................135
Long Term Renewals ....................................................................................137
Manual Renewal ........................................................................................138
Automatic Renewals ..................................................................................139
Contract Closing............................................................................................141
-3-
Close with Actual Rates.............................................................................142
Close with Opening Rates .........................................................................142
Partial/Edit Returns....................................................................................143
MANAGEMENT ................................................................................................146
Day End Process...........................................................................................147
Early Closeout ...............................................................................................148
Day Startup ...................................................................................................149
Month End ........................................................................................................150
End of Year ...................................................................................................152
End of Day Report Pooling ............................................................................154
ACCOUNTS RECEIVABLES ............................................................................155
Edit Daily Deposits – Removing Payment on an Open Contract ...................156
Edit Cash Receipts – Removing Payments from a Closed Contract .............158
Miscellaneous Credit Memo ..........................................................................159
Miscellaneous Billing .....................................................................................161
Cash Receipts by Customer (Balance Forward) ...........................................162
Cash Receipts by Invoice Number (Specific Invoice) ....................................163
Void Invoice...................................................................................................165
Correcting an Overcharge on Rental/Sales Items .........................................167
Customer Monthly Statements ......................................................................169
APPENDIX........................................................................................................171
Navigating Around the Program ....................................................................172
Helpful Hints ..................................................................................................186
Frequently Asked Questions .............................................................................187
-4-
Section
1
PRE-INSTALLATION GUIDE
-5-
Thank you for purchasing Total Rental for Windows as your Rental Management
Software. Once your order has been processed, a Total Rental installation CD
with additional instructions will be sent to the address on file. When your CD
arrives, call the technical support phone number listed on the enclosed
instructions to be scheduled for installation.
Installation will proceed quickly if the following is performed first; you must have
either a dedicated phone line with computer modem or high speed internet
connection available. If a dedicated phone line with computer modem is used, it
cannot be part of a rolling or multi-line phone system. High speed internet
through cable or DSL can also be used and is the preferred connection method.
If you decide to use a dedicated phone line you must purchase Symantec
PcAnywhere. This software is required for all dial-up phone line connections.
If a high speed internet connection is used any of the following software/services
may be used; Symantec PcAnywhere, GoToMyPC (subscription connection
service) or VNC (free-ware).
-6-
Electrical Requirements
A computer needs a steady electrical current to function properly. Changes in
line voltage caused by weather, construction or accidents could have adverse
effects on your computer. You never know when a power outage or power surge
may strike crippling your computer equipment. These situations could result in
the destruction of expensive computer equipment and/or loss of data.
It is recommended that the computer system is given its own dedicated circuit or
IG line. It is also recommended that each computer be equipped with its own
Uninterruptible Power Supply (UPS) w/Automatic Voltage Regulation (AVR). A
UPS will allow a computer 3 – 15 minutes of additional time, after a power outage
occurs to be properly shutdown. AVR will maintain a clean, steady power output
to any attached device. It is also recommended that other computer devices be
protected with a surge suppressor.
Telephones and Communications
At times you may have a question regarding the operation of Total Rental. We
can assist you more thoroughly if a telephone is at or near the computer where
the rental software is installed.
For support, it is required that at least one computer have access to the Internet
through high speed or a telephone line that can be connected to the computer’s
modem. If a telephone line is used the line must be a single dedicated telephone
line, which does not pass through your telephone system. This ensures a
connection between your computer and ours will not be impeded by phone calls
or other devices. When not being used for support this line could be used for
other devices such as fax or credit card machines.
Remote Control/Assistance
It is required that at least one computer be installed with Symantec PcAnywhere,
GoToMyPC or other remote management software (RDP/VNC) and have access
to a telephone line or the Internet. This will enable your computer to have a
seamless connection with ours should a support issue arise.
-7-
Computer Supplies
Stock Paper
Total Rental for Windows can use a laser printer for reports. (Please refer to
“Total Rental System Requirements” for further information). These types of
printers accept standard copier style paper.
Contracts/Statements/Post Cards
Our generic laser contracts are two-part, white-pink, presorted forms. There are
1,250 forms per box. We also have three-part laser contracts, white-pink-yellow,
presorted forms. As an alternative our dot matrix style Contract forms are threepart NCR forms, which come in boxes of 900. Custom forms for TruServ
members, Grand Rental Station, Just Ask Rental and Taylor Rental can be
purchased through Centurion. If you decide to have custom forms made it is
strongly recommended that our generic laser form be given to your printer as a
guide to ensure proper placement of information.
To order contracts or monthly statements please call us direct at 1-800-284-4877
x29. You will find most of our forms and supplies are very competitively priced
and can be shipped the same day your order is placed.
Backing up
An essential and commonly over-looked part of general computer maintenance,
which will ensure peace of mind, is creating backups of your computer data. It is
recommended that a backup be performed for each business day and at month’s
end. It is recommended that eight separate backup media be used, one for each
day of the week and one at month’s end. If you have any questions regarding
necessary equipment or backing up your data speak to your hardware consultant
or representative.
-8-
Total Rental
System Requirements
Computer System:
Minimum: 1.2 GHz Computer w/ 20 Gig HD, 128MB RAM
Recommended: 2.4GHz or faster w/80 Gig HD, 512 MB RAM1
Operating System:
Windows 98 SE, Windows 2000/2003, Windows NT 4, Windows XP Home
or Professional Edition
NOT SUPPORTED: Windows 95, Windows 98, Windows ME, MAC OS
Monitor:
SVGA (Super VGA)
Minimum: 15” screen
Recommended: 17” screen or larger
Video:
Minimum: 16 MB Video RAM
Recommended: 32 MB RAM2
Printer:
Minimum: Dot Matrix printer (Lexmark 2300/2400 series, Okidata
320/321)3
Recommended: Laser with 12~14 ppm with 200 sheet tray or larger
(Hewlett Packard LaserJet 1300, 2300.)
NOT SUPPORTED: Inkjet printers, All-in-One Printers
Remote Communications:
Minimum: Any 56K standard modem
Recommended: High Speed Internet Access (DSL or Cable)
Communications Software:
Required: Symantec PcAnywhere (Version 10.5 or newer)
Backup Device:
Minimum: CD-RW
Recommended: DVD-RW or DAT
Backup Software:
Minimum: Any CD-ROM burning software
Recommended: BackUpMyPC by STOMP, Inc (www.stompinc.com),
NovaBackup Professional by NovaStor (www.novastor.com)
Customers must be well versed in the operation of the chosen device AND
the software.
-9-
Electrical:
Recommended: A uninterruptible power supply (UPS) or battery backup
system which includes automatically voltage regulation (AVR) for every
computer running Total Rental.
Network:
Networks must be installed by qualified network specialists using 100 MB
Network Interface Cards or faster with CAT 5 cable and a 100 MB Hub or
Switch.
Recommended: Giga bit Ethernet network with associated hardware.
Notes:
1. Database programs, by design, will use as much memory as is
available. The amount of RAM within a computer is one of the factors
that determine how quickly the software and system respond. It is
strongly recommended, on those systems where Total Rental will
reside, to install as much memory as possible.
2. Some computer systems come with “shared” memory. This means the
video sub system uses main memory (see above) to supplement video
memory. Since this can have an adverse effect on system
performance it is recommended, if “shared” memory is used, to
upgrade to a video card with more memory or substantially increase
system memory to accommodate this issue.
3. While Dot Matrix printers will work with Total Rental, alignment
difficulty, noise, slowness and cost of forms makes laser printers much
more desirable. Most laser printers can print two pages in the amount
of time it takes to print multi-part dot matrix forms. Maintenance and
reliability are much better with laser printers as well.
- 10 -
Technical Notes & Installation Guidelines
Printer Notes:
Printers should be installed using the latest drivers from the manufacturer.
Printer names and share names should be simple, descriptive and limited
to as few words as possible (avoid spaces too). Print a windows test page to
each printer installed (both locally and over the network where applicable).
Before purchasing any printer not listed on our system requirements page you
should contact your hardware or network consultant for their advice and the
latest information. A dependable printer is essential to the operation of your
store.
Network Notes:
The hard drive or shared folder that contains Total Rental must be shared with
FULL ACCESS and contain no spaces in the “Shared as” drive name OR the
computer name. Workstations must have a permanent drive mapped to the root
the drive or folder. The mapped drive on the workstations cannot be designated
as Drive “R”. User accounts (if created) must have full access to the drive. It is
recommended that all workstations within a network have the same operating
system and version.
Software Notes:
Running software programs such as disk defragmenters, backup utilities,
weather monitors, etc. during normal business hours will degrade system
performance, especially during peak use times. We encourage the use of antivirus programs but warn that these programs should be set to scan after
business hours. It is also important to note which applications are loaded in the
System tray. Programs that appear here are resident in system memory and will
degrade system performance as well. If system performance begins to degrade
please check with a computer professional about which applications can be
removed.
System Response Time / Speed:
Purchase business class computers. Avoid consumer based computers that are
pre-loaded with software and extras that will not be used. Purchase the fastest
processor, largest hard drive and the most RAM you can afford. This includes
system RAM as well as video card RAM. RAM is currently one of the least
expensive ways to enhance system performance. Lastly, network response
times can be improved by installing Giga bit network interface cards and switches
as opposed to 100 Mb network cards and Hubs. Speak to your computer
professional about ways to enhance the speed and reliability of the network.
- 11 -
Backup Device:
Customers must be well versed in the operation of the chosen device and the
appropriate software to run it. Full backups of all appropriate application
directories should be completed daily and backup media should be rotated at
least every other day. To provide for “disaster recovery” at least one backup
should be stored off-site and updated frequently. We recommend a seven or
eight data backup rotation consisting of Monday thru Saturday (or Sunday if
appropriate) and the seventh (or eighth) backup being a month end backup that
is stored off-site.
Backup the DR2000 folder and all files therein. Sub-folders of the DR2000 folder
are not necessary if space and time is a concern.
Cash Drawer Information:
For Parallel Cash Drawers, a second physical LPT port is required (LPT2)
Serial Cash Drawers are not supported.
Remote Access and Support:
We endeavor to provide the fastest response to Total Rental issues as possible.
We strongly recommend high speed internet access through either DSL or cable
networks. We also realize that this service may not be available in all areas and
recommend, in these instances, a local internet service provider (ISP) with dialup service be used. This provides internet access while reducing the cost of
dialing into our servers.
If high speed internet access is used firewalls and network routers must be
configured to allow access to Total Rental.
We strongly recommend a reliable and knowledgeable computer support
professional be consulted prior to any computer equipment purchase or
installation. Issues related to hardware or software other than Total Rental will
require such support.
- 12 -
Section
2
GENERAL SYSTEM SETTINGS
IMPORTANT NOTE:
Once settings have been selected and Total Rental is
operational any changes made after such time can have an
impact on the operation of the software.
- 13 -
Rental Settings
Daily No. Of Hours: This sets the number of hours for the Same Day rental rate
as well as determines maximum utilization for the 24 Hour rate. This number is
used to calculate utilization for all time periods.
Weekly No. Of Days: This determines the number days of possession allowed
for a weeks rental.
4 Week No. Of Days: This determines the number of days of possession allowed
for a Monthly Rental (4 Weeks).
Weekend -1 Days: This determines any number of full days of possession
allowed for a rental. (Number of days is user definable.)
Weekend -2 Days: This determines any number of full days of possession
allowed for a rental. (Number of days is user definable.)
Weekend -3 Days: This determines any number of full days of possession
allowed for a rental. (Number of days is user definable)
Time Due: The time an item needs to be returned in order for the given rate to
apply (before Overtime Charges are applied)
Daily OT Factor: This determines what is charged when an item is returned late
within any given day. The OT Factor of 6 would constitute 1/6th of the daily rate.
For example, using the daily rate divided by 6 will equal the overtime fee
charged.
Weekly OT Factor: This determines what is charged when an item is rented for
a week and returned late anytime beyond the weekly period. The OT Factor of 4
would constitute ¼ of the weekly rate. For example, using the weekly rate
divided by 4 will equal the overtime fee charged.
4 Week OT Factor: This determines what is charged when an item is rented for
a Month and returned late any number of days beyond the Monthly rental. The
- 14 -
OT Factor of 28 would constitute 1/28th of the monthly rate. For example, using
the 4 week rate divided by 24 will equal the overtime rate charged.
Overnight Time Due: When an overnight rate is selected, reflects the time the
rental item is due back the following morning without incurring late charges.
Event No. of Days: Party Rentals. The number a days for a given event, i.e.
Weddings, Parties. Future Option.
Grace Period: The number of minutes allowed beyond the Time Due before a
late fee will be accessed. This function is in effect for any rental over 24 hours
except for weekend rentals and must be greater than 0 but not greater than 59
minutes.
Default Rate
The Default Rate simply selects the most common rental rate for the majority of
your rental items. Make note that each item will have its own default rate so you
need only select the most common rate here.
Default Price
This determines the most common price that will be used when selling your
rental items. Each item can store up to two prices for resale. Normally Price-1 is
used for setting the retail sales price of a new unit and Price-2 for the sale price
of a used unit.
Contract Type
The Contract Type field selects the most common type of rental contract for your
business. The vast majority of the time the Regular type is the best.
Regular is any contract that will be less than 28 days.
Long Term is any contract that will be more than 28 days.
Retail Sales is used for selling items.
Quote is for quoting rental and sales items.
Quote Conversion is for converting a quote into a contract.
- 15 -
NOTE: Regular contracts can be converted into Long-Term contracts.
Minimum Plus: This forces the system to calculate a rental charge that is always
more than the minimum charge. This switch should always be checked.
Weekly Plus: Future option. This switch will determine if the system will use the
Weekly OT Factor or simply start the rate over after the week has elapsed. (For
example, with this switch checked the 8th day would be a full 24 hour rate instead
of charging ¼ of the weekly rate).
Monthly Plus: This switch determines if the system will use the 4Week OT
Factor or simply start the rate over once a month has expired. (For example,
with this switch checked the 29th day would be a full 24 hour rate instead of
charging 1/20th of the Monthly rate). If this box is check the 4Week Overtime
factor will be ignored.
Modify Rates: This switch allows clerks to alter the rental rate of each item on a
contract. This is often left unchecked.
Include Saturday and Sunday: It tells the system to count Saturday and
Sunday as rented days. With the switch unchecked the system will skip
weekends. The Weekly and 4 Week rates would need to be adjusted to 5 and 20
days respectively in order to calculate the correct due dates. This setting is most
often used by rental yards dealing exclusively with contractors. This switch is
usually left checked.
Special Item Discount: This switch allows clerks to use the F6 key to issue a
line item discount for each item on a contract. The discount applied is a
percentage.
Enter Meter During Rsv: Forces the clerk to enter a meter reading from the
rental unit when making a reservation. This is often left unchecked.
- 16 -
Taxable on Rental: Determines if a rental item is taxable on rent. It is
recommended to keep this switch checked, even if the items are non-taxable.
This switch is ignored when the rental tax rate, under Code Maintenance is set to
0.00%.
Taxable on Sales: Determines if a fleet sale item (selling a rental item) is taxable
on sale. It is recommended that you leave this switch checked, even if the items
are non-taxable. This switch is ignored when the sales tax rate, under Code
Maintenance is set to 0.00%.
Rental Pictures Off: Demo version only. Not used in live version.
Damage Waiver: Determines if the damage waiver will apply to rental items. It
is recommended that this box be checked even though a damage waiver is not
charged. This switch is ignored when the Damage Waiver rate, under Billing
Information is set to 0.00%. If it is determined, at a later date, to apply a damage
waiver, simply adding a percent to Damage Waiver (under Billing Information) will
apply a damage waiver to all rental items.
Micrometer, Default to 0: This switch will reset the micrometer of items, like
diamond blades, to zero after they are returned. This will require the clerk to
read the blade each time it is rented.
Flat Rate: This switch will enable a flat rate in the system (the ability to charge a
set amount regardless of how long the item is rented).
Mandatory Meter Reading: This switch will force the clerk to check the meter
reading each time the item is rented.
Allow Adjustment of Meter Out At Closing: Allows the clerk to make
adjustments on Meter Out reading prior to closing the contract.
- 17 -
Sales Settings
Sales Cost Percentages
The sales settings page deals with retail sales items. The Sales Cost Percentage
determines the three retail prices that can be stored for each item. Normally
these are left to zero giving the most flexibility when entering prices. Any number
entered here will be a percentage of cost that will then be added to the cost to set
the retail price.
Taxflag ON when Adding Sales items
This switch determines if a retail item is taxable on sale. It is recommended that
this switch is checked, even if the items are non-taxable. This switch is ignored
when the tax rate, under Code Maintenance is set to 0.00%.
Barcode Sales Items
If this box is checked the system will allow a Sales Item to be scanned using a
bar code scanner.
- 18 -
Invoice / Contract Assignment
Determines how the front counter screens will appear and function.
Auto Assign Contract / Invoice / Quote No.: When checked the system would
automatically assign the next available number. It is recommended that this
setting remain checked. Please contact Tech Support for additional information
prior to changing this setting.
Assign Invoice Number at: [Opening / Closing]
This determines when an invoice number is generated for a rental contract.
When Pre-Billing rental contracts it is recommended that the invoice number is
assigned during the opening of the contract. When Post Billing rental contracts
(Pay on Return), it is recommended that the invoice number is assigned during
the close of the contract.
Contract Screen Start Page
This setting determines which screen appears after the clerk ID and contract type
has been determined (General tab). Selecting screen “2” selects the Customer
Information tab, “3” selects the Rental Item tab, “4” selects Sales Item, “5” selects
Shipping Notes and “6” selects Totals tab. The typical starting screen selected is
the Rental Item Screen, number “3”.
Starting Contract No.
This determines the starting Contract number. The largest allowable number is
9,999,999. It is recommended to start with the lowest possible number. If this is
a data conversion, to avoid conflicts, the beginning contract number will be
determined by the last contract written in the previous system.
Starting Invoice No.
This determines the starting Invoice number. It is recommended that this number
begin at a higher value than contract numbers. Due to retail sales, partial returns
and long-term renewals this number will increment faster than contract numbers.
Because every contract will show both a contract and invoice number, by
selecting two distinct number sequences you can easily recognize the difference
between contract or invoice numbers.
- 19 -
Starting Quote No.
This determines the starting Quote number. This will only increment when a
quote is presented to a customer.
Default Search Options:
These settings determine the most common searchable options when looking up
contracts, customers, rental and sales items.
Contract Search Page
When looking up a contract, determines the default search parameter. The
options are by Customer (see Contract Search by Customer (Default Setting)),
contract number or item number.
Contract Search by Customer (Default Setting)
If Customer on Contract Search Page is selected, allows the searchable
parameter to be defined by Customer ID, last name, driver’s license or telephone
number. This only applies when the above search is set to Customer.
Customer
When looking up a customer, determines the default search parameter. Available
search parameters are Customer ID, last name, driver’s license or telephone
number.
Rental
When looking up rental items, determines the default search parameter.
Available search parameters are item number, item description and
manufacturer’s item number.
Sales
When looking up sales items, determines the default search parameter. Available
search parameters are item number, item description and manufacturer’s item
number.
SORTNAME DEFAULT
Point of Sale customers only.
Remember Customer Search
Future search option.
- 20 -
Billing Information
Age of Late Invoices
Determines when an invoice is considered overdue. Normally set to 30 days.
Monthly Finance Charge
The amount of finance charge, as a percentage, that is assessed to each late
invoice. Finance charges will not be assessed unless Compute Finance Charges
under the Accounts Receivable menu is run.
Age of Credit Alert
When set, will inform the clerk if overdue invoice(s) exist in the system beyond a
specified period. For example, if Age of Credit Alert is set to 45 days, the system
will check the customers account history for any invoices beyond 45 days and
issue a warning. To disable this function select “N/A” from the drop down menu.
Damage Waiver %
This defines the Damage Waiver charged to customers. A Damage Waiver of
10% is common among rental stores. Setting the Damage Waiver to 0.00 will not
charge a damage waiver.
History Months on File
The system has the ability to store a maximum of 99 months of accounting
history. This deals primarily with payment history of invoices that were posted to
Accounts Receivable. The system will do a purge based on the number of
months set.
- 21 -
Last Month End
This field is automatically updated to show the last time an End of Month has
been performed in the system.
Last Year End
This field is automatically updated to show the last time an End of Year has been
performed in the system.
Charge Finance Charges on Existing Finance Charges
Setting this switch will allow for compound interest (finance charges applied to
late finance charges). Consult an accounting professional or appropriate local
authority for additional information.
Prebill All Contracts
When this box is checked the system will create an invoice at the opening of the
contract. Placing a check in this box will disable Prebill All Long Term Contracts.
Note: Assign Invoice Number should be set to Opening
Prebill All Long Term Contracts
When this box is checked the system will create an invoice for all long term
contracts at opening. Placing a check in this box will disable Prebill All Contracts.
Calculate Discount at Opening
When this box is checked the system will calculate the discount associated to a
customer when a contract is opened. If a rental item is returned either before or
after the due date the discount will be adjusted accordingly. This may be
confusing to some customers. However, if the customer is accustomed to seeing
- 22 -
a discount on the open contract, place a check in this box. It is recommended to
calculate the discount amount only on the closing contract.
Open Contracts: Apply Payments to Security Deposits First
When this setting is checked payments will be applied to the Security Deposit
first with the remainder towards the Rental Amount. This helps enforce the
security deposit as a must have item, while still allowing some flexibility.
Normally this is unchecked allowing for more flexibility at the counter.
Allow Posting of Credits to A/R for Cash Accounts
This item is normally unchecked. When checked the system prompts if the credit
should be posted to the cash customer’s account. This would allow for any
change or overpayments to be posted to their account.
Allow Access to A/R Terms
When checked would give the clerk the ability to assign A/R terms to a closing
invoice. It is recommended that this not be checked since most charge accounts
have preset terms.
No Deposit on Reservation
If this box is checked the system automatically assumes that no deposit will be
taken on a reservation. But, you still have the flexibility to collect a deposit. This
will speed up the process of creating reservations.
No Deposit on Resv. Conversion
If this box is checked the system automatically assumes that no deposit will be
taken on a reservation conversion. But, you still have the flexibility to collect a
deposit. This will speed up the process of creating reservations.
Process Deposits at Renewals
This switch affects long term contracts. When checked would apply the security
deposit towards another month’s rental (renewal). If unchecked, the system
would hold onto the security deposit until the long term contract is closed out.
Selective Pay on Return
When this box is checked the clerk has the flexibility to alter the security deposit,
total deposit required as well as pre-bill, post bill or simple collect a deposit.
Workstation Credit Card Setup
This is only used if you have the Credit Card Processing module and are using
this terminal to process them. Further documentation of this feature will be
provided when you purchase this option.
- 23 -
Statement Settings
Print Company Name
This switch controls whether or not your Company Name will print on Monthly
Billing Statements. The system will print the company name, which is located
under the Miscellaneous Tab\Company Name when this switch is checked. If
you have your own customized statement forms this switch can be unchecked to
prevent the Company Name from printing.
Print P.O. Number
Place a check in this box if you want to print purchase order numbers on your
billing statements.
- 24 -
General Ledger Defaults
The settings on this tab represent a generic general ledger setup. All of the
settings on this page can be edited to fit specific needs. To add new codes
please refer to the Code Maintenance section of this guide.
Print
Placing a check in this box will display the list on the computer screen. When
displayed, use the toolbar in the upper left-hand corner to either print or exit the
list.
The icon of the printer on the right-hand side of the toolbar will send the page(s)
to the printer. The icon of the door, just to the left of the printer icon will exit the
screen and return to the previous location.
- 25 -
Miscellaneous
Canadian
Canada only. When checked will enable GST Tax and switch from USA to
Canadian Postal Codes.
Validate Clerk Initials
Requires the clerk to enter a valid clerk ID before any rental or sales activities
occur. If this is unchecked would accept any entry as being valid. It is
recommended that this remain checked in order to track activity throughout the
system.
Allow Access to Salesman Code
If checked will allow clerk to enter Salesperson code to accounts. Salesman
Codes are added under Code Maintenance
Allow Access to Territory Code
Allows the clerk to select a territory for each contract. Most companies do not
check this box as territories tend not to fluctuate. However, if the customer
moves from one job site to another, this could be useful.
Retail Printer Choice
When checked will prompt between printing to a contract printer or receipt
printer.
- 26 -
Renewal Credit Message
This feature allows control of the credit message that prints on long-term contract
renewals. With this checked the system will print aging information on the longterm renewal contract. Information will be formatted as it is on the monthly billing
statement i.e. over 30, over 60, over 90, over 120 days, etc.
Auto Phone Area Codes
When this box is checked, the system will remember the area code associated
with each zip code. When adding new customers, entering the zip code will
auto-fill the associated area code. This feature will remember area codes entered
for each zip code and display them whenever that zip code is entered again.
Print Cash Receipts
If this box is checked, the system will print out a payment receipt when collecting
payments on accounts via Cash Receipts.
Enable Entry of Authorized Renters
If this box is checked the system will allow manual entry of authorized renters.
When unchecked the names must be chosen from the list of authorized renters.
This works in conjunction with Require Authorized Renter switch found under
Code Maintenance on the Customer Defaults Tab.
No Confirmation at Exit TR2000
When checked will not prompt for confirmation when exiting Total Rental.
No Confirmation at Day End
When this box is checked will allow for the Day End to be completed without a
completion prompt. This allows for Day End to be run without user intervention.
Default to Current Date When Converting Reservations
If checked, reservations that have been converted early will default to the current
computer date. If unchecked the system will default to the date of the
reservation.
Do Not Display Customer Balance During Contract Processing
When checked will prevent the customer’s balance from being displayed during
Customer Lookup. It is recommended, to provide confidentiality, that this box be
checked.
Do Not Show Overdue Contracts in Overbooking
When checked this will prevent overdue contracts from generating an
overbooking message in the system. If left unchecked contracts that are past
due (days or minutes late) will generate an overbooking message when trying to
be rented.
- 27 -
End of Day Report Pooling
When enabled, this function will allow specific reports to be printed out
automatically when processing the End of Day. To set up the reports to print out,
go to the Manangement menu and select Setup Day End Reports. Place a
check next to the print box along side the report you would like to print out.
Store Opening Time
When set, displays open time of store. Currently this feature is not used.
Store Closing Time
When set, this feature is used to calculate when items are due back (based on
the Minimum or Same Day rates). For example; an item is rented for four hours
starting at 3:00 pm (15:00) and the store closing time is set to 5:00 pm (17:00),
the system will terminate the rental at 5:00 pm.
Automatic Customer Numbering
If this is checked the system will automatically number new customers starting
from a preset number. If left unchecked the clerk would assign a customer
number to all new customers. It is recommended to leave this checked and have
the system automatically number new customers. Customer account number
can be altered at a later time. See Next Customer #.
Next Customer #
This displays the next customer number. After selecting Automatic Customer
Numbering, this field is enabled to enter the beginning customer number, after
which this number should not be changed manually. This number will increment
by one every time a new customer name is entered.
- 28 -
System Date
Initially set to the date prior to the “go live” date to allow the entry of beginning
balances. Once the Total Rental is “live” the date is updated automatically after
an End of Day has been processed.
MLC Update Code
Reserved for MLC Technical Support. Normally this area is blank.
Zip Code Maintenance
This will open up a database of all Zip Codes found in the software. This is used
when you come across a Zip Code in the software that may not show the correct
information. From this screen you can edit the City, State and Area Code that
appears when the Zip Code is entered.
Company Name
This screen shows the information that prints out on Contracts/Invoice and
Statements.
NOTE: Even though there is a Change button this will now allow the Company
name to be altered, because a new serial number will need to be generated. If
the Company Information needs to be changed contact Technical Support for
assistance.
Clear Out Multi-Store
This is to be used under the supervision of Technical Support. This is used only
when multiple store locations have been entered and are not running the MultiStore Module.
- 29 -
Contract Print Defaults
Rental Rates on Contract
With this checked the system will print all available rates for each rental item on
the contract. This is common practice in the tool rental industry. However, partyonly stores may want to turn this off to save vertical space. This example shows
how it will look when it is switched on.
Line between Each Item
When checked places a horizontal dotted line between each item to ease
readability. If space is an issue leave this box unchecked.
- 30 -
Company Name
When this box is checked will print the company name on all “generic” rental
contracts. Stores that use customized rental contracts should uncheck this box.
Open vs. Reservation
A check in this box will force the system to print the words “Open Contract” on
the top of every reservation. This feature is normally unchecked but can prove
useful when deliveries are set for the day before a rental or event and you do not
want to reprint the document on that date. For example, an equipment rental
company may make deliveries at 4:00am. The system can be set to print “Open
Contract” on the forms the night before instead of “Reservation.”
Time Used vs. Days
Controlling how the closing contract prints, this switch is normally checked for
tool rental companies and unchecked for party stores. The following shows an
example of how the formula looks on the printed contract with this box checked.
The M W D & H
fields on this
contract indicate
Months, Weeks,
Days and Hours
the items were
out. This
example shows
1 Day.
Customer Phone
Place a check in this box to have the customer phone number appear on the
printed contract.
Pay on Delivery
When selected this feature prints the remaining open balance on the contract
next to “Pay on Delivery”. The delivery person would need to collect this amount.
Using this feature disables the ability to reduce the amount of the deposit
required to rent. It is usually un-checked since it is easily determined how much
to collect based on the amount due, which already appears on the contract.
Previous Partials
This switch will cause any previously returned items to be printed on each
subsequent partial return contract until the last item has been returned. This can
be confusing at time and is usually left unchecked.
Print Separate Delivery Instructions
When selected will print all delivery instructions to the report printer instead of the
contract printer. This is helpful when delivery instructions are lengthy and would
- 31 -
cause the contract to print another page. If unchecked will print delivery
instructions on the contract.
Contract Print Preview as Default
This switch, if checked, causes the system to preview all contracts and invoices
on the computer screen. A print toolbar will appear when viewing to permit
printing. This will add an additional step to contract processing.
No. Of Copies
This number indicates the number of complete contracts that will print out.
No. Of Parts/Form
This value controls the number of parts to each contract form. For example, if
you have purchased Two-Part NCR Rental Contracts you would set this value to
2. If you have Three-Part Rental contracts this would be set to 3.
Example: If No. of Copies is set to “1” and No. Of Parts/Form is set for “2” (NCR
white/pink forms) the printer will print identical information on one white and one
pink copy of the NCR form.
No. of Closed Contrs. For Charge Accts
This controls the No. of Copies of closed contracts that will print for each charge
account. With this number set to 2 the system will produce two complete copies
of each closed contract for charge accounts.
Print Contract to
[Laser | Dot Matrix]
This setting should remain on “Laser” even if dot matrix printers are used.
- 32 -
Print Caution Notes to
[Contract Printer | Report Printer]
This switch controls where the system will send Full Page Cautions notes. The
standard caution notes will still print directly below the associated rental item on
the contract. If an item has full page caution notes and the above setting is set to
Contract Printer this will cause the safety and warning messages to print on
contract paper. It is recommended that you set this to Report Printer if you have
a separate Report Printer.
Card-Scan & OCR Setup (not shown)
This optional feature is used to setup the Driver’s License scanner and control
the OCR interface. If this option is available do not attempt to make any changes
without consulting technical support.
- 33 -
System Messages
Contract Messages
Advertising Note
This text box allows for a user-definable message and will print on the contract if
space allows.
Message
This text box allows for a user-definable message and will print on all open, non
pre-billed contracts. It will print in the lower right-hand corner of the contract
directly under the Totals area.
Statement Message
Statement Message
The statement message is three lines of text that is printed on monthly billing
statements.
- 34 -
Passwords
To maintain the integrity of Total Rental, password protection allows each section
listed on this tab to require a password to gain entry. Once a password is entered
into the listed box and saved, when someone attempts to enter a password
protected area, a password entry box will appear. Failure to provide a correct
password will deny entry into that area. Passwords can be from 1 to 9 characters
in length and be either alphabetic, numeric or a combination. If a password is not
required leave the box blank.
Note: If you decide to use passwords in any section it is highly advisable to
password protect General System Settings and Management under the
Miscellaneous Functions section.
- 35 -
Cashdrawer Information
Prompt for Beginning Cashdrawer
When selected, starting Total Rental for the first time after an End of Day was run
will prompt for the beginning cash drawer amount. This message may be
ignored if no starting cash is required. If you have a preset cashdrawer amount
everyday, it is recommended that this box be unchecked, the same would apply
to accounts Integrated with Point-of-Sale.
Multiple Cashdrawers
Allows access of individual cash drawers attached to workstations to be
controlled by the program.
Enter Beginning Cash
This field is provided, in the event that the beginning cash drawer amount was
incorrectly entered at the start of the day, to enter a cash drawer amount.
- 36 -
Printer Settings
Report Printer
The selected printer will be used to print reports.
Invoice Printer
The selected printer will be used to print closed contracts, retail invoices
as well as invoice reprints.
Contract Printer
The selected printer will be used to print contracts, reservations,
adjustments and quotes.
Receipt Printer
For use only when special receipt printers are used.
Cash Drawer
For use with external parallel port cash drawers.
NOTES: If only one printer is used for all functions it will be required to switch
between pre-printed and plain paper when printing contracts or reports.
- 37 -
Printer PROMPT
This switch, when checked will force a printer selection window to appear prior to
printing. You will be required to select a printer before any print jobs are spooled.
It is recommended that this remain unchecked as it may slow down normal
contract processing functions.
Use Receipt Printer
Used only if a separate receipt printer exist on the system. Prior to purchasing a
receipt printer please consult with technical support to confirm the device is
supported by Total Rental.
NOTE: The above switches are used for troubleshooting purposes. Please
consult technical support before attempting to change these settings.
- 38 -
Language Translation Tables
When selected, configures Total Rental to display its screens in the selected
foreign language. Each Total Rental workstation can be configured for a different
language.
- 39 -
Security (future release)
This enhanced security system will replace the current Password section in Total
Rental. The enhanced security is, by default, not enabled. This multi-level
security system allows sections of the program to be assigned on a clerk by clerk
basis. Each clerk will have a separate login name and password and access to
specific sections of Total Rental based on what is selected here. Only
owner/managers should assign permissions for clerks and have access to this
section.
Secured Areas
Accounts Receivable Menu
Edit Daily Deposits
Customer Balance Inquiry
Cancel Quotes
Customer Maintenance
Rental Item Deletions
Sales Item Receiving/Update
General System Settings
Void A/R Invoice
Allow Post to A/R
Cash Receipts Entry
Credit Memos
Contract Cancellations
Contract Renewals
Modify Rates
Management
Rental Maintenance
Day End & Exit
Sales Item Deletion
Allow Negative Receiving/Update
- 40 -
Section
3
CODE MAINTENANCE
- 41 -
Customer Type
The customer type is a way for you to categorize your customers. This allows
for reports and labels to be generated based on a specific customer type. The
BG, Restricted Account is a status that can be assigned to any customer
considered a risk.
Note: When a clerk attempts to rent an item to a customer marked as “BG” a
warning message is flashed informing the clerk of this status. The customer is
restricted to sale items purchases.
- 42 -
Tax
All state and county tax codes are entered into this table. Two tax descriptions
are hard coded into the software: Exempt Tax and Standard Tax Code. Click
Modify to change any existing rate. All rates are percentage based. Click Add to
enter new tax descriptions.
Taxable Charges
Rental
Retail
Use
Delivery
Damage
Fuel
Labor
Note: Please consult your financial advisor, account or state representative for
information regarding specific taxable charges.
- 43 -
Clerk
This table allows the entry of clerk ids. Clerk IDs can be 1 to 3 characters in
length and may contain alphabetic, numeric or alphanumeric characters. Certain
reports can be sorted to display specific information only if clerk IDs are created.
The Drawer # and Beginning Cash can be left blank if you do not assign clerks
cash drawer amount and/or specific cash drawer.
- 44 -
General Ledger
A set of default General Ledger numbers are provided in Total Rental according
to GL numbers assigned by the American Rental Association. These are
standardized numbers which can be modified to fit a specific accounting setup.
An available QuickBooks module for Total Rental allows GL data to be exported
from Total Rental to QuickBooks Pro.
NOTE: Prior to making any changes with the General Ledger please consult your
financial advisor or accountant.
- 45 -
Salesman
This table allows you to assign inside/outside salesmen codes and commission
type based on rentals or sales. The salesman code is an alphanumeric field
between 1 to 3 characters.
C Type
Enter “M” for margin or “G” for Gross
R. Comm. Rate
Rental commission rate. Enter a percentage based on margin or gross.
S. Comm. Rate
Sales commission rate. Enter a percentage based on margin or gross.
- 46 -
Territory
This table assigns the salespersons territory. You can also enter multiple
territories.
Territory
The code can be 1 to 3 characters in length and may be alphabetic, numeric or
alphanumeric.
Description
Location or description of the territory covered.
- 47 -
Vendor
Enter vendor information in this table. The vendor code can be 1 to 4 characters
and can be alphabetic, numeric or alphanumeric. Available fields are Name,
Street, City, Phone number, State and Zip. Two additional fields allow for listing
alternate vendor information.
- 48 -
Repair
The Repair tab works in conjunction with the Repair Entry Screen and the
Preventative Maintenance Module (Module) and will affect Return on Investment
(ROI).
Repair code
This code can 1 to 4 characters and may be alphabetic, numeric or
alphanumeric.
Description
Enter the rental equipment repair description.
- 49 -
Source
This screen allows you to keep track of how a customer heard about your rental
business. Examples include: word of mouth, Yellow Pages, direct mailers, walkin, etc.
Code
The Code is a general abbreviation of your source name. This code can be 1 to 3
characters and may be alphabetic, numeric or alphanumeric.
Source Name
A general description of this source.
- 50 -
Customer Defaults
The settings listed here are general default customer settings. These settings are
for all customers in the system. In addition these settings can be applied on a
customer by customer basis. The settings entered in here will affect “NEW”
Customers added to the system.
Tax Exempt
Most customers are not exempt from sales tax and this box should remain
unchecked. If the majority of the customers are tax exempt place a check here
Check local tax laws on Tax Exempt status.
P.O. Number
Requires that a purchase order number (P.O. #) is required for rentals.
Damage Waiver
Check this option even if you do not charge a damage waiver. The damage
waiver can also be assigned on a per contract basis. For further details see
section on Damage Waiver %.
Finance Charges
A set percentage that would be assessed to an invoice that is past due. For
further details see section Age of Late Invoices.
- 51 -
Charge Customer
A charge customer is someone that usually pays on a monthly basis.
Salesman
This allows entry of the salesman code to the customer account.
Require Driver’s License
Requires the clerk to enter a driver’s license
Require Phone
Requires the clerk to enter a phone number.
Require Authorized Renters
For use with those accounts that allow only specific personnel to pick up or drop
off rental equipment.
Credit Limit
A default credit limit that will allow rentals up to this amount, this can also be set
for each customer specifically.
Customer Type
Most common customer that rents from your rental business
Tax Code
Tax code which you would apply to those customers who rent from your rental
business
Area Code / State / Zip / City
Information entered here will appear for all customers. It is recommended that
these fields are left blank.
Source
Most common way customers are referred to your rental business
- 52 -
Terms
This table reflects the current credit terms that have been set up for charge
customers. Terms can be setup any way necessary.
Typical terms are:
Net:
Pay right away
Net15:
Customer is allowed 15 days to pay the invoice
Net30:
Customer is allowed 30 days to pay the invoice
- 53 -
Store Locations
For use with Multi-Store Module Only. This allows for each store in a rental chain
to be setup and assigned a store designator. This allows for multiple stores to
share and control inventory.
- 54 -
Section
4
RENTAL ITEMS
- 55 -
Rental File Maintenance
From the Total Rental Main Menu select Rental Items, Rental File Maintenance
Add – opens Adding Rental Item tab to allow entry of a new item in inventory
Modify – opens the Modify tab to allow changes to the highlighted item
Search – used in conjunction with the Search in: box. All fields listed are
searchable, i.e., Item, Description, Manufacturer, Available, etc.
Print – currently disabled
Delete – permanently removes the highlighted item from inventory, history will
still be remain in the database files.
Kits – (appears grayed out) When available, allows the assemble of rental items
Accessories – rental or sales items that are used with the main rented item
Related Items – rental items that can be used in place of the requested item
Search In – Enter the specific “search” request followed by Enter key to perform
the search.
Import – attaches an image file to the highlighted rental item, for information
regarding importing of pictures please see “Importing Rental Pictures.”
Delete – removes an image file from the highlighted rental item
GoTo Field – presents a drop down menu to select a field to jump to.
Exit – Leaves this screen and returns to the main menu.
- 56 -
Importing Rental Pictures
Total Rental can display a picture of any rental item in inventory. Please follow
the guidelines below before any images are added to rental items.
1. ALL IMAGES MUST BE BITMAP FORMAT. (.BMP format)
2. Images can be taken from the internet, digital camera or scanner.
3. Image resolution for digital camera’s and scanners should be set to
medium format. Since image resolution for digital camera’s and
scanners can vary between manufacturers, this may require several
adjustments.
4. Use an imaging software program to adjust image quality (after setting
the camera or scanner) but be aware increasing image quality (called
dot per inch (DPI)) will increase image size and may lengthen the time
necessary to do certain operations.
5. Onscreen space is limited to approximately 2” X 1.5”. If the image
appears too small decrease the resolution or too “blockish” increase
the resolution until the image is clear on the screen.
6. A new, separate folder should be created to contain all images. This
may be created under TRAPPS folder (if this exists on your system) or
a separate folder. (Creating this folder under the DR2000 folder will
increase backup time and space and should be avoided.)
7. When saving images, provide a name that is simple but descriptive.
Using the rental item number as the image name can be less
confusing than using names.
To Import Rental Pictures:
1.
2.
3.
4.
Select Rental Items, Rental File Maintenance.
Highlight the selected item.
Click the Import button.
From the Open Picture window click on “Look In:” to select the location
of the image.
5. Click on “Files of Type” drop down and select “Bitmap (*.bmp, *.dip)”.
6. Click on the image name and click OK.
7. The image will appear in the “blue box” and is now associated to the
rental item
- 57 -
Adding Rental Items
Item Number - The rental item format is usually decided before any rental items
are entered. Two formats are available and careful consideration should be given
to which format to use.
o Format 1: XX-XXX-XX
o Format 2: XXXXXXXXX
Format 1 makes use of a hyphen after the first two and last two digits. In this
instance the first two places represent the rental item department; floor care,
lawn & garden, etc. The next three digits represent the actual item part number;
floor care – vacuum, wet/dry turbo; lawn & garden - mower, mulching 21” etc.
The last two digits represent the unique identifier in the rental inventory.
Format 2 removes the dashes so that two extra characters may be used. This
can be used towards expanding the Rental Item Department or Rental Item
Number.
Description: The description field accepts up to 40 characters. It is
recommended to use a simple naming convention beginning with a generic term
and getting more descriptive. An example would be: Lawn Mower, HI-VAC
4.0HP Honda.
- 58 -
Rates
Total Rental has four required rates (Minimum / 24hr / Weekly / 4 Week). Each
rental item entered must have these rates set for Total Rental to calculate rates
properly.
Minimum – an amount in dollars that applies to the lowest rate charged for a
rental item.
MinHr – the number of hours that applies to the Minimum rate.
Hourly – an amount in dollars that applies if any pre-set rate is exceeded.
Typically, the Hourly rate is set to be the difference between the Minimum rate
and the Daily Rate.
Daily – an amount in dollars for items rented for 8 hours. Also considered a
same day rental. The rental item needs to be returned before the store is closed.
24 Hr – an amount in dollars for items rented for a full 24 hours and if metered a
maximum of eight (8) hours. No matter what time the item is rented the customer
has until the same time the following day.
Add’l Day – an amount in dollars that applies to each additional day a rented
item is not returned. If the Add’l Day rate is used all subsequent rates are
ignored. The weekly rate would be calculated based on the Additional Day rate x
7 days. It is recommended that this box remain empty.
Weekly – an amount in dollars for items rented for 7 days.
- 59 -
4 Weeks – an amount in dollars for items rented for 28 days.
Weekend 1 – an amount in dollars for items rented on Saturday and returned
Monday morning. Usually used when the store is not open on Sunday.
Weekend 2 – an amount in dollars for items rented on Friday and returned
Monday morning. Usually used for party or holiday rentals.
Weekend 3 – an amount in dollars for items rented on Thursday and returned
Monday morning. Usually used for party or holiday rentals.
Grace Period – an amount in minutes that applies to items rented beyond 24
hours. The grace period is additional time the customer has to return the item
before late charges apply.
Daily OTF – A numeric value used to determine how much is charged on a rental
item that is overdue. The Daily rate divided by the Daily OTF will determine the
overtime rate in dollars. This rate applies to items returned late beyond a 24HR
rental.
Weekly OTF – A numeric value used to determine how much is charged on a
rental item that is overdue. The Weekly rate divided by the Weekly OTF will
determine the overtime rate in dollars. This rate applies to items returned late on
a Weekly rental. If Weekly Plus is enabled under System Options, the weekly
OTF will be ignored. The system will consider each day late beyond the week as
an additional Day.
4 Week OTF – A numeric value used to determine how much is charged on a
rental item that is overdue. The 4Week rate divided by the 4Weeks OTF will
determine the overtime rate in dollars. This rate applies to items returned late on
a 4Weeks rental. See also “Monthly Plus”
Suggested Deposit – sometimes considered a “Security” or “Cleaning” deposit,
it is added to the rental amount.
Default Rate – displays the most common rental rate for this item when it
appears on the Contract/Reservation Entry screen. This can be changed
(overridden) when creating a contract.
Future Rates
Weekend 2 – an amount in dollars for items rented on Friday and returned
Monday morning even though the store is open on Sunday.
Weekend 3 – an amount in dollars for items rented on Thursday and returned
Monday morning.
- 60 -
Event –an amount in dollars for an event such as a wedding or party.
No. of Days - the number of days that occur within Weekend1, Weekend2,
Weekend3 and Event.
Time Due – the time the item needs to be returned for the given rate to apply.
Overnight – a rental, taken a few hours before closing, which will be returned by
opening the next day for an Overnight Rate to apply.
- 61 -
Miscellaneous
Note: The switches here will reflect the setting changes made during System
Option training (General System Options\General System Settings).
Taxable On Rental – place a check mark here if renting this item is taxable
under applicable city, county or state law.
Taxable On Sale – place a check mark here if selling this rental item is taxable
under applicable city, county or state law.
DWC – place a check mark here if a damage waiver applies to this rental item. It
is recommended that you leave this check even if you do not charge a damage
waiver. As you learned during the System Options class the Damage Waiver %
will determine what is charged.
Group Item – place a check mark here if the rental item is a non-serialized item.
(Typical non-serialized items: chairs, tables, hoses, silverware) See Rental
Receiving.
Subrent – an item rented from another rental store that is being rented at this
location.
% - the percentage amount the store receives from the sub-rental
Operated – Use tax charged
- 62 -
Kit Master – check this box if this rental item is the primary item that a kit is built
around.
Kit Sub – check this box if this rental item is part of a kit, but not the primary
item.
Minimum Plus – check this box if no less than the minimum rate will apply.
Monthly Plus – check this box if you would like the system to ignore the 4Week
Overtime factor and consider each day late beyond the 28 day period as an
additional day charge.
Include Sat & Sun – check this box if Saturday and Sunday are considered days
of rent.
Meter – check this box if the rental Item is metered. Once checked the Meter tab
will become available.
Full Page Caution Notes – check this box if additional caution, warning or safety
instructions are needed for the rental item. Once checked the Full Page text area
under Caution Notes tab is available
Flat Rate – check this box if a fixed rate applies to this rental item regardless of
length of rental time.
Utilization – total number of hours this item may be rented.
Utilization hours reflect 8 hours of usage per 8 hour day,
224 hours per 28 day month, 2688 hours per 12 months,
13440 hours per 6 years.
- 63 -
SKU (Stock Keeping Unit)
Serialized Items
This tab is used to enter serialized items. The last two digits (SKU Number) are
used to identify the rental item. The department number, item number and
description can be identical as long as the SKU numbers are different.
(Please see “Rental Receiving” to add non-serialized (group) items.)
Examples of serialized items are: Bobcats, scissor lifts, and floor sanders.
Serialized items:
o
o
o
o
XX-XXX-01 – represents the first unit in inventory
XX-XXX-02 – represents the second unit in inventory
XX-XXX-03 – represents the third unit, and so on.
NOTE: On-hand quantity for any serialized item should
never be greater than 1.
SKU Number – the last two digits in the part number that are unique to this
rental item. The SKU number along with the serial number can be used to
identify equipment in inventory.
Display Y/N – placing a check here (Y) will permit this item to be displayed on
the Rental Item Lookup screen as active inventory. Un-checking this box will
remove the item from Rental Item Lookup but keep the item in Rental Item
Maintenance.
Owned/Inventory – quantity owned and quantity in current inventory.
- 64 -
Available/Reserved – quantity available and quantity reserved.
Cost – purchase cost.
Meter – when Meter is selected on Misc. tab, allows entry of current meter
reading of rental item.
Purchase Date – date item was purchased.
Serial Number – model serial number.
Owning Location – (Multi Store designator) displays which store owns this item.
Selectable from drop down menu.
Current Location – (Multi Store designator) displays where the item currently
resides. Selectable from drop down menu.
Manufacturer – Manufacturer’s name.
Manufacturer Part # - item model / part number as assigned by the
manufacturer.
Book Value – item’s current book value.
Insured Value – item’s insured value if damaged.
Price 1 – price of the unit if sold new.
Price 2 – price of the unit of sold used.
Rental GL – General Ledger number assigned to rental item.
Fleet GL – General Ledger number assigned to fleet sale item. (Rental items
sold).
Freight GL – General Ledger number assigned to shipping item.
- 65 -
Rental Receiving
Non-Serialized Items
Although it appears similar to the serialized item screen, please note the
differences; Owned/Inventory, Available/Reserved, Cost, Meter and Serial
Number fields are not available.
Entering a new Non-Serialized Item
Misc. tab
Entry of non-serialized items can only occur when the Group Item box is checked
on the Misc. tab. Once checked the SKU tab takes on the appearance of the
screen above.
The last two digits (SKU Number) are commonly set to 00 and are used to
represent all of the same rental items. The department number, item number and
description are identical for all items entered for this non-serialized item.
Examples of non-serialized items are: silverware, pressure hoses, and chairs.
- 66 -
Non- Serialized items:
o XX-XXX-00 – represents all of the same units in inventory
o XX-XXX-01 – represents units in Store #1 (Multi-Store Only)
o XX-XXX-02 – represents units in Store #2 (Multi-Store Only)
o NOTE: On-hand quantity for non-serialized items can be
greater than 1.
SKU Tab
Once the SKU number has been entered, confirm there is a check mark in
Display Y/N. This will allow the 00 rental item SKU to appear in Rental Item
Lookup. Fill in any additional information and click Save. After saving the
information click on Receiving button to enter the Rental Item Receiving screen.
Item Number – SKU number of the non-serialized (group) item to be received.
This number and its associated description are auto-populated when an item is
initially entered into inventory.
Editing Clerk – receiving clerk ID.
- 67 -
Purchase Date – date the item was purchased or received
Quantity – number of items purchased
Cost – price of an Individual item (not total cost)
Manufacturer – manufacturers name
Manufacturer Part # - manufacturers model/part number
History – displays the receiving history for this item.
- 68 -
Specifications
ITEM Specifications – user entered information that would be beneficial to the
rental clerk or customer. The information entered is usually not specific but
general in nature. This information does not print out but appears on the Rental
Item Lookup screen.
SKU Specifications – user entered information that is similar to above but
specific to only the item being rented. If there is more than one SKU, individual
information can be entered for each SKU. This information does not print out but
appears on the Rental Item Lookup screen.
- 69 -
Meter
Meter Type:
Hour Meter – used to track usage of an item based on hours. Can be used to
determine when an item needs to be serviced as well.
Interactive Hour Meter – when selected opens Interactive Hour Meter box.
Used to keep track of the usage hours on an item as well as charge for additional
time over the allotted meter.
Hour Meter OT Factor – determines what is charged for each hour over
the allotted meter. It recommended that the OT factor be set to 8.
Hours/Day – used to determine the number of hours of use over a 24
hour period. Usually set to 8 (8 hours of use per 24 hour period).
Hours/Week – used to determine the numbers of hours of use in a five
day period. Usually set to 40 (8 hours X 5 days). Excludes Saturday &
Sunday.
Hours/Month – used to determine the numbers of hours of use in a 20
day period. Usually set to 160 (20 days X 8 hours).
- 70 -
Other (Decreasing) – when selected opens Other (Decreasing) Allowed box.
Used to track wear or a declining value of an item. The item being rented is
measured before it leaves the store and after it returns to the store. The
difference in measurement is what is charged. If unchecked, boxes will contain
allowable measurement based on selected Units of Measure. See “Setting up a
Diamond Blade.”
Other (Decreasing) Allowed – Place a check mark in this box if Per
24HR/Day, Per Week, Per 4WK/Month rate boxes will not used.
Per Rental - allowable measurement based on selected Units of Measure
for an 8 hour rental.
Per 24/Day - allowable measurement based on selected Units of Measure
for a 24 hour rental
Per Week - allowable measurement based on selected Units of Measure
for a weekly rental (7 days)
Per 4wk/Month - allowable measurement based on selected Units of
Measure for a monthly rental (28 days)
Units of Measure
Whole – whole units (numbers)
Tenth – one unit beyond the decimal point (.1)
Hundredths – two units beyond the decimal point (.01)
Thousandths – three units beyond the decimal point (.001)
Sales Item SKU Number- SKU number charged when the measured
value exceeds the allowed usage. A sales item must be created under
Sale Item Maintenance.
- 71 -
Setting Up a Diamond Blade
Add the diamond blade into rental inventory. Next, create a sales item in Sales
File Maintenance with the price set for the amount being charged for excessive
use. Follow the steps below to set the meter.
1.
2.
3.
4.
5.
Select Rental Items, Rental File Maintenance.
Select the diamond blade to be metered and press Modify.
Select the Misc. Tab and place a check next to Meter.
Select the Meter Tab.
Select Other (Decreasing) from Meter Type. This opens Other
(Decreasing) Allowed, Per Rental, Per 24Hour/Day, Per Week, Per
4WK/Month.
6. Place a check in the box below Other (Decreasing) Allowed. This
disables all other rates except Per Rental.
7. Enter the allowed amount in the box next to Per Rental. In this
example, type .001 (if there is no allowable amount enter .000).
8. Select the unit of measure in Whole, Tenth, Hundredth or
Thousandths. (Thousandths is the typical unit of measure for a
diamond blade).
9. Enter the sales item number created for this blade in the Sales Item
SKU Number box. (Press F10 or right mouse click for the Sales Item
Lookup screen).
10. Click Done.
NOTE: Total Rental can store the last meter reading on the diamond blade or it
can reset the meter value to zero. To reset the meter reading to zero before
every rental go to General System Settings, General System Option and Rental
Setting Tab. Place a check in the box “MicroMeter Default to 0”. If this is
unchecked Total Rental will store the last meter reading on the Diamond Blade.
- 72 -
Caution Notes
Standard – user entered information on the safe operation of the item being
rented. This message is printed on the contract below the rental item.
Full Page –Allows additional user entered information on the specific item being
rented. It must be enabled under Misc. tab. This message will print on a separate
piece of paper. See “Full Page Caution Notes”
- 73 -
Accessories
Accessories are a convenient way to place items commonly used together but
that can also be rented separately. Typically, pricing is the same as if each item
was rented separately. This allows a degree of flexibility to offer other options to
customers when they are renting. For example, if a table is selected, common
accessories might be folding chairs and linen.
Adding Accessories
Highlight the rental item that will have accessories associated to it. Select the
Accessories button from the Rental Item Maintenance screen. This brings up the
Rental Item Accessories window.
- 74 -
Rental Item/Sales Item - click on the radio button to select either rental item or
sales item. This selection brings up the appropriate Lookup screen.
Enter Item Number - Press the F10 key or right mouse click in this box to bring
up the Lookup screen. After the appropriate Lookup screen appears select the
item to add as an accessory. Confirm the addition of this item as part of the
accessories kit.
Qty - Clicking in this box will allow the quantity to be changed. Select the
appropriate quantity.
Note - User entered information that is relevant to the item. Click Done to
complete the entry.
Delete/Done – clicking on Delete will remove the highlighted item from the list.
Clicking Done will save the items and return to the previous menu.
- 75 -
Kits
Kits are groupings of rental items that can be rented separately but, when rented
together result in a discounted price. Creating kits is a three step process which,
when created properly, can save considerable time.
An example of a kit would be an air compressor that includes a hammer, two bits
and a hose.
Guidelines for Setting up Kits
• All kit items (called Kit Sub items) must be valid rental or sales
inventory items with pricing and rental times set.
• Each Kit Sub item will be assigned separate kit rates as well as
standard rates.
• The Kit Master is a new separate, rental item that will contain the
Kit Sub items. It is not an active rental item but serves as a “place
holder” for the Kit Sub items.
• The Kit Master Rates are the sum of all Kit Sub Item rates for each
rate type: Minimum, Daily, 24 Hour, Weekly, 4 Week & etc.
• The Kit Master Item does not print on the rental contract, but
instead prints each individual item selected from the kit with the kit
rate applied.
Kit Sub Item
Prior to creating an actual kit, Kit Sub items must be identified. To mark an item
as a Kit Sub Item, select an existing rental item from the Rental Item
Maintenance screen. On the Misc. Tab place a check next to Kit Sub; the Kit
Rates tab becomes available. When the Kit Rates tab is selected, rates that
appear here are automatically taken from the Rates tab. The rates listed in the
Kit Rates tab are independent of rates listed on the Rates tab. Adjust the Kit
Rates accordingly. Remember, all Kit Sub rates, when totaled together, must
equal the Kit Master price. Click Done when finished to make this item available
as a kit sub. Follow the above procedure to continue selecting Kit Sub items.
- 76 -
In the above example, when the air chisel is selected as part of a kit, the rates
listed on the Kit Rates tab would apply. Kit Rates can be changed at anytime but
making a rate change to the kit sub item requires the kit master item to be
updated as well.
Kit Master Item
The Kit Master is a new rental item whose sole purpose is to pull the Kit Sub
Items together onto a rental contract. When creating a Kit Master follow the
procedure for creating a new, non-serialized rental item. Enter the Item Number
and Description of the kit.
- 77 -
The Kit Master rates entered on the Rates tab will be the sum of all Kit Sub Items
that make up the kit.
For Example:
Kit Sub item 1: Minimum Rate = 25
Kit Sub item 2: Minimum Rate = 70
Master Kit Item: Minimum Rate = $95.00
This is performed for each item and for each rate that will appear with the Kit
Master. Click Done when completed.
Any price adjustments to the Kit Sub item rates must also be changed in
the Kit Master item rates.
- 78 -
Putting the Kit Together
After the Kit Sub Items have been selected and the Kit Master Item has been
created, it is time to attach the Kit Sub Items to the Kit Master Item.
Highlight the Kit Master Item in the Rental Item Maintenance screen. Click on the
Kits button.
Rental Item/Sales Item - click on the radio button to select either Rental Item or
Sales Item. This selection brings up the appropriate Lookup screen.
- 79 -
Selecting Rental Item will limit you to only items marked as Kit Sub Items. If
Sales Item is selected the entire Sales inventory is available.
Enter Item Number - Press the F10 key or right mouse click in this box to bring
up the Lookup screen. After the appropriate Lookup screen appears select the
item to add as a Kit Sub item. Confirm the addition of this item as part of the kit.
Qty - Clicking in this box will allow the quantity to be changed. Select the
appropriate quantity.
Delete/Done – clicking on Delete will remove the highlighted item from the list.
Clicking Done will save all kit sub items and return to the previous menu.
The screen above represents how the Kit Master with Kit Sub Items will appear
when writing a contract. Check boxes in the left column allow items to be deselected. Any item that is not available or is overbooked will be highlighted in red.
If all items are selected and available click DONE. The kit items will now appear
on the contract.
- 80 -
Related Items
Related items are items that can be used in place of the requested item.
Setting up Related Items
Click on the Related Items button to bring up the Related Rental Items window.
- 81 -
Enter Item Number - Press the F10 key or right mouse click in this box to bring
up the Lookup screen. After the appropriate Lookup screen appears select the
item to add as a Kit Sub item. Confirm the addition of this item as part of the kit.
Qty - Clicking in this box will allow the quantity to be changed. Select the
appropriate quantity.
Notes - - User entered information that is relevant to the item. Click Done to
complete the entry.
Delete/Done – clicking on Delete will remove the highlighted item from the list.
Clicking Done will save the item and return to the previous menu.
When writing a contract or reservation, bringing up the Rental Item Lookup
screen shows that both breakers AH-090-01 & AH-090-02 are unavailable.
Pressing F10 or clicking on the drop down menu arrow will display the related
item.
- 82 -
Edit Item Number or Department
It may be necessary to change the item number or department for a rental item.
Any changes made to the item number or department will continue to follow the
changed item so that it will appear correctly in invoice history.
To edit the item number or department, from the Total Rental Main Menu select,
Rental Item, Rental File Maintenance.
Locate and highlight the item to be changed.
Click on the Edit tab at the top right corner of the Lookup screen.
Select either the item number or department radio button.
Enter the new value and click Change.
A confirmation window will appear. Type YES to confirm the changes.
Click OK. The program returns to the Item Lookup screen.
- 83 -
Section
5
SALES ITEMS
- 84 -
Adding Sales Inventory
From the Total Rental Main Menu select Sales Items, Sales Item Maintenance.
Add – opens Adding Sales Item tab to allow entry of a new item in inventory
Modify – opens the Modify tab to allow changes to the highlighted item
Search – used in conjunction with the Search in: box. All fields listed are
searchable, i.e., Item, Description, Onhand, Price A, etc.
Print – currently disabled
Delete – permanently removes the highlighted item from inventory, history will
remain in the database file.
Search In – Enter the specific “search” request followed by Enter key to perform
the search.
GoTo Field – presents a drop down menu to select a field to jump to.
Exit – Leaves this screen and returns to the main menu.
- 85 -
Adding a New Sales Item
Click on the Add button in the Sales Item Maintenance screen brings up the
Adding Sales Items screen.
Enter the Sales Item number
Item Number - The sales item format is usually decided before any sales items
are entered. Two formats are available and careful consideration should be given
which format to use.
o Format 1: XX-XXXXXXXXXX
o Format 2: XXXXXXXXXXXXX
Format 1 makes use of a hyphen after the first two digits. In this instance the
first two places represent the sales item department; sand paper, napkins, dust
mask, etc. The next 10 digits represent the actual item part number; mechanics
gloves, sand paper grit 320, etc.
Format 2 removes the dashes so that two extra characters may be used. This
can be used towards expanding the Sales Item Department or Sales Item
Number.
Description: The description field accepts up to 40 characters. It is
recommended to use a simple naming convention beginning with a generic term
and getting more descriptive. An example would be: GAS MIX, 50:1 STIHL PINT
- 86 -
Manufacturer’s Part Number –enter the manufacturer’s part number
Barcode – enter the sales item bar code or use a Barcode Scanner to scan the
items barcode. For further information see “Barcode Sales Items.”
Manufacturer – item manufacturer
Cost – the cost of an individual item (not total cost)
Cost % - Using a percentage (not markup) based on cost. Determines Price A, B
or C. Once selected, Price A, B or C cannot be altered. Three available price
structures can be set. If you wish to use straight pricing do not use Cost %.
Price A, B or C – Straight pricing. Three available price structures can be set.
On hand – current quantity in stock
Serial Number(s) – place a check in this box if the sales item being entered
contains a serial number. Once the item is added to the system, click on the
Serial Numbers tab to enter the serial number.
Vendor – click the drop down arrow to select the vendor.
For additional information see “Setting up Vendors.”
Alternate Vendor 1 – click the drop down arrow to select an alternate vendor.
Alternate Vendor 2 – click the drop down arrow to select an alternate vendor.
Reorder Point – a threshold value for ordering additional sales items.
Quantity – number of sales items to be ordered when the reorder point is
reached.
Taxable – place a check if sales item is taxable. Tax rate is set under General
System Settings\Code Maintenance\Tax Tab.
Total Cost – Total cost = Cost X On Hand
General Ledger – default general ledger code for sales items (retail sales) is
2200. This can be changed to any g/l number.
Location in Store – the physical location of sales item in the store.
Multi-Store Location – (Multi-Store) which store location carries this sales item.
- 87 -
Serial Numbers
The Serial Numbers tab is available after placing a check in the box labeled
Serial number(s) from the Adding Sales Item tab. To enter serial numbers of
items received place the mouse pointer in the box under Serial Number heading.
Type the serial number and click Done. Status field, Cust ID, Date sold, etc. is
automatically updated when the item is sold.
- 88 -
Modify Sales Serial File
The Modify Sales Serial file is used to alter different parameters associated to
serialized sales items. Changes to the serial number, status, id, date sold, etc.
can be made by clicking in the field to be changed and entering the new data.
All/Sold/Pending/Returned – selection determines which serialized sales items
are displayed.
Search in: - clicking on any of the yellow highlighted headings changes the
search parameter.
Add – allow the entry of a new serialized sale item directly into the Modify Sales
Serial File screen.
Delete- deletes the highlighted item.
Done – commits the changes to Total Rental.
Cancel – Cancel all changes or adjustments.
- 89 -
Edit Item Number or Department
It may be necessary to change the item number or department for a sales item.
Any changes made to the item number or department will continue to follow the
changed item so that it will appear correctly in invoice history.
To edit the item number or department, from the Total Rental Main Menu select
Sales Item, Sales File Maintenance.
Locate and highlight the item to be changed.
Click on the Edit tab at the top right corner of the Lookup screen.
Select either the item number or department radio button.
Enter the new value and click Change.
A confirmation window will appear. Type YES to confirm the changes.
Click OK. The program returns to the Item Lookup screen.
- 90 -
Setting Up Vendors
Vendors are where you get your sales items from. In Total Rental you can setup
a database of all your vendors.
Follow the steps below:
1.
2.
3.
4.
5.
From the Total Rental Main Menu
Select General System Settings
Code Maintenance
Click on the Vendor Tab
Click ADD to add a new vendor/click Modify to make changes to
the highlighted vendor
Vendor ID: The Vendor ID is 1 to 3 digits, alphabetical, numerical or a
combination of both
Name/Address: Name of the vendor and address
Phone: Vendors Phone Number
Vendor1: alternate vendor 1
Vendor2: alternate vendor 2
- 91 -
Bar Code Sales Items
Total Rental will allow for you to scan the Barcode of a sales item and when the
barcode is scanned, it will automatically pop up with the item the barcode
corresponds to. In order for this to work certain settings and requirements must
be met. Total Rental works with keyboard wedge style Barcode readers and has
worked on some USB style Barcode readers. In order to test the capability of the
Barcode reader if you open up a new Word Processing Document and when you
scan the Barcode Item it should appear as text in the Word Processor. If not this
type of Barcode reader may not work.
To enable Bar Codes:
• General System Settings\ General System Options\ Sales Items –
place a check (√) next to Barcode Sales Items.
• NOTE: This will now default your Sales Item search to be by
Barcode
Assign Barcodes to Sales Items:
Now you will need to assign the barcode of the sales item to the Sales Item
entered into Total Rental. From the Total Rental Main Menu select Sales Items
then choose Sales File Maintenance. Find the Item that you want to assign the
Barcode for and click on Modify, now scroll down to the Barcode field and scan
the items Barcode and the barcode that was scanned will now appear in that
field. You must assign a Barcode to each of your sales item in order for Barcode
Sales Items to work properly. If nothing is in the Barcode field for a specific item
and you attempt to scan that Barcode nothing will “pop” up.
- 92 -
Section
6
CUSTOMERS
- 93 -
Adding Customers
From the Total Rental main menu select Customer, Customer File Maintenance.
Add – opens Add New Customer tab to allow entry of a new customer.
Modify – opens the Modify tab to allow changes to the highlighted customer.
Search – used in conjunction with the Search in: box. All fields listed are
searchable, i.e., Cust.Id., Lastname, Firstname, etc.
Print – prints a customer master list.
Delete – removes the highlighted customer and associated history from the
Customer Lookup screen. Although removed from being viewed or used,
customer history is not completely deleted. Re-entering the customer account
number will re-associate the history.
- 94 -
Adding Customers (Full Screen Method)
Clicking on the Add button opens the ADD NEW Customer tab.
Customer ID – two types of customer numbering schemes available:
Automatic Customer Numbering
o System will begin numbering customers sequential from a
pre-determined starting number. This is the recommended
method.
Manual Customer Numbering
o Customer number needs to be entered at Contract opening.
o Not recommended due to greater chance of duplicate entries
and errors.
Drivers License - stores the customer’s driver’s license. This field can be
changed to “required” status.
Lastname – Type customer’s last name or company name. Upper or lower case
letters are allowed.
Firstname – Type customer’s first name or additional company information.
Upper or lower case letters are allowed.
Address 1 – Type customer’s address or company address.
- 95 -
Address 2 – Type secondary address.
Zip - If Auto Area Codes is switched on, entering the customer’s zip code will
automatically fill in the appropriate City, State and Area Code.
State – Type state if not auto-filled.
City – Type city if not auto-filled.
Phone 1 / Phone 2 – Type phone number.
Fax – Type fax number.
Mobile – Type Cellular (Mobile) phone number.
Delivery Zone – Type delivery zone.
Contact – Type main point of contact.
Note – User entered information relevant to this customer.
Critical – If this box is checked the note field will appear in red. This field will
appear when the customer’s name is pulled up on the Contract/Reservation
Entry screen.
- 96 -
Additional Information (Optional)
The fields shown above provide space for additional information that may be
pertinent to the customer or company being added. This information is not
printed on any forms or contracts. If credit card information is entered, this credit
card may be used to pay for rental or sales items. Only the last four digits will
appear on print-outs.
Date of Birth – MM/DD/YYYY format
S.S.N – Social Security Number
Credit Card Co.- select the credit card company from the pull down menu.
Credit Card # - enter valid credit card number.
Expires – enter expiration date of credit card. MM/YY format.
TaxId# - enter customer’s or company’s tax identification number.
Cert.Of Ins. Expir. –enter the expiration date for the Certificate of Insurance.
MM/DD/YYYY format.
Credit Limit – user entered dollar value. This is the maximum credit limit
available to this customer. Clerk will be prompted if the rental item will exceed the
specified credit limit.
Credit Terms – Initially set in General System Settings, Code Maintenance.
Select the terms from the drop down menu.
- 97 -
Discount Rates Rental –a percentage that applies to all rentals. Can be set
from 0 -100%.
Sales – a percentage that applies to all items purchased. Can be set from 0 –
100%.
Price Level – if defined, sets the sales item price level A, B or C for this
customer. (Optional).
Customer Type – category for this customer. (Home owner, large contractor,
landscaper, etc.) Additional customer types can be created and assigned under
Code Maintenance.
Salesman – Salesperson assigned to this account. If no salesperson is assigned
defaults to House Account. Additional salesperson codes can be created and
assigned under Code Maintenance.
Taxcode – tax code assigned to customer. Typical codes are “ST” if customer is
taxable (Standard Tax Code) or “EX” if tax exempt (Exempt Tax Code).
Additional tax codes can be created and assigned under Code Maintenance.
Source – source that generated customer. (Newspaper, advertisement, etc.)
Additional source codes can be created and assigned under Code Maintenance.
Territory – salespersons territory. Typically used if an outside salesperson is
assigned to this customer.
- 98 -
Charge – place a check mark if customer is a charge account.
Tax Exempt – place a check mark if customer is not taxable. Also set the tax
code to Exempt Tax Code (EX)
Authorized Renter – when checked requires authorized individuals that can rent
equipment through selected company name to be entered on the contract.
Finance Charge – place a check mark if monthly finance charges will apply
towards past due invoices.
PO Required - if checked, clerk will be required to enter a purchase order
number before processing the rental contract.
Damage Waiver – when checked applies a damage waiver charge to this
customer. Can be done on a per contract basis as well.
After all applicable information for this customer is complete click DONE to save
the information or ADD ANOTHER to save this information and begin entry of a
new customer.
- 99 -
Adding Customers Quick Add
Quick Add allows abbreviated customer information to be added during
Contract/Reservation entry.
To perform Quick Add during Contract/Reservation entry:
1. From the Total Rental Main Menu select Counter Operations,
Reservations/Contracts/Quotes.
2. Select New Contract and enter your clerk ID along with contract type, date
out and time out. Press Enter.
3. Select the Customer tab and press F12 to enter Quick Add mode.
Customer ID – type customer’s ID or if auto-assigned, skip to next field
Lastname - type customer’s last name or company name. This field is required.
Firstname – type customer’s first name (optional).
Driver’s License – type customer’s driver’s license. Optional but can be
required.
Address 1 – customer’s or business’s address (optional).
Address 2 – secondary address if necessary (optional).
- 100 -
City- type name of city or see below.
State/Zip- enter customer’s zip code to have system search for City, State and
Area Code or type State and zip code information.
Phone – type customer’s phone number or business number. Optional but can
be required.
Job Location – type job location (optional)
P.O. Number – type purchase order number. Optional but can be required.
Note - user entered information specific to this customer.
Car License Number – automobile license plate number (Optional).
Salesperson – select sale person from the drop down menu.
Territory- select territory from the drop down menu.
Authorized Renters – select authorized individual to rent equipment through
selected company name. If you require this of your company it is suggested that
you flag the customer as requiring an authorized renter (see “Authorized
Renters”). Otherwise this can be ignored.
Damage Waiver – place a check mark if customer is charged damage waiver.
Charge Account – place a check mark if customer is a charge account.
Tax Exempt – place a check mark if account is tax exempt.
- 101 -
Section
7
COUNTER OPERATIONS
- 102 -
Front Counter Screen
Counter Operations is the central area from where all transactions take place.
Entering contracts, reservations as well as quotes, adjustments and cancellations
are performed here.
There are several ways in which data can be entered or fields searched in Total
Rental. Whether it’s Counter Operations, Customer or Sales Items, the methods
involved are similar. Almost all boxes on a tab, which are empty, are searchable.
The only exception is when a specific value is required, such as in the Clerk ID
field. To perform a search or “lookup”, with the cursor blinking in the desired field:
1.
Press F10 key to bring up the look up screen or
2.
right mouse click to bring up the look up screen or
3.
type the first two or three characters of the description or item
number followed by the Enter key to bring up the lookup screen.
(Even one character will work but this will present all items
beginning with that character.)
To reposition the cursor in another field press the Tab key on the keyboard,
single click with the left mouse button or press the Enter key.
To move between screens, click on the name of the tab with the left mouse
button, use Page Up or Page Down keys or click on one of the two blue arrows at
the bottom of the screen.
You can also move about certain areas by holding down the ALT key followed by
the underlined character. (Example; ALT–C will cancel a contract or ALT-W will
present the Preview screen.)
- 103 -
To exit from a specific function, field or tab, use the ESC (Escape) key on the
keyboard. In almost all instances using the ESC key will return the cursor to the
previous menu or condition without saving or completing the selected function. It
will also clear data from search fields as well. Several other buttons perform a
similar action;
1.
Cancel is used to stop processing and return to the prior condition.
2.
Close will close the current screen and return to the previous
screen.
3.
Done will save the selected information and proceed to the next
function.
4.
Exit cancels all actions and returns to the prior condition.
- 104 -
From the Total Rental main menu select Counter Operations\
Reservations/Contracts/Quotes.
Contract / Reservation Entry Screen
General Tab
Inquiries – this section allows quick access to view and edit customer
information, rental & sales inventory as well as create a credit memo and inquire
about reservations without returning to the main menu.
Contract Functions – this section contains contract openings and reservations,
adjustments and closings along with converting reservations and cancellation
functions.
Quote Functions - this section performs all quote functions. Quotes can be
written, saved and printed without actually designating the item out on rent.
Quotes can easily be converted to a reservation or contract.
- 105 -
The following sub-menus appear under the three main function categories.
Inquires contains:
Customer INFO 1. Customer INFO – provides a link to the Customer Lookup screen.
2. Customer Contract Info – provides a quick view of all current contracts.
3. Delivery Info – provides delivery information for a selected customer.
Rental Item/Reserv, 1. Rental Items – provides a link to the Rental Item Lookup screen.
2. Reservations – displays reservation calendar for the selected item.
3. Missed Rentals – method to track missed rentals or requested items.
Sales Items – provides a link to Sales Item Lookup.
Credit Memo – starts the process for creating a credit memo against a
rental contract.
Contract Functions contains:
NEW Contracts – starts the process for creating a rental contract,
reservation or retail sale.
Convert Reservation – takes an existing reservation and converts it to a
contract.
Adjustment – permits modification to existing contracts and reservations.
Closing – performs contract closing for any open contract.
Cancellation – removes an existing contract or reservation and returns all
items and money.
Renewals – performs either a manual or automatic renewal of long term
contracts.
Quote Functions contains:
NEW Quote – starts the process for creating a quote.
Adjust/convert – permits modification of an existing quote to an open
contract / reservation.
Cancellation – removes an existing quote.
- 106 -
New Contract
Press the New Contract button under Contract Functions. This will move the
cursor to Clerk ID:.
Clerk ID - enter the clerk ID and press enter.
Contract Type – select the contract type by mouse clicking or using the arrow
keys followed by pressing the space bar.
Regular – creates a contract or reservation up to 28 days.
Long Term – creates a contract for 28 days and beyond.
Retail Sales – used to sell a sale or rental (fleet) item.
Quote – used to create a quote for a rental or sales item.
Quote Conversion – allows a quote to be converted to an open contract or
open reservation.
Date Out - defaults to the current software date. If Date Out is advanced to a
future date Total Rental will automatically make the contract a reservation. The
banner above Clerk ID changes from “Contract” to “Reservation”. Date Out
format is MM/DD/YYYY.
- 107 -
Time Out – defaults to the current software time. Time Out can be adjusted to
allow for preparation of equipment or can be advanced to create a reservation.
When the time out is advanced Contract/Reservation radio buttons appear (see
below). All time is presented in 24 hour military format (12:00=noon, 24:00 =
midnight, 1PM=13:00 hours, 2PM=14:00 hours, etc.). Press Enter to proceed.
- 108 -
After selecting Time Out the next screen may be different depending on
personalized settings. Regardless of which screen appears next, Total Rental will
perform as indicated for the tab selected.
Rental Tab
The Rental tab permits adding rental items to an open contract. The default
lookup is by “Description” but can be changed to item number or manufacturer’s
item number.
There are three searchable fields listed on the Rental tab. Select the rental item
using one of the following methods.
1. If you know the Item Number, type the first two or three digits followed
by the Enter key to bring up the Rental Item Lookup screen. If the item
number is not known press F10 or click the right mouse button in this
field to bring up the Rental Item Lookup screen.
2. If you know the Description name, type the first two or three
characters in the name to bring up the Rental Item Lookup screen
sorted by Description. The more characters entered, the narrower the
search will become. Pressing F10 or clicking the right mouse button in
this field will bring up the Rental Item Lookup screen with all items.
3. If you know the MFG Item #, type the first two or three digits to bring
up the Rental Item Lookup screen sorted by MFG Item #. Pressing F10
or clicking the right mouse button in this field will bring up the Rental
Item Lookup screen.
- 109 -
Once the Rental Item Lookup screen appears, select the item to be rented. If the
QTYAVL (quantity available) is zero (0) press F2 to bring up the Calendar screen
to determine when the item will become available.
The above Calendar can display when the item is available, if it is reserved or if
the item is out and who has it.
In our example, there are three (3) diesel air compressors. All three have been
out on rent since the 29th and are due to return the 7th.
Two of the three should be available the 8th. The third air compressor was due
back 5/19. In this instance, a reservation can be taken for the item or if available,
another comparable model could be selected. After extracting the necessary
information click Exit to return to the Rental Item Lookup screen.
- 110 -
If the item is available, selecting the item can be performed using several
different methods.
Use the up/down error keys on the keyboard to highlight the item and press Enter
or click Done.
Use the mouse to highlight your selection and press Enter or click Done.
Use the mouse to highlight your selection and double click the left mouse button.
Once the item has been selected the Rental screen re-appears.
- 111 -
The selected rental item along with the item number and description appears in
the appropriate fields on the Rental tab.
Press Enter or left mouse click on the drop down arrow in the Rate Type box.
Rate Type - Choose the appropriate Rate Type from the list of available rates
and press Enter.
Note: The Miscellaneous Rate type (Misc.) allows user entered terms.
Meter Reading - Enter the current meter value. If Mandatory Meter Reading is
enabled the clerk will be required to enter a meter out reading before proceeding.
To enable Mandatory Meter Reading go to General System Settings, General
System Options, Misc. tab.
- 112 -
Days - Depending on the rate selected, the number of days will automatically
appear. If 24 Hour Rate is selected, up to six (6) days may be manually entered.
Units - Enter the number of units requested. For serialized rental items, this
number cannot be greater than 1. If this is a group item, enter a value up to the
amount owned.
Time Due - The time due is automatically determined by the program.
Depending on the rate type chosen the system will automatically fill in the time
due based on the number of hours the item will be out.
Rate Amount - automatically filled in depending on the rate selected. If Modify
Rates is not enabled this field will be grayed out. To enable Modify Rates go to
General System Settings, General System Options, Misc. tab.
Avail. (F10) - The system will automatically check the availability of the item. If
the item is not available the system will warn of an overbooking condition.
Overbooking can be over-ridden or a different item can be selected.
Add – enters the rental item on the contract.
To add additional items to the contract follow the above steps until all items
appear on the contract.
- 113 -
Sales Tab
The Sales tab is similar in function to the Rental tab. Retail sales items and rental
items (fleet sales) being sold are entered here.
There are three searchable fields listed on the Sales tab. Select the sales item
using one of the following methods.
4. If you know the Item Number, type the first two or three digits followed
by the Enter key to bring up the Sales Item Lookup screen. If the item
number is not known press F10 or click the right mouse button in this
field to bring up the Sales Item Lookup screen.
5. If you know the Description name, type the first two or three
characters in the name to bring up the Sales Item Lookup screen
sorted by Description. The more characters entered, the narrower the
search will become. Pressing F10 or clicking the right mouse button in
this field will bring up the Sales Item Lookup screen with all items.
1. If you know the MFG Item #, type the first two or three digits to bring
up the Rental Item Lookup screen sorted by MFG Item #. Pressing F10
or clicking the right mouse button in this field will bring up the Sales
Item Lookup screen.
- 114 -
If the item is available, selecting the item can be performed using several
different methods.
Use the up/down error keys on the keyboard to highlight the item and press Enter
or click Done.
Use the mouse to highlight your selection and press Enter or click Done.
Use the mouse to highlight your selection and double click the left mouse button.
Once the item has been selected the Sales screen re-appears.
- 115 -
Quantity - enter the quantity requested.
Price - the price is automatically entered. If there are multiple prices (Price A, B,
C) and Sales Price Level is enabled, available prices will appear. Choose the
appropriate price or manually enter a price.
Amount- automatically calculated by the system depending on the number of
items purchased.
Add – enters sales item to contract.
To add additional items follow the above steps.
- 116 -
Customer Tab
There are several ways to enter customer information in Total Rental. Quick Add
is the fastest method and requires only the most pertinent information to
complete a rental or sales contract. The standard Customer Add method
provides for additional information and usually involves more time. The optional
driver’s license scanner can reduce time and mistakes since this method “reads”
information from a driver’s license and automatically fills the required fields in
Total Rental. An image of the driver’s license is also associated to the customer’s
account.
Using <F12> Quick Add
Select the Customer tab and press F12 key. This unlocks the customer
information fields.
If Automatic Customer Numbering is enabled a new Customer ID is automatically
assigned. If this function is disabled you must enter a unique customer number.
Type all required information using the Enter or Tab key to select the next field.
If using the driver’s license scanner, the following information is “read” from the
license and automatically entered into the appropriate fields; last name, first
name, driver’s license number, address, city, state/zip. A copy of the license
image is also stored with the account information.
After supplying the required information, click on any other tab to proceed.
- 117 -
Delivery Info.
The Delivery Infor. tab contains customer instructions regarding the delivery of
rental or retail items as well as delivery and pickup dates.
With Delivery Date or Pickup Date highlighted, press F2 or right mouse click to
present a calendar to select proper dates.
Any special delivery instructions along with travel directions may be entered in
the area marked Instructions. The delivery instructions entered can be saved as
default instructions and, if selected, will remain with the customer until changed.
When selected, delivery instructions can be printed on a separate page
otherwise the information will print on the standard contract.
- 118 -
Totals Tab
This tab brings together the entire rental and sales transaction. The transaction
method should be determined prior to creating any transactions in Total Rental.
Depending on the business practice, there are several different methods of
transactions.
Pre-Billing – the full amount (contract total + deposit) is collected prior to the
renter leaving the premises.
Pay-On-Return – charges are determined and collected when the item is
returned.
Selective–Pay-On-Return – the ability to determine if the customer pays prior to
leaving the store or after the items are returned. The security deposit and total
deposit can be altered.
- 119 -
The Totals tab contains all charges as they will appear on the printed contract.
Fields appearing in white may be altered.
Rental – total charges for all items rented.
Sales – total charges for all retail sale items.
Less Discount - discounts applies to rental and retail sales items.
Damage Waiver – damage waiver, if any, applied to the rental item.
Use Tax – also considered over-the-road-tax in some states.
Delivery –delivery charge, if any.
Fuel –fuel charge, if any.
Labor –labor charge, if any.
Sub Total – sub total for this column.
On Screen Note – user entered information. Appears on screen only.
Contract Note - user entered information that will appear on the printed contract.
NOTE: Delivery, Fuel and labor charges can be applied directly to the contract
and appear within the contract totals. These three fields can also be added as
sales items associated to specific General Ledger codes. When setup as GL
codes: the Delivery, Fuel and Labor fees will be printed below the contract items
instead of within the totals area.
- 120 -
Tax Code – tax code applied to this customer. Automatically selected but can be
changed from the drop down menu.
Sales Tax – total tax charged based on sub total amount and customer tax code.
Contract Total – total, including tax.
Security Deposit Req. - only available when Selective Pay on Return is
enabled, otherwise field is grayed out.
IF YOU ARE PRE-BILL…enter the total open amount in the Amount Tendered
field and press Enter. Select the method of payment from the Choose Payment
Type menu. When prompted “Process Contract?” select Yes.
IF YOU ARE PAY ON RETURN…in the Total Deposit Required field enter 0.00.
This will set all values to 0 and no money will be required to be collected.
IF YOU ARE SELECTIVE PAY ON RETURN…after clicking on the Process
button a pop-up screen appears. Click Pay on Return to send this contract to the
printer without collecting any money. To collect payment press Pay Now. The
Totals screen will re-appear to process payment.
- 121 -
Selective Pay on Return
Selective Pay on Return provides the flexibility to control the type of transaction
at the time of rental. If the full amount is required at the time of rental select Pay
Now from the pop-up screen. Enter the total amount owed in the Amount
Tendered field and click Process. The Amount Tendered is usually equal to the
Total Deposit Required amount. The contract will print and any change due will
be presented on the screen. If payment is not required at the time of rental
select Pay On Return from the pop-up screen. A contract will print but no
amount is tendered. A general practice is for the customer to sign the contract
indicating receipt of the equipment and agreement to payment. Another
important feature is the ability to alter the Security Deposit or Total Deposit
Required fields.
•
•
Security Deposit – the Security Deposit amount can be altered
from 0.00 to any amount, usually to the total of the Security
Deposit. Any changes made here will be reflected in the Total
Deposit Required field.
Total Deposit Required – the Total Deposit Required amount can
be altered from 0.00 to any amount, usually to the total of the Total
Deposit Required amount. Any changes made here will be reflected
in the Security Deposit field.
- 122 -
Reservations
Creating a Reservation is similar to creating a contract. The primary difference is
the time and date selected. Either Date Out or Time Out, or both may be
changed depending on the customer’s needs. With the cursor in the Date Out
field use plus (+) or minus (-) to increment or decrement the date or press F2 or
right mouse click to bring up a calendar.
Date Out
If Date Out is advanced to any future date the banner above Clerk ID changes to
Reservation. Press Enter to select Time Out and proceed to the next screen. Add
Rental or Retail sales items and proceed to the Totals screen.
Time Out
If Date Out remains unchanged and Time Out is advanced a box appears with a
selection for Contract or Reservation. Select the appropriate item and press
Enter. Add rental or retail sales items and proceed to the Totals screen.
- 123 -
Based on the default settings for reservations, Total Rental may or may not
prompt for payment. In the above example Total Rental does not require a
deposit because No Deposit on Reservation has been selected from within
General System Settings, General system Options, Billing Information. This may
be over-ridden by entering an amount in Security Deposit Req.
If a deposit is required for all reservations, uncheck No Deposit on Reservation in
General System Settings, General system Options, Billing Information. The
system will determine the deposit required based on pre-determined settings and
prompt to collect the open amount.
- 124 -
Convert Reservations
Reservations are converted to a contract when the reserved item is ready to be
picked up or delivered. From the Contract/Reservation entry screen select
Convert Reservation. The Contract Lookup screen appears.
Searchable fields are selected at the top of the screen by Customer name,
Contract number or Item number. Select one and enter the search parameter at
the bottom of the screen. Locate and highlight the reservation to be converted.
Click Done or double left click with the mouse. Press Yes when “Convert this
Reservation to a Contract” screen appears.
The Contract/Reservation entry screen appears. Enter the Clerk ID, and press
Enter to alter Date Out. When converting a reservation a day early, the system
provides the flexibility to choose today’s date or the reservation date. Press F3 to
switch between today’s date or the reserved date. Press Enter to alter Time Out.
- 125 -
Time Out can also switch between current time and the time of the reservation.
Press F3 to switch between the Actual Time or Reserve time. Press Enter to
proceed.
Adjustments to the rental or retail sales items can be performed at this time.
Once completed, process the contract as usual.
- 126 -
Fleet Sale
Fleet Sales are used when it becomes necessary to sell equipment or to charge
for broken equipment.
From the Contract / Reservation Entry Screen select New Contract. Enter the
Clerk ID to proceed. Change the Contract Type from Regular to Retail Sale by
mouse clicking or using the arrow keys followed by pressing the space bar. Now
you should be on the Sales Tab. Place a check next to Fleet Sale, just above the
Item Number field. Now using the search fields: Item Number, Description and
MFG Item # search for the item that is to be sold, by either using a keyword
search, Function (F10) key or right click the mouse to bring up the Rental Item
Lookup. Now process the Sales as usual, by adding a customer and processing
(totaling) the Sale.
- 127 -
Adjustments
Adjustments are used whenever a change needs to be made on an open
contract or reservation. Extending a contract, adding or removing items,
stopping rent on a piece of equipment (off-clock), adding additional charges
(delivery, fuel, labor) and converting a regular contract to a long term contract or
reservation are some adjustments that can be performed.
From Contract/ Reservation Entry screen select Adjustment. The Contract
Lookup screen appears.
Searchable fields are selected at the top of the screen by Customer name,
Contract number or Item number. Select one and enter the search parameter at
the bottom of the screen. Locate and highlight the contract reservation to be
adjusted. Click Done or double left click with the mouse.
Enter the Clerk ID to proceed. The date of the adjustment will revert back to the
date and time the contract was originally opened. Advancing the date on an
open contract will convert it to an open reservation. Re-printing of an open
contract can be performed if no changes are made under Adjustment. Simply
proceed to the Totals screen and select Process.
- 128 -
Off Clock
The Off Clock function halts the rental clock on a piece of equipment. A typical
example is a piece of equipment that is waiting for pick up.
To access the Off Clock function, select Adjustment from the
Contract/Reservation Entry screen. Select the contract from the Contract Lookup
screen and proceed to the Rental tab.
Click Off Clock to bring up the Off Clock selection screen.
Select the item to Off Clock and enter the Stop Date and Stop Time. Press F2 or
right mouse click to bring up a calendar to select the date. Select the date using
the arrow keys or click with the mouse. Click Exit and proceed to Stop Time. Stop
time will default to current system time or manually enter the time (in military
time).
- 129 -
Clicking DONE from the Off Clock screen causes the Print Return Receipt
prompt. Make a selection and click Adjust Contract to process the adjustment.
- 130 -
Regular to Long Term Conversion
Convert to LT function allows a clerk to turn a regular contract into a long term
contract. This is especially useful when a customer rents an item on a regular
contract but decides to keep it more than 28 days.
To access the Convert to LT function, select Adjustment from
Contract/Reservation Entry screen. Select the contract from the Contract Lookup
screen and proceed to the Rental tab. Click on Convert to LT button on the
Rental Tab.
After clicking on Convert to LT the system will prompt “Convert this Regular
Contract to a Long Term?”. Select Yes to proceed.
- 131 -
After selecting Yes the following screen is presented.
The system holds onto the deposit (full deposit) that was originally taken at
contract opening. The deposit will be held by the system until the Long Term
contract is closed. The above box will appear only if the switch Process Deposits
at Renewals is disabled. If Process Deposits at Renewals is enabled the system
will apply the security deposit taken at opening towards the first month’s rental.
The system will change the current rental term to long term.
Depending on the system parameters selected if Pre-Bill Long Term contracts is
enabled the system will prompt to collect payment, post the balance to A/R or
allow the payment to be collected later. Click Renew Contract to proceed. The
Enter Payment screen appears. Click on Yes to enter payment on the Totals tab.
If NO is selected the program prompts to send the balance to A/R.
If YES is selected the open amount will be posted to A/R. If NO is selected the
rental program will cycle through again.
The original open date on the contract is used to determine the close date.
- 132 -
LT Adjustment (Long Term Swap)
The long term swap function allows the swap of one item for another from a long
term contract. This is typically used when an item is damaged or maintenance
must be performed on the item.
To access Long Term Swap, select Adjustment from Contract/Reservation Entry
screen. Select the long term contract from the Contract Lookup screen and
proceed to the Rental tab.
Highlight the item to swap and click on Long Term Swap button.
SWAP Long Term Contract screen appears. Enter the Swap Date and Swap
Time and click Done.
- 133 -
Press the F2 key or right mouse click to bring up a calendar to select the swap
date.
After selecting or entering the date, manually enter the time (in Military Time),
Click DONE to continue with the Long Term Swap process.
Search for the replacement rental item using F10 Rental Item Lookup.
After selecting the swapped item, the contract should resemble the screen below:
If no money was taken or was not posted to Accounts Receivable the system
may prompt for payment. Otherwise click Process Adjust. to complete the
transaction.
- 134 -
Cancellation
The Cancellation function allows a pre-billed reservation or a post billed
reservation & contract to be canceled and all items returned to inventory.
Select Cancellation from Contract/Reservation Entry screen. Select the contract
from the Contract Lookup screen and click Done.
- 135 -
After the contract to cancel has been selected the system returns to the General
tab. Enter the Clerk ID and press Enter. The Rental tab appears.
Since this contract is being canceled no changes are necessary to the Rental or
Sales tab. Select Totals tab and click Cancel Contract.
Several messages appear confirming the cancellation. If a deposit was collected
the system will prompt for the amount of deposit refund. Several more prompts
will occur displaying the amount to be refunded.
Enter Payment Type when prompted.
NOTE: Cancelled contracts do not print out. The system will record the
cancellation in the Contract Audit Trail Report, located under the Management
menu.
- 136 -
Long Term Renewals
The Renewals function allows long term contracts to be extended for an
additional month. There are two specific types of Renewals: Manual and
Automatic. Manual Renewals allows a clerk to specify which long term contract
is extended for another billing period. Automatic Renewals allows a clerk to
extend any Long Term Contract that falls within the specified billing days. For
example, if a clerk selects the number of advance billing days to 5, Total Rental
will check for any long term contracts due in the following five days and
automatically extend them for another 28 Days.
- 137 -
Manual Renewal
From the Contract/Reservation Entry screen select Renewals and choose
Manual Renewal. The Contract Lookup screen will appear showing only Long
Term Contracts.
Select the long term contract to renew and either press Enter or click DONE.
Enter the Clerk ID and proceed to the Totals tab. The system may prompt for
payment depending on payment type selected. If no Payment is taken a prompt
to post the amount to accounts receivables appears.
- 138 -
Automatic Renewals
Select Contract/Reservation Entry Screen, Renewals then select Automatic
Renewals. The Automatic Long Term Renewal screen appears.
Clerk - enter clerk ID.
Advanced Billing Days – number of days that Total Rental will scan ahead. Any
long term contracts that are due within this period will appear in grid below.
Renewal Date – the current date plus the number of advanced billing days.
Print Contracts – placing a check in this box will print renewed long term
contracts.
- 139 -
Load - will populate the grid with long term contracts that fall within the number
of Advanced Billing Days.
In the above example the number of Advanced Billing Days is set to 10. The
Renewal Date is set to10 days ahead of the current date automatically. After
clicking Load, Total Rental found 1 long term contract that can be renewed for
the time specified.
- 140 -
Contract Closing
The contract Closing function is used to close all contracts whether regular or
long term. When closing a contract, the current date is always used.
From the Contract/Reservation Entry screen select Closing. The Contract
Lookup Screen appears. Select the contract to be closed and press Enter or
click DONE.
The General tab will appear next. Enter the Clerk ID. The Date In will default to
the current software date and cannot be changed. The Time In can be altered if
necessary. Press Enter to proceed to the Rental tab.
When closing a contract several options are available:
1. Close with Actual Rates
2. Close with Opening Rates
3. Partial/Edit Return
- 141 -
Rental Tab
Close with Actual Rates - Unless over-ridden, the system will always charge
“Actual Rates”. Actual Rates reflect the rate selected plus any over time accrued.
Total Rental, by default, will attempt to provide the best rate available. For
example, if the customer rents an item at a Daily Rate (8 hours) and brings that
item back in 4 hours, the system will charge the minimum rate (or the minimum
rate plus the hourly charge). A grace period only takes effect on rentals longer
than 24 hours. Same day rentals do not utilize the grace period function.
Close with Opening Rates – Closing with opening rates simply takes the rate
originally quoted without overtime factors involved (regardless of the time the
item was returned). This is helpful, if for some reason, the equipment is returned
late by no fault of the renter. The system will revert to the original price that was
quoted.
- 142 -
Partial/Edit Returns – this function allows any item on the contract to be
returned, while maintaining the remaining items on a contract. It will also allow
the rental price to be altered. If a charge is associated to the rented item that
cannot be covered by selecting Close with Opening or Closing rates, then
Partial/Edit Returns can be used. Selecting Partial/Edit Returns presents the
Returning One by One screen.
UnitsIn – entering a value here indicates which item is being returned and
enables Amount field to be changed. Units In may be any value up to the total
number of items out.
Entering a price of 0.00 or placing a check in N/C (no charge) will cause the
following prompt to appear. Select Yes if there is no charge associated with the
item being returned.
Click RESET to un-do any changes. Click DONE to confirm any changes and
proceed. Click CANCEL will void any changes and return to the Rental tab.
After all changes are completed click DONE to proceed to the Totals tab.
- 143 -
Sales Tab
Sales Item Return
During contract closing the clerk can return any unused sales items, such as
sandpaper to inventory. While on the Sales screen click on Return this will open
the Sales Return Screen.
Item #/Description – Sales Item Number and Description
Qty – OUT – Quantity Purchased
Qty RETURN – Quantity being returned
Amount – Qty Returned x Cost/item
Any changes will be reflected on the Totals tab, and money will be returned if
previously collected.
- 144 -
Totals Tab
Any changes to Closing Options will be reflected here on the Totals tab. Note the
bottom right corner indicates which closing options have been selected.
Click Close Contract to complete this transaction.
- 145 -
Section
8
MANAGEMENT
- 146 -
Day End Process
The Day End process should be performed on a regular basis to provide a clear
and concise record of the day’s transactions. The Day End process can be
performed prior to store closing or store opening but must be the very last or very
first operation performed in Total Rental. Failure to do a Day End may result in
confusing financial records and loss of transactions. Day End information will be
combined to provide Month End and Year End financial records.
Day End Procedures
Prior to performing a Day End certain reports should be printed to maintain a
written copy of the day’s transactions.
1. Exit out of Total Rental on ALL other computers except the computer that
will perform Day End.
2. From the Main Menu select Counter Operations\Daily Reports\Day End
Reports.
3. Select the reports to be printed from the list. Once the Day End reports
have completed printing the Day End process can proceed.
4. Press the escape key (ESC) until you have returned to the Total Rental
main menu.
5. From the Main Menu select Day End & Exit.
- 147 -
6. Confirm the Current Date is correct and place a check mark in PRINTED
Daily Transaction Report. Placing a check mark here confirms that the
daily reports have been printed. This is only a reminder and will not print
any reports. If End of Day Report pooling is enabled this box will be
unavailable.
7. Click Process. This procedure may take several minutes.
Note: If End of Day Report Pooling is enabled, after clicking on
Process the selected reports will begin printing. Once the reports have
completed printing the Day End process will proceed.
Early Closeout
Early Closeout is sometimes used when making a bank deposit before actual
store closing hours. The primary difference between Early Close and Day End is
the ability to re-enter Total Rental after an Early Close without changing the date.
To perform an Early Closeout:
1. Follow all the steps for Day End Procedure, printing out all necessary
reports.
2. Place a check mark in PRINT Daily Transaction Report and Early
Closeout.
3. Click Process. When processing is completed, restart Total Rental and
enter the same date.
4. When actual day end occurs run the Day End Procedure as normal,
printing all necessary reports.
- 148 -
Day Startup
When starting Total Rental for the first time after a Day End Procedure is
properly performed, the system will request the date and beginning cash.
1.
2.
3.
Click on the Total Rental icon to start Total Rental.
When the Date/Beginning Cash window appears confirm the date. The
system will automatically default to your computer’s date. If this date is
incorrect simple type in the correct address with MM/DD/YYYY format.
Enter the Beginning Cash (Cashdrawer) or leave at 0.00 if no cash
amount is entered. The beginning cash drawer prompt can be disabled if
no cash drawer amount is needed (General System Settings\General
System Options\Cashdrawer Information, Prompt for Beginning
Cashdrawer). If this box is checked, during day startup the clerk will be
prompted for the beginning cashdrawer, otherwise the field is grayed out.
- 149 -
Month End
Like the Day End, a Month End is used to close out the month and update Year
to Date Totals. It is strongly recommended that Month End is run on the last
business day of the current month. If, for some reason, the month end cannot be
performed on the last business day of the month, the fiscal month will consist of
the period from the last time the month end was run until the present day when it
is run again. If Month End is not performed the system date cannot be backdated.
Month End Procedures
1. Follow all Day End functions including printing all Day End reports.
2. Backup the current month’s data. (Some users update the Rental Training
software prior to performing a month end.)
3. Exit out of Total Rental on ALL other computers except the computer that
will perform Month End.
4. From the Main Menu select Accounts Receivable\Month End Reports, and
select all necessary reports.
5. After all reports have printed select Month End Closing.
- 150 -
Place a check next to End of Month and click Process. The system will go
through the process of clearing out monthly totals (MTD) and posting those
figures to year to date (YTD).
- 151 -
End of Year
Similar to Month End, End of Year closes the year to date totals and updates the
Life Time to Date. The year end can be tailored to your business’s fiscal year end
whether it closes on December 31st or some other time during the year. To
maintain fiscal integrity it is important that it occurs on the same date every year.
1. Exit out of Total Rental on ALL other computers except the computer
that will perform Day End/Month End/Year End functions.
2. Follow all Day End functions including printing all Day End reports.
3. Backup current data. (Some users update the Rental Training software
prior to performing a Year End.)
4. From the Main Menu select Accounts Receivable\Month End Reports,
and select all necessary reports. Since some data, after Year End is
performed, cannot be reprinted it is recommended that the following
reports be printed out regardless of which ones are selected.
a. Rental ROI Detail Analysis
b. Rental ROI Summary Analysis
c. Business Status
- 152 -
Place a check in both End of Month and End of Year and click Process. The
system will perform the process of clearing out yearly totals (YTD) and updating
the figures to lifetime to date (LTD).
- 153 -
End of Day Report Pooling
This function allows the store owner to assign pre-defined reports to print out
automatically during the Day End Process. This will streamline the end of
process where the clerk will not need to manually print out all the required
reports, rather then to make sure that the respective Report Printer has plain
paper in the tray.
To enable End of Day Report Pooling
1. From the Main Menu
2. Select General System Settings
3. Select General System Options
4. Click on the Miscellaneous Tab
5. Place a check (√) next to End of Day Report Pooling
To assign reports to print out
1. From the Main Menu
2. Select Management
3. Select Setup Day End Reports
4. Select from the list of available reports
5. Click on the Report Name to see Additional Options where available
a. For example, selecting Reservations will give you options in
regards to how the report will be formatted and how many days
beyond the current date to print out (Days Ahead)
6. Place a check (√) next to the Print Box
7. Once you have selected all your reports, click on Save
8. Total Rental will prompt with a box stating Data Has Been Saved
9. Now click Close to return to the Management Menu
10. Hit the Escape (ESC) key to return to the Main Menu
- 154 -
Section
9
ACCOUNTS RECEIVABLES
- 155 -
Accounts Receivable
There are several locations within Total Rental that account receivable functions
may be accessed. From the Counter Operations menu several functions are
available; Edit Daily Deposits, Cash Receipt by Invoice number or customer as
well as Customer Balance Inquiry. Additional account receivable functions are
available under the Accounts Receivable menu.
Edit Daily Deposits – Removing Payment on an Open Contract
Edit Daily Deposits is used to correct or adjust the amount of deposit on a rental
contract. Any adjustments made will affect the current day’s cash drawer.
Select Counter Operations\Edit Daily Deposits.
Contract Number - manually type the contract number or use F10 to display the
Contract Lookup screen.
Customer ID - customer’s account number.
Deposit Received - amount of money received towards the open contract.
Date Deposit Received -date payment was posted.
Clerk- clerk’s ID
Deposit Returned- deposit reduced from the original deposit received.
Date Deposit Returned - Date deposit was returned.
- 156 -
Clerk- clerk’s ID
Contract Total - amount of the rental plus tax and damage waiver
Original Deposit- full amount (contract total plus security deposit).
Edit Deposit -amount changed
Authorized Amount - amount authorized to the credit card. This is for Total
Rental Customers with integrated credit card processing.
Additional Deposit Received - Additional payment that will be applied towards
the open contract.
Additional Deposit Returned - payment amount that would be taken off the
open contract.
Security Deposit - payment that applies towards the security deposit.
Payment Type - form of payment
Editing Clerk – clerk’s ID
Reference- user entered data
- 157 -
Edit Cash Receipts – Removing Payments from a Closed Contract
This allows payments to be removed (or backed out) from closed contracts
(invoices). (A typical example would be a bounced check used for payment.)
Select Accounts Receivable\Edit Cash Receipts.
Invoice Number - enter invoice number or use F10 to display the Invoice Lookup
screen.
Editing Clerk - clerk’s ID
Customer - customers account number and name.
Invoice Date - date the contract was closed
Invoice Amount - total amount invoiced on the contract
Amount Paid - the amount paid
Invoice Balance – remaining open balance on the closed contract (invoice).
Amount Overpaid - amount that was over-paid or misapplied. The system will
automatically deduct this from the paid invoice.
Reference – user entered information.
Payment Type – select the type of payment for this credit.
- 158 -
Issuing Credits
Miscellaneous Credit Memo
This type of credit is used to issue the customer a specific type of credit. This
should not be used to issue credits for rental and sales items or tax credits.
From the main menu select Accounts Receivable\Credit Memo for Misc.
Accounts.
Clerk – clerk’s ID.
Customer - enter customer’s account number use F10 to display the Customer
Lookup screen. The remaining information will automatically fill in after customer
is selected.
Date - automatically defaults to the current software date.
Damage Waiver – enter the amount of damage waiver to credit the customer.
Fuel - enter the amount of fuel to credit the customer.
Delivery - enter the amount of delivery charge to credit the customer.
Labor - enter the amount of labor to credit the customer.
Finance Charge - enter the amount of finance charge to credit the customer.
- 159 -
Invoice Number - automatically generated by the software when the credit has
been applied.
Tax Credit – select the appropriate tax code to apply to this credit towards. Only
fields that have been configured as taxable are available to issue credits all other
items will be grayed out.
Reference – user entered information.
Credit Note – user entered information.
Total Credit – total amount of credit that will be credited to customer.
Post to AR – placing a check here will apply credit towards Accounts
Receivable.
Payment Type – select the type of payment for this credit.
- 160 -
Miscellaneous Billing
Carrying Over Balances from a prior system
Typically used to forward balances from a previous rental system to Total Rental.
Entering balances in this manner will be tracked under a separate General
Ledger number. Speak to your accountant or financial advisor for additional
information prior to using this option.
From the main menu select Accounts Receivable\Miscellaneous Billing.
Editing Clerk - clerk’s ID.
Customer Id - enter customer’s account number or use F10 to display the
Customer Lookup screen.
Contract #/Invoice # - Not used.
Invoice Date – automatically enters current software date. This date may be
modified if necessary.
Invoice Amount - balance being forwarded.
Tax Code- if the balance has been previously taxed set this field to exempt
status otherwise select appropriate tax rate.
Invoice Total - Total amount to be posted.
- 161 -
Posting of Payments
Cash Receipts by Customer (Balance Forward)
This applies payments to the customer’s account based on first in/first out
method. Total Rental will apply the payment towards the oldest invoice first.
From the main menu select Accounts Receivable\Cash Receipts by Customer or
select Counter Operation\Cash Receipts by Customer.
Customer – enter customer’s account number or use F10 to display the
Customer Lookup screen.
Clerk- clerk’s ID.
Date Paid - defaults to the current software date.
Amount Paid - amount to apply to open balance.
Reference - user entered information.
Payment Type – select the type of payment.
Print Receipt – when checked will print a receipt.
- 162 -
Cash Receipts by Invoice Number (Specific Invoice)
Allows posting of payments to specific invoices.
From the main menu select Accounts Receivable\Cash Receipts by Invoice
Number or select Counter Operations\Cash Receipts by Invoice.
Invoice Number – enter the invoice number or use F10 to display the Invoice
Lookup screen.
Customer – customer’s account number. Auto-filled after selection of Invoice
Number.
Balance – open balance. Auto-filled after selection of Invoice Number.
Name – customer’s name. Auto-filled after selection of Invoice Number.
Invoice date – date contract was closed (invoiced).
Invoice Amount – total invoice amount
Amount Paid – previous amount paid, if any.
P.O. # - purchase order number, if any.
Discount - discount applied to previous, if any.
- 163 -
Terms – credit terms applied to this invoice.
Date Paid – date of last payment.
Invoice Balance – remaining balance.
Clerk – clerk’s ID.
Date Paid - current date (defaults to current software date).
Amount Paid - Amount to be applied to the open balance.
Discount – discount to apply, if any.
Applied Amount - equal to the amount paid plus the discount.
Reference – user entered information.
Payment Type – select payment type.
Print Receipt – when checked will print a receipt.
- 164 -
Void Invoice
Voiding will remove an invoice from Total Rental as if the invoice was never
written. It will return all inventory to stock and apply or return any balance.
From the main menu select Accounts Receivable\Void Invoice or Counter
Operations\Contr. /Inv. History Print/Display.
Invoice # - enter the invoice number or use F10 to display the Invoice Lookup
screen. Once the invoice number has been selected the system will automatically
fill customer and contract fields from invoice history.
Current A.R Status - This information is retrieved from the invoice history once
the invoice number has been selected. It provides a summary of all charges on
the invoice.
Item/Description - displays items on contract.
- 165 -
Void – pressing this button will provide a confirmation prompt. Type “YES” to
proceed.
After typing “YES” the Voiding Invoice clerk ID window appears. Enter clerk’s ID
and press Void.
If the invoice has been paid the system will prompt with three forms of payment.
Apply Credit to Specific Invoice - allows the clerk to post the payment already
collected to another invoice on the account.
Issue Credit Now - allows the clerk to return the payment to the customer.
Post Open Credit to A/R - allows the clerk to post an open credit towards
Accounts Receivable account.
If the invoice has not been paid the system will not prompt for any of the above
choices. The system will automatically cross pay the invoice.
- 166 -
Correcting an Overcharge on Rental/Sales Items
A credit needs to be issued to correct an amount charged for a rental/sales item.
Issuing a credit memo is very similar to creating a contract but the system will
consider the amounts entered to be a credit.
From the main menu select Counter Operations\Reservations/Contracts/Quotes.
Under Inquires select Credit Memo.
Enter the clerk ID and press Enter.
The sequence may differ based on default settings but the general procedure is
the same.
1.
2.
3.
4.
5.
6.
Select the customer account from the Customer tab.
Select the rental item(s) from the Rental tab.
Enter the quantity and price of the item and enter the amount to be
credited. The system will automatically consider the amount as a
credit.
Perform the same for sales items using the Sales Tab.
Sales items automatically default to Price A. The system will
automatically consider the amount as a credit.
When completed entering information select the Totals tab.
- 167 -
7.
8.
9.
10.
Enter the amount overcharged for Delivery, Fuel or Labor fees.
Select the appropriate Tax Code
Select one of the following payment types:
a. Cash
b. Credit Card
c. Company Check
d. Post to A/R - this will only be available when Allow Posting of
Credits to A/R for Cash Accounts is enabled.
Press Credit MEMO to execute the transaction and print a copy of the
transaction. To preview the transaction with the option to print, place a
check mark in the small box on the Credit MEMO button and press
Credit MEMO button.
An invoice number is generated which can be reprinted, if necessary from
Contract/Invoice/History Print Display.
- 168 -
Customer Monthly Statements
Total Rental Accounts Receivable allows the printing of monthly customer
statements for all active customers.
From the main menu select Accounts Receivable\A/R Reports Menu\Customer
Monthly Statements.
Blank - Plain paper statement.
Statement/TopTear – pre-printed form with tear-off at the top of the form. This
portion is returned with the customer’s payment.
Statement/SideTear - pre-printed form with tear-off on the side of the form. This
portion is returned with the customer’s payment.
All Active – selects all active customers with transactions during the past
statement period (Month).
Balance Due - selects all active customers with transactions during the past
statement period with a balance due.
- 169 -
One by One – user selects one active customer with transactions during the past
statement period.
Customer ID –available after One by One is selected. Enter the customer
account number or use F10 to display the Customer Lookup screen.
Charge Accounts Only - place a check in this box to print statements for
customers marked as charge accounts.
Sort Order - determines the order in which statements will be printed. Select
Name to print statements in alphabetical order. Select Customer Id to print
statements in account number order.
Message – User entered information that will appear on the statement.
Additional Options
For Restart Only - used when an interruption occurs during the printing of
statements. Entering the Starting Company Name or Starting Customer ID will
begin printing from the point of interruption onward until all remaining statements
have printed.
- 170 -
Section
10
APPENDIX
- 171 -
Navigating Around the Program
MAIN MENU
The mouse can be used to click any of options above or you can use the TAB
Key on the keyboard along with the Arrow Keys. Below you will find Keyboard
shortcuts when at the Main Menu, click on the Underlined Letter pertaining to the
menu option.
O = Counter Operations
C = Customer
R = Rental Items
S = Sales Items
A = Accounts Receivable
M = Management
G = General System Settings
Y = System Maintenance Tools
D = Day End & Exit
P = Special Programs Menu
- 172 -
Counter Operations Menu (O + underlined letter below)
R = Reservations/Contract/Quotes
C = Contract/Invoice History Print/
Display
D = Daily Reports
E = Edit Daily Deposits
S = Cash Receipts By Invoice
B = Cash Receipts By Customer
I
= Customer Balance Inquiry
H = Rental History By Item or
Customer
K = Change Clerk Password
Customer Menu (C + underlined letter below)
- 173 -
C
= Customer File Maintenance
R
= Reports
L
= Labels
P
= Postcards
Rental Item Sub Menu (R + underlined letter below)
R
= Rental File Maintenance
R
= Rental Receiving
E
= Repair Entry
R
= Reports
L
= Labels
Sales Item Sub Menu (S + underlined letter below)
- 174 -
S
= Sales File Maintenance
I
= Sales Item Receiving
R
= Reports
L
= Labels
Accounts Receivable Menu (A + underlined letter below)
- 175 -
C
= Cash Receipts By Invoice
Number
R
= Cash Receipts By Customer
D
= Credit Memo for Misc. Accounts
E
= Edit Cash Receipts
B
= Miscellaneous Billing
M
= Month End Reports / Closing
F
= Finance Charges
I
= Customer Balance Inquiry
A
= A/R Reports Menu
V
= Void Invoice
Management Menu (M + underlined letter below)
D
= Display Business Status
C
= Contract Audit Trail Report
S
M
= Sales Item
Markup/Markdown
= Modify Sales Serial File
U
= Update Rental Qty Available
R
= Modify Missed Rental File
V
= Verify Customer Balances
I
= Invoice Audit Trail Report
R
= Rental Rates Update
L
= Salesman Reports
Y
Setup Day End Reports
A
User Manual
General System Settings (G + underlined letter below)
- 176 -
G
= General System Options
C
= Code Maintenance
Counter Operations
Daily Reports (O + D + underlined letter below)
- 177 -
C
= Contracts Due Today
D
= Deliveries
P
= Pickups
R
= Reservations
E
= Day End Reports
L
= Rental Item Location
A
= A/R Charges
S
= Cash Receipts & A/R
Charges
T
= Outstanding Deposits
I
= Items Due Today
O
= Open
Contracts/Reservations
B
Open Contracts By
Customer
Q
Quotes
Counter Operations \ Daily Reports
Day End Reports (O + D + E + underlined letter below)
D
= Daily Transaction
C
= Cashdrawer Summary
T
= Daily Transaction By Clerk
A
= Cash Accounting
M
= Amount To Be Deposited
Customer \ Reports
Customer Reports (C + R + underlined letter below)
- 178 -
A
= Activity Report
C
= Customer Directory
Rental Item \ Reports
Rental Reports (R + R + underlined letter below)
- 179 -
M
= Master/Rate List
Y
= Inventory
I
= Items Sold
E
H
Equipment Maintenance
Report
= History of Booking
Z
= Utilization (Time)
D
= ROI Detail
U
= ROI Summary
O
= Overbooking
P
= Purchases
A
R
= Rerent vs. Inhouse
Analysis
= Depreciation
N
= Missed Rentals
C
= Accessories
L
= Physical Inventory
S
= Resale Price List
V
= Inventory Available
Sales Items \ Reports
Sales Reports (S + R + underlined letters below)
- 180 -
I
= Inventory Master
P
= Price
R
= Reorder
C
= Cumulative Sales
D
= Departmental Summary
G
= Cost of Goods Sold
S
= Serial
H
= Sales History
U
= Purchases
Y
= Physical Inventory
Accounts Receivable \ A/R Reports Menu
Accounts Receivable Reports (A + A + underlined letter below)
- 181 -
C
= Customer Monthly Statements
A
= A/R Aging Reports
R
= Cash Receipts
G
= General Ledger Report
T
= Summary Transaction
T
= A/R History
S
Sales Tax
H
Cash Accounting
H
Total Charges
Accounts Receivable \ Month End
Month End Reports
- 182 -
R
= Rental Items Sold Report
E
= Rental Repairs Report
N
= Rental ROI Detail Analysis
T
= Rental ROI Summary
Analysis
I
= Rental Item Purchase
C
= Cash Receipts
A
= A/R Aging Report
S
= Sales Tax Report
Y
= Sales Analysis Report
D
= Sales Departmental
Summary Report
P
= Sales Item Purchase Report
B
= Business Status
G
= General Ledger Distribution
Report
U
Summary Transaction Report
E
Month End Closing
Contract / Reservation Entry Screen
The mouse can be used to click any of options above or you can use the TAB Key
on the keyboard along with the Arrow Keys. Below you will find Keyboard shortcuts
when at the Contract / Reservation Entry screen, click on the Underlined Letter
pertaining to the menu option.
Inquiries
I = Customer INFO
R = Rental Item/Reserv.
S = Sales Item
M = Credit Memo
Contract Functions
N = NEW Contract
V = Convert Reservation
A = Adjustment
S = Closing
T = Cancellation
E = Renewals
- 183 -
Quote Functions
Q = New Quote
J = Adjust / Convert
O = Cancellation
Customer Info
C
= Customer Info
I
= Customer Contract Info
D
= Delivery Info
R
= Rental Items
E
= Reservations
I
= Missed Rentals
Rental Item / Reservation
- 184 -
Contract Screen
Tabs
To switch between different available tabs, such as i.e. Customer, Totals; either use
the left mouse button to click on the appropriate tab, use the Page Up/Page Down
keys to move forward or backwards through available tabs, or mouse click on the
appropriate Blue Arrow (left | right).
In certain areas actions can be performed by using the ALT Key and the appropriate
underlined letter for example, ALT-C (Cancel Contract), ALT-W (Preview) and ALT-P
(Process). The same actions can be performed by Left Clicking your mouse on the
appropriate button.
NOTE: The Box with the # 1 and up/down scroll buttons are used to increase or
decrease the number of contracts to print out depending on your settings for
Parts/Form.
- 185 -
Helpful Hints
The ESCAPE (ESC) Key
When necessary to cancel an operation or exit a certain function hitting the ESC
Key will allow you to cancel the action.
Calendar
Most anytime you come across a date field in the software by right clicking the
mouse button in the appropriate field or hitting the Function F2 (F2) key on your
keyboard will bring up a Calendar screen.
Search
Most anytime you come across a field prompting for example, Invoice Number,
Customer ID, Item # and etc. By hitting the Function F10 (F10) key on your
keyboard will bring up the respective lookup screen, the same function can be
performed by Right-Clicking your mouse in the appropriate field.
- 186 -
Frequently Asked Questions
How to print a Rental Rate List?
From the Main Menu select Rental Items\Reports\Master
This will show you two different rate lists, where different information will print out
depending on your options. The Rental Rate List by Store owner will show you
all items that are in the rental database regardless if the item is marked for
display or not. Also it will show specific detail in regards to ROI information and
etc. The Customer Rate List in either of the different print options will just show
or print the rates for all items in your rental database that you physically own
(display flagged as yes).
How to Add New Clerks?
From the Total Rental Main Menu select General System Settings\Code
Maintenance\ click on the tab labeled Clerk. Now you are able to add new
clerks, modify old clerks and even delete clerks.
How to change your Tax Code?
From the Total Rental Main Menu select General System Settings\Code
Maintenance\ click on the tab labeled Tax. Now you are able to add a new tax
code, modify an old tax code or even delete codes.
Day End Reports don’t print when click on Process
A common misconception is that during the Day End Process when placing a
check (√) next to ‘PRINTED Daily Transaction Report’ during the day end close
out it will print out your Day End Reports. No reports will print out; you will need
to print out the day end reports prior to system close out. If End of Day Reports
Pooling is enabled the following box is not selectable.
Print Preview
Print Preview allows you to view the contract or invoice to the monitor screen and
than by clicking on the printer icon allows you to print the invoice. This is used in
cases where you don’t want a contract or invoice to print. For example, taking
reservations over the phone and you don’t want to keep a hard copy of that
reservation. To enable this place a check in the little check box prior to
Processing the Contract or Reservation.
How come my contracts are printing Reservation along the top rather than
printing Open Contract?
Check to see that the Total Rental Date and the Computer Date are both
identical. Otherwise this would mean a Day End Close has not been performed
and would need to be run in order for the dates to properly carry over.
- 187 -
Can I change the price on a closed ticket or add or change information on a
closed invoice?
No you cannot change anything on a closed contract. For security reasons this
option is not available. You however have the option to Void the invoice or issue
credits towards the invoice.
I didn’t print out my Day End Reports is there anyway to retrieve those
reports in the system?
If you failed to print out your day end reports the following reports can be
reprinted in a date range. From Accounts Receivable\A/R Reports Menu: you
can select from Cash Receipts, Summary Transaction, and G/L Distribution.
Note: The Cashdrawer summary is presently not able to be reprinted, so it will
need to be printed out among your normal day end reports.
How do you enter a delivery charge on a rental contract?
On the Totals Screen, before you process a contract there is a field labeled
Delivery where you can enter in the Delivery Charges there.
When two items are rented on the same contract, how do you close out just
one of the rental items them?
See page “Partial Returns”
How do you find out how much was made on rental items at the end of
each month?
If a Month End has been done the separation will be for this current month; if a
Month End has not been done the numbers will coincide with the last time an
End of Month has been run in the system.
¾ Month End procedures – see page “Month End”
¾ Main Menu select Accounts Receivable Menu>Month End>
Rental ROI Detail Analysis
Is there a way to add items to a contract that are being used with Rental
Items? For example, carpet cleaner being rented out and cleaning solution
is usually sold along with the rental item.
See page “Rental & Sales Accessories”
How do you setup an initial meter reading for some rental items? Example:
diamond cutting blades rented out with concrete saw, the customer is
charged per thousandths of an inch of wear from the initial reading.
The initial reading you can setup on the specific SKU under Rental File
Maintenance, their your going to modify the SKU on the SKU tab and enter in the
Meter Reading in the field labeled METER.
¾ When you are opening the contract, after you have selected the
Rental item to add to the rental contract, after selecting the
corresponding Rate Type there is a field called METER
- 188 -
READING where you can confirm or change the reading when
creating a contract for that item.
¾ Diamond Blades are setup a specific way, see page “Setting up
a Diamond Blade.”
How do you adjust the closing time on an item that is being closed out,
when the item was returned the night before while the store was closed?
There is no way to back date the closing time – what you can do is an Off Clock,
which will stop the Rent on the item on the date and the time you select. You’re
then going to process through with the contract adjustment.
• Off clock see page “Off Clock”
• Or if you are not going to charge the customer any additional
charges beyond the initial charges, you can choose from
Closing Options\Close with Opening Rates; which will charge
what you had originally quoted the customer /or Partial/Edit
Returns where you be able to enter a specific amount.
• Partial Returns see page “Partial Returns”
- 189 -