1
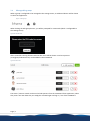
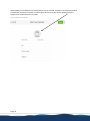
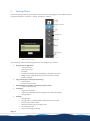
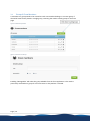
User Manual 1.2 Contents Contents .................................................................................................................................................. 2 1. Navigating CrewBoard ..................................................................................................................... 3 1.2 2. 3. Info Pages ................................................................................................................................ 4 Crew Members ............................................................................................................................ 5 2.1 Groups ..................................................................................................................................... 5 2.2 Settings .................................................................................................................................... 5 2.3 Export function ........................................................................................................................ 5 2.4 Manageable groups ................................................................................................................. 7 Settings Menu.................................................................................................................................. 9 3.1 Groups & Crew Members ...................................................................................................... 10 3.2 Logs ........................................................................................................................................ 12 3.3 Attendance List ...................................................................................................................... 12 3.4 Info pages .............................................................................................................................. 13 3.5 Settings .................................................................................................................................. 14 3.5.1 License ............................................................................................................................... 16 Figure 1 Main Screen Figure 2 Lock button Figure 3 Info page Figure 4 Change info Page Figure 5 Export function Figure 6 Presence list Figure 7 Edit group Figure 8 Fill PIN-code Figure 9 Edit Crew Figure 10 Adding Crew Member Figure 11 Settings menu Figure 12 Add Group button Figure 13 Create Crew Group Figure 14 Change Crew group members Figure 15 Edit Crew member Figure 16 Logs page Figure 17 Attendance Figure 18 Main info page Figure 19 Change default template Figure 20 Change Info Page Figure 21 Change entry value Figure 22 Attendance list button Figure 23 Default active group Figure 24 Sorting mode Figure 25 Change PIN Figure 26 License info Page | 2 3 3 4 4 6 6 7 7 7 8 9 10 10 11 11 12 12 13 13 14 14 15 15 15 15 16 1. Navigating CrewBoard Info Pages Lock Buton quick edit button Report button Configuration menu Crew members Toggle switch Groups Figure 1 Main Screen Tapping this button will lock the screen. This feature can be used when cleaning the screen to avoid accidental signing in / out. It also dims the display. Tapping the lock button again will unlock the screen, and returns the application to normal state. ` Page | 3 Figure 2 Lock button 1.2 Info pages This button shows the “info pages” feature here important telephone numbers and other contact details of local authorities, hotels, restaurants can be shown on a location basis. Configuration of the info pages is further described in chapter 2. Figure 3 Info page Info pages button Change current location Click on the “change location” button to change location. Simply click the location (if required after using the “search location” field. If required any location can be set as “default location” which will be shown by default. If no selection change is to be made click the “back” button to return to the current location. Figure 4 Change info Page Back to return to current info page Search list Set new location as default location Page | 4 2. Crew Members In this area all configured crew members will be displayed, each crew member can have the following details: • Photo • Name • Function • Telephone number (only displayed on export) • Badge ID (for integration with onboard security system) Each person has a switch next to his name showing his or her current status, by sliding the switch the person will be signed in or out. 2.1 Groups This feature can be used on larger systems with many crew members, where the number of people no longer fits properly on one screen. Navigate through the groups by clicking the group names. 2.2 Settings The settings button will open up a new page with the administrative settings of CrewBoard. This part of the application will be further described in chapter 2. 2.3 Export function When the export button is pressed the current presence list will be exported and displayed on the screen, when this is performed from and PC or MAC workstation the list can be saved as PDF. The icon can be changed to a “report” of “emergency” button. The icon can also be removed to disable Page | 5 the export function. See chapter 3 for further details. report icon emergency icon Button disabled Figure 5 Export function All persons present onboard will be displayed, together with all their relevant details, which can be very useful in the case of an emergency. Figure 6 Presence list Page | 6 2.4 Manageable groups When a group is configured to be managed in the settings menu, an additional button will be shown on the front-application: Figure 7 Edit group When clicking the Edit group button, you will be prompted for a PIN-code (which is configurable in the settings menu) Figure 8 Fill PIN-code After successful entering the PIN-code the edit menu will be shown. From here persons (crew/guest/subcontractors) can be added to the CrewBoard. Figure 9 Edit Crew The Active / Inactive switch can be used to hide persons from the CrewBoard front-application, when they return at a later date they can simply be activated again and sign in / out of the CrewBoard. Page | 7 When adding a Crew Member all relevant details can be entered, clicking on the Picture thumbnail provides the possibility to upload or make a photo directly from the device. Making a photo is supported on mobile devices only (iPad). Figure 10 Adding Crew Member Page | 8 3. Settings Menu Enter the settings menu by pressing the settings button and logging in with administrative credentials (default: username = admin, password = admin) Groups and members Logs Attendance list Info pages Settings Log out button Figure 11 Settings menu In the settings menu the following items can be configured or viewed: Groups & Crew Members o Active/inactive o Name (first, last) o Function o Telephone number (only displayed on emergency export) o Badge ID (for integration with onboard security system) o Picture (upload) Logs (check sign in and sign out history) o Filter by date o Export function (PDF) Attendance list (see who is currently signed in/out) o Export function (PDF) Info Pages o Adjust the template o Adjust the individual entries (change data, add and remove) o Change order Settings o Change Logo o Change icon or enable/disable “Attendance List” button o Email contact information o Defaults (Active group, sorting mode) o Set new password o Check and change licensing Page | 9 3.1 Groups & Crew Members A minimum of 1 group needs to be created as each crew member belongs to a certain group. If desired all crew can be placed in a single group, removing the need to switch groups on the front page. Figure 12 Add Group button Figure 13 Create Crew Group Enabling “Manageable” will make this group editable from the front-application. This mode is particularly useful when a group for sub-contractors or day workers is created. Page | 10 By selecting a group name, crew members can be added or removed Figure 14 Change Crew group members View details Add crewmember Move position Edit Delete The “move position” button can be used by selecting and dragging the person to the desired position. This action moves the actual person to a different position on the front page. Clicking the “view details” option of an existing member or clicking the “add member” button navigates to the individual member page. There you can activate/disable the user, change the group membership add/change the individual entries (Name, Job, Phone and Badge ID). By clicking the “upload file” button you can upload a photo. The image size should not exceed 1Mb size, preferred format is .PNG. Navigate back Activate/disable user Change group membership Upload picture Figure 15 Edit Crew member Page | 11 Save changes 3.2 Logs On the log page a full log of who signed in/out and at what time can be viewed and exported. Use the export button if you want a full export of the log. Use the filter button after selecting “from” and “to” dates to view a more specific part of the log and afterwards export it to a PDF document. Figure 16 Logs page Log Export Filter 3.3 Attendance List The attendance list page displays the current presence together with the crew member’s details. The export function can be used to export this list to a PDF document. Figure 17 Attendance Page | 12 Info pages 3.4 The info pages menu provides the configuration of the default info pages template and the individual info pages. Figure 18 Main info page Edit default template Add info page Set as default Change info page entries Edit info page name Delete entry Figure 19 Change default template Add title entry Change title order Change title value Delete title value Edit default template: entries changed here will have an effect on newly created info page entries, fields defined here will be present when creating a new info page. The correct setting of the default template results in easier configuration of the individual info pages, all titles listed here will be present when creating a new info page. Add info page: Create a new info page based on the default template Set default: set info page as default info page (upon opening/restarting the app) Change info page entries: to adjust current fields on the info page and/or to add/remove Delete entry: to delete an entry Page | 13 Figure 20 Change Info Page Edit default template Add item Delete entry Change entry values Change order S Figure 21 Change entry value Edit default template Navigate back Change title (field description) Delete entry Adjust value Save entry Settings 3.5 The settings menu provides some of the basic configuration parameters for the CrewBoard application. Logo, upload logo that is shown on the pages, images are automatically resized to an height of 80 pixels (keeping the aspect ratio in tact). The image size should not exceed 1MB, preferred format is .PNG. Page | 14 Attendance list button: Enable or disable the attendance list button on the front page. If no Attendance button is required, it can be set to a report button or a emergency button. This does not change functionality of the button itself, just the icon. Figure 22 Attendance list button Updates e-mail address: When an email address is provided, each person signing in or out will trigger an email process that sends the current presence list in a PDF document to the specified email address. Please note that this feature could overload an email box under heavy use. Also a valid SMTP server needs to be present for sending the emails. Default active group: Select the group that needs to be displayed when opening the frontapplication. When refreshing the web-page it will also return to the default group. Figure 23 Default active group New password: change the current password by entering it in both fields and selecting the save button Sort mode: Defines the way Crew Members are sorted in the application, the options are sort on Name, Job, Presence or Manual. Figure 24 Sorting mode Pin code: The pin code is used for editing data entries via the front-applications. All editable values require a pin code to be entered before allowing them to be edited. This allows for management directly from the front application device such as an iPad. Figure 25 Change PIN Page | 15 3.5.1 License When deploying CrewBoard a system ID is generated and when requesting a licence the System ID needs to be downloaded and sent to YachtCloud. YachtCloud then generates a licence ID based upon the number of user licences purchased. Figure 26 License info Page | 16