1
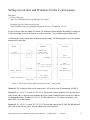
Getting Started with uCLinux/Blackfin Development Under Windows.
The Survival Guide
Version: July-03-2006
Topics:
Preparing the Developer Resource CD-ROM.
Unpacking coLinux installer before saving it on the CD.
Installing coLinux.
Adding the second ether card to the computer system.
Where are the coLinux settings located?
The 2-card system under Windows XP (untested).
The 2-card system under Windows 2000 (tested).
Setting up coLinux and Windows for the 2-card system.
Configuration files for the 2-card system (both Windows and coLInux).
Talking to the STAMP over serial connection.
Talking to the STAMP over ether connection.
Getting comfortable.
Mounting the CD-ROM.
Exchanging files between Windows and coLinux.
Adding more disk space to coLinux.
Quick way to backup the coLinux work.
Installing the new version of Blackfin Toolchain.
Installing the new version of Blackfin uCLinux kernel.
What is next?
Forthcoming Survival Guides.
Which wordprocessor did I use?
Disclaimers.
About the author.
This is a recollection how I set up uCLinux/Blackfin development tools on one particular Windows machine
running Win2k Professional. I decided to use the Windows PC because all my other work is performed under
Windows. Switching my work other to Linux is out of question. Fortunately, the Blackfin team released a sonamed Cooperative Linux, which is a complete Debian Linux running in a sandbox under Windows. This
Guide recalls my steps in getting started with Blackfin development under coLinux. There is less material
covered by this Guide than one can find in the official Wiki documentation, but the steps and problems are
presented in the order they appeared during the actual installation process.
The need for documentation became painfully obvious when I took a few week break due to my other
projects. The details evaporated from my memory and I again felt lost. I hope that this Survival Guide will help
refresh both my and your memory a few months down the road.
Getting Started with uCLinux/Blackfin Development Under Windows.
(c) Wojtek Skulski
3-Jul-2006
1
Preparing the Developer Resource CD-ROM.
First, I made a separate directory BF_Tools with the following layout. Then I burnt a CD by dragging-anddropping the BF_Tools onto the Windows CD burner.
\
BF_Toolchain_2005R4
colinux_installer_v095
extra
images
sources
Kernel_ 2005R4_RC2
UBoot_ 2005R4
Wiki_docu
<-- root dir (was "BF_Tools" under Windows)
<-- Toolchain (compiler, etc.)
<-- coLinux v. 0.95 *unpacked* installer
<-- uCLinux kernel for Blackfin
<-- Das uBoot for Blackfin
<-- documentation in Wiki format
Notes:
1. The content of the directories comes from the "release directories" on www.blackfin.uclinux.org. Go to the
main web page. Near the top there are "projects". Click on the word "Releases" and it will put you in the
relevant directory. Copy the files from there.
2. Use the release files with the same date. For example, the 2005 R4 compiler will only work with the 2005
R4 kernel. Releases with different dates are not compatible.
3. The release web page says you should be able to obtain release notes by clicking on the release version
title, but often the release notes are in the form of a separate PDF file. The PDF files also provide the file
lists and installation instructions.
4. I unpacked the coLinux installer before burning the CD, making it possible to run the installer directly from
the CD. Further instructions are below.
5. The snapshot of Wiki documentation is not very useful because the Wiki evolves daily on the website
www.blackfin.uclinux.org. In practice one needs to use the online Wiki. I decided to include the Wiki on
the CD for the purpose of making a good-looking CD.
6. Printing and reading some selected Wiki pages is very useful before attempting the installation. I prefer to
write my notes on printed copies.
7. By mistake I inserted a space into the directory names Kernel_ 2005R4_RC2 and UBoot_ 2005R4. The
space escapes attention while reading (did you notice it?) and then it causes "no such file" error while typing
the names without spaces (what is a natural thing to do). The remedy in such a case: use quotation marks
while changing the working directory:
> cd "UBoot_ 2005R4"
I am documenting the mistake because it may happen again. I will remove the spaces for the next CD.
Getting Started with uCLinux/Blackfin Development Under Windows.
(c) Wojtek Skulski
3-Jul-2006
2
Unpacking coLinux installer before saving it on the CD.
The coLinux is found at http://blackfin.uclinux.org/frs/?group_id=32
The coLinux 0.95 is distributed as a single file colinux_installer_v0_95.zip, whose size reported on the web
page is 231.67 MB. The file takes 237,229 kB on the NTFS disk. There are no obvious instructions or
release notes on the website. Fortunately, a clue is provided if one clicks on the release
title line "bfin-colinux_v0.95". The clue says verbatim:
For documentation and a quick start guide, read the Radme
inside the package or read the wiki page at
http://docs.blackfin.uclinux.org/doku.php?id=colinux
MS-Word or a Word equivalent must be available on the Windows machine to make use of the readme. I
downloaded the file colinux_installer_v0_95.zip to a temporary Windows directory. After double-clicking
on the archive I found the readme.doc. Inside the readme I saw a bunch of warnings ("might crash your
system") which kept me away from coLinux for about two weeks. Below the warnings there was an
explanation of the coLinux design philosophy, followed by "The coLinux setup". These particular setup
instructions were not very useful. Fortunately, the other instructions on the Wiki were quite clear. I discussed
the Wiki page with the sysadmins to make sure coLinux will not cause problems for the local network.
Next, I unpacked the .zip file. This step has created the directory named "colinux_installer" with subdirectories
"extra", "images", and "sources". To avoid confusion, I renamed "colinux_installer" to "colinux_installer_v095".
This main directory contains coLinux_setup.exe, which is a typical Windows setup program that needs be
double-clicked to initiate the installation.
At this point I could have started the installation process, but I decided to burn the CD instead and install from
the CD. The CD will be useful to install on other computers. So I moved the "coLinux_installer_v095"
to BF_Tools, and I kept adding other directories there to create a complete Developer CD.
At this point I also realized the documentation was a problem, so I started writing a track record that has
become this Survival Guide.
Installing coLinux.
References:
CoLinux Wiki page:
http://docs.blackfin.uclinux.org/doku.php?id=colinux
CoLinux installation Q&A:
http://blackfin.uclinux.org/forum/forum.php?thread_id=1587&forum_id=44
Getting Started with uCLinux/Blackfin Development Under Windows.
(c) Wojtek Skulski
3-Jul-2006
3
The Wiki page mentions several details without explanation. I recommend printing the page, highlighting
unclear points, and poking around until all is clear. Otherwise one may provide wrong parameters during
the installation.
It is not stated whether or not you need Windows admin rights to install and run coLinux. In my case I do have
such rights, so the problem did not pop up. Based on information that I gathered later, I now think you either
need Windows admin rights to install coLinux, or you have to ask your admin to do it for you. In order to use
coLinux you can be an ordinary user if you install "services" mentioned below.
The first step on the Wiki page says "create a root folder (e.g. colinux) where the proper files and
subdirectories will be located". I could skip this step because my CD already had the proper folder structure
created when I unzipped the installer. So I did not create any folders on the hard disk. NB, this folder should
not be called "a root folder" but rather "an installation folder" because it contains the coLinux installation files
rather than the final coLinux system.
I double-clicked on the colinux_setup.exe in the CD installer folder and followed the Wiki directions. The
installation went smoothly, but there were a few unclear points that became more clear only later.
-- The "tuntap driver" is a piece of software that makes coLinux think it talks to the physical ether card, while
in fact it talks to Windows, who then talks to the ether card. (It is probably more complicated than this, but this
level of understanding is probably fine.) One definitely needs to install tuntap.
-- When I installed coLinux, there was only one ether card in the machine. The installer did a good job
dealing with the ether card. The networking parameters were setup correctly. The success created an
impression that one hardly needs to know what is set and where. The impression was proven wrong as soon
as I added the 2nd networking card to the system. Adding the 2nd card is covered in the next section.
-- The coLinux is seen by Windows at one IP address, while Windows is seen by coLinux at another IP
address. Both have to be "on the same class C subnet" (whatever that means). The numbers proposed on the
Wiki page are just fine, but read the next paragraph. In my case, I have chosen 10.12.12.x for the
communication Windows <--> coLinux.
-- The Wiki page says "It should be an address in a not yet routed class C subnet...". How do I know if
the subnet was "not yet routed"? My sysadmins looked at the numbers and noded their heads that the subnet
was "not yet routed" and hence it could be used. Ask your sysadmins just in case!
-- I also wanted to know if using these IP addresses could cause problems to the rest of the local network.
The Wiki page does not explain, and it is better to ask then to be sorry. So I asked on the forum (reference
above). The answer: by default, these addresses do not propagate to the network. They are used strictly for
internal communication between Windows and coLinux. Windows does not send the packets any further, if the
communication is between the addresses10.12.12.x. However, the phrase by default implies that the packets
can optionally be sent to the local network, what probably would be bad. I decided to take the risk, assuming
that the default has been set up correctly by coLinux developers.
-- In my case, when the IP dialog appeared, it was colored such that I could not see what I was typing (a
Getting Started with uCLinux/Blackfin Development Under Windows.
(c) Wojtek Skulski
3-Jul-2006
4
bug in the video driver?). It turned out later that I mistyped the IP addresses, and I ended up with 10.12.12.11
and 10.12.12.12 rather than intended 10.12.12.1 and 10.12.12.2. The mistake did not hurt. The addresses
can be changed later "by hand", as explained later in the Guide.
-- The Wiki page says "There is also an option for serial support." If you are going to connect the BF
STAMP to your Windows/coLinux box, you need this option. You need to know which physical serial port(s)
your PC has, and select one of these during the installation. Doing so will enable coLinux to talk to the
STAMP over this serial port. I planned doing just that, and most likely you want to do it as well. Windows can
still use this serial port, so there is no problem with activating the option just in case.
-- It was not clear if I should say "yes" to installing PuTTY. PuTTY was already installed long ago on my
computer, so I said "no" to PuTTY installation, but PuTTY was installed nevertheless. I now have two
PuTTYs on my PC. If you already have a PuTTY and want to use it rather than install the new one, then you
can change the command strings in the square icons mentioned below. I realized this only later.
-- Wiki says enigmatically "You can also select the profile for PuTTY and the service if you want." There
was no explanation whether I should or should not "want" either of the two. I said "no" to both, though I was
not sure what they were. Later it turned out, that I would need "services" if I was an ordinary user on my
Windows machine. However, since I have administrator rights, I can start coLinux without installing services.
-- After installation there will be two coLinux users. One is named "root", the other "colinux". The system will
get installed with default passwords "bf533" for both users. I was told later I should change these a.s.a.p to
something proprietary and secure, because part of the network traffic is actually being routed to coLinux.
What means the coLinux system can get hacked while it is running. Therefore, the passwords have to be
changed just like in a true Linux system.
-- After changing user passwords, I changed the samba password as well. (Samba makes it possible to see
each other's directories between Windows and coLinux.) There are two users, root and uclinux. The
password should be changed for both. Login as user "user" and execute the following:
$ smbpasswd
Old SMB password:
<--- initially bf533
New SMB password:
<--- type new password
Retype new SMB password:
<--- type new password again
Password changed for user uclinux
-- "If you want to mount your coLinux home directory as a SMB share under Windows, you have to
configure the TAP driver." This was the 2-nd to last line of the post-installation messages. It did not explain
how to configure the TAP driver to work with samba. It was not explained in the Wiki installation notes either.
It turns out that nothing has to be done, other than changing the samba password as explained above.
-- As a final puzzle, Wiki says "Now you can install additional software with synaptic or aptitude." The
statement reads like one of those insider jokes ("less is more"). Would be better if a pointer was given to a
coLinux maintainance page, because this innocent statement touches upon upgrading the freshly made coLinux
installation by either installing new or upgrading the existing packages. My experience tells me that Linux
maintainance is a can of worms. One sentence is not quite enough.
Getting Started with uCLinux/Blackfin Development Under Windows.
(c) Wojtek Skulski
3-Jul-2006
5
Like I said, I launched the installer and all went smoothly. I enjoyed my fresh "Linux in a box" for a while. And
then the reality knocked to the door to remind I was dealing with the true Linux system after all. The fun turned
into a struggle. So read on.
Adding the second ether card to the computer system.
My sysadmins were not happy about connecting the BF STAMP to the local network. I decided to use a
separate networking card to connect the PC and the BF STAMP. I asked them to install the card, and when I
arrived the next day, the 2nd card was in the slot. It was not connected to anything yet, but the Windows
drivers were already installed. The card was ready and waiting for the networking parameters.
I tried using a crossover ether cable to connect the STAMP to this card, but the LEDs were not blinking. The
sysadmins swore it was a proper cable. Who knows. Finally, they gave me a hub and I connected both the
STAMP and the new card to the hub using the regular ether cables. The LEDs on the STAMP were blinking
now. Just remember the lesson: if the LEDs are not blinking, change the cables until they are.
Where are the coLinux settings located?
References:
CoLinux Wiki page:
http://docs.blackfin.uclinux.org/doku.php?id=colinux
Configuring for the 2nd networking card Q&A:
http://blackfin.uclinux.org/forum/forum.php?thread_id=1730&forum_id=116
Setting up the 2-card system turned into a struggle. First, I had to find where the settings were located and
could be changed. I found 7 (seven) such places. They all must be consistent.
1. CoLinux configuration file config.txt.
On my machine, coLinux is installed in the Windows folder P:\bfin-colinux. I will call this "the Windows
coLinux folder". In this folder there are eight executables (with names colinux-xxx.exe), the i-386 coLinux
kernel image for the host PC, the images of the coLinux root filesystem and the home filesystem, and so on.
The installer also created the coLinux configuration file config.txt that is well documented on the Wiki
page. This file contains the vital coLinux settings to be changed.
In the process of setting up I renamed the original file to config_1card.txt. I then created another file
named config_2card.txt for the configuration with two network cards. Both files will be discussed in the
next section.
Getting Started with uCLinux/Blackfin Development Under Windows.
(c) Wojtek Skulski
3-Jul-2006
6
2. Xming configuration C:\colinux_Files.
The installer created a Windows folder C:\colinux_Files. Despite the name, it contains only the Xming
files, but no other coLinux files. I did not try to change the Xming settings, even though Wiki says that the
75-dpi and 100-dpi fonts have to be installed "by hand". Emacs does not work because the fonts are
missing. A simple remedy is not to use emacs. I am using nano instead. (Nano is a simple but quite
reasonable text editor.)
3. Windows desktop icons.
Four Windows desktop icons were created. Each icon can launch an arbitrary Windows executable with
some command-line parameters. The string which contains the command can be viewed and changed by
right-clicking on the icon and selecting Properties from the pull-down menu. In such a way the icons can be
customized. The four icons are discussed below.
3.1 The one that looks like X is launching the Xming X-windows server. It does not need any twiddling (yet).
3.2 A round icon labeled CoLinux will start the coLinux system by executing the following command
P:\bfin-coLinux\colinux-daemon.exe @config.txt
I created another round icon (using copy-paste on the desktop), and changed the commands of both round
icons to the following. In such a way I can start coLinux with two different configurations which will be
discussed shortly.
P:\bfin-coLinux\colinux-daemon.exe @config_1card.txt
P:\bfin-coLinux\colinux-daemon.exe @config_2card.txt
It is also good to know how to stop coLinux. The instruction says one should issue a Linux command, but I
noticed that clicking on the "x" mark in the upper-right corner of the coLinux console also does the trick.
The console is the coLinux window that you *cannot* type into. After exiting in such a way one has to wait
until Windows warning dialog goes away. It takes a few seconds until it does.
3.3 Two square icons were created. One is labeled bfin-root, the other bfin-colinux. They look the same, but
execute two different command lines.
P:\bfin-coLinux\putty\putty.exe -X [email protected]
P:\bfin-coLinux\putty\putty.exe -X [email protected]
These square icons launch PuTTY and perform login as two different users ("root" or "colinux") into a
machine whose IP address is 10.12.12.10. This is one of the places where the IP address needs to be
adjusted. At some point I changed the IP address inside coLinux from the initial value to 10.12.12.10.
(More details later.) I then adjusted the icon commands, as shown above. If you cannot login using PuTTY,
what happened to me while setting up the two-card system, this is one of the places to look at.
Getting Started with uCLinux/Blackfin Development Under Windows.
(c) Wojtek Skulski
3-Jul-2006
7
4. Networking cards and pseudo-cards under Windows.
The settings of the physical cards and the tuntap pseudo-cards are accessed by clicking the Windows Start
-> Settings -> Network and Dial-up Connections.
After installing the 2nd ether card, there were two physical cards (shown as manufacturer's card names)
and one TAP pseudo-card. I renamed the physical cards to "Local Area Connection" and
"Dedicated_card" in order to know which is which. The TAP pseudo-card was created earlier by the
coLinux installer.
I was advised on the discussion forum (reference above) to create the second TAP pseudo-card. This is
probably a proper recipe for Windows XP, but was a mistake under Windows 2000. Under Win2k one
should not create another TAP.
So, depending on which Windows you are using, you should see either one TAP (under Win2k) or two
TAPs (under Win XP). This second TAP you will have to create yourself by hand. Creating the second
TAP is explained further down in the Guide.
One can right-click on any card or pseudo-card and select Properties. Then select Internet Protocol
(TCP/IP) and hit the button "Properties". Now one can configure any given card or pseudo-card.
Specifically, I had to properly configure both the IP address and the network mask of the newly installed
card. My settings will be discussed further below.
5. uCLinux networking configuration inside uCLinux: /etc/network/interfaces
In addition to the config.txt discussed earlier (which lives in the Windows uCLinux folder), there is another
configuration file named /etc/network/interfaces inside coLinux. The following commands were copied
from a PuTTy logged into coLinux:
>
>
cd /etc/network
ls -la interfaces
-rw-r--r-- 1 root root 1352 Apr 20 12:57 interfaces
This file is discussed on the Wiki page, but only for a *single* ether card. In the next section I will give my
version of it for the two-card system.
6. uBoot running on the STAMP board.
The IP address of the BF STAMP is set by submitting a command to uBoot using the serial connection.
Until this address is correctly set, the communication with the same uBoot over the ether link will not work.
I do not know whether this IP address will propagate to the uCLinux that is being booted by uBoot on the
Getting Started with uCLinux/Blackfin Development Under Windows.
(c) Wojtek Skulski
3-Jul-2006
8
same board.
BOOT> setenv ipaddr 10.12.13.20
BOOT> setenv netmask 255.255.255.0
<-- do not use "=" sign here! Wrong: ipaddr=10.12.13.20
<-- do not use "=" sign here!
7. uCLinux kernel running on the STAMP board.
After the kernel is booted, the IP address of the BF STAMP is set by submitting a command to uClinux
kernel using the serial connection. Until this address is correctly set, the communication with the same
uClinux over the ether link will not work. I do not know whether this IP address is propagated from the
uBoot bootloader to the uCLinux being booted.
I have not yet gotten to playing with the uCLinux kernel running on the board.
The 2-card system under Windows XP (untested).
References:
Configuring for the 2nd networking card:
http://blackfin.uclinux.org/forum/forum.php?thread_id=1730&forum_id=116
In particular, Jurgen's message sent on 2006-04-13 19:18.
According to Juergen Hennerich (reference above), under Windows XP you need to add another TAP to the
Windows side, and then "bridge" the new TAP with the new hardware card, using the built-in "bridge"
function. I have not tested this procedure because my machine runs Win2k. I only created the second TAP,
only to find out that Win2k does not have the "bridge" function. So here is the untested recipe for WinXP.
You have to first install a new TAP connection under Windows. For this you should open the
Windows control panel and select the "add hardware" option. Windows will scan for new hardware.
You should select the option, that the hardware is already installed. Then you should select the option
that gives you a list of hardware. Select "network hardware" and select the "coLinux TAP adapter"
and install it.
Remark: I have actually done this under Win2k. I can now see two TAP's in the Windows "Network and
Dial-up Connections". I renamed them TAP_1 and TAP_2 and tried the next step, which unfortunately did not
work because of lacking "bridge" functionality under Win2k.
Now go to the network connection dialog and select your ethernet connection, which you want to use
for the bridge and press Ctrl and select the new TAP adapter.
Open the panel "Network and Dial-up Connections", or whatever this panel is named under WinXP. Highlight
the 2nd hardware ether card that has been added to the system to become a "dedicated card". Press CTRL
Getting Started with uCLinux/Blackfin Development Under Windows.
(c) Wojtek Skulski
3-Jul-2006
9
and then highlight the TAP_2 that you have just created.
When you have selected both, press the right mouse button. The context menu will pop up. Select the
"bridge" option.Now you will see a new connection: The bridge. You can give it an IP-Address. This
will be the IP-Address on which the Windows host will be seen on the network.
A new pseudo-card will appear in the "Network and Dial-up Connections". Right-click on it and give it the IP
address and the mask just like the other cards.
Now you should edit the config file config.txt in the Windows coLinux directory. There you can see a
line: eth1=tuntap. You should change the line to
eth1=tuntap,"exact name of the network connection"
and add another line: eth2=tuntap,"Name of the new TAP".
Assuming that the original card is named "LAN_card", and TAP_2 was "bridged" to "Dedicated_card" as
explained earlier, I think that you would use the following two lines. But I am not quite sure because this has
not been tested.
eth1=tuntap,"LAN_card"
eth2=tuntap,"TAP_2"
Like I said, I was not able to complete this procedure under Win2k. So I now have two TAP's, one of which
is useless. However, I cannot delete one of these, because according to Juergen this would actually delete both
TAP's. So I have to accept the presence of the unused TAP in my system.
The 2-card system under Windows 2000 (tested).
References:
Configuring for the 2nd networking card:
http://blackfin.uclinux.org/forum/forum.php?thread_id=1730&forum_id=116
After finding out that the "bridge" does not exist under Win2k, Juergen offered the following advice:
If you have Win2k you have to use the pcap-bridge. You have to go to:
http://www.winpcap.org/install/default.htm and download the winpcap package and install it.
I installed WinPcap 3.1 which provides the "bridge" function to Win2k. This program does not seem to have
the user manual, though it does have a comprehensive developer manual. Actually, according to the website
WinPcap is a Windows Packet Capture Library. I gave up further investigations of WinPcap and proceeded
to the next stage of the battle.
Getting Started with uCLinux/Blackfin Development Under Windows.
(c) Wojtek Skulski
3-Jul-2006
10
Setting up coLinux and Windows for the 2-card system.
References:
CoLinux Wiki page:
http://docs.blackfin.uclinux.org/doku.php?id=colinux
Configuring for the 2nd networking card:
http://blackfin.uclinux.org/forum/forum.php?thread_id=1730&forum_id=116
So now we know where the settings are located. The WinPcap has been installed, but nothing is working yet.
It will start working as soon as the settings are made consistent in 7 (seven) different places listed earlier.
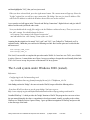
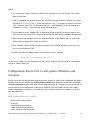
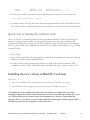
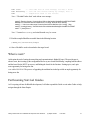
I will sketch the system configuration, and then present the settings. The following figure is best viewed with a
monospaced Courier font.
|----------------------------------------------|
STAMP
|
|
Windows
|
|
coLinux
|
|
|
|
|
|
|
|
|
------| Dedicated
|
|
|
|
ether
|
|
|
| ether card
|
|
|
| 10.12.13.30 |<--->| hub |<--->| 10.12.13.10
|
|
|
|
|
|
|
|
|
|
eth2
|
|
|
------|
winPcap |<....>| 10.12.13.20 |
|
|
|
|
|
|
|
|
|
|
|
|
|
|
|TAP
|
|
eth1
|
|
|
| 1: 10.12.12.11 |<....>| 10.12.12.10 |
|
|
| 2: 10.12.12.13 |
|
|
|
|
RS-232
|
|
|
masks
|
| serial port |<--------------->| serial port
|
| 255.255.255.0 |
-------------|
|
|
|
|
|
|
|
|
1st ether
|
|
|
other machines <------------>| IP automatic
|
|
|
local net
----------------------------------
Figure 1. The layout of three different networks in the 2-card system.
Network 1. The 1st physical ether card is connected to LAN. It receives the IP automatically via DHCP.
Network 2, IP = 10.12.12.x, mask 255.255.255.0. This network connects Windows (TAP pseudo-cards)
with CoLinux (eth1). It has been setup automatically by the coLinux installer, but later I tweaked it a little bit
by changing the coLinux IP address to 10.12.12.10, still on the same x.x.12.x subnet. By mistake, I also
added TAP_2 by to this network.
Network 3, IP = 10.12.13.x, mask 255.255.255.0. This network connects the STAMP, the 2nd dedicated
ether card, and the coLinux (eth2). All of its settings were created by hand.
Getting Started with uCLinux/Blackfin Development Under Windows.
(c) Wojtek Skulski
3-Jul-2006
11
Notes:
1. The "connections" between coLinux and Windows are not physical wires, and therefore I have drawn
them as dotted lines.
2. TAP_2 is redundant and should be deleted, but according to Juergen it cannot be deleted. I have given
an address 10.12.12.13 to TAP_2, on the same subnet as TAP_1. As it turns out, unless I specify that
TAP_1 should be used, TAP_2 is being used and TAP_1 is left dangling. So in fact the connection is
established over TAP_2. I have therefore shown both in the figure.
3. The fact that there is one "dangling TAP" is shown in the Windows task tray as a small computer icon
with a red cross, the same icon as it would be shown when the ether cable is accidentally disconnected.
4. When coLinux is not running, there are two disconnected icons on the Windows tray, i.e., both TAPs.
When coLinux is running, there is only one such icon.
5. Since I installed coLinux, Windows Explorer developed a nasty habit of popping up error boxes, one
box per each unconnected TAP.
6. In order to log into the running coLinux system, one has to issue a command
putty.exe -X [email protected]
As one can see, doing so we are connecting to the eth1 "device" inside the coLinux system. We are using the
user name "colinux" in this case.
Configuration files for the 2-card system (Windows and
coLinux).
Since we know how the physical and non-physical nets are arranged, it is time for the configuration files in their
full glory. There are two such files, the P:\bfin-colinux\config.txt in the Windows coLinux folder, and the file
/etc/network/interfaces in the folder inside coLinux. Furthermore, the file "config.txt" has two variants, for the
one-card and two-card configurations. I intend to use mostly the two-card variant. The one-card variant is
meant for debugging in case the two-card variant developes a problem and becomes unusable (e.g., the 2nd
card fails in hardware).
Begin P:\bfin-colinux\config_1card.txt
kernel=P:\bfin-coLinux\vmlinux
mem=256
initrd=P:\bfin-coLinux\initrd.gz
cobd0=P:\bfin-coLinux\rootfs.img
cobd1=P:\bfin-coLinux\homefs.img
Getting Started with uCLinux/Blackfin Development Under Windows.
(c) Wojtek Skulski
3-Jul-2006
12
cobd2=P:\bfin-coLinux\swap.img
cofs0=c:\
cofs1=P:\bfin-coLinux
cofs2=D:\
root=/dev/cobd0
ttys0=COM1,"baud=57600 parity=N data=8 stop=1 xon=off odsr=off octs=off idsr=off to=on rts=on
dtr=on"
eth0=slirp,"",tcp:22:22/tcp:333:22/tcp:10000:10000/udp:69:69
eth1=tuntap
End P:\bfin-colinux\config_1card.txt
Begin P:\bfin-colinux\config_2card.txt
# same text as config_1card above, plus one extra line at the end
eth2=pcap-bridge,"Dedicated_card"
End P:\bfin-colinux\config_2card.txt
Notes:
1. The file config.txt is well explained on the Wiki page (reference above).
2. The text ttys0=COM1,.... is one line, but has been wrapped around in the printout above.
3. Two config's are almost identical. The only difference is one extra line in the 2-card variant.
4. These are Windows 2000 files. You would not use WinPcap under Windows XP.
Begin coLinux file /etc/network/interfaces
# /etc/network/interfaces -- configuration file for ifup(8), ifdown(8)
# The loopback interface
auto lo
iface lo inet loopback
# there are 3 interfaces
# eth0 mapped to the LAN card that connects to the world in Windows
# eth1 mapped to TAP_1 on Windows side
# eth2 mapped to hardware Dedicated_card on Windows side
auto eth0 eth1 eth2
# The first network card - this entry was created during the Debian installation
# (network, broadcast and gateway are optional)
iface eth0 inet dhcp
Getting Started with uCLinux/Blackfin Development Under Windows.
(c) Wojtek Skulski
3-Jul-2006
13
# First TAP_1 in the PC machine is named eth1 here
# Give it coLinux addr 10.12.12.10
# Note: I also created another TAP_2 in Windows but it was a mistake
#
TAP_2 is not used for anything. Unfortunately it cannot be removed
#
from Windows, so it just sits in Windows not being used.
iface eth1 inet static
address 10.12.12.10
netmask 255.255.255.0
# Second dedicated hardware card in the PC machine is named eth2 here
# Give it coLinux addr 10.12.13.x
# The Dedicated_card has address 10.12.13.y under Windows
# The STAMP board connected to the Dedicated_card has address 10.12.13.z
# SUMMARY:
# The net 10.12.13.xxx is the Dedicated net that connects
# coLinux -- Windows Dedicated_card -- STAMP board(s)
# 10.12.13.20 -- 10.12.13.10
-- 10.12.13.30
iface eth2 inet static
address 10.12.13.20
netmask 255.255.255.0
End of coLinux file /etc/network/interfaces
Notes concerning /etc/network/interfaces:
-- The remarks that TAP_2 is useless while TAP_1 is used are not entirely accurate because software
chooses the one or the other. If I do not specifically request TAP_1, it will actually choose TAP_2.
-- When coLinux starts, a message is issued to the console As far as I can tell, this message is of no further
consequence. I do not know what is causing this complaint.
eth2: duplicate address detected!
Talking to the STAMP over serial connection.
This topic is well covered in the Wiki documentation. I used both Hyperterminal from within Windows, and
minicom started on the PuTTY coLinux session. Establishing a serial connection is of course the first necessary
step when talking to the STAMP board. Assuming that the serial port has been properly configured while
setting up coLinux, the procedure is simple: connect the serial cable, start either the Hyperterminal (Windows)
or the minicom (coLinux) and hit the reset button on the STAMP board.
CoLinux serial port settings are written in the config.txt, so one can re-configure the serial port at any time by
editing that file. Concerning Hyperterminal, it has a menu-based configuraton.
Getting Started with uCLinux/Blackfin Development Under Windows.
(c) Wojtek Skulski
3-Jul-2006
14
Talking to the STAMP over ether connection.
After setting up the networking as described above, I managed to load a kernel file from the coLinux to the
STAMP. However, the STAMP would not boot this file, because the uBoot that was in the flash was 2 years
old, and it did not properly decompress the new kernel. (Surprise. I thought uBoot was a bootloader without
such dependencies.)
Before downloading the kernel to the STAMP one has to do two things.
1. Put the kernel image into the tftp folder under coLinux. The name of the folder is /svr/tftp
2. Tell uBoot where to look. UBoot expects three things:
2.1 The IP address of the tftp server must be given to uBoot.
2.2 The name of the file must be uImage.
2.3 The file must be palatable to uBoot (not true in this case).
Here is the record. First, let's see what I have put in the tftp folder. The following was copied from the
coLinux terminal window.
colinux:/svr/tftp# ls -la
total 11912
drwxr-xr-x 2 root root 4096 Apr 20
drwxr-xr-x 3 root root 4096 Mar 23
-rwxr-xr-x 1 root root 9890597 Apr
-rwxr-xr-x 1 root root 9890597 Apr
colinux:/svr/tftp#
18:13 .
17:06 ..
20 18:08 linux-bf533
20 18:13 uImage
Second, let's see if uBoot can see the tftp server. The following was copied from the STAMP communication
window. Notice that 10.12.13.20 is the IP of the eth2 in coLinux, which has been set up to talk to the
WinPcap "bridge", and therefore to the STAMP.
BOOT> ping 10.12.13.20
Using MAC Address 00:FFFFFFE0:22:FFFFFFFE:03:FFFFFFFA
host 10.12.13.20 is alive
Third, let's inform uBoot that it should use 10.12.13.20 for the tftp transfer. The following was copied from
the STAMP communication window.
BOOT> setenv serverip 10.12.13.20
BOOT> setenv gatewayip 10.12.13.20
Getting Started with uCLinux/Blackfin Development Under Windows.
(c) Wojtek Skulski
3-Jul-2006
15
Lastly, lets initiate the tftp session, in which uBoot will transfer the uImage to the STAMP memory. The
following was copied from the STAMP communication window.
BOOT> tftpboot
Using MAC Address 00:FFFFFFE0:22:FFFFFFFE:03:FFFFFFFA
TFTP from server 10.12.13.20; our IP address is 10.12.13.30
Filename 'uImage'.
Load address: 0x1000000
Loading: ########..... (many more # characters)
done
Bytes transferred = 9890597 (96eb25 hex)
BOOT>
Mounting the CD-ROM under coLinux.
After the coLinux is already installed, the CD-ROM can be mounted under coLinux. Somewhat amazingly, the
CD-ROM is still accessible from Windows, even though it is also mounted under coLinux.
>
>
mount /mnt/cdrom
ls /mnt/cdrom
<-- this will show the files on CD
Exchanging files between Windows and coLinux.
There are three methods to exchange the files. 1) When the coLinux is already installed, the CD-ROM can be
used to exchange files between Windows and coLinux. CDs are cheap, and one can use a rewriteable CD.
Additionally, the CD can be used both for exchanging the files and backing them up at the same time.
2) By default, disk C: is visible under coLinux as a folder /windows. I created a folder C:\temp and I am using
it to exchange the files. The folder is visible as /windows/temp under coLinux. From Windows side, this folder
is read/write. From coLinux side, it is read-only for user colinux, and read-write for user root.
3) Samba can be used to share the Windows folders with coLinux. Samba seems to be configured properly.
The configuration is in the file /etc/samba/smb.conf.
In order to use samba, you need to change the samba password for user colinux from default bf533 to
something more secure. After doing this, on Windows side execute the icon "My Network Places". Type the
following into the dialog:
\\10.12.12.10\colinux
where the number 10.12.12.10 is the IP address of the eth1 interface under coLinux (in your case the IP may
be different). The name colinux means the folder you want to share, in this case a home directory of user
colinux. You can find out the IP number by typing the command ifconfig under coLinux, and looking at
the block titled eth1. After you type the above, Windows will ask for user name and password. Type
colinux as the name, and type the samba password as password. (You have just changed it a minute ago.)
Getting Started with uCLinux/Blackfin Development Under Windows.
(c) Wojtek Skulski
3-Jul-2006
16
NB 1. Looking at the samba config file it seems to me that user root is not allowed to be the samba user,
probably because of security.
NB 2. File exchange is slooooow. I tried using the directory /windows/tmp as a working directory, for
example for unpacking the .bz2 files. The unpacked file was growing at a rate of a few kB per second. It was
totally impractical to use /windows this way.
Adding more disk space to coLinux.
Reference: http://docs.blackfin.uclinux.org/doku.php?id=colinux
Inevitably, at some point it will be necessary to add more disk space to coLinux than it was forseen during the
installation. The reference tells how to make a blank file image and how to format it under coLinux.
Here is a quick way to add 2GB to coLinux without much hassle. The procedure may be repeated to add
more than one 2GB workspace.
1. Under Windows Explorer, I copied the homefs.img by CTRL-C CTRL-V. This action created a copy of
the entire 2 GB file in the Windows coLinux folder. I then renamed the new file to scratchfs.img.
2. I added one more line to the coLinux config file config_2card.txt which lives in the Windows coLinux
folder. The initial section of this file now looks like this:
# This is file config_2card.txt which lives in the Windows coLinux folder
kernel=P:\bfin-coLinux\vmlinux
mem=256
initrd=P:\bfin-coLinux\initrd.gz
cobd0=T:\bfin-coLinux\rootfs.img
cobd1=T:\bfin-coLinux\homefs.img
cobd2=P:\bfin-coLinux\swap.img
cobd3=P:\bfin-coLinux\scratchfs.img
cofs0=c:\
cofs1=P:\bfin-coLinux
cofs2=D:\
root=/dev/cobd0
<-- this line
3. Logged as root under coLinux, I made the following new entry in /etc/fstab:
# This is coLinux file /etc/fstab
/dev/cobd0
/
ext3
proc
/proc
proc
tmpfs
/dev/shm
tmpfs
/dev/cobd2
swap
swap
/dev/cobd1
/home
ext3
/dev/cobd3
/scratch
ext3
Getting Started with uCLinux/Blackfin Development Under Windows.
defaults
defaults
defaults
defaults
defaults
defaults
(c) Wojtek Skulski
0
0
0
0
0
0
3-Jul-2006
0
0
0
0
0
0
<-- this one
17
cofs00
cofs02
/windows
cofs
/mnt/cdrom cofs
defaults,noatime
defaults,noauto,user
0
0
0
0
4. I created a new folder /scratch under coLinux, and changed the ownership of /scratch, just in case:
root> chown uclinux:users /scratch
5. I restarted coLinux. The copy of the home file structure appeared under /scratch. I then deleted all "user"
files which were there, and got a formatted space mounted under /scratch. (I kept the lost+found folder.)
Quick way to backup the coLinux work.
Here is a quick way to periodically backup coLinux work without much hassle. This way of backing up is
meant as a security measure to enable un-doing potentially destructive actions, such as deleting an old
toolchain and installing the newest-greatest one from the Blackfin website. I typically perform the following
before any risky actions (such as upgrading the toolchain) or after I achieved some milestone, e.g., a working
version of U-Boot.
1. Stop coLinux.
2. Copy the disk images (files with .img extension) to another disk. If something goes wrong, the entire .img
file can be restored in order to undo the damage.
3. In order to create a more permanent copy,WinZip can compress the .img file from about 2 GB to
something as small as 50 MB, which can be then comfortably backed up to a memory stick or a CD.
Installing the new version of Blackfin Toolchain.
References:
1.
http://docs.blackfin.uclinux.org/doku.php?id=installing_the_blackfin_tool_chain
2.
http://blackfin.uclinux.org/forum/forum.php?thread_id=2388&forum_id=44
After finishing the coLinux installation described earlier, the toolchain was installed under /opt. Before
attempting to upgrade the toolchain I backed up the entire root file system rootfs.img to another disk, just in
case. This precaution proved essential because the first attempt led to a fatal error, which initiated the
discussion (Ref. 2). I was able to restore the original conditions before trying the solutions suggested in Ref. 2.
I did this several times before the upgrade was successful at last.
Getting Started with uCLinux/Blackfin Development Under Windows.
(c) Wojtek Skulski
3-Jul-2006
18
Attempt #1 --> fatal error.
I followed Ref. 1, which lead to a fatal error as follows. I am describing this error because others have
encountered it too, see Ref. 2.
Installing the rpm on Debian or CoLinux <-- these are Wiki instructions, Ref. 1.
For an RPM file, as root enter the following command:
bash# alien -i <filename>
(e.g.
<-- Filename should include full path.
alien -i bfin-elf-3.4-beta.i386.rpm)
This will install to the directory /opt/uClinux/bfin-uclinux
My actual commandd was as follows. The "path" shown in bold is of course specific to my installation, where I
am using a CD with the toolset 2006 Release 1 Patch Level 4 (final). I have prepared this CD myself.
bash# alien -i /mnt/cdrom/BF_Toolchain_2006R1_RC4/blackfin-toolchain-06r1-4.i386.rpm
The operation failed with the following error message:
dpkg: error processing blackfin-toolchain_06r1-5_i386.deb (--install):
trying to overwrite `/opt/uClinux/bfin-elf/bfin-elf/bin/g++', which is also in
package bfin-gcc
dpkg-deb: subprocess paste killed by signal (Broken pipe)
Errors were encountered while processing:
blackfin-toolchain_06r1-5_i386.deb
Attempt #2 --> success.
After the failure, I restored the entire root file system by copying the backed up rootfs.img from the backup
disk. The successful commands to execute were the following.
1. Restored the backup rootfs.img
2. Started coLinux
3. Logged as root
4. apt-get remove bfin-gcc <-- this was missing in Wiki docu
5. Performed alien, which worked without any error message this time.
Getting Started with uCLinux/Blackfin Development Under Windows.
(c) Wojtek Skulski
3-Jul-2006
19
# mount /mnt/cdrom
# alien -i /mnt/cdrom/BF_Toolchain_2006R1_RC4/blackfin-toolchain-06r1-4.i386.rpm
6. Logged in as ordinary user colinux, change to work directory, and "make clean".
After performing these six steps the new toolchain seemed to work like the old one.
Installing the new version of Blackfin uCLinux kernel.
Release Name: 2006R1 RC2 uClinux Release (Final)
References:
1. http://blackfin.uclinux.org/frs/?group_id=17 --> release_notes_2006R1.pdf
2. http://blackfin.uclinux.org/forum/forum.php?thread_id=2381&forum_id=39
The installation instructions are on page 7 of the Release Notes (ref 1). According to Ref 2, the "working
directory" can be any directory. I have chosen the home dir of the regular user uclinux for this purpose. This
has lead to a problem: not enough disk space. The authors of tar, in their infinite wisdom, do not provide an
option to specify the output. (Under tar, the options -i and -o do not mean input/output; there is no output
option whatsoever, and the option character "-" does not exist.) Therefore, there was not enough space to
hold both the unzipped archive and the un-archived directory tree. The remedy consists of unzipping on-the-fly
from the zipped archive, see step 3 below.
1. Install Toolchain Release 2006R1
<-- as explained earlier, this step failed
Go to http://blackfin.uclinux.org/frs/?group_id=18 for more information. (There is no information there.)
2. Download the source code of project uClinux for Blackfin release 2006R1
Go to http://blackfin.uclinux.org/frs/?group_id=17
3. Uncompress uclinuxdist.tar.bz to working directory (I have chosen /home/uclinux)
cp uClinuxdist_2006R1.tar.bz /(WORK_DIR)
cd /(WORK_DIR)
bunzip2 uClinuxdist_2006R1.tar.bz
tar xvf uClinuxdist_2006R1.tar
<-- not enough disk space
tar jvf uClinuxdist_2006R1.tar.bz
<-- replace the previous two lines
4. Compile the source using following commands (cannot be done unless the toolchain was installed).
cd uClinuxdist
Getting Started with uCLinux/Blackfin Development Under Windows.
(c) Wojtek Skulski
3-Jul-2006
20
make clean
<-- this ends with an error message, see Note 1 below.
make menuconfig <-- save and exit without making any changes, Note 2.
make
<-- Compilation seems to last forever.
Note 1. The initial "make clean" ends with an error message:
make[1]: Entering directory `/home/uclinux/uClinux-dist/vendors/AnalogDevices/BF533-STAMP'
Makefile:4: /home/uclinux/uClinux-dist/linux-2.6.x/.config: No such file or directory
make[1]: *** No rule to make target `/home/uclinux/uClinux-dist/linux-2.6.x/.config'. Stop.
make[1]: Leaving directory `/home/uclinux/uClinux-dist/vendors/AnalogDevices/BF533-STAMP'
make: *** [clean] Error 2
Note 2. I started menuconfig, and exited from the very 1st screen.
5. Find the compiled blackfin executable linux in the following location
$(WORK_DIR)/uClinux-dist/images
6. Above file shall be used to download to the target board.
What is next?
At this point the task of setting the networking and communication is finished (I hope). The next fun part is
about to start, that is setting up the configuration files for my new board BlackStamp, compiling both the uBoot
and the kernel for the BF532 processor, and flashing the board for the first time. Exciting topics, and quite
some opportunity for having more fun.
Note added Jul/01/06: The process of upgrading the toolchain has indeed provided an ample opportunity for
having more fun.
Forthcoming Survival Guides.
As I keep using coLinux for Blackfin development, I will either expand this Guide or write other Guides to help
navigate through the Linux Empire.
Getting Started with uCLinux/Blackfin Development Under Windows.
(c) Wojtek Skulski
3-Jul-2006
21
Which wordprocessor did I use?
I used Blackbox Programmer's Editor. Blackbox is a free, open-source programming environment for
Windows, available from http://www.oberon.ch/blackbox.html. I use Blackbox for scientific computations,
algorithm development, and data acquisition. Whenever I need to get my programming done quickly,
efficiently, and reliably, I turn to Blackbox. Additionally, I much prefer Blackbox wordprocessor over Word.
An introduction to Blackbox programming is available from this web location:
http://www.pas.rochester.edu/~skulski/Presentations/BB_Class.ppt
Disclaimers.
Usual disclaimers apply.
About the author.
(c) 2006 by Wojtek Skulski.
Getting Started with uCLinux/Blackfin Development Under Windows.
(c) Wojtek Skulski
3-Jul-2006
22