1
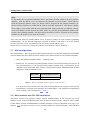
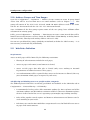
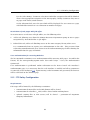
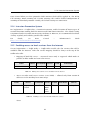
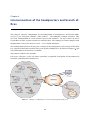
Kerio Control Step-by-Step Guide Kerio Technologies 2010 Kerio Technologies s.r.o. All rights reserved. This guide provides detailed description on configuration of the local network which uses the Kerio Control, version 7.1. All additional modifications and updates reserved. For current version of the product, go to http://www.kerio.com/firewall/download. For other documents addressing the product, see http://www.kerio.com/firewall/manual. Contents 1 Introduction ................................................................... 2 Headquarters configuration . . . . . . . . . . . . . . . . . . . . . . . . . . . . . . . . . . . . . . . . . . . . . . . . . . . . 6 2.1 Selection of IP addresses for LAN . . . . . . . . . . . . . . . . . . . . . . . . . . . . . . . . . . . . . . . . . . 6 2.2 Configuration of network interfaces of the Internet gateway . . . . . . . . . . . . . . . . 7 2.3 Kerio Control installation . . . . . . . . . . . . . . . . . . . . . . . . . . . . . . . . . . . . . . . . . . . . . . . . . 8 2.4 Kerio Control Administration interface and product activation . . . . . . . . . . . . 10 2.5 Setting connection and basic traffic rules . . . . . . . . . . . . . . . . . . . . . . . . . . . . . . . . . 10 2.6 DHCP Server Configuration . . . . . . . . . . . . . . . . . . . . . . . . . . . . . . . . . . . . . . . . . . . . . . . 11 2.7 DNS configuration . . . . . . . . . . . . . . . . . . . . . . . . . . . . . . . . . . . . . . . . . . . . . . . . . . . . . . . 12 2.8 Web interface and SSL-VPN certificates . . . . . . . . . . . . . . . . . . . . . . . . . . . . . . . . . . . . 12 2.9 Mapping of user accounts and groups from the Active Directory . . . . . . . . . . . 13 2.10 Address Groups and Time Ranges . . . . . . . . . . . . . . . . . . . . . . . . . . . . . . . . . . . . . . . . 14 2.11 Web Rules Definition . . . . . . . . . . . . . . . . . . . . . . . . . . . . . . . . . . . . . . . . . . . . . . . . . . . . . 14 2.12 FTP Policy Configuration . . . . . . . . . . . . . . . . . . . . . . . . . . . . . . . . . . . . . . . . . . . . . . . . . 15 2.13 Antivirus Scanning Configuration . . . . . . . . . . . . . . . . . . . . . . . . . . . . . . . . . . . . . . . . . 16 2.14 Intrusion Prevention System . . . . . . . . . . . . . . . . . . . . . . . . . . . . . . . . . . . . . . . . . . . . . 17 2.15 Enabling access to local services from the Internet . . . . . . . . . . . . . . . . . . . . . . . . 17 2.16 Secured access of remote clients to LAN . . . . . . . . . . . . . . . . . . . . . . . . . . . . . . . . . . 18 2.17 LAN Hosts Configuration . . . . . . . . . . . . . . . . . . . . . . . . . . . . . . . . . . . . . . . . . . . . . . . . . 18 2.18 Viewing statistics of Internet usage and user browsing behavior . . . . . . . . . . . 19 3 Configuration of the LAN in a filial office . . . . . . . . . . . . . . . . . . . . . . . . . . . . . . . . . . . . . . 20 3.1 Configuration of network interfaces of the Internet gateway . . . . . . . . . . . . . . . 20 3.2 DNS configuration . . . . . . . . . . . . . . . . . . . . . . . . . . . . . . . . . . . . . . . . . . . . . . . . . . . . . . . 20 4 Interconnection of the headquarters and branch offices . . . . . . . . . . . . . . . . . . . . . . . 4.1 Headquarters configuration . . . . . . . . . . . . . . . . . . . . . . . . . . . . . . . . . . . . . . . . . . . . . . 4.2 Configuration of a filial office . . . . . . . . . . . . . . . . . . . . . . . . . . . . . . . . . . . . . . . . . . . . 4.3 VPN test . . . . . . . . . . . . . . . . . . . . . . . . . . . . . . . . . . . . . . . . . . . . . . . . . . . . . . . . . . . . . . . . . A Used open source items . . . . . . . . . . . . . . . . . . . . . . . . . . . . . . . . . . . . . . . . . . . . . . . . . . . . . . . 24 B Legal Notices . . . . . . . . . . . . . . . . . . . . . . . . . . . . . . . . . . . . . . . . . . . . . . . . . . . . . . . . . . . . . . . . . . 25 3 4 21 22 22 23 Chapter 1 Introduction This manual describes configuration steps to be taken for implementation of Kerio Control in a model network. This network includes most elements present in a real-life Kerio Control network — Internet access from the local network, protection against attacks from the Internet, access to selected services on the LAN from the Internet, user access control, automatic configuration of clients on the LAN, user authentication in the Active Directory domain, user browsing behavior control, etc. Another issue is to provide interconnection of networks between the headquarters and a branch office by a secure (encrypted) channel (so called VPN tunnel) and secure access of clients to the local network via the Internet using Kerio Control. This manual provides guidelines for quick setup. Detailed information addressing individual Kerio Control features and configuration instructions are provided in the Kerio Control — Administrator’s Guide available at http://www.kerio.com/firewall/manual. Network configuration example Kerio Control configuration will be better understood through an example of a model network shown at figure 1.1. Figure 1.1 Network configuration example 4 It is recommended to reserve a standalone server for the firewall’s purposes (Internet gateway). Such server can be: • A physical or virtual server with Windows. Use Kerio Control in a Windows edition installed in the system as an application. The firewall can be run along with other server applications, such as the mailserver with groupware features Kerio Connect. However, the firewall host should not be used as a user workstation. Implementation on a server with Windows is suitable especially in minor networks where only one server is available, or if you want to use Kerio Control to replace an existing software firewall or proxy server. • A physical or virtual server without operating system. If there is a physical or virtual server reserved where no other applications will be run, it is recommended to use the Kerio Control’s Appliance edition which provides firewall including a host operating system. Compared with the Windows edition on the same hardware, this version offers higher performance and network throughput. It also guarantees no collisions with incompatible applications and system services. However, no other applications can be hosted on the same system along with the firewall. For virtualization systems VMware and Parallels, virtual appliances are ready available for import and instant startup. • Kerio Control Box hardware device. This box consists of Kerio Control in edition Appliance installed on a special optimized hardware device. In smaller networks, it can be also used as a switch for connection of local stations. The Kerio Control box is available in two types different in performance and number of network ports. 5 Chapter 2 Headquarters configuration This chapter provides detailed description on configuration of the local network and setup of Kerio Control in company headquarters. The same procedure can be applied for network configuration in a branch office (bearing in mind slight differences described in chapter 3). For purposes of this example, it is supposed that an Active Directory domain company.com is created in the headquarters’ LAN and all hosts in the network are included in this domain. 2.1 Selection of IP addresses for LAN In our example, we will focus on private networks connected to the Internet through a single public IP address. Under such circumstances, the local network will be “hidden” behind this IP address entirely. Local networks which do not belong to the Internet (so called private networks) use reserved special ranges of IP addresses. These addresses must not exist in the Internet (Internet routers are usually set in order to drop all packets that include these addresses). The following IP ranges are reserved for private networks: 1. 2. 3. 10.x.x.x, network mask 255.0.0.0 172.16.x.x, network mask 255.240.0.0 192.168.x.x, network mask 255.255.0.0 Warning: Do not use other IP addresses in private networks, otherwise some web pages (those networks that have the same IP addresses) might be unavailable! For the headquarters’ LAN, the private addresses 192.168.1.x with subnet mask 255.255.255.0 (IP subnet 192.168.1.0) will be used whereas IP addresses10.1.1.x with subnet mask 255.255.255.0 (IP subnet 10.1.1.0) will be used for the filial’s LAN. Setting IP addresses in an example network The following methods can be used to assign IP addresses to local hosts: • The 192.168.1.2 static IP address will be assigned to the domain server / FTP server (its IP address must not be changed, otherwise mapping from the Internet will not work). • A Static IP address will be assigned to the network printer by the DHCP server (DHCP lease). Printing machines cannot have dynamic IP addresses, otherwise they would be unavailable from clients if the IP changes. 6 2.2 Configuration of network interfaces of the Internet gateway Note: IP addresses can be assigned to printers either manually or by a DHCP server. If a DHCP server is used, the printing machine is configured automatically and its address is listed in the DHCP lease list. If configured manually, the printing machine will be independent of the DHCP server’s availability. • Dynamic IP addresses will be assigned to local workstations (easier configuration). Figure 2.1 Example of configuration of a network with assigned IP addresses Notes: 1. The DNS domain in the LAN must be identical with the Active Directory domain (i.e. company.com). 2. IP addresses 10.1.1.x with the subnet mask 255.255.255.0 will be used in the network of the branch office. The Active Directory domain is not used in this network, so it is necessary to create a local DNS domain filial.company.com. 2.2 Configuration of network interfaces of the Internet gateway Internet gateway is a host (or a server) at the boundary of LAN and the Internet. In this example, a server with Windows will be used. The Kerio Control firewall (see chapter 2.3) as well as Kerio Connect will be installed on this server. Kerio Connect will be used as a mailserver and groupware server. 7 Headquarters configuration Internet Interfaces Follow the ISP’s instructions to set the interface connected to the Internet. Most ISP use automatic configuration of TCP/IP parameters by using DHCP protocol. In case of manual configuration, the following parameters are required for proper functionality of the Internet interface: IP address, subnet mask, default gateway and at least one DNS server’s address. The web interface of the company headquarter’s firewall should have a fixed IP address to make it possible for the filial’s server and VPN clients to connect to it (see requirements in chapter 1). Suppose that the ISP has assigned IP address 85.17.210.230. It is also recommended to assign a DNS name (e.g. server.company.com) to this IP address; otherwise all VPN clients will be required to define the server by the IP address. Verify connectivity (i.e. by using the ping command or by opening a Web site using your browser). LAN Interface The following parameters will be set at the LAN Interface: • IP address — we will use the 192.168.1.1 IP address (refer to chapter 2.1). • network mask — 255.255.255.0 • default gateway — no default gateway is allowed at this interface! • DNS server — no DNS server should be set on this interface. 2.3 Kerio Control installation Install Kerio Control by following the procedure corresponding with your server type. Installation on Windows Run the Kerio Connect installation file. Select Full installation. If the installation program detects the Internet Connection Sharing service, it is recommended to strictly disable this service, otherwise collisions might occur and Kerio Connect may work incorrectly. It is also recommended to disable also other system services which might cause collisions — Universal Plug and Play Device Host and SSDP Discovery Service. Now set a password for access to administration (user Admin). If the installation is performed remotely (e.g. via Remote Desktop), check the corresponding option to avoid blocking of network traffic when the installation is completed. Under usual circumstances, a reboot of the computer is not required after the installation is completed (a restart may be required if the installation program rewrites shared files which are currently in use). This will install the Kerio Control Engine low-level driver into the system 8 2.3 Kerio Control installation kernel. Kerio Control Engine and Kerio Control Engine Monitor will be automatically launched when the installation is complete. The engine runs as a service. Installation of Software Appliance Kerio Control in the software appliance edition is distributed as an ISO image of the installation CD that can be used to implement the system and install the firewall on either a physical or virtual host. ISO image of the installation CD can be burned on a physical CD and then the CD can be used for installation of the system on the target computer (either physical or virtual). In case of virtual computers, the ISO image can be also connected as a virtual CD ROM, without the need to burn the installation ISO file on a CD. After installation, the computer will be rebooted and a simple wizard for setting of the following basic firewall parameters will get started — network interfaces, remote administration, Admin passwords, etc. Any other settings can be done remotely in the Kerio Control Administration web interface. VMware Virtual Appliance installation Use a corresponding package in accordance with the type of your VMware product (see above): • In case of products VMware Server, Workstation and Fusion, download the compressed VMX distribution file (*.zip), unpack it and open it in the your VMware product. • You can import a virtual appliance directly to VMware ESX/ESXi from the URL of the OVF file — for example: http://download.kerio.com/dwn/control/ kerio-control-appliance-7.1.0-1234-linux.ovf VMware ESX/ESXi automatically downloads a corresponding disk image (.vmdk). the OVF configuration file and Upon the first startup of the virtual host, a simple wizard is opened allowing to set basic parameters of the firewall — network interfaces, time and time zone, etc. Other parameters can be set remotely in the Kerio Control Administration web interface. Installing Virtual Appliance for Parallels Download the distribution package in Zip (*.zip), unpack it and open it in the corresponding Parallels product. 9 Headquarters configuration Upon the first startup of the virtual host, a simple wizard is opened allowing to set basic parameters of the firewall — network interfaces, time and time zone, etc. Other parameters can be set remotely in the Kerio Control Administration web interface. Installing Kerio Control Box Use the power cable to connect Kerio Control Box to a power-supply unit. Connect the first port (port number 1) to the Internet (i.e. connect it to the router, cable modem, ADSL modem, etc.) and the last port (number 4 or 8 —, depending on the model) to the local network or directly to the computer from which you will perform initial configuration. Start the device and the computer used for its administration and connect to the Kerio Control Administration web interface at the default IP address of the device (10.10.10.1). To see how to install Kerio Control Box, refer the Kerio Control Box - Installation guide, delivered in the product package. 2.4 Kerio Control Administration interface and product activation In your web browser (Internet Explorer, Firefox or Safari) open the Kerio Control Administration web interface. This interface is available at the local IP address of the firewall, i.e. in this example at: https://192.168.1.1:4081/admin/ Upon the first connection to this interface product activation wizard is started automatically. This wizard allows to: • Register the product with the purchased license number, • Import the license key file (license.key — saved from the previous installation), • Register trial version (registration allows to test Kerio Web Filter and update the integrated antivirus and the intrusion prevention system), • Activate unregistered trial version. Upon successful activation, you will be asked to enter the main firewall administrator’s (Admin) password. This username and password will then be required for authentication at the Kerio Control Administration interface. 2.5 Setting connection and basic traffic rules Login to the Kerio Control Administration interface (use username Admin and the password defined in the product activation wizard). Upon the first logon, the Configuration Assistant dialog is displayed automatically. 10 2.6 DHCP Server Configuration Connectivity Wizard First, run the Connectivity Wizard (the first link in the Configuration Assistant). following parameters using the Wizard: Set the • Internet connection types (the wizard, page 1) — select persistent connection with a single Internet line. • Internet interface (the wizard, page 2) — select an adapter connected to the Internet. • Interface for the local network (the wizard, page 3) — select an adapter connected to the local network. Network Rules Wizard Once connectivity is configured, run the Traffic Policy Wizard (the second link in the Configuration Assistant). Set the following parameters using the Wizard: • Access to Kerio Control services — enable all the services: Kerio VPN (for connection of networks in the headquarters and other offices, and for connection of remote clients — see chapter 4), Clientless SSL-VPN (remote access to shared folders and files in the network via web browser) and Kerio Control Administration (remote administration of Kerio Control). • Mapping other services — add SMTP service mapping on the firewall. In this step you can also define mapping for other hosted services such as an FTP server. This will be better understood through the second method — custom rule definition. For details, see chapter 2.15. Note: There is no reason for allowing any services on firewalls of branch offices (branch office servers use dynamic IP address). 2.6 DHCP Server Configuration Go to the Configuration → DHCP server section in the Kerio Control Administration interface. Connectivity wizard set the DHCP server in auto-config mode. Therefore it is not necessary to define other information than desired reservations. In the upper part of the window (Scopes) click on the local network scope and in the lower part of the window (Leases and Reservations) add reservation for network printer. The address you reserve need not necessarily belong to the scope described above, however, it must belong to the specified network (in this example the 192.168.1.3 address is reserved). You need to know the hardware (MAC) address of the printing machine to make the reservation. 11 Headquarters configuration Hint: Do not make the reservation manually unless you know the MAC address of your printing machine. Run the DHCP server and connect the machine to the network. An IP address from the formerly defined scope (see above) will be assigned to the printing machine. In the list of leased addresses, mark this IP address and click on Reserve. This opens a dialog for IP address reservation with the corresponding MAC address already predefined. Change reserved IP address to the desired one (192.168.1.3), edit the description and click on OK. Restart your printing machine. The appropriate IP address will be assigned to the printing machine by the DHCP server after the restart. Note: You can also use another DHCP server to detect settings of your network equipment automatically. Set the firewall computer’s internal IP address (192.168.1.1) as the default gateway and DNS server in parameters for this range on the DHCP server. In this case it is necessary to keep the DHCP server in Kerio Control disabled! 2.7 DNS configuration In Configuration → DNS, keep the default settings (the DNS service and simple DNS translation with the hosts file and a table of leased addresses are allowed) and set the advanced options: • Enter the local DNS domain name — company.com. • Enable the Use custom forwarding option Add the rule for forwarding of requests to the Active Directory, i.e. of all requests for names starting with _ (underscore), to the domain server in the LAN. This setting is required for correct communication of local computers with the domain server. DNS name _* Table 2.1 Forward to DNS servers 192.168.1.2 Rule for forwarding of DNS requests to Active Directory It is also necessary to add rules for correct forwarding of DNS queries between the headquarters’ network and networks of branch offices. For detailed description on these settings, refer to chapters 4.1 and 4.2. 2.8 Web interface and SSL-VPN certificates The Kerio Control web interface allows remote administration of the firewall via a web browser (Kerio Control Administration) and viewing of Internet usage statistics (Kerio StaR). It also allows viewing of information regarding attempts to access forbidden web pages (see chapter 2.11) and users can use it to set several parameters of their accounts. The Clientless 12 2.9 Mapping of user accounts and groups from the Active Directory SSL-VPN interface is used for secured remote connections to shared files in local networks by a web browser. For proper functionality of web services, an SSL certificate is required that proves the server’s identity. To create certificates for web interfaces, go to Configuration → Advanced Options, to the Web Interface or the SSL-VPN tab. In advanced settings of individual interfaces, select Change SSL certificate and Create certificate. The server name for which the certificate will be issued should be identical with the server name including domain — in our example, name server.company.com is used. For access to Kerio Control interfaces from the Internet, a record for this name must exist also in public DNS. Hint: It is recommended to replace the created SSL certificates by an SSL certificate issued by a public certification authority (one certificate can be used both for the web interface and the Clientless SSL-VPN interface — there is no need to pay for two certificates). 2.9 Mapping of user accounts and groups from the Active Directory To enable disposal of Active Directory user accounts, set mapping of a corresponding domain and define a template that will apply specific Kerio Control parameters (user rights, data transfer quotas, etc.) to all users. Domain mapping To set Active Directory domain mapping, go to the Active Directory tab under User and Groups → Users. The firewall must belong to the corresponding domain. For mapping of user accounts, enter name and password of a user with rights to read the Active Directory database (any user belonging to the domain). Creating templates for user accounts On the User Accounts tab, select the mapped Active Directory domain, i.e. company.com. If mapping is set correctly, all user accounts included in the domain will be displayed here. Click on the Template button to define a template for user accounts. It is also intended to enable remote users to access the local network by Kerio VPN Client or Kerio Clientless SSLVPN. Set user rights on the Rights tab. Hint: In case you do not want to use any of the domain accounts, you can block them in Kerio Control and hide blocked accounts. The accounts will be blocked only in Kerio Control, they will stay active in the domain. 13 Headquarters configuration 2.10 Address Groups and Time Ranges Open the Configuration → Definitions → Address Groups section to create IP group Email Access that will be used to limit access to email accounts (refer to chapter 2.15). This group will consist of the 123.23.32.123 and 50.60.70.80 IP addresses and of the entire 195.95.95.128 network with the 255.255.255.248 network mask. Note: Definition of the first group requires name of the new group, later additions allow selection of an existing group. Likely, go to Configuration → Definition → Time Ranges to create a time interval that will be limited to accessing Internet services during the labor hours (from Monday to Friday from 8 A.M. to 4:30 P.M., Saturdays and Sundays from 8 A.M. to 12 A.M.). You can use predefined day groups (Weekday or Weekend) to define the Valid on entry — it is not necessary to tick each day individually. 2.11 Web Rules Definition Requirements Access to Web pages will be limited by the following restrictions: • filtering of advertisements included in web pages, • access to pages with erotic/sexual content is denied, • access to Web pages that offer jobs is denied (only users working in Personal Departments are allowed to access these pages), • user authentication will be required before access to the Internet is allowed (this way you can monitor which pages are opened by each user). Ads filtering and blocking access to specific website categories The following basic HTTP rules are already predefined and available in the URL Rules tab in Configuration → Content Filtering → HTTP Policy: • It recommended to keep rules Allow automatic updates for Kerio software and Allow automatic updates and MS Windows activation enabled. Otherwise automatic updates of Kerio Control and of the server’s operating system might stop working correctly. • Rules Allow popular search engines and Remove advertisement and banners can be used according to your needs. • Rule Deny sites rated in Kerio Web Filter categoriescan be used to block all users access to pages with erotic contents. 14 2.12 FTP Policy Configuration Use the Select Rating... button to select Kerio Web Filter categories that will be blocked. Then select appropriate categories in the Pornography /Nudity section to deny access to pages with erotic/sexual content. On the Advanced tab, enter the text which will be displayed if a user to access a page with forbidden content or set redirection to another webpage. Restrictions of web pages with job offers To restrict access to websites with job offers, use the following rules: 1. Add a rule allowing users from the Human Resources Department group to access pages categorized by Kerio Web Filter as Job Offers. 2. Behind this rule, add a rule blocking access to the same category for any other users. It is recommended not to require user authentication in this rule. This prevents from redirecting unauthenticated users’ browser to the authentication page before showing the information that the page is blocked. User authentication for accessing Websites The last optional restriction is user authentication while accessing Web pages. To enable this feature, use the corresponding option under Users and Groups → Users, the Authentication Options tab. User authentication is performed within redirection to the Kerio Control web interface’s authentication page. It is necessary that the web interface is enabled and all its parameters set correctly (refer to chapter 2.8). Upon entering a valid username and password, the browser will be redirected to the solicited page. 2.12 FTP Policy Configuration Requirements FTP usage will be limited by the following restrictions: • transmission of music files in the MP3 format will be denied • transmission of video files (*.AVI) will be denied within working hours • uploads (storing files at FTP servers) will be denied — protection of important company information 15 Headquarters configuration FTP restrictions specified by predefined rules Go to Configuration → Content Filtering → FTP Policy to set FTP limitations. The following rules are predefined rules and can be used for all intended restrictions: • Rules Forbid *.mpg, *.mp3 and *.mpeg files and Forbid upload are ready to use. • Modify the Forbid *.avi files rule by going to the Advanced tab and setting the time when the rule is valid in the Working hours range (see chapter 2.10). FTP server in local network ?In the following example, we intend to enable the local FTP server from the Internet. The Forbid upload rule denies even upload to this server which is not always desirable. For this reason we must add a rule that would enable upload to this server before the Forbid upload rule: • On the General tab set the following condition: “if any user accesses FTP server 192.168.1.10, then allow.” • On the Advanced tab, set the operation type to Upload and use the wildcard for any file (*). Notes: 1. The IP address of the host where the appropriate FTP service is running must be used to define the FTP server’s IP address. It is not possible to use an outbound IP address of the firewall that the FTP server is mapped from (unless the FTP server runs on the firewall)! IP addresses are translated before the content filtering rules are applied. 2. The same method can be also applied to enable upload to a particular FTP server in the Internet whereas upload to other FTP servers will be forbidden. 2.13 Antivirus Scanning Configuration Any supported external antivirus application that you intend to use must be installed first. The Sophos antivirus application is integrated into Kerio Control and you will need a special license to run it. The ideal solution is to combine the integrated and an external antivirus (so called dual antivirus check). In Configuration → Content Filtering → Antivirus, on the Antivirus tab, set antiviruses and, if applicable, also advanced settings for the selected external antivirus. For complete list of supported antiviruses and their detailed configuration guides, refer to http://www.kerio.com/firewall/third-party#av. 16 2.14 Intrusion Prevention System Kerio Control allows to select protocols which antivirus check will be applied to. The HTTP, FTP scanning, Email scanning and SSL-VPN scanning, tabs enable detailed configuration of scanning of individual protocols. Usually, the default settings are convenient. 2.14 Intrusion Prevention System In Configuration → Traffic Policy → Intrusion Prevention, enable detection of known types of network intrusions coming from the Internet and from known intruders. The default setting is optimized and it is usually not necessary to change it. However, it is recommended to check Security regularly and evaluate possible false alarms. For details, see Kerio (http://www.kerio.com/firewall/manual). Control — Administrator’s Guide 2.15 Enabling access to local services from the Internet Go to Configuration → Traffic Policy → Traffic Rules to add rules for services that will be available from the Internet. Rules for service mapping should be always at the top of the traffic rules table. • Mapping of local FTP server — unsecured access only is supposed which makes it possible to filter traffic and scan it for viruses. Name Source Access to FTP server Any Table 2.2 Destination Firewall Service FTP Action Allow Translation Mapping 192.168.1.2 Making the local FTP servers available from the Internet • Access to other mail server services (save SMTP) — allowed only from certain IP addresses in the Working hours time range. Name Source Destination Access to email Group Access Firewall to email Table 2.3 Service IMAP IMAPS POP3 POP3S Action Translation Allow Enabling access to the firewall’s mailserver services Notes: 17 Valid in Working hours Headquarters configuration 1. This rule enables access to IMAP and POP3 services in both encrypted and unencrypted versions — client can select which service they will use. 2. Based on this example, the SMTP service was mapped by the traffic rules Wizard (refer to chapter 2.5) — the appropriate rule already exists. 3. Access to the SMTP service must not be limited to certain IP addresses only as anyone is allowed to send an email to the local domain. 2.16 Secured access of remote clients to LAN Enable the VPN server for secured access of remote clients (“VPN clients”) to LAN under Configuration → Interfaces (for details, see chapter 4.1). No additional settings are required. Communication of VPN clients is already allowed by the traffic policy created by the wizard — refer to chapter 2.5. Kerio VPN Client Kerio VPN Client must be installed at each remote host to enable their connection to the VPN server in Kerio Control. This application is available for Windows, Mac OS X and Linux. Installation files can be downloaded from http://www.kerio.com/firewall/download. Clients will connect to the server at the headquarters (i.e. to 85.17.210.230) or to the server name server.company.com and they will be authenticated through their domain usernames and passwords (see chapter 2.9). For help details, see Kerio VPN Client — User’s Guide (http://www.kerio.com/firewall/manual). 2.17 LAN Hosts Configuration TCP/IP parameters for the hosts that are used as the domain server and as the FTP server must be configured manually (its IP address must not be changed): • IP address — we will use the 192.168.1.2 address (refer to chapter 2.6), • Default gateway — use IP address of the appropriate firewall interface (192.168.1.1), • DNS server — since Microsoft DNS is running on the host, the system sets the local loopback address (loopback — 127.0.0.1) as the primary DNS server. Set automatic configuration of both IP address and DNS server (using DHCP) at all workstations (it is set by default under most operating systems). 18 2.18 Viewing statistics of Internet usage and user browsing behavior 2.18 Viewing statistics of Internet usage and user browsing behavior Kerio Control also includes a web interface called Kerio StaR (statistics and reporting) which allows to view user browsing behavior as well as statistics in tables and charts. The monitored activity items include: • • • • • visited websites, email messages and instant messaging, large file transfers, multimedia (online audio and video streaming), remote access (terminal access and VPN connection). Tables and charts are available for the following statistical issues: • volume of transferred data, • used protocols (services), • top visited web domains, • top requested web categories. Statistics can be either showed for the overall traffic or for individual users. Access and authentication to the statistics Internet usage statistics may include fragile information. For this reason, a special right is used for access to this information, assigned only to the Admin by default. Therefore, it is first necessary to grant rights for statistics viewing to specific users and/or groups under Users and Groups. Statistics are available via the Kerio Control web interface. You can enter the web interface at the URL following this pattern: https://<firewall>:4081/ which is in our example: https://server.company.com:4081/ Users with rights to view statistics see the Kerio StaR’s main page with overall statistics upon their logon to the web interface. Other users see the web interface welcome page first. By default, the web interface is available from the LAN. To make it available from the Internet, it is necessary to define a corresponding traffic rule (see chapter 2.15). Detailed information addressing the Kerio Control web interface and Kerio StaR is provided in the Kerio Control — User’s Guide available at http://www.kerio.com/firewall/manual. 19 Chapter 3 Configuration of the LAN in a filial office For quick configuration of the filial’s LAN, it is possible to follow similar method as for the headquarter’s network (see chapter 2). The only difference is in DNS configuration. Supposing that there is no domain server or any other DNS server in the filial’s network. The Kerio Control’s DNS module will be used as the primary DNS server. 3.1 Configuration of network interfaces of the Internet gateway Set a fixed IP address (e.g. 10.1.1.1) at the firewall’s interface connected to the local network. Make sure that no default gateway is set on this interface! No DNS server should be set here as well! Follow the ISP’s instructions to set the interface connected to the Internet. 3.2 DNS configuration In Configuration → DNS, keep the default settings (the DNS forwarder service and simple DNS translation with the hosts file and a table of leased addresses are allowed) and set the advanced options: • Enter the local DNS domain name — filial.company.com. • Enable the Use custom forwarding option The settings are addressed in details in chapter 4.2. • It is recommended to add a record about the server (or about other hosts to which a fixed IP address will be assigned) to the hosts file: 10.1.1.1 server 20 Chapter 4 Interconnection of the headquarters and branch offices This chapter provides information on interconnection of headquarters and branch office servers by an encrypted channel (“VPN tunnel”). The following example describes only the basic configuration of a VPN tunnel between two networks. No tips related to access restrictions or other specific settings are included here. For example of a more complex VPN configuration, refer to the Kerio Control — User’s Guide document. The configuration consists of two parts: settings in the headquarters and settings of the filial. It is supposed that both networks have been already configured as described in chapter 2 and that connection to the Internet is available. Information related to the example For better reference, review the figure providing a graphical description of interconnected networks, including their IP addresses. Figure 4.1 Example of configuration of a network with assigned IP addresses 21 Interconnection of the headquarters and branch offices The headquarters uses IP addresses 192.168.1.x with the network mask 255.255.255.0 and with DNS domain company.com. The branch office uses IP addresses 10.1.1.x with network mask 255.255.255.0 and with the subdomain filial.company.com. 4.1 Headquarters configuration 1. In Kerio Control under Configuration / Interfaces select a VPN server, open its settings dialog and enable it. Note: The VPN network and Mask entries now include an automatically selected free subnet for VPN. There is no reason to change the network. 2. Use the Edit SSL certificate button to create an SSL certificate with the name of the corresponding server (e.g. server.company.com). This certificate is used for identification of the VPN server. Note: It is recommended to later replace this generated certificate with a certificate authorized by a reliable public certification authority. 3. Create a passive endpoint of the VPN tunnel (the office’s server uses a dynamic IP address — therefore there must be the active endpoint of the tunnel at the office). Specify the remote endpoint SSL certificate’s fingerprint by the fingerprint of the certificate of the branch office VPN server. 4. In the configuration of the DNS module (refer to chapter 2.7), enable the Use custom forwarding. Define rules for the filial.company.com domain. Specify the server for DNS forwarding by the IP address of the remote Kerio Control host’s interface (i.e. interface connected to the local network at the other end of the tunnel). Domain / Network DNS server(s) filial.company.com 10.1.1.1 Table 4.1 Headquarters — DNS forwarding configuration 4.2 Configuration of a filial office 1. In Kerio Control under Configuration / Interfaces select a VPN server, open its settings dialog and enable it. Note: The VPN network and Mask entries now include an automatically selected free subnet for VPN. There is no reason to change the network. Use the Edit SSL certificate button to create an SSL certificate with the name of the corresponding server (e.g. server.filial.company). This certificate is used for 22 identification of the VPN server. The fingerprint of the created SSL certificate will be required for definition of the VPN tunnel on the headquarters server (see chapter 4.1). Select it, copy it to the clipboard and paste it to an email message, text file, etc. Note: It is recommended to later replace this generated certificate with a certificate authorized by a reliable public certification authority. 2. Create an active endpoint of the VPN tunnel which connects to the company’s headquarters server (server.company.com). The fingerprint of the VPN server certificate can be set simply by clicking on Detect remote certificate. 3. In the configuration of the DNS module (refer to chapter 2.7), enable the Use custom forwarding. Define rules for the company.com domain. Set the IP address of the headquarter’s domain server (192.168.1.2) which is used as the primary server for the company.com domain as the DNS server used for forwarding. Domain / Network company.com Table 4.2 DNS server(s) 192.168.1.2 Filial — DNS forwarding configuration 4.3 VPN test Configuration of the VPN tunnel has been completed by now. At this point, it is recommended to test availability of the remote hosts from each end of the tunnel (from both local networks). For example, the ping or/and tracert operating system commands can be used for this testing. It is recommended to test availability of remote hosts both through IP addresses and DNS names. If a remote host is tested through IP address and it does not respond, check configuration of the traffic rules or/and find out whether the subnets do not collide (i.e. whether the same subnet is not used at both ends of the tunnel). If an IP address is tested successfully and an error is reported (Unknown host) when a corresponding DNS name is tested, then check configuration of the DNS. Note: VPN clients connecting to the headquarters server can access both the headquarters and the branch office networks and vice versa (the access is not limited by any restrictions). Therefore, it is recommended to test connection to both networks also from the VPN client. 23 Appendix A Used open source items Kerio Control contains open-source software. Full source code packages for these components are available in the Software Archive at http://download.kerio.com/archive/. 24 Appendix B Legal Notices Microsoft , Windows , Windows NT and Active Directory are registered trademarks or trademarks of Microsoft Corporation. VMware is registered trademark of VMware, Inc. Other names of real companies and products mentioned in this document may be registered trademarks or trademarks of their owners. 25