1
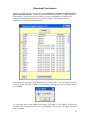
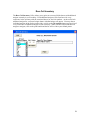
Copyright 2013 Rowny Systems, Inc.
Copyright and License Provisions
The ANTIGEN PLUS Ab-ID program is protected by the copyright laws pertaining to computer
software. Copies can be made for backup purposes only. It is illegal to give copies to another
person or duplicate the software by any other means. Purchase of the ANTIGEN PLUS Ab-ID
CDs and manual from Rowny Systems, Inc. or one of its distributors constitutes a license to
install and use the program on computers or a computer network with three stations in a single
laboratory facility. ANTIGEN PLUS Ab-ID may not be shared by facilities in different
geographical locations unless each facility is individually licensed.
Warranty
Rowny Systems, Inc. guarantees that the original CD is free from defects in material and
workmanship for one year from the date of purchase. Should any defect occur, you may return
your CD accompanied by a dated proof of purchase; Rowny Systems, Inc. will replace your CD
free of charge. ALL OTHER WARRANTIES, EXPRESS OR IMPLIED, INCLUDING
WARRANTIES OF MERCHANTABILITY AND FITNESS FOR A PARTICULAR
PURPOSE, ARE HEREBY DISCLAIMED. THE DISTRIBUTOR MAKES NO
WARRANTIES WITH RESPECT TO THE PROGRAM.
Technical Support
Rowny Systems offers free technical support and advice for Antigen Plus for one year from the
date of purchase, Monday-Thursday between 9 am and 5 pm U.S. Eastern Time at (301) 7613106. International callers please call 001 301 761-3106. Rowny Systems also offers technical
support via Email at [email protected].
Data Entry Support
Rowny Systems offers automated red cell panels for Antigen Plus Ab-ID. Please contact us for
more information about this service.
Liability
Rowny Systems, Inc. and its distributors assume no responsibility for the use of the ANTIGEN
PLUS Ab-ID program. The licensee assumes all responsibility for the proper use of the program
including establishing appropriate protocols and validation procedures to ensure accurate data
entry. ANTIGEN PLUS Ab-ID makes no decision or final recommendation on the meaning of
test results or on patient care.
i
Contents
Introduction ..................................................................................................1
Validation ......................................................................................................1
Installation ...................................................................................................2
Operation ......................................................................................................4
Antigen Order ...............................................................................................7
Data Entry .................................................................................................... 9
Searching and Selecting ............................................................................14
Printing .......................................................................................................16
Evaluating Test Results..............................................................................18
Exclusion Policy...........................................................................................20
Technical Information for Further Testing..............................................21
Utilities .........................................................................................................22
Saving Panels and Results..........................................................................23
Loading Panels and Results........................................................................25
Importing Data ...........................................................................................26
Rare Cell Inventory.....................................................................................28
ASCII File Creation....................................................................................29
Additional Information...............................................................................30
ii
Introduction
Antigen Plus Ab-ID is a red blood cell inventory and antigen search program that allows the user
to enter test results that are automatically evaluated to assist with the interpretation of those
results. It is designed to permit fast and easy data entry of test panels, and then search the data for
any combination of antigens you choose. It is intended to quickly select donor cells with
particular phenotypes for antibody identification studies and to speed up the interpretation process
for the blood bank technologist.
The data stored for each donor are:
Donor ID
Optional Note
Lot Number
Vial Number
Expiration Date
Supplier Name
Location
Phenotype Designation
Sex
Blood Group
28 Principal Antigens Phenotype
Additional Antigens - user-defined special typings
Frozen flag
Out-of-Stock flag
The user may specify any combination of antigens to search for, search the data and select any
cells desired, enter test results, and print a selected panel or results panel worksheet. The user
may store and retrieve the selected panels with any test results as desired. AntigenPlus Version 7
must be run from inside Microsoft Windows 9x or later. It requires a printer that can print in
Landscape format (11 x 8½).
Validation
The phenotypic information printed on a selected or results panel can be validated by assuring
that its data exactly match the data from the suppliers. Part of a laboratory’s validation procedure
should be to print each lot panel and have the responsible technologist compare it with the
supplier’s data sheet and sign it. The signed Lot Panel sheets, which have the printing date and
time on them, should be kept on file for as long as the cells remain on hand.
An ellipsis (...) appearing on the additional antigen section of a printed lot panel indicates the
presence of more additional antigens than could print on the lot panel page. Those cells can be
validated by selecting them with the Search mode and printing them on a Selected Panel Sheet
which will print all additional antigens for that cell.
Antigen Plus makes no decision or final recommendation on the meaning of test results or on
patient care - this is the user’s responsibility. Antigen Plus uses the logic recommended by the
American Association of Blood Banks to evaluate initial test results in the same way a
technologist would do.
1
Installation
For a Single-User
Start Microsoft Windows®. Place CD in your CD drive. Navigate to the disk using Windows
Explorer and double-click on the file SETUP.EXE. Alternatively, select the Start menu on your
desktop, and choose Run. In the Command Line box, type D:\SETUP.EXE and press Enter.
Follow all instructions that appear on the screen during the setup procedure. Please note: in some
cases your CD drive may have a designation other than "D." If, so use that letter instead of "D"
in the instruction above or use the Browse command to navigate to the setup file on the CD.
For Network Installation
Repeat the above instructions on your server or other drive accessible to the network up to the
point that the setup procedure asks you to approve the default path for the AP7 directory. Change
the path to place the directory on the network drive on which you want the data to reside, e.g.
f:\ap7. There is an additional directory on the installation disc: \Workstation Install.
This is intended to install all the supporting files on individual workstations when they are to
share the server AP7 program and database file. The \Workstation Install\Setup.Exe should be
run from the individual workstations. It will not install the executable file onto the workstation.
The administrator should create a shortcut to the AP7.Exe file on the workstation, and have it
point to the appropriate network directory.
If You are Upgrading from a Version Earlier Than AP7
Once you have installed the program and opened it, choose the Utilities option on the top menu
bar. From the Utilities menu, choose Import Data. Click on the arrow at the right side of the
SELECT TYPE OF DATA BOX and select AP2 Database or AP6 Database. Using the lower
box, navigate to your old Antigen Plus directory (usually c:\ap62). Once you click on this path, a
list of available files ending in .mdb will appear in the SELECT FILE box. Select the file you
wish to import and click Load.
Since AP7 recognizes a cell with irregular information, e.g. cells with
Spaces in the donor or lot number or cells with missing lot or donor numbers,
a message will appear informing you that the cell in question is not being
imported. Please note the donor and lot number of that cell so that you may
enter it manually after the rest of the database has imported. When the
Load program has completed, a message confirming that you have
imported as many cells as were properly entered in your old database will
appear on the screen. You have now imported all your available
individual cell and lot data from your prior version of Antigen Plus as well
as any panel data that was saved.
2
To Run the Program
After installation is completed, insure that YOU ARE THE ONLY USER the first time you run
the program. Antigen Plus must verify the structure of the database, and cannot do so if there are
other users. This is only necessary the first time a newly-installed program is run.
Double click the Antigen Plus icon to start the program. When the program loads, select the
Options menu at the top of the screen. Type in the name and address of your facility as you want
it to appear on all the printouts generated by the program.
Network Protocols
The network administrator, in the interest of data security, will determine each user’s rights to the
Antigen Plus database. Antigen Plus may be configured to comply with the network rights by
using the following command line parameters:
AP7.Exe /NoSave ... (give this group read-only rights.)
AP7.Exe /UpdateSaved ... (give this group read-only rights to everything EXCEPT that
the group will have rights to update and save Selected Panels.)
3
Operation
There are three principal modes of operation: Add/Change Cells, Search for Match, and
Results Panel. You can switch between the three modes by clicking the File menu with the
mouse pointer or by pressing the Alt + F keys to open the menu, then selecting an option. If no
cells have been selected, the Selected Cells Panel and Results Panel mode will not be available.
A menu option is selected by highlighting it with the mouse, scrolling to the desired option with
the Up and Down Arrow keys and pressing enter, or by pressing a letter key matching an
underlined letter in the menu option.
When the program starts, the Add/Change screen will automatically be displayed. It contains
cell data boxes and buttons and includes an Additional Antigens entry box with Add and Delete
buttons, and Save/Delete/Delete Lot/Clear buttons at the bottom of the screen.
4
When the Search mode is selected, a search pattern box will appear that will allow you to enter a
search pattern of the 28 principal antigens and/or any additional antigens, search the inventory for
matches, and mark cells for inclusion in a selected panel.
The search panel will immediately display how many cells are found in your database that are
matches for your current search pattern, and continuously displays how many cells have been
selected. Note that the search pattern defaults to blood group O cells.
5
The Results Panel screen can only be activated when at least one or lot have been selected. All
selected cells will be displayed in the Results Panel screen grid. Next to each cell phenotype,
seven results columns are provided.
The cells displayed on the Results Panel screen will be those currently selected either in the
Search mode or by using the Add Lot to Selected Cells function on the Utilities menu.
An autocell row will always display at the end of each Results Panel.
The Results Panel screen cannot be minimized, but clicking on the Exit button at the top of the
screen will not erase the current results. All results will be maintained until either the Clear
Selected Cells function on the Utilities menu is selected or the program is exited. Simply return
to the Results Panel screen through the File menu to bring back any previously entered results.
The entire panel and its results, with comments, can be saved for future reference by going to
Utilities | Save Selected Panel. Individual cells (and their associated results) can be deleted by
exiting the Results Panel screen and deleting the cell from the Selected Cells Panel screen.
Instructions for entering test results and an explanation of their interpretation may be found in this
manual in the section on Evaluating Test Results. Whenever a reaction is entered into a results
box (the columns under IAT, Enz, DTT and A-D), those antigens that are ruled out by a negative
reaction will be shaded, and the number of times an antigen has been ruled out is displayed on the
bottom line. The rule-out counts for P1 and Xga are given an asterisk, with an explanation in the
Evaluation box below. Positive P1 and Xga antigens require three negative reactions to verify
their exclusion.
6
Antigen Order
The antigen buttons are displayed in a common default order of blood groups: Rh-Hr, Kell,
Duffy, Kidd, Lewis, P, MN, Lutheran, and Sex-Linked. Some suppliers’ data sheets list them in a
different order, so in order to simplify entry there are 7 display options selectable with the 7
option buttons in the Options menu.
Click a button with the mouse pointer, or Tab to the Options menu box and press the Left or
Right Arrow keys to highlight a button, then press Enter.
Option
1
Option
2
Option
3
Option
4
Option
5
Option
6
Option
7
The differently-colored labels will move with them to make the change more obvious. Note that
the order inside the Rh-Hr system may change: the V, f, and Cw antigens switch places, with the V
label being colored differently to make this more obvious. With Option 5 the order inside the
MNSs group changes to SsMN. The display option will be used to print Lot Panels so that the
data entered can be easily compared to a supplier's antigram. It will also be used to preview and
print Selected Cell and Results Panels.
7
Automating the Antigen Order
If you prefer to have the antigen order change on the screen to automatically match the supplier
displayed on the Add/Change or Search screens, open the Utilities menu and select Set
Supplier Antigen Order. All the suppliers that have been entered into the database will display
alphabetically in the Supplier list box. If the Add/Change and Search screens have no supplier
displayed, the name in the list box will be the first in the list. If a supplier is being displayed on
the Add/Change or Search screens, that supplier name will be displayed in the list box. To set
the default antigen order for a supplier, open the list box (click on the down arrow next to the
box) and select the supplier name by clicking on it with the mouse. Select the appropriate
number for that supplier and click on the Save button.
Once the supplier orders are set, the screens will change automatically when Supplier Default is
checked.
If one of the numbers is checked, the screens will display the common antigens in that order only.
In the Supplier Default mode, Selected and Results panels will print in the Supplier order of the
first cell on the screen in the case of multiple suppliers.
8
Data Entry
Data may be entered or changed in a box whenever the cursor is blinking in that box. The cursor
starts out blinking in the Donor No. box, and can be moved to another box by pointing to it with
the mouse and clicking the left mouse button. The cursor also moves to the next box by pressing
the Tab key, or to the previous box by pressing the Shift + Tab keys. Previously saved data can
be viewed and selected by clicking the little down-arrow to the right of the box, or by pressing the
Ctrl + Down Arrow keys while the cursor is in the box. The box will be “opened”, and the data
will be displayed in numerical and alphabetical order. Any item in the list can be selected with a
mouse click, or by highlighting it with the Up or Down Arrow keys and pressing Enter.
Alternatively, items can be scrolled without opening the box by pressing the Down Arrow key.
A list box may be opened at a particular spot in the list by first entering a character or characters
in the box and then opening it. A button may be activated or “pushed” by clicking it with the left
mouse button, or by moving the cursor to the button and pressing any key. You can tell when the
cursor is on a button because its outline becomes darker, and if it has writing on it, the writing is
surrounded by a dotted line. As with boxes, the cursor can be moved from button to button by
using the Tab or Shift + Tab keys, or by clicking directly with the mouse. In general, the cursor
moves from left to right and top to bottom on the screen. A donor cell is identified by its Donor
ID and Lot Number. A donor number or lot number may appear any number of times, but the
Donor ID - Lot Number combination must be unique. In order to save a cell in the database, it
must have a non-blank Donor ID and a non-blank Lot Number. When you are entering several
cells from a single antigram or lot panel, the data boxes are blanked after you Save, but remain
indexed at the last item entered. Therefore, when you enter one cell and save it, then enter a new
Donor ID number, you can Tab to the Lot Number box and press the Down Arrow to recall
the previous Lot. Its expiration date and supplier will also appear, saving you from having to reenter the data.
Donor Number
The Donor No. box will accept up to 16 characters and may be any combination of capital letters
and characters except apostrophes. Enter a donor ID and press the Tab key to move on to the Lot
Number box. If the donor is already on file, the cell data will be retrieved and displayed.
Drop-down (or list) boxes have six positioning buttons on the right-hand side: go to first record,
page up, line up, line down, page down, and go to last record. One donor may be present on
several different panels. If a donor has more than one cell on file, and her previously existing ID
is entered, the most recent one found will be displayed. This is to facilitate entering duplicate
donors - when you wish to enter a donor who is already on file into a new lot number, the old
phenotype will automatically appear, and you then need to enter only the new lot number, check
the expiration date, and click the Save button. It is assumed that the phenotype will not have
changed from a previous panel.
9
Donor Note
An optional note may be stored with each Donor ID by selecting Donor Note from the top menu.
The note is automatically saved when you make a change. A Donor Note is associated with the
Donor ID only, not the Lot, so it will appear with every Lot that a donor ID is in. When a Donor
ID has a note on file, a small tick mark will appear in the box:
Lot Number
The Lot Number is used to show the supplier's unique lot number for this cell's panel. All cells
with a given Lot Number will have the same supplier and expiration date.
The Lot Number box will accept up to 16 characters and may be any combination of numbers
and capital letters. Enter a lot number and press the Tab key to move on to the Vial box. If the
lot number was already on file, the expiration date and supplier will be retrieved and displayed.
Vial
The Vial box will accept any number from 0 through 99. It will also accept a TC (tech cell) vial.
Enter a vial number or TC and press the Tab key to move on to the Expires box. Pressing the
Up and Down Arrow keys or clicking the little up and down arrows to the right of the box will
automatically raise or lower the displayed vial number. T C is located below the 0.
Expiration Date
The Expires box is for the expiration date of all cells in the lot number displayed. You may enter
a date in any format that is comfortable for you, such as “20 Dec 10” or “12-20-11”, then press
the Tab key to move on to the Supplier box. The date will be re-displayed in the format set in the
Windows Control Panel/Regional Settings/Date function. If the date is before the present system
date, a bright red Out of Date! will appear under the Expires box. The expiration date is stored
10
with the lot number, so if you change the expiration date of a lot number, then ALL cells with
that lot number will have the new expiration date.
Supplier
The Supplier box will accept up to 20 characters. You should ensure that the name is identifiable
using just the first 9 or 10 characters since an abbreviated name may be printed on selected panel
sheets.
The supplier is stored with the lot number, so if you change the supplier of a lot number, then
ALL cells with that lot number will have the new supplier.
Location
Enter a storage drawer location for a frozen cell. The location is stored independently and will
not affect other cells with the same lot number--should there be any. The location will print out
on the selected panel sheets in lieu of a lot number. The Location box will accept up to 15
characters in any combination of letters and numbers.
Rh-Hr
Antigen Plus Ab-ID comes with the standard Rh-Hr phenotype designations loaded in the drop
down box that is activated by clicking on the down arrow adjacent to the Rh-Hr entry box.
Choosing one of these designations by clicking on it will place it in the entry box and will mark
the appropriate pluses and negatives in the Rh-Hr antigen group (see illustration below). If
changes are made to that antigen group a red warning flag will appear stating that the phenotype
has been cleared. This flag will appear upon any user action following the change. If that action
is to save the cell, a dialog box will present the option of canceling the save. If the save is
cancelled, the warning flag will disappear and no warning will be given on the subsequent save
action. Antigen Plus Ab-ID will not save a cell with an inappropriate Rh-Hr designation. The
individual antigen entries may remain but the Rh-Hr identification will be erased until it is
reinstated (at which time the antigens will again be marked with the appropriate pluses and
minuses). In cases where you wish to designate an RH-Hr without knowing the entire phenotype,
you must enter a qualifying character after the Rh-Hr description (e.g R1R1x ) to allow the
program to accept an incomplete Rh-Hr typing. An exception is made for electronically imported
panels in which a red cell manufacturer has supplied a cell with an Rh-Hr designation that is not
fully supported by the cell phenotype.
Note: Antigen Plus no longer specifies the Cw antigen in Rh-Hr designations since we cannot
predict 100% when C will be on the same gene complex as Cw.
11
Additional Antigens
The Additional Antigens box consists of an entry box, an Add and Delete button, and a display
box directly below them containing this cell’s additional antigen phenotype. You may enter an
additional antigen of up to 8 characters in the entry box, or select one from the list by clicking the
box open. To add what is in the entry box to this cell, click the Add button. To delete an item
from the additional antigen display box, enter the item you wish to delete in the entry box, then
click the Delete button. To delete ALL the items in the display box, click the Delete button and
press the Delete key on the keyboard.
To add what is in the entry box to this cell, click the Add button.
To delete an item from the additional antigen display box, enter the item you wish to delete in the
entry box, then click the Delete button. To delete ALL the items in the display box, click the
Delete button and press the Delete key on the keyboard.
There is no limit on how many additional antigens you may enter. However, once the screen
space is used up, further antigens will be stored but not displayed, and only the first 20 can be
exported to ASCII files for use in other databases. When there are more additional antigens than
can be displayed on a Lot Panel print out, an ellipsis (“...”) at the end of the additional antigen
list (displayed alphabetically) will indicate the presence of the additional typings and alert the
user to refer to an original hard copy or to a Selected Panel print out or a Selected Cells Panel
screen containing that cell to determine the precise phenotype of the donor cell. The reason for
the entry-box method of adding additional antigens is to ensure consistency: you must be
consistent in your notation in order for a search to work properly. For example, to indicate a
Colton b antigen (Cob) as positive, you may enter Co(b+), CoBPos, or any other notation that is 8
characters or fewer, but you should use the exact same notation for all cells with this antigen. The
entry box will contain a list of all the additional antigens previously saved in your inventory, and
you should check for an antigen’s presence before entering a new one.
.
Out Of Stock
Click the Out Of Stock button, click OK in response to the pop-up query, and then click the Save
button to mark a cell as exhausted. The data will remain on file so that you can recall the
phenotype in case the cell shows up in a new lot. The cell will not be available in the search
process unless you mark the Include in Searches feature in the Out of Stock Inventory box in
the Options menu. When you click the Save button, you will be given the option of marking the
entire lot as out of stock. Click Yes or No in the popup window, or type y or n, to indicate your
choice. Please note: If you do not click the Save button after marking the cell as out of stock, the
cell will remain in stock and the out of stock flag will not reappear on the screen when that cell is
recalled.
12
Sex
Clicking the Sex button will change the button from blank to M to F. This is optional
information, and not normally of significance in the selection of panel cells.
Group
The Group button allows you to enter the blood group of the donor cell. Since most commercial
panel cells are group O, that is the default setting. To change the blood group to A, B, or AB,
click the Group button until one of those characters appears. To leave the blood group
unspecified, click the Group button until a blank appears.
Frozen
Click the Frozen box to mark a cell as frozen. The expiration date will be blanked. Frozen cells
will be found last in the search process, since searching is done starting with newest cells first.
Antigens
The 28 principal antigens are displayed with colored labels for easy identification. When you are
entering a new cell, all the antigens will have a 0 setting. You may change a setting to a +, s, w,
or blank by clicking the button with the mouse pointer (right and left mouse clicks scroll through
the choices in opposite orders), or by moving to a button with the Tab key and pressing any other
key. A blank setting indicates that no information is available. For example, some suppliers may
not include the Kell system Kpb and Jsb, so you may blank these antigens’ buttons.
Save
Clicking the Save button will save all the cell data displayed for the unique Donor No. - Lot
Number combination. Any items not previously present in the data boxes (Donor, Lot,
Expiration Date, Supplier, Additional Antigens, and Rh-Hr) will be added to the lists in those
boxes. The cell display is cleared and the cursor returns to the Donor No. box. The Lot Number,
Expiration Date, and Supplier are saved as a group with the Lot Number. If you have changed
the date or supplier of a lot, then ALL cells with that lot number will have the new date and
supplier. A Donor Note is saved only with the Donor ID, and stays with the Donor ID regardless
of which Lot it is in.
Delete
Clicking the Delete button will prompt you to make sure, then remove the displayed Donor No. –
Lot Number combination from your inventory. When a cell is deleted, any unique lot, additional
antigen, or Rh-Hr information it may have had will also be deleted from the lists in those boxes.
Delete Lot
Clicking the Delete Lot button will prompt you to make sure, then remove ALL cells with the
displayed lot number.
13
Searching and Selecting
Search for Match
When the Search option is selected from the File menu, the Search Pattern box appears.
The pattern box contains a row of 28 antigen buttons, a Group button, a Frozen flag button, an
Additional Antigens list box and the additional antigens search display box, Search Next and
Search Previous buttons, and a check box for selecting cells:
Search Pattern
To enter a search pattern, click the desired antigen buttons in the search pattern box. They are in
the same order as the labeled antigens directly above them. You may set the buttons to 0, +, or
blank. A 0 or + setting means that a matching cell must have a 0 or + in the same place (s or w
designations will be read as + during a search). A blank setting means “don’t care”, and during a
search those antigens will be ignored. To search for frozen cells only, click the Frozen button.
To search for a particular blood group, click the Group button until the appropriate group
designation appears. To add additional antigens to the search pattern, check those desired in the
Additional Antigens box. You may select as many additional antigens as you like, but only the
first 8 to 10 (depending upon their length) will display on the screen. To remove items from the
Search Additional Antigens display box, uncheck the item in the Additional Antigens list.
14
Searching
To perform a search, click the Search Next button. The system will search your inventory for a
cell which matches ALL the +, 0, and Additional Antigens in your search pattern. s or w are
recognized as positive during a search. When you clock the Search Next button, the inventory
will be searched starting with the NEWEST cells first, that is, in reverse expiration date order.
All frozen cells have no expiration date and will be gathered at the END of the search order.
Upper and lower case letters are equivalent in searching for additional antigens. If you have two
notations for a single antigen, for example Yta- and ytA-, a match will be found. You cannot
enter any new antigens into the Additional Antigens list box - the list already contains all the
additional antigens in your inventory.
A search for an unspecified blood group (blank) will match ANY blood type, specified or
unspecified.
If an antigen pattern or additional antigen shows “0 Matches Found” and you are sure that the
pattern or antigen exists, it may be because the cell’s blood group does not match, or the cell is
marked Out of Stock and the Options|Exclude From Searches box is checked.
Each time a match is found, the cell is displayed above. To search for the next match, click the
Search Next button again. A message will appear when the end of the inventory data has been
reached. You may also search the data in the other direction, from OLDEST to NEWEST, by
clicking the Search Previous button; a message will appear when the beginning of the inventory
data has been reached. Any change to the search criteria (changing any search antigen button or
changing the search additional antigens box) will reset the search procedure, and the data will be
searched starting at the beginning.
Selecting
Whenever you are in the Search for Match mode (the search pattern box is present) and a cell is
displayed above, you may click the Select box to tag this cell with a checkmark or to erase an
existing checkmark. You may display a cell in the search mode either by searching for it or by
entering and clicking on the specific donor number in the Donor No. box, or by clicking on the
desired number in the Donor No. drop down box. Cells with a checkmark are included on
selected cell panels. There is no limit to how many cells you may select, however the preview
screen can only display up to 15 cells at a time and a printed selected panel can only print up to
15 cells on a page. The results screen can only display up to 11 cells at a time. You may scroll to
subsequent preview screens and all cells selected will print on consecutive pages. To empty the
Selected and Results panels without exiting the program, remove ALL checkmarks by selecting
the Clear Selected Cells option on the Utilities menu.
Previewing a Selected Panel
You may preview your selected panel on the screen by selecting Selected Cells Panel from the
File menu. Before previewing your panel, however, you should choose the order in which you
want them previewed and printed. This is done from the Options menu. If you choose Sorted
by Expiration Date, the cells will start with the most recent and end with the frozen cells
selected. The frozen cells themselves will be displayed in Donor ID/Lot number order. If you
choose In Order Checked, the cells will appear in the order in which you selected them during
the search. If you choose Sorted by Donor/Lot, the cells will be displayed by Donor ID/Lot
number order. The same order choice will govern your printed worksheet and will remain in
effect until you change it from the Options menu. The selected cells will be displayed 15 at a
time. The 28 principal antigens are displayed in the Display Option order you have selected on
the search/entry screen.
15
Printing
Antigen Plus should ensure that your printer prints in Landscape (11 x 8½) format. If your print
out appears in Portrait format, you may correct this in Windows by minimizing the Antigen Plus
program, then invoking the Start, Settings, and Printers commands, and setting up the printer.
When you are finished, reactivate Antigen Plus by clicking its icon at the bottom of the screen.
Lot Panel
The Print Lot # Panel option on the File menu will print all the cells in the lot displayed in the
Lot Number box. The cells will be in vial order, and will be shown with all the data you have
entered on the screen or have imported from a file (see page 26). If a cell has 6 or more additional
antigens and they will not all fit into the additional antigens column, the last antigen will be cut
short and have an ellipsis (“...”) after it to indicate that there is more data than is showing. The 28
principal antigens are displayed in the Display Option order you have selected on the screen (see
pages 6 and 7).
Use the Lot Panel printout to check your data against the supplier’s data sheet, and keep a
signed copy for your validation records. To verify the existence of the additional antigens
whose presence is marked with an ellipsis, select the cell in question in the Search mode and print
it out in a Selected Panel.
16
Selected Panel
The Selected Panel is a worksheet containing all of the cells with check marks on them. The cells
are displayed in your choice of Expiration Date, Checked, or Donor ID / Lot and vial order. If a
cell has been saved with an entry to the Location box, the location information will be displayed
instead of a lot number. The 28 principal antigens are displayed in the Display Option order you
have selected on the screen. The worksheet will display the date and time it was printed.
Additional antigens are printed to the left of the principal antigens. If there are more additional
antigens than can print on one line, more lines will be inserted underneath the cell until all
additional antigens are printed. These additional lines may be printed on a consecutive page if
the page on which they start is filled. If a selected cell has an expiration date prior to the system
date, the cell’s first column will be marked OOD (Out of Date). If a selected cell is Frozen, the
cell's first column will be marked FZN. The Selected Panel may be previewed on the screen at
any time by selecting the Selected Cells Panel option in the File menu. The Selected Panel may
be printed at any time by clicking the Print button at the top of the screen.
Deleting a Selected Cell
A cell may be removed from the selected panel preview screen by clicking anywhere in the cell's
row. The row will change color and you will be prompted to make sure you wish to remove the
cell from the selected panel (the cell will not be deleted from the system). When you respond
OK, the cell's checkmark will be removed, and the selected panel will be redisplayed from the
beginning. Alternatively, you may locate the cell on the search screen using the Search Next or
Search Previous buttons, click the Select button to erase the checkmark, then preview the
selected panel again.
17
Evaluating Test Results
The Results screen may be called up from the File menu whenever selected cells are present as a
result of selection by search or by adding a lot panel or panels to the Selected Cells in the
Utilities menu. Results can be recorded as they are read by clicking in the box in the appropriate
test column that is in the same row as the tested cell. The test column box will be highlighted and
a drop down box will appear with a choice of results that may be entered by clicking on the
desired number. The default choice is 0 through 4+ (Agglutination Grading). Result choices may
be seen and entered in the Marsh 0 to 10 scale by choosing that option in the Options menu.
Once a choice is entered, move the cursor down to the next tested cell and repeat the procedure.
If no result was entered in a box, the next box will require one mouse click to be highlighted and
a subsequent click to bring up the result choices.
Test Results may also be entered by keystroke (with the exception of "10" on the Marsh scale
which must be selected with the mouse. To remove a result from a box, click once on the box,
18
then click on the blank space above the zero in the choices box. As the results are entered, the
exclusions obtained will appear in the Evaluation box at the bottom of the screen.
If the Shade Ruled Out Antigens on Results Panel checkbox in menu Options is checked, the
excluded antigens will also be shaded. The bottom line of the Results Panel, “RuleOuts”, keeps
a running tally of the number of times an antigen has been excluded.
Exclusions are specific to the results column in which they are entered and are so marked. The
basis for those exclusions is documented below in the Exclusion Policy section. Results and
exclusions are maintained as long as the selected cells are not cleared. If the Selected Cell Panel
is saved, any results entered against those cells will be saved with the panel and will appear on
the Results screen when the saved Selected Cell Panel is loaded. If more cells are required for
testing than appear on the Results screen, simply exit the screen by clicking the Exit button and
add cells to the Selected Cell Panel by the Search or Add Lot to Selected Cells methods. The
current Evaluation box will appear at the bottom of the Search screen. Any new cells selected
will be present on the Results screen when it is called up again.
A Results panel may be printed at any time by clicking on the Print button. If any cell has a long
list of additional antigens obscuring the test columns, the Additional Antigen column may be
compressed by moving the cursor on top of the left hand border of the shaded title bar of the
Additional Antigens column—the cursor will change to a two-headed horizontal arrow—holding
the mouse clicker down and dragging the border to the right. The additional antigens will be
hidden and the test columns will be visible without scrolling to the right of the screen. An Auto
Cell row will appear as the last cell of any Results panel. The Auto Cell will have blank boxes in
each column. If typings are known for the Auto Cell, they may be entered on the Results screen
and will be saved and may be recalled if the Selected Cells Panel is saved. Test results may be
entered for the Auto Cell but those results will have no effect on the evaluation regardless of any
information that is entered in the Auto Cell columns. If a positive test result is entered for the
Auto Cell a warning will appear in the Evaluation box.
19
Exclusion Policy
Antigen Plus - Ab ID excludes antigens in the manner described by the AABB Technical Manual,
15th Edition, (ch 19: pg 428-9). Homozygosity is required for the exclusion in the following
blood group systems: Rh, Duffy, Kidd, MNS. In the presence of anti-D, the program will exclude
E and C on heterozygous cells.
The blood group antigens that can be excluded on heterozygous cells are K, Kpa , Jsa, and Lua.
As the homozgosity of P and Xga is not easily determined from most panel sheets, the program
requires 3 examples of each antigen to be non-reactive with the patient sample before it will
exclude either antigen.
It is always advisable to review AABB Technical Manual, 15th Edition, (ch 19: pg 429-36) for
more detailed information on Complex Antibody Identification including variability of antigen
strength, the effect of storage on RBC antigens and use of autologous cells while considering the
antigens excluded or not, by the program. Any final decision made by the technologist must be
consistent with their facility SOP for Antibody Identification.
The program does not encompass the knowledge of all blood group systems and their patterns of
reactivity. Any technologist using the program to automate the exclusion process must apply
serological expertise to interpret the program’s lists of antigens excluded versus antigens not
excluded. The program evaluates each column of reactivity independently. Exclusions obtained
from the results recorded in columns A, B, C, and D will be exactly the same as those obtained
from identical results recorded in the Liss indirect antiglobulin test (IAT column). There is too
much variability in antibody reactivity to risk excluding an antigen on anything but the reactions
obtained by the technologist and recorded in Antigen Plus - Ab ID.
Red cell treatments, when performed correctly, do have a standardized effect that is well
documented. Antigen Plus - Ab ID does employ that information when the ENZ column and
DTT column have results recorded in them. The ENZ column will not exclude Duffy and MNS
blood group system antigens. The DTT column will not exclude Kell or Lutheran blood group
system antigens.
High frequency antigens and low incidence antigens, which can be used as a search parameter to
select cells for the results panel, cannot be used in the exclusion process or listed in the
Evaluation box at the bottom of the results panel. As the antigens listed in the Additional
Antigens are entered by the individual user, they are not pre-coded by the program. A list of
technical tips to assist any technologist who may have an antibody to a high frequency antigen or
to a low incidence antigen is included in the Help utility and is reproduced on the following
pages.
The following text always appears with any results in the Evaluation box.
These are tentative rule-outs.
Additional confirmatory data based on your own criteria are recommended.
It is the user's responsibility to record accurate test data and to confirm that data according to
established protocols.
20
Technical Information for Further Testing
1. If all cells in the first panel are reactive and the autocontrol is negative, try chemically treated
screen cells and see if this alters the reactivity in any way. Chemical treatment of red cells
includes: enzymes, DTT, AET or CDP (chloroquine diphosphate). Methods and information on
obtaining any of the products required, can be found in the American Red Cross
Immunohematology Methods and Procedures, D. Mallory, ed. Selecting 2 or 3 cells from the
panel, or using the screen cells, will save time, save plasma and still provide new information. If
the information is that nothing changed, go to step 2.
[More information on the actions of specific chemicals is listed in step 2,(iii).]
2. If all cells in the first panel tested are reactive and the auto control is negative, perform a
common phenotype on the patient's red cells (patient must not have been transfused in the
preceding 90 days). Blood group systems to include Rh, Kell, Duffy, Kidd and MNS. Select a
cell from any of the panels or screen cells in your inventory that is negative for the same antigens
the patient lacks and test it. This is referred to as running a phenotypically matched cell.
EXAMPLE: PATIENT
POSSIBLE MATCHES:
D+C+E-c+e+, K-, Fy (a+b-), Jk(a-b+), M+N+S-s+.
D-C-E-c+e+, K-, Fy(a-b-), Jk(a-b+), M-N+S-s+
D+C+E-c-e+, K-, Fy(a+b-), Jk(a-b+), M+N-S-s
i) If the phenotypically matched cell does not react with the patient's plasma, select a panel
of red cells based on one example of each antigen to be excluded per cell.
EXAMPLE: FOR THE PATIENT LISTED ABOVE THE SELECTION CRITERIA
WOULD BE:
CELL 1 E+, K-, Fy(b-), Jk(a-), S-.
CELL 2 E-, K+, Fy(b-), Jk(a-), S-.
CELL 3 E-, K-, Fy(b+), Jk(a-), S-.
CELL 4 E-, K-, Fy(b-), Jk(a+), S-.
CELL 5 E-, K-, Fy(b-), Jk(a-), S+.
This will confirm or exclude which antibody(ies) to the common antigens the patient has formed
and what is left to form in the future.
ii) if the phenotypically matched cell(s) is reactive with the patient's plasma and the
autocontrol is negative, the most probable cause is an antibody to a high frequency antigen.
Use Antigen Plus to select any examples of high frequency antigen-negative red cells
in your cell library. I.e.. At(a-), k-, Kp(b-), Js(b-) etc.
iii) If you have a limited rare cell library or failed to obtain a negative reaction with the high
frequency antigen-negative red cells available, consider that various red cell treatments which
modify or destroy certain antigens on red cells can also be useful. DTT/AET treatment will
destroy: Kell (not Kx), Lutheran, Knopps/McCoy, Cartwright, Cromer, Dombrock, Auberger,
JMH and Lwa. Gerbich is destroyed by DTT but not AET. ENZYMES (papain, ficin, trypsin,
bromelin) will remove: Duffy, MNS, Chido, Rogers, JMH, Gerbich, Gilfeather, Xga, Pr, Vw,
Cartwright, Mia, Cla, Jea, Nya and most Ena. Chloroquine diphosphate (CDP) will destroy Bg and
class I HLA antigens.
3. If all cells in the first panel tested are reactive and the auto control is positive, do a direct
antiglobulin test (DAT) on the patient's cells before doing further serum testing.
i) If the DAT is positive, a warm autoantibody should be suspected and may hide underlying
alloantibodies in the patient's plasma. The autoantibody should be removed by autoabsorption
before further antibody identification can be achieved. Autoabsorption can only be performed
21
using pre-transfusion patient red cells. The patient must not have been pregnant or transfused in
the preceding 90 days. For further information and testing methods, refer to the AABB Technical
Manual, Current Edition, or the American Red Cross Immunohematology Methods And
Procedures, D. Mallory, ed.
ii) If the DAT is negative, a cold autoantibody should be considered. A cold screen tested from
room temperature down to 4o C will indicate if an autologous absorption done at 4o C will be
useful to remove the autoantibody. Again, the patient must be untransfused in the preceding 90
days.
iii) If autoabsorption, warm or cold, is not possible, there are alternatives. Allogeneic warm
absorption is possible using R1R1, R2R2, and rr cells. A prewarm method may be useful to
remove any cold reactivity. Prewarm methods must be used with caution preferably after the
clinically significant antibodies have been tentatively identified. Prewarm methods have been
documented to remove anti-H activity in a Bombay phenotype and an example of anti-Vel.
References on request.
4. If all the cells tested are negative, several things must be considered:
i) Repeat the cell that gave the original positive reaction that initiated the panel, i.e. the
antibody screen test or one of the units being crossmatched. Note where the antibody reacts immediate spin or IAT? Was the panel tested at the same phase the reaction occurred in?
ii) How soon after the original testing, was the panel performed? Was the sample stored
properly?
iii) Is the reactive cell homozygous for any common antigen and is there another cell
homozygous for the same antigen that can be used to repeat the result?
iv) Will enhancement media help reveal a weak reacting alloantibody pattern, i.e.
Enz, PEG, LISS with a longer incubation time, or polybrene?
v) If none of this adds any information about antibody specificity, you may have an antibody
directed against a low frequency antigen. While the identity of the antibody is a puzzle, it is
rarely a significant problem when looking for compatible units of red cells for transfusion. If you
have time to play with it, use Antigen Plus to locate as many low incidence antigen positive cells
as you have listed under special antigens. If none of them react, and you still wish to resolve the
specificity, send the sample to a reference lab for crosstesting. Most reference labs keep their
unidentified lows in hopes of finding another example.
5. If your routine test method can detect weak reacting autoantibodies at any phase of testing,
positive antibody screen results can lead to a common panel result of several weak reactions with
no specificity determined. Antigen Plus will perform exclusions based on its policy and may well
exclude all common specificities depending on the number of reactions and phenotype of the cells
which do not react. The technologist should follow his or her Blood Bank SOP for antibody
identification which should address this type of panel testing outcome. Depending on method
used, patient population and number of occurrences, the most common choices are likely to
include:
i) Try more sensitive method if an alloantibody may be just forming or was not stimulated in the
recent past.
ii) Repeat the original test by a less sensitive method, e.g. from solid phase testing back to tube
LISS-IAT (a common approach to dealing with the very sensitive capabilities of solid phase
testing.)
iii) Seen only at immediate spin – assess possible clinical significance and drop the IS test if
appropriate.
Use the prewarm method only after significant antibodies (anti-Vel, anti-PP1Pk, anti-H in a
Bombay) have been excluded.
22
Utilities
Backing Up
You should frequently backup your data onto a backup drive, external hard drive or tape
backup system. The Backup Data option on the Utility menu will prompt you for the location of
a directory: select a directory and then click Backup to copy the file AP7.MDB to it.
Please note: The backup utility will overwrite an
existing backup unless you have marked the existing
file as Read-only. In that case, you must back up to
a different directory.
Clear Selected Cells
This menu option will clear all the cells selected by the Select This Cell button, and there will be
zero cells selected. Unless the Selected Cells Panel has been saved, no results will retained.
Add Lot to Selected Cells
After a lot number has been selected, clicking the mouse on Add Lot to Selected Cells will place
all the cells in that lot on a Selected Cells Panel. All selected cells will be checked as selected in
the Search panel.
23
Save Selected Panel
The Save Selected Panel option is disabled unless there has been at least one cell checked, or the
user has loaded a saved panel.
To save the currently selected panel:
Open the Utilities dialog box and select the Save Selected Data option. A new screen will
appear:
According to your laboratory protocol, enter a name and number of up to 20 characters each into
the Name and Number box, or lookup an existing title by clicking the Lookup Existing Panel
radio button and making a selection. You may add a description of unlimited length to the saved
panel in the Full description text box. When you are ready to save the panel with or without an
extended description, press Save. If an existing name and number combination was selected, the
currently selected panel will replace that saved panel. All results associated with that panel will
also be saved.
To delete a saved panel:
Selecting a Name or Number will display the relevant panel and also display the DeleteThis
Panel button. Pressing this button will open a dialog box to ensure that you wish to delete the
displayed panel.
24
Load Selected Data
To load a saved panel:
Open the Utilities dialog box and select the Load Selected Data option. The Load option is
disabled unless there is at least one saved panel. A new screen will appear:
Open the Name, Number, or Date list box, by clicking on the appropriate radio button or downarrow. You can narrow the search list by first entering a character or characters in the box and
then opening it). Click on a title and click the Load button. This will add the panel you have
selected, along with any results previously entered to the Selected Cells and Results screens.
Loading a saved panel will empty the Selected Cells and Results screens of any previously
entered data. Once a saved panel is loaded, additional cells may be added to the Selected Cells
and Results screens by using the Search function (see page 14) or the Add Lot to Selected Cells
function.
Any time a saved selected cell cannot be found during loading, presumably because a user has
deleted the cell since having saved the panel, the cell will not be loaded with the panel and any
results associated with that cell will be removed from the evaluation calculation. The following
message will appear:
25
Import Data
This menu option imports data into the AntigenPlus Version 7
database from panel (.PNL) files supplied by email from Rowny
Systems, or downloaded directly from the Rowny website. You
may also import entire databases from this or previous versions of
Antigen Plus.
Click Download From Internet to see a list of panels available
online.
If you are importing panels that have been emailed to you, select
the drive and directory where they are to be found, double-click on
the appropriate folder in the drop-down list box so that the
directory name appears in the Path box below, and click the Load
button. This selection may be run any number of times without
harm; only those cells which are not already present will be added
to your database. If an existing donor in a new lot is encountered,
any updated information on that donor will be added as the default
information for that donor.
You may also import entire databases from this or previous
version of Antigen Plus.
Neither Rowny Systems nor its distributors make any guarantee
as to the accuracy of any panel data supplied electronically.
It is the responsibility of the end-user to validate the accuracy
of any imported data by printing out the imported lot and
validating it against the information supplied by the red cell
panel manufacturer.
.
26
Download From Internet
Initially, you must have entered some text in menu Options|Text to appear on printed Cell Lot
panels and Selected Panels. You should insure that your workstation has a working connection
to the internet. The first time you press Connect, you will be prompted to send an email or
otherwise contact Rowny Systems to set up your subscription. Once the subscription is
established, you will see the following screen:
Available panels are listed in descending order of Expiration Date. You may select as many as
you wish, and as each panel is added to your database, a message shows the Lot ID and number
of cells added:
If a lot already exists in your database, the message will display “0 Cells Added”. If any of the
individual cells with that lot already exist in your database, the message will display how many
cells were added.
27
Rare Cell Inventory
The Rare Cell Inventory Utility allows you to print out a count of all the donors with additional
antigens currently in your inventory. Each additional antigen will be listed once for every
occurrence in the inventory with the associated donor, lot, and vial numbers. At the end of each
additional antigen list, a count of unique donors with that antigen will appear. You may choose
individual antigens in the list box on the right, or click on the All Antigens button to print a list of
every occurrence of additional antigens in your inventory. When you have selected the desired
antigen or antigens, click on the print button and the list will be sent to your default printer.
28
ASCII File Creation
Use this option on the utility menu to create an ASCII file of your cell data which can be read by
other applications, such as a database or spreadsheet. There are two format options: regular
ASCII or Comma Delimited. The comma-delimited option separates each field with a comma,
has a carriage return/line feed at the end of each record, and is suitable for importing into most
spreadsheet or database programs. The regular ASCII option places a carriage return/line feed at
the end of each field, and may be more suitable for reading and processing by a programming
language such as BASIC or C. The data will be written in Donor ID/ Lot Number order. Each
cell will consist of 59 fields, in the following order:
1. Donor ID
2. Lot Number
3. Date
4. Location
5. Supplier
6. Vial Number
7. Rh-Hr Notation
8. Blood Group
9. D Antigen (0 for negative, 1 for positive, blank for unknown)
10. C Antigen
11. E Antigen
12. c Antigen
13. e Antigen
14. Cw Antigen
15. f Antigen
16. V Antigen
17. K Antigen
18. k Antigen
19. Kpa Antigen
20. Kpb Antigen
21. Jsa Antigen
22. Jsb Antigen
23. Fya Antigen
24. Fyb Antigen
25. Jka Antigen
26. Jkb Antigen
27. Lea Antigen
28. Leb Antigen
29. P1 Antigen
30. M Antigen
31. N Antigen
32. S Antigen
33. s Antigen
34. Lua Antigen
35. Lub Antigen
36. Xga Antigen
37. 1st Additional Antigen
38 - 56. 2nd through 20th Additional Antigen
57. Sex (M, F, or blank)
58. Frozen (0 or 1, where 1 = Frozen)
59. Out of Stock (0 or 1, where 1 = out of stock)
Each item will occupy one field even if it is blank or empty. If you select comma-delimited, any
commas found imbedded in any of your data fields will be removed.
29
ADDITIONAL INFORMATION
COPYING TEXT FROM THE SCREEN
The text in the Full description box on the Save and Load panel screens and the text in the Help
screens can be copied into another application by highlighting the text by placing the mouse
cursor at the beginning of the text to be copied, holding down the right mouse button and
dragging the cursor across the text to be copied. The text will be highlighted. Release the mouse
button and press the "Ctrl" and "C" keys on your keyboard simultaneously. The text will then be
copied to the Windows Clipboard and can be copied into any Windows application that has a
Paste function.
COPYING TEXT TO THE FULL DESCRIPTION BOX
Text from the Windows clipboard may be copied into the Full description box on the Save screen.
When the cursor is flashing in that box press the "Ctrl" and "V" keys on your keyboard
simultaneously. The text you have copied from another application will be pasted into the
description of the panel and may be saved with the Panel Key name by clicking the Save button
on the screen.
PROGRAMMING NOTES
AntigenPlus Ab-ID is written in Visual Basic and uses a Microsoft Access database. Users
familiar with Access may open the databases and produce reports, run queries, and generally
explore record layouts and file structure for purposes of importing data held in other databases.
Be sure to back up the original database before attempting any of these procedures.
30