1
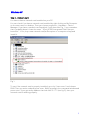
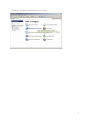
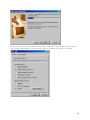
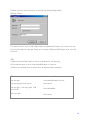
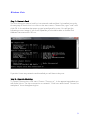
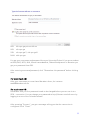
How to connect to Studentbynett
(how to get on the Internet from SiB’s student hostels)
Studentboligene
Studentsamskipnaden i Bergen
September 2008
How to connect to Studentbynett
(Or how to connect to the Internet from SiB’s student hostels)
Show responsibility!
We would like to point out that all users of Studentbynett are bound by the IT
regulations of their study place. The capacity of the network, both totally and at the
individual Student hostel, is shared between the users, and as a result we are
dependent on responsible usage. The misuse of the network will lead to exclusion.
Securing a Windows-pc connected to the Internet
Computer security IS NOT just for the specially interested – everybody who owns a
Windows-PC which is connected to the internet is in danger of having their computer
attacked and must take the necessary precautions to protect it.
The following three simple steps can do a lot to increase the security for your PC.
1. Update your software
The most important part of securing your PC, is updating your software. Securityholes are discovered in internet-programs regularly and it is therefore important to
check the developer’s webpage’s for updates. For all versions of Windows the
“Windows Update” (http://windowsupdate.microsoft.com/) is imperative. (Requires
Internet Explorer 5.0 or newer). If you are using Windows XP or Windows 2000 you
should activate automatic updates of the operating system so that new updates are
downloaded and installed automatically.
2. Antivirus
To protect your computer against the explosive spreading of computer virus, it is vital
that you have an updated antivirus program installed. Every institution of study offers
free antivirus for their students. Below you can read how to get access to them.
Norges Handelshøyskole (NHH)
You can download free antivirus program at
http://www.nhh.no/om-nhh/avdelinger/it-avdelingen/antivirus.aspx
Universitetet i Bergen (UiB)
You can download free antivirus program at
http://www.uib.no/it/prog/site/ca/antivirus.htm
2
Høyskolen i Bergen (HiB)
You can find information about antivirus program, if you follow the link below:
http://www.hib.no/om/enheter/ikt/student/antivirus/
Free anti-virus software
An example: www.grisoft.com
3. Firewall
Users of Windows XP should activate the built-in firewall. Even if this offers limited
protection it is better than nothing at all. Users of older Windows versions or users
who need more control of the firewall and protection also against outgoing traffic
should install a personal firewall, like for instance ZoneAlarm. (www.zonelabs.com)
Related links
http://www.microsoft.com/security/protect/default.asp
http://it.uib.no/
http://www.wlan.uib.no/
http://student.hib.no/datahverdag/
http://www.nhh.no/it/
Need help to connect?
If you need help after reading this brochure, we have network groups, see
www.sib.no/bolig
If your hostel doesn’t have network group, you can contact the support telephone on
55 95 77 00 – Tuesday, Wednesday and Thursday between 7pm and 9pm.
3
NHH-students
NHH uses a service for NHH students for access to network-recourses and internet.
It will also give access to M when not on NHH.
The service is called NHH Secure Access and is accessible at
https://secure.privnett.nhh.no
NHH Secure Access is simple to set up and use, and do not require * extend
userrights on the computer. The service can therefore be used wherever you have
internet access
User manual is to be found here: http://www.nhh.no/it/
* Use of "Network Connect" require * extend userrights on the computer
NOTE: VPN-connection will work!
4
Windows XP
Step 1 – Network card
You have to have a network card installed on your PC.
You can check if you have a network card installed by right clicking on My Computer
on the start menu or desktop. Then you choose properties – Hardware - Device
Manager. If you have a network card installed, it will show like Fig. 1, but remember
that it probably doesn’t have the name ” 3Com 3C920 Intergrated Fast Ethernetkontroller”. If not, buy a new network card (at Reception or a computer shop) and
install it.
Fig 1.
To see if the network card is properly installed, go to the “start menu” and choose
RUN. Then you write cmd and press enter. Write ipconfig in the command window and
press enter. If you get and ip address that look like 10.*.*.* (see fig. 2), then your
network card is working properly.
5
Fig. 2
Step 2 – Make a connection
To make a new connection, you have to enter the start menu and click on control
panel. If you have a classic start menu, you will find control panel under settings.
There are two ways to make a new connection. If you have XP theme on control panel,
you can continue on the next page. But if you have classic theme, you have to click on
“Network connections” – “New connection wizard” - and then jump to point 3.
6
1. Click on ”Network and Internet connections”:
7
2. Choose ”Create a connection to the network at your workplace”
3. Choose ”Virtual Private Network Connection”
8
4. Choose a name for the connection
If you get a question about dialling initial connection, you have to choose “do not dial
the initial connection”
5. Write in the hostname of the vpn server you’re going to connect to.
HiB:
hib-vpn-gw.privnett.hib.no
UiB:
uib-vpn-gw
SIB:
uib-vpn-gw1 / uib-vpn-gw3
NHH: nhh-vpn-gw
9
Click Finish
10
6. Before you connect to Internet, you have to click on properties.
7. Enter security and click on settings.
11
8. On data encryption choose ”Optional encryption” and choose the protocols as the
picture below
9. Click ”Ok” two times - enter username and password - connect to Internet.
12
VPN-server
Brukernavn / Username
uib-vpn-gw
[email protected]
hib-vpn-gw.privnett.hib.no Username
uib-vpn-gw1 / uib-vpn-gw3
(SiB-accounts)
nhh-vpn-gw
Username@sib
Username
13
Windows 2000
Step 1 – Network card
Check it if you have a network card installed by clicking on *My Computer–Control
panel- System – Hardware- Device manager, and look for network card in the list of
installed devices (see fig.1). If not buy a new network card (at the reception or a
computer shop) and install it.
Fig 1.
To see if the network card is properly installed, go to the “start menu” and chose
RUN. Then you write cmd and press enter. Write ipconfig in the command window and
press enter. If you get and ip address that look like 10.*.*.* (see fig. 2), then your
network card is working properly.
14
Fig. 2
Step 2 – Make a connection
Chose settings on the start menu, then network connections- new connection wizard.
Then you chose VPN connection and one of the following servers:
For UiB students:
uib-vpn-gw
For HiB students:
hib-vpn-gw
For SiB accounts:
uib-vpn-gw1 / uib-vpn-gw3
For NHH students: nhh-vpn-gw
VPN-server
Brukernavn / Username
uib-vpn-gw
[email protected]
hib-vpn-gw.privnett.hib.no Username
uib-vpn-gw1 / uib-vpn-gw3
(SiB-accounts)
nhh-vpn-gw
Username@sib
Username
Then you finish the rest of the wizard. Remember to fill inn username and password.
15
Then you have to choose properties on the new dial connection.
To connect to Internet with Vpn, you have to change the security setting. Choose the
same as the pictures below. ”Click on Settings”
On data encryption choose ”Optional encryption” and set a cross on the same
protocols as the picture below.
16
Click ”Ok” two times and connect to Internet.
NB!
Students from HiB will have to write username to connect.
UiB students have to write username@student to connect.
Students with SiB account write username@sib to connect
Students from NHH have to write their student number (sxxxxxx)
17
Windows 9x/Me
Step 1 – Network card
You have to have a network card installed on your PC.
You can check it if you have a network card installed by click on:
*My Computer–Control panel-Network
If you have a network card available it will show like Fig. 1
If not buy a new network card (at the reception or a computer shop) and install it.
Fig.1
Remember that your network card probably doesn’t have the name ”Realtek
RTL8029....”
Step 2 – Configurating Network
Double click on My Computer – Control panel - Network.
Click on the line TCP/IP - Your network card (Look at the picture on fig.1), and choose
Properties. Select as shown in the pictures on the two next pages.
18
DNS Configuration Folder:
Gateway Configuration Folder:
19
WINS Configuration Folder:
20
IP Address Folder:
To see if the network card is properly installed, go to the “start menu” and chose
RUN. Then you write command and press enter. Write ipconfig (winipcfg for win95) in
the command window and press enter. If you get and ip address that look like 10.*.*.*
( see fig. 2), then your network card is working properly.
Fig 2.
Step 3 – Installing VPN
You will need CD with your Operating-system (Win 95/98/98SE/Me) during the
installation. You might have the installations files already on your computer. Double
click on My Computer – Control panel -- Add/Remove Programs -- Windows Setup
21
Folder -- choose Communications -- Details -- Click on Virtual Private Networking
(See Fig.3.). Choose OK
Fig. 3
The machine will start installing the necessary files and need to too reboot.
Step 4 – Make a connection
You will now need to setup “Dial-Up Network”. You will need your login name and
password.
Click on My Computer - Dial-Up Networking - Make New Connection. In Windows Me
you find “Dial-Up Networking” in control panel. Then just follow the pictures below:
For UiB students:
For HiB students:
For SiB accounts:
uib-vpn-gw
hib-vpn-gw.privnett.hib.no
uib-vpn-gw1 / uib-vpn-gw3 (For students with SiB accounts)
For NHH students: nhh-vpn-gw
22
23
Click on the right mouse button on the new connection then Properties. You will se
the screen shown below. Just follow the pictures and do the same as it shows
24
Security Folder:
Security folder only in Windows ME
25
Double click on the connection in the Dial-Up Networking folder:
Dialing Folder:
You have to write in your own login name and password. Now try to connect to the
Internet through the vpn-gw. Open your browser (Explorer/NetScape ie) to surf the
Internet!
NB!
Students from HiB will have to write username for connecting.
UiB students have to write username@student to connect.
Students from NHH have to write their studentnumber (sxxxxxx)
VPN-server
Brukernavn / Username
uib-vpn-gw
[email protected]
hib-vpn-gw.privnett.hib.no
Username
uib-vpn-gw1 / uib-vpn-gw3 (SiB
accounts)
Username@sib
nhh-vpn-gw
Username
26
Windows NT
IMPORTANT: If you have a service pack installed, remember to have it available on
your harddrive when you are installing VPN.
Control-panel -> Network -> protocols -> Add -> Choose "Point To Point Tunneling"
protocol -> OK Choose number of vpn's to 1 -> OK.
RAS will then be installed or update. So then you have to add the Vpn adapter the
same way you do a modem. Don’t restart the machine if you have service pack 1 or
higher, because you have to reinstall it before you restart. After installing RAS and
servicepack, you can restart the machine.
My Computer -> Dial-up networking -> New -> choose name like "VPN" -> write uibvpn-gw / nhh-vpn-gw / hib/vpn-gw in the field for phone number -> Dial using:
RASPPTPM (VPN1) -> Security -> Accept any (on top) -> OK.
Choose dial up VPN -> Dial -> username and password -> connect -> now you have
a internet connection. -> Press "Disconnect" when you’re finished.
NB!
Students from HiB will have to write username to connect.
Students with SiB accounts write username@sib to connect
UiB students have to write username@student to connect
Students from NHH have to write their studentnumber (sxxxxxx)
VPN-server
Brukernavn / Username
uib-vpn-gw
[email protected]
hib-vpn-gw.privnett.hib.no
Username
uib-vpn-gw1 / uib-vpn-gw3 (SiBaccounts)
Username@sib
nhh-vpn-gw
Username
27
Mac (OS X)
First you have to find a program in your program folder called “Internet Connect”.
Next you will see this program window. Choose the “Edit configuration…” option on
the dropdown menu:
28
Enter your dialup information as shown under:
Now you are ready to connect to Internet. Click on ”Conncet”.
Students from HiB will have to write username for connecting.
UiB students have to write username@student to connect.
Students from NHH have to write their studentnumber (sxxxxxx) for connection
29
VPN-server
Brukernavn / Username
uib-vpn-gw
[email protected]
hib-vpn-gw.privnett.hib.no Username
uib-vpn-gw1 / uib-vpn-gw3
(SiB accounts)
nhh-vpn-gw
Username@sib
Username
30
Windows Vista
Step 1 – Network Card
The first thing you need to look for is a network card and that it’s installed correctly.
An easy way to check this is to click on the start-menu. Choose Run, type “cmd” and
click OK. In the window that pops up type ipconfig and hit enter. You will get the
following screen-image. If you scroll upwards you should be able to find an IPv4
Address that starts with 10.x.x.x.
If you don’t have any network card installed you will have to buy one.
Step 2 – Opprette tilkobling
To create a connection, click start. Choose “Connect to”. In the appearing window you
will find a link to ”Set up a connection or network”. Click here and choose ”Connect to
workplace” from the appearing list.
31
If you are asked “Do you want to use a connection that you already have?”,choose ”No,
create a new connection” and ”Next”
At the question “How do you want to connect?” answer ”Use my Internet connection
(VPN)”
If you get the question about setting up an Internet connection, click ”I’ll set up an
Internet
connection later”
In the following image, in the field “Internet address” you select from the table below.
”Destination name” can you decide. Examples UiB VPN, HiB VPN
32
HiB:
hib-vpn-gw.privnett.hib.no
UiB:
uib-vpn-gw
SIB:
uib-vpn-gw1 / uib-vpn-gw3
NHH: nhh-vpn-gw
You get your username and password from you University/School. If you are a student
at KhiB, BAS, NiTH, NLA, Norsk Lærerakademi, Diakonissehjemmet or Betanien you
get your password from SIB.
After entering username/password, click ”Remember this password” before clicking
next.
For students at UiB!
After your username you must have @student.uib.no, for instance
[email protected]
For students at HiB
Remember that you first password needs to be changed before you can use it at a
VPN‐connection. You can change your password at http://ekstern.stud.uib.no or by
logging in at one of the Schoolterminals.
After pressing ”Connect”, you get a message telling you that the connection is
configured. Click “Close”.
33
If Windows Vista tries to connect, it won’t work. When the connection has gone wrong,
click ”Set up the connection anyway”
Close down all windows and click ”Start” and ”Connect. Right‐click on the
connection you just made, and select “Properties”
Click the ”Security”‐tab, select ”Advanced (custom settings)” and click ”Settings”.
Set the options to look like this:
Remember to choose ”Optional encryption”.
Click OK, click yes at the appearing box and click OK again. Your connection is now
ready and you can click “connect”.
34