1
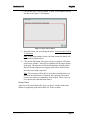
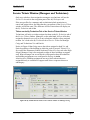
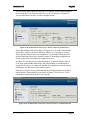
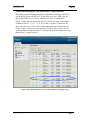
USER GUIDE Unit 3: Assist™ Chapter 3: Using Assist Schoolwires Synergy™ & Assist Version 1.2 Schoolwires Assist 1.2 Using Assist TABLE OF CONTENTS Introduction ......................................................................................................................... 1 Audience and Objectives ................................................................................................ 1 Before You Begin ........................................................................................................... 1 All Users ..................................................................................................................... 1 Members of Support Staff ........................................................................................... 2 User Views of My Workspace ............................................................................................ 3 Setup for This Chapter .................................................................................................... 5 A Requestor’s View ........................................................................................................ 6 A Manager’s View .......................................................................................................... 7 Technicians’ Views ......................................................................................................... 8 A High-Level Technician’s View ............................................................................... 8 A Low-Level Technician’s View.............................................................................. 10 An Approver’s View ..................................................................................................... 11 My Tickets Window ......................................................................................................... 13 Submitting Requests (Requestor Only Permission) ...................................................... 13 Submitting Requests (Managers and Technicians) ....................................................... 20 Adding a New Ticket for Self ................................................................................... 20 Adding a New Ticket for Another User .................................................................... 23 Submitting a Recurring Request ............................................................................... 24 Using the Ticket Click Menu in the My Tickets Window (All Requestors) ................ 28 Accessing the Ticket Click Menu ............................................................................. 29 Attaching, Deleting or Downloading Files ............................................................... 29 Adding Comments to a Ticket .................................................................................. 31 Deleting Comments from a Ticket ............................................................................ 31 Viewing Ticket History............................................................................................. 33 Using the Buttons in the My Tickets Window (All Requestors) .................................. 34 Filtering Tickets ........................................................................................................ 34 Withdrawing Tickets ................................................................................................. 35 Printing Tickets ......................................................................................................... 36 Ticket Completion Survey ............................................................................................ 36 Ticket Completion Survey When Work is Complete (Requestors) .......................... 37 Ticket Completion Survey When Work is Not Complete (Requestors) ................... 37 Finding Tickets ................................................................................................................. 39 Results for Requestors .................................................................................................. 39 Results for Support Staff ............................................................................................... 39 Finding Tickets ............................................................................................................. 40 Approval Queue Window (Approvers) ............................................................................. 44 Using the Ticket Click Menu in the Approval Queue Window.................................... 47 Accessing the Ticket Click Menu ............................................................................. 47 Editing a Ticket ......................................................................................................... 47 Adding Comments .................................................................................................... 48 Viewing Ticket History............................................................................................. 49 Using the Buttons in the Approval Queue Window ..................................................... 49 Filtering Tickets ........................................................................................................ 49 SynAstUnit3Ch3V1_061808 Page i Schoolwires Assist 1.2 Using Assist Approving Tickets .................................................................................................... 50 Denying Tickets ........................................................................................................ 51 Printing Tickets ......................................................................................................... 52 Service Tickets Window (Managers and Technicians) .................................................... 53 Tickets on the By Technician Tab of the Service Tickets Window ............................. 53 Tickets on the By Queue Tab of the Service Tickets Window ..................................... 55 Comparing the By Technician and the By Queue Tabs ................................................ 57 Using the Ticket Click Menu in the Service Tickets Window ..................................... 59 Accessing the Ticket Click Menu ............................................................................. 59 Editing a Ticket (Including Priority, Status and Due Date) ...................................... 59 Adding Comments .................................................................................................... 62 Viewing Ticket History............................................................................................. 63 Using the Buttons in the Service Tickets Window ....................................................... 63 Filtering Tickets ........................................................................................................ 63 Closing a Ticket (From By Technician Tab Only) ................................................... 64 Assigning a Ticket (From Either Tab) ...................................................................... 65 Cancelling a Ticket (From Either Tab) ..................................................................... 66 Printing Tickets (From Either Tab)........................................................................... 66 Assignment Calendar (Managers and Technicians) ......................................................... 67 Tickets Seen in Calendars ............................................................................................. 67 Filtering in the Assignment Calendar ........................................................................... 67 Filtering in the Assignment Calendar ........................................................................... 68 Reports .............................................................................................................................. 69 Reports Available by Assist User Role ......................................................................... 69 Obtaining Reports ......................................................................................................... 70 SynAstUnit3Ch3V1_061808 Page ii Schoolwires Assist 1.2 Using Assist Introduction S choolwires Assist provides an efficient, fully web-based application for requesting, tracking and fulfilling work requests—from changing a light bulb to trouble-shooting a computer problem. Assist automates work flow to improve productivity and allow anyone involved in the process to easily monitor and track service online. Audience and Objectives This chapter should be read by all Assist users. It covers how to submit, approve, manage and complete tickets in Assist. In this chapter, you will learn to: Submit and edit requests in the My Tickets window as a requestor. Submit and edit requests in the My Tickets window as a manager or technician. Submit and edit recurring requests in the My Tickets window as a manager or technician. Find tickets. Approve and deny tickets in the Approval Queue window as an approver. Edit tickets as a manager or technician in the Service Tickets window. This includes: o Changing the information o Changing the priority o Entering a due date o Assigning a ticket o Changing the status o Closing a ticket o Cancelling a ticket View the assignment calendar as a manager or technician. Generate reports as a requestor, manager, approver or technician. Before You Begin All Users If you have not already done so, Schoolwires recommends that you read the Framework for Synergy & Assist chapter, “Navigating in Synergy & Assist.” It covers signing in and general navigation, including hover menus, click menus and grid functions. Changing your user account information, including your password is also covered in that chapter. SynAstUnit3Ch3V1_061808 Page 1 Schoolwires Assist 1.2 Using Assist Members of Support Staff In addition, if you are assigned as a manager, technician or approver, we recommend that you read the Assist chapter, “Assist Relationships for Support Staff.” That chapter will help you understand the relationships that must be established for the efficient and effective operation of Assist. SynAstUnit3Ch3V1_061808 Page 2 Schoolwires Assist 1.2 Using Assist User Views of My Workspace As you may have read in the Assist chapter, “Assist Relationships for Support Staff,” users are assigned user profiles within Users & Groups. The permissions within their profiles specify the permissions they will have when they sign in to Assist and its related systems of Users & Groups and Buildings & Locations. The permissions that are available for user profiles in Assist and its related systems are shown in Figure 1. You can create profiles with as many of these permissions as required to meet your organization’s needs. Figure 1: Permissions in user profiles SynAstUnit3Ch3V1_061808 Page 3 Schoolwires Assist 1.2 Using Assist As you can see from Figure 1, the permissions specific to working in Assist are: Assign tickets. Cancel tickets. Create recurring requests. Manage assets. Manage queues. Manage settings and staff. Manage categories and subcategories. Submit requests. Most Assist users will be able to submit requests. Based on their user profiles, managers and technicians may also be able to assign and cancel tickets, and create recurring requests. Approvers cannot assign or cancel tickets, or create recurring requests. In addition to the permissions in their user profiles, support staff members also have permissions that are related to their roles on the support staff. These do not depend on the permissions in their user profiles. Roles for support staff members are assigned on the Support Staff tab in the Settings window in Assist Administration as shown in Figure 2. See the Assist chapter, “Assist Administration,” for more information. Figure 2: Settings window: Support Staff tab SynAstUnit3Ch3V1_061808 Page 4 Schoolwires Assist 1.2 Using Assist The tasks that are available on the My Workspace tab of Assist will vary based on the permissions of each user. In this chapter, we will cover all the tasks or work areas that may be available after you sign in. Setup for This Chapter For this chapter we have set up users with the following roles and assigned to the Middle School East: Requestor: Lindsey Manager: Craig High-level Technician: Viv Low-level Technician: Patrick Approvers: Chloe (Level 1) and Syd (Level 2) We assigned both technicians to Manager Craig. We created an approval queue for major PC work and a standard queue for minor PC work. We assigned Craig, Viv and Patrick to both queues as support staff and assigned Chloe and Syd as approvers for the approval queue. We have set up three subcategories within the Technology ticket type and the Computer category. The subcategories were assigned as follows: Tickets for the Computers—PC Major subcategory will be assigned to the Computers: PC Major approval queue. Tickets for the Computers—PC Minor subcategory will be assigned to Technician Patrick. Tickets for the PC Troubleshooting subcategory will be assigned to the Computers: PC troubleshooting standard queue. SynAstUnit3Ch3V1_061808 Page 5 Schoolwires Assist 1.2 Using Assist A Requestor’s View The user profile that we assigned to Requestor Lindsey is shown in Figure 3. As you can see, the only permission this user has is to submit requests. Since she has not been assigned as a member of the support staff, this is her only permission within Assist. Figure 3: User profile assigned to requestor As shown in Figure 4, the only task available on the My Workspace tab to a user with permissions similar to Lindsey is access to My Tickets, which will display only tickets submitted by or for Lindsey. Notice that when Requestor Lindsey signs in, the My Tickets window will display. Figure 4: My Tickets workspace for a requestor See “My Tickets” later in this chapter for more information on submitting tickets. See “Reports” later in this chapter for more information on how to obtain reports and the reports that are available to requestors. SynAstUnit3Ch3V1_061808 Page 6 Schoolwires Assist 1.2 Using Assist A Manager’s View The user profile we assigned to Manager Craig is shown in Figure 5. Figure 5: User profile for manager on support staff As you can see, in addition to being able to submit tickets just as any other requestor can, this user can: Assign tickets. Cancel tickets. Create recurring requests. User profiles, of course, give you the flexibility to set up a manager with as many of these permissions as suit your organization. Note: In order for a manager to be able to add recurring tickets, that user’s profile must contain both the permission to create recurring requests and the permission to submit requests. A requestor who is not a manager or technician cannot submit recurring tickets. Since Craig is a member of the support staff as well as a requestor, when he signs in, a By Technician tab of the Service Tickets window like the one shown in Figure 6 will display. In addition to the permissions in his user profile, he has permissions associated with his role as a manager on the support staff. Figure 6: My workspace tab for manager on support staff SynAstUnit3Ch3V1_061808 Page 7 Schoolwires Assist 1.2 Using Assist From here, he can navigate to the other tasks that are available to him, namely: My Tickets, which will display only tickets submitted by or for Craig. Assignment Calendar, which will display all tickets with due dates that are assigned to Craig and any technicians assigned to him. Reports, which will give Craig access to the reports available to managers. Since the Cancel Tickets button is available within the Service Tickets window, you can see that he has this permission in his user profile. The Assign Tickets button is also available to Craig on the By Queue tab. See “Service Tickets (Managers and Technicians)” later in this chapter for more information on processing tickets, including assigning and cancelling tickets. Creating recurring tickets is covered in “My Tickets.” See “Reports” later in this chapter for more information on how to obtain reports and the reports that are available to managers. Technicians’ Views We set up a high-level technician, whose user profile, as you will see, contains the same permissions as Manager Craig. We have also set up a low-level technician, whose user profile has the same permissions as Requestor Lindsey. You might set up technicians with a user profile having some, but not all of the same permissions in the user profile as a manager. With user profiles, you have this flexibility. A High-Level Technician’s View Perhaps a technician is the only member or the most qualified member of the support staff in a building in which there is no manager. As a result, you might want that technician to be able to assign and cancel tickets as well as to create recurring tickets. The profile we assigned to Technician Viv, the high-level technician, is shown in Figure 7 and contains those permissions. Figure 7: User profile for high-level technician on support staff As you can see, in addition to being able to submit tickets just as any requestor can, this user can: Assign tickets. SynAstUnit3Ch3V1_061808 Page 8 Schoolwires Assist 1.2 Cancel tickets. Create recurring requests. Using Assist Note: In order for a technician to be able to add recurring tickets, that user’s profile must contain both the permission to create recurring requests and the permission to submit requests. A requestor who is not a manager or technician cannot submit recurring tickets. Since Viv is a member of the support staff as well as a requestor, when she signs in, a By Technician tab of the Service Tickets window like the one shown in Figure 8 will display. In addition to the permissions in her user profile, she has permissions associated with her role as a technician on the support staff. Figure 8: My Workspace tab for high-level technician on support staff From here, she can navigate to the other tasks that are available to her, namely: My Tickets, which will display only tickets submitted by or for Viv. Assignment Calendar, which will display only those tickets assigned to Viv that have due dates. Reports, which will give Viv access to the reports available to technicians. Since the Cancel Tickets button is available within the Service Tickets window, you can see that she has this permission. The Assign Tickets button is also available to Viv on the By Queue tab. See “Service Tickets (Managers and Technicians)” later in this chapter for more information on processing tickets, including assigning and cancelling tickets. Creating recurring tickets is covered in “My Tickets.” See “Reports” later in this chapter for more information on how to obtain reports and the reports that are available to technicians. SynAstUnit3Ch3V1_061808 Page 9 Schoolwires Assist 1.2 Using Assist A Low-Level Technician’s View The user profile we assigned to Technician Patrick, the low-level technician, is shown in Figure 9. As you can see, the only permission he obtains from this profile is being able to submit work requests. This is the same permission we assigned Requestor Lindsey when we applied a user profile to her. Consequently, the tasks this low-level technician can perform as a member of the support staff in Assist are solely related to his role as a technician. Figure 9: User profile for low-level technician on support staff As you can see, unlike Requestor Lindsey, when Technician Patrick signs in to Assist, a By Technician tab of the Service Tickets window like the one shown in Figure 10 will display. Figure 10: My Workspace tab for low-level technician on support staff Like Manager Craig and Technician Viv, from here, he can navigate to the other tasks that are available to him, namely: My Tickets, which will display only tickets submitted by or for Patrick. Assignment Calendar, which will display only those tickets assigned to Patrick that have due dates. Reports, which will give Patrick access to the reports available to technicians. SynAstUnit3Ch3V1_061808 Page 10 Schoolwires Assist 1.2 Using Assist Unlike Manager Craig and Technician Viv, however, Technician Patrick does not have the Cancel Tickets button available within the Service Tickets window. On the By Queue tab, he does not have the Assign Tickets button and he cannot create recurring tickets. See “Service Tickets (Managers and Technicians)” later in this chapter for more information on processing tickets. See “Reports” later in this chapter for more information on how to obtain reports and the reports that are available to technicians. An Approver’s View The user profile we assigned to the approvers (Chloe and Syd), is shown in Figure 11. Figure 11: User profile for approvers on support staff As you can see, the only permission they obtain from this profile is being able to submit requests. This is the same permission we assigned Requestor Lindsey and Technician Patrick when we applied user profiles to them. Consequently, the tasks these approvers can perform as members of the support staff in Assist are solely related to their roles as approvers. Since they have no access to the Service Tickets window, approvers cannot assign or cancel tickets, or create recurring tickets. As you can see, unlike Requestor Lindsey, Technician Patrick or Manager Craig, when one of the approvers signs in to Assist, an Approval Queue window like the one shown in Figure 12 will display. SynAstUnit3Ch3V1_061808 Page 11 Schoolwires Assist 1.2 Using Assist Figure 12: My Workspace tab for an approver on support staff From here, the approvers can navigate to other tasks available to them, specifically: My Tickets, which will display only tickets submitted by or for the approver who is signed in. Reports, which will give them access to the reports available to approvers. Because of the user profiles assigned to them, these approvers cannot assign tickets or cancel tickets, or submit recurring requests. See “Approval Queue (Approvers)” for more information about approving and denying tickets. See “Reports” later in this chapter for more information on how to obtain reports and the reports that are available to approvers. SynAstUnit3Ch3V1_061808 Page 12 Schoolwires Assist 1.2 Using Assist My Tickets Window As mentioned earlier in this chapter, most users of Assist will be able to submit tickets. All users who have this permission within their user profiles will have the My Tickets and Reports tasks available to them in the navigation pane of the My Workspace tab of Assist. If a user is also assigned as a member of the support staff, other tasks will display in the navigation pane. What those tasks are and which one will display when a staff member first signs in depends on the support staff role that user is assigned. Whether a user is a member of the support staff or not, the tickets that display in My Tickets are only those that have been submitted by or for the user who is signed in. Figure 13 shows the My Workspace tab for Requestor Lindsey. She enters in the My Tickets window as shown in Figure 13. Figure 13: My Workspace for a requestor Submitting Requests (Requestor Only Permission) Users who have permission to submit requests (i.e., add tickets) and who are not managers or technicians can only submit requests for themselves. To add a new ticket: 1. Click on the New Ticket button at the top of the navigation pane. A New Request window like the one shown in Figure 14 will display. All the fields in this window are required. SynAstUnit3Ch3V1_061808 Page 13 Schoolwires Assist 1.2 Using Assist Figure 14: New Request first window 2. Choose a ticket type from the Ticket Type combo box. This will populate the Category combo box. 3. Choose a category from the Category combo box. This will populate the Subcategory combo box. 4. Choose a subcategory from the Subcategory combo box. Note: Based on the subcategory you choose, the ticket will be assigned to one of these three: Approval Queue (Status column will show Awaiting Approval. Technician column will show Unassigned.) Standard Queue (Status column will show In Queue. Technician column will show Unassigned.) Staff member (Status column will show Assigned. Technician column will show staff member’s name.) 5. Click on the Next button. A second New Request window like the one shown in Figure 15 will display. Both fields are required. SynAstUnit3Ch3V1_061808 Page 14 Schoolwires Assist 1.2 Using Assist Figure 15: New Request second window 6. Enter a subject for the request. Be as clear and concise as possible. 7. Enter a description for the request. Provide more information about your request here. 8. Click on the Next button. A third New Request window like the one shown in Figure 16 will display. The building and location that display by default are the ones associated with you in your user account. Figure 16: New Request third window 9. If you wish to submit a ticket for a building other than the one in your account, choose one from the Building combo box (required). This populates the Location combo box. SynAstUnit3Ch3V1_061808 Page 15 Schoolwires Assist 1.2 Using Assist 10. If you wish to submit a ticket for a location other than the one in your account, choose one from the Location combo box (required). 11. If you wish to assign an asset to the ticket, choose one from the combo box or type the name of the asset in the Asset Name text box (optional). Note: If you choose an asset from the Asset combo box, the Asset Name text box will not display. See Figure 17 for an example. Figure 17: Asset chosen from combo box 12. Click on the Finish button. An Edit Ticket window like the one shown in Figure 18 will display. You will receive an email immediately concerning the ticket you just entered. Support staff will receive emails as required. Depending on the subcategory you chose and how it is assigned, the email will tell you one of the following three things. Figure 18: Edit Ticket window: General tab SynAstUnit3Ch3V1_061808 Page 16 Schoolwires Assist 1.2 Using Assist The ticket you entered has been assigned to a queue. The ticket you entered has been assigned to a technician. The ticket you entered requires approval. 13. To add an attachment, click on the Attachments tab. An Attachments tab like the one shown in Figure 19 will display. Figure 19: Edit Ticket window: Attachments tab a. Click on the Add Attachment button. A New Attachment window like the one shown in Figure 20 will display. Figure 20: New Attachment window b. Click on the Browse button. A browsing window will open. c. Browse your computer or network for the file you wish to attach. d. Select the file. e. Click on the Open button in the browsing window. The New Attachment window will return as the active window. The file path will be populated as shown in Figure 21. Figure 21: Populated New Attachment window SynAstUnit3Ch3V1_061808 Page 17 Schoolwires Assist 1.2 Using Assist f. Click on the Upload button. The file you added will display in the grid on the Attachments tab as shown in Figure 22. Figure 22: Edit Ticket window: Attachments tab 14. To add a comment: a. Click on the Comments button. A Ticket Comments window like the one shown in Figure 23 will display. Figure 23: Ticket Comments window b. Enter the comment in the text box. c. Click on the Add button. The comment will display in the bottom of the window as shown in Figure 24. SynAstUnit3Ch3V1_061808 Page 18 Schoolwires Assist 1.2 Using Assist d. Click on the Finish button. The Ticket Comments window will close. Figure 24: Ticket Comments window Note: If you hover over a comment, the full comment and information about the comment will display. SynAstUnit3Ch3V1_061808 Page 19 Schoolwires Assist 1.2 Using Assist Submitting Requests (Managers and Technicians) Managers and technicians have the option of submitting requests for themselves in the same manner as any other requestor. They may also submit requests for other users. If their user profiles allow, they may submit recurring requests as well. Adding a New Ticket for Self To add a new ticket for yourself: 1. Click on the New Ticket button at the top of the navigation pane. A New Request window like the one shown in Figure 25 will display. Figure 25: New Request window (manager or technician) 2. Leave the radio button to the left of Myself selected. 3. Click on the Next button. The next page of the New Request window like the one shown in Figure 26 will display. Figure 26: New Request second window SynAstUnit3Ch3V1_061808 Page 20 Schoolwires Assist 1.2 Using Assist 4. Choose a ticket type from the Ticket Type combo box. This will populate the Category combo box. 5. Choose a category from the Category combo box. This will populate the Subcategory combo box. 6. Choose a subcategory from the Subcategory combo box. Note: Based on the subcategory you choose, the ticket will be assigned to one of these three: Approval Queue (Status column will show Awaiting Approval. Technician column will show Unassigned.) Standard Queue (Status column will show In Queue. Technician column will show Unassigned.) Staff member (Status column will show Assigned. Technician column will show staff member’s name.) 7. Click on the Next button. A third New Request window like the one shown in Figure 27 will display. Figure 27: New Request third window 8. Enter a subject for the request. Be as clear and concise as possible. 9. Enter a description for the request. Provide more information about your request here. 10. Click on the Next button. A fourth New Request window like the one shown in Figure 28 will display. The building and location that display by default are the ones associated with you in your user account. SynAstUnit3Ch3V1_061808 Page 21 Schoolwires Assist 1.2 Using Assist Figure 28: New Request fourth window 11. If you wish to submit a ticket for a building other than the one in your account, choose one from the Building combo box (required). This populates the Location combo box. 12. If you wish to submit a ticket for a location other than the one in your account, choose one from the Location combo box (required). 13. If you wish to assign an asset to the ticket, choose one from the combo box or type the name of the asset in the Asset Name text box (optional). Note: If you choose an asset from the Asset combo box, the Asset Name text box will not display. See Figure 29 for an example. Figure 29: Asset chosen from combo box SynAstUnit3Ch3V1_061808 Page 22 Schoolwires Assist 1.2 Using Assist 14. Click on the Finish button. An Edit Ticket window will display. You will receive an email immediately concerning the ticket you just entered. Support staff will receive emails as required. Depending on the subcategory you chose and how it is assigned, the email will tell you one of the following three things. The ticket you entered has been assigned to a queue. The ticket you entered has been assigned to a technician. The ticket you entered requires approval. 15. To add attachments, click on the Attachments tab. You will add attachments in the same manner as a requestor. See “Submitting Requests (Requestor Only Permission)” earlier in this chapter for more information. 16. To add comments, click on the Comments button. You will add comments in the same manner as a requestor. See “Submitting Requests (Requestor Only Permission)” earlier in this chapter for more information. Adding a New Ticket for Another User Since requests will come in from users who cannot access Assist, managers and technicians must have the option of submitting requests for other users. To add a ticket for another user: 1. Click on the New Ticket button at the top of the navigation pane. A New Request window like the one shown in Figure 30 will display. Figure 30: New Request window (manager or technician) SynAstUnit3Ch3V1_061808 Page 23 Schoolwires Assist 1.2 Using Assist 2. Click in the radio button to the left of Another User. The New Request window will refresh. As you can see from Figure 31, a combo box will display. All Assist users will display in this combo box. 3. Choose the user from the combo box. 4. Click the Next button. The next page of the New Request window will display. 5. Enter the rest of the information for the ticket as you would for one for yourself. Be certain the building and location are entered correctly for the user. The new ticket will display in the My Tickets window for the user for whom the ticket was created. The user for whom you entered the ticket will receive an email immediately concerning the ticket you just entered. Support staff will receive emails as required. Submitting a Recurring Request Managers and technicians whose user profiles include the permission to submit recurring requests can do so for themselves or for other users. To submit a recurring request: 1. Click on the New Ticket button at the top of the navigation pane. A New Request window like the one shown in Figure 30 will display. Figure 31: New Request window (manager or technician) 2. Choose the user option you desire for the recurring request by clicking in the radio button to the left of that option. 3. Once the next page of the New Request window as shown in Figure 32 displays, enter a subject for the request (required). Be as clear and concise as possible. SynAstUnit3Ch3V1_061808 Page 24 Schoolwires Assist 1.2 Using Assist Figure 32: New Request window 4. Choose a ticket type from the Ticket Type combo box (required). This will populate the Category combo box. 5. Choose a category from the Category combo box (required). This will populate the Subcategory combo box. 6. Choose a subcategory from the Subcategory combo box (required). This will determine how the ticket is assigned to support staff. Note: Based on the subcategory you choose, the ticket will be assigned to one of these three: Approval Queue (Status column will show Awaiting Approval. Technician column will show Unassigned.) Standard Queue (Status column will show In Queue. Technician column will show Unassigned.) Staff member (Status column will show Assigned. Technician column will show staff member’ name.) 7. Click on the Next button. A New Request window like the one shown in Figure 33 will display. SynAstUnit3Ch3V1_061808 Page 25 Schoolwires Assist 1.2 Using Assist Figure 33: New Request window 8. Enter the subject for the request (required). Be as clear and concise as possible. 9. Enter a description for the request (required). Provide more information about your request here. 10. Since this is a recurring request, click in the checkbox to the left of Recurring Request. 11. Click on the Next button. The next page of the New Request window like the one shown in Figure 34 will display. Be certain the building and location are entered correctly for the user. Figure 34: New Request window SynAstUnit3Ch3V1_061808 Page 26 Schoolwires Assist 1.2 Using Assist 12. If you wish to submit a ticket for a building other than the one shown by default, choose one from the Building combo box (required). This populates the Location combo box. 13. If you wish to submit a ticket for a location other than the one in shown by default, choose one from the Location combo box (required). 14. If you wish to assign an asset to the ticket, choose one from the combo box or type the name of the asset in the Asset Name text box (optional). 15. Click on the Next button. The last page of the New Request window like the one shown in Figure 35 will display. All fields are required. Figure 35: New Request window 16. Choose the frequency of recurrence from the Recurrence combo box (required). 17. Enter a start date for the request (required). 18. Enter a stop date for the request (required). 19. Click on the Finish button. An Edit Ticket window will display. You or the user for whom the request was entered will receive an email confirming the ticket you entered. Depending on the subcategory you chose and how it is assigned, the email will tell you one of the following three things. The ticket you entered has been assigned to a queue. The ticket you entered has been assigned to a technician. The ticket you entered requires approval. SynAstUnit3Ch3V1_061808 Page 27 Schoolwires Assist 1.2 Using Assist 20. To add attachments, click on the Attachments tab. You will add attachments in the same manner as a requestor. See “Submitting Requests (Requestor Only Permission)” earlier in this chapter for more information. 21. To add comments, click on the Comments button. You will add comments in the same manner as a requestor. See “Submitting Requests (Requestor Only Permission)” earlier in this chapter for more information. Note: As you can see from Figure 36, the tickets and the requested date for the tickets will display according to the recurrence information you entered. Figure 36: My Tickets with recurring requests Using the Ticket Click Menu in the My Tickets Window (All Requestors) As a requestor, you can only add comments or attach files to a ticket. You cannot change any other information on the ticket. You will use the ticket click menu to: Edit a ticket to attach, delete or download a file. TIP: You can also edit a ticket by double-clicking on the ticket subject. This will open an Edit Ticket window. Add comments to a ticket or delete comments from a ticket. View the history of a ticket. SynAstUnit3Ch3V1_061808 Page 28 Schoolwires Assist 1.2 Using Assist Accessing the Ticket Click Menu To access the click menu for a ticket, click on the subject of the ticket. A ticket click menu like the one shown in Figure 37 will display. Figure 37: Ticket click menu As you can see, the click menu for a ticket contains the following information about the ticket: Subject Description Building Location Ticket Type Category Subcategory Attaching, Deleting or Downloading Files After you have added a ticket, to attach additional files, delete attachments or download attachments, you must edit the ticket either from the ticket click menu or by double-clicking on the ticket subject. To edit a ticket using the ticket click menu: 1. Click on the ticket subject. The click menu for that ticket will display. 2. Click on the Edit button. An Edit Ticket window like the one shown in Figure 38 will display. As you can see, it opens on the General tab. However, as a requestor, you cannot change the information on this tab. SynAstUnit3Ch3V1_061808 Page 29 Schoolwires Assist 1.2 Using Assist Figure 38: Edit Ticket window: General tab Click on the Attachments tab as shown in Figure 39. You add attachments in the same manner as you do when you add a new ticket. See “Submitting Requests (Requestor Only Permission)” earlier in this chapter for more information. Figure 39: Edit Ticket window: Attachments tab a. To download a file, click on the Download button. Save or open the file as desired. b. To delete an attachment: i. Click in the checkbox to the left of each attachment you wish to delete. Warning: If you have multiple pages of attachments, you can only select multiple attachments or use the Select All checkbox on a single page. If you move to another page, the attachments you selected on the first page will be deselected. SynAstUnit3Ch3V1_061808 Page 30 Schoolwires Assist 1.2 Using Assist ii. Click on the Delete Attachment(s) button. A confirmation message like the one shown in Figure 40 will display. Figure 40: Delete Attachment confirmation message iii. Click on the Delete button. The attachment you deleted will not be listed in the grid on the Attachments tab. iv. Repeat Step (i) to Step (iii) as required. Adding Comments to a Ticket You can add comments to a ticket from the ticket click menu or while editing that ticket. You add a comment to any ticket in the same manner as you do when you add a new ticket. You can add a comment from the ticket click menu or when editing a ticket. See “Submitting Requests (Requestor Only Permission)” earlier in this chapter for more information. Deleting Comments from a Ticket To delete a comment: 1. Click on the ticket subject. The ticket click menu for that ticket will display. 2. Click on the Comments button. A Ticket Comments window like the one shown in Figure 41 will display. SynAstUnit3Ch3V1_061808 Page 31 Schoolwires Assist 1.2 Using Assist Figure 41: Ticket Comments window 3. Click on the Delete button to the right of the comment you wish to delete. A confirmation message like the one shown in Figure 42 will display. Figure 42: Delete Comment confirmation message 4. Click on the OK button. The Ticket Comments window will refresh. The comment you deleted will not be in the window. 5. Click on the Finish button. The My Tickets window will return as the active window. Note: If you accessed the Ticket Comments window while editing a ticket, the Edit Ticket window will return as the active window. SynAstUnit3Ch3V1_061808 Page 32 Schoolwires Assist 1.2 Using Assist Viewing Ticket History You can view history for a ticket from the ticket click menu or while editing that ticket. To view history, click on the History button. A Ticket History window like the one shown in Figure 43 will display. As you can see, you can only view the information in this window. Figure 43: Ticket History window SynAstUnit3Ch3V1_061808 Page 33 Schoolwires Assist 1.2 Using Assist Using the Buttons in the My Tickets Window (All Requestors) With the exception of the Filter Tickets button, the buttons at the top of the My Tickets window may be applied to multiple tickets on a page in the grid. Warning: If you have multiple pages of tickets within the My Tickets window, you can only select multiple tickets or use the Select All checkbox on a single page. If you move to another page, the tickets you selected on the first page will be deselected. Access the My Tickets task in the navigation pane. A My Tickets window like the one shown in Figure 44 will display. This contains any tickets that you have submitted or someone has submitted for you. Figure 44: My Tickets window Filtering Tickets Within the My Tickets window, you can only filter by ticket status. To do this: 1. Click on the Filter Tickets button. A filter panel like the one shown in Figure 45 will display between the buttons and the grid. As you can see, it defaults to showing all open tickets. Figure 45: Filter panel SynAstUnit3Ch3V1_061808 Page 34 Schoolwires Assist 1.2 Using Assist 2. Choose a status from the Status combo box. The My Tickets window will refresh. Only the tickets with the status you chose will display in the grid. Note: To close the filter panel, click on the Filter Tickets button again. Withdrawing Tickets If you have resolved the problem or entered it in error, you can withdraw the ticket for that work. To do this: 1. Use the filter or pagination as required to locate the ticket or tickets you wish to withdraw. 2. Click in the checkbox to the left of the ticket or tickets you wish to withdraw. 3. Click on the Withdraw Ticket(s) button. A Withdraw Ticket(s) window like the one shown in Figure 46 will display. Figure 46: Withdraw Ticket window 4. Enter the reason you are withdrawing the ticket. You must enter at least 25 characters. 5. Click the OK button. My Tickets will return as the active window. The status of the ticket or tickets you withdrew will be Withdrawn. Note: If you are withdrawing multiple tickets, the reason for the withdrawal will be the same for all the tickets. SynAstUnit3Ch3V1_061808 Page 35 Schoolwires Assist 1.2 Using Assist Printing Tickets To print selected tickets: 1. Use the filter or pagination as required to locate the ticket or tickets you wish to print. 2. Click in the checkbox to the left of the ticket or tickets you wish to print. 3. Click on the Print Ticket(s) button. A Print Ticket(s) window like the one shown in Figure 47 will display. Figure 47: Print Ticket Note: If you selected more than one ticket, they will all display in the same window and print as one document. 4. Use your browser Print button or keyboard shortcut to print. Ticket Completion Survey When a ticket is closed, the requestor will receive an email like the one shown in Figure 48. The requestor will click on the link in the email to go to the Ticket Completion survey like the one shown in Figure 49. Figure 48: Email to requestor when ticket closed SynAstUnit3Ch3V1_061808 Page 36 Schoolwires Assist 1.2 Using Assist Ticket Completion Survey When Work is Complete (Requestors) When the requestor clicks on the link in the email, a sign-in window for Assist will display. After signing in, the requestor will see a Ticket Completion Survey window like the one shown in Figure 49. Figure 49: Ticket Completion Survey window The survey defaults to Yes. Therefore, if the work has been completed satisfactorily, the requestor just has to click on the Submit button. Ticket Completion Survey When Work is Not Complete (Requestors) After signing in to Assist, the requestor will see a Ticket Completion Survey like the one shown in Figure 49. If the work has not been completed satisfactorily, the requestor will click in the radio button to the left of No. A comment field will display as shown in Figure 50. SynAstUnit3Ch3V1_061808 Page 37 Schoolwires Assist 1.2 Using Assist Figure 50: Comment field in Ticket Completion Survey window To re-open the ticket, the requestor must enter a comment and click on the Submit button. The technician will be notified that the ticket has been reopened. It will display on the By Technician tab of Service Tickets with a status of Assigned. SynAstUnit3Ch3V1_061808 Page 38 Schoolwires Assist 1.2 Using Assist Finding Tickets You can search for tickets by: Ticket Number Building & Location Ticket Type, Category and Subcategory Status and Priority You will search the same way whether you are solely a requestor or also a member of the support staff. Your results, however, will be different. Results for Requestors If you are solely a requestor, Assist will only search the tickets you entered. You will be able to edit those tickets as you normally can. Results for Support Staff If you are a member of the support staff, Assist will search all tickets. However, you will only be able to access those tickets with which you are associated as either a requestor or a support staff member. SynAstUnit3Ch3V1_061808 Page 39 Schoolwires Assist 1.2 Using Assist Finding Tickets Figure 51: My Tickets workspace for a requestor To search for tickets: 1. Click on the Find Ticket button in the navigation pane. A Find Ticket window like the one shown in Figure 52 will display. Figure 52: Find Ticket window: Ticket No. 2. To search by ticket number: a. Enter a ticket number in the Ticket No. field. Enter numerals only. SynAstUnit3Ch3V1_061808 Page 40 Schoolwires Assist 1.2 Using Assist b. Click on the Find button. The results of the search will depend on your role. Your access to a ticket found in the search will depend on your association with that ticket. 3. To search by building and location: a. Click on the to the left of By Building & Location. It will expand as shown in Figure 53. Figure 53: Find Ticket window: Building & Location b. Choose a building from the Building combo box. That will populate the Location combo box. c. Choose a location from the Location combo box. That will populate the Asset combo box. d. Choose an asset from the Asset combo box if desired. e. Click on the Find button. The results of the search will depend on your role. Your access to tickets found in the search will depend on your association with those tickets. SynAstUnit3Ch3V1_061808 Page 41 Schoolwires Assist 1.2 Using Assist Figure 54: Find Ticket window: Type, Category & Subcategory 4. To search by ticket type, category and subcategory: a. Click on the to the left of By Type, Category & Subcategory. It will expand as shown in Figure 54. b. Choose a type from the Type combo box. That will populate the Category combo box. c. Choose a category from the Category combo box. That will populate the Subcategory combo box. d. Choose a subcategory from the Subcategory combo box. e. Click on the Find button. The results of the search will depend on your role. Your access to tickets found in the search will depend on your association with those tickets. 5. To search by status and priority: a. Click on the to the left of By Status and Priority. It will expand as shown in Figure 55. Figure 55: Find Ticket window: Status & Priority SynAstUnit3Ch3V1_061808 Page 42 Schoolwires Assist 1.2 Using Assist b. Choose a status from the Status combo box. c. Choose a priority from the Priority combo box. d. Click on the Find button. The results of the search will depend on your role. Your access to tickets found in the search will depend on your association with those tickets. SynAstUnit3Ch3V1_061808 Page 43 Schoolwires Assist 1.2 Using Assist Approval Queue Window (Approvers) Only users who have been assigned as approvers will see the Approval Queue task in the navigation pane of the My Workspace tab. Requestors must choose a subcategory for each ticket they enter. In doing this, they are determining whether that ticket is assigned to a standard queue, an approval queue or a specific technician. If a ticket has been assigned to an approval queue, the requestor receives an email stating that the ticket requires approval. All first level approver receive emails informing them that a ticket requires approval. Approval queues can have up to five levels of approval. If there are multiple approvers at any level, only one must approve a ticket. Then it will either move to the next approval level or to the Service Tickets windows for the appropriate support staff. The approval queue we set up for this chapter required two levels of approval. Approver Chloe is a first-level approver. Approver Syd is a second-level approver. Before Approver Chloe was notified that any tickets required approval, she signed in and her Approval Queue window looked like the one shown in Figure 56. Figure 56: Chloe's Approval Queue window with no tickets SynAstUnit3Ch3V1_061808 Page 44 Schoolwires Assist 1.2 Using Assist After she received an email telling her a ticket required approval, she signed in again. Her Approval Queue window looked like the one shown in Figure 57. Figure 57: Chloe's Approval Queue with ticket Approver Syd signed in at the same time as Approver Chloe after Chloe received the email. However, as you can see from Exhibit 58, since Syd is a level-two approver for the queue, the ticket does not yet show in her queue. Figure 58: Syd's Approval Queue no tickets SynAstUnit3Ch3V1_061808 Page 45 Schoolwires Assist 1.2 Using Assist As you can see from Figure 59, as an approver, the ticket click menu is available to Chloe. Using the buttons in the Approval Queue window, she is also able to: Filter tickets. Approve tickets. Deny tickets. Print tickets. Figure 59: Ticket click menu in Approval Queue window SynAstUnit3Ch3V1_061808 Page 46 Schoolwires Assist 1.2 Using Assist Using the Ticket Click Menu in the Approval Queue Window Accessing the Ticket Click Menu You will access the ticket click menu in the Approval Queue window in the same manner as you access it in the My Tickets window. You will click on the ticket subject as shown in Figure 60. Editing a Ticket As an approver, you can edit all the information on a ticket. You can add attachments, delete attachments and download attachments. TIP: You can also edit a ticket by double-clicking on the ticket subject. This will open an Edit Ticket window. To edit a ticket from the ticket click menu: 1. Click on the Edit button in the ticket click menu. An Edit Ticket window like the one shown in Figure 60 will display. Figure 60: Edit Ticket window 2. Change information on the General tab as required. 3. Change information on the Building & Location tab as required. Remember that changing the building on the ticket may move it to the Approval Queue window of approvers assigned to that queue in the other building. The ticket may be removed from your Approval Queue window if you are not assigned to that building. 4. Change the ticket type, category or subcategory on the Category tab as required. Remember that changing the subcategory may change the queue or technician on that ticket. As a result, the ticket may be removed from your Approval Queue window. SynAstUnit3Ch3V1_061808 Page 47 Schoolwires Assist 1.2 Using Assist 5. Add, delete or download attachments on the Attachments tab. You do this in the same manner as a requestor. However, as an approver, you can make attachments viewable only to members of the support staff by marking them as internal attachments as shown in Figure 61. Figure 61: New Attachment window in Service Tickets 6. Click on the Save button. The Approval Queue window will return as the active window. Adding Comments Approvers will add comments to tickets in the Approval Queue window in the same manner as requestors add comments in the My Tickets window— from the ticket click menu or while editing a ticket. However, as you can see from Figure 62, approvers may add internal comments to tickets that cannot be viewed by requestors. Figure 62: Ticket Comments window in Approval Queue SynAstUnit3Ch3V1_061808 Page 48 Schoolwires Assist 1.2 Using Assist Viewing Ticket History Approvers will view history on a ticket in the same way requestors view history—from the ticket click menu or while editing that ticket. Click on the History button to view the ticket’s history. Using the Buttons in the Approval Queue Window As you can see from Figure 63, as an approver, you have access to the following buttons in the Approval Queue window. Filter Tickets Approve Tickets Deny Tickets Print Tickets Figure 63: Approval Queue window Filtering Tickets Approvers will filter tickets in the Approval Queue in the same way requestors filter tickets in the My Tickets window. Figure 64: Filter in Approval Queue SynAstUnit3Ch3V1_061808 Page 49 Schoolwires Assist 1.2 Using Assist However, as you can see from Figure 64, an approver can filter tickets by: Building Type Category Approving Tickets Approvers will use the Approve Ticket(s) button to approve tickets in the Approval Queue. To approve tickets: 1. Click in the checkbox to the left of each ticket you wish to approve. Warning: If you have multiple pages of tickets, you can only select multiple tickets or use the Select All checkbox on a single page. If you move to another page, the tickets you selected on the first page will be deselected. 2. Click on the Approve Ticket(s) button. A confirmation message like the one shown in Figure 65 will display. Figure 65: Approve Ticket(s) confirmation message 3. Click on the Approve button. The Approval Queue window will return as the active window. The ticket you approved will no longer display in the grid. a. If there are other approvers at a higher level: SynAstUnit3Ch3V1_061808 The ticket will display in their Approval Queue windows. Notice in Figure 66 that the ticket Approver Chloe just approved now appears in Approver Syd’s Approval Queue window. Page 50 Schoolwires Assist 1.2 Using Assist Figure 66: Syd's Approval Queue window with ticket The approvers for the next level will be notified. The requestor will be notified that the ticket requires approval. Note: If there are multiple approvers at a level, only one has to approve the ticket for it to move to the next level. b. If you are the final approver for the ticket: The ticket will be moved to the Service Tickets windows of the appropriate members of the support staff. Support staff will be notified. The requestor will be notified that the ticket has been assigned to a queue. Note: If there are multiple approvers at the final level, only one has to approve the ticket for it to move to the ticket queue. Denying Tickets Approvers will use the Deny Ticket(s) button to approve tickets in the Approval Queue. To deny tickets: 1. Click in the checkbox to the left of each ticket you wish to deny. Warning: If you have multiple pages of tickets, you can only select multiple tickets or use the Select All checkbox on a single page. If you move to another page, the tickets you selected on the first page will be deselected. SynAstUnit3Ch3V1_061808 Page 51 Schoolwires Assist 1.2 Using Assist 2. Click on the Deny Ticket(s) button. A Deny Ticket window like the one shown in Figure 67 will display. Figure 67: Deny Ticket window 3. Enter the reason you are denying the ticket. You must enter at least 25 characters. Note: If you deny multiple tickets, the same reason for denial will be entered for all the tickets. 4. Click on the OK button. The Approval Queue window will return as the active window. The ticket you denied will no longer display in the grid. The requestor will be notified that the ticket has been denied. No other approvers or support staff will be notified since the ticket is no longer in process. Note: The requestor will be able to view the reason the ticket was denied in the ticket history. If desired, the requestor will need to create a new ticket to re-submit the work request. There is no way to re-open a ticket that has been denied. Printing Tickets Approvers will print tickets in the Approval Queue window in the same manner as requestors print tickets in the My Tickets window. SynAstUnit3Ch3V1_061808 Page 52 Schoolwires Assist 1.2 Using Assist Service Tickets Window (Managers and Technicians) Only users who have been assigned as managers or technicians will see the Service Tickets task in the navigation pane of the My Workspace tab. If the user profiles for a manager and a technician include permission to cancel and assign tickets, the tasks that they can perform in the Service Tickets window will be the same. The difference will be what tickets will display on the By Technician tab of that Tickets on the By Technician Tab of the Service Tickets Window Technicians will only see tickets assigned to them on the By Technician tab of the Service Tickets window. Managers, on the other hand, will see all tickets assigned to themselves as well as to any technicians who have been assigned to them. Let’s look at the By Technician tab of Service Tickets for Manager Craig, and Technicians Viv and Patrick. Notice in Figure 68 that Craig can see the tickets assigned to both Viv and Patrick regardless of the building in which the work is located. Ticket #15 is for work at the Elementary School North and Ticket #2 is for work at the High School. Manager Craig is not assigned to either of these buildings as support staff. What a manager can see on this tab will depend on how the technician and building assignments were configured in Settings in Assist Administration. Building assignments are not a factor when tickets are assigned directly to a member of support staff when a requestor chooses a subcategory Figure 68: By Technician tab of the Service Tickets window for Manager Craig SynAstUnit3Ch3V1_061808 Page 53 Schoolwires Assist 1.2 Using Assist As you can see from Figure 69, however, Viv can only see the tickets assigned to her on the By Technician tab of the Service Tickets window. In Figure 70 you see that Patrick can only see those assigned to him. Figure 69: By Technician tab of the Service Tickets window for Technician Viv Notice that neither of the tickets shown in Figure 69 is for work in the Middle School East, which is the only building to which Viv is assigned in Settings. That is because these tickets were assigned to Viv when the subcategory was selected when the tickets were created or edited. The building assignments in Settings only affect tickets that are assigned to queues. In Figure 70, you only see one ticket assigned to Technician Patrick. Since it is for work in the Middle School East, the only building to which Patrick is assigned in Settings, you cannot tell whether the assignment was made when a subcategory was selected or from within a queue. Patrick was assigned a user profile that did not include permission to assign or cancel tickets. Consequently as you can see in Figure 70, the Cancel Tickets button does not appear on his By Technician tab. Figure 70: By Technician tab of the Service Tickets window for Technician Patrick SynAstUnit3Ch3V1_061808 Page 54 Schoolwires Assist 1.2 Using Assist Tickets on the By Queue Tab of the Service Tickets Window Depending on their building and queue assignments, what support staff will see on the By Queue tab of Service Tickets may vary. Let’s look at the By Queue tabs of the Service Tickets windows of Craig, Viv and Patrick. Figure 71 shows the By Queue tab of Service Ticket for Craig. Notice that it contains Ticket # 1, 4, 5, 6, 7, 8, 9, 10, 12 and 18. Figure 72 shows the By Queue tab of Service Ticket for Viv and contains the same tickets as that of Craig. Ticket # 18, however, does not show on the By Queue tab of Service Ticket for Patrick shown in Figure 73 because Patrick is not assigned to Craig Queue One. Viv and Craig are. Figure 71: By Queue tab of the Service Tickets window for Manager Craig SynAstUnit3Ch3V1_061808 Page 55 Schoolwires Assist 1.2 Using Assist Figure 72: By Queue tab of the Service Tickets window for Technician Viv Figure 73: By Queue tab of the Service Tickets window for Technician Patrick SynAstUnit3Ch3V1_061808 Page 56 Schoolwires Assist 1.2 Using Assist Comparing the By Technician and the By Queue Tabs Compare the buttons that are available on the By Technician tab (Figure 68 and 69) to those that are available on the By Queue tab for Craig and Viv (Figure 71 and Figure 72). Remember, unlike Patrick, Craig and Viv can cancel and assign tickets. The buttons that are available on the By Technician tab are: Filter Tickets Close Tickets Cancel Tickets (if that permission in user profile) Print Tickets The buttons that are available on the By Queue tab are: Filter Tickets Assign Tickets (if that permission in user profile) Cancel Tickets (if that permission in user profile) Print Tickets Since these tabs contain grids, you can apply all but the Filter Tickets button to one or more tickets on the page to tickets by clicking in the checkbox to the left of the tickets. Figure 74: Editing a ticket while on the By Technician tab SynAstUnit3Ch3V1_061808 Page 57 Schoolwires Assist 1.2 Using Assist As you can see in Figure 74, when you edit a ticket on the By Technician tab, the Comments and History buttons display. Therefore, when you edit a ticket on the By Technician tab, the buttons that are available are: Comments Assign Ticket (if that permission in user profile) Close Ticket Cancel Ticket (if that permission in user profile) History Print Tickets Figure 75: Editing a ticket while on By Queue tab As you can see from Figure 75, when you edit a ticket on the By Queue tab, the Comments and History buttons will also display. Therefore, when you edit a ticket on the By Queue tab, the buttons that are available are: Comments Assign Ticket (if that permission in user profile) Cancel Ticket (if that permission in user profile) SynAstUnit3Ch3V1_061808 Page 58 Schoolwires Assist 1.2 Using Assist History Print Tickets When you apply these buttons while editing a ticket, you are only performing the action on the ticket that you are editing. By comparing editing a ticket on the By Technician tab (Figure 75) to editing a ticket on the By Queue tab (Figure 76), you will see that you can change the priority when editing a ticket on either tab, but you can only change the status when you edit a ticket on the By Technician tab. Using the Ticket Click Menu in the Service Tickets Window Accessing the Ticket Click Menu You will access the ticket click menu in the Service Tickets window in the same manner as you access it in the My Tickets window or the Approval Queue window. You will click on the ticket subject as shown in Figure 76. Figure 76: Ticket click menu in Service Tickets window Editing a Ticket (Including Priority, Status and Due Date) As a manager or technician you can edit all the information on a ticket. You can add attachments, delete attachments and download attachments. TIP: You can also edit a ticket by double-clicking on the ticket subject. This will open an Edit Ticket window. To edit a ticket from the ticket click menu: 1. Click on the Edit button in the ticket click menu. If you are editing a ticket on the By Technician tab, an Edit Ticket window like the one shown in Figure 77 will display. If you are editing a ticket on the By Queue tab, an Edit Ticket window like the one shown in Figure 78 will display. SynAstUnit3Ch3V1_061808 Page 59 Schoolwires Assist 1.2 Using Assist Figure 77: Editing a ticket while on the By Technician tab Figure 78: Editing a ticket while on By Queue tab SynAstUnit3Ch3V1_061808 Page 60 Schoolwires Assist 1.2 Using Assist 2. Change information on the General tab as required. As you can see from Figure 77 and 78, what that information is varies between the By Technician tab and the By Queue tab of the Service Tickets window. Subject (when editing from either tab). Description (when editing from either tab). Priority (when editing from either tab). The choices are: Low (blue flag in grid) Medium (green flag in grid—default for all new tickets) High (yellow flag in grid) Critical (red flag in grid) Status (when editing from By Technician tab only). The choices are: Assigned In progress Pending Hold Awaiting third party Due Date (when editing from either tab). 3. Change information on the Building & Location tab as required (when editing from either tab). Remember that the ticket was assigned to a queue, changing the building on the ticket may move it to the Service Tickets windows for technicians and managers assigned to that queue in the other building. The ticket may be removed from your Service Tickets window if you are not assigned to that building. 4. Change the ticket type, category or subcategory on the Category tab as required (when editing from either tab). Remember that changing the subcategory may change the queue or technician on that ticket. As a result, the ticket may be removed from your Service Tickets window. SynAstUnit3Ch3V1_061808 Page 61 Schoolwires Assist 1.2 Using Assist 5. Add, delete or download attachments on the Attachments tab. You do this in the same manner as a requestor or approver. As a technician or manager, you can make attachments viewable only to members of the support staff by marking them as internal attachments as shown in Figure 79. Figure 79: New Attachment window in the Service Tickets window 6. Click on the Save button. The Service Tickets window will return as the active window. Adding Comments Technicians and managers will add comments to tickets in the Service Tickets window in the same manner as requestors and approvers add comments—from the ticket click menu or while editing a ticket. As you can see from Figure 80, technicians and managers may add internal comments to tickets that cannot be viewed by requestors. Figure 80: Ticket Comments window in the Service Tickets window SynAstUnit3Ch3V1_061808 Page 62 Schoolwires Assist 1.2 Using Assist Viewing Ticket History Technicians and manages will view history on a ticket in the same manner as requestors and approvers view history—from the ticket click menu or while editing that ticket. Click on the History button to view the ticket’s history. Using the Buttons in the Service Tickets Window Filtering Tickets Managers and technicians will filter tickets in the Service Tickets window in the same manner as requestors and approvers filter tickets. However, as you can see from Figure 81 and Figure 82, technicians can only filter tickets on the By Technician tab by status while managers can filter on that tab by status and by technician. Both managers and technician can filter tickets on the By Queue tab by queue as shown in Figure 83. Figure 81: Filtering tickets on the By Technician tab for technicians Figure 82: Filtering tickets on the By Technician tab for managers SynAstUnit3Ch3V1_061808 Page 63 Schoolwires Assist 1.2 Using Assist Figure 83: Filtering tickets on the By Queue tab (for managers & technicians) Closing a Ticket (From By Technician Tab Only) You can close a ticket by clicking on the Close Ticket button when you are on the By Technician tab of the Service Tickets window. A Close Ticket window like the one shown in Figure 84 will display. Enter the reason you are closing the tickets. You must enter at least 25 characters. Note: If you are closing multiple tickets from the grid, the same reason will appear on all the tickets you close. The ticket status will change to Closed. However, since the default filter on the By Technician tab is set to display tickets with Assigned status, it will not be visible until you filter for closed tickets. The requestor will receive an email like the one shown in Figure 85. Clicking on the link in the email will take the requestor to a Ticket Completion Survey. See “Ticket Completion Survey” earlier in this chapter for how requestors complete this survey. Figure 84: Close Tickets window SynAstUnit3Ch3V1_061808 Page 64 Schoolwires Assist 1.2 Using Assist Figure 85: Email to requestor when ticket closed Assigning a Ticket (From Either Tab) If you have permission to assign tickets, you can assign a ticket by clicking on the Assign Ticket button when you are on either tab of the Service Tickets window and are editing a ticket. However, you can assign tickets from within the grid only on the By Queue tab. To assign the ticket: 1. Access the desired tab of the Service Tickets window. a. If you are working on the By Queue tab, you can either select a ticket or tickets from the grid by clicking in the checkbox to the left of each ticket you wish to assign or you can edit the ticket you wish to assign. b. If you are working on the By Technician tab, you must edit the ticket you wish to assign. 2. Click on the Assign Ticket button. An Assign Ticket window like the one shown in Figure 86 will display. Figure 86: Assign Ticket window 3. Choose a technician from the combo box. SynAstUnit3Ch3V1_061808 Page 65 Schoolwires Assist 1.2 Using Assist a. If you are working on the By Technician tab of the Service Tickets window, the list of available technicians will contain the names of all support staff (managers and technicians) who are assigned to the building on the ticket. b. If you are working on the By Queue tab of the Service Tickets window, the list of available technicians will contain the names of all support staff (managers and technicians) who are assigned to the queue at the building on the ticket. 4. Click on the Assign button. The tab on which you began will return as the active window. Cancelling a Ticket (From Either Tab) If you have permission to cancel tickets, you can cancel a ticket by clicking on the Cancel Ticket button when you are on either tab of the Service Tickets window. A Cancel Ticket window like the one shown in Figure 87 will display. Figure 87: Cancel Ticket window Enter the reason you are cancelling the ticket. You must enter at least 25 characters. The ticket status will change to Cancelled. However, since the default filter on the By Technician tab is set to display tickets with Assigned status, it will not be visible until you filter for cancelled tickets. The requestor will be notified that the ticket was cancelled. Note: If you cancel multiple tickets from the grid, the same reason will be entered for all the tickets you cancelled. Printing Tickets (From Either Tab) Managers and technicians will print tickets in Service Tickets in the same manner as requestors and approvers print tickets. SynAstUnit3Ch3V1_061808 Page 66 Schoolwires Assist 1.2 Using Assist Assignment Calendar (Managers and Technicians) Once tickets are assigned and due dates are entered, they will appear on staff assignment calendars. Tickets Seen in Calendars As you can see from Technician Viv’s Assignment Calendar in Figure 88, a technician will only see tickets that have been assigned to her on the assignment calendar. Figure 88: Technician Viv's Assignment Calendar Managers, on the other hand, will see tickets for all technicians assigned to them as well their own tickets as you can see from Manager Craig’s Assignment Calendar in Figure 89. Figure 89: Manager Craig's Assignment Calendar SynAstUnit3Ch3V1_061808 Page 67 Schoolwires Assist 1.2 Using Assist Filtering in the Assignment Calendar Managers and technicians will filter tickets on the Assignment Calendar in the same way they filter tickets in Service Tickets. However, as you can see from Figure 90, technicians can only filter by the date while mangers can filter by the date and technician as shown in Figure 91. Figure 90: Calendar Filter for Technicians Figure 91: Calendar Filter for Managers SynAstUnit3Ch3V1_061808 Page 68 Schoolwires Assist 1.2 Using Assist Reports Reports Available by Assist User Role The reports available to each Assist user from the Reports task in the navigation pane are shown in Figure 92. Figure 92: Reports by Assist Staff Role SynAstUnit3Ch3V1_061808 Page 69 Schoolwires Assist 1.2 Using Assist Obtaining Reports As you can see from Figure 92, which reports you will see in the Reports window will depend on your role as a member of Assist support staff. However, you will obtain the reports in essentially the same manner. Figure 93 shows the Reports window for a manager, which contains all available reports. Figure 93: Reports window of manager SynAstUnit3Ch3V1_061808 Page 70 Schoolwires Assist 1.2 Using Assist To obtain a report: 1. Click on the View button to the right of the desired report. A Report Filter window like the one shown in Figure 94 will display. Figure 94 shows the window for the Ticket Summary Report, which is available to all members of support staff. As you can see, you can filter by: Buildings Types & Categories Priorities Status Date Range Figure 94: Ticket Summary Report Filter window 2. Choose your criteria by clicking in the checkboxes to the left of each criterion. Notes: Expand each criterion class by clicking on Close each criterion class by clicking on To get data, you must select at least one criterion in each class except date range. Some criterion subclasses are populated when you select a criterion. For instance, in Figure 95, notice that there are no criteria under the Category subclass. However when I choose a Type, that subclass is populated as you can see in Figure 9-96. SynAstUnit3Ch3V1_061808 . . Page 71 Schoolwires Assist 1.2 Using Assist Figure 95: Category subclass not populated Figure 96: Category subclass populated SynAstUnit3Ch3V1_061808 Page 72 Schoolwires Assist 1.2 Using Assist 3. Click on the Run Report button. The report you ran will display. See Figure 97. Figure 97: Report Results 4. If you wish to export the report: a. Choose a format for the export from the Select a format drop-down list. As you can see from Figure 98, you can export it as a Microsoft® Excel file or an Adobe® PDF. Figure 98: Export file formats b. Click on the Export link. c. Open or save the file as desired. 5. You can also modify the criteria for your report by clicking on the Modify Criteria link at the top of the report. The original Report Filter window will display. SynAstUnit3Ch3V1_061808 Page 73 Schoolwires Assist 1.2 Using Assist 6. To clear the criteria: a. Click on the Clear button to clear the old criteria. b. Select new criteria and run the report. 7. You can drill down into some reports to get more information. For instance, look at the Total Tickets by Category Report shown in Figure 99. If you click on the Category name, you will get a Ticket Summary Report for that category like the one shown in Figure 100. Notice that you can return to the parent report by clicking on the Back to Parent link at the top of the report. Figure 99: Total Tickets by Category Report SynAstUnit3Ch3V1_061808 Page 74 Schoolwires Assist 1.2 Using Assist Figure 100: Ticket Summary for Category SynAstUnit3Ch3V1_061808 Page 75