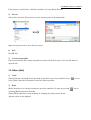
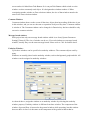
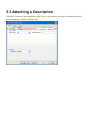
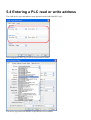
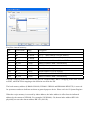
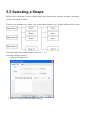
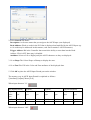
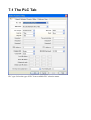
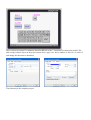
1
EasyBuilder 500 User’s Manual
Chapter 1. EasyBuilder500 Installation
1.1 EasyBuilder500 Startup
Software :
Visit Weintek Labs, Inc.’s website at http://www.weintek.com to obtain all available software editions
(including Simplified Chinese, Traditional Chinese and English version) and latest upgraded files.
Hardware Requirements (Recommend):
CPU: INTEL Pentium II or above
Memory: 64MB or above
Hard Disk: 2.5GB or above (At least spare disc space 10MB.)
CD-ROM: 4X or above
Display: 256 color SVGA with 800 x 600 resolutions
Keyboard and Mouse: One for each
RS-232 COM: At least one available port for using in [Online Simulator] / [Project Download] / [Project
Upload]
Printer
Operating System:
Windows 95 /Windows 98 /Windows NT/Windows 2000 /Windows Me/Windows XP.
Installation:
Double click Setup and display as follows.
Click "Next "
Choose the destination EB500 to be installed and
then click "Next ".
-1-
EasyBuilder 500 User’s Manual
Click "Next" to confirm installation.
Installation processing
Click "Close" to finish the installation.
Chose menu [Start] / [All Programs] / [EasyBuilder] to start the program.
Each meaning of selecting is as follows under the software menu:
EasyManager
EasyBuilder
ImageCF
PLCAddressView
ReleaseNote
MT500 comprehensive management software
EB500 configuration software
Convert the eob and related bin file into the download format
Various kinds of brand PLC address types and ranges table
The edition and relevant latest information explaining
-2-
EasyBuilder 500 User’s Manual
1.2 System Connections
Typical connection for MT510 and MT508 series:
-3-
EasyBuilder 500 User’s Manual
Typical connection for MT506 series:
PC [RS-232] port of the HMI generally connects to the PC. Since the PC [RS-232] and PLC [RS-485]
share the same connector, it’s recommend to use MT5-PC cable provided which splits the port into
two separate connectors to ease the program and test process. Connect either the PLC [RS-485] or
PLC [RS-232] port of the HMI to the PLC. (Check the PLC connection mode in the back of this
manual to assure proper port connections.) At the same time, be sure that all DIP switches are set to
the “OFF” position.
-4-
EasyBuilder 500 User’s Manual
Chapter 2. Creating a Simplest Project
“Easy-to-use” is the strongest advantage of EB500 software. Through an example of project with a switch
control object, we explain how to create a simple project from EB500. Other project making is basically the
similar procedure to this example.
2.1 First Step
First of all, let us create a blank new project.
1) After installing the EB500, select Start/All Program/Easybuilder/Easybuilder 500.
2) If it's the first time running EasyBuilder or a last blank project was opened on last time log-in, the
following popup dialog appears.
Select the model of the display and then click “ok”.
Otherwise ,the last open project is opened for editing. Select menu bar [File]/[New] to create a new project,
the following popup dialog appears.
Select the appropriate model you are programming. Here we choose model [MT510T/508T 640*480] as an
example, then click “ok”.
-1-
EasyBuilder 500 User’s Manual
3) We can easily create a new project in this way. In the menu bar, select menu [File]/[Save] to save the
project. as a.epj. The display shows as below.
Click “Save”
4) In the menu bar, select [Tools] / [Compile], it will pop up a compiling message box. After compiling, click
[Close] to close the message box.
5) In the menu bar, select [Tools] / [Off-line simulation] for PC to simulate the PLC and emulate operations.
At this time, we can see the new blank project we just created on the simulation screen as below.
There’s no object on the screen and it doesn’t allow to be executed any operations.
On this screen, right Click the mouse and select Exit , or press Space key to exit the simulation screen.
-2-
EasyBuilder 500 User’s Manual
2.2 Create a Toggle Switch Object
Next step, we add a switch object on the project.
1) First, in menu bar, select [Edit]/[System Parameters], the “System Parameters Setting” popup dialog
appears.
In this example, we choose PLC type as MITSUBISHI FX0n/FX2.Select corresponding HMI model you are
using.
2) In the menu, select [Tools]/[Toggle Switch] or click
dialog appears as follows:
icon, the popup Toggle Switch attributes
3) Switch to Shape Tab, select Use bitmap and press Bitmap library.
-3-
EasyBuilder 500 User’s Manual
After pop up a Bitmap library dialog, press Select Library.
Select appropriate Bitmap library. We choose bmp1.blb here and click Open.
The pop-up dialog shows as below. Select the bitmap1 and click OK.
-4-
EasyBuilder 500 User’s Manual
Return to Shape Tab dialog and press OK.
Left Click the mouse to pull the object in to the screen as below.
-5-
EasyBuilder 500 User’s Manual
4) In menu bar, select File/Save and then select Tools /Compile.
5) In menu bar, select Tools/Off-line simulation. When clicking the switch object, you can see the on/off
situations like a real one.
6) If you have MT5_PC, please connect [PLC] port of MT5_PC to PLC and [HMI] port of MT5_PC to the
PLC[RS485] port of the display, PC port to the PC COM.
Have the power openly now.
-6-
EasyBuilder 500 User’s Manual
7) In the menu bar, select [Tools]/[On-line Simulation], you will find by clicking the switch on your display,
you can control the corresponding PLC output Y1. You can change this output status.
8) In the menu bar, select [Tools]/[Download].
9) After downloading, reset the HMI. You can control this switch by touching the object.
-7-
EasyBuilder 500 User's Manual
Chapter 3.Software Reference Guide
EasyManager and PLCAddressView are software used for Easybuilder 500. We will introduce them
one by one.
3.1 EasyManager
Easy Manager is the comprehensive software of system of a whole set of WeinView500 software.
There are three modules in the whole Easybuilder500: EasyDownload [Upload & Download],
EasyWindow (On-line Simulator & Off-Line Simulator) and Easybuilder. Easybuilder is the
software for editing, used for planning various kinds of component positions, generally abbreviate
as EB500. You can download and simulate on line (or off line) by using EasyManager that is
realized by the way transferring other two mould groups via EasyManager. Don’t need to open
EasyManager window downloading or off-Line from EasyBuilder. But you have to set up related
parameters on EasyManager(ex.COM port, communication speed),otherwise the operation may be
unable to run.
The structure relation diagram of EasyManager depicts as below:
EasyManager
EasyDownLoad
EasyWindow
EasyBuilder
Select Start/All Programs/EasyBuilder/EasyManager, the popup
EasyManager dialog appears as below:
EasyManager has the following components:
In EB500 the communication parameter between the computer and HMI is
defined as follows:
COM Port Drop-Down Box:
Select the number of the RS232 Serial COM port ,COM1 or COM2 for
computer.(Ports COM1 through COM10 are available for selection.)
EasyBuilder 500 User's Manual
Communications Speed Drop-Down Box:
Determine the communications speed between the PC and the unit during downloads and
uploads,the 115200 speed is recommended. (For old style machine or special requirement, the
38400 speed is recommended.)
Project Download/Upload or Recipe Download/Upload:
Select Project Download/Upload to transfer project data.
Select Recipe Download/Upload to transfer recipe data.
Complete or Partial Download/Upload:
Selecting Complete to download both program file (*.eob) and system file (*.bin) is slower than
select Partial to download just only program file(*.eob). When uploading, speeds are the same to
select either Complete or Partial.
Easybuilder:
EasyBuilder is the software for editing, Used for planning various kinds of component positions,
generally abbreviate as EB500. Push this button can enter the editing picture of EB500 software.
Please consult this seal of section five about the detailed introduction to this software.
Online-Simulator:
Simulator can read the data of PLC through MT500 after a project is compiled by EB500.( This
creates a file with extension*.eob) and you can operate directly on computer by MT500.
Using Online-Simulator function saves much time for repeat downloading. Please refer to Ch. 6 for
detail.
Offline-Simulator:
The Offline simulator emulates the operation of a project on the PC screen which retrieves the static
data from display. Please refer to Ch. 7 for detail.
Download:
Download a project compiled by EasyBuilder to the MT500. Please refer to Ch. 2 for detail.
Upload:
Upload the project file from MT500 to an object file (*.eob). The upload file can’t be opened by
EB500 but can be transferred to another HMI. On the other words, the upload file can be transferred
among the HMI with the same program. Please refer to Ch.3 for detail.
Jump to RDS (Remote Debug & Simulation) Mode:
Jump to RDS is used for On-line simulations or debug. Uploads and Downloads are done in this
EasyBuilder 500 User's Manual
mode. You also can search system’s ROM version or some system information.
Jump to Application Mode:
This is the normal operating mode of a unit. Clicking Jump to Application runs the project in
memory. If there is no project (or the project is broken) in the unit , the unit jumps to RDS Mode
after booting. You can download a complete project to HMI and then return to operation mode.
Jump To Touch Adjust (Touch screen calibration) Mode:
Jump to Touch Adjust is used to calibrate the touch screen. Changing motherboards or displays have
to use this mode to calibrate the touch screens. MT 500 series shows the instruction to lead you to
complete the calibration.
The three buttons of EasyManager describe above can be forced into switch to the corresponding
mode, far-end On-line operation mode and Touch screen calibration mode.
Touch Test Mode:
Test touch panel accuracy. In this mode, when you touch the screen, there is a corresponding display
“ +” on the point you touch which for you to test the accuracy. Note: This mode change isn't on the
EasyManager menu, But it is done by changing DIP Switch. Please refer to DIP Switch chapter for
detail.
Exit:
This button closes the EasyManager application.
3.2 Download
Before a project can be downloaded it must be compiled. There are two methods to process: one is
through the download button of EasyBuilder, another one is from EB500, select Tools/ Download in
the menu bar or press
icon to download.
(1) Downloading through EasyManager:
Select Start/All Programs/EasyBuilder/EasyManager.
Set up all necessary parameters. Please refer to EasyManager part in this
chapter.
Click on DownLoad button.
EasyBuilder 500 User's Manual
Choose the project file and then click Open.
Downloading begins with the Easy Download dialog popping up and is tracked by the progress bar.
After downloading, click OK.
Click on Jump To Application button or reset the display to application mode, the project is
operated on the display.
(2) Downloading through EB500
Open the [*.epj] file name of the project on EB500 or the current editing file, select Save in the Edit
menu and then select Compile in the Tools menu.
After compiling, close the compiling dialog. In Tools menu, select Download or press
The pop-up dialog appears as below:
Click OK when finish.
Click on Jump To Application button or reset the display to application mode, the project is
operated on the display.
(3) Downloading through Compact Flash memory.(for E series)
MT500 E series support the function of downloading through Compact Flash memory.
icon.
EasyBuilder 500 User's Manual
Step
Task
1
After editing, compile and save.
2
Click ImagCF icon from the programs list.
3
Click
icon and open eob extension
compiled from step1.
4
ImageCF.exe program combines .eob file
and related .bin file to a
ImageCF.bin(Please don't use other name
on this file.)
5
Copy ImageCF.bin to the root folder of CF
card.
6
Insert the CompactFlash card into the units
Compact Flash slot. Put dipswitch 2 of the
unit in the ON position and the others are
all off. Then push reset button. The unit
comes up in RDS mode and a green CF
card button appears.
7
Click the green button and then start to
download. After download, the mode
automatically switches to Application
mode.
Picture
EasyBuilder 500 User's Manual
The CF slot of MT500 may not detect all brands of CF cards. “San Disk”and “PQI”are suggested.
The CF memory card may be formatted as FAT16 or FAT32.
3.3 Uploading
We can upload the project from HMI to PC and then On-line Simulation in the computer and
download project enter other HMI to operate. The upload file must be *.eob which is not allowed to
compile on EB500. Uploading isn't reached in EB500. Upload the project through EasyManager/
Upload.
Open EasyManager, set up the corresponding parameters. The pop-up dialog shows as follows:
Input the file name. Click Open. If the password is set on the project, it pops up a password message
box. After the password is confirmed, the pop-up message box appears as below.
Click OK after downloading. Find the file from the corresponding location and then download to
other HMI or run On-line simulation.
EasyBuilder 500 User's Manual
3.4 PLC AddressView
Select and click PLC AddressView will show plc address type and range, the pop-up dialog shows
as follows:
Bit is a base unit, eight bits are one byte, two bytes are a word, and two words are the Dword.
d: Decimal, o: Octal, h: Hexadecimal
Bit(HMI): HMI bit Bit(PLC): PLC bit
The Address Type show different PLC address type and range. Usually, there are 4 data types Bit,
Byte, Word, Double Word.
1. Bit address type
LB (Local Bit): Internal bit of the HMI.
EasyBuilder 500 User's Manual
RBI: Recipe index bit. Please refer the ch 8.
RB: Recipe bit.
Ms_RB: Master/Slave connect, the Slave HMI can use Ms_RB to get the Master HMI’s RB
data.
Ms_LB: Master/Slave connect, the Slave HMI can use Ms_LB to get the Master HMI’s LB
data.
ddd: Decimal address format
ooo: Octal address format
hhh: Hexadecimal address format
ddd(h): ”ddd” word address in decimal format, ”h” bit address in hexadecimal format.
ddd(dd): ”ddd” word address in decimal format, ”dd” bit address in decimal format.
ddd(o): ”ddd” word address in decimal format, ”o” bit address in decimal format.
Some PLC base address are 1. For example, Modbus RTU 1x and 0x address range is from 1 to
32767. Some Modbus RTU device base address is 0. So, the MT500 address have to subtract 1
to according the device address. Mitsubishi FX2n SM address type base address is 8000.
Max and Min to mean maximum address number and minimum address number.
2. Byte address type
Byte address has 2 types, ddd and hhh.
ddd: byte address in decimal format
hhh: byte address in hexadecimal format
Max and Min to mean maximum address number and minimum address number.
3. Word address type
LW: Local Word, the data in HMI memory. When the HMI power off, the LW data will reset to
0. 9000~9999 are reserved for system.
RWI: Index to Recipe Word. Please see ch8.
RW: Recipe Word. After the HMI power off, backup by battery. 60000~65536 are reserved for
system.
Ms_RW: Recipe Word located in the Master HMI. Slave HMI use Ms_RW to access Master
HMI RW data.
Ms_LW: Local Word located in the Master HMI. Slave HMI use Ms_LW to access Master
HMI LW data.
4. Double Words address type
Double words address has 2 types, ddd and hhh.
In EasyBuilder, No. of words select 2.
ddd: address in decimal format
hhh: address in hexadecimal format
EasyBuilder 500 User's Manual
3.5 EasyBuilder interface
Click EasyManager's EasyBuilder button or directly select Start/All Programs/Easybuilder/
EasyBuilder500 in the menu bar. If it's the first time running EasyBuilder or a last blank project was
opened on last time log-in, the following popup dialog appears.
Select the type of display and then click OK to enter EB500 screen editor window. Or enter EB500
to open the latest opened project.
Select File/New to create a new project. The pop-up dialog appears as below. Select the appropriate
type of display from the drop-down box and then click OK to enter EB500 screen editor window.
EasyBuilder 500 User's Manual
3.5.1 Screen Editor Overview
The following shows the screen editor window. The function of each screen area are explained
below.
a. Title Bar:
Displays the project's file name, active window number and title.
b. Menu Bar:
Displays the menu used to select EasyBuilder commands. There is a corresponding dropdown
under each function bar. Each choice in the dropdown execute an operation.
c. Tool Bar:
Displays the icons corresponding to File, Edit, Library, Tools ,Simulation and up/ download
menu items.
d. State Selector:
Selecting different state toggles all the parts on the window to the specified state.
e. Alignment:
EasyBuilder 500 User's Manual
Makes all the selected parts line up to the top, bottom, left or right
f. Size Adjust:
Makes the dimension, width or height, of all the selected parts the same size.
g. Position Adjust:
Adjusts the position of selected parts.
h. Group:
Makes a collection or combination of selected parts and drawing elements as one object. Save the
group to the library for next time use.
i. Layer Control:
Adjusts the Layer of selected part ¡V one layer up, one layer down, to top layer and to bottom
layer.
j. Text size & position:
Changes the font size and alignment of the selected text.
k. Rotate and Flip:
Flips the shape horizontally or vertically and rotates the shape in 90-degree increments.
l. Parts Tools:
Each icon represents each Part type. Clicking on one of these icons causes that icon¡¦s dialog to
appear. That Part¡'s attributes can then be set and the Part can be placed on the screen.
m. Window Treebar:
Provides quick access to Window properties or objects.
n. Drawing Tools:
Each Icon represents each drawing tool. These tools include: line, rectangle, circle, arc, polygon,
bitmap and so on.
o. Cursor Position:
Shows the current cursor position on the active screen and assistant statements.
EasyBuilder 500 User's Manual
3.5.2 Menu [File]
1) New
Select [New] from File menu or select
to create a new project.
Click OK, a new project is initiated.
2) Open
Select [Open…] from File menu or select
to open a exist project.
Choose the selected project file and then click Open or double click that project file.
3) Close
Select [Close] from File menu to close the current project.
EasyBuilder 500 User's Manual
All current windows are closed after clicking Close, the display shows as below:
4) Save
Select [Save] from the File menu or select
to save the current project.
The dialog shows as below if the project hasn’t been saved.
Input the file’s name and click Save.
EasyBuilder 500 User's Manual
If the project is saved before, click Save and there isn’t any dialog showed.
5) Save as
Select [Save as] in the File menu to save the current project to designate path.
Input new project name to save the new project.
6) Exit
Exit EB 500.
7) Current opened files
Four current opened files’ names and paths are showed in the File menu. Click any file name to
open the file.
3.5.3 Menu [Edit]
1)
Undo
[Undo] function cancels the latest operation and go back to previous condition. Press
select [Undo] from the Edit menu to cancel the latest operation.
2)
icon or
Redo
[Redo] function revert current operation to previous condition. It's done by pressing
selecting [Redo] from the Edit menu.
[Undo]/[Redo] function is used in adding or changing any object on the screen.
Add one object as the diagram:
icon or
EasyBuilder 500 User's Manual
Click Undo.
then click Redo.
Note: Considering the size of the file, only the lastest action can be Undo/Redo.
3) [Cut],[Copy],[Paste] and [Delete]
Cut, Copy, Paste and Delete functions are available for all objects. The corresponding icons are:
4) Multi-Copy
Multi-Copy duplicates one object to many and arrange them in a certain way.
Choose an object and select [Multi-Copy] from the Edit menu. The popup dialog appears as below.
EasyBuilder 500 User's Manual
Pitch:
The duplicates object is overlaps.
Interval:
The space between duplicated objects is the X and Y distance.
RGT/BTM:
The address type of duplicates is copied from left to right one row at a time.
X: Horizontal Distance/ Y: Vertical Distance:
The space of the duplicates are X and Y distance apart.
Quantity X/Y:
The replica object is in x (y ) quantity of the direction.
Address Distance:
This value adjusts how much the object's Address is incremented for each duplicated object.
Example:
Choose an object:
The attributes of the object as follows:
EasyBuilder 500 User's Manual
Select Multi. Copy from the Edit dropdown. The Multi. Copy dialog shows as below:
Click OK and the result shows as the following diagram:
Check the attributes of each object. The addresses of them from left to right are Y1, Y4, Y7 …and
X and Y direction are each 3 objects.
EasyBuilder 500 User's Manual
If the Multi. Copy dialog shows as below:
Click OK and then the result shows as the following diagram:
The X vector is 4 and the Y vector is 3. The addresses from top to down are Y1,Y5 and Y9.
5) Window Copy
EB500 supports the window copy function not only within a project but also among different
projects. For example:
As the diagram, there are two windows in a project:
EasyBuilder 500 User's Manual
Select Window Copy from Edit menu, the pop-up dialog box appears as below:
Click OK and then pop up a message box. Select OK.
EasyBuilder 500 User's Manual
Window 10 is covered by window 11. Window 10 shows the same content as window 11.
Similar way is used in copying windows among different projects. Browse the file (*epj) that has
the window you want to copy or import. Fill in the Source Window No. from the *.epj project.
Select a window number in the open project where the window is to be placed.
6)
[Layer]
or selecting the
When many projects layer one on top of the other, through pressing
[Edit] menu [Layer] submenu to change the order of the objects.
Select object and An object may be brought to the front, back, front one layer at a time or back one
layer at a time by choose a corresponding icon.
7) [Nudge]
Choose an object and the object position moves can be adjusted by nudging. Press the cursor keys
on the keyboard to move an object or group one pixel at a time. Object position moves can be called
from the [Edit] menu [Nudge] submenu and the corresponding icons are
.
8) [Align]
Objects can be aligned by their left edge, vertical center, right edge, top edge, horizontal center, or
EasyBuilder 500 User's Manual
bottom edge. Object alignment can be called from the [Edit] menu [Align] submenu or by clicking
on the appropriate corresponding icons
.
9) [Make same size]
When multiple objects are selected, they can all be fixed to the same size by using the [Make same
size] function. Objects can be made the same width, height, or overall size. It can be done from the
[Edit] menu [Make same size] submenu or by clicking on the corresponding icons
.
10) Transformation
The one that can be turned is only a figure drawn with the drawing tool, such as the straight line,
round, polygon ,etc., other components can not be turned. Select the object and the object
transformation can be done from the [Edit] menu [Flip Vertical], [Flip Horizon] or [Rotate 90
degree] items or by clicking the corresponding icons
.
11) Group/Ungroup
[Grouping]/[Ungrouping] multiple objects or shapes can be called by this function. Grouped single
objects can be used as a object or can be saved to the library for next time use. Click
icon to
gather multiple objects and click
icon to break up a group into its separate objects. Select
[Library]/[Group library]/[Save to group library] to save the group.
12) Redraw Window
Redraw the window to show again, the corresponding icon is
13) [Select All Objects]
An object can be selected by clicking
[Edit] menu.
.
icon in the drawing tools or selecting [Select] from the
EasyBuilder 500 User's Manual
There are 3 types of selection: 1) [Select]: Select single object.
2) [Select All Objects]: Select the all objects on the screen.
3) [Select Next Object]: Select the object under the selected object
Cancel the selected object:
If many objects are selected and you would like to cancel some of them, move the mouse to
the object ,press [Ctrl] key and then click that object to cancel the selection.
Add the object:
If many objects are selected and you would like to add another object, move the mouse to the
object you are adding ,press [Ctrl] key and then click that object to add the selection.
NOTE : Many objects or states are selected , just move the mouse and select someone of the
object , press [Ctrl] key and then click that object to be selected.
14) Change Attribute
Double click on the object or click on the Edit icon
to call up its Attribute Dialog for editing.
15) Change the size of the object
By double clicking the object, the dialog of the object’s attribute appears. Select Profile to change
the size of the object or by dragging the corresponding points to resize the object.
3.5.4 Menu [View]
In View menu, each selection controls the display of each toolbar. Basically, each function in the
toolbar can be found in corresponding menu.
1.
Standard Toolbar
As the diagram above, the functions to the corresponding icons are:
[New]: Create a new object
[Open]: Open a existing project
[Save]: Save the current project
[Cut]: Cut
[Copy]: Duplicate
[Paste]: Paste
[Undo]: Cancel the latest action
[Redo]: Return to the previous condition
[Print]: Print
[About EB500]: Detail of EB500 Version
[Help]: Perfecting
[Redraw]: Redraw Window
EasyBuilder 500 User's Manual
[Grid]: Set grid on the screen
[Snap]: Enable the snapping of objects to the grid.
[Save Objects to Shape Library]: Save Objects to Shape Library
[Call up Shape Library]: Call up Shape Library
[Call up Bitmap library]: Call up Bitmap library
[Save to Group Library]: Save to Group Library
[Call up Group Library]: Call up Group Library
[Compile]: Compile project
[On-line Simulation]: On line simulation
[Off-line Simulation]: Off line simulation
[Download]: Download project
[State bar]: Change the state of the object
2.
Manager Toolbar
[Font]: Choose the size of the font
[Font enlarging]: Enlarge the font
[Font shrinks]: Reduce the font
[Align Left]: When the content of the text exceeds 2 lines, the text is put according to the left
align way.
[Center]: When the content of the text exceeds 2 lines, the text is put according to the center
align way.
[Align Right]: When the content of the text exceeds 2 lines, the text is put according to the
Right align way.
[Top Layer]: Set up object and lie in top layer.
[Bottom Layer]: Set up object and lie in Bottom layer.
[Previous Layer]: Set up object to Previous Layer.
[Next Layer]: Set up object to Next Layer.
[Nudge Up]: Make object Nudge Up.
[Nudge Down]: Make object Nudge Down.
[Nudge Left]: Make object Nudge Left.
[Nudge Right]: Make object Nudge Right.
[Align Left]: Make several object Align Lefts.
[Align Vertical]: Make several object Align Vertical.
[Align Right]: Make several object Align Right.
[Align Top]: Make several object Align Top.
[Align Horizontal Center]: Make several object Align Horizontal Center.
[Align Bottom]: Make several object Align Bottom.
[Make Same Width]: Make several object to the same Width.
EasyBuilder 500 User's Manual
[Make Same Height]: Make several objects to the same Height.
[Make Same Size]: Make several objects to the same size.
[Group]: Make the object form one group.
[Ungroup]: Cancel one group of groups.
[Flip Vertical]: Flip up or down.
[Flip Horizontal]:Flip right or left.
[Rotate]: Rotate counterclockwise 90 degrees.
3.
Draw Toolbar:
[Select]: In choosing the object state.
[Attributes]: Change the attributes of the object.
[Line]: Draw a line.
[Rectangular]: Draw a rectangular.
[Ellipse/Circle]: Draw a ellipse/circle.
[Arc]: Draw an arc.
[Text]: Add the text.
[Bitmap]: Add the bitmap.
[Scale]: Add the scale.
[Polygon]: Draw a polygon.
[Shape]: Add a Shape.
[Alarm Scan]: Add alarm message.
[System Message]: Change system information.
[PLC Control]: Add PLC control elements.
[Event Log]: Add event log object.
[Data Transfer]:Periodically retrieve object's data from PLC.
4.
Icon
Part Toolbar 1 & 2:
Title
Capability
ID
Bit Lamp
Displays On or OFF shape to reflect current bit status in the
PLC.
BL-nnn
Word Lamp
Displays different shapes to reflect current register data in
the PLC.
WL-nnn
Set Bit
Changes the state of PLC bit address data.
SB-nnn
Set Word
Writes specified data to a PLC word address.
SW-nnn
Toggle Switch Combination of bit lamp and set bit parts.
TS-nnn
EasyBuilder 500 User's Manual
Multi-State
Switch
Combination of word lamp and set word parts.
MS-nnn
Function Key
Creates a touch area to input data, change window, pop up
or minimize a window or leave the memo.
FK-nnn
Moving
Shape
Moves a changeable object on the screen.
MV-nnn
Animation
Moves a changeable object along predefined track on the
screen or displays the different states of the object.
AN-nnn
Numeric
Input
Displays PLC registers data in numeric form and allows
keypad input for changes.
NE-nnn
Numeric Data
Displays the PLC register data only in numeric form.
ND-nnn
ASCII Input
Displays the PLC register data in ASCII and accept keypad
input.
AE-nnn
ASCII Data
Displays only the PLC register data as ASCII characters.
AD-nnn
Bar Graph
Displays the PLC register data as a bar graph.
BG-nnn
Meter Display
Displays the PLC register data as an analog meter
MD-nnn
Indirect
Window
Calls a specific pop up window by a PLC word address.
WP-nnn
Direct
Window
Controls a preset pop up window by a PLC bit address.
WC-nnn
Alarm
Display
Displays alarm messages.
AL-nnn
Alarm Scan
Registered alarm messages.
AS-nnn
Trend Display
Periodically retrieve a group of PLC register data and
displays in a trend graph.
TD-nnn
XY Plot
Periodically retrieve a group of PLC register data and
displays X values versus Y values.
XY-nnn
System
Message
Set up system message.
SM-nnn
Recipe
Transfer
Downloads a block of registers to the controller or uploads
a block of registers to the HMI.
RP-nnn
Event Log
Set up the warning incident in Event log
EL-nnn
EasyBuilder 500 User's Manual
Event Display
Displays prioritized and formatted alarm messages as
triggered by bit status in a defined location.
ED-nnn
5. Object/Window Treebar:
Object/Window Tree bar lists the all objects/windows. The windows are numbered from 4,6,10
to1999. Each window is displayed by window No. and window name. The window without a
window name is an empty window. Right click the highlighted window and
select Create to create a new window. Double click to open an existing
window. The window with "*" in front of the window No. means it is open.
Right click the highlighted window and select Delete or Close to delete or
close an open window.
EasyBuilder provides a good way in the Object Treebar to display the PLC
address of each object. Click on the Objects Tab to view all the objects and
of which corresponding PLC address on the Window number being
displayed.
Click on an object No. in the Treebar to highlight the object. The object can
be positioned and edited. Double click on an object No. to pop up the
attributes dialog of the object.
To hide or display the Object/Window Treebar, Select
[View]/[Object/Window Treebar] or simply press the Tab key.
6.
Cursor Position:
Shows the current cursor position on the active screen and assistant statements.
3.5.5 Menu [Option]
1. Grid/Snap
Grid is composed of many pixels on the screen for the alignment of the object. Enter X, Y pixels to
change the grid density. Select Display checkbox to enable/disable grid visibility.
Note: The grid isn’t showed on the screen after a downloaded.
Select Option/ Grid/Snap, the following pop-up dialog appears:
Spacing: Enter the space of the grid. Unit is dot, the default are 20 dots in both X and Y.
EasyBuilder 500 User's Manual
Display: Enables/Disables grid visibility.
Snap: As choose snap, the mouse’s cursor position is then fixed according to the screen’s grid
points, relieving you of the need to make repeated find position adjustments.
Fix objects: Fix the location of the object to prevent objects from inadvertently being moved.
2. Window Property
Set the environment of the screen.
Select Window Property from the Option menu.
Grid color: Set the Grid color.
Object ID: Enables/Disables the object ID number from being displayed on an object.
Using Function Key to make Shape Library: Please refer to Library Operations in Ch5.9. for
further discussion.
Jump to application mode when download down: Enables/Disables automatically forcing the
MT500 jump to the application mode after a download.
Automatic save and compile at download and simulate: Enables/Disables automatically saving
and compiling a project before a simulation or download.
3. Language
EasyBuilder supports several languages. Should use the designated language, EasyBuilder must be
installed under correct Window edition. For example, should support Traditional Chinese,
EasyBuilder must be installed under Windows Traditional Chinese edition. At the same time , must
install the designated font .Satisfied above, choose [Language ] and choose the correct language
type in the function form [Option ], in this way , can use the suitable language type.
3.5.6 Menu[Draw]
1.
Line/Rectangular/Ellipse/Circle/Arc/Polygon
EasyBuilder 500 User's Manual
The following Attributes dialog box is displayed when drawing an object.
The Frame attributes are used to set how the lines for the object are displayed.
Select Line types – There are eight selections for the line or frame width.
Select a Color– Select a color from the 256-color selection.
The Interior attributes are for objects that can be filled. For objects that cannot be filled, this option
is disabled. The filled attributes are not displayed if the Filled check box isn’t selected.
If the Filled option is selected, the following attributes can be set:
Select Interior colors – Select a color from the 256-color selection.
Select Pattern – There are 26 different patterns available in the Pattern Style.
The Pattern Style dialog pops up when the Pattern Style button is clicked.
Note: The color window pops up when a color selection dialog is activated. One of the standard
colors may be chosen or click on Customize color to access a full spectrum of color options.
EasyBuilder 500 User's Manual
2. Text
Click on the Text icon to display the Create Text Object dialog as below:
Font: 8, 16, 24, 32, 48, 64 and 96 font sizes are available.
Align: When the text input for a display more than2 lines the alignment can be left, right or center
justified.
Color: Choose 32 colors out of 256 colors. Basic colors include the common use colors and
customized colors allow you to choose your favorites.
Content: Type in the characters to be displayed. When typing in the characters, press the ENTER
key to move to a new line.
3. Shape
The function is to place a static shape no the screen, the procedure is as following:
1) Select Shape from the Draw menu or click
icon to pop up the dialog as below:
EasyBuilder 500 User's Manual
2) Click on the Shape Library and select appropriate shape. Click OK.
3) The display returns to the previous dialog.
4) Click OK to place the shape.
EasyBuilder 500 User's Manual
4. Bitmap
Add a static bitmap on the screen by clicking Bitmap function. The procedure is the same as
creating a shape.
5. Scale
Scale is useful with bar graph, meter or trend display.
The types of scale are horizontal, vertical or curved.
1. Click Scale icon.
2. Left click to adjust the size of the object.
3. Double click the selected object.
Frame: Select the color and line style to be used for the Scale.
Scale: Select the Style to be displayed: horizontal, vertical or curved Up, Down, Full, and ?.
Division: Select the number of Divisions on the scale (Range from is 1 to 255).
4. Fill in Style Tab.
5. Fill in Profile tab to adjust size.
EasyBuilder 500 User's Manual
6. Click OK and place the object.
The display of using a scale with meter shows as below:
The operation shows……
EasyBuilder 500 User's Manual
3.5.7 Menu [Parts]
The further details are discussed in Ch.6.
3.5.8 Menu [Library]
Please refer to Shape Library, Bitmap Library and Group Library in Ch.5
3.5.9 Menu [Tools]
There are five functions in Tools menu, please refer to Ch.12.
3.5.10 Menu [Window]
Please refer to Ch4.
3.5.11 Menu [Help]
1. Select Help Topics and the following dialog box appears:
EasyBuilder 500 User's Manual
Key in the key words you are looking for or directly choose the index from the list.
2. About EasyBuilder
Select About EasyBuilder. The pop-up message box appears as follows:
The EasyBuilder version and copy right are illustrated in the message box.
3.6 On-line Simulation
EB500 supports on-line simulation. The result of simulation ran on PC only with PLC is the same
as that with both HMI and PLC. Two methods to execute on-line simulation: Through Simulator
from EasyManager and the other is Simulator under EB500 (standard toolbar). The simulator
directly retrieve the data from the PLC to simulate MT500 operation. By using on-line simulator
when testing, it's save time caused for the repeated download. Before simulation, make sure the
right connections between MT500 and the PLC and set the COM port and all parameters in the
Easy Manager.
1)
Simulator from EasyManager.
Open EasyManager set the all parameters and click Online Simulator, the following dialog
popup:
Select the project and the click Open. Here we choose the existing a.eob file and a pop-up
screen appears as follows:
EasyBuilder 500 User's Manual
Realize on-line simulation like this.
2)
On-line simulation under EB500
Open EB500, and open the project you are going to simulate. Select Save/Compile in the Edit
menu and select On-line simulator in the Tools menu or click
icon.
3.7 Off-line Simulation
EB500 supports Off-line simulation. Off-line simulation will not get the data from PLC, read the
data only from the local address, so all datas are static. Off-line simulation can be execute from
EB500 or from EasyManager.
From EB500, Save the file first and then compile it. Select Off-line Simulator from Tools menu or
icon to run the simulation. From EasyManager, select Offline Simulator to emulates the
click
operation of a project on the PC screen.
3.8 Assistant Tools
EasyBuilder500 provides a set of powerful On-line (Off-line) Assistant Tools. Right click anywhere
in the simulation screen, the pop-up menu appears:
EasyBuilder 500 User's Manual
The following explain these functions in detail.
1. Search
Click Search the following pop-up dialog appears:
Check PLC checkbox and input PLC device and the range of the address. Click Search which
shows all the objects using the specific PLC address.
EasyBuilder 500 User's Manual
“W[0020] Ob[005] Ad[00010,03]-Move indicates: window No.[0020],object No.[005], start
address and length [00010,03]-Move indicates Object name. Double clicking the highlighted
data turns the display to the window on which the object is. The object is encompassed by
white dotted line.
In this way, any address of the object can be found.
Similarly, select Part and choose the type you are looking for. Click Search and the display
shows as below:
Double clicking the highlighted data turns the display to the window on which the object is
and shows it.
Click on [Copy to clipboard], Object searching for now is duplicated to clipboard, In this way
you can clip and paste in any place.
2. PLC Monitor
Select PLC Monitor and the following dialog pops up:
EasyBuilder 500 User's Manual
All current operating windows and the content are displayed by
clicking on [Update Information].
If this project create AlarmScan and EventLog object, then
window 0 will run all the time. So long as AlarmScan and
EventLog happen , the system will be dealt with at once. If use
TrendDisplay or Data Transfer then window 1 will run all the
time, in order to obtain the information that TrendDisplay or
Data Transfer need. If use Message Board, because the
information of the message board needs keeping all the time, the
message board window will exist all the time. If use Common
Window, then window 6 must exist all the time. In the graphic
presentation above window 34, it is Open window at present.
Open every item "+ ", there are 2 kinds of to show the color all
contents, among them a yellow one is the touch-sensitive screen
to send the data to COM port, a getting blue one data that
inside punish.
Block Capture: Display the communication data with PLC.
3. System resource
Select System resource to view all resources allocation of the inner
system.
MT500 adopts static resource allocation among them each basic
window occupies 400kb, each pop-up window occupies 350kb,each
fast window occupies 100kb,each common window
occupies30kb,window 0 occupies 320kb. So how many components
every window can be put at most should regard resource taken up in
window as the accurate one in order to exceed.
Timer taking one second as unit can't exceed 500 at most, taking 0.1
seconds as unit can't exceed 100.
Message Quene is the running condition of commands in the system.
Sequence(2) is prior to sequence(1).
EasyBuilder 500 User's Manual
4. Data Monitor
Select [Data Monitor] can monitor the situation of the data.
As the graph above, Pause is stop, All Objects is in order to monitor the operation of all, and
can show the information of these objects to choose any kind or several kinds of object in
Monitor Object, count is information ID.
[WI/OI]: window number/object number.
[Object]: object name.
[Access Type]: Visit way (Read or Write).
[Address Type]: Device name.
[Address]: Device address.
[Data(HEX)[low byte list first]]: Data.
5. Emulator Setting
Select [Emulator Setting] to set the simulation display.
If bitmap background mode is selected, the display is as the following:
EasyBuilder 500 User's Manual
If bitmap background mode is canceled, the display is as the following:
All the displayed are the same.
On the right of the Object Information, the types of the object are set; on the right,
(Address)/(Object Frame)/(Small Font)/(Transparent)/(Object ID)/(Common Window)
If Address, Object Frame and Object ID are selected, the display shows as below:
EasyBuilder 500 User's Manual
6. Print
Print Screen: Print the current screen.
Print Screen Preview: Print preview the current screen.
Print Screen to File: Save the current screen as a *.bmp file.
Print Window: Print the current window(s).
Print Window Preview: Print preview the current screen.
Print Window to File: Save the current window as a *.bmp file.
Page Setup: Set up the print format.
Note: Al the printings are printed through Windows.
7. Exit
Exit the current simulation screen or press Blank key to exit the program.
8. Help
Open the help file.
9. About
The explanation of the EB500 and copyright.
Chapter 4. Window Operations
Window is one of the most important and unique elements for EB500.
The above example shows creating multiple windows at the same time.
4.1 Window Types
Window is the basic element for an EB500 project. Every display is composed by many windows.
There are three types of windows: Base, Fast selection and Common. The basic window can also be
used as popup windows after changing the size. All windows can be assigned as underlay windows.
Basic Window:
These are the normal windows that would be displayed during HMI runtime operations. When
using (change window) command to order the base window that is switched over, will remove
all display on the screen [ Except (Common Window) (Fast Selection Window) ] and then the
basic window will show on the screen. As object on base window can be touched off and
opened popup windows, the primitive information on base window will be kept at this moment.
Being touched off and opened popup windows will be added on base window, all windows of
the same situation can be regarded as the set membership. Switching over from base window N
to base window M, all Sub window of the base window N will be closed then show basic
window M and its subsidiary window. The basic window must fill-up the size of the screen.
Fast Selection Window:
It is activated when the Task Button associated with it is pressed. The window displays on the
screen unless it's hided from Task Button. So it can put Task Button which switch over the
window or other commonly used object. It is designated as window number 4. When
reassigning another window as Fast selection window, the size of that window must be the
same as the Fast selection window.
Common Window:
Common window shows on the screen all the time, object showing needing all the time is put
in this window, and you can see the state or operation of object at any time. Common window
is window 6. The Common window can be changed via Function key but here should be only
one active common window.
Message broad window:
Each project has only one message broad window which is set from [System Parameter
Setting]/[General]. The size of window can be set. If several windows use message broad
window, actually they use the same message broad. Please refer to Ch.9 for further detail.
Underlay Window:
Up to three windows can be specified as underlay windows. The common objects used by
many
Windows are usually placed on the underlay window, such as background, graph and title. All
windows can be assigned as underlay windows.
As showed above, assign the window as an underlay window by selecting the underlay
window property. Underlay window is different from base window. The component of the
window of ground floor is inserted to the general window while operating, but this window
does not show in fact. It is the same as the component of the general window that its
component shows and controls etc..
Screen-Window relationship:
A screen includes: common window, base window and fast window; a common window or a
base window includes several popup windows.
When carry out (Changing Window) command, will remove all windows on the screen (including
the popup windows) and switch the window going to be displayed. The common window is always
active. The popup windows coming from direct or indirect windows don't change the original
content and are only attached to the base window. Maximum three underlay windows are available
in window setting dialog.
When editing a base window (range of window numbers is from 10 to 1999), display shows all
objects on the window. At the same time, if there is an underlay window under the base window, the
base window shows all objects defined to the underlay window, such as control objects (set bit,
function key, etc). Moreover, if show the object in the common window, can show on the present
screen too, all control objects defined to common windows are effective on the active window.
There are 1999 windows available in a project (including base window, common window and fast
selection window), but only one fast selection window. Switch the assigned window as a fast
selection window by the [Jog FS-window] function key. Please refer to Function Key chapter for
further detail.
Each new project has an initial screen, the window number is 10. (or 1, please refer to [System
parameters]/ [Editor]). A project often uses several windows. Valid range of the window numbers is
from 10 to 1999 (number under 10 is reserved for system, such as window 4 for fast selection
window, window 6 for common window).
NOTE:
1. Maximum 6 popup windows can be open at the same time. (If using print function, maximum
5 windows are displayed. If selecting compressed object function, maximum 4 windows are
displayed. The reason is because each of the function occupies one window.
2. One window can be opened once at the same time. Therefore, a window can’t be opened by
two direct (indirect) windows on a base window.
3. Using Function Key parts with Close Window doesn't close direct or indirect window. This is
because the on or off of the direct window is only related to the On or Off status of the bit lamp
address, while the on or off of the indirect window is only related to the data of the word lamp. The
function key couldn't change the data of the addresses to close these windows.
4. Window 0 to window 9 are used for system, such as window 4 for fast selection window,
window 6 for common window. Only from window 10 to window 1999 are available for any usage.
5. Popup window is attached on the active base window. When base window is closed, the popup
window is automatically closed. If you switch to the base window you will find the popup window
still attaching to the base window is active. (Unless there is order closed)
6.
Base screen must be full size.
7. Fast selection window doesn’t support popup window, which means that it’s not allowed to use
popup window on the fast selection window.
8. Being touched off and opened popup windows will be added on base window, all windows of
the same situation can be regarded as the set membership. So, object in common window touches
off the open window and exists all the time, unless object in common window touches off and
closes it.
4.2 Window properties
[Window Setting] prove as follows:
Name: Give each window a unique name in order to identify it.
Window No: Valid window numbers are from 10 to 1999 (1 to 10 is reserved for system).
Start Pos: If this window is popup window, the angular vertex will be located in this seat on its left.
Size: Set appropriate width and height. Set window width as full screen size (320x240 or 640x480
depending on model) if it's a base window.
Style: Tracking, Monopoly, Clipping and Coherence.
These parameter types have pointed out that one spring relation between the window and window in
close proximity to it. If there is "monopolizing" nature at a window, then when it springs, its father
will be frozen at window, and spring this at the window and show it all the time in its upper strata
the most. If there is " cutting and getting rid of " nature at a window, be then limited by its father's
window at the border of this window, that is to say that shows that the part outside its father's border
of the window will be cut down! If there is "following" nature at a window, then when the father in
this window moves at window, it will follow to move too.
Both the Clipping and Tracking must be selected on the same time.
Coherence means that there can be no windows between the calling window and this window. One
cannot be brought to the foreground without the other; both will be brought forward.
For example, window A and window B are on the base window. Generally speaking, window A is
displayed on the upper level if it is touched. However, if you mark it as Coherence, even if you
touch it, it doesn’t go to the up level and cohere to it’s calling window.
Note: The window number is not changeable after a window is created, but name, frame and
background are changeable.
Security: Set the corresponding security level to prevent unauthorized access to windows. See
Ch10. Security for further details.
Underlay window: Set up corresponding Underlay Window in the present window. Underlay
window is set only for created window. Generally speaking, shared objects can be put on it.
Frame: It's suggested to choose frame for popup window. The width of the frame can be selected: 0,
4, 6, 8, 10, 12, 14, 16. If the Frame is not set to 0, 8 colors are available for the frame.
Background: Select the background color and pattern for the window.
Modifying window properties
1). Select [Open Window] from the window menu. Highlight the target window, click on
Setting to change the properties.
2). Right click the selected window from the window Treebar and choose setting.
4.3 Creating New Windows
In the window menu, select the Open Window command/ New window. Select the window type:
Base Window or Fast selection or Common Window to create a new window or right click on an
undefined window number in the Treebar and then select Create.
Selecting appropriate types of window pops up window properties dialog. Base window is selected
here. Or right click directly on an undefined window number in the Treebar to create a new window
as the graph below.
The popup dialog of window properties shows as follows:
Fill in all properties and then click OK.
4.4 Opening Windows
After a window is created, with the open window dialog box select it from the list and double click
it or press [Open] to open the window. The windows with an * mark are already opened.
Select the window name from the window menu to enter an opened window.
Deleting windows
1. On the [Window] menu, select [Open Window], then choose the window from the list and
press [Delete].
2. Right click the window number in the window Treebar. Selecting Delete to delete the
window.
Note: A window Delete can't be executed when it's active. For example, window 11 is closed
so that you can find the Delete selection:
Window 10 is active so that you can't find the Delete selection.
4.5 Examples
The followings are some simple examples of operating the windows.
Example 1: We need to set up certain data to the register when initializing a project or an
application. We set LB0 to On and LW1 to 200 when start up window 10.
1. Create a (Set Bit Object), Device type for LB, Device address for 0. Select style [Set On at
window open]
2. Create a Set Word object, Device type for LW, Device address for 1. Select style [Set at window
open]
3. Create a Bit Lamp object, Device type for LB, Device address for 0. Select Function as Normal
to display at State 0.
4. Create a numeric data object, Device type for LW, Device address for 1.
5. The complete project shows as below:
6. Save, Compile, Off-line simulation to run the project. LB0 is set for ON, LW1 is set for200.
Reference: Ch6.1:Bit Lamp Object, 6.4:Set Bit Object, 6.5:Set Word object, 6.11:Numeric Data
Object.
Example 2: A popup window with a keypad.
In many situations, we need to input the data to the register. If we place the keyboard on the active
window, not only is it too dull to be artistic, but it also eliminates the space for designing the active
display. We use a popup direct window for solving this problem well. If we would like to input data
to the LW0.
1. Create a numeric input extend object, set Device type for LW, Device address for 0, Trigger
device for LB and address for 9000.
2. Create window 11, width is 180, height is 180.
3. Edit window 11,place a keypad in the middle of the window.
4. Create a direct window object, Device type for LB, Device address for 9069. In size, width for
180 and height for 180.
The complete project shows as below:
5. Save, compile and Off-line simulation to run the project:
6. When clicking on the numeric input extend object to input LW0, a popup keypad appears under
the object. After inputting, the keypad disappears.
Reference: Ch.13 System Bit and Register, address B9000, LB9069.
Note: In EB500, there is a default 2-digit keypad.
4.6 Windows related object
Directly-related function keys of windows: Change Window, Return to Previous, Change Common
Window, Popup Window, Jog FS-Window. Related function keys of direct window: Direct and
Indirect window. Please refer to corresponding content of [Parts].
4.7 Resource allocation of windows
MT500 uses static distribution memory to allocate the resource. Each window occupies certain fix
resource. Right click to select [System Resource] under the off-line simulation to look up the
distribution of the resource.
A base window occupies at most 400Kb, which means if you place too many objects on the base
window to exceed 400Kb, error occurs. A popup window occupies at most 350Kb, fast selection
window occupies 100Kb and common window occupies 30Kb. Please refer to [Help] in Ch.8.3.
The basic principle of window design is to select an object and set up the attributes. Place on the
display and then save the project. Please refer to Ch. 5 for basic design of windows.
Chapter 5. EB500 Getting Started
5.1 Create an Object
A window includes a lot of switch, lamp, numeric input and picture etc. Add an object to the window is
very easy, there are 3 steps procedure to create object.
Add object 3 steps.
1. Click Toolbox object icon or from menu [Object] select one object.
2. The object attribute dialog will appear. Set the object’s attribute. Example: PLC read/write address,
Shape or Bitmap and label.
3. After the attributes setting, click [OK] place the object on window. If necessary, adjust size or drag it to
new position.
5.2 ID Number
An ID number is assigned automatically to a part. The number identifies a specific part on the current
window. The programmer can not change the ID number.
BL: Bit Lamp
WL: Word Lamp
SB: Set Bit
SW: Set Word
TS: Toggle Switch
MS: Multi-state Switch
FK: Function Key
MV: Moving Shape
AN: Animation
NE: Numeric Input Extend
ND: Numeric Data
AE: ASCII Input Extend
AD: ASCII Data
BG: Bar Graph
MD: Meter Display
WP: Indirect Window
WC: Direct Window
AL: Alarm Display
AS: Alarm Scan
TD: Trend Display
XY: XY Plot
SM: System Message
RP: Recipe Transfer
EL: Event Log
ED: Event Display
5.3 Attaching a Description
If desired, a comment can be attached to a Part. This is a good practice for future referencing and useful
when deciphering a printout of project files.
5.4 Entering a PLC read or write address
The valid device type and address range depends on the individual PLC type.
Select appropriate PLC type in the system parameter menu.
The device type field will indicate all possible devices available.
EasyView internal memory:
Type
Device Name
Range
Description
Bit
LB
0~9999
Bit
RBI
0h~4095h
Local Bit
h=0~F, index address of recipe memory
Bit
RB
0h~4095h
h=0~F, absolute address of recipe memory
Bit
Ms_RB
0h~4095h
h=0~F,absolute address of Master HMI’s recipe memory
Bit
MS_LB
0~9999
Address of Master HMI’s local memory
Word
LW
0~9999
Local Word
Word
RWI
0~4095
index address of recipe memory
Word
RW
0~4095
absolute address of recipe memory
Word
Ms_RW
0~4095
absolute address of Master HMI’s recipe memory.
Word
MS_LW
0~9999
Address of Master HMI’s local memory
The RB is mapping to the same area as the RW, for example RB50..RB5F is mapping to the same location
as RW5, while the LB is mapping to the different area from the LW.
The local memory address (LB9000~LB9999, LW9000~LW9999 and RW60000~RW65535) is reserved
for system use and user shall not use them as general purpose device. Please refer ch.12 System Register.
When the recipe memory is accessed by index address, the index address is offset from its indicated
address by the content of LW9000. For examples if (LW9000)= 50, then an index address RWI 100
physically accesses the data at address RW 150 (100+50).
5.5 Selecting a Shape
Before select a shape has to select a shape library. (One shape library includes 48 shapes; each shape
includes maximum 32 states)
There are two methods to use shape. One is static shape another way is display different object states.
The static shape object methods please refer Ch. 3, 5, 6.
Selecting a shape for object:
1. Click on the [Shape] tab
2. Select [Use shape], click on [Shape Library]
3. The shape browser wills pop-up. Select a shape, click [O.K]
Click [OK], the shape will show on the object’s position.
The shapes are stored in a specified shape library (*.slb file). A maximum of 20 shape libraries can be
attached to a project. By calling up different shape libraries, useful shapes for almost any application can
be found. Users can also build up their own shape library.
Background
Allows the background field of the library objects to be changed. This is used to
see how a window’s background color affects the way a shape appears. The
background color of the shape object in the library does not follow the shape when
it is placed on the window.
Select Lib
Attach an existing library to the current project
New Lib
Attach a new (blank) library to the current project
Unattach Lib
Remove a library from the current project
Delete shape
Delete all the shapes from the selected cell
Place
Place the shape on the current window as a group of draw objects
Note: After create the new shape library or new shapes have to save project. Otherwise, the library or
shapes will lost.
5.6 Selecting a Bitmap
There are two methods to use Bitmap. One is static Bitmap another way is display different object states.
The static Bitmap object methods please refer Ch. 3, 5, 6.
Selecting a shape for object:
1. Click on the [Shape] tab.
2. Select [Use Bitmap].
3. Click [Bitmap Library].
The Bitmap browser will pop up. The Bitmap graphics are stored in a specified Bitmap library (*.blb
file). Each project is able to include a maximum of 10 Bitmap libraries. By calling up different Bitmap
libraries, a useful Bitmap library for almost any application can be found. Users can also build up their
own Bitmap libraries.
Background
Allows the background field of the library objects to be changed. This is used to see
how a window’s background color affects the way a bitmap appears. The
background color of the bitmap object in the library does not follow the bitmap
when it is placed on the window.
Select Lib
Attach an existing library to the current project
New Lib
Attach a new (blank) library to the current project
Unattach Lib
Remove a library from the current project
Add bitmap
Add Bitmap graphics to the specified cell
Delete bitmap
Delete Bitmap graphics from the selected cell
Export
Save the Bitmap to a file with *.bmp format
Note: After create the new shape library or new shapes have to save project. Otherwise, the library or
shapes will lost. After deleting, when there is Bitmap used in this Library in the procedure, the
corresponding position in the procedure will no longer show corresponding Bitmap, but show the blank
figure , and even choose this Bitmap Library again, the corresponding position will no longer show this
Bitmap, only reselect corresponding Bitmap for this component and can show Bitmap again .
4. Click [OK]
5.7 Creating Labels
A label means the text characters shown on the face of the Switch, Lamp or other objects (Parts).
Adding a label to a Part
1. Click on [Label] tab
2. Select Attributes for the part.
3. Select the state to label.
4. Type the state’s label in the Content box.
5. Click [OK].
State
States are displayed only for those parts with multiple states. The text displayed for each state can be
set independently. Simply select a state in order to set its text, font, color and alignment.
Font
A variety size of font is available – 8, 16, 24, 32, 48, 64, 72 and 96.
Alignment (Justification)
When the text input for a Label becomes more than two lines, the alignment can be defined as left,
right or center justification.
Color
A maximum of 32 from 256 colors are available for selection, the “basic” palette includes the most
commonly used colors. The “customized” palette allows the user to customize his preference color
palette.
Select color icon to customize the palette
Content Box
Type in the characters to be displayed on the button in the Content Box. The “ENTER” key can be used
to move to the next line if desired.
Position
Once the Part is placed on the screen, the Label can be moved anywhere within the boundary of the
object. Just click on the label and drag the mouse to move it to the desired position. Toggle through the
state designator to display the predefined label in each state.
Use label
Determine whether to show the content of labels or not.
Tracking
When there is state of the label can use the label as moves a certain state of the decision to count at
over 1 o'clock, whether other labels follow this label to move together. Choose [follow], this all labels
of component will show in the same position.
5.8 Task Button
The EasyView 500 provides a method to pop up (maximize) or icon-ize (minimize) child windows and
change window displays.
There are 2 Task buttons, a control Fast Selection Window, another control Window bar.
Whether set up the use of Task Button or not in [General] of the system parameters, attribute, such as the
color, the position, etc.
If “Task button” is enabled, pressing the right-hand task button will pop up a fast selection window. The
fast selection window can have several function keys (placed on it by the user) to change to different
windows. Since the fast selection window is global to all windows, it can be called up at any time. To
change windows, press the function key that targets the destination window. This avoids the tedious
search and find process. The Window Bar accommodates up to six window icons. Double-clicking the
minimize icon of a window will icon-size the corresponding window. Clicking it again will return the
window to its original location and size.
Fast Selection Window
Window bar
The Task Button for
Window bar and Fast
Selection Window
Task Bar can include 6 window icons at the same time at most. Doubling click and minimizing icons can
minimize corresponding pop up window , clicking again can resume to the original state at the window in
this icon. Can minimize this window on Window bar when one popup window contains [Minimize
window] and [Window bar] with the function key. Can consult [Parts ] /[Function key ] some content.
Procedure to Setup Task Buttons
1. On [Edit] menu
Select [System Parameter]. Set [Task button] as Enable. Set the position of the task buttons to the left or
right side of the window.
Note: The task buttons will be visible at run time in the lower right or left corner of the display. The Task
buttons are not visible when editing a window.
2. Click on the General Tab. Select the different drop downs to determine how the task bar will appear.
Then, in the [Window] menu
Select [Open Window]
Press [Task button], then press [Window] or [Screen] buttons to customize how the Fast select button or
Window bar button will look.
3. Fill in the blanks of the Fast Window and Window Selection dialog
The Fast Window dialog has the settings for the button that controls the bar where window icons are
displayed.
The Window Attribute dialog has the settings for the button that controls the popup Fast Window.
Style: Set “Fast” or “Slow” to control the pop up speed.
Shape: Define the shape of task button or window button just as you would any other button object.
Label: Place a customized label on the task or window button.
4. The Screen dialog has the settings for the button that controls the popup Fast Window.
Attribute: Show speed: Set “Fast” or “Slow” to control the pop up animation speed.
Shape: Select a shape for the Screen or Window button just as you would any other button object.
Label: Place a customized label on the task or window button.
5.9 Shape Library
Open a window and Draw the graphics by using the drawing tools in the EB500 program. For example,
the following graphic uses the line and rectangle tools.
Select the whole graphic by using the arrow tool and dragging a rectangle around it. White handles should
appear on all of the selected objects.
In the Library menu select [Shape] Æ [Save to library] or click the
tool.
Can choose this Shape Library first when need to use this Shape , then choose this Shape directly.
In [Option ] /[Window Property ],use [Function key ] it make by Shape Library it select, the following
picture shows:
If has not selected this function , while making the picture pursueing to be drawn and storing to Shape
Library, Shape will be combined for the coordinate of the picture for the coordinate of selecting the
picture at present.
Store the picture done well to Shape Library, Shape got is as follows:
Now, select Using Function key to make Shape Library.
Create a Function Key object under shape. Select shapes and Function Key, save to Shape Library.
The Shape Library’s boundary will be equal to the Function Key’s boundary, but the Shape Library
doesn’t include the Function Key Object.
Shape Library SYS Button and SYS_Shape is system library.
5.10 Bitmap Libraries
1. On [Library] menu, select [Bitmap]/select [Call up Library].
2. Click on the Add bitmap… button, the following dialog box pops up. Fill in cell no. (Bitmap no. to
save imported graphics), assign a name (up to 8 characters) to the bitmap and enter the number of states
the bitmap is to have.
All states must be assigned a bitmap. When done, click on Next button.
Push [Finished ], such a Shape with 2 kinds of states is added to Shape Library.
Several points about [Get Bitmap Graphics ] the communication frame are explained:
1. One color of the bitmap can be selected as transparent.
To make a color transparent simply select the Transparent check mark and then click anywhere in the area
to be made transparent.
Click on Finished when final selection is made. The graphic importer will guide you through each state to
get and install BMP graphics. The Back button can be used to review the entered bitmaps.
Can see , the background color of the car has already disappeared, has regarded this Bitmap as static
Bitmap and shown on the screen, its result is as follows:
This is useful for eliminating background colors.
2. [Compressed ] can compress this Bitmap to deal with , can reduce the memory body taken up.
The example figure shows after being compressed as above, its size turns from 12036 Byte into 7474
Byte. Certainly, the space taken up after some figures are compressed becomes great instead, should not
compress this component at this moment.
3. Bitmap introduced is limited as follows:
Its several colors support 2 colors , 16 colors or 256 colors. The size of the figure introduced can't exceed
640*480 (W *H ) .
Bitmap Library SYS Button and SYS_Shape is system library.
5.11 Group Library
“Group Libraries” enable multiple parts and drawing objects to be combined and saved, and then called
up whenever necessary. The Group objects saved in these libraries can be viewed and selected using the
Browser function. Since groups of objects may include parts that refer to Shape or Bitmap graphics, the
related Shape and Bitmap libraries must be attached to the project before calling up group objects.
Click on the Select Lib… button. A Standard Dialog Box for selecting a file appears. Select the name of
the Group library to be opened.
Adding a Group to a Library or save an item to Open a window and Draw the graphics by using the
drawing tools. Also add any parts such as lamps, function keys, etc. For example, the group shown to the
left uses shapes, bitmaps, a numeric part and rectangle tools.
1. Save group of object to a Group library
Use arrow tool to select all the candidate objects on the window.
Then, in the [Library] menu, select [Group]/[Save to library] or click
icon. The dialog will appear.
Select the appropriate Group library, fill in the Description and Group No, click OK and the selected
objects are saved to the group library.
[Group Library ] the content is as follows:
Library Name: Select the group library from the dropdown list.
Including library: Specifies the related Shape and Bitmap libraries for that group of objects. If the related
Shape and Bitmap libraries are not included with the project, the group objects will be displayed as
boundaries of shapes and/or bitmaps. To correct this, go to the Shape and Bitmap libraries dialogs and
open the required libraries.
Select Lib…: A Standard Dialog Box for selecting a file appears. Select the name of the Group library to
be opened.
New Lib. … : A Dialog Box for entering a file name appears. Enter the name of the group library to be
created.
Place: Select the group of objects and place it on the screen.
Unattach Lib.: Remove the library from current project.
Delete: Delete the selected group library.
Close: Close the group library dialog.
2. Call up the group of object from a Group library
In the [Library] menu, select [Group]/[Call up library] or click
icon. The dialog will appear.
Select the group, click [Place…]. The objects on the current window.
5.12 Label Library
From EB500 V2.5.0 add multi-language function, the multi-language use Label Library to realize
this function. Please follow these step:
1. Open Label Library: Click menu [Library]/[Label Library] open Label Library Dialog.
2. Setting Label Library
State No.: Select the state No. to display each state’s context.
Label Name: User’s define Label name.
State No.: State Number, range is 0~31, total 32 states.
Language 0 ~ Language 3: User’s define 4 different language message.
Add…: Add a label to label library.
Modify…: Modify the label that already in Label Library.
Delete …: Delete the label library.
Exit: Exit Label Library dialog.
Click [Add…], a appear the dialog:
In this dialog, set the label name and total state number.
Click [OK], the Label Library will more one label. Select this label, click [Modify…]. The Label Content
Setting dialog pop up:
This dialog able to edit each state, each language content.
3. Operating Multi-Language fuction:
If the EB500 objects has label attribute, it can use Label Library. The following example use Word Lamp
object:
Select Use Label Library box
Label Index: Select the label that already define in Label Library. It was enabled by selected Use Label
Library box.
Use Label Library: Select this box to enable use Label Library.
Label Library…: Click [Library] to open Label Library.
After the Word Lamp setting, use System Register LW9130 to change the different language.
LW9130(Multi-Language change):
LW9130=0;Display label library, language 0 content text.
LW9130=1;Display label library, language 1 content text.
LW9130=2;Display label library, language 2 content text.
LW9130=3;Display label library, language 3 content text.
LW9130>3;Still display label library, language 0 content text.
5.13 Tag Library
Software V2.5 adds a new capability for supporting address tags. This capability can translate all
required addresses into specific tags. In the project, a tag is used to represent a particular address
and users can make use of the tag library to utilize this capability. Procedures of usages are
described as below:
1. Opening the tag library:Select [Library]-> [Tag…] to open the tag library.
2. Setting the Tag Library
[Add …]: Adding a new address tag to the tag library
[Delete]: Deleting an existing address tag in the tag library.
[Modify…]: Modifying the contents of an existing address tag in the tag library.
[Exit]: Exit the tag library dialog
After pressing [Add…] or [Modify…] button, a dialog appears shown as below:
[Tag Name]: English or Chinese character can be used to identify an available register or a PLC
Addresses. Maximum length of an English tag name’s characters is 10 and maximum length of a Chinese
tag name’s characters in is 5.
[Address Type]: An address type is Bit or Word.
[Device Type]: Selecting a device type to set relative device type or address.
[Address]: Defining an address.
After pressing [OK] button, a new address tag is added into the tag library.
3. Usages of the tag identifications
Objects, possessing an address attribute, can use the tag library in EB500.
Now usages of the tag library are described as below for a Multi-States object.
A new [Tag] item is found in general page of a object attribute dialog:
If this [Tag] item is checked, users can select an existing tag in the tag library for a particular
address.
Notification:
Not only addresses can be used clearly and directly through a tag library, but also it is convenient
and practical for modifying some partial addresses after completing a project. (When a
purpose-built address must be changed, it is unnecessary to modify this address on all relative
dialogs, and users only correct this address in the tag library.)
5.14 Compressing Project
After a project is set up successfully, it can duplicate in other computers , or store to other catalogues .
Will meet 2 questions at this time. One is all kinds of problem of the file . But present hard disk space is
all bigger, so this question is not big . One is that this project may use a lot of Shape Library or Bitmap
Library , an impossible one users will go to find these picture libraries that it use to duplicate with this
project file afterwards, so EB200 offers and compresses the function. It is smaller that it can make the
project file compress , and all picture library files(Shape Library or Bitmap Library,etc.) applied this
project to are compressed into *.cmp for one with project file . In this way , can utilize and deserve .
*cmp file comes to transmit the project file . Only have to decompress it when use this project file , all its
storehouse files used will be decompressed to the acquiescence route too.
The course compressed and decompressing is as follows:
Select the menu [Tools]/[Compress/Uncompress], the dialog pop up:
Use the [Browse] feature to find the project to compress. The Destination name is automatically assigned.
This name can be changed by the user.
Click [Compressing…] button to begin the compression process.
The picture show: the project compress to demo.comp.
Decompiling procedure like Compressing. Browse for the project to decompile. The Destination name si
automatically assigned, but can be changed. Click [Decompile] to begin the decompile process.
If the library already exists, the dialog will appear. Select [Yes to all] to replace the existing file.
Chapter 6 Object
Object is designed for meet the specific demand, generally speaking one object realizes a function,
but some object must finish the specific function with the assistance correlated with Object or PLC.
The following form shows:
Object
Correlate Object
Explanation
Numeric Input Extend
Function Key
The keyboard is created by the function
key
ASCII Input Extend
Function Key
The keyboard is created by the function
key
Indirect Window
Window
Window that has already been created
Direct Window
Window
Window that has already been created
Alarm Scan
Alarm Display , Alarm Bar
Alarm information show by the alarm
display or alarm bar.
Alarm Display
Alarm Scan
Show the information from "Alarm Scan"
Alarm Bar
Alarm Scan
Show the information from "Alarm Scan"
Trend Display Plot
Data Transfer
When the project has a lot of "Trend
Display Plot", can cooperate with " Data
Transfer " component , raise and pursue
the renewal speed of surface
Event Log
Event Display
Shown the information of log-in by "
Event Display "
Event Display
Event Log
The information shown is logged in by "
Event Log "
PLC Control
PLC
PLC procedure controls the operation of
the function
Most object support "bit" or "word" address type (only "Numeric Input Extend" can operate double
word) ,because some PLC has "Double words" address type ,so some driver of PLC will "Double
word" is it change to make with " word ", user is it pay special attention to operation instructions,
PLC of driver to need.
6.1 Bit Lamp
A Bit Lamp displays the ON or OFF states of a designated PLC address. If the bit status is
OFF, the state 0 shape is displayed. If the bit status is ON, the state 1 shape is displayed. The
corresponding label is also displayed if Use Label is enabled.
Procedure to place a Bit Lamp
1. Click Bit Lamp icon, the following popup dialog displays:
2.
Fill in General Tab Items:
Description: A reference name that you assign to the Bit Lamp. (not displayed)
Read Address: PLC location address of "Bit Lamp"
Attribute:
Normal:
only the corresponding shape is displayed which doesn't blink.
ON Blink State 0 or 1:
Show the figure of 0 as "Read Address" state ,for OFF ;Show the figure of 1 as the state ,for
ON. And show the result of blinking , the frequency glimmers set up from "Break time".
3. Click the Shape Tab: Select a shape or a bitmap to display the corresponding OFF and ON
states.
4. Go th the Label Tab and fill in Attribute and Content fileds for corresponding OFF and ON
states.
5.
Click OK.
6.2 Word Lamp
A Word Lamp changes state according to the value in the designated word address of PLC. If
the value equals to 0, the first shape is displayed. If the value equals to 1, the second shape is
displayed, and so on. The corresponding label for the state is also displayed if “Use Label” is
checked.
PLC
addrwss 0
PLC
addrwss 1
PLC
addrwss 2
Procedure to place a Word Lamp
1. Click Word Lamp icon
2.
Fill in General Tab Items:
Description: A reference name that you assign to the Word Lamp. (not displayed)
Read Address: PLC Word that controls the Word Lamp state, shape and label.
Data format: Defines data from the controller as BIN or BCD
No. of states: Appoint all quantity of states.
3.
Go to Shape Tab. Select Shape or bitmap to display the corresponding states.
4.
Go to Label Tab. Fill in text.
5. Click OK to place the word Lamp on the window. Position the word Lamp and resize it if
necessary. Adjust the label position as desired.
Data format types
BIN (binary format) Decimal numbers are encoded by bit weight
15
14
13
12
11
10
9
8
7
6
5
4
3
2
1
15
14
13
12
11
10
9
8
7
6
5
4
3
2
1
2
2
2
2
2
2
2
2
2
2
2
2
2
2
2
0
2
0
BCD (binary coded decimal format) Decimal numbers are encoded by bit weight per 4-bit nibble
15
14
13
10
12
11
10
3
9
10
8
7
6
2
5
10
4
3
2
1
10
1
0
0
Examples:The Read address raw data is (10010100)BIN=
7
6
5
4
3
2
1
0
1*2 +0*2 +0*2 +1*2 +0*2 +1*2 +0*2 +0*2 = 128+16+4 = (148)DEC
1
0
The Read address raw data (1001 0100)BCD = 9*10 + 4*10 =(94) DEC
6.3 Set Bit
The Set Bit Part defines a touch area, that when activated, changes the ON or OFF state of a
specified bit.
Y0
Y0
Procedure to place a Set Bit
1.
Click Set Bit icon
2.
Fill in General Tab:
Description: A reference name that you assign to the Set Bit Part. (not displayed)
Write Address: Address of PLC that is acted on by the Set Bit action.
Style: Consult the attached list of this festival.
3.
Go to Shape Tab. Select Shape or Bitmap to display graphics that represent the touch area.
4.
Go to Label Tab: Fill in fields to denote states.
5.
Click OK .Position the Set Bit part and resize it.
Set Style Functions
Set Style
Description
ON
When the Set Bit Part is pressed, the designated Device address is turned
ON. The state continues (keeps ON) even after release.
OFF
When the Set Bit Part is pressed, the designated Device address is turned
OFF. The state continues (keeps OFF) even after release.
Toggle
Every time the Set Bit Part is pressed, the designated PLC bit is
complemented (ON->OFF, OFF -> ON)
Momentary
When the Set Bit Part is pressed and keep holding, the designated Device
address is turned ON, Whether when the Set Bit Part is freedom, the
designated Device address is return OFF.
Set ON at window
open
When the window containing this Set Bit Part is opened, the designated PLC
address is turned ON.
Set OFF at
window open
When the window containing this Set Bit Part is opened, the designated PLC
address is turned OFF.
Periodical toggle
Changes the state of the designated bit at a regular interval as selected in the
Interval dropdown.
Set ON at window
close
When the window containing this Set Bit Part is closed, the designated PLC
address is turned ON. (the operation is suitable for Local Bit (or LW)
Set OFF at
window close
When the window containing this Set Bit Part is closed, the designated PLC
address is turned OFF. (the operation is suitable for Local Bit(or LW)
Set ON at window
maximized
When the window containing this Set Bit Part is maximized, the PLC
Device address is turned ON.
Set OFF at
window
maximized
When the window containing this Set Bit Part is maximized, the designated
PLC address is turned OFF.
Set OFF at
When the window containing this Set Bit Part is minimized, the designated
window minimized PLC address is turned OFF.
Set ON at window
minimized
When the window containing this Set Bit Part is minimized, the designated
PLC address is turned ON.
Set ON at
backlight off
When the backlight is turned off, the designated PLC address is turned ON.
Set OFF at
backlight off
When the backlight is turned off, the designated Device address is turned
OFF.
Set ON at enter
success
When a function key with the ENT attribute is pressed in response to a
Numeric Input or ASCII Input part and the attempt to write the data
succeeds, the designated PLC address is turned ON.
Set OFF at enter
success
When a function key with the ENT attribute is pressed in response to a
Numeric Input or ASCII Input part and the attempt to write the data fails, the
designated PLC address is turned OFF.
6.4 Set Word
The Set Word Part defines a touch area that when
activated you can write a predefined value (constant) to the
designated PLC address.
Procedure to place a Set Word
1.
Click Set Word icon
2.
Fill in General Tab content:
Description: A reference name that you assign to the Set Word (not displayed)
Write Address: Word in the HMI/PLC that is affected by the Set Word control. Data in the
register may be interpreted as Binary or BCD information. (See note on Word Lamp Part)
Set Style: Please refer to the following graph.
3.
Go to Shape Tab: Select Shape or Bitmap to display graphics that represent the touch area.
4.
Go to Label Tab: Fill in fields to denote states.
5.
Click OK, position the Set Word part and resize it if necessary.
Set Style Functions
Set Style
Description
Set constant
When pressed, preset Set value data is written to the designated PLC device
address.
Add Value(JOG+)
Every time pressed, the Inc. value is added to the designated word If the
result is not larger than Upper limit
Sub Value(JOG-)
Every time pressed, the Dec. Value is subtracted from the value of the
designated word if the result is not less than Bottom Limit.
JOG++
When pressed, the Inc. value is added to the designated word at regular
intervals as specified by JOG delay and JOG speed it the result is not larger
than Upper limit.
JOG--
When pressed, the Dec. value is subtracted from the value of the designated
word at regular intervals as specified by JOG delay and JOG speed if the
result is not less than Bottom limit.
Set at window
open
When the window containing this part is opened, the Set value data is
written to the designated word.
Periodical JOG++
This Attribute becomes active automatically when the window is active. The
Inc. value is added to the designated word, if the result is not larger than
Upper limit. Once the upper limit is reached or exceeded, the value returns
to zero and incrementing begins again.
T
0
V+K
Upper limit
NO
YES
Periodical JOG--
This Attribute becomes active automatically when the window is active. The
Dec. value is subtracted from the designated word, if the result is not less
than Bottom limit. Once the bottom limit is reached or exceeded,
decrementing stops.
Upper
Limit
T
V-K
Bottom
Limit
NO
Set at window
close
Set value data is written to the designated word automatically when the
window containing it is closed. The function is effective for LW (Local
Word) and LB (Local Bit)
Periodical bounce
This Attribute becomes active automatically when the window is active. The
Inc. value is added to the value of the designated word until the Upper limit
is reached. Then the Inc value is subtracted from the designated word until
zero is reached. This cycle is repeated until the window becomes inactive.
T
0
V+1
NO
NO
YES
YES
0
Step up
Upper
Limit
V-1
This Attribute becomes active automatically when the window is active. The
value is incremented by 1 at regular intervals as specified by the Break time
until the High limit is reached. Then the value is reset to the Low limit.
Low
Limit
T
V+1
High
Limit
NO
YES
Step down
This Attribute becomes active automatically when the window is active. The
Value is decremented at regular intervals as specified by the Break time until
the Low limit is reached. Then the Value is reset to the High limit.
High
Limit
T
V-1
Low
Limit
NO
YES
Set at window
maximized
Set value data is written to the designated word automatically when the
window containing it is maximized.
Set at window
minimized
Set value data is written to the designated word automatically when the
window containing it is minimized.
Set at backlight off
Set value data is written to the designated word automatically when the
backlight is turned off.
Note: T= the periodic action
V= the data in the register
K= the increasing (decreasing) parameter
6.5 Toggle Switch
The toggle switch is a combination of Bit Lamp and Set Bit. It
represents the ON/OFF status of a PLC bit address, and defines a
touch area, when activated; it can put the corresponding location
address as ON or OFF.
Procedure to place a Toggle Switch.
1. Click Toggle Switch icon
2. Fill in General Tab:
Description: A reference name that you assign to the Toggle Switch. (not displayed)
Read address: Bit that controls the Toggle Switch state, shape and label
Write address: Bit that is affected by the Toggle Switch Set Style.
Switch style: See Switch Style Functions below.
3. Go to Shape Tab: Select Shape or Bitmap to display graphics that represent the touch area.
4. Go to Label Tab: Fill in fields to denote states.
5. Click OK to place the Toggle Switch part on the window. Position the Toggle Switch part and
resize it.
Switch Style Functions
Switch Style
Description
ON
When the Set Bit Part is pressed, the Write address is turned ON. The
state is the same even after release.
OFF
When the Set Bit Part is pressed, the Write address is turned OFF. The
state is the same even after release.
Toggle
Every time the Set Bit Part is pressed, the Write address state is changed
one time (ON OFF, OFF
ON)
Momentary
Only while the Set Bit Part is pressed, is the Write address turned ON.
When the switch is released, the Write address is turned OFF.
6.6 Multi-State Switch
The Multi-State Switch is a combination of
Word Lamp and Set Word. It displays a different
state depending on the value of the PLC monitor word address (maximum of 32 states) It also
defines a touch area that when activated, writes a specified data to the PLC word address, which
may be the same as or the different from the Read address.
Procedure to place a Multi-State Switch
1. Click Multi-State Switch icon
2. Fill in General Tab:
Description: Reference text assigned to the Multi-State Switch (not displayed).
Read Address: Word in the PLC that controls the Multi-State Switch state, shape and label. Data
in the register transfer to Binary or BCD format.
Write Address: Word in the PLC that is controlled by the Multi-State Switch Style. Data in the
register transfer to Binary or BCD format.
No. of words is restricted to 1.
No. of states: The number of states is restricted to a maximum of 32 states. The value of 1 means
one state only.
3. Go to Shape Tab: Select Shape or Bitmap to display word states.
4. Go to Label Tab: Fill in fields to denote states.
5. Click OK to place the Multi-State Switch part on the window. Position the Multi-State Switch
part and resize it.
Switch Style Functions:
Set Style
Description
JOG+
The value in the designated write address is increased by one when the
Multi-State Switch is pressed. If the value is equal to the No. of states, o
is returned to the register.
JOG-
The value in the designated write address is decreased by one when the
Multi-State Switch is pressed. If the value is equal to zero, -1 is returned
to the register.
6.7 Function Key
Function key is used for changing windows, inputting numeric or ASCII codes, maximizing,
minimizing or moving windows, designing message board or printing, etc.
Procedure to place a Function Key
1. Click Function Key icon
2. Fill in General Tab Items:
Description: Reference name assigned to the Function Key ( not displayed).
Function: Select the type of function.
3. Go to Shape Tab:Select Shape or Bitmap to display function key that represent the touch area.
4. Go to Label Tab: Fill in fields to denote states.
5. Click OK to place the Function Key on the window. Position the Function Key part and resize it.
6.7.1 Change Window
If the function key is set as “Change Window”, when the function key is pressed (activated), the
current window display (including the child windows of the current window) terminates and
changes to the window designated by “Window No.”
6.7.2 Return to Previous
This function terminates the existing window and recalls the last active window. It’s valid to Base
window.
For example: If window 21 was replaced by window 32, and window 32 has a function key defined
as Return to previous, then ,when it is pressed, window 32 is terminated and window 21 is
displayed.
6.7.3 Change Common Window
If the function key is set as “Change Common Window”, when the touch area is pressed, the
current common window display is replaced by the new common window designated.
6.7.4 Window Bar
A function key defined with “Window Bar” attribute is used to move the position of a window on
the screen. A Popup window can make use of this function. The window is moved by touching the
window bar area then touching a second position, the window is moved to that place.
6.7.5 Minimize Window
When the function key is pressed, the window is minimized to an icon in the task bar. A touch on
the window’s icon returns to the original window.
Note: The Minimize Window function works only if when [Task button] on [System
Parameters]/[General] is open.
6.7.6 Popup Window
If the function key is set as “Popup Window”, when the touch area is pressed, the window
designated by Window No is displayed on top of the base window. The existing window(s) are not
closed.
6.7.7 Close Window
This is the method for operators to close Popup Windows, but not for direct or indirect window,
This is because opening or closing the direct( indirect ) window is controlled by the bit( or word)
while Close Window function key only closes the popup window but not to control the data in the
register.
6.7.8 JOG FS-Window
This function changes the popup window that appears when the Fast Selection, Task Bar button is
pressed. The changed window should be the same size as the Fast Selection window (window No
4).
We have already finished introducing the function key which has controlled the window, have now
let us make an example which control the window.
1. Create a new project, and save it.
2. Create Fast Select Window 4, Common Window 6, Basic Window 11, Basic Window 12, the
Basic Window 13, Basic Window 14 separately, Window 12 sizes same as Window 4 (here (100,
350)), Window 14 want smaller than Base Window size 14 (here (640, 480)).
3. Put 3 function keys on Window 4, namely 2 [Change Window] the function key is differentiated
and can be switched over to Window 10 and Window 11, the function key of one [JOG
FS-Window], can switch over to Window 12. As the picture shows:
4. Put a text object at Window 6; show the text as “Common Window 6"
5. The Window 10 put one text object, show text as "Basic window 10", and two function key one
of [Return to Previous], the other one for [Popup Window], the second window can popup Window
14. As the picture shows:
6. Put a text object at Window 11, show text as "Basic Window 11", and one function key of
[Return to Previous].
7. Put the function key of one [JOG FS-Window] at Window 12, can switch over the function key
of 4 , 2 windows [Change Common Window], switch over to Window 6 and Window 13
respectively. As the picture shows:
8. Put a text object at window 13, show text as "Common Window 13"
9. Put a Window Bar at window 14, show the content in order to "Popup Window 14", and 2
function keys of [Minimize Window] and [Close Window].
10. Finish setting up, [Save], [Compile], [Online/Offline Simulator] or [Download], can show the
result in the picture.
11. Push [Return] after use the button to switch over from Window 10 to Window 11 in the Fast
Select Window, will return to Window 10, the ones that push [Return] in Window 10 will return to
Window 11.
12. Push [Popup Window] in Window 10, will spring Window 14. (You can operate to the thing that
it moves, minimizes, closes etc.)
13. Choose [Fast Window 2] in Fast Select Window, will switch over to the 2nd Fast select window.
14. Push [Common window 2 or 1], can switch over and show the Common Window.
6.7.9 Character Codes and Creating a Keypad
A keypad is composed of a variety of function keys with different ASCII codes (0, 1, 2…..and a, b,
c…..) and special keys “ENT” (Enter), “BS” (Backspace), “CLR” (Clear) and ”ESC” (Escape).
Since any character can be assigned to a function key, specialized keypads can be made for any
application. Keypads are used with the Numeric and ASCII Input Parts to change their values.
How to create a typical Numeric keypad?
1. By creating one function key then duplicating it, changing its character code 0, 1, 2, 3, 4, 5, 6, 7,
8, 9, ENT, BS, CLR and arranging the keys in a regular pattern, a keypad can be created as below:
FK_0 is created as following:
Other function key (FK_1~FK_14) are set for: ASCII(2)~ASCII(9),ASCII(0),ENT,CLR,
BS,-,"."
2. Create Numeric Input object:
After creating, [Save], [Compile], [On-line(Off-line) simulation] or [Download], the display
shows as below. When Numeric Input object is activated, function keys (FK_0~FK_14) become
Numeric Input keypad.
6.7.10 Message Board
Please refer to Ch.9.
6.7.11 Print
Please refer to Ch.11 [Print]
6.8 Moving Shape
The Moving Shape tool is used to place an object in a window at a location specified by the
PLC. The state and then absolute location of the shape in the window depend on the current values
of three continuous PLC registers. Generally speaking, the first register controls the state of the
object and the second one controls the horizontal position (X), and the third one controls the vertical
position (Y).
Procedure to place a Moving Shape
1. Click Moving Shape icon
2. Fill in General Tab Items:
Description: A reference name that you assign to the Moving Shape. (not displayed)
Read Address: Word in the PLC that controls the Moving Shape state, position and label.
Attribute: see the table below.
3. Go to Shape Tab: Select Shape or Bitmap to move and display states.
4. Go to Label Tab: Fill in fields to denote states, if desired.
5. Click OK to place the Moving Shape on the window (x=1, Y=0) and then position and resize it.
Attribute Functions
Up to 32 different states can be assigned to the Moving Shape Part. The Read address should be 0
when the state is set to 1 or the object isn’t displayed. The corresponding address of Read address
from 0~31 is from 1~32. Position is controlled by the Read Address Device as shown in the table
below. (X for horizontal axis; Y for vertical axis)
Control by PLC
X
Y
X&Y
Read Data
Two words
Two words
Three words
Read Address
Shape or Bitmap State
Shape or Bitmap State
Shape or Bitmap State
Read Address+1
X position
Y position
X position
Read Address+2
-
-
Y position
When scaling is used, scaling is performed as follows:
Display value = [(reading value – Input min) / (Input max – Input min)] * (Scaling max – Scaling
min)
When reverse scaling is used, scaling is performed as follows:
Display value = [(Input max – reading value) / (Input max – Input min)] * (Scaling max –
Scaling min)
Possible selections:
Style Functions:
X axis only
The Moving Shape object Only move horizontally on X, on the
same time Input max (or min) isn't result. The first register records
the state of the object and the second one records the position.
Y axis only
The Moving Shape object Only move vertically on X, on the same
time Input max (or min) isn't result. The first register records the
state of the object and the second one records the position.
X & Y axis
The Moving Shape object move on the both X and Y, on the same
time Input max (or min) isn't result. The first register records the
state of the object and the second one records the position of X
and the third one records the position Y.
X axis w/ scaling
The Moving Shape object Only move horizontally on X, the
corresponding moving position is set up by inputting data and
proportion. ( If the 0~1000 of PLC is read but you want the
corresponding position is 0~640, the values of Input low and Input
high can be set for 0,1000 and the values of Scaling low and
Scaling high can be set for 0,640) The first register records the
state of the object and the second one records the position.
Y axis w/ scaling
X axis w/ reverse scaling
The Moving Shape object Only move vertically on Y, the
corresponding moving position is set up by inputting data and
proportion. ( If the 0~1000 of PLC is read but you want the
corresponding position is 0~480, the values of Input low and Input
high can be set for 0,1000 and the values of Scaling low and
Scaling high can be set for 0,480) The first register records the
state of the object and the second one records the position.
Move the direction contrary to(X axis w/ scaling)
Y axis w/ reverse scaling
Move the direction contrary to(Y axis w/ scaling)
6.9 Animation
The Animation Part is used to place an object on the screen at a specified location determined
by a predefined path and data in the PLC. The state and the absolute location of the shape on the
screen are controlled by current reading value of two continuous PLC registers. Typically, the first
register controls the state of the object and the second controls the position along the predefined
path. When the PLC position register changes value, the shape or bitmap jumps to the next position
along the path.
Preserving the route
The figure will be moved in
corresponding preserving the route.
Procedure to place an animation
1. Click Animation icon
2. Click on screen to define the path and stopping points (points of track) for the object to travel.
Right-click to end the setting.
3. Double click the animation object to edit Attributes.
4. Fill in General Tab:
Description: A reference name that you assign to the Animation. (not displayed)
Read Address: Word in the PLC that controls the Animation state, position and label.
[Read Address +1] is the word address to control the position. The data in the register is defined
as Binery or BCD format. The number is limited to 2 here.
No. of states: Select the total number of states for the object. This determines what state of the
shape or bitmap is displayable at stops along the path.
5. Go to Shape Tab: Select Shape or Bitmap to move and display states.
6. Go to Label Tab: Fill in text to denote states.
7. Go to the Profile tab:
The Profile tab settings shows as following:
Position: The location of the upper left-hand corner of the Animation area.
Size: The dimensional area on the screen that the outside edge of the path occupies.
Shape Rect. Size: The area of the shape or bitmap that is used in the Animation.
Points 0 (1,2,3….) : The track can be repositioned by selecting the point number. Point 0 is the
first point of the path, point 1 is the second point of the path and so on. X, Y are the
corresponding coordinates.
8. Click OK to complete the setup.
Assign the read address:
Read Address
Shape or Bitmap State
Read Address+1 The potision number on the predefined path.
The following is an example of an animated object:
Add an animated object as following:
Read Address:LW1 (bin format)
No. of state:4
Shape selection:
State 0
State 1
State 2
The predefined path as below:
State 3
(1)When LW1=0,LW2=0:
(2)When LW1=1,LW2=1:
(3)When LW1=2,LW2=2:
(4)When LW1=3,LW2=3:
6.10 Numeric Input Extend
A Numeric Input Extend Part displays the current reading of a designated PLC register data
and the data in the register can be changed by keypad. If the Trigger address bit is active, when the
area of the shape is touched, a flashing cursor indicating input via keypad is activated. Use an
already displayed keypad made of function keys to enter numeric data to the PLC register.
Show present
number value
Activate touch area
Use the customized keyboard data-in
Procedure to place a Numeric Input Extend
1. Click Numeric Input Extend icon
2. Fill in General Tab Items:
Description: A reference name that you assign to the Numeric Input Extend. (not displayed)
Read Address: Word in the PLC that is displayed and modified by the Numeric Input Extend
Tab.
The data is changed to Binary or BCD format (Please refer Word Lamp). The number here is
limited to 1 (16 Bits) or 2 (32 Bits).
Trigger Address: Bit in the PLC that controls the ability to enter data into the Read Address. If
bit is OFF, data entry is disabled.
3. Fill in Numeric Tab items:
Display: Control the format of the data display. See the context as below.
Numeric: Set up the position of the Decimal point and the Max. and Min value.
4. Go to Shape Tab: Select Shape or Bitmap to enhance the effect of the display.
5. Fill in Numeric Tab items: Set up the Font, Color and Align of the display.
6. Click OK to place the Numeric Data part on the window.
The format of the numeric display:
Decimal:
For Raw data Display, the reading value is displayed in its original value as a decimal number
in the range two attributes appear after selecting the decimal system:
Raw data display: Display the raw data and arrange the data according to the No. below
Dec. If the No. below Dec. is 2, the number“14561"displays as145.61.
Do conversion: The reading value is converted to engineering units before display.
Scaling is performed as follows:
(Reading value–Input min) * (Engineering max–Engineering min)
Display value = Engineering min+
(Input High – Input min)
The changing value will show the data according to the establishment of "No. above Dec." and
"No. below Dec.". For example if the number as 123.456 but No. below Dec. =2, No. above
Dec. =3, number value shows that as "123.45", the last datum has been removed after
changing.
Example: If the range of the input data is 0~1000, and the value written in the PLC is 0~100
(namely for relation of 0.1 times), should set up as follows:
Input lower limit =0, Input upper limit =100, Engineering low =0, Engineering high =1000, the
following picture shows:
Hexadecimal: The number is displayed in hex (0~9, A~F) format. Scaling is disabled.
Binary: The number is displayed in binary (0 & 1) format. Scaling is disabled.
To Hexadecimal number system and the binary scale form, inputting the maximum and
inputting the minimum regards as agreeing with the binary scale data.
Mask: Displays only “****” and ignores the reading value. This is used for security code input.
Its proportion of conversion and decimal point, etc. have selected and has been all neglected.
Single float: Data in the controller is translated from a 32 bit IEEE Floating-Point format to a
decimal number and displayed.
Double float: Data in the controller is translated from a 64 bit IEEE Floating-Point format to a
decimal number and displayed.
At the time of the data entry of the decimal system, if choose to " show initial data", input the
minimum and input the restriction range that the maximum will be regarded as the effective data-in ,
if choose " the project data are changed ", the project changes the maximum and project and
changes the restriction range that the minimum will be regarded as the effective data-in.
Do conversion, so:
(Input data-Engineering low)*(Input high-Input low)
PLC value =
+ Input low.
(Engineering high-Engineering low)
Single float format (32 bit)
S
e[30:23]
31
30
f[22:0]
23 22
0
Single precision mode
Value
0< e < 255
e=0;f != 0
(-1) x 2
S
e-127
S
–126
(-1) x 2
x 1.f
x 0.f
S
e=0;f=0
s=0;e=255;f=0
(-1) x 0.0
The positive number is infinitely great
s=1;e=255;f=0
The negative number is infinitely great
s=0 or 1;e=255;f!=0
NaN (Not a number)
Double precision float format (64 bit)
S
e[62:52]
63
62
f[51:32]
f[31:0]
52 51
32 31
Double precision mode
Value
0< e < 2047
e=0;f != 0
(-1) x 2
e=0;f=0
S
e -1023
S
–1022
(-1) x 2
x 1.f
x 0.f
S
s=0;e=2047;f=0
(-1) x 0.0
The positive number is infinitely great
s=1;e=2047;f=0
The negative number is infinitely great
s=0 or 1;e=2047;f!=0
NaN (Not a number)
The form above is according to IEEE754 standard, the mode of the algorithm is appointed by the
standard of IEEE binary scale floating dot arithmetic.
Font attribute:
Can appoint the size that number value show with the color and align the way here. Available font
sizes include : 8 , 16 , 24, 32, 48, 64, 72 and 96. The Align is only for decimal format.
0
If the form shown is set up for “the above -figure number of the decimal point” =5, " -figure
number under the decimal point " =0, the number value read is 123, there are several kinds as
follows of forms shown :
Right Adjust
Left Adjust
Leading Zero
1 2 3
1 2 3
0 0 1 2 3
6.11 Numeric Data
A Numeric Data Part displays the current reading of a designated PLC register data. Data is
displayed as text; no shape or bitmap can be associated with this part.
Procedure to place a Numeric Data
1. Click Numeric Data icon
2. Fill in General Tab Items:
Description: A reference name that you assign to the Numeric Data. (not displayed)
Read Address: Word in the PLC that is displayed and modified by the Numeric Data Tab. Data
format is defined data as binary or BCD. The number here is limited to 1 ( 16 bits) or 2 (32 bits)
3. Fill in Numeric Tab items: See previous section on Numeric Input Extend.
Display: Control the display format of the data.
Value:Set up the position of the decimal point.
4. Go to Font Tab: Fill in attributes of the displayed digits. See Numeric Input Extend
5. Click OK to place the Numeric Data part on the window.
6.12 ASCII Input Extend
ASCII Input Extend displays current value of the PLC register data as decoded by the standard
ASCII character table. When the trigger bit is active, ASCII Input is available through the
alphanumeric keypad. Entered data is put into consecutive PLC registers starting with the “Read
address”. The ASCII code saved in the low bit displays on the left-had side and the code saved in
the high bit displays on the right-hand side.
Value read is solved and translated
and shown by ASCII yard
Activate touch area and enter the
introduction state
Input from the keyboard
Procedure to place an ASCII Input
1. Click ASCII Input Extend icon
2. Fill in General Tab Items:
Description: A reference name that you assign to the ASCII Input. (not displayed)
Read Address: Word or words in the PLC that is displayed and modified by the ASCII Input. (up
to 16 words may be addressed in this manner, each word contains 2 ASCII characters)
Trigger Address: Bit in the Controller that controls the ability to enter data into the Read
Address. If bit is OFF, data entry is disabled.
Attribute: Select to Left or Right justify the ASCII characters as they are displayed.
3. Go to Shape Tab: Select Shape or Bitmap to display the state.
4. Go to Font Tab: Fill in the Color and Font attributes of the displayed data.
5. Click OK to place the ASCII Input Extend part on the window.
The memory way in ASCII Input Extend is explained as follows:
1[Attribute]/[Adjust]Choose[Left]
When input character "A"
The Highest(Word)
2(Word)
1(Word)
The lowest(Word)
Highorder
byte
Low-order High-order Low-order High-order Low-order High-order Low-order
byte
byte
byte
byte
byte
byte
byte
20(H)
20(H)
20(H)
20(H)
20(H)
20(H)
20(H)
41(H)
A
When input character "AB"
The Highest(Word)
2(Word)
1(Word)
The lowest(Word)
Highorder
byte
Low-order High-order Low-order High-order Low-order High-order Low-order
byte
byte
byte
byte
byte
byte
byte
20(H)
20(H)
20(H)
20(H)
20(H)
20(H)
42(H)
41(H)
B
A
When input character "ABC"
The Highest(Word)
2(Word)
1(Word)
The lowest(Word)
Highorder
byte
Low-order High-order Low-order High-order Low-order High-order Low-order
byte
byte
byte
byte
byte
byte
byte
20(H)
20(H)
20(H)
20(H)
20(H)
43(H)
42(H)
41(H)
C
B
A
2[Attribute]/[Adjust]Choose[Right]
When input character "A"
The Highest(Word)
2(Word)
1(Word)
The lowest(Word)
Highorder
byte
Low-order High-order Low-order High-order Low-order High-order Low-order
byte
byte
byte
byte
byte
byte
byte
41(H)
20(H)
20(H)
20(H)
20(H)
20(H)
20(H)
20(H)
A
When input character "AB"
The Highest(Word)
2(Word)
1(Word)
The lowest(Word)
Highorder
byte
Low-order High-order Low-order High-order Low-order High-order Low-order
byte
byte
byte
byte
byte
byte
byte
42(H)
41(H)
B
A
20(H)
20(H)
20(H)
20(H)
20(H)
20(H)
When input character "ABC"
The Highest(Word)
Highorder
2(Word)
1(Word)
The lowest(Word)
Low-order High-order Low-order High-order Low-order High-order Low-order
byte
byte
byte
byte
byte
byte
byte
byte
43(H)
42(H)
41(H)
C
B
A
20(H)
20(H)
20(H)
20(H)
20(H)
Users are used to in the data-in , can show the content of introduction at the same time on the
keyboard, then put a text display component on the keyboard, let it read the corresponding data
between LW9060-LW9075.
Creat a new project and adding a ASCII Input Extend Object to window 10, it is set up as follows:
Adding a keyboard and an ASCII Data, this object is set up as follows:
Put the keyboard and this object together, [save], [compile],[on(off)- line simulation] or
[download],pursue not showing its if operation result:
If the number of words that this ASCII Data Object should show is X, then its equipment address
should be (9075 - X +1).
6.13 ASCII Data
ASCII Data displays the current value of the PLC register data. The data is decoded by
standard ASCII characters table. ASCII yard that the low byte exists shows that on the left, the
display that the high byte exists is on the right.
Procedure to place an ASCII Data Part
1. Click ASCII Data icon
2. Fill in General Tab Items:
Description: A reference name that you assign to the ASCII Input. (not displayed)
Read Address: Word or words in the PLC that is displayed and modiafied by the ASCII input
(up to 16 words maybe addressed in this manner, each word contains 2 ASCII characters).
3. Go to Font Tab: Fill in the Color and Font attributes of the displayed data.
4. Click OK to place the Numeric Data Part on the window.
6.14 Bar Graph
The Bar Graph displays PLC register data as a bar graph in proportion to its value by the
SPAN and ZERO settings. As the pictures below, users can design any shape of the bar graph.
Procedure to place a Bar Graph
1. Click the Bar Graph Tool, the dialog appears:
2. Fill in General Tab Items:
Description: A reference name that you assign to the Bar Graph. (not displayed)
Read Address: The Word that are used to control the Bar Graph display.
Data format: Defines data from the controller as binary BCD.
No. of words: Restricted to 1 or 3. Three words are needed when variable alarm is selected. The
Bar Graph continuously retrieves 3 data words, one for data and one each for high and low alarm
limits. One word is needed when fixed alarms are selected.
3. Fill in Shape Tab Items to select suitable graph for enhancing the effect of the display. Seldom
need to dispose the figure for the excellent picture.
4. Go to Bar Graph Tab and make settings as below.
5. Click OK to position the Bar Graph and resize it if necessary.
Bar Graph
Here we define the direction, alarm available or not, color and value of the bar graph.
Attribute:
Direction: Up, Down, Left and Right.
Variable alarm:
Yes: The high and low alarm limits are retrieved from PLC data registers as described below.
They are changeable. When the Read Address is between the high and low alarm limits, the bar
graph is in the non-alarm situation. When it above or under the limit value, the graph is under
the alarm situation. The color displays according to the alarm colors set up.
No: The high and low limits are set from the value of the Bar Graph. It’s fix after the setting.
Variable Alarm
YES
NO
Read Address
Bar graph data
Bar graph data
Read Address+1
Low alarm
--
Read Address+2
High alarm
--
Color: Set Bar, Background, Frame and Alarm bar colors.
Background
Frame
Bar or Alarm
The filled bar percentage is calculated as follows:
% of filled bar = [(Register value – Zero)/(Span – Zero)]* 100%
Low/High alarm limit: If “Variable alarm” is No, the high and low alarm limits are entered here.
6.15 Meter Display
The Meter displays PLC register data as an angular indicator in proportion to its value as
defined by the SPAN and ZERO setting.
Indicator
Shape
Scale
Procedure to place a Meter
1. Click the Meter Tool
2. Fill in General Tab Items:
Description: A reference name that you assign to the Meter (not displayed)
Read Address: PLC word that used to control the displayed value.
Data format: Defines data from the controller as binary or BCD
No. of words: Restricted to 1
3. Go to Meter Display make selections and fill in fields as desired.
4. Click OK to position the Meter and resize it
Color: set indicator color.
Percentage of angle (relative to 180° for Half circle and 360° for Full circle) = [(Register value –
Zero)/(Span – Zero)] * 100%
Indecator style:
Style 1(2): Up half, Full up (down) and 3/4 full.
Up half
Full up
Full Down
3/4 full
Notice: The indicator will generally cooperate with the component use of the scale, will strengthen
the operation result of the indicator with the scale. It please consult 3.5.6 chapter [menu] /[drawing ]
scale some content not relevant.
6.16 Indirect Window
The Indirect Window places a defined child window area over the current window. Usually
their size is smaller than a full window. The Windows are then displayed in the Indirect
Window frame as called by a PLC data register. There is no limitation to the maximum Indirect
Windows on each screen. However, at run time, only 6 windows at the most can be displayed
simultaneously on each screen. Set Read Address to 0 to close the window.
The Set Word [Write
address ] =D100=20
The indirect window
D100=0
D100=21
[read address ] =D100
Popup Window
20
Popup Window
21
Close the Popup
Window
Procedure to place an Indirect Window
1. Click the Indirect Window Tool
2. Fill in General Tab Items:
Read address: Word in the PLC that determines which window is displayed in the Indirect
Window area. When change the value of the register, the designated window pops up. For
example, if the value is 20, window number 20 pops up. When the value is 0, pop-up window is
closed.
3. Click OK to position the Indirect Window and resize it
The display area of the popup window is restricted by the size of the indirect window. The popup
window outside the boundary of the indirect window isn’t displayed. Add function button parts”
Window Bar” or “Minimize Window” to reposition and minimize the features.(Refer to “Window
Bar” and “Minimize Window” in the Function Key Part section.)
Popup windows of Direct (Indirect) windows: A window is controlled by a bit address (direct
window) or word address (indirect window). Once a bit or a word activates, the corresponding
popup window appears. When the value is zero, the window is closed.
Task bar: If have [Window bar ]and[Minimize window] with the function key at the window
sprung, then spring a window each time, will reserve a little icon for this window on the task bar .
Push the window little icon at the bar can wave upper strata most to reach the screen corresponding
window in task. Double click the icon can minimize window, is it can recover window to the reset
condition to hit.
6.17 Direct Window
The Direct Window places a defined child window area over the current window. Popup
window is displayed within the border of the direct window. Typically, direct window is the same
size as the popup window. There’s no limit to the number of the direct window. However, at run
time, a maximum of six windows can be displayed simultaneously. The open or close of the
window is controlled by the bit address, but not by Function Key. When “ON” is assigned to the bit
address the popup window appears.
The Toggle
Switch,[Read
address]&[Write
address] are the
same .(M10)
Push the Toggle
Switch, [Read address]
and [Write address] to
all turn into ON ,
Procedure to place a Direct Window
1. Click the Direct Window Tool
2. Fill in General Tab Items:
The Direct window
[Read
address]=10,the
window number is
20.
Description: A reference name that you assign to the Direct Window. (not displayed)
Read Address: Bit in the PLC that calls the Direct Window.
Window No.: The window number assigned to the Direct Window
3. Click OK to position the Direct Window where you want it to pop-up and resize
The size of the window limits the area of display. The window area outside of the window
boundary is clipped. Function Button parts “Window Bar” and “Minimize Window” can be
assigned to the window to enable repositioning and minimizing. (Refer to “Window Bar” and
“Minimize Window” in the Function Key Part section.)
6.18 Alarm Scan
Alarm Messages are displayed on Alarm Display and Alarm Bar parts. The message to be
displayed must first be registered in the Alarm Scan list. A bit controls each message. If the bit
activates the alarm (ON or OFF), the corresponding message is displayed. (This object is only for
alarm register)
Procedure to add/modify alarm messages
1. Click Alarm Scan icon to pop up the Alarm Scan Object message summary screen.
2. Click on the Add button to add a new message or click on the Setting … button to modify an
existing message.
Fill in the Attributes Dialog:
Read Address: specifies the PLC bit address that triggers the message.
Alarm attribute:
ON: displays this message when the bit is ON.
OFF: displays this message when the bit is OFF.
Category: Reserved
Content: Enter the message Content text, text Color and Font size. The default font is 16.
3. Click OK, the message appears in Alarm Scan message summary box.
In order to take full use of communication bandwidth, it is recommended that a block of
continuous
PLC bit devices be used for the Alarm Scan list. For example: Use Bits 100 to 199 to control the
display of all alarm Messages so that one read command retrieves Bits 100 to 199 all at once
instead of one bit at a time.
6.19 Alarm Display
Warning information shows that the component will show all warning information touched off in
the area that is established. A content shown is the same for the content and reporting to the
police that its shows, are all the warning information about a certain nodal switch (location address).
After a warning information is produced , must be when this location address is switched over to the nonwarning state again, this warning information will just be dispelled automatically, otherwise warning
information will show all the time, namely in warning state all the time. (this component only shows
warning information, must be by the component wanted to show in component log-in of " warning
information log-in ")
Procedure to add Alarm Display
1. Click Alarm Display icon
2. Fill in General Tab Items:
Description: A reference name that you assign to the Alarm Display. (not displayed)
Read Address: The Read Address controls the scrolling, up and down, of the alarm display
window. If the read address is N, the information of N-1 is ignored and displays the information
of N on the first row.
Data format: BIN or BCD
No. of words: fixed to 1
Display line: Assign the number of lines to a window. (unit:16 pixels)
Char. Length: Assign the number of characters to a line.(unit:8 pixels)
For example: The font of the characters are 24(24*24pixels). Display line is 5, Char. Length is
30.
3. Click OK to place and position the Alarm Display where desired.
Example of an Alarm Display:
A Shape (SP_0) is used for the background rectangle. The Shape SP_1 shows the sunken viewing
area. Some TEXT is placed on the Shape(AL_0) to identify what is being displayed. Two Set Word
parts (SW_6, SW_7) are used to increment and decrement the alarm register.
The actual Alarm Display part is placed on top of the shape and the alarm messages appear as
below:
6.20 Trend Display
The Trend Display periodically retrieves a block of PLC data and displays the trend data over time.
As each sampling period elapses, the new data is read from the PLC and inserted towards the right
side of the trend graph, It shows that has real time.
Shape
Scale
Trend Display
The newest data show that
on the left, the orbit is
moved right.
An example of a typical trend display is shown above. A Shape is used for the background and
Scales are added to show relative information about the trend. The trend display is then placed on
the Shape.
Procedure to add a Single page Trend Display
1. Click Trend Display icon.
2. Fill in General Tab Items:
Page type: Select Single page. Single page is a simple trend display which displays the data
selected from the active screen and don’t reserve the historical data.
Sampling time: Time between point plots in seconds.
Plot point: the number of sample points displayed across the length of the chart.
Read address: Specify the PLC word address of the first Trend data pen, the second Trend data
pen starts at read address + 1, and the third starts at read address + 2, etc.
No. of Channel: The number of PLC data words retrieved is the same as No. of Channel, one
word per channel.
3. Fill in the Trend Tab: Select the “Channel” to view each channel’s settings.
Description: A reference name that you assign to the Trend Display. (not displayed)
Channel: Can choose any channel to set up it . Choose 0 to choose the 1st channel promptly,
choose 1 to be article 2, analogize sequentially.
Pen attribute: Specify the Trend Color and pen thickness for the channel.
Value: Set the zero and span for each channel.
4. Click OK to position and resize the Trend Display
Procedure to add a Multiple pages Trend Display
1. Click Trend Display icon
2. Fill in General Tab Items:
Page type: Select Multiple pages.
Multiple pages allows a trend display to be extended. Data is plotted as before but it is not lost
Data is stored in the memory for backup. The maximum is 30 history pages for looking up.
Hold style: Determines how the trend reacts when the hold bit is activated. Hold trend display
simply prevents further updates until the Hold bit is turned off. Hold trend display & clear stops
the trend update and clears out all pages of the trend. When the Hold style turns to OFF, the trend
display resumes
Attribute: Start from left selects to have the trend pens start from the left and traverse the display
before scrolling begins.
Start from the right begins the pens scrolling from right to left from the first sample onwards.
In other words " the pen moves the paper " and way that " the paper start writing ". Their show
that the directions all roll and show from the left right.
Sampling time: Time between point plots, the unit is second.
Plot point: The number of sample points displayed across the length of the Trend Display part.
Note: The plot point includes the points of two side boundaries. If 20 is selected, the screen is
divided into 19 pieces. Therefore, if the screen is going to be divided into 20 pieces, 21 should be
selected.
Read address: Specify the PLC word address of the first trend data pen, the second trend data
pen starts at read address + 1, and the third starts at read address + 2, etc.
No. of Channel: The number of PLC data words retrieved is the same as No. of Channel, one
word per channel. Up to 16 channels can be specified for a trend.
Scroll control: The address of the register that determines which portion of the multiple page
display is being shown on the screen. Each increment of the value in the scroll register moves the
Trend display from one sample plot to the left. Can set up two pieces of number value and
establish the component, the equipment address of this component and equipment address which
looks through page control are the same. Set these first two components as and added, one is set
as and reduced, can be used for controlling the trend picture like this to looked through the page
forward and translate pages backward.
Hold control: The bit that controls the trend update. See Hold style above.
3. Fill in the Trend Tab: Select the “Channel” to set each channel.
Description: A reference name that you assign to the Trend Display. (not displayed)
Pen attribute: Specify the Trend Color and pen thickness for the channel.
Value: Set the zero and span for each channel.
4. Click OK to position and resize the Trend Display.
Now come to do a form page trend display and example of many page trend display separately.
1. Single page trend display
Newly build a project and save at first.
In [editor] /[systematic parameter ] in set up by correct one PLC the types and parameter.
Add a form page trend display object. Its [time of taking a sample] is one second, it is 10 to take
a sample and count, it is 4 that the orbit is counted , the following picture shows:
In [trend display] in set up 4 channel because separately it blue for the trajectories, the red, the
green, purple. Minimums are all 0, the maximum is 500, 1000 respectively, 1500, 2000.
Adjust the size of the trend picture component.
Add 2 scale object, one is horizontal, one is vertical, their partition is all 20.Add 2 scale object ,
one is horizontal, one is vertical, their partition is all 20.Hand in them to transform into the net
together, and pay attention to above object pile of trend display: The size of these 3 object (2
scale and a trend picture ) must be unanimous and totally overlap together.
Add 4 Numeric Data objects, show LW0 separately, LW1, the number value of LW2 and LW3.
Add 4 Set Word object many state establish component, part of LW0, LW1, the data of LW2 and
LW3 carry on the cycle circulation change. Its corresponding minimum is all 0, the maximum is
500, 1000 respectively, 1500, 2000. The progressivelying increase value is 10, frequency is 0.5
seconds.
Result set up finally:
Result operated finally:
2. Multiple pages trend display
Newly build a project and save at first.
In [editor] /[systematic parameter ] in set up by correct one PLC the types and parameter.
Adding more than one page trend display object, the institute shows that its attribute is set up as
follows:
It is 21 to pay attention to taking a sample and count. Reading the address as LW0, it is 4 that the
orbit is counted, in this way LW0 reads LW3 is the materials sources of 4 channel. It is LW10 to
look through page control, can be used for looking over the historical materials. Retentive control
LB0 can stop reading the materials of the trajectory.
The color of setting up 4 trajectories sequentially is red , green , purple , blue, minimums are all 0,
the maximum is 500 , 1000 , 1500 respectively, 2000.Add 2 scale components and 5 vertical lines,
as drawn:
Add 4 Set Word objects, control LW0, LW1, LW2 separately, LW3, the establishment of these 4
components is totally the same, among them LW0 is set up as follows:
And then add increase and reduction that 2 Set Word objects controlled LW10, in order to control
and look through the page forward or backward, among them control the component increased to
set up as follows:
Controlling the component reduced, its [write address] is LW10 too, [attribute] /[type ] for
decreasing progressively, decreasing value 5, go to limit 0.
Add a Toggle Switch over the switch, controls the switch of LB0, delay reading the materials in
order to control the trend display, it is set up as follows:
Window 10 shows as follows finally:
[save], [compile ], [off-line simulation ], the following picture of operation result of it shows:
Push [stop], the trend display will be too static to move . Pay attention to observing and looking
through movements of the page at this moment. Is it look through to carry out once movement of
page, trend display reference position of coordinate of on the left move 5 most (is it look through
Set Word object set for to control, namely [ increase value ] or [decreasing value ] number value,
this piece there is number value 5) take a sample by distance that order. There are some of 21
samples in all on the screen, the scale just divides the screen into 20 squares for 20 partitions,
each square is distances that 2 samples are clicked.
6.21 Alarm Bar
The area where Alarm bar will locate in Alarm bar shows by way of horse race light that what
touched off preserved alarm information, this alarm information must be about nodal address of
some the unit, this location address is touched off until warning stated alarm information will roll
and show from right left. Alarm will have rolled until this location address has been switched over
to the non- warning state continuously all the time . Log-in in alarm information must be in object
in advance. (This object only shows alarm information, must be by object wanted to show in object
log-in of "Alarm Scan") In [systematic parameter] [generally ] in [Alarm bar ] partly it last Alarm
bar speed roll, u.i.:
The larger the value of Pxels per scroll or Scroll peed are, the faster the display scrolls.
Procedure to add Alarm Bar
1. Click the Alarm Bar Tool
2. Fill in General Tab Items:
Description: A reference name that you assign to the Alarm Bar. (not displayed)
Display line: Specifies the height of the window, in lines, at one message per line. All messages
are displayed as size 16 or 24 font. Two lines are required for size 24 font.
Char. length: Specifies the width of the window in 16 point characters. Namely if set as 20, it is
the English letter of 16 to then show 20 pieces of script or 10 pieces of script are Chinese
characters of 16, can show that 10 pieces of script are English letters of 24 too , or can show that
about 7 pieces of script are Chinese characters of 24 .
3. Click OK to place and position the Alarm Bar where desired.
Example: Create an Alarm Bar
Create a new project.
Set scroll speed from [Edit]/[System parameters]/[General]
Add an Alarm Bar object on window10 and set the Display line and Char. Length 2 and 40
respectively.
Click [Alarm Display] icon and enter the list. Add two alarm information as below:
Add two switches to control the ON and OFF of LB0 and LB1 respectively.
[Save], [Compile], [Online (Offline) simulation] or [Download], the result as follows:
The state of ON or OFF of LB0 and LB1 directly triggers the alarm message display of an Alarm
Bar.
6.22 Recipe Transfer Object
Recipe Transfer Object can transmit the data from the prescription card of the touch-sensitive
screen to PLC, can transmit from PLC to the touch-sensitive screen . Ask to consult chapter 8 in
detailed content.
6.23 Data Transfer
This part is used to periodically transfer data from PLC to HMI or HMI to PLC. Data
Transfer functions are always active no matter what screen is being displayed. Data may be single
or multiple bit or word data. The main function is to speed up the update rate of the screens.
Procedure to create a Data Transfer function.
1. Click Data Transfer Tool to pop up the Data Transfer summary screen.
Click on the Add … button to create a new Data Transfer function or click on the Setting … icon
to modify an existing Data Transfer function. If you click on the Delete button, the current
highlighted function is deleted.
2. Assign options in the Data Transfer Object dialog box.
Description: A reference name that you assign to the Data Transfer. (not displayed)
Source address: The starting address of the bit or word to transfer.
Destination address: The starting address of the bit or word that receives the data.
Attribute:
Address mode: Set Address mode to transfer Bit or Word data. Select Bit data, the attribute
dialog shows as above. Select Word data, the attribute dialog shows as below.
Number of Bits: The number of consecutive bits is to be transferred.
Interval: The Interval selection is the frequency rate (0.0 to 25.5 seconds) at which the block
transfer is repeated. An Interval of 0.0 transfers the data once at power up.
Click OK to return to Data Transfer summary dialog.
3. Click Close in the Data Transfer Object dialog when all desired Data Transfer functions have
been programmed.
When there is a lot of Trend display in a project, its data amount is bigger, the speed may be
relatively slow, if use Data Transfer Object, can accelerate the speed that the data upgrade greatly.
So long as all set the addresses which read the data of these Trend displays as the continuous one,
use a all right once of Data Transfer Object to read the datum that reaches 16 words (Word) from
PLC most, can guarantee the continuity of Trend display in this way, will not influence the renewal
speed of the touch-sensitive screen. The following form shows for 3 Trend displays:
Object
Device Type
Begin address
Data amount
(Word)
Time of taking a
sample (second)
Trend Display 1
DM
0
5
1(50~100ms)
Trend Display 2
DM
5
3
1(50~100ms)
Trend Display 3
DM
8
3
1(50~100ms)
The touch-sensitive screen divides into 3 times and reads materials that DM0 touched DM8, it takes
3 seconds altogether. When use Data Transfer Object, the following form shows:
Object
Device Type
Begin address
Data amount
(Word)
Time of taking a
sample (second)
Transfer Object
DM->LW
0
11
1(50~100ms)
Trend Display 1
0
5
(0ms)
Trend Display 2
5
3
(0ms)
Trend Display 3
8
3
(0ms)
It only needs to read data once altogether. Its time taken of communication is short. Achieve the
speed of communication and purpose to accelerate renewal speed of picture of accelerating like this.
6.24 Event Log
Event Log Messages are displayed on the Event Display Part. The message to be displayed on the
Event Display must first be registered in the Event Log list. A bit or word device controls each
message. If the bit or word device activates (either ON/OFF or value limit), the corresponding
message is displayed in the Event Display.
(This object is just for logging in the event. Event is displayed from Event Display.)
Procedure to add/modify the Event Log
1. Click Event Log Tool
2. Select the [Add] button to add a new message or select [Setting] to modify the current
information.
3. Fill in Attributes Dialog:
Address type: Select Bit or Word address type.
Read Address: Specifies the PLC bit or word address that triggers the message.
Attribute:
Event trigger:
Bit Address type: ON: displays message when bit is ON.
OFF: displays message when bit is OFF.
Words Address type: When value in word is less than entered value, use “<” to trigger. When
value in word is greater than entered value,u se “>” to trigger
Print:
On trigger: Prints out message when event is triggered.
Return to normal: Prints out message when the event returns to normal state.
Category: Event category (reserved for future use)
Text: Input the context, color and font of the event information.
Note: The inside data in the body of memory can include in Event information.
The format as follows:
%nnd:
%: The starting delimiter
nn: An internal register (LW) number 00-99
d: The ending delimiter
For example: The Content field is set as "Current temperature value %25dF: HIGH ALARM"
If LW25 = 120 then the message are printed out as "Current temperature value 120F: HIGH
ALARM". To print out current value of PLC register data, first assign a Recipe transfer object or
PLC Control/General Control to move data from the PLC to internal (LW) memory. Write Value:
A value to be written to the Write address of the Event Display when the event is acknowledged.
The value is the window number of the popup indirect window.
4. Click OK, the message appears in the Event Log message summary box.
Note: In order to take full use of communication bandwidth, it is recommended that a block of
continuous PLC bit devices be used for the Event Log list. For example: Use Bits 100 to 199 to
control the display of all event messages so that one read command retrieves Bits 100 to 199 all at
once instead of one bit at a time.
6.25 Event Display
The Event Display part opens a window to display messages in prioritized order. Various
formatting features allow the display of event trigger, acknowledge and return to normal times. The
use of the RTC or the retrieve of time from PLC is required for proper display of the time. (This
object displays the event only).
Procedure to create an Event Display Part.
1. Click Event Display icon
2. Fill in General Tab Items:
Description: A reference name that you assign to the Event Display. (not displayed)
Read Address: Used to control the scrolling, up and down, of the Event display window. The
value in the read address is the relative distance from the event in the topmost line of the display.
All active messages are sorted by time, the new events are displayed on the topmost line and
previous ones are below it If the value is N, the No. N information will be displayed in the first
line.
No. of words: The Read address and write address are fixed at 1 for this part.
Write Address: A word that receives the write value specified in the Event Log’s trigger event.
3. Fill in Event Display Tab Items:
Display line: Specify the window height in lines of Font 16 text per line.
Character length: Specify the number of words displayed on each line.
Text space: The number of pixels above and below messages.
Acknowledge style: Click is touch once. Double click is touch twice quickly.
Color: Colors of message text for different states
Acknowledge: the color after the event information is confirmed.
Return to normal: the color of the time when the event returned to a non-triggered state.
Select box: the color of a dashed line that highlights a selected message.
Format: The information displayed before the message.( such as Sequence No., Event Trig.
Time)
Format
Explanation
Sequence No.
The number of the event. Event numbering starts at 0.
Event Trig. time
The time that the event was triggered.
Acknowledge time
The time that the event was acknowledged.
Return to normal time
The time when the event returned to a non-triggered state.
Extended time format
Change the time format in the time tag to Days:Hours:Minutes.
Short time format (H:M)
Change the time format in the time tag to Hours:Minutes.
Event Trig. date
The date when the event occurred. (Month/Day)
Extended date format
Change the date format in the date tag to Year/Month/Day.
No.
Date
Trig. Time
time
normal time
Event
Note: Be sure to allow sufficient character length to accommodate all information. If the Format
information and message text exceeds the Character length, the message is truncated.
4. Click OK to position the par
Date/Hour is obtained from [System parameters]/[General]/[RTC resource]. If RTC source is set up
for "Inside RTC", because inside RTC lies and must install Recipe Memory Card in Recipe Memory.
If Choose PLC then user to use Data Transfer object, periodically retrieve the RTC data from PLC
and write to the following address:
Address
Explain
P.S
LW 9010
Second
0 – 59 (BCD format)
LW 9011
Minute
0 – 59 (BCD format)
LW 9012
Hour
0 –23 (BCD format)
LW 9013
Date
1 –31 (BCD format)
LW 9014
Month
0 —11 (BCD format)
LW 9015
Year
0-9999 (BCD format)
LW 9016
Week
1-7 (BCD format)
Now come to do an example about the fact that the incident shows.
1. Project on it establish at first each it is new, in [editor ] /[system parameter ] in choose by correct
PLC type and parameter.
2. In [incident log-in ] in add 2 piece incident, show picture:
The first incident among them [the exporting value] is 20, the second incident [the exporting
value ] is 21.
3. Adding an indirect window in window 10 of project of establishing newly, its [reads address ] is
LW5.
4. Add an incident to show the component in window 10, u.i.:
Event display object transfers one shape at bottom, in order to strengthen the result of showing.
5. Add a switch state that Set Bit object switch controls LB10.
6. Add a text object, show the content in order to " raise the temperature ".
7. Adding one Set word object, it is set up as follows:
Window 10 is shown by the following picture finally:
8. Creat window is 20, the following picture shows, there are a text object and one Toggle Switch
Object which controls LB10.
9. Creat window 21, the following picture shows, there are a text object and one Set word object.
The establishment of Set word object is as follows:
10. [save ], [compile ],[on(off)- line imitate ] or can't download, this procedure operation result is
like the Fig.:
When touch off LB10 or LW30 to the corresponding condition, will present corresponding Event
information . In China's log-in the outputs of 2 incidents are worth 20, 21 is the window serial
number of event window that will spring when the incident is touched off.
6.26 PLC Control
The PLC control provides a way for the PLC to control HMI system functions.\
Procedure to create a PLC control function.
1. Click PLC control icon to pop up the PLC control summary screen.
2. Click on the Add button to create a new PLC control function.
Click on the Setting button to edit an existing PLC control function. If you
Click on the Delete button and the current highlighted function is deleted.
3. Fill in PLC control dialog:
Read Address: Designates the address of the PLC control register.
Attribute: Assign the operation activated by this function.
Type of control: See Types of Controls below.
4. Click on the OK button to create the object and exit the dialog.
5. Click on the Close button to exit the PLC Control summary.
Types of Controls
Change Window
This operation uses two addresses. The Read address holds the active window number. If the
value stored in the Read address changes to a valid window number, that window number then
replaces the currently displayed window. The new window number is moved into the Read
Address + 1 register.
Read address
Controls screen changes by number
Read address+1
Destination screen number is written
As the example above, the current window is 10. If LW0 is assigned to 20, the current window
will change to window 20 and value 20 then be returned LW1.
Change Window precautions:
Whenever function key of one "Change Window" is pushed, will close the present window, and
will show the goal window. But PLC its function of controlling the component [Change Window]
is similar to " switching over the basic window " the function key, only it is touched off by PLC
register but not touched accusing of operating and touching off. When the value of reading the
address is changed into a new effective window serial number, will close the window at present
and show the window appointed from the address of reading, then the content of reading the
address will write and read address +1. This is operated and will when change in value that [read
address ] only be touched off, and this value changes once and can only carry on the screen once
to switch over.
Back light control
The function turns the display’s backlight OFF when the Read address turns ON. When the
backlight is OFF, a touch reactivates the backlight.
At this time, the state of LB0 is ON. Retouch LB0 turns the state to OFF so that the backlight
goes back to the previous state.
Screen hardcopy
The function use a Read address to control the printout of current screen. If the bit is triggered
from OFF to ON, the current screen is printed out. Set the valid printer type from [System
parameters]/[General]/[Screen hardcopy]. Please refer to the context of [Screen hardcopy] on
Ch.11
Report printout
Prints the screen number designated by the Read address. After the screen is printed, the Read
address is set to 0.Please refer to the context of [Report printout] on Ch.11
Back light control (write back)
Turns the display’s backlight OFF when the Read address turns ON Whenever the backlight is
turned OFF (through PLC control or time-out) the HMI turns the Read address bit OFF in the
PLC. When the backlight is OFF, a touch reactivates the backlight.
As the example above, when the LB3 turns to ON, backlight is off and LB3 is given the order of
OFF. When the user touches the screen, the backlight turns to ON but LB3 is still OFF.
Write Data to PLC(current base window)
Can use this to operate when PLC wants to know the serial number of the present basic window.
The data content of PLC is serial numbers of the present basic window to deserve and operate
returning and giving.
Notice: When switch over the basic window, the touch-sensitive screen will convey the present
basic window serial number to the designated word address automatically.
uch as pursueing, when one PLC set up as above controls object , will preserve the serial number
of present base window in word address LW0.
General PLC Control
This control is used to trigger data transfer to and from the PLC.
There are four transfer directions:
1. PLCÆRW(Recipe Data Register),Read address value=1
2. PLCÆLW(Local data memory of touch screen),Read address value=2
3. RW(Recipe Data Register)ÆPLC,Read address value=3
4. LW(Local data memory of touch screen)ÆPLC,Read address value=4
Concrete to prove as follows:
Control the component while establishing the communication frame to choose location " General
PLC Control " to control in PLC, read type and address of choosing the control register used in
the address column, pay attention to regarding single charactering (Word ) as the unit, the system
will be automatic planning controls the data and chooses the register address in order that " data
transmission control the register " as four continuous data registers of the start address with PLC
that is established , their concrete meaning and operation method are as follows:
1. Establish the address of reading: He expresses the type of data transmission carried out, as
stated, have four kinds in all, used for storing and controlling the code of the type in this register,
when the register is written into the new control code, the system carries out corresponding
transmission promptly, this register will be restored to the throne is 0 soon after transmit and
finish.
2. Establish and read address +1: It shows the size of one of the data transmitted, namely the
number of words of one of data transmitted.
3. Establish and read address +2: It shows what needs paying attention to in skew amount of the
data register address of PLC in the transmission course is that this skew amount is to in the
register " establishing and reading address +4 " And the the speech one, for example regard
OMRON PLC as for example fruit PLC controls the address of reading established
interchangeably in the component as DM100, and the start address of one of data of PLC
operated while the data in register DM102 are transmitted for 4 is DM108 =[( 100+4+4].
4. Establish and read address +3: It expresses the prescription data register of the touch-sensitive
screen in the transmission course (RW), or local address skew amount of data register (LW) skew
amount for example above if data of DM103 100 in giving an example, data of touch-sensitive
screen of transmission course start address of piece RW (LW ) 100 then =( 0+100).
Lift the instance of using as follows:
Is it control with PLC data transmission of word is it touch reject data of filling a prescription of
the register a initial one the same and heavy with RW200 to get DM100 initial 30 of OMRON
PLC to need now In little data one, the method to realize is as follows:
1. supposes at first that we control transmitting with DM10 four initial data registers, should put
one PLC and control the component at the window of the touch-sensitive screen first , choose
the type to control for PLC in common use , read the address as DM10.
2. next, should confirm the skew amount of the size and address of one of operating data , it is 30
to give the establishing value of DM11, show that it is 30 words to transmit the size of one of
the data; It is 86 to give the establishing value of DM12, it is DM100 of PLC that it is initial to
show the source operated =( 14+86) ; It is 200 to give the establishing value of DM13 , show
that the goal address is RW200 =( 0+200) .
3. needs establishing and transmitting the type code according to the direction of data
transmission finally, carry out the transmission course, it is 1 to give the establishing value of
DM10, show and carry out data transmission in data one of PLC that will establish the start
address that reaches the touch-sensitive screen which establishes the start address to fill a
prescription in the memory data one. If it is 3 to establish DM10 value, it is in opposite
direction to transmit.
As a same reason, the transmission of two kinds of other directions is operated the samly, just
touch and reject the square data memory to turn into local data register LW.
6.27 System Message
Customize system messages for different languages.
When the display cannot access the PLC,"PLC no response"is displayed.
When the reply message from PLC is different than expected,"PLC response error"is displayed.
When the system runs out of memory or some other fatal error occurs,"System severe error"is
displayed.
Procedure to modify system messages
1. Click System Message icon to pop up the system message dialog box.
2. Fill in appropriate text for the content of each message.
3. Press OK to finish the modification.
There are these 3 systematic information that can generally let users revise. For furhter details,
please refer to appendix me about other systematic information [system information ]
6.28 Object Superpose
If superpose a lot of components together, a lot of special functions will emerge. MT500 can
support the superposing of a lot of objects , when touch and accuse of these objects, the procedure
will carry out corresponding operation with the different levels order of each object , touched and
accused of at first in object of the upper strata the most, then the second layers of object. For
example: If 6 (Set Bit/Toggle Switch ) objects are superposed together, whether control Y0 (upper
strata most ) reach Y5 (lower floor most ) , then when touch and accuse of these objects , MT500 is
the executive program in the order of the following separately.
First layer
Y0
Carry out the order of Y0 at first
The second layer
Y1
Carry out the order of Y1
The third layer
Y2
.
4th layer
Y3
.
5th layer
Y4
.
6th layer
Y5
Carry out the order of Y5 finally
Control Y0 to open / close at first, then control Y1 to open / close (the second step), control Y2 to
open / close (the third step) …….Control Y5 to open / close (the 6th step).
User must pay attention to one point: When MT500 meets and switches over the basic window
order, it will neglect in the component of this component ground floor and switch over to the goal
window directly. The following picture, if Y2, in order to switch over the basic window function
key, then the following Y5 of Y3 will be neglected.
First layer
Y0
Carry out the order of Y0 at first
The second layer
Y1
Carry out the order of Y1
The third layer
Y2
4th layer
Y3
Change Base Window
Neglect
5th layer
Y4
Neglect
6th layer
Y5
Neglect
Proposing object that is superposed, the figure don't be over 32.
Chapter 7
System Parameters
1. Filling in the system parameters
Select the [Edit]/[System Parameters… ] menu and the System Parameter Setting dialog appears as
below:
There are seven tabs in the dialog: [PLC], [General],[Indicator],[Security],[Editor],[Hardware] and
[Auxiliary]. We introduce them one by one.
7.1 The PLC Tab
PLC type: Select the type of PLC from available PLC selection menu.
We support most of the PLC models. For special request, customers can contact with us to develop
the new drivers.
HMI model: Select the suitable model number from the dropdown.
Serial Port I/F: Select the PLC port’s type of hardware communications. RS-232 and RS-485 are
available.
Baud rate, Parity, Data bits and Stop bits: Set the communication parameters to match the PLC ports
settings.
HMI station No.: This is used when PLCs require the HMI to have a node or station identifier. For
example, for AB DH485 or Unitelway driver, many HMIs maybe connect with a PLC and each
HMI is given by a station No. Leave it at 0 if just one HMi is used.
PLC station No.: Used when PLCs have a node or station identifier. Set as needed or leave at 0 if
not used.
Multiple HMI: Allows more than one HMI to be connected to one PLC. Enable as a Master or a
Slave, depending on connection, or Disable as needed.
Disable: Disables the chaining of multiple HMIs to one PLC.
Slave: Select this if this HMI connects to another HMI in the chain.
Master: Select this when the HMI is the unit connected directly to the PLC.
HMI-HMI link speed: This is used only when a serial interface is used for connecting multiple
HMIs.
Set connection parameters:
Multiple HMI: Set the HMI directly connecting to MT500 display as the mater and set the rest of
the displays as slaves.
HMI-HMI link speed: 38400bps and 115200bps are available.
Please consult the appendix II relevant content about Multiple HMI.
PLC time out constant (sec): This setting determines how long the HMI waits for a response from
the PLC. If the comm. delay time of PLC is longer than time out constant, “PLC NO Response”
message appears no the display. Typically, the PLC time out constant is set at 3.0 (sec).
PLC data package:
HMI will collect all PLC data with continuous address and send an order reading to read these data
automatically, this has improved communication efficiency and reduced the response time greatly .
But if the addresses of these data are discontinous, then HMI will read these data through the single
order, then need reading the order to read these data of a lot of. It can allow two addresses to have
intervals , even two data with discontinous address to set up this parameter, so long as this interval
is not greater than this parameter, HMI can still use one to read the order to read these data from
PLC .
Give an example as follows:
As left picture shows , will read the data from D20 to D29, when PLC data package is set
D20
up as 0, system use 3 read order is it read data to come , is it carry out one read order spend
D21
50 millisecond to suppose respectively, probably 150 millisecond read these data to want
D22
flowers in these words, and when PLC data package is set up as 1, it only needs one to read
the order , the data that and just read more 7 byteses after ordering to extend to read these
D24
data, probably need 50+7*2*2 =78 millisecond comes to read these data. It is obvious,
D25
when data are the more, use communication time that continuous PLC address can be
economized is the more.
D27
D28
D29
7.2 The General Tab
Task button: The Task button is used to pop up the Fast Selection window or display the Task Bar.
Attribute: Enables or disables the task button. If disabled, the Fast Selection window and Task Bar
are not available at run time.( the default is enable for a new project)
Position: The Task buttons can be located on the right or left side of the display.
Background color: Select background colors from the drapdown.
Text: Determines text alignment within the Task Buttons.
Alarm Bar: The Alarm bar Part displays alarm text in the form of newsbar.
Pixels per scroll: Select 8, 16, 24 or 32 from the drop-down menu. This specifies how many pixels
are scrolled in each increment. The larger the number is, the faster a given message is displayed.
Scroll speed: This setting determines how fast each increment of the scroll is displayed. The larger
the number is, the faster the information displays.
No. of windows: This setting is used to specify the maximum number of windows allowed open at
any one time. If printing function is used, the maximum number is 5. If the compressed object is
used, the maximum number is 4.
Password: It locks the project after it is downloaded so it cannot be uploaded without first entering
the password. Password should be enter when upgrading the ROM in BootRomUpdate.
Startup window No.: This is the window displayed when the HMI is powered up.
Back light saver: The HMI turns off back light power if there are no touch operations within the set
time (Range: 0 to 30 minutes). A zero setting disables the back light"auto shutoff"function.
Cursor color: Determines the color of the cursor when activate the input of numbers or words.
Buzzer: The buzzer sounds briefly every time the touchscreen is activated by touch. This selection
allows the programmer to turn off the buzzer.
Common Window:
Popup window: Determines where an popup window called from the common window is displayed.
Typically, The Popup window is displayed on the top layer.
Attribute: Determines the location of the Common window, above or below the base screen.
Extra No. of Event: Normally, 200 events are stored in the Event Log. If more than 200 events are
needed, the additional amount is entered here. If 1200 events are need, 1000 is inputted here. Up to
2800 additional logs can be added.
RTC source: Establish the source of the clock when the unusual incident emerges. RTC data can be
got from PLC or inside RTC. If choose to get from PLC, is it set up one data transmission
component come to transmit from PLC actual RTC datum reach to corresponding LW address cycle
to need then (can consult the content of " reserving the register address systematically " relevantly ).
If choose inside RTC, must then at CPU board card Recipe card which can be selected for use in
installation.
Print: Use these settings to set the Printer protocol. Print time and print sequence number can be
printed at the same time.
Printer: Select the printer drivers.
Print Sequence number: Select to print the sequence number of the event along with the event
occurrence. The number increases for each new event.
Print time tag: Print the time along with the printed information.
Extended time format (D:H:/M): Change the time format in the time tag to Days/Hours/Minutes.
Error Detection: Neglect the wrong signal (for example lacks the paper ) of the printer or the
transmission that has been keeping typing the data all the time until the wrong signal has been
removed.
No error detection: Printer errors are ignored.
Message board window No.:
Select the window number to be used as the message board.
Regarding to Message board, please refer to ch.9 [Message board].
7.3 The Indicator Tab
Touch indicator: The Touch indicator changes color every time a screen touch is touched.
Attribute: Enable makes the Touch indicator visible and active. Disable makes the indicator
invisible and not active.
Non-configured area, Active area, and Inactive area: Set the touch area’s color that is displayed in
Touch indicator.
Non-configured area: Set the color of the Touch indicator when the Non-configured area is selected.
Active area: Set the color of the Touch indicator when the Active area is selected.
Inactive area: Set the color of the Touch indicator when the Inactive area is selected.
Frame: Set the color of the circular outline in the Touch indicator
CPU indicator: The CPU indicator is a percentage bar graph that shows system resource usage.
Attribute: Enables or disables this feature. If disabled, the CPU indicator is not displayed at run
time.
Color: Set the color of the displayed CPU indicator.
Alarm indicator: The Alarm indicator comes on when there are alarms present. This indicator is a
bar graph that increases when the number of alarms increases.
Attribute: Enables or disables this feature. If disabled, the CPU indicator is not displayed at run
time.
Color: Set the color of the displayed CPU indicator.
7.4 The Security Tab
Please refer to Ch.10 [Security Level]
7.5 The Editor Tab
Beginning window No.: Set the window numbering starting at 1 or 10. Internally, EasyBuilder
maintains the initial window of 10 but displays all window numbers with an offset so they appear to
start with an initial window of 10.
Compiler level: Determine the compile type.
Level 0: Don’t check the validity of the device address when compiling.
Level 1: Check the validity of the device address when compiling.
For example: Mitsubishi the CV2 of Fx/2n is displayed in a double word. If a multi-state object
uses a word to indicate CV2, showed as below:
When the compile level is at level 0, the compile system ignores the mistake. However, there would
be unexpected error when the compiled project is run on the HMI. When the compile lever is at
level 1, the compile system will detect the mistake. Level 1 is suggested.
Part Layout:
Select Control to have the part move to the topmost layer and become visible.
Select Nature to have the part stay in its original layer, still changing state, though partially or
invisible.
Address Mode:
Standard: Used when a touchscreen is connected to one PLC.
Extended: Used when a touchscreen is connected to more than one PLC.
Explanation about Extended Address Mode
The application of EasyView HMI can only be via RS-232 or RS-485 and a PLC line in the past,
joining the function of Extended Address Mode in order to overcome this restriction, users can
realize this function via the interface of RS-484 , the following picture shows:
As to user, it is essential that PLC that can be controlled more than 2 by a HMI is used in some,
detail how to realize this function as follows.
1.Can support PLC of Extended Address Mode to choose
Chosen PLC must RS-485 interface, and Communication protocol must include PLC station No..
2.Choose Extended Address Mode as follows in the systematic parameter
3.Fill in the form of Extended Address Mode as follows in Device Address of object
Pursue to show it for Extended Address Mode as above: Bit address: 3#03 ; Word address: 4#12
Before "#" is station NO., later in order to " appointed station NO. Address "
Extended Address Mode, in order to control yard with "#", before "#" is station NO., later it was
Standard Address Mode.
7.6 The Hardware Tab
TFT PCD Value: This setting applies to the MT510T only. It allows the user to change the PCD of
the display. The PCD is related to the scan frequency of LCD. Low PCD is suggested.
System Parameter:
No: Don’t stored the system parameters in the retentive memory
Yes: stored the system parameters in the retentive memory
If “store” function is selected and download the compiled EOB file to the HMI, when activate the
display for the first time, the system parameters will be written into the retentive memory. Every
time the display is activated later, the system parameters are retrieved directly from the retentive
memory. Please refer to Ch.12 for further detail.
EventLog DataBase:
No: Disables user to keep EventLog information in retentive memory. When the HMI starts up or
shut down, EventLog DataBase information disappears.
Yes: Enables user to keep EventLog information in retentive memory. When the HMI starts up or
shut down, EventLog DataBase information doesn’t disappear.
DataBase Start Address: Information is stored in retentive memory starting with the specified
address.
Memory about Eventlog information
If choose to be stored in Eventlog column of the systematic parameter, systematic to can land time
that excite already information store in Recipe Card automatically. As to user, needn't worry about
the problem of how to store of Eventlog information, the system will automatically process the
course of storing!, the position that appoints the address of ones that lie in systematic parameter in
database [DataBase Start Address ], acquiescence is 0.
Store in the information in Recipe Card, including Eventlog manages information and time lands
information. In [Eventlog manage information ] is it appoint address as start address store , data size
30 words to store, Eventlog information is thereafter followed closely, each size of Eventlog
information is the same, is 20 words, how to calculate that Eventlog information stores the size for
example.
In[System Parameter][Hardware], Eventlog database is chosen to be stored, Database start address
is 100, the following picture shows:
The system will begin to keep a storage area and use and store Eventlog database from RW100 in
Recipe Card automatically, can store [Eventlog manages information ] and the following picture of
200 pieces of Eventlog information show:
Recipe Card Address
Data
RW100
Eventlog manages information
RW130
The first Eventlog information
RW150
The secondEventlog information
RW170
The third Eventlog information
……
……
……
……
RW4090
The 199th Eventlog information
RW4110
The 200th Eventlog information
The size of storage area kept is 200* 20+30 =4030 word, the storage area for can't write area into,
any write into movement can't cause anticipated result as to user. [DataBase start address ] the user
can set up at will, but should pay attention to the following two points:
1.Can't there is conflict of addresses with the project object in the designed storage area.
2.Storage area can exceed RW60000, RW60000 the above reserve for system.
How to expand the storage area, can the user see Eventlog information of more clauses and
subclauses ? In [systematic parameter ] [generally ] [Extra.no.of event ] in input it 1000,show
picture:
Add 200 Eventlogs of systematic acquiescence, there are 1200 Eventlogs altogether, the memory
space taken up is expanded to 1200* 20+ 30 =2430 words.
Ch.8 Recipe Transfer
The Recipe Transfer part activates the transfer of a block of contiguous registers from the HMI to the
PLC or from the PLC to the HMI. HMI storage address is determined by an internal word. For MT500,
64K is selected to store the recipe data.
8.1 Procedure to create a Recipe Transfer Part
1. Click the Recipe Transfer Tool or select Recipe Transfer from the Parts menu.
2. Fill in General Tab items:
Description: A reference name that you assign to the Recipe Transfer. (not displayed)
Write Address: Word that begins the block of registers to write or receive upload from the PLC.
No. of words : How many registers are transferred.
Direction:
Download : Moves values from the HMI retentive memory to the PLC.
Save: Transfers values from the controller to the HMI retentive memory area.
3. Go to Shape Tab: Select Shape or Bitmap of the button to activate the transfer.
4. Go to Label Tab: Fill in fields to denote states, if desired.
5. Click OK to position the part and resize it.
8.2 Recipe memory
Recipe memory card should be chose for using recipe memory. The recipe memory resides in battery
backed SRAM. The memory contents are preserved for at least half year after power off. The battery is
recharged whenever the system is powered. The total size of recipe memory is 64K words.
There are two ways to represent the recipe memory: “RW” represents absolute address,”RW1” represents
index address and the number of words you specify in LW9000 offsets an index address from its indicated
address. For example if (LW9000)= 50, an RWI 0 index address points to the address with data 50. If we
change (LW9000)=51, an RWI 0 index address points to the address with data 51. The table shows as
below:
Basing on the concept above, here we take an example:
We create a project and select PLC type as [MODBUS RTU]. We upload 5 consecutive numbers starting
at address 200 from device type as 4x to RW300 address of recipe memory and the consequence explains
as below:
We create a new project and choose PLC type as [MODBUS RTU]:
First of all, we add a Recipe Transfer object with device type=4x, Device address=200, No. of words=5,
Direction is “Save” and content as “ Upload” :
We place it on the window.
The recipe transfer object is done. However, the object just points out to transfer 5 numbers starting from
the address of 4x200 to recipe memory but doesn’t indicate the specific locations. That’s why we need
LW9000. We set LW9000 as 300. Press transfer button and then we transfer the 5 continuous words
followed by the address of 4x200 to 5 continuous locations after the recipe memory RW300. If we would
like to 5 continuous data starting from 4x200 to RW100, we just need to set LW9000 as 100.
To complete the example, we create a ASCII input extend object to modify the updated data. Set
Device type as 4x, device address as 200, No. of words as 5. In trigger address, set device type
as LB and device address as 9000.
Create a Numeric Input Extend object to amend the data of LW9000 where device type is LW, device
address is 9000; in trigger address, device type is LB and device address is 9000.
We place a ASCII input extend object to display the data of RW300 and check if the data is transferred.
The setting shows as the dialog below.
Then we place a keypad.
A complete project displays as follows:
Save, compile and off-line simulate to run the project.
We set LW9000 as 300 first so that RW10 shows the data of RW300.
Then we input “ABCDEFGHIJ” into 4x200 and press save. You will find the data of RWI0 is the same as
the data of 4x200 which means the upload succeed.
How could we download 5 continuous data after RW300 to the 5 continuous locations after 4x200? We
add a recipe transfer object on the project where device type is 4x, device address is 200, No. of word is 5
and change the direction to download.
The following is the complete project:
When off-line simulation, we set LW9000 as 300 and input “AAAAAAAAAA”into RWI0:
When we press the download button, you will find the data is transfer from RW300 to 4x200.
From the example above, we can find that whether uploading the data of PLC to retentive memory or
downloading the data to PLC, the starting addresses of retentive memory are all the corresponding
address of LW9000.
8.3 Upload/ Download of the recipe memory between HMI
and PLC
Recipe memory is very useful. Take production line as an example, the production facilities complete
different tasks by different parameters provided. Now we can save the set of data to recipe memory
according to the specific format. When we need them, we retrieve them without inputting a plenty of data
temporarily.
There is example below of how to conveniently retrieve several recipe data:
Assume that there are 10 sets of recipes, each recipe is composed by 5 words, including
Recipe name which takes up 4 words and recipe data which takes up 1 word. We arrange the recipe from
RW0.
Through the project design, we plan to effectively exchange the data between PLC register 4x100 and
each set of recipe data above. In a project, RWI0 and RWI4 display the receipt data of set number 0. Press
download button to download the recipe data to 4x100; press upload button to upload the data of 4x100 to
recipe memory. The upward button executes the upward lookup of the recipe data and the downward
button executes the downward lookup of the recipe data.
After roughly understanding the purpose of the project, we explicate the procedure of the project below.
At first, create a new project and choose PLC type as [MODBUS RTU] in [Edition]/[System parameters].
Create a ASCII Input Extend object to display and amend the recipe name.
Create a Numeric Input Extend to display and amend the recipe data.
Create a ASCII Input Extend and a Numeric Input Extend to display and amend the recipe data in PLC.
Create two recipe transfer objects: one is for downloading recipe data and another is for uploading recipe
data.
Then we design two buttons for users to conveniently look up and amend each set of recipe
data: one is for looking up forward and another is for looking up backward.
We set look up forward as a multi-state switch object. Every time when you press this object, system
deducts 5 from the value of LW9000. Because each set of recipe data includes 5 words, RWI0 displays
the previous recipe data each press to reach the purpose of looking up forward.
We set look up backward as a multi-state switch object. In the same theory, every time when you press
this object, system adds 5 from the value of LW9000. Because each set of recipe data includes 5 words,
RWI0 displays the previous recipe data each press to reach the purpose of looking backward. Here the
upper limit is 45 (10 sets of recipe).
Create a Numeric Data object to display the current recipe data.
However, how do we know which set of recipe data is currently displayed? How to control the
value of LW0? Here we create two more multi-state switch objects, one is subtraction and another is
addition, which display as follows:
LW9000 " reduce " Superpose LW0 to " reduce "; LW9000 " add "Superpose LW0 to " add ", Thus, when
we look up the recipe data, the value of LW0 changes and display the current recipe data.
Then we place a keypad, add some context for embellishment. One project is done as below:
Save, compile and off-line simulation to run the project:
We input the 10 sets of recipes into recipe memory card and then jump to the eighth set. Change the
recipe name as“KKKKKKKK”, recipe data as 1234 and press the download button:
We find the data in 4x100 becomes "KKKKKKKK",1234. The changes in memory show as
below:
Through the procedure of the project, we grasp the basic idea on designing recipe data.
Ch9. Message Board
Designate a window as a message board where an operator can input information in it. Designate
this window from [System parameters]/[General] as follows. Here we assign window 11 as the
message board.
Operation mode, the thickness of the pen, color and clear board can be set from Function Key
[Message Board]:
Functions of the Message Board explain as follows:
Set Operation Mode:
Pen: Used for drawing graphics or text on the Message Board window.
Brush: Used as an eraser to erase lines drawn by the pen.
Clip: Allows the operator to drag a rectangle around an area. When the operator stops touching the
screen the area in the rectangle is erased.
Set pen style: Set pen style is used to select the pen thickness.
Set pen color: Set pen color is used to select the color of lines drawn on the Message window.
Clear board: Erases the entire Message window.
Example:
Select [File]/[New] to create a new project from EB500. Create window 11 and window 12. Place a
“Set Bit Object”and a direct window. Direct window is set as a full screen and the setting of the
“Set Bit Object” are as following:
The setting of the direct window is as below:
The setting of Window 11:
Palette button is a Set Bit Object, it establishes it as follows:
Another direct window:
A other one some object that static behavior show, you can establish at will.
The setting of window 12: ( the size of window 12 should be the same as the window 11):
FK_0 function key is Clear board function; FK_1 is the Brush function; FK_2 is the Clip function;
FK_3 is the Pen function;FK_4、FK_5 and FK_6 represent 3 kinds of thickness of the pen; FK_7,
FK_8…FK_12 represent 6 different color; WL_0 is Multi-state switch with 6 states and correspond
to FK_7… .FK_12 six colors; SP_1 is white shape; SP_0 is self-designed shape; the setting as
below:
[Save]/[Compile]/[Off-line Simulation],[On-line Simulation] or [Download]. The result displays as
below:
The system keeps LB9020-LB9022 and is used for controlling and combining identification
Pen,Brush,Chip,choose or not,LB9030-LB9032 can set the thickness of the pen,LW9006 can set the
operation mode,LW9007 can set the thickness of the pen,LW9008 can choose any pen's color from
256 colors. Please refer to Ch12 for detail.
Ch10. Security Levels
Security level which raises the safety of a project is as the admission for users to access to projects
or windows. When setting the attributes of the window, we can see the selection of security level
which displays as below:
Note: Security level is only valid for base window but not for other windows.
There are 3 levels in a project. Level 0 is the lowest level of security (all have access to these
windows regardless of the password), Level 1 is a middle level allowing access to level 1 and level
0 windows. Level 2 is the highest level of security and can access all levels. For example, we can
set the security of the most important switches as highest level so that general users are not allowed
to access these important switches.
Here we take an example of security level:
Select [File]/[New] to create a new project. Check [Security Control] from [Edit]/[System
parameters]/[Security] and then set the passwords for di fferent 3 levels. 1111 is given to level 1:
System register LW9042 displays the security level of the active base window and just can be read
out not be written in. Create a Numeric Data object and place it on window 10 to display the current
security level showed a s below:
The whole project is as follows:
Save, compile and Off-line simulation:
Because there' s no password input, the current security level must be 0.
Now, create a window 11 and set the security level for 1:
Create a function key on window 10, the attributes display as below:
Save, compile and Off-line simulation:
When we press function key, we are not allowed to switch to window 11. The reason is because the
current security level is 0 but the security level of window 11 is 1. Lower security level can' t access
to higher security level. We are allowed to enter higher security level by inputting password. System
register LW9040-LW9041 are for setting password. Add another Numeric Data object on window
10:
Note: The system is kept register LW9040-LW9041 the introduction password, number is double
word. Add a Numeric Input object , Save, Compile and Off-line simulation:
Now, if we input password 1111, the current window will be switch to level 1.
Press the switch window button under security level 1, window is successfully changed to window
11:
However, how to switch the higher level security to lower lever security? LW9043 allows the
project to force the HMI to a lower security level. Add a Numeric Data on window 10 as below:
Save, Compile and Off-line Simulation:
Input 1 into Change level but current level doesn’t become 1. A lower level can’t be force to higher
level.
Now, we input password 1111 to change the current level to
1:
Press function key to switch window 11. If we set 0 for change level, the current level becomes
0 and we can’t switch the current window to window 11.
It raises the system safety to apply the reasonable password security level to the projects by
different permissions for different operators.