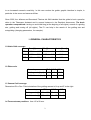
1
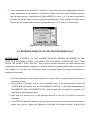
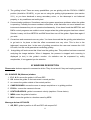
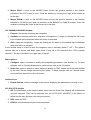
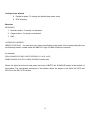
User’s Manual. Tijuano Guider. 2.1m Telescope.
Version 3, June 2006
Sandra Ayala, Joaquín Bohigas, Salvador Sazueta, Michael Richer and Esteban Luna.
Translated by Margarita Valdez-Gutiérrez.
I.
II.
III.
IV.
V.
VI.
VII.
VIII.
IX.
X.
XI.
General characteristics
Turning on
Guider initializing
Autoguiding
Centering objects on the spectrograph slit
Turning off
Recommendations for guiding
Remote conecction
Parameters file for initialization
Frequent problems
Windows description
2
3
4
5
7
8
8
9
10
10
11
After six months of testing the Tijuano guider was modified following sugestions coming from users
and the OAN technical staff. Nowadays the OAN is in charge of the Tijuano operation. One of the
main problems related to this instrument was a poor imaging. This was improved installing a
mechanism to optically align the zoom. However there are optical aberrations to large distances from
the optical axis that the guider can not correct given that it does not count with an optical system to
correct the image coming from telescope. The guider works efficiently even with a poor imaging, due
1
to an increased camera’s sensitivity. In this new version the guider graphic interface is simple, in
particular in the zoom and camera utilities.
Since 2005, the Jefatura and Secretaría Técnica del OAN decided that the guider’s basic operation
relies in the Telescope Assistant and in second instance in the Resident Astronomer. The basic
operation comprehends: turning on and initializing (at the begining of all nights), search of a guiding
star, guiding and turning off (all nights). The P.I can help in the search of the guiding star and
autoguiding (changing parameters, for example).
I. GENERAL CHARACTERISTICS
I.I Guider field coverage.
Dec [“]
f/7.5
RA [“]
Scale [“/mm]
-3964 to 1425 -2319 to 1491
13.03
f/13.5 -2178 to 783
-1197 to 819
7.16
f/27
-580
3.26
-992
to 356
to 373
I.2 Plate scale.
Secondary
f/7.5 f/13.5 f/27
Guiding mode [“/pix]
0.20 0.10
0.049
Full field mode [“/pix] 0.38 0.19
0.096
I.3 Camera field coverage
Dimensions RA x Dec. Field orientation of the guiding camera is N up and E to the right.
Secondary
f/7.5
f/13.5
f/27
Guiding mode [“]
154 x 102
77 x 51
38 x 25
Full field mode [“] 292 x 194 146 x 97 74 x 49
I.4 Focus extreme positions: from -65 a 99 mm.
2
I.5 Zoom extreme positions (approximated):
from -140 (“GUIADO” mode) to +140 (“CAMPO” mode).
I.6 Autoguiding default values
KP value: 1.0
Secondary
f/7.5
f/13.5
f/27
Binning factor
3
6
12
Autoguiding box size (pix)
60
120
200
Zona muerta (pix)
1.0
2.0
4.0
II. Turning on
II.1 Hardware
1. Check the guider electronics has been turned on.
2. Turn on the monitor and the guiders electronics switch, labeled “GUIADOR”.
3. In a couple of minutes the monitor displays the message “la cuestion es cuadrada”. The
computer is ready for instructions.
II.2 Software
1. In the SONAJA computer go to the “instrumentos nivel 0” icon.
2. Look for the “EL TIJUANO GUIADOR” icon. If it does not work, open a terminal in SONAJA
and execute: /home/observa/instrumentacion/bin/nuevo-guiador.sh &.
3. A welcome message appears and then a window to select the secondary currently in use.
After this press OK and then the guider interface opens. The interface is composed by three
windows (see the figures below):
GUIADOR 2M (Motores): main window controlling the guider.
GSC-GTK: Guide Star Catalog to select guiding stars.
Camara Guiador: guider’s camera control window.
4. Initialize the guider (section III). It takes a couple of minutes. In case of trouble a window
appears displaying a message. Trouble sources could be the electronics not being turned on,
communication problems, etc.
3
Figure 2. Guider’s interface windows.
III. GUIDER INITIALIZING
¾ Check the guider is out of the instrument’s optical path and center a relatively bright star,
magnitude ~5 , in the instrument currently in use.
1. GUIADOR 2M (Motores) window: go to the ACCIONES menu, up to the left in the window, and
then press the button CENTROS INSTRUMENTOS. A list of centers for the different
instruments in the 2.1m telescope appears (see the figure below). Select the instrument which
is currenlty operating and press the button OK. If your instrument does not appear in the list
select CENTROS MECANICOS of the secondary mirror in use. A message is displayed during
a couple of minutes indicating that the guider is getting initialized.
4
2. If the axis search gets stuck, go to the ACCIONES menu and click on INICIALIZA.
Figure 3. List of centers for the different instruments at the 2.1m telescope.
3. GUIADOR 2M (Motores) window: select the ZOOM button in CAMPO mode (the ZOOM
position in ACTUALES should be +140 approximately). This button changes to GUIADO giving
another click.
4. CAMARA GUIADOR window: write the integration time (in seconds). Then press the button
CONTINUO. A small window will appear and you should press the button OK only if you want
to interrup the integrations.
5. GUIADOR 2M (Motores) window: place the star at the center of the guider’s camera using the
buttons N, S, E, O.
6. GUIADOR 2M (Motores) window: select the ZOOM button at the position GUIADO (the ZOOM
position in ACTUALES should be -140 approximately).
7. GUIADOR 2M (Motores) window: recenter the star and get the best focus using the buttons
FOCO + - . To focus the guider, with the telescope in focus, use a magnitude > 8 star close to
the center’s field; the best imaging is located here.
8. GUIADOR 2M (Motores) window: menu ACCIONES, press the button CONFIGURA and then
the button DEFINE CERO AR/DEC. Check that the AR and DEC lectures (below ACTUALES)
display zeros. You can reach this position by pressing the button 0/0.
IV. AUTOGUIDING
IV.1 Guiding star search (GSC-GTK window)
1. GSC-GTK window: write the object coordinates and epoch. This information cab be listed in the
guider’s coordinates catalog in the same window.
2. Press the button BUSCAR en GSC.
5
3. The 30 brightest stars in the guider’s field are displayed in the window picturing this field (N is up,
E to the left). Brightness is coded by color: white (up to magnitude 10), green (between 10 and 13)
and red (beyond 13). Magnitude 9 stars (or less) located close to the center’s white rectangle
(region where the guider produces vignetting in the instrument) are not displayed.
4. Locate the cursor (and then click) over the brightest star and closest to the center’s yellow square
and outside of the white rectangle. Press the mouse’s right button. Then the guider moves to the
position of the star you have selected. The star’s magnitude will be displayed in the bottom left
corner of the window. If there is more than one star at that location, the magnitude of all of them
will be displayed as well.
5. GUIADOR 2M (Motores) window: change the ZOOM to the CAMPO mode, by clicking the button
located to the left of
the “ZOOM” word; the ZOOM position in ACTUALES should be +140
approximately.
6. Camara Guiador window: write the integration time (less than 10 seconds) and press the Continuo
button. Usually 4 seconds are enought for a 13 magnitude star. Your guiding star is displayed
once the guider has stopped. If it is not the case, increase the integration time. If still it does not
appear, select another star and repeat from step 4. If the problem persists (and sky is not cloudy)
reinitialize the guider (section III).
IV.2 Autoguiding
1. Guiador 2M (Motores) window: switch the ZOOM to the GUIADO mode (the ZOOM position in
ACTUALES should be -140 approximately) and refocus if it is necessary. It is possible to guide
with the ZOOM in the CAMPO mode but results are not good.
2. Camara Guiador window: stop the Continuo process pressing the OK button.
3. Then press the Exponer button: the image of your guiding star will be displayed.
4. Move the cursor over your star and press the mouse’s left button. A square will appear: the
autoguiding box.
5. Press the AUTO button to start the autoguiding. For a better understanding and to improve
guiding, go to section VI.
6. In the NEC brand monitor located to the right of the SONAJA PC, is displayed the field’s
image, the pixel differences in the star position with respect to the initial one (EX, EY,
corresponding to RA and DEC errors), etc.
7. To stop autoguiding press the OK button in the window appeared at the beginnig of this
process. Be aware: guiding could stop in case it loses the star (due to clouds or mechanical or
optical problems) or due to guiding errors accumulation (see section VI).
6
8. If the autoguiding is not good (EX>1 and EY>1 most of the time) stop guiding and check the
guider parameters in the camera’s configuration window (Opciones menu/Configura Camara;
see the figure below). Check that the ZONA MUERTA is set to 1.0. It is also convenient to
increase the VALKP value in order to guide more dinamicaly. Do not increase too much or the
EX and EY will oscilate (with absolute value greater than 1.0). A value of 2 works nicely.
Figure 4. Guider’s parameter window.
V. CENTERING OBJECTS ON THE SPECTROGRAPH SLIT
PLEASE NOTE: CONTRARY TO THE GUIDING PROCESS ALREADY DESCRIBED, IN THIS
CASE IT IS NECESSARY, FIRST, TO LAUNCH THE AUTOMATIC GUIDING AND ONLY THEN
PLACE THE OBJECT OVER THE SLIT. This is due to the fact that once you have selected your
guiding star (when the small box appears), the guider looks for the guiding star inside of that box and
then centers it in the box. For this reason when the guiding starts, the guider could induce a
telescope’s movement.
1. Point the telescope, center approximately your object, select a guiding star and launch the
automatic guiding.
2. Once guiding is working, click on the ACCIONES menu in the main window. Select the
CONFIGURACION option and at VELOCIDADES PALETA, in the field corresponding to
INCREMENTO AR or INCREMENTO DEC, write a small offset in arcsec (for example 1.0),
according to the required direction.
3. Note that you should move in the opposite direction to the one you need to move the
telescope.
4. GUIADOR 2M (Motores) window: click on the directional buttons until you have placed the
object over the slit. Images are displayed in the B&C Slit Camera window. Wait until the
7
object stabilizes (EX<1.0 and EY<1.0) prior to giving another click, in particular for offsets
equal or greather than 5”. Offsets greather than 12” are not recommended, because the
guiding star could depart from the guiding box and then you will loose the guiding.
Figure 5. Configuration window in the GUIADOR 2M (Motores) window. The use of the
VELOCIDADES PALETA is of particular importance in spectroscopical observations.
VI. TURNING OFF
1. Check the guider is not integrating in Continuo or Auto mode.
2. GUIADOR 2M (Motores) window: ACCIONES menu and click on the Salir button.
3. Turn off the guider electronics (switch labeled Guiador in the observation’s room).
VII. RECOMMENDATIONS FOR GUIDING
VII.1 Selection of the guiding star (GSC-GTK window)
a. Do not use a star inside the white square which defines the vignetting zone in the instrument.
b. Do not use a guiding star when the yellow square (guider’s mirror) touches or enters into the
white square because vignetting will be produced.
c. Try to guide with the brightest star and closer to the center’s field without vignetting the
instrument. Telescope’s imaging gets degraded for longer distances. Remember that good
imaging becomes into a better guiding.
d. Avoid the zone where the telescope’s baffle produces vignetting in the guider. The integration
time will be longer and the image’s quality will be poor if you are in this zone.
8
VII.1 Selection of guiding parameters (Camara Guiador window)
a. Guiding does not work with saturated stars. If this is the case reduce the integration time or select
another star.
b. Ideal integration times are 2 to 4 seconds provided you have enough signal without saturation.
c. Zona muerta is the minimum offset (by default 1, 2 and 4 pixeles) of the guiding star to perform a
correction. Default values for each secondary mirror are equivalent to 0.2”. This means guiding
will provide a little bit less than 0.1” to the image size (square root of the addition of the individual
squared values contribution). Default values are highly recommended.
d. The default binning factor is 3, 6 and 12. With these values the signal is good and does not
degrade the image of the guiding star. It is strongly recommended DO NOT change the binning
factor value.
e. Valor KP (by default 1, could be larger or smaller than 1) multiplicates the palette pulses (different
for RA and DEC) to be carried out throughout the autoguiding corrections. A value larger than 1
will perform aggressive corrections; it is recommended when the guider delays in minimizing the
guiding errors EX and EY (for example with unbalanced telescope). Reduce the value if the
guiding oscillates in excess (EX and EY change frecuently and in sign as well).
f. The default Tamaño Caja Autoguiado (in pixels) is
f/7.5
12”
f/13.5
12”
f/27
10”
The box should be big enough to include an enough sky pixel number for statistics. In very stable
conditions the box size can be reduced (improves the S/N). On the contrary, the size could be
increased (200 pixels maximum) to avoid lose the guiding by error acummulation (it is considered as
an error when EX and/or EY exceed a given fraction of the box in pixels).
VIII. REMOTE CONNECTION
To access the guider control from another computer, the display needs to be exported from the
SONAJA computer (IP 192.168.0.2). As an example, the guider controls will be displayed from the
ALPHA computer (IP 192.168.1.1). The simplest way to perform the remote connection is by using
Secure Shell. In a terminal window in ALPHA, write:
% ssh 192.168.0.2 or ssh sonaja
% password: (ask for it)
% home/observa/instrumentacion/bin/nuevo-guiador.sh&
9
the first instruction executes the remote connection to SONAJA and automaticaly will export the
SONAJA’s display in ALPHA. The second instruction accesses the Tijuano guider control program.
Another way to perform the remote conecction is by using telnet. From ALPHA:
% xhost +
% telnet 192.168.0.2 or telnet sonaja
% password: (ask for it)
% tcsh
% setenv DISPLAY 192.168.1.1:0.0 or setenv DISPLAY alpha:0.0
% /home/observa/instrumentacion/bin/nuevo-guiador.sh&
IX. PARAMETERS FILE FOR INITIALIZATION
If you are using an instrument not icluded in the list CENTROS INSTRUMENTOS in the menu
ACCIONES, GUIADOR 2M (Motores) window, check values (write them separately in a piece of
paper) for AR, DEC and FOCO (below ACTUALES) from a star already centered and focused in the
instrument and in the guider. To keep those data edit the file centros-guiador-2m in the directory:
/home/observa/instrumentacion/share/ui_motores
To the end of the file write a line with these data (separated by commas):
NOMBRE,AR,DEC,ZOOM,FOCO,SECUNDARIO
where NOMBRE is an identification to recognize your definition, AR, DEC and FOCO are the values
you saved from ACTUALES, ZOOM=+146.6 and fixed at all times.
X. FREQUENT PROBLEMS
1. The star’s image is really bad. The guider could be in focus but it produces bad imaging
beacuse the star is far away from the telescope’s optical axis. For good image quality it is
required a lens to correct field curvature and astigmatism. This guider has not such a lens. For
this reason it is recommended to select guiding stars close to the optical axis. Remember that
good imaging turns into a better guiding.
2. The guider does not find the guiding star. It could be you did not correctly define one or two
things: the secondary mirror and/or the guider’s center (in Inicializacion). It is also possible that
the telescope did not point well: if this is the case the telescope will not find the star.
10
3. The guiding is bad. There are many possibilities: you are guiding with the ZOOM in CAMPO
position (should be GUIADO), or you are not using the guiding right parameters (see section
VII.1), or you have declared a wrong secondary mirror, or the telescope is not balanced
properly, or sky conditions are terribly bad.
4. Communication problems. Sometimes control programs experience problems when the guider
is operating. Probably the reason resides in directions, a fact that does not occur between two
instruments because they do not operate simultaneously. It has been found that MEZCAL and
B&Ch control programs are unable to save images when the guider program has been closed.
Solution is easy: exit from MEZCAL and B&Ch and then turn off the guider. Open them again if
you wish.
5. Corrections and movements are very slow. You have observed that the guiding star takes time
to go back to its place or that the offset movements are very slow. This is due to the
telescope’s response time. In the case of guiding corrections the user can increase the VAL
KP value, but this could generate an oscillating guiding.
6. Autoguiding still works even that it has lose the guiding star. This problem has been corrected
analyzing the image statistics. When it happens, the process is stopped and a warning is
displayed (a text) in the guider’s monitor. As statistics can be surpassed by reality
complexities, it is suggested you be attentive.
XI. WINDOWS DESCRIPTION
Please note: buttons respond to consecutive clicks. They do not work if they are keeping pressed.
XI.1 GUIADOR 2M (Motores) window
1. E, O, N, S: moves the guider in AR and DEC.
2. 0/0: moves the guider to the instrument’s central position.
3. >>: moves the guider outside of the central position.
4. CAMPO/GUIADO: moves the zoom to campo acquisition or to guiding position.
5. FOCO+-: moves the camera to focuse.
6. LENTOS/RAPIDOS: guider’s movement velocity (rapidos= 5 times lentos).
7. MEM: saves the guider’s location.
8. MOV: moves the guider to a location saved by MEM.
Messages below ACTUALES
1. AR, DEC: guider’s position in AR and DEC with respect 0/0.
11
2. FOCO: guider’s position in this axis (-65 to 99mm).
3. ZOOM: guider’s position in this axis (approximately +140mm in CAMPO and -140mm in
GUIADO).
4. ESC. PLACA: plate scale value.
Messages in Otros Mensajes
1. List of locations saved by MEM: click on the button to the right to see the whole list.
2. Bottom row messages: displays the last guider action or inform that communication has been
lost between guider and PC.
Menu options
ACCIONES
1. INICIALIZA: opens a window with buttons that search for the guider’s center in the different
axes. Inicializa EJE AR – Inicializa EJE DEC – Inicializa EJE FOCO – Inicializa EJE ZOOM –
Cancela: close the window.
2. CENTROS INSTRUMENTOS: displays a list of the guider mechanical centers (AR, DEC and
FOCO) for each of the 3 secondary mirrors as well as the centers of other instruments. Select
one and a click on OK moves the guider to that location. The Cancela button closes the
window.
3. CONFIGURACION: opens a window with buttons that define the guider’s location as well as
its coordinates origin (its center) on the respective axis (or axes). – Define Cero AR/DEC –
Define Cero AR – Define Cero DEC – Cierra esta ventana. It also opens the VELOCIDADES
PALETA window where can be changed the guider movements in AR, DEC (in arcsec) and
FOCO (in mm).
4. Salir: finish the program. A confirmation is not requested.
MOVER
1. Mueve AR DEC: opens a window with buttons to move the guider the distance written in the
left window (in arcsec). – MOV. AR – MOV. DEC – MOVER AR y DEC, as well as a button to
the left of Mover Telescopio that when activated, moves the telescope the same angular
distance but in opposite direction to the guider, fact that keeps the guiding star location. Close
the window by clicking the X sign at the corner up to the rigth.
12
2. Mueve FOCO: a click on the MOVER button moves the guider’s camera to the location
indicated in the FOCO axis (in mm). Close the window by clicking the X sign at the corner up
to the rigth.
3. Mueve ZOOM: a click on the MOVER button moves the guider’s camera to the location
indicated in ZOOM (in mm) and not precisely to the GUIADO or CAMPO location. Close the
window by clicking the X sign at the corner up to the rigth.
XI.2 CAMARA GUIADOR window
1. Exponer: the camera executes one integration.
2. Continuo: the camera performs a sequence of integrations. It stops by clicking the OK button
in the window that is displayed when this option is activated.
3. Auto: starts the autoguiding. It stops by clicking the OK button in the window that is displayed
when this option is activated.
In the window there is a field to write the integration time in seconds (below T. INT.). The guider’s
camera has not a shutter and bright stars show a long tail in N-S direction (the CCD’s transfer
direction). The star is located in the upper part of the tail.
Menu options
1. Configura: opens a window to modify the autoguiding parameters (see Section VI). To abort
changes click on Cancela button and to perform them click on the OK button.
2. Graba fits: opens a window to save, delete or rename (in IRAF format and in the path defined
by the user) the last image acquired by the guider. To abort changes click on Cancela button
and to perform them click on the OK button.
Instrucciones
1. Estado Camara: writes a message in the monitor displaying the parameters currently in use.
XI.3 GSC-GTK window
1. AR: RA coordinates of the location where stars from the Guide Star Catalog will be searched
and then depicted. They can be acquired from the CATALOGO USUARIO (in the Menu) or
written by the user (by hand o by using the arrows).
2. DEC: same for DEC.
3. EPOCA: coordinates epoch previously mentioned.
13
4. Buscar en GSC: searchs for GSC stars inside the guider’s field around the coordinates
indicated in the fields AR and DEC with epoch defined in EPOCA.
5. O. AR: offset in RA with respect to the RA position written in the field AR. It can be written by
hand by using the arrows.
6. O. DEC: same for DEC.
7. Offsets a guiador: send the offsets O.AR and O.DEC to the guider (with respect to its central
position). The guider moves directly to this position.
8. Stars list. Located to the right of the RA fields and up to the field’s graphical display. In this list
you can see the stars founded in the GSC and ordered by decreasing magnitude.
9. Messages bar: bottom row in the window. It lists the magnitude of the star selected in the
field’s graphical display. It is possible that more than one star is located at the cursor position.
Interactive graphic window
This window depicts the guider’s field. It displays the following information:
1. Guider’s central location: bright point located almost coincident with the ellipse’s center
and inside the white rectangle.
2. Instrument’s vignetting zone: white rectangle centred with the guider’s central position.
Vignetting will be produced when the guider’s mirror (in yellow color) invades this area.
For the F/7.5 the rectangle (10’X10’) applies to all the instruments except PUMA (which
is 20’x20’). For the F/13.5 and F/27, the rectangle is for CAMILA and CID-BIB
respectively (experimentally determinated).
3. Guider’s mirror: is depicted by the yellow rectangle. It should not invade the white
rectangle depicting the instrument’s vignetting zone. The position where the yellow
rectangle is located corresponds to the currently guider’s physical location.
4. Primary mirror baffle’s vignetting to the guider’s field: white ellipse. The baffle produces
vignetting in the zone outside of this ellipse. Imaging is bad at this zone.
To interact with this window use the mouse:
1. Cursor placed over a star. Click with the right mouse button: shows the star’s
magnitude at the messages bar as well as the O.AR and O.DEC offsets, and moves
the guider to the selected offset. Click with the left mouse button: same as for the right
button, but the guider does not move.
2. Cursor placed where there is not a star. Both mouse’s buttons show the offsets in O.AR
and O.DEC without moving the guider.
14
Configuracion window
5. Escala de placa. To change the default plate scale value.
6. GSC directory.
Menu bar
ARCHIVOS
1. Guardar archivo. Currently not activated.
2. Cargar archivo. Currently not activated.
3. Salir.
CATALOGO USUARIO
ABRIR CATALOGO. You can send your object coordinates to the guider if the corresponding file has
the following format: number name HH MM SS.S sign GG MM SS epoch comments
for example:
0001 LkHa262 2 56 08.0 +20 03 23 2000.0 V=14.6, J=9.6
0008 LkHa262c 2 56 07.8 +20 02 09 2000.0 center field
Select the object from the list and press the button OBJETO AL GUIADOR located at the bottom of
the window. The coordinates and epoch of the chosen object are written in the fields AR, DEC and
EPOCA in the GSC-GTK window.
15