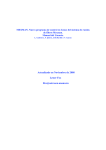
1
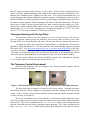
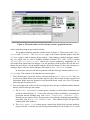
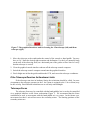
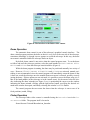
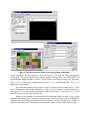
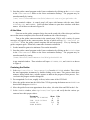
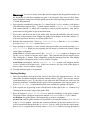
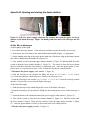
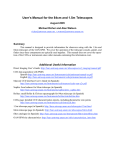
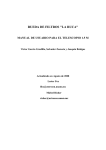
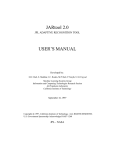
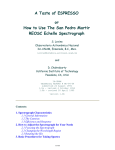
User’s Manual for the 84cm and 1.5m Telescopes
August 2005
Michael Richer and Alan Watson
[email protected], [email protected]
Lester Fox
[email protected]
last revised August 2009
David Clark
[email protected]
Summary
This manual is designed to provide information for observers using with the 1.5m and
84cm telescopes of the OAN-SPM. We cover the operation of the telescope console, guider, and
finder since these components are typically used together. This manual does not cover the operation of the CCDs or instruments since other manuals containing this information exist.
Additional Useful Information
Direct Imaging User’s Guide: http://haro.astrossp.unam.mx/telescopios/ccd_imaging/manual.pdf
CCD data acquisition with PMIS:
Spanish http://haro.astrossp.unam.mx/Instruments/ccds/pmisman/manual-es.pdf
English http://haro.astrossp.unam.mx/Instruments/ccds/pmisman/manual-en.pdf
Marconi CCD interface User’s Guide (in Spanish):
http://haro.astrossp.unam.mx/Instruments/ccds/marconi/ccds-oan-e2v.pdf
Sophia: focal reducer for 84cm telescope (in Spanish)
http://haro.astrossp.unam.mx/Instruments/sophia/intro_sophia.htm
Bolitas: small Boller & Chivens spectrograph for 84cm telescope (in Spanish)
http://haro.astrossp.unam.mx/Instruments/bolitas/introbolitas.htm
CCDs page: detailed CCD characterization reports, including photometric zero points
http://haro.astrossp.unam.mx/Instruments/ccds/introccds.htm
1.5m telescope page (in Spanish): http://haro.astrossp.unam.mx/telescopios/15mt.html
84cm telescope page (in Spanish): http://haro.astrossp.unam.mx/telescopios/84cm.html
filter catalogue (in Spanish): http://haro.astrossp.unam.mx/Instruments/filtros/introfiltros.htm
OAN-SPM site characteristics: http://haro.astrossp.unam.mx/sitio/caracteristicas_intro.htm
Telescope Characteristics
Automatic dome rotation is available at both telescopes. Nonetheless, it is prudent to occasionally check that the dome is not occulting the telescope. This is particularly so at the 1.5m,
because the dome shutter is not much wider than the telescope itself.
Both telescopes are equipped with two finder telescopes. The finder with the smaller
field of view has a video camera attached. This camera is viewed and controlled from the control room.
Figure 1: The finder telescopes at the 84 cm (left) and 1.5 m (right) telescopes.
Both telescopes are equipped with software and hardware protection systems that limit
the telescope’s motion and protect them from being driven to dangerous orientations. If one attempts to move the telescopes beyond the software-defined limits, the telescope console simply
ignores the requested motion. If, while guiding, the software limit is violated, eventually, the
hardware protection system will brake the telescopes’ motors. It is wise to respect the hour angle and declination limits while guiding (see below). Otherwise, significant time will be wasted
recovering from the intervention of the hardware protection system.
The 1.5m
The 1.5m telescope is a Ritchey-Chrétien with an 1.5m primary mirror. It delivers a
roughly f/13.5 beam to a Cassegrain focus. The edge of the primary is out of figure, and so the
telescope is stopped down at the secondary to about 1.32m. The telescope often suffers from significant astigmatism. The telescope has an equatorial mount and can point to declinations between +59° 40' and -40° and hour angles between +5 and -5 hours. If the telescope is not perfectly balanced, it can have problems pointing at the northern and southern extremes of declination. The telescope has a reputation for pointing inconsistently, sometimes badly and sometimes
well. The best that can be expected is about 3 arcmin over the whole sky, about 1 arcmin along
the equator (e.g., moving between Landolt standard fields), and a few arcsec over small distances, although often the pointing is worse. Typical delivered image quality is 1.0 to 1.5 arcsec.
The telescope is located at a longitude of +115° 28' 00'', a latitude of +31° 02' 43'', and an altitude of 2790 meters (9150 feet).
At the 1.5m, there are two routes from the warm room to the telescope: through the old
control room and by the outside walkway. To minimize heat leaks into the dome, which can degrade the seeing, we recommend using the outside walkway.
The 84cm
The 84cm telescope is a Ritchey-Chrétien with an 84cm primary mirror. It delivers a
roughly f/15 beam to a Cassegrain focus. The telescope often suffers from significant astigmatism. The telescope has an equatorial mount and can point to declinations between +64°45'14"
and -39° degrees and hour angles between +5 and -5 hours. If the telescope is not perfectly balanced, it can have problems pointing at the northern and southern extremes of declination. Furthermore, the declination gear is slightly oval from wear. As a result, the declination drive can
get stuck going to the extreme northern and southern positions. Unfortunately, until a new drive
system is installed, it will be impossible to achieve good pointing in declination and it will not be
uncommon to have problems with the pointing at the limits of the declination range. The pointing accuracy is about 3 arcmin over the whole sky, about 1 arcmin along the equator (e.g., moving between Landolt standard fields), and a few arcsec over small distances. Typical delivered
image quality is 1.5 to 2.5 arcsec. The telescope is located at a longitude of +115° 27' 58'', a latitude of +31° 02' 42'', and an altitude of 2790 meters (9150 feet).
Telescope Opening and Closing Policy
The decision to open or close the telescope is entirely at the discretion of the telescope
operators. Reasons include, but are not limited to, rain or snow, threat of rain or snow, snow
blowing off the trees, wind, humidity, and smoke. Do not argue. Do not complain. Do not pester.
As regards the policy for closing due to high humidity, you should close if the relative
humidity is rising and attains 85%. You may open once the relative humidity begins to drop and
falls below 90%. (see http://haro.astrossp.unam.mx/~resast/noticias/bol12000.htm for the official policy document in Spanish.) If there is any condensation on the porch roof in front of the
1.5m dome or on the metal sides of the catwalk at the 84cm dome or the outside dome walls at
either telescope, the dome should be closed regardless of the level of the relative humidity.
If rain or snow is likely, the telescope should be covered with a tarpaulin (see Apendix
C). If in doubt, inquire with the telescope operator at the 2.1m.
The Telescope Control Environment
Observers deal primarily with two computers: the telescope console computer and the
Linux data acquisition workstation.
Figure 2: The telescope console computers at the 84 cm (left) and 1.5 m (right) telescopes.
The telescope console computer is located in the console cabinet. Normally, one interacts with the telescope console computer via the graphical interface running on the Linux workstation. At the 1.5m only, one may interact directly with the telescope console computer, but this
is rarely necessary (see Figure 2).
The Linux workstation serves as the interface to all telescope-related observing operations: the telescope console, the dome control, the finder camera, the guider, and the secondary
mirror focus. The Linux workstation has an Instrumentos folder on the desktop that contains the icons that start the various instrument control programs. The Linux workstation also
has a Paquetes Astronomia folder on the desktop that contains the icons that start various
data analysis packages, e.g., IRAF, an image display (ds9, SAOtng, Ximtool), supermongo, etc..
By default, images are stored in /home/observa/imagenes, though this can usually be
modified easily. Given the number of components controlled from the Linux workstation, we
recommend using several desktops to conveniently display their program windows.
There is a second Linux workstation in the observing room that may be used for more detailed data reduction and data archiving. This workstation also has the same Paquetes Astronomia folder as the data acquisition workstation. Again, the images are found in
/home/observa/imagenes by default.
The observing account is observa on all computers. The passwords will be indicated in
the observing room.
Operation of the Telescope Console
The three switches on the console cabinet switch on the console computer, telescope motors, and exhaust fan. The telescope is assumed to be at the zenith when the console computer
boots. Nevertheless, the telescope coordinates will have errors typically larger than the field of
the CCD but smaller than the field of the finder.
The telescope is switched off by placing it at the zenith (see below) and turning off the
three switches on the console cabinet.
At the 1.5m, there is a panic button on the front of the lower telescope support (that
is, the north side of the southern telescope support; Figure 3). Also, in an emergency, switching
off the three power switches on the console cabinet will stop the telescope. Regardless, when
stopped in either manner, the telescope will be completely lost and must be brought to the zenith
manually.
Figure 3: The panic button at the 1.5 m telescope.
The Graphical Console Interface
Figure 4 presents the main window of the telescope console’s graphical user interface.
The graphical console interface is started by clicking on the telescope icon found in the
Instrumentos folder on the Linux workstation's desktop. (The icon is called Control Telescopio
at the 1.5m and Consola at the 84cm.) In the event that this icon is missing, start the graphical
interface by issuing
/home/observa/instrumentacion/bin/consola
(at the 84cm)
/usr/local/instrumentacion/bin/consola
(at the 1.5m)
Figure 4: The main window of the telescope console's graphical interface
at the command prompt in any terminal window.
The graphical interface opens the window shown in Figure 4. There are two tabs: TELESCOPIO and CATALOGO. The TELESCOPIO page is the console interface proper while the
CATALOGO page is used to manage object catalogs. Upon starting, a default catalogue containing very bright stars as well as Landolt standards (Landolt 1973, 1983, 1992) is loaded
(/home/observa/default.cat). Object lists of stars arranged by magnitudes can be
also loaded from /home/observa/Catalogs/. It is also possible to load an object list with the coordinates for your objects. See the default catalogue for the file format. To move the telescope to a
catalogue object, select the object and then click on the MUEVE TELESCOPIO button.
In most cases, the user will interact primarily with the telescope console window (TELESCOPIO tab). This window is divided into four vertical panes.
1. The left-most pane is used for relative telescope motions (MOVS RELATIVOS). There are
two boxes in which offsets (in arcseconds) may be typed, one for each of right ascension and
declination. Below these are buttons for each direction (north, south, east, west). The largest
offset that may be entered is 60".
2. The second pane (the widest of the four) displays the telescope coordinates and the buttons
that are used for telescope movement.
a. The EDITAR COORDENADAS button opens a window in which object coordinates and
epoch are entered (Figure 5). To move the telescope to these coordinates, accounting for
precession and the pointing map, click MUEVE TELESCOPIO (PRECESA, ETC).
Should you not want to correct for precession or the telescope pointing map (probably a
poor idea), click MUEVE SIN CORRECCIONES. This window may be left open while
working with other windows.
b. The POSICIONES FIJAS button opens a menu from which fixed telescope positions
may be selected. Currently, the only fixed positions defined are the zenith (ZENITH) and
Figure 5: The window used to enter object coordinates.
the position for filling the dewar (PONER LONA). At the 84cm, this position is also used
to cover the telescope with a tarpaulin in case of rain or snow (see Apendix C).
c. The INSTRUCCIONES MAS USADAS button opens a menu with several options:
•
CORRIGE COORDENADAS sets the current telescope coordinates to the coordinates
most recently entered at the coordinates window or selected from the object catalogue. This is the most commonly used option.
•
CORRIGE ZENITH informs the console that the telescope is at the zenith and resets
the coordinates appropriately. Be careful not to select this button by mistake!
•
DESACTIVA GUIADO deactivates telescope guiding.
•
ACTIVA GUIADO activates telescope guiding. This only works at the 84cm. At the
1.5m, you must point to another object to begin tracking again.
•
INSTRUCCIONES EN LINEA opens a command line window at which console
commands may be typed (in uppercase at the 84cm, lowercase at the 1.5m). The
most useful of these are given in Apendix A.
3. The third pane (INFO UTIL) lists the object hour angle, airmass, and azimuth as well as the
universal and sidereal times and the Julian date.
4. The right-most pane includes the controls for automatic dome control. There are two push
buttons: POSICIONADO AUTOMATICO and GUIADO. Selecting POSICIONADO AUTOMATICO will cause the dome to position itself at the telescope position each time the telescope is moved. GUIADO will cause the dome to track the telescope position while observing an object. There is also a display of the dome azimuth and two arrow buttons. The arrow
buttons may be used to position the dome to a specific azimuth. GUIADO must be deactivated if the dome is to remain at these manually selected positions.
Across the bottom of the TELESCOPIO page (Figure 4) is an object catalogue interface
with two buttons (Mover Telescopio and Graba Objs.). All object coordinates entered
using the EDITAR COORDENADAS window (Figure 5) are stored here for future use. In theory,
selecting an object from this list and pressing the Mover Telescopio button sends the telescope to the object position. However, this works only erratically. The Graba Objs. button
Figure 6: The catalogue interface.
may be used to save the objects accumulated in this catalogue to a file that may later be used in
the CATALOGO page.
The CATALOGO page of the console interface (Figure 6) allows the use of object catalogues. The interface includes the object catalogue, two menus, and a large MUEVE TELESCOPIO button. Objects may be selected from the catalogue in use by paging using the scroll bar or
by searching using the Buscar/Busca por nombre aproximado menu. Object catalogues are loaded via the Archivos/Carga archivo de disco menu. The telescope is
moved to the object by pressing the MUEVE TELESCOPIO button.
Telescope Pointing and Correcting Coordinates
There are two hand paddles: one in the dome and one at the observing station. Both have
switches to permit rapid motions, though all motions are slow by default. On the paddle in the
dome, rapid motions are activated by pressing the button on the back of the paddle while simultaneously pressing one of the directional buttons on the front of the paddle. On the paddle at the
observing station, rapid motions are activated by pressing the button above the joystick (1.5m) or
the arrow buttons (84cm) while simultaneously moving the joystick/arrow buttons. It is much
better to pulse the hand paddle than to hold the switches down continuously.
Neither telescope points especially well over the whole sky. Errors of up to three or four
minutes are possible. Therefore, after a large slew, you may need to find a bright star in the almanac and correct the telescope coordinates (INSTRUCCIONES MAS USADAS/CORRIGE
COORDENADAS).
If your object is well centered in the CCD, it is worthwhile to correct the telescope coordinates before moving after a long exposure.
If the Telescope Becomes Lost
If the telescope is completely lost, normally because the console program was stopped
with the telescope at some position other than at the zenith:
Figure 7: The graphical interfaces used for focusing the 1.5m telescope (left) and 84cm
telescope (right).
1. Move the telescope to the zenith under the control of the console or hand paddle. You may
have to “lie” about the desired right ascension and declination. Use the level (normally hung
on the wall of the observing floor) on a horizontal part of the guider or filter wheel to verify
that the telescope is vertical.
2. Close the graphical console interface and turn off the telescope console computer.
3. Switch the telescope console computer on and start the graphical interface.
4. Find a bright star in first the guider and then the CCD, and correct the telescope coordinates.
If the Telescope Reaches its Hardware Limits
If the telescope runs into its hardware limits, the technicians should be called. In some
circumstances the telescope operator (at the 2.1m if none is assigned to the 1.5m or 84cm) may
be able to help. Recall that the technicians are on call only until midnight.
Telescope Focus
The telescope focus may be controlled with the hand paddles, but it can also be controlled
via a graphical interface on the Linux workstation (Figure 7). We recommend that the Linux
workstation be used, as movements with the hand paddle are very coarse. In the former case,
movements less than 1 unit will not move the secundary mirror. The limiting positions of the
secondary mirror are:
Telescope
upper limit
lower limit
84cm
3871
40
1.5m
1154
0
To start the telescope focus control program on the Linux workstation, click on the
Secundario icon in the Instrumentos folder on the Linux workstation desktop. If the icon
is not present, start the focus control program by issuing
/usr/local/instrumentos/bin/secundario
at the 1.5m
wishx /home/observa/secundario/secundario5.tcl
at the 84cm
from any terminal window.
Basically, you should take a sequence of images varying the focus between each and
measuring the FWHM with imexam in IRAF. There are also focus macros in the CCD control
software that may be useful for this task (if you are using the PMIS software; see the relevant
manuals). In all likelihood, as the secondary passes through focus, the telescope's astigmatism
will cause oval distortions to twist by 90 degrees.
At the 84cm: It is best to always focus by raising the secondary, which corresponds to
increasing the focus read out by pressing the upward pointing arrow (Figure 7).
At the 1.5m: It is best to always focus by raising the secondary, which corresponds to
decreasing the focus read out by pressing the Dn button (Figure 7). The telescope focus at the
1.5m depends sensitively on the position of the telescope (several detailed reports are available
starting from http://www.astrossp.unam.mx/~resast/sec1.5m/foco2003.html). The focus changes
because the support structure for the secondary mirror deforms as the telescope is elevated towards the zenith, requiring the secondary mirror to be raised as the zenith distance decreases.
The program that controls the secondary mirror has been modified to correct this systematic effect automatically. This correction is implemented as an option. To use it, click the push button
Corrige por flexiones (Figure 7). Note that this option should only be activated after
the telescope has been focused. Even with this option, we recommend checking the focus if the
image quality is important, though the automatic focus control should be sufficient for standard
star fields and the like.
Figure 8: The interface to the finder video camera.
Dome Operation
The automatic dome control is part of the telescope's graphical console interface. The
dome control program positions the dome so that it is very close to the east side of the telescope,
sometimes alarmingly so, though it never appears to occult the telescope. In this way, the dome
movement is minimized while the telescope tracks an object.
By default, dome control is not active when the control program starts. To set the dome
to follow and track the telescope position, select the push buttons for POSICIONADO AUTOMATICO and GUIADO from the telescope console interface (Figure 4).
While the dome program is running, the dome may be positioned manually in a variety of
ways. However, if POSICIONADO AUTOMATICO and GUIADO are activated, manual positioning is not recommended, since the control program will immediately return the dome so that
it does not occult the telescope once the manual dome movement is released, possibly severely
jarring the dome. If these options are not activated, it is possible to move the dome using (a) either of the hand paddles (at the telescope or in the control room), (b) the arrows below the window indicating the dome azimuth (see Figure 4), or (c) positioning the cursor over the window
indicating the dome azimuth, clicking with the right mouse button, specifying the desired azimuth in the window that opens, and finally selecting this window’s MOVER button.
The control program does not rotate the dome when the telescope is sent to one of its
fixed positions (zenith, filling).
Finder Operation
The telescope finder video camera is controlled using the Buscador icon in the Instrumentos folder. The program itself is located at
/home/observa/Colorado/Buscador/run_buscador
Figure 9: The three windows used for telescope guiding at the 84cm.
at both telescopes. The user interface is shown in Figure 8. The slider bar allows changing the
camera gain. The desired exposure time may be entered in the text box. The default gain is 1.0
and the default integration time is 100 ms. These values are sufficient to easily see 6 mag stars.
The Integrar button starts integrations while the Detener button stops them. The Salir
button closes the program.
The signal from finder video camera is fed to a monitor in the control room. At the
84cm, the monitor is dedicated to the finder. At the 1.5m, the monitor is shared with the telescope guider. To see the signal from the finder video camera at the 1.5m, press the LINE A button on the video monitor in the control room.
When you are looking at a star with the small telescope finder, in order to see it in the
monitor in the control room, you have to place the star in the center of the cross seen through the
eyepiece of the small telescope finder at the 84 cm telescope. At the 1.5 m telescope you have to
place the star at the point of the needle seen through the eyepiece of the small telescope finder.
Telescope Guider Operation
Although the guiders at the 1.5m and 84cm telescopes are very similar, their user interfaces differ in some important details. Unfortunately, no detailed discussion of either guider is
available online. The guiders use intensified CCD cameras that can be degraded and damaged
by excessive saturation (from too much light combined with too much gain). Therefore, you
should increase gain only slowly and not use the intensifier while there is light in the dome or
while the sun is up.
At the 84cm telescope, guide stars should only be chosen in the upper half of the guider’s
field of view. Choosing guide stars in the lower half will result in a donut or partial donut of diffuse light being thrown into the field of view of the science CCD. For reports (in Spanish), see
http://www.astrossp.unam.mx/Instruments/guiador84_nuevo/donas/donas.htm
or its update (Aug. 2007) at
http://www.astrossp.unam.mx/Instruments/guiador84_nuevo/donas_ago07/donas2.pdf.
Figure 10: The four windows used to control the guider at the 1.5m.
Starting the Guider
At the 1.5m
Check that the guider power strip, located on the south east side of the mirror cell, is
turned on. If the guider control computer beeps repeatedly, reset it with the button indicated on
its case.
Turn on the guider camera monitor in the control room. Press the LINE B button on the
monitor. If all is well, a variety of system messages will appear on the camera monitor, the last
of which will say “La cuestion es cuadrada.” If not, the guider control computer did
not boot properly. In this case, it will perhaps beep repeatedly. Pressing the reset button (indicated) should reboot the control computer and resolve the problem. If not, contact the electronics technician.
1. Set the intensifier gain to its minimum. Turn on the intensifier.
2. Start the guider control program on the Linux workstation by clicking on the Guiador icon
in the Instrumentos folder on the Linux workstation desktop. The program may be
started manually by issuing
/usr/local/instrumentacion/bin/checa-si-esta-ejec-guiador.sh
in any terminal window. A control panel will open with buttons with the same labels
GUIADOR, GSC, and CAMARA. Select all three buttons to open three windows with these
names. All of these are shown in Figure 10.
At the 84cm
First turn on the guider computer (beige box on the south side of the telescope) and then
turn on the camera computer (silver box on the southwest side of the telescope).
Turn on the guider camera monitor in the control room. If all is well, a variety of system
messages will appear on the camera monitor, the last of which will say “La cuestion es
cuadrada.” If not, the guider control computer did not boot properly. If so, try booting the
guider computer again. If that fails, contact the electronics technician.
1. Set the intensifier gain to its minimum. Turn on the intensifier.
2. Start the guider control program on the Linux workstation by clicking on the Guiador icon
in the Instrumentos folder on the Linux workstation desktop. The program may be
started manually by issuing
/home/observa/instrumentacion/bin/guiador84.sh
in any terminal window. Three windows will open: GUIADOR, GSC, and CAMARA as shown
in Figure 9.
Centering the Guider
1. Select Opciones/Ceros Instrumentales from the GUIADOR window. Then, select
the most appropriate instrument, by double-clicking on its name. This process takes three
minutes, during which time a window appears to indicate the progress of this process. Proceed once this progress window disappears.
2. Put a magnitude 5 or 6 star, roughly in focus, in the center of the CCD field.
3. Move the guider mirror into the field of the CCD by pressing the button next to ESPEJO so
that its label changes to DENTRO.
4. Move the guider focus to an approximate focus value, -40 at the 84cm and 2200 at the 1.5m.
5. In the CAMARA window, select Opciones/Configura and verify that the various parameters have their proper values:
Parameter
FACTOR DE BINNING
TAM. CAJA GUIADO
VALOR KP
ZONA MUERTA
84cm 1.5m
4
2
60
60
1.0
20
1
0.7
Warning: It is wise to always restart the consola computer and the graphical interface at
the beginning of each direct imaging run at the 1.5m telescope, since users of other instruments commonly change the telescope paddle speed (this affects guiding performance via the
VALOR KP parameter).
6. Start exposing continuously (using the FOCO button on the CAMARA window), with about a
200 millisecond exposure time. A small window labeled Cancela el foco will open
with a button labeled Ok, which will eventually be used to stop the exposures. Note that exposure times for the guider are given in milliseconds.
7. Find, center, and focus the star in the guider field. Increase the intensifier gain only slowly.
Note that, as the telescope focus changes, the guider focus changes in the same manner, i.e.,
if the telescope focus increases, so will the guider focus.
8. Redefine the centre position. Select Opciones/Configura from the GUIADOR window.
Press the Redefine Ceros button, then Cancela.
9. Stop exposing by selecting Ok in the window that opened when you started exposing (Cancela el foco). When you stop exposing, the last image is written to the camera window
on the Linux workstation.
at the 1.5m: It will take some time for the Cancela el foco window to disappear and
for the CAMARA window to become active again. This is normal and does not require repeatedly clicking the Ok button. What is happening is that the last image from the video display
is being digitized for display in the CAMARA window’s display.
at the 84cm: Immediately, both the Cancela el foco window will disappear and the
CAMARA window will become active. In this case, however, no copy of the video display is
shown in the CAMARA window’s display.
10. Turn the intensifier gain to its minimum.
Starting Guiding
1. Enter the coordinates and epoch of the center of the field in the appropriate boxes. (If you
entered the coordinates using the coordinate editing window, Figure 5, the telescope console
sends them there for you.) If your object is not centered in the field and you wish to use the
telescope coordinates, remember that the epoch of these coordinates is the current epoch. Select BUSCA EN GSC. A representation of the stars available for guiding will appear.
2. Select a guide star by pressing on the colored blocks on the right of the GSC window or by
clicking on the star in the image of the guider field.
3. Press the button OFFSETS AL GUIADOR to send the coordinates to the guider window.
The guider offsets will appear in the boxes marked DESEADAS in the GUIADOR window.
At the 84cm, the guider mirror will automatically go to these coordinates.
At the 1.5m, send the guider camera to this position by pressing the button MUEVE AR/DEC
in the GUIADOR window. Note that the eventual coordinates in the boxes marked REALES
will be somewhat different from the DESEADAS. Even so, make sure that the actual coordinates (REALES) approach their desired values (DESEADAS), without reversing direction for
instance. Typically, the declination coordinates (REALES and DESEADAS) agree better than
the right ascension coordinates. The latter often differ by 50 units. If coordinates do not approach the desired values, it is likely that the guider is confused and it will be necessary to
recentre the guider (Opciones/Ceros Instrumentales, see above).
4. Start exposing (with perhaps a 1 second exposure time). Find and center the guide star in the
guider field on the video monitor. Adjust the focus if necessary. Increase the intensifier gain
only slowly. Stop the exposure. The key to finding guide stars is to know the position of the
telescope accurately. We recommend correcting the coordinates of the telescope whenever its
position is known.
5. Start another exposure (FOCO, CAMARA window) with an exposure time of 2-5 seconds
(which determines the correction rate). Adjust the gain so that the star is not saturated. Stop
the exposure.
At the 84cm: Take a single exposure using the CAMARA window’s EXPONER button
(Figure 9). This image will be displayed in the CAMARA window’s display.
At the 1.5m: The last image from the video display will be transferred to the CAMARA window’s display automatically.
6. Select the guide star by clicking on its image in the CAMARA window. Press AUTO to start
guiding. A window will open that says Cancela el autoguiado. On the guider video
monitor, a very large-scale image of the star and an image of the guider box will appear.
Stopping Guiding
1. Press the Ok button in the Cancela el autoguiado window.
2. Set the intensifier gain to its minimum.
Stopping the Guider
1. At the 1.5m, the easiest way to shut down the guider is to close the guider control panel
(Figure 10). This will close all of the other guider component windows.
At the 84cm, select ACCIONES/Salir from the GUIADOR window (Figure 9).
2. Set the intensifier gain to its minimum. Switch off the intensifier.
3. Switch off the camera monitor.
4. At the 1.5m, switch off guider power strip.
At the 84cm, turn off the two computers started earlier.
Apendix A
The following commands generally work for (a) the command-line interface to the console computer at the 1.5m and (b) the INSTRUCCIONES MAS USADAS/INSTRUCCIONES
EN LINEA button/menu from the graphical interfaces at the 84cm and 1.5m. However, the
commands should be given in upper case for the command-line interface at the 1.5m and the
graphical interface at the 84cm. The commands should be given in lower case for the graphical
interface at the 1.5m. Command variables are shown in italics. All of these commands are completed using the RETURN key.
A more extensive list of command-line commands may be found in the old telescope
manuals:
84cm (English): http://haro.astrossp.unam.mx/telescopios/man84cm/manual-en.html
84cm (Spanish): http://haro.astrossp.unam.mx/telescopios/man84cm/manual-es.html
AH hh mm ss.s
Set the hour angle. Telescope guiding is deactivated. This is useful for taking flat fields and filling the dewar.
FIJO_DEC dd mm ss
Set the declination. For negative declinations issued at the command-line console computer, the minus sign must appear on the
first non-zero coordinate. For example, to set the declination to -00
10 23 you must issue DEC 00 -10 23. Telescope guiding is deactivated. This is useful for taking flat fields, filling the dewar, or positioning the telescope to cover it with a tarpaulin.
Shift+@
Stop the console program at the 1.5m. Not used at all with the
graphical interfaces.
AR hh mm ss
Set the right ascension. The telescope won’t move until the ACT
command is issued.
DEC dd mm ss
Set the declination. For negative declinations issued at the command-line console computer, the minus sign must appear on the
first non-zero coordinate. For example, to set the declination to -00
10 23 you must issue DEC 00 -10 23. The telescope won’t move
until the ACT command is issued.
EPOCA yyyy.y
Change the epoch. The telescope won’t move until the ACT command is issued.
ACT
Move to the position defined by AR, DEC, and EPOCA and start
tracking.
ZENITH
Move the telescope to the zenith.
NGUIA
Stop tracking. This is useful for taking flats and filling the dewar.
LEE_RELOJ
Force the console computer to set its time. This is perhaps only
useful at the 1.5m and it’s not clear that it still works there.
Apendix B: Opening and closing the dome shutters
Figure 11: Left: The power supply cable and the switches that open the upper and lower
shutters at the 84cm telescope. Right: The hand paddle that moves the telescope and the
dome.
At the 84 cm telescope
At the begining of the night:
1. Turn on the telescope motors. If the telescope oscillates around the zenith, do not worry.
2. In the dome, move the dome to the south with the hand paddle (Figure 11, right panel).
3. On the landing at the top of the stairs on the south side of the dome, plug in the shutter motors
(the cable is indicated by the number 1 in Figure 11).
4. First, turn the switch to open the upper shutter (number 2, Figure 11) and then hold down the
switch to drop the lower shutter (number 3, Figure 11). The switch to drop the lower shutter
must be held down until the lower shutter is completely open. Once the upper shutter is completely open, it is a good idea to close it a bit. Return the switch to its central position.
5. Disconnect the power supply (cable number 1, Figure 11).
6. Send the telescope to the position for filling the dewar (POSICIONES FIJAS/PONER
LONA from the telescope control interface). Remove the telescope cover.
7. Send the telescope to the zenith (POSICIONES FIJAS/CENIT from the telescope control
interface). Remove the covers from the finder telescopes.
At the end of the night:
1. Send the telescope to the zenith and put the covers of the finder telescopes.
2. Send the telescope to the position for filling the dewar and put the cover on the telescope itself.
3. Orient the dome to the south and connect the power supply (cable number 1, Figure 11).
4. First, lift the switch to close the lower shutter (number 3, Figure 11). Hold the switch until
the lower shutter is closed. Then, turn the switch to close the upper shutter (number 2, Figure
11). Once the upper shutter is closed, set the switch back to its central position.
5. Disconect the power supply (number 1, Figure 11).
6. Turn off the telescope motors.
Figure 12: Left: The power cable and the switches that open the upper and lower shutters
at the 1.5m telescope. Right: The switches that open the primary mirror shutters and that
move the dome.
At the 1.5 m telescope
At the beginning of the night:
1. Turn on the telescope motors.
2. In the dome, orient the dome to the north with either the hand paddle or the switches on the
wall (see right panel, Figure 12).
3. On the landing at the top of the stairs on the north side of the dome, connect the power supply
(number 1, Figure 12).
4. First, turn the switch to open the upper shutter (number 2, Figure 12). Second, press the
switch to drop the lower shutter (number 3, Figure 12). Hold the switch until the lower shutter
is completely open. Once the upper shutter is completely open, it is a good idea to close it
slightly. Return the switch to its central position.
5. Disconnect the power supply (number 1, Figure 12).
6. Open the primary mirror shutters in the order indicated on the switches (Figure 12, right).
7. Remove the covers of the finder telescopes.
At the end of the night:
1. Send the telescope to the zenith (POSICIONES FIJAS/CENIT from the telescope control
interface).
2. In dome, close the primary mirror shutters in the order indicated on the switches (Figure 12,
right). Replace the covers of the finder telescopes.
3. Orient the dome towards the north and connect the power supply (number 1, Figure 12).
4. First, lift the switch to close the lower shutter (number 3, Figure 12). Hold this switch until
the lower shutter is completely closed. Then, turn the switch to close the upper shutter (number
3, Figure 12). Once the upper shutter is completely closed, return the switch to its central position.
5. Disconnect the power supply (number 1, Figure 12).
6. Turn off the telescope motors .
Apendix C: Covering the telescopes with a tarpaulin.
At the 84cm telescope:
1. Send the telescope to ‘Poner lona’.
2. Cover the telescope with a tarpaulin.
3. Send the telescope to the zenith. Be sure that all the electronic devices are covered properly
with another tarpaulin (see Figure 13).
4. Orient the dome to the north-east. The telescope should look like the figure.
Figure 13: This photo shows the telescope and its electronics covered with tarpaulins.
At the 1.5m telescope:
1. Send the telescope to a large, northern declination, e.g., with FIJO_DEC +55 00 00 from
the telescope control interface (INSTRUCCIONES MAS USADAS/COMANDOS EN LINEA).
2. Cover the secondary mirror with a tarpaulin (see Figure 14). It may help to use the wooden
pole that is usually leaning against the dome wall to properly position the tarpaulin.
3. Send the telescope to the zenith and cover the primary mirror with another tarpaulin. It is safe
to step on the mirror cell (the square-ish orange structure at the bottom of Figure 14).
4. Orient the dome towards the north-east.
Figure 14: This photo shows the 1.5m telescope covered with tarpaulins.