1
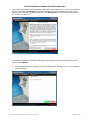
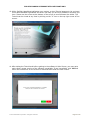
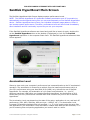
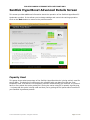
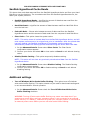
SanDisk HyperBoost™ PC Accelerator User Manual Preliminary, Rev 0.1 The content of this document is subject to change without notice Technical Support SanDisk Knowledgebase Contact SanDisk FOR USE BY SANDISK HYPERBOOST BETA PARTICIPANTS ONLY Table of Contents Overview.......................................................................................................3 Minimum System Requirements ..............................................................3 Package Contents .......................................................................................3 Connecting Device to Your Computer .....................................................4 Setting Up SanDisk HyperBoost Software ..............................................5 SanDisk HyperBoost Main Screen ..........................................................11 Acceleration Level .....................................................................................11 Status ..........................................................................................................12 Acceleration Log ........................................................................................12 Time Saved ................................................................................................12 SanDisk HyperBoost Software Options .................................................13 Help .............................................................................................................13 Check for Updates.....................................................................................13 Recalibrate .................................................................................................13 Advanced Details.......................................................................................14 About ...........................................................................................................14 Tutorial ........................................................................................................14 Eject ............................................................................................................14 Exit ..............................................................................................................14 SanDisk HyperBoost Advanced Details Screen ....................................15 Capacity Used ............................................................................................15 SanDisk HyperBoost Cache Reads .........................................................16 Additional settings ....................................................................................16 System Tray Icon ......................................................................................18 Uninstalling the Software ........................................................................19 Frequently Asked Questions....................................................................20 Page 2 of 20 FOR USE BY SANDISK HYPERBOOST BETA PARTICIPANTS ONLY Overview SanDisk HyperBoost is the simplest way to upgrade your PC’s performance. Using a combination of hardware and software, SanDisk HyperBoost optimizes your PC. You will enjoy shorter bootup times, quicker application launch times, faster access files and folders, and overall a more responsive PC. SanDisk HyperBoost is using a USB 3.0 drive that is built on SSD technology in a tiny form factor to deliver excellent performance. It works with your system's existing hard drive to deliver the performance benefits of solid state technology at a fraction of the cost of total hard drive replacement. The SanDisk HyperBoost software monitors the user’s behavior and automatically copies the most frequently used applications and files onto the SanDisk HyperBoost drive. When the user accesses a file or application that is stored on the drive, the software reads that data off of the SanDisk HyperBoost drive rather than the Hard Disk Drive (HDD). By using Flash memory and no moving parts, SanDisk HyperBoost storage is much faster than traditional HDDs. Therefore, SanDisk Hyperboost significantly reduces latencies and transforms PCs into much faster machines – up to 4 times faster than before1. It easily connects to any laptop or desktop computer configured with a USB 2.0 or 3.0 port and Windows® 7/8/8.1 operating system. Works with your existing hard drive to boost system speed. Up to 2 times faster bootup and up to 4 times faster application response times1. Easy installation – no need to open your PC, no Software downloads. Automatic operation - Just plug the drive in, and let SanDisk HyperBoost do the rest. Easily connects to any laptop or desktop computer. Durable, resilient design. Minimum System Requirements Windows® 7/8/8.1 Hard Disk Drive as the main storage (no SSD) 1GB of RAM (32bit) and 2GB of RAM (64bit) USB 3.0 recommended for full performance improvement; USB 2.0 compatible Internet Explorer 9 or higher Package Contents SanDisk HyperBoost Drive SanDisk HyperBoost Software already preloaded on the drive. As compared to 5400RPM SATA hard drive. USB 3.0 port required for full performance improvement. Based on internal benchmarking tests; performance may vary depending on host device, OS, frequency of application usage and other factors. 1 © 2014 SanDisk Corporation. All rights reserved. Page 3 of 20 FOR USE BY SANDISK HYPERBOOST BETA PARTICIPANTS ONLY Connecting Device to Your Computer To plug in the device to your computer, follow these steps: NOTE: The SanDisk HyperBoost software is designed to work with either laptop or desktop computer. 1. Turn on the computer. Ensure you login to an account that has administrative privileges. If this is your own personal computer, you’re probably ok. 2. Connect to a USB 2.0 or 3.0 port. Typically, the USB 3.0 port has a blue port color or the initials SS next to the port. NOTE: The SanDisk HyperBoost PC accelerator works with both USB 2.0 and 3.0 ports. For maximum system performance, it is recommended to use a USB 3.0 port. (USB 3.0 ports have transmission speeds of up to 5 Gbit/s, which are much faster than USB 2.0 ports with 480 Mbit/s speeds.) © 2014 SanDisk Corporation. All rights reserved. Page 4 of 20 FOR USE BY SANDISK HYPERBOOST BETA PARTICIPANTS ONLY Setting Up SanDisk HyperBoost Software To install the software, follow these steps: 1. After device is connected, either the SanDisk HyperBoost Software Autoplay screen appears, or a file explorer window may get opened automatically. This depends on your Windows settings. You might also notice a message saying that a device driver software is getting installed: On Windows 7: On Windows 8/8.1: Once the Autoplay screen appears, click on Open Folder to View Files. NOTE: If neither the Autoplay screen nor the File explorer window appears, please access the SanDisk HyperBoost application through Windows File Explorer. This may have been caused because your computer was powered on after the device was connected, or because Autoplay was disabled in your PC’s settings. © 2014 SanDisk Corporation. All rights reserved. Page 5 of 20 FOR USE BY SANDISK HYPERBOOST BETA PARTICIPANTS ONLY 2. The SanDisk HyperBoost Setup icon appears. Double-click on the SanDiskHyperBoostSetup option. 3. If a Windows User Account Control screen appears requesting permission for software to make changes to your computer, select Yes. (If no screen appears, proceed to step 4.) 4. The SanDisk HyperBoost Installer Welcome screen appears. Click Next. © 2014 SanDisk Corporation. All rights reserved. Page 6 of 20 FOR USE BY SANDISK HYPERBOOST BETA PARTICIPANTS ONLY 5. The License Agreement screen appears. Read the License Agreement. Scroll to the bottom of the screen and click Accept to confirm acceptance. Note: Only after you scroll to the bottom of the End User License Agreement, the Accept button will become green and you will be able to click on it. 6. The SanDisk HyperBoost Software Settings screen appears. Select the appropriate check box and click Install. Create desktop shortcut: displays a SanDisk HyperBoost software icon on your desktop (recommended). © 2014 SanDisk Corporation. All rights reserved. Page 7 of 20 FOR USE BY SANDISK HYPERBOOST BETA PARTICIPANTS ONLY 7. The SanDisk HyperBoost Software Installation screen displays the status as the software is installed on your computer. (This process may take a few minutes) After the software had been installed, the computer should be rebooted to complete the software configuration process. Click Now to reboot at this time, or Later to reboot at another time. NOTE: During the installation process you may notice the Autoplay window, or a File Explorer window, open up. If they do, please close them. 8. After reboot, you may see another User Access Control screen, requesting permission for software to make changes to your computer, select Yes. 9. After Clicking Yes the SanDisk HyperBoost software launches and the PC accelerator is activated. NOTE: SanDisk HyperBoost has to calibrate your system in order to show you by how much it accelerated your PC. Due to this process, your computer may feel slow during the first couple of minutes immediately after the software is first launched. Please refrain from launching additional applications while the calibration takes place in order to minimize any impact on the calibration results. The calibration process is only initiated during the first time you launch the software, so you will not feel the same slowness on subsequent runs. © 2014 SanDisk Corporation. All rights reserved. Page 8 of 20 FOR USE BY SANDISK HYPERBOOST BETA PARTICIPANTS ONLY 10. While SanDisk HyperBoost calibrates your system, a short Tutorial appears to let you learn more about SanDisk HyperBoost and how it can help you be more productive and save you time. Please use the arrows at the bottom of the screen to scroll between the slides. The Tutorial can be closed at any time by clicking on the “X” icon on the top right corner of the screen. 11. After taking the Tutorial and before getting to the software’s Main Screen, you may get a notice that a newer version of the software is available. If one is available, click Yes and follow the instructions on the screen to download and install the new version. © 2014 SanDisk Corporation. All rights reserved. Page 9 of 20 FOR USE BY SANDISK HYPERBOOST BETA PARTICIPANTS ONLY NOTE: The SanDisk HyperBoost PC accelerator is fully operational every time your computer is turned on. Opening and closing the SanDisk HyperBoost software does NOT affect the acceleration operation. © 2014 SanDisk Corporation. All rights reserved. Page 10 of 20 FOR USE BY SANDISK HYPERBOOST BETA PARTICIPANTS ONLY SanDisk HyperBoost Main Screen The SanDisk HyperBoost Main Screen displays system performance levels. NOTE: The SanDisk HyperBoost PC Accelerator software accelerates your PC’s operation by automatically monitoring and storing files you use most frequently on the SanDisk HyperBoost device. SanDisk HyperBoost has to learn your individual computer usage patterns, before it can increase system performance. Therefore, performance levels will be minimal immediately after installation and will continually improve as you use your computer. If the SanDisk HyperBoost software was closed and you’d like to launch it again, double-click on the SanDisk HyperBoost icon on the desktop (if displayed) or look for the SanDisk HyperBoost application in the computer Start menu. The SanDisk HyperBoost software’s Main Screen appears. Acceleration Level Shows by how much your computer’s performance has increased thanks to the PC accelerator’s operation. The acceleration is showed as a multiple from the baseline performance which is your PC’s performance using your Hard Disk Drive (HDD) only, without the use of SanDisk HyperBoost. For example, an acceleration of x1.0 means no acceleration, i.e., your PC performs exactly as it did before you installed SanDisk HyperBoost. An acceleration of x2.0 means that your PC’s performance is double than what it used to be prior to use of SanDisk HyperBoost. The Acceleration Level may depend on the state of the cache, applications in use, and basic PC performance (CPU, HDD, RAM size, USB port type – USB2/3, etc.). The Acceleration Level increases if frequently used data files are accessed - i.e., if you’re mostly using the same files and applications. The Acceleration Level decreases if seldom used data files are accessed, i.e. if you’re accessing files and opening applications you haven’t used in a while. © 2014 SanDisk Corporation. All rights reserved. Page 11 of 20 FOR USE BY SANDISK HYPERBOOST BETA PARTICIPANTS ONLY Status Shows the current device status: Learning: SanDisk HyperBoost is learning which files and applications you use most frequently to make them faster. Accelerating: SanDisk HyperBoost is optimized to accelerate the files and applications you most frequently use. Disabled: Data will no longer be served from the SanDisk HyperBoost drive, and your PC’s performance will return to the baseline performance levels before using SanDisk HyperBoost. Acceleration Log A log of the Acceleration Level as was recorded over time. You may change the graph scale to show the Acceleration Level over the last minute/hour/day/week by clicking on the appropriate tab. Hovering over each dot on the graph will show the exact value for that measurement point and the time it was taken. Time Saved By making your PC operate faster, SanDisk HyperBoost saves you time you would have otherwise wasted waiting for your PC to respond. The Main Screen of the SanDisk HyperBoost software displays a time counter that adds up wasted seconds into minutes and even hours. During Current Session - Shows how much time saved since the last you rebooted your system or the last time you cleared the cache. Cumulative Since First Installed - Shows cumulative time saved since you first installed SanDisk HyperBoost. © 2014 SanDisk Corporation. All rights reserved. Page 12 of 20 FOR USE BY SANDISK HYPERBOOST BETA PARTICIPANTS ONLY SanDisk HyperBoost Software Options SanDisk HyperBoost software options allow you to select various PC accelerator options. Click on Options to access a drop-down menu and select the following options as needed: Help Check for Updates Recalibrate Advanced Details About Tutorial Eject Exit Help This option accesses the SanDisk Technical Support website. 1. Click on Options and select Help. The SanDisk Technical Support website appears and allows you to search for detailed information, as well as review a list of FAQs. You need an internet connection for this option. Check for Updates This option checks if there is an updated version of the software available. In addition, each time you launch the software application, it will automatically check for updates and notify you when they are available. 1. Click on Options and select Check for Updates. On-screen information appears that provides the latest software update information. 2. Click OK to return to the previous screen, or in case there is one available, click Yes and follow the instructions on the screen to download and install the new version. Recalibrate This option recalibrates the Performance Acceleration Level. The Performance Acceleration Level is evaluated by measuring the performance of various components of your system including your Hard Disk Drive’s performance as well as that of the SanDisk HyperBoost device. Such evaluation is necessary as the Performance Acceleration depends on your own computer’s performance standards and components (for example, CPU type and frequency of operation, Hard Disk Drive (HDD), RAM size, USB port speed etc.). This way, the SanDisk HyperBoost software can accurately determine by how much your PC is running faster thanks to using SanDisk HyperBoost. The Calibration process is normally determined once the software is launched for the first time after installation. However, over time the computer performance standards may change and can be recalibrated to show a more current measurement based on the latest computer standards. NOTE: It is recommended to close all other applications before recalibrating, as some applications may overload your PC and affect the calibration results. © 2014 SanDisk Corporation. All rights reserved. Page 13 of 20 FOR USE BY SANDISK HYPERBOOST BETA PARTICIPANTS ONLY Advanced Details Please see “SanDisk HyperBoost Advanced Details Screen” section in this document. About This option provides general product information as well as the software version number. 1. Click on Options and select About to view the About page. 2. Click OK to return to the previous screen. Tutorial This option launches a short Tutorial to let you learn more about SanDisk HyperBoost and how it can help you be more productive and save you time. Please use the arrows at the bottom of the screen to scroll between the slides. The Tutorial can be closed at any time by clicking on the “X” icon on the top right corner of the screen. Eject Enables you to put your PC to sleep, or power it down completely, in order to safely eject the SanDisk HyperBoost device. This may be desirable if you have to plug the device out, for example, in order to fit your laptop in a bag. The SanDisk HyperBoost device MUST be reconnected before the computer is turned back on, in order to preserve the cached data that is boosting your PC’s performance. WARNING: If device is not ejected properly, or if the PC is turned on before the SanDisk HyperBoost device is plugged in, all previously cached data will be deleted and your PC will return to its original performance level prior to installation. Be sure to use this option or power off the computer before removing the device. Exit This option closes the SanDisk HyperBoost software application. However, the SanDisk HyperBoost PC accelerator is fully operational every time your computer is turned on. Closing the SanDisk HyperBoost software does NOT affect the acceleration operation. © 2014 SanDisk Corporation. All rights reserved. Page 14 of 20 FOR USE BY SANDISK HYPERBOOST BETA PARTICIPANTS ONLY SanDisk HyperBoost Advanced Details Screen This screen provides additional information about the operation of the SanDisk HyperBoost PC Accelerator product. It also allows you to change settings and control the caching operation. Click on the Back button to return to the previous screen. Capacity Used This gauge shows what percentage of the SanDisk HyperBoost device is being actively used for storing data. The device will continuously be refreshed with new data files that are most frequently used. Files that are not frequently used will automatically get removed, so you don’t have to worry about the cache getting full. Seeing the cache being full is actually a good thing – it shows that the cache is being used and that you’re getting the full performance benefits of your SanDisk HyperBoost product. © 2014 SanDisk Corporation. All rights reserved. Page 15 of 20 FOR USE BY SANDISK HYPERBOOST BETA PARTICIPANTS ONLY SanDisk HyperBoost Cache Reads This shows how much data was read from the SanDisk HyperBoost device and from your Hard Disk Drive over the last hour. The more data read from the SanDisk HyperBoost device, the faster your system performs. SanDisk HyperBoost Reads – signifies the amount of data that was read from the SanDisk HyperBoost device over the last hour. Hard Disk Reads – signifies the amount of data that was read from Hard Disk Drive over the last hour. Cache Hit Ratio – Shows ratio between amount of data read from the SanDisk HyperBoost device and the amount of data read from the computer’s Hard Disk Drive. Clear Cache - This option clears the system cache. NOTE: This action clears all cached data from the SanDisk HyperBoost device, and will reset system performance to its original level prior to installation. After the cached data has been cleared, the SanDisk HyperBoost PC Accelerator caching engine will automatically restart the learning process and start filling the device with fresh data. 1. On the Advanced Details Screen select Clear Cache. The Clear Cache confirmation screen appears. 2. Confirm your choice and select OK to clear cache or Cancel to exit without clearing cache. Disable/Enable Caching - This option temporarily disables caching. NOTE: This action will not clear any previously stored cached data from the SanDisk HyperBoost device. 1. On the Advanced Details Screen select Disable Caching. The Disable Caching confirmation screen appears. 2. Confirm your choice and select OK to disable caching or Cancel to exit without disabling caching. Additional settings Turn off Windows Write-Cache Buffer Flushing - This option turns off windows write-cache buffer flushing. This option should only be used for benchmark testing and is not recommended for normal operation. 1. On the Advanced Details Screen check the Turn Off Windows Write-Cache Buffer Flushing checkbox. WARNING: Turning off write-cache buffer flushing may cause some data loss if you experience a power failure and your computer system is not connected to an external power source (i.e. a battery). Please be sure that your computer system is connected to an external power source before you turn off write-cache buffer flushing. © 2014 SanDisk Corporation. All rights reserved. Page 16 of 20 FOR USE BY SANDISK HYPERBOOST BETA PARTICIPANTS ONLY Start With Windows - This option automatically launches the SanDisk HyperBoost Main Screen when the computer is started. (The caching operation is not affected by this option.) 1. For an automatic launch upon computer startup, make sure the Start with Windows checkbox on the Advanced Details Screen is checked. 2. For a manual start, uncheck the Start with Windows checkbox on the Advanced Details Screen. USB Speed - Shows whether the SanDisk HyperBoost Device is operating in USB2.0 mode (high speed) or in USB3.0 mode (super speed). The PC accelerator works with both USB 2.0 and 3.0 ports, however, for maximum system performance, it is recommended to use a USB 3.0 port. NOTE: Due to limitation of the Windows operating system, this indication is only available on Windows 8/8.1 operating systems. © 2014 SanDisk Corporation. All rights reserved. Page 17 of 20 FOR USE BY SANDISK HYPERBOOST BETA PARTICIPANTS ONLY System Tray Icon SanDisk HyperBoost’s system tray icon is a providing a fast and convenient way to check the status of your PC acceleration process. NOTE: Immediately after the installation the system tray icon may be hidden. Click on the tiny “up” arrow to show the hidden icons. Then you can drag the SanDisk HyperBoost system tray icon onto the visible system tray, in order to make it visible at all times. The system tray icon may have two modes: Green - This shows that the PC acceleration process is enabled and that everything is operating as expected. Red - This shows that the PC acceleration process was disabled, or that there was an error that is preventing the acceleration process to run properly. Open the application to learn more. © 2014 SanDisk Corporation. All rights reserved. Page 18 of 20 FOR USE BY SANDISK HYPERBOOST BETA PARTICIPANTS ONLY Uninstalling the Software To uninstall the software from your computer, follow these steps: 1. Click on your Computer’s start menu. 2. Select All programs (in Windows 7) or click on the down arrow (in Windows 8/8.1) to see all installed applications. 3. Under SanDisk, you will find an Uninstall application. 4. Double-click on the Uninstall application, and click Yes on the User Access Control screen, if one opens up. The SanDisk HyperBoost Installer screen appears. Click on Next. The software will be removed from your computer. © 2014 SanDisk Corporation. All rights reserved. Page 19 of 20 FOR USE BY SANDISK HYPERBOOST BETA PARTICIPANTS ONLY Frequently Asked Questions Please visit SanDisk Knowledgebase for the most frequently asked questions and troubleshooting tips. SanDisk is a trademark of SanDisk Corporation, registered in the United States and other countries. SanDisk HyperBoostTM is a trademark of SanDisk Corporation. All other brand names mentioned herein are for identification purposes only and may be the trademarks of their respective holder(s). © 2014 SanDisk Corporation. All rights reserved. Page 20 of 20