1
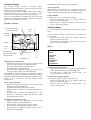
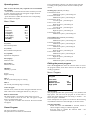
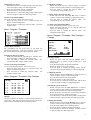
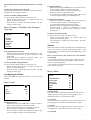
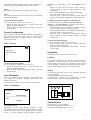
CTR 07
Simplified display
Microprocessor control
The simplified display provides a basic representation of the
machine’s status, indicated by means of large symbols and
characters that are even visible from a distance.
User’s Manual
Only if several machines are installed: the status of the first
machine only is displayed but an alarm indication will appear
when any of the machines is in alarm.
INTRODUCTION .................................................................... 1
SIMPLIFIED DISPLAY ............................................................ 1
Simplified Window .......................................................... 1
SYNOPTIC DISPLAY.............................................................. 2
Synoptic Window............................................................. 2
SELECTION MENU ................................................................ 2
Menu ............................................................................... 2
PRESET PROGRAM ............................................................... 3
EDITING THE PRESET PROGRAM ........................................... 3
Menu / Program.............................................................. 3
Menu / Program / Timetable........................................... 4
Menu / Program / Timetable / Day Changes .................. 4
Menu / Program / Timetable / Day Changes / Change... 4
Menu / Program / Timetable / Day Changes / Copy Day 5
CONFIGURING THE CLOCK ................................................... 5
Menu / Clock ................................................................... 5
ALARMS .............................................................................. 5
Menu / Alarm .................................................................. 5
FACTORY CONFIGURATION.................................................. 6
Menu / Factory................................................................ 6
USER PARAMETERS ............................................................. 6
Menu / Parameters.......................................................... 6
INSTALLATION ..................................................................... 6
Location .......................................................................... 6
Wiring ............................................................................. 6
CHARACTERISTICS ............................................................... 6
GUARANTEE CONDITIONS.................................................... 7
Contents
Introduction
This Control Panel is designed to control machines used to
change the air in the simplest way possible.
The user activates the air change functions by means of a knob
and looking at the graphic display that shows the pertinent
windows.
Rotating the knob makes it possible to change the values and
scroll the menu items, while pressing it confirms the changes
or selections made.
The icon for closing the window is always displayed at the
top right of the screen. To move to the next window,
rotate the knob until this icon is reached, and then press
the knob.
The operating status of the entire air change plant is
summarised in the window that is normally displayed, and the
user has a choice of a simplified version or a complete
overview of the machine.
The user can access the simplified window at any time and
from any window by simply holding the knob pushed
down for 5 seconds. Alternatively, it can be accessed by
selecting the Simplified item in the selection menu.
Simplified Window
External temperature
Fan speed
set
Temperature
set
Alarms
activated
Close
icon
Post-heating status
Humidity involved
Changing the speed on the fans
- Rotate the knob clockwise to increase the speed and
anticlockwise to reduce it.
When Chrono is selected, the speed is automatically selected
according to the weekly programme, whereas when Auto is
selected the speed is selected automatically, depending on the
quality of the air extractor and the comfort profile
configuration.
Changing the temperature setting
- Press the knob – the temperature set starts to flash.
- Rotate the knob to change the temperature setting.
- Press the knob to stop the changing modem and the
temperature setting stops flashing.
When Off is set, post-heating is kept switched off.
Alarms Activated
When alarms are activated an icon is displayed along with
flashing wording. The wording may indicate dirty filters or
suggest calling for assistance with more serious problems.
Switching to the Synoptic Window
- To pass to the synoptic window, hold the knob down for
5 seconds.
1
When off is set, post-heating is kept switched off.
Synoptic Display
The synoptic display provides a detailed graphic
representation of the machine’s status and from here all the
available functions can be activated.
To pass from the simplified window to the synoptic window,
hold the knob down for 5 seconds. To access the synoptic
window from any other window, close all the windows.
Only if several machines are installed: the status of the first
machine only is displayed but an alarm indication will appear
when any of the machines is in alarm.
Synoptic Window
External temperature
Fan speed setting.
Change Window
Use the Close icon to access the other windows.
- Rotate the knob until the icon is selected, which will
appear on a dark background.
- Press the knob to confirm the selection made - this will
take you to the menu window.
Selection Menu
Close
icon
Humidity
involved
To access detailed system information, select the items in the
menu.
From the synoptic window, use the close icon to access the
menu window.
- Rotate the knob until the icon is selected, which will
appear on a dark background.
- Press the knob to confirm the selection made - this will
take you to the menu window.
Bypass
Menu
Timer
icon
Expulsion fan
Expulsion temperature
Immission Fan
Alarms Activated
When alarms are activated an icon is displayed along with
flashing wording. The wording may indicate dirty filters or
suggest calling for assistance with more serious problems.
Post
Heating coils
Temperature set
Changing the speed on the fans
- Rotate the knob until the current speed is selected, which
is shown in light wording on a dark background.
- Press the knob and the current speed flashes.
- Rotate the knob to change the speed.
- Press the knob to confirm the change made, and the speed
is shown in light wording on a dark background.
When chrono is selected, the speed is automatically selected
according to the weekly programme, whereas when auto is
selected the speed is selected automatically, depending on the
quality of the air extractor and the comfort profile
configuration.
Timer / Booster function
- Rotate the knob until the Timer icon is selected, which
will appear on a dark background.
- Press the knob and the timer setting will flash.
- Rotate the knob if you want to set a value that differs by 5
minutes.
- Press the knob to confirm the configuration set. The
timer starts to count down and the fans will run at 100%
speed until the time expires.
Menu
Program
Clock
Alarms
Simplified
Factory
Parameters
Selecting an item in the menu
- Rotate the knob until the required item is selected, which
is shown in light wording on a dark background.
- Press the knob to confirm the selection made – the
corresponding new window opens.
Go back to the Synoptic Window
To access the synoptic window, use the close icon.
- Rotate the knob until the icon is selected, which will
appear on a dark background.
- Press the knob to confirm the selection made – the
synoptic window opens.
Changing the temperature setting
- Rotate the knob until the Temperature icon is selected,
which will appear on a dark background.
- Press the knob – the temperature set starts to flash.
- Rotate the knob to change the temperature setting.
- Press the knob to confirm the change made. The set
temperature stops flashing.
2
Operating status
How to select the unit (only required if several machines
are installed)
- turn the knob to select the unit the status of which you want
to check: the name of the unit will appear in light coloured
letters on a dark background
- press the knob to confirm the selection: the corresponding
status window will appear
Menu / State
State
Te(exter.)
Tr(return)
Tx(expel.)
Fan(supply)
Fan(exhau.)
Humidity
-16.7
-21.7
-17.7
On
On
No
Te (exter.)
External temperature
Tr (return)
Recirculated air temperature
Tx (expelled)
Expelled air temperature
Fan (supply)
Intake fan state
Fan (exhau.)
Exhaust fan state
Humidity
Humidity is present
Bypass
Bypass working
Fan speed medium or high is to be taken as being selected
according to the quality of the air and the comfort profile
chosen.
Working days (Monday to Friday):
From 00:00 to 06:30
Medium fan speed – post-heating off
From 06:30 to 08:00
Medium fan speed – post-heating on
From 08:00 to 11:30
Low fan speed – post-heating on
From 11:30 to 13:00
High fan speed – post-heating on
From 13:00 to 18:00
Low fan speed – post-heating on
From 18:00 to 22:00
High fan speed – post-heating on
From 22:00 to 24:00
Medium fan speed – post-heating off
Non-working days (Saturday and Sunday):
From 00:00 to 06:30
Medium fan speed – post-heating off
From 06:30 to 08:00
Medium fan speed – post-heating on
From 08:00 to 11:30
Medium fan speed – post-heating on
From 11:30 to 13:00
High fan speed – post-heating on
From 13:00 to 18:00
Medium fan speed – post-heating on
From 18:00 to 22:00
High fan speed – post-heating on
From 22:00 to 24:00
Medium fan speed – post-heating off
Editing the preset program
Select the Program item from the selection menu to access
the program window, from where the user can edit the preset
weekly programme.
Menu / Program
Program
Heat 1
The first post-heating stage is working
Heat 2
The second post-heating stage is working
CO2 VOC ppm
Amount of air (values less than 700 ppm indicated clean air,
while values close to 2000 ppm indicate very dirty air).
Back to main window
The main window is accessed by means of the close icon:
- turn the knob to select the icon: this will appear in light
letters on a dark background
- press the knob to confirm the selection: the menu window
will appear
Preset Program
The preset program is as follows:
Fan speed low is to be taken as switched off.
Time table
Low speed
Medium speed
High speed
off
040%
065%
Speed Settings
The program provides three speed settings: low, medium, and
high speed. The user uses the program to set the times at
which the speed changes from one setting to another – see
Menu / Program / Timetable
In the example the low speed is to be taken as the fans being
off, medium as the fans at 40% and high, as the fans at 65%.
Selecting timetables
- Rotate the knob until timetable is selected, which is
shown in light wording on a dark background.
- Press the knob to confirm the selection made – the
timetable window opens.
3
Configuring a set speed
- Rotate the knob until the required speed is selected, which
is shown in light wording on a dark background.
- Press the knob and the current value flashes.
- Rotate the knob to set the required speed.
- Press the knob to confirm the setting made, and the speed
is shown in light wording on a dark background.
Go back to the Menu Window
To access the menu window, use the close icon.
- Rotate the knob until the icon is selected, which will
appear on a dark background.
- Press the knob to confirm the selection made – the menu
window opens.
Menu / Program / Timetable
Configuring a change
- Rotate the knob until the required change is selected,
which is shown in light wording on a dark background.
- Press the knob to confirm the selection made – the
corresponding change window opens.
Copying changes from another day
- Rotate the knob until the Copy Day item is selected,
which is shown in light wording on a dark background.
- Press the knob to confirm the selection made – the
corresponding copy day window opens.
Go back to the Timetable Window
To access the timetable window, use the close icon.
- Rotate the knob until the icon is selected, which will
appear on a dark background.
- Press the knob to confirm the selection made – the
timetable window opens.
Menu / Program / Timetable / Day Changes /
Change
Monday
Graphic Representation
The programmes for all seven days of the week are
represented graphically. Each bar represents a time of the
day, and the height of the bar indicates the three speeds.
Selecting the daily programme
- Rotate the knob until the required day is selected, which
is shown in light wording on a dark background.
- Press the knob to confirm the selection made – the
corresponding day changes window opens.
Go back to the Program Window
To access the Program window, use the close icon.
- Rotate the knob until the icon is selected, which will
appear on a dark background.
- Press the knob to confirm the selection made – the
program window opens.
Menu / Program / Timetable / Day Changes
Monday
C1
C2
C3
C4
C5
C6
00 . 00
05 . 00
07 . 00
08 . 00
11 . 00
14 . 00
low
med
high
med
high
med
off
on
on
on
on
on
Changes
The user programs the changes in speed and post-heating at
preset times. The first three letters after the time indicate the
speed, while on/off indicates the post-heating status.
Change
Time
Fan speed
Post-heating
2
05:00
medium
on
Selecting a change
- Rotate the knob until the required Change item is
selected, which is shown in light wording on a dark
background.
- Press the knob and the change selected flashes.
- Rotate the knob to select a new change.
- Press the knob to confirm the change made, and the
change is shown in light wording on a dark background.
Configuring the time
- Rotate the knob until the Time item is selected, which is
shown in light wording on a dark background.
- Press the knob and the time setting flashes.
- Rotate the knob to set the required time.
- Press the knob to confirm the setting made, and the time
is shown in light wording on a dark background.
Selecting the speed on the fans
- Rotate the knob until the Fan Speed item is selected,
which is shown in light wording on a dark background.
- Press the knob and the current speed setting flashes.
- Rotate the knob to select the new speed setting among the
three possibilities (low, medium, and high).
- Press the knob to confirm the setting made, and the speed
setting is shown in light wording on a dark background.
Enabling post-heating
- Rotate the knob until the Post-Heating item is selected,
which is shown in light wording on a dark background.
- Press the knob and the current enabling flashes.
- Rotate the knob to enable or disable post-heating.
- Press the knob to confirm the enabling, and this is shown
in light wording on a dark background.
4
Post-heating is always disabled when the fans are switched
off.
Graphic representation of the program
The graphic representation of the daily program selected is
updated each time changes are made.
Go back to the Day Change Window
To access the day change window, use the close icon.
- Rotate the knob until the icon is selected, which will
appear on a dark background.
- Press the knob to confirm the selection made – the day
changes window opens.
Menu / Program / Timetable / Day Changes /
Copy Day
Configuration of minutes
- Rotate the knob until the Minute item is selected, which
is shown in light wording on a dark background.
- Press the knob and the minutes begin to flash.
- Rotate the knob to configure the required minutes.
- Press the knob to confirm the configuration, and the
minutes setting is shown in light wording on a dark
background.
Go back to the Menu Window
To access the menu window, use the close icon.
- Rotate the knob until the icon is selected, which will
appear on a dark background.
- Press the knob to confirm the selection made – the menu
window opens.
Copy day
Monday
Tuesday
Wednesday
Thursday
Friday
Saturday
Alarms
Selecting changes to be copied
- Rotate the knob until the day that has the changes to copy
is selected, which is shown in light wording on a dark
background.
- Press the knob to confirm the selection made – the
updated day changes window is displayed.
Go back to the Day Change Window
To access the day change window, use the close icon.
- Rotate the knob until the icon is selected, which will
appear on a dark background.
- Press the knob to confirm the selection made – the day
changes window opens.
Configuring the Clock
Select the Clock item from the menu to access the clock
window.
Menu / Clock
Clock
Day
Hours
Minutes
Configuring the time
- Rotate the knob until the Hours item is selected, which is
shown in light wording on a dark background.
- Press the knob and the current time setting flashes.
- Rotate the knob to set the required time.
- Press the knob to confirm the setting made, and the time
is shown in light wording on a dark background.
Mon
12
45
Configuring the day
- Rotate the knob until the Day item is selected, which is
shown in light wording on a dark background.
- Press the knob and the current configured day flashes.
- Rotate the knob to configure the required day.
- Press the knob to confirm the configuration, and the day
is shown in light wording on a dark background.
When alarms are activated, more detail can be obtained on the
cause of the fault by opening the dedicated window. The
alarm window is accessed by selecting the Alarm item in the
selection menu.
How to select the unit (only required if several machines
are installed)
- turn the knob to select the unit the status of which you want
to check: the name of the unit will appear in light coloured
letters on a dark background
- press the knob to confirm the selection: the corresponding
status window will appear
Menu / Alarm
Alarm
Communication
Te(external)
Tr(return)
Tx(expelled)
Filters
Fans
ok
ok
ok
ok
ok
ok
Communication
OK indicates that communication between the board on the
machine and the control panel is working properly. KO
indicates that there is a communication fault.
Te (external)
OK indicates that the temperature sensor for the external air is
working properly. KO indicates that the sensor is faulty.
Tr (return)
OK indicates that the temperature sensor for the return air is
working properly. KO indicates that the sensor is faulty.
Tx (expelled)
5
OK indicates that the temperature sensor for the expelled air is
working properly. KO indicates that the sensor is faulty.
Filters
OK indicates efficient filters. KO indicates dirty filters.
Fans
OK indicates that the fans are working properly. KO indicates
that the fans are faulty.
Go back to the Menu Window
To access the menu window, use the close icon.
- Rotate the knob until the icon is selected, which will
appear on a dark background.
- Press the knob to confirm the selection made – the menu
window opens.
Factory Configuration
Expert technical personnel can effect detailed configuration of
the functions using the control panel, by accessing the
Factory window from the selection menu. This access is
password protected.
Menu / Factory
Factory
Unit ver. 1.2
Insert password
----
guaranteed, it is preferable to select Not defined for the
season.
- Rotate the knob until the current season setting is
selected, which is shown in light wording on a dark
background.
- Press the knob and the current season setting flashes.
- Rotate the knob to select a new season.
- Press the knob to confirm the selection made, and the
season is shown in light wording on a dark background.
Configuring automatic regulation of the fan speeds
Four comfort profiles are available: clean air, clean air +,
clean air ++ and super clean air. The first uses less energy,
while the last provides maximum comfort.
- Rotate the knob until the set profile is selected, which is
shown in light wording on a dark background.
- Press the knob and the current configured profile flashes.
- Rotate the knob to change the profile.
- Press the knob to confirm the configuration, and the
profile required is shown in light wording on a dark
background.
Go back to the Menu Window
To access the menu window, use the close icon.
- Rotate the knob until the icon is selected, which will
appear on a dark background.
- Press the knob to confirm the selection made – the menu
window opens.
Installation
Installation is to be done by specialist personnel.
Location
Go back to the Menu Window
To access the menu window, use the close icon.
- Rotate the knob until the icon is selected, which will
appear on a dark background.
- Press the knob to confirm the selection made – the menu
window opens.
User Parameters
The use can configure the air changes in order to obtain the
best compromise between maximum performance and
satisfactory comfort.
The parameters window is accessed via the selection menu.
For optimum performance the unit must be fixed to an inside
wall about 1,5 m above floor level, away from heat sources
(such as heaters, cooker tops, etc.) and where it is not exposed
to direct sunlight. It must not be installed near doors, where it
can be struck by them, which will ruin the electronics.
Wiring
Connect the power supply to the + and – terminals, respecting
the correct polarity.
Connect the BUS to the terminal marked s.
2
Connect using a screened 2 x 0,35 mm
cable via G-S-24V
internal terminals, with a maximum length of 100m.
Season
winter heating
-------------------------------------------Auto
clean air
Selecting the Season
Selecting the correct season makes it possible to make
optimum use of the heat exchanger, while forgetting to update
the season leads to incorrect functioning of the air change
process. If correct updating of this parameter cannot be
+ s
Parameters
-
Menu / Parameters
Characteristics
Power Supply: 9 / 30 Vdc 250mW
Maximum working temperature: 0 / 50 °C
Maximum storage temperature: -20 / 70 °C
6
Guarantee Conditions
The 2 year (24 month) guarantee period starts from when the
equipment is received. The date of receipt must be checked in
the purchase invoice.
For the guarantee period, the manufacturer will repair any
defects resulting from fabrication errors or material faults free
of charge. At their discretion they may replace the defective
parts or the entire apparatus. Any other call for works under
guarantee is excluded. The manufacturer also does not accept
any responsibility for damages caused.
The material deemed to be faulty must be returned to the
manufacturer via the dealer, along with a detailed description
of the defect, provided by the dealer.
The cost of delivery of the goods is for the client’s account.
The return of the repaired goods shall be for the
manufacturer's account.
Under no circumstances will the manufacturer react for
defects caused by improper use that does not conform to the
user manual supplied, or by natural events such as lightning,
earth tremors, fire, etc.
They also do not accept any responsibility for repairs or
modifications made to the equipment by personnel that do not
work for the manufacturer.
7