1
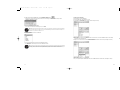
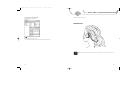
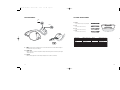
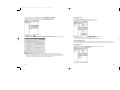
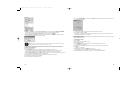
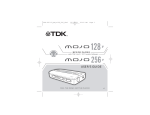
TDK.l82.03/MOJO 1 User's Guide
9/3/03
9:37 AM
Page 1
HEADPHONE MP3/FM PLAYER
NO WIRES, NO TANGLES
USER'S GUIDE
v1
TDK.l82.03/MOJO 1 User's Guide
9/3/03
9:37 AM
Page 2
TABLE OF CONTENTS
Regulatory
Information
Federal Communications Commission (FCC)
This device complies with Part 15 of the FCC Rules. Operation is subject to the following two conditions:
1 This device may not cause harmful interference, and
2 This device must accept any interference received, including interference that may cause undesired operation.
NOTE: This equipment has been tested and found to comply with the limits for a Class B digital device, pursuant to Part 15 of
the FCC Rules. These limits are designed to provide reasonable protection against harmful interference in a residential installation. This equipment generates, uses and can radiate radio frequency energy and, if not installed and used in accordance
with the instructions, may cause harmful interference to radio communications. However, there is no guarantee that interference will not occur in a particular installation. If this equipment does cause harmful interference to radio or television reception, which can be determined by turning the equipment off and on, the user is encouraged to try to correct the interference by
one or more of the following measures:
• Reorient or relocate the receiving antenna.
• Increase the separation between the equipment and receiver.
• Connect the equipment into an outlet on a circuit different from that to which the receiver is connected.
• Consult the dealer or an experienced radio/TV technician for help.
For internal memory, 1MB = 1 million bytes; includes operating software - storage capacity available to purchaser, after
formatting, is less.
NOTE ON HELP MATERIALS . . . . . . . . . . . . . . . . . . . . . . . . . . . . . . . . . . . . . . . . . . . . . . . . . . . . . . . . 1
UNPACKAGING MOJO 1 . . . . . . . . . . . . . . . . . . . . . . . . . . . . . . . . . . . . . . . . . . . . . . . . . . . . . . . . . . . . . . 1
QUICK SETUP . . . . . . . . . . . . . . . . . . . . . . . . . . . . . . . . . . . . . . . . . . . . . . . . . . . . . . . . . . . . . . . . . . . . . . . . . . . 2
USING MOODLOGIC TO TRANSFER MUSIC . . . . . . . . . . . . . . . . . . . . . . . . . . . . . . . . . . . 4
USING MOJO 1 . . . . . . . . . . . . . . . . . . . . . . . . . . . . . . . . . . . . . . . . . . . . . . . . . . . . . . . . . . . . . . . . . . . . . . . .
14
MOODLOGIC ADVANCED GUIDE . . . . . . . . . . . . . . . . . . . . . . . . . . . . . . . . . . . . . . . . . . . . . . . . .
22
CONFIGURING FM RADIO PRESETS & UPGRADING FIRMWARE . . . . .
28
USING A MEMORY EXPANSION CARD
. . . . . . . . . . . . . . . . . . . . . . . . . . . . . . . . . . . . . . . 32
TROUBLESHOOTING. . . . . . . . . . . . . . . . . . . . . . . . . . . . . . . . . . . . . . . . . . . . . . . . . . . . . . . . . . . . . . . .
32
MOJO 1 SPECIFICATIONS . . . . . . . . . . . . . . . . . . . . . . . . . . . . . . . . . . . . . . . . . . . . . . . . . . . . . . . . . . 33
WARNINGS & PRECAUTIONS . . . . . . . . . . . . . . . . . . . . . . . . . . . . . . . . . . . . . . . . . . . . . . . . . . . . . 34
TECHNICAL SUPPORT . . . . . . . . . . . . . . . . . . . . . . . . . . . . . . . . . . . . . . . . . . . . . . . . . . . . . . . . . . . . . . 39
TDK.l82.03/MOJO 1 User's Guide
9/3/03
9:37 AM
Page 4
QUICK SETUP
NOTE ON HELP MATERIALS
In addition to this printed User’s Guide, the following sources of help and information are available:
• Visit TDK’s Technical Support at www.tdksupport.com
• Visit MoodLogic’s Web site (www.moodlogic.com) for FAQs and other MoodLogic information. You can also email
[email protected] for assistance.
• View MoodLogic’s electronic help files by running MoodLogic and clicking HELP, MOODLOGIC HELP.
• If using MusicMatch Jukebox (MusicMatch Jukebox application must be downloaded from www.musicmatch.com; track
transfer plug-in included on installation CD-ROM), visit www.musicmatch.com for help and view the help materials from the
HELP menu in the MusicMatch Jukebox application.
Follow the steps below to set up MOJO 1. The included MoodLogic software can be used to transfer audio tracks from your computer to MOJO 1. The included MOJO 1 PC Software can be used to configure MOJO 1’s FM radio presets and upgrade the unit’s
firmware should a firmware update become available. MusicMatch Jukebox (not included) can also be used to transfer tracks
to MOJO 1. If desired, download from www.musicmatch.com and install MusicMatch Jukebox (version 8.0 or later
recommended), then install the MusicMatch Jukebox plug-in located on the MOJO 1 installation CD-ROM.
1 INSERT BATTERY (1 AAA alkaline)
1
UNPACKING MOJO 1
open
• Unpack the MOJO 1 player and other items.
The items listed below are inside the packaging:
MOJO 1 player
1 AAA Battery
Software CD-ROM
USB connection cable
Extra earpiece covers
NOTE : Save the product’s original packaging in case you need to ship it back to TDK. Ship the product in the safest possible
manner as TDK cannot be held responsible for any damages the product sustains during shipping.
2
• Open the battery compartment door and insert 1 AAA alkaline battery (included). Be sure to match the battery’s polarity
markings (+ and -) to the polarity markings on the player.
• After inserting the battery, close the battery compartment door.
2 INSTALL SOFTWARE
• Load the included CD-ROM into your computer’s disc drive and follow the on-screen prompts to install MoodLogic and the
MOJO 1 PC Software.
NOTE : If you wish to use MusicMatch Jukebox (version 8.0 or later recommended) as your track transfer software, download the
application from www.musicmatch.com, install the application on your computer, then install the MusicMatch Jukebox plug-in
from the included installation CD-ROM.
• If the on-screen prompts do not automatically appear, double click MY COMPUTER, double click on the drive into which you
loaded the CD-ROM, then double click MOJO 1 SETUP.EXE and follow the on-screen prompts.
1
2
TDK.l82.03/MOJO 1 User's Guide
9/3/03
9:37 AM
Page 2
USING MOODLOGIC TO TRANSFER MUSIC
3 CONNECT MOJO 1 TO PC
The included MoodLogic software can be used to transfer tracks from your PC to MOJO 1.
Using MoodLogic Software for First Time (Requires live Internet connection.
If you do not have an Internet connection, please contact TDK Technical Support. For all other MoodLogic issues, please contact
MoodLogic Inc.) MoodLogic needs to scan your hard drive and build its music library. Follow the steps below.
2
1
To run MoodLogic:
1. Click the MoodLogic desktop icon.
OR
In Windows, click START, PROGRAMS, MOODLOGIC, MOODLOGIC.
• If you are running MoodLogic for the first time, you’ll be prompted to create a screen name (requires Internet connection).
Follow the on-screen prompts to complete the process.
• Connect the small end of the USB cable (included) to MOJO 1’s USB port.
• With your PC and MOJO 1 powered ON, connect the other end of the USB cable to a USB port on your PC.
(To power ON MOJO 1, hold down its PLAY/PAUSE [ ] button for a few seconds.)
• Follow any on-screen prompts to complete installation.
• Follow the “Transferring Music to MOJO 1” instructions to load music onto MOJO 1.
3
4
TDK.l82.03/MOJO 1 User's Guide
9/3/03
9:37 AM
Page 4
To build the MoodLogic music library:
1. If it’s not running already, launch MoodLogic.
• If MoodLogic is being run for the first time, the SCAN DISCS FOR MUSIC FILES window should open automatically after
you’ve followed the prompts to create a screen name.
2. If the SCAN DISCS FOR MUSIC FILES window does not open automatically, click FILE and select ADD MUSIC.
• The SCAN DISCS FOR MUSIC FILES window will now open.
The MoodLogic MY MUSIC View
View user-created mix
View the tracks that are in your TRANSFER LIST and the tracks that are currently in your connected MOJO 1 player
View your computer’s MoodLogic music library
View tracks in all genres in the TRACK LIST window
View tracks by all artists in the TRACK LIST window
TRACK LIST Window
3. Select SCAN MY COMPUTER FOR MUSIC FILES and click NEXT to have MoodLogic scan your entire computer for tracks.
OR
To have MoodLogic scan a particular directory (folder), select ADVANCED, click NEXT, then browse to the desired directory
and click OK.
• Wait while MoodLogic scans your computer and builds its database. The files will not be moved from their original
locations.
Open or close text search box
Create new empty mix
Play tracks in your music playback application
The MoodLogic interface has multiple Views, which are selected by clicking MY MUSIC, MP3 PLAYER, etc. in the VIEW window.
View your computer’s MoodLogic music library by clicking MY MUSIC in the VIEW window. View the musical contents of your
connected MOJO 1 player and any tracks that are in the TRANSFER LIST by clicking MP3 PLAYER in the VIEW window. If you
have created any custom mixes (MoodLogic’s version of playlists), they will also be selectable from the VIEW window.
To transfer tracks from your PC to MOJO 1 (the fastest way):
1. Run MoodLogic and power ON MOJO 1.
2. Using the USB cable, connect MOJO 1 to your PC.
• MoodLogic will automatically “activate” 100 of your tracks.
4. After activation is complete, click FINISH and follow any on-screen prompts to complete setup.
To add additional tracks to your MoodLogic music library:
1. In MoodLogic, click FILE and select ADD MUSIC.
• The SCAN DISCS FOR MUSIC FILES window will open.
2. Select ADVANCED, click NEXT, then browse to the directory where the desired file(s) are located and click OK.
• Wait while MoodLogic scans the selected directory to expand its music library. The files will not be moved
from their original locations.
5
NOTE : In the MoodLogic interface, audio files may have any of the following extenstions: .mjm, .mjw, .tdk, .mp3 or .wma. Files
that are located on MOJO 1’s internal memory are encrypted and cannot be copied back to the PC.
6
TDK.l82.03/MOJO 1 User's Guide
3. Click MoodLogic’s MY MUSIC tab
9/3/03
9:37 AM
Page 6
to browse your PC-based music library.
6. To transfer the selected track(s) directly to your connected MOJO 1 unit, right click on a selected track and choose
TRANSFER TO MP3 PLAYER.
NOTE : Before MoodLogic can be used to transfer tracks, you must build its music library by following the “To build the MoodLogic
music library:” steps previously described.
4. Navigate to the desired PC-based track(s). In the ARTIST box, you can click any artist name to view only tracks by that artist
in the TRACK LIST window.
• If MOJO 1 has a memory card (not included) inserted, the “Select Storage to Transfer To” window will open. Select INTERNAL
or EXTERNAL and click OK.
5. In the TRACK LIST window, click a track title to select the track, or hold down CONTROL (CTRL) and click multiple track titles
to select multiple tracks.
• The titles of selected tracks will appear highlighted.
• The track(s) will be transferred to MOJO 1.
To transfer tracks from your PC to MOJO 1 (the most organized way):
1. Run MoodLogic and power ON MOJO 1.
2. Using the USB cable, connect MOJO 1 to your PC.
3. Click MoodLogic’s MY MUSIC tab
to browse your PC-based MoodLogic music library.
NOTE : Before MoodLogic can be used to transfer tracks, you must build its music library by following the “To build the MoodLogic
music library:” steps previously described.
4. Navigate to the desired PC-based track(s). In the ARTIST box, you can click any artist name to view only tracks by that artist
in the TRACK LIST window.
7
8
TDK.l82.03/MOJO 1 User's Guide
9/3/03
9:37 AM
Page 8
5. In the TRACK LIST window, click a track title to select the track, or hold down CONTROL (CTRL) and click multiple track titles
to select multiple tracks.
7. In the VIEW window, click on the MP3 PLAYER tab.
TRANSFER LIST
MOJO 1 memory status
MOJO 1 view
• The titles of selected tracks will appear highlighted in the TRACK LIST window.
6. To add the selected track(s) to MoodLogic’s TRANSFER LIST, right click on a selected track and select SEND TO MP3 PLAYER
VIEW.
• The TRANSFER LIST (the top pane) and the MOJO 1 view (bottom pane) will open. The MOJO 1 view displays the tracks that
are currently stored on your connected MOJO 1 player.
8. To change the playback order of tracks, click and drag any track to the desired position in the TRANSFER LIST. The playback
order of tracks in the TRANSFER LIST matches the playback order the tracks will have when transferred to MOJO 1.
9. To remove a track(s) from the TRANSFER LIST click the track’s title in the TRANSFER LIST, right click and select
REMOVE FROM LIST.
• Repeat until all desired tracks have been added to MoodLogic’s TRANSFER LIST.
9
10
TDK.l82.03/MOJO 1 User's Guide
9/3/03
9:37 AM
Page 10
10. When satisfied with the TRANSFER LIST, click the TRANSFER TO DEVICE button
.
• If MOJO 1 has a memory card (not included) inserted, the “Select Storage to Transfer To” window will open. Select
INTERNAL or EXTERNAL and click OK.
To delete tracks from MOJO 1:
1. Run MoodLogic and power ON MOJO 1.
2. Using the USB cable, connect MOJO 1 to your PC.
3. Click MoodLogic’s MP3 PLAYER tab to view the contents of MOJO 1’s memory.
• The track(s) will be transferred to MOJO 1.
• If you wish to cancel the track transferring process, click STOP.
NOTE : While MOJO 1 will appear under My Computer as a USB mass storage device, copyright laws prevent using the Windows
interface to transfer audio files to MOJO 1. You can use the included MoodLogic software to transfer audio files to MOJO 1. It is
not possible to copy audio files from MOJO 1 to a PC.
To navigate by artist:
The artists of your tracks are listed in the Artist box.
4. In the MOJO 1 view (bottom pane), click a track title to select the track, or hold down CONTROL (CTRL) and click multiple
track titles to select multiple tracks.
5. Right click on a selected track and select REMOVE FROM DEVICE to delete the selected track(s) from MOJO 1’s memory.
• Click an artist to view tracks by that artist in the TRACK LIST window.
• Click ANY ARTIST to view tracks by all artists in the TRACK LIST window.
NOTE : All tracks in your music library can be navigated by artist, but only tracks that have been activated can be navigated by
genre, tempo, year and mood. Tracks can be activated automatically (requires activation credits or full version of MoodLogic) or
manually by “profiling” them. See the “MoodLogic Advanced Guide” section of this User’s Guide for more information.
OR
Press your computer keyboard’s DELETE (DEL) button, then click OK to delete the selected track(s) from MOJO 1’s memory.
11
12
TDK.l82.03/MOJO 1 User's Guide
9/3/03
9:37 AM
Page 12
USING MOJO 1
To listen to a track or mix with MoodLogic:
1. Select the desired track(s) or mix.
2. Click Play.
MOJO 1 is convenient and easy to use.
WEAR STYLE
Play selected tracks in your music playback software.
OR
Double-click a track or a mix to play it.
• Your audio playback software (not included) should open and play the track(s).
NOTE : Disconnect the USB cable before attempting to use MOJO 1. When the USB cable is connected, playback is not possible.
13
14
TDK.l82.03/MOJO 1 User's Guide
9/3/03
9:37 AM
Page 14
PLAYER CONTROLS
PLAYER CONTROLS CONTINUED
STOP/OFF
1. ON/PLAY/PAUSE
• To turn MOJO 1 ON and start playback,
hold down ON/PLAY/PAUSE for a few
seconds until the green LED lights solid.
• To start playback, press ON/PLAY/PAUSE.
• To pause playback, press ON/PLAY/PAUSE.
ON/PLAY/PAUSE
HOLD
SKIP BACKWARDS
R
SKIP FORWARD
NOTE : When MOJO 1 is powered ON, playback
automatically starts from the beginning of the last
track that was playing when the unit was powered OFF.
SOURCE
VOL+ / VOL-
L
2. STOP/OFF
• To stop playback, press STOP/OFF.
• To turn OFF MOJO 1, hold down STOP/OFF for a few seconds
until its LEDs switch off.
3. SKIP FORWARD
• If playback is active, press to skip to the beginning of the next track.
• Hold down to scan forward through the track that’s currently playing.
• If playback is stopped, hold down to begin intro playback (The beginning of each track will play for 10 seconds.) Press
STOP to resume normal playback.
• In FM mode, press to advance to the next preset radio station.
• In FM mode, hold down until the unit begins to scan forward for radio stations. MOJO 1 will play each station for
10 seconds, then scan forward to the next station. Press STOP when the desired station is found. (The station will be
added to MOJO 1’s presets. Repeat to add up to 5 stations to MOJO’s presets.)
NOTE : An additional 20 FM presets can be programmed using the MOJO 1 PC Software.
4. SKIP BACKWARDS
• Hold down to scan backward through the track that’s currently playing.
• If playback is stopped, hold down to begin intro playback (The beginning of each track will play for 10 seconds.)
Press STOP to resume normal playback.
• If playback is active and track has been playing for more than five seconds, press to restart playback at the beginning of
the current track. (If the track has been playing for less than five seconds, press to start playback at the beginning of the
previous track.)
• In FM mode, press to go to the previous preset radio station.
• In FM mode, hold down to scan backwards for radio stations. MOJO 1 will play each station for 10 seconds, then scan
backwards to the next station. Press STOP when the desired station is found. (The station will be added to MOJO 1’s
presets. Repeat to add up to 5 stations to MOJO’s presets.)
norm rpt all rpt1 rdm
norm rock jazz classic
mode
In this example, MODE is set to NORM.
DSP
In this example, DSP is set to NORM.
7. HOLD
• Place in ON position to disable all other buttons.
• Place in OFF position to enable all buttons.
8. DSP
• Slide the switch to select the desired sound preset. The presets are NORMAL, ROCK, JAZZ and CLASSIC. Each preset
delivers a different blend of bass and treble.
9. MODE
• Slide the switch to select the desired playback mode. The modes are NORMAL, REPEAT ALL (all tracks play then repeat.
Tracks loaded into internal memory play first.), REPEAT 1 (same track plays repeatedly) and RANDOM (tracks played in
random order). In NORMAL mode, all tracks in internal memory play first, then all tracks loaded on memory card (if
loaded) play.
10. SOURCE
• Press to select the playback source. The playback sources are INTERNAL (built-in memory), FM (radio) and MMC/SD
(memory expansion card). The MMC/SD option is only available when an optional MMC or SD card that contains tracks is
loaded into MOJO 1’s memory expansion slot. Whenever the SOURCE button is pressed to select INTERNAL (built-in
memory) or MMC/SD (memory expansion card), playback automatically begins from the first track on the selected source.
NOTE : An additional 20 FM presets can be programmed using the MOJO 1 PC Software.
INT
FM
EXT
(MMC/SD)
5. VOL+
• Press to increase the volume. (Also changes volume of audio out port.)
6. VOL –
• Press to decrease the volume. (Also changes volume of audio out port.)
15
16
TDK.l82.03/MOJO 1 User's Guide
9/3/03
9:37 AM
Page 16
PLAYER PORTS
STATUS INDICATORS
POWER
DC 4.5V
14. BATT
• Lights when the battery is nearly depleted.
ext
batt
FM
int
AUDIO OUT
15. EXT
• (Has various states. See chart.)
ext
batt
FM
int
16. FM
• (Has various states. See chart.)
ext
batt
FM
int
17. INT
• (Has various states. See chart.)
ext
batt
FM
int
ext
batt
FM
int
2
L
1
USB
11.
USB
• Used for transferring tracks into MOJO 1 from a PC. Connect the small end of the included USB cable to MOJO 1.
Connect the other end to your PC’s USB port.
Player modes
PLAY
STOP
PAUSE
INTRO (auto scan)
FM Record
USB active
EXTernal memory active
On
Slow flash rate
Fast flash rate
Fast flash rate
FM active
On
Slow flash rate†
Fast flash rate
Fast flash rate
On
INTernal memory active
On
Slow flash rate
Fast flash rate
Fast flash rate
Fast flash rate
On
† Turns off after 2 minutes
12. AUDIO OUT
• Used for connecting a second set of headphones to MOJO 1. Allows listening with a friend. Audio out port supplies
variable output level.
13. POWER
• Used for powering MOJO 1 from an outlet. Requires adapter (DC 4.5 volt, 300 mA, not included).
17
18
TDK.l82.03/MOJO 1 User's Guide
9/3/03
9:37 AM
Page 18
PLAYBACK QUICK STEPS
To power on MOJO 1:
• Hold down ON/PLAY/PAUSE for a few seconds until the INT LED lights. After being powered on, MOJO 1 automatically will
begin playback from the last selected playback source.
To power off MOJO 1:
• Hold down STOP for a few seconds.
To play from MOJO 1’s internal memory:
1. Power on MOJO 1.
2. Repeatedly press SOURCE until INT lights.
• Playback will begin.
USING MOJO 1 AS A DATA STORAGE DEVICE
MOJO 1 can function as a portable data storage device, allowing you to load non-audio files, such as text documents into its
memory. This can come in handy when you need to transport a data file from one location to another.
NOTE : While MOJO 1 will appear under My Computer as a USB mass storage device, copy protection prevents using the Windows
interface to transfer audio files to MOJO 1. It is not possible to copy audio files from MOJO 1 to a PC.
To load a non-audio file(s) into MOJO 1’s memory:
1. Power ON MOJO 1 and using the USB cable, connect MOJO 1 to the PC where the desired non-music file is located.
2. In Windows, double click MY COMPUTER.
• The My Computer window will open.
3. In the My Computer window, double click the REMOVABLE DISK icon.
• The REMOVABLE DISK (MOJO 1’s memory) window will open.
4. Drag and drop or copy and paste the file(s) from any location on your hard drive to the REMOVABLE DISK window.
NOTE : See “Transferring Music to MOJO 1” for instructions on loading tracks onto MOJO 1’s internal memory. Tracks must be
loaded onto MOJO 1’s internal memory to enable playback from internal memory.
To play from a memory expansion card (MMC or SD) that’s inserted into MOJO 1:
1. Power on MOJO 1.
2. Repeatedly press SOURCE until EXT lights.
• Playback will begin.
NOTE : See “Transferring Music to MOJO 1:” for instructions on loading tracks onto a memory expansion card. Tracks must be
loaded onto the memory expansion card to enable playback from the card.
To play FM radio:
1. Power on MOJO 1.
2. Repeatedly press SOURCE until FM lights.
• Playback of a preset radio station will begin.
To record FM radio to MOJO 1’s internal memory:
1. Put MOJO 1 in FM playback mode and tune the desired radio station.
2. Hold down ON/PLAY/PAUSE for a few seconds until the FM and INT LEDs begin flashing quickly.
• Recording will begin.
3. Press STOP to stop recording.
NOTE : MOJO 1 will appear as two separate drives. Each will be listed as a REMOVABLE DISK. One REMOVABLE DISK is MOJO 1’s
internal memory, the other is MOJO 1’s memory card slot. The memory card slot will only be accessible if a memory card is loaded.
To retrieve a non-music file(s) from MOJO 1’s memory:
1. Power ON MOJO 1 and using the USB cable, connect MOJO 1 to the PC to which you wish to transfer the file(s).
2. In Windows, double click MY COMPUTER.
• The My Computer window will open and should contain a REMOVABLE DISK icon.
3. In the My Computer window, double click the TDK MOJO 1 EXT icon.
• The REMOVABLE DISK window will open.
4. Drag and drop or copy and paste the file(s) from the REMOVABLE DISK window to the location on the PC’s hard drive where
you wish to store the file(s).
• The file(s) will be transferred to the PC’s hard drive.
NOTE : MOJO 1 will appear as two separate drives. Each will be listed as a REMOVABLE DISK. One REMOVABLE DISK is MOJO 1’s
internal memory, the other is MOJO 1’s memory card slot. The memory card slot will only be accessible if a memory card is loaded.
NOTE : MOJO 1 will automatically stop recording when its internal memory is full.
NOTE : If MOJO 1 has less than 3 MB of available internal memory, recording FM radio will not be possible.
19
20
TDK.l82.03/MOJO 1 User's Guide
9/3/03
9:37 AM
Page 20
MOODLOGIC ADVANCED GUIDE
The version of MoodLogic supplied with MOJO 1 automatically “activates” 100 of your tracks (requires Internet connection.)
Automatically activating tracks corrects your tracks’ file names and enables advanced MoodLogic features. If you purchase the
full version of MoodLogic (available from www.moodlogic.com), up to 10,000 tracks will be activated. At any time, you can
manually “profile” your tracks to achieve the same results. Manually profiling tracks can earn automatic activation credits.
To enable MoodLogic’s most advanced, unique features, you must:
• Activate tracks automatically (requires Internet connection)
OR
• Profile tracks manually.
• Activating automatically retrieves information about your tracks. (The information is retrieved from MoodLogic’s Internet
database.)
• Profiling is a manual process where you provide information about your tracks.
• After a song has been Activated or Profiled, it is considered Active.
• Active tracks are either Mixable or Non-Mixable. (Only tracks with certain high quality data properties can become Mixable.)
• You can Instant Mix any Mixable track.
• Tracks that are neither Mixable nor Non-Mixable are considered Pending.
• To make a Pending song Mixable, you must automatically Activate it or manually Profile it.
Song Status Legend
THIS PAGE LEFT BLANK INTENTIONALLY
To manually profile your music:
1. Run MoodLogic.
2. From the TOOLS menu, select PROFILE CENTER.
• The PROFILE CENTER window will be displayed.
21
22
TDK.l82.03/MOJO 1 User's Guide
9/3/03
9:37 AM
Page 22
3. Select an artist whose tracks you want to profile, and click PREPARE ARTIST FOR PROFILING.
• MoodLogic will scan the tracks by that artist and will list the tracks that can be profiled.
4. Select the song(s) that you want to profile, and click the PROFILE YOUR SONGS button.
To correct a track profile:
1. Run MoodLogic.
2. Click MoodLogic’s MY MUSIC tab to browse your PC-based music library.
3. In the TRACK LIST, right-click the song that you want to correct.
PROFILE YOUR SONGS button
• The song will play and the PROFILE SONG window will be displayed, presenting you with a series of questions about the
song. For best results, it is recommended that you profile multiple tracks by the same artist.
4. From the right-click menu, choose CORRECT OR ADD SONG PROFILE.
The Profile Song window will be displayed, and the song will play while you profile.
5. Answer the questions about the tracks as accurately as you can.
• The song profile will be modified, and your data will be added to the database.
Creating a MoodLogic Instant Mix
The MoodLogic Instant Mix feature instantly creates a Mix based on your favorite song, genre, or artist. A mix is an organized
collection of tracks. Only songs that have been activated (either automatically or by profiling) are eligible for instant mixing.
To create an Instant Mix:
1. Run MoodLogic.
2. Click MoodLogic’s MY MUSIC tab
to browse your PC-based music library.
5. Follow the instructions on the screen and answer the questions about the song(s) as accurately as possible.
• The track is manually profiled and your data is queued for quality assessment before it is entered into the MoodLogic
database. In the meantime, your settings are available for your personal use. For example, if you profile a song as
Alternative, it will be listed with your Alternative genre tracks in the MY MUSIC view.
23
24
TDK.l82.03/MOJO 1 User's Guide
9/3/03
9:37 AM
Page 24
3. Select the song, genre, or artist that you want to base your Instant Mix on.
4. Click MIX.
• The INSTANT MIX view will be displayed.
To delete a track from a Mix:
1. Run MoodLogic.
2. Click the mix from which you wish to delete a track.
• The mix will be highlighted and its contents displayed.
3. Select the track you wish to delete
4. Right-click the highlighted track and select REMOVE FROM MIX.
OR
Select the track you want to delete and press your keyboard’s DELETE (DEL) key.
• The track will be deleted from the mix. The track will not deleted from MoodLogic or from your computer.
To change the track playback order in a mix:
1. Run MoodLogic.
2. Click the mix you want to reorder.
• The mix will be highlighted and its contents displayed.
3. Drag and drop tracks until the tracks are listed in the desired playback order.
OR
Right-click any song in the mix and select SHUFFLE TRACKS.
• Changes are automatically saved.
5. If you are basing your Instant Mix on a genre or an artist, select one of the options on the Mix wheel. This wheel is not
displayed if your Mix is based on a song.
• MoodLogic will scan your music collection and create an Instant Mix for you.
6. For more or less variety in your Instant Mix, move the VARIETY slider left or right respectively. Click SHUFFLE to randomly
change the order of the tracks. You can also delete tracks from the Instant Mix, or drag tracks into a different order.
• Your instant mix will be overwritten by the next instant mix you create. To save an instant mix, right click the INSTANT MIX
in the VIEW window, select SAVE AS NEW MIX and follow the prompts.
To drag tracks to a blank mix:
1. Run MoodLogic.
2. Click the CREATE NEW EMPTY MIX button in the MY MUSIC view.
• A blank mix (with a name such as “Untitled”) will be displayed.
3. Type a title for your mix.
4. Return to the MY MUSIC view and drag the desired tracks from the TRACK LIST to the icon that represents your new Mix.
• Your tracks will be automatically saved in the mix.
Changing MoodLogic Mixes
You can edit an existing mix by adding tracks, deleting tracks, or changing the track order.
To add a track to a mix:
1. Run MoodLogic.
2. From the MY MUSIC view, select the track you want to add to a mix.
3. Drag the and drop the track(s) into the mix.
• The track(s) will be added to the mix. You do not have to save the mix after adding tracks. Changes are automatically
saved.
25
To rename a mix:
1. Right-click the mix you want to rename and select RENAME.
2. Type a new name for the mix and press your computer keyboard’s ENTER key.
• The mix will automatically be saved with its new name.
To delete an entire mix:
1. Right-click the mix you want to delete and choose DELETE from the menu.
OR
Select the mix you want to delete and press the Delete (DEL) key on your keyboard.
OR
Select the mix you want to delete and choose DELETE MIX from the Mix menu.
To delete a track from MoodLogic:
1. Right-click the highlighted track and choose DELETE SONG(S) FROM MOODLOGIC.
OR
Select the track you want to delete and press Delete (DEL) on your keyboard.
• A prompt will be displayed to confirm that you want to delete the track from MoodLogic. This does not delete the track
from your computer, but it makes the track inaccessible from MoodLogic.
Cleaning Your Music Library
When you add music to MoodLogic, the application notes where the tracks are located on your PC. If you move or remove a
music file from your computer, the tracks remain on your MoodLogic interface. If you move or remove tracks frequently, it is
recommended that you clean your music library to remove the tracks from the MoodLogic interface.
To clean your music library:
1. From the MY MUSIC view, select CLEAN LIBRARY from the TOOLS menu.
• The CLEAN LIBRARY window will be displayed.
2. Click REMOVE SONGS. If you want to remove tracks from MoodLogic that are on any unavailable storage device, click the
checkbox before clicking REMOVE SONGS.
• The tracks will be removed.
26
TDK.l82.03/MOJO 1 User's Guide
9/3/03
9:37 AM
Page 26
CONFIGURING FM RADIO PRESETS
& UPGRADING FIRMWARE
To view tracks that are stored in MOJO 1’s memory:
1. Run MoodLogic.
2. Power ON MOJO 1 and using the USB cable, connect MOJO 1 to your PC.
3. Click MoodLogic’s MP3 PLAYER tab to view the contents of MOJO 1’s memory.
4. Click REFRESH to ensure that the displayed information is current.
Navigating Activated Tracks by Genre, Tempo, Year and Mood
After tracks have been activated, they can be navigated by genre, tempo, year and mood. See below for details.
To navigate by genre:
The genres of your tracks are listed in the GENRE box.
The included MOJO 1 PC Software is used to program MOJO 1’s FM radio presets. It can also be used to erase MOJO 1’s memory
and to upgrade the firmware should a firmware update become available.
NOTE : After connecting MOJO 1 to your computer and running this software, a list of presets currently stored on MOJO 1 will
appear in the RADIO PRESET ORGANIZER LIST. Presets 1-20 must be programmed using this software. Presets 21-25 must be
programmed with MOJO 1’s controls, as described in the”Using Mojo 1” section.
To run the MOJO 1 PC Software:
1. Click the MOJO 1 PC Software desktop icon.
OR
In Windows, click START, PROGRAMS, MOJO 1 UTILITY TOOLS, MOJO 1 PC SOFTWARE.
To set MOJO 1’s preset FM radio stations:
1. With MOJO 1 connected to your PC and powered ON, run the MOJO 1 PC Software.
2. Use the STATION SLIDER and/or the LEFT and RIGHT ARROWS to select the desired radio station.
• Click a genre to view tracks in that genre in the TRACK LIST window.
• Click ANY GENRE to view tracks in all genres in the TRACK LIST window.
STATION SLIDER
To navigate by tempo:
Tempo is the speed of music, also known as beats per minute (BPM).
• Click the TEMPO checkbox and adjust the left (minimum desired tempo) and right (maximum desired tempo) sliders to view
tracks with the desired tempo(s) in the TRACK LIST window. For example, for medium to fast tracks, keep the left slider in the
middle and move the right slider to the far right. Only tracks that have tempos in the desired range will be displayed in the
TRACK LIST window.
To navigate by year:
This filter sorts music by when it was released.
• Click the YEAR checkbox and adjust the left (earliest release date) and right (latest release date) sliders to view tracks
released in the desired range of years in the TRACK LIST window. For example, to view or listen to tracks from the 80s, put the
left slider on 80 and the right slider on 90. MoodLogic will display your tracks that were released within that range of years in
the TRACK LIST window.
3. When the desired station is displayed, click ADD TO LIST to add the station to the RADIO PRESET ORGANIZER list.
To navigate by mood:
Unlike most applications MoodLogic can sort your activated tracks by mood.
• Select the mood or moods of the tracks that will be displayed in the TRACK LIST window. For example, to view or listen to
tracks with hard, aggressive beats, click AGGRESSIVE.
RADIO PRESET ORGANIZER LIST
NOTE : From the My Music screen (see above), you can navigate activated tracks by any combination of
criteria. For instance, you could navigate by alternative tracks that have a fast tempo and were released in the ‘90s.
4. Repeat steps 2 and 3 to add additional stations.
27
28
TDK.l82.03/MOJO 1 User's Guide
9/3/03
9:37 AM
Page 28
7. Press and hold ON/PLAY/PAUSE for 20 seconds until the START button in the upgrader software is enabled. (The unit’s INT
and FM LEDs will also both light.)
• To change to order of stations in the RADIO PRESET ORGANIZER list, click any station and click MOVE UP or MOVE DOWN.
The order in which the stations are listed is the order in which the presets will be programmed on MOJO 1.
• To delete a station from the RADIO PRESET ORGANIZER LIST, click the station and click DELETE.
5. When the RADIO PRESET ORGANIZER LIST reflects the desired station presets, click TRANSFER to transfer the presets to
MOJO 1. Previously saved presets will be erased from MOJO 1.
8. Click the START button.
• A warning window will appear, stating that the player’s internal memory will be erased.
9. To proceed with the upgrade, click YES.
• When complete, a window will open, confirming that firmware upgrade is complete. Do not disconnect MOJO 1 from your
computer before the confirmation window appears.
Formatting MOJO 1’s Memory
If you’ve loaded files into MOJO 1’s internal memory or onto an optional memory card and experience playback issues, you may
need to reformat MOJO 1’s memory.
NOTE : MOJO 1 has 20 programmable radio station presets that can be programmed with this software. An additional 5 can be
programmed with MOJO 1’s controls, as described in the”Using Mojo 1” section.
If a MOJO 1 firmware upgrade becomes available, follow the procedure below to update MOJO 1’s internal firmware
(requires live Internet connection):
1. Run the MOJO 1 PC Software.
2. Click the UPGRADE button, located in the lower right hand side of the MOJO 1 PC Software screen.
• A window will open. Click OK to go to the TDK Web site (www.tdk.com/mojo1support) where you can check to see if a
firmware update is available. If a firmware update is available, it will appear as a link on the TDK Web page.
3. Click the “Download firmware” link, select SAVE in the window that opens, choose the location on your hard drive where you
want to save the file, and click SAVE to save the file to your hard drive.
4. After the download is complete, double click on the downloaded file to start the upgrader software.
5. Load a fresh battery into MOJO 1. Power OFF MOJO 1.
6. Using the USB cable, connect MOJO 1 to your PC.
29
To reformat MOJO 1’s memory:
1. Power ON MOJO 1.
2. Using the USB cable, connect MOJO 1 to your PC.
3. Run the MOJO 1 PC Software.
4.. Click the MEMORY button, located in the lower left hand side of the MOJO 1 PC Software screen.
• The Memory Utility window will open.
5. Using the pulldown, select MOJO’s memory (internal or optional card, if inserted) that you want to format.
6. Click START.
• A warning screen will appear.
7. Click OK to start formatting or click CANCEL to abort the process.
• After formatting is complete, COMPLETE will appear in the Memory Utility window.
8. After COMPLETE appears, disconnect MOJO 1 from your PC and close the Memory Utility Window.
30
TDK.l82.03/MOJO 1 User's Guide
9/3/03
9:37 AM
Page 30
USING A MEMORY EXPANSION CARD
SDMMC
MOJO 1 includes a memory expansion slot. A MultiMedia Card (MMC) or a Secure Digital (SD)
card can be inserted to increase the number of tracks that MOJO 1 can store. These optional
memory cards can be purchased from your local consumer electronics retailer or on the Internet.
To load a memory expansion card into MOJO 1:
1. Remove the memory expansion slot cover and save it for future use.
2. With MOJO 1 OFF, insert an MMC or SD card into MOJO 1’s memory expansion slot.
To remove a memory expansion card from MOJO 1:
• Steadily push in on the memory card until it releases, then slide the card straight out from
MOJO 1.
TROUBLESHOOTING
If you encounter difficulties, please read this entire section before calling TDK Technical Support.
If the player does not turn on when the ON/PLAY/PAUSE button is pressed:
• The battery may be inserted incorrectly. Be sure to match the battery’s polarity markings (+ and -) to the polarity markings
inside the battery door.
• The battery may be depleted. Use a new battery.
THIS PAGE LEFT BLANK INTENTIONALLY
If tracks are skipping or the sound quality is poor:
• There may be strong magnetic fields near the unit. Move the unit away from the TV or other source of a magnetic field.
• The battery may be nearly depleted. Use a new battery.
If MOJO 1 will not start playback:
• The HOLD function may be activated. Put the HOLD switch in its OFF position.
• The internal memory and/or expansion card may not contain any music tracks. Using MoodLogic and the USB cable, transfer
MP3 and/or WMA music tracks onto MOJO 1.
• The memory card may be damaged.
If MOJO 1 is not recognized by Windows:
• Check the USB connection between your unit and the computer.
• Verify that the PC’s USB drivers are properly installed.
If MOJO 1 freezes:
• Remove MOJO 1’s battery, leave the unit idle for 10 minutes, reinsert the battery and hold down ON/PLAY/PAUSE for a few
seconds to power ON MOJO 1. Normal operation should be possible.
31
32
TDK.l82.03/MOJO 1 User's Guide
9/3/03
9:37 AM
Page 32
MOJO 1 SPECIFICATIONS
WARNINGS & PRECAUTIONS
Carefully read the following safety and operating instructions. Keep this document handy for future reference.
General
Internal Memory
Memory Expansion Slot
Input/Output
Audio Out
USB
FILE SUPPORT
MP3
WMA
Variable bit rate (VBR) MP3
POWER SUPPLY
DC Power
Battery
Battery Life
FEATURES
FM tuner
FM programmable presets
FM recording
Song intro function
Upgradable firmware
Repeat mode
DSP(EQ) mode
Specifications (MP3/WMA)
THD
Bitrate (MP3)
Bitrate (WMA)
Audio Output
S/N of DAC
Specifications (FM Tuner)
Audio Output
Frequency Band
S/N
Speaker
Driver Unit
Output Power
Impedance
Sensitivity
Frequency Response
33
Do not subject the player to extreme force
128MB
Requires SD or MMC card (not included)
Vibration during walking or exercising will not affect the MOJO 1 player. However, dropping the player or dropping a heavy
object on the player may result in distorted sound and/or damage to the unit.
Variable level
Yes
Keep the player away from water at all times
Yes
Yes
Yes
4.5V DC 300mA (adapter not included)
Requires 1 AAA
Up to 10 hrs
The player may be damaged if water enters it. If the player comes in contact with water,
wipe it immediately with a dry cloth. If the player does not function, call TDK Technical Support.
Keep the player away from small children
The player contains small parts that present a choking hazard.
Do not operate a motor vehicle while using the player
In many states, using the player will operating a motor vehicle is illegal. It’s also dangerous.
Store the player with care
20 presets on PC & 5 presets on MOJO 1
1 hour on 128MB internal memory
Scans songs with 10 seconds playback
USB and MOJO 1 PC Software
Normal, 1, All, Random
Classic, Rock, Jazz, Normal
0.03%
8 - 320kbs
32 - 192 Kbps
12mW @ 1kHz
85dB
12mW @ 1kHz
87.5MHz ~ 108MHz
65dB
30mm Cobalt Magnet
100 mW Max
32 ohms
116 db at 1 kHz
20-20,000 Hz
Avoid keeping the MOJO 1 and the flash memory card (not included) on or near high heat source(s) or in places with high
humidity or a strong magnetic field.
Cleaning the Player
Disconnect the power supply adapter (not included) from the wall outlet or power source before
cleaning. Do not use liquid or aerosol cleaners. Use a damp cloth for cleaning.
Using and Replacing Batteries
Do not dispose the battery(s) in fire, recharge, put in backwards, or mix with used or other battery types as they may explode
or leak and cause personal injury.
Do not attempt to recharge standard non-rechargeable batteries. Recharging non-rechargeable batteries (such as normal,
heavy duty or alkaline batteries) may lead to an explosion or leakage and can cause personal injury.
Do not immerse batteries in water
Do not repair or disassemble the batteries.
Do not drop the batteries or subject them to extreme force.
Do not short-circuit the batteries, as this may result in skin burns.
If the product will go unused for longer than a few weeks, remove the batteries.
Insert the batteries according to the polarity markings on the product.
Keep the batteries in a cool and dry place, away from heat, moisture and metal objects when not in use.
Handle leaking batteries with rubber gloves. Avoid direct contact with skin or eyes. If this happens, wash thoroughly with
water and seek medical attention.
Dispose of used batteries as required by local ordinances or regulations.
Keep the batteries out of reach of young children.
34
TDK.l82.03/MOJO 1 User's Guide
9/3/03
9:37 AM
Page 34
Servicing
Do not attempt to service any part of the product yourself. Servicing should only be done by qualified service personnel.
Power Sources
Refer to the operating instructions included in your documentation and markings, if any, on the product.
Proper Care, Usage & Safety
Do not use any object to probe the openings of the product as this may result in electric shock or fire, and will also damage
the product.
Do not spill liquid of any kind on the product.
Do not wear headphones while driving.
Do not use MOJO 1 when lightning is occurring.
Do not listen to headphones at loud volumes as permanent hearing damage may result. If you experience ringing in your ears,
discontinue use.
Battery Health Hazards
Inhalation
Inhaling the fumes from the contents of an exposed battery may cause respiratory irritation. Seek fresh air and medical attention.
Skin Contact
Direct skin contact with the contents of an exposed battery may cause skin irritation
and/or chemical burns. Remove contaminated clothing and wash the affected skin area with soap and water. If a chemical
burn or the irritation persists, seek medical attention.
Eye Contact
If the contents of an exposed battery comes into contact with the eyes, this may cause severe irritation and chemical burns.
Flush the eyes thoroughly with water immediately for at least 15 minutes, lifting the upper and lower eyelids while doing so,
until no evidence of the chemical remains. Seek medical attention.
MOODLOGIC, INC. END-USER LICENSE AGREEMENT
NOTE: THE END-USER LICENSE AGREEMENT BELOW APPLIES ONLY TO THE INCLUDED MOODLOGIC™ SOFTWARE. BY CLICKING
ON THE "YES" BUTTON, YOU ARE UNCONDITIONALLY CONSENTING TO BE BOUND BY AND ARE BECOMING A PARTY TO THIS
LICENSE AGREEMENT ("AGREEMENT"). IF YOU DO NOT UNCONDITIONALLY AGREE TO ALL OF THE TERMS OF THIS AGREEMENT,
CLICK THE "NO" BUTTON AND THE DOWNLOAD AND INSTALLATION PROCESS WILL NOT CONTINUE. IF THESE TERMS ARE CONSIDERED AN OFFER, ACCEPTANCE IS EXPRESSLY LIMITED TO THESE TERMS.
1. GRANT. Subject to the terms of this Agreement, MoodLogic, Inc. (the "Company") hereby grants you a limited, personal, nonsublicensable, non- transferable, non-exclusive license to use the software that you are about to download and install
("Software") only for your personal, non-commercial use and only in accordance with any documentation that accompanies it.
2. RESTRICTIONS. You may not, nor permit anyone else to, directly or indirectly: copy, modify, distribute, rent, re-sell or lease
the Software; reverse engineer, disassemble, decompile or otherwise attempt to discover the source code or structure,
sequence and organization of the Software; reverse engineer, derive, collect, collate, disassemble, decrypt, or otherwise
attempt to discover the content, structure, and organization of any persistent store contained in or used by the Software; use
35
the Software for timesharing or service bureau purposes, or otherwise use the Software for any commercial purpose; use the
Software for performing comparisons or other "benchmarking" activities, either alone or in connection with any software (and
you will not publish any such performance information or comparisons); or remove any proprietary notices from the Software.
As between the parties, title, ownership rights, and intellectual property rights in and to the Software, and any copies or portions thereof, shall remain in the Company and its suppliers or licensors. You understand that the Company may modify or discontinue offering the Software at any time. The Software is protected by the copyright laws of the United States and international copyright treaties. This Agreement does not give you any rights not expressly granted herein.
3. INTELLECTUAL PROPERTY; CONTENT. As a condition to your use of the Software and the Company web site and service (collectively the "Service"), you agree that you will not use the Software or the Service (a) to infringe the intellectual property
rights or proprietary rights, or rights of publicity or privacy, of any third party; (b) to violate any law, statute, ordinance or regulation; (c) to disseminate content or information ("Content") that is harmful, threatening, abusive, harassing, tortuous,
defamatory, vulgar, obscene, libelous, or otherwise objectionable; and/or (d) to disseminate any software viruses or any other
computer code, files or programs that may interrupt, destroy or limit the functionality of any computer software or hardware or
telecommunications equipment. You, not the Company, are solely responsible for all Content that you upload, post, e-mail,
transmit, or otherwise disseminate using or in connection with the Software or the Service, and you acknowledge and agree
that the Company acts solely as a passive conduit for the transmission of Content. Further, the Company is not obligated to
exercise any screening, editorial, or other control over Content you receive, and such Content may include material that could
be deemed distasteful, misleading, inaccurate, offensive, pornographic or otherwise objectionable. You access all such
Content at your own risk and you will be solely responsible for any damage to your computer systems or loss of data resulting
therefrom. Although the Company has no obligation to monitor any Content disseminated in connection with the Software or
the Service, the Company may do so and may remove or block access to any Content that it believes may be (or alleged to be)
in violation of the restrictions set forth in this paragraph. You also agree to comply with all of the notices, terms and conditions posted on the Company web site, including the Terms and Conditions of Use posted thereon.
4. LICENSE TO THE COMPANY. Any time you create, upload, post or transmit Content that originates with you in connection
with the Service, you grant the Company and its affiliates a royalty- free, perpetual, irrevocable, exclusive, unlimited license
and right (including any moral rights), with right to sublicense, to use and otherwise fully exploit the Content in whole or in
part, in connection with the Service and the advertising and promotion thereof, throughout the world in any form, media, or
technology now known or later developed. You understand and agree that this grants the Company the right without limitation
to use the Content on and in connection with the Service in the following ways: to reproduce it for use on and in connection
with the Service; to distribute, transmit, publicly perform and communicate it to the public on and in connection with the
Service; to modify, adapt and create derivative works of it for technical purposes in connection with such uses; and/or to incorporate it into compilations or collections of other works for such purposes. You also warrant that any time you submit any other
Content originating with a third party, that the holder of any intellectual property or proprietary rights (including any moral
rights) in such original Content has completely and effectively waived all such rights and validly and irrevocably granted to
you the right to grant the license stated above.
5. SUPPORT AND UPGRADES. This Agreement does not entitle you to any support, upgrades, patches, enhancements, or fixes
for the Software (collectively, "Support"). Any such Support for the Software that may be made available by the Company shall
become part of the Software and subject to this Agreement.
6. INDEMNITY. You agree that the Company shall have no liability whatsoever for any use you make of the Software or the
Service. You hereby agree to indemnify and hold harmless the Company from any and all damages, liability, costs, and expenses (including attorney's fees) arising from claims related to your use (and/or use authorized by you) of the Software or the
Service.
7. WARRANTY AND DISCLAIMER. THE COMPANY PROVIDES THE SOFTWARE "AS IS" AND WITHOUT WARRANTY OF ANY KIND,
AND THE COMPANY HEREBY DISCLAIMS ALL EXPRESS OR IMPLIED WARRANTIES, INCLUDING WITHOUT LIMITATION WARRANTIES OF MERCHANTABILITY, FITNESS FOR A PARTICULAR PURPOSE, PERFORMANCE, ACCURACY, RELIABILITY, AND
36
TDK.l82.03/MOJO 1 User's Guide
9/3/03
9:37 AM
Page 36
NONINFRINGEMENT. THIS DISCLAIMER OF WARRANTY CONSTITUTES AN ESSENTIAL PART OF THIS AGREEMENT. SOME STATES
DO NOT ALLOW LIMITATIONS ON HOW LONG AN IMPLIED WARRANTY LASTS SO THE FOREGOING LIMITATIONS MAY NOT APPLY
TO YOU. 8. LIMITATION OF LIABILITY. UNDER NO CIRCUMSTANCES AND UNDER NO LEGAL THEORY, TORT, CONTRACT, STRICT
LIABILITY, OR OTHERWISE, SHALL THE COMPANY OR ITS LICENSORS, SUPPLIERS OR RESELLERS BE LIABLE TO YOU OR ANY
OTHER PERSON FOR ANY INDIRECT, SPECIAL, INCIDENTAL, OR CONSEQUENTIAL DAMAGES OF ANY CHARACTER INCLUDING,
WITHOUT LIMITATION, DAMAGES FOR LOST PROFITS, LOSS OF GOODWILL, WORK STOPPAGE, ACCURACY OF RESULTS, COMPUTER FAILURE OR MALFUNCTION, OR DAMAGES RESULTING FROM YOUR USE OF THE SOFTWARE OR THE SERVICE. IN NO
EVENT WILL THE COMPANY BE LIABLE FOR ANY DAMAGES IN EXCESS OF THE FEES PAID BY YOU IN CONNECTION WITH THE
SOFTWARE OR SERVICES PROVIDED BY THE COMPANY OVER THE TWELVE MONTH PERIOD PRECEDING THE DATE ON WHICH
THE CLAIM AROSE, EVEN IF THE COMPANY SHALL HAVE BEEN INFORMED OF THE POSSIBILITY OF SUCH DAMAGES. SOME
STATES DO NOT ALLOW THE EXCLUSION OR LIMITATION IF INCIDENTAL OR CONSEQUENTIAL DAMAGES, SO THE ABOVE LIMITATION AND EXCLUSION MAY NOT APPLY TO YOU. 9. TERMINATION. You may terminate this Agreement and the license granted
herein at any time by destroying or removing from all hard drives, networks, and other storage media all copies of the
Software. The Company may terminate this Agreement and the license granted herein at any time. Upon receiving notice of termination from the Company you agree to destroy or remove from such storage media all copies of the Software. Sections 4, 68, 10 and 11 shall survive termination of this Agreement. 10. EXPORT CONTROLS. You shall comply with all export laws and
restrictions and regulations of the Department of Commerce, the United States Department of Treasury Office of Foreign Assets
Control ("OFAC"), or other United States or foreign agency or authority, and you agree not to export, or allow the export or reexport of the Software in violation of any such restrictions, laws or regulations. By downloading or using the Software, you are
agreeing to the foregoing and you are representing and warranting that you are not located in, under the control of, or a
national or resident of any restricted country. 11. MISCELLANEOUS. This Agreement represents the complete agreement concerning this license between the parties and supersedes all prior agreements and representations between them. It may be
amended only by a writing executed by both parties. If any provision of this Agreement is held to be unenforceable for any reason, such provision shall be reformed only to the extent necessary to make it enforceable. The failure of the Company to act
with respect to a breach of this Agreement by you or others does not constitute a waiver and shall not limit the Company's
rights with respect to such breach or any subsequent breaches. This Agreement shall be governed by and construed under
California law as such law applies to agreements between California residents entered into and to be performed within
California.
NOTE: TDK REPRESENTATIVES CANNOT ANSWER YOUR QUESTIONS ABOUT THE INCLUDED MOODLOGIC™ SOFTWARE. FOR SUPPORT, PLEASE CONTACT MOODLOGIC™ DIRECTLY:
Internet: http://www.moodlogic.com/mlabout-contact.html
Email: [email protected]
TDK LIMITED WARRANTY – MOJO 1 TM Portable Headphone MP3 Player
One Year Limited Warranty for Hardware
90 Day Limited Warranty for Software
TDK Electronics Corporation ("TDK") warrants to the end-user customer that this product, exclusive of software (referred to
herein as "Hardware" or "Product") will be free from defects in material and workmanship for a period of one (1) year from
date of purchase. If TDK receives notice of any such defects during the warranty period, TDK will, at its option, either repair or
replace the Product which it finds to be defective at no charge (except for shipping and insurance). Repair of defective Product
may be with either new or rebuilt replacement parts that will be warranted for the remainder of the original warranty period.
Any exchanged parts under this warranty will become the property of TDK. Replacement Product may be either new or reconditioned. If the Product is discontinued and no longer available, then it may be replaced with Product determined by TDK to be of
similar value and performance.
37
TDK warrants to the end-user customer that the TDK-branded software included with the Product, when properly installed and
used will operate in substantial conformance with the user manual for a period of ninety (90) days from the date of purchase.
If TDK receives notice of defective software during the warranty period, TDK will replace the TDK software media which it finds
to be defective at no charge (except for shipping and insurance.)
TDK does not warrant that the operation of the Product will be uninterrupted or error free. This Limited Warranty does not apply
to defects resulting from (1) acts of God, accident, misuse, abuse, negligence, abnormal, or unusually heavy use; (2) improper
installation, operation, testing, or maintenance; (3) power failure or connection to improper voltage supply; or (4) attempted
repair by any party other than TDK. This Limited Warranty does not apply when the malfunction results from the use of the
Product in conjunction with other products, software, or accessories, or where it is determined by TDK that there is no fault
with the Product itself. This Limited Warranty is invalid if the factory applied serial number has been altered or removed from
the Product.
This Limited Warranty extends only to the original end-user customer and is not transferable to any subsequent purchaser. This
Limited Warranty is valid only within the United States. For areas outside the United States, contact the authorized dealer from
whom you purchased the Product to determine what warranty, if any, applies.
In order to obtain warranty service, you must deliver the Product to TDK freight prepaid, in either its original package or packaging providing a degree of protection equivalent to that of the original packaging, along with proof of purchase. (Please contact TDK at the number listed below or in the manual for further information.)
TDK MAKES NO OTHER WARRANTIES, EXPRESS OR IMPLIED, INCLUDING BUT NOT LIMITED TO THE WARRANTIES OF MERCHANTABILITY ,FITNESS FOR A PARTICULAR PURPOSE, OR NON INFRINGEMENT OF THIRD PARTY RIGHTS. TO THE EXTENT THAT
ANY IMPLIED WARRANTIES APPLY, DESPITE THEIR EXCLUSION UNDER THIS LIMITED WARRANTY, SUCH WARRANTIES SHALL BE
LIMITED TO THE DURATION OF THE EXPRESS WARRANTIES PROVIDED HEREUNDER.
THE REMEDIES PROVIDED UNDER THIS LIMITED WARRANTY ARE THE SOLE AND EXCLUSIVE REMEDIES. TDK’S LIABILITY UNDER
ANY LEGAL THEORY FOR ANY LOSS OR DAMAGE IN ANY WAY RELATED TO THE PRODUCT SHALL IN NO EVENT EXCEED THE PURCHASE PRICE OF THE PRODUCT. IN NO EVENT SHALL TDK BE LIABLE FOR ANY INCIDENTAL OR CONSEQUENTIAL DAMAGES
RESULTING FROM USE OF THE PRODUCT.
Some states do not allow limitations on how long an implied warranty lasts or any exclusion or limitation of incidental or consequential damages, so the above limitations and exclusions may not apply to you. This warranty gives you specific legal
rights, and you may have other rights which vary from state to state.
U.S.A.:
TDK Electronics Corporation
901 Franklin Avenue
Garden City, NY 11530, U.S.A.
For on-line support or to contact Technical Support, please visit: http://www.tdksupport.com or call 1.800.835.8326.
For registration of product, please visit: http://www.tdk.com/registration
38
TDK.l82.03/MOJO 1 User's Guide
9/3/03
9:37 AM
Page 38
TECHNICAL SUPPORT
Keep TDK’s email, web site and phone numbers in a convenient location as indicated below. Keep your MP3 player’s model
number, serial number, and a copy of your sales receipt handy as well.
If you experience a problem while installing or operating your MOJO 1 MP3 player, please refer first to the relevant sections of
this manual regarding setup and installation. If you are not able to resolve the problem, please refer next to the section on
Troubleshooting. You may also wish to refer to the TDK Technical Support web site at www.tdksupport.com for additional
information.
How to contact us
There are several ways for you to contact TDK’s Technical Support Department:
• Visit our web site at www.tdksupport.com for Help, upgrades, and answers to Frequently Asked Questions (FAQ’s)
• Call our 800-835-8326 technical support line
39