1
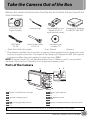
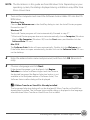
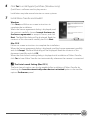
Quick Start Guide
Take the Camera Out of the Box
3
First Steps
4
Shooting and Playback
9
Installing the Supplied Software Applications
12
Transferring Pictures to a Computer
17
En
Thank you for your purchase of a Nikon COOLPIX S640 digital camera.
This guide introduces the procedures necessary in using this camera for the first
time.
For more detailed information, please refer to the supplied User’s Manual.
Technical support information is available online at the following sites:
• For users in the USA: http://www.nikonusa.com/
• For users in Europe and Africa: http://www.europe-nikon.com/support/
• For users in Asia, Oceania, and the Middle East: http://www.nikon-asia.com/
An Important Notice about Accessories
Nikon COOLPIX digital camera is designed to the highest standards and
includes complex electronic circuitry. Only Nikon accessories, such as chargers,
batteries, Charging AC Adapters and AC adapters, are certified by Nikon
specifically for your Nikon COOLPIX digital camera and are engineered and
tested to operate within the requirements of the electronic circuitry of our
cameras.
2
Take the Camera Out of the Box
Remove the camera and accessories from the box and confirm that you have all the
items listed below.
COOLPIX S640
Digital Camera
Camera Strap
USB Cable
UC-E6
Audio Video Cable
EG-CP14
• Quick Start Guide (this guide)
Rechargeable Li-ion Charging AC Adapter
Battery EN-EL12
EH-68P/EH-68P (AR)*
(with terminal cover)
Software Suite
installer CD
• User’s Manual
• Warranty
* Plug adapter supplied only in countries or regions where required and its shape varies with
country or region of purchase. The shape of the Charging AC Adapter EH-68P (AR) supplied
in Argentina differs from that supplied in other countries (A6).
NOTE: A Secure Digital (SD) card, hereafter referred to as a “memory card”, is not provided.
See page 138 of the User’s Manual for a list of approved memory cards.
Parts of the Camera
1
2
3
4
5
6
12
7
8
9
10
11
1
2
3
4
5
6
Power switch/Power-on lamp
Zoom control
Shutter-release button
Charge lamp/Flash lamp
A (shooting mode) button
c (playback) button
7
8
9
10
11
12
Rotary multi selector
k (apply selection) button
l (delete) button
d button
Battery-chamber/memory card slot cover
Monitor
A: This icon indicates that more information is available elsewhere in this guide.
Take the Camera Out of the Box
3
First Steps
Step 1
Attach the Strap
Step 2
Insert the Battery and the Memory Card*
* Data will be recorded onto the camera’s internal memory
(approximately 45 MB) even if there is no memory card. If recording
data to the camera’s internal memory, you do not have to insert a
memory card in step 2.3.
2. 1
Open the battery-chamber/
memory card slot cover.
Slide the cover latch toward Y (1)
and open the battery-chamber/
memory card slot cover (2).
2.2
Battery chamber
Memory card slot
Insert the battery.
• Insert the Rechargeable Li-ion Battery EN-EL12
(supplied) into the battery chamber.
• Use the edge of the battery to push the orange battery
latch in the direction indicated by the arrow (1) and
fully insert the battery (2). When the battery is fully
inserted, the battery latch will lock it in place.
Battery latch
Inserting the Battery Correctly
Inserting the battery upside down or backwards
could damage the camera. Be sure to check the battery
is in the correct orientation.
4
First Steps
2. 3
Insert the memory card.
Make sure that the orientation of the memory
card is correct, and slide it in until it clicks into
place.
Inserting the Memory Card Correctly
Inserting the memory card upside down or
backwards could damage the camera or the memory
card. Be sure to check the memory card is in the correct
orientation.
2. 4
Close the battery-chamber/memory card slot cover.
Close the battery-chamber/memory card slot cover (1), and
slide the cover latch to the Z position (2).
B Removing the Battery and Memory Card
Turn the camera off and confirm that the power-on lamp and the monitor are off before
opening the battery-chamber/memory card slot cover.
Removing the Battery
• To eject the battery, open the battery-chamber/memory card
slot cover and slide the orange battery latch in the direction
shown (1). The battery can then be removed by hand (2).
• Note that the battery may become hot during use; observe
due caution when removing the battery.
Removing Memory Cards
Open the battery-chamber/memory card slot cover and press
the card in (1) gently to partially eject the card. The card can
then be removed by hand (2).
Pages 14, 15, 22 and 23 of the User’s Manual
First Steps
5
Step 3
Charge the Battery
Use the supplied Charging AC Adapter EH-68P and USB Cable UC-E6 to charge the
battery inserted into the camera.
3.1
Prepare the Charging AC Adapter EH-68P.
If a plug adapter* is included, attach the plug adapter to the plug on
the Charging AC Adapter. Push the plug adapter firmly until it is
securely held in place. Once the two are connected, attempting to
forcibly remove the plug adapter could damage the product.
* The shape of the plug adapter varies according to the country or
region in which the camera was purchased.
For Customers in Argentina
If the camera was purchased in Argentina, a plug adapter is not
supplied. Proceed to step 3.2.
EH-68P (AR)
3. 2
Be sure that the power-on lamp and the monitor are off.
Be sure to insert the battery into the camera and turn off the camera.
3.3
Use the supplied USB
cable to connect the
Charging AC Adapter to
the camera.
3. 4
Plug the Charging AC Adapter into an
electrical outlet.
USB cable
The camera’s charge lamp slowly blinks
green to indicate that the battery is charging.
Charging is complete when the charge lamp
turns off.
About 4 hours are required to charge a
fully exhausted battery.
3.5
6
Disconnect the Charging AC Adapter from the electrical outlet and then
disconnect the USB cable.
Pages 16-19 of the User’s Manual
First Steps
Step 4
Turn On the Camera
Press the power switch to turn on the
camera. The power-on lamp (green) will
light for a moment and the monitor will
turn on.
C
Auto Power Off in Shooting Mode (Standby Mode)
If no operations are performed for about a minute (default setting), the monitor will turn off
automatically and the camera will enter standby mode. If no operations are performed for another three
minutes, the camera will turn off automatically (the auto off function). If the monitor is off in standby
mode (power-on lamp is flashing), press the power switch or the shutter-release button to reactivate it.
Step 5 Choose a Language and Set the Camera Clock
A language-selection dialog is displayed the first time the camera is turned on.
Follow the steps below to choose a language and set the time and date.
The Rotary Multi Selector
Use the rotary multi selector to choose and apply settings. Operate
the rotary multi selector by pressing it up, down, left, right and by
pressing the k button.
Move the highlight up.
Items can also be highlighted by
rotating the rotary multi selector.
Advance to the next screen
(move the highlight to the right).
Return to the previous screen
(move the highlight to the left).
Apply selection.
Move the highlight down.
5. 1
5. 2
Date
Set time and date?
No
Yes
Cancel
Choose the desired language and press
the k button.
Rotary multi selector operations
used are indicated with U.
Choose Yes and press the k button.
• The time zone selection screen is
displayed.
First Steps
7
5. 3
London
Casablanca
Back
Select your home time zone (city
name) and press the k button.
• The Date screen is displayed.
5. 4
If daylight saving time is in effect, press the
rotary multi selector up to turn on the
daylight saving time option.
When the daylight saving time option is
enabled, W is displayed at the top of the
monitor.
To turn off the daylight saving time option,
press the rotary multi selector down.
5. 5
Date
Date
D
M
Y
D
M
Y
01
01
2009
15
11
2009
00
00
15
Edit
Press the rotary multi selector up or
down to edit the highlighted item.
• Press right to move the highlight in the
following order. D (day) ➝ M (month)
➝ Y (year) ➝ hour ➝ minute ➝
D M Y (the order in which the day,
month, and year are displayed).
• Press the rotary multi selector left to
return to the previous item.
10
Edit
Choose the order in which DMY are
displayed and press the k button.
• The settings are applied and monitor
display exits to shooting mode.
• The lens will extend at this time.
C Changing the Language, Date and Time
Select Language or Date from the z tab (setup menu) to change the settings.
• Press the d button and choose the z tab to display the setup menu.
• Choose Language to change the language.
• Choose Date to change the date and time. Choose Time zone from the Date option in the
setup menu to change the home time zone (city name) and daylight saving time settings.
Pages 116 and 120 of the User’s Manual
C
Imprinting the Date on Pictures
After setting the date and time, set the Date imprint setting in the setup menu. Once Date imprint
is set, the shooting date and time can be imprinted on the image data when taking pictures.
Page 124 of the User’s Manual
The next procedure explains basic shooting operations using A (auto) mode.
8
First Steps
Shooting and Playback
Step 1
Check Indicators in the Monitor
Check the battery level and number of exposures remaining.
Battery level indicator
Display
NO INDICATOR
B
13
N
Battery
exhausted.
Description
Battery fully charged.
Battery low. Prepare to replace or charge
the battery.
Cannot shoot. Recharge or replace with a
fully charged battery.
Number of exposures remaining*
* When data are recorded to the internal memory, C is displayed.
Pages 24-25 of the User’s Manual
Step 2
Frame the picture
Position the main subject near the center of the monitor.
Zoom control
Rotate towards g to zoom in and
enlarge the subject, or rotate
towards f to zoom out, increasing
the area visible in the frame.
13
Pages 26-27 of the User’s Manual
Shooting and Playback
9
Step 3
3.1
Focus and Shoot
Press the shutter-release button halfway, stopping
when you feel resistance.
• Camera automatically selects the
focus area (up to nine areas)
containing the subject closest to
the camera. When the subject is
in focus, the focus area (active
focus area) glows green.
• When the camera is unable to
focus, the focus area blinks in red.
Change the composition and
press the shutter-release button
halfway again.
Flash lamp
Focus area
1/250 F2.7
Shutter speed
Aperture
Flash lamp
The status of the flash can be checked by pressing the shutter-release button halfway.
On
Flash will fire when picture is taken.
Blinks
Flash charging.*
Off
Flash off or not required.
* If the battery is low, the monitor display will turn off while the flash is charging.
3. 2
Smoothly press the shutter-release button the rest of the way
down to take the picture.
Do not use force when pressing the shutter-release button, as this may
cause camera shake, resulting in blurred pictures.
Pages 28-29 of the User’s Manual
10
Shooting and Playback
Step 4
View Pictures
Press the c button.
• The camera enters playback mode, and
the picture is displayed in full-frame
playback mode.
A button
15/11/2009 15:30
0004.JPG
• Press the k button to display the
shooting information screen. Press the k
button again to return to full-frame
playback.
• Use the rotary multi selector to view other
pictures. Rotate the rotary multi selector, or
press up, down, left, or right, to view
subsequent or previous pictures.
• Press the A button or the shutter-release
button to return to shooting mode.
C Deleting Pictures
To delete the picture currently displayed in the
monitor, press the l button. When a
confirmation dialog is displayed, use the rotary
multi selector to select Yes. Press the k button
to delete the picture.
• Deleted pictures cannot be recovered.
• To exit without deleting the picture, select No
and press the k button.
Pages 30-31 of the User’s Manual
Step 5
4
4
View the previous picture
View the next picture
15/11/2009 15:30
0004.JPG
4
4
Erase 1 image?
No
Yes
Turn Off the Camera
Press the power switch to turn the camera off.
Shooting and Playback
11
Installing the Supplied Software Applications
Nikon Transfer, ViewNX and other software can be installed from the supplied
Software Suite CD.
Nikon Transfer can be used to copy (transfer) pictures to a computer for storage.
ViewNX can be used to view transferred pictures on the computer.
Before You Begin: System Requirements for Supplied
Software Applications
Confirm that your system meets the following requirements.
Windows
Macintosh
PowerPC G4 or G5 model
or Intel Core or Intel Xeon
(universal binary) model
CPU
1 GHz or faster Intel Celeron, Pentium 4, or
Core series processor recommended
OS*
Preinstalled versions of 32-bit Windows Vista
Service Pack 1 (Home Basic/Home Premium/
Mac OS X (Version 10.3.9,
Business/Enterprise/Ultimate editions),
10.4.11, 10.5.6)
Windows XP Service Pack 3 (Home Edition/
Professional)
RAM
Windows Vista: 1 GB or more with a
512 MB or more (1GB or
minimum of 128 MB free
Windows XP: 512 MB or more (1 GB or more more recommended), with
recommended), with a minimum of 128 MB a minimum of 128 MB free
free
Hard disk space 1 GB or more required when software is running
* Refer to the Nikon website for the latest information on operating system compatibility.
The URL for your region’s Nikon website is noted on page 2 of this guide.
Before Installing
Exit all other applications and turn off any virus-checking software before beginning
Nikon Transfer installation.
When Installing, Using or Uninstalling Nikon Transfer/ViewNX
Log on to an account with administrator privileges.
12
Installing the Supplied Software Applications
NOTE: The illustrations in this guide are from Windows Vista. Depending on your
operating system, the dialogs displayed during installation may differ from
those shown here.
1
Turn on the computer and insert the Software Suite installer CD into the CDROM drive.
Windows Vista
Choose Run Welcome.exe in the AutoPlay dialog to start the Install Center program.
Proceed to step 3.*
Windows XP
The Install Center program will start automatically. Proceed to step 3.*
* If the Install Center program does not start automatically, choose Computer (Windows
Vista) or My Computer (Windows XP) from the Start menu, and double-click the
SoftwareSuite CD icon.
Mac OS X
The Software Suite folder will open automatically. Double-click the Welcome icon.
If the folder does not open automatically, double-click on the Software Suite CD icon
on the desktop.
2
Enter the administrator name and password, and then click OK (Macintosh
only).
3
Choose a language and click Next.
If the desired language is not displayed, click Region
Selection to choose a different region and then choose
the desired language (the Region Selection button is not
available in the European release of Software Suite). The
Software Suite installer dialog will be displayed.
C If Nikon Transfer or ViewNX is Already Installed
The Language Selection dialog will not be displayed if Nikon Transfer or ViewNX has
already been installed. The Software Suite installer dialog is displayed in the language
selected when Nikon Transfer or ViewNX was first installed.
Installing the Supplied Software Applications
13
4
Click Standard Install.
Install Nikon Transfer, ViewNX and related software.
C Other Installation Options
Custom Install
Install selected software.
Link to Nikon
Download trial versions of other Nikon software from a Nikon website or visit Nikon
technical support websites.*
my Picturetown (Photo Storage and Sharing Service)
Connect to Nikon’s convenient and easy-to-use photo management site, my
Picturetown.* Not available in some areas.
Install Guide
View help information on installing and using software included on the Software Suite CD.
* An Internet connection required.
5
Install Panorama Maker.
Panorama Maker is software that joins a series of images to create a single panorama
image.
Windows
Choose a language in the Choose Setup Language dialog and click OK. When the
ArcSoft Panorama Maker 4 dialog is displayed, click Next. The license agreement dialog
will be displayed. Read the license agreement carefully, click Yes, and follow the onscreen instructions to complete the installation.
Mac OS X
The license agreement dialog will be displayed. Read the license agreement carefully,
click Accept, and follow the on-screen instructions to complete the installation. Proceed
to step 7.
14
Installing the Supplied Software Applications
6
Click Yes to install Apple QuickTime (Windows only).
QuickTime is software used to play movies.
Installation may take several minutes on some systems.
7
Install Nikon Transfer and ViewNX.
Windows
Click Next, and follow on-screen instructions to
complete the installation.
When the license agreement dialog is displayed, read
the contents carefully, choose I accept the terms in
the license agreement to accept its terms, and click
Next. The Read Me dialog will be displayed. Read the
contents of this document carefully and click Next.
Mac OS X
Follow on-screen instructions to complete the installation.
When the license agreement dialog is displayed, read the license agreement carefully
and click Accept. The Read Me dialog will be displayed. Read the contents of this
document carefully and click OK.
When the Auto-Launch setting dialog is displayed with installation of Nikon Transfer,
click Yes to have Nikon Transfer start automatically whenever the camera is connected.
C The Auto-Launch Setting (Mac OS X)
The Auto-Launch option can also be enabled after installation of Nikon Transfer by
checking the Launch automatically when device is attached option in the transfer
options Preferences panel.
Installing the Supplied Software Applications
15
8
Install the suggested software, available online.
Recommended software, available over the Internet,
can be downloaded. An Internet connection is
required.
• The software displayed varies depending upon the
computer’s operating system.
• When the cursor is positioned over a software name,
an explanation of the software is displayed.
Downloading software
Check the software to be installed and click Confirm. Follow the on-screen instructions
to complete the installation(s).
Not downloading software
Click Skip.
C Microsoft DirectX 9 (Windows XP only)
If DirectX 9 is not yet installed, a DirectX 9 installer dialog will be displayed.
Follow the on-screen instructions to install DirectX 9.
9
Click Yes (Windows) or OK (Mac OS X) to close the
Install Center window.
If prompted to restart the computer, follow the on-screen
instructions.
10
Remove the Software Suite installer CD from the CD-ROM drive.
This completes installation. Proceed to “Transferring Pictures to a Computer”.
16
Installing the Supplied Software Applications
Transferring Pictures to a Computer
1
Be sure that the camera is off.
2
Connect the camera to the computer using the supplied USB cable.
Be sure that connectors are properly oriented. Do not attempt to insert connectors at an
angle, and do not use force when connecting or disconnecting the USB cable.
B Powering the Camera While Transferring Pictures
• Use a battery with enough charge to power the camera for the duration of the transfer,
otherwise the camera may turn off before the transfer is complete.
• If Charge by computer is set to Auto (default setting) in the camera’s setup menu, and if
the camera is connected via the included USB cable to a computer, the battery can be
charged automatically. The battery can be charged while transferring images. The camera's
charge lamp blinks slowly while the battery is charging.
Pages 84 and 131 of the User’s Manual
C Using a Card Reader
The pictures stored on the memory card inserted into a card reader or similar device can also
be transferred to the computer using Nikon Transfer.
• If the memory card has a capacity greater than 2 GB, or is SDHC-compliant, the intended
device must support these features of the memory card.
• Insert a memory card into the card reader or similar device, and refer to the steps 3, 4, and 5
to transfer pictures.
• To transfer pictures stored in the camera’s internal memory to the computer, the pictures
must first be copied to a memory card using the camera.
Page 115 of the User’s Manual
Transferring Pictures to a Computer
17
3
The camera automatically turns on.
The power-on lamp will light. The camera monitor will
remain off.
Windows Vista
When the AutoPlay dialog is displayed, click Copy pictures
to a folder on my computer using Nikon Transfer. Nikon Transfer will start.
To bypass this dialog in the future, check Always do this for this device:.
Windows XP
When the action selection dialog is displayed, select Nikon Transfer Copy pictures to
a folder on my computer, and click OK. Nikon Transfer will start.
To bypass this dialog in the future, check Always use this program for this action.
Mac OS X
Nikon Transfer will start automatically if Yes was selected in the Auto-Launch setting
dialog when Nikon Transfer was first installed.
4
Confirm that the source device is displayed in the transfer options Source
panel and click Start Transfer.
Source device
Start Transfer button
At the Nikon Transfer default settings, all pictures are transferred to the computer.
18
Transferring Pictures to a Computer
At the Nikon Transfer default settings, ViewNX starts automatically when transfer is
complete and transferred pictures can be viewed.
ViewNX can also be started with the following operations.
Windows
Choose Start menu>All Programs>ViewNX>ViewNX.
Double-clicking the ViewNX shortcut icon on the desktop will also start ViewNX.
Macintosh
Open Applications and click Nikon Software>ViewNX>ViewNX.
Clicking the ViewNX icon on the Dock will also start ViewNX.
For more information on Nikon Transfer or ViewNX, refer to help information contained
in Nikon Transfer or ViewNX.
5
Disconnect the camera.
Do not turn off the camera or disconnect the camera from the computer during transfer.
When transfer is complete, turn off the camera and disconnect the USB cable.
If the camera is turned off, battery charging also stops.
D Viewing Nikon Transfer and ViewNX Help Information
For more information on Nikon Transfer or ViewNX, start Nikon
Transfer or ViewNX and select Nikon Transfer Help or ViewNX
Help from the Help menu.
Transferring Pictures to a Computer
19
Other Features of the COOLPIX S640
C Scene mode
Page 37 of the User’s Manual
Simply choose the scene mode that most closely matches the shooting scene.
In scene auto selector mode, the camera chooses the optimum scene mode for simpler
shooting by framing the picture.
F Smart portrait mode
Page 51 of the User’s Manual
When the camera detects a smiling face using face priority, it releases the shutter
automatically. The skin softening function makes the subject’s skin appear smoother.
s Subject tracking mode
Page 54 of the User’s Manual
The camera automatically tracks and focuses on moving subjects.
C List by date, F Auto sort
Pages 61 and 64 of the User’s Manual
After taking pictures, you can search for the pictures you want to check by selecting the
date of recording or sorted folder name.
PictBridge
Page 85 of the User’s Manual
Print pictures directly from the camera with connection to a PictBridge-compatible
printer.
Printed in Hong Kong
CT9G01(11)
© 2009 Nikon Corporation
6MM71011-01