1
INDEX
I. Pager Diagram....................................... 1
II. Symbols Illustration.............................1
III.Operation................................................2
1. Reading Private Messages....................3
2. Reading Public Messages......................8
IV.Utilies Menu Operation.......................10
1. Adjusting The Real-Time Clock..........10
2. Choosing Audio, Vibration Or Quiescency
Alert....................................................11
3. Setting The Alarm...............................12
4. Adjusting The LCD Contrast...............13
5. Zoom Function....................................13
6. Turn Pager Off....................................14
V. Changing Battery................................15
VI.Specifications........................................16
VII.Precautions...........................................16
I
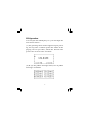
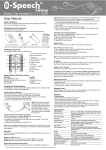
I. PAGERDIAGRAM
A. “Up” key
B. “Down” key
C. “Function” key
D. “Read/Confirm” key
E. Display Screen
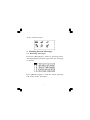
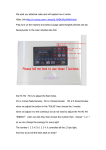
II. Symbols Illustration
Receiving Range Display
Low Battery Indication
Sound Alert Display
No Alert Display
Vibration Alert Display
1
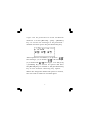
III.Operation
Use the [FUNCTION] key to cycle through the
four main menus :
(1) the greeting menu which appears upon power
up, the top line of which prints the name of the
paging service provider, while the bottom line
prints the current time and date.
(2) & (3) the public message menu, list of public
messages available.
2
4) the utilities menu.
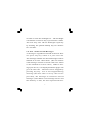
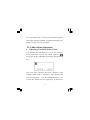
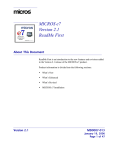
1. Reading Private Messages
1.1 Reading Messages
Press the [READ] key while at greeting menu.
The highlighted number represents the message
is unread.
Press [READ] again to read the whole message
and other earlier messages.
3
You may also use the [UP] and [DOWN] key to
navigate through the messages. At the end of
every message, the receiving time and date are
appended along-side the call tone ('A', 'B', 'C', or
'D') whose use is assigned by the paging service
provider. To save memory, messages with the
same content but with different call tone will be
stored as one message with a reminder tag
appended.(i.e. repeated/duplicated call, the setting depends on service provider)
1.2 Protecting Or Deleting Messages
Private messages can be deleted to free the
memory space they occupy. Important mes-
4
sages can be protected to avoid accidental
deletion. Use the [READ] / [UP] / [DOWN]
key to locate the message to be protected /
deleted and then press the [FUNCTION] key.
Three options are available:(1) to protect (
the message; (2) to delete (
(3) to delete all (
)
) the message;
) messages. Use the [UP]
/ [DOWN] key to choose an option and then
the [READ] key to confirm or the [FUNCTION]
key to exit without choosing any option.
When the dangerous delete-all option is chosen,
the user will be asked to confirm again.
5
When a message is protected, it will be placed
at the end of the message queue for ease of
searching, and it may be unprotected (
) by
first locating the message and then pressing the
[FUNCTION] and [READ] key.
1.3 High Visibility Backlight
The pager provides a backlight for reading messages in the dark. At any screen when the pager
is on, holding the [FUNCTION] key for two
6
seconds to turn the backlight on. The backlight
will remain on until no key is pressed for a while.
The user may turn off the backlight explicitly
by holding the [FUNCTION] key for another
two seconds.
1.4 New And Unread Messages
A message is regarded as unread if the user does
not press any key when it is just received.
The message number for unread messages will be
marked in reverse video mode. (Do not confuse
with message content received with error which
is also marked in reverse video.) When a message just arrives, it is displayed and the pager will
give an alert tone. The alert can be stopped by
pressing any key. If it is not stopped during
alerting (the alert time is set by the service
provider), the message is treated as unread
message. (N.B. When a new message arrives and
the memory is full, the last unprotected mes7
sage will be squeezed out to make room for the
new one.)
1.5 Power Management
To save power, the LCD screen will go back to
the Opening Screen if there is no key activity
for 8 seconds (the time depends on service
provider). If the pager still do es not d et e ct
any key activity for another 4seconds (the
time depends on service provider), the LCD
screen will be powered off. In this power saving
mode the pager is still able to receive messages
as usual. If a new message arrives, the screen
will be turned on automatically and the message
will be displayed. The user may also turn on
the screen explicitly by pressing any key.
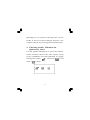
2. Reading Public Messages
Press the [FUNCTION] key while at greeting
menu to go to the public message menu and then
8
use the [UP] / [DOWN] key to choose the expected item, press the [READ] key at last.
The highlighted number represents the message
is unread. Press [READ] again to read the whole
message and other messages down.
The user may also use the [UP] and [DOWN]
key to navigate through the messages. At the
end of every message, the receiving time and
date are appended. Public messages may not be
protected or deleted. Note that the paging ser9
vice provider may or may not broadcast public
messages and the number of public messages depends on the service provider.
IV. Utilites Menu Operation
1. Adjusting The Real-Time Clock
Use the [FUNCTION] key to go to the utilities
menu and then choose the clock option (
)
using the [UP] / [DOWN] and then the [READ]
key.
The user may change the hour, minute, time
format (AM / FM or military), day, month and
year in sequence. Use the [DOWN] key to increase the fields and the [UP] key to decrease.
10
[READ] key to sequence through the various
fields, at last save the exchanges and exit; exit
without change by pressing [FUNCTION] key.
2. Choosing Audio, Vibration Or
Quiescency Alert
Use the [FUNCTION] key to go to the utilities
menu and then choose the alert option using
[UP] / [DOWN] and then [READ] to toggle
among the audio (
mute (
), vibration (
) mode.
11
), and
3. Setting The Alarm
Use the [FUNCTION] key to go to the utilities
menu and then choose the alarm option (
)
using the [UP] / [DOWN] and then the [READ]
key.
The user may change the alarm on / off, hour,
minute and time format (AM or PM). Use the
[DOWN] key to increase the field and the [UP]
key to decrease. [READ] key to sequence
through the various fields, at last save the exchanges and exit; exit without change by pressing [FUNCTION] key. When t he al arm i s
activated, a bell icon (
) will appear at the
bottom right corner of the greeting screen.
12
4. Adjusting The LCD Contrast
Use the [FUNCTION] key to go to the utilities
menu and then choose the contrast option
(
) using the [UP] / [DOWN] and then the
[READ] key.
Adjust to the desired contrast using the [UP] /
[DOWN] key and complete by pressing [READ],
exit without change by pressing [FUNCTION]
key.
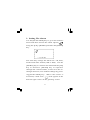
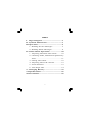
5. Zoom Function
Use the [FUNCTION] key to go to the utilities
menu and then choose the enlarging fonts option (
) using the [UP] / [DOWN] key and
13
then confirm by pressing the [READ] key. The
fonts displayed on screen will be enlarged as following picture:
6. Turn Pager Off
Use the [FUNCTION] key to go to the utilities
menu and then choose the power-off option
(
) using the [UP] / [DOWN] key and then
confirm by pressing the [READ] key. Unlike
the power-saving mode, the pager will not receive any message when it is switched off this
way. Press the [READ] key for one second to
turn on the pager again.
14
V. Changing Battery
When the battery icon is shown and the "LOW
CELL" notice is given, and the icon (
) will
appear on left side of the greeting screen. It
means that the battery almost runs out.
Change a new battery by switching off the pager,
releasing the battery door lock, opening the battery door, removing the old battery, replacing
the new battery, closing the battery door, and
then locking the door. The messages will be
kept for minimum 15 minutes when the battery
is removed.
15
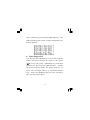
VI. Specifications
Display : small fonts: 21 characters x 8 lines
large fonts : 17 characters x 4 lines
Storage : 20K English characters
Battery : 1 x AAA alkaline
Weight : 65g with battery
Private messages : 60 (30 of which
protectable)
Public messages :
100 maximum
Typical battery life : 30 days without
switching off
Dimensions :
75 x 51 x 18 mm
VII. Precautions
1. Avoid humidity. Never let water or other
liquid gets into the unit.
2. Do not place the unit under direct sunlight
or near heat.
3. Do not repair the unit yourself.
16
4. Prevent the unit from falling down on the
ground, bending or strong impact.
5. Do not apply strong cleaning agents to
clean the unit.
6. Do not touch the screen with sharp-headed
object.
All upgrade editions are subject to change without any further notice. We apologize that there
may be some minor differences between the contents stated in User's Manual and the actual operations of the product.
17
FEDERAL COMMUNICATIONS COMMISSION
RADIO AND TELEVISION INTERFERENCE
STATEMENT FOR A CLASS ‘B’ DEVICE
This equipment has been tested and found to comply with the limits
for a Class B digital device, pursuant to Part 15 of the FCC Rules
These limits are designed to provide reasonable protection against
harmful interference in a residential installation. This equipment
generates, uses and can radiate radio frequency energy and, if
not installed and used in accordance with the instructions, may cause
harmful interference to radio communications. However, there is
no guarantee that interference will not occur in a particular installation. If this equipment does cause interference to radio or
television reception, which can be determined by turning the
equipment off and then on, the user is encouraged to try to correct
the interference by one of more of the following measures:
Reorient or relocate the receiving antenna.
Increase the separation between the equipment and receiver
Connect the equipment into a different outlet so that the
equipment and receiver are on different branch circuits.
Consult the dealer or an experienced radio/TV technician
for help.
This device complies with Part 15, of the FCC Rules. Operation is
subject to the following two condition:(1) this device may not cause
harmful interference, and (2) this device must accept any inter-
18
fere received including interference that may cause undesired
operation.
Changes or modifications not expressly approved by the Manufacturer could void the user’s authority to operate the equipment.
85-S640-004101
19