1
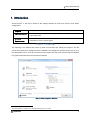
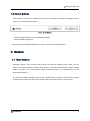
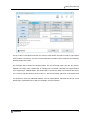
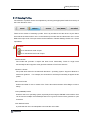
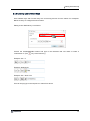
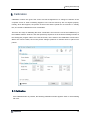
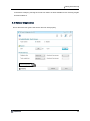
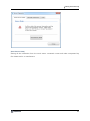
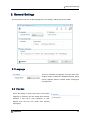
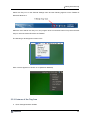
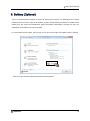
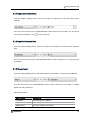
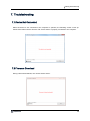
[T3kCfg User Manual] T3kCfg User’s Manual Version 2.8 Copyright © 2013 Nuribom Co., Ltd. Revision 1.10 [T3kCfg User Manual] Contents 1. INTRODUCTION ........................................................................................................................... 4 1.1 TABBED MENU ................................................................................................................................................................... 5 1.2 CONTROL BUTTONS ............................................................................................................................................................ 6 2. GESTURE ..................................................................................................................................... 6 2.1 TOUCH GESTURE ............................................................................................................................................................... 6 2.1.1 Selecting Profiles ...................................................................................................................................................... 9 2.1.2 Editing Profiles ........................................................................................................................................................ 10 2.1.3 Entering User Defined Keys .................................................................................................................................... 14 2.1.4 Entering Function Keys ........................................................................................................................................... 15 2.1.5 Expanding the Profiles ............................................................................................................................................ 15 3. CALIBRATION ............................................................................................................................ 18 3.1 CALIBRATION ................................................................................................................................................................... 18 3.2 AREA SETTINGS ............................................................................................................................................................... 20 3.3 TOUCH SETTINGS ............................................................................................................................................................. 22 3.3.1 Time Settings .......................................................................................................................................................... 23 3.3.2 Wheel / Zoom Sensitivity Settings ........................................................................................................................... 23 4. SENSOR SETTINGS ................................................................................................................... 24 4.1 ENABLE/DISABLE TOUCH SCREEN ..................................................................................................................................... 24 4.2 BUZZER ........................................................................................................................................................................... 25 4.3 SHORTCUT KEYS .............................................................................................................................................................. 25 4.3.1 Calibration Key ........................................................................................................................................................ 25 4.3.2 Touch-enable Key ................................................................................................................................................... 25 4.4 SENSOR DIAGNOSTICS ...................................................................................................................................................... 26 5. GENERAL SETTINGS ................................................................................................................. 28 5.1 LANGUAGE ....................................................................................................................................................................... 28 5.2 TRAY ICON ....................................................................................................................................................................... 28 5.2.1 Features of the Tray Icon ........................................................................................................................................ 29 5.3 TOUCH INPUT MODE ......................................................................................................................................................... 30 5.4 POSITIONING OF THE MONITOR .......................................................................................................................................... 31 6. SOFTKEY (OPTIONAL)............................................................................................................... 32 6.1 SOFTKEY SETTINGS .......................................................................................................................................................... 33 6.1.1 Input User Defined Key ........................................................................................................................................... 34 6.1.2 Input the Function Key ............................................................................................................................................ 34 6.1.3 Mouse Input ............................................................................................................................................................ 34 7. TROUBLESHOOTING ................................................................................................................. 36 7.1 DEVICE NOT CONNECTED ................................................................................................................................................. 36 7.2 FIRMWARE DOWNLOAD ..................................................................................................................................................... 36 7.3 THIS PROGRAM DOES NOT SUPPORT VX.XX FIRMWARE ......................................................................................................... 37 2 [T3kCfg User Manual] 7.4 WHEN MORE THAN TWO T3K TOUCH SENSORS ARE CONNECTED ........................................................................................ 37 3 [T3kCfg User Manual] 1. Introduction This document1 is the user’s manual of the settings software for T3K touch sensors (T3k Series Configurator). Program T3kCfg.exe Operating System Microsoft Windows XP (32 & 64 bit), Vista (32 & 64 bit), and 7 (32 & 64 bit), Linux, Mac OSX, Minimum Intel Celeron 333 MHz Processor or higher Requirements Resolution of 1024 x 768 or higher [Prerequisites for Running T3kCfg] The following is the window that comes up when one launches the T3kCfg.exe program. The left side is where buttons for setting the mouse, calibration and settings are located. Select each to go to the appropriate menus. One can see from the lower right hand side of this window that the software has gotten information from the T3k series hardware. [Figure. “T3kCfg” Program for Windows] 1 This document is subject to change without prior notice. 4 [T3kCfg User Manual] [Figure. T3kCfg for Mac OSX] [Figure. T3kCfg for Linux] 1.1 Tabbed Menu When one goes into one of the Mouse, Calibration, Sensor Settings, or General Settings menus, one is provided with five different buttons (six if one has Softkey installed) on the top right whereby the selection of which will give the user access to its specific settings. Home: Access to the menus in a wider named format. One can also see the firmware version of the device. Gesture: Setting the Touch Gesture Profiles. Calibration: To calibrate the touch coordinates and settings of the area to touch. Sensor Settings: Enabling and disabling touch functionality; turning the sound on and off; shortcut keys for calibrating and enabling / disabling touch; and a diagnostic tool for the sensors. General Settings: Language settings and the input mode for touch functionality. Softkey Settings (Optional): Settings for the user defined Softkeys. (Softkeys need to be installed for this to work) 5 [T3kCfg User Manual] 1.2 Control Buttons On the bottom of each menu window are keys to go to the default, to refresh the settings from the sensors, and terminate the program. [Figure. Control Buttons] Default: Change values to the manufacturing defaults.. Exit: Terminate the program. The following is the detailed explanation of each function of the T3kCfg software. 2. Gesture 2.1 Touch Gesture Selecting “Gesture” from the above list provides one with the following screen. Here, one can make a connection between a certain touch gesture, an action performed with a finger, multiple fingers, or a palm, or to a certain mouse button, a keyboard button, or a combination of a mouse and keyboard buttons. The T3k Touch Sensor classifies gestures into a bundle and this bundle is what we call a Profile. There are five Profiles in all and users can select which Profile to use thru Touch Gesture. 6 [T3kCfg User Manual] On top of the Touch Gesture window, the name of each Profile is listed from left to right. Before each Profile is a check box. One can check the Mac OS X Profile to select it but also view what the General Profile has to offer. The example above shows the General Profile. On the horizontal upper strip are the actions, whether it is a drag, a tap, a double tap, or a lengthy tap. On the left, vertically, is the type, whether it is a single finger, multiple fingers, the whole hand or a put & tap. When one combines the above, one comes up with the functions of the mouse i.e., left-click and drag, right click, or left double click. On the bottom, there are additional features such as Inertial Wheel, Individual Put & Tap, Put & Double Tap, Hybrid Multi-Touch, Mac OS X Margin, and Invert Wheel. 7 [T3kCfg User Manual] Touch Types that T3k Touch Sensor Recognizes Touch the screen via a single finger. Single Touch Touch the screen with multiple fingers. Fingers Touch Palm Touch Touch the screen with the palm of one’s hand. Place one finger on the screen and tap with another finger. Put & Tap Place two fingers on the plane of the screen and move them farther apart or closer together. Zoom Zoom-in: Move the fingers farther apart. Zoom-out: Move the fingers closer together. Touch Actions that T3kCfg Touch Sensor Recognizes Drag Place the pointer on the screen and move. Tap Press and let go of the screen in a quick fashion. Double Tap Press and let go of the screen twice in a quick fashion. Long Tap Press and let go of the screen but in slower fashion. 8 [T3kCfg User Manual] 2.1.1 Selecting Profiles The selection of profiles can be accomplished by choosing the appropriate Profile from the top of the Touch Gestrure menu. There are two modes of selecting a profile. One is by the Mouse and the other is by the Hand. One selects the Mouse when one is in the Mouse input mode and the Hand when one is in the Multi-touch input mode. The input mode can be selected in General Settings. Refer to 5.3 Touch Input Mode. Caution:. is for the Mouse mode of input is for the Multi-touch mode of input General Profile: The Profile that provides a simple and basic touch functionality. Good for single touch functionality but also supports some gestures inherent in T3k Touch Sensors. Windows 7 Profile: The profile best suited for the Microsoft Windows 7 operating system. Supports Windows 7 multi-touch gestures. For example, the shortcuts for the Snap functionality is applied in this profile. Mac OS X Profile: Profile best suited for use on a Mac OS X. This is also where the Mac OS X Margin comes in handy. Linux (GNOME) Profile: Suited for the Linux operating system, especially those using the GNOME user interface. One can access the multiple virtual desktops that Linux is good at. There is also gestures to open a terminal. User Defined Profile: A profile that the user can manipulate to do what the user needs. 9 [T3kCfg User Manual] 2.1.2 Editing Profiles After selecting a profile, one can go and edit parts of the profile by clicking a type and an action. There are four different editable types in each profile and each item has a different set of changes one can make. Each are explained below. A B C D A. Editing the Single > Drag, Tap, and Double Tap type 10 [T3kCfg User Manual] There are limited actions that one can select from each Profile. The following is the detailed editable actions present for the Single > Drag, Tap, and Double Tap type. Type Single > Drag Single > Tap Single > Double Tap Actions Explanation (Disabled) - Left Drag Press the left mouse button and drag (Disabled) - Left Click Click the left mouse button (Disabled) - Left Double Click Double click the left mouse button Caveat: Selecting Disabled for all Single > Drag, Tap, and Double Tap may make the touch functionality not work properly. B. Editing the Fingers, and Palm > Drag Functionality Can edit each or all the directional keys of forward, back, right, and left. 11 [T3kCfg User Manual] The following is the detailed editable actions for the Fingers and Palm > Drag type. Actions Explanation (Disabled) - (User Defined) User defined keys (Function key) Function keys from F1 to F24 Left Drag Press the left mouse key and drag Right Drag Press the right mouse key and drag Middle Drag Press the middle mouse key and drag Wheel Move the mouse wheel forward or backward Ctrl+Wheel Press the Control key and move the wheel Forward Press the Alt key and the left arrow key Back Press the Alt key and the right arrow key C. Editable Actions for Fingers > Tap. Double Tap, and Long Tap The following is the editable actions for the Fingers > Tap, Double Tap, and Long Tap type. Actions Explanation (Disabled) - (User Defined) User defined keys (Function keys) Function keys from F1 to F24 Left Click Click of the left mouse button Right Click Click of the right mouse button Middle Click Click of the middle mouse button Forward Pressing of the Alt key and right arrow key (Move forward on Windows Explorer or Internet Explorer) 12 [T3kCfg User Manual] Back Press the Alt key and the left arrow key (Move backward on Windows Explorer or Internet Explorer) Task Switcher Switch from the many tasks present on one’s desktop. Task Switcher (Aero mode) Switch from the many tasks present on one’s desktop but with Aero functionality turned on. (Aero functionality needs to be turned on for this to work on Vista or above operating system.) Task Manager Opens the Task Manager Explorer Opens the Windows Explorer Desktop Minimize all the tasks at hand and view the background image on one’s desktop. D. Editing the Zoom functionality One can edit each or both the zoom-in and zoom-out functionality. Below are the detailed editable actions for the Zoom type. Actions Explanation (Disabled) - (User Defined) User defined keys (Function Key) Any function keys from F1 to F24 Wheel Mouse wheel Ctrl+Wheel Pressing of the Ctrl key and turning the mouse wheel. (Programs in which the Ctrl+Wheel is recognized such as Windows Explorer, Internet Explorer, and Microsoft Word) 13 [T3kCfg User Manual] 2.1.3 Entering User Defined Keys User Defined Keys and Function Keys are reoccurring actions from the above four examples. Below are ways to configure these two items. Editing a User Defined key is as follows. Choose the Ctrl/Alt/Shift/Win buttons and type in the character that one wants to select a combination of. (The key is the Clear key.) Example: Ctrl + C Example: Window key Example: Ctrl + Shift + Esc One can simply type in the sequence or select from above. 14 [T3kCfg User Manual] 2.1.4 Entering Function Keys Entering the function keys to edit a profile is as follows. One can key in the sequence on the keyboard or select from the Ctrl/Alt/Shift/Win keys and press the function key on the keyboard. ( is the Clear key) Example: Ctrl + F1 Example: Ctrl + Alt + F3 Example: F20 2.1.5 Expanding the Profiles On the bottom of the Mouse menu, is four features that are related to each Profile. They go on and off as one goes from General to Windows 7 to Games, etc. One can also turn them on and off by toggling them. 15 [T3kCfg User Manual] Inertial Wheel: On top of the mouse wheel gesture, this feature adds inertia to it. For example, when one presses multiple fingers onto the screen of a document or a Web page, and move up or down in a quick fashion, consecutive pages keep turning as if the wheel had inertia. Individual Put & Tap, Put & Double Tap This setting is to set Put & Tap and Put & Double Tap as mutually exclusive features, i.e. when Put & Tap is working, Put & Double Tap cannot work and vice versa. When off, they are not mutually exclusive. Hybrid Multi-Touch: When the input mode is set to multi-touch Windows 7 mode, (refer to 5.3 Touch Input Mode), one cannot use all of the gestures specified in a profile. If the Hybrid Multi-Touch is selected, in addition to the gestures provided by the Windows 7 operating system, a subset of gestures inherent in T3k is applied. Mac OS X Margin: When using the Mac OS X, there is a difference in the coordinates of the Mac against that of a PC. Selecting this item will erase this difference. Only to be used on a Mac OS. Invert Wheel: To reverse the way that the mouse wheel behaves. As shown above, when one is in Multi-Touch Mode, one does not have access to any functionality inherent in T3k Touch Sensors. Windows 7s multi-touch takes over here. 16 [T3kCfg User Manual] Shown above is the same Multi-Touch Mode but with Hybrid Multi-Touch turned on. As one can see, the user can drag, tap, double-tap, and long-tap with the palm in addition to the Windows 7’s multi-touch features. Information: Action profile Setting for Mac OS X Version Mac OS X Screen Margin Invert Wheel(Mouse) Snow Leopard or lower O X Lion or higher O O 17 [T3kCfg User Manual] 3. Calibration Calibration is where one goes if the screen size has changed due to a change in resolution of the computer screen or when something happens to the sensors and they are not aligned properly. Usually, when this happens, the position of the mouse and the pointer do not coincide. To remedy this, one needs to calibrate the touch coordinates. There are two ways of calibrating the touch coordinates. One is thru the use of the Calibrate key in the Calibrate window. Another is thru the special key sequence set in the Sensor Settings window of the T3kCfg.exe program. When one uses the former, one is taken to the Calibration screen below. When one uses the latter, the mouse pointer changes positions to indicate where to place one’s pointer. 3.1 Calibration If the Calibrate button is pressed, the following calibration window appears. Click on each blinking red cross. 18 [T3kCfg User Manual] Follow the blinking red cross. A beep will sound as soon as one presses the blinking red cross and another will sound as one takes the pointer off the screen. The second beep is when the Main Module registers the point. There are nine crosses in total. Caution: 9 points calibration required at T3K firmware version 2.4 or lower. 19 [T3kCfg User Manual] Screen Margin: The screen margin is for the value of determining the cross hair position for screen coordinates of the calibration position. Entered the numerical input value is percentage of the proportion number of margin in the display screen. Ox Oy Sy Sx Screen Margin = Ox / Sx * 100 3.2 Area Settings This is to place a limit on the area for a single click, double click, Put & Tap, and the palm. Changing values in the Area Settings may cause the Tap, Double Tap, Put & Tap, or the Palm functionalities to malfunction. Use it at one’s own discretion. When a person taps on a surface, there are two things that she does. One is that she touches the surface or simply Touch, and the other is she lifts the finger from the surface or Lift. Click Area: This is the area where the user Touches and Lifts. 20 [T3kCfg User Manual] If the area where the user Touches and Lifts is not within the bounds set, touch is not recognized. Double Click Area: This is the area where the user Touches, Lifts, and Touches again. If the area where the user Touches, Lifts, and Touches is not within the bounds set, the double click is not recognized. Put & Tap Area This is the minimum percent area within which the Put & Tap action should be performed. If the area in which one performs the Put & Tap is less than the limits of the box, Put & Tap is not recognized. Palm Area This is the area that the palm is recognized. If the surface is any smaller than this, it recognizes it as a finger or multiple fingers. 21 [T3kCfg User Manual] 3.3 Touch Settings When one goes down to the bottom of the Calibration settings, one will see Touch Settings. Click on it and one should have the following window. 22 [T3kCfg User Manual] 3.3.1 Time Settings This is how fast or how slow one touches the screen with one’s fingers. The top is for the Tap and the bottom is for the Long Tap. The units for both are in milliseconds. 3.3.2 Wheel / Zoom Sensitivity Settings Mouse Wheel: This is the sensitivity setting for the wheel. If it is on the positive side, as the pointer goes down, the page goes down with it. If on the negative side, the page goes down as the pointer goes up. The closer it is to 0, the less receptive it is to the touch of the wheel. The farther it is to 0, it is quicker to the touch. Zoom: This setting sets the zoom sensitivity of the sensors. As the settings for the mouse wheel, it is more sensitive when it is farther away from 0 and less sensitive when it is closer. The functionality may change as one goes from positive to negative depending on the program. 23 [T3kCfg User Manual] 4. Sensor Settings The Settings window is divided into Enable/Disable Touch Screen, Buzzer and Shortcut Keys. 4.1 Enable/Disable Touch Screen The purpose for this is to enable/disable the touch screen. When enabled, the device responds to touch. When disabled, the device does not respond to touch. One would need a mouse/keyboard to interact when disabled. When one presses the Disable button, the following pop-up appears. Press the Timer Button to disable touch. Otherwise, it reverts back to Enabled. 24 [T3kCfg User Manual] This is to limit the disabling of the touch feature when there is no other pointing device present. To continue, one needs another pointing device (for example a mouse) to click the timer button. 4.2 Buzzer This is where one can turn on and off the sound when there is an error with the installation, or when a click is made. It is also the place to go if one would like to listen to the sound when a click is made. Click: For turning on and off the beep when a mouse is clicked or a touch occurs. Error: For turning on and off the beep when an error has occurred. An example would be disconnection of the camera sensor. 4.3 Shortcut Keys 4.3.1 Calibration Key One can use the Scroll Lock, Num Lock, or Caps Lock keys and the Number of Key Presses on the right to calibrate the device. Press the Scroll Lock, Num Lock, Caps Lock or the Escape key once to exit out of the Calibration screen. In the above figure, the Calibration key is set up so that when the user presses the Caps Lock key six times, the pointer goes to appropriate position and one is in the Touch Coordinate Calibration mode. Press on the Caps Lock key once to exit out of the Calibration mode 4.3.2 Touch-enable Key This is the Enable/Disable Touch shortcut key. One can use the Scroll Lock, Num Lock, or Caps Lock keys to enable or disable the touch capabilities of the device. 25 [T3kCfg User Manual] In the above example, pressing the Scroll Lock button six times disables touch. Pressing it again six times enables it. 4.4 Sensor Diagnostics This is where the user goes if the sensor does not work properly. 26 [T3kCfg User Manual] [Save Sensor State] Getting all the information from the touch sensor connected current and make compressed zip file. Please send it to manufacturer. 27 [T3kCfg User Manual] 5. General Settings This is the where one can set the language, tray icon settings, and the touch input mode. 5.1 Language This is for selecting the language. One can select from English, Korean, Traditional / Simplified Chinese, Dutch, French, Spanish, German, Turkish, Arabic, Portuguese and Japanese. 5.2 Tray Icon This is the setting to use the tray icon to store profile mappings. If selected, one can change from General, Windows 7, Mac OS X, Linux (Gnome), or User Defined from the tray icon rather than opening T3kCfg.exe. 28 [T3kCfg User Manual] Select Use Tray Icon on the General Settings menu and the following appears on the Taskbar of Microsoft Windows 7. When the user selects Use Tray Icon, the program does not terminate when one presses Exit but stays on until she selects Exit from the Taskbar. The following is what appears on Mac OS X. Here is how it appears on Ubuntu 10.10 (Maverick Meerkat). 5.2.1 Features of the Tray Icon a. Quick Change Between Profiles 29 [T3kCfg User Manual] One can change between Profiles from the Tray Icon. From the Tray Icon, one can easily change from the five Profiles as well as open up or terminate the T3kCfg program. b. T3k Touch Sensor Status By using the Tray Icon, one can also check the status of the T3k Touch Sensor. The sensor is disconnected. The sensor is connected and using the number 2 Windows 7 Profile. 5.3 Touch Input Mode The T3k Touch Sensor supports two input modes, mouse and multi-touch. Mouse: This mode is for basic mouse input. Using the Mouse mode, one can use all the gestures prevalent with the T3k Touch Sensor. Even if the operating system does not support multi-touch, one can use T3k Touch Sensor gestures. Multi-Touch: This mode is for operating systems that already support multi-touch, i.e. Windows 7 or 8. When one selects Multi-Touch mode, it is the operating system that recognizes gestures. This mode does not support the inherent gestures of the T3k Touch Sensor. 2 2 One can go to the Mouse Profile and select Hybrid Multi-Touch to partially allow T3k Touch Sensor gestures. Refer to 2.1.5 Expanding the Profiles. 30 [T3kCfg User Manual] If one selects Auto Select, the operating system selects the input mode depending on the OS. Operating System Supported Input Mode Auto Select Linux Mouse Mouse Max OSX Mouse Mouse Windows XP Mouse Mouse Windows Vista Mouse Mouse Windows 7, 8 Mouse, Multi-Touch Input Multi-Touch Input Android* Mouse, Multi-Touch Input Multi-Touch Input 5.4 Positioning of the Monitor This is for the rare cases that one has set the calibration in a certain position but would like to change the position. The calibration data is automatically translated to the desired position. Horizontal Vertical (90° Clockwise) Horizontal (180° Clockwise) Vertical (270° Clockwise) 31 [T3kCfg User Manual] 6. Softkey (Optional) This is an optional feature present in some T3k wide screen versions. It is basically a set of virtual buttons that one can set to open an annotation program, start browsing the Internet, or disable touch. Initially, they are set by the manufacturer. When the Softkey functionality is present, the user can manipulate some features to one’s own liking. For users that have this option, they will see an icon to the lower right of the Main screen of T3kCfg. Press on it and one will be presented with the following menu. 32 [T3kCfg User Manual] 6.1 Softkey Settings The following is a list of user settable items. Item Explanation (Disabled) - (User Defined) User Defined key (Function Key) Function keys from F1 to F24 (Mouse) Mouse input Escape (ESC) Esc key Task Switcher Switch from the many tasks present on one’s desktop. Task Switcher (Aero) Switch from the many tasks present on one’s desktop but with Aero functionality turned on. (Aero functionality needs to be turned on for this to work on Vista or above operating system.) Task Manager Opens the task manager. Explorer Opens the Windows Explorer. Desktop Minimize all the tasks at hand and view the background image on one’s desktop. 33 [T3kCfg User Manual] 6.1.1 Input User Defined Key From the Softkey Settings menu, select the number one would like to use and choose (User Defined). One can choose from the keys Ctrl/Alt/Shift/Win buttons and press the specific key to make a user defined combination. (The is the Clear key.) 6.1.2 Input the Function Key From the Softkey Settings menu, select the number one would like to use and choose (Function Key). One can choose from the keys Ctrl/Alt/Shift/Win buttons and/or select from F1 to F24 from the Combo Box. 6.1.3 Mouse Input From the Softkey Settings menu, select the number one would like to use and choose (Mouse). One can choose from the Ctrl/Alt/Shift/Win buttons and/or select from Left, Right, or Middle button from the Combo Box. Mouse Combo Box: Mouse Action Explanation Left Button Press the left mouse button Right Button Press the right mouse button Middle Button Press the middle mouse button 34 [T3kCfg User Manual] One can select from a combination of key sequences or choose from two different states. A combination of key sequences could be from a simple Escape key, to the more complex Ctrl+C, Ctrl+V, or Ctrl+Alt+Del. The aforementioned two states are the Enable/Disable Touch and Entering/Exiting Calibration. In the above figure, one is in the process of selecting a key sequence. One already has the Ctrl key selected and is waiting for the next key. The "C" on the right of the key sequence is to clear the slate. 35 [T3kCfg User Manual] 7. Troubleshooting 7.1 Device Not Connected When the device is not connected to the computer in question, the following screen comes up. Check if the USB connector from the T3k Touch Sensor is properly connected to the computer. 7.2 Firmware Download During a firmware download, one cannot set the sensor. 36 [T3kCfg User Manual] 7.3 This program does not support vx.xx firmware When the version of the software does not correspond to the version of the firmware, the following Dialog opens. It is specifying the versions of the firmware that it supports and the current version of the touch sensor’s firmware. One can change the software program and run it again, or upgrade the firmware of the touch sensors. 7.4 When More than Two T3k Touch Sensors are Connected When more than two T3k Touch Sensors are detected, the following Sensor Selector comes up. Select the appropriate sensor and press on Open. Model: The name of the T3k Touch Sensor. Device Path: 37 [T3kCfg User Manual] The device path on the host computer. Check: Pressing the appropriate will make an alarm sound. 38