1
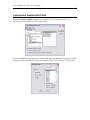
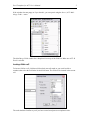
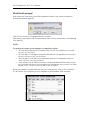
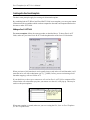
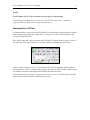
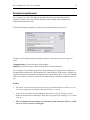
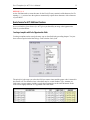
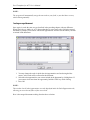
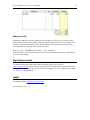
Excel Templates
&
Quote/Invoice Maker
for ACT!
V 1.1
Another efficient and affordable ACT! Add-On by
http://www.exponenciel.com
Excel Templates for ACT! User’s Manual
2
Table of content
Relationship between Excel Templates and Quote/Invoice Maker........................................... 3
Purpose of the add-on ................................................................................................................... 3
Installation procedure................................................................................................................... 3
Creating an Excel Template with ACT! fields............................................................................ 4
Inserting a field in a cell ........................................................................................................ 5
What if the cell is not empty? ................................................................................................ 6
Creating a bi-directional template ............................................................................................... 7
Adding an ExcelÆACT field ................................................................................................ 7
Removing an Excel ÆACT! field ......................................................................................... 8
Creating a merged document ....................................................................................................... 9
Saving the document ............................................................................................................. 9
Updating ACT! fields .......................................................................................................... 10
Automation Options .................................................................................................................... 10
Running in fully automated mode.............................................................................................. 11
Naming the merged document ................................................................................................... 12
Quote/Invoice for ACT! Additional Features ........................................................................... 13
Creating a template with Sales/Opportunities fields............................................................ 13
Creating a merged document ............................................................................................... 14
Hiding errors in cells ........................................................................................................... 15
Registering your product ............................................................................................................ 15
Support ......................................................................................................................................... 15
Excel Templates for ACT! User’s Manual
3
Relationship between Excel Templates and Quote/Invoice Maker
Quote/Invoice Maker for ACT! brings additional features to Excel Templates for ACT!. Whereas
Excel Templates for ACT! allows to merge contact fields in your Excel documents,
Quote/Invoice Maker for ACT! also allows to merge sales/opportunities fields, a feature
particularly useful to create quotes or invoices directly from your ACT! sales/opportunities.
Purpose of the add-on
Excel Templates for ACT! allows to create a bi-directional link between ACT! and Excel. You
may create MS Excel templates the same way you create MS Word templates in ACT!, ie. by
inserting fields in an Excel document.
Excel Templates for ACT! also allows to make use of Excel powerful calculation features to
update fields in ACT! by allowing you to map cells from your Excel spreadsheet to your ACT!
fields. So you could export data to Excel, have Excel perform calculations and import the results
of these calculations in ACT!.
Installation procedure
Download the program file from our download page and double-click it to start the installation.
Follow the instructions and once the installation is completed, run ACT! and open your database.
Then click the Windows Start button, go under Programs, locate the Exponenciel ACT! Add-Ons
group and click Excel Templates for ACT!.
An icon will be automatically added to your Contact view toolbar.
In the event this installation process failed, click the Windows Start button, go under Programs,
locate the Exponenciel ACT! Add-Ons group and click Excel Templates for ACT!.The main
window will be displayed. Go to the Options | Integrate with ACT! menu and add icons or menu
items to your ACT! screens as needed. When prompted, accept that ACT! be re-started.When
ACT! re-starts, whatever icons or menu items you asked to be created will be there to launch
Excel Templates for ACT!.
Excel Templates for ACT! User’s Manual
4
Creating an Excel Template with ACT! fields
To create an Excel Template, launch Excel Templates for ACT! then choose File | New
Template in Excel Templates for ACT! main window.
Excel will launch and a popup window with the fields names will automatically open (see below).
You may close this window. To re-open it at any time, use the Tools | Insert ACT! fields menu.
Excel Templates for ACT! User’s Manual
If the window does not popup or if you closed it, you can open it using the Insert | ACT! MailMerge Fields… menu.
The Mail Merge Fields window has a dropdown list on top of the fields list. Make sure ACT Æ
Excel is selected.
Inserting a field in a cell
To insert a field in a cell, click that cell (but don't enter edit mode or you won't be able to
continue) then select the field in the list and click Insert. The field will be inserted in the current
cell.
The code should be familiar to you if you have created word processor templates before.
5
Excel Templates for ACT! User’s Manual
6
What if the cell is not empty?
If the current cell is not empty, you will be prompted to choose if you want to overwrite the
current cell content or append it.
Click Yes to overwrite, No to append and Cancel to cancel.
This feature is particularly useful for concatenating fields. You can easily create a cell containing
City, State Zip.
NOTE:
To speed up the creation of your templates, we added these options:
• The Auto Select Next option will automatically select the next field down in your field
list, once you click Insert.
• The Auto Move 1 Cell Right will automatically make the cell immediately to the right of
the active cell active, once you click Insert.
• The Auto Move 1 Cell Down will automatically make the cell immediately under the
active cell active, once you click Insert.
• At the bottom of the ACTÆ Excel field list, a field named Date and Time allows to insert
the current date and time (it will not update itself automatically once inserted). Use Excel
Format | Cells… menu to remove the date or time as needed.
When your template is created, make sure you save it using the File | Save As Excel Templates
for ACT! menu. Excel Templates for ACT! templates are saved with the .XBT extension.
Excel Templates for ACT! User’s Manual
7
Creating a bi-directional template
The basic same principles apply for creating a bi-directional template.
By combining both ACTÆExcel and ExcelÆACT fields in one template, you can export contact
information to the spreadsheet which can then compute the data and send computed data back to
the same or other ACT fields.
Adding an ExcelÆACT field
To create a template, follow the same procedure as described above. To insert Excel->ACT
fields, make sure you select Excel Æ ACT in the dropdown box of the Insert Field window.
When you insert a field, note that it won’t actually insert a code in the cell itself but rather it will
name the active cell with a coded name (ACT_C_fieldID). In fact, you are not inserting a field
but rather mapping a cell to a field in ACT.
If you check Insert a descriptive comment in cells with an Excel->ACT field, a comment will be
inserted in the cell so that when you place your mouse over the cell, it will pop up. This may be
useful to edit your templates.
When your template is created, make sure you save it using the File | Save As Excel Templates
for ACT! template menu.
Excel Templates for ACT! User’s Manual
8
NOTE:
Excel Template for ACT! does not import currency signs, nor date formats.
Cell formatting is handled directly by Excel. Use the Excel Format | Cells… command to
properly format your data (currency signs, date format, etc.).
Removing an Excel ÆACT! field
As explained above, when you insert an ExcelÆACT! field, nothing is inserted in the cell, but the
same is named using a particular syntax (ACT_C_fieldID ). To remove an ExcelÆACT! field,
you need to delete this name.
Here is how to proceed: click the cell with the ExcelÆACT! field you want to remove. Look for
the Name Box in the upper left corner of your Excel Window just left of the formula bar.
In this case the cell name is ACT_C_60 (which means the cell was mapped to the field with 60
for internal ID, ie. User11). Note this name and go to Excel Insert | Name | Define window. In the
list of names, select the name displayed in the Name Box and click Delete.
If you used the Insert a descriptive comment in cells with an Excel->ACT field option, do a rightclick on the cell and select Delete comment to get rid of it.
Excel Templates for ACT! User’s Manual
9
Creating a merged document
To merge a template with data from the current contact, run Excel Templates for ACT!, then
select your template and click OK. Excel Templates for ACT! will open the template in Excel and
replace the field codes with the corresponding field values of the current contact.
Saving the document
To save your merged document, use the File | Save As and Update ACT History menu.
Excel will then save your document under a name of your choice (merged documents are saved
with the standard .XLS extension) and the following window will open.
•
•
•
If you check Attach document to history alone, the document will be attached to the
current contact.
If you check Add a ‘Letter sent’ history record alone, a ‘Letter sent’ history record will
be added with the regarding information that you typed in the appropriate box.
If you check both, the ‘Letter sent’ record will be created with the document attached to
it.
Excel Templates for ACT! User’s Manual
10
Updating ACT! fields
If your template is bi-directional, you may manually update ACT! with the values of the cells you
mapped by going to Excel Data menu and choosing Transfer Mapped Data to ACT. For
automating this process, see below.
Automation Options
When creating a merged document (ACTÆ Excel only), you have two automation options to
choose from in Excel Templates for ACT! main window:
• if you check Do not open the document. Simply: Attach it to the current contact, the
new document will be created in the background and automatically attached to the
current contact.
• If you check Do not open the document. Simply: Update the current contact (if the
template is bi-directional, the new document will be created in the background and if
required data will be transferred back to the current contact.
You may check both options so that your ACT! fields are automatically updated and the
document is attached to the contact.
Excel Templates for ACT! User’s Manual
11
Running in fully automated mode
Excel Templates for ACT! may be run in fully automated mode. You could create an icon on your
ACT! toolbar or add a trigger to one of your fields to have the program run automatically.
All that is needed is that you provide the path of a template preceded with a "/" as a command
line argument.
So if you create a shortcut with the following syntax, it will automatically create a merged
document based on the template.XBT.
C:\Program Files\Exponenciel\Excel Templates for ACT!\ExcelTemplates.exe
/C:\Templates\template.XBT
NOTE:
When in automated mode,by default, all automation options are automatically activated:
therefore the document will be saved, attached to the current contact and if any Excel cells are
mapped to ACT fields these fields will be updated. Excel will be closed automatically (if any
unsaved documents are open, you will be prompted to save them though)
NEW IN v.1.1 If you wish to either not attach the document (i.e. you only want to transfer data
back to ACT!) or not transfer any data back to ACT! to update fields(ie. you only want to attach
the document), add the following switch at the end of your command line:
/noAttach (for no attachment)
or
/noTransfer (for no Data transfer)
IMPORTANT NOTE FOR SETTING UP A TRIGGER IN ACT
If your command line argument, i.e. the path of the template, contains spaces, ACT! will return
“an invalid path” error when trying to launch the program. So we provided a placeholder to
replace any space in the path of the template: the interrogation mark.
Ex:
This command will not work because of the space between 'My' and 'Documents' in the
argument:
C:\Program Files\Exponenciel\Excel Templates for
ACT\ExcelTemplates.exe /C:\My Documents\template.XBT
Use this command line instead:
C:\Program Files\Exponenciel\Excel Templates for
ACT\ExcelTemplates.exe /C:\My?Documents\template.XBT
Be careful! Do not replace spaces in the path of the program itself (C:\Program
Files\Exponenciel\Excel Templates for ACT\ExcelTemplates.exe), just
in the command line arguments!
Excel Templates for ACT! User’s Manual
12
Naming the merged document
Excel Templates for ACT! also helps you automatically name your documents, which is
particularly useful if you want to include the name of the company, of the contact or any
information contained in a field.
To define the naming convention, go to the Options menu and choose Preferences.
The name can be defined using any character allowed in a file name as well as two types of
codes:
[TemplateName] will insert the name of the template.
[field_Id] will insert the value of the field which ID is in-between brackets.
As en example, if your Naming convention is [TemplateName]-[25] and you are creating a new
document based on the Invoice.XBT template for a contact with the "ABC Design" company, the
merged document will be automatically named "Invoice-ABC Design.XLT". If you are in manual
mode, you will have a chance to rename the file when saving it, if the name created does not suit
you.
NOTES:
•
This feature is particularly important when running in automated mode (see ablove), as you
won't get an opportunity to manually name the file before it is saved.
•
To get the list of field IDs, run the actdiag.exe file located in your ACT! folder, go to the
Reports menu and choose Field Report. Each field is assigned an ID (Company is 25, Contact
is 26, etc.) .
•
Files are automatically incremented ( as in Document1.XLS, Document2.XLS, etc.) so that
you never risk to overwrite an existing file
Excel Templates for ACT! User’s Manual
13
NEW IN V. 1.1
As the field data used to create the name for the Excel file may contain invalid characters for file
naming (/,\,.), you now have the option to automatically replace these characters with a character
of your choice.
Quote/Invoice for ACT! Additional Features
As we said earlier, Quote/Invoice for ACT! gives you the ability to merge sales/opportunities
fields in your documents.
Creating a template with Sales/Opportunities fields
Creating a template works exactly the same way as described in the preceding chapter. You just
have one more option in the Mail Merge Fields window: Sales field.
The principle is the same: you select the field you want to insert and the proper code is inserted in
the current cell. The difference here is that there may be several Product, Type, Amount, etc.
fields since you may want to include several sales/opportunities in the same document. So the
code will be slightly different: it is appended with a row index.
Excel Templates for ACT! User’s Manual
14
NOTE:
The program will automatically assign the next index to your field, so you don't have to worry
about indexing manually.
Creating a merged document
Once again, it works the same way as described in the preceding chapter with one difference.
When Quote/Invoice Maker for ACT! detects that there is one or more sales field in the merged
document, it prompts you to choose which sales/opportunities from the current contact you want
to include in the document.
1. You may change the order in which the sales/opportunities are listed using the blue
arrows, as this order will be reflected in the document.
2. Select the sales/opportunities you want to include in the document by clicking them. If
you want to select more than one opportunity, hold the CTRL key while clicking.
3. Press OK.
NOTE:
This window lists all sales/opportunities currently displayed under the Sales/Opportunities tab,
allowing you to use the tab filter to filter out records.
Here is the merged document resulting from the above selection.
Excel Templates for ACT! User’s Manual
15
Hiding errors in cells
Quote/Invoice Maker scans your document before opening it to figure out if it contains Sales
fields or not. If a cell of your template contains a formula which returns an error message when
no data is entered in the template, Quote/Invoice Maker's scan might stop too early. So you
should hide the error message. Here is how to proceed:
In the cell, type: =if(ISERR(your_formula), "", your_formula)).
With this syntax, if the formula returns an error, the cell will be blank and if not, it will contain
the result of the formula.
Registering your product
To continue using your product passed the trial period, please buy a license at
www.exponenciel.com. Licenses are issued for one ACT! username and will only work for that
username. You may upgrade at any time from Excel Templates for ACT! to Quote/Invoice Maker
for ACT! for a small upgrade fee.
Support
For support, contact [email protected].
Rev. September 15, 2003 – v. 1.1.2