1
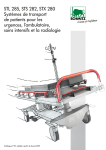
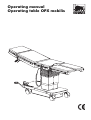
Letzte Änderung: Monday, 4. July 2005 10:16
Operating manual
Operating table OPX mobilis
This operating manual includes instructions for the
operation of the mobile operating tables
–
–
–
–
–
–
–
–
–
–
2
OPX
OPX
OPX
OPX
OPX
OPX
OPX
OPX
OPX
OPX
mobilis 200 (161.201)
mobilis 200/G (161.205)
mobilis 300 C (161.311)
mobilis 300 C/G (161.315)
mobilis 300 CL (161.321)
mobilis 300 CL/G (161.325)
mobilis 300 CE (161.331)
mobilis 300 CE/G (161.335)
mobilis 300 CLE (161.341)
mobilis 300 CLE/G (161.345)
Operating manual
Contents
Introduction . . . . . . . . . . . . . . . . . . . . . . . . . . . . . . . . . . . . . . . . . . . . . . . . . . . . . . . . . . . . . . . . . . . . . .
About this operating manual . . . . . . . . . . . . . . . . . . . . . . . . . . . . . . . . . . . . . . . . . . . . . . . . . . . . . . .
Symbols used in the text . . . . . . . . . . . . . . . . . . . . . . . . . . . . . . . . . . . . . . . . . . . . . . . . . . . . . . . . . . .
Safety instructions . . . . . . . . . . . . . . . . . . . . . . . . . . . . . . . . . . . . . . . . . . . . . . . . . . . . . . . . . . . . . . .
Intended use . . . . . . . . . . . . . . . . . . . . . . . . . . . . . . . . . . . . . . . . . . . . . . . . . . . . . . . . . . . . . . . . . . .
Summary of safety instructions . . . . . . . . . . . . . . . . . . . . . . . . . . . . . . . . . . . . . . . . . . . . . . . . . . . . . .
...
...
...
...
...
...
...
...
...
...
...
...
5
5
6
7
7
8
Description of the operating table . . . . . . . . . . . . . . . . . . . . . . . . . . . . . . . . . . . . . . . . . . . . . . . . . . . . . . . . . . . 11
Commissioning . . . . . . . . . . . . . . . . . . . . . . . . . . . . . . . . . . . . . . . . . . . . . . . . . . . . . . . . . . . . . . . . . . .
Keeping . . . . . . . . . . . . . . . . . . . . . . . . . . . . . . . . . . . . . . . . . . . . . . . . . . . . . . . . . . . . . . . . . . . .
Transportation . . . . . . . . . . . . . . . . . . . . . . . . . . . . . . . . . . . . . . . . . . . . . . . . . . . . . . . . . . . . . . .
Unpacking . . . . . . . . . . . . . . . . . . . . . . . . . . . . . . . . . . . . . . . . . . . . . . . . . . . . . . . . . . . . . . . . . .
Electrical connection . . . . . . . . . . . . . . . . . . . . . . . . . . . . . . . . . . . . . . . . . . . . . . . . . . . . . . . . . . .
...
...
...
...
...
..
..
..
..
..
13
13
13
13
14
Operation . . . . . . . . . . . . . . . . . . . . . . . . . . . . . . . . . . . . . . . . . . . . . . . . . . . . . . . . . . . . . . . . . . . . . . . . . . . .
Mobility . . . . . . . . . . . . . . . . . . . . . . . . . . . . . . . . . . . . . . . . . . . . . . . . . . . . . . . . . . . . . . . . . . . . . . . . .
Potential equalization socket . . . . . . . . . . . . . . . . . . . . . . . . . . . . . . . . . . . . . . . . . . . . . . . . . . . . . . . . . .
Battery . . . . . . . . . . . . . . . . . . . . . . . . . . . . . . . . . . . . . . . . . . . . . . . . . . . . . . . . . . . . . . . . . . . . . . . . . .
Battery charger . . . . . . . . . . . . . . . . . . . . . . . . . . . . . . . . . . . . . . . . . . . . . . . . . . . . . . . . . . . . . . . . . . . .
Adjusting the table-top . . . . . . . . . . . . . . . . . . . . . . . . . . . . . . . . . . . . . . . . . . . . . . . . . . . . . . . . . . . . . .
Longitudinal shift function of the table-top . . . . . . . . . . . . . . . . . . . . . . . . . . . . . . . . . . . . . . . . . . . . . . . .
Integrated kidney bridge . . . . . . . . . . . . . . . . . . . . . . . . . . . . . . . . . . . . . . . . . . . . . . . . . . . . . . . . . . . . .
Leg plates. . . . . . . . . . . . . . . . . . . . . . . . . . . . . . . . . . . . . . . . . . . . . . . . . . . . . . . . . . . . . . . . . . . . . . . .
Head plate . . . . . . . . . . . . . . . . . . . . . . . . . . . . . . . . . . . . . . . . . . . . . . . . . . . . . . . . . . . . . . . . . . . . . . .
Back section . . . . . . . . . . . . . . . . . . . . . . . . . . . . . . . . . . . . . . . . . . . . . . . . . . . . . . . . . . . . . . . . . . . . . .
Arm rest 101.107 . . . . . . . . . . . . . . . . . . . . . . . . . . . . . . . . . . . . . . . . . . . . . . . . . . . . . . . . . . . . . . . . . .
Add-on kidney bridge . . . . . . . . . . . . . . . . . . . . . . . . . . . . . . . . . . . . . . . . . . . . . . . . . . . . . . . . . . . . . . .
Shoulder arthroscopy support . . . . . . . . . . . . . . . . . . . . . . . . . . . . . . . . . . . . . . . . . . . . . . . . . . . . . . . . .
Accessories for urology . . . . . . . . . . . . . . . . . . . . . . . . . . . . . . . . . . . . . . . . . . . . . . . . . . . . . . . . . . . . . .
Further accessories of the Schmitz range . . . . . . . . . . . . . . . . . . . . . . . . . . . . . . . . . . . . . . . . . . . . . . . . .
15
15
17
18
19
21
25
27
29
31
33
34
35
36
40
42
Cleaning and disinfection . . . . . . . . . . . . . . . . . . . . . . . . . . . . . . . . . . . . . . . . . . . . . . . . . . . . . . . . . . . . . . . . . 43
Cleaning . . . . . . . . . . . . . . . . . . . . . . . . . . . . . . . . . . . . . . . . . . . . . . . . . . . . . . . . . . . . . . . . . . . . . . . . 43
Disinfection . . . . . . . . . . . . . . . . . . . . . . . . . . . . . . . . . . . . . . . . . . . . . . . . . . . . . . . . . . . . . . . . . . . . . . 44
Operating table OPX mobilis –
EDITION 01-05-GB
ID.-Nr.: 02007844
3
Contents
Check-ups . . . . . . . . . . . . . . . . . . . . . . . . . . . . . . . . . . . . . . . . . . . . . . . . . . . . . . . . . . . . . . . . . . . . . . . . . . . . 45
Electromagnetic Compatibility (EMC) . . . . . . . . . . . . . . . . . . . . . . . . . . . . . . . . . . . . . . . . . . . . . . . . . . . . . . . . .
Electromagnetic Emissions. . . . . . . . . . . . . . . . . . . . . . . . . . . . . . . . . . . . . . . . . . . . . . . . . . . . . . . . . . . .
Electromagnetic Immunity . . . . . . . . . . . . . . . . . . . . . . . . . . . . . . . . . . . . . . . . . . . . . . . . . . . . . . . . . . . .
Electromagnetic Immunity for Non-Life Supporting Equipment. . . . . . . . . . . . . . . . . . . . . . . . . . . . . . . . . .
Separation distance . . . . . . . . . . . . . . . . . . . . . . . . . . . . . . . . . . . . . . . . . . . . . . . . . . . . . . . . . . . . . . . .
47
47
48
49
50
Malfunctions and repairs . . . . . . . . . . . . . . . . . . . . . . . . . . . . . . . . . . . . . . . . . . . . . . . . . . . . . . . . . . . . . . . . . 51
Disposal . . . . . . . . . . . . . . . . . . . . . . . . . . . . . . . . . . . . . . . . . . . . . . . . . . . . . . . . . . . . . . . . . . . . . . . . . . . . . 51
Spare parts . . . . . . . . . . . . . . . . . . . . . . . . . . . . . . . . . . . . . . . . . . . . . . . . . . . . . . . . . . . . . . . . . . . . . . . . . . . 53
Product designation . . . . . . . . . . . . . . . . . . . . . . . . . . . . . . . . . . . . . . . . . . . . . . . . . . . . . . . . . . . . . . . . . . . . . 54
Nameplates . . . . . . . . . . . . . . . . . . . . . . . . . . . . . . . . . . . . . . . . . . . . . . . . . . . . . . . . . . . . . . . . . . . . . . 54
Symbols employed on the product . . . . . . . . . . . . . . . . . . . . . . . . . . . . . . . . . . . . . . . . . . . . . . . . . . . . . . 55
Technical data . . . . . . . . . . . . . . . . . . . . . . . . . . . . . . . . . . . . . . . . . . . . . . . . . . . . . . . . . . . . . . . . . . . . . . . . . 56
Classification . . . . . . . . . . . . . . . . . . . . . . . . . . . . . . . . . . . . . . . . . . . . . . . . . . . . . . . . . . . . . . . . . . . . . 58
Standards applied . . . . . . . . . . . . . . . . . . . . . . . . . . . . . . . . . . . . . . . . . . . . . . . . . . . . . . . . . . . . . . . . . 58
Declaration of Conformity. . . . . . . . . . . . . . . . . . . . . . . . . . . . . . . . . . . . . . . . . . . . . . . . . . . . . . . . . . . . . . . . . 59
After sales service . . . . . . . . . . . . . . . . . . . . . . . . . . . . . . . . . . . . . . . . . . . . . . . . . . . . . . . . . . . . . . . . . . . . . . . 60
4
Operating manual
Introduction
About this operating manual
In case of any questions, we therefore kindly ask you to
contact Schmitz u. Söhne.
In this paragraph you will find information about the
layout of this operating manual and explanations
regarding the marks and symbols used.
This operating manual includes instructions for the use of
the operating tables OPX mobilis, also called operating
tables in the following.
Our products are constantly being improved, this is why
constructional changes carried out after printing of this
operating manual could not be taken into consideration.
Operating table OPX mobilis –
EDITION 01-05-GB
This operating manual is to be read and observed by any
person using or handling the operating tables OPX
mobilis.
In addition to the operating manual and to the obligatory
regulations for the prevention of accidents effective in the
user’s country and on the site of use, the acknowledged
rules for safe and professional work are also to be
observed.
ID.-Nr.: 02007844
5
Introduction
Symbols used in the text
In this operating manual following designations or signs
are used for pieces of information of special importance
g
v
a
6
Danger!
This symbol will appear wherever safety
instructions are designed to protect people from
physical harm. The symbol stands for imminent
danger of death or serious injury.
Caution!
This symbol will appear where situations are
described, which might be dangerous, and
which might inflict slight injuries.
h
This symbol will appear in front of additional
helpful pieces of advice.
• A dot in front of the text means:
This is what you have got to do.
– A dash in front of the text means:
This is part of a listing.
Attention!
This symbol will appear in front of such hints
which shall prevent the table or other
equipment from being damaged.
Operating manual
Safety instructions
The operating table OPX mobilis has been constructed
according to the latest state of engineering and according
to the acknowledged rules of safety engineering.
Nevertheless, its use may inflict danger to life or physical
safety of the user or of third parties, or impairment to the
operating table or to other material assets.
Always keep this operating manual at hand at the site of
use of the operating table!
Do not use the operating table unless in perfect condition
and only for its intended use, with regard to safety and
possible dangers, and observing the operating manual!
Any malfunction which may affect the safety has to be
eliminated immediately!
Do not carry out any modifications, extensions or
reconstructions of the operating table unless approved by
the manufacturer.
Electrically conductive double castors, electrically
conductive pads and a potential equalization socket are
standard features of the operating table OPX mobilis. It
may be used inside rooms where the electrical installation
conforms to German VDE (i. e. the Association of
German Electrical Engineers) 0100-710 standard or to
an equivalent national standard. If the operating table
OPX mobilis is equipped with non-electrically conductive
(coloured) pads, it must not be used in the presence of
flammable anaesthetic mixtures.
Additionally to the operating manual, observe the
general rules implied by the law and otherwise obligatory
for accident prevention and environmental protection!
Spare parts have to meet the requirements stipulated by
the manufacturer. This is always guaranteed when using
original spare parts.
Observe the intervals prescribed or stated in this
operating manual for periodical check-ups!
Take care that running and process materials as well as
parts replaced are disposed of safely and with minimum
environmental impact!
Intended use
According to German VDE 0100-710 standard, the
operating table OPX mobilis may be used inside rooms of
the application groups 0, 1 or 2. It is exclusively designed
for purposes of human medicine. The operating table
serves to position patients during an examination or
during surgical interventions. The nursing staff has to take
care to position the patients in such a way as to prevent
any danger to their respiration, to their nervous system or
to their circulation. This is especially important when
patients are under anaesthetics. Any use apart or beyond
these purposes is not intended. The manufacturer is not
Operating table OPX mobilis –
EDITION 01-05-GB
liable for any damage resulting of such non-intended
use, which would be entirely at the user’s risk.
The operating table may only be handled by persons who
have been briefed in its professional handling and who
have familiarized themselves with the product by means
of this operating manual.
Intended use also means following the operating manual
and observing the conditions for inspection and
maintenance.
ID.-Nr.: 02007844
7
Introduction
Summary of safety instructions
g
g
g
g
g
g
8
Danger!
Operating tables with an “E” in their type
designation are equipped with rechargeable
batteries. Do not charge the batteries during a
surgical intervention inside the operating
theatre.
Danger!
Patients run the risk of falling off the operating
table unless they are secured on the table-top.
Patients lying on the operating table have to be
secured to the table-top according to
professional standards.
Danger!
Patients run the risk of getting hurt when the
operating table is moved while he or she is lying
on top in knee-elbow-position. Do not move
the table with the patient in knee-elbowposition.
Danger!
Patients run the risk of getting hurt if the
operating table is moved with an attached
extension device, due to its diminished stability
against tilting. Do not move the operating table
with an attached extension device when a
patient is lying on top.
Danger!
If an extension device is attached to the
operating table, its stability against tilting will be
diminished. Always use the props of the
extension device during an operation.
Danger!
If patients are not positioned correctly, there
may be danger to their respiration, to their
nerve cords or to their circulation. Always
position patients in such a way as to prevent any
possible danger to their respiration, to their
nerve cords or to their circulation.
g
g
g
g
g
Danger!
In case the components of the table-top hit
against an obstacle during adjustment, the
operating table may tilt. Remove possible
obstacles before adjusting the operating table
or its individual components. When folding the
leg plate down, make sure it cannot hit the
floor.
Danger!
If its castors are released, the operating table
may move unintentionally during patient
transfer. Always secure the operating table by
means of the central brake before transferring
the patient.
Danger!
Patients run the risk of getting hurt by
unforeseen movements of the table accessories.
When attaching accessories, make sure that
they are properly fixed. Do not use worn or
damaged accessories.
Danger!
Patients run the risk of getting hurt by
unforeseen movements of the operating table.
Always secure the patient to the table-top
according to the recommended practices of
patient positioning.
Danger!
When HF surgical equipment or defibrillators
are being used, there is danger of the patient’s
suffering burns if he or she touches the metal
parts of the operating table or of its accessories,
or if he or she is lying on soaked sheets or cloths
covering the electrically conductive pads of the
table-top. Always observe the manufacturer’s
instructions for use.
Operating manual
g
g
v
v
v
v
Danger!
Patients run the risk of getting hurt if the
longitudinal shift function is released with the
table positioned in Trendelenburg or Reverse
Trendelenburg angle of more than 5°. Reduce
the inclination angle of the table-top before
activating the longitudinal shift function.
Danger!
If the operating table OPX mobilis is used in the
presence of flammable anaesthetic mixtures,
the floor must be electrically conductive.
g
h
Caution!
The operating table is only stable on a level
floor. Choose a horizontal and safe site of
installation for the operating table.
Danger!
For tables with longitudinal shift feature, the
position of the table-top will bear influence on
the stability of the operating table. Always shift
the table-top into such a position, within the
limits of the specific application, as to improve
the stability of the table.
If there is an extension device attached to the
table or if the patient is positioned in kneeelbow position, the stability of the table will be
diminished. Improve the stability of the table by
moving the table into such a position as to
make the double castors at the foot end of the
table point to the foot end.
Caution!
In case the table-top is adjusted into extreme
positions, there is danger of jamming one’s
finger in certain points. Do not grab below the
operating table or behind the frames of the
table-top elements.
Caution!
In order to ensure a gentle patient positioning
when using the add-on kidney bridge, use an
additional pad on top of the break. (This pad
comes together with the add-on kidney bridge.)
Caution!
If the operating table is positioned on a moist or
freshly cleaned floor, please keep in mind that
the frictional forces will be diminished. The
operating table may therefore be moved by
external force even if the double castors are
blocked. Make sure before starting an
intervention that the operating table is in a
sufficiently stable position.
Operating table OPX mobilis –
EDITION 01-05-GB
ID.-Nr.: 02007844
9
Introduction
h
h
h
10
An unfavourable position of the double castors
may diminish the stability of the table. It may
help to move the operating table in such a way
as to raise the stability. Please see the examples
given in the illustration.
A patient weight of max. 135 kg allows all
surgical interventions to be carried out in either
orientation of the patient (patient’s head lying
at head or foot end of the table), provided the
castors of the operating table are blocked.
In the case of normal patient orientation and
table-top in mid-position (for operating tables
with longitudinal shift function) the operating
table may be charged with a patient weight of
max. 185 kg. Upon patient transfer, or when
letting the patient mount the operating table,
make sure that the table-top is loaded mainly
above the table column. Familiarize yourself
with the reactions of the operating table under
this kind of charge before starting a surgical
intervention.
Operating manual
Description of the operating table
Head plate
Back section
Seat section
Leg plate
Foot pump lever
Pedal for brake
and for
directional
castor
Selector lever
Potential equalization socket
Control panel
for electric version
Double castor
In the following operating manual the terms left, right,
front, and rear are used as seen by a person sitting on the
operating table in normal position.
Operating table OPX mobilis –
EDITION 01-05-GB
ID.-Nr.: 02007844
11
Description of the operating table
The operating tables OPX mobilis can be equipped
differently, depending on the model.
All operating tables are mobile. They are equipped with
four electrically conductive swivel-type double castors
with central brake. The operating table models with a “C”
in their type designation have got an additional
directional castor.
All operating tables are equipped with mechanically
operated hydraulic pumps. The operating table of the
200 model series have got two hydraulic adjustment
functions: Height adjustment Raise/Lower and
Trendelenburg/Reverse Trendelenburg. The tables of the
300 model series have got an additional lateral
adjustment function.
Operating tables with an “E” in their type designation are
equipped with an additional electrically-driven hydraulic
pump. In this case the operating table is equipped with a
hand-held remote control unit as well, and with
rechargeable batteries installed inside the floor pan.
Operating tables with an “L” in their type designation are
equipped with a table-top with longitudinal shift function.
By means of this feature, such parts of the patient’s body
can be screened which under normal circumstances are
inaccessible to the C-arm equipment.
Operating tables with a “G” in their type designation are
equipped with an integrated kidney bridge. The
integrated kidney bridge is adjusted hydraulically by
means of the foot pump.
h
h
A patient weight of max. 135 kg allows all
surgical interventions to be carried out in either
orientation of the patient (patient’s head lying
at head or foot end of the table), provided the
castors of the operating table are blocked.
In the case of normal patient orientation and
table-top in mid-position (for operating tables
with longitudinal shift function) the operating
table may be charged with a patient weight of
max. 185 kg. Upon patient transfer, or when
letting the patient mount the operating table,
make sure that the table-top is loaded mainly
above the table column. Familiarize yourself
with the reactions of the operating table under
this kind of charge before starting a surgical
intervention.
Pads
The operating tables are normally equipped with black
antistatic pads. Coloured pads, which, however, are not
electrically conductive, are available upon special
request. The antistatic black version fulfils the limits of
resistance according to ISO 2882. Coloured pads are not
electrically conductive, which means that in this case the
operating table is not explosion-proof.
Safety devices
All operating tables can be equipped with X-ray cassettes,
which can be inserted below the table-top either from the
head end or from the foot end.
All operating tables can be adapted optimally to various
applications by means of accessories.
All operating tables are equipped with electrically
conductive swivel-type double castors, with (normally)
electrically conductive pads, and with a potential
equalization socket.
According to the regulations of European Standard
60601-2-46, the operating tables are designed to carry
a maximum patient weight of 135kg. In case a higher
charge is intended, please observe the instructions given
below.
12
Operating manual
Commissioning
Keeping
Inside its original packing the operating table may be
exposed for a period of 15 weeks to environmental
conditions within the limits of:
Ambient temperature
-5°C to +50°C
Relative atmospheric humidity
10% to 95%
Atmospheric pressure
500 hPa to 1,060 hPa
Transportation
• In order to transport the operating table, adjust seat
and back section into horizontal position.
• Remove head and leg plates, and detach other
accessories.
• Adjust the table-top into minimum height.
Upon leaving the factory, the operating tables are
positioned fit for transportation. In case of further
transportation at a later date, we recommend to adjust
the operating table into the same positions.
Unpacking
Carry the operating table, if possible, in its original
packing to its final site of use. Check the operating table’s
condition.
Any possible damage occurred during transportation
should be reported immediately to Schmitz u. Söhne. You
will find their address and telephone no. on the last page
of this operating manual.
Operating table OPX mobilis –
EDITION 01-05-GB
ID.-Nr.: 02007844
13
Commissioning
Electrical connection
The operating table can be equipped with an electrically
driven hydraulic pump. In that case it is also equipped
with a hand-held remote control unit activating the
electro-hydraulic pump. The hydraulic pump draws its
energy from the integrated batteries.
If the main switch is switched on, the battery state is
indicated by means of the LEDs at the hand-held remote
control unit.
• In order to connect the hand-held remote control unit
to the table, insert the plug into the socket, with the
marking dots in alignment, and plug the plug into the
socket until it locks.
• In order to disengage the hand-held control unit, draw
the front part of the plug back. Then pull the plug out
of the socket.
Operating tables with an “E” in their type designation are
equipped with rechargeable batteries.
Hand-held remote control unit
Batteries
Operating tables with an “E” in their type designation are
equipped with an electro-hydraulic pump and a handheld remote control unit.
The hand-held remote control is connected to the
operating table OPX mobilis by means of a plug-type
connector. You will find the connector socket for the handheld remote control unit at the top of the height
adjustment column.
The connector plug and socket are marked by dots. The
plug will lock inside the socket when the relative dots are
brought into alignment.
The batteries have to be recharged as soon as the yellow
LED on the remote control unit is on. You will find details
how to charge the batteries under “Charging the
batteries” on page 18.
The electric drive of the hydraulic pump can be activated
additionally by means of the main switch. You will find the
main switch on the control panel at the left hand side of
the floor pan.
h
The table-top of the operating table can always
be adjusted mechanically, without electric drive,
by means of the foot pump.
Marking dots
• The electrically driven hydraulic pump of the operating
tables with an “E” in their type designation has to be
activated by means of the main switch.
14
Operating manual
Operation
v
Mobility
Depending on the model, the operating tables
OPX mobilis can equipped in different ways.
All operating tables are mobile. Depending on the
model, they are either equipped with
– four double castors with central brake
– four double castors with central brake and an
additional directional castor.
Caution!
If the operating table is positioned on a moist or
freshly cleaned floor, please keep in mind that
the frictional forces will be diminished. The
operating table may therefore be moved by
external force even if the double castors are
blocked. Make sure before starting an
intervention that the operating table is in a
sufficiently stable position.
Moving and locking the operating table
g
Danger!
Patients run the risk of falling off the operating
table unless they are secured on the table-top.
Secure the patient to the table-top according to
professional standards.
• Move the table into the desired position and then turn
the castors outwards in order to improve the stability
of the operating table.
h
The position of the castors will bear influence
on the stability of the operating table.
Operating table OPX mobilis –
EDITION 01-05-GB
ID.-Nr.: 02007844
15
Operation
The operating tables, except the standard model, are
equipped with an additional directional castor. The
directional castor can be activated by means of a foot
pedal for the brake and for the directional castor.
g
Selector lever
Pedal for brake
and for
directional castor
Foot pump lever
The pedal for the brake and for the directional castor can
have three different positions.
– If the pedal is raised, the operating table will move in
straight run. An additional directional castor
16
positioned below the height adjustment column is now
touching the ground.
– If the pedal is in mid position, the operating table can
easily be moved in any direction. The directional
castor is retracted.
– If the pedal is pressed down, the operating table is
secured against unintentional movement.
g
Danger!
Patients run the risk of getting hurt when the
operating table is moved while they are lying on
top in knee-elbow-position. Do not move the
table with a patient lying on top in knee-elbowposition.
Danger!
Patients run the risk of getting hurt if the
operating table is moved with an attached
extension device, due to its diminished stability
against tilting. Do not move the operating table
with an attached extension device when a
patient is lying on top.
• In order to move the operating table in straight run,
raise the pedal completely.
• In order to move the operating table easily in any
desired direction, raise the pedal into mid-position.
• Move the operating table into the desired location.
• Secure the operating table afterwards by pressing the
pedal completely down.
Operating manual
Potential equalization socket
The operating table is equipped with a potential
equalization socket. You will find the potential
equalization socket at the front side of the floor pan.
g
Danger!
Patients may be exposed to danger by
electrostatic tensions. By means of the potential
equalization socket electrostatic tensions are
conducted to earth. Always connect the
potential equalization socket of the operating
table to earth before use.
• Before putting the operating table into operation,
connect the potential equalization socket to the earth
connection.
Operating table OPX mobilis –
EDITION 01-05-GB
ID.-Nr.: 02007844
17
Operation
Battery
If the operating table is equipped with an electrohydraulic pump, this pump draws its energy from
batteries installed inside the floor pan. The batteries have
to be recharged regularly in order to avoid an exhaustive
discharge.
g
Danger!
Plugging the plug of the charging cable in or
out may produce sparks. In order to avoid
danger of explosion, the batteries must not be
charged inside the operating theatre during
surgical interventions.
The yellow LED will be on as soon as the batteries have to
be recharged. When the red LED is on, the electrohydraulic pump can no longer be activated before the
batteries have been recharged.
• If the red LED is on, switch the main switch at the
control panel off, use the foot pump in order to adjust
the table-top until the operation is finished, and
recharge the batteries afterwards.
Fuse
F2 = 3.15A
Charging the batteries
h
a
The batteries should be recharged regularly, e.
g. overnight. The batteries cannot be
overcharged if you use the battery charger
which comes with the table.
Charging
socket
Attention!
If the batteries of the operating table are
charged by means of a battery charger other
than the one supplied with the table, the
batteries may get damaged. Always use the
original battery charger for charging the
batteries.
The hand-held remote control unit is equipped with LEDs.
The green LED is on when the batteries are fully charged.
18
Fuse
F1 = 10A
h
Main switch
The fuses for the electro-hydraulic pump (F1 =
10 A, time lag type, 5 x 20 mm) and for the
charging current (F2 = 3.15 A, time lag type, 5
x 20 mm) are also inserted into the control
panel.
Operating manual
Battery charger
The battery charger is fit for a voltage input of between
90V to 264V. It can be equipped with the feed cable
corresponding to the requirements on site.
LED, green, yellow or orange-coloured
• In order to charge the batteries, move the operating
table out of the operating area.
h
h
The batteries cannot be charged as long as the
main switch is on.
The charging current is up to 2A. Make sure
that the correct fine-wire fuse (3.15A, slowblow type) has been installed inside the fuse
holder F2 for charging current. This is especially
important for the more ancient models of the
OPX mobilis range.
• Switch the main switch at the control panel off.
The charging cable of the battery charger is connected to
the operating table by means of a plug contact. You will
find the socket for the battery charger at the control panel
at the left hand side of the floor pan.
The plug and the charging socket are marked by dots.
The plug will lock inside the charging socket if it is
plugged into the charging socket with the dots in
alignment.
h
The operating modes of the battery charger are indicated
by means of a 3-coloured LED.
Charging diagram
Charging voltage
The control panel is equipped with a covering
sheet, which is designed to protect the control
electronics against electrostatic discharge
current. Fold this covering sheet up in order to
get access to the control panel.
Voltage (V)
Rapid charge
Charge
LED=orange LED=yellow
Electric
current (A)
• Plug the plug of the battery charger into the charging
socket so that the marking dots are in alignment and
press the plug in until it locks inside the charging
socket.
• Connect the battery charger to the mains power
supply.
Operating table OPX mobilis –
EDITION 01-05-GB
ID.-Nr.: 02007844
Compensation charge
LED=green
Charging
current
Capacity
19
Operation
If the batteries are drained, it will take approx. 8 to 10
hours to recharge them. The batteries are charged as
soon as the LED is green. The battery charger can then be
disconnected.
• In order to detach the charging cable, pull the front
part of the plug back and pull the plug out of the
socket.
Now the table-top can again be adjusted with the aid of
the electro-hydraulic pump.
h
20
With fully charged, practically new batteries, the
table can carry out all its functions approx. 60
times when charged by a patient weight.
Operating manual
Adjusting the table-top
All operating tables are equipped with a foot pump for
adjusting the table-top hydraulically.
g
g
Danger!
If patients are not positioned correctly, there
may be danger to their respiration, to their
nerve cords or to their circulation. Always
position patients in such a way as to prevent any
possible danger to their respiration, to their
nerve cords or to their circulation.
Raising the table-top
Adjusting Reverse Trendelenburg
position
Danger!
In case components of the table-top hit against
an obstacle during adjustment, the operating
table may tilt. Remove possible obstacles before
adjusting the operating table or its individual
components. When folding the leg plate down,
make sure it does not hit the floor.
Lateral tilt left
Lateral tilt right
The following table shows the functions which can be
carried out by means of the hydraulic pump.
Adjusting Trendelenburg position
Lowering the table-top
The functions are preselected by means of the selector
lever.
Operating table OPX mobilis –
EDITION 01-05-GB
ID.-Nr.: 02007844
21
Operation
Adjusting the table-top by means of the foot
pump
The functions of the hydraulic pump are preselected by
means of the selector lever, and the position of the tabletop is adjusted by means of the hydraulic pump.
The operating table models with electrically operated
hydraulic pump are equipped with a selector lever each
at the rear, at the left and at the right hand side. This way
the operating table can be operated from the rear as well
as from the left or right hand side.
• In order to adjust the table-top, make the selector
lever point to the symbol for the desired function.
• Press the foot pump repeatedly until the table-top is
adjusted into the desired position.
h
In order to lower the table-top, other than for
the other functions, there is no need to pump
the foot pedal. It is sufficient to move the
selector lever into “Lowering table-top” position
and press the foot pump lever only slightly. The
table-top will sink automatically through its own
weight.
Selector lever
Pedal for brake
and for
directional castor
22
Foot pump lever
Operating manual
Adjusting the table-top by means of the electrohydraulic pump
Operating tables with an “E” in their type designation are
equipped with an electro-hydraulic pump and a handheld remote control unit. The electro-hydraulic pump can
be activated by means of the hand-held remote control.
LEDs indicating the
preselected function
Three LEDs at the hand-held remote control unit indicate
the battery capacity. You will find details about how to
charge the batteries under “Charging the batteries” on
page 18.
When the batteries are charged, the functions of the
operating table can be carried out by means of the
electro-hydraulic pump and activated by means of the
hand-held remote control.
The green LED is on as
long as the “Run” key is
activated
The “I/O” key enables
the “Run” key
The “Run” key activates
the electro-hydraulic
pump if it is enabled.
The different functions are shown by means of symbols on
the hand-held remote control unit. The function
preselected by means of the selector lever is indicated by
means of the LED in the relative symbol. You can switch
the functions of the hydraulic pump by means of the
selector lever and read the preselected function at the
hand-held remote control unit.
The green, yellow and
red LEDs indicate the
battery capacity when
the main switch is
switched on.
When the main switch is switched on, the LEDs at the
hand-held remote control indicate the battery capacity.
Now the “Run” key can be enabled for three minutes by
pressing the “I/O” key. As long as the “Run” key is
enabled, the green LED in the “I/O” key is illuminated.
For a period of three minutes the electro-hydraulic pump
can now be activated by pressing the “Run” key. As long
as the “Run” key is pressed the electro-hydraulic pump
will work and carry out the function preselected by means
of the selector lever. After three minutes the “Run” key will
be deactivated in order to prevent the electro-hydraulic
pump from accidentally being activated.
Operating table OPX mobilis –
EDITION 01-05-GB
ID.-Nr.: 02007844
23
Operation
h
g
Electromagnetic interference or other influences
between the operating table and other electrical
appliances may cause failures or malfunctions.
The LED in the corresponding symbol on the hand-held
remote control unit is on.
Danger!
If the operating table OPX mobilis carries out
unintentional adjustment functions (e. g. due to
an electric short circuit), the “I/O” key will serve
as a panic button. Switch the main switch at the
control panel off as well. Afterwards, readjust
the table using the foot pump and call the
technical service.
• In order to adjust the operating table, switch the main
switch at the control panel “ON”.
The three lower LEDs now indicate the battery capacity.
When the battery capacity becomes insufficient, the
electro-hydraulic pump can no longer be used. However,
you can still adjust the operating table by means of the
foot pump and recharge the batteries afterwards. You will
find details under “Charging the batteries” on page 18.
24
• Make the selector lever point towards the desired
function.
• Press the “I/O” key. This key enables the “Run” key for
a period of three minutes. During this three minutes’
period several different adjustment functions can be
carried out successively.
• Press the “Run” key until the desired position is
achieved.
• When the operating table is adjusted to the desired
position, press the “I/O” key in order to deactivate the
“Run” key.
The “Run” key is deactivated automatically after a three
minutes’ period in order to prevent an accidental
activating of the electro-hydraulic pump. Press the “I/O”
key again before readjusting the operating table.
Operating manual
Longitudinal shift function of the table-top
• In order to adjust the longitudinal position of the tabletop, press the release lever on the left hand side at the
bottom of the back section to the inside out of its
engage position, and press the release lever and the
hand grip together.
• Shift the table-top into the desired position, let go of
the release lever, and shift a little further until the
table-top clicks audibly into position.
Depending on the model, the operating table can be
equipped with a table-top with longitudinally shift
function. By means of this feature, patients can be
screened with C-arm equipment without the need to
move them into a different position.
Shifting the table-top in longitudinal direction
g
Danger!
For tables with longitudinal shift feature, the
position of the table-top will bear influence on
the stability of the operating table. Always shift
the table-top into such a position, within the
limits of the specific application, as to improve
the stability of the table.
g
Danger!
The patient lying on the operating table can get
hurt by a sudden and unexpected moving of the
table-top which has not properly engaged into
position. Make sure after each adjustment
procedure that the table-top has properly
engaged.
• Check if the table-top has properly engaged by
slightly pushing the table-top in longitudinal direction.
The table-top must not move.
h
The table-top charged with the patient’s weight
can be shifted in longitudinal direction more
easily if the table-top is slightly inclined.
Hand grip
Release lever for
longitudinal shift
function of the table-top
Operating table OPX mobilis –
EDITION 01-05-GB
ID.-Nr.: 02007844
25
Operation
g
h
Danger!
Patients run the risk of getting hurt if the
longitudinal shift function is activated with the
table-top in Trendelenburg or Reverse
Trendelenburg position of an angle of more
than 5°, Reduce the inclination angle of the
table-top before activating the longitudinal shift
function.
In this connection, please also observe the
relative caution label above the release lever for
the longitudinal shift function.
Before using the operating table, please make yourself
familiar with its reactions when charged with a patient’s
weight.
26
Operating manual
Integrated kidney bridge
Raising the kidney bridge
Depending on the model the operating table can be
equipped with an integrated kidney bridge. The
integrated kidney bridge is adjusted in height
hydraulically by means of the foot pump of the table.
The kidney bridge provides the back section of the table
top with an additional bulge. The kidney bridge is
designed in such a way as to allow the positioning of
heavy-weight patients. If the kidney bridge is overloaded
a pressure relief valve limiting the possible load responds
when the kidney bridge is raised by means of the foot
pump.
The kidney bridge is raised by means of the foot pump of
the operating table. The switch lever serves to switch the
hydraulic system into “activate kidney bridge” mode and
back to “normal” operation of the table top adjustment
functions.
Foot pump lever
Changeover lever for
integrated kidney bridge
integrated kidney bridge
Foot pedal for
central brake and
for directional
castor
Preselector lever
v
• Raise the switch lever into top position by the tip of
your foot. The kidney bridge can now be adjusted in
height by means of the hydraulic foot pump of the
table.
• Raise the kidney bridge up to the desired height using
the foot pump.
• Make the switch lever return into mid-position. In
order to do so, you can also shortly press the lever fully
down. It will then automatically return into midposition when released.
Caution!
If the kidney bridge is raised to an extreme
height, this position will be uncomfortable for
the patient. In order to assure a gentle patient
positioning, do not raise the kidney bridge
more than necessary, and in case of an extreme
raising of the kidney bridge, use additional
pads in order to position the patient in a gentle
way.
Operating table OPX mobilis –
EDITION 01-05-GB
ID.-Nr.: 02007844
27
Operation
Lowering the kidney bridge
The kidney bridge can be lowered in height anytime
without having to use the foot pump.
v
Caution!
Before lowering the kidney bridge, make sure
that there are no body members or objects in
the area between the kidney bridge pad and
the frame of the back section.
• Press the switch lever for the kidney bridge completely
down against its spring force until the kidney bridge is
lowered down to the desired position.
• Release the switch lever. The lever will return
automatically into mid-position and activating the foot
pump will again make the operating table carry out
the adjustment movement preselected by means of the
preselector lever.
a
a
28
Attention!
The kidney bridge may get damaged if it is
slightly raised and at the same time charged
with the full patient weight. Make sure that the
kidney bridge is completely lowered before
letting the patient mount onto the table top.
Attention!
The pads are exposed to extraordinary wear
when the back section of the table is raised as
long as the kidney bridge is raised. Do not raise
the back section more than necessary as long
as the kidney bridge is raised.
Operating manual
Leg plates
h
v
Head plate and leg plates are fixed in the same
way, so that leg plates and head plate are
interchangeable. This way the clearance below
the table-top can be varied.
Fixing the leg plates
Bolt
Leg plate
Caution!
Interchanging the head and leg sections will
influence the stability of the operating table as
well as its reactions to adjustments. In this
connection, please observe the hints regarding
positioning of the castors on page 15 and
regarding the position of the longitudinally
adjustable table-top on page 25.
Please familiarize yourself with the reactions of the
operating table when being charged with the patient
weight before using the operating table.
Reception hole
Cut-out
Gudgeon
• In order to fix the leg plate, push its bolt into the
reception hole in the seat section. The lower plug is
inserted into the cut-out below the reception holes.
• Push the leg plate in until it clicks into position and
make sure that the leg plate is properly engaged.
Detaching the leg plates
• In order to detach the leg plate, lift it slightly, thus
relieving it.
• Press the release button and pull the leg plate off the
seat section.
Operating table OPX mobilis –
EDITION 01-05-GB
ID.-Nr.: 02007844
29
Operation
Swivelling the leg plates outwards
Adjusting the inclination of the leg plates
Toothing
Release button
T-screw
v
Caution!
Fingers or hands can get jammed if you grab
the joint of the leg plate when carrying out the
swivelling movement. Do not grab the joint
when swivelling the leg plate.
• In order to adjust the inclination of the leg plate, press
the release button at the leg plate.
• Incline the leg plate, against the resistance of the gas
spring, and let go of the release button when the
desired position is achieved.
The leg plate is now fixed again.
• In order to swivel the leg plate outwards, loosen the Tscrew.
• Swivel the leg plate into the desired position.
g
Danger!
The leg plate can come loose if the tooth system
has not locked properly. An unintentional
swivelling of the leg plates can only be
prevented if the tooth system is properly
engaged. Make sure the tooth system is
interlocked when refastening the T-screw.
a
Attention!
When the operating table is being lowered as
long as the leg plate is folded down, the leg
plate may hit the cladding of the mobile base
and the cladding or the leg plate may get
damaged. Before lowering the table top, make
sure that there is sufficient clearance.
• Refasten the T-screw while slightly moving the leg plate
in order to make the tooth system engage.
30
Operating manual
Head plate
h
v
Head plate and leg plates have got similar
fixtures, so that leg plates and head plate are
interchangeable. This way the clearance below
the table-top can be varied.
Caution!
Interchanging the head and leg sections will
influence the stability of the operating table as
well as its reactions to adjustments. In this
connection, please observe the hints regarding
positioning of the castors on page 15 and
regarding the position of the longitudinally
adjustable table-top on page 25.
h
The head plate can be detached more easily if
you press against the head plate, thus relieve it,
and only then press the release buttons.
• In order to detach the head plate, press the head plate
from the rear against the reception holes.
• Press the release buttons at the left and right hand
frame of the back section, either simultaneously or
one after another, and pull the head plate off the back
section.
Adjusting the inclination of the head plate
Please familiarize yourself with the reactions of the
operating table when being charged with the patient’s
weight before using the operating table.
Attaching the head plate
• In order to attach the head plate, push the latch bolts
into the reception holes until the head plate clicks
audibly into place.
• Check if the head plate has properly engaged.
Release lever
Detaching the head plate
Head plate
• Raise the release lever.
• Adjust the inclination of the head plate against the
resistance of the gas spring, and let go of the release
lever as soon as the desired position has been
achieved.
Head plate
Release button
Operating table OPX mobilis –
EDITION 01-05-GB
ID.-Nr.: 02007844
31
Operation
Adjusting the inclination of the head section pad
Head section pad
Grip recess
Clamping screw
a
Attention!
If the loosened fixing screw is re-inserted the
wrong way (on-edge), its thread can get
damaged upon fastening. Therefore, loosen
the fixing screw only as little as necessary.
• In order to adjust the inclination of the head section
pad, loosen the fixing screw at the head plate.
v
Caution!
There is danger of jamming ones fingers under
the head section pad! When loosening the
fixing screw, grab into the cut-out in order to
adjust the inclination angle of the head section
pad.
• Adjust the head section pad into the required angle
and re-fix the fixing screw.
v
Caution!
If the lever of the fixing screw points to the
ceiling, the patient can get hurt. Always take
care to make the lever point to the floor.
• In order to adjust the lever of the fixing screw, pull it
away from the head plate so that the lever disengages,
turn it into the direction desired and let it engage
again.
32
Operating manual
Back section
g
Adjusting the inclination of the back section
v
Caution!
When the table-top is in an extreme position,
there is danger of jamming one’s fingers in
certain spots. Do not grab below the table-top
or behind the table-top frame.
The back section is secured in its position by means of a
gas spring with release mechanism. After releasing, the
back section can be adjusted either against or with the aid
of the resistance of the gas spring.
Danger!
When releasing the gas spring at the back
section, make sure to hold onto the back
section, as the force of the gas spring may
cause the back section to jerk up or down and
thus hurt the patient.
• In order to adjust the angle of the back section, press
the release lever at the right hand bottom side of the
back section from the inside out of its position and
press release the lever and the hand grip together.
Make sure to hold onto the back section.
• Adjust the back section against the resistance of the
gas spring or against the patient’s weight and let go
of the release lever as soon as the desired position is
achieved.
The release lever will slide back into its original position
and secure the position of the back section.
h
Please familiarize yourself with the reactions of the
operating table when being charged with the patient’s
weight before using the operating table.
Hand grip
Release lever for
back section
adjustment
Operating table OPX mobilis –
The reactions of the back section when being
adjusted depend largely on the kind of charge
exerted on the table-top (e. g. on the patient
weight, accessories attached, or interchanged
head and leg plates).
a
EDITION 01-05-GB
ID.-Nr.: 02007844
Attention!
If the operating table is being adjusted with the
back section in folded-down position, the back
section may hit the cladding of the mobile base
and damage it. This can also happen when the
automatic 0 function is activated. Always make
sure that there is sufficient clearance below the
table-top before carrying out the adjustment
functions.
33
Operation
Arm rest 101.107
The operating tables can be equipped with arm rests.
Releasing
The arm rest is fixed on top of a ball-and-socket joint. The
ball-and-socket joint is blocked or released by means of
a clamping lever.
Blocking
• In order to release the ball-and-socket joint, proceed
in reverse order. Turn the clamping lever anticlockwise. Pull the clamping lever off against the
spring force, turn it back, let it re-engage and then
turn it once more anti-clockwise.
• In order to block the ball-and-socket joint, turn the
clamping lever clockwise.
• Then pull the clamping lever out against the spring
force in order to unlock it. Turn it back anti-clockwise
and let it engage again.
• Turn the clamping lever clockwise once more. Repeat
the whole procedure until the arm rest is adjusted into
the desired position.
34
Operating manual
Add-on kidney bridge
The operating tables without integrated kidney bridge can
be equipped with an add-on kidney bridge.
The add-on kidney bridge is attached to the operating
table instead of the back section.
The add-on kidney bridge is now attached.
v
Attaching the kidney bridge
Caution!
In order to guarantee a gentle positioning of
the patient when using the add-on kidney
bridge, use an additional pad on top of the
break. (This pad comes together with the kidney
bridge.)
Adjusting the add-on kidney bridge
Kidney bridge
The add-on kidney bridge can be adjusted by means of a
hand crank. The crank can be inserted on either side of
the kidney bridge. Due to a joint in the crank handle, it
can still be operated easily even if there are accessories
attached to the side rails.
Crank
• In order to attach the add-on kidney bridge, remove
the back section pad.
• Insert the add-on kidney bridge into the frame of the
back section. The locking pins in the frame will lock
inside the cut-outs at the bottom of the add-on kidney
bridge.
Operating table OPX mobilis –
EDITION 01-05-GB
• In order to adjust the add-on kidney bridge, insert the
crank into its square-end receptacle at the left or right
hand side of the kidney bridge.
• Turn the crank until the desired position of the add-on
kidney bridge is achieved, and remove the crank
again.
ID.-Nr.: 02007844
35
Operation
Shoulder arthroscopy support
The shoulder arthroscopy support is an accessory for the
operating table series OPX mobilis. Its intended use, in
combination with the operating table, is the optimal
patient positioning for interventions in shoulder
arthroscopy. In combination with the shaped head rest,
patient positionings for interventions in ophthalmology,
ENT or oral surgery are possible.
g
Danger!
Attaching the shoulder arthroscopy support to
the back section will diminish the stability of the
operating table. The shoulder arthroscopy
support should only be attached to the seat
section.
It is not intended to use the shoulder arthroscopy support
for patient positionings in neurosurgery. For these
purposes there are special accessories at your choice.
The shoulder arthroscopy support may only be fixed to the
seat section of the OPX mobilis. It can be equipped with a
shaped head rest or with a head plate of the Schmitz
range by means of an appropriate connecting piece.
Attaching the shoulder arthroscopy support
Clamping screws
Head plate
Catching hook
g
Add-on pad
Joint
Fastening disc
Release lever for
adjustment of
inclination angle
Push-in sheet
Clamping screw
g
Danger!
The position of the table-top (for operating
tables with longitudinal shift function) will bear
influence on the stability of the operating table.
If the relative application allows, the table-top
should be adjusted in such a way as to raise the
stability of the table. If the arthroscopy support
is attached, the table-top should be shifted as
far as possible into the direction of the back
section.
Danger!
The attached arthroscopy support will diminish
the stability of the operating table. Raise the
stability by positioning the operating table in
such a way as to make its double castors point
into the direction of the centre of gravity.
Mounting
with locking
bolt
Gas springs
36
Operating manual
• In order to attach the shoulder arthroscopy support,
push the plug-in gudgeons into the reception holes at
the seat section. Make sure afterwards that the plug-in
gudgeons are properly locked.
The plug-in gudgeons lock inside the reception holes.
• In order to detach the shoulder arthroscopy support,
press the release buttons at both sides of the seat
section and pull the plug-in gudgeons out of the
reception holes.
Operating table OPX mobilis –
EDITION 01-05-GB
Adjusting the inclination of the shoulder
arthroscopy support
• In order to adjust the inclination angle of the shoulder
arthroscopy support, push the release lever up so that
the gas springs are released.
• Adjust the inclination angle of the shoulder
arthroscopy support against the counter-pressure of
the gas springs. As soon as the desired position is
achieved, let go of the release lever.
ID.-Nr.: 02007844
37
Operation
Attaching and detaching the add-on pads
Knurled screw
• In order to attach the add-on pads, push them from
the rear into the recess so that the plug-in sheet locks
inside the mounting and the catching hook rests
behind the fastening disc.
• In order to detach the add-on pad, unlatch the plugin sheet by extracting the snap-in bolt and then pull
the add-on pad out to the rear.
Catching hook
Clamping screw
Joint
Push-in sheet
Mounting
with
locking bolt
38
Fastening disc
Release lever for
adjustment of
inclination angle
Operating manual
Attaching and adjusting the head plate or the
shaped head rest
The shoulder arthroscopy support is used in combination
with a shaped head rest or a head plate. The shaped
head rest or the head plate are fixed inside the mounting
by means of a connecting piece.
• In order to attach the head plate or the shaped head
rest, insert the round rod of the connecting piece into
the holder at the head plate or at the shaped head rest
and tighten the clamping lever or the fastening screw.
• Insert the square rod into the holder at the shoulder
arthroscopy support and tighten the clamping screw.
• In order to adjust the position of the head plate or of
the shaped head rest, loosen the gear-toothed joint of
the connecting piece. Adjust the position of the head
rest and tighten the clamping lever again. Finally
make sure that the joint is properly locked.
• Check the holders for the head plate or for the shaped
head rest, the hinging points of the gas springs, the
plug-in gudgeons and the fastening discs for the
catching hooks regularly for possible damages.
Operating table OPX mobilis –
EDITION 01-05-GB
ID.-Nr.: 02007844
39
Operation
Accessories for urology
In order to adapt the operating table for better use in the
domain of urology it can be equipped with special
accessories. These are in detail: an extension of the table
top, designated as urological adaptor, and elbow rests
which are fixed to the adaptor as well as a rinsing basin
on swivel-mounted support which is fixed to the side rail.
Urological adaptor
Attaching the urological adaptor
• In order to attach the urological adaptor, insert its
plug-in gudgeons into the into the reception holes at
the seat section. Make sure afterwards that the plug-in
gudgeons are properly locked.
g
Elbow rests
Danger!
If a urological adaptor is attached, the stability
of the operating table will be diminished. Raise
the stability by moving the operating table into
such a position as to make the double castors
point in the direction of the urological adaptor.
Rinsing basin on
swivel-mounted
support
The extension of the table top is exclusively designed for
attachment at the seat section. The extension of the table
top may be charged with a weight of 100kg.
The rinsing basin on swivel-mounted support can also be
attached to the side rail in any other position.
40
g
Danger!
For tables with longitudinal shift feature, the
position of the table-top will bear influence on
the stability of the operating table. Always shift
the table-top into such a position, within the
limits of the specific application, as to improve
the stability of the table.
Operating manual
Attaching the rinsing basin on swivel-mounted support
• In order to attach the rinsing basin on swivel-mounted
support, fix the vertical pole of the support to the side
rail of the operating table by means of an appropriate
fixing clamp.
• Make sure that the clamp is properly locked.
• Make the rinsing basin swivel into the desired position.
a
h
Attention!
In certain positions of the operating table the
rinsing basin on swivel-mounted support may
get damaged. Watch the movements of the
rinsing basin on when adjusting the table top. If
required, adapt the inclination angle of the
rinsing basin to that of the operating table while
carrying out the adjustment movements of the
table top.
In order to raise the prestress of the hinge joints
the caps of the joints can be removed and the
screw underneath tightened by means of an
Allen screw.
Operating table OPX mobilis –
EDITION 01-05-GB
ID.-Nr.: 02007844
41
Operation
Further accessories of the Schmitz range
The operating tables can be adapted to special
requirements by means of the ample range of
accessories. It is essential to observe the operating
instructions of the relative accessories. Among others,
following accessories may be used:
Ref.-No.
Designation
101.103
101.104
Arm rests
101.110
Arm/hand operating table
101.121
101.122
Wristlets
101.127
Body restraint strap
101.145
Infusion rod
101.141
Anaesthetic frame
101.224
Leg supports (Göpel type)
101.174
Shoulder/lateral supports
101.182
Knee support
101.247
Rinsing basin with holder
101.161
101.167
101.164
101.166
various attachment clamps
101.254
and 101.256
Shaped head rest and connecting piece
101.270
Universal adaptor
101.188
Cushion, semicircular
101.190
Cushion for operations on the intervertebral
disc
101.520
Extension device
101.281
Cassette carrier for X-ray cassettes
42
Operating manual
Cleaning and disinfection
The pads at the seat and back sections are removable for
easier cleaning. Head section and leg plates can be
removed completely. This way they can easily be cleaned
individually.
a
Attention!
The pads will get deformed when exposed to
heat. The operating table, including its pads,
must not be sterilized by superheated steam.
Plastic components and pads of the operating table may
only be cleaned using appropriate cleansing agents.
Cleaning
a
For cleaning a weak alkaline cleansing agent may be
used, e. g. a mild detergent or soap-suds.
• If your operating table is equipped with an electricallydriven pump, interrupt the recharging process of the
batteries.
• For cleaning, raise the operating table to maximum
height and move seat and back section into horizontal
position.
• If required, remove the pads of the seat and back
sections.
h
h
Attention!
Agents for disinfection of the patient’s skin can
cause discolourations on the pads. Remove
such disinfecting agents from the pads in order
to avoid such discolourations.
Do not employ machine-driven methods of
cleaning or disinfecting.
Do not use scouring agents or solvents.
• Clean the operating table and its pads using a weak
alkaline all-purpose cleaning agent (e. g. soap-suds
or mild detergents).
• Dry moist spots on the operating table and on its pads.
• Put the pads back into place.
Operating table OPX mobilis –
EDITION 01-05-GB
ID.-Nr.: 02007844
43
Cleaning and disinfection
Disinfection
For disinfecting a commercial disinfecting agent for
surfaces on an aldehydic basis may be used.
v
h
44
Caution!
Disinfecting sprays may cause corrosion on
mechanical parts, or create explosive mixtures
inside the table components. For this reason,
do not use disinfecting sprays!
Do not use disinfecting agents containing
chlorine or agents hydrolysing chlorine.
a
Attention!
Agents for disinfection of the patient’s skin may
cause discolourations on the pads. Remove
such disinfecting agents from the pads in order
to avoid discolourations.
• Disinfect the operating table using a commercial
disinfecting agent for surfaces on an aldehydic basis
in a ready-made weak solution. The agent should be
mentioned in the list of the DGHM (i. e. the German
society for hygiene and microbiology).
h
The list of the DGHM can be obtained
from the publishers
mhp-Verlag
Ostring 13
D-65205 Wiesbaden
Germany.
Operating manual
Check-ups
Ageing, wear and tear etc. will affect the safety of the
operating table. As a preventive measure, we
recommend regular safety check-ups. The user has to
carry out the safety check-ups prescribed for this device.
The safety-relevant check-ups are legally prescribed in the
operators’ ordinance and have to be observed.
Following check-ups have been stipulated for the
inspections:
Annually
– Checking the labels and the availability of the
operating manual
– Visual inspection of the operating table and of the
accessories with regard to possible damages
– Functional test of the operating table
– Checking the electrical safety according to German
Standard VDE 0751, part 1, standard, or alternatively
according to European Standard 60601-1-1 (repeat
test)
Every five years
– Checking all hydraulic hoses and all hydraulic
connections for possible damages
– Replacement of batteries in the case of operating
tables with electro-hydraulic adjustment functions (Etype models)
If defects are stated on the occasion of the safety checkups, the operating table must not be used until these
defects have been repaired.
Operating table OPX mobilis –
EDITION 01-05-GB
ID.-Nr.: 02007844
45
Check-ups
46
Operating manual
Electromagnetic compatibility (EMC)
The following paragraph regarding electromagnetic
compatibility only applies for the mobilis “E” model
series.
–
–
–
–
mobilis 300 CE
mobilis 300 CE/G
mobilis 300 CLE
mobilis 300 CLE/G
Portable and mobile communication media using RF may
interfere with electric medical appliances. Electric medical
appliances are subject to special precautionary measures
with regard to EMC. They have to be installed and
commissioned in accordance with the prescriptions
regarding EMC as stated in this operating manual.
The models listed above are called OPX mobilis in the
following.
Electromagnetic Emissions
Guidance and Manufacturer’s Declaration - Electromagnetic Emissions
The operating table OPX mobilis is intended for use in the electromagnetic environment specified below. Users of the OPX
mobilis operating table should make sure that it is used in such an environment.
Compliance
Electromagnetic Environment Guidance
RF Emissions CISPR 11
Group 1
The OPX mobilis operating table uses RF
energy only for its internal functions.
Therefore, its RF emissions are low and are
not likely to cause any interference in nearby
electronic equipment.
RF Emissions CISPR 11
Class B
Harmonic Emissions IEC 61000-3-2
Not applicable
Voltage Fluctuations/
Flicker Emissions IEC 61000-3-3
Not applicable
Electromagnetic Emissions
Operating table OPX mobilis –
EDITION 01-05-GB
The OPX mobilis operating table is suitable
for use in all establishments other than
domestic and those directly connected to the
public low-voltage power supply network that
supplies buildings used for domestic
purposes.
ID.-Nr.: 02007844
47
Electromagnetic compatibility (EMC)
Electromagnetic Immunity Guidance
Immunity Test
IEC 60601Test Level
Compliance Level
Electromagnetic Environment Guidance
Electrostatic Discharge (ESD)
IEC 61000-4-2
±6kV Contact
±8kV Air
±6 kV Contact
±8 kV Air
Floors should be wood, concrete, or
ceramic tile. If floors are covered with
synthetic material, the relative humidity
should be at least 30%.
Electric Fast Transient / Burst
IEC 61000-4-4
±2 kV on power supply lines
±1 kV on input/output lines
±2 kV on power lines
±1 kV on input/output lines
Mains power quality should be that of a
typical commercial or hospital
environment.
Surge
IEC 61000-4-5
±1 kV Differential mode
voltage
±2 kV Common mode
voltage
±1 kV Differential mode
voltage
±2 kV Common mode
voltage
Mains power quality should be that of a
typical commercial or hospital
environment.
Voltage Dips, Short Interrupts
and Variations on Power Supply
Lines IEC 61000-4-11
<5% UT
(>95% dip in UT)
for 0.5 cycles
40% UT
(60% dip in UT)
for 5 cycles
70% UT
(30% dip in UT)
for 25 cycles
<5% UT
(<95% dip in UT)
for 5 seconds
not applicable
Power Frequency
Magnetic Fields (50/60 Hz)
IEC 61000-4-8
3 A/m
3 A/m
Note
48
Power frequency magnetic fields should be
those of a typical commercial or hospital
environment.
UT is the AC mains voltage prior to application of the test level.
Operating manual
Electromagnetic Immunity for Non-Life-Supporting Equipment
Guidance and Manufacturer’s Declaration - Electromagnetic Immunity
The OPX mobilis operating table is intended for use in the electromagnetic environment specified below. Users of the OPX mobilis operating
table should make sure that it is used in such an environment.
Immunity Test
IEC 60601 Test Level
Compliance Level
Electromagnetic Environment Guidance
Portable and mobile RF communications
equipment should not be used at a closer
distance to the OPX mobilis operating
table including its power supply line than
the recommended separation distance
estimated using the equation applicable to
the frequency of the transmitter.
Separation distance
3, 5
d = ⎛ ---------⎞ P
⎝ 3 ⎠
3, 5
d = ⎛ ---------⎞ P 80 MHz to 800 MHz
⎝ 3 ⎠
Conducted RF Disturbance IEC
61000-4-3
Radiated RF Disturbance 610004-3
3 Veff
150 kHz to 80 MHz
3 V/m
80 MHz to 2.5 GHz
3V
3 V/m
7
d = ⎛ ---⎞ P
⎝ 3⎠
800 MHz to 2.5 GHz
where P is the maximum output power
rating of the transmitter in watt (W)
according to the manufacturer of the
transmitter and d is the recommended
separation distance in meters (m).
Field strengths from fixed RF transmitters,
as determined by an electromagnetic site
survey, should be less than the compliance
level in each frequency range.
Interference may occur in the vicinity of
equipment marked with the following
symbol:
Note 1
Note 2
At 80 MHz and 800 MHz, the higher frequency range applies
These guidelines may not apply in all situations. Electromagnetic propagation is affected by absorption and reflection from
structures, objects and people.
a
Field strengths from fixed transmitters, such as base stations for radio (cellular/cordless) telephones and land mobile radios,
amateur radio, AM and FM radio broadcast and TV broadcast cannot be predicted theoretically with accuracy. To assess the
electromagnetic environment due to fixed RF transmitters, an electromagnetic site survey should be considered. If the measure
field strength in the location in which the OPX mobilis operating table is used exceeds the applicable RF compliance level above,
the OPX mobilis operating table should be observed to verify normal operation.
Over the frequency range 150 kHz to 80 MHz, field strengths should be less than 3 V/m
b
Operating table OPX mobilis –
EDITION 01-05-GB
ID.-Nr.: 02007844
49
Electromagnetic compatibility (EMC)
Recommended separation distances
Recommended separation distance between portable and mobile RF communications equipment and the OPX mobilis
operating table
The OPX mobilis operating table is intended for use in the electromagnetic environment in which radiated RF disturbances are controlled. The
user of the OPX mobilis operating table can help prevent electromagnetic interference by maintaining a minimum distance between portable and
mobile RF communications equipment (transmitters) and the operating table as recommended below, according to the maximum output power of
the communications equipment.
Separation distance according to frequency of transmitter
m
Rated maximum output
power of transmitter
W
150 kHz to 80 MHz
80 MHz to 800 MHz
800 MHz to 2.5 GHz
3, 5
d = ⎛ ---------⎞ P
⎝ 3 ⎠
3, 5
d = ⎛ ---------⎞ P
⎝ 3 ⎠
7
d = ⎛ ---⎞ P
⎝ 3⎠
0.01
0.12
0.12
0.23
0.1
0.37
0.37
0.74
1
1.2
1.2
2.3
10
3.7
3.7
7.4
100
12
12
23
For transmitters rated at a maximum output power not listed above, the recommended separation distance d in meters (m) can be estimated
using the equation applicable to the frequency of the transmitter, where P is the maximum output power rating of the transmitter in watt (W)
according to the manufacturer of the transmitter.
Note 1
At 80 MHz and 800 MHz, the higher frequency range applies
Note 2
These guidelines may not apply in all situations. Electromagnetic propagation is affected by absorption and reflection from
structures, objects and people.
50
Operating manual
Malfunctions and repairs
In case of a malfunction, please contact Schmitz u. Söhne.
You will find their telephone number on the last page of
this operating manual.
Disposal
Apart from the metal elements, especially following
components have to be disposed of according to the local
regulations:
–
–
–
–
–
–
batteries
hydraulic fluid
electronic components
foam pads
bellows (PVC)
floor pan (ABS)
Operating table OPX mobilis –
EDITION 01-05-GB
ID.-Nr.: 02007844
51
Disposal
52
Operating manual
Spare parts
Technical descriptions such as circuit diagrams, exploded
views, repair instructions or spare parts lists can be
obtained upon request from Schmitz u. Söhne.
When ordering technical descriptions or spare parts at the
manufacturer’s, kindly indicate the reference no., the
serial no. and the project no. of the operating table. You
will find these data on the nameplate of the operating
table.
In the case of coloured pads, please also indicate the
ref. no. of the colour. You will find the colour no. on the
back of the pads.
Operating table OPX mobilis –
EDITION 01-05-GB
ID.-Nr.: 02007844
53
Product designation
Product designation
Nameplates
OPX mobilis 200
OPX mobilis 300 C
OPX mobilis 300 CL
OPX mobilis 300 CE
OPX mobilis 300 CLE
“G” models are marked accordingly
Battery charger
54
Operating manual
Symbols employed on the product
Potential equalization socket
Class AP device
Observe the operating manual!
Do not activate the longitudinal shift
function at a Trendelenburg/Reverse
Trendelenburg inclination angle of the
table-top of more than 5°.
Do not move the table when a knee rest is
attached.
Do not move the table when an extension
device is attached.
Operating table OPX mobilis –
EDITION 01-05-GB
ID.-Nr.: 02007844
55
Technical data
Technical data
Measurements/ weights/ electrical data
OPX mobilis 200
Total length w/o head plate
Total length incl. head plate
Width of table-top
Total width
Base plate
(length x width)
Diameter of swivel-type castors
Height adjustment range
Trendelenburg adjustment
Reverse Trendelenburg adjustment
Lateral adjustment both sides
Range of longitudinal shift
of the table-top
Back section adjustment
Leg plate inclination
Leg plate spread angle
Head plate inclination totally
Setting angle of head section pad
Weight
Nominal charge /
Maximum charge
Pressure rating of the
hydraulic system
56
OPX mobilis 300 C
OPX mobilis 300 C/G
OPX mobilis 300 CL
OPX mobilis 300 CL/G
OPX mobilis 300 CE
OPX mobilis 300 CE/G
OPX mobilis 300 CLE
OPX mobilis 300 CLE/G
720 to 1,080 mm
740 to 1,100 mm
±20°
±20°
250mm
(2 × 125mm)
1,780 mm
2,130 mm
540 mm
590 mm
980 × 545 mm
720 to 1,080 mm
720 to 1,080 mm
—
±20°
—
—
—
45°
—
160 kg
25 °
180 kg
125 mm
740 to 1,100 mm
30°
30°
±20°
250mm
(2 × 125mm)
+70°/-50°
+20°/-90°
45°
+25° to 45°
25 °
190 kg
—
45°
45°
25 °
200 kg
25 °
210 kg
135kg /185kg
120 bar
Operating manual
Measurements/ weights/ electrical data
OPX mobilis 200
Applied part
INT 1 min/4 min
Protection against
ingress of water
Protection against the presence of
flammable anaesthetic mixtures
OPX mobilis 300 C
OPX mobilis 300 C/G
OPX mobilis 300 CL
OPX mobilis 300 CL/G
OPX mobilis 300 CLE
OPX mobilis 300 CLE/G
type B
According to European Standard 60601-2-46 the maximum admissible leakage currents meet the CF
requirement
The appliance is not designed for
uninterrupted duty. A 4 minutes’ interval is
recommended after 1 minute’s full-load
operation.
IP X 4
AP
Fine-wire fuses 5 x 20mm:
F1 = 10 A, time lag type/
F2 = 3.15 A, time lag type
4 pcs; 6 V; 12 Ah
Fuses employed ( “E” models only)
Battery type employed
Input AC of the battery charger
Output DC of the battery charger
90 V to 264 V / 50 to 60 Hz / max. 1.2 A
max. 29.5 V DC / 2 A
Fine-wire fuses 5 × 20 mm:
2 pcs 0.4 A, time lag type /
1 pc 2.0 A, time lag type
Internal fuses of the battery charger
Manufacturer
OPX mobilis 300 CE
OPX mobilis 300 CE/G
Schmitz u. Söhne GmbH & Co. KG
P. O. Box 14 61, D-58734 Wickede (Ruhr)
Zum Ostenfeld 29, D-58739 Wickede (Ruhr),
Germany
phone +49 (2377) 840
fax
+49 (2377) 84162
http://www.schmitz-soehne.de
e-mail Domestic sales dept.: [email protected]
e-mail Exports dept.:
[email protected]
e-mail After-sales service:
[email protected]
Under reservation of changes in construction and measurements.
Operating table OPX mobilis –
EDITION 01-05-GB
ID.-Nr.: 02007844
57
Technical data
Classification
Class 1 medical device according to guideline 93/42 EC
Standards applied
The operating table OPX mobilis fulfils the requirements
of following standards:
– European Standard 60601-1:1990
+ A1:1993 + A2:1995
– European Standard 60601-1-2:2002
– European Standard 60601-2-46:1998
– European Standard ISO 14971
– German VDE Standard 100-710
58
Operating manual
Declaration of Conformity
Operating table OPX mobilis –
EDITION 01-05-GB
ID.-Nr.: 02007844
59
Serviceteam
Phone 02383 - 910 0110
Schmitz u. Söhne GmbH & Co. KG
Postfach 1461, D-58734 Wickede (Ruhr)
Zum Ostenfeld 29, D-58739 Wickede (Ruhr)
Germany
Phone
+49 (2377) 840
Fax
+49 (2377) 84162
http://www.schmitz-soehne.de
e-mail: [email protected]
Branch offices
Spain
SCHMITZ u. Söhne Ibérica S.L.
Avda de Bruselas 58, semisótano
E-28028 Madrid
Phone/Fax +34 (91) 7130000
Switzerland
SCHMITZ AG
Schloss-Strasse 67
CH-8207 Schaffhausen
Phone
+41 (52) 6432505
Fax
+41 (52) 6432691
SCHMITZ SA
Francois Poncet
Chemin de Veilloud 60
CH-1024 Ecublens VD
Phone
+41 (21) 6917466
Fax
+41 (21) 6917462
France
Sarl Schmitz France
Za du Serroir 2
F-54690 Lay Saint Christophe
Phone
+33 (3832) 29467
Fax
+33 (3832) 28238
The company reserves the right to alter the
design, construction, dimension and finish of
its products without notice.