1
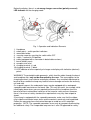
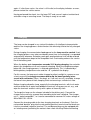
EN
User Manual
DS-PRO Underwater Lamp
SPELEO / TECHNICAL
dl_hid_navod_v1-18-eng.doc
Contents
Contents..................................................................................................................1
Caution....................................................................................................................2
General Description ................................................................................................2
Operation and Indication Elements .........................................................................3
Putting in Operation ................................................................................................5
Charging..................................................................................................................6
De-pressurizing the canister....................................................................................8
Lighting....................................................................................................................9
Security Precautions .............................................................................................11
Maintenance, Storage, Transport..........................................................................11
Failures, Warranty and Repairs ............................................................................12
Warranty Terms and Conditions ...........................................................................13
Technical Specifications........................................................................................14
Disposal, Environmental Care...............................................................................14
Authorised Service Centre ....................................................................................15
Declaration of Conformity......................................................................................16
1
Caution
Read this Manual carefully before using the lamp. Keep the Manual for later use.
General Description
DS Pro is a powerful, efficient, safe and variable underwater lamp, a result of a
years’ long joint effort of divers and electronics engineers. Most of known
requirements of present divers, rescuers and cave explorers have been embedded
in its design. The lamp is suitable for recreational, professional and technical diving
in all types of water. It has the following features:
- A robust two-part inox / plastic structure, suitable for water depths of up to 150
metres/450 ft (type tested for 20 bars). The handpiece (light source) is inseparably
connected with the barrel (battery case) by a rugged polyurethane-coated cable (on
special request, detachable version available).
- The light source (handpiece) contains a 24W HID tube producing the light flux of
1,450 lumens (which corresponds to a 75W halogen bulb). The handpiece may be
mounted to a hand holder, helmet, etc.
- The battery case (barrel) contains one (TECHNICAL version) or two (SPELEO
version) independent battery packs for extended lighting time and increased
reliability. The barrel may be mounted to a belt, jacket or bottle.
- A microprocessor-controlled, fast charger is integrated in the barrel. An adaptive
charging algorithm with temperature sensors protects the batteries from overloading
and charges them optimally, thus increasing the battery life to up to several
hundreds of cycles (typically 500 cycles if the required technical conditions are
maintained). The charging time of a completely empty (discharged) battery into a
fully charged state is approx. 3 hours if the battery is cooled properly. The charging
time may be longer depending on the ambient temperature.
- Advanced electronics for energy-saving lighting. The HID tube power converter
efficiency is up to 85%. The lighting time at full power is up to 4.5 hours with the
SPELEO version and roughly half the time with the TECHNICAL version.
- A new design of charging terminals eliminates the need to open any part of the
lamp. Thus, the lamp remains sealed hermetically all the time and cannot get wet,
polluted or flooded due to insufficient closing. There is no cap to get lost or polluted.
2
A mains adapter used for charging (90-240V AC / 50-60 Hz “global” input) is
included in the delivery. A power inverter may be delivered upon request and
connected to a 12-24V DC car or boat battery.
- A LED display in the barrel lid provides necessary information on all diving and
charging modes to the user. It indicates the battery status during charging and
lighting, and the remaining charging or lighting times depending on the mode. It also
signals any alarm / failure conditions if any (e.g. overheating while charging, battery
failure – defective cell, etc.).
- The HID tube start is immediate, the time to reach the full arc intensity is 30
seconds. If the HID tube fails to start within approximately 3s, a restart is performed
automatically in about 15s.
- The HID tube light colour temperature is 6,000 K, which is similar to the bluewhite daylight colour and helps achieve optimum viewing, photography and camera
recording results during working, recreational, rescue and cave diving.
- The reflector-integrating HID tubes feature a precise adjusting of the light beam.
The radiation angle of standard discharge tubes is 20 to 24 degrees, which is a
compromise (the greater the radiation angle, the lower the luminance). Lamps with
the radiation angle of 12 degrees are available upon special order.
- A safety relief valve is installed on the barrel lid to prevent overpressure inside the
lamp due to potential electrical, chemical or other phenomena.
Operation and Indication Elements
The only control element is located on the handpiece. It is a hermetically sealed
rotating switch. The switch has two arresting positions (OFF and ON), which are
relatively shifted by 180°. There are colour dots on the switch ring and the
handpiece. To activate the ON position, turn the switch until the points are facing
each other (arresting position 1). To make the switch OFF, rotate the switch ring by
180° (arresting position 2).
The display has two digits, each with a decimal point. The display shows
information on the remaining lighting or charging time, temperature and other lamp
statuses. The decimal points indicate the number of active battery packs and their
statuses.
3
Below the display, there is a red wrong charger connection (polarity reversal)
LED indicator for the charging mode.
8
9
6
1
11
5
4
10
6
7
3
2
Fig. 1: Operation and Indication Elements
1. Handpiece
2. colour point – switch position indicators
3. removable holder
4. securing screw for arresting the switch while OFF
5. switch – marked in ON position
6. cable (equipped with a connector in detachable versions)
7. barrel (battery case)
8. overpressure valve
9. charging terminal (+) red
10. charging terminal (-) black
11. LED indicator of reverse polarity of charger und display with indication (decimal)
points
WARNING: The watertight cable grommets, which feed the cable through the barrel
and handpiece lids, may not be dismantled by the user. The same applies to the
charging terminals, and reflector and display windows. Any unauthorised attempt to
break or disassemble the lamp may lead to serious damage and make the warranty
null and void.
On a special request, the underwater lamp, may be equipped with a waterproof,
separable cable connector on the barrel side. This may be useful, for example, while
travelling by plane where you are required to disconnect the handpiece from the
barrel to prevent unintentional switch-on of the lamp for safety reasons However,
there is no universal safety standard, the requirements may vary from airport to
airport.
If your lamp is equipped with the separable connector, make sure that the rubber
ring inside the connector keeps clean and the contacts remain dry and unpolluted.
Protect the connector from mechanical damage to avoid loss of its watertight
properties. NOTE: The separable connector serves only to transport disconnecting
for additional safety. The inseparable lamp version is also CE approved for safety.
4
Putting in Operation
Having unpacked the lamp from shipping package (a new delivery of after any
transport), check the lamp for visible damage (e.g. damaged or ripped-out cable,
loose cable grommets, caved-in barrel or handpiece bodies, cracks on the glass
windows, broken HID tube). Make sure that the switch is in the OFF position.
Perform this check after every transport.
In order that the intelligent controller can update information on the battery capacity
and status and the battery can be formatted, the lamp must pass a complete
discharge-charge-discharge-charge cycle as described below.
The first cycle takes place during production. If you do not use the lamp for a rather
long time, the capacity information may get lost. In that case, the time is blinking on
the display to indicate that the given value is inaccurate. To restore the data,
perform the cycle once more. Or, if you do not use the lamp for a rather long time,
the lamp may refuse to come on and display data – in that case perform the cycle
described below again (skipping the first discharging step).
To perform the discharge-charge-discharge-charge cycle, you need a bucket or
another suitable vessel filled with cold water.
First, discharge the battery (reach the minimum battery voltage). Put the lamp in
the vessel with water so that the barrel is standing vertically, partially immersed (the
water level being approx. 18 cm/7 in), with the display visible and the charging
terminals including their interiors above the water and dry. The handpiece should lie
in water horizontally, the switch must be accessible and the reflector window may
not be close to the vessel wall.
Turn ON the lamp (refer to the Lighting chapter). Depending on the battery status,
the lamp display may indicate the remaining lighting time, or show blinking data
(when the time information is unavailable), or even nothing (when battery is totally
discharged). Keep the lamp shining until it goes off or the display shows LP (Low
Power) or nP (No Power, empty battery). Then switch the lamp OFF.
Following that, the lamp must be fully charged. This provides information on the
battery capacity in the processor. Keep the lamp in the water vessel, making sure
that the terminals are dry. Follow the instructions in the Charging chapter.
When the battery gets charged and the display indicates rd (Ready), disconnect the
charging cable from the terminals and restart the lamp (refer to the Lighting
chapter). The lamp should start shining within 30 seconds. In the case of error, the
lamp displays an error indication or, if the battery is defective, the display remains
blank. In that case please contact the authorised service centre.
When switched ON and in operation, the lamp displays the remaining lighting
time. If the time value is blinking or “00” is displayed (time info invalid or unreliable),
repeat the preceding steps: get the lamp discharged and re-charge it until the
display indicates valid (non-blinking) time information when you turn the lamp ON
5
again. If, after three cycles, the value is still invalid, or the display indicates an error,
please contact the service centre.
Having performed the check, turn the lamp OFF and secure it against unintentional
activation using an arresting screw. The lamp is ready to use now.
Charging
The lamp can be charged in any state of the battery. An intelligent microcontroller
watches the charging process and estimates the remaining time to the fully charged
status.
During charging, the accumulators heat up and so the lamp must be cooled. If not,
the charging process may take considerably more time since charging is suspended
automatically whenever the battery pack gets overheated and shall not be restored
until the temperature drops to the acceptable limit. Overheating reduces the service
life of the battery pack.
When the battery pack temperature exceeds 54°C during charging, the controller
detects the temperature rise and suspends charging. When the temperature drops
below 40°, the charging process is restored automatically. This is indicated by a
blinking battery temperature value and the “°C” symbol on the display.
For this reason, the lamp must not be charged on direct sunlight in summer or near
a heat source. It is strongly recommended to dip the barrel partially into a
vessel with cold water (18cm / 4in deep), or, if no such vessel is available, to wrap
the barrel into a piece of cloth, keeping it wet and ensuring a sufficient air flow.
Before charging, rinse the lamp, especially the charging terminals, with fresh water
and then blow out all water from inside the terminals using pressure air, e.g., and
wipe the terminals and their vicinity with a piece of clean dry cloth.
To charge the lamp use the charger included in the delivery only. Connect the
charger to the mains by a power cord according to the local standard. The charger
unit is “world-compatible”, i.e. it can be connected to common AC mains voltage of
90 to 260V/ 50 – 60 Hz.
Connect the charging cable to the inox charging terminals on the barrel. Push the
red-marked “banana” plug into the red-marked (positive) terminal and the black one
into the unmarked (negative) terminal. The red banana plug may be equipped with
an isolating cover, protecting the contacts from short-circuiting. Before connecting
6
the banana plug, press the plug button to make the isolating cover slip into the body.
If the power cables get swapped, a red light goes on under the display. The
display shows nothing and no charging takes place.
If the charger is connected correctly, the display shows a numerical value for a short
time – the microprocessor software version. Then, the ch (Charging) symbol is
displayed for about 4 s. From now on, the display shows the expected charging time
(in hours and minutes, or in minutes only).
There are two indication dots (decimal points) under the digits, indicating the battery
charging status. Each point belongs to one of the two battery packs (the
TECHNICAL version has just one point since one battery pack is available only).
Charging statuses:
Point is shining:
Point is blinking:
Point is not shining:
The battery is being charged in the fast charging mode.
The battery has been charged successfully but low current
is still fed for maximum charge.
The battery has been fully charged.
The fast charging mode is programmed as recommended by the battery
manufacturer. The battery voltage, battery temperature (for each battery separately)
and ambient temperature are checked while charging. This helps calculate the
amount of power “poured” into the batteries and the temperature rise in time, the
latter being one of the fast charging terminating conditions. If it is impossible to
estimate the remaining charging time reliably (e.g. before completing the initial
cycle, or after a long storage, or in the case of a cell damage), the display presents
blinking information and the decimal points indicate the number of active batteries
(one or two). To set the parameters properly, it is necessary to perform one or more
complete discharge-charge cycles until valid (non-blinking) information gets
displayed.
If, upon the charging start, the initial battery temperature is too high (over 40°C),
the display shows the temperature value and the °C symbol alternatively. The
battery must be cooled to a temperature lower than 40°C (dip the battery into a cold
water vessel), and only after that, the charging may start.
Once the fully charged status is reached, the display indicates rd (Ready). The
lamp is considered fully charged for approximately 48 hours. After that time, some
self-discharging of the accumulators may take place.
It is allowed to terminate charging whenever the fully charged state is reached or
any time before. If the battery is not fully charged, the lighting time is reduced
accordingly. Avoid unnecessary short charge-discharge cycles to save the battery
life.
Even the best-quality batteries do age and their capacity slowly decreases. For this
reason, the estimated available lighting and charging time values vary. You are
recommended to replace the batteries whenever the capacity decreases to
approximately one half of the initial value – contact an authorised service centre.
7
Charging Error Messages
Any of the following error messages may appear on the display:
E0...short-circuit of both battery temperature sensors
E1...temperature sensor short-circuit during charging
E2...battery has reached higher voltage than allowed
E3...a higher charge has been fed than allowed
E4...maximum charging time (26h) has been exceeded
E5...battery starting voltage has not been reached
Should any of the above mentioned messages appear repeatedly, please contact
an authorised service centre.
The battery canister is protected against overpressure by a safety valve. During fast
charging, the cells may produce some gas which causes a overpressure inside the
canister. The safety valve opens in that case and the inside pressure becomes
almost equal to outside pressure.
It is then very important that the safety valve fits back into its original seat. Please
check by slightly pressing by a finger that the valve is seated. If the valve protrudes
more than 1mm above the lid level and is „soft“ by internal pressure, it is
recommended to de-pressurize the canister. More about de-pressurizing is in next
chapter.
De-pressurizing the canister
Note:
This chapter applies only to the lamps equipped with a safety overpressure valve
with a de-pressurizing head in its top. If your lamp does not contain the depressurizing valve top, the de-pressurizing is not user available. DO NOT try to pull
out the valve from its seat by any tool, risk of dirt or moisture intrusion into the valve
or canister exists! Following that, the lamp may be seriously damaged by water
leakage. After each charging, check the valve by slightly pressing by a finger to its
top. The valve may protrude slightly (less than 1 mm) from the canister lid thanks to
the remaining tank pressure and by pressing the valve back you ensure that it is
perfectly watertight. If the valve top is pushed out slightly again, let it so.
During battery charging, the gases may be generated from the cells. The more gas
is generated, the greater the internal pressure is and the valve protrudes from its
seat until it reaches the level when the gas may get away from the canister. If the
valve protrudes more than 1mm above the lid level, de-pressurizing may be done, to
ensure an extra safety of the canister.
8
Fig. 2: De-pressurizing the canister
Prior de-pressurizing the canister, the valve must be prefectly clean and dry. This
can be achieved by washing the valve by fresh water and then blowing medium
pressure air onto the lid or drying it by a lint free towel. During that, do not pull the
valve top.
After drying the valve perfectly, pull the de-pressurizing valve head by two nails
slightly out from the lid until the gas goes out from the canister. Then let the valve sit
back to its original seat. Check its position by slight pressing of the finger.
NEVER operate the valve underwater, or if the valve is wet!
Lighting
The lamp may be turned ON in any state of the battery, with the exception of a total
battery discharge or failure. To turn the lamp ON/OFF, rotate the knurled knob
(switch) on the handpiece by a half-turn in any direction. The ON and OFF
positions are arrested by clicking of a spring ball into a dent.
To turn the lamp ON: Turn the switch in such a manner that the colour point on the
handpiece faces the colour hole on the switch (the position is arrested).
To turn the lamp OFF: Turn the switch by 180° against the ON position. The safety
arresting screw should lie against the colour point on the handpiece (the position is
arrested).
9
Upon the lamp start, the display indicates the remaining lighting time and then,
shortly, the ON information. Then the HID tube starts (arc ignition) and the display
shows the remaining lighting time (if available).
To know the lighting time with the lamp OFF, just turn the lamp ON and immediately
OFF. The requested time gets displayed for approximately 4s but the HID tube does
not start. This saves the tube service life, which depends, among others, on the
count of “ignitions”.
Be sure to cool the lamp handpiece while shining permanently (dip it into water).
The lamp heats up by lighting and insufficient cooling may lead to loss of
waterproofness or mechanical damage due to excessive temperature.
It is difficult to light the discharge tube when hot. The tube heats by lighting and may
start blinking upon repeated lamp switch ON and OFF. If the HID tube fails to start
within several seconds, the display indicates shortly Eb (Error-bulb). A delay follows
to cool the tube (15s) and then the tube is restarted.
If five unsuccessful tube-starting attempts have been made, the display starts
blinking Eb (Error-bulb) and the start is terminated. The lamp must be switched OFF
and, after some time, may be switched ON and the tube may be restarted.
The count of successful and unsuccessful tube starts, together with other operation
data, is stored in the processor non-volatile memory and may be downloaded from
the lamp for maintenance purposes.
During lighting, the display continuously indicates the remaining lighting time,
together with the decimal points indicating the active status of the battery pack(s).
The remaining time is estimated on the basis of information on charged energy in
the batteries, measured current from the batteries, time, temperature and battery
voltage. The estimation algorithm is well proven and verified yet should be used for
information only.
If the lamp is equipped with two battery packs, each of them contributes equally to
the total drawn current. This helps preserve the battery life and adds some
reliability. If one cell fails suddenly (disconnects or shorts), the other battery
immediately resumes the lamp supply. Any cell failure affects the remaining lighting
time of course. This is indicated by one decimal point blinking and the Er (Error)
symbol gets displayed.
Whenever the battery voltage approaches the minimum value, the display indicates
LP (Low Power), the tube power goes down periodically and the light intensity
decreases. When the estimated lighting time elapses and the battery voltage is still
sufficient, the display shows 00 (remaining minutes) until the battery gets
discharged. Again, the battery capacity information is adjusted accordingly.
When the battery gets fully discharged (reaches the minimum voltage), the
display indicates nP (No Power) and the tube switches off.
If the lamp is equipped with a separable connector, then make sure that the
connector is tightened properly before diving.
10
If, during lighting, voltage is applied to the charging terminals (for testing purposes,
e.g.), the lamp goes off.
Security Precautions
!
Always cool the lamp handpiece while shining permanently (dip
it in water). The lamp heats up by lighting and insufficient cooling
may lead to loss of waterproofness or mechanical damage due to
excessive temperature.
Never shine the lamp into faces to avoid eye damage or injury.
Keep the lamp out of reach of children and away from inflammable substances.
Appropriate qualification is required for scuba diving.
Use the arresting screw to secure the OFF position of the switch during transport.
Maintenance, Storage, Transport
Avoid exposure to excessive temperatures and long-time direct sunlight. While
storing, handling and transporting, protect the lamp against contact with hard or
sharp objects, shocks, impacts, vibrations, solvents or aggressive substances.
Rinse the lamp with fresh water or immerse it in a vessel with fresh water after
diving to clear the belts and slots from impurities. Then wipe the lamp dry. Make
sure that the lamp is undamaged and off.
While storing, secure the lamp in such a manner that its components cannot hit
each other and the lamp cannot turn ON spontaneously. Observe the storing
temperature range.
11
Never carry and hang the lamp by the cable and do not stress the cable by
excessive pulling or bending (bend radius of at least 5cm). It may lead to damage or
rip-out from the grommet.
During operation, both parts of the lamp may heat up. Do not leave the lamp
thermally insulated during operation, e.g. packed in clothes. Secure the lamp
against spontaneous activation using a safety arresting screw.
Observe the applicable transport safety rules and the carrier’s instructions. Apply
for transport permission before any aeroplane transport. Keep this Manual at your
disposal for security inspection if any. With some airlines, underwater lamps may be
carried with their previous consent and in the cabin luggage only.
NOTE: When transporting the lamp without original carrying case, be careful to pack
it into your luggage so that the cable will not bend sharply, even if the luggage falls
to floor or during rough manipulation. Minimum bending radius of the cable is
5cm.The strain relief tube may not be bent.
Failures, Warranty and Repairs
It is practically impossible to perform any major repair or dismantling outside an
authorised service centre. But we believe that the lamp reliability is so high that no
repairs will be necessary during your events.
The manufacturer provides a 24-month warranty effective from the first
purchase date applied to the product except for the discharge tube and
batteries, for which the warranty time is 6 months after the purchase date.
WARNING: In case a part of the lamp drops on a hard surface, mechanical damage
may occur. The glass parts and the switch are extremely sensitive to shocks. Any
12
mechanical damage caused by mishandling or any attempt to open the lamp without
the aid of an authorised service centre makes the warranty null and void. Repairs
can be made by an authorised servicing centre or the manufacturer only.
Warranty Terms and Conditions
Risks of mechanical problems, or lamp damage
Cable damage
Turn off, carry out of water and perfectly dry the lamp. The lamp cannot be flooded
under normal conditions. Flooding, if any, must be a result of mechanical damage
and most probably means damage to the flooded interior through electrolysis.
As the lamp is user inaccessible, never try to disassemble it. Turn the lamp off,
pull it out of water, place in a safe and tight vessel and store on a safe place until
the reaction is completed. Warning – the lamp may break open due to overpressure
while flooding. Deliver the lamp to an authorised service centre as soon as possible.
Problems during lighting
The display is blinking, showing the remaining time:
It happens after extended period of non-using the lamp (more than a few months).
The display blinks to note that thanks to self-discharging and ageing of the
accumulators, the remaining lighting time cannot be estimated correctly. To fix it,
perform one cycle of discharging and charging as described in the Putting into
Operation chapter.
The display is dark, the lamp will not start lighting:
Probably the accumulators deep discharged or damaged. Try to charge the lamp. (it
may take several hours to re-charge)
Lamp does not switch on / Display indicates a tube error
This is probably due to a failure of the discharge tube, which is the most sensitive
component of the lamp. It may be replaced in an authorised service centre only.
Short lighting time / Battery failure / Low voltage indication
13
Charge the battery, maintaining the procedure and conditions specified in the
Charging section, or perform the complete initialising cycle. If the situation does not
improve, there is probably a battery failure. When the lamp is equipped with two
battery packs (SPELEO version), the operation can continue with one battery but for
a reduced lighting time.
Technical Specifications
COLOUR TEMPERATURE 6000K
DIMENSIONS
Canystr
Handpiece
Ø80 x 208mm
Ø68 x 124mm
VOLUME
total
1,58dm3
ENVIRONMENT
Operating temperature -5 to +30°C
Storage temperature
-10 to +40°C
IMMERSION DEPTH
water
MASS
SPELEO version
TECHNICAL version
3,19kg (1,66kg in water)
2,6kg
LUMINOUSE FLUX
1,450lm
IMMUNITY AGAINST SHOCK AND VIBRATION
(50Hz) [ms-2]
98,1 (10g)
max. 150m
max. 15 bar
OVERPRESSURE
Tested for 160m water column pressure
ELECTRICAL SAFETY
Lamp
SELV according to
IEC60950 UL1950
Charger
Charger
Disposal, Environmental Care
The lamp contains NiMH batteries and some hazardous matter (lead)
pursuant to the EP 2002/95 directive and subsequent regulations. After
its service end, dispose of the lamp in conformity with the applicable
regulations by returning the same to the manufacturer or an authorised
14
centre. Do not throw it into household waste containers. The manufacturer
participates in the REMA national recycling system.
Authorised Service Centre
RYSTON Electronics s.r.o.
Pod Vinicí 2045/18
CZ-143 00 Praha 4 - Modřany
Production Dept.:
tel.: +420 225 272 260 (263) fax: +420 225 272 261
e-mail: [email protected]
15
Declaration of Conformity
07
issued by
Manufacturer:
Ryston Electronics s.r.o.
Pod Vinicí 2045/18, CZ-143 00 Praha 4 – Modřany
Reg. No.: 45312834
For product:
Diving lamp
Type: DS-PRO SPELEO / DS-PRO TECHNICAL
The above mentioned product
meets
the requirements stated in the following Council Directives:
-
73/23/EEC (for electrical equipment designed for use within certain voltage limits);
2004/108/ES (concerning the electromagnetic compatibility requirements);
complies
with the provisions of the following European harmonized standards:
-
EN 55022:1998 + A1:2001 + A2:2003 + Cor.: 2005-3 + Cor.: 2005-09, class B;
EN 55024:1998 + A1:2001 + A2:2003;
EN 60950-1: 2001;
EN 61000-3-2 ed. 2:2000, A2:2004;
EN 61000-3-3:1995, Cor. 1:1997, Z1:2002;
At Prague, on December 4, 2007
16