1
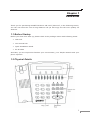
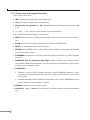
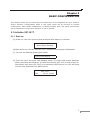
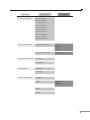
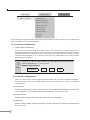
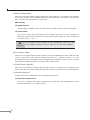
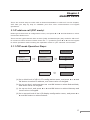
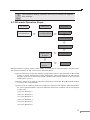
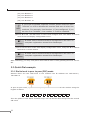
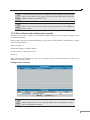
Trademarks
Copyright © PLANET Technology Corp. 2003.
Contents subject to revise without prior notice.
PLANET is a registered trademark of PLANET Technology Corp. All other trademarks belong to their respective owners.
FCC Warning
This equipment has been tested and found to comply with the limits for a
Class A digital device, pursuant to Part 15 of the FCC Rules. These limits are
designed to provide reasonable protection against harmful interference when
the equipment is operated in a commercial environment. This equipment
generates, uses, and can radiate radio frequency energy and, if not installed
and used in accordance with the Instruction manual, may cause harmful interference to radio communications. Operation of this equipment in a residential
area is likely to cause harmful interference in which case the You will be required to correct the interference at his own expense.
CE Mark Warning
This is a Class B product. In a domestic environment, this product may cause
radio interference, in which case the You may be required to take adequate
measures.
Revision
PLANET IP Phone VIP-101T
QUICK INSTALLATION GUIDE
For model: VIP-101T
Part No.: EMQ-VIP101TV1
Table of Contents
Chapter 1 Overview
1.1 Before Startup
1.2 Physical Details
1
1
1
1.2.1 Front view and keypad function
2
1.2.2 Rear view
3
Chapter 2 Basic Configuration
5
2.1 Initialize VIP-101T
5
2.1.1 Start up
5
2.1.2 LCD configuration
6
2.1.2.1 System Configuration
(i) Connect Configuration
8
8
(ii) User Line Number
11
(iii) Firmware Update
12
(iv) Hardware Test
12
(v) Reboot
12
Chapter 3 Making Calls
3.1 IP address call (P2P mode)
3.1.1 P2P mode Operation Steps
13
13
13
3.2 GK mode Operation Steps
15
3.3 Quick Dial example
16
3.3.1 Dial to local in peer to peer (P2P) mode
16
3.3.2 Phone Book web configuration sample
17
Chapter 4 Quick Reference in CD-ROM Guide
19
Chapter 1
OVERVIEW
Thank you for purchasing PLANET IP Phone VIP-101T (VIP-101T, in the following terms).
You can now ease the cost of long distance call yet still enjoy the toll voice quality via
Internet.
1.1 Before Startup
Before your first time start up, please check if the package comes with following items:
•
VIP-101T
•
Your manual CD
•
Quick Installation Guide
•
RJ-45 cable
And later, you are required to familiar your environment, your TCP/IP network and your
phone systems.
1.2 Physical Details
1
1.2.1 Front view and keypad function:
● C: Cancel and Clear
● áâ : Move to left /previous and right/next.
● OK: Press OK to confirm the modification.
● Direct Line (DL) Button 1 – 10: Speed dialing according to phone book data
1-10.
● “+” and “- ” key: Adjust voice volume in communication.
●
X : Speaking without picking up handset.
● MUTE: Mute the voice of MIC and let others can’t hear from You in communication.
● PSTN: Press PSTN to switch between IP Phone and PSTN calls
● HOLD: To hold a call with H.450 function.
● SPEED: Press SPEED and number (Phone book index) to do speed dial according to phone book data.
● FORWARD: Forward an incoming call to another IP device by H.450 forward
function.
● MESSAGE and its indicated LED light: When missing the incoming calls,
the message LED will be flashing. You can know the information of miss call by
pressing the message button.
● TRANSFER:
1. Transfer a call by H.450 transfer function. Press TRANSFER button in communication and press phone No. which You want to transferred to can transfer this call .
2. Change characters to be capital or lowercase: when press TRANSFER before
press letters can switch type of letters.
● REDIAL: Redial the last outgoing call.
● Number 1 –10, * and #: The function is as the same as the general phone
set.
2
● Corresponding list of keypad and symbol:
1
“Space” ; “,” ; “.” ; “!” ; “1”
2
“A” ; “ B” ; “C” ; “2”
3
“D” ; “E” ; “F” ; “3”
4
“G” ; “H” ; “I” ; “4”
5
“J” ; “K” ; “L” ; “5”
6
“M” ; “N” ; “O” ; “6”
7
“P” ; “Q” ; “R” ; “S” ; “7”
8
“T” ; “U” ; “V” ; “8”
9
“W” ; “X” ; “Y” ; “Z” ; “9”
Ü
“-“ ; “?” ; “*”
0
“0”
#
“_” ; “@” ; “#”
1.2.2 Rear view
9V DC
9V DC Power input outlet
LAN
RJ-45 connector, connected directly to Switch/
Hub through straight CAT-5 cable.
PC
RJ-45 connector, connected directly to the PC
through straight CAT-5 cable
PSTN
RJ-11 connector, connected directly to the
PSTN analog line.
LED Display
Two LED indicated lights; LNK/ACT and 100 for
LAN port and PC port. When network status is
in normal, LED of LNK/ACT will be flashing;
when transmit rate is in 10 Mbps/100Mbps,
LED of 100 will light off/on.
3
4
Chapter 2
BASIC CONFIGURATION
This chapter shows you the starting point of VIP-101T to be integrated into your network
and/or Internet. Configuration steps in this quick guide will be focused on keypad
configuration. More detail configuration, including keypad, web, and telnet instructions
will be illustrated in respective chapters in user’s manual.
2.1 Initialize VIP-101T
2.1.1 Start up
(a) Power on, the LCD screen shows as below after about 15 seconds.
VIP-101T
Board Start Booting
(b)Wait about one minute until VIP-101T finishes boot program initialization.
(c) You can see flashing greeting as below:
System Initializing………..
(d) Then VIP-101T will come into standby mode: The main LCD screen would be
shown as similar as following. The P2P word means VIP-101T is now in Peer-toPeer Mode, and when VIP-101T is connected to SNTP server, on LCD will show
current time obtained from SNTP server.
VIP-101T
P2P
10:10:10 AM
5
2.1.2 LCD configuration
Most functions may be directly configured via keypad operations in VIP-101T.
VIP-101T LCD menu levels can be viewed below:
1st Level
1. System Configuration
2nd Level
1. Connect Configurations
3rd Level
1. IP Address
2. Subnet Mask
3. Gateway
4.Primary DNS
5.Secondary DNS
6. Gatekeeper
7. Second Gatekeeper
8. SNTP Configuration
9. Connection Mode
10. DHCP mode
11. Token Password
12. Management Center
13. GRQ Option
14. Gatekeeper ID
2. User Line Name
3. Firmware Update
1.Download Method
2.Set File Server IP
3.Set TFP User Account
4.Indicate File Name
5.Start Download
6.Firmware Version
4. Hardware Test
5. PPPoE configuration
1.PPPoE Mode
2.Username
And
Pass-
word
3.Retry When Disconnect
4.PPPoE Operation
6. Reboot
6
1st Level
2. User Line Number
2nd Level
3rd Level
01.Line Number 1
02.Line Number 2
03.Line Number 3
04.Line Number 4
05.Line Number 5
06.Line Number 6
07.Line Number 7
08.Line Number 8
09.Line Number 9
10.Line Number 10
3. Ring Configuration
1.Ring Style Selection
i.Low
ii.Middle
iii.High
2.Ring Volume Control
4. Indicate Forward Type
Ring Volume: 10 to 63
1.Activate
2.Deactivat
5. Message Box
1.New Call
2.History
6. Phone Address Book
1.Display
2.Add
u NAME:
u NUM:
3.Edit
4.Delete
7
1st Level
7. PPPoE information
2nd Level
3rd Level
1.PPPoE Status
2.Note Information
3.PPPoE IP Address
4.Destination Host
5.DNS Primary
6.Subnet Mask
7.Authentication
8.Protocol
9.Device
In this session, we will introduce the main configuration of VIP-101T for you to quickly and
easily establish voice communication.
2.1.2.1 System Configuration
• Please Enter Password:
You’ll see this prompt each time when you try to configure or modify system configuration parameters in VIP-101T. It is required to key in password to enter machine
configuration menu, parameters under this menu are important ones, please consult
network administrator or your ISP to ensure all the parameters are correct before
proceeding any further.
Press ç or è to enter System Configuration menu and input
G
Hint
default password “x” via keypad.
Keypad Operations:
TRANSFER
9
9
OK
(i) Connect Configuration
There are sub-menus under Connect Configuration. If you have obtained configuration information from your ITSP, please insert the parameter in order to complete
configuration.
(1)IP address
In this configuration mode, please press the prepared IP Address on the VIP101T keypad, the IP address format should be: xxx.xxx.xxx.xxx.
(2)Subnet Mask:
Please insert proper subnet mask parameter via keypad.
(3)Gateway
Please insert proper default gateway IP that meets the network environment
on your side.
8
G
Hint
G
Hint
When key in IP address/Subnet Mask/Gateway values,
please add 0 before IP address (ex.192.168.0.1 please key in
192.168.000.001) for machine operation.
There are sub menus in Connect Configuration. You are required to set up item 1 ~ 3 of Connect Configuration menu for
basic IP address allocation
Incorrect IP address, Mask, and Gateway will make VIP-
M
101T unable to perform network functionalities. Please
make sure TCP/IP settings in machine are correctly in-
Caution
serted.
(4)Primary DNS
Please insert DNS IP address in this option; in most circumstances, the DNS server
IP address can be obtained from ISP.
(5)Secondary DNS
Please insert backup DNS server IP address here. If the primary DNS server failed,
domain name resolution in VIP-101T will not be affected.
G
Hint
DNS is a MUST-HAVE parameter for domain name calls in
Peer-to-Peer mode. If your machine is operating in GK mode,
in most cases, the DNS server can be omitted.
(6)GateKeeper
If machine is running in GK mode, you’ll need to configure at least one GateKeeper
server IP Address and set this IP Address via VIP-101T keypad. (In most circumstances, GK IP address)
(7)Second GateKeeper
VIP-101T provides alternative GateKeeper feature, if VIP-101T can’t register to Main
GateKeeper for 10 times, it will try to register to the Second GateKeeper. When
main GateKeeper can’t work normally, VIP-101T can still keep working with Second
GateKeeper
G
Hint
If you cannot ensure the GK related parameters, please consult your ITSP for proper GK information.
9
(8)SNTP Configuration
VIP-101T supports SNTP (Simple Network Time Protocol) for proper time display.
You‘ll need to offer one available SNTP server IP Address, so that VIP-101T will display correct time information on your side.
SNTP Mode:
(a) SNTP Server:
Please specify a SNTP server for VIP-101T to obtain current time information.
(b) Time Zone:
You can set time zone according to the location VIP-101T is. For example, in
Taiwan the time zone should be set as 8,which means GMT+8, in the meantime,
you may press “*” as “-“.
M
Caution
If the SNTP server option is not configured, VIP-101T will
only display system up time, and no current time display.
(9)Connection Mode
There are two types that are Peer-to-Peer (P2P) and Gatekeeper (GK) mode for VIP101T to connect to other devices. Please move the “~” symbol by press c or e on
the keypad to select operation mode meeting the operation mode on your network
environment. Machine default running mode is P2P mode.
(10)DHCP Mode (ON/Off)
VIP-101T can operate in DHCP client mode. If there is a DHCP in the same IP segment; VIP-101T can obtain TCP/IP parameters from the DHCP server automatically.
(11)Token Password
Usage of the token password can be illustrated as below:
(a) LCD menu password:
You may configure the logon password for entering LCD configuration menu.
Default password is “x” (lower case).
10
(b) H.235 security:
Token password also can be used to setup RRQ/ARQ authentication token password in Gatekeeper operation environment. If VIP-101T wants to register to a
GateKeeper, which demands for H.235 security token feature, please configure
token password here. In most cases, you may get the password from GateKeeper
administrator. If GK demands for H.235 authentication, VIP-101T can’t work normally with this GateKeeper unless Token Password is set.
(12)Management Center
This option is reserved for support service, please leave this in default configuration
(255.255.255.255).
(13)GRQ Option
In GK operation environment, VIP-101T can find the GK via auto discovery function.
If this function is enabled and IP address of GateKeeper is set as 255.255.255.255,
VIP-101T will multicast to search the GateKeeper on network with configured GateKeeper ID (please refer to (14) Gatekeeper ID); if IP address of GateKeeper is set,
before VIP-101T register to the assigned GateKeeper, it will send out GRQ (GateKeeper Request) message with configured GateKeeper name to GateKeeper first.
(14)GateKeeper ID
GateKeeper ID (name) is required for GateKeeper auto discovery function. When
VIP-101T sending out GateKeeper discovery message, it will search GateKeeper with
this configured GK ID, and register with User Line Name, and number.
G
Hint
In GK operation environment, you’ll need to configure one ID
to complete the registration toward the GateKeeper.
(ii) User Line Number
While machine is operating in GK mode, you’ll need to configure at least one
number for the VIP-101T to register to the GateKeeper. Up to 10 different
numbers can be setup in VIP-101T.
(1)Line Number 1
(2)Line Number 2
(3)Line Number 3
(4)Line Number 4
(5)Line Number 5
(6)Line Number 6
(7)Line Number 7
(8)Line Number 8
(9)Line Number 9
(10) Line Number 10
11
If you’d like to disable a specific number, please insert six zero
G
Hint
“000000” on LCD to disable this number and rest of other line
numbers. For example: Line Number 1-5 are configured, if
you set Line 3 as “000000”, Line number 3-5 will be disabled.
Or you may logon VIP-101T via web interface, and delete the
unwanted items in Phone Book configuration menu.
(iii) Firmware Update
Download method
There are two methods to download new firmware (rom) file, please move the “~”
symbol by press ç or è on the keypad to select TFTP or FTP method, then press
OK to confirm it.
(a) Set FTP Server IP
When proceeding firmware upgrade, you may choose to offer either TFTP or FTP
server IP Address to complete firmware upgrade. Please insert IP address of TFTP/
FTP server, which has proper firmware file.
Set FTP user account
If FTP method is chosen, please key in the username and password for FTP server
access.
Indicate file name
In either TFTP or FTP firmware upgrade mode, you’ll need to assign the firmware file
name in TFTP or FTP server via keypad.
Start Download
Press OK to start download new firmware file in TFTP/FTP server. After firmware
upgrade completed, VIP-101T will reboot automatically.
Firmware Version
Display VIP-101T firmware and hardware related information.
(iv) Hardware Test
VIP-101T integrates self-test functionality to ensure machine proper operation.
Please follow the messages on LCD panel to complete the self-diagnostics.
(v) Reboot
If modification is made to VIP-101T, please confirm all the parameters are properly
configured, and use this Reboot option to make the changes effective.
M
Caution
12
It is required and important for you to reboot VIP-101T to
make the changed parameters effective.
Chapter 3
MAKING CALLS
There are several ways to make calls to desired destination in VIP-101T. In this chapter,
we’ll lead you step by step to establish your first voice communication via keypad
operations.
3.1 IP address call (P2P mode):
Please go to third level of configuration menu, and press ç or è and OK button to select
Connection Mode menu.
There are two types that are Peer-to-Peer (P2P) and Gatekeeper (GK) mode for VIP-101T
to connect to other devices. Please move the “~” symbol by press ç or è on the keypad
to select operation mode meeting the operation mode on your network environment.
3.1.1 P2P mode Operation Steps:
1st Level
1.System
Configuration
2nd Level
ð
1.Connect
Configuration
3rd Level
ð
1. IP Address
ò
2. Subnet Mask
ò
5. Reboot
ï
3. Gateway
(a) Go to third level of VIP-101T’s configuration menu, and press ç or è and
OK button to select IP address, and insert value via keypad.
(b) Go up one level, and press ç or è and OK button to select Subnet Mask,
and insert value via keypad.
(c) Go up one level, and press ç or è and OK button to select Gateway and
insert value via keypad.
(d) Go to second level of the LCD display configuration menu, and press ç or
è and OK button to select Reboot.
13
G
Hint
G
Hint
If P2P mode is selected, after IP address, Subnet Mask, and
Gateway configured, please go to Reboot menu to restart machine to make these settings effective. Now, you may place
calls toward other users on the network.
When key in IP address/Subnet Mask/Gateway values,
please add 0 before IP address (ex.192.168.0.1 please key in
192.168.000.001) for machine operation.
M
VIP-101T default running mode is P2P mode. If you’d like
Caution
to connect others via GK mode, the setup procedure of
VIP-101T can be referred in the next section.
After setting up networking parameters, you may directly dial the destination IP address
to establish the voice communication toward desired personnel.
Operation steps:
Pick up the telephone set or press the “Speaker” phone button, and dial the IP address
you’d like to connect to.
For example, we’d like to place a call to IP address: 192.168.0.2
1
G
Hint
9
2
*
1
6
8
*
0
*
2
#
By default configuration, symbol “#” is used to terminate the
dialed digits.
After inserting the destination IP address, you may now hear the ring back tone from
remote site, and prepare to talk.
G
Hint
If the call cannot be made, please check if all the TCP/IP parameters are correctly configured, and matched with the network environment or parameters assigned by your ISP.
For those who are making calls to PLANET VIP-x00 voice gateway,
Supposing there is an extension line 100 connected to FXO port 0 of PLANET VIP-400
(which default number is 201). And you ‘d like to connect to the extension line 101, please
dial the keypad in the following sequence:
1
9
2
*
1
6
8
*
0
*
2
*
2
0
1
#
After these numbers, you should hear the dialtone from the extension line, and you may
now dial the extension number to connect to the destination.
14
G
Hint
The realworld dialing numbers will vary to reflect the application settings.
3.2 GK-mode Operation Steps:
1st Level
1.System
Configuration
2nd Level
ð
1.Connect
Configuration
3rd Level
ð
1. IP Address
ò
2. Subnet Mask
ò
3. Gateway
2.User Line
Number
ò
2.User Line
Name
ò
ï
4. Gatekeeper
ð
5. Rebbot
Machine default running mode is P2P mode. If you’d like to connect others via GK mode,
the setup procedure of VIP-101T can be referred below:
(a)Go to third level of the LCD display configuration menu, and press ç or è and OK
button to select Gatekeeper. Insert Gatekeeper server IP Address via VIP-101T’s
keypad. (If there is second GK exists, please insert the IP address in the “Second
Gatekeeper” menu.)
(b)Press C twice to go back to LCD menu first level, and press ç or è and OK button
to select User Line Number.
(c)You’ll need to insert at least one number for VIP-101T to register with Gatekeeper
for voice communication. Up to 10 different direct line numbers can be configured
in VIP-101T.
(15) Line Number 1
(16) Line Number 2
(17) Line Number 3
(18) Line Number 4
(19) Line Number 5
(20) Line Number 6
15
(21) Line Number 7
(22) Line Number 8
(23) Line Number 9
(24) Line Number 10
G
If you’d like to disable a specific number, please insert six zero
Hint
numbers. For example: Line Number 1-5 are configured, if you
“000000” on LCD to disable this number and rest of other line
set Line 3 as “000000”, Line number 3-5 will be disabled.
(d)Press ç or è and OK button to select and configure User Line Name at second
level of the LCD display configuration menu.
M
At lease one ID name should be configured in VIP-101T to
Caution
complete registration toward the Gatekeeper.
(e)Go to second level of the LCD display configuration menu, and press ç or è and
OK button to select Reboot
M
At lease one ID name should be configured in VIP-101T to
Caution
complete registration toward the Gatekeeper.
After rebooting, you may now place calls toward other H.323 gateway/terminal via the
GK.
3.3 Quick Dial example
3.3.1 Dial to local in peer to peer (P2P) mode
Assume there are two VIP-101Ts in the network the IP address are 192.168.0.1,
192.168.0.2
In peer-to-peer mode, you can direct pickup the handset and dial the number using the
keypad as below:
1
9
2
*
1
6
8
*
0
*
2
#
Then the phone in 192.168.0.2 should rings. You can do the same thing from the second
VIP-101T.
16
G
Hint
G
Hint
If you already know the IP address of the remote side as well
as you can reach it by ping, you can direct make dial via its IP
address and end with an “#”.
You can refer to the user manual for how to setup the speed
dial. It will much more faster then pressing the IP address
one by one.
3.3.2 Phone Book web configuration sample
Assuming you’d like to place a call toward PLANET Office, the call setup example could
be as like following:
Please logon VIP-101T web configuration, and choose “Phone Book” configuration. Insert
following parameters:
Index number: 7
Destination Name: PLANET Office
Domain name: vip.planet.com.tw
E.164: 9
After clicking on “Add Entry”, you can just pick up the hand-set and dial 9 call to the
operator in PLANET office.
Configuration example
G
Hint
If called destination is a URL, to reach the destination call
party, please be sure to specify DNS server in Network Interface configuration menu.
17
18
Chapter 4
QUICK REFERENCE IN CD-ROM GUIDE
This guide is used to help you startup your VIP-101T settings. It is also recommended to
check the CD-ROM manual to check the Web and Telnet configuration chapters for more
detail introductions, and explanations of VIP-101T.
19
Part No.:EMQ_VIP101Tv1