1
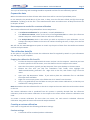
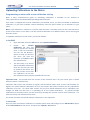
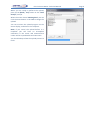
 TECHNICAL MANUAL DISTELL FISH FRESHNESS METER Model Torrymeter © DISTELL.Com, December 2010 (Version 2.8) – for use with v1 firmware Contents Introduction ....................................................................................................................................... 3 Creating Custom Calibrations .............................................................................................................. 4 Measurement methodology ....................................................................................................................................... 4 Selecting your product samples .................................................................................................................................. 4 Measurement of samples using the meter .................................................................................................................. 4 Prepare the data ......................................................................................................................................................... 5 Data components needed for a custom calibration ............................................................................................. 5 The calibration data file .............................................................................................................................................. 5 Copying the calibration file from CD .................................................................................................................... 5 Creating a custom calibration ..................................................................................................................................... 5 Product settings ................................................................................................................................................... 5 Research settings ................................................................................................................................................. 6 Uploading Calibrations to the Meter ................................................................................................... 8 Programming a meter with a new calibration setting ................................................................................................ 8 In the DMS ........................................................................................................................................................... 8 In the meter ......................................................................................................................................................... 8 Document References ...................................................................................................................... 10 Technical Specifications .................................................................................................................... 11 Sensor ....................................................................................................................................................................... 11 Display ...................................................................................................................................................................... 11 Sensor Enclosure ....................................................................................................................................................... 11 Hardware / Software ................................................................................................................................................ 11 Declaration of Conformity ................................................................................................................ 12 The Products covered by this Declaration ................................................................................................................. 12 Directives and Standards to which these Products Conform ..................................................................................... 12 Directives ........................................................................................................................................................... 12 Standards........................................................................................................................................................... 12 Trading Terms and Warranties .......................................................................................................... 13 Terms and Conditions of Order Acceptance .............................................................................................................. 13 Orders ................................................................................................................................................................ 13 Prices ................................................................................................................................................................. 13 Terms of Payment.............................................................................................................................................. 13 Terms and Conditions of Sale .................................................................................................................................... 13 Retention of Title ............................................................................................................................................... 13 Risk .................................................................................................................................................................... 13 Delivery ............................................................................................................................................................. 13 Returns .............................................................................................................................................................. 13 Liability for Loss or Damage ............................................................................................................................... 13 Terms and Conditions of After Sales Warranty .................................................................................................. 14 Contact Details ................................................................................................................................. 15 Fish Freshness Meter Technical Manual Page 3 Introduction This Technical Manual is intended to accompany the User Manual that is included with the Distell Freshness Meter. It has been written to cover some of the more advanced ways in which the Freshness Meter can be used. The information here is not expected to be of particular interest to most users, and is aimed at researchers and other technical users. There is, in addition, a large amount of information on the Distell website at http://www.distell.com. The website includes a ‘Frequently Asked Questions’ section, where we address many of the queries that have been raised in connection with the Freshness Meter. If, after reading this document and the information on the website, you have questions about or problems with the Freshness Meter then please get in touch with us. Our contact details are at the end of this manual. Fish Freshness Meter Technical Manual Page 4 Creating Custom Calibrations Note: a comprehensive guide on creating custom calibrations is available on our website at http://www.distell.com/downloads/CustomCalibrations.pdf. This online guide is written largely with the Distell Fatmeter in mind because, in general, custom calibrations are more useful to the Distell Fatmeter than the Freshness Meter. We recommend that this guide be read first and then further information can be taken from the online guide where needed. Measurement methodology Clearly define your measurement protocols It is important to clearly define your measurement methodology for the product well in advance of the actual measurements. The ‘native’ measurement scale for the Freshness Meter is the Torry Freshness Scale, which ranges from 1 (very spoiled) to around 16 (very fresh). In practice the upper limit of the scale varies from one fish species to another. You will need to first decide what scale you want your calibration to represent. For the sake of an example, this section will describe a process to build a calibration representing ‘time from death in days’. Selecting your product samples To create a calibration from scratch you will need some typical samples of product for the measurements. We recommend between 2 and 5 sample fish, and these samples should all be very fresh and they should have been killed at the same time. The process could be performed with a single sample, but different fish will have different levels of bacteria and fat content, which can impact the readings from the Freshness Meter. Using multiple fish allows these variations to be averaged such that a single generic model of the fish is represented. The sample fish should be stored on ice at around 0°C but they must not be frozen, otherwise the readings from the Freshness Meter will be unusable. Measurement of samples using the meter The procedure for collecting the data is similar to that for creating an organoleptic chart, as described in the User Manual. All samples should be measured using the Freshness Meter’s RESEARCH‐1 calibration setting, and the meter should be configured to take 3 readings per sample. The measurement process should be carried out twice each day, once in the morning and once in the evening. For our ‘time from death in days’ calibration there should be a 12‐hour gap between each set of readings. When the time comes to take readings: •
Record the desired value for the calibration at that time. For our example, this will be the time, in days, since the fish were killed, e.g. 1.5 days, 2 days, etc. Be reasonably precise at this stage; if the fish were killed 77 hours earlier then record 3.2 days rather than rounding off to the nearest half day. •
For each fish take three readings. Each reading should be taken from exactly the same position on each fish – usually a little above the lateral line at a meaty part of the shoulder. Record the individual readings, as well as the average for each fish. Then, once all the measurements are recorded, calculate the average for all the fish. Fish Freshness Meter Technical Manual Page 5 This cycle of measuring and recording should be repeated until the fish are sufficiently spoiled. Prepare the data When the measurements have all been taken then there will be a series of paired data points. In our example, the paired data is (a) the time, in days, since the fish were killed, and (b) the average RESEARCH‐1 reading on all the fish. If the measurements were carried out over 10 days then there will be 20 pairs of data. Data components needed for a custom calibration The custom calibration will be produced from three components: •
The Reference Calibration for your Meter, normally RESEARCH‐1; •
The Reference Dataset, which is the series of averaged RESEARCH‐1 values (the reference dataset comprises values taken from the reference calibration); •
The Analysis Dataset, which is the values you wish to represent in your calibration. In our example the analysis dataset is the series of numbers showing the time, in days, since the fish were killed. We will use the Data Management System to match up the pairs of data from the Reference Dataset and the Analysis Dataset. The calibration data file At this point it is a good idea to locate the calibration data file supplied by Distell on your Information CD, and copy to your computer. Copying the calibration file from CD •
Find the CD that was supplied with the meter and put it in the computer. Note that you have to use the specific CD for the meter, since the data on the CD is unique to the meter. •
Open the CD contents, typically via ‘My Computer’ from your desktop or the Start menu •
Browse the files until you find the ‘Installation Files’ folder, then highlight the ‘ReferenceCalibration_xxxxx.DCF’ file. Right click on the file, and choose ‘Copy’ from the menu •
Open your ‘My Documents’ Folder. If you wish to place the calibration file in a sub‐folder then open that sub‐folder. •
Right click on an empty space in the folder then click ‘Paste’ from the menu. •
Also, it is a good idea to use this folder to save your own custom calibrations, so that they are available for creating future work. Note: Remember that the calibration file on the CD is unique to the meter with the serial number shown on the CD. The custom calibration that is produced from this process is partially derived from the reference calibration, and so the custom calibration is also unique to the meter whose reference calibration was used. To create a custom calibration for more than one meter, use each meter's individual reference calibration along with the same reference and analysis datasets. Creating a custom calibration Each meter is shipped with the following calibration settings: Product settings •
A minimum of four standard product calibrations Fish Freshness Meter Technical Manual Page 6 Research settings •
One research calibration, known as Research‐1, and which is used for reference when creating your own custom calibrations •
Five vacant slots for installing custom calibrations. These slots are pre‐programmed with Fish‐1 to Fish‐5, but these calibrations do not contain valid data. The data that makes up these product datasets is called a calibration. The DMS provides the capability to create a new calibration, and upload the calibration into one of the five vacant slots in the research group. The process of creating a custom calibration in the DMS follows. To begin, select ‘Create Custom Calibration’ from the File menu in the DMS. This will open the 'Custom Calibration Data' window. Note: your version of the DMS may have an additional ‘Download’ button. The download function works with firmware v3 and upwards, so is not covered here. The following steps should be followed: 1.
The first stage is to locate the .DCF file containing the Reference Calibration. (For RESEARCH‐1 this file should be on the CD you received with your meter, under the file reference Calibration Module. For some older units, however, this file was not available so please get in touch with Distell to obtain it.) Click on the ‘Browse...’ button to navigate to the file then click ‘Load’ to load the reference calibration data from the file. Alternatively you can drag the file from the Windows desktop or a file explorer window and drop it on the Create Custom Calibration window. 2.
The second stage is to select the reference calibration you wish to use. The .DCF file in stage 1 may contain multiple calibrations, though only those used in the Freshness Meter’s Research menu are able to be used for this. Select the appropriate calibration from the drop‐down list and the DMS will use this file as your Reference Calibration for calculating new custom calibration. You must choose the calibration setting that was used to take the measurements; typically this will be Research‐1. 3.
Using the table, enter the values for Reference Dataset in left hand column and Analysis Dataset in right hand column, for each pair of samples. The data is checked after each entry and any errors in the data will be highlighted in different colours; the key to the colours is shown below the data table. If the data shows no errors then the DMS will now create a calibration curve based upon data values entered, and the new custom calibration will be displayed in the form of a graph. There is an option to import this data from a CSV file, which may be more convenient for large datasets. The CSV file should be formatted as two columns with no header, the first column being the Reference value and the second column being the Analysis value. Fish Freshness Meter Technical Manual 4.
The fourth stage, once the data has been entered, is to choose maximum and minimum threshold values. This allows you to limit the range of values in the calibration. Anything outside of your chosen range will appear as 'out of range' on the meter itself. The DMS will attempt to choose sensible values for these, but you can override them with your own choice if you wish. 5.
The fifth stage is to enter the name of the new calibration. This is limited to 12 letters, symbols or numbers, due to the size of the display on the meters. The meter will show the calibration name given here on the display. Page 7 Note: When measurements using this new custom calibration are downloaded to the DMS, the calibration name may show as Custom‐1, Custom‐2, etc. according to the slot number (see the next stage). This only happens with older meter software. With latest meter software the DMS will show the name you have selected for the custom calibration. 6.
Select the grouping method according to instructions available in the Help Section of the DMS. Normally you will choose ‘Separate’. If your meter is an older version, then choose ‘Combined’. This choice governs which calibration slots are available in the next stage. 7.
The seventh stage is to select the research setting, or slot, that the new calibration should use. In other words, which of Fish‐1 to Fish‐5 will be replaced by your new calibration. The documentation that you received with the meter will show you what calibrations are in which slot. Where calibrations are combined into a single list you can choose slots 5 to 9. Alternatively, where there are separate Product and Research menus available in your meter then you can choose slots 1 to 5 of the Research settings. Not all meters have all of these slots available, check the configuration of your meter to be certain. Your choice should be influenced by whether or not you have already added a custom calibration to the meter ‐ if slot 1 is in use, for example, then you should choose slot 2 or 3 unless you'd rather overwrite the calibration in slot 1. 8.
You can now save the Data in two formats: •
•
For uploading your custom calibration to the meter using the DMS, save as a Distell Calibration File (.DCF). The uploading process is discussed in the next section. For exporting to a spreadsheet or database save as a Comma Separated Value file (.CSV). In this form, the data is presented as a series of 1000 discrete data points that reflects the measurement range of the meter. The best‐fit type is usually best left at Exponential, but you can use your own judgement for what shape best represents your data. Fish Freshness Meter Technical Manual Page 8 Uploading Calibrations to the Meter Programming a meter with a new calibration setting Note: a more comprehensive guide on uploading calibrations is available on our website at http://www.distell.com/downloads/UploadingCalibrations.pdf. Your meter is shipped with several calibrations pre‐installed, but if you have purchased an additional calibration, or you have created a custom calibration, then this option allows you to upload it to your meter. Note: each calibration is unique to a specific meter because it has been tuned to the exact electronic profile of the sensor in the meter. You can upload a calibration to a different meter, but it will not give accurate results. To upload a calibration to your meter, proceed as follows: In the DMS •
Open the DMS, select the File menu, then Upload Calibrations. •
Locate the Custom Calibration file that you wish to upload. This should have a .DCF file extension. You can use the Browse... button to help you find the file. Once you have the filename, click Load to open the calibration file. •
The third step is to choose which individual calibrations from the file that you wish to upload to the meter. The file may contain more than one calibration, so only tick the calibrations that you wish uploaded at this time. Important note: You should check the version of the firmware that is on your meter (this is shown when the meter is switched on). Fatmeters with version 2.6 firmware (or higher) and Freshness meters with version 1.08 firmware (or higher) can upload multiple calibrations at once, but meters with older firmware can only upload one calibration at a time. For these older meters only the first ticked calibration will be uploaded, even though the DMS will look like it is uploading all of the ticked calibrations. To upload multiple calibrations to the older meters, you will need to go through this process once for each calibration. It is best to tick only one calibration each time. The newer firmware will upload multiple calibrations in one operation. In the meter Once you have selected the calibration to upload, switch meter ON, and go to the 'Add Product' option of the Choices Menu on the meter, and press the Y (Read / Yes) button. Fish Freshness Meter Technical Manual When you are ready to perform the upload, press the Y (Read / Yes) button at the 'Data Ready?' prompt. When the meter shows 'Waiting data' you can click the Start button in the DMS to begin the upload. You can monitor the upload progress on the meter display, and also on the computer. Note: If you cancel the upload before it is complete you will have an incomplete calibration in the meter and measurement results will be unpredictable and inaccurate. You should always allow the upload process to finish. Page 9 Fish Freshness Meter Technical Manual Page 10 Document References The following documents and papers may be of interest to anyone seeking further information on the work of assessing fish freshness. AMU L and DISNEY J G, 1973 Quality changes in West African marine fish during iced storage. Tropical Sci. 15 125‐38. BURT J R, GIBSON D M, JASON A C and SANDERS H R, 1976 Comparison of methods of freshness assessment of wet fish part 11. Instrumental and chemical assessments of boxed experimental fish. J. Fd Technol. 1 73‐89 BURT J R, GIBSON D M, JASON A C and SANDERS H R, 1976 Comparison of methods of freshness assessment of wet fish part 111. Laboratory assessment of commercial fish. J. Fd. Technol. 11 117‐28 CHEYNE A, 1975 How the GR Torrymeter aids quality control in the fishing industry. Fishing News International Dec. 1975. CONNELL J J, HOWGATE P F, MACKIE I M, SANDERS H R and SMITH G L, 1976 Comparison of methods of freshness assessment of wet fish. Part IV. Assessment of commercial fish at port markets. J. Fd. Technol. 11 297‐308 JASON A C and LEES A, 1971 Estimation of fish freshness by dielectric measurement. Department of Trade and Industry Report No. 71/7. Torry Research Station, Aberdeen JASON A C, LEES A and RICHARDS J C S, 1972 UK Pat. No. 1 262 749 JASON A C and RICHARDS J C S, 1975 The development of an electronic fish freshness meter. J. Phys. E: Sci. Instrum. 8 826‐30 SANDERS H R and SMITH G L, 1976 The construction of grading schemes based on freshness assessment of fish. J. Fd. Technol. 11 365‐78 SHEWAN J M, MACINTOSH R G, TUCKER C G and EHRENBERG A S C, 1953 The development of a numerical scoring system for the sensory assessment of the spoilage of wet white fish stored in ice. J. Sci. Fd. Agric. 4 283‐98 Fish Freshness Meter Technical Manual Page 11 Technical Specifications Sensor Type: Carbon and steel electrodes
Output current: < 1 mA
Display Type LCD, 2 lines x 16 characters
Sensor Enclosure Material ABS Plastic, waterproofed to IP 65
Size 195mm x 100mm x 40mm
Weight (including batteries)
280g
Hardware / Software Capacity Up to 48 calibrations can be stored in each meter and up to 1000 data samples can be recorded before a download is required. Software The Distell Data Management System is supplied with each meter, and is downloadable from our website. Interface Distell meters are supplied with a waterproof USB cable that can be used for periodic downloads as well as real time data capture. Batteries Powered by internal rechargeable batteries, Nickel Metal Hydride (NiMh) Charger / Power Supply
Universal charger / power supply, also acts as desktop power supply unit. Fitted with waterproof connector. Input voltage 110V – 250V AC, 50 – 60 Hz Output voltage 12 V DC, 1.2 A Fish Freshness Meter Technical Manual Page 12 Declaration of Conformity The Products covered by this Declaration The following Electrical / Electronic equipment, manufactured by Distell.com, for measurement, control and laboratory use: Fish Freshness Meter Fish Fatmeter Meat Fatmeter Moisture Meter ‐ Torrymeter ‐ FFM 692, FFM 992 ‐ MFM 1092, MFM 992 ‐ MM 692, MM 992 Directives and Standards to which these Products Conform Directives SAFETY EEC 73/23/EEC, 93/68/EEC
EMC EEC 89/336/EEC, 93/68/EEC
Standards SAFETY EEC EN 60950: 2000, as amended
EMC EEC EN61326‐1 : 2006
EN/CISPR 11: 2003 (Class B)
EEC EN/IEC61000‐3‐2: 2006
EN55011: 1998+A1: 1999+A2: 2002 (Class B)
EEC EN/IEC61000‐3‐3: 2002
EN/IEC61000‐4‐2: 1995 +A1 + A2
EEC EN/IEC61000‐4‐3: 2002 +A1
EN61000‐4‐4: 2004
EEC EN/IEC61000‐4‐5: 1995 +1
EN/IEC61000‐4‐6: 1996 +A1
EEC EN/IEC61000‐4‐11: 2004
FCC CFR47: 2005 ‐ Part 15, Sub Part B (Class B) (US Federal code of regulations), Consisting of : Clause 15.107, Clause 15.109 VCCI Agreement of VCCI: 2006.4 (Class B),In conformance with : Table 4.2, Table 4.6
ST
ST
DATE OF ISSUE: 1 December 2000, updated 1 July, 2008 YEAR CE MARKING FIRST AFFIXED: 2000 David T. Fulton, Proprietor & General Manager Distell.com, Old Levenseat, Fauldhouse, West Lothian, Scotland – UK. Fish Freshness Meter Technical Manual Page 13 Trading Terms and Warranties In line with most manufacturers, the products that we manufacture and sell are covered by a comprehensive warranty. In order that all customers are fully aware of the terms and conditions of order acceptance, terms of sale and after‐sales warranty, we have summarised below our current terms for reference. Terms and Conditions of Order Acceptance Orders An order received by Distell.com (hereinafter referred to as ‘The Company’) is deemed to be an offer to purchase by the customer, and subject to the conditions herein contained which will be deemed to be accepted by the customer upon delivery of the goods. Prices The prices quoted are subject to stock availability and whilst every endeavour will be made to supply at quoted prices, The Company reserve the right to revise prices at any time prior to delivery, upon giving notice to the customer to that effect. Terms of Payment Payment for goods is cash with order. Payment for services is due on delivery or completion of services. Any other terms of payment must be confirmed in writing from The Company prior to ordering goods and services. The Company reserves the right to charge interest on overdue accounts at the monthly rate of 5% above base rate. Terms and Conditions of Sale Retention of Title The ownership of any goods supplied by The Company shall remain vested in The Company until full payment has been received. The customer shall be entitled to resell the goods or services only as agents of The Company and shall be bound to account to The Company therefore. Risk All risks in relation to the goods will pass to the customer upon delivery to the customer or his agents. Delivery Delivery shall be deemed to be effected when the goods have been delivered to the address agreed between the customer and The Company or when collected by or on behalf of the customer. The Company will endeavour to deliver the goods without delay, but shall not be liable for late delivery howsoever caused, nor shall such failure be deemed to be in breach of any contract. If for any reason the customer refuses delivery, then without prejudice to any other rights due to The Company, The Company reserves the right to treat the order as cancelled forthwith. Returns No returns of goods or services supplied by The Company will be accepted without The Company’s prior written consent. Liability for Loss or Damage The Company does not accept liability for damage or partial loss of goods or services under the following circumstances: •
where there is a clear signed receipt of delivery to the customer. •
where the customer has signed for receipt of goods marked as unexamined. •
Fish Freshness Meter Technical Manual Page 14 where the customer fails to give notice of any damage or loss within three days of delivery. Terms and Conditions of After Sales Warranty Any warranty given is solely confined to the repair / replacement of any product supplied or manufactured by The Company, directly to the customer. All equipment supplied or manufactured by The Company is covered by a twelve month warranty covering parts and labour. The warranty commences on the date of shipment or, where delivery is by The Company’s own staff, from the date of delivery. The Company warrant that the Equipment shall be free from defects in workmanship and materials. Any equipment that is demonstrably defective on receipt by the customer must be returned within seven working days of receipt of goods to qualify for a free of charge replacement. Thereafter our sole responsibility shall be to repair or replace the defective product at our discretion, upon receipt at our premises. The faulty equipment must be received properly packaged, protected and insured from Transit Damage. The Company accepts no responsibility under the warranty for any product that has been opened, tampered with, reprogrammed, altered modified or misused in any way, and in no event shall the company be liable for incidental, consequential, indirect or special damages including, but not limited to damage arising from the loss of use of the product, system or profits, or any claim against the company by any other party. This warranty is in lieu of all other warranties, whether expressed or implied, including without limitation, implied warranties of merchantability and/or of fitness for a particular purpose. Following the expiry of the manufacturer’s warranty, we strongly advise our customers to avail themselves of our comprehensive service and maintenance contract. This contract covers your equipment and where applicable your installation, for a period of one, two or three years. Note that all labour and parts are covered by this service contract, but shipping, packaging and insurance are payable by the customer. For further details please contact our offices. In the event of a warranty claim or a service requirement please contact our Returns Department. Details of address and telephone numbers are shown at the rear of this manual. For a copy of the complete Terms and Conditions, please contact our sales office or distributor. Fish Freshness Meter Technical Manual Contact Details The DISTELL FISH FRESHNESS METER is manufactured in the UK by DISTELL.COM UNIT 5, OLD LEVENSEAT FAULDHOUSE WEST LOTHIAN EH47 9AD SCOTLAND TELEPHONE: +44 (0)1501 770124 FAX: +44 (0)1501 772424 WEBSITE : www.distell.com EMAIL: [email protected] Page 15