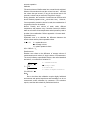
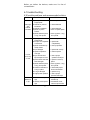
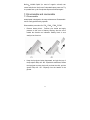
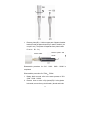
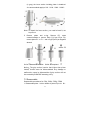
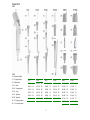
1
Operating Manual
single channel
Support
☎:4006 296 833
Contact us
About us
Electronic pipette
Silver-nano series
Evolutional pipette design, superior user-friendly product support
Content
1 Introduction
3
2 Packaging contents
3
3 Product description
4
3.1 Screen instruction
4
3.2 Button functions
4
3.3 Menu
5
4 Operation
6
4.1 Battery
6
4.2 Tip-fitting and ejection
7
4.3 Start up
8
4.3.1 Start and stand-by
8
4.3.2 System set-up
8
4.3.3 Select pipette mode
9
4.3.4 Parameter set-up
9
4.4 Nine pipette modes
10
4.4.1 PIPETTE mode
10
4.4.2 RPIPET mode
13
4.4.3 STEPPER mode
14
4.4.4 MIX mode
15
4.4.5 MANUAL mode
16
4.4.6 Four special pipette modes
17
PIPETTE+MIX
17
STEPPER+SEQ
18
ASPIRATE
21
GEL
22
4.5 PROGRAM LIST
23
Program pre-set
23
Parameter set up
25
5 CALIBRATE
26
Calibration environment and facilities
26
Calibration procedures
27
1
Configuration for calibration
6 Troubleshooting
31
6.1 Solution for trouble shooting
31
6.2 Leak test
32
7 Disassemble and reassemble
33
7.1 Disassemble
33
7.2 Reassemble
37
8 Maintenance
9
28
41
8.1 Cleaning and decontamination
41
8.2 Easy maintenance
42
8.3 Replace battery
43
8.4 Storage
43
Precautions and limitations
44
10 Warranty information
44
11 Technical data
45
Appendix 1
46
Correction factors for distiller water as a function of test
temperature and air pressure
Appendix 2
47
Accessories
2
1. Introduction
smartpipette is the newest generation of electronic pipette
utilizing air replacement concept to aspirate and dispense liquid.
smartpipette incorporates many breakthrough features such as
comfortable design suitable for griping and operating on right or
left hand, Color screen for clear visualization, frequent interval
calibration to insure the linearity and accuracy of each single
measurement, wide range of operation modes to meet the
needs of high end research purpose.
5 common modes and 4 special modes enable all kind of
operations demanded in labs. Clear and simplified interface
make it a user friendly instrument.
Channel
Single
Product
code
Model
Range
Increment
RONLABS
Tip
0.2--10μL
0.01μL
10μL
601011
S10
601021
S100
5--100μL
0.1μL
200,300μL
601031
S300
20--300μL
0.5μL
300,500μL
601041
S1200
100--1200μL
1μL
1000,1200μL
601051
S5mL
500--5000μL
5μL
5mL
601061
S10mL
1--10mL
0.01mL
10mL
2. Package contents
Parts check list:
l Electronic pipette
l
Battery block
l
Battery charger
l
Lubricate
l
USB cable
l
User manual
l
Warrantee card
Please check the package contents immediately to ensure free
of transportation damage or loss.
3
3. Product descriptions
3.1
Screen:
Battery State
Volume and units
Piston Position
Mode
Cycle Counter
Speed
▲Aspirate
▼Dispense
Menu
3.2
Keypad:
① Left
● Menu
● Confirm(OK、YES)
● EDIT
② Selection(Up or Down)
● Change Parameter
● Select Parameter
③ Right
● Speed Adjustment
● EXIT
④ Start(or PIP)
● Start
● Aspirate or dispense
⑤ Tip ejection button
Note: If Picture or operation instruction described in this manual
is different from the product, Please always refer to the product.
4
⑥ Reset
● Restart and return to mail
screen and factory setting
● Start calibration mode
⑦ USB
● Power supply
⑧ Battery Holder
● Install or replace battery
⑨ Finger rest
● Suitable for either right or
left hand operator
3.3 Menu:
Main menu
CHANGE MODE①
Menu
SET PARAMETER
PROGRAM LIST
SETTING
Submenu
PIPETTE
RPIPET
STEPPER
MIX
MANUAL
SPECIAL
P1
3rd level
Set-up level
PIPETTE+MIX
STEPPER+SEQ
ASPIRATE
GEL
②
CHANGE MODE
SET PARAMETER
SAVE
ENTER
P2
……
P3
……
P4
……
P5
……
P6
……
MAX VOL*(available on S1200 only)
COUNTER
BUZZER
BRIGHTNESS
BACKGROUND
CALIBRATE
②
①
Note:CHANGE MODE serve the same function as CHANGE MODE
5
4. Operations
4.1 Battery
Note:
① We strongly recommend you fully charge the battery before
using the pipette.
② You must only use RONLABS original battery and battery
charger. Any damage caused by using substitute accessory
will not be covered by warrantee.
③ Please charge your battery indoor.
④ Do not place the battery in contact with metal surface.
⑤ Battery disposal should be done in accordance to local
regulation. Separate such battery with your daily garbage is
highly recommended.
⑥ Never expose battery on extremely high temperature, which
may cause explosion.
Battery (specification):
Lithium-Ion Battery
Voltage:3.7V
Capacity:900mAh
Maximum charging voltage:4.2V
Charging times:2 hours will achieve a full charge [with
original charger, item number:693201]
Battery charger (specification)
Input:AC 100-240V, 50/60Hz, Max 0.15A
Output:USB 5V, 500mA
Installing/Replacing batteries
1. Press the cover of battery holder down and push toward
the direction indicated on battery holder.
2. Insert the battery block accordingly.
3. Restore the cover of battery holder.
Battery state indication on screen
Green: Full charged
Black (white background) or White (black background): Partial
charged.
Red: Low battery indication (recharge or replace battery is
recommended).
Insufficient battery indication:When power is extremely low and
insufficient to support mechanism during operation process,
main screen appears “PIP” indication.
6
Note:
Following icon and alarm will remind you to recharge or replace
battery when PIP (start) button is clicked again.
When you see the reminding message, recharge or replace
battery immediately. The power will go off in 90 seconds.
Recharging battery
Before connecting charger with power supply, make sure the
input voltage is compatible. After Connecting charger and
pipette with USB cable, insert plug into electric outlet.
Note:
1. Color of battery state indications
Blinking black (or white) state-bar indicates power is being
charged. Blinking green state-bar indicates power has been
full charged.
2. It is normal that temperature of battery will be higher when it is
being charged.
3. Excessive charge of the battery may damage the battery or
shorten the battery life.
4. Old battery may cause malfunction of the pipette. It is
recommended to replace battery block in every 2 years.
4.2 Fitting and ejecting tips
Fitting tips
Make sure you select compatible tips. The recommended fitting
method is to insert pipette perpendicularly into the tip, rotate the
tip 180 degree left and right for firm fitting.
smartpipette is basically compatible to tips of major brand.
Notice:Liquid should never enter the tip holder.
Eject the tip
smartpipette incorporate ergonomic tip ejection design. Gently
push ejection button, the tip will be ejected from the pipette.
7
4.3 Getting start
4.3.1 Turn-on and Stand-by
① Turn- On
Smartpipette is turned on automatically when the battery block is
inserted accordingly. The screen will then display “RONLABS
smartpipette”; press PIP in sequence.
After press PIP, screen will display “AUTOTEST” (piston
diagnostic is on the working). When self diagnostic is over,
screen should return to main menu or pipette mode. Example of
model S1200 is shown as follow:
Notice: If “CHECK PISTON” is displayed, the message
indicates piston is moving irregularly. Disassemble bottom
section to find out the cause of the problem. Please refer to
chapter 6 for trouble shooting and remedy.
② Stand-by
If operation is paused for more then 2 minutes, pipette enters
stand-by mode. Press PIP will resume to previous state.
Note:
1. If liquid is not dispensed during pipetting process (or the
pipetting cycle is not completed), pipette will not enter
stand-by mode.
2. If pipette will not be used for long period of time, remove
battery block to ensure battery life.
4.3.2 System set-up
Press left key to enter main menu. Press selection key to
select setting. Press OK to confirm. The parameter setting of
pipette mode can be done from sub-menu.
8
MAX VOL(Max Volume):Only available on S1200 model which
can be set to 1000μL or 1200μL , other models such as
S10,S100,S300,S5mL,S10mL are fixed value for this parameter.
COUNTER:ON or OFF to select whether counting the cycle is
required.
BUZZER:ON or OFF to select whether alarm for low battery is
required.
BRIGHTNESS:1-6 level can be set according to personal favor.
BACKGROUND: Customize background color to be black or
white (black = 1,white =2)
Set-up:
Press selection key to select setting item, then edit. When the
value is highlighted in red and blinking, press selection key will
adjust value. Then press left key to confirm, right key to exit
and return to previous menu.
4.3.3 Pipette Modes
Press left button to enter menu; highlight CHANGE MODE and
OK to enter. Press selection key to select target mode and OK
to confirm.
4.3.4 Set-up Parameter
There are 2 ways to set up parameter:
① On main screen:Selection, Left, Right buttons are all you
need to access quick setting. Please refer to next chapter for
detail description.
9
② From SET PARAMETER:Follow the steps underneath allow
you to set up parameters easily.
Menu⇒ SET PARAMETER(use selection key)【EXIT will return to
previous screen】; OK to enter parameter setting. Consequently,
parameter setting can be done with Selection, Left, and Right
buttons. (Refer to following chapter for detail description).
4.4 Modes description
4.4.1 PIPETTE mode
PIPETTE mode is also known as automatic
mode,
which
aspirate
and
dispense
according to set up value. This mode,
incorporates auto purge function to ensure
no retention on the tip, is most common for
beginner.
PARAMETER Set-up
VOLUME: Value between valid range is available for set-up.
Factory default setting is the maximum volume given in the
specification.
IN SPEED:Default setting is 9. Available range is 1~9.
OUT SPEED:Same as IN SPEED. Maximum speed is 9.
Setting Methods
From main screen or SET PARAMETER is available.
① Main Screen
To increase volume:Press selection up key, to decrease
volume: Press selection down key.
Setting aspirate speed:Press right button before aspirating.
Setting dispense speed:Press right button after aspirating.
② SET PARAMETER
(1) MENU ⇒ SET PARAMETER
10
(2) OK
⇒
selection key ⇒ EDIT ( Parameter is blinking and
ready for set up).
(3) Press selection key to change values and confirm with
OK.
.
(4) Repeat above process to complete speed setting of aspirate
and dispense.
(5) After parameter setting is completed, press selection down
key; SAVE AND EXIT is prompted, YES to confirm, YES
blink, YES to confirm 1 more time.
11
(6) Press EXIT to return to main screen.
Note:If you wish not to save the change of parameter, Press NO
to abort and return to main screen.
Operation of PIPETTE mode
Select PIPETTE mode, set volume and speed, operation is
ready.
1. Immerse the tip perpendicular to liquid and press PIP,liquid
is aspirated into the tip.
2. When aspirate is completed, remove the tip from liquid;
gently touch the tip on edge of vessel to clean up excessive
liquid.
3. Press PIP to dispense liquid. Alarm is designed to notice the
completion of 1 operation cycle.
4. If different type of liquid sample is aspirated, new tip should
be replaced to prevent contamination.
Notice:Keep pressing PIP key until tip is removed from the
liquid will prevent re-aspirate caused by piston relocation.
This function is designed to ensure the precision of small
volume pipetting.
Note:
1. During aspirating cycle, do not dip the tip to the bottom of the
vessel. This way may influence the accuracy.
2. After aspirate, wait for 1 second (sample volume <1000μL) to
3 second (sample volume >1000μL) before removing the tip
from liquid.
3. If sample’s viscosity or density is higher then water, pre-rinse
2-3 times before operation is recommended. Pre-rinsing
consists of aspirating certain volume of liquid and then
dispensing it back into the same vessel (or waste).
4. Tips should be immersed approximately 3mm for smaller
models as S10,S100,S300,S1200,and 5mm for larger models
12
as S5mL,S10mL.
5. After 1 operation cycle (aspirating and dispensing), make sure
that you hear alarm (2 ticks) before next operation cycle.
4.4.2 RPIPET mode
Rpipet will fill extra volume when aspirating.
Dispense is done in 2 steps. First step is
to dispense required volume. Second step
is to dispense the rest of volume. This
mode is especially suitable to viscous
liquid.
Parameter set-up
VOLUME: Value between valid range is available for set-up.
Factory default setting is the maximum volume given by
specification.
IN SPEED:Default setting is 9. Available range is 1~9.
OUT SPEED:Same as IN SPEED. Maximum speed is 9.
Setting Methods
From main screen or SET PARAMETER is available. (Refer to
parameter set-up on PIPETTE mode for detail description)
Operation of RPIPET mode
Select RPIPET mode, set volume and speed, operation is ready.
1. Immerse the tip perpendicular to liquid and press PIP; liquid
is aspirated into the tip.
2. When aspirate is completed, remove the tip from liquid;
gently touch the tip on edge of vessel to clean up excessive
liquid.
3. Press PIP to dispense desired volume. There are still extra
liquid in the tip. Screen will display PIP as follow.
13
4. Press PIP to clear the rest of liquid from the tip.
5. If required, replace the tip before next operation.
4.4.3 STEPPER mode
This mode fill-in total required volume
(Total required volume=volume × times of
dispense)and dispense equal volume in
number of times. It is special suitable for
repeating operation of same volume. The
diagram on the right indicates total of 1000μL will be filled-in at
once and dispense in 5 times × 200μL/time.
Parameter set-up
VOLUME:Value between valid ranges is available for set-up.
TIMES: ”Times” in this mode indicate times of dispense. This
parameter can be set up from SET PARAMETER menu, not from
main screen.
Notice:Times of dispense × volume/times has to be no
larger then maximum volume given in the spec. The
program will automatically reduce times of dispense if
above calculation is violated.
Different model of smartpipette has different factory default
settings as follow:
S10:VOLUME =2μL,TIMES=5
S100:VOLUME =20μL,TIMES=5
S300:VOLUME =20μL,TIMES=5
S1200:VOLUME=200μL,TIMES=5
S5mL:VOLUME =1000μL,TIMES=5
S10mL:VOLUME=2mL,TIMES=5
IN
SPEED:Default setting is 9. Available range is 1~9.
OUT SPEED:Same as IN SPEED. Maximum speed is 9.
14
Setting Methods
From main screen or SET PARAMETER is available. (Refer to
parameter set-up on PIPETTE mode for detail description)
Operation of STEPPER mode
Select STEPPER mode; set volume and times; operation is
ready.
1. Immerse the tip perpendicular to liquid and press PIP; liquid
2.
3.
4.
5.
is aspirated in to the tip.
When aspirate is completed, remove the tip from liquid;
gently touch the tip on edge of vessel to clean up excessive
liquid.
Press PIP for number of times to sequentially dispense. The
number of times left to dispense is displayed on screen.
When total number of times to dispense is completed, there
are extra liquid in the tip. Press PIP to purge the extra liquid.
If required, replace new tip for next operation.
4.4.4 MIX mode
This mode is achieved by repeatedly
aspirating and dispensing according to the
parameters. Diagram on the right indicates
200μL of liquid is aspirated and dispensed
for 5 times.
Parameter set-up
MIX VOL:Value between valid range is available for set-up.
MIX TIMES:Times of mixing (aspirating and dispensing cycle= 1
time); maximum setting value is 200. Counter will not display 3
digits (100-200). This parameter setting can only be done from
SET PAREMETER menu.
Different model of smartpipette has different factory default
setting as follow:
S10:MIX VOL=2μL,MIX TIMES=5
S100:MIX VOL=20μL,MIX
TIMES=5
S300:MIX VOL=20μL,MIX
TIMES=5
S1200:MIX VOL=200μL,MIX
S5mL:MIX
TIMES=5
VOL=1000μL,MIX TIMES=5
S10mL:MIX VOL=2mL,MIX
15
TIMES=5
IN
SPEED:Default setting is 9. Available range is 1~9.
OUT SPEED:Same as IN SPEED. Maximum speed is 9.
Setting Methods
From main screen or SET PARAMETER is available. (Refer to
parameter set-up on PIPETTE mode for detail description)
Operation of MIX mode
Select MIX mode; set volume, speed and times; operation is
ready.
1. Immerse the tip perpendicular to liquid and press PIP; liquid
is aspirated in to the tip.
2. When mixing process is completed, pipette stop.
3. Extra liquid is still in the tip; Press PIP to purge.
4. If required, replace the tip before next operation.
Notice: Press PIP for more then 1 second will abort the
operation instantly.
4.4.5 MANUAL mode
This mode allows operator to control
volume, start and stop the aspirate and
dispense.
Parameter set-up
VOL LIMIT:Value between valid range is available for set-up.
Factory default setting is the maximum volume given by
specification.
IN SPEED:Default setting is 9. Available range is 1~9.
OUT SPEED:Same as IN SPEED. Maximum speed is 9.
Setting Methods
From main screen or SET PARAMETER is available.
(Refer to parameter set-up on PIPETTE mode for detail
description)
Operation of MANUAL mode
Select MANUAL mode; set speed; operation is ready.
1. Immerse the tip perpendicular to liquid and press PIP and
hold until desired volume of liquid is aspirated in to the tip.
2. When the screen display the volume has reached the target,
16
release the PIP button.【Do not release the button until the
volume has reached the target】
3. When aspirate is completed, Remove the tip from liquid;
gently touch the tip on edge of vessel to clean up excessive
liquid.
4. Press selection down button to switch from aspirate to
dispense. The screen will indicate the direction mark change
from ▲ to ▼. Press down PIP until dispense is completed. If
maximum volume of the pipette is aspirated, the operation
will automatically switch from aspirate to dispense. All you
need to do is to press down PIP to complete dispense.
5. After 1 operation cycle (aspirating and dispensing), screen
display PIP instruction. Press PIP to clean up the rest of
liquid in the tip. Make sure that you hear alarm (2 ticks)
before next operation cycle.
Notice:It is recommended to use lower speed, for this mode,
to ensure the best operation result.
4.4.6
4 special pipette modes
SPECIAL has 4 special modes under this menu:
① PIPETTE+MIX
This mode allows operator to mix sample after dispense,
suitable for sampling and dilute sampling.
Parameter set-up
PIPETTE VOLUME:Value between valid ranges is available for
set-up.
MIX VOL:Value between valid ranges is available for set-up.
MIX TIMES:Times of mixing (aspirating and dispensing cycle= 1
time); maximum setting value is 200. Counter will not display 3
digits (100-200). This parameter setting can only be done from
SET PAREMETER menu.
17
Different model of smartpipette has different factory default
setting as follow:
S10:PIPETTE VOL=5μL,MIX VOL=4.5μL,MIX TIMES=5
S100:PIPETTE VOL=50μL,MIX VOL=45μL,MIX TIMES=5
S300:PIPETTE VOL=50μL,MIX VOL=45μL,MIX TIMES=5
S1200:PIPETTE VOL=500μL,MIX VOL=450μL,MIX TIMES=5
S5mL:PIPETTE
VOL=1000μL,MIX VOL=500μL,MIX TIMES=5
S10mL:PIPETTE VOL=5mL,MIX VOL=4.5mL,MIX TIMES=5
IN
SPEED:Default setting is 9. Available range is 1~9.
OUT SPEED:Same as IN SPEED. Maximum speed is 9.
Setting Methods
From main screen or SET PARAMETER is available. (Refer to
parameter set-up on PIPETTE mode for detail description)
Operation of PIPETTE+MIX mode
Select PIPETTE+MIX mode; set all parameters; operation is
ready:
1. Immerse the tip perpendicular to liquid and press PIP; liquid is
aspirated in to the tip.
2. When aspirate is completed, remove the tip from liquid; gently
touch the tip on edge of vessel to clean up excessive liquid.
3. Press PIP to dispense the sample.
4. Press PIP again to perform MIX function. MIX function stop
when the cycle complete.
5. Press PIP again to clear the rest of liquid in the tip.
6. If required, replace the tip for next operation.
Notice:During mixing process, press PIP for more then 1
second will abort the operation instantly.
② STEPPER+SEQ
This mode fill-in total required volume(Total
required volume= V01+V02+V03… of dispense)
and dispense a number of different volume
samples. Extra volume of sample will be
aspirated to achieve the best result.
18
Parameter set-up
VOLUME:Value between valid ranges is available for set-up.
V01、V02、V03…:The volume to be dispensed each time. Sum of
the total volume should not excess the maximum volume of the
pipette. If volume of the last dispense is smaller then lower
volume limit of the pipette, this dispense will be treated as waste,
purged out with any extra liquid.
Different model of smartpipette has different factory default
setting as follow:
S10:TOTAL VOL=10μL,V01=5μL,V02=5μL
S100:TOTAL VOL=100μL,V01=50μL,V02=50μL
S300:TOTAL VOL=100μL,V01=50μL,V02=50μL
S1200:TOTAL VOL=1000μL,V01=500μL,V02=500μL
S5mL:TOTAL VOL=1000μL,V01=500μL,V02=500μL
S10mL:TOTAL VOL=10mL,V01=5mL,V02=5mL
IN
SPEED:Default setting is 9. Available range is 1~9.
OUT SPEED:Same as IN SPEED; maximum speed is 9.
Setting Methods
From main screen or SET PARAMETER is available.(Refer to
parameter set-up on PIPETTE mode for detail description)
Volume of sequence dispense can be set after aspirate of total
required volume.
If total volume 1000μL is to dispense in 3 sequences (450μL +
400μL + 150μL) the setting example would be as follow:
1. MENU ⇒ CHANGE MODE; select SPECIAL ⇒ OK ⇒
select STEPPER+SEQ ⇒ OK.
2. Press PIP to aspirate sample. Screen display 500μL; move
selection key to set the target volume to 450μL.
19
3. Press PIP to proceed first dispenses (450μL); Screen then
display default of V02 is 450μL, Press selection key to set the
target to 400μL as follow:
4. Press PIP to dispense V02. The rest of 150μL will be
displayed as follow; Press PIP to dispense V03; Press PIP
again to clean up the extra liquid
Operation of STEPPER+SEQ mode
Select STEPPER+SEQ mode; set all parameters; operation is
ready:
1. Immerse the tip perpendicular to liquid and press PIP; total
required volume is aspirated into the tip.
2. When aspirate is completed, remove the tip from liquid; gently
touch the tip on edge of vessel to clean up excessive liquid.
3. Press selection key to set up V01, volume of first dispense.
4. Press PIP to dispense sample of V01; screen display volume
of second dispense V02.
5. Repeat process 3 and 4 until all liquid in the tip is dispensed.
6. After all liquid is dispensed, screen display PIP; press PIP to
clean up the rest of liquid.
20
③ ASPIRATE
This mode works as reverse function of
STEPPER. It fills in equal volume in number of
times and dispenses the total volume at once
(total volume for dispense = volume × times
of aspirate).
Parameter set-up
VOLUME:Value between valid ranges is available for set-up.
TIMES:”Times” in this mode indicate times of dispense. This
parameter can be set up from SET PARAMETER menu, not from
main screen.
Note:
(Times of aspirate × volume/times) has to be no larger then
maximum volume of given specification. The program will
automatically reduce times of aspirate if above calculation is
violated.
Different model of smartpipette has different factory default
setting as follow:
S10:VOLUME=2μL,TIMES=5
S100:VOLUME=20μL,TIMES=5
S300:VOLUME=20μL,TIMES=5
S1200:VOLUME=200μL,TIMES=5
S5mL:VOLUME=500μL,TIMES=5
S10mL:VOLUME =2mL,TIMES=5
IN
SPEED:Default setting is 9. Available range is 1~9.
OUT SPEED:Same as IN SPEED. Maximum speed is 9.
Setting Methods
From main screen or SET PARAMETER is available. (Refer to
parameter set-up on PIPETTE mode for detail description)
Operation of ASPIRATE mode
Select ASPIRATE mode; set volume and times; operation is
ready.
1. Immerse the tip perpendicular to liquid and press PIP; liquid
is aspirated in to the tip. Screen display times for the rest of
sampling.
21
2. When first aspirate is completed, remove the tip from liquid;
gently touch the tip on edge of vessel to clean up excessive
liquid.
3. Immerse the tip perpendicular to second liquid sample and
press PIP,the 2nd liquid sample is aspirated in to the tip.
Screen display times to be aspirated for the rest of liquid.
4. Repeat the process until total volume is aspirated; screen
display the rest of times is 0; volume of total fill-in.
5. Press PIP to dispense the sample.
6. If required, replace new tip for next operation.
④ GEL
This mode is specially designed for gel
pipetting. Aspirate speed is adjustable;
dispense speed is set to be low to prevent
sample overflow. The function is appropriate
for handling viscous sample.
Parameter set-up
VOLUME:Value between valid range is available for set-up.
IN
SPEED:Default setting is 9. Available range is 1~9.
OUT SPEED:Fix.
Note: S10、S100、S300 OUT SPEED default is 1;
S1200、S5mL、S10mL OUT SPEED default is 2.
Setting Methods
From main screen or SET PARAMETER is available. (Refer to
parameter set-up on PIPETTE mode for detail description)
Operation of GEL mode
Select GEL mode; setting up all parameters; operation is ready.
1. Immerse the tip perpendicular to liquid and press PIP,liquid
is aspirated in to the tip.
2. Remove the tip from liquid; gently touch the tip on edge of
3.
4.
5.
vessel to clean up excessive liquid.
Press PIP to dispense the sample.
After dispense, screen display PIP . Press PIP to clear up
the rest of sample.
If required, replace new tip for next operation.
22
4.5 PROGRAM LIST
There are 6 quick access addresses for operators to store
personal programs.
Program pre-set
① Set-up pipette mode
1. MENU ⇒ scroll to select PROGRAM LIST
2. OK to access set up programs,There are 6 addresses
available: Default is 1200/PIPET; Scroll to select target
address for customization.
4. OK to enter set up screen as follow:
5. Select CHANGE MODE ⇒
OK to set up desired pipette
mode such as STEPPER or others as follow:
23
6. OK and return to step 3. Select Save ⇒ OK to store the
setting as follow; this program now has been saved as
system default; or EXIT to return to previous menu.
② Parameter set-up
Parameter set up for quick access program can only be done
from program list. Detail steps are described as follow:
Take STEPPER mode as example;
If the desired program for STEPPER mode is to dispense
100μL for 10 times.
1. MENU ⇒
scroll to select PROGRAM LIST⇒
to select P1⇒ EDIT⇒
OK⇒ scroll
scroll to select CHANGE MODE⇒
scroll to select STEPPER⇒ OK
(P1 now is set up to be STEPPER mode)
2. Scroll to select SET PARAMETER⇒ OK
screen ⇒ Scroll to select
to enter set up
sample volume( value in red
indicates the parameter like to be edit)⇒ EDIT⇒ blinking (edit
ready)⇒ selection key to change the value to 100μL⇒
OK
to confirm and return to screen as follow:
2. Scroll to select times of dispense⇒
EDIT ⇒ blinking (edit
ready)⇒ Selection key to change value to 10; OK to
confirm and return to screen as follow:.
24
3. Scroll selection key to select aspirate speed (in speed)
⇒ EDIT ⇒ blinking (edit ready)⇒ scroll selection key to
change value (desired speed) ⇒ OK
to confirm and
continue the setting of dispense speed (out speed) in the
same method.
4. Scroll down ⇒ SAVE AND EXIT is prompted ⇒ YES ⇒
blinking for confirmation ⇒ YES to confirm and return to
previous screen.
Note:
Setting up program for P1~P6 can only be done from
program list. Main screen is not available for quick access
programs.
Access program P1~P6
1. From previous screen in step 5⇒ scroll to select ENTER⇒ OK
to confirm.
2. From main screen ⇒ MENU ⇒ PROGRAM
ENTER as follow:
25
LIST ⇒ P1 ⇒
(1)
(2)
(4)
(3)
(5)
5. CALIBRATE
smartpipette is factory-calibrated with distiller water based on
ISO 8655 standard. Generally, a new electronic pipette does not
need calibration or configuration. For special requirement (liquid
with significantly different gravities or temperature), Calibration
feature is available to achieve greater accuracy.
In addition, if the device is frequently used for certain period of
time, calibration process is also recommended in every 3
months.
Calibration environment
Calibration environment should be controlled with room
temperature 15-30℃ (±0.5℃), humidity 50%-80%. Higher level
of humidity is preferred to prevent from instant evaporation of
liquid sample and further influence the result. Calibration room
with few air circulation, temperature meter, and humidity meter is
recommended to ensure the accuracy.
Facilities
1. Analytical balance
A suitable analytical balance is determined by the volume of the
electronic pipette:
26
Volume of
electronic
pipette
Reading of
analytical
balance
1μL~10μL
10~100μL
>100μL
0.001mg
0.01mg
0.1mg
Linearity and
repeatability of
the analytic
balance
0.002mg
0.02mg
0.2mg
Measurement
of inaccuracy
≤0.002mg
≤0.02mg
≤0.2mg
2. Pure water, dehydrogenized water or distiller water qualified
with ISO 3696.
3. Shock and dust resistant area; distant from heat source and
sunlight.
Procedures
To ensure accuracy, we adopt 3 calibration points (10
measurements/1 calibration point) as following procedures:
1. Clean up pipette and check lubricate condition of piston.
2. Ensure the pipette, tips, analytical balance, distiller water
and all the facilities are located in the same environment for
more then 2 hours.
3. Before calibration process, pre-rinse the tip by going
through 5 cycles of aspirate-dispense.
4. Measure 100%, 50% and 10% of maximum volume given
by the specification. 10 times each point.
5. Calculate the average value; based on it, calculate
systematic error and random error based on formula
specified in ISO 8655.
6. Compare the results of measurements and ISO 8655 to
determine whether configuration is furthermore required.
27
ISO 8655 Standard (Maximum permissible error)
Volume
Systematic error Random error
Range
(μL)
(μL)
(μL)
1~10μL
5~100μL
20~300μL
100~1200μL
500~5000μL
1000~10000μL
1
±0.12
≤0.08
5
±0.12
≤0.08
10
±0.12
≤0.08
5
±0.80
≤0.30
50
±0.80
≤0.30
100
±0.80
≤0.30
20
±4.00
≤1.50
150
±4.00
≤1.50
300
±4.00
≤1.50
100
±16.0
≤6.0
600
±16.0
≤6.0
1200
±16.0
≤6.0
500
±40
≤15
2500
±40
≤15
5000
±40
≤15
1000
±60
≤30
5000
±60
≤30
10000
±60
≤30
Configuration for calibration
Smartpipette has complied with ISO 8655, industrial standard,
for permissible error. If different standard should be applied,
proceed to configuration with following steps.
1. Press select down and right button simultaneously、then
press reset button. Electronic pipette will restart and
prompt PRESS PIP. Release select down and right
button; Press PIP to enter configuration mode. Screen
display CL in red, indicating calibration mode is ready.
28
2. MENU⇒ CALIBRATION⇒ OK
to enter calibration screen.
3. select to select target value ⇒ EDIT ⇒ blinking ⇒ press
select key to change value(the value should be the same
as average volume obtained from calibration measurement
procedures) ⇒ OK to save.
4. Repeat step 3 until all value is verified. OK to save⇒ OK
again to confirm. Screen will return to previous menu.
5. Press reset button; pipette will restart. Press PIP to enter
main screen. The system has returned to normal state.
6. To confirm if verified value has been saved; MENU ⇒ select
key to select CALIBRATE ⇒ EDIT
to confirm the value. If
value is not correct, repeat the process.
Note:
Only the calibration value verified in calibration mode (with CL
character on screen) will be saved into system memory. In
another word, the calibration value verified in regular system (no
CL character on screen) will not be saved into system memory.
Calculation of mass loss
Conversion of the corrected mass to volume
V=(w+e)× Z
V=Volume(μL)
w=Weight(mg)
e=Evaporation loss(mg)
Z=mg/μL correction factors
Evaporation loss has great influence to small volume pipetting.
Therefore, the calculation of evaporation loss is essential to
29
accurate operation.
Methods
Fill certain volume of distiller water into a vessel that is weighted;
Observe 30 seconds and read the volume loss and calculate
the volume loss per second ( if 3mg is the volume loss for 30
seconds, volume loss per second is 3mg÷30s=0.1mg/s).
During operation, the correction of mass loss can be done with
above methods (operation time × volume loss / sec). However,
if an evaporation prevention device is used, the consideration of
evaporation loss can be omitted.
Notice: Density and volume of water under different
temperature and pressure vary, Correction factors (for distiller
water as a function of test temperature and air pressure) need to
be taken into consideration. Refer to appendix 1 for more detail.
Systematic error
Systematic error is to calculate the difference between the
actual volume and the piston operated volume.
A= V — V0
A = systematic error
V = average volume
V0= piston operated volume
A%= 100%×A/V0
Random error
Random error refers to the difference of average volume of
measurements and volume of single volume of measurement.
The result indicates unpredictable factors, also called standard
deviation S, or coefficient of variation CV.
∑ (V
n
S=
i =1
i
−V
n −1
CV=100%×S/ V
)
2
S=s
t
andar
ddevi
at
i
on
agevol
ume
V =aver
n=meas
ur
et
i
me
Vi=v
ol
umeofs
i
ngl
emeas
ur
ement
Note:
Due to the facts that calibration requires highly facilitated
environment and special experience and knowledge, we do no
recommend on-site calibration by customers. If the situation
require, send the device back for professional service.
30
Before you deliver the devices, make sure it’s free of
contamination.
6. Troubleshooting
6.1Possible problems and recommended solution
Problem
Cause
Solution
= piston position is
4reinstall piston
inappropriate
Message
with
CHECK
PISTON
= lubricate for piston is
insufficient
= lubricate is solidified
= particle on piston
surface
= particle between piston,
o-ring, and cylinder
= tip-fitting is
Lack of
accuracy
or leak
Retention
in tip
4 refresh lubricate
4 refresh lubricate
4clean or replace piston
4clean up piston, o-ring,
and cylinder
4 refit the tip
inappropriate
= the tip is not compatible
to the device
= particle in between tip
and tip holder
= tip is damaged
= speed for aspirate is
over high
= tip is removed from
liquid sample too soon
= piston surface has dust,
been damaged
= particle between piston,
O-ring, and cylinder
= insufficient lubricate on
O-ring or piston
= o-ring is damaged
= inappropriate operation
4 replace with
compatible tip
4 clear up tip holder
4 replace with new tip
4 reset the speed
4 refer to proper
operation technique
4 replace or clean up
piston
4clean up piston, o-ring,
and cylinder
4 refresh with proper
amount of lubricate
4 replace o-ring
4 refer to proper
operation technique
= retention of the tip is too
4 fitting with low
high
= viscosity of the liquid is
high
4use RPIPET mode;
31
retention tip
rinse the tip few times
before pipetting; reduce
speed.
Can not
aspirate
Noisy
during
operation
= battery life is over
4 replace new battery
= insufficient power
4 recharge the power
= insufficient lubricate
4 refresh lubricate
=inappropriate
4 Calibrate with proper
Lack of
precision
on
special
liquid
sample
calibration, require
recalibrate on high
viscose liquid
= when liquid sample is
volatile or significantly
different from water in
density
liquid sample
4 pre-rinse the tip and
Tip fall
down or
hard to fit
= quality of the tip
4use recommended tip
= damaged tip
4replace new tip
calibrate with the liquid
again.
If you still have question or problem, consult your local dealer for
customer support. You can also call 4006 296 833 for technical
support in the nation.
6.2 Leak test
Leak test should be performed from time to time to ensure the
quality and precision of operation, especially after maintenance
or decontamination procedure.
Methods
1. Pre-rinse the tip.
2. Set the pipette to maximum volume.
3. Aspirate the volume of distiller water.
4. Maintain the pipette in the vertical position and wait for 30
seconds.
5. If water droplet appears at the tip end, leak is confirmed.
6. If there is no droplet, re-immerse the tip into the surface of
liquid.
7. If the water level inside the tip goes down, leak is confirmed.
Refer to trouble shooting for solution.
32
Notice:Volatile liquid (or most of organic solvent) can
cause leak due to the issue of saturated vapor pressure. Try
to operate few cycle of aspirate-dispense and test again.
7. Disassemble and reassemble
7.1 Disassemble
smartpipette is designed to be easy maintenance. Disassemble
can be easily performed by operator.
Disassemble procedure for S10、S100、S300、S1200
1.
Remove battery block: Position your thumb and apply
pressure to the cover of battery housing; slice the cover
toward the direction as indication. Battery block is now
easily to be sliced out.
2.
Keep the tip-ejector button depressed, and grip the top of
the tip-ejector D5(or A5、B5、C5)with the other hand; Rotate
the tip-ejector counter clock until you hear the click; pull the
ejector D5(or A5、B5、C5)away from the handle of the
pipette.
33
3.
Remove lower section: Rotate lower part of the tip-holder
counterclockwise to unscrew it and pull down from the upper
part.
Bottom
4.
Remove o-ring (D3):Hold on D4(orA4、B4、C4),rotate
connecting nut D2(orA2 、 B2 、 C2) counterclockwise to
separate D2 and D4; remove o-ring D3(or A3、B3、C3).
34
5.
Remove piston(D1):Hold on upper part of pipette; Another
hand will bend the piston down as you want to break it ( do
not pull it out). The piston will separate from piston holder
D1 or A1、B1、C1).
Remove piston with
Piston holder
thumb
Disassemble procedure for S10 、 S100 、 S300 、 S1200 is
completed.
Disassemble procedure for S5mL、S10mL
1. Battery block removal: refer to the same process of S10、
S100、S300、S1200.
2. Remove lower s ection of tip ejector(E6): Lie the pipette
horizontal; screen face up; both hands ( thumb and index
35
finger) hold on the intersection of E5(or F5)and E6(or F6);
apply pressure to separate the two sections.
Index
Thumb
3. Remove upper section of tip ejector(E5):Keep the tip eject
button depressed; rotate upper section of tip ejector E5(or
F5) toward clockwise until the hinge pop out.
4. Remove lower section of tip holder:Rotate lower part of the
tip-holder ( E4)counterclockwise to unscrew it and gently
pull out until piston holder presents. Bend the lower section
36
(in gray); the lower section including piston is detached.
(the same methods apply to S10、S100、S300、S1200)
Note: To detach the loser section, you need to bend it, not
to pull out.
5. Remove
piston
and
o-ring:
Remove
E5;
rotate
counterclockwise to remove E4(or F4) from E2(or F2);
remove piston E1(or F1) and o-ring E3(orF3) as diagrams
showed.
So far,disassemble of S5mL、S10mL is completed.
Notice:The grip section (section that higher then piston
holder) should never be disassembled. Any damage or
malfunction cause by disassemble of grip section will not
be covered by RONLABS warranty policy.
7.2 Reassemble
Reassemble procedures for S10、S100、S300、S1200
1. Reassemble piston:hold on bottom of piston D1(or A1、B1、
37
C1); gently insert the tip of piston into the piston holder as
follow:
2. Restore D2(or A2、B2、C2) by rotating counterclockwise;
restore o-ring D3(or A3、B3、C3) as illustrated below; connect
tip
holder
D4
with
connecting
nut
D2
by
rotating
counterclockwise.
3. Restore ejector D5(or A5、B5、C5) : Keep the ejector button S1
depressed; insert the ejector and fit the hinge section the
reverse way of assemble procedures ( refer to following
38
diagrams):
4. Restore battery block into battery housing; restore housing
cover. Reassembly of the pipette is complete.
Reassemble procedures for S5mL、S10mL
1. Use a pinch to place o-ring E3(or F3)back to E4(orF4);
insert tip of piston E1(or F1)into E2 (or F2); screw E4 into
E2(or F2).
2. Restore E5(or F5)and E2(orF2)
,press air-vent with finger
39
and insert piston-tip into piston holder.
Notice: If air-vent is not covered, the piston may not be
inserted into piston holder due to air leak.
Air-vent
3. Screw the lower section (grey) into the grip section (white)
clockwise; press down and hold the ejector button S1 and fit
the hinge section E5(or F5)the reverse way of assemble
procedures.
40
4. Restore lower section of tip ejector (there are 2 fitting
notches on both E6(or F6)and E5(or F5); match the
notches in position and pop one side in first, and the other
side later.
5. Restore battery block into battery housing; restore housing
cover. Reassembly of the pipette is complete.
8. Maintenances
8.1 Cleaning and decontamination
Smartpipette is designed for easy maintenance as regular
maintenance will ensure the accuracy and precision in your daily
operation. It is especially important if the liquid you are working
with is erosive solvent.
Notice:It is important to remove battery before you proceed
with cleaning and decontamination.
① Exterior
Methods:Wipe the exterior with soft-cloth or lint-free tissue
impregnated with 60% of IPA water. Then wipe the entire pipette
again with stiller water.
Check if the exterior of pipette is clean and free of dust,
especially tip holder before every operation. Leave the parts to
dry by evaporation or wipe them within a clean soft-cloth.
② Interior
Procedures
1. Disassemble all part s for cleaning according proper
procedure.
2. Wipe the exterior with soft-cloth or lint-free tissue impregnated
with 60% of IPA water. Then wipe the entire pipette again with
stiller water.
3. Generally, o-ring, piton doesn’t require special cleaning. If
dust or any particle is detected, wipe out with clean soft-cloth.
4. Refresh a thin layer of lubricate on o-ring and piston.
5. Reassemble according the proper procedures.
③ Decontamination
The handle is not autoclavable. Only the bottom sections
including tip-ejector, tip-holder, o-ring, connecting nut, can be
41
autoclaved individually as following procedures:
1. Clean the parts, especially tip holder.
2. Put the parts into autoclaving sack.
3. Autoclave at 121℃, 1 bar for 20 minutes.
4. Check if the parts are dry before reassembling the pipette.
5. Set the pipette aside to stabilize for at least 2 hours.
smartpipette is produces with anti-aging material. With
ultraviolet, you can expose the pipette all day without
disassemble.
8.2 Easy maintenance
Different level of maintenance will be required based on different
liquid sample:
Chemistry
How
Aqueous
solution and
Buffer
solution
Inorganic
acid or alkali
=Use filter
tips
Infectious
liquid
=Use filter
tips
=Pipette
mode
Cell culture
fluid
= Use filter
tips
Organic
solution
=Increase
operation
speed
Cleaning and maintenance
Disassemble bottom section of
the pipette; rinse contaminated
parts with distiller water; leave it
to dry naturally and refresh
lubricate on piston.
Disassemble bottom section of
the pipette; rinse contaminated
parts with distiller water; leave it
to dry naturally and refresh
lubricate on piston.
Disassemble bottom section;
immerse into disinfectant for 30
minutes; perform autoclaving
with stiller water
Disassemble bottom section;
immerse into disinfectant for 30
minutes; perform autoclaving
with stiller water
Disassemble bottom section of
the pipette; rinse contaminated
parts with distiller water; leave it
to dry naturally and refresh
lubricate on piston.
42
Radiation
solution
Nucleic acid
or protein
solution
= Use filter
tip
=Use
Pipette
mode
Disassemble bottom section of
the pipette; rinse contaminated
parts with distiller water; leave it
to dry naturally and refresh
lubricate on piston.
=Use filter
tip
=Use
Pipette
mode
Nucleic acid: boil 10 minutes
with amino acetic acid or
hydrochloric acid buffer solution
(pH2.0); rinse with distiller water
and leave it to dry by
evaporation or under 60℃
environment; refresh lubricate on
piston.
Protein: disassemble bottom
section and clean with soap
solution and distiller water; leave
it to dry by evaporation or under
60℃ environment.
8.3 Replace battery
When the operation is significantly slow or acting abnormally
due to low battery power or battery life, recharge with USB cable
or replace battery block as following procedures:
1. Push the cover of battery holder and slice toward the direction
indicated on battery holder.
2. Replace with new battery block accordingly.
3. Restore the cover of battery holder.
4. Turn on the device and confirm the power state.
Note:
After replacing battery, main screen and setting return to default
setting.
8.4 Storage
Daily storage: After operation, hang the pipette on a pipette
stand. If the tip has any liquid, never place the pipette
horizontally (liquid flow into handle of the pipette may corrode
piston and cause damage).
If the devices will only be used once a while, it is recommended
to remove battery block, clean and decontaminate. Store the
pipette in dry, clean, stable environment to preserve its’ life.
43
9. Precautions and limitations
l
l
l
l
l
l
l
l
l
Read this manual carefully and use the product according to
the instructions.
Use the product within the limitation of chemical corrosion.
Do not aspirate highly flammable sample.
If temperature of liquid, tip, and pipette is significantly
different, the result can be very inaccurate.
Do not operate this device close to an environment with
explosive gas.
Do not disassemble the product with abuse.
If the product does not function normally, stop the operation
and confirm troubleshooting chapter in this manual.
Operating
temperature
should
maintain
between
15℃to40℃, relative humidity should not exceed 80%.
Store electronic pipette,
accessories carefully.
battery
charger
and
other
10. Instrument warranty
This instrument is warranted to the original purchaser by
Ronlabs Scientific to be free of defects in materials or
workmanship for a period of 12 months from the date of
purchase, providing that is has been operated according to the
instructions, not abused or misused, that the serial number has
been removed, and the instrument has not been disassembled,
other then procedures for normal maintenance. No other
warranty is expresses or implied, including the warranty of
merchantability.
Should the unit need to be returned, the purchaser must pay
insurance and shipping cost charges. Ronlabs Scientific will
assume the cost of returning the repaired unit to the purchaser.
This products packaging is capable of withstanding normal
shipping hazards.
44
11. Permissible errors
RONLABS smartpipette
Model
Reference
range
S10
ISO 8655
Systematic
error
Random
error
Systematic
error
Random
error
0.2
±0.04
≤0.02
±0.12
≤0.08
1
±0.05
≤0.02
±0.12
≤0.08
5
±0.08
≤0.04
±0.12
≤0.08
10
±0.10
≤0.04
±0.12
≤0.08
5
±0.40
≤0.25
±0.80
≤0.30
10
±0.35
≤0.20
±0.80
≤0.30
50
±0.20
≤0.15
±0.80
≤0.30
100
±0.40
≤0.25
±0.80
≤0.30
20
±0.80
≤0.40
±4.00
≤1.50
30
±0.60
≤0.30
±4.00
≤1.50
150
±1.00
≤0.50
±4.00
≤1.50
300
±1.20
≤0.50
±4.00
≤1.50
100
±2.00
≤0.50
±16.0
≤6.0
120
±0.50
≤1.50
±16.0
≤6.0
600
±2.00
≤2.00
±16.0
≤6.0
1200
±4.50
≤3.00
±16.0
≤6.0
500
±4.00
≤2.50
±40.0
≤15.0
2500
±8.00
≤5.50
±40.0
≤15.0
5000
±5.00
≤6.00
±40.0
≤15.0
1ml
±20.0
≤5.0
±60.0
≤30.0
5ml
±21.0
≤10.0
±60.0
≤30.0
10ml
±25.0
≤20.0
±60.0
≤30.0
Volume
0.2-10
S100
5-100
S300
20-300
S1200
100-1200
S5ml
500-5000
S10ml
1000-10000
Note:
① If there is no special remark, the unit of above data is μL.
②Test environment: PIPETTE mode, speed 9.
45
Appendix 1
Correction factors for distiller water as a function of test
temperature and air pressure
Air pressure
Temperature
(℃)
Z value in microlitres per milligram
1KPa=10hPa
80
85
90
95
100
101.3
105
15.00
1.0017
1.0018
1.0019
1.0019
1.0020
1.0020
1.0020
15.50
1.0018
1.0019
1.0019
1.0020
1.0020
1.0020
1.0021
16.00
1.0019
1.0020
1.0020
1.0021
1.0021
1.0021
1.0022
16.50
1.0020
1.0020
1.0021
1.0021
1.0022
1.0022
1.0022
17.00
1.0021
1.0021
1.0022
1.0022
1.0023
1.0023
1.0023
17.50
1.0022
1.0022
1.0023
1.0023
1.0024
1.0024
1.0024
18.00
1.0022
1.0023
1.0023
1.0024
1.0025
1.0025
1.0025
18.50
1.0023
1.0024
1.0024
1.0025
1.0025
1.0026
1.0026
19.00
1.0024
1.0025
1.0025
1.0026
1.0026
1.0027
1.0027
19.50
1.0025
1.0026
1.0026
1.0027
1.0027
1.0028
1.0028
20.00
1.0026
1.0027
1.0027
1.0028
1.0028
1.0029
1.0029
20.50
1.0027
1.0028
1.0028
1.0029
1.0029
1.0030
1.0030
21.00
1.0028
1.0029
1.0029
1.0030
1.0031
1.0031
1.0031
21.50
1.0030
1.0030
1.0031
1.0031
1.0032
1.0032
1.0032
22.00
1.0031
1.0031
1.0032
1.0032
1.0033
1.0033
1.0033
22.50
1.0032
1.0032
1.0033
1.0033
1.0034
1.0034
1.0034
23.00
1.0033
1.0033
1.0034
1.0034
1.0035
1.0035
1.0036
23.50
1.0034
1.0035
1.0035
1.0036
1.0036
1.0036
1.0037
24.00
1.0035
1.0036
1.0036
1.0037
1.0037
1.0038
1.0038
24.50
1.0037
1.0037
1.0038
1.0038
1.0039
1.0039
1.0039
25.00
1.0038
1.0038
1.0039
1.0039
1.0040
1.0040
1.0040
25.50
1.0039
1.0040
1.0040
1.0041
1.0041
1.0041
1.0042
26.00
1.0040
1.0041
1.0041
1.0042
1.0042
1.0043
1.0043
26.50
1.0042
1.0042
1.0043
1.0043
1.0044
1.0044
1.0044
27.00
1.0043
1.0044
1.0044
1.0045
1.0045
1.0045
1.0046
27.50
1.0045
1.0045
1.0046
1.0046
1.0047
1.0047
1.0047
28.00
1.0046
1.0046
1.0047
1.0047
1.0048
1.0048
1.0048
28.50
1.0047
1.0048
1.0048
1.0049
1.0049
1.0050
1.0050
29.00
1.0049
1.0049
1.0050
1.0050
1.0051
1.0051
1.0051
29.50
1.0050
1.0051
1.0051
1.0052
1.0052
1.0052
1.0053
30.00
1.0052
1.0052
1.0053
1.0053
1.0054
1.0054
1.0054
46
Appendix 2
Parts
Parts
S:Grip section (white)
S1:Tip-ejector button
S2:Piston holder
A1-F1:Piston
A2-F2:Connecting nuts
A3-F3:O-ring
A4-F4:Tip holder
A5-D5:Tip ejector
S100
S10
S300
S5mL
S1200
S10mL
611101
AS
611102
BS
611103
CS
611104
DS
611105
ES
611106
FS
612101
A1
612102
B1
612103
C1
612104
D1
612105
E1
612106
F1
613101
A2
613102
B2
613103
C2
613104
D2
613105
E2
613106
F2
614101
A3
614102
B3
614103
C3
614104
D3
614105
E3
614106
F3
615101
A4
615102
B4
615103
C4
615104
D4
615105
E4
615106
F4
616101
A5
616102
B5
616103
C5
616104
D5
617101
E5
617102
F5
618101
E6
618102
F6
E5、F5:Upper tip ejector
E6、F6:Lower tip ejector
47
Tips (order information):
Item#
Model
Range
Color
Packing
Compatible pipettte
682010
R-10
0.5-10μL
Clear
1000/Bag,20Bag/Case
S10
682011
R-10-R
0.5-10μL
Clear
96/Rack,5Rack/Bag,10Bag/Case
S10
682020
R-200
1-200μL
Clear
1000/Bag,20Bag/Case
S100
682021
R-200-R
1-200μL
Clear
96/Rack,5Rack/Bag,10Bag/Case
S100
682030
R-300
1-300μL
Clear
1000/Bag,20Bag/Case
S100、S300
682031
R-300-R
1-300μL
Clear
96/Rack,5Rack/Bag,10Bag/Case
S100、S300
682120
R-1250
100-1250μL
Clear
1000/Bag,5Bag/Case
S1200
682121
R-1250-R
100-1250μL
Clear
96/Rack,5Rack/Bag,10Bag/Case
S1200
682500
R-5m
1-5mL
Clear
100/Bag,10Bag/Case
S5mL
682501
R-5m-R
1-5mL
Clear
54/ Rack,10Rack /Case
S5mL
682600
R-10m
1-10mL
Clear
100/Bag,10Bag/Case
S10mL
682601
R-10m-R
1-10mL
Clear
24/ Rack,10Rack /Case
S10mL
682605
R-10m-E
1-10mL
Clear
100/Bag,10Bag/Case
S10mL
Above are recommended partial model; please refer to www.ronlabs.com for more information.
48
Accessories ( order information):
Battery
Item #
693101
Model
RA-E9m
Type
Lithium-Ion
Voltage
3.7V
Rated capacity
900mAh
Maximum
4.2V
charging
Voltage
Charging time
2h*
Note:★ When use with Ronlabs original product
Battery charger
Item#
693201
Model
RA-DC1
Color
White
Input(AC)
Output(USB)
100-240V,50/60Hz,
Max 0.15A
5V,500mA
USB cable
Item#
693301
Model
RA-MT1
Color
White
Lubricate
Item#
693401
Model
RA-GR1
Above are recommended partial model; please refer to
www.ronlabs.com for more information.
★Any modification of this user manual will not be noticed in advance.
Please check www.ronlabs.com for newest version,
49
腾讯微博