1
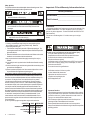
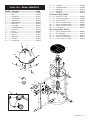
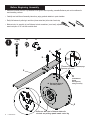
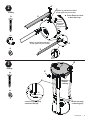
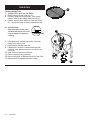
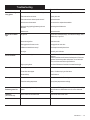
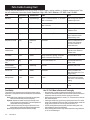
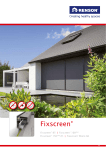
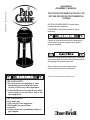
464445004 / 0 - 4165320 (12-10-03) 464445004 ASSEMBLY MANUAL FOR OUTDOOR HOUSEHOLD USE ONLY. DO NOT USE INDOORS OR FOR COMMERCIAL COOKING INSTALLER/ASSEMBLER: Leave these instructions with consumer. CONSUMER: Keep this manual for future reference. Failure to follow all manufacturer's instructions could result in serious personal injury and/or property damage. Read and follow all safety statements, Assembly Instructions and Use and Care directions before attempting to assemble and cook. Some parts may contain sharp edges. Wear protective gloves if necessary. Visit us on the web at: www.charbroil.com FOR YOUR SAFETY 1. Do not store or use gasoline or other flammable vapors and liquids in the vicinity of this or any other appliance. 2. A Fuel bottle not connected for use shall not be stored in the vicinity of this or any other appliance. FOR YOUR SAFETY If You smell gas: 1. Shut off gas to the appliance. 2. Extinguish any open flame. 3. Open lid. 4. If odor continues, immediately call your gas supplier. 4644450-04 1 Safety Symbols The symbols and boxes shown below explain what each heading means. Read and follow all of the messages found throughout the manual. Indicates an imminently hazardous situation which, if not avoided, will result in death or serious injury. Be alert to the possibility of serious bodily injury if the instructions are not followed. Be sure to read and carefully follow all of the messages. Indicates a potentially hazardous situation which, if not avoided, may result in minor or moderate injury. Important: Fill out Warranty Information below Warranty Information Model Number ________________________________ Date Purchased _______________________________ ATTENTION: The regulator supplied is for Butane gas only and can be used with 15Kg or smaller Butane bottles. Char-Broil Barbecues can run on Propane gas, but only with an approved 37 mbar PROPANE GAS REGULATOR. (see instructions). Do not use a variable regulator. If in doubt contact your Local gas stockist. Installation Safety Precautions Installation Safety Precautions Warning: accessible parts may be very hot, wear protective gloves when handling hot parts. Keep young children away. Beware of heat escaping when lifting lid. This barbecue is designed for use with LP (Butane/propane) gas. The valve supplied must be used. Replacement parts must be those specified by the manufacturer. Barbecue installation must conform with local codes. Barbecue is not to be installed in or on recreational vehicles and/or boats. Keep any electrical cords and/or fuel supply hoses away from any hot surfaces. Do not modify for use in any other location. Modification will result in a safety hazard. Check the seals on the gas container and regulator before connecting a new gas container to the appliance. Injectors have been stamped for size. Never remove injectors from valves. Any modification of the appliance may be dangerous. This product is subject to patents pending in the U.S. and other countries. 1)Fuel hose from fuel bottle must not touch barbecue body. A distance of at least 18 cm must be maintained between fuel hose and barbecue body! Do not exceed 1.5 m length of hose. Do not twist fuel hose for any reason. Visually inspect hose before each use of appliance. If there is excessive abrasion, cracking or wear, hose is cut, or when National safety regulation and standards require, hose must be replaced prior to operation. Barbecue must only be used with Nationally approved fuel hoses and bottles. Fuel bottle must sit to side of barbecue unless a means of attachment is provided. 2) Installation of barbecue must conform with National safety regulations and standards. Barbecue must only be used outdoors and must not be installed or used within 1 metre (back and sides) of combustible material. Do not locate barbecue under overhead made of combustible materials. Do not place over drains or gullies. Avoid use of electrical cables and petrol hoses near heated areas. 3) Use only Nationally approved regulator and gas as shown below: COUNTRY GAS FR Butane GB,ES,PT,IT,GR,LU,BE,IE Butane Propane NO,FI,SE,DK,IS Propane CH,DE,AT Propane NL Butane 2 4644450-04 PRESSURE 28-30 mbar 28-30 mbar 37 mbar 30 mbar 50 mbar 30 mbar For safe use of your Barbecue and to avoid serious injury: Do not let children operate or play near Barbecue. Keep Barbecue area clear and free from materials that burn. Do not block holes in bottom or back of Barbecue. Check burner flames regularly. Use Barbecue only in well-ventilated space. NEVER use in enclosed space such as carport, garage, porch, covered patio, or under a surface that can catch fire. Do not use charcoal in a gas Barbecue. Use Barbecue at least 1M from any wall or surface. Maintain 3M. clearance to objects that can catch fire or sources of ignition such as pilot lights, live electrical appliances, etc. Apartment Dwellers: Check with management to learn the requirements and fire codes for using a Gas Barbecue in an apartment. If allowed use outside on the ground floor with a one (1) meter clearance from walls or rails. Do not use on or under balconies made of wood. NEVER attempt to light burner with lid closed. A build up of nonignited gas inside a closed Barbecue is hazardous. Never operate Barbecue with fuel bottle out of correct position. Always close fuel bottle valve before moving fuel bottle from specified operating position. R ----- 3 S ----- 1 T ----- 1 U ----- 1 V ----- 1 Parts List - Model 464445004 Key Qty -- Description --------------------------------- Part# A ----- 1 B ----- 1 C ----- 1 D------1 F ----- 1 G ----- 1 H ----- 2 I ------ 1 J ------ 1 K ----- 1 L ----- 1 M ----- 1 N ----- 1 O ----- 1 P ----- 1 Q ----- 1 ----Lid Handle -------------------------------------------- 4154399 ----Base --------------------------------------------------- 4154381 ----Cooking Grill ----------------------------------------- 4157097 ----Valve Assembly -------------------------------------- 4158212 ----Barbecue Lid ----------------------------------------- 4509232 ----Barbecue Bottom ------------------------------------ 4509233 ----Blank Legs -------------------------------------------- 4302534 ----Valve Cover ------------------------------------------ 4502445 ----Hose/Regulator Bag -------------------------------- 4158191 ----Control Leg ------------------------------------------- 4526182 ----Burner ------------------------------------------------- 4068082 ----Leg Handle ------------------------------------------- 4150357 ----Ignitor -------------------------------------------------- 4153713 ----Ignitor Wire ------------------------------------------- 4153761 ----Electrode ---------------------------------------------- 4153800 ----Control Knob ----------------------------------------- 4154214 ----Lid Hanger ---------------------------------------------Heat Indicator w/ Nut ---------------------------------Grease Cup --------------------------------------------Grease Clip --------------------------------------------Heat Plate -------------------------------------------- 4154245 4156896 5156609 5156610 4156439 W----- 6 ----#10-24 x 7/16 T- Nut ----------------------------X ---- 20 ----#10-24 Hex Nut (keps) --------------------------Y ----- 3 ----#10-24 Dome Nut ---------------------------------Z ---- 14 ----#10-24 x 1" Machine Screw -------------------AA --- 3 ----#10-24 x 3/8" Machine Screw -----------------BB --- 3 ----#10-24 x 2" Machine Screw -------------------CC --- 3 ----1-1/2" Spacer --------------------------------------- 4080094 4080208 4080251 4080302 4080345 4080377 4080724 DD --- 2 EE --- 1 FF --- 2 GG --- 3 HH --- 2 4080361 4080413 4080735 4080772 4080139 #10 Fasteners Bag: 4254038 Misc. Fasteners Bag: 4253106 ----#6-32 x 3/8" Machine Screw -----------------------5/16 Flat Washer --------------------------------------#10 x 3/8 Self-tap Screw ----------------------------#12-14 x 1/2" Self-tap Screw ----------------------.175ID x .25OD x 1/8" Spacer ------------------ Z A Z C S GG Y GG V F Z R R X EE X CC X GG X CC L X W AA W S R U AA W M X N A 1 DD HH Q FF X BB O X X K Z H BB P Z D X Z H I FF X X G T J X B Z Z 4644450-04 3 Before Beginning Assembly Remove all contents from box. Lay cardboard on the ground when unpacking, assemble Barbecue parts on the cardboard to avoid scratching surfaces. Carefully read and follow all assembly instructions, paying particular attention to parts orientation. Easily find fasteners by referring to each item (shown actual size) at the start of each step. Minimum tools...for assembly of your Barbecue include screwdrivers (cross head), adjustable wrench and pliers. A 3/8" nut driver would be ideal. 1 #10Bag X2 X2 X2 X W M Z N Z To Barbecue Bottom X between Leg and Barbecue Bottom (Finger K tighten fully onto screws) W s Use top two holes of four-hole pattern. (Inside Barbecue Bottom) Note: Tighten by turning screws only. G s Be sure that holes in Barbecue bottom for electrode are pointing upward toward control leg. 4 4644450-04 Z 2 X between Leg and Barbecue Bottom (Finger tighten fully onto screws) #10Bag X4 s Rotate Barbecue bottom to attach blank legs. H W (Inside Barbecue Bottom) Note: Tighten by turning screws only. Z X4 X W between Leg and Barbecue Bottom (Finger tighten fully onto screws) X4 Z H X To Barbecue Bottom 3 B X #10Bag Z X6 K s Wheels face awayfrom control leg. Z X6 B X Control leg (K) properly attached to base(B) Repeat assembly on blank legs(H). 4644450-04 5 4 D N Misc. Bag X2 Assemble bottom spacer first. DD HH DD X2 D HH A 1 K J 5 C A Valve Cover must be BETWEEN flanges of Control Leg L I Valve B L s I 6 4644450-04 VERY IMPORTANT: Burner tube must pass through hole in valve cover and engage valve attached to control leg. K I 6 #10 Bag X2 X2 AA X 7 #10 Bag X1 X3 X3 CC AA X4 X AA AA X CC K BB X BurnerTube Q BB P IMPORTANT X Be sure Valve Cover is INSIDE Control Leg. Rear view of control leg 8 #10 Bag X3 Insert long end of electrode frombeneathBarbecue bottom N O V Y Round End Y G P Flat End O View of electrode (P) from beneath Barbecue bottom(G). 4644450-04 7 Assembly - Leak Test Do not use Barbecue until leak checked. If leak is detected at any time, STOP. Immediately close fuel bottle valve, stay away from the Barbecue and call local gas supplier. For your safety Leak test must be repeated each time fuel bottle is exchanged or refilled. Do not smoke during leak test. Do not use an open flame to check for gas leaks. Barbecue must be leak checked outdoors in well-ventilated area, away from ignition sources such as gas fired or active electrical appliances. During leak test, keep Barbecue away from open flames or sparks. Never remove injector at end of valve (A). 3 A To leak test your Barbecue: 3 Use a clean paint brush and 50/50 soap and water solution. Use mild soap and water. s Do not use household cleaning agents. Damage to gas train components can result. 2 1. 2. 3. 4. Turn control knob to OFF Be sure regulator is tightly connected to fuel bottle. Turn gas on at the tank by using the regulator. Brush soapy solution onto following connections: Regulator fitting, face at crimps and vent hole (2); Hose (3) and all connections; All fuel bottle welds (fuel bottle collar, middle and bottom) (4). 5. "If growing" bubbles appear, there is a leak. Close fuel bottle valve immediately. Retighten connections and repeat leak test procedures. If leaks cannot be stopped replace parts. 1 4 Postion tank to side of barbecue on level surface. 8 4644450-04 If "growing" bubbles appear do not use or move the fuel bottle. Contact gas supplier. X2 Misc. Bag 11 B C FF U A Feed wire through hole from INSIDE Barbecue Bottom. Rear View FF 12 14 Z (Tighten using screw only.) A #10Bag X2 C U T F S Z Grill rests on T- nuts(W). X2 X Misc. Bag EE X X1 EE Thermometer Nut (Remove from thermometer) 4644450-04 9 15 Misc. Bag X3 GG R GG Use & Care NEVER attempt to light burner with lid closed. A buildup of non-ignited gas inside of closed Barbecue is hazardous. Never operate Barbecue with fuel bottle out of correct position specified in assembly instructions. Putting out grease fires by closing the lid is not possible. Barbecues are well ventilated for safety reasons. Do not use water on a grease fire. Personal injury may result. If a grease fire develops turn knob and fuel bottle off. Do not leave Barbecue unattended while preheating or burning off food residue on high. If Barbecue has not been regularly cleaned a grease fire can occur that may damage the product. 10 4644450-04 Safety Tips s If you have a Barbecue problem see the "Troubleshooting Section". s When Barbecue is not in use, turn off control knob and fuel bottle valve. s Never move Barbecue while in operation or still hot. s Use long-handled barbecue utensils to avoid burns and splatters. s Grease cup must be attached to grease clip and emptied after each use. Do not remove grease cup until Barbecue has completely cooled. s If you notice grease or other hot material dripping from Barbecue onto valve, hose, or regulator, turn off gas supply at once. Determine the cause, correct, and clean valve, hose and regulator before continuing. Perform a leak test. s The regulator may make a humming or whistling noise during operation. This will not affect safety or use of Barbecue. Before Your First Cookout Light burner, check to make sure it is lit, close the lid and warm up Barbecue on HIGH for 15 minutes. Curing of paint and parts will produce an odor only on first lighting. does not spring back, replace valve assembly before using Barbecue. Turn knob to LOW position then turn back to OFF position. Valve should turn smoothly. Use & Care Ignitor Lighting s 1. 2. 3. Do not lean over Barbecue while lighting. Open lid. Turn on gas at fuel bottle. Push in and turn knob on control leg to HIGH. Push IGNITOR button rapidly to light. Be sure burner lights and stays lit. 4. If IGNITOR does not work, follow match lighting instructions. Match Lighting s Do not lean over Barbecue while lighting. 1. Open lid. Turn gas on at fuel bottle. 2. Place lit long-stem match into one of three large match lighting holes around burner tube from beneath Barbecue. 3. Push in and turn control knob to HIGH. Be sure burner lights and stays lit. Burner Flame Check Match lighting holes Hose Check Before each use, check to see if hose is cut or worn. Replace damaged hose before using Barbecue. Use only valve/hose/ regulator specified by manufacturer. General Barbecue Cleaning Clean porcelain Barbecue lid and bottom with soap and water or nonabrasive cleaner to remove dust and grease. Use Creme of Tartar for stubborn stains. Do not use a Barbecue cleaner on outside of Barbecue. Wipe with vinegar. Do not paint inside of Barbecue. Replace ceramic briquets as frequently as necessary to avoid grease buildup and flare-ups. Porcelain grill: Because of glass-like composition, most residue can be wiped away with baking soda/water solution or specially formulated cleaner. Use nonabrasive scouring powder for stubborn stains. 1. Light burner in Barbecue bottom using long-stem match as described in Match Lighting. 2. Push in and rotate knob from HIGH to LOW. You should see a noticeably smaller flame in LOW position from that seen in HIGH position. Always check flame, as described above, prior to each use. If burner does not light turn knob to OFF, wait 5 minutes, try again. If the burner does not ignite with valve open, gas will continue to flow out of the burner and could accidently ignite with risk of injury. Clean burner twice a month when in regular use. Clean burner prior to use after storage. Spiders and insects like to build nests in burner tube (especially during colder months). These nests can cause flashback (fire in burner tube). Typical spider web inside burner Repainting Your Barbecue Turn gas off at Fuel Bottle. Press ignitor button rapidly. "Click" should be heard each time at electrode. See Troubleshooting if no click is heard. After extended use and exposure to weather, paint on Barbecue legs may deteriorate or become spotted. Although this detracts from Barbecue's appearance, it will not impair its performance. To refinish Barbecue legs, use wire brush and lightly sand with fine grit sandpaper. Sanding allows new paint to adhere more easily. Refinish legs with heat-resistant paint. Valve Check Storing Your Barbecue Turning Barbecue Off Turn knob to OFF position. Ignitor Check Important: Make sure gas is OFF at Fuel bottle before checking valve. Knob locks in place. To check valve, first push in knob and release, knob should spring back. If knob Clean cooking grill. Apply a light coating of vegetable oil to heat plate. Store in dry location. When fuel bottle is connected to Barbecue, store both outdoors in well-ventilated space and out of reach of children. Store Barbecue indoors ONLY if fuel bottle is disconnected, removed from Barbecue and stored outdoors. Cover Barbecue if stored outdoors. Choose from a variety of Barbecue covers offered by manufacturer. 4644450-04 11 Use & Care A Cleaning the Gas Train 1. Turn gas OFF at knob and Fuel Bottle. 2. Remove cooking grill and grease cup (A). 3. Disconnect ignitor wire from electrode. Wipe ceramic portion of electrode with rubbing alcohol and cloth (D). 4. Examine upper and lower surfaces of burner tube closely (E). If any cracks or holes are found, replace burner tube. s VERY IMPORTANT: When replacing burner tube, burner tube must pass through hole in valve cover and engage valve attached to control leg. VALVE C BURNER TUBE 7. Using garden hose (preferably with nozzle), force water through burner tube to clean. 8. Replace burner plate and dome nuts. 9. If Barbecue is to be stored, coat tube burner lightly with cooking oil. Wrap protective cover over each end to keep insects out. 10. Attach flat end of ignitor wire to electrode. 11. Replace cooking grill and grease cup. 12. Before cooking again on Barbecue, follow Gas Flow Check. 13. Barbecue must be completely dry before cooking. D E A 12 4644450-04 Problem Troubleshooting Possible Cause Prevention/Cure Wire and/or electrode covered with cooking residue. Clean wire and/or electrode with rubbing alcohol and clean swab. Electrode and burner are wet. Wipe dry with cloth. Electrode cracked or broken "sparks at crack" Replace electrode. Wire is loose or disconnected. Reconnect wire or replace electrode/wire. Wire is shorting (sparking) between ignitor and electrode. Replace ignitor wire/electrode. Bad electrode. Replace electrode. No gas flow. Check to see if fuel bottle is empty. If fuel bottle is not empty, refer to "Sudden drop in gas flow". Obstruction of gas flow. Clear burner tube. Disengagement of burner to valve. Reengage burner and valve. Is Barbecue assembled correctly? Check steps in assembly instructions. Out of gas. Check for gas in fuel bottle. Excess flow valve tripped. Turn off knob and fuel bottle valve. Wait 30 seconds and light Barbecue. If flames are still low turn off knob and fuel bottle valve. Disconnect regulator. Reconnect regulator and leak test. Turn on fuel bottle valve, wait 30 seconds and then light Barbecue. High or gusting winds. Turn front of Barbecue to face wind or increase flame height. Low on gas. Refill fuel bottle. Excess flow valve tripped. Refer to "Sudden drop in gas flow" above. Grease buildup. Clean Barbecue. Excessive fat in meat. Trim fat from meat before Barbecuing. Excessive cooking temperature. Adjust (lower) temperature accordingly. Persistent grease fire. Grease trapped by food buildup around burner system. Turn knob to OFF. Turn gas off at fuel bottle. Open lid carefully and let fire burn out. After Barbecue cools, remove & clean all parts. Flashback... (fire in burner tube) Burner and/or burner tube blocked. Clean burner and/or burner tube. Burner will not light using ignitor. Burner will not match light. Sudden drop in gas flow or low flame. Flames blow out. Flare-up. 4644450-04 13 Patio Caddie Cooking Chart Cooking times and temperatures may vary according to specific recipes, cooking conditions, or barbecue equipment used. Take this into consideration to insure best results. Please note: High = 260 - 343 C / Medium = 177- 260C / Low = 93-260 C ITEM SIZE/QUANTITY TEMPERATURE TIME TIPS Beef Steak 1 inch High/medium high Rare - 7-10 minutes, Medium - 12-15 minutes Well - 18-20 minutes Sear over high heat. Reduce to medium high. Cover. Hamburgers 1/2 inch Medium Medium - 10 minutes, Medium/well - 12 minutes Cover. Turn once. Well - 15 minutes Pork Chop 1 inch High/medium 30 minutes, Internal temp. 71C Sear over high heat. Reduce to medium. Cover. Boneless Pork Loin .9kg Low 1 hour, Internal temp. 71C Brown roast over direct heat. Cover. Remove to side for indirect cooking. Cover. Baby Back Pork Ribs .79kg Medium/low Low 50 minutes Brown over medium/low for 10 minutes. Cover. Reduce to low. Cover. Baste last 15 minutes with sauce. Boneless, Skinless, Chicken Breast .23kg Medium/high 20 minutes Pound, rub with oil. Sear over high heat. Cover. Reduce to medium. Cover. Cut Chicken 1 each Medium Wings - 20 minutes, Leg/thigh - 35 minutes Breast - 40 minutes, Internal temp. 74C Cook skin side first. Cover. Turkey Breast with Ribs .9kg Low 1 hour, Internal temp. 74C Cook skin side down first to brown. Cover. Shrimp, Medium, peeled and deveined .23kg Medium/high 5 minutes Skewered, oiled. Cover. Corn on Cob 1 each Medium 40 minutes Husks on, soaked in cold water. Direct heat, cover. Turn during cooking. Baking Potatoes 1 each Medium 1 hour Wrap in aluminum foil. Indirect heat. Cover. Turn once during cooking. Yellow Onion 1 each Medium/high 12-15 minutes 1/2 inch whole rings. Oiled. Cover. Food Safety Food safety is a very important part of enjoying the outdoor cooking experience. To keep food safe from harmful bacteria, follow these four basic steps: Clean: Wash hands, utensils and surfaces with hot soapy water before and after handling raw meat and poultry. Separate: Separate raw meats and poultry from ready-to-eat foods to avoid cross contamination. Use a clean platter and utensils when removing cooked foods. Cook: Cook meat and poultry thoroughly to kill bacteria. Use a thermometer to ensure proper internal food temperatures. Chill: Refrigerate prepared foods and leftovers promptly. 14 4644450-04 How To Tell If Meat Is Barbecued Thoroughly Meat and poultry cooked on a Barbecue often browns very fast on the outside. Use a meat thermometer to be sure food has reached a safe internal temperature and cut into food to check for visual signs of doneness. Whole poultry should reach 82C ; breasts, 77C. Juices should run clear and flesh should not be pink. Hamburgers made of any ground meat or poultry should reach 71C and be brown in the middle with no pink juices. Beef, veal and lam steaks, roasts and chops can be cooked to 63C. All cuts of pork should reach 71C. NEVER partially Barbecue meat or poultry and finish cooking later. Cook food completely to destroy harmful bacteria. When reheating takeout foods or fully cooked meats like hot dogs, Barbecue to 18C, or until steaming hot. SERVICE Char-Broil International L.L.C. Bradley House Bircholt Road Parkwood,Maidstone,Kent, ME15 9XY Phone 01622 677244 Fax 01622 688124 GB For Warranty and replacement parts [email protected] [email protected] E-MAIL ADDRESS (For U.K. Residents only) 4644450-04 15