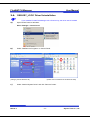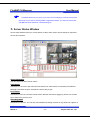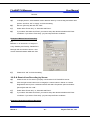
1
FlexWATCH Manager
User Manual
FlexWATCH Manager User Manual
(Version. 3.0_Rev0)
Nov 27, 2007
Seyeon Tech Co., Ltd.
www.seyeon.co.kr
www.flexwatch.com
M1103-4
-1-
Seyeon Tech Co., Ltd.
FlexWATCH Manager
User Manual
FlexWATCH Manager Software License Agreement
NOTICE TO USER:
THIS IS A USING CONTRACT NOT A PURCHASING AGREEMENT. PLEASE READ
THIS CONTRACT CAREFULLY.
IF YOU USE A COUPON CODE INCLUDED IN FLEXWATCH MANAGER
CD TO ISSUE THE PRODUCT KEY OR USING ALL OR ANY PORTIONS OF THE SOFTWARE, IT MEANS
THAT YOU ACCEPT ALL THE TERMS AND CONDITIONS OF THIS AGREEMENT AND YOU AGREE THAT
THIS AGREEMENT IS ENFORCEABLE LIKE ANY WRITTEN NEGOTIATED AGREEMENT SIGNED BY YOU.
IF YOU DO NOT AGREE, DO NOT USE THIS SOFTWARE.
IF YOU ACQUIRED THE SOFTWARE ON
TANGIBLE MEDIA (e.g. CD) WITHOUT AN OPPORTUNITY TO REVIEW THIS LICENCE AND YOU DO
NOT ACCEPT THIS AGREEMENT, YOU MAY OBTAIN A REFUND OF THE AMOUNT YOU ORIGINALLY
PAID IF YOU:
(A) DO NOT USE THE SOFTWARE AND (B) RETURN IT, WITHOUT ISSUING THE
PRODUCT KEY BY THE COUPON CODE, WITH THE PROOF OF PAYMENT, TO THE LOCATION FROM
WHICH IT WAS OBTAINED WITHIN THIRTY (30) DAYS OF THE PURCHASE DATE.
1. Use of Software
Seyeon grants the right of using only. You may install only one copy of the Software onto
a hard disk or other storage device of up to the permitted Number of Computers. In the
case you are to install the Software entirely or/and in part onto file server or/and
network server you have to buy the same number of copies of the Software as the users
of the server. If the product key for this software is issued, or saved in either a hard disk
or other storage device, we regard that you are “Using” the software. Since a single
coupon code should not be used to issue multi product keys, you shall keep the coupon
code or the product key in a safe place so that it can not be known by others.
2. Transfer of Using Right
You may not rent, lease, sublicense, or lend the Software. You may however use former
version of the Software in case you upgrade it to new version of the Software providing
you may not use new version of the Software and old version of the Software at the
same time.
3. Copyright
You agree that all intellectual properties or/and copyright of the Software in any form
(tangible or not tangible) belong to Seyeon and protected by the Korean Copyright Law
M1103-4
-2-
Seyeon Tech Co., Ltd.
FlexWATCH Manager
User Manual
and International Treaty Provisions. You agree not to modify, adapt, or translate the
Software. You also agree not to reverse engineer, de-compile, disassemble, or otherwise
attempt to discover the source of the Software. You may not make any form (e.g.; CD) of
copy of the Software entirely or/and in part without Seyeon’s written form of permission.
4. Limited Warrants
Seyeon warrants to you that the Software will perform substantially in accordance with
the Documentation for the ninety (90) day period following your receipt of the Software.
To make warranty claim, you must return the Software to the location where you
obtained it along with proof of purchase within such ninety (90) day period. If the
Software does not perform substantially in accordance with the Documentation, the
entire liability of Seyeon and your exclusive remedy shall be limited to either, at
Seyeon’s option, the replacement of the Software or the refund of the license fee you
paid for the Software. For further warranty information, please contact Seyeon’s
Customer Support Department.
5. DISCLAIMER OF WARRANTIES
Except for the limited warranty set forth in section 4, Seyeon and its suppliers make no
warranties, express, implied, or statutory, as to any other matters, including but not
limited to non-infringement of third-party rights, merchantability, or fitness for any
particular purpose. Seyeon and its suppliers do not and cannot warrant the performance
or results you may obtain by using the Software.
6. Limitation of Liability
In no event will Seyeon and its suppliers be liable to you for any consequential, indirect,
incidental, punitive, or special damages, including any lost profits or lost savings, even if
a representative of Seyeon or any supplier has been advised of the possibility of such
damage, or for any claim by any third party.
7. Governing Law and General Provisions
This Agreement will be governed by the regarding laws in force in Korea. This Agreement
shall automatically terminate upon failure by you to comply with its terms, in which event
you must destroy all copies of the Software. This Agreement may only be modified by a
writing signed by an authorized officer of Seyeon, although Seyeon may vary the terms
of this Agreement in connection with the licensing of any Updates to you.
M1103-4
-3-
Seyeon Tech Co., Ltd.
FlexWATCH Manager
M1103-4
User Manual
-4-
Seyeon Tech Co., Ltd.
FlexWATCH Manager
User Manual
Contents
1.
2.
Overview of FlexWATCH Manager ............................................................................................8
1.1.
Introduction .................................................................................................................8
1.2.
Key Benefits ................................................................................................................9
1.3.
Application ................................................................................................................16
Software Installation and Installation........................................................................................18
2.1.
3.
FlexWATCH Manager Installation ...............................................................................18
2.1.1.
Installation with a Product Key ...........................................................................18
2.1.2.
Installation with a USB Serial Key ......................................................................22
2.1.3.
Reinstallation and Upgrade ...............................................................................29
2.2.
FlexWATCH Manager Backup....................................................................................29
2.3.
FlexWATCH Manager Uninstallation...........................................................................30
2.4.
‘USB KEY_LOCK’ Driver Uninstallation ......................................................................31
Operation Guide .....................................................................................................................32
3.1.
Running FlexWATCH Manager ..................................................................................32
3.2.
Brief Description of FlexWATCH Manager Window .....................................................32
3.3.
ACCESS Level and Password Setup..........................................................................36
3.4.
3.5.
3.3.1.
ACCESS Level .................................................................................................36
3.3.2.
Admin Password Setup .....................................................................................37
HDD Disk Manager Configuration...............................................................................38
3.4.1.
Required HDD Capacity Calculation ..................................................................38
3.4.2.
HDD Configuration ............................................................................................39
3.4.3.
Installed Drives .................................................................................................40
3.4.4.
Enabled Drives .................................................................................................41
3.4.5.
E-mail service ...................................................................................................41
Log Message Configuration .......................................................................................42
3.5.1.
4.
5.
Select Log Message..........................................................................................43
3.6.
All Properties.............................................................................................................45
3.7.
FlexWATCH Manager Properties................................................................................46
Server Registration & Property Setting ....................................................................................50
4.1.
FlexWATCH Server Registration with Static IP ............................................................50
4.2.
FlexWATCH Server Registration with Dynamic IP .......................................................53
4.3.
Server Property Setting..............................................................................................54
Camera Registration & Property Setting ..................................................................................57
M1103-4
-5-
Seyeon Tech Co., Ltd.
FlexWATCH Manager
6.
User Manual
5.1.
Camera Registration..................................................................................................57
5.2.
Camera Property setting ............................................................................................58
5.3.
Video Property Setting ...............................................................................................59
Camera Live View...................................................................................................................61
6.1.
Camera Display.........................................................................................................61
6.2.
Camera Grouping and Sequential Display ..................................................................63
6.2.1.
Camera Grouping .............................................................................................63
6.2.2.
Camera Sequential Display ...............................................................................63
6.3.
Full Display Mode ......................................................................................................63
6.3.1.
Full Screen Mode..............................................................................................64
6.3.2.
Monitoring Mode ...............................................................................................64
6.4.
Dual Monitor..............................................................................................................65
6.5.
Single Display Mode ..................................................................................................66
6.6.
Fit Image To Window .................................................................................................66
6.7.
P/T/Z Control.............................................................................................................67
6.7.1.
PTZ Control ......................................................................................................67
6.7.2.
PTZ Grid Interface and PTZ Dialog Interface......................................................68
6.7.3.
PTZ Sensitivity Control ......................................................................................70
6.7.4.
PTZ Preset .......................................................................................................70
6.7.5.
PTZ Auto Preset................................................................................................72
6.7.6.
Touring .............................................................................................................72
6.8.
Camera Removal from a Group..................................................................................73
7.
Server Status Window.............................................................................................................74
8.
System Log Window ...............................................................................................................75
9.
Beep Alarm Notification...........................................................................................................76
9.1.
10.
Beep Alarm Configuration ..........................................................................................76
Relay Output (DO) Configuration......................................................................................78
10.1.
11.
Relay Output (DO) Configuration................................................................................78
Recording Configuration ..................................................................................................80
11.1.
Forced(Manual) Recording.........................................................................................80
11.2.
Recording Conditions and Criteria ..............................................................................80
M1103-4
11.2.1.
Recoding by Conditions.....................................................................................80
11.2.2.
Schedule Driven Recording ...............................................................................83
11.2.3.
Motion Driven Recording ...................................................................................85
11.2.4.
Event driven Recording by Sensor .....................................................................86
-6-
Seyeon Tech Co., Ltd.
FlexWATCH Manager
12.
User Manual
Player Lite .......................................................................................................................87
12.1.
Network Site Registration...........................................................................................88
12.2.
Search Images ..........................................................................................................89
12.3.
Playback ...................................................................................................................91
12.4.
Tools .........................................................................................................................91
12.4.1.
Print .................................................................................................................92
12.4.2.
AVI Backup .......................................................................................................92
12.4.3.
JPEG Backup ...................................................................................................93
13.
Network Alarm Manager Configuration .............................................................................93
14.
ISENS-Central Configuration ...........................................................................................95
15.
Trouble Shooting .............................................................................................................99
15.1.
Installation.................................................................................................................99
15.2.
Server Registration....................................................................................................99
15.3.
Video Display ..........................................................................................................100
15.4.
Video Recording ......................................................................................................101
15.5.
Relay Output Control ...............................................................................................101
15.6.
PTZ Control.............................................................................................................102
15.7.
Virtual Memory Error Messages ...............................................................................102
M1103-4
-7-
Seyeon Tech Co., Ltd.
FlexWATCH Manager
User Manual
1. Overview of FlexWATCH Manager
1.1. Introduction
FlexWATCH Manager is a proprietary application program to globally and locally manage
remote video over the TCP/IP network.
It only works with all FlexWATCH Network camera or video server series and provides you
with simple and consolidated tool for not only real time view of digital video but also DVR(Digital Video
Recording) solution. You can simply install the software in your monitoring PC and connect it to any
FlexWATCH network camera or video server series over the TCP/IP network.
♣ Key Features
● Works with all FlexWATCH Network Camera and Video Server series.
(RTOS Firmware Version2.3 or 3.0, Linux3.0 support)
● Controls FlexWATCH servers with either static IP or dynamic IP address.
● Easy search and control the remote video.
● Supports Maximum 256 cameras and camera grouping
(16ch, 25ch, 36ch, 64ch, 128ch, 256ch support)
● Supports Drag and Drop functions for camera selection
● Supports Event, Motion Detection, Schedule and forced recording options.
● Supports not only S/W PTZ (Pan/Tilt/Zoom) but also H/W control by Joystick.
● System log based video search.
● Easy and fast search & playback of archived video
● File rename and AVI file conversion of archived video
● Supports 10 multi-languages.
● Works with the network alarm manager and when an alarm occurs, it automatically
records the video streams and send video data to the network alarm manager.
● Works with ISENS System.
● Works with MPEG4 models.
● Works with a joystick through COM or USB port for PTZ control.
M1103-4
-8-
Seyeon Tech Co., Ltd.
FlexWATCH Manager
User Manual
1.2. Key Benefits
Complete and pure Network Digital Video Recording
FlexWATCH™ Manager provides powerful tool to view, record and playback multiple
compressed video feeds from multiple FlexWATCH™ from any location over the TCP/IP network.
Scheduled, Event, software motion detection and Forced recording driven video recording
options are provided and you can search all archived video by server or camera for the specific time.
Centralized and Decentralized Real-time Remote Monitoring
FlexWATCH Manager enables you to set up monitoring and recording solution at any place in
your local or remote facility. FlexWATCH network cameras and video servers support both static and
dynamic IP addresses. Also Up to 10 different FlexWATCH Manager or FlexWATCH Manager
Viewer program can simultaneously access to the same video sources. Therefore, you can build up
centralized or decentralized remote monitoring and security solution in flexible ways. Highlighted
quick video display can be achieved by doubling clicking on an image to closely view specific camera.
Scalable System for Medium or Large sized Monitoring
Number of video cameras can easily be added with good scalability. If you have 16 cameras in
your premise and want to add more cameras, simply add FlexWATCH network camera and control
them through FW-Manager. No needs for complicated video cablings and buying other costly DVR
equipment.
Cost Effective & Easy Installation
FlexWATCH Manager is designed to work with any FlexWATCH Server series. Thus, once
FlexWATCH Network servers are connected to the network at any site in your premise or global
facility, you can control multiple videos over the TCP/IP network. You are completely free from
complicated coaxial cabling and maintenance.
Powerful Recording Options and Playback
FlexWATCH Manager provides powerful tools to record and playback multiple compressed
video feeds from multiple FlexWATCH servers in a secured control room. Scheduled, Event Alarm,
Software motion detection and Forced recording options are provided and you can search all
archived video by server or camera for the specific time. Remote playback of archived video in the
FlexWATCH Manager over the TCP/IP network is also possible through FlexWATCH Manager
M1103-4
-9-
Seyeon Tech Co., Ltd.
FlexWATCH Manager
User Manual
remote player software.
M1103-4
- 10 -
Seyeon Tech Co., Ltd.
FlexWATCH Manager
User Manual
Easy Camera Relocation and Easy Upgrade
Unlike conventional DVR system which requires dedicated and complicated video cabling to
relocate camera location and sometimes hardware upgrade to enhance system performance, you can
easily relocate camera location by simply connect it to other network or easily upgrade system
by software enhancement.
Expandable Storage Options Using Networked HDD
Either dedicated PC HDD or Network HDD can be used as a storage device. Thus, you can
easily extend your storage capacity depending on your recording needs. No need to stick to dedicated
PC HDD anymore
External Device Control
FlexWATCH Manager enables you to control not only live video but also Pan/Tilt/Zoom
device and Relay output device connected to FlexWATCH server over the network in a remote
security room. This enables you to easily verify any alarm driven video and control relay output device
over the TCP/IP network.
Complete Windows based Application
FlexWATCH Manager is Windows based application software. You can control all the functions
by a mouse. And it provides you with user friendly interface for easy video control. (Window 2000,
Windows 2000 Professional SP4, Windows XP Professional SP2 support)
Next Generation of Security Solution
TCP/IP based video management solution is becoming one of industrial trend as a state-of-theart next generation of remote monitoring and security solution which can seamlessly replace your
analog solution. FlexWATCH Manager makes your investment more valuable and durable to cope with
future challenge by adopting next generation of solution.
10 Multi languages Support
FlexWATCH Manager supports Korean, English, Germany, Spanish, Portuguese, Italian,
Japanese, Traditional Chinese, Simplified Chinese, and Turkish.
Dynamic IP Support by AOIP server
FlexWATCH Manager works with AOIP server to support FlexWATCH servers with dynamic IP
address.
M1103-4
- 11 -
Seyeon Tech Co., Ltd.
FlexWATCH Manager
User Manual
Dual Monitor Support
If you use a graphic card supporting dual monitor, you can manage dual screens.
H/W Motion Detection Support for Linux based models
If H/W motion detection function of FlexWATCH 3.0 product is enabled, FlexWATCH Manager
can record motion driven recording without S/W motion detection.
NAM (Network Alarm Manager) Support
FlexWATCH Manager 2.5 or higher version can work with FW-NAM. When an event is occurs,
you can see video in a pop-up window.
ISENS System Support
FlexWATCH Manager 2.6 or higher version can work with ISENS System. For more questions
about ISENS, please contact us at [email protected].
All Property Setting Support
FlexWATCH Manager 2.6 or higher version supports All Property Setting, meaning that you can
change all the setting values for Camera Status, Image Configuration, Recording Condition, etc at
once.
Joystick Support for PTZ control
FlexWATCH Manager 2.6 or higher version supports a Joystick for PTZ control.
MPEG4 model Support
FlexWATCH Manager 3.0 or higher version supports MPEG4 models.
M1103-4
- 12 -
Seyeon Tech Co., Ltd.
FlexWATCH Manager
User Manual
Hardware & Software Specification for FW Manager
NVS
NVS
NVS
NVS
NVS
NVS
16ch
25ch
36ch
64ch
128ch
256ch
H/W Spec
2k
XP
SP4
CPU
Memory
XP
2k
XP
XP
2k
XP
2k SP4
WIN O/S
SP2
P4 2.8GHz
512M or above
XP
XP
SP2
SP2
2k SP4
SP2
P4 3.0 GHz
512M or above
SP4
SP2
SP2
SP4
SP2
Xeon
Xeon
Xeon
Dual 3.0
Dual 3.0
Dual 3.0
1G or above
1G or above
1G or above
P4 3.2GHz
512M or above
Graphic
Graphic card with 128M or above
card
yes ( optional CD RW )
CD Rom
Monitor
M1103-4
19” or above
21” or above
- 13 -
Seyeon Tech Co., Ltd.
FlexWATCH Manager
User Manual
Supporting Video Server
Display and Recording Performance
• All FlexWATCH IP Network camera and Video
• Display only : Max 480 fps
server series
• Firmware version 2.0 or later.
• Recording only : Max 1000 fps
• Display & Recording
Recording : 1000fps & Display : 480fps
Camera Display
• Drag & drop
Video Playback
• Max 256 channel display per each group
• Support search video data and playback.
support
• Remote playback function by FlexWATCH
• Auto calibration to window display.
Manager.
• Multiple camera group mode & sequential
• Quick and easy search of each server and
display.
camera by time condition.
PTZ Device Control
Disk Management
• PTZ control on image
• Support using local HDD and network HDD.
• PTZ control on separate PTZ menu
• Option to disk circulation / stop at HDD full
• Auto position on warning condition status.
• Recording space modification for record.
• 32 Preset control
File Backup
• Support editing recorded video file name.
Video Recording
• Conversion to AVI files for Windows media
• Time schedule / Manual recording by event,
player.
Software motion detection
• 2 location setup option for motion detection.
Server status screen
• Using video database.
• Display server status, alarm status and
recording status.
System Log Window
• Display system log message
Security
• Password protection for discretion access.
M1103-4
- 14 -
Seyeon Tech Co., Ltd.
FlexWATCH Manager
M1103-4
User Manual
- 15 -
Seyeon Tech Co., Ltd.
FlexWATCH Manager
User Manual
Frame Rate & Required Bandwidth Table
Models
Channels Type
FW 1110
FW 1150A
Required Bandwidth
NTSC
30fps
2.4Mbps
PAL
25fps
2.4Mbps
1Ch
NTSC
30fps
2.4Mbps
PAL
25fps
2.4Mbps
FW-3440
4Ch
NTSC
30fps
9.6Mbps
PAL
25fps
9.6Mbps
FW-5440
6Ch
NTSC
15fps
4.8Mbps
PAL
12fps
4.8Mbps
Remarks
Network
1Ch
FW 1160
FW 3110A
FPS / Channel
Camera
Network
Video Server
Network
Video
Recorder
*All tests executed under the local network environment and File size is set to 352 X 240 (10KBps, NTSC)
and 352 x 288(12KBps, PAL) and quality is set to normal.
File Size and HDD Capacity for Recording
The following table shows you the file sizes and HDD capacities for recording video data from
FlexWATCH network cameras and video servers.
Type
Resolution
NTSC
PAL
File Size
Required HDD Capacity
1Ch
4Ch
8Ch
16Ch
176X112
4KBps
2.5GB
10GB
20GB
40GB
352X240
10KBps
6GB
24GB
48GB
96GB
704X480
30KBps
18GB
72GB
144GB
288GB
173X114
5KBps
3GB
12GB
24GB
48GB
352X 288
12KBps
7GB
28GB
56GB
112GB
704X 576
40KBps
24GB
96GB
192GB
384GB
* Above HDD capacity is based upon recording 1 frame/sec for 7 days and 24 hours.
The Formula for Calculation of HDD capacity usage
HDD capacity usage can be calculated by the below formula. File size can de different by the
quality of video image. It is required to find a file size of JPEG image by snapshot option.
File Size x FPS X # of Ch x Period (60sec x 60Min x 24hrs x days)
1.3. Application
The application of FW-Manager is limitless when it is combined with FlexWATCH server series and
other supporting products from Seyeon Tech Co., Ltd. FW-Manager enables you to flexibly and easily
M1103-4
- 16 -
Seyeon Tech Co., Ltd.
FlexWATCH Manager
User Manual
design medium to larger remote monitoring and security solution in a cost effective manner. The
followings could be recommended application areas with FW-Manager.
• Centralized local facility monitoring and recording such as Building, Airport, Plant, Dam and
Shipyard.
• Centralized remote facility monitoring over the Internet such as Unmanned
facility of Telco, Chain store, Gas Station, Branch Office & construction site
• Security Alarm Company for visual security and alarm verification
• System Integration for small to large sized facility
M1103-4
- 17 -
Seyeon Tech Co., Ltd.
FlexWATCH Manager
User Manual
2. Software Installation and Installation
2.1. FlexWATCH Manager Installation
FlexWATCH Manager is a commercial program and it uses a key to prevent illegal copies. A
Product Key or USB Serial key can be used. This chapter describes the installation by a Product Key
and a USB Key.
2.1.1. Installation with a Product Key
A)
Insert the FlexWATCH Manager CD into your CD-ROM drive in your PC, and open “My
Computer”.
B)
Select CD-ROM drive and execute the proper FlexWATCH Manager Installation file that
matches to your product key.
C)
M1103-4
Installation wizard will start install program. Click “Next” button.
- 18 -
Seyeon Tech Co., Ltd.
FlexWATCH Manager
D)
User Manual
Read agreement about FlexWATCH Manager and select ‘I accept the terms in the license
agreement’ and click “Next” button.
E)
In this page you can create icons in desktop, start menu, start program and shortcut by
selecting each menu. Select shortcut icons and click “Next” button.
M1103-4
- 19 -
Seyeon Tech Co., Ltd.
FlexWATCH Manager
F)
User Manual
Select the destination folder for FlexWATCH Manager. The default location is ‘C:\Program
Files\Seyeon Tech\FlexWATCH Manager’. You can change the location to another folder if
you want, but the default location is recommended. Click “Next” button.
G)
M1103-4
Select “Product Key” and input the product key then click “Next” button.
- 20 -
Seyeon Tech Co., Ltd.
FlexWATCH Manager
)
User Manual
To issue the product key, please access to http://www.goodskey.com and then input
the coupon number attached to software CD and MAC address of installed Ethernet card
on user’s PC to install FlexWATCH Manager. For more detailed information, please refer
to the guideline on www.goodskey.com.
M1103-4
- 21 -
Seyeon Tech Co., Ltd.
FlexWATCH Manager
)
User Manual
The Product Key cannot be reissued, so print out the screen shot of the product key
and keep it carefully.
H)
Click “Finish” button to finish the installation of FlexWATCH Manager.
2.1.2. Installation with a USB Serial Key
A)
Insert the FlexWATCH Manager CD into your CD-ROM drive in your PC, and open “My
Computer”.
M1103-4
- 22 -
Seyeon Tech Co., Ltd.
FlexWATCH Manager
B)
User Manual
Select CD-ROM drive and execute the proper FlexWATCH Manager Installation file that
matches to your product key.
C)
Installation wizard will start install program. Click “Next” button.
D)
Read agreement about FlexWATCH Manager and select ‘I accept the terms in the license
agreement’ and click “Next” button.
M1103-4
- 23 -
Seyeon Tech Co., Ltd.
FlexWATCH Manager
E)
User Manual
In this page you can create icons in desktop, start menu, start program and shortcut by
selecting each menu. Select shortcut icons and click “Next” button
F)
Select the destination folder for FlexWATCH Manager. The default location is ‘C:\Program
Files\Seyeon Tech\FlexWATCH Manager’. You can change the location to another folder if
you want, but the default location is recommended. Click “Next” button.
M1103-4
- 24 -
Seyeon Tech Co., Ltd.
FlexWATCH Manager
G)
M1103-4
User Manual
Select “USB Serial Key” and input the product key then click “Next”.
- 25 -
Seyeon Tech Co., Ltd.
FlexWATCH Manager
H)
User Manual
Please input the Serial Number written on USB Serial Key and click “Next”.
If the driver of USB Serial Key is not installed, please check on ‘Do you want to install
the Sentinel System Driver?’ Otherwise, uncheck it and Click “Finish” button.
M1103-4
- 26 -
Seyeon Tech Co., Ltd.
FlexWATCH Manager
I)
User Manual
Following is the procedure of Sentinel System Driver installation.
Click “Next” button.
J)
Read the license agreement of Sentinel System Driver, select ‘I accept the terms in the
license agreement’ and click “Next” button.
M1103-4
- 27 -
Seyeon Tech Co., Ltd.
FlexWATCH Manager
K)
Select “Complete” and click “Next”.
L)
Click “Install” button.
M1103-4
User Manual
- 28 -
Seyeon Tech Co., Ltd.
FlexWATCH Manager
M)
User Manual
Click “Finish” to finish the installation of Sentinel System Driver (USB Serial Key).
2.1.3. Reinstallation and Upgrade
For reinstall and upgrade, just install the program as the installation procedure.
2.2. FlexWATCH Manager Backup
You can backup all the property information in FlexWATCH Manager. The backup folders
include “config” and “profile” under FlexWATCH Manager installed folder. Thus, if you backup these
folders and replace the original folders of the newly installed FlexWATCH Manager with these backup
folders, you can reuse the property information of the previous FlexWATCH manager.
If there is much property information, please backup the related folders and files for your
system safety in case of H/W problem.
)
‘config’ folder is located in c:/Program Files/Seyeon Tech/FlexWATCH Manager.
When you backup the “config” folder and apply to newly installed FlexWATCH Manager,
the number of Channels should be matched. (Ex: FW-Manger 64Ch). Please notice that
all the setting values such as for the HDD Management, Player, and Player Lite will
applies as well.
M1103-4
- 29 -
Seyeon Tech Co., Ltd.
FlexWATCH Manager
2.3.
A)
User Manual
FlexWATCH Manager Uninstallation
Execute ‘Uninstall FlexWATCH Manager’ as below picture.
Start> Program > FlexWATCH Manager > Uninstall FlexWATCH Manager.
Click “Yes” button to uninstall FlexWATCH manager program. The program will be uninstalled
automatically.
B)
M1103-4
Click “OK” button to finish the uninstallation.
- 30 -
Seyeon Tech Co., Ltd.
FlexWATCH Manager
User Manual
2.4. ‘USB KEY_LOCK’ Driver Uninstallation
)
A)
If you installed FlexWATCH Manager with a Product Key, the driver wasn’t installed
Open Control Panel on Windows.
Start > Settings > Control Panel
B)
Select “Add/Remove Programs” on Control Panel.
(Category view in Windows XP)
C)
M1103-4
(Classic View in Windows XP as Windows 2000)
Select “Sentinel System Driver” and click “Remove” button.
- 31 -
Seyeon Tech Co., Ltd.
FlexWATCH Manager
User Manual
Click “Yes” button.
-If you click “Yes”, the driver will be removed automatically, and “Sentinel System
Driver” would be removed from the list.
3. Operation Guide
3.1. Running FlexWATCH Manager
Run the program by selecting “FlexWATCH Manager” program as shown below.
Windows start> All Programs > FlexWATCH Manager > FlexWATCH Manager.
3.2. Brief Description of FlexWATCH Manager Window
If you run the program for the first time, the following program window will be appeared and you need
M1103-4
- 32 Program
Tool
Seyeon Tech Co., Ltd.
FlexWATCH Manager
User Manual
to configure the system following the configuration guide described in this manual. You can configure
and control the program using user friendly ICONs provided in the program.
Program
Tool Bar
Server Registration Tool Bar
A)
Display Control Tool Bar
Program Tool Bar:
You can use provided ICONs for
various functions such as server registration, camera control, camera status, system log,
player, etc. Followings are the detailed explanation about respective ICONs.
Server Registration Window: To show server registration window in the program and register
FlexWATCH server and configure server related configuration such as Beep Alarm, DO control
and etc. You can turn on/off this window from the program once configuration is done by double
clicking this Icon.
Display Control Window: To show camera group and configure camera related configuration
such as Recording, PTZ and etc. You can turn on/off this window from the program once
configuration is done by double clicking this Icon.
Camera Status Window: To show camera, event, recording status. You can turn on/off this
window from the program once configuration is done by double clicking this Icon.
System Log Window: To show system log message triggered by user defined event. You can
turn on/off this window from the program once configuration is done by double clicking this Icon.
Launch Player Lite for Simple Search & Playback: to run the Player Lite program to search &
playback the recorded video based on each server.
Launch Player for Search & Playback: To run the Player to search & playback the recorded
M1103-4
- 33 -
Seyeon Tech Co., Ltd.
FlexWATCH Manager
User Manual
video.
Log Viewer: To run the log viewer to search recorded logs.
Access Level Control: To change access level to Admin mode from User level and vice versa.
Full Screen mode : Normal DVR interface mode
Window Full Screen mode : Only to display the registered cameras
Voice Icon
: To activate voice connection to the selected sever and camera
Volume control : To control speaker and Mic volume for Voice connection
Program Info : To check program version & publisher
B)
Server Registration Tool Bar:
If you click
this Icon Server control
window will come up and following ICONs will appear.
Server Registration: By clicking this ICON, you can run server registration widow and register
new FlexWATCH in the program.
Disk Manager: To assign PC’s HDD for FW-Manager recording.
Admin Password: To set up Admin Password for the system configuration.
Log Selection: To configure log message scenario to be archived.
Beep Alarm Off: To manually turn off Beep Alarm.
Manager Properties: To configure configuration such as AOIP server, Total Display speed,
Remote Playback service, etc.
C)
Server Related Tool Bar:
This tool bar is to provide easy interface to
control server related options.
Server Deletion: To delete a registered FlexWATCH server from the FW-Manager program.
Note if you execute this, cameras connected to the FlexWATCH server will be deleted.
Camera addition : To add all cameras to an active camera group
Go home page: Shortcut to home page of registered FlexWATCH server.
Relay Output Control: To control relay output connected the FlexWATCH server.
Server Properties: To change the server information and configure beep alarm or DO condition.
D)
Camera Related Tool Bar:
This tool bar appears when you select a camera in the
Server registration window. Camera Property setting can be done from either Camera
related tool bars in the Server and Camera registration window.
Join Camera: To join selected camera from registered server to an active camera group. To do
this, there must be an active camera group, which is created by a user.
Manual Recording: To manually start recording live video stream regardless recording condition.
Camera Properties: To configure camera related configuration such as Camera name change,
M1103-4
- 34 -
Seyeon Tech Co., Ltd.
FlexWATCH Manager
User Manual
Video quality, Recording condition and motion detection area.
E)
Display Control Tool Bar:
you can see these icons when you click ‘Group Mode’.
Camera Group Registration: To create an active camera group to which registered cameras will
be joined and displayed on the screen.
Camera Circulation: To sequentially display registered cameras in the different camera groups.
This option is valid when there is more than 1 camera group is created. You can set up the
Camera Circulation dwelling time in the properties of a group.
Camera Group Tool Bar:
F)
you can see these icons when you select a camera
group.
Camera Group Deletion: To delete a selected camera group. If you execute this, cameras in the
camera group will be deleted. But camera and its recording configuration will still be remained in
the program unless you manually change or delete them in the server registration section.
Group Properties: To change camera group information such as a group name and circulation
dwelling time.
Camera Circulation : Refer to Camera Circulation in E)
G)
Camera related Tool Bar:
you can see these icons when you select a camera in
a camera group.
Camera Deletion: To delete a selected camera from a camera group.
Camera Properties : To change camera related information such as Camera info, recording
condition, motion detection area and Etc.
Camera Circulation : Refer to Camera Circulation in E)
M1103-4
- 35 -
Seyeon Tech Co., Ltd.
FlexWATCH Manager
User Manual
3.3. ACCESS Level and Password Setup
3.3.1. ACCESS Level
FlexWATCH Manager provides two different levels of program access. One is Admin level, which
enables you to configure and to control the program without any restriction. The other one is User
level to which only limited control authority will be provided.
By using Access Level option, you can limit the control of FlexWATCH and only the Admin level user
can configure and manage the program.
The followings are authority provided to each level.
Administrator Level
User Level
- Camera monitoring
- Camera Group Selection
- Circulation mode
- Recorded video playback by the player or log viewer mode.
- FlexWATCH Manager Shutdown
- Sever Registration menu access
- Camera Registration and Deletion
- Group Registration and Deletion
- Network Alarm Manager Setup
- When the FlexWATCH Manager is run for the first time, it starts with User. However, since Admin
Password is not set at the beginning, you can freely switch to Admin Level by clicking
(Switch Level
Icon). Access level will be activated only after you set up Admin Password in the Server Registration
Window. Pressed Switch Level Icon means Administrator Level while Unpressed Switch Level Icon
means User Level.
A)
Switch Admin Level to User Level
If the Switch Level Icon is pressed, it means you are in Administrator mode. If you click the
(Switch
Level Icon) once again, the access level is switched to User level as shown below.
M1103-4
- 36 -
Seyeon Tech Co., Ltd.
FlexWATCH Manager
User Manual
Admin Level
User Level
Notice) As long as you are in User Mode, you will not see the Server Registration menu.
B)
If
Switch User Level to Admin Level
Switch Level Icon is unpressed you are in User Mode. If you click the Switch Level Icon, the
following pop-up window will come up. And you need to enter the Admin Password if the Admin
Password is set up before. Otherwise access level is switched to Admin level without asking you
Admin Password.
User Level
Admin Level
3.3.2. Admin Password Setup
You can set up the Admin Password only in Admin Level. If you are in User Level, please
switch to Admin Level by clicking
Icon. Please click Server Registration Window Icon
the Server Registration Menu. To set up or change Admin Password, please click
to view
(Edit Password
Icon).
Notice) If you can’t find
, please click on Manager located on the top of the Server Registration tree
in the Server Registration menu.
M1103-4
- 37 -
Seyeon Tech Co., Ltd.
FlexWATCH Manager
User Manual
[Edit Admin Password] Please enter Current password, new password, and the new password again
for the confirmation. After entering all the required fields, please click OK button.
Since FlexWATCH Manager has Admin Password, if you are in User Level, you have limited access to
FlexWATCH manager.
)
If you lost your Admin password, there is no way to recover the password except
deleting all the configuration files and reinstalling the program. Thus, you are strongly
recommended to make a note for Admin password. In case you lost your admin
password, please consult with your local distributor or the manufacturer before doing any
action.
3.4. HDD Disk Manager Configuration
Disk manager is to select HDD and allocate recording space for FlexWATCH Manager. PC Hard Disk
Drives or Network Hard Disk Drives can be used as recording HDDs by the program. If you would
like to extend HDD disk space, we recommend you to use Network HDD.
By using this option, you can properly manage your HDD as following ways.
-
To circulate HDDs when the disk is full
-
To add other HDDs in you PC or Network HDDs to increase your recording capacity
-
To specify recording space used by the program so that you can reserve HDD
space for other program use.
-
E-mail alert for HDD failure or before full
-
HDD space status at a glance
3.4.1. Required HDD Capacity Calculation
You need to calculate required HDD capacity to record video for the specific time frame and need to
equip enough HDD equipment in your PC or in your network.
)
M1103-4
If you change Hard Disk Drive in the middle of recording video, recorded video data
- 38 -
Seyeon Tech Co., Ltd.
FlexWATCH Manager
User Manual
in the removed Hard Disk Drive can not be searched through normal search mode.
Thus, you need to carefully set up HDD configuration.
3.4.2. HDD Configuration
You can calculate the required HDD capacity as following formula. A file size can be varied in
accordance with its video quality. Thus you need to check the file size in JPEG by Snapshot option. In
general, the normal JPEG image file size is 10K ~ 12K byte.
File Size x FPS X # of Ch x Period (60sec x 60Min x 24hrs x days)
A)
Click [Disk Manager] Icon
or use right mouse button in the Server control
window to start Disk manager.
B)
Assign HDD into Enabled Driver window and press Apply button.
Menu
Installed Drives
Drive
Description
List up of HDD Drive configured in the PC. Event
Network Drive can be used.
Type
Indicate Type of HDD Drive
( HDD : Local HDD Drive)
(REMOTE : Network HDD Drive )
Drives Size
Total size of respective HDD
Free Size
Available HDD size which can be used for
recording. Note that Free size must be higher than
3GB to record any frame in the HDD.
Quota Size
HDD size for recording. You can adjust Quota size
by clicking Quota size.
Quota size must be higher than 1.2GB
Note : ( Free Size > Quota Size )
M1103-4
- 39 -
Seyeon Tech Co., Ltd.
FlexWATCH Manager
Enabled Drives
User Manual
Drive
Assigned HDD list for recording.
Type
Drive Type
Quota Size
Size of HDD for recording
Information
Displays Disk Usage, Recording Start time, and
Recording End time
e-Mail Service
E-mail service for HDD recording problem, HDD
space alert, or periodic recording status report
Others
Circulation
FIFO (First In, First out) Based disk circulation
option, if all available drives are full.
Up
Change the sequence of HDD for recording.
Select the drive and place it to one level up to
record
Down
Select the drive and place it to one level down to
record
=>
Add a HDD in the installed drives section to the
enabled drives section.
<=
Move back a HDD in the enabled drives window to
the installed drives section.
3.4.3. Installed Drives
Installed Drives show all the Drives in your PC.
REMOTE indicates network HDD which are mapped
to your PC. It shows total HDD capacity and free size. Quota size is to allocate HDD for recording.
Once Quota size is configured, you need to put it to [Enabled Drives] list.
)
M1103-4
Note that if you would like to use Network HDD drive in your network, you need to
- 40 -
Seyeon Tech Co., Ltd.
FlexWATCH Manager
User Manual
map the network drive to your PC so that that HDD can be recognized by Disk Manger
program.
3.4.4. Enabled Drives
This is to show the HDD list which to be used for recording. If multiple HDD is enabled, video will be
recorded in the registered order of HDD from top to bottom.
If you select [Circulation] option, when all the assigned HDDs are full, video will be recorded based
on FIFO (First-IN, First-Out).
)
Notice that the current recording HDD is indicated by “Current=>”. Thus it may
look different than the registered order. For example, even if you registered HDDs
as C, D and E drives, when the current recording HDD is D drive, it will display as D,
E, and C.
3.4.5. E-mail service
E-mail for HDD status can be triggered based on following options
-
E-mail alert on recording problem
-
HDD space alert when the HDD is used up to 70%/80%/90% and 100%
-
Periodic report for HDD space and recording start and end time
a) Click “Config” button in the Email server. Then you will see the pop-up window as shown
below.
b) Select the option field you would like to get information.
Email alert on recording problem
You can enable the Email alert function for recording problem.
HDD space alert
This is for when circulation option is not selected. When HDD usage reaches the selected percentage
of HDD capacity such as 100%, 90%, 80%, and 70%, FlexWATCH Manager will send you an email.
M1103-4
- 41 -
Seyeon Tech Co., Ltd.
FlexWATCH Manager
User Manual
Periodic recording status report
Once a day, FlexWATCH Manager will send you an email including HDD usage, recording start time &
end time. You can choose day & time.
)
E-mail account must be configured in the Server property window to activate e-mail
alert feature.
If you would like to temporally disable e-mail feature keeping all e-mail setting, please following below
procedure.
-
Select “Log Selection”
-
Click Details button in “Etc category” in the Log selector window
-
Uncheck “Some information sent by e-mail” filed.
3.5. Log Message Configuration
You can configure log message scenario from the log Selector which defines log message scenario to
be archived in the system DB so that system log which comply with predefined log scenario will be left
when event is happened and that log message can be playback through Log Viewer Program.
System Log selection Icon from Program tool bar menu to configure log message to be
a) Click
applied. (You can also select Log Selection from the right mouse button menu on Manager.)
B) Check log message from the classified category you would like to use.
c) If you Click [Details] button, you can see below pop-up window. You can check out predefined log
messages by the program.
d) Select log messages you would like to use from the predefined log messages.
It is recommended to use as little log message as you can to simplify your log search option.
M1103-4
- 42 -
Seyeon Tech Co., Ltd.
FlexWATCH Manager
User Manual
e) Click “OK” button to apply your configuration.
3.5.1. Select Log Message
Log messages show you all the events occurred in FlexWATCH Manager. Please refer to below
log message table for detailed information.
System Log Scenario
Followings are the system log message list.
Category
Log Message
System
FlexWATCH Manager start
Category
FlexWATCH Manager is shutdown
New server registration
Server Category
Server deletion
Server name change
Server port number change
Camera name change
Recording speed change
Recording condition change
Camera
Category
Motion detection condition change
Camera configuration change
Camera addition to display group
Camera removal from display group
Camera Group creation
Camera Group removal
M1103-4
- 43 -
Seyeon Tech Co., Ltd.
FlexWATCH Manager
User Manual
Event driven recording start
Event driven recording stop
Motion detection start
Motion detection stop
Event Category
PTZ activation
PTZ stop
Beep alarm start
Beep alarm stop
Relay output start
Relay output stop
The recording disk drive is changed
HDD configuration changed
Disk circulation start
Disk connection fail
Disk Manager
Category
There are no disks to record
The all assigned HDD space is occupied
There is some error on disk
The error is detected on disk
HDD Usage goes over 90%
HDD Usage goes over 80%
HDD Usage goes over 70%
Display Window
Category
Server disconnected
Server reconnected
Video detection fail
Admin password change
Etc Category
AOIP server address change
Some information is sent by email
Launching Player in Log window
System log messages are saved by FlexWATCH Manager whenever there are some changes
in registered servers or cameras. You can view this log messages in the log window located in the
bottom of the FlexWATCH Manager. If you double click on a log message, FwManager Player will
be launched with the time of the log, server ID, and camera ID. You can easily search the archived
video at the log event time.
M1103-4
- 44 -
Seyeon Tech Co., Ltd.
FlexWATCH Manager
User Manual
Tips
If the player is already running, when you double-click on a log message, the information of the
log (time, Server ID, Camera ID) will be entered into the player.
3.6. All Properties
You can select All Properties in the right mouse button menu on Manager. You can configure
Max. Frame Rate, Camera Status Bar Option, Image Size & Quality, Recording condition, Forced
Record, etc. You can configure multiple servers & cameras at once.
B
A
Name
D
C
Functions
Description
A.
-Selected All
-Select all the registered servers
Server Selection
-Unselected All
-Unselect all the registered servers
B.
-Maximum Frame Rate
-Configure Max. Frame Rate for servers
Server
Configuration
Configuration
-Receive I Frame
M1103-4
-for MPEG4 only
- 45 -
Seyeon Tech Co., Ltd.
FlexWATCH Manager
User Manual
C.
-Select All
-Select all registered cameras
Camera Selection
-Unselect All
-unselect all registered cameras
-Select by channel
-Select Cameras by selected channel
-Camera Status Bar Option
-select the options for the Camera Status
D.
Camera
Bar
Configuration
-Image configuration
-Control the Image Size & Quality
-Recording Condition
-manage the Recording conditions such
Configuration
as Always, Schedule only, Event Only,
and Schedule and Event.
-Recording Configuration
-control Pre-Alarm & Post Alarm, Max.
Recording Speed.
-Forced Record
-select Forced Recording option.
Configuration
)
)
If you configure all the servers & cameras by All Properties, all the current setting
values will change to the new setting values.
If you want to set the Maximum Recording Speed, you first select the Maximum
Frame Rate in All Server Property.
3.7. FlexWATCH Manager Properties
You can configure the Total Maximum Display Frame Rate and AOIP (Always-On-IP) in
Properties of FlexWATCH Manager. In general, if you use a PC with the specification recommended
by this manual, recording rate would not be affected by the display rate. However, if you use low spec.
PC and want to use Max. Recoding speed, you need to lower the Display Frame Rate.
If you want to use AOIP service for FlexWATCH products, you need to enter the URL of the
AOIP server. The address of AOIP server in Korea operated by Seyeon Tech Co., Ltd. is
www.aoip.co.kr.
This address may be different if your local supplier operates their own AOIP server
By this AOIP server, FlexWATCH network cameras and video servers with dynamic IP address
or private IP address can work with FlexWATCH manager.
A)
To view sever registration menu, please click
B)
If you click the properties icon of FlexWATCH Manager
.
(Or select “Properties” in the right
mouse button menu on “Manager”), you can configure the Display Frame Rate and the AOIP
M1103-4
- 46 -
Seyeon Tech Co., Ltd.
FlexWATCH Manager
User Manual
server address.
Full Screen Mode Resolution
You can set the Resolution for the Full Screen mode. Each resolution has different Split Screen
when you add a new camera group. (Ex: 1280x1024 dynamic, 6, 9, 12, 15… 33, 36)
)
If you change the monitor of FlexWATCH Manager installed PC with a lower resolution
monitor, please set the Full Screen Mode Resolution to 1024x768. If the new monitor has
higher resolution, you do not need to do anything.
Total Maximum Display Frame Rate
You can set Display Frame Rate for both Window Mode and Full Screen Mode. This frame rate
refers to the total frame rates which FlexWATCH Manager can display for all display channels. The
greater the display frame rate, the higher the CPU usage.
Since the performance of the display can be affected by memory, CPU, and graphic card, it is
strongly recommended that you use a PC with a recommended specification.
MPEG4 Dedicated – Display I frame only
When you only use MPEG4 products, you can display only I frame excluding P frames.
M1103-4
- 47 -
Seyeon Tech Co., Ltd.
FlexWATCH Manager
User Manual
Dual Monitor
You can use this option when you use 2 monitors. In this case, width: length will be 2:1. If you
use the dual monitor option, you can display the FlexWATCH Manager with 2 monitors as one. But
you can’t use split screen and monitoring mode.
Fit Image to Window
Regardless of camera resolution, the display image will be stretched out and will fit to the size of
Window.
AOIP Server
You need to enter the address of the AOIP server, to which your FlexWATCH servers are
registered for dynamic IP support. This address may be different if your local supplier operates their
own AOIP server.
Remote Playback Service
If you want to Remote Playback Service, enter the NIPP Port number first and then, check
On/Off box to enable the service. You also need to create an account by Add button.
You can add up to 5 accounts. If you click “Add”, you will get Edit Remote Account window.
Please enter a password and click OK.
Remote client can access to the archived video recorded by FlexWATCH Manager through TCP/IP
network.
① Enter the NIPP port number and check the On/Off box.
NIPP port is used for the communication between FlexWATCH Manager and remote player.
Thus, if default NIPP port 50000 is used by another network device, you need enter an appropriate
port number and configure the port forwarding for your router.
② To give an authority to a user to access to archived video; you need to create a user account by
“Add”.
③ You can Add, Delete, Edit the account.
M1103-4
- 48 -
Seyeon Tech Co., Ltd.
FlexWATCH Manager
User Manual
④ If you click “Add” button, you will see Edit Remote Account window. Please enter a desired ID &
Password. Please keep the ID&Password in a safe place.
FlexWATCH Manager currently supports up to 5 user accounts. Password will appear as “*”.
Email Service
FlexWATCH Manager supports Email Service as below.
Item
Description
Service
To enable/disable the email service
SMTP Server
Enter the SMTP server address provided by your email service
provider.
Authentication
To enable/Disable the authentication option. If this is enabled, you will
be asked for your ID&Password.
Email User ID
Enter the user ID for email service
Email User Pwd
Enter the user Password for email service.
Sender email
Enter the address of the sender
M1103-4
- 49 -
Seyeon Tech Co., Ltd.
FlexWATCH Manager
Recipient email
User Manual
Enter Recipients’ email addresses. You can enter up to 3 email
addresses.
Subject
This will be the subject of an email message sent by FlexWATCH
Manager. If this is not entered, the default subject will be ‘Message
from FlexWATCH Manager’.
First Line
Enter the first line of an email. If this is not entered, the default
message will be ‘This is generated by FlexWATCH Manager’.
The email service is triggered only when you have following events.
① Camera Disconnection
② Recording problem
③ If FlexWATCH Manager is not under Circulation mode and the used size is more than the
percentage you set in Disk Manager (70%, 80%, 90%, 100%)
④ If Periodic recording status report is enabled in Disk Manager.
When an email is sent, you will see ‘Some information is sent by email’ in the log window.
4. Server Registration & Property Setting
4.1. FlexWATCH Server Registration with Static IP
You can either use ICON or right mouse button menu to start server registration. This option is
only for Admin Level. If you are in User Level, you will not be able to see Server Registration Section
or
(Server Registration Menu Icon).
A)
Click “Server Registration Menu Icon”
B)
Click Add server icon
C)
Enter proper server information in the [New Server] window and click “OK”.
M1103-4
to show Server Registration menu section.
from the following menu.
- 50 -
Seyeon Tech Co., Ltd.
FlexWATCH Manager
User Manual
Description of New Server Window
Item
AOIP Function
Description
To hook up video from Video server registered in AOIP server. You must know
S/N number of Video server registered in AOIP server and Server should be
Active status. If you use Static IP, just leave it as it is.
Server IP Address
FlexWATCH Sever IP Address (You can enter either IP address or DNS)
Server Port
Default HTTP port is 80. If a different port is being used, enter proper HTTP
port number.
Audio Port
Default port value is 32001. This is used for Audio device working with
FlexWATCH.
VSMID
This is for FlexWATCH 3.0 or higher version. It refers to the server ID
registered in the server supporting proxy function such as FW-5450, FW-5000,
or FW-VSS.
Server Rood ID
Admin ID of FlexWATCH Server. ‘root’ is default and this can not be changed.
Server Root
FlexWATCH server admin password (Default is ‘root’, but if you changed the
Password
Server Model
M1103-4
password, please enter the changed password.)
Server Model Name. It will be entered automatically by”Get Info”.
- 51 -
Seyeon Tech Co., Ltd.
FlexWATCH Manager
User Manual
Video Format
NTSC/PAL
Server Serial
Server’s Serial Number. In case of static IP, it will be entered automatically
Number
Get Info
It will be entered automatically by”Get Info”.
by”Get Info”.
In case of static IP, if right IP address and ID& PW is entered,
‘Get info’ button automatically calls Server model, Video Format, serial number
and default Server name. In case of dynamic IP with AOIP function, if the serial
number is properly entered, ‘Get info’ button automatically calls current Server
IP address, Server model, Video Format, and default Server Name.
Server Name
Server name is user definable. Thus, you can change server name to be
displayed on the screen. Default server name is automatically entered by “Get
Info” button.
MJPEG Dedicated
To set up maximum frame rate for the server. Depending on number of
Maximum Frame
cameras or bandwidth available. (NTSC: 30,15,10,5,2,1 PAL: 25,12,8,5,2,1)
Rate
Server ID
Sever ID is proprietary one assigned for respective server and can not be
changed once it is assigned.
Server ID
Server ID is criteria to search archived video by System Log viewer or player. In case of
hardware failure and you remove that server from the program, that ID number will be reserved till you
manually select it for new video server.
If you remove a server from FlexWATCH Manager, the removed server ID can’t be used for search. If
you want to use that server ID again, you need to assign that server ID to a new server. Please notice
that the archived image from that server ID may be different than the current registered server’s
images if the current server is different from the previous server.
It is very strongly recommended for you to make a note for all the Server ID for each video server as
a back-up.
M1103-4
- 52 -
Seyeon Tech Co., Ltd.
FlexWATCH Manager
User Manual
Number of Video Servers and Cameras
The number of video servers and cameras which can be supported by FlexWATCH Manager is
limited by the software version. If you bought 36channel version, you can register up to 36 servers
in the program, but if the total number of cameras across the registered servers exceeds 36cameras,
no more registration can be done. Also the total camera number is counted based on the number of
cameras supported by the model regardless of actual connected cameras to the server.
For example if you buy 9 units of 6channel Video servers and want to connect 4 cameras for each
server and want to use 36channel FlexWATCH Manger, you can not do that and you need to buy
64channel FlexWATCH Manager.
If you buy 36 units of 1channel Network cameras, then you can register and viewer up to 36channel
without any problem.
Therefore, you need to be careful about the number of video servers and channels you would like to
connect. You are required to contact local distributor to extend the number of video channels.
)
)
Demo version allows you to register up to 2video servers and 9 cameras with 1GB
recording.
When you register servers in FlexWATCH Manage, you need to consider the number of
channels. For instance, if you registered 3units of FW3450, you already used up 12 channels (4ch x
3 unit).
4.2. FlexWATCH Server Registration with Dynamic IP
FwManager can control FlexWATCH servers which are connected to Dynamic IP network. But
FlexWATCH should be registered in AOIP (Always-On-IP) server which is IP gateway for any
FlexWATCH server and enables FlexWATCH server to be installed on the Dynamic IP or Private IP
network and users can access the video server at anytime and anywhere.
A)
Check out whether the FlexWATCH server is correctly connected to AOIP server and you
can view live through standard web browser. If not, FlexWATCH Manager can not be
connected to the FlexWATCH server on the Dynamic IP network.
B)
Get S/N Number of that FlexWATCH server, since you need to type in 12 digits of S/N in
the information field. Please refer to the S/N written on the attached product label on the
bottom of a product.
C)
M1103-4
Check [AOIP Function] box and enter the 12 digits S/N. Please click “Get Info”, then you will
- 53 -
Seyeon Tech Co., Ltd.
FlexWATCH Manager
User Manual
automatically get Server Model, Video Format, Server IP address, etc.
D)
You may also adjust the Maximum Frame Rate in MJPEG mode. After all values are set, you
can click OK to finish the registration.
)
If you need further information or questions regarding AOIP server, or FlexWATCH
products, please contact your local supplier or Seyeon Tech Co., Ltd.
([email protected]).
4.3. Server Property Setting
Once Server Registration is done, it is recommended that you set up server property such as Server
Name, Video Frame rate and Server Admin ID & Password. If you do not set up this option, default
setting will be applied. You can change Server Property at any time.
a) Move mouse over the server name and click right mouse button. (Or click server name and click
the server properties icon
.)
b) Select [Properties]. Then click Server [Info] tap from the option
M1103-4
- 54 -
Seyeon Tech Co., Ltd.
FlexWATCH Manager
User Manual
Server Admin ID & Password
To view and to control video and other setting values, you need to type in administration ID &
Password of respective FlexWATCH server. If root Password is changed, you need to change Root
Password accordingly to control the video.
Note that you can view cameras with other access level set up in the respective FlexWATCH
server such as power_user, User, Guest level. If access level is not set up in the FlexWATCH server,
anyone see view video through FwManager program.
Thus, you need to set up access control option in the FlexWATCH server
Server Name Change
Server name will appear in the Server Registration window. Thus, it is recommended that you give
right name to easily identify the server by its name from the main screen.
MJPEG Dedicated – Frame Rate Control
You can set the video transmission speed for the server by configuring [Maximum Frame Rate] option.
If you set up Maximum Frame Rate, recording frame rate will be less than the Maximum Frame Rate.
For example, if you set Maximum Frame Rate at 10FPS, the maximum recording frame rate is less
than 10 FPS.
M1103-4
- 55 -
Seyeon Tech Co., Ltd.
FlexWATCH Manager
User Manual
TIPS
If multiple servers are installed and you have limited network bandwidth available, you
need to reduce frame rate by reducing actual frame rate in the server property option.
)
Maximum frame rate does not mean that selected frame rate can be achieved under
any circumstances, since it depends on the network bandwidth and PC performance.
M1103-4
- 56 -
Seyeon Tech Co., Ltd.
FlexWATCH Manager
User Manual
5. Camera Registration & Property Setting
5.1. Camera Registration
Once server registration and property setting are done, you need to make a camera group. After
cameras are registered in a group, you will see the images of registered cameras as a group.
A)
Click Camera control window icon
to show Display Control window from the program
tool bar.
B)
Click Add group icon
from the Display Control window. You can use right mouse button
menu to add new camera group as well.
C)
Enter Group Description, and specify circulation period, Select Split Screen and press ‘OK’
button.
Circulation period is to set up duration of Camera display when multiple camera groups are
configured to be sequentially displayed. You can specify display time per Camera group depending on
your needs. Split Screen can be changed by Properties of Group Registration.
D)
Select Camera group and add new cameras from Server Registration window to a Camera
group. There are four different ways to add the cameras in the Server window to a Camera
group
① Double click the Camera in the Sever Registration window.
② Select ‘join’ by the right mouse button on a camera name in the Server Registration window.
③ Drag and drop a camera to a camera group.
④ Select a desired camera to be register, click “Join Camera” icon.
Following figure is a camera registration example by right mouse button menu.
M1103-4
- 57 -
Seyeon Tech Co., Ltd.
FlexWATCH Manager
E)
User Manual
Now newly added Camera will be automatically positioned in the program window and
displayed as follow. You can freely move cameras’ position by Drag & Drop.
5.2. Camera Property setting
Followings can be set up through camera property setting.
-
Video quality setting
-
Motion detection area setting
-
Camera recording setting
-
PTZ Camera preset naming and control sensitivity setting
-
Advanced PTZ control setting
A)
Select Properties in right mouse button menu over a camera image.
B)
Select [Info] tap to adjust Camera Name, Status Bar option, and Status Bar Red Alarm
condition setup.
M1103-4
- 58 -
Seyeon Tech Co., Ltd.
FlexWATCH Manager
C)
User Manual
Status Bar Option
Status bar option is to optionally display camera related information on the status bar of camera on the
bottom of Camera. Record and Motion status, Time stamp, Camera name and Receive Frame
Rate can be optionally displayed.
D)
Status Bar red alarm condition setup
Status bard red alarm is to give visual alarm notice when there is an event triggered.
Visual alarm will be triggered by
-
Alarm sensor activation ( When the sensor change to Normal open/ close status)
-
Motion detection
-
Camera loss
5.3. Video Property Setting
Image size, Image Quality, Video color adjustment, Horizontal and vertical flip options are provided.
A)
Select Properties in right mouse button menu over a camera image.
B)
Select [Video] tap to configure video mode.
M1103-4
- 59 -
Seyeon Tech Co., Ltd.
FlexWATCH Manager
User Manual
Image Size
4 steps of image size options are provided. Actual size is different depending on the video format and
followings are actual sizes.
NTSC: 176x112 (Small), 352x240 (Normal), 704x240(Large), 704x480 (Full)
PAL: 176X144 (Small), 352X288(Normal), 704X288(Large), 704X576(Full)
The larger the image size, the higher the file size and the lower frame rate. Thus, select right file size
per your network bandwidth available and frame rate you would like to achieve.
)
Note that if you change Image size in the middle of recording, any changed image
size will be recorded. This may affect recording duration with the selected HDD. Thus,
you need to be more careful to change Image size in the middle of recording.
)
In case of MPEG4 4ch products, image size change will affect all of the channels.
And it will also change CBR mode to VBR mode if FlexWATCH is in CBR mode.
Image Quality
5 steps of Image quality control options are provided. There lower image quality, the higher
compression rate. If you select highest size, low video compression is done from the server side and
video file size is larger than normal. Default is Normal quality and you can adjust the quality per your
needs.
M1103-4
- 60 -
Seyeon Tech Co., Ltd.
FlexWATCH Manager
)
User Manual
Note that image quality change comes with image file size change. And changed file
size affect recording duration with the selected HDD. Thus, you need to consider this point
before change image quality.
)
In case of MPEG4 FlexWATCH in CBR mode, the change of image quality
automatically changes CBR mode to VBR mode.
Horizontal and Vertical Flip
This option enables you to display a camera in horizontally and vertically different ways. This option is
useful when the camera is mounted in a reverse way on the ceiling and wants to display video in a
right direction.
Flash Save
This option is to save changed video control configuration in the Server, not in the program. If
not, changed configuration will be temporarily saved in the server and when the server is rebooted, it
will be returned to the default setting and you will get changed video as well.
6. Camera Live View
Following display options are provided by the program.
-
Highlighted camera view with system log
-
Multiple camera grouping
-
Duplicate registration of videos in different camera groups
-
Sequential display of camera group option
-
Pan/Tilt/Zoom device control
-
Full Screen Mode
6.1. Camera Display
FlexWATCH Manager enables you to display as many cameras as registered in the program on a
single screen. For example, if you purchased FlexWATCH Manager 36 channel and installed 36
cameras, you can simultaneously display all those cameras on the computer screen.
Registered cameras under a group of the Group Mode will be displayed on the screen following the
order of Server ID given to the server when you register server in the program.
For example, Cameras connected to the Server which has Server ID# 0, will be displayed first and
next will be for the cameras connected to the Server ID#1.
M1103-4
- 61 -
Seyeon Tech Co., Ltd.
FlexWATCH Manager
User Manual
However, you can freely change the position of the cameras to display on the display screen by
Drag & Drop.
M1103-4
- 62 -
Seyeon Tech Co., Ltd.
FlexWATCH Manager
User Manual
6.2. Camera Grouping and Sequential Display
You can make different groups of cameras by the extent of importance you need to monitor. Also
sequential display of different groups of cameras can be achieved as well.
6.2.1. Camera Grouping
As mentioned in the ‘Camera Live view’ menu above, you can create Multiple Camera groups and
add the cameras from the Server control window to a Camera group.
)
It is highly recommended to create more Camera groups, if you would like to get
much faster video frame rate rather than put all the cameras in a single camera group.
[Figure] An example of Camera Grouping
6.2.2. Camera Sequential Display
Sequential display of cameras per Camera group can be done by clicking Sequential display Icon
from the Camera control window
You can also configure display duration time for the respective group of cameras. Go to Camera group
property and adjust its display duration time
6.3. Full Display Mode
FlexWATCH Manager supports 2 types of Full Display modes. One is Full Screen Mode
(Wondow Full Screen) and the other is Monitoring Mode (Full Screen). Full Screen Mode displays only
M1103-4
- 63 -
Seyeon Tech Co., Ltd.
FlexWATCH Manager
User Manual
camera view without any tool bars while Monitoring Mode displays camera view with control menu for
PTZ or voice communication.
6.3.1. Full Screen Mode
If you click Window Full Screen Icon
, only camera view will be seen.
General Mode
Full Screen Mode
6.3.2. Monitoring Mode
If you click
, FlexWATCH Manager will turn to the Monitoring mode.
General Mode
Monitoring Mode
Descriptions of control panel in monitoring mode.
Go back to the General Mode.
Go back to the General Mode and launch the player.
M1103-4
- 64 -
Seyeon Tech Co., Ltd.
FlexWATCH Manager
User Manual
When PTZ device is attached, it will in active and you can control Pan/Tilt/Zoom
You can select PTZ move mode (step mode or continuous mode).
Control the sensitivity of PTZ.
The current registered group list
Control Circulation mode and Alarm [Beep].
Connect to a voice device when it is available.
Shows assigned HDD size and current usage
6.4. Dual Monitor
Dual Monitor mode is for effective camera display with two monitors. For example, if you want to
display each 16 cameras in each monitor, you can use two monitors and view all 32 channels at
once.
You can enable this function in the properties of Manager in Server Registration section.
General mode
M1103-4
Monitoring Mode
Full Screen Mode
Single Monitor
yes
yes
yes
Dual Monitor
yes
no
yes
- 65 -
Seyeon Tech Co., Ltd.
FlexWATCH Manager
User Manual
General Mode in Dual Monitors
Monitor A
Monitor B
Window Full Screen Mode in Dual Monitors
.
6.5. Single Display Mode
When you display multiple channels of video, the display frame rate can be less than actual
frame rate. However, if you display a selected camera in Single Display mode, you can see the video
at actual frame rate, at which FlexWATCH Manager receives from a FlexWATCH server.
For example, FlexWATCH Manager displays 36 channels but each camera may display at
around 3 frames per second. (In general, it can’t display at actual frame rate received from
FlexWATCH Server.) If you click a desired camera, it will turn to the Single Display mode and you
can view it at actual frame rate.
A)
Please double-click a desired camera.
B)
If you double-click it again, it will turn to the general mode.
6.6. Fit Image To Window
M1103-4
- 66 -
Seyeon Tech Co., Ltd.
FlexWATCH Manager
User Manual
In FlexWATCH Manager 2.06 or higher version, it supports “Fit Image To Window” function.”
Regardless of camera resolution, the display image will be stretched out and will fit to the size of
Window.
A)
Please select Properties of “Manager” in Server Registration section.
B)
Select “Fit Image To Window” and click “OK”.
Normal Image
Image by “Fit Image to Window”
6.7. P/T/Z Control
You can control Pan/Tilt/Zoon device which is connected to the FlexWATCH server through
FlexWATCH Manager over the Network. You can also use Joystick to control PTZ.
6.7.1. PTZ Control
A)
Please make sure that PTZ device is correctly connected to FlexWATCH server and
correctly working through a standard web browser. If PTZ device is correctly working through
web browser, you do not need to configure other settings here in this FlexWATCH Manager
except PTZ control sensitivity.
)
If PTZ device already set up and want to check its working status from the
FlexWATCH Manager, go to a web browser of respective FlexWATCH server by selecting
[go home page] button
B)
M1103-4
from the Server Control Window.
Please roll over an image by mouse and select PTZ Grid or PTZ dialog to control PTZ
- 67 -
Seyeon Tech Co., Ltd.
FlexWATCH Manager
User Manual
function. You will see if PTZ device is attached or not.
If PTZ device is not connected, you will get below pop-up window.
C)
There are two ways of controlling PTZ devices such as PTZ Grid and PTZ Dialog.
6.7.2. PTZ Grid Interface and PTZ Dialog Interface
A)
Description of P/T/Z Grid Interface
Item
Description
To move PTZ to Up/Down and Right/Left.
Simply click the mouse on the direction you would like to move. The larger the circle, the
larger movement per click.
Control Zoom In/Out function of Zoom Camera. ‘Z+1’~’Z+3’ id for Zoom In & ‘Z1’~’Z-3’ for Zoom Out.
Control Focus In/Out of the camera. ’F+1’~’F+3’ is for Focus In & ‘F-1’~’F-3’ is for
focus Out.
B)
M1103-4
Description of P/T/Z Dialog Interface
- 68 -
Seyeon Tech Co., Ltd.
FlexWATCH Manager
Items
Speed
User Manual
Description
Adjust the Camera Speed (1-16). The greater the number the faster the camera
speed.
You can control PTZ in 8 directions.
Zoom In/Out ‘+’(Zoom In) & ‘-‘(Zoom Out)
Focus Near/Far ’+’(Focus Near) & ‘-’(Focus Far)
Auto Pan Start/Stop if the PTZ model supports Auto Pan
If each Preset is set, you can control PTZ camera by predefined
Preset Call
Preset. The PTZ camera will move to the preset position by clicking the Preset
number.
You can select either Step mode or Continuous mode. Under low bandwidth, it is
recommended that you use Step mode, which enables you to move the PTZ
PTZ Move Mode
camera for a certain distance by a click. In continuous mode, you can move the
PTZ camera by holding a directional button. The longer you hold the button, the
more distance the PTZ camera moves. Thus, it is useful under higher bandwidth.
Advanced function button. If you click, you will use more advanced options.
M1103-4
- 69 -
Seyeon Tech Co., Ltd.
FlexWATCH Manager
User Manual
When it has RX connection, you can control Camera Power, Light On/Off, AUX1
and AUX2.
Select
and activate the Group function
Start/Stop for Tour function
Camera Power On/Off
Light On / Off
To control AUX 1
To control AUX 2
6.7.3. PTZ Sensitivity Control
You can adjust PTZ sensitivity to control the PTZ movement.
A)
Please select the properties of camera by right mouse button menu.
B)
Select [Properties] and select PTZ tab. Please adjust ‘Grid Mode Sensitivity’. The greater the
number of sensitivity, the longer the movement.
The properties of Camera
)
PTZ sensitivity can be applied to each video channel. You can adjust the sensitivity
value by left/right arrows.
6.7.4. PTZ Preset
You can set up to 32 PTZ preset positions. After choosing a preset, you can configure PTZ
sensitivity, Pan/Tilt, Zoom, Focus, and preset name. If you set up a preset position, please click Apply
button to save the preset position.
M1103-4
- 70 -
Seyeon Tech Co., Ltd.
FlexWATCH Manager
User Manual
Depending on the PTZ model, preset function can be supported or not. Thus, you need to refer to
Server User Guide to select right PTZ device supported by FwManager.
)
Depending on the PTZ models, preset function can be supported or not. Thus, you
need to check if the PTZ model supports the Preset function or if FlexWATCH supports
the preset functions for the PTZ model.
M1103-4
- 71 -
Seyeon Tech Co., Ltd.
FlexWATCH Manager
User Manual
6.7.5. PTZ Auto Preset
Auto Preset is to set camera focus to the user defined PTZ preset area when an event is happened so
that you can monitor or record important area.
Please make sure that PTZ preset function is supported by the PTZ device connected to the
server and PTZ preset is already set up before you start this configuration.
Please select Advanced PTZ tab and select “Auto Preset”. Each camera connected to a FlexWATCH
server supports up to 4 auto presets.
Please click “Set” button to configure conditions and criteria for the Auto preset.
6.7.6. Touring
PTZ Touring is to sequentially move PTZ Camera to predefined preset area. Please select
Touring in Advanced PTZ tab menu. Please check if a preset properly works by “Go”. To set the
touring positions, please select a preset in listbox and click “Set” (Or check the preset number in check
box.) And adjust the Delay time between presets.
M1103-4
- 72 -
Seyeon Tech Co., Ltd.
FlexWATCH Manager
User Manual
Once configuration is done, click Apply button and exit the configuration. To enable Touring
option, have your mouse point over an image and select Touring option in right
mouse button menu.
)
Note that Touring option can be enabled/disabled through this procedure only as
shown below.
)
6.8.
Camera Removal from a Group
You can easily delete a camera from a current camera group.
A)
Select a camera.
B)
Either click the delete camera icon
or place your mouse over an image from the
selected camera and select Remove.
M1103-4
- 73 -
Seyeon Tech Co., Ltd.
FlexWATCH Manager
)
User Manual
A deleted camera from a group is just removal from display not actual removal from
the server. If you want to actually delete a registered camera, you need to remove the
FlexWATCH server which the camera belongs to.
7. Server Status Window
Server status window shows you current status of video, Alarm sensor and recording for respective
servers and cameras.
Server Information
You can see server IDs & server names.
Video Status
It refers to C1~C6 Icons. Spin will show how fast the live video stream is received by FlexWATCH
Manager. The faster the spin, the faster the frame rate you get.
Event Status
It refers to E1~E6 Icons. Events include motion detection and sensor triggering. Event icon will also
spin if there is any event occurs.
Recording Status
It refers to R1~R6 Icon. You can also check whether recording is active for any camera at a glance. If
M1103-4
- 74 -
Seyeon Tech Co., Ltd.
FlexWATCH Manager
User Manual
there is any recording being done, you will see Red arrows moving.
Audio Status
It refers to A1~A6 icon. When there is audio data coming from FlexWATCH, you will see Blue arrows
moving.
8. System Log Window
FlexWATCH Manager provides log message window so that user can easily view log message
status.
System log message is interfaced to Server, camera and FwManager Player. Thus, you can easily find
which servers and cameras the log messages come from and launch FlexWATCH Manager Player by
double clicking the log message. You can play back recorded video by clicking a log message
Click
this ICON from the Program tool bar to run Log View Window on the program. If you want
to hide this window, you can click
ICON again.
Shortcut to FwManager player through System log message
If you click the system log message, you are directed to server and specific camera and you can
easily find out at which server or camera the system log was happened. You can directly call
FlexWATCH Manager Player and instantly view the recorded video through System Logo message.
If you double click the system log message, it will call FlexWATCH Manager Player.
If you double click the message again, you are directed to video server in the FlexWATCH Manager
Player and double click again then go to the camera.
TIP
M1103-4
- 75 -
Seyeon Tech Co., Ltd.
FlexWATCH Manager
User Manual
Once FwManager Player already called and it is running behind the FlexWATCH Manager main
screen, only double clicking on a system log message will direct you to the respective Camera.
Thus, if you need to view any archived video through System log message, just keep the
FlexWATCH Manager Player run behind the FlexWATCH Manager program.
9. Beep Alarm Notification
Beep alarm through PC sound will be activated when an event occurs following the beep alarm
configuration so that event can easily be notified to a manager or a guard.
Note that if you would like to get an alarm notification through e-mail, it is recommended that you use
the e-mail function of server. This e-mail function can be set up by Admin menu of the FlexWATCH
server.
9.1. Beep Alarm Configuration
This configuration is applied for a server, not respective cameras. Thus, you need to configure this
option in the Server control window.
Configuration method for the beep alarm is the same as that of recording configuration which is
explained in detail in the Recording Configuration chapter. Thus, you are required to refer to
Recording configuration chapter to get better understanding of configuration method.
Beep Alarm independently works from recording condition. But it is recommended that you
refer to recording condition, if you want to match the Beep Alarm condition with recording
condition.
A)
Select FlexWATCH server from the Server control window.
B)
Click right mouse button and select server ‘Properties’.
C)
Select ‘Beep’ tap and configure been alarm options.
D)
Add Beep Alarm condition by click ‘Add’ button.
E)
Once beep alarm condition is set up, please set up the beep alarm duration option.
M1103-4
- 76 -
Seyeon Tech Co., Ltd.
FlexWATCH Manager
User Manual
Duration
This is to specify beep alarm period when the Beep Alarm is triggered. 0 means infinite while
86400 sec is equal to 1 day long alarm.
TIP
If you want to the beep alarm activated until you manually stop it, please set the duration
time to 0 sec.
If you want to stop the beep sound, please click the beep control icon as show below. (Or select
“Turn off Beep” in right mouse button menu on Manager in Server Registration menu.
TIP
If you configure beep alarm condition by Motion detection, you need to configure motion detection
area in the respective server.
M1103-4
- 77 -
Seyeon Tech Co., Ltd.
FlexWATCH Manager
User Manual
TIP
Beep alarm will be activated for the Duration you set up in the configuration menu. If you want to
manually disable Beep alarm sound, you need to remove Beep alarm options from the server property
setting.
Thus, you are required to set the right Beep alarm duration time.
10. Relay Output (DO) Configuration
You can control external device which is connected to FlexWATCH server using Relay output
mode of FlexWATCH Manager. Through this mode, you can automatically turn on/off the light or siren
when the event is happened following the Relay output condition. You can also manually control the
Relay output.
10.1. Relay Output (DO) Configuration
This configuration is applied for FlexWATCH server, not respective cameras. Thus, you need to
configure this option in the Server control window.
Configuration method for the Relay output control is the same as that of Recording
configuration which is explained in detail in the following “Recording Configuration” chapter. Thus,
you are required to refer to Recording configuration chapter to get better understanding of
configuration method.
Relay Output control independently works from recording condition. But it is recommended
that you refer to recording conditions to synchronize relay output control condition with
recording conditions, if you want.
Depending on the server model, the number of relay output ports is different.
A)
Select FlexWATCH server from the Server control window.
B)
Click right mouse button and select server ‘Properties’.
C)
Select Relay output number and configure alarm conditions by clicking [ADD] button.
Depending on the FlexWATCH network camera or video server models, different number of
DO port number will appear.
M1103-4
- 78 -
Seyeon Tech Co., Ltd.
FlexWATCH Manager
User Manual
Duration
Duration is to keep relay output device working for a specific period. 0 means infinite while
86400 sec is equal to 1 day long alarm.
Name
Relay Output device name can be given so that connected device can easily identified by the
name through Relay output device control panel.
TIP
If you want to the Relay Output activated until you manually stop it, please set the
duration time to 0 sec.
TIP
If another event is happened during the duration period, that event will be ignored and Relay
output will be kept connected.
Relay output device connected to a server can be manually controlled by FlexWATCH Manager
regardless of any configuration made above.
A) Click right mouse button over an image (Or a camera name in Server or Camera Registration
section) from a selected camera.
B) Select ‘Relay Output Control’ option. (Or just click the Relay Output Control Icon as shown
below image.) Then Relay Output control panel will come up.
M1103-4
- 79 -
Seyeon Tech Co., Ltd.
FlexWATCH Manager
Relay Output Control Icon
User Manual
Relay Output Control menu
Relay Output Control Panel
11. Recording Configuration
FlexWATCH Manager Program provides powerful recording options to enable you to record live video
streams transmitted from FlexWATCH Network Cameras or Video servers. Followings are the key
features of recording options provided by FlexWATCH Manager.
-
Multiple recording options are provided such as Forced (Manual) recording, Schedule,
Motion detection and Sensor Driven video recording option.
-
Multiple recording conditions for each camera
-
Pre/Post alarm option
-
Recording frame rate control option
11.1. Forced(Manual) Recording
Forced recording option enables you to record any time regardless of any other recording
conditions. You can enable it by clicking “Forced” Recording icon
on a camera name as shown
below.
11.2. Recording Conditions and Criteria
11.2.1. Recoding by Conditions
FlexWATCH Manager supports various recording conditions such as Schedule, Motion
Detection, and Event. The following is the Recording condition setup procedure.
M1103-4
- 80 -
Seyeon Tech Co., Ltd.
FlexWATCH Manager
A)
User Manual
Please make sure that HDD configuration is already done so that video can be recorded
right after recording configuration.
B)
Click the right mouse button over an image (Or a camera name in Server or Camera
Registration section) from a selected camera and select ‘Properties’ option.
C)
Please select [Record] tab in the properties of camera.
Descriptions of Recording options in the properties of camera
Items
Descriptions
Add
To add a new recording condition
Edit
To edit a existing recording condition
Remove
To delete a recording condition
Pre-Alarm
Refers to total frame number to be saved before an event (0~5 frames)
This is only for MJPEG Image.
Post-Alarm
Refers to total frame number to be saved after an event (0~5 frames)
This is only for MJPEG Image.
MJPEG Dedicated
Maximum Frame number per second for recording.
Maximum Recording
This is only for MJPEG Image.
Speed
Pre/Post-Alarm and Maximum Recording Speed applies for each camera. However, the recording
speed depends on network bandwidth, the performance of a video server and FlexWATCH Manager
installed PC.
M1103-4
- 81 -
Seyeon Tech Co., Ltd.
FlexWATCH Manager
D)
User Manual
Please click Add button to add a recording condition.
The following is the description about Recording Condition and Criteria. You need careful
attention and good understanding about Recording conditions and Criteria in order for you to
properly set up recording conditions and to achieve your goal.
Condition Setup
Schedule Setup
Event Setup
Description of Recording Conditions
Items
Condition
Always
Setup
Descriptions
To active Always Recording regardless of any other
conditions. If you select this condition Schedule and
Event condition window become inactive.
Schedule Only
To record based on the Schedule. Event condition
window becomes inactive.
Event Only
To record by events (Motion detection or Sensor)
Schedule condition window becomes inactive.
Schedule and Event
To record by events during the Schedule time. Thus if
it is not in schedule, any event can’t trigger the
recording.
Schedule
Day of week
To select day of a week
Setup
Time
To set the desired time for recording. If Day of a week
has not been selected, recording will be done
during the selected time every day.
Date
M1103-4
To set the desired data.
- 82 -
Seyeon Tech Co., Ltd.
FlexWATCH Manager
Event Setup
Motion On
User Manual
To select cameras for motion detection recording. If
CH1 of the server is selected, when CH1 detects
motions recording will begin. If CH1 & CH3 are
selected, then when both CH1 & CH3 detect motions,
recording will begin, meaning that if only CH1 detects
motions, the recording will not begin.
There are two types of motion detection functions such
as by HW and SW. Please set the motion detection
function based on your need.
Alarm On
To select sensors for event recording. If #1 sensor of
the server is selected, when #1 sensor gets an input,
recording will begin. If #1 sensor & #3 sensor are
selected, when both #1 & #3 sensors get inputs, the
recording will begin, meaning that if only #1 sensor
gets a input, the recording will not begin.
If the function doesn’t properly work, please
check out if the sensors are properly connected
to FlexWATCH server.
11.2.2. Schedule Driven Recording
A)
Click the right mouse button over an image(Or a camera name in Server or Camera
Registration section) from a selected camera and select ‘Properties’ option and select
[Record] tab and click “Add” to display the recording condition setup window.
B)
Select “Schedule Only”. If you select “Always”, then FlexWATCH manager will do recording
all the times regardless of any other conditions.
Example of Schedule Driven Recording
M1103-4
- 83 -
Seyeon Tech Co., Ltd.
FlexWATCH Manager
User Manual
Ex)
Between 1st of June and 1st of August, in every
Saturday and Sunday, FlexWATCH Manager will
record from 6AM to 1PM.
C)
M1103-4
Please click “OK” to finish the setting.
- 84 -
Seyeon Tech Co., Ltd.
FlexWATCH Manager
User Manual
11.2.3. Motion Driven Recording
There are two motion detection functions available including HW motion detection and SW
motion detection. If FlexWATCH server supports HW motion detection, using HW motion detection
rather than SW motion detection is better for the performance of FlexWATCH Manager. If you want
SW motion Driven Recording, you first need to set the motion detection area in the properties of
Camera. Please refer to the following steps for motion detection area setup.
Click the right mouse button over an image (Or a camera name in Server or Camera
Registration section) from a selected camera and select ‘Properties’ option and select “Motion
Detection” tab.
Description of [Motion Detection] menu
Item
Description
Display Screen
You can select up to 2 motion detection areas by Mouse Drag.
Motion Detection Area List
The current motion detection area list. If click on the Area #, you can
see the selected motion detection area.
Detection Sensitivity
To adjust detection Sensitivity.
Detection Interval
To select Detection Interval of how often FlexWATCH Manager tries to
detect the motions. The Interval values are between 1 sec to 15 sec.
Remove
M1103-4
To remove the selected motion detection area. Select Area # and click
- 85 -
Seyeon Tech Co., Ltd.
FlexWATCH Manager
User Manual
Remove.
A)
In Display Screen, select desired motion detection area by a mouse drag and select other
options. And Click “OK” or “Apply” to finish the setting.
B)
Move to “[Record]” tab and click “Add”.
C)
Select either “Event Only” or “Schedule and Event”.
D)
If you select “Schedule and Event” you need to setup the desired schedule with Event
conditions. If you select “Event Only” you just setup the Event conditions.
Example of Motion Driven Recording
Ex)
Between 1st of June and 1st of August, in
every Saturday and Sunday, FlexWATCH
Manager will record when camera 1 has
motion detected between 6AM and 1PM.
E)
Please click “OK” to finish the setting.
11.2.4. Event driven Recording by Sensor
A)
Please check out if a sensor is properly connected to DI of FlexWATCH server.
B)
Click the right mouse button over an image(Or a camera name in Server or Camera
Registration section) from a selected camera and select ‘Properties’ option and select
[Record] tab and click “Add” .
C)
Select either “Event Only” or “Schedule and Event”.
D)
If you select “Schedule and Event” you need to setup the desired schedule with Event
conditions. If you select “Event Only” you just setup the Event conditions.
Example of Schedule and Event Recording
M1103-4
- 86 -
Seyeon Tech Co., Ltd.
FlexWATCH Manager
User Manual
Ex)
Between 1st of June and 1st of August, in every
Saturday and Sunday, FlexWATCH Manager will
record when sensor 1 is triggered between 6AM
and 1PM.
12. Player Lite
Player Lite is a program which enables you to search and to playback the archived video based
on each server. You can easily search the archived video data by selecting a date on the calendar. It
also provides several functions such as enlargement, reduction, snap-shot, AVI conversion, print for
the searched images.
You can launch the Player Lite by clicking Player Lite
icon in the upper tool bar.
Below is the screenshot of the Player Lite.
A
E
B
C
F
D
M1103-4
G
- 87 -
Seyeon Tech Co., Ltd.
FlexWATCH Manager
User Manual
- Player Lite Main Screen
A.
- Network Sites for remote server Registration & Search
Network Sites & Local
- Local Sites for searching archived data in local site (FlexWATCH
Sites
manager installed PC)
B.
-Registered server list. When you click a server, all channels will appear
Server List
C.
in the Display Window.
-Each calendar day will be in red if it has archived data on that day.
Calendar
D.
- Enlargement, Reduction, Print, AVI Conversion, Snapshot functions
Tools
E.
- When you click on the green bar displayed on the time bar, it will
Display Window
display the searched images.
F.
- tools for Playback the archived images.
Play bar
G.
-It will show you the recorded data in green bar for each channel. By
Time bar
clicking on the green bar, you can playback the images from that time.
12.1.Network Site Registration
You can search archived video from registered FlexWATCH Manager or FlexWATCH 5000
series.
A)
Please click the right mouse button on Network Site and select “Add Storage”.
B)
Fill in the required fields with the proper information as shown below.
M1103-4
- 88 -
Seyeon Tech Co., Ltd.
FlexWATCH Manager
User Manual
In case of error
In normal case
12.2.Search Images
Search functions for network sites or local sites are the same. Please refer to following steps.
A)
Select desired server under Network sites or Local Sites. Then it will show you registered
servers in the Server List. Please select a server to search.
B)
If the selected server has recorded images, Calendar will display days in red; otherwise the
number will be in blue. The current selected day will be in green as shown below.
M1103-4
- 89 -
Seyeon Tech Co., Ltd.
FlexWATCH Manager
C)
▶
move to next month.
▶▶
move to next year.
◀
move to previous month.
◀◀
move to previous year.
Today
move to current date.
User Manual
Please click one of the days appeared in red and check out the Time Bar.
You will see the green bar which indicates that there are recorded data. When you click on
the green bar, you can see a red vertical line at the selected time line with recorded images
in the Display Window.
M1103-4
- 90 -
Seyeon Tech Co., Ltd.
FlexWATCH Manager
User Manual
Time Bar: If there are recorded data, you can see the green bar. If you click on the green bar,
you can see a red vertical time line. The red line will move forward as playback.
12.3.Playback
If you click on the green bar, you can see the searched images in Display Window and Play Bar
will be activated. The functions of Play Bar are as follows:
Play Bar
1
2
3
4
5
6
7
8
9
10
1. Playback Speed. (Slowest, Slow, Normal, Fast, Fastest)
2. Reverse Playback
3. Forward Playback
4. Pause
5. Stop
6. Reverse Playback by 1 frame
7. Forward Playback by 1 frame
8. Recorded date
9. Show you the images from 1 minute before (It is in active when it is paused.)
10. Show you the images from 1 minute after (It is in active when it is paused.)
12.4.Tools
You can use various functions in Tools. While the playback, please click the pause button. And
select a desired channel in Display Window. The icons in Tools will be activated at a paused image.
M1103-4
- 91 -
Seyeon Tech Co., Ltd.
FlexWATCH Manager
User Manual
①Click
②Activation
Enlargement of a paused image from a selected channel.
Reduction of a paused image from a selected channel.
Original paused image from a selected channel.
Print a paused image from a selected channel.
AVI Backup for the selected images.
JPEG backup for the selected image.
Termination of Player Lite.
12.4.1. Print
A)
At paused mode, please select the desired channel in Display Window to print out.
B)
If you click
icon, you will see the Print Window. Select proper print options and Click
“OK”.
C)
Please enter the description for the image and click “OK”.
12.4.2. AVI Backup
A)
At paused mode, please select the desired channel in Display Window.
B)
If you click
M1103-4
icon, you will get the below pop-up window.
- 92 -
Seyeon Tech Co., Ltd.
FlexWATCH Manager
C)
User Manual
Adjust the Frame Rate for AVI Backup and click “OK”. Then you will see below pop-up
window.
D)
You can adjust Start time and Recording duration by second. Please click the find button in
File setting to select a location for AVI backup file. Enter the proper name for an AVI file and
click “Record” to begin the AVI backup.
12.4.3. JPEG Backup
A)
At paused mode, please select the desired channel in Display Window for JPEG Backup.
B)
Please click
icon, you will see the Save As window. Please select the location and
enter then proper file name. Click “Save” and you will get a JPEG backup file.
13. Network Alarm Manager Configuration
FlexWATCH Manager supports Network Alarm Manager and the steps are as follows:
A)
Select Network Alarm Manager in the right mouse button menu on “Manager” in Server
Registration section.
M1103-4
- 93 -
Seyeon Tech Co., Ltd.
FlexWATCH Manager
User Manual
B)
You will see “Network Alarm Manager” window as shown below.
C)
If you enable it, you can enter up to 3 IP addresses for network alarm manager. And you can
also configure the Recording Time between 1 and 10 minutes. Click “OK” to finish.
D)
Select a desired camera to be popped up when an alarm occurs. Please select “Alarm
Information” in the right mouse button menu.
E)
M1103-4
You will see below Alarm Information window.
- 94 -
Seyeon Tech Co., Ltd.
FlexWATCH Manager
User Manual
Sensor
If you want to send a signal to Alarm Manager by Sensor, check this
Motion Detection
If you want to send a signal to Alarm Manager by Motion Detection,
check this.
Level
Indicate the level of Alarm ( High, Middle, Low )
Alarm Name
Enter the name of Alarm
Administrator
Enter the name of Administrator
Location
Enter the name of the location
Contact 1,2,3
Enter the contact information such as telephone number
Address
Enter the address
)
When FlexWATCH Manager works with a Network Alarm Manager, you can view the
archived video from FlexWATCH Manager by Network Alarm Manager. To use this
function, you need to enable the Remote Playback Service in FlexWATCH Manager.
14. ISENS-Central Configuration
ISENS stands for IP-SurvEillaNce System and this system is for the large scaled CCTV security
solution. FlexWATCH Manager 2.06 or higher version supports ISENS. ISENS-Central is a Windows
service which manages all the ISENS events, DB, etc. FlexWATCH Manager sends the information of
all the events to ISENS-Central.
A)
Click right mouse button on “Manager” and select “ISENS-Central”.
B)
You will see below pop-up window.
M1103-4
- 95 -
Seyeon Tech Co., Ltd.
FlexWATCH Manager
User Manual
Name
Remarks
Send Alarm to ISENS Central
Check to work with ISENS
One ISENS can work with several FlexWATCH
FlexWATCH Manager ID
Manager. Thus, you need to enter the appropriate
ID for FlexWATCH Manager.
Session ID
ISENS-Central IP
Enter the same ID as FlexWATCH Manager ID
Enter IP address of ISENS-Central for TCP/IP
communication
Default port is 12001. If you change this, you also
ISENS-Central Port
change the port number when you install the
ISENS-Central.
FwManager IP
Enter IP address of FlexWATCH Manager installed
PC
FWManager MAC Address
For future use
C)
Please fill in the required fields first. Then check the Send Alarm to ISENS Central.
D)
Select a camera from which you want to send alarm information to ISENS central. And select
Alarm Information in the right mouse button menu.
M1103-4
- 96 -
Seyeon Tech Co., Ltd.
FlexWATCH Manager
E)
User Manual
You will see below Alarm Information window.
Sensor
If you want to send a signal to ISENS-Central by Sensor, check this
Motion Detection
If you want to send a signal to ISENS-Central by Motion Detection,
check this.
Level
Indicate the level of Alarm ( High, Middle, Low )
Alarm Name
Enter the name of Alarm
Administrator
Enter the name of Administrator
Location
Enter the name of the location
Contact 1,2,3
Enter the contact information such as telephone number
Address
Enter the address
F)
If you want to search the archived data by ISENS, you need to enable the Remote Playback
Service and also need to add an account for Remote Playback Service as shown below.
M1103-4
- 97 -
Seyeon Tech Co., Ltd.
FlexWATCH Manager
G)
User Manual
After all related setting is done; you need to export a file which is used for ISEND-DB. Please
select Export Config in the right mouse button menu.
H)
Please check all the desired servers working with ISENS and click “Export” button. Choose
the location and name the export file. You will need this Export file to be loaded into ISENS
Composer later. Please refer to ISENS User’s Manual for more information.
M1103-4
- 98 -
Seyeon Tech Co., Ltd.
FlexWATCH Manager
User Manual
15. Trouble Shooting
Followings are basic trouble shooting guide. If you encounter problems which can not be
resolved with below trouble shooting guide, please contact your local distributor or Seyeon
Tech Co., Ltd. ([email protected]).
15.1. Installation
A) Symtoms: A Key Lock can not be installed in PC. (Notice: a key lock is replaced by a
coupon since 2005)
Solution:
-
If you are using FlexWATCH Manager Ver 1.0, you need to go to control panel and
delete Key lock software first and then install it again.
-
If you are to install FlexWATCH Manager for the first time, check out to see if the Key
Lock is properly connected to your PC.
)
If you have another kind of a key lock connected to your PC for other software,
FlexWATCH Manager can’t be run.
15.2. Server Registration
A) Symptoms: Can not register FlexWATCH server in the FlexWATCH Manager
Solution:
-Check out whether FlexWATCH server and FlexWATCH Manager are connected
M1103-4
- 99 -
Seyeon Tech Co., Ltd.
FlexWATCH Manager
User Manual
to Network, since FlexWATCH server must be on line
- If FlexWATCH server is registered in the AOIP server, please access to the AOIP
server and check if the FlexWATCH server is correctly connected to AOIP server.
B) Symptoms: Can not register FlexWATCH servers any more in the FlexWATCH Manager
Solution:
Regardless of the number of registered FlexWATCH servers, you can’t
register more than the number of channels allowed by your FlexWATCH
manager version. For example, if you use FlexWATCH Manager 36ch version,
you can register up to 36 channels regardless of the number of servers.
C) Symptoms: FlexWATCH server can be accessed through AOIP server, but you can’t
register the FlexWATCH server into FlexWATCH manager.
Solution:
-
Please check if the address of AOIP server is correct. (The address of the AOIP
server operated in Korea is www.aoip.co.kr; however, if your supplier operates their
own AOIP server, the address would be different.)
-
Please check if the S/N of the FlexWATCH server is correct.
15.3. Video Display
A) Symptoms: Can not view any video on the screen.
Solution:
-
Check whether you created at least one camera group and put registered cameras
into the camera group.
-
Check network status of your PC where FlexWATCH Manager is installed.
B) Symptoms: Can not get video from FlexWATCH server
Solution:
- Please check the status of FlexWATCH server in its homepage. If it is not alive, please
fix the network status.
C) Symptoms: Overall display frame rate is so low and sometimes the image got frozen.
Solution: Check out following points.
M1103-4
- 100 -
Seyeon Tech Co., Ltd.
FlexWATCH Manager
User Manual
- Whether enough bandwidth is available between FlexWATCH Manager and
FlexWATCH server, if multiple videos are being displayed.
-Especially when FlexWATCH servers are located in WAN network, there would be
some network bottle neck.
-Check out whether PC specification meets manufacturer’s recommendation.
-Check out actual live video streams through web browser whether you get good frame
rate or not, while FlexWATCH Manager is running.
15.4. Video Recording
A) Symptoms: No “Schedule” driven recording is done Solution:
- Check whether there are enough HDD space is available. You need at least
more than 100M bytes of HDD space. You can try if the recording works or not by forced
recording option.
- Check whether the schedule condition is correctly done or not.
B) Symptoms: No video recording is done by motion detection option, although forced
recording option is working
Solution:
- Check whether a Motion detection area is correctly set up or not
- Check whether Motion sensitivity is correctly set up
- Check whether recording condition is correctly set up for the right camera.
C) Symptoms: No video recording is done by alarm event.
Solution:
- Check alarm event condition whether configuration is correctly set up.
- Check out whether the sensors are correctly working or not. Connect each
FlexWATCH sever and check out its sensors’ functionality.
15.5. Relay Output Control
A) Symptoms: Alarm Output device does not work through Relay Output control panel of
FlexWATCH Manager.
Solution:
- Check Relay Output tab in Server Property.
- Check DO activation configuration is correctly done or not.
M1103-4
Ltd.
- 101 -
Seyeon Tech Co.,
FlexWATCH Manager
User Manual
- Check if DI is correctly working or not.
15.6. PTZ Control
A) Symptoms: PTZ does not work through FlexWATCH Manager.
Solution:
Check whether PTZ works through Web browser. If it doesn’t work, check out
PTZ cabling and PTZ configuration in the FlexWATCH server.
15.7. Virtual Memory Error Messages
A) Symptoms: When you see a virtual Memory Error message while displaying cameras.
Solution: In Windows 2000 or Windows XP, if your PC doesn’t have enough virtual memory,
you may get this kind of a message.
Properties of “My Computer” Æ “Advanced” tab Æ “Settings” in
Performance Æ “Advanced” tab Æ “Change” in Virtual memory.
Now you can change the virtual memory size by Custom size. It is recommended
that you enter 2 times more than actual RAM size.
M1103-4
- 102 -
Seyeon Tech Co., Ltd.