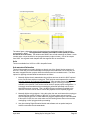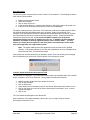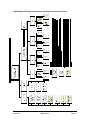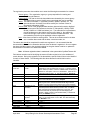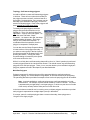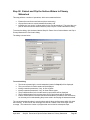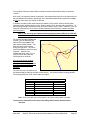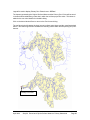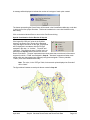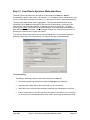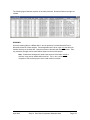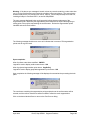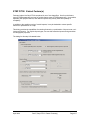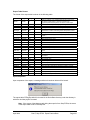
1
Vermont Agency of Natural Resources Stream Geomorphic Assessment SGAT User Guide Stream Geomorphic Assessment Tools Version 4.5: An ArcView Extension Software Design and Development By C. L. Davis Consulting Associates, Ltd. Weybridge -- Middlebury, VT For the Vermont Agency of Natural Resources April, 2006 Development of the Stream Geomorphic Assessment Tools and User Guide was supported by grants from the: Clean and Clear Funds US Fish and Wildlife Agency State Grants (Version 4) Federal Emergency Management Agency Project Impact EMB-200-GT-0005, CFDA 83.551 (Version 1) Pre-Disaster Mitigation Project, CFDA 83.557 (Version 2) US Environmental Protection Agency Section 319 Grant (Version 3) Contracting for Version 1 was provided by the: Lamoille County Regional Planning Commission Michele Boomhower, Executive Director Addison County Regional Planning Commission Adam Lougee, Executive Director Contracting for Versions 2 and 3 was provided by the: Lamoille County Regional Planning Commission Michele Boomhower, Executive Director Contracting for Versions 4 and 4.5 was provided by the: Department of Fish & Wildlife, VT Agency of Natural Resources Vermont Center for Geographic Information David Brotzman, Executive Director Agency of Natural Resources Technical Advisory Group included: Mike Kline, Shannon Hill, Staci Pomeroy, Ty Mack Department of Environmental Conservation Christa Alexander, Department of Fish and Wildlife Request for technical assistance, training, questions and comments should be directed to: Shannon Hill, (802) 747-5066, [email protected] River Management Section , DEC, Water Quality Division 103 South Main St., Building 10 North Waterbury, Vermont 05671-0408 Information on the Stream Geomorphic Assessment process may be obtained from the River Management Section, Geomorphic Assessment internet web page at: www.vtwaterquality.org Table of Contents Appendices ____________________________________________________ iv Introduction ____________________________________________________ 1 Overview _________________________________________________________________ 1 History ___________________________________________________________________ 1 Credits ___________________________________________________________________ 3 Trademarks _______________________________________________________________ 4 System Requirements ______________________________________________________ 4 Restrictions_____________________________________________________ 5 Geographic Limitation ______________________________________________________ 5 Soils Data Requirements ____________________________________________________ 5 ArcView Skills _____________________________________________________________ 5 Feedback _________________________________________________________________ 5 Format of Material Distributed _____________________________________ 6 Format of This Document ___________________________________________________ 6 Contents of Distribution CD__________________________________________________ 7 General Concepts________________________________________________ 8 Setting Up for Using the Tools ____________________________________ 13 Installation of the Tools ArcView Extension ___________________________________ 14 To unload the Tools extension ______________________________________________ 16 Required Directory Structure________________________________________________ 17 Required dBase Tables ____________________________________________________ 19 Required Source Themes___________________________________________________ 20 The ArcView Project File ___________________________________________________ 27 Reviewing the Source Shape Files (Themes) ________________________ 29 Overview of the Processing Steps in the Tools Extension _____________ 32 Using the Theme and Data Tracking Form _____________________________________ 34 Guidelines for using the Stream Geomorphic Assessment Tools __________________ 34 Organization ___________________________________________________ 36 Common Dialog Operations/Messages in the Tools Extension ____________________ 37 Input/Output Data Set Registration ___________________________________________ 39 Output Data Set Naming/Registration_________________________________________ 40 Multiple Versions of Data Sets ______________________________________________ 41 Processing Time and Patience ______________________________________________ 44 The Note Field on the Dialogs for Processing Steps_____________________________ 45 Using the Log __________________________________________________ 46 Accessing the Stream Geomorphic Assessment Tools________________ 49 Initialization Procedure ____________________________________________________ 49 April 2006 Page i Setup Dialog for the Stream Geomorphic Assessment Tools___________ 58 User Type________________________________________________________________ 58 Application ______________________________________________________________ 59 User View________________________________________________________________ 60 Theme/Table Registration and Management ___________________________________ 61 Registering Themes _______________________________________________________ 63 Removing a Theme Registration___________________________________________ 68 Registering Tables ________________________________________________________ 68 Removing a Table Registration ____________________________________________ 72 Managing Derived Themes and/or Tables _____________________________________ 73 The Tools Main Dialog ___________________________________________ 76 Part A: Data Development Primary Watershed ______________________ 77 Step 01: Dissolve Sub-Watershed Boundaries into Overall Watershed Boundary ____ 78 Step 02: Extract and Clip the Surface Waters to Primary Watershed _______________ 86 Critical Evaluation Required by the User ____________________________________ 90 Step 03: Combine Stream Segments between Confluence Points _________________ 93 Step 04a: Setup for Assigning Tributary Identifiers Interactively __________________ 96 Step 04b: Assign Tributary Identifiers Interactively ____________________________ 101 Step 04x: Assign Tributary Identifiers Manually _______________________________ 107 Step 04z: Problems Associated with Incorrect Assignment of Tributary Identifiers__ 109 Part B: Data Development for Sub-Watersheds _____________________ 111 Step 05: Clip Linear Surface Waters to Sub-Watershed Boundaries ______________ 112 Step 06: Calculate Reach Points and Reach Point Data ________________________ 115 Step 07: Calculate Valley Line and Data _____________________________________ 125 Step 08: Calculate Channel Width and Stream Data____________________________ 136 Step 09: Calculate Stream Corridors (Buffers) ________________________________ 140 Step 09: Using Alternative Stream Corridors (Buffers) _______________________ 146 Step 10: Data Entry/Review of Reach Point Data ______________________________ 149 Step 10: Calculating Derived Data ________________________________________ 153 Step 10: Set Map Documentation Fields ___________________________________ 155 Step 10: Export Reach Point Data to dBase Table ___________________________ 157 Part C: Soils, Land Cover and Density Analysis ____________________ 159 Step 11: Step 12: Step 13: Step 14: Step 15: Clip Theme to Boundary___________________________________________ 160 Summarize and Attach Descriptive Data _____________________________ 163 Sum Data to Upstream Watershed Area ______________________________ 170 Summarize Area by Field Value (Cross-Tabulate) ______________________ 175 Calculate Densities _______________________________________________ 183 Part D: Reach Segmentation and Feature Indexing__________________ 190 Part D: Reach Segmentation ____________________________________ 191 STEP SEG00: Setup Surface Water Theme ___________________________________ 192 STEP SEG01: Segment Reaches ___________________________________________ 195 April 2006 Page ii Part D: Feature Indexing________________________________________ 199 STEP FIT00a: Setup for Feature Indexing ____________________________________ 201 STEP FIT00b: Feature Indexing ____________________________________________ 206 STEP FIT00c: Feature Data Modification/Deletion _____________________________ 211 STEP FIT01: Feature Segmentation _________________________________________ 214 STEP FIT02: Extract Feature(s) ____________________________________________ 217 STEP FIT03: Export Feature Data ___________________________________________ 220 April 2006 Page iii Appendices A: Documentation for using the Optional Tools provided with the Stream Geomorphic Assessment Tools extension. Two tools are provided: Review Polyline Theme for Geometric (GIS) Errors and Build Polygons from Polylines. B: Theme and Data Tracking Form – Forms are provided that can be used to track the source data, including currency, responsible agency, source scale and date. Additional forms are provided that can be used to document the input themes/tables, parameter values and output themes for each of the processing Steps. Thus, a written description can be available for future reference. C: Data Element (Attribute) Description by Processing Step – A concise description of each Processing Step. The input themes/dBase files, the output themes/dBase files and the attribute fields that are created or updated are listed for each step. D: Data Element (Attribute) Description by Theme/dBase File – A concise listing by theme/dBase file of the fields (attributes) and the processing Step in which they are added or updated. E: Cross-Tabulation Field Names for Soils – Step 14 provides the capability to develop crosstabulations for soils data. This appendix provides a listing of the source field, potential values and names of the cross-tabulation fields which will be created. F: Cross-Tabulation Field Names for Land Cover – Step 14 provides the capability to develop cross-tabulations for Land Cover data. This appendix provides a listing of the source field, potential values and names of the cross-tabulation fields which will be created. G: Top 20 Soils Attribute Documentation (October 2005) – This is a reproduction of the description for the Top 20 soils attributes available from Vermont Center for Geographic Information (VCGI) and the Natural Resources Conservation Service, USDA. H: The step-by-step approach to developing the stream corridors (buffers) in Step 09 is illustrated to assist those users who would like to understand the process or who wish to develop custom stream corridors. I: Documentation for using the System Functions provided with the Stream Geomorphic Assessment Tools extension. J. Processing Steps For the Development of Fluvial Erosion Hazard Zones K. Development of Stream Corridor Buffers And Fluvial Erosion Hazard Zones Note: The Appendices are provided as separate documents. April 2006 Appendices Page iv Introduction Overview The Stream Geomorphic Assessments Tools were developed to provide assistance to organizations performing Phase I of the Stream Geomorphic Assessment as specified in Draft 4 of the Handbook for Stream Geomorphic Assessment, Phase I (Vermont Agency of Natural Resources, April 1, 2005). History Version 1 of the Stream Geomorphic Assessment Tools was released in April of 2002. Key components of the software were developed under the funding available at that time. Since the release of Version 1, it has been used in the Phase I Geomorphic Assessment of several watersheds. The experience gained from its use in those efforts has been reflected in the development of Version 2. Version 2 embodies the enhancement of certain functions provided under Phase I and includes a number of additional capabilities. Among the new capabilities are the following: ♦ ♦ ♦ ♦ ♦ ♦ ♦ ♦ ♦ Inclusion of Inflow Points and upstream drainage area for watersheds Stream Corridor development in Accordance with Appendix E of the Phase I Handbook Calculation of a Valley Line, including length and average width Calculation of channel sinuosity, valley confinement and channel and valley slopes Aggregation of data for upstream watershed areas for stream corridors and sub-watersheds Coordinates for Reach Points (Latitude/Longitude and State Plane) Ability for the user to provide documentation information on the watershed and reach points User data entry, editing and review of Reach Point data Numerous other minor modifications to improve usability In order to implement these additions/modifications, it was necessary to reorganize the processing steps established in Version 1. Version 3 incorporated the following enhancements and/or changes: • • • • • • Significant modification to the user interface that requires themes/tables to be registered prior to their use. This minimizes the chances of improper selection in a given step and facilitates software distribution. Incorporation of the “Floodway Determination” application. Tracking of processing results and errors via a log. System Functions area permitting modification of channel width regression equation parameters based upon upstream drainage area, reach point formatting, establishing/modifying units of measurement to be used, log management and control of the number of output versions. Added verification for detecting digitizing errors. Single point for identifying the user view to which output themes are added. The basic processing steps of Version 2 remain in version 3. However, the need to identify a view, the input themes/tables and the output tables has been removed from the individual processing steps. April 2006 Introduction Page 1 Version 4 incorporates the following major enhancements and/or changes: • • • • • • • • Modification to the calculation algorithm in Step 07 to more accurately depict valley lines. Modification to Step 10 to include a function that will assign to each reach the Town Name, Ortho Photo Ids, USGS Quad Names and HUC Watersheds within which the reach falls. Addition of Step 15 to calculate densities (number of points, total lengths and/or total areas) that fall within stream corridors and/or sub-watersheds. Densities are calculated for both reach and upstream drainage areas. Incorporation of two steps within Part D that provide the ability to “segment” a Phase 1 reach into Phase 2 segments. Incorporation of four steps within Part E that provide the ability to create the Fluvial Erosion Hazard (FEH) zones. Modification of error messages to include a unique error number. A Microsoft Access® data base has been developed to include the error number, message format, message example and reason(s) message will be issued. The data base is intended to be dynamic and facilitate adding more specific reasons for the occurrence of errors identified during technical support. Ability to edit limits imposed in Step 10 for Channel Widths, Elevation, Valley lengths and Valley Widths via a system dialog. Removal of Step 00 and the calculation of the VTId in Step 06. Other “fixes” and minor modifications were performed as needed. Version 4.5 incorporated the following major enhancements: • • • Part D was subdivided into two sections: Reach Segmentation (developed in Version 4.0) and Feature Indexing. Four steps are provided for Feature Indexing: o Step FIT00 provides capabilities for interactively indexing point (e.g. grade controls, alluvial fans, etc.) and polyline (e.g. erosion, straightening, etc.) features to the surface waters. o Step FIT00c permits one to modify certain data associated with indexed features. o Step FIT01 permits one to segment indexed features to correspond to any reach segmentation performed. o Step FIT02 provides the capability for one to extract specific indexed features and potentially to offset these features from their original locations (which would be coincident with the surface waters) for cartographic purposes. o Step FIT03 permits one to export data for indexed features for subsequent import into the DMS. Part A, Step 04 provides an interactive method for assigning tributary identifiers. April 2006 Introduction Page 2 Credits Technical advice and review of the Tools during development were provided by the following: Barry Cahoon, Mike Kline, Shannon Hill, Staci Pomeroy and Ty Mack Agency of Natural Resources Department of Environmental Conservation Water Quality Division – River Corridor Management Section Christa Alexander Agency of Natural Resources Department of Fish and Wildlife In Version 4, the algorithm for calculating valley lines in Step 07 was modified to use Thiessen Polygons. Certain scripts for calculating Thiessen Polygons were extracted with permission from the ArcView extension Vector11.avx created by Francisco Olivera, Ph.D., P.E., Department of Civil Engineering, Texas A&M University, College Station, TX. An algorithm was then developed to trace the interior vertices to form the valley line. Shayne Jaquith (River Management Section), Shannon Hill (Waitsfield, VT) and Kristen Underwood of South Mountain Research and Consulting, Bristol, VT provided insight into the use of Version 2 that enabled improvements to the Version 3. Without the time and energy devoted by the above the software development would not have been possible. Special thanks are given to Staci who made sure that questions and issues were resolved in a timely fashion and who spent many hours testing the software as it was being developed. The development effort was team-spirited and appreciated by all. The approach used to obtain Latitude/Longitude coordinates was borrowed from a script (View_Lat.ave, dated June 16, 2000) written by Peter Telep of the Vermont Department of Environmental Conservation, Waterbury, VT. Shannon Hill of the River Management Section), Christa Alexander of the Vermont Department of Fish and Wildlife and Kristen Underwood of South Mountain Research and Consulting, Bristol, VT were instrumental participants as technical advisors during the development of Version 1. Shannon also served as a technical advisor during the development of Version 2. April 2006 Introduction Page 3 Trademarks ESRI, ArcView, Spatial Analyst, Arc/Info and PC Arc/Info are registered trademarks of Environmental Systems Research Institute, Inc. (ESRI). Avenue and Dialog Designer are trademarks of Environmental Systems Research Institute, Inc. Windows, Window 98, Windows 2000, Windows Explorer, Microsoft Excel and Microsoft Access are trademarks or registered trademarks of Microsoft, Inc. System Requirements The Stream Geomorphic Assessment Tools (Tools) were developed using the Avenue™ programming language available with ArcView™. The Tools are provided as an ArcView extension; therefore no system requirements (RAM or processor speed) above or beyond that required for ArcView are imposed. The file containing the Tools extension requires approximately 4 MB of hard disk space. The shape files and dBase files produced by the Tools will be dependent upon the projects undertaken. These may consume an extensive amount of hard disk space. The Tools were developed and tested under ArcView Version 3.2a. It is expected that the Tools should run on ArcView Versions 3.1+; however no testing has been performed on versions other than 3.2a. The Tools were developed and tested under Windows 2000. While it is expected that the Tools will perform in the same manner under other operating systems, no testing has been performed in environments other than under Windows 2000. To prevent possible conflicts with other ArcView extensions, perform the following: I. II. Start with a new ArcView project. Unload any ArcView extensions other than the Tools. Certain processing steps, notably Step 03, Step 06, Step 07 and Step 09, within the Tools are computationally intensive. Use of older computers with limited memory (RAM) and slower processor speeds can take a significant amount of time during those steps. Newer computers with processor speeds (1GHz and up) and with 512MB or more of memory (RAM) are recommended. The Tools make extensive use of dialogs to facilitate user input of data. These dialogs have been developed using the Dialog Designer provided with ArcView Version 3.1 and later. Use of dialogs within ArcView is dependent upon having the file named “avdlog.dll” in the directory BIN32. This directory is located under the directory in which ArcView has been installed. In normal installations of ArcView, the path to the Bin32 directory is as follows: C:\esri\av_gis30\arcview\bin32 Note: It is unpredictable what may happen if the user attempts to load the Tools extension if the avdlog.dll file is not found by ArcView in the BIN32 directory. Due to the design of the dialogs, it is recommended that screen resolution of 1024 by 768 be used. A limited review of the dialogs on a 15 (true visibility) monitor at 800 by 600 resolution indicates that the dialogs will (barely) fit on the screen. April 2006 Introduction Page 4 Restrictions Geographic Limitation The Tools have been designed to work with data developed for the State of Vermont. This data is readily accessible from the Vermont Center for Geographic Information (VCGI). While it may be possible to use data other than that provided by VCGI, there are no assurances that the Tools will function properly or provide meaningful results. Soils Data Requirements Steps 12 and Steps13 of the Stream Geomorphic Assessment Tools provide the capability to “extract” data pertaining to soils for use in the assessment process. VCGI and Natural Resources Conservation Services, USDA (NRCS) recently published a CDROM containing the certified and uncertified soils data for the State of Vermont. Included on that CDROM are dBase tables for each county that contain the “Top 20” attributes used in interpreting soil data. A revised set of “Top20” tables were released by NRCS in October of 2005. This required modification of the SoilXTabFields_05.dbf table used by the Tools. It is essential that these two tables be in synch. A copy of these tables is included on the Distribution CD. Step 12 and Step 14 of the Tools will work only with the version of soil data currently (subsequent to October 2005) provided by VCGI. (Prior versions of soil data and the “Top20” attribute table will not work due to technical changes in field names, field values and field types.) ArcView Skills Use of the Stream Geomorphic Assessment Tools will require some working knowledge of ArcView. Certain steps (02 and 04) will require the user to modify the attribute table associated with a theme. Other steps may require knowledge of editing features in themes. Feedback Comments or feedback on the Tools should be directed to: State of Vermont Agency of Natural Resources Department of Environmental Conservation Water Quality Division, River Management Section 103 South Main St., Building 10 North Waterbury, VT 05671-0408 (802) 241-3777 April 2006 Restrictions Page 5 Format of Material Distributed Format of This Document This document is organized in the following manner: o o o Definition of the requirements for setting up and using the extension; Description of the general concepts and operation of the processing steps; and Identification and detailed description on the processing steps. It is strongly recommended that the initial sections be read thoroughly and understood prior to using the Stream Geomorphic Assessment Tools. These sections apply to the overall use of this extension and define common characteristics of the processing steps. The description of the individual processing steps will identify the major errors which can be encountered during processing and, where possible, the cause(s) of those errors. Where practical and feasible, step-by-step instructions are provided to accomplish a specific function. In many instances you will find Notes inserted into the text. These provide ancillary information which might be useful. April 2006 Format of Material Distributed Page 6 Contents of Distribution CD The Stream Geomorphic Assessment Tools is distributed on a CDROM. As illustrated in the figure below, there will be several directories at the root level of the CDROM. Root Directory of CDROM Tools BaseData DerivdData Extension Temp Sample Data Documentation SysData Required System Tables Soils, LcLu, HUC 10 Tables ArcView Legend Files GIS Themes may be included The content of each directory is as follows: Tools: Contains four directories which are required to be present in order for one to be able to use the Tools extension. The directories BaseData and SysData will contain data sets that are to be used with the extension. All data sets contained in these directories are required and must be copied onto the hard disk to directories of the same name. The Temp and DerivdData directories are included only to illustrate the required directory structure. Extension: Contains the ArcView extension for the Tools (GeoSW4.avx). (Refer to section Setup: Installation of the Tools Extension.) Documentation: Contains this manual and each appendix in separate Portable Document Format (“.pdf”) files. Note: Any data (directories and/or files) copied from CDROM to a directory on your hard disk is assigned a Read-Only attribute. This will prevent any modifications from being made to those directories and data sets. This attribute must be “removed” in order for the Tools extension to function properly. To remove, use Windows Explorer and select all directories and/or files. Click the right button on the mouse. Select Properties. Then, remove the check mark on Read-Only. April 2006 Format of Material Distributed Page 7 General Concepts It is essential to have a general understanding of certain basic concepts for using the Tools. This section provides an introduction to the basic concepts, each of which will be described in more detail in subsequent sections. The basic concepts are as follows: o o o o o o o Implementation of a User Type; Implementation of an Application; Required directory structure; System Tables to maintain data on processing steps performed and to control the operation of the Tools; An Alias in referencing themes, tables and required field names in a theme or table; Theme/table registration by the user for source data sets and by the Tools when creating a theme/table; and Logging of processing steps and activities performed. All of the concepts have been implemented in the underlying software for the Tools. User Type: Considerable flexibility has been incorporated into the Tools. This flexibility has broadened the applicability of the Tools to enable research, analysis and testing of new concepts in Stream Geomorphic Assessment and to provide assistance in planning issues for local governments. Given the flexibility available, it becomes necessary to limit the scope of the Tools in order to provide users with only those capabilities required to perform their tasks. This is accomplished by the implementation of a User Type. There are four User Types: System, FEH (Fluvial Erosion Hazard), Regional Planning and Watershed Group with access as described below: Watershed Group is restricted to the functions associated with stream geomorphic assessment. Regional Planning is permitted access to certain additional system functions and stream geomorphic assessment; FEH includes the capabilities provided for Regional Planning, as well as the functions associated with creating fluvial erosion hazard zones; and System has full access to all functions. The User Type is set via the Setup Dialog, which is described in a subsequent section. It is possible that the User Type will be pre-selected and locked to prevent alteration. If this occurs, it is performed solely to prevent one from inadvertently changing and using the Tools inappropriately. Application: At present, there are three applications to which the Tools may be applied: Stream Geomorphic Assessment; FEH-Option 1; and FEH-Option 2. The latter two are associated with planning issues and are, therefore, available to only the User Types of FEH and System. The three Applications primarily dictate the parameters to be used for buffering specific features in Step 09: Create Stream Corridors. The Application is set via the Setup Dialog, which is described in a subsequent section. It is possible that the Application will be pre-selected and locked to prevent alteration. If this occurs, it is performed solely to prevent one from inadvertently changing and using the Tools inappropriately. April 2006 General Concepts Page 8 Required Directory Structure: A required directory structure is imposed and is based upon the directory in which the ArcView project file is located. There are four (sub-) directories that are required: BaseData, DerivdData, SysData and Temp. All source data sets (themes and tables) must be located in the BaseData directory. Source data sets include any data sets (themes) which have been digitized by the user and data sets (themes and tables) created or compiled by other organizations. All data sets (themes and tables) created (derived from source data sets) by the Tools will be located in the DerivdData directory. The Tools is distributed with a number of system tables and ArcView legend files. All of these files are located in the SysData directory. System Tables: A number of system tables will be distributed with the Tools; and must be located in the SysData directory under the directory in which the ArcView project file is located. It is strongly recommended that no changes be made to any of the system tables without clear understanding of the impact of those changes. Inappropriate changes will have unpredictable results, including corruption of the ArcView project file and potential corruption of any data sets being used. Note: Some dialogs in the System Functions area permit limited and controlled changes to certain system tables. Avoid making any changes to the system tables not provided through these dialogs. The system tables provide flexibility in the use of the Tools, control the operation of certain processing steps and carry data forward from one session (with the Tools) to the next. The system tables are listed along with a brief description in a table near the end of this section. Alias: An alias is similar to a “nickname” for a person. When referring to a person by their nickname, not everyone will know who that person is. However, if the others are told who the nickname refers to, then they can relate the nickname to a person and then to knowledge about that person. In a similar manner, aliases have been implemented in the Tools to refer to themes and tables. When one first starts using the Tools, the specific names of the themes (shape files) or tables are not known. Through a process called registration, the user will associate a theme or table with an alias. Then, wherever that specific alias is used in the Tools, a translation will occur to reference the specific shape file or table. Whenever a theme or table is created in the processing steps of the Tools, that data set will automatically be associated with an Alias. This provides a consistent use of aliases for all data sets referenced in the Tools. The alias is also used in the following manner: o A theme or table created by the Tools will be assigned a name that is based upon the alias. For example, the name of the theme resulting from Step 01 will be S01Watershed.shp, where Watershed is the Alias used for the overall watershed. o Themes will be displayed in the User View using a default legend named “alias.avl”, e.g. “watershed.avl”. The default legend may, however, be overridden if specific conditions are to be displayed, e.g. potential errors. The aliases used are listed in a table at the end of this section. April 2006 General Concepts Page 9 Theme/Table Registration: All themes or tables provided to or created by the user, must be registered. A primary reason for implementing a registration procedure is to associate a theme or table with its corresponding alias. As a result, a theme/table is identified once; and the Tools will then know the name of the data set to be used in all of the processing steps in which that theme/table is to be used. The registration procedure also enables one to enter the following documentation for a theme\table: Source agency: The organization, agency or group responsible for creating and maintaining the data set. Current As Of: The date at which the theme/table was released by the source agency. This will aid future users to identify more current data that may be available. Status: The status of the data, i.e. preliminary release, update in process, etc. The status levels were “borrowed” from those used by the Vermont Center for Geographic Information (VCGI). Source Scale: Much of the geographic data will have been electronically traced or digitized from various source documents such as the VT Orthophotos (1:5000), USGS Quads (1:24000 or 1:25000 and others), etc. The scales shown in parentheses provide guidance as to the relative accuracy of the data, i.e. the smaller the number to the right of the colon the more accurate the data should be. This documentation field will only be applicable to theme registration. Note: A free form text field for entering notes. This can be a contact name for the data set, a condition discovered with the data, etc. The above data should be completed for each theme/table registered. All theme/table registration data is maintained in the system table SysBaseThemes.dbf. Field aliases are also used to identify the names of fields required to be in the theme attributes or in tables. During the registration of the theme/table, specific fields must be identified for these aliases. Logging: A Log has been implemented to record key actions or the results of processing steps. Critical errors encountered will be noted in the log entries. The intent of the Log is to provide users with the ability to track where they are in the processing cycle and errors encountered. In addition, the log will also provide key information to the supporting organization(s) should any problems occur during use of the Tools. Access to the log can occur on any of the Menu Dialogs. In addition, on the dialog in which the Log is displayed, one can enter notes specific to a theme or table. This can be an aid in documenting problems with the source themes or tables, error conditions, corrections applied, etc. Refer to the Section entitled “Using the Log” for more detailed information. April 2006 General Concepts Page 10 System Table SysApps SysBaseTheme SysBTReqFields SysChanParm SysDialog SysDir SysErrors SysImpact SysImpactLoc SysLimits SysLog SysRptForm SysStatus SysSubImpact SysSystem SysUnits Description Identifies permissible applications and name of buffering table to be used in Step 09: Create Stream Corridors. An Access Level is associated with each application that defines which User Type is permitted to use an application. Contains critical data, including an alias, for each possible theme/table to be used or created. Maintains relationship between alias used within the Tools and the actual file name on the hard disk. Identifies the active theme or table being used for a given alias. Maintains relationship between an internal field alias and an actual field name. Contains the constant, coefficient and exponent to be used in the regression equation for calculation of the channel width in Step 08: Calculate Channel Width and Stream Data. Enables use of different values for these parameters based upon drainage area upstream of a reach point. Certain User Types can modify these parameters and/or the applicable range of drainage areas to which they apply via System Functions Æ Channel Width Calculation. Identifies, for each dialog in the Tools, the Part, Step Number and Title. An Access Level is also associated with each dialog that defines which User Type is permitted access. Maintains the current (required) directory structure relative to the directory in which the ArcView Project file is located. Message numbers and message format for error/info messages Defines Impacts and associated data for Feature Indexing in Part D. Defines permissible locations associated with specific Impacts and for Feature Indexing in Part D. Contains the upper and lower limits imposed during editing in Step 10 for Elevation, Channel Width, Valley Length and Valley Width. Modifications to these limits can be made through a system dialog: System Functions Æ Edit Limits for Step 10. Repository of log entries for user notes entered, actions taken or processing steps completed. The results of the processing steps are noted and include identification of any critical errors encountered. Maintains the current format being used for assigning reach point identifiers in Step 06: Calculate Reach Points. User modification is allowed via System Functions Æ Format Options for Reach Point ID’s. Source theme/table status per VCGI. User can select the status associated with a source theme/table during registration. Defines permissible sub-impacts associated with specific Impacts and for Feature Indexing in Part D. Maintains current system environment of the Tools (User Type and Access Level, Application and User View) to enable seamless operation between different sessions with the Tools. Maintains units of measure to be used in calculating lengths and areas in the Tools and the Map Units to which views are to be set. These units can be set via System Functions Æ Measurement Units. Included in the table also are the conversion factors from a view’s Map Units to the selected linear and area units of measure. These are automatically calculated when one sets the Map Units, Linear Units and/or Area Units. Included in this table is a parameter referred to as Connecting Feature Search Distance (or Near Distance). This controls the search distance to identify connecting features such as stream polyline segments. This value can also be set via System Functions Æ Measurement Units. SysUserType Two additional parameters, which should not be altered by the user, are Zero Value and Minimum Area. The Zero Value parameter is used to identify equality in such things as coordinates. The Minimum Area defines the area of a polygon (in the view’s Map Units) below which the polygon is to be considered a sliver polygon resulting from digitizing errors. Identifies permissible User Type’s and associates an Access Level with each. The Access Level defines those applications and dialogs that are to be accessible to the User Type. Note: Additional dBase tables defining buffering specifications located in the SysData directory. At present, three such tables have been defined: SysBufOpt1.dbf, SysBufOpt2.dbf and SysBufSGA.dbf. The buffer tables are described in Appendix H. April 2006 General Concepts Page 11 Source Others Others Others Tools User Others Others User Others Others Tools User Others N/A Others User Derived Derived Derived Derived Derived Derived Derived Derived Derived Derived Derived Derived Derived Derived Derived Derived Derived Derived Derived Derived Derived Derived Derived Derived Derived Derived Derived Derived Derived Derived Derived Derived Derived Derived User Derived User Derived Alias HUC10Boundary LcLu LcLuCodes LcLuXTabFields MeanderCL OrthoBoundary QuadBoundary SegPtsUser Soils SoilsTop20 SoilXTabFields SubWatersheds SurfaceWaters System TownBoundary ValleyWalls Watershed PPt SWClipped SWComb SWFinal RPts ValleyLine Corridor LC LW SC SW 12LC 12LW 12SC 12SW 13LC 13LW 13SC 13SW 14LC12 14LC13 14LW12 14LW13 14SC12 14SC13 14SW12 14SW13 SegPtsProj SWSEG FEHPtsProj SWFEH FEH1Zone FEH2Zone LnImpact PtImpact LnImpactSeg PtImpactSeg Aliases Used in the Tools Description HUC 10 Watershed Boundaries Land Cover/Land Use Land Cover/Land Use Codes LcLu XTab Fields Meander Centerline VT Orthophoto Boundaries USGS Quad Boundaries User-supplied Reach Segmentation Points Soils Soils Top 20 Attributes Soils XTab Fields Sub-Watersheds Surface Waters System Status and Errors Town Boundaries Valley Walls Overall Watershed Primary Pour Pt Surface Waters for Watershed S/W Combined between confluence pts Surface Waters clipped to Sub-Watersheds Reach Points Valley Line Stream Corridors LcLu Clipped to Corridors LcLu Clipped to Sub-Watersheds Soils Clipped to Corridors Soils Clipped to Sub-Watersheds LcLu Areas Summed to Reach Corridor LcLu Areas Summed to Reach Sub-Watershed Soil Areas Summed to Reach Corridor Soil Areas Summed to Reach Sub-Watershed LcLu Areas Summed to Upstream Corridor LcLu Areas Summed to Upstream Watershed Soil Areas Summed to Upstream Corridor Soil Areas Summed to Upstream Watershed LcLu Area XTab for Reach Corridor LcLu Area XTab for Upstream Corridor LcLu Area XTab for Reach Sub-Watershed LcLu Area XTab for Upstream Watershed Soil Area XTab for Reach Corridor Soil Area XTab for Upstream Corridor Soil Area XTab for Reach Sub-Watershed Soil Area XTab for Upstream Watershed Segmentation Points Projected onto Surface Waters Segmented Surface Waters Segmentation Pts Projected onto Surface Waters for FEH Analysis Surface Waters for FEH Fluvial Erosion Hazard (FEH) Zone -- Method 1 Fluvial Erosion Hazard (FEH) Zone -- Method 2 Impacts: Polyline Features Impacts: Point Features Impacts: Polyline Features segmented Impacts: Point Features with segmentation ids assigned Step 00 00 00 00 00 00 00 00 00 00 00 00 00 00 00 00 01 02 02 03 05 06 07 09 11 11 11 11 12 12 12 12 13 13 13 13 14 14 14 14 14 14 14 14 D1 D1 E1 E1 E3 E3 F0 F0 F1 F1 Note: The Aliases associated with Step 00 are base themes/tables described in other sections. Those data sets whose Source is identified as User or Derived are described in the Sections pertaining to the Step in which they are created or required. April 2006 General Concepts Page 12 Setting Up for Using the Tools Setup involves the following steps, which are described in subsequent sections: 1. 2. 3. 4. Installing the ArcView extension for the Stream Geomorphic Assessment Tools; Creating the required directory structure to permit use of the Tools; Copying the System Tables to the SysData directory; and Copying the data sets (themes and tables) provided to the BaseData directory. Note: It might be best to copy the entire Tools directory from the CDROM onto your hard drive. Then, remove the Read-Only attribute for all directories and data sets. The Tools directory can then be renamed to a more meaningful name. One must also obtain the required source data for each watershed for which assessment is being conducted and perform some level of pre-processing. The GIS coverages (also referred to as themes or shape files) and potential pre-processing steps are as follows: 1. Surface Water coverage(s) will have to be converted to shape file(s) and merged into a single shape file that encompasses the geographic area for the entire watershed. 2. Soils coverage(s) will have to be converted to shape file(s) and merged into a single shape file that encompasses the geographic area for the entire watershed. 3. Land Cover/Land Use coverage will have to be converted to a shape file covering the geographic area of the watershed. The process required will depend upon the format in which the coverage is acquired. • If in grid format, it will have to be converted to a shape file of polygon class. To reduce the size of the coverage, the geographic area should be restricted to that area surrounding the watershed. (Note: This format conversion requires the use of the Spatial Analyst extension to ArcView.) • If in Arc/Info polygon format, coverage(s) will have to be converted to shape file(s) and merged into a single shape file that encompasses the geographic area for the entire watershed. 4. Coverages must be acquired that contain the boundaries for the following features: • • • • HUC 10 watersheds, Ortho photos, Towns and USGS Quads. These coverages or shape files will generally be provided on the CD-ROM containing the extension. The pre-processing steps for the above are beyond the scope of this manual; and may require the assistance from person(s) familiar with Arc/Info and/or ArcView. April 2006 Setting Up for Using the Tools Page 13 User created or delineated coverages that must be available are as follows: 1. Sub-watershed delineations will have to be acquired in shape file format of polygon class. The delineations may be developed through on-screen digitizing or through the use of the Spatial Analyst extension to ArcView. 2. Valley wall delineations will have to be acquired in shape file format of polygon class. The delineations will have to be developed through on-screen digitizing. 3. Delineation of the meander centerline will have to be acquired in shape file format of polyline class. The delineation will have to be developed through on-screen digitizing. 4. Phase 2 reach segmentation points will have to be identified if reach segmentation is to be performed. The points may be developed via on-screen digitizing. In the processing steps where these themes are used, digitizing requirements will be provided. Setup: Installation of the Tools ArcView Extension The Stream Geomorphic Assessment Tools is provided as an extension to ArcView 3.2+. The name of this extension is GeoSW4.avx. To make the extension available, it must be copied to the Ext32 subdirectory under the directory in which the ArcView software has been installed. For normal installations, this would be located at the following path: C:\esri\av_gis30\ArcView\Ext32 Note: If you are unsure as to where the Ext32 directory is located, you can use the Find program on the Start menu of Windows 98 or the Search program on the Start menu of Windows 2000. Simply enter “Ext32” as the file or folder to search for. After you have located the Ext32 directory, simply copy the GeoSW4.avx file into that directory. After copying the extension, make sure that the Read-Only attribute has been cleared. To access the extension, you must first start ArcView. Then, click on the File menu as shown in the figure to the right. Then, click on the Extensions item. A list of extensions will be presented to you. Scroll down until you find the one named “Stream Geomorphic Assessment 4.50. Click in the checkbox to the left of the name, as shown to the right. Then, click Ok, which will return you to ArcView. April 2006 Setting Up for Using the Tools Page 14 If you have a project open and the active window is either the ArcView Project window or a View, you will see a new button on the button bar with a “squiggly” line icon. (This icon is usually used to represent free hand drawing or sketching. Just think of the icon as a stream centerline.) As illustrated in the figure to the right, the button will usually be the furthest to the right. This button provides access to the Stream Geomorphic Assessment Tools extension. By clicking on the Tools button, you will be taken to the introductory (or Splash) screen for the Stream Geomorphic Assessment Tools. This screen is shown below. By clicking on the Continue button on the Introductory screen, an initialization procedure will be executed. This procedure will verify/perform the following: 1. 2. 3. 4. That the ArcView project has been saved; That the required directory structure has been established; That the required system tables are located in the SysData directory; and, finally, Will “load” any themes/tables that were registered in prior sessions. The initialization procedure is described in detail in the Section entitled “Accessing the Stream Geomorphic Assessment Tools”. Error conditions that are detected during the initialization process will be displayed in message boxes. If an error is detected, access to any functions of the Tools will be prevented. Upon completion of the initialization procedure, the following warning will be displayed. Note: It is strongly recommended that you adhere to the procedures described in the warning message. The background for this warning is provided in the Section entitled “Accessing the Stream Geomorphic Assessment Tools”. April 2006 Setting Up for Using the Tools Page 15 When the Ok button is clicked, the SetUp dialog for the Stream Geomorphic Assessment Tools will be presented. This dialog is shown in the figure below. The SetUp dialog represents the “top-level” dialog in the Tools extension. All other dialogs are accessed through this dialog. In addition, one must return to this dialog to “exit” the Tools extension by clicking on the Exit button. Exiting the Tools extension removes any “traces” of itself and returns one to a “pure” ArcView environment. It does not, however, unload the extension. To unload the Tools extension 1. 2. 3. 4. 5. Make the project window the active window in ArcView. Click on the File Menu. Click on Extensions Scroll down the list of extensions until you find Stream Geomorphic Assessment Click on the check box to the left of Stream Geomorphic Assessment. The check mark should disappear. 6. Click on Ok The Tools button should disappear from the Button Bar. April 2006 Setting Up for Using the Tools Page 16 Setup: Required Directory Structure The Tools requires that a specific directory structure be established. The directory structure, shown on a subsequent page, is relative to the directory in which the ArcView project file is saved. Specifically, if the ArcView project is saved in a directory named “LewisCreek”, then the directory structure shown must exist under the LewisCreek directory. Imposing a directory structure provides the following benefits: • • • • Ability to make backups, Transferring data to other organizations, Elimination of redundant data and therefore difficulty in maintaining current versions, and Consistent organization throughout all organizations. Note: The required directory structure can be found on the Distribution CD under the directory named Tools. The required directories are used in the following manner: BaseData: The source data sets which are required in one or more of the processing steps of the Tools are located in this directory. The source data sets are either dBase tables or ArcView shape files (themes) and are the original data sets obtained from other sources or developed for use with the Tools. These data sets are listed in the following table. Data Set HUC 10 Boundaries Land Cover/Land Use (LcLu) LcLu Codes/Descriptions LcLu XTab Field Definitions Meander Centerline Ortho Photo Boundaries Reach Segmentation Points Soils Soils “Top 20” Attributes Soil XTab Field Definitions Sub-Watersheds Surface Waters Town Boundaries USGS Quad Boundaries Valley Walls Type Shape File Shape File dBase Table dBase Table Shape File Shape File Shape File Shape File dBase Table dBase Table Shape File Shape File Shape File Shape File Shape File Source RCM VCGI VCGI/RMS RMS User delineation VCGI/RMS User delineation NRCS/VCGI NRCS/VCGI/RMS RMS User delineation VCGI VCGI/RMS VCGI/RMS User delineation Note: In the source column, the abbreviations refer to the following: NRCS (Natural Resources Conservation District), RMS (River Management Section, VT Agency of Natural Resources) and VCGI (Vermont Center for Geographic Information). Many of the geographic coverages available in Vermont are provided by VCGI in a tiled format, i.e. the state is divided into a rectangular (square) grid much like a spreadsheet. A tile pertains to a specific grid cell. For surface waters and soils, a tile usually encompasses the same area as nine of the orthophotos available from the VT Tax Mapping Program. April 2006 Setting Up for Using the Tools Page 17 It will be normal to have to acquire multiple tiles (for surface waters, soils, etc.) in order to cover the same area as the watershed being assessed. Prior to use with the Tools, these tiles will have to be merged into a single data set. Refer to the sections entitled Setup: Required dBase Tables and Setup: Required Source Themes for additional considerations. During Theme/Table Registration, the location of the specific data set will be reviewed. If it is not located in the BaseData directory, the user will be offered the opportunity of having the data set copied to that directory. Once a data set has been registered for use within the Tools, the user should not move or delete the data set from the BaseData directory without first un-registering it using the options provided in the Tools. Refer to the section Setup: Registering Source Data. DerivdData: All data sets (tables or themes) created by any processing step in the Tools will be located in this directory. When a data set is created by a processing step, it will automatically be registered. Once a data set has been registered, the user should not move or delete the theme from the DerivdData directory without first un-registering the data set using the options provided in the Tools. Temp: In certain processing steps in the Tools, intermediate or temporary data sets are created. These will be saved in the Temp directory. Under normal conditions, these data sets will be deleted upon completion of processing for the given step. These temporary data sets will not be deleted if they can be useful to the user in correcting digitizing or attribute errors in the source data sets. The user will be informed of the existence of these data sets at the end of the processing step. Following the initialization procedure, a copy of the critical system tables will be placed in the Temp directory. These tables are: SysBaseTheme.dbf, SysBTReqFields.dbf and SysLog.dbf. Any data sets found in the Temp directory can be deleted without adverse affect on the operation of the Tools. SysData: Critical dBase tables and ArcView legend files are located in this directory. The legend files are used to display themes resulting from a given processing step. In several cases, these legend files will highlight error conditions detected during processing. There are a number of dBase tables, which are referred to as system tables, located in this directory. These tables control the operation of the Tools; and, therefore, should not be altered in any manner. When the Continue button on the Introductory (or Splash) screen is clicked, an initialization procedure will be conducted. This procedure will verify that the above directory structure exists and that the required system tables are located in the SysData directory. Any errors detected during this procedure will prevent use of any functions within the Tools. Note: Refer to the Section entitled “Accessing the Stream Geomorphic Assessment Tools”. April 2006 Setting Up for Using the Tools Page 18 Setup: Required dBase Tables There are a number of dBase tables that are distributed along with this extension. These tables are required in order to use various steps. These tables are provided on the Distribution CDROM in the directory Tools\BaseData. Note: These dBase tables must be copied to the directory BaseData under the directory in which the ArcView project file is located. S00Top20_05.dbf is required for Step 12. This table contains the twenty most frequently used attributes for soils mapping units, e.g. flooding, high/low depth to water table, etc. The documentation provided by VCGI/NRCS is included as Appendix G. Note: The field named MUKEY is generally used to link these attributes with the geographic soils coverages (themes or shape files). Steps 12 and Steps14 of the Stream Geomorphic Assessment Tools provide the capability to “extract” data pertaining to soils for use in the assessment process. VCGI and Natural Resources Conservation Services, USDA (NRCS) has published a CDROM containing the certified and uncertified soils data for the State of Vermont. Included on that CDROM are dBase tables for each county that contain the “Top 20” attributes used in interpreting soil data. Due to certain formatting issues, a revised set of “Top20” tables were released by NRCS in October of 2005. A statewide version of the “Top20” was also developed. A copy of this table, named S00Top20_05.dbf, has been provided on the Distribution CD for the Stream Geomorphic Assessment Tools. The table can be found in the BaseData directory on the CD. Step 12 and Step 14 of the Tools will work only with the version of soil data currently (subsequent to October 2005) provided by VCGI. S00SoilXTabFields_05.dbf is required for Step 14. This table identifies for each field in the S00Top20_05.dbf table all of the unique values that occur for that field and assigns a unique field name associated with the value. Use of this table will be described by example in Step 14. Appendix E provides a description and listing of the fields, field values and field value names. Warning: It is imperative that the S00Top20_05.dbf and the S00SoilXtabFields_05.dbf tables be consistent. It is recommended that the tables supplied on the Distribution CD be used. S00LUCodes.dbf is required for Step 12. This table contains a description for each code in the Land Use/Land Cover coverage. At present, the set of codes that are in use is very limited. One can review the descriptive codes by viewing the table in ArcView. Note: The field named Code is used to link these attributes with the geographic land cover/land use coverages (themes or shape files). The field used in the geographic coverages may vary. Contact the person/organization providing the land cover/land use coverage to determine the correct field to be used. S00LcLuXTabFields.dbf is required for Step 14. This table identifies for the Code field in the S00LUCodes.dbf table all of the unique values that occur for that field and assigns a unique field name associated with the value. Use of this table is similar to that of S00SoilXTabFields.dbf. Appendix F provides a description and listing of the fields, field values and field value names April 2006 Setting Up for Using the Tools Page 19 Note: If the land cover/land use coverage to be used is other than the LCLU coverage available from VCGI, the two tables described above will have to be created for the specific coverage. Further, the field names and types must be identical to that in Appendix F for the S00LcLuXTabFields.dbf. In order for processing Steps 12 and 14 to function, the four tables described above must be registered in the Tools. Refer to the section Setup: Registering Source Data. Appendix B provides a Data Tracking Form for documenting the required reference tables, among other items. This can provide essential documentation for future reference. Setup: Required Source Themes There are a number of themes which will have to be acquired prior to using the Tools extension: • • • • • • • • • • • HUC 10 Watershed Boundaries (RMS), Land Cover/Land Use (VCGI or others), Ortho Photo Boundaries (VCGI/RMS), Surface waters (VCGI), (Note: If using VHD-SWL, use the “arc” feature type.) Soils (VCGI/NRCS), Town Boundaries (VCGI/RMS), USGS Quad Boundaries (VCGI/RMS), Meander Centerline delineation (User-supplied), Reach Segmentation points, Sub-watershed delineations (User-supplied), and Valley Wall Delineations (User-supplied). Each of these themes will require some “pre-processing”. The general requirements are listed below for each of these themes. Note: For users new to ArcView, it might be best to have this effort performed by others. Certain steps may require the Spatial Analyst extension to ArcView. Boundary Theme: HUC 10 Watersheds The HUC 10 Watershed Boundaries have been created by merging more detailed (HUC 12) subwatershed boundaries. These are available in a shape file format from the River Management Section, VT Agency of Natural Resources. Boundary Themes: Ortho Photo, Town and USGS Quad The Ortho Photo, Town and USGS Quad Boundaries are available from VCGI in ArcInfo Export format in a state-wide coverage. The data must be converted into a shape file. Note: The Import71 program supplied with ArcView will convert from ArcInfo Export format to shape files. The Merge operation of the Geoprocessing Extension of ArcView can be used to merge the tiles into a single shape file. April 2006 Setting Up for Using the Tools Page 20 Land Cover/Land Use The LCLU coverage is available from VCGI in either ArcInfo Grid format or ArcInfo Export format. For the Grid format: The entire state is provided as a single “file”. It is necessary to convert the Land Cover from a Grid format to a shape file (polygon class) for use with the Tools. To limit the size of the resulting shape file, the area should be restricted to that which encompasses the watershed being assessed. Note: Conversion from Grid format to shape file format requires the Spatial Analyst extension to ArcView. For the Export format: The coverages are generally available by special order from VCGI with the geographic area covering a USGS quad. The data must be converted into a shape file; and all quad areas must be merged into a single shape file. Note: Contact VCGI for special processing. It may be less problematic and less expensive to have the extraction (into a single Export file) performed by VCGI. To ensure that the proper coverage is obtained, provide the overall watershed boundary resulting from Step 01 of the Tools; and request a buffer (500 meters?) area outside in the event that the watershed boundaries change during assessment. Meander Centerline Delineation These will be provided via digitizing by the user. The resulting theme must be of polyline class. Meander centerlines need not be drawn for all sub-watersheds, but must be drawn 1. Where valley walls are present; or 2. Reach segmentation is to occur. The meander centerline is one of the key features that can be used in creating stream corridors or Fluvial Erosion Hazard zones. In the buffering performed in Part B, Step 09 to create stream corridors, use of the meander centerline is optional. Use of meander centerlines remains to be optional for the application of FEH-Option 1. In contrast, the meander centerline is a required feature for creating the fluvial erosion hazard zone using the application of FEH-Option 2 when a given reach has been (is being) segmented. Note: In the FEH-Option 2 application, the meander centerline not only serves as an element used to develop a component buffer, but it is also used to sub-divide buffers in accordance with any reach segmentation performed during a Phase 2 assessment. The following summarizes the digitizing requirements for the meander centerline: 1. Meander centerlines must be drawn as lines (polylines). User must ensure that the ends of polyline segments are snapped together if digitizing was stopped and then started again within a reach. 2. Individual polylines drawn to represent meander centerlines can continue through multiple reaches. 3. With the exception of terminal reaches, the meander centerline must travel through the entire length of a sub-watershed; and must intersect the sub-watershed boundary only twice: Once upon entering the sub-watershed and once upon exiting. The meander centerline should never cross the sub-watershed boundary except at the point of entrance and the point of exit. 4. For terminal reaches, the meander centerline will intersect the sub-watershed boundary only once: Upon entering the sub-watershed. April 2006 Setting Up for Using the Tools Page 21 5. The meander centerline should respect the boundaries of the valley walls, if available for a given reach, i.e. the meander centerline should remain inside of the boundary for the valley walls. 6. At confluence points, it will be necessary to have a small segment of the meander centerline traveling up the tributary fall within the sub-watershed of the main stem or primary tributary. This is required to meet number (3) above for the reach on the tributary. The small (dangling) will be ignored in the development of buffering for the reach on the main stem or primary tributary. An example of this is illustrated in the figure below. Stream Centerline # # Meander Centerline Dangling Segment of Meander Centerline Sub-watershed Boundaries # 7. A meander centerline must be present in a given reach for which segmentation has been performed in order to develop a fluvial erosion hazard zone using the application of FEHOption 2. A meander centerline may be present in all other reaches. 8. A meander centerline may be present in a given reach in order to develop a fluvial erosion hazard zone using the application of FEH-Option 1. 9. Meander centerlines do not have to be contiguous or continuous. For example, one may be digitizing the meander centerline for a tributary, and come to a confined valley. At this point one can stop digitizing the meander centerline. If the tributary subsequently flows into a wide valley one can draw another meander centerline for that valley. In such situations, however, remember the other rules listed above. 10. A meander centerline will be used in the development of stream corridors (via Part B, Step 09) if and only if valley walls are present for the same reach. If the above rules for digitizing the meander centerline are not followed, erroneous data will likely be generated. Where certain conditions are detected, error messages will be issued in Part B, Step 09 and Part D, Step FEH03. Reach Segmentation Points The User must provide an ArcView shape file containing points defining break points (or Phase 2 SGA reach segmentation points) for reaches that are to be segmented. The points must be placed near the surface water feature (polyline) that is to be segmented. It is not necessary that the points be placed exactly on the polyline. April 2006 Setting Up for Using the Tools Page 22 The Phase 1 reach break points for the reach, i.e. the bounding reach points, should not be included as segmentation points. The Tools will automatically detect the reach points to be used. The following figure illustrates a Reach being segmented into five reach segments. In the preceding figure, four points (segment reach points) identify the locations where the reach is to be segmented into five parts. These points must be provided by the user in an ArcView shape file (theme). In that shape file, attribute fields must exist that contain the following: (a) reach number - identifier for the reach identifier (RchPtId) and (b) segment ID - a unique identifier (within the reach) for each segmentation point. In the above figure, the value for RchPtId is “M03” and the identifiers for the segment reach points are 1, 2, 3 and 4. The RchPtId will be used to ensure that the proper stream feature is selected for segmentation and the unique identifiers for the segmentation points are used to communicate errors to the user during segmentation. Note: In the preceding figure, the surface water for the reach is represented by the blue polyline connecting reach points M03 and M04. During processing Step FEH01, the segmentation points will be projected onto that polyline. In addition, the surface water will be subdivided into the five segments labeled A…E. April 2006 Setting Up for Using the Tools Page 23 The above figure outlines the process for developing the reach break shape file required for segmentation in SGAT. The segmentation shapefile must ONLY contain points for where the stream is to be broken. The attribute table MUST have a field containing the Phase 1 reach number and a unique identifier for each segment break (number or letter). One of the outputs from SGAT is a segment break shapefile with the segment ID’s as one attribute. Soils These are available from VCGI on a CD in shapefile format. Sub-watershed Delineation These will be created by manually digitizing or through use of the Spatial Analyst extension of ArcView. Either way, the exterior boundary for the project must match the huc 10 boundary so that when merged with other projects within the state the exterior boundaries match. The three options for digitizing sub watershed boundaries are as follows: 1. Manually digitize the sub watersheds using polylines and use the built in SGAT optional tool to convert from polylines to polygons. Each polyline would represent the common boundary between two adjacent sub-watersheds. One must also ensure that the ends of the polylines are “snapped” together. The Review Polyline Geometry processing available in the Optional Tools can be used to check for proper polyline configuration. It is strongly recommended that this processing be performed repeatedly until all errors identified have been corrected. Then, the Build Polygons processing available in the Optional Tools area can be used to convert the polylines into the required polygons. 2. Manually digitize using polygons. Using this option the user would start with one polygon representing the exterior boundary of the HUC 10 for the project area and use the ArcView split polygon tool to create additional polygons representing the sub-watersheds. If this option is used, the user must make sure the resulting theme does not have either overlapping or sliver polygons before proceeding. 3. Use other existing Digital Elevation Models and software such as spatial analyst or ArcGIS to automate the sub-watersheds. April 2006 Setting Up for Using the Tools Page 24 Warning: If sub-watersheds are delineated using polygons, it is essential that the polygons do not overlap, do not include sliver polygons, do not include areas between adjacent subwatersheds and are not composed of multi-part polygons. If any of these conditions exist, they can result in erroneous data sets being generated. Further, these types of errors may result in errors occurring in various processing steps. The errors identified may not actually represent the true error and may occur in the latter processing steps. This can result in a significant loss of time in determining the actual cause of such errors. Surface Waters The surfacewater theme is available at the 1:5,000 scale from VCGI as a themes called the Vermont Hydrography Data Set or WaterHydro_VHD. These are available from VCGI in ArcInfo Export format. The entire state is subdivided into tiles. Each tile has a geographic extent of a Huc 8 or Vermont planning basin (based on the the Basin17 shapefile). Multiple tiles may be required to obtain complete coverage for a watershed. If starting with multiple tiles, the data must be converted into a shape file; and all tiles must be merged into a single shape file. If starting with one tile, you must use the route.drain file, NOT the route.rch, as shown in the following figure. Valley Wall Delineation These will be provided via digitizing, and must be of polygon class. Valley walls need not be drawn for all sub-watersheds. Multiple polygons can be drawn to represent valley walls. However, to be used by the Tools, the valley wall polygon must include the reach point and its immediate upstream neighboring reach point which is associated with the same Tributary Identifier (See Step 04 for Tributary Identifier explanation). If only one of the reach points is included in the polygon, the valley walls will be ignored for that sub-watershed (or reach point). If multiple polygons are drawn to represent valley walls, it may be necessary to “overlap” the polygons to ensure that each pair of reach points is included within one (and only one) of the polygons. For example, if polygons were drawn to encompass reach points M01 and M02 and another polygon for M02 and M03, the polygons would have to be drawn such that they both included reach point M02 (i.e. overlapping each other at that reach point), as shown in the following figure. April 2006 Setting Up for Using the Tools Page 25 If a pair of reach points is included in more than one valley wall polygon, an error will be generated by the Tools. The polygons should not be clipped to the sub-watershed boundaries as the Tools will detect the polygon to be used for a sub-watershed and will clip it to the sub-watershed boundaries. However, the only place the valley walls should cross the watershed boundaries is at the reach point. A polygon extending way beyond the terminal reach point may cause errors in SGAT. Note: For digitizing, geographically-referenced images of the 7 ½ minute USGS quads are available from VCGI; and the orthophotos are available from the Tax Mapping Program, VT Tax Department. Refer to Appendix A: Optional Tools for tools to assist in digitizing. Note: Separate polygons should be generated for each tributary. These polygons will overlap with the mainstem polygon in the valley bottom. The tributary polygon must only encompass the tributary reach points and cannot cross the mainstem surfacewater. The figure above and to the right illustrates the multiple overlapping polygon for the mainstem and tributary reach points. Appendix B provides a Data Tracking Form for documenting source themes, among other items. This can provide essential documentation for future reference. April 2006 Setting Up for Using the Tools Page 26 Setup: The ArcView Project File It is recommended that you provide a clean environment under which the Tools extension is to be used. Specifically, perform the following: 1. Create a directory in which the ArcView project will be saved. This will be referred to as the project directory. 2. Create the required (sub-) directories under the project directory. (Refer to earlier section on the Required directory Structure.) 3. Copy the required system tables into the SysData directory. Do not copy these tables from another project. Always copy them from the Distribution CD to ensure that unrelated data and/or errors are not transferred into the new project. 4. Start with a new ArcView project. 5. Unload all ArcView extensions other than the Tools. 6. Do not create any Views. 7. Do not load any tables. 8. Save the ArcView project into the project directory. The Setup dialog in the Tools will require you to identify a View, the User View, to which any themes registered or created will be added. This view will be created by the Tools. All data sets (themes and tables) to be used within the Tools must be registered. This is accomplished by accessing the Theme/Table Registration and Management dialog from the Setup dialog. During the registration process, any themes will automatically be added to the User View. From the preceding steps, the dBase tables provided with the Tools extension and the source shape files should be available in the BaseData directory under the directory in which the ArcView project file is located. To summarize, the dBase tables are: • • • • S00Top20_05.dbf, S00LuCodes.dbf, S00SoilXTabFields_05.dbf and S00LcLuXTabFields.dbf. And, the required (source) shape files are: • • • • • • • • • • • Huc 10 Boundaries, Land Cover/Land Use, Meander Centerline delineation, Ortho Photo Boundaries, Reach Segmentation Points, Soils, Town Boundaries, Sub-watershed delineation, Surface waters, USGS Quad Boundaries, and Valley Wall delineation. April 2006 Setting Up for Using the Tools Page 27 Save the Project The ArcView project must be saved in order to use the Tools extension. The following provides a brief outline of the procedure: 1. 2. 3. 4. 5. Make the project window active, Select the File Menu, Click on Save Project As..., In the resulting dialog box, migrate to the directory in which the project to be saved, and Enter the name of the project (could be the name of the watershed). The project must be saved in order for the Tools extension to identify the subdirectories in which the resulting shape files and dBase tables are to be saved. When you access the Tools extension, it will automatically create the subdirectories named BaseData, DerivdData, SysData and Temp under the directory in which the ArcView project file exists. If these subdirectories already exist, they will be used. If you received an SGAT template on a CD than the appropriate directory structure is already set up for you. In addition, all of the standard shapefiles and tables are already registered and the view is named “SGAT”. The only themes you should have to register are the valley walls, sub-watersheds, surface water and, where applicable, the segmentation points. Note: The system tables and ArcView legend files must be located in the SysData directory. If the system tables are not found during initialization, an error message will be issued and use of the Tools will be prevented. If the project has not been saved and you attempt to use the Tools, the following error message will be issued when you click on the Continue button of the introductory screen. Load the Stream Geomorphic Assessment Tools The procedure for loading the Tools extension into the project was described earlier in the section Setup: Installation of the Tools Extension. The procedure is briefly outlined below: 1. 2. 3. 4. 5. Make the project window the active window in ArcView. Click on the File Menu. Click on Extensions Scroll down the list of extensions until you find Stream Geomorphic Assessment V xxxx Click on the check box to the left of Stream Geomorphic Assessment V xxxx. A check mark should appear. 6. Click on Ok The Tools button should appear on the Button Bar. Upon completion of the steps described in this section, you can begin using the Stream Geomorphic Assessment Tools. April 2006 Setting Up for Using the Tools Page 28 Reviewing the Source Shape Files (Themes) The key to successful and efficient use of this software is to take the time to review the initial geographic coverages prior to use. A simple review can identify areas such as the following: • Streams crossing over (sub) watersheds where they should not. This represents incorrect stream digitizing or watershed delineation. Using the digital versions of the USGS quads and the VT Orthophotos (from the VT Tax Mapping Program), one can fairly quickly resolve and correct these issues. • Watersheds with multiple pour points, (i.e. where water flows out of the watershed). Each (sub) watershed can have only one outflow point. In many cases, the watershed boundary may be near the confluence point of streams. Verify that: 1. The watershed boundary crosses downstream of the point of confluence or 2. The watershed boundary is above the point of confluence and that it crosses only a single stream. The following figures illustrate correct watershed boundaries in relation to the stream network. Stream Lines Watershed Line Stream Lines Watershed Line April 2006 Organization Page 29 The following figures illustrate data problems with either the sub-watershed delineation or surface waters. The figure on the left illustrates surface waters crossing over a sub-watershed boundary. This would be indicative of incorrect digitizing of the surface waters or incorrect sub-watershed delineation. The figure on the right illustrates the sub-watershed boundary crossing upstream of a stream confluence. This will result in two outflow points (pour points) for the sub-watershed on the right (streams flowing from northeast to southwest). Sub-Watershed Sub-Watershed Both of the above situations will result in errors being generated and/or in invalid data being produced for the watershed and therefore the reach points. Performing a careful review up front can save a significant amount of time and (hopefully) eliminate the confusion of trying to figure out the data resulting from incorrect inputs. Meander Centerline and Valley Walls One should review the meander centerline and valley walls to ensure that proper digitizing techniques have been used, and that the digitizing requirements set forth in the Section entitled “Setup Required Source Themes” have been followed. Note: It is important that the geometry established between the sub-watershed, valley walls, surface waters and meander centerline make logical sense. It would not make sense to have the surface waters or meander centerline traveling outside of the polygons established for the sub-watersheds or valley walls. If such geometry is included, erroneous data and or error conditions are likely to occur. April 2006 Organization Page 30 Editing the Source Shape Files (Themes) Editing of themes will require knowledge of the editing tools of ArcView. When using these functions be sure to perform the following: • Set the snap tolerances in the Theme Properties to a reasonable value. Too large a value may result in snapping to the incorrect vertices of connecting polylines; whereas too small a value will require you to work at a very large view scale. • Work at a View scale which enables you to see the vertices of the theme which is being edited. You should be able to clearly see the circle around the crosshairs representing the snapping tolerance. • Be sure to snap ends of polylines to each other. Not doing so will prevent the Tools extension from properly tracing the stream network. Note: To set the snap tolerance in ArcView you must have the polygon or polyline theme you want to edit highlighted, select the :theme” on the toolbar and select “properties”. As shown below, a box will appear. Select the editing button and set both the general and interactive snapping tolerance. To assist in editing and determining the corrections to make the following data sets can be acquired: • Geographically-referenced digital images of the USGS 7 ½ minute quads can be obtained from VCGI. • Orthophotos can be acquired from the Tax Mapping Program, Vermont Department of Taxes. If significant errors are identified in the surface waters, it is recommended that VCGI be notified. Refer also to Appendix A: Optional Tools. The tool Review Polyline Theme for Geometry (GIS) Errors can provide assistance in verifying that the digitizing or correction process was performed accurately. April 2006 Organization Page 31 Overview of the Processing Steps in the Tools Extension The diagram on the following page illustrates an overview of the flow of data between the major components of the Tools extension. Multiple processing steps are included in the areas shown as Part A (Data Development for Primary Watershed); Part B (Data Development for Sub-Watersheds); Part C (Soils and Land Cover Analysis) and Part D (Reach Segmentation) and Part E (Fluvial Erosion Hazard Zone). The processing steps for each part are described in subsequent sections. Note: Access to Steps SEG00 and SEG01 of Part D is provided to all users. The remaining steps (Part E) are restricted to specific users. The Stream Geomorphic Assessment Tools were designed to be used in a step-wise fashion, i.e. finish one step and proceed to the next. Much like a stream flowing downhill, the data must flow sequentially from one step to the next. If an error condition is encountered that requires one to revert back to a processing step, run all steps in sequence from that point on. April 2006 Organization Page 32 April 2006 Organization Page 33 Source Themes Surface Water Sub-watershed Delination Themes Modified or Created Review for Accuracy and Consistency Part A Manual Assignment of Tributary Identifier to Streams in Surface Water Theme DataElements Calculated Legend Modifications Themes for Surface Water and Sub-watersheds Manual Assignment of Inflow/Outflow pts and Upstream Drainage Area for Overall Watershed in Primary Pour Pt Theme Primary Grouping of ArcView Processes Data Generated from Part B for each Reach Point Required User Effort Identifier of Tributary Reach Point Identifiers Reach Pt Distance from Start Sub-Watershed Area Drainage Area Length of Streams Channel Length ChannelWidth Valley Line (Length/Width) Stream Corridors Reach Pt Elevations Valley/Channel Slopes ChannelSinuousity Valley Confinement Modifications to Surface Waters or Primary Watershed Modifications to Surface Waters or Sub-watersheds Themes from Part B (see above) Themes from Part A (see above) Part B Sub-watershed Surface Waters ReachPoints Stream Corridors Valley Walls Watershed Sub-watershed Surface Waters Primary PourPts Meander Centerline Overview of the Stream Geomorphic Assessment Tools Part C Land Cover Land Use Density Analysis of point, linear or areal features within Sub-watershed or Stream Corridor Acreage in Stream Corridor, Sub-Watershed or Watershed Drainage Area For Soils MappingUnits Land Cover/Land Use and Summary of areas by Soils/LcLu Attribute Values (e.g. acres by type of flooding: Frequent, Occasional , Rare, None, or Not Rated) Sub-watershed Surface Waters ReachPoints Part D Reach Segmentation Points Valley Walls Limitedavailability Fluvial Erosion Hazard Zones Surface waters segmented at segmentationpoints Segmenation Points projected onto Surface Waters Data Generated from Part D Meander Centerline Themes from Part B: Data Generated from Part C Soils Using the Theme and Data Tracking Form A Theme and Data Tracking Form is included in Appendix B of this manual. The form enables one to document the input themes/tables and the output themes/tables for each processing step. By completing the form as you work through the steps for a watershed, you will be establishing documentation for the project. This can be an invaluable reference should additional analysis be required on the watershed at some future time. It is recommended that the forms be completed for each watershed and filed in a central location. Guidelines for using the Stream Geomorphic Assessment Tools The general guidelines are: • Perform each step in sequence • If corrections are to be made to the interior watershed boundaries or the geography of the streams within the watershed, then the procedure can be restarted at Step 02. • • If additional sub-watersheds are delineated (i.e. reach points added), start at Step 02. If the sub-watershed delineations are altered in a manner that affects the overall watershed boundary (i.e. the outermost boundary of the sub-watersheds), then you will have to restart at Step 01. IMPORTANT NOTE: If you have already assigned tributary identifiers and find that you have to go back due to an error in the sub-watersheds or surfacewater and re-run Steps 1-3 you can avoid having to re-assign the tributary identifiers by using the following procedure o o o o o o April 2006 Highlight the S03swcomb.shp shapefile that contains the tributary ID’s. Make sure none of the polylines within the theme are selected or highlighted. On the ArcView toolbar select “theme” and then “Convert to shapefile”. Save the theme into your base data folder with a new name. Go into SGAT theme registration and unregister your old surface water and register the theme you just created as your surfacewater. Start SGAT over from Step 1 or 2 depending on whether you changed the eaterior watershed boundary. As shown in the figure below, in Step 3 Combine Stream Segments between confluence points under Options select “All Fields”. This will carry along your trib ID’s to the new S03swcomb.shp and you will not have to re-assign them. Organization Page 34 • Each step can be performed multiple times without adverse affect on the data. For example, if you get a telephone call and don’t remember if you clicked on the “execute” button (usually the Clip, Calc, or Summarize button), simply click on it again. You may receive a warning that certain fields will be cleared and re-used, simply respond Ok. Note: You can view the log using the “data set” of “All Themes/Tables” to determine the processing steps completed. Simply scroll down to the last entries and identify the processing step resulting in the last entries being created. April 2006 Organization Page 35 Organization of Dialogs in the Stream Geomorphic Assessment Tools April 2006 Organization Page 36 Common Dialog Operations/Messages in the Tools Extension The dialogs were designed to function in a similar manner to minimize the learning required. In addition, certain features have been incorporated to assist in the use of the dialogs. Each of these common features is described below. Each dialog will have an Execute button and a Done button. Both of these will be located in the lower right corner of the dialog. The Execute button may be labeled in a different way on each dialog but will reflect the operation which is to be performed. Examples are Clip, Dissolve, Calculate, Summarize, etc. Clicking on the Done button closes that dialog and returns you to the parent or next higher dialog in the hierarchy. Refer to the figure on the preceding page. Clicking on the Execute button causes the dialog to edit the information entered or selected on the dialog. If information is incorrect or incomplete, an error message will be issued. The following is an example of such an error message occurring when a negative value for an elevation was entered for a reach point in Step 10. After clicking on the Execute button, attributes of certain “input” themes may be edited. This requires that the shape files pertaining to those themes be available for editing. Specifically, none of the files can be open in another application and the properties must not be marked as read-only. If either of these conditions is detected, the following error message is presented. The most common situations causing the above error condition are: • • Attribute table associated with the theme is open in another application such as Microsoft Excel. If this is the cause, then close the other application. Shape files were copied from a CD to the hard disk. This operation generally causes the directories and files copied to have the Read-Only attribute set. Windows Explorer can be used to verify and modify the Read-Only property. (See Introduction - Contents of Distribution CD - Sample Data for brief instructions on changing this property.) April 2006 Organization Page 37 Certain processing steps require specific attribute fields to be in the input theme(s)/table(s). If they are not found, an error message such as that shown below will be issued. This may be an indication that the wrong theme has been registered for a given input. Most likely, however, it will indicate that the attributes for a given theme have been improperly edited by the user. The operation to be undertaken by clicking on the Execute button will not occur until the error conditions have been corrected. The editing performed assists in reducing errors; however, the user should verify the information entered or selected prior to clicking on the Execute button. The processing step for most dialogs will create an output theme or table. The name and location of those data sets will automatically be established. Depending upon specific system settings for the specific output data set, either a single version or multiple versions may be created. For most, situations only a single version will be allowed. If one is repeating a step and either a single version is allowed or multiple versions are allowed but an existing data set is selected to be replaced, you will be warned that the existing data set will be replaced. In such cases, the following message will be issued. If you do want to replace the file, click on Yes; otherwise click on No. If you click on No, the operation will be canceled and the following message will be issued. If you repeat a step and want to replace the prior version, click on Yes. If you click on Yes, the following message will confirm the replacement. April 2006 Organization Page 38 Certain dialogs, especially those in Parts A and B, create attribute fields and calculate values for those fields. If you repeat a given step, those fields may already exist. If the fields do exist, the dialog will issue a message similar to the following. If you feel that the situation is incorrect, you can prevent re-calculation by clicking on No. To continue and have the fields re-calculated, click on Yes. It is important to note that the Tools were designed such that you can repeat a step. This can be useful if you have forgotten which step you had last performed. When you do repeat a step, always continue processing the remaining steps in sequence. This will ensure that the data is consistent. After the dialog edits the information entered and/or selected on the dialog, the following message will be issued. This is a “bail out” point providing you with the opportunity to terminate the step. This is provided in the event that you accidentally clicked on the Execute button. Input/Output Data Set Registration A process, referred to as registration, requires that every theme and table be identified prior to its use in the Tools. This means that the source themes and tables (described in earlier sections) must be registered by the user using the dialog entitled “Theme/Table Registration and Management” available from the Setup dialog. This dialog will be described in a subsequent section. Note: All data sets (themes or tables) created by the processing steps in the Tools are automatically registered. Only those themes or tables that are used in a given step need to be registered before that step can be used. For example, Step 01 dissolves the sub-watersheds into an overall watershed. As a result, only the theme representing sub-watersheds needs to be registered prior to using Step 01. April 2006 Organization Page 39 If an attempt is made to use a step for which the required (input) themes/tables have not been created (by the Tools and registered) or registered (by the user for source data sets), an error message similar to the following will be issued. Note: The above error message will be issued after one selects button on the Menu dialog for a given processing Step and prior to the display of the dialog. This is due to the fact that the test is performed in the open event for the dialog. The registration procedure simply associates the name of the actual file(s) on the hard disk to be used with a given ”Alias”. The Tools will consistently refer to a theme/table using its alias throughout all processing steps. The use of an alias in this manner permits the actual file on the hard disk to have any name. Note: The registration process updates the record for the given alias in the system table “SysBaseTheme.dbf”. As a result, the theme required for an alias is retained between different sessions with the Tools. The existence of the themes/tables referenced in the system table (SysBaseTheme.dbf) are also verified during the initialization procedure for the Tools. For example, the source theme for surface waters has been assigned an alias of surfacewaters. During registration, the user may identify the theme to be used for surface waters as “S00SWLModified.shp”. Whenever the Tools requires the theme for surface waters it simply uses the alias of surfacewaters; and, an internal translation creates the reference to the actual shape file ”S00SWLModified.shp”. The benefits of this are many, but for the purposes of the user it is primarily that a theme or table need only be identified once. After that the Tools will refer to the theme or table that was identified during the registration procedure. Output Data Set Naming/Registration All themes and tables created by processing steps within the Tools are automatically registered. Each output data set is associated with a specific alias. Further, the output data sets are automatically named. The name assigned to a data set will be the concatenation of the letter “S” (or “SEG” for processing steps in Part D), the step number and the alias. For example, the output of Step 01 is the overall watershed (formed by dissolving the sub-watersheds). This output theme is associated with the alias of “watershed”. Therefore, the output theme name will be “S01Watershed.shp”. Depending upon system settings for the output theme, it is possible that a sequence number will follow the alias in the name of the output theme. This will occur only if multiple versions are allowed for the specific output data set. This is described in the following section. April 2006 Organization Page 40 Multiple Versions of Data Sets The capability to create multiple versions of data sets resulting from a processing step is available. It is, however, restricted to certain User Types. (Refer to Section entitled “Setup Dialog”.) This capability is controlled for each data set (via its alias) by the value assigned to a field named BTMultiple in the system Table “SysBaseTheme.dbf”. Modification of this value is permitted through the dialog System Functions Æ Multiple Output Versions. This dialog is shown below. Since access to this dialog is restricted, the button on the System Functions menu dialog may be disabled or not displayed. In such circumstances, only a single version of a data set is permitted. This will result, in replacing the output data sets if a processing step is re-run. It is strongly recommended that one utilize single versions of output data sets. This will minimize the amount of hard disk space required and eliminate any confusion as to which data set represents the version to be used in subsequent analysis. In rare circumstances, it may be desirable to create multiple versions of a data set for the purposes of comparison. For example, it may be desirable to create versions of the stream corridors (from Step 09) for different applications (Stream Geomorphic Assessment, Fluvial Erosion Hazard Option 1) for comparison. This discussion pertains to those circumstances. One should always use the dialog shown earlier to modify the setting for creating multiple versions rather than attempting to manually modify the system table SysBaseTheme.dbf. This will ensure that the following rules are adhered to: o Only derived themes and tables are allowed to have multiple versions. Specifically, base (source) themes and tables should never be permitted to have multiple versions. o All records for a given alias in the system table SysBaseTheme.dbf must contain the same value for BTMultiple. To set the ability for an alias to have multiple versions or to restrict to a single version, select the alias from the drop down list in the upper left of the dialog. Then, select the appropriate setting in the panel for Multiple Versions Allowed: Yes enables multiple versions to be created and No restricts the alias to having a single version. Note: Only derived data sets will be included in the drop down list of aliases. April 2006 Organization Page 41 Affect of Multiple Versions on Dialogs for Processing Steps The setting for Multiple Versions of an alias will be reflected on all dialogs for which the associated data sets are used either as an input or created as an output. An informational note will be displayed on the dialog to the right of each control for an input or output data set. This note will indicate the status of available data sets and provide guidance in selecting a data set, where applicable. The following illustrates the location and examples of the notes. Dialog Controls Single Version When a data set is being created and the alias is restricted to a single version, the data set names will be constructed by concatenating the letter “S” (or “SEG” for processing steps within Part D), two digits reflecting the step number in which the data set is created and the alias. For example, the data set created for the overall watershed in Step 01 will be named “S01Watershed.shp”. The first time that a step is run, the following message will be shown to the right of the control on the dialog for the output data set: “Theme (or Table) will be created upon completion of this Step.” The assigned name for the data set will be shown in the control; and the control will be disabled. The second and subsequent times that the step is run, a note similar to the following will be displayed: “Existing Theme S01Watershed.shp for Overall Watershed will be replaced.” Again, the assigned name for the data set will be shown in the control; and the control will be disabled. Any processing steps which require an input data set, which is restricted to a single version, will automatically display the name of the data set in the appropriate control on the dialog. Since there is only one possible choice, that control will be disabled. Multiple Versions Multiple versions of a data set should be used only where absolutely necessary. Only derived data sets are to be allowed to have multiple versions. Base (or source) data sets should not be allowed to have multiple versions. As stated earlier, the dialog Multiple Output Versions available April 2006 Organization Page 42 under System Functions should be used to establish multiple versions. This ensures that only derived data sets can be modified. Note: The ability to create multiple versions is restricted to certain User Types. When a data set is being created and multiple versions are allowed, the data set names will be constructed by concatenating the letter “S” (of “SEG” for processing steps in Part D), two digits reflecting the step number in which the data set is created, the alias and a two digit sequence number. For example, the first version of the data set created for the overall watershed in Step 01 would be named “S01Watershed01.shp”; and the second version will be “S01Watershed02.shp”, etc. Note: Certain data sets, such as the reach point data (from Step 10) and the soils and land use cross-tabulations (resulting from Step 14) are to be imported into a Web Baed Data Management System. The script used to import the data into the data base will be expecting a specific data set name. When multiple output versions are enabled, one must use caution to ensure that the correct data set is being imported. In addition, one may have to rename the data set resulting from use of the Tools to match that expected by the import script. When an output data set is created with the ability to have multiple versions, the following will occur: o o When entering the dialog in which a data set for an alias is being created for the first time, the output name will be entered into the dialog control. Since this is the first time, no alternative output versions are available. As a result, the control will be disabled. As illustrated in the figure below, the second and subsequent times that the dialog is entered, the data sets previously created will be listed in the output control along with an entry for “New Version”. The data sets will be listed in the order created with the most recent version as the first entry. The control will be enabled to allow selection of an existing data set or “New Version”. If an existing data set is selected, it will be replaced. If, however, “New Version” is selected, then a new data set will be created. The name will be assigned as described earlier with a sequence number one larger than any that are registered. The name assigned will not be displayed in the control until processing has been completed. April 2006 Organization Page 43 If an input data set has the ability to have multiple versions, the following will occur: o o When only a single version has been created, it will be displayed in the control and the control will be disabled. When multiple versions have been created, the list of versions will be displayed in the control with the most recently created as the first entry. The control will be enabled to permit selection. If multiple versions of a data set are to be used, it is strongly recommended that a “Note” be entered for the data set(s) in the step that creates them. This will be the only manner in which the data sets can be distinguished. The Note will be entered into the log and associated with the data set being created. (Refer to the Section entitled ”Using the Log”.) One can manage multiple versions of a derived theme using Setup Dialog Æ Theme/Table Registration and Management Æ Manage Derived Themes/Tables. Through this dialog one can delete (from the hard disk and project) or remove (from the project) any version of a data set. Processing Time and Patience When the Execute button is clicked, the processing step will be initiated. During processing, various messages will be displayed in the ArcView message/status line, which is found on the bottom left of the ArcView application window. In addition, the cursor will assume the shape of an hour glass; thus, reflecting that the processing step is being executed. Certain steps, most notably Steps 03, 06, 07, 09 and 11, may require a significant amount of processing time. The actual time will depend upon the hardware environment and the size of the watershed being assessed. It may be difficult to be sure that processing is occurring. The only manner to be somewhat assured is the shape of the cursor. If it is in the form of an hour-glass, then processing is being performed. Occasionally, the ArcView message/status line may show a blip of activity and then disappear. Have patience. To the best of our testing and knowledge, no known “infinite loops” exist. April 2006 Organization Page 44 Upon completion of processing, a message such as that shown below will be displayed. This message will reflect the final disposition of the step. The Note Field on the Dialogs for Processing Steps A dialog control labeled “User Note” will be located at the bottom of each dialog for the processing steps and data set registration. This is a “free-form” text field into which a note can be entered that pertains to the output data set and that will be entered into the system log. This field, along with the system log, should be used to describe any pertinent conditions. As an example, one may have attempted to run Step 01 and received errors. The errors are corrected and Step 01 is run again. It would be useful to know that the second run follows cleaning up certain errors, e.g. a note could be entered describing the type and number of errors corrected. This field is also useful for describing the content or variation when Multiple Output Versions of a data set are used. (Refer to Section entitled “Multiple Output Versions”. The system log is described in the Section entitled “Using the Log”. April 2006 Organization Page 45 Using the Log A log will contain entries for all key activities, i.e. registration of a source theme/table, selection of user type or application, completion of a processing step, etc. This provides the user with the ability to review the log to determine what steps or activities have been completed and what the results were for various processing steps. The log will serve as a critical component with respect to support in the use of the Tools. The log, as well as any necessary data sets, should be forwarded to the support entity. This will provide the support person with the steps completed and any critical error conditions encountered. Each entry in the log contains the following: o o o o o o o o Date and time of log entry Record number: In some cases multiple records are required for an entry. Also any note entered by the user on the dialog will generally be entered into the log in the second (or sometimes third) record. Identification of step for which log entry was made. This will either be the step number or a three character abbreviation for the step (e.g. “Reg” for registration; “Ini” for initialization; “Sys” for system and “N/A” for not applicable). Name of the data set created or modified. Alias associated with the data set. Operation performed in the step. Input themes/tables: Up to three input data sets will be shown in a record. If more than three are used, multiple records will be created for the log entry. These will be differentiated by the record number. Comment: This field will display the results of the processing step or activity for which the log entry was made. User notes will also be in this field but will be included in a separate record. The following illustrates the dialog when the data set selected is “All Themes/Tables”. Using this “overall” data set, log entries are shown in chronological order, and is best when attempting to identify what activities have occurred and/or the order in which activities have occurred. April 2006 Using the Log Page 46 Scrolling to the right provides additional information, such as the results of a given step. This is illustrated below: Note: Certain comments or user notes may be truncated in the Log/Audit Notes window. This appears to be due to a limitation in the length of a line. If this is problematic, export the log. The resulting dBase table, will be placed in the Temp directory. Subsequently, the table can be opened in Microsoft Excel to view the entire comments/notes field. The Date, Time, Step Number, Name of Data Set and Alias will be listed in the log entry window only if the data set selected is “All Themes/Tables”. If a specific data set is selected, these data elements will be listed elsewhere on the dialog along with the following: o o o o Data Set Source will be either Base (source theme or table registered by the user) or Derived (data set created by the Tools). Data Set Type will be either Theme or Table (dBase table). Active will indicate the data set which was last created or used for the given alias. This will have meaning only if multiple versions of a given alias can be created. Multiple Version will be either Yes or No and will indicate whether multiple versions of data sets can be created for the given alias. Note: The ability to create multiple versions is controlled by a setting in one of the system tables. As a general rule, only a single version will be allowed to avoid any confusion. Note: In rare circumstances, multiple versions may be desirable in order to compare results. For example, it may be desirable to create multiple stream corridors via Step 09 to compare different buffering criteria. When multiple versions are enabled, the output data set names will have a sequence number appended, i.e. S09Corridor01.shp, S09Corridor02.shp, etc. April 2006 Using the Log Page 47 The following illustrates the dialog showing log entries for a specific data set. If one selects a specific data set, a comment or note can be entered in the bottom field on the dialog. Such notes can be invaluable aids in understanding any issues regarding the data sets. For example, during Step 01, digitizing errors may be identified. These errors are subsequently corrected and Step 01 is run again. It would be advisable to enter a note to indicate the type and number of corrections made for the sub-watershed theme. This will provide a record of how the data was developed. Further, if support in the use of the Tools becomes necessary, such information will be invaluable. A special data set named “System” may be found if one scrolls through the list of available data sets. This is a non-existent data set and is used to post log entries of activities that take place during initialization or other system actions. On the dialog is an Export button. This can be used to export the log for a data set selected. The Export button will create a copy of the log in dBase format in the Temp directory. Upon completion, a message will indicate the name of the exported log. The name will vary depending upon the data set selected. The resulting table can then be opened in either Microsoft Access or Excel for sorting, formatting and/or printing. Due to limitations in the width of the log entry area on the dialog, it is possible that the entire contents of the field for Comments (including user notes) will not be displayed. By exporting the log, one can then view the entire field. Note: If the selected data set is “All Themes/Tables”, the entire log will be exported. April 2006 Using the Log Page 48 Accessing the Stream Geomorphic Assessment Tools With the extension loaded, you can access the Tools button on the button bar of ArcView. The Tools button will only be available when the active window in ArcView is either a View window or the Project window. The figure to the left below illustrates the Tools button when the ArcView project window is active. This button will usually be the furthest to the right on the button bar. When the button is visible, clicking on it will activate the Introductory or Splash screen (shown below on the right) for the Tools. Clicking on the Continue button on that screen will display the Setup Dialog. Clicking on the Exit button simply closes the Introductory (or Splash) screen. This does not, however, unload the extension. The process for unloading the extension has been described earlier. Initialization Procedure When the Continue button on the Introductory dialog is clicked, an initialization procedure is invoked. This procedure performs a number of tasks to create and to verify the environment required for using the Tools. The following steps describe the verification procedure undertaken. ArcView Project: A check is made to ensure that the ArcView project has been saved. If the ArcView project has not been saved, the following error message is issued and access to the Tools is prevented. Directory Structure: A test is made to verify that the required directories exist under the directory in which the ArcView project has been saved. If one or more of these directories do not exist, they are automatically created. The following warning message will be issued indicating any missing directories which have been created. April 2006 Accessing the Stream Geomorphic Assessment Tools Page 49 System Tables: A number of “system” tables are required. These (dBase) tables control the operation of the Tools or are a repository of data. Through these tables the status and data generated from one session using the Tools is carried forward into the next. A test is made to ensure that all of the system tables reside in the SysData directory. If one or more of these tables are missing, the following error message will be issued: Following the error message, another message box will attempt to display the names of those tables that are missing. This is illustrated in the following: Note: No validation of the format or contents is made for the system tables. As a result, user modification of these tables will cause unpredictable results when running the Tools, including possible corruption of data and/or the ArcView project file. Hidden “SysTable” and “SysView” DocGUI’s: A DocGUI is a “Graphical User Interface” (GUI) for “documents” (Doc) in ArcView. Examples of DocGUI’s are Views, Tables, Charts, Layouts, Scripts and Dialogs. A document is an actual view, table, chart, layout¸ script or dialog. Multiple documents are available under a DocGUI. The Tools creates two DocGUI’s named SysTable and SysView. These provide a focal point for the Tools to quickly access themes, attributes of themes and data from tables. The SysTable and SysView DocGUI’s are made invisible to the user to prevent confusion and inadvertent modification to any of the documents. The SysView DocGUI will contain a single view named RegThemes. All themes registered by the user or created through use of the Tools will be added to that view. Whenever a theme (shape file) is registered or created within the Tools, the associated attributes are added to the SysTable DocGUI. In addition, whenever a table is registered or created, it is added to this DocGUII. The following illustrates the two DocGUI’s created. Remember, however, that these will not be visible. April 2006 Accessing the Stream Geomorphic Assessment Tools Page 50 Adding system tables to SysTable DocGUI: The system tables are added to the SysTable DocGUI. As each table is added to the DocGUI, a test is made to ensure that the table can be edited. If any table cannot be edited, the following error message will be issued: If the above error message is issued, it will be followed by a second one listing the system tables that are “marked as Read-Only or in use by another application”. The following is an example: As each table is loaded into the system GUI, tests are made to determine if a table is corrupted or invalid. If any are found, the following messages will be displayed. The first will identify the error condition and the second will identify the tables that are not useable. Directory Structure: The system table, SysDir.dbf, is updated with the directory structure relative to the ArcView project file. User View: The User View to which themes are to be added (when registered or created by the Tools) is saved in the system table, SysSystem.dbf. The initialization procedure obtains the name of the view, if any, identified in that system table. If a view is identified (via prior use of the Tools), a check is made to determine if that View exists in the current ArcView project. If it does not, it is created and named in accordance with the name from SysSystem.dbf. In addition, the Map Units for the View are set in accordance with the units from the system table, SysUnits.dbf. No error or warning messages are issued at this time. Validation of system tables for theme/table registration: Two system tables, SysBaseTheme.dbf and SysBTReqFields.dbf, retain the registration data for any themes and tables registered by the user or created by the Tools. Each theme/table to be used or created April 2006 Accessing the Stream Geomorphic Assessment Tools Page 51 must be represented by at least one record in the SysBaseTheme.dbf table. The data within that record defines the alias used within the Tools. When a theme/table is registered, a shape file or dBase table becomes associated with that alias. Through the alias, then, the Tools know which shape file or table is to be used in each processing step. In a similar manner, certain fields in themes or tables (to be registered by the user) are required to be present. The Tools would not know in advance the names of those fields. As a result, an alias is used within the Tools to refer to a given field. During registration, the user must associate a specific field with that alias. Through the alias, then, the specific field to be used would be identified. For example, the source theme for soils must have a field uniquely identifying the soil mapping unit identifiers (the MUKEY field in Vermont). In addition, the source table for the soil attributes must have a similar field (which is also MUKEY for the Top 20 soil attributes in Vermont). The user must identify the field containing the identifiers when registering the soil theme and the soil attribute table. During the initialization process, the records contained in the system tables SysBaseTheme.dbf and SysBTReqFields.dbf are compared with a hard-coded list to ensure that all necessary records are in those tables. If a record is missing, that record will automatically be created. No error messages will be issued. Load themes/tables previously registered: The final step in the initialization process is to verify the registered themes and tables (from prior sessions with the Tools) and to load them into the system DocGUI’s. The User View to which themes are to be added upon user registration or creation in a processing step is identified by the user on the Main dialog. The name of the view selected or created is saved in the system table SysSystem.dbf. During an earlier step in the initialization procedure, it is determined whether the User View exists in the ArcView project. If it does not, then the following message will be issued: If the user selects Yes, then all themes which have been registered will be added to the view during this step of the initialization procedure. In adding the themes to the view, a basic legend associated with the alias for the theme will be used. If the user selects No, then the view will have been created, however, no themes will be present in the view. If it has been determined that the ArcView project directory has changed from the last session, the user will be provided with the opportunity to load the registered themes into the User View. Note: If an ArcView project file along with the themes/tables referenced is moved to a different directory, the user is prompted to locate each theme/table referenced. For each April 2006 Accessing the Stream Geomorphic Assessment Tools Page 52 theme/table, one must migrate to the new directory and identify the specific theme or table. The opportunity to “add the registered themes” to the view (as noted in the above message), will automatically load those themes/tables even though the location of the ArcView project file has changed. Regardless of whether the User View is to be recreated, each theme or table that is registered will be loaded in one of the system DocGUI’s: SysTable (for tables and attributes of themes) or the view RegThemes in SysView. This provides rapid access for the Tools for all of the referenced themes/tables. The data associated with themes/tables that have been registered is maintained from one session of the Tools in the system tables SysBaseTheme.dbf and SysBTReqFields.dbf. In addition, the directories in which these data sets should be located is automatically determined (as noted earlier). The directory structure is maintained in the system Table SysDir.dbf. During the process of adding the registered themes/tables, the following tests are performed: o o Does the referenced theme or table exist in the required directory? Can each data set be edited? Note: The system table SysBaseTheme.dbf contains a field that indicates whether the data set is a base (source) or derived (created by the Tools) data set. This is then translated into the corresponding directory for that type of data set: Base data sets are to be located in the BaseData directory and derived data sets are to be located in the DerivdData directory. If it is found that one or more of the registered data sets are not located in the required directories, the following warning message will be issued. After the initialization procedure has completed, click on the View Log button and select the Data Set named System to identify those data sets that were not found. As shown below, one log entry for each data set not found will be included in the log under the System alias. April 2006 Accessing the Stream Geomorphic Assessment Tools Page 53 If it is found that one or more of the registered data sets cannot be edited, the following sequence of messages will be issued. The first message will identify the number of data sets that cannot be edited. The second message will inform the user as to the actual names of the first eleven data sets. The message will indicate whether the list is a complete or partial list of data sets. The inability to edit data sets will generally be due to one of two conditions: o The data set is in use by another application. For example, one can open up a dBase table (including the attributes to a theme) using either Microsoft Access or Microsoft Excel (among other applications). If such is the case, ArcView will recognize that it cannot apply edits. o The data set has been copied from a CDROM. When this occurs, the attributes of a file as they exist on the CDROM will be carried forward to the copy on the hard disk. Files on a CDROM will have the Read-Only attribute set. This prevents any modification of the files on a CDROM. This attribute is also set on any copies made of the files to the hard disk. Note: Use Windows Explorer to clear the Read-Only attribute of any files copied from a CDROM. As indicated in the error message, access to the SGAT extension is prevented until the error condition is corrected. Initialize Buffer Reference Tables: The final step in the initialization procedure is to verify the buffer reference tables. In the Setup Dialog, the user must select an Application. The application permits one to use the Tools for different purposes, such as Phase I Geomorphic Assessment, Fluvial Erosion Hazard Option 1 or Option 2. The selection of an application controls the processing and/or functionality of the Tools. At present, the primary difference in the Tools is related to access to the fluvial erosion hazard zone in part E of the tool. t The buffers are dependent upon the following: o o Calculation of the channel width for each reach in Step 08. Factor (to be multiplied by the channel width) associated with a feature type. Due to the importance of these dBase tables, the initialization procedure will verify their existence and format. The following describes the verification process. April 2006 Accessing the Stream Geomorphic Assessment Tools Page 54 The permissible applications are contained within the system table named SysApps.dbf. In that table, one record will be present for each application. Among other data, the name of the buffer reference table to be used for the application will be included in each record. If no buffer reference table is associated with an application, the following error message will be issued: Note: The above will occur if the value for the field “BuffrTable” is blank or contains “Not Selected”. The buffer reference tables must exist in the SysData directory (under the directory in which the ArcView project file is located). If the table referred to in a given record is not located in the SysData directory, the following error message will be issued. If the dBase table is found in the SysData directory, a review of the required fields is conducted. If any of the required fields are missing, the following error message is issued. A field named “Key” is present in the buffer reference table. The values contained within that field define a specific stream type or stream grouping; and associated with that key value are the factors which are to be used in creating the buffers for specific feature types and/or conditions. This provides the mechanism to isolate particularly sensitive streams for special buffering. However, the bulk of the streams will be dealt with in a uniform manner. This is enabled through the use of a key value of “Default”. In other words, if a key value cannot be found to match the conditions associated with a specific reach, the buffering parameters associated with the key value of “Default” will be used. The final verification test is to ensure that a record containing a value for the Key field of “Default” exists. If such a record is not found, the following error message will be issued. April 2006 Accessing the Stream Geomorphic Assessment Tools Page 55 If no errors are detected with regard to the buffer reference tables, the initialization procedure will conclude. If, however, any error conditions are detected, access to the Tools is prevented. In such a case, the errors must be corrected in order to gain access. The initialization procedure will always make backups of the critical system files that maintain the registration data and the log entries. These backups will be placed in the Temp directory. The following message will be issued only in the event that an error is detected during the procedure for Loading themes/tables previously registered. This is to serve as a reminder only. One may have copied the system directory SysData for a previous project into a new directory but forgot to copy the themes/tables from that project into the required directories. In this case, the error pertaining to “registered data sets not found in the required directories” (described above) will be issued. Having realized that, one can exit the SGAT extension; copy the data sets into their appropriate directories and restore the system tables (SysBaseTheme.dbf, SysReqFields.dbf and SysLog.dbf) from the Temp directory to the SysData directory. When the SGAT extension is then started, the data sets previously registered will be found; and one can proceed with using the Tools. If any errors are detected during the initialization procedure, the following error message will be displayed. When a fatal system error has been detected, the hidden DocGUI’s created (SysTable and SysView) will be removed from the ArcView project; and you will be returned to ArcView. Remember that the SGAT extension remains loaded; it simply is not being used. Refer to the earlier section for unloading the SGAT extension from ArcView. If no errors have been detected during the initialization procedure, the following warning message will be displayed. SGAT will remain active until one clicks on the Exit button on the Setup Dialog. Until that time, the hidden DocGUI’s will remain in the ArcView project. When one clicks on the Exit button, the hidden DocGUI’s are removed; thus leaving a “pure” ArcView environment. April 2006 Accessing the Stream Geomorphic Assessment Tools Page 56 When one exits the SGAT extension, it remains loaded as signified by the button with the “squiggly” line on the button menu when the active window is the project window or a view. The extension can remain loaded while editing is performed, the project is saved or ArcView is closed. Any number of “anomalous” conditions may occur if one attempts to edit a theme, attribute table or dBase table while the SGAT extension is active. The extension will be “active” until one clicks on the Exit button on the Setup dialogs. It is not possible to detail all combinations of events that can cause problems. As a result, it is best simply to follow the general guidelines of not editing while SGAT is active. Note: When assigning the Trib ID’s in Step 04, always exit the SGAT extension. Do not save the project while the SGAT extension is active. Doing so will result in the hidden DocGUI’s being saved with the project. While this is generally not a problem, these hidden DocGUI’s may cause problems if other extensions are used in the ArcView project. When one clicks on the OK button for the above message, the ArcView project window will be minimized and the icon representing that window will be displayed on the bottom-left area of the ArcView window. This is done to emphasize the concerns expressed above. When one clicks on the Exit button on the Setup Dialog, the project window will be returned to its prior state. The Setup Dialog will then be displayed. Use of this dialog is described in the next section. April 2006 Accessing the Stream Geomorphic Assessment Tools Page 57 Setup Dialog for the Stream Geomorphic Assessment Tools The Setup Dialog provides access to all of the functions necessary to “setup” for using the Stream Geomorphic Assessment Tools. This dialog is illustrated below: Note: The options available on this dialog may vary based upon the intended use or user. As a result, certain controls may be predefined and disabled. The use and application of the data established on this dialog, however, is described in this section. User Type The User Type can be one of four options: System: This User Type is reserved for user support personnel and certain advanced users, as it permits access to system parameters and functions via the System Functions dialog. Due to the critical nature of these functions and the subsequent impact on data produced by the Tools, these functions are disabled for other User Types. FEH: For the development of Fluvial Erosion Hazard Zones with all of the capabilities of the Regional Planning user type. Regional Planning: Regional Planning organizations have access to certain more system functions. Watershed Group: This User Type provides dedicated use of the Tools in performing Phase I Geomorphic Assessment. All applications and system functions not dedicated to that effort are disabled or removed as alternatives. Note: The User Type may be predefined and locked to prevent inadvertent selection of incorrect parameters. In this case, the control for defining the User Type will be disabled. April 2006 Setup Dialog for the Stream Geomorphic Assessment Tools Page 58 The User Type must be selected prior to accessing any of the other functions on this dialog. If the User Type is “Not Selected”, other functions on the dialog will be disabled. The following Warning message will be issued prior to the display of the Setup dialog if the User Type has not been selected. Application The User Type selected will establish the alternatives available for the Application to which the Tools are to be applied. It is, therefore, essential to select the User Type first; and, then, the Application. The Application can be one of three options: SGA: This Application is for the Phase I Geomorphic Assessment. Buffering will be performed in Step 09 (Create Stream Corridors) per Appendix E of the Stream Geomorphic Assessment Phase I Handbook available from the Vermont Agency of Natural Resources. This Application is available to all User Types. FEH Option-1: This Application is for the Fluvial Erosion Hazard Option 1. Buffering will be performed in Part D in accordance with Option 1 in the Technical Guidance for Determining Floodway Limits Pursuant to Act 250 Criterion 1(D), dated 10/07/03, from the Vermont Agency of Natural Resources. FEH Option-2: This Application is for the Fluvial Erosion Hazard Option 1. Buffering will be performed in Part D in accordance with Option 2 in the Technical Guidance for Determining Floodway Limits Pursuant to Act 250 Criterion 1(D), dated 10/07/03, from the Vermont Agency of Natural Resources. Note: The Application may be predefined and locked to prevent inadvertent selection of incorrect parameters. In this case, the control for defining the application will be disabled. The Application must be selected prior to accessing any of the other functions on this dialog. If the Application is “Not Selected”, other functions on the dialog will be disabled. The following Warning message will be issued prior to the display of the Setup dialog if the User Type has not been selected. April 2006 Setup Dialog for the Stream Geomorphic Assessment Tools Page 59 User View Finally, one must identify or create a View to which the themes registered by the user or created by processing steps within the Tools will be added. To select a view, click on the Set View button. A message box, similar to that shown below, will be displayed that lists the existing views in the project and includes and entry for “Create New View”. Note: If you have received an SGAT template from the RMS the view will already be set for you. Click on the view to be used, or click on “Create New View”. If the latter is selected, a message box will be displayed, as shown below, requesting the name to be assigned to the view. The default name of “SGAT” will be displayed. Enter the name that is to be assigned to the view. If a name is entered that has been assigned to an existing view, the following will be displayed. The View must be selected prior to accessing any of the other functions on this dialog. If the View is “Not Selected”, other functions on the dialog will be disabled. The following Warning message will be issued prior to the display of the Setup dialog if the View has not been selected. April 2006 Setup Dialog for the Stream Geomorphic Assessment Tools Page 60 When a View has been selected or created, the Map Units for the view will be set in accordance with the field named MapUnits in the system table SysUnits.dbf. The User Type, Application and User View will be maintained in the system table SysSystem.dbf. This ensures that the selections will be retained between different sessions in working with the Tools. Once the User Type, Application and View have been selected, the remaining controls on the dialog will be enabled. This permits access to the following: o o o o Theme/Table Registration and Management Stream Geomorphic Assessment Tools (SGAT) Viewing the Log System Functions To begin using the Stream Geomorphic Assessment Tools, one must first register the source themes and tables. These have been described in earlier sections; and can be registered via the Theme/Table Registration and Management dialog. This dialog is described in the next section. Theme/Table Registration and Management As has been presented in earlier sections, each theme or table to be used in the Tools must be registered first. The process of registering a theme or table involves identifying a theme or table that is assigned to an alias. In other words, the theme or table to be used for a specific purpose is identified by the user; for example, the theme to be used for surface waters. Note: Refer to the Section entitled “General Concepts” for a discussion on the term “alias”. The primary dialog for Theme/Table Registration and Management is shown below. For the required themes and tables, a check mark will appear to the left of the button for a given theme/table if it has been successfully registered. A “Stop Hand” will signal that registration has either not been done or not completed. April 2006 Setup Dialog for the Stream Geomorphic Assessment Tools Page 61 Registration of themes and tables is very similar and requires that the user obtain some descriptive information for each. The registration process is required only for those themes/tables which are not created by the processing steps in the Tools. The registration process will be described in subsequent sections. Themes and tables which are created within the Tools are referred to as “derived” themes. These can be managed via a dialog that is accessed via the button labeled “Manage Derived Themes and/or Tables”. The only management options available for these data sets are: o o o o To remove the theme/or table from the project. The data set will remain on the hard disk. To delete the theme and/or table from the hard disk. It will also be removed from the project. To post a note to the log for a given theme or table. To delete a note posted to the log for a given theme or table. Use of the dialog permitting management of derived themes and tables will be presented in a subsequent section. Using the Export Theme/Table List button, one can export a list of the registered themes for subsequent use in either Microsoft Access or Microsoft Excel. All themes, which have either been registered by the user or created within the Tools, will be included in the export file. The export file, “RegList.dbf”, will be located in the Temp directory. By clicking on the button labeled View Log, one can view the actions taken via registration or management. Note: Refer to the earlier Section entitled “Using the Log” for a discussion on the log and the dialog providing access to it. Clicking on the Done button will return to the Setup Dialog. April 2006 Setup Dialog for the Stream Geomorphic Assessment Tools Page 62 Registering Themes As has been discussed in prior sections, each theme must be registered prior to its use within the Tools. Only those themes, which are supplied to or created by the user, need to be registered. Specifically the following themes must be registered: Land Cover/Land Use, 2002 LcLu, (as polygons) obtained from the VT River Management Section. Meander Centerline delineations (as polylines) as digitized by the user; Ortho Photo Boundary (as polygons) will be pre-registered in SGAT template, otherwise must be obtained from VCGI; HUC 10 Boundary (as polygons) will be pre-registered in SGAT template, otherwise must be obtained from Iobtained from River Corridor Management (RCM); Reach Segmentation Points (as points) as digitized by the user (required only if segmentation of reaches is to be performed); Soils (as polygons) obtained from VCGI, version updated in 2003; Sub-watershed delineations (as polygons) as digitized by the user; Surface Waters (as polylines) obtained from (VCGI); Town Boundary (as polygons) will be pre-registered in SGAT template, otherwise must be obtained from VCGI; USGS Quad Boundary (as polygons) will be pre-registered in SGAT template, otherwise must be obtained from VCGI; and Valley Wall delineations (as polygons) as digitized by the user. Each of the above themes will be registered separately, although the same dialog will be used. The specific theme to be registered is selected by the button on the Theme/Table Registration and Management Dialog. The resulting dialog, as shown below for Soils, will reflect the theme being registered in the dialog Title. April 2006 Setup Dialog for the Stream Geomorphic Assessment Tools Page 63 To select a theme, click on the Select Theme button. In response, the File Dialog will be displayed as shown below. In the right (directory structure) side of the above dialog, migrate to the directory in which the theme is located. Then, click on the file name and then on the OK button (or simply double click on the file name). This will select the file to be used. At this point, the selected file will be reviewed with respect to certain edit criteria to help ensure that the correct shape file has been selected and that it is in the correct directory. First, a test is performed to ensure that the theme is not corrupted or invalid. If this test is failed, the following error message will be display and the theme selection will be ignored. A test is performed to ensure that the shape file selected can be edited. If it cannot, then the shape file is either in use by another application or has its Read-Only attribute set (as would be the case for files copied from a CDROM). If so, an error message will be issued. A test is made to ensure that the shape file has not already been registered under another Alias. If it is found to be registered, the following error message will be issued. In the above situation, an incorrect shape file was selected for “Soils”. April 2006 Setup Dialog for the Stream Geomorphic Assessment Tools Page 64 For the themes to be considered for use in the Tools, the feature class will be Polygon, Polyline or Point. In addition, each of the required themes is expected to be of a particular feature class. The following table identifies the alias, description and feature class for the required themes: Alias HUC10Boundary Land Cover/Land Use (LcLu) MeanderCL OrthoBoundary QuadBoundary SegPtsUser Soils SubWatersheds SurfaceWaters TownBoundary ValleyWalls Description Boundaries of HUC 10 watersheds 2002 Land Cover/Land Use Meander Centerline delineation Boundaries of Ortho photos Boundaries of USGS Quads Reach Segmentation points Soil Mapping Units Sub-watershed delineation Surface Waters Boundaries of Towns Valley Wall delineation Feature Class Polygon Polygon Polyline Polygon Polygon Point Polygon Polygon Polyline Polygon Polygon If the shape file selected is not of the correct feature class for the theme being registered, the following error message will be issued; and the selection will be ignored. If no errors have occurred thus far and the shape file selected is located in a directory other than BaseData, the following message will be issued. Clicking on No in the above message will abort the theme selection, as will be indicated by the following message. Clicking on Yes will cause the component files for the shape file to be copied to the BaseData directory. This ensures that the required directory structure is adhered to. If no errors have been detected, the name of the theme selected will be entered into the control labeled “Shape File Name” on the dialog. Registration, however, will not occur until the Save button is clicked. April 2006 Setup Dialog for the Stream Geomorphic Assessment Tools Page 65 The registration procedure also enables one to enter the following documentation for a theme: Source agency: The organization, agency or group responsible for creating and maintaining the data set. Current As Of: The date at which the theme/table was released by the source agency. This will aid future users to identify more current data that may be available. Status: The status of the data, i.e. preliminary release, update in process, etc. The status levels were “borrowed” from those used by the Vermont Center for Geographic Information (VCGI). Source Scale: Much of the geographic data has been electronically traced or digitized from various source documents such as the VT Orthophotos (1:5000), USGS Quads (1:24000 or 1:25000 and others), etc. The scales shown in parentheses provide guidance as to the relative accuracy of the data, i.e. the smaller the number to the right of the colon the more accurate the data should be. This documentation field will only be applicable to theme registration. Note: A free form text field for entering notes. This can be a contact name for the data set, a condition discovered with the data, corrections made, etc. The above data should be completed for each theme registered. It is not essential that the documentation information be entered at the time when the theme is registered. One can register the theme and then return to the registration dialog for the given theme to add or to update the documentation information as it becomes available. Note: All theme registration data is maintained in the system table SysBaseThemes.dbf. Field aliases are also used in identifying the names of fields required to be in the attributes of certain themes. During the registration of the theme/table, specific fields will have to be identified for each of these aliases. The following table lists those themes for which fields must be identified. Theme Alias HUC10Boundary Land Cover / Land Use Field HUC 10 Ids LcLu Classification Codes MeanderCL OrthoBoundary SegPtsUser --- None --Ortho photo Ids Reach Pt Ids SegPtsUser Segment Pt Ids Soils Soil Mapping Unit Identifiers Soils Soil Mapping Unit Symbols SubWatersheds SurfaceWaters QuadBoundary TownBoundary ValleyWalls --- None ----- None --Quad Name Town Name --- None --- April 2006 Description Identifier associated with HUC 10 boundary. Values in field will identify the Land Cover/Land Use classification code represented by a polygon. This field (and the values within it) is used to “relate” to a dBase table containing the definition or description of the LcLu classification. (Refer to LcLu Codes/Descriptions table.) VT field will usually be “GridCode”. --- None --Identifier associated with photo boundary. Identifier associated with reach to be segmented. These would be the same identifiers as created in Step 06. Numerical identifier uniquely identifying a segmentation point within a given reach. Recommend that values begin with the number 1 for each reach and increase as one moves upstream. Values in field will identify the soil type represented by a polygon. This field (and the values within it) is used to “link” to a dBase table containing characteristics (attributes) of the soils. The characteristics will vary based upon the Soil Mapping Unit Identifier. (Refer to Soils Top 20 Attribute table.) This field will usually be “MUKEY” if in VT. Field is used in Step 14 to identify “soil” polygons that represent water, i.e. has a field value of “w” or “W”. This field will usually be “MUSYM” if n VT. --- None ----- None --Name of USGS Quad associated with boundary. Name of town associated with boundary. --- None --- Setup Dialog for the Stream Geomorphic Assessment Tools Page 66 To select a Field Name, click on the drop down list and scroll up/down to find the appropriate entry. Then, click on the field name. This identifies the field to be used; however, the field will not be registered until the Save button is clicked. Take the time to ensure that the correct field has been selected. Incorrect selection will cause error conditions in subsequent processing steps that may be difficult to interpret. Note: The Field Name need not be defined at the same time as Theme is selected. However, the theme will not be considered registered until all required fields have been defined. Note: To remove a field selection, click on drop down list for field and select “Not Selected” Whenever a theme is selected or changes to data on the dialog have been made, the Save and Cancel buttons will become enabled. Any selection or changes will not take affect until one has clicked on the Save button. If one clicks on either the Cancel or Done buttons after selection or changes have been made, the following warning message will be issued. If the changes are to be canceled, click on Yes in the above messages. Any selection or changes made will be ignored. If the changes are not to be canceled, click on No. This will return to the dialog with the changes remaining. To save the changes, click on the Save button. The following illustrates the completed dialog for registering the soils theme. April 2006 Setup Dialog for the Stream Geomorphic Assessment Tools Page 67 Removing a Theme Registration To remove a theme registration, select the theme to be removed from the Theme/Table Registration and Management dialog. Once the registration dialog is displayed, click on the Remove button. Note: The Remove button will be enabled only if a theme has previously been registered. The following message will be displayed after clicking on the Remove button. Clicking on No in the above message will abort the remove operation and will return you to the theme registration dialog. If the theme is to be unregistered, click on Yes. After the theme has been unregistered, it is also removed from the ArcView project. The following message will then be issued. If the theme being unregistered has been used in any processing steps, select No. This will retain the entries in the log should they be needed at some future point for support or simply seeing the order of events that have taken place. Clicking on Yes will remove all log entries pertaining to the theme. Registering Tables Note: If you have received the Version 4 template then all required tables have been preregistered. If for some reason you need to register a table follow the directions below. Table registration is nearly identical to that for themes. Each table must be registered prior to its use within the Tools. Only those tables supplied to or by the user need to be registered. Specifically the following tables must be registered: Soils Top 20 Attributes forwarded with SGAT extension to ensure compatibility with the Soil XTab Fields table; Soil XTab Fields provided with SGAT extension to ensure compatibility with the Soils Top 20 Attributes; LcLu Code Descriptions forwarded with SGAT extension to ensure compatibility with the LcLu XTab Fields table; and LcLu XTab Fields provided with SGAT extension to ensure compatibility with the LcLu Code Descriptions. April 2006 Setup Dialog for the Stream Geomorphic Assessment Tools Page 68 Each of the above tables will be registered separately, although the same dialog will be used. The specific table to be registered is selected by the button on the Theme/Table Registration and Management Dialog. The resulting dialog, as shown below for Soils Top 20 Attributes, will reflect the table being registered in the dialog Title. To select a table, click on the Select Table button. In response, the File Dialog will be displayed as shown below. In the right (directory structure) side of the above dialog, migrate to the directory in which the table is located. Then, click on the file name and then on the OK button (or simply double click on the file name). This will select the file to be used. At this point, the selected file will be reviewed with respect to certain edit criteria to help ensure that the correct table has been selected and that it is in the correct directory. First, a test is performed to ensure that the theme is not corrupted or invalid. If this test is failed, the following error message will be display and the theme selection will be ignored. A test is performed to ensure that the shape file selected can be edited. If it cannot, then the shape file is either in use by another application or has its Read-Only attribute set (as would be the case for files copied from a CDROM). The following error message will be issued in such circumstances. April 2006 Setup Dialog for the Stream Geomorphic Assessment Tools Page 69 Then, a test is made to ensure that the table is not an attribute table associated with a shape file. If it is, the following error message will be issued. A test is then made to ensure that the table has not already been registered under another Alias. If it is found to be registered, the following error message will be issued. In the above situation, an incorrect table was selected for “SoilsTop20_05”. Unlike for themes, there is no test for the ability to edit any tables being registered. All tables are used only in a read (reference) mode. If the file selected is located in a directory other than BaseData, the following message will be issued. Clicking on No in the above message will abort the table selection, as will be indicated by the following message. Clicking on Yes will cause the table to be copied to the BaseData directory. This ensures that the required directory structure is adhered to. If no errors have been detected, the selected table will be entered into the control labeled “dBase File Name” on the dialog. Registration, however, will not occur until the Save button is clicked. April 2006 Setup Dialog for the Stream Geomorphic Assessment Tools Page 70 The registration procedure also enables one to enter the following documentation for a table: Source agency: The organization, agency or group responsible for creating and maintaining the data set. Current As Of: The date at which the table/table was released by the source agency. This will aid future users to identify more current data that may be available. Status: The status of the data, i.e. preliminary release, update in process, etc. The status levels were “borrowed” from those used by the Vermont Center for Geographic Information (VCGI). Note: A free form text field for entering notes. This can be a contact name for the data set, a condition discovered with the data, etc. Note: The source scale data available for themes is not applicable to tables. The above data should be completed for each table registered. It is not essential that the documentation information be entered at the time when the table is registered. One can register the table and then return to the registration dialog for the given table to add or to update the documentation information as it becomes available. Note: All table registration data is maintained in the system table SysBaseThemes.dbf. Field aliases are also used in identifying the names of fields required to be in the attributes of certain tables. During the registration of the theme/table, specific fields will have to be identified for each of these aliases. The following table lists those tables for which fields must be identified. Table Alias SoilsTop20 Field Soil Mapping Unit Identifiers SoilXTabFields LcLuCodes --- None --LcLu Classification Codes LcLuXTabFields --- None --- Description Values in field will identify a soil type. This field (and the values within it) is used to “relate” to the soils theme in order to transfer the attributes to each soil area (polygon). (Refer to Soils theme.) This field will usually be “MUKEY” if in VT. --- None --Values in field will identify the Land Cover/Land Use classification code. This field (and the values within it) is used to “relate” to the LcLu theme in order to transfer the attributes to each LcLu area (polygon). (Refer to LcLu theme.) This field will usually be “GRIDCode” if in VT. --- None --- To select a Field Name, click on the drop down list and scroll up/down to find the appropriate entry. Then, click on the field name. This identifies the field to be used; however, the field will not be registered until the Save button is clicked. Take the time to ensure that the correct field has been selected. Incorrect selection will cause error conditions in subsequent processing steps that may be difficult to interpret. Note: The Field Name need not be defined at the same time as Table is selected. However, the table will not be considered registered until all required fields have been defined. Note: To remove a field selection, click on drop down list for field and select “Not Selected” Whenever a table is selected or changes to data on the dialog have been made, the Save and Cancel buttons will become enabled. Any selection or changes will not take affect until one has clicked on the Save button. April 2006 Setup Dialog for the Stream Geomorphic Assessment Tools Page 71 If the changes are to be canceled, click on Yes in the above messages. Any selection or changes made will be ignored. If the changes are not to be canceled, click on No. This will return to the dialog with the changes remaining in place. To save the changes, click on the Save button. The following illustrates the completed dialog for registering the soils table. Removing a Table Registration To remove a table registration, select the table to be removed from the Theme/Table Registration and Management dialog. Once the registration dialog is displayed, click on the Remove button. Note: The Remove button will be enabled only if a table has previously been registered. The following message will be displayed after clicking on the Remove button. Clicking on No in the above message will abort the remove operation and will return you to the table registration dialog. If the table is to be unregistered, click on Yes. After the table has been unregistered, it is also removed from the ArcView project. The following message will then be issued. April 2006 Setup Dialog for the Stream Geomorphic Assessment Tools Page 72 If the table being unregistered has been used in any processing steps, select No. This will retain the entries in the log should they be needed at some future point for support or simply seeing the order of events that have taken place. Clicking on Yes will remove all log entries pertaining to the table. Managing Derived Themes and/or Tables Derived themes and tables are, as the name suggests, derived from the source themes and tables discussed in prior sections. The derived themes and tables are the output or result of the processing steps within the Tools. Note: If no changes are made to the environment (e.g. units, channel width parameters, etc.) or the source themes/tables, re-running a processing step should produce the same result. The dialog shown below provides the ability to manage the derived themes and tables. Note: This dialog cannot be used for any source themes or tables. Their management is via the dialogs presented in the previous two sections. This dialog is available via the button labeled “Manage Derived Themes and/or Tables” on the Theme/Table Registration and Management” dialog. This dialog is very similar in content and layout to that for viewing the Log. The primary difference, however, is the ability to Remove or Delete a derived theme or table. April 2006 Setup Dialog for the Stream Geomorphic Assessment Tools Page 73 To select a theme or table, perform the following: 1. Click on the drop-down arrow next to the Theme/Table control. 2. Scroll up/down the list of derived themes/tables until the desired data set is found. 3. Click on the data set of interest to highlight it. When a data set is selected, the remaining controls on the dialog will display the associated data. This data is as follows: o o o o Data Set Source will be either Base (source theme or table registered by the user) or Derived (data set created by the Tools). For the data sets displayed on this dialog, this will always be Derived. Data Set Type will be either Theme or Table (dBase table). Active will indicate the data set which was last created or used for the given alias. This will have meaning only if multiple versions of a given alias can be created. Multiple Version will be either Yes or No and will indicate whether multiple versions of data sets can be created for the given alias. Note: The ability to create multiple versions is controlled by a setting in one of the system tables. This setting can be changed via System Functions Æ Multiple Output Versions. As a general rule, only a single version will be allowed to avoid any confusion. Note: In rare circumstances, multiple versions may be desirable in order to compare results. For example, it may be desirable to create multiple stream corridors via Step 09 to compare different buffering criteria. When multiple versions are enabled, the output data set names will have a sequence number appended, i.e. S09Corridor01.shp, S09Corridor02.shp, etc. o o o o o Alias associated with the data set. Description of alias. Path identifying the location of the data set. Step number in which data set was created. Date and time when data set was created. In the Log/Audit control, all entries in the Log will be displayed. The data associated with a log entry is as follows: o o o o o o o Unique identifier for each log entry. Date and time when log entry was made. Record number: In some cases multiple records are required for an entry. Also any note entered by the user on the dialog will generally be entered into the log in the second (or sometimes third) record. Step number in which log entry was made. Operation performed in the step. Input themes/tables: Up to three input data sets will be shown in a record. If more than three are used, multiple records will be created for the log entry. These will be differentiated by the record number. Comment: This field will display the results of the processing step or activity for which the log entry was made. User notes will also be in this field but will be included in a separate record. By reviewing the log entries, one can identify the steps in which the data set was created or registered, modifications to the data set were made and/or critical errors encountered during processing steps that create or modify the data set. April 2006 Setup Dialog for the Stream Geomorphic Assessment Tools Page 74 Adding a User Note to the Log One can add a User Note to the log by simply entering it into the control labeled Note. When a note is entered, the Save and Cancel buttons will become enabled. After the note has been entered, click on the Save button to enter the note into the log. The Log/Audit area will then be updated to display the note along with the other entries. Note: Log entries are displayed in chronological order. As a result, a note entered via this dialog should be the last entry. After entering a note, clicking on either the Cancel or the Done button will result in the following message being issued. Responding “Yes” to the above message, will cancel entering the note into the log. Responding “No” will return to the dialog; however, the note remains unsaved until one clicks on the Save button. Deleting a User Note One can also delete a note or comment previously entered into the log. These entries are identified by the term “Comment” in the Operation field. To delete a note, perform the following: 1. Click on the entry, in the Log/Audit window, that is to be deleted. The entry should become highlighted. If it does not, then either a change is pending or an entry that cannot be deleted has been selected. If a change (entry of a note) is pending click on either Save or Cancel. Note: Only those entries with “Comment” in the Operation column can be deleted. 2. When the entry is highlighted, the Delete Note button will be enabled. Click on it to delete the selected comment (or note). After the above, the following message will be issued. Click on Yes to delete the selected note; or No to cancel the deletion. To remove the selection of a note for deletion, click on the Cancel button. April 2006 Setup Dialog for the Stream Geomorphic Assessment Tools Page 75 The Tools Main Dialog The Main Dialog for the Tools extension is shown in the figure below. This dialog serves as a “table of contents” into the major components (or groupings) of the Tools. Processing steps for Parts A, B, C and D are described in the following sections. The Optional Tools are described in Appendix A. Directions for processing Step E can be found in Appendix J. Each of the buttons will, in turn, display a dialog showing the corresponding processing Steps. As described earlier, the dialogs for the processing steps are organized in a hierarchical manner. The Main Dialog represents the top of the hierarchy. Clicking on the Done button will close the Main dialog and will return you to the Setup dialog. From that dialog, clicking on the Exit button will return you to ArcView. April 2006 The Tools Main Dialog Page 76 Part A: Data Development Primary Watershed Part A of the Tools extension pertains to developing data for the entire watershed, i.e. the sum of all of the sub-watersheds to be analyzed. This will be referred to as the Primary or Overall watershed in this manual. The following processing steps are included in Part A: Step 01: Dissolve sub-watersheds into a Primary/Overall watershed. Step 02: Extract surface waters for linear features and clip to Overall watershed boundary. Step 03: Combine stream segments (polylines) between points of confluence. Step 04: User-assignment of tributary identifiers to stream segments. Access to these steps is provided by clicking on the button labeled “Part A: Watershed Data Development” on the Main Dialog. Clicking on that button will display the dialog displayed below. Clicking on the buttons for Steps 01, 02 or 03 will display the corresponding dialog box for that step. Clicking on the button labeled Done will return you to the Main Dialog. April 2006 Part A: (Steps 01 – 04) Data Development for Primary Watershed Page 77 Step 01: Dissolve Sub-Watershed Boundaries into Overall Watershed Boundary The purpose of this step is to form a geographical boundary for the entire watershed that is consistent with the sub-watershed boundaries. The resulting watershed is referred to as the Primary or Overall watershed. One might be able to acquire a theme representing the overall watershed from another source. That theme, however, may not define the same geographic extent or coverage as the subwatersheds. This step ensures geographic (and geometric) consistency between the overall watershed and the sub-watersheds. The Tools can use a theme representing sub-watersheds that has been created using the Spatial Analyst extension to ArcView or through digitizing. The theme must be provided in ESRI shape format and contain polygons representing the sub-watersheds. Note: It is recommended that sub-watersheds be delineated using polylines. The capabilities provided in the Optional Tools menu can be used to verify the geometry of the polylines and subsequently build polygons. This procedure will minimize the types of digitizing errors described at the end of this section. Such errors can take a significant amount of time to resolve. Further, if the errors are not corrected, unpredictable errors will occur in subsequent processing steps. To access the dialog, click the button labeled Step 01: Dissolve Sub-Watersheds into Overall Watershed in Part A main dialog. The dialog is shown below. April 2006 Step 01: Dissolve Sub-Watersheds into Overall Watershed Boundary Page 78 Required Input Data sets not registered or created If the theme representing sub-watersheds has not been registered prior to selecting this step, the following error message will be issued. The above error message will be issued after one selects the button on the Part A dialog for this Step and prior to the display of the dialog. This is due to the fact that the test is performed in the open event for the dialog. To use this dialog: In general, the input and output data sets will automatically be set. Always review the instructions or notes to the right of each data set. These will provide guidance based upon the configuration established via system settings. o o o Since the theme for sub-watersheds should have already been registered, it will automatically be identified. The output theme is associated with the alias of “watershed”; therefore the name of the output theme is defined by concatenating the letter “S”, “01” (step number) and “Watershed”, i.e. “S01Watershed.shp”. Enter a comment/note in the Note text field to describe any conditions, error corrections, etc. that may aid in understanding the process used in developing the assessment data. Click on the button labeled Dissolve to initiate processing. Note: Refer to the section entitled “Common Dialog Operations in the Stream Geomorphic Assessment Tools” for common error and warning messages. Upon Completion Alias of Output Theme for Overall or Primary watershed: Watershed Legend file used to display output theme: Watershed.avl Legend file used to display input theme: SubWSErrors.avl The theme representing the overall watershed will be saved in the DerivdData subdirectory under that in which the ArcView project file exists. This theme is added to the user view identified on the Main dialog. Click on the button labeled Done to return to the Part A menu dialog. April 2006 Step 01: Dissolve Sub-Watersheds into Overall Watershed Boundary Page 79 The figure below on the left represents the source theme for sub-watersheds; and the figure on the right illustrates the theme representing the overall watershed resulting from this step. Attribute fields created for sub-watershed theme. SubWSArea - Area of the sub-watershed. Note: It is possible that the user may modify the boundaries of the sub-watersheds to correct for errors or to simply adjust their configuration following this step. In such cases, if Step 01 is not re-run, the area of the sub-watersheds will not be accurate. As a result, this field will be recalculated in Step 06 to ensure accuracy. SubWSId - A unique identifier for each sub-watershed. Error checking conducted for the sub-watershed theme During the processing of the sub-watershed theme, several edits of the sub-watershed are made. These are performed to identify potential digitizing errors that may cause errors in this or subsequent processing steps. The edits performed on the sub-watershed theme are to identify the following potential errors: o o o o o Polygons composed of multiple parts; Polygons that share multiple boundary segments with an adjacent sub-watershed; Polygons that overlap adjacent polygons; Self-intersecting polygons; and Polygons that are less than a system-defined area. The above errors will be described subsequently. April 2006 Step 01: Dissolve Sub-Watersheds into Overall Watershed Boundary Page 80 If any of these types of potential digitizing errors are detected, an interim theme will be saved in the Temp directory. The following sequence of messages will identify the errors detected and name of interim theme upon completion of processing. The interim theme will be the name of the source (input) theme for the sub-watersheds, but will have the characters “Exp” and a sequence number prefixed. As indicated in the latter message above, the source theme for sub-watersheds was “S00subwshed.shp”. The interim theme will be “Exp01S00Subwshed.shp”. The interim theme will be added to the user view to assist in reviewing the potential errors detected; however, it is not registered in the system tables. The source (input) theme for the sub-watersheds, as well as the interim theme, will have two fields added to their attribute tables: GeoSWRevu and GeoSWCount. The GeoSWRevu field will contain a code used to identify an error detected for the given sub-watershed; and the GeoSWCount field will identify, where meaningful, the number of occurrences for the given error and the sub-watershed. Each of these fields will be described subsequently. The source theme and the interim theme will be displayed in the user view using the legend file “SubWSErrors.avl”. This will visually assist in locating and reviewing specific errors. An example of the legend and the view is shown below. Certain potential errors pertain to a specific sub-watershed polygon, e.g. self-intersection, area, and multi-part conditions. Other potential errors pertain to a sub-watershed polygon and a neighboring polygon, e.g. overlaps and multiple boundary segments. In the latter case, the potential error condition is assigned to both polygons. The following table identifies the potential error code (used in the GeoSWRevu field and the legend), the use of the GeoSWCount field and the potential error condition. April 2006 Step 01: Dissolve Sub-Watersheds into Overall Watershed Boundary Page 81 GeoSWRevu Code M B D O A GeoSWCount Use Number of parts Number of boundary segments -- N/A --- N/A --- N/A -- Potential Error Condition Multi-part polygon. Common boundary between neighboring polygons is more than one Topology -- Self-intersecting polygon boundary Polygon overlap between neighboring polygons Polygon area is less than minimum set in the system table SysUnits.dbf. Error Correction and Use of the Interim Theme It is expected that the errors can be corrected somewhat easier in the interim theme than in the original source theme. Corrections for the following error conditions will automatically be applied, if possible, in the interim theme: Topology (Self-intersecting polygon boundaries) – Self-intersections occur when the boundary of a polygon crosses over itself (like the shape of a bow tie or figure eight). A “Clean” operation is performed which should break the polygon up into multiple parts. Each part will then be placed in the interim theme as a separate polygon (record). Multi-part polygons – Multi-part polygons will be broken up into separate polygons in the interim theme. If any of the “individual” polygons share a common boundary segment, they will be combined into a single polygon. Any remaining potential error conditions will require correction by the user. The following describes the potential error conditions in more detail. If corrections are applied to the interim data set, it will subsequently have to be registered as the Sub-watershed theme. To accomplish this, perform the following: 1. Go to the theme registration dialog for sub-watersheds (Setup Dialog Æ Theme/Table Registration and Management Æ SubWatersheds). 2. Click on the Remove Theme button to un-register the original sub-watershed theme. 3. Respond Yes to “…Are you sure you want to remove this theme?” 4. Respond No to “…Do you want to clear the system log file of primary entries for this theme?” This will preserve the log entries that identified the errors in the original subwatershed theme. 5. Click on the button Select Theme 6. Select the theme to which the corrections have been applied. 7. Complete the Documentation Information. 8. Click on the Save button to register the theme. After the above, the theme to which the corrections have been applied will be used as the subwatershed theme in all processing steps. April 2006 Step 01: Dissolve Sub-Watersheds into Overall Watershed Boundary Page 82 Less than Minimum Area set in SysUnits.dbf The SysUnits.dbf system table contains a field named MinArea that has arbitrarily been assigned a value of 0.01 (one hundredth). This value will be in the area units established for performing geomorphic assessment, which by default are square miles. Note: No facility has been provided to alter the value for the MinArea field in the SysUnits.dbf table. If it becomes essential to alter that value, it will have to be performed by manual editing of that table. Note: The unit of measurement for areas is managed via System Functions Æ Measurement Units. The area of each polygon is compared with this value. If the area is less than the MinArea value, then a potential error condition is set. The GeoSWRevu field will be assigned a value of “A” for the polygon (record) to indicate that it falls below the MinArea value. This test is used primarily to detect sliver polygons, i.e. small polygons that are a result of digitizing errors. It may be possible that an actual sub-watershed can be delineated with an area less than that set for MinArea. For such cases, this error should be ignored. Multiple boundary segments Under normal conditions, neighboring polygons (sub-watersheds) will share only a single common boundary. In some cases, however, they may share more than one common boundary. An example of such situations is shown in the figure on the next page. In the figure, there are two situations in which neighboring sub-watersheds surround an intervening sub-watershed. As a result, the neighboring sub-watersheds share two separate and distinct common boundary segments. This, obviously, is not an error. However, if the intervening polygon was a sliver polygon resulting from digitizing errors, it would be an error. These need to be corrected prior to continuing. Sliver polygons may not be visible in a View without zooming in to a very detailed scale. At a normal scale, the legend would cause them to appear similar to that shown for the “overlapping” boundary error in the figure on the following page. Overlapping boundaries Overlaps will occur due to digitizing errors in which the boundaries for neighboring polygons cover a common area. Any such conditions will result in an error. As shown in the figure on the following page, an overlap was detected with both polygons marked as having an overlap. The overlap will occur on the common boundary. All overlaps need to be corrected prior to continuing. April 2006 Step 01: Dissolve Sub-Watersheds into Overall Watershed Boundary Page 83 Common Boundaries # # M11 M12 ## M10 # # # M04 Ú Ê M02 # M03 # # # M08 # T7.02 # ## N T7.S2.01 N T7.S4.01 T7.S3.01 # N T7.03 T7.S4.02 T7.S1.02 ## ## # T7.S1.01 T7.S4.03 # M07 M06 M01 T7.01 # # M09 N # # M05 # Common Boundaries April 2006 Boundary Containing Overlap N T7.S4.04 N Step 01: Dissolve Sub-Watersheds into Overall Watershed Boundary Page 84 Topology – Self-intersecting polygons It would be difficult to create self intersecting polygons in ArcView. These will occur when the boundary for the polygon crosses over itself, such as a bow tie or figure eight. During digitizing, if one crosses over the boundary (such as shown to the right), ArcView will create a multi-part polygon. Each of the polygons will be a separate part of the same shape. To identify multi-part polygons, select the polygon with the feature selection tool (to highlight it). Then, click and hold down the right button. A pop-up menu will appear. Go down the menu and select “Shape Properties”. As shown to the right, the shape properties dialog will appear. Scroll down until you find a “Multi-Part Separator”. If coordinates follow that separator, then the polygon is composed of multiple parts. You can also use the Shape Properties dialog to locate vertices of the polygon boundary. If you select a vertex (point) in the list of points, a solid point symbol will be placed in the view showing the location. Closing the Shape Properties dialog will cause the point symbol to be removed from the view. While it is not likely that a self-intersecting shape will be found, a “Clean” operation is performed on each polygon placed in the interim theme created. This should convert any self-intersecting polygons into a multi-part polygon. These, in turn, are then broken up into individual single-part polygons (separate records in the shape file) as described below. Multi-Part Polygons Polygons composed of multiple polygons will be generated either by performing polygon operations (clipping, etc. via the Geoprocessing Wizard, an ArcView extension) or by digitizing. The preceding discussion provided one example of how such multi-part polygons can be created. Note: In certain applications, multi-part polygons are a valid representation of a realworld situation. For example, a parcel can be divided by a road or a stream. The parcel is represented by a single shape, a multi-part polygon, in which one part lies on one side of the road (or stream) and the other part lies on the other side. In the Interim theme created for use in resolving errors, multipart polygons are broken up so that each polygon is represented as a single shape (record) in that theme. If, however, parts of a multi-part polygon share a common boundary, those polygons are “merged” into a single polygon. April 2006 Step 01: Dissolve Sub-Watersheds into Overall Watershed Boundary Page 85 Step 02: Extract and Clip the Surface Waters to Primary Watershed This step performs a number of operations, which are summarized below: • • • Extracts linear surface water features (where necessary), Clips surface waters to overall watershed boundary, and Identifies the “pour points” (outflow points) for the overall watershed. This point isthe one point at which the surface waters intersect (cross over) the overall watershed boundary. To access the dialog, click the button labeled Step 02: Extract Linear Surface Waters and Clip to Primary Watershed in Part A main dialog. The dialog is shown below. To use this dialog: • • • • • • • The theme representing the overall watershed (created in Step 01) will be displayed. The source theme for surface waters will be displayed. Identify extraction parameters, if any, for flow regimes. Identify extraction parameters, if any, for linear feature types. The pre-defined name for the surface water (output) theme will be displayed. The pre-defined name for the primary pour point (output) theme will be displayed. Enter a comment/note in the Note text field to describe any conditions, error corrections, etc. that may aid in understanding the process used in developing the assessment data. The overall watershed boundary is used to select and clip those surface waters which fall within the boundary. In other words, the resulting theme will be a subset of the much larger source coverage. This reduces the number of polylines that are involved in subsequent steps. April 2006 Step 02: Extract and Clip the Surface Waters to Primary Watershed Page 86 The one place where the surface water crossed the exterior watershed boundary is called the “outflow”. As a result, it is imperative that the “intersection” points determined here fall on the same point for the sub-watershed boundaries. Specifically, the overall watershed boundary obtained from Step 01 must be used as an input theme for this step. In addition, the older surface water themes provided by VCGI contain “entities” defining lakes (including ponds), islands, banks of rivers, streams, dummy lines, tile lines and network lines. To perform the geomorphic assessment only the “linear features” may be used. Therefore, if you are using the old themes you must use the “Extract Selected Linear Features” to select only those features required. Note: If you are using the 1:5000 Vermont Hydrography Data (VHD) set you DO NOT need to extract any entities. Make sure both boxes are un-checked and process. S L N L L S Only the linear stream features represented by the heavy lines (blue, “S” and black, “N”) should be used for analysis by the Tools extension. L N The figure to the right illustrates the Feature Types as defined by the attribute field named Swl for the older surface waters themes. Two lakes are shown with a stream flowing through them. The values used for the Swl are shown for each “segment”. Network lines, represented by the value “N”, are used to connect the inflow and outflow points on the lakes. The user will have to be familiar with the attribute data provided for the older surface waters. The following table provides guidelines for extracting data from VCGI surface water coverages: Code C D I L N R S VCGI Attribute Values for Field “SWL” Record Pertains To Include Constructed Conduits Yes Dummy Lines No Islands No Lakes No Network Lines Yes River Banks No Streams Yes Note: All of the codes may not be present in any given surface water coverage. To perform the extraction use the area of the dialog labeled Linear Stream Feature Selection April 2006 Step 02: Extract and Clip the Surface Waters to Primary Watershed Page 87 1. If you are NOT using the 1:5000 VHD, and you are using an older version of the surfacewater, click on the check box labeled Extract Selected Linear Features. Make sure that a check mark is in that box. If one already exists, clicking in the box removes the check mark and disables the related controls on the dialog. Clicking again inserts a check mark and enables the controls. 2. In the box labeled Feature Field select the field containing the values identifying feature types. If the Tools extension finds a field named “Swl”, it will be displayed. If that field does not exist, then “Not Selected” will be displayed. You must then select the correct field. 3. Once the field has been selected the values for that field will be displayed in the larger box. Select those values which are to be retained in the output surface water theme. As indicated in the table above, the values which should be retained are C, N and S. If one (or more) of those values are not listed in the larger box, then the missing values were not found in the input surface water theme. Be sure to scroll up and down in the larger box to ensure that you have selected all appropriate values. To select a value, simply click on it. After that, hold the shift key down to select additional values. Note: If you check the Extract Selected Linear Features check box, but don’t select a field name (2 above) or at least one value (3 above), an error message will be issued when you click on the button labeled Clip. Using the Flow Regime extraction on the dialog The procedure described above can be used in the box on the left for Flow Regimes. At present, data values for Flow Regimes (e.g. permanent, intermittent or unknown) have not widely been captured. The ability to extract using flow regimes has been included in this dialog for use by those who have access to such data. For example, you may want to analyze only those streams which have a “permanent” flow regime. To do that make sure that a check mark exists for the Extract Selected FReg’s; identify the field containing the flow regime values and then select those values of interest. Note: One can use this area of the dialog to perform an extraction based upon any field. It does not have to pertain to flow regimes. Simply enter a check mark in the Extract Selected FReg’s check box. Select any field. The values for that field will be displayed. Select those values for which you want corresponding surface water features placed in the output theme. Starting the process After the required information has been entered on the dialog, click on the button labeled Clip/Extract. Processing may take a few moments depending upon the hardware used. Note: Refer to the section entitled “Common Dialog Operations in the Stream Geomorphic Assessment Tools” for common error and warning messages. Upon completion Alias of Output Theme for Clipped Surface Waters: SWClipped Legend file used to display Clipped Surface Waters theme: SWClipped.avl Alias of Output Theme for Primary Pour Points: PPT April 2006 Step 02: Extract and Clip the Surface Waters to Primary Watershed Page 88 Legend file used to display Primary Pour Points theme: PPT.avl The themes representing the Clipped Surface Waters and the Primary Pour Points will be saved in the DerivdData subdirectory under that in which the ArcView project file exists. This theme is added to the user view identified on the Main dialog. Click on the button labeled Done to return to the Part A menu dialog. The top figure below illustrates the input (source) surface water theme and the overall watershed theme. The bottom figure below illustrates the resulting surface water and the primary pour point themes. Primary Pour Point April 2006 Step 02: Extract and Clip the Surface Waters to Primary Watershed Page 89 Critical Evaluation Required by the User The Primary Pour Point theme will contain three attribute fields: PptId contains a unique identifier (sequential number) for each point. PPtType is used to identify the “type” of pour point represented by the point. There must be one and only one point (record) in the theme which has the value “Outflow” in this field. UpStrmDA is used for defining the upstream drainage area. The value is relevant only for those points identified as “Inflow” points in the PPtType field. An accurate value is critical for proper calculation of Channel Width in Step 08. If the legend file “PPtType.avl” exists in the SysData directory, the Primary Point Theme will be displayed in the view with the legend shown to the right. That legend will display each point in accordance with the PPtType assigned in this step, i.e. “Outflow” and “Unkown.” If a single intersection point (of the stream network and the overall watershed boundary) is found, that point will “automatically” be assigned as the outflow for the watershed. That point will be defined as the initial reach point on the main stem; and the “PPtType” attribute field for that point will be assigned the value of “Outflow”, as shown in the figure to the right. Only one point can be assigned that value. If multiple intersection points are found, the following error messages will be issued. The name of the output theme for the Primary Pour Pts will be identified in the second error message. April 2006 Step 02: Extract and Clip the Surface Waters to Primary Watershed Page 90 “Unknown” “Unknown” “Unknown” If the legend file “PPtType.avl” exists in the SysData directory, it will be used to display the Primary Pour Point theme. If multiple intersection points have been found, they will be labeled as “Unknown” in the View, as illustrated above. It is reasonable to have multiple intersection points. For example, the study area watershed may be defined such that the main stem enters at one point and leaves at another. As Illustrated to the right, multiple intersections may also occur when only a portion of a larger watershed is being reviewed. In such cases, tributaries will be entering from the upstream areas of the watershed. If there are multiple points of intersection, the user should investigate them as they may signify incorrect subwatershed delineation and/or incorrect stream digitizing. (See “Potential Surface Water Problems” at the end of this section”.) Review the stream layer and watershed layer to be sure that the watershed bounds extend beyond the end of the stream layer. Rerun this step once corrections have been made. April 2006 Step 02: Extract and Clip the Surface Waters to Primary Watershed Page 91 Potential Surface Water Problems The resulting surface water theme should be reviewed to ensure that the Extraction/Clipping process occurred correctly. Potential problems that may occur are the following: • Fragments of streams extend into the overall watershed. This would be indicative of errors in digitizing the surface waters or incorrect subwatershed delineation. Gap in Stream Network Stream Fragments • Gaps in the linear stream network. This would be indicative of incorrect field values selected in the Linear Feature Types or Flow Regime or incorrect assignment of those values in the surface water theme. To obtain a confirmation of the correctness of the resulting surface water theme, you can run the Review Polyline Theme for Geometry (GIS) Errors in the Optional Tools. This is described in Appendix A. If problems are identified, they should be corrected and the process repeated. As appropriate, corrections can be made to the source themes for the surface waters and/or the sub-watershed boundaries. If modifications are made to the sub-watershed boundaries that affect the overall watershed boundary, repeat the process starting at Step 01. Otherwise, simply rerun Step 02. April 2006 Step 02: Extract and Clip the Surface Waters to Primary Watershed Page 92 Step 03: Combine Stream Segments between Confluence Points The surface water coverages are developed in a general nature in order to serve a variety of purposes. Therefore, it is reasonable to expect that a number of stream segments (polylines) will be used to represent the path of a stream from one point of confluence to the next. In some cases, those polylines may be exceptionally short, i.e. a few meters long. This can make manual selection of the stream segments, as is required for Step 04, difficult. Two s eg combi ments ned The figure to the right illustrates what occurs in this step. The three “streams” which have been labeled have exceptionally short segments. These segments would not be visible without zooming it to a very large scale. This can lead to incomplete selection of all segments belonging to a given main stem or tributary, which is ed required in Step 04. bi n This step concatenates stream segments between reach points and/or point of confluence into single segments. As a result, greater ease and efficiency in performing subsequent steps is achieved. re Th en egm es ts c om Two segments combined To access the dialog, click the button labeled Step 03: Combine Stream Segments between Points of Confluence in Part A main dialog. The dialog is shown on the next page. IMPORTANT NOTE: If you have already assigned tributary identifiers and find that you have to go back due to an error in the sub-watersheds or surface water and rerun Steps 1-3 you can avoid having to re-assign the tributary identifiers by using the following procedure April 2006 Highlight the S03swcomb.shp shape file that contains the tributary ID’s. Make sure none of the polylines within the theme are selected or highlighted. On the ArcView toolbar select “theme” and then “Convert to shape file”. Save the theme into your base data folder with a new name. Go into SGAT theme registration and unregister your old surface water and register the theme you just created as your surface water. Start SGAT over from Step 1 or 2 depending on whether you changed the exterior watershed boundary. As shown in the figure below, in Step 3 Combine Stream Segments between confluence points under Options select “All Fields”. This will carry along your Trib ID’s to the new S03swcomb.shp and you will not have to re-assign them. Step 03: Combine Stream Segments between Confluence Points Page 93 To use this dialog: • • • • The theme representing surface waters clipped to the overall watershed boundary (produced in Step 02) will be displayed. Select the attribute fields which are to be transferred to the output theme. The pre-defined name for the surface water (output) theme will be displayed. Enter a comment/note in the Note text field to describe any conditions, error corrections, etc. that may aid in understanding the process used in developing the assessment data. Selecting Attribute Fields to Transfer It is not possible to predict the attribute fields which will be included in the source theme for surface waters; and therefore, the surface water theme resulting from Step 02. Most of those fields will have little value in Stream Geomorphic Assessment; and many will not be valid when the stream segments are combined in this step. Note: If the TribID’s are already assigned in the surfacewater shapefile you MUST select that field to carry them onto the next step. Either select all fields or selected fields. You can select to have all fields transferred from the input theme to the output theme, no fields or selected fields by clicking on the corresponding radio button on the left side of the dialog. Should you elect to transfer “selected” fields, then the Select Fields box on the right will be enabled. Select those fields to be transferred by clicking on the first field of interest. Then, hold down the Shift key while clicking on any other fields. Among the fields that may be available and may be useful are RivName and RivId. The RivName field may contain the name or a code, which can be used to obtain the name of the stream, e.g. Lewis Creek. The RivId will contain a unique identifier for the stream which might provide linkage to other data sets pertaining to the stream. April 2006 Step 03: Combine Stream Segments between Confluence Points Page 94 Two additional fields that may be helpful for the user are SWL and SWRes. The SWL will indicate the values selected in Step 02. The SWRes will show at what level of scale the stream line was digitized at. It is important to note, however, that the SWRes field may not be available on a uniform basis. SWRes Value 2 4 Scale at which stream layer digitized 1:100,000 1:24,000 6 1:5000 (off orthophoto; subjective) Starting the process After the required information has been entered on the dialog, click on the button labeled Combine. Processing may take a few moments depending upon the hardware used. Note: Refer to the section entitled “Common Dialog Operations in the Stream Geomorphic Assessment Tools” for common error and warning messages. Upon completion Alias of Output Theme for Combined Surface Waters: SWComb Legend file used to display Clipped Surface Waters theme: SWComb.avl The theme representing the Combined Surface Waters will be saved in the DerivdData subdirectory under that in which the ArcView project file exists. This theme is added to the user view identified on the Main dialog. Click on the button labeled Done to return to the Part A menu dialog. April 2006 Step 03: Combine Stream Segments between Confluence Points Page 95 Step 04a: Setup for Assigning Tributary Identifiers Interactively “Tributary Identifiers” are used to identify those surface waters that are involved in geomorphic assessment within the Tools. In effect, only those surface water polylines that have been assigned a non-blank value will participate in any of the remaining processing steps. As a result, it is important to properly identify the surface waters and to assign the tributary identifiers. This step provides tools to assist in that effort. To use the capabilities of this step, one must first create a “route” table. The route table identifies the connectivity between polylines and orders the connectivity for tracing the stream network. In addition, the order of the polyline vertices in the surface water theme is altered (if necessary) to ensure that the order is in the upstream direction, i.e. vertex 0 is at the downstream end of the polyline and vertex n is at the upstream end. The purpose is to facilitate rapid transversal of the stream network. In summary, the surface water theme (from which the route table is created) may be modified to ensure the upstream direction of vertices in the polylines. The route table is created by clicking on the Setup button. In order to create the route table, the entire surface water theme is traced. Processing times may be somewhat lengthy 10 to 20 minutes (perhaps more in very large watersheds or in watersheds with dense surface waters). So, have patience and plan for the processing time when this function is used. Warning: If any changes to the surface water theme used as an input have been made, or the theme has been re-created, always perform the setup function before assigning any tributary identifiers. Otherwise, unpredictable errors may occur when assigning tributary identifiers, since the route table previously defined may not be coincident with the newly defined surface water theme. The route table will be assigned a name based upon the name of the surface water theme from which it is created. For example, the surface water theme normally used by this step is S03SWComb.shp. As a result, the output dBase table will be named S03SWCombTribIdSet.dbf and will be located in the DerivdData directory under that in which the ArcView project file is located. Once the route table has been created, then the button labeled “Assign Trib Ids” will be enabled. Clicking on this button will result in the dialog for Step 04b (for assigning tributary identifiers) to be displayed. The Setup dialog for assigning tributary identifiers is illustrated on the following page. To use this dialog: • • • • The theme containing surface waters created in Step 03 will be displayed. The theme containing the primary pour point for the watershed created in Step 02 will be displayed. The surface water theme that may be modified, which is the same as the one identified above, will be displayed. Enter a note to be entered into the system log upon completion of setup processing. April 2006 Step 04a: Setup for Assigning Tributary Identifiers Interactively Page 96 Starting the Process After the user note has been entered, click on the Setup button. This will create the route table necessary for indexing features. Remember that processing may require 10-20 minutes or more. If the route table has already been created, the Assign Trib Ids button will be enabled. Click on that button to access the dialog for assigning tributary identifiers to the surface waters. Note: Refer to the section entitled “Common Dialog Operations in the Stream Geomorphic Assessment Tools” in the SGAT User Manual for common error and warning messages. During processing When one first clicks on the Setup button, a test is made to determine whether the route table already exists in the DerivdData directory. If it does, the following message will be issued: This is included in the event that an erroneous click on the Setup button was made. Since this procedure can take a bit of time, one can click on No to cancel the setup procedure. If, however, there have been any changes to the surface water theme created by Step 03 or that theme has been re-created, click on Yes to re-create the route table. April 2006 Step 04a: Setup for Assigning Tributary Identifiers Interactively Page 97 If one elects to proceed, the next step is to trace the surface waters to build the “route table”. The route table simply defines the connectivity using arbitrarily assigned identifiers for the initial and ending vertices of the polylines in the theme. Stream tracing will begin at the outflow or pour point for the overall watershed. Since the outflow point is created in Step 02 as the intersection of the stream network with the overall watershed, it is known that a stream segment will begin at the outflow point. That stream segment is acquired, and the end vertex (opposite end of the stream segment) is used to find the next segment for tracing. With the next stream segment, its end vertex is used to find the next stream segment, etc. Note: A check is made to determine if the vertex order of the polyline is correct, i.e. that the vertex 0 is the downstream end. If the order is reversed, then the vertex order is reversed in the surface water theme. In this manner, the tracing then continues upstream from one stream segment to the next. As each new polyline is traced, a sequential number is assigned to the upstream vertex. The downstream vertices of all polylines connecting to that point are assigned the same sequential identifier. The end result is that “connectivity” can be determined simply through the identifiers assigned; thus providing a rapid method for indexing features, i.e. identifying those surface water polylines that connect point “A” to point “B”. When tracing, if a point of confluence is encountered, then the stream segment chosen will be the one forming the “hardest right turn” from the perspective of the direction in which stream network is being traced. If it is found that no other segments are “connected” to an end vertex, stream tracing is then reversed and proceeds downstream. Using the above as an outline, the figure below illustrates the order of stream tracing. Assume that tracing begins at the confluence point in the upper right corner; and the red arrows show the upstream direction and the green arrows show the downstream direction. Tracing occurs in the numerical order shown. 6 4 1 7 3 8 5 9 10 14 2 11 Upstream Tracing Downstream Tracing April 2006 12 13 Step 04a: Setup for Assigning Tributary Identifiers Interactively Page 98 Attempt to use Surface Water polylines more than twice Since stream tracing occurs upstream and downstream, the maximum number of times any stream segment should be encountered is two. As each stream segment is encountered during tracing, the field “SWUsed” in the surface water extract theme is incremented and tested. If the value exceeds two, the following error message is issued. To identify the surface water polyline, query the attribute field named SWUsed for a value greater than 2. This will identify the polyline in error. Usually reviewing the polyline, its vertices and adjacent polylines will reveal the problem. Because the search distance to find connecting polylines is set as 0.25 meters, any surface water polylines less than 0.25 meters in length will cause such a problem. In such cases, one will have to edit the surface water theme to remove the small polylines and connect the others by snapping the end vertices. Upon Completion The route table, which will normally be named S03SWCombTribIdSet.dbf will be created and saved in the DerivdData directory. A sample of a route table is displayed below: RECNO 0 FROMID 1 TOID 2 1 2 3 2 3 4 3 4 5 4 5 6 9 6 7 10 7 8 11 8 9 5 9 10 6 10 11 7 11 12 8 12 13 TOTYPE Term The record number in the surface water theme that is associated with a given polyline is shown in the first column. The second and third columns represent the identifiers assigned to the starting and ending nodes. The last column contains the type of node represented by the ToId. Using the table begins with identifying the To node. Then, using the From node for that row, look for its value in the To column to connect to the next downstream polyline. Note: It is because the record numbers refer directly to records in the surface water theme, that the route table must be kept consistent with the surface water theme. If any changes are made to the surface water theme, then the record numbers will change. And, if the record numbers change, the route table will be referencing incorrect records. April 2006 Step 04a: Setup for Assigning Tributary Identifiers Interactively Page 99 A message similar to the following will be issued upon completion of the Setup procedure. Upon completion, one can proceed on with assigning tributary identifiers by clicking on the button labeled Assign Trib Ids. Clicking on Done will return one to the Part A main menu. April 2006 Step 04a: Setup for Assigning Tributary Identifiers Interactively Page 100 Step 04b: Assign Tributary Identifiers Interactively This dialog enables the one to assign tributary identifiers to selected polylines in the stream network. This dialog is accessed by clicking on the button labeled Assign Trib Ids on the Step 04 dialog. Once that button is clicked, the following message is displayed. The above message is issued to provide a warning that the surface water theme and the data created via the Setup function must be consistent. If they are not consistent, unpredictable results may occur when assigning tributary identifiers, including infinite loops. As a result, if any changes have been made to the surface water theme or it has been recreated, always run the Setup function before assigning tributary identifiers. Click on “No” to return to the preceding dialog; or “Yes” to continue on. If you continue on, the following message will be displayed. Assigning tributary identifiers involves actual changes to the attributes of the surface water theme. As a result, it is recommended that one create a backup of the surface water theme before proceeding. This will enable one to restore the surface water theme should errors occur during the assignment of tributary identifiers. If a backup is not desired, click on “No”. Otherwise click on “Yes”. If one elects to create a backup, a message similar to the following will be issued after the backup is created. The name of the backup will be constructed of the surface water theme name, which is normally S03SWComb, with “_BkUp_nn.shp” appended. The “nn” will be replaced with a unique sequential number, e.g. “01”. All component files of the surface water theme will be backed up in the Temp directory under the directory in which the ArcView project is located. April 2006 Step 04b: Assign Tributary Identifiers Interactively Page 101 Following the above procedure, one can proceed with the process of assigning tributary identifiers, which is relatively straightforward. Fundamentally, one enters the value to be used for the tributary identifier, indicates whether the upstream surface water is to be “broken” at the point entered and then enters two points defining the extent of the surface waters to which the tributary identifier is to be assigned. The dialog for Assigning Tributary Identifiers is illustrated below. To use this dialog The dialog was designed to be placed on the computer screen along with the view. To start, move the dialog to the right or left side of the screen. Then, click on the Show View button. This will display the User View. Move and resize the user view to fit alongside the dialog. This will enable you to move back and forth between the view and the dialog. When selecting points to identify the extent to which a tributary identifier is to be used, zoom in to the area of interest. Working at a “large scale” of the view enables one to place points accurately alongside of the polylines representing surface waters. Working at “small scale” may cause inaccurate location of the points; and, thus, errors to be generated. This dialog is accessed via the Assign Trib Id button on the Assign Tributary Id Setup dialog. As a result the following registered theme names will be available from the Feature Indexing Setup dialog: • • Surface water (S03SWComb.shp) Primary Pour Point (S02PPt.shp) As tributary identifiers are assigned they are entered into the attribute field named TribId in the surface water theme. However, the assignments are not permanent until one clicks on the Save Trib Ids button. When assigning tributary identifiers, the following order is recommended: 1. Enter the value of the tributary identifier to be used at the top of the dialog. 2. Establish a check mark in the checkbox control labeled “Break polyline at upstream (ending) point”. A tributary identifier generally always starts at either the outflow point of the overall watershed or at a confluence point. This, by definition, means at the initial vertex of a polyline. Conversely, most tributary identifiers are not directly associated with the terminal vertex of a polyline. As a result, if a check mark is located in the check box to "break polyline...", the surface water will be broken at the point entered by the user and the use of the Trib Id value will stop at that point. April 2006 Step 04b: Assign Tributary Identifiers Interactively Page 102 If the check mark is missing from the check box to "break polyline...", the use of the Trib Id value will extend to the end of the polyline, which may be quite a ways upstream from the actual point entered by the user. 3. After (1) and (2) have been established, click on the button labeled Set Start/End Pts. 4. Click on the title bar of the View to make it the active window. 5. With the view active, use the zoom/pan tools to navigate to the area where assignment of the given tributary identifier is to start. Work at a view scale where one can enter a point that can be associated with a specific surface water polyline. If one works at a very small view scale, incorrect selection of surface water polylines may occur. This will lead to error conditions. 6. When you are zoomed in to an appropriate scale for selecting the point, click on the Assign Trib Id tool. This tool is the furthest to the right on the same line as the zoom, pan, identify tools and is represented by the “eyeglasses” icon. 7. With the Assign Trib Id tool selected, click at a point on the surface waters in the user view where the starting point is to be located. Note: The points entered must be within the search distance set on the dialog of the surface water polylines. If the points are located at a greater distance, no polylines will be found and an error message will be issued. Note: You must always locate the downstream point first. 8. Use the zoom/pan tools to navigate to the area where the end point is to be located. 9. Then, again, select the Assign Trib Id tool. 10. Left click in the view at the point on the surface waters where use of the given tributary identifier ends. Note: The starting point must fall on the downstream path between the ending point and the outflow point of the watershed. If the starting and ending points do not lie on the same path, an error message will be issued. 11. Click on the dialog to make it the active window. 12. If an error was made in selecting the points, click on the Clear Start/End Pts button. Then, re-establish the points beginning with step (3) above. 13. Once the Point(s) have been established and the dialog is active, the tributary can be assigned by clicking on the Set Trib Id button. Warning: The tributary identifier will not be permanently saved until one clicks on the Save button. This permits one to cancel assignment if an error was made. 14. To cancel pending updates, click on the Cancel button. This will clear all pending updates created since the start of the session or the last Save operation. 15. To save pending updates, click on the Save button. This will permanently apply the assignments to the surface water theme. As indicated in Steps (14) and (15), one must save the tributary identifier assignments. If you attempt to quit the dialog by clicking on the Done button, a check is made to determine whether any changes are pending. If there are an error message is issued warning that the assignments will be lost if you continue. April 2006 Step 04b: Assign Tributary Identifiers Interactively Page 103 Tributary Ids Assigned Thus Far Near the top of the dialog is a dropdown list that displays all of the tributary identifiers assigned thus far. The list is updated if successful assignment occurs following use of the Set Trib Id button. Abbreviated Instructions Available from the Dialog. To review an abbreviated set of instructions (similar to those above), click on the Instructions button. This will display a separate dialog box with the instructions listed. The Instruction dialog can be closed; or it will automatically be closed when the primary Step 04b dialog is closed. Show View Button on the Dialog The Show View button is simply a short cut for displaying the user view. If the view is already visible, there will be no apparent action when one clicks on the Show View button. Clearing All Trib Ids The button labeled Clear All Trib Ids is provided for those who want a clean start. The value for the Trib Id attribute for all polylines in the surface water theme will be set to blank. In addition, the dropdown list of tributary identifiers used thus far will be emptied. Validation of Continuity The button labeled Validate Continuity provides two checks to help ensure proper assignment of tributary identifiers: 1. Assignment of tributary identifiers is made in a continuous manner from the outflow of the overall watershed to all terminal points where assignment of a tributary identifier stops. 2. Each tributary identifier is assigned in a continuous manner. The first validation scans all surface water polylines from the upstream end at which the use of a tributary identifier ends to the outflow of the overall watershed. If any polylines are encountered that do not have a value for the TribId attribute, a counter is incremented. The number of polylines encountered is displayed in the top portion of the Validation Results panel in the field labeled “Blank Intervening Polylines”. In addition, an attribute field named “Skipped” will be set to “Y” for those polylines. To identify the polylines that have been missed, open the attribute table for the surface water theme. Then review each polyline having a value of “Y” for the attribute named Skipped. By using the attribute table to identify the specific polyline and then reviewing the polylines and their neighboring polylines in the View, the correction should become apparent. To illustrate, the situation displayed in the figure on the following page was created. The heavy green line was properly assigned a tributary identifier. However, those that are highlighted in yellow were not. Thus, eight polylines were identified as having been skipped. The values of the attribute field Skipped were set to “Y” as shown in the attribute table. Assignment of the tributary identifiers to the skipped polylines can be accomplished via the Step 04b dialog or directly through the attribute table. If modifications are to be performed by editing the attribute table, it is strongly recommended that you exit the SGAT extension first. Warning: The dialog for Step 04b establishes the surface water theme to be available for editing with recovery. This status for editing is established when the dialog is opened and remains in effect until the dialog is closed by clicking on the Done button. If one inadvertently stops editing April 2006 Step 04b: Assign Tributary Identifiers Interactively Page 104 with the dialog open, unpredictable errors will occur that may even render the surface water theme unusable. Do not edit or modify the editable status of the surface water theme while the SGAT extension is active. The second validation determines if a given tributary identifier has been assigned in a continuous fashion. To accomplish this, all polylines having the same tributary identifier are merged into a single polyline. Then, a test is done to determine how many parts that polyline is composed of. If the assignment was performed in a continuous manner, there will only be one part. If more than one part exists, then the assignment was not performed continuously. Perhaps an easy way to visualize this potential error is to imagine that you have assigned the value “T2.s1” to a series of polylines. Then, you continue on with the assignment of identifiers in other areas of the watershed. When, you get back to the initial area, you use the same value “T2.S1” and assign it to a sequence of other polylines that are not connected with the first group. So, in effect two tributaries now have the same identifier. In this case, the second validation would result in the tributary identifier of “T2.S1” as having two parts. The results of this validation test are shown in the lower part of the Validation Results panel. All tributary identifiers having more than “one part” will be listed along with the number of parts. Review of the polylines and correction is best done using both the attribute table and the view as with the first validation. April 2006 Step 04b: Assign Tributary Identifiers Interactively Page 105 If no errors were detected during validation, the following message will be displayed. As indicated in the message, the validation check indicates that “assignment of Tributary Identifiers appears to be okay…”. This does not guarantee that no errors exist. A careful review should be conducted to ensure proper assignment. Upon Completion Click on the Done button. This will return you to the Step 04 dialog. Clicking on the Done button on that dialog will return you to the Part A Main dialog. April 2006 Step 04b: Assign Tributary Identifiers Interactively Page 106 Step 04x: Assign Tributary Identifiers Manually Proper execution of Steps 01 through 04 is critical to the operation of the “Tools”. These steps establish the basic set of geographic data that control the remaining steps and establish the underlying data for the analytical results to be developed in all of the remaining steps. Assigning the Tributary Identifiers Using ArcView, edit the Attribute Table for the Surface Water theme resulting from Step 03. In the field named TribId, enter the values to be used for tributary identifiers. For the purposes of this manual, the term tributary includes the main stem. The rules for assigning values in the TribId field are as follows: • • • • Each tributary which is to be assessed must be assigned a unique identifier; All stream segments comprising a tributary must be assigned the same value; Stream segments which are not being assessed would not be assigned a value; and The same Tributary Identifier must be assigned continuously from the N initial surface water segment to the terminal segment. For this purpose, T4 T4.S2 N a terminal segment is defined as the last polyline segment or the last T4 T4 segment that is to be assigned a Tributary Identifier (i.e. no upstream T4 N segments will be assigned any T4.S1 tributary identifier. This is important T4 T4.S10 at points of confluence: Proceeding N T4.S6 upstream from the confluence point, N T4 one (and only one) stream must be T4 T4.S3.a assigned the same Tributary N Identifier as the stream flowing N T4.S4 downstream from the confluence N T4.S5 point. The other stream flowing N T4.S7 upstream from the confluence point N T4.S3 would be assigned a different Tributary Identifier. (See Figure to right.) # # # # # ## # # # # # ## For example, all stream segments pertaining to the Main Stem could be assigned the code of “M”; all segments for the first Tributary could be assigned the code “T1”; the second Tributary could be assigned the code “T2”, etc. Tributaries which flow into other tributaries can be assigned identifiers in a hierarchical manner. For example, sub-tributaries which flow into a tributary identified as “T2” could be assigned identifiers such as “T2.01S1”, “T2.01S2”, etc. Remember, however, that the tributary “T2” must continue through to its terminal segment. The figure to the right illustrates this concept. Note that “T4” continues to the terminal segment; and all other subordinate tributaries are assigned different Tributary Identifiers. April 2006 Step 04x: Assign Tributary Identifiers Manually Page 107 The following is a general outline of one procedure which can be used to assign the identifiers: 1. Open the view in which the surface waters from Step 03 was added. 2. Make that Surface Water theme resulting from Step 03 active by clicking on it in the Table of Contents frame on the left-hand side of the view. 3. Click on the Open Theme Table button on the button bar. The attribute table for the theme will now become the active window. 4. Click on the Table menu on the menu bar; then click on Start Editing. 5. Click on the field name for TribId in the table window. The TribId field name will appear depressed. If it does not, then click on it again. 6. Click in the View window to make it the active window. 7. Click on the Select Features button on the button bar. 8. Click anywhere in the view away from any stream segments. This will clear any selections which have previously been made. 9. In the View window, select the stream segments which are to be assigned a unique tributary identifier, i.e. the stream segments belonging to the main stem or a single tributary. The selected segments will be displayed in “yellow”. After you have selected the first segment, hold the Shift key down to select additional segments. Note: Selecting a highlighted feature (i.e. one that was previously selected) will “un”-select that stream segment. Work at a scale in the View window that enables you can clearly see the stream segments. Be sure to “un”-select any stream segments that have been erroneously selected, especially at points of confluence. 10. After you have selected all the segments for a given tributary (or periodically during the selection process), click on the title bar of the table window. This will make the table window the active window. Don’t click on any field or record in the table, as that may clear the selections made. 11. Click on the Calculate button on the button bar. 12. In the resulting dialog, enter the tributary identifier to be assigned in the lower box. Surround the identifier with double quotes (e.g. “M”). The values will be assigned to the TribId field because you selected it in (5) above; and will be assigned to only those records which have been selected in (9) above. They will appear highlighted in yellow. 13. Repeat (8) through (12) until all tributary identifiers have been assigned. Note: Use the Zoom and Pan buttons on the button bar or as you are selecting features click the right button on the mouse and select Zoom or Pan from the pop-up menu. Attempt to work at a view scale where you can clearly see the stream segments between points of confluence. Remember in Step 03 all stream segments between confluence points were combined. If, however, changes to the sub-watershed boundaries are made that affect the overall watershed boundary, then the process must start again at Step 01. If this occurs follow the procedure outlined in Step 03 Combine Stream Segments between Confluence Points for retaining the trib ID’s. If, during processing in other steps, you find you need to modify or add tributary identifiers, return to this step and make the necessary changes. Then, perform processing from Step 05 on. Don’t skip any steps. You will get warnings that certain attribute fields already exist for various themes; and that these fields will be cleared and reused. In response, simply click on OK. April 2006 Step 04x: Assign Tributary Identifiers Manually Page 108 Step 04z: Problems Associated with Incorrect Assignment of Tributary Identifiers Certain processing steps, specifically those from Step 06 on, will operate only on those stream segments which have been assigned a tributary identifier. The importance of properly assigning the Tributary Identifier is outlined in the summaries of the processing steps to follow. Step 05 processes all stream segments regardless of whether a tributary identifier has been assigned. Following completion of Step 05, the stream network will be displayed in the view in accordance with the legend file named “TribIdAssigned.avl” (assuming that legend file is in the SysData directory). The stream segments will be displayed in different colors based upon whether a “TribId” was assigned in this step, Step 04. Step 06 will calculate reach points starting from the primary pour point for the overall watershed (from Step 02). For this step, the stream network is composed only of those stream segments which have been assigned a tributary identifier. When a terminal stream segment is encountered (i.e. no stream segment is attached that has been assigned a Tributary Identifier), no further reach points will be calculated upstream of that segment. This means that if you missed assigning an identifier to a stream segment, then no reach points will be calculated above that segment. An example of this is shown in the figure to the right following Step 06 processing. In the figure, the reach points that were calculated are shown as green “dots”. Note that reach points are calculated up to about the midpoint of the main stem. Somewhere above that reach point, a Tributary Identifier was not assigned to a stream segment. The last segment to which one was assigned in a continuous fashion becomes the “terminal segment” and no further reach points are calculated above that segment. Even though Tributary Identifiers were assigned above that segment, they will be ignored because the continuity in assigning those identifiers was broken. As Step 06 traces the stream network, a “record” is kept of each time a sub-watershed is encountered. Again, the stream network is composed of only those surface water segments that have been assigned a Tributary Identifier. When a sub-watershed is “entered” by the stream, the sub-watershed is “marked” as being used. In addition, the area of the sub-watershed is added to the “tally” of sub-watersheds that have been “used”. Upon completion of processing, the area of the sub-watersheds used is compared with that of the overall watershed. If a discrepancy between the areas is detected, an error message similar to that shown below will be issued. If the sum of the areas (in the message) is less than that of the overall watershed, then a Tributary Identifier has not been assigned to a stream segment which flows from the subwatershed. On the other hand, if the sum of areas is greater than that of the overall watershed, then the stream network (composed of those stream segments that have been assigned a Tributary Identifier) flows into a sub-watershed more than once. This would indicate a problem with the sub-watershed delineation with respect to the surface waters. Specifically, it is likely that the sub- April 2006 Problems Associated with Incorrect Assignment of Tributary Identifiers Page 109 watershed boundary has been drawn such that it crosses above a confluence point. This would create two pour points for the sub-watershed, which is not valid. Upon completion of processing, Step 06 will display the sub-watershed theme in accordance with the legend file “SubWSUsed.avl” (assuming that legend file is in the SysData directory). With that legend file, the sub-watersheds that have been “used” will be displayed in a color different from those that have not been used. Use caution in interpreting the cause of the error, as there may be both types of errors described above. If the error message is displayed, take time to review all of the source data: subwatershed delineation, sub-watershed versus surface waters and assignment of tributary identifiers. In calculating reach points in Step 06, each reach point is assigned the same Tributary Identifier as the stream flowing through it. This is a critical attribute of reach points for all subsequent processing steps. Do not proceed beyond Step 06 without cleaning up all errors. Doing so will not only produce incorrect results; but will adversely affect the normal processing performed in the subsequent steps. The operation of the subsequent steps depends upon correct input data. Unpredictable results may occur, such as infinite loops, internal ArcView errors (e.g. index out of range, “nil” objects, Segmentation Violations , etc.). Refer also to the description of Step 06 for illustrations of various types of errors. Step 07 will calculate the valley line and data where valley walls are delineated and only for those streams which have been assigned a Tributary Identifier. Step 07 will only produce valley lines for stream segments in a sub-watershed where the reach point and its upstream neighboring reach point have been assigned the same Tributary Identifier. This primarily affects subwatersheds which encompass a confluence of tributaries. If the reach points for the tributaries entering the sub-watershed are assigned different Tributary Identifier than that assigned to the outflow reach point, no valley line will be drawn. (Refer to the description of Step 07.) Step 08 will calculate channel width only for those streams which have been assigned a tributary identifier. Step 09 will create a stream corridor only for those streams which have been assigned a tributary identifier. In summary, improper or incomplete assignment of tributary identifiers will adversely affect the results produced. If you find that you need to modify the tributary identifiers assigned, simply return to this step. Make the modifications necessary and proceed from this step forward. Be sure to perform each step in sequence. April 2006 Problems Associated with Incorrect Assignment of Tributary Identifiers Page 110 Part B: Data Development for Sub-Watersheds Part A of the Tools extension was primarily devoted to data preparation for the overall watershed. This part creates the data to be used in analyses; and is oriented around the sub-watersheds. The following processing steps are included in Part B: Step 05: Step 06: Step 07: Step 08: Step 09: Step 10: Clip Linear Surface Waters to Sub-Watershed Boundaries. Calculate Reach Points and Reach Point Data. Calculate Valley Line and Data. Calculate Channel Width and Stream Data. Create Stream Corridors (Buffers). Data Entry/Review of Reach Point Data. Note: Requirements for stream corridors (buffers) other than those created in Step 09 is presented following that section. Note: Step 10 can be used to review data following Step 06. Use caution in altering any data as it may be over-written by other steps. Refer to the section on Step 10. To access the processing steps for Part B, click the button labeled Part B: Data Development for Sub-Watersheds on the Main dialog. The dialog for Part B, as illustrated below, will be displayed. To access the dialog for any specific step simply click on the corresponding button. Click on the Done button to return to the Main dialog for the Tools extension. April 2006 Part B: (Steps 05 – 10) Data Development for Sub-Watersheds Page 111 Step 05: Clip Linear Surface Waters to Sub-Watershed Boundaries This step takes the surface waters from Step 04 and clips the stream segments at the subwatershed boundaries. While this step provides no apparent benefit to the user, it is critical to the operation of subsequent steps. This step utilizes the theme created in Step 03. However, it is imperative that the assignment of Tributary Identifiers be completed. As indicated below, the theme resulting from this step, Step 05, is used as an input theme for many of the remaining steps. • Points where stream segments, which were assigned a tributary identifier in Step 04, cross a sub-watershed boundary will become reach points. The reach points will be created in Step 06. • The stream segments that were assigned a tributary identifier in Step 04 will form the basis for valley lines. The valley lines and associated data will be created in Step 07. • The stream segments that were assigned a tributary identifier in Step 04 will form the basis for stream corridors. The stream corridors will be created in Step 09. To access the dialog for this step click the button labeled Step 05: Clip Linear Surface Waters to Sub-watershed Boundaries on the Part B main dialog. The dialog for this step is illustrated below. April 2006 Steps 05: Clip Linear Surface Waters to Sub-Watershed Boundaries Page 112 To use this dialog: • • • • The theme representing sub-watershed boundaries will be displayed. The theme for surface waters combined between points of confluence as produced in Step 03 (and to which the tributary identifiers should have been added in Step 04) will be displayed. The pre-defined name for the (output) theme that will contain the surface water segments clipped to the sub-watershed boundaries will be displayed. Enter a comment/note in the Note text field to describe any conditions, error corrections, etc. that may aid in understanding the process used in developing the assessment data. Starting the process Click on the Clip button after all entries on the dialog have been completed. Note: Refer to the section entitled “Common Dialog Operations in the Stream Geomorphic Assessment Tools” for common error and warning messages. Upon completion Alias of output theme for surface waters clipped to sub-watershed boundaries: SWFinal Legend file used to display output theme if no errors are encountered: TribIdAssigned.avl Legend file used to display output theme if errors are encountered: TribIdError.avl The theme representing the surface waters, which have been clipped to the sub-watershed boundaries, will be saved in the DerivdData subdirectory under that in which the ArcView project file exists. This theme is added to the user view identified on the Main dialog. During the clipping procedure, the number of parts of which a polyline (representing a stream segment) is composed is reviewed. If any polyline is composed of multiple parts, an error condition is raised. At the end of processing, the following error message will be displayed. Polylines composed of multiple parts can be formed during the clipping procedure. The figure to the right illustrates a stream segment (blue) flowing from east to west. Due to digitizing errors in either the sub-watershed boundary (most likely) or the surface waters, the stream is shown leaving the sub-watershed A (on the east), re-entering it and then leaving again. When this polyline is clipped, both parts falling into sub-watershed A are used to form a multi-part polyline; and the part falling into subwatershed B forms a single-part polyline. The attribute table for the output theme will contain a field named GeoSWRevu. If a multipart polyline is encountered, this field will April 2006 Stream segments forming multi-part polyline in sub-watershed A # # Sub-Watershed A # Stream segment (polyline) associated with sub-watershed B Sub-Watershed B Sub-Watershed Boundary # Steps 05: Clip Linear Surface Waters to Sub-Watershed Boundaries Page 113 contain the value “Y” to identify the polylines causing this error. Further, if the legend file named “TribIdError.avl” is located in the SysData directory, the output theme will be displayed using that legend. Any errors must be corrected prior to continuing. If the error is in the sub-watershed delineation, correct the error and re-run this step. If the error is in the surface water theme, correct the error in the surface water theme used as input to this step. Then, re-run this step. Remember, however, that now the surface water theme used as input to this step is out of synch with the original surface water theme as well as the themes derived via Step 02 and Step 03. When this step is re-run, use the Note field on the dialog to indicate that corrections were made and to which theme. If no errors are detected and the legend file “TribIdAssigned.avl” exists in the SysData directory, the stream layer that is created in Step 05 will be displayed using that legend. The legend, as shown to the right, will display each stream segment in accordance with whether a TribID value was assigned in Step 04. Dark blue will indicate TribID Assigned, light blue will indicate TribID NOT Assigned. The figure below displays the theme added to the view with the legend file. Review the stream network to ensure complete and proper assignment of the Tributary Identifiers. (Refer to the discussion under Step 04.) While not visible, the stream segments will be “broken” at the points of intersection with the subwatershed boundaries. Click on the button labeled Done to return to the Part B menu dialog. April 2006 Steps 05: Clip Linear Surface Waters to Sub-Watershed Boundaries Page 114 Step 06: Calculate Reach Points and Reach Point Data This step actually traces the stream network starting at the primary pour point of the overall watershed created in Step 02 or manually assigned by the user following Step 02. The stream network traced is composed solely of those stream segments which were assigned a tributary identifier in Step 04. Attribute Fields Created for Reach Point Theme All fields pertaining to the reach points are created in the attribute table of the reach point theme once Step 06 is completed. While all fields are created during this step, however, not all fields are populated with values in this step. (Refer to Appendix C and D for the list of fields associated with each reach point and identification of the step in which the fields are populated.) Note: All fields are created at this point to enable the user to have access to the dialog in Step 10 for reviewing data associated with reach points. Note: For technical reasons, the fields required for the Import capabilities provided in Step 10 are not created in this step. They, instead, are created during the Import function itself. This provides the mechanism to detect whether the import has occurred. In addition, the formats of the fields in the import table are used to define the fields within the attribute table for the reach point theme. The fields that are populated in Step 06 are as follows: RchPtId - As the stream network is “traced”, a Reach Point is created each time a watershed boundary is crossed. This point is assigned an identifier in accordance with the user-specified format (in the Format Options for Reach Pt Id’s dialog, which is accessible from the System Functions dialog). TribID -The Tributary Identifier (from Step 04) assigned is that of the stream flowing through the reach point. PPtType - The field named “PPtType” is used to identify the type of reach point. The values assigned to the PPtType field will be “blank” for normal reach points; “Outflow” for the primary pour point of the overall watershed; and “Terminal” for reach points that represent the terminus of the Main Stem or a Tributary. Note: A “Terminal” reach point represents the terminating vertex of the last polyline segment for the Main Stem or a Tributary or the terminating vertex of the last polyline segment for the Main Stem or a Tributary that was assigned a Tributary Identifier in Step 04. DistToStrt - Is the distance in feet from the reach point to the primary pour point for the watershed. RchDistId – An identifier assigned based upon the distance calculated for DistToStrt. The format for this identifier is as follows: TI-mmm.ttt Where “TI” is the tributary identifier assigned in Step 04, “mmm” is the distance in miles upstream from the primary pour point for the overall watershed and “ttt” is the decimal part of the distance upstream in fractional miles. April 2006 Step 06: Calculate Reach Points and Reach Point Data Page 115 Assume the value of “M-006.945”. That would imply that the reach point is located on the tributary “M” and is 6.945 miles upstream from the primary pour point for the overall watershed. This identifier provides an “address” for the reach point. DnStrmRPt and UpStrmRPt - These fields will contain the reach point identifiers (see RchPtId above) immediately downstream and upstream, respectively, from the current reach point. UpStrmDA -The upstream drainage area, in square miles, for each reach point identified in the “PptType” field as an “Inflow” point. The values in this field will be carried over from the Primary Pour Point theme created in Step 02. SubWSArea - The area of the sub-watershed associated with the reach point. Note: A sub-watershed can have one and only one “outflow” point. That point is referred to as the reach point for the sub-watershed. DrngArea - The sum of sub-watershed areas for all of the sub-watersheds above the reach point. This reflects the “catchment area” contributing flow to the reach point. Latitude and Longitude - The latitude and longitude of the reach point. SP_XCoord and SP_YCoord The VT State Plane X and Y coordinates of the reach point, respectively. SysRptType - The internal system value used to control the software in Steps 07 and above. Warning: Unpredictable results, including infinite loops, will occur if values in this field are altered. Attribute Fields Created for Sub-Watershed Theme RchPtId – There is a one-to-one correspondence between a sub-watershed and its reach point. The reach point serves as the “pour point” where all of the water flows out of the sub-watershed. The identifier of the reach point for the sub-watershed is inserted into this field. Note: The RchPtId field provides a link to the data associated with reach points for thematic display of that data using the sub-watershed theme. TribID -The Tributary Identifier (from Step 04) assigned is that of the stream flowing through the reach point and thus serving to provide drainage from the watershed. SubWSArea - Area of the sub-watershed. This field is originally calculated in Step 01; however, it is recalculated in this step to ensure that the area reflects that of the sub-watershed polygons. Note: It is possible that the user modified the boundaries of the sub-watersheds to correct for errors or to simply adjust their configuration. In such cases, if Step 01 was not re-run, the area of the sub-watersheds would not be accurate. SubWSId - A unique identifier for each sub-watershed. TribIdSet - Indicates whether a sub-watershed was encountered in tracing the stream network (using only those streams assigned a tributary identifier). Field will contain a value of “N” or “Y”; and is used in the display of the sub-watershed theme in accordance with the legend file “SubWSUsed.avl” (see discussion later in this section). April 2006 Step 06: Calculate Reach Points and Reach Point Data Page 116 Accessing the Dialog To access the dialog for this step click the button labeled Step 06: Calculate Reach Points on the Part B main dialog. The dialog for this step is illustrated below. To use this dialog: • • • • • • The theme representing sub-watershed boundaries will be displayed. The theme representing the primary pour point for the overall watershed (produced in Step 02) will be displayed. The theme representing surface waters clipped to the sub-watershed boundaries (produced in Step 05) will be displayed. The pre-defined name for the reach point (output) theme will be displayed. The format to be used for creating the reach point identifiers is displayed in the lower left corner of the dialog box. Enter a comment/note in the Note text field to describe any conditions, error corrections, etc. that may aid in understanding the process used in developing the assessment data. Note: The format, including length, of the reach point identifiers can be modified via Setup Dialog Æ System Functions Æ Format Options for Reach Pt Id’s. Starting the process After the required information has been entered on the dialog, click on the button labeled Calculate. Processing may take a few moments depending upon the hardware used. Note: Refer to the section entitled “Common Dialog Operations in the Stream Geomorphic Assessment Tools” for common error and warning messages. Upon completion Alias of output theme for reach points: RPts Legend file used to display reach point theme: RPts.avl Legend file used to display sub-watershed theme: SubWSUsed.avl April 2006 Step 06: Calculate Reach Points and Reach Point Data Page 117 A message will be displayed to indicate the number of each type of reach point created. The theme representing the Reach Points will be saved in the DerivdData subdirectory under that in which the ArcView project file exists. This theme is added to the user view identified on the Main dialog. Click on the button labeled Done to return to the Part B menu dialog. Special Consideration for the Results of Step 06 If the legend file “RPts.avl” exists in the SysData directory, the Reach Point Theme will be displayed using that legend. As shown on the right, reach points will be displayed in accordance with the PPtType assigned in this step, i.e. “Outflow”, ”Terminal” and “Standard”. The reach point types “Outflow” and are determined in Step 02, and are carried over into the Reach Point theme. “Terminal” represents those reach points that are at the end of the stream segment for which a “TribID” was assigned in Step 04. “Standard” represents all other reach points, which are determined where streams (having been assigned a Tributary Identifier, “TribID”) cross a sub-watershed boundary. Note: The value, in the “PPtType” field, for those reach points displayed as “Standard” will be “blank”. The figure below illustrates a reach point theme created in Step 06. April 2006 Step 06: Calculate Reach Points and Reach Point Data Page 118 # M09 The figure to the right illustrates the reach points created (with labels applied). It is useful to note the correlation of the reach points, stream network and sub-watersheds. Specifically, the reach points fall at the intersection of the stream network and the sub-watershed boundaries. # M08 M07 # T1.00 T1.01 T1.02 # # # M06 T1.03 # T1.04 # # M05 # M04 If the legend file “SubWSUsed.avl” exists in the SysData directory, the Sub-watershed Theme will be displayed in the view with the legend shown to the right. The legend will display each subwatershed in accordance with the value for the field “TribIdSet”, which is assigned in this step. The value for “TribIdSet” will be set to “Y” if the sub-watershed was encountered while tracing those streams for which a Tributary Identifier (“TribID”) was assigned in Step 04. Otherwise, the value will be set to “N”. The legend will display the values “Y” and ”N” as “Subws Included” and “Subws EXCLUDED”, respectively. An example is shown in the following figure. A sub-watershed displayed as “Excluded”, implies that the sub-watershed was not encountered while tracing the stream network. This, in turn, means that the streams entering the subwatershed were not assigned a Tributary Identifier in Step 04. In addition, If the sum of the sub-watersheds (encountered during stream tracing) does not equal the area of the overall watershed, an error message similar to that shown below will be displayed. Generally the error will show the sum of the sub-watersheds being less than the area of the overall watershed. In most cases, this is an indication that one (or more) sub-watersheds were not encountered during stream tracing. This type of error and the general location of the stream segments missing Tributary Identifiers will be made visible through use of the legend file, “SubWSUsed.avl”, as described earlier. Check the assignment of Tributary Identifiers in Step 04. If modifications or additions are made to the Tributary Identifiers in Step 04, perform processing from Step 05 on. April 2006 Step 06: Calculate Reach Points and Reach Point Data Page 119 If the error message indicates that the sum of the sub-watersheds is greater than the overall watershed, there is a subwatershed line drawn above the confluence of two streams assigned tributary identifiers. See figure to the right. Note: The sum of the sub-watershed areas exceeded the area of the overall watershed because the sub-watershed was encountered twice during stream tracing. Watershed line crosses above the confluence of two streams. Potential Error during Stream Tracing In order to create reach points, the stream network will be composed of only those stream segments for which a tributary identifier was assigned in Step 04. All other stream segments are ignored. Incomplete tracing can occur if one misses assigning a tributary identifier to an internal segment of the main stem or a tributary. (Review the section describing Step 04 and Step 05 for additional errors that may occur during stream tracing.) To provide some background regarding potential errors, a description of the method implemented for tracing the stream network and determination of reach points follows. First, a query is made to select only those records that contain a value for the TribId field, i.e. those stream segments to which the user assigned a tributary Identifier in Step 04. The selected records are saved as a temporary shape file in the Temp directory. This theme will be assigned a name of SWTrbnn.shp, where ArcView will assign a sequential number in lieu of the “nn”. The temporary data set will be deleted upon completion of processing, unless an error is detected during stream tracing. If an error is detected, an error message will be issued alerting the user to the existence of the data set so that it can be used in correcting the error encountered. The data set can be deleted by the user without adverse affect on the operation of the Tools. Note: If any temporary data sets having the prefix of “SWTrb” exist in the temporary directory, ArcView will assign a sequential number that makes the data set unique. Stream tracing will begin at the outflow or pour point for the overall watershed. Since the outflow point is created in Step 02 as the intersection of the stream network with the overall watershed, it is known that a stream segment will begin at the outflow point. That stream segment is acquired, and the end vertex (opposite end of the stream segment) is used to find the next segment for tracing. With the next stream segment, its end vertex is used to find the next stream segment, etc. April 2006 Step 06: Calculate Reach Points and Reach Point Data Page 120 In this manner, the tracing then continues upstream from one stream segment to the next. At the end of each stream segment, a test is made to determine whether a sub-watershed boundary is coincident with that point. (Remember that Step 05 clipped the stream segments with the subwatershed boundaries.) If a sub-watershed boundary is found then a reach point is created at that point. If a point of confluence is encountered, then the stream segment chosen will be the one forming the “hardest right turn” from the perspective of the direction in which stream network is being traced. If it is found that no other segments are “connected” to an end vertex, a terminal reach point is inserted at that point. Stream tracing is then reversed and proceeds downstream. Using the above as an outline, the figure below illustrates the order of stream tracing. (Note: Neither sub-watershed boundaries nor reach points are shown in that figure.) Assume that tracing begins at the confluence point in the upper right corner; and the red arrows show the upstream direction and the green arrows show the downstream direction. Tracing occurs in the numerical order shown. Only those stream segments to which tributary identifiers have been assigned are shown. 6 4 1 7 3 8 5 9 10 14 2 11 Upstream Tracing Downstream Tracing 12 13 If one misses assigning a tributary identifier to a segment in the middle of the main stem or a tributary, stream tracing will stop at the ending vertex of the last segment for which the identifiers have been assigned to contiguous stream segments. This vertex will be identified as a terminal reach point; and any upstream segments beyond the one for which the tributary identifier was not assigned will be ignored. (See section description for Step 04.) April 2006 Step 06: Calculate Reach Points and Reach Point Data Page 121 Attempt to use Surface Water polylines more than twice Another error may also be encountered during stream tracing. Since stream tracing occurs upstream and downstream, the maximum number of times any stream segment should be encountered is two. As each stream segment is encountered during tracing, the field “SWUsed” in the temporary data set (SWTrbnn.shp) is incremented and tested. If the value exceeds two, the following error message is issued. Following the above message, the following will be issued with the appropriate shape file name included. To find the surface water segment which caused the error, add the shape file to a view. Then open the attribute table and query the field named “SWUsed” to find values greater than two. You can then zoom to the selected segment to find the specific location of the error One cause of this error can be digitizing as was indicated in the error checking for Step 05. (See section description for Step 05.) It is also possible that a stream segment with a length less than the search tolerance used for stream tracing has been encountered. The search tolerance is used to find segments (polylines) connected to the end vertex of a polyline during tracing. In effect, the search tolerance defines the radius of a circle. Any stream segments that intersect that circle are candidates for continuing the tracing. When the Tools extension is distributed, the tolerance is set to 0.25 in view units (which would be meters). If the segment that you have just completed tracing is shorter than 0.25 meters, then stream segments connected to both ends will be candidates for the next stream to trace. Depending upon the geometry, it is possible that an incorrect segment will be selected. As mentioned above, load the temporary data set into a view and check all stream segments surrounding the one for which the value of SWUsed is greater than 2. Check the lengths of any polylines connecting to that segment or within the search radius. If any are found to be less than the 0.25 (or current value), then the error may be caused by the value used for the search tolerance. April 2006 Step 06: Calculate Reach Points and Reach Point Data Page 122 To address this issue, one can reduce the search tolerance. To accomplish this, use the Measurement Units dialog (shown below). The bottom portion of that dialog contains a control named “Connecting Feature Search Distance”. Reduce the value shown, perhaps by half. Then, re-run Step 06 again. Note: To access the Measurement Units dialog, go to the Setup Dialog and click on the button labeled system Functions in the lower left corner. The connecting feature search distance is also used in Step 06 to establish the starting direction and point for tracing the surface waters. If the primary pour point, established in Step 02, is located within the connecting feature search distance of two (or more) sub-watersheds, then the error displayed below will be issued. April 2006 Step 06: Calculate Reach Points and Reach Point Data Page 123 The figure to the right illustrates the situation. In this case, modify the boundary of the sub-watershed such that it will be located more than the connecting feature search distance away from the Primary pour point. Alternatively, one could modify the connecting feature search distance via the dialog described earlier. It is also possible that the initial subwatershed has been duplicated, i.e. copied on top of itself. If this is the case, the duplication will not be apparent. To identify this situation, select the sub-watershed theme as the active. Click the cursor in the middle of the initial sub-watershed. Then, open the attribute table for the theme. Identify the number of records that are highlighted (selected). If there are two or more records highlighted, then the subwatershed has been copied onto itself. Simply delete one of the records (or as many records as it takes to have only one record left). Make sure that the boundary of the remaining sub-watershed is coincident with all neighboring subwatersheds. sub-watershed boundaries Circle representing Search Distance Primary Pour Pt Ú Ê # Surface Water Do not proceed beyond Step 06 without cleaning up all errors. Doing so will not only produce incorrect results; but will adversely affect the normal processing performed in the subsequent steps. The operation of the subsequent steps depends upon correct input data. Unpredictable results may occur, such as infinite loops, internal ArcView errors (e.g. index out of range, “nil” objects, Segmentation Violations , etc.). April 2006 Step 06: Calculate Reach Points and Reach Point Data Page 124 Step 07: Calculate Valley Line and Data Valley lines travel from one reach point to its upstream neighboring reach point near the center of the valley and in straight line segments. Specifically, valley lines do not follow the meandering path of a stream. The following figure illustrates a “Valley Line” and its relationship to the valley walls, stream centerline, sub-watershed boundaries and reach points. Stream Line Valley Walls Upstream Reach Pt # Downstream Reach Pt # Valley Line Sub-watershed Lines It is important to note that valley lines are used solely for the purposes of determining valley length and an average width of the valley. These two values are then combined with similar data for the stream channel to arrive at Channel Sinuosity and Valley Confinement using the following equations: Sinuosity = Channel Length / Valley Length Confinement = Valley Width / Channel Width Valley Slope = (Elevation difference between upstream & downstream reach breaks) / Valley Length Note: Sinuosity, Confinement, Valley Slope are calculated in Steps 07, 08 and/or 10 if the required data is available. In performing a geomorphic assessment, the calculated values are compared with fairly broad ranges of values to categorize a given reach. For example, the value for sinuosity is used to group stream channels into the following categories: Low sinuosity (sinuosity value between 1.0 April 2006 Step 07: Calculate Valley Line and Data Page 125 and 1.2), moderate sinuosity (sinuosity value between 1.2 and 1.5) and high sinuosity (sinuosity value above 1.5). As a result, no attempt has been made in the processing of Step 07 to obtain highly accurate measurements for valley length and average width. Note: For information on sinuosity and confinement refer to the Stream Geomorphic Assessment Handbooks available from the River Management Section of the Department of Environmental Conservation, Agency of Natural Resources. Requirements for Digitizing Valley Walls In Step 07, a “valley line” will be created for those sub-watersheds in which valley walls have been delineated. The valley line should approximate the center of the valley walls. In Step 09, the valley walls will be used to create stream corridors in accordance with the process described in the Vermont “Stream Geomorphic Assessment Phase 1 Handbook, Appendix E.” Users should read and be familiar with the Appendix E of the State assessment handbook before completing this step. Delineation of valley walls is required only for unconfined (wide) valleys. Unconfined valleys are often found along the main stem of the river or along the main stem of major tributaries. In some instances, unconfined valleys may also be found on smaller tributaries. The process for where to delineate valley walls is described in Appendix E. April 2006 Step 07: Calculate Valley Line and Data Page 126 Additional criteria to which the user should adhere for digitizing valley walls are as follows: 1. Valley walls must be drawn as (or converted into) polygons. 2. For each reach point, it and its upstream reach point must be “contained” within a single polygon representing valley walls. (Refer to preceding figure.) 3. Valley walls can be drawn such that they include multiple reaches. The figures below illustrate a polygon drawn for valley walls that encompass multiple reaches. However, separate polygons must be drawn for the mainstem and tributary reaches, overlapping at the confluence point. One valley wall polygon drawn for mainstem reaches Separate valley wall polygons drawn for tributaries 4. Valley walls do not need to be contiguous or continuous. For example, one may be digitizing valley walls for a tributary, and come to a highly confined valley. At that point, one should stop digitizing valley walls. If the tributary subsequently flows into a wide valley, one would draw another polygon for those valley walls. In such situations, however, remember rule (2) above. April 2006 Step 07: Calculate Valley Line and Data Page 127 The following figure illustrates a non-contiguous polygon representing valley walls. Non-continuous polygon contains both upstream and downstream Reach Pts 5. If separate polygons are drawn for valley walls that share a reach point, then the polygons will have to overlap such that they both include the reach point. In the following figure, the two polygons drawn for valley walls overlap to include the common reach point. Overlapping Polygons Valley Wall Polygon 1 Valley Wall Polygon 2 Common Reach Pt Note: Drawing overlapping polygons is generally not advisable in a Geographic Information System (GIS) as it can cause problems with normal GIS functions. However, since the valley walls are being drawn solely for use in the Tools extension, this is acceptable. If you subsequently need to use the valley walls (polygons) for other GIS functions, they can be “dissolved” through use of the Geoprocessing Wizard extension provided with ArcView. Following that exercise, any overlaps will be removed and the adjoining polygons will be converted into a single polygon. April 2006 Step 07: Calculate Valley Line and Data Page 128 In addition to the rules for digitizing the polygons representing valley walls, valley lines will only be drawn if a reach point and its upstream neighboring reach point are associated with the same Tributary Identifier, “TribId”. This is illustrated in the figure below. In Step 04, the Tributary Identifier, “TribId”, was changed from T7 to T7..01S1 and T7..01S3 at the point of confluence. Since there is no continuity of the Tributary Identifier, no valley line will be drawn. In such cases, the user must revert back to Step 04 and correct the assignment of Tributary Identifiers, or determine the length and width of the valley and enter it in Step 10. If the latter action is taken, the user must also use Step 10 to calculate Sinuosity, Confinement and Valley Slope. Attribute fields for the Reach Point theme See Appendix C and D for descriptions of all fields associated with the Reach Point theme. The attribute fields calculated in this step are identified below. Note: All attribute fields associated with the Reach Point theme are created in Step 06. ValyLength – Length in feet of valley line drawn. ValyWidth – Width of valley in feet. This is calculated by obtaining the area of the valley walls that falls within the sub-watershed and dividing that by the valley length. ValyConfin – Valley confinement will be calculated only if channel width data is available for a given reach. This is calculated as the valley width divided by channel width. This data does not get imported into the DMS but can be used within the SGAT program. Sinuosity – Channel sinuosity will be calculated only if channel length data is available for a given reach. This is calculated as the channel length divided by valley length. This data does not get imported into the DMS but can be used within the SGAT program. ValySlope – Valley slope will be calculated only if the elevation data is available for the reach point and its upstream neighboring reach point. Valley slope is calculated as the difference between the elevation of upstream reach point and the elevation of reach point divided by the valley length. The result is then converted to a percentage by multiplying by 100. This data does not get imported into the DMS but can be used within the SGAT program. SysValyLen – Software generated value for valley length (refer to ValyLength above). Maintained separately for comparison with value of ValyLength should the user modify that value in Step 10. SysValyWid – Software generated value for valley width (refer to ValyWidth above). Maintained separately for comparison with value of ValyWidth should the user modify that value in Step 10. As indicated above, ValyConfin and Sinuosity will be calculated only if the required channel data is available. This will occur if Step 07 is run again after Step 08. If the channel data is not available (which would be normal if the processing steps are run in sequence), these values will be calculated in Step 08. Valley Slope will be calculated only if elevation data is available. This would imply that the elevation data was entered via Step 10 and then Step 07 was run. When elevation data is entered in Step 10, one can have Valley Slope calculated in that step by clicking on the Calc Data button. April 2006 Step 07: Calculate Valley Line and Data Page 129 In Step 10, one can modify the values calculated for valley width and valley length. Then, by clicking on the Calc Data button in that step, all derived values will be calculated. If the valley width and/or valley length are modified in Step 10, do not run Step 07 again, any changes made in Step 10 will be lost. Attribute fields for the Valley Line theme The following attributes are included in the resulting Valley Line theme: RchPtId – Identifier of the “downstream reach point” associated with the valley line. TribId – Tributary Identifier associated with the reach points for the valley line. UpStrmRPt– Reach Point Identifier for the “upstream reach point” associated with the valley line. ValyLength – Length in feet of valley line drawn. ValyWidth – Width of valley in feet. This is calculated by obtaining the area of the valley walls that falls within the sub-watershed and dividing that by the valley length. Using the dialog To access the dialog for this step click the button labeled Step 07: Calculate Valley Line and Data on the Part B Main dialog. The dialog for this step is illustrated below. To use this dialog: • • • • • The theme representing sub-watershed delineations will be displayed. The theme representing reach points (from Step 06) will be displayed. The theme representing valley wall delineations will be displayed. The pre-defined name for the valley line (output) theme will be displayed. Enter a comment/note in the Note text field to describe any conditions, error corrections, etc. that may aid in understanding the process used in developing the assessment data. April 2006 Step 07: Calculate Valley Line and Data Page 130 Starting the process Click on the Calculate button after all entries have been completed. Note: Refer to the section entitled “Common Dialog Operations in the Stream Geomorphic Assessment Tools” for common error and warning messages. During Processing The processing involved in creating valley lines is calculation intensive and can take several minutes or more to complete. The duration will depend upon the computer resources available (processor speed, amount of RAM and hard disk speed) and the complexity of the valley wall configuration. During processing, the Status Line of ArcView will be used to indicate the progress. The left part of the Status Line will indicate the Reach Point for which a valley line is being calculated, as well as the number being processed and the total number to be processed. The right portion of the Status Line will display a Progress Bar showing the percent done. If you need to stop processing At the far right of the Status Line is a Stop button. Clicking on that will terminate processing upon completion of the reach point under investigation. (Note: Completion of processing for the valley line being created may take several seconds or minutes, so have patience.) If you click on the Stop button, processing will terminate normally and all valley lines created thus far will be saved. Status of Reach valley line is being calculated for. Stop Button Percent of Step completed April 2006 Step 07: Calculate Valley Line and Data Page 131 The algorithm developed for calculating the valley walls is fairly complex and was tailored through testing in a wide range of valley wall delineations. However, there may be conditions under which the algorithm will not be able to define a valley line properly. When such a condition is detected, an error message similar to the following will be issued When such an error occurs, no valley line will be created for the reach identified in the message. In addition, the message provides the user with the opportunity to “bail out” at this point or continue. If the No button is clicked, the valley lines that have been created thus far will be saved in the output theme identified on the dialog; and that theme will be added to the view identified on the Main dialog. Clicking on Yes, will cause the software to ignore the reach point identified in the error message and will continue on with the next reach. Note: Multiple occurrences of the above error/continuation messages can happen. If you encounter error conditions, please refer to the digitizing rules described earlier in this section entitled Digitizing/Modification of Valley Lines or Data. If you have adhered to those rules, the algorithm employed in this step has encountered a set of circumstances that prevent it from creating the valley lines. In such cases, you can use the Measuring Tool of ArcView to obtain the length and average width of the valley lines omitted and enter those values into the appropriate reach points using Step 10. Then, click on the Calc Data button to have the derived data elements calculated. Upon Completion Alias of output theme for valley line: ValleyLine Legend file used to display Clipped Surface Waters theme: ValleyLine.avl The theme representing the Valley Line will be saved in the DerivdData subdirectory under that in which the ArcView project file exists. This theme is added to the user view identified on the Main dialog. Click on the button labeled Done to return to the Part B menu dialog. Upon completion of processing for this step, a message similar to the following will be displayed. This is a general summary of the processing that took place. The number of Terminal Reach Points represents those which were identified in Step 06 as reach points at the ends of tributaries identified in Step 04. Valley Walls not drawn indicates the number of reaches for which no valley walls were drawn (or errors were encountered); and Valley Lines created indicates the number of valley lines that were successfully created. April 2006 Step 07: Calculate Valley Line and Data Page 132 The following message will then identify the theme created and location on the hard disk where it has been saved: Following completion of processing, review the valley lines created. It is possible that this step may improperly calculate valley lines; and, therefore, valley lengths and widths. Reviewing the Valley Lines created Upon completion of processing, open the View to which the theme was added. Then, Zoom In to a reasonable scale where you can view an entire sub-watershed (if necessary, you can Zoom In closer). It would be best to start at the Outflow point for the overall watershed as this gives a good point of reference. In a systematic manner, use the Pan tool to follow the streams up to the terminal reach points. Check to see that the valley lines created reasonably follow the center of the valley walls. As you review the valley lines, keep in mind the following: ♦ Only that part of the valley located within a sub-watershed is considered. If the valley walls extend laterally outside of the sub-watershed, the area outside of the subwatershed is ignored. This will be most prevalent where tributaries meet at a confluence point. ♦ Keep in mind that if you were measuring the length and width of a valley manually, you would be working with USGS Topographic maps at a scale of 1:24000 or 1:25000. So trying to achieve accuracy to a high degree is not warranted. ♦ The valley lines should be within a reasonable distance of the middle of the valley. ♦ If you find a valley line that looks significantly off, determine the length of a valley line that you would create. To do this, use the Measuring Tool of ArcView and click on points that you would use to draw a valley line. ArcView will show the length of the last segment and the total length on the Status Line. Double click to quit measuring. Write down the downstream reach point identifier and the length indicated by ArcView on the Status Line. Remember that the length reported by ArcView may be in meters (or which ever type of “Distance Units” the user set in the “View Properties”. Convert meters to feet by multiplying by 3.28084 feet/meter. Then, you can use the dialog for Step 10 to compare the length that you have measured with that calculated in this step. ♦ This step calculates the average valley width by dividing the area of the valley (falling within the sub-watershed) by the valley length. April 2006 Step 07: Calculate Valley Line and Data Page 133 Specific considerations to keep in mind while reviewing the valley line theme also include the following: ♦ With the exception of confluence points, valley lines are drawn from reach point to reach point. At points of confluences, no line is drawn to connect the tributaries. Such a line is irrelevant in calculating valley length or width for either tributary. ♦ Where valley lines are drawn for the terminal segment of a tributary, the valley line is drawn to the terminal reach point and not to the end of the valley wall polygon. Drawing the valley line to the end of the valley wall polygon would distort the valley length when compared to the channel length; and, therefore, produce incorrect values for Sinuosity. ♦ If valley lines are missing, check the continuity of the Tributary Identifiers for the reach point and all of the neighboring upstream reach points. If the Tributary Identifier of the reach point is not the same as one of the upstream reach points, no valley line will be drawn. Valley lines may also be missing due to errors encountered during processing. Messages will inform the user of such errors. (Refer to the rules stated at the beginning of this section.) ♦ If the “appearance” of the valley line seems suspect, check to see if changing the length would alter the category to which the reach would be assigned for Sinuosity. If altering the length would not affect the category, then there is no need to alter the valley line other than for visual appearance on any maps to be produced. ♦ The following figure illustrates certain of the considerations described above: # # Valley line segment not drawn at confluence points Valley Lines (Red) April 2006 Step 07: Calculate Valley Line and Data Page 134 Digitizing/Modification of Valley Lines or Data One has the option to modify the theme in a variety of ways to improve the visual appearance of the valley lines or to increase their accuracy. Specifically, one can edit the valley line theme to include missing valley lines or alter existing one by moving vertices. If modifications are performed to obtain more accurate valley lengths, the attribute table will have to be edited to update the valley lengths in the field ValyLength. Note: Remember if the Calculate button of ArcView is used to update the valley lengths, ArcView will return the lengths in the units set for Map Units for the view. This will generally be in meters for the State of Vermont. The following equation can be used in the Calculate Dialog to obtain lengths in feet: ([Shape].ReturnLength * 3.28084) Valley widths will have to be obtained by measuring the width of the valley in several places. The multiple readings would then have to be averaged and included in the attribute table for the field ValyWidth. WARNING: The above approach will update the Valley Line theme; however, it will not affect the Reach Point theme, which is the repository of all data calculated in the Tools. The revised values for lengths and widths will also have to be entered into the reach point theme using Step 10. REMEMBER if you enter data via Step 10: Re-running Step 07 will cancel any changes made via Step 10. April 2006 Step 07: Calculate Valley Line and Data Page 135 Step 08: Calculate Channel Width and Stream Data Using the data from Step 06, attribute values are calculated for the reach point and surface water theme. All linear distance values will be calculated in accordance with the units (feet) specified on the dialog. Note: Do not attempt to change the units of the data. Doing so will produce unexpected results. Attribute fields for the reach point theme See Appendix C and D for descriptions of all fields associated with the Reach Point theme. The attribute fields calculated in this step are identified below: Note: None of the calculations are imported into the DMS. They can be used in SGAT and ten they are re-calculated in the DMS. Note: All attribute fields associated with the Reach Point theme are created in Step 06. ChanlWidth –Width of the channel in feet per equation c +a*x^e. The default calculation of the channel width is through the equation: 0.0 + 10.18 * (DrngArea) 0.50 Where DrngArea is in Square Miles (from Step 06 and Step 02). Note: The constant, coefficient and exponent in the equation can be modified by via Setup Dialog Æ System Functions Æ Channel Width Calculation. Note: The user may subsequently alter the values for Channel Width in Step 10. If altered, the derived value for Valley Confinement must be re-calculated in that step. Warning: If modifications are made in Step 10, do not run Step 08 again. This will result in canceling any changes made in Step 10. TotStrmLen – Total length of all streams within the boundary of the sub-watershed “served” by the reach point. ChanlLen– Length of channel, in feet, for the main stem or tributary from the reach point to the next upstream reach point. ChanlSlope – Channel slope is the difference in elevation at the upstream end of the channel and the downstream end of the channel divided by the Channel Length. Elevation of the reach points can only be entered in Step 10 following completion of Step 06. The values will be calculated if the elevation data is available. ChanlSnuos – Channel sinuosity is the Channel Length (ChanLen) divided by the Valley Length (ValyLen). The values will be calculated if Valley Length information is available (from Step 07 or Step 10). Note: The user may subsequently alter the values for Valley Length in Step 10. If altered, the derived values (Channel Sinuosity and Valley Slope) must be recalculated in that step. Warning: If modifications are made in Step 10, do not run Step 07 or 08 again. This will result in canceling any changes made in Step 10. April 2006 Step 08: Calculate Channel Width and Stream Data Page 136 SysChanWid – Software generated value for Channel Width (refer to ChanlWidth above). Maintained separately for comparison with value of ChanlWidth should the user modify that value in Step 10. ValyConfin – Valley Confinement is the Valley Width divided by the Channel Width. The values will be calculated if Valley Width data is available (from Step 07 or Step 10). Note: The user may subsequently alter the values for either Valley Width or Channel Width in Step 10. If altered, the derived value for Valley Confinement must be re-calculated in that step. Warning: If modifications are made in Step 10, do not run Step 07 or 08 again. This will result in canceling any changes made in Step 10. Attribute fields for surface water theme The attributes listed below are calculated and added to the surface water theme. RchPtId – Assigned to each stream segment. This provides the user with the ability to select streams that fall within the sub-watershed served by a given reach point. SWLength – The length of each stream reach. ChanlWidth – This value will be assigned to only those stream segments which have been assigned a Tributary Identifier in Step 04. This value will be used in Step 09 for creating stream corridors through buffering. To access the dialog for this step click the button labeled Step 08: Calculate Channel Width and Stream Data on the Part B main dialog. The dialog for this step is illustrated on the next page. April 2006 Step 08: Calculate Channel Width and Stream Data Page 137 To use this dialog: • • • • • The theme representing sub-watershed delineations will be displayed. The theme representing surface waters clipped to the sub-watershed boundaries (produced in Step 05) will be displayed. The theme representing reach points (produced in Step 06) will be displayed. Click in the check box for “Dissolve Surface Water” to place or to clear a check mark. If a check mark is found in that check box, a separate theme will be created containing the surface water segments “dissolved”. In performing the “dissolve”, all surface water segments having the same reach point identifier and tributary identifier will be combined into a single polyline. The name of the resulting theme will be the same as the surface water theme selected as input with the letters “Dslv” appended to the ended. See dialog box above for an example. Enter a comment/note in the Note text field to describe any conditions, error corrections, etc. that may aid in understanding the process used in developing the assessment data. Starting the process After the required information has been entered on the dialog, click on the button labeled Calculate. Processing may take a few moments depending upon the hardware used. Note: Refer to the section entitled “Common Dialog Operations in the Stream Geomorphic Assessment Tools” for common error and warning messages. During Processing During processing the reach point identifiers associated with a sub-watershed (in Step 06) are used to find the corresponding reach point in the reach point theme. If a miss-match occurs, the following error message will be displayed. The occurrence of the error message generally means that the theme selected for subwatersheds is not the same one that was used in Step 06 when the reach point theme (selected on the dialog for this step) was created. Verify theme selection and/or restart the steps from Step 06 and run all steps in sequence. Note: It is critical that any given theme be used consistently in all steps. For example, the sub-watershed theme supplied by the user should be used in all subsequent steps that require a sub-watershed theme. Data (refer to Appendix C and D) is added or modified in the attribute tables of themes in many steps. Subsequent steps require that data to be present and consistent with other themes. April 2006 Step 08: Calculate Channel Width and Stream Data Page 138 Upon completion Upon completion the following message will be displayed to summarize the processing that took place. The attribute tables for reach point theme and for the surface water theme will be updated as described earlier. If the user checks the option box Dissolve Surface Water, the theme will be added to the view but will not be turned on automatically. The figure to the right shows the Dissolved Surface Waters and the reach points. While not visible, all of the stream segments (polylines) associated with the same reach point and tributary identifiers are combined into a single polyline. This theme is intended solely for use in thematic display of data pertaining to reaches or tributaries. This theme should not be used for any analytical purposes. Click on the button labeled Done to return to the Part B menu dialog. April 2006 Step 08: Calculate Channel Width and Stream Data Page 139 Step 09: Calculate Stream Corridors (Buffers) This step enables one to create stream corridors (or buffers) using the themes for valley walls, meander centerline, sub-watersheds, surface waters and reach points. The stream corridors will only be created for the main stem and tributaries (i.e. those stream segments to which a tributary identifier was assigned by the user in Step 04). o The corridors generated in this step reflect the process described in the Vermont “Stream Geomorphic Assessment Phase 1 Handbook, Appendix E”. Users should be familiar with the information provided in Appendix E of the handbook before completing this step. If the application selected on the Setup Dialog is either FEH-Option 1 or FEH-Option 2, then the button to access Step 09 will be disabled. Buffering to create fluvial erosion hazard zones is conducted in Part E of the Tools. In addition, the following message will be displayed when the Part B dialog is selected from the Main Dialog. The parameters may vary for the development of individual buffers around different features, e.g. stream centerlines, meander centerlines and valley walls. These parameters are defined in a buffer reference table associated with each application. Once an application is selected via the Setup Dialog, the buffer reference table is automatically identified. Through a buffer reference table the component buffers to be used in defining a stream corridor are identified. The following list certain fields included in those tables and identify their use: Default buffer (DefaultBuf) – A fixed distance to be used in creating a buffer around the stream centerline. If the distance is zero, no default buffer will be created. Stream Centerline (StreamCL) – A channel width multiplier used to create a buffer around the stream centerline. If the value is zero, no buffer will be created. Meander Centerline (MeanderCL) – A channel width multiplier used to create a buffer around the meander centerline. If the value is zero, no buffer will be created. Stream Centerline without a Meander Centerline (SCLnoMCL) – A channel width multiplier used to create a buffer around the stream centerline for reaches where no meander centerline is present. If the value is zero, no buffer will be created. Valley Toe (ValleyToe) – A channel width multiplier used to create a buffer around the toe of the valley walls. If the value is zero, no buffer will be created. Require Valley Walls (RequireVW) – Permissible values are “Y” (Yes) or “N” (No) defining whether the valley toe feature must be present for a given reach to perform buffering of the meander centerline. If the value is “Y”, buffering of the meander centerline will only be performed if the valley toe feature is present for the reach. If the value is “N”, buffering of the meander centerline will be performed at all times, regardless of the presence of a valley toe feature. Note: The channel width is calculated in Step 08. A channel width multiplier is a value that is multiplied by the channel width to arrive at a buffer distance. April 2006 Step 09: Calculate Stream Corridors (Buffers) Page 140 When buffering is perform via this step, the various combinations of data associated with a given reach are used to find a record in the buffer reference tableassociated with Step 9. The search goes from very specific combinations of the data to the most generalized form (or default parameters to be used if no specific combination is found). This permits one to define very specific buffering criteria for specific conditions. In addition, as research progresses and data becomes available, buffering parameters can be added or modified as necessary to the buffer reference tables. Note: The methods of combining data to form a key and the rules for searching for a record are too complex for presentation here. Appendix H provides such details. Source Data required for Stream Corridor Development Valley walls and a meander centerline need to be digitized before this step can be completed; and are required only for unconfined valleys. Unconfined valleys are often found along the main stem of the river or along the main stem of major tributaries. In some instances, unconfined valleys may also be found on smaller tributaries. The process for defining where to delineate valley walls and a meander centerline are described in “Stream Geomorphic Assessment Phase 1 Handbook, Appendix E”. Refer to Step 07 for additional criteria for digitizing valley walls. For reaches where valley walls and a meander centerline are not available, the following may be created: o o A default corridor (for example, 100 feet on either side of the stream centerline) and/or A buffer created around the stream centerline as a multiple of the channel width (for example, 2.5 times the channel width on either side of the stream centerline). If both of the above are created, the resulting stream corridor will be the sum of the area covered. Note: The above buffers will be created (or not) depending upon the criteria in the buffer reference table. Additional criteria the user should adhere to for digitizing meander centerlines: 1. Meander centerlines must be drawn as lines (polylines). User must ensure that the ends of polyline segments are snapped together if digitizing was stopped and then started again within a reach. 2. Individual polylines drawn to represent meander centerlines can continue through multiple reaches. Multiple Reaches Meander Centerline April 2006 Step 09: Calculate Stream Corridors (Buffers) Page 141 3. With the exception of terminal reaches, the meander centerline must travel through the entire length of a sub-watershed; and must intersect the sub-watershed boundary only twice: Once upon entering the sub-watershed and once upon exiting. The meander centerline should never cross the sub-watershed boundary except at the point of entrance and the point of exit. 4. For terminal reaches, the meander centerline will intersect the sub-watershed boundary only once: Upon entering the sub-watershed. 5. The meander centerline need not be continuous. This is illustrated in the following figure. Downstream Reach Point Non- continuous Meander Centerline. Contains both upstream and downstream reach points Upstream Reach Point No Meander Centerline Meander Centerline starts again 6. The meander centerline should respect the boundaries of the valley walls, if available for a given reach, i.e. the meander centerline should remain inside of the boundary for the valley walls. April 2006 Step 09: Calculate Stream Corridors (Buffers) Page 142 7. At confluence points, it will be necessary to have a small segment of the meander centerline traveling up the tributary fall within the sub-watershed of the main stem or primary tributary. This is required to meet number (3) above for the reach on the tributary. The small (dangling) will be ignored in the development of buffering for the reach on the main stem or primary tributary. An example of this is illustrated in the figure below. Stream Centerline # # Meander Centerline Dangling Segment of Meander Centerline Sub-watershed Boundaries # 8. A meander centerline must be present in a given reach in order to develop a fluvial erosion hazard zone using the application of FEH-Option 2. 9. A meander centerline may be present in a given reach in order to develop a fluvial erosion hazard zone using the application of FEH-Option 1. Attribute fields for the resulting Stream Corridor theme The following attributes are included in the resulting Stream Corridor theme: RchPtId – Identifier of the reach point associated with the sub-watershed. TribId – Tributary Identifier associated with the sub-watershed. CordrArea – Area of the stream corridor within a given sub-watershed in square miles. Attribute fields for the Reach Point theme See Appendix C and D for descriptions of all fields associated with the Reach Point theme. The attribute fields calculated in this step are identified below. CordrArea – Area of the stream corridor in Square miles. Note: All attribute fields associated with the Reach Point theme are created in Step 06. To access the dialog for this step click the button labeled Step 09: Create Stream Corridors (Buffers) on the Part B main dialog. April 2006 Step 09: Calculate Stream Corridors (Buffers) Page 143 The dialog is illustrated below. To use this dialog: • • • • • • • The theme representing the valley walls will be displayed. The theme representing the meander centerline will be displayed. The theme representing the sub-watershed delineations will be displayed. The theme representing the surface waters clipped to the sub-watershed boundaries (from Step 05) will be displayed. The theme representing the reach points (from Step 06) will be displayed. The pre-defined name for the stream corridor (output) theme will be displayed. Enter a comment/note in the Note text field to describe any conditions, error corrections, etc. that may aid in understanding the process used in developing the assessment data. Note: The linear (distance) and area units are displayed on this dialog. They, however, cannot be changed. Starting the process After the required information has been entered on the dialog, click on the button labeled Buffer. Processing may take a few moments depending upon the hardware used. Note: Refer to the section entitled “Common Dialog Operations in the Stream Geomorphic Assessment Tools” for common error and warning messages. April 2006 Step 09: Calculate Stream Corridors (Buffers) Page 144 Upon completion Alias of output theme for stream corridors: Corridor Legend file used to display stream corridors theme: Corridor.avl A message will be displayed to indicate how many reach points and terminal reach points were utilized in creating the corridors, and how many stream corridors were created. The theme representing the stream corridors will be saved in the DerivdData subdirectory under that in which the ArcView project file exists. This theme is added to the user view identified on the Main dialog. # An example of the stream corridors produced is illustrated in the figure to the right. # # Click on the button labeled Done to return to the Part B menu dialog. See Appendix H for details on the internal processing steps used to create the Stream Corridor. # # # # Stream Corridor # # # # # # # # # # # # # # # # # ## ## ## # # # April 2006 Step 09: Calculate Stream Corridors (Buffers) Page 145 Step 09: Using Alternative Stream Corridors (Buffers) Research on the development of “stream corridors” continues to evolve. As a result, it may be of interest to utilize stream corridors which have been created outside of the Tools extension. In order to use those corridor delineations within the Tools extension, the considerations discussed below must be kept in mind. Note: For insight into how Stream Corridors are created in Step 09, refer to Appendix H. The steps used may provide some guidance as to how custom Stream Corridors may be created using the Geoprocessing Wizard extension to ArcView. Requirements In summary, the corridor delineations: • • • Must be provided in shape file format. Must adhere to acceptable GIS standards. Specifically, there must be no overlap of the corridors. During development it is possible to create individual buffers for different tributaries. Where these buffers meet, it is possible that they will overlap each other. This overlap, or common area, must be removed. Must be “clipped” to (or “unioned” with) the sub-watershed boundaries. The approach used to do this will vary depending upon how the corridors were initially defined. In particular, a “stream corridor” must be constrained by the boundaries of the corresponding sub-watershed. Note: Use of the ArcView Geoprocessing Extension may provide the needed functions. Attribute fields The following attribute fields must be added to the attribute table for the alternate stream corridor theme. They must be present in order to use this theme in Step 11. TribId – The field for Tributary Identifiers must be a string field type with length long enough to hold the values to be assigned. Each corridor (or buffer) must have the value of the TribId for the stream flowing through the corridor. For additional information, review Step 04. RchPtId – The field for Reach Point Identifiers must be a string field type with length long enough to hold the values assigned. Each corridor (or buffer) must have the value of the RchPtId for the outflow (or pour pt) of the corridor. For additional information, review Step 06. The values to be used can be acquired by performing Step 01 through Step 06, inclusive. The values will then be in the attribute table for the reach point theme. One can then produce a map with the reach points labeled with the ids or obtain the values by inspection with the Identify tool in ArcView. CordrArea – The field for the area of the corridor must be a decimal field with a length of 16 and precision of 10. The values can be calculated using the Calculate button in ArcView. All areas must be in square miles. To convert from square meters to square miles, divide the area in square meters by 2,589,988.11. Note: An outline of the procedure to accomplish this is listed on the following page. April 2006 Step 09: Using Alternative Stream Corridor (Buffers) Page 146 Procedure for Using Alternative Stream Corridors (Buffers) in the Tools Extension 1. Add the alternative stream corridor theme to the view in which the other themes for the watershed exist. 2. Run Steps from 01 through 08, inclusive. 3. In order to use a theme within the Tools extension, it must be registered. The process of registering is performed automatically when a theme/table is created within a processing step. At present there is no way to register a stream corridor theme that is not created by Step 09. For the time being the following work-around can be used: a. Run Step 09 solely to create a theme for stream corridors and have it registered. Make note of the name assigned to the stream corridor theme. b. Exit the Tools extension. c. Remove all references in any Views and from the Tables area to the theme created in (a). d. Using Windows Explorer migrate to the DerivdData directory in which the theme from (a) is located. e. Delete all component files for the stream corridor theme created in (a). f. Copy all component files for the theme to be used for stream corridors into the DerivdData directory. g. In ArcView, open a view. h. From the File menu, select Manage Data Sources. i. In the dialog resulting from (h), migrate to the DerivdData directory. j. Select the theme copied in (f). k. Click on Rename. l. Type in the name of the theme from (a). m. Exit the Manage Data Sources dialog. n. Start up the Tools extension. o. Click on View Log. p. Select the data set name for (a and l above) q. Enter a Note to reflect that the SGAT generated theme for corridors was replaced by a user-defined theme. Note: The above takes advantage of the registration of an SGAT generated theme, but replaces that theme with another, i.e. it is a way of “fooling” SGAT. 4. Continue with Step 11, Step 12, Step 13 and Step14. Warning: The theme to be used must be of polygon class, meet the requirements outlined in this section, including the requirement for the fields TribId, RchPtId and CordrArea. If these requirements are not met, unpredictable results will occur when Step 11 is run. April 2006 Step 09: Using Alternative Stream Corridor (Buffers) Page 147 Outline of A procedure to calculate areas The following is a general outline of one procedure which can be used to calculate the areas of the alternative stream corridors: 1. Open the view to which the alternate corridor theme has been added. 2. Make the alternate corridor theme active by clicking on it in the table of contents frame on the left-hand side of the view. 3. Click on the Open Theme Table button on the button bar. The attribute table for the theme will now become the active window. 4. Click on the Table menu on the menu bar. 5. Click on Start Editing 6. Click on the Edit menu on the menu bar. 7. Click on Select None. 8. Click on the field name for CordrArea in the table window. The field name will appear depressed. If it does not, then click on it again. 9. Click on the Calculate button on the button bar. 10. In the resulting dialog, double click on the [Shape] field entry in the upper left-hand side. In the lower left-hand box, the term “[Shape]” will appear. 11. After the “[Shape]”, enter a period followed by “ReturnArea” followed by “/ 2589988.11. The complete entry should look like: [Shape].ReturnArea / 2589988.11 Remember the period after [Shape] 12. Click on Ok. 13. The areas should then appear in the attribute table under the field (column) named CordrArea. 14. Click on the Table menu. 15. Click on Stop Editing. 16. In response to “Save Edits?”, click on Yes. Setting Reach Point Identifiers and Tributary Identifiers At present, assignment of the Tributary Identifier (TribId) and the Reach Point Identifier (RchPtId) will have to be assigned manually or through other means. Potentially, the Spatial Join and/or Select By Theme functions in ArcView may provide a more automated method for transferring these data elements from attribute tables of other themes, such as the sub-watershed theme. April 2006 Step 09: Using Alternative Stream Corridor (Buffers) Page 148 Step 10: Data Entry/Review of Reach Point Data The dialog for Step 10 provides the ability to review and/or edit certain data associated with reach points. The dialog can be used at any point following Step 06. If one attempts to access Step 10 prior to running Step 06, an error message will be issued. Step 10 provides the user with the ability to enter or modify a limited set of data that is associated with a reach point: Elevation, Channel Width, Valley Length, Valley Width, among other “documentation type” fields. Step 10 is the only place where elevations can be assigned to reach points. Elevation data can be assigned at any point following Step 06. Valley Length and Valley Width, however, will be calculated in Step 07 for those reaches for which valley walls have been drawn. Channel Width will be calculated in Step 08 for all reaches. As a result, one must use caution in entering or modifying data in Step 10. If data is entered in Step 10 and then Step 07 or 08 is run, the changes made in Step 10 will, most likely, be lost. In Steps 06 through 10, data is associated with each reach point. Appendix C and D provide a detailed description of the attributes and identifies the processing steps in which they are assigned. While the attributes are associated with the reach point theme, one can relate that data to other themes for thematic mapping. During processing in Steps 06 through 09, the Reach Point Identifier (“RchPtId”) is assigned to features for the surface waters (from Step 05), subwatersheds, valley lines (Step 07), “dissolved” surface waters (Step 08) and stream corridors (Step 09). Using the Export button in Step 10, the data associated with the reach points can be exported to a dBase table. One can relate that table to other themes using the Relate button in ArcView after identifying the RchPtId field in the exported table and then the theme of interest. To access the dialog for this step click the button labeled Step 10: Data Entry/Review of Reach Point Data on the Part B main dialog. The dialog, with sample data entered, is illustrated below. April 2006 Step 10: Data Entry/Review of Reach Point Data Page 149 To use this dialog: The dialog is set up for the user to review most data associated with the reach points created in Step 06. Only a limited set of data can be modified. Data generated from Step 06 through Step 09 will be shown in the appropriate place in the dialog. Those values where the field label is “grayed out” can not be changed. Those values with a “normal” field label can be changed or data can be edited. Warning: If modifications are made in Step 10 to data calculated in another step (examples: Valley and Channel Width and Valley Length), do not run that step again. Doing so may result in canceling any changes made in Step 10. If Step 07 or 08 is re-run then data should be thoroughly reviewed in Step 10. • • The theme representing reach points will be displayed. Select the Reach Point Id for which you would like to review data (from Step 06 through Step 09). Reach Point attributes displayed on the dialog The following provides a brief description of the attribute fields associated with reach points that are displayed on the dialog. For a more detailed description, including identification of the step calculating a specific value, refer to Appendix C or D. • Identifiers: o o o Reach Point Id is the value assigned in Step 06 to the reach points. TribId is the value assigned in Step 04 for the stream segment that flows through the reach point. Distance Id: Identifier for each reach point based upon distance from the primary pour point for the watershed. • Reach Point Type - Shows the PPtType assigned in Steps 02 and 06. Values that will be encountered in this field are “Outflow”, for the primary pour point of the overall watershed; “Terminal”, for terminal reach points of the main stem or tributary, and blank, for all other reach points. • Location Data: o o Distance to Start: Distance from the primary pour point of the watershed to the reach point. (The primary pour point is that reach point assigned the value of “Outflow” for the reach point type.) Elevation: User must enter elevation value for the reach point. Elevation can be entered in Step 10 at any time following the completion of Step 06. Note: An elevation for Terminal reach points must be entered in order for the slope to be calculated at the downstream reach point. o o April 2006 State Plane Coordinates: VT State Plane coordinates for reach point Geographic Coordinates: Longitude and Latitude coordinates for the reach point Step 10: Data Entry/Review of Reach Point Data Page 150 • Channel: o o Width: Width of the channel calculated in Step 08. User may choose to enter a value based on field observations or other knowledge. Length: Length of channel in feet for the main stem or the tributary from the reach point to the next upstream reach point (from Step 08). Note: User does not need to enter channel width for Terminal reach points. o o • Slope: Is the difference in elevation at the upstream end of the channel and the downstream end of the channel, divided by the Channel Length. Slope is calculated as a percentage. Sinuosity: Is the Channel Length divided by the Valley Length. Make sure this number is >1.0 or the DMS will not accept the data. If the value is LESS THAN 1, the user must manually measure the valley length and enter it into the dialog box. Valley: o Width: Is an average width of the valley walls. In Step 07, Channel Width is calculated by dividing the area of the valley walls that fall within a sub-watershed by the Valley Length. Note: Step 07 will create a valley line (and therefore the value for this field) only if a valley wall polygon (in the user-supplied theme for valley walls) encompasses the reach point and its neighboring upstream reach point. For those reaches which do not have valley walls in the user-supplied theme, the user must enter the value for Valley Width in Step 10 and calculate the derived value for Confinement in that step. o Note: User does not need to enter valley width for Terminal reach points. Length: Is the length of a generalized line running down the center of the valley walls. The line is created in Step 07 and the length of that line is calculated and inserted in this field. Note: Step 07 will create a valley line (and therefore the value for this field) only if a valley wall polygon (in the user-supplied theme for valley walls) encompasses the reach point and its neighboring upstream reach point. For those reaches which do not have valley walls in the user-supplied theme, the user must enter the value for Valley Length in Step 10 and calculate the derived value for Sinuosity in that step. Note: User does not need to enter Valley Length for Terminal reach points. o o • Slope: Is the difference in elevation at the upstream end of the valley (Upstream Reach Pt) and the downstream end of the valley (at the reach point) divided by the Valley Length. Refer to description of Valley Length field, as the software may not generate Valley Length values for all reaches. Confinement: Is the Valley Width divided by the Channel Width. The value of this field can be calculated in Step 7, 8 or 10 depending upon availability of the Valley and Channel Width data. Refer to description of Valley Width field, as the software may not generate Valley Width values for all reaches. Areas: o o o April 2006 Reach Sub-Watershed: Area of the sub-watershed associated with the reach point. (The reach point will serve as the pour point for the sub-watershed.) Reach Drainage Area: Drainage area upstream of the reach point. Overall Watershed: Drainage area of overall watershed at the primary pour point. Step 10: Data Entry/Review of Reach Point Data Page 151 • Map Documentation and Notes/Comments for Reach Note: The contents of the USGS Quad names, VT Orthophoto identifiers, Town Names and HUC 10 watersheds can automatically be filled in by clicking on the button labeled Set Map Doc. This will require that themes defining the boundaries for the USGS Quads, VT Orthophotos, Towns and HUC 10 watersheds be available and have been registered. Use of the dialog associated with the Set Map Doc button will be described subsequently. o o o o o USGS Quads: List of USGS topographic quads (1:24000 or 1:25000 scale) which cover the main stem or tributary for the geomorphic reach. List should include commas separating individual USGS quad names, e.g. South Mountain, Bristol, etc. VT Orthos: List of VT orthophotos which cover the main stem or tributary for the geomorphic reach. List should include commas separating individual orthophoto identification, e.g. 088192, 088196. Towns: List of towns which cover the main stem or tributary for the geomorphic reach. List should include commas separating individual orthophoto identification, e.g. Hinesburg, Starksboro, etc. HUC 10: List of HUC 10 Watershed Identifiers within which the reach or a part of the reach falls. Notes: Location for user to make comments about the reach, data concerns, problems, etc. User should document any changes made to reach point data, e.g “Changed valley length to be 5279 instead of 5300, due to error in valley wall theme”. Maximum length of entry is 128 characters. Editing Data Step 10 provides the user with the ability to enter or modify a limited set of data that is associated with a reach point: Elevation, Channel Width, Valley Length, Valley Width, USGS Maps, Orthophotos, Towns and Notes (or Comments). Note: Step 10 is the only place where elevation, USGS Maps, Orthophotos, Towns and Notes can be assigned to reach points. This data can be entered (or edited) at any point following Step 06 without concern for the data to be overwritten in another step. To edit data, select the reach point of interest in the list box labeled Reach ID. Then, place the cursor in the field to be changed and replace the value shown. Continue until all of the changes required have been made. All changes made remain as pending changes until the Save button is clicked. As a result, changes can be made to any number of reach points prior to clicking on the Save button. Once the Save button is clicked, the changes are applied to the attribute table associated with the reach point theme. Note: The Save and Cancel buttons will become enabled only after a change has been made to a data value. After the first change, these buttons will remain enabled until the changes are saved (via the Save button) or canceled (via the Cancel button). For Terminal reach points, the only data element that is appropriate and required is the elevation. Channel Width, Valley Width and Valley Length are not appropriate and will not be used. The corresponding values for downstream reach point will be used for the sub-watershed. As with all software, it is recommended that changes be saved periodically. This will prevent loss of data should an abnormal situation (such as hardware or software error) occur. In addition, April 2006 Step 10: Data Entry/Review of Reach Point Data Page 152 saving changes at known points will enable one to remember what changes need to be reentered should one have to cancel changes at a later time. If, after having made any number of edits to data, one wants to cancel those changes, click on the Cancel button. The following message will be displayed. Click on Yes, if you want to cancel all pending changes. Remember that all changes pending since the last Save or since editing began will be lost. Click on No to retain the changes made. If one clicks on Done or Export, the user will be warned of pending changes via the message shown above. All pending changes must either be saved or canceled prior to quitting the dialog (via the Done button) or performing an export (via the Export button). Warning: If modifications are made in Step 10 to Channel Width, do not run Step 08 again. This will result in canceling any changes made in Step 10. Warning: If modifications are made in Step 10 to Valley Width or Valley Length, be cautious about running Step 07 again. If Valley Walls have been drawn for a reach (in the user-supplied theme), the values for Valley Width and Valley Length will be calculated in Step 07. This will result in canceling any changes made in Step 10 to the corresponding reaches. Note: Refer to the section entitled “Common Dialog Operations in the Stream Geomorphic Assessment Tools” for common error and warning messages. Step 10: Calculating Derived Data Clicking on the “Calc Data” button (calculate data button) on the dialog for Step 10 will calculate values for the following: • • • • Channel Slope: If the reach point and its upstream neighboring reach point have been assigned elevations and the Channel Length is available, the Channel Slope will be calculated. Channel Slope is the difference in elevation at the upstream end of the channel and the downstream end of the channel, divided by the Channel Length. Result is expressed as a percentage. Valley Slope: If the reach point and its upstream neighboring reach point have been assigned elevations and the Valley Length is available, the Valley Slope will be calculated. Valley Slope is the difference in elevation at the upstream end of the valley (Upstream Reach Pt) and the downstream end of the valley (at the reach point) divided by the Valley Length. Result is expressed as a percentage. Sinuosity: If both Valley Length and Channel Length are present, Channel Sinuosity will be calculated by dividing the Channel Length by Valley Length. Confinement: If both Valley Width and Channel Width present, Valley Confinement will be calculated by dividing the Valley Width by the Channel Width. If the value of any required data element is zero, the related calculations are not performed. This allows one to enter data as it is collected. April 2006 Step 10: Data Entry/Review of Reach Point Data Page 153 Clicking on the Calc Data button is recommend to insure that all “derived” data is calculated with the most current values. Repeatedly clicking on the button will not adversely affect data, e.g. the derived data (slopes, sinuosity and confinement) will simply be re-calculated each time the user clicks on the calculation button. When one clicks on the Calc Data button, the message shown below will be displayed. Upon completion, a message, similar to that shown below, will summarize the number of reach points for which a given calculation was performed. If upstream reach points could not be associated with reach points, a warning message will be displayed after calculations have been competed. The above message could occur if the user assigned Trib Id's to all branches at a confluence point that differed from the stream draining from the confluence point. In these cases, there is no clear link between the neighboring reach points; and therefore the slopes cannot be calculated. If no calculations were made, the message shown below will be displayed. Any calculations made in response to clicking on the Calc Data button are added to the pending changes. To make these changes permanent, click on the Save button; or to cancel the changes, click on the Cancel button. April 2006 Step 10: Data Entry/Review of Reach Point Data Page 154 Step 10: Set Map Documentation Fields Clicking on the “Set Map Doc” button on the dialog for Step 10 will establish the following map documentation fields for each reach: • • • • USGS Quad Name VT Orthophoto I Town Name HUC 10 Watershed Name When one clicks on the Set Map Doc button, the dialog as shown below will be displayed. The top part of the dialog contains check boxes for each of the boundary themes of interest. To the right of the check boxes will be a message indicating the availability of the theme or the name of the theme being used for the given boundary. If a check box for a theme is disabled, either the theme or a required field for the theme has not been registered. The specific reason will be identified in the message to the right of the check box area. In the above, a required field has not been registered for the theme containing USGS Quad boundaries; and the theme containing the Town boundaries has not been registered. Themes for the HUC 10 watershed boundaries and VT Orthophoto boundaries are available. If a theme is available, the check box will be enabled and initially will be checked. If a check mark is in the check box, the theme will be used. If no check mark is present, the theme will be ignored. If, for some reason, one does not want to use a specific theme, simply click on the check box to remove the check mark. April 2006 Step 10: Data Entry/Review of Reach Point Data Page 155 When all of the desired changes, if any, are made, click on the Identify button to define the USGS Quads, VT Orthophothos, Towns, and HUC 10 watersheds that each reach falls within. The following message will be displayed after one clicks on the Identify button. This provides a “bail out” point. If one does not want to continue, click on the No button. Otherwise, click on Yes. Upon completion of processing, a message similar to the following will be displayed. Click on the Done button to return to the dialog for Step 10. The map documentation fields will be filled in for the themes selected, as illustrated in the figure below. Note the identifiers are now listed in the fields for the VT orthophotos and the HUC 10 watersheds. Had the Town boundary and USGS Quad themes been fully registered, the names for the towns and quads within which the reach falls would have also been entered for each reach. April 2006 Step 10: Data Entry/Review of Reach Point Data Page 156 Step 10: Export Reach Point Data to dBase Table The data must be exported out of SGAT and imported into the DMS. It may also be desirable to work with the data associated with reach points in other applications such as Microsoft Excel or Microsoft Access. To accomplish this, one must use the Export button on the dialog. By clicking on this button, a copy of all of the data for each reach point is made in a dBase table. That table can subsequently be opened via the other application. Note: That the export function produces a table and not a theme. Warning: The attribute table for the reach point theme is also a dBase table. It will have the same name as the theme, but with the file extension of “.dbf”. Do not open the attribute table of any theme in another application. Inadvertent changes may corrupt the theme making it unusable in ArcView. Click on the Export Data button after all reach points have been reviewed and any additional entries, changes and/or calculations have been completed. All pending changes must be saved prior to exporting the reach point data. If changes are pending, a message will be issued to that effect and will prevent access to the export function. The Export function will always create a dBase table named “RchData.dbf” in the DerivdData directory. Prior to continuing with the export, a check is made to determine if that table already exists (indicating that the Export function has previously been run). If the table is found, the following message is issued. If you wish to have the table replaced with a “current” version of the data, click on Yes. Otherwise, click on No. If you are periodically exporting data, you can always copy or move the table generated to another directory. This provides a method of retaining versions of data and backups. The export table is not used in the Tools. As a result, this table can be moved or deleted as requirements dictate. Upon completion The dBase table, named “RchData.dbf” containing the data associated with reach points will be saved in the DerivdData subdirectory under that in which the ArcView project file exists. The table is NOT added to the ArcView project. A sample of the table is illustrated on the following page. Not all of the fields that are generated in the dBase table are shown due to size of table. The Export function of Step 10 can be performed anytime subsequent to the completion of Step 06. This step simply exports the attribute data associated with reach points to a dBase table, which can then be used in another application. Upon completion of the Export operation, you will be returned to the dialog for Step 10. Click on the button labeled Done to return to the Part B menu dialog. April 2006 Step 10: Data Entry/Review of Reach Point Data Page 157 RchPtId T1.10 T1.09 T1.08 T1.07 T1.06 T1.05 T1.04 T1.03 T1.02 T1.01 T1.00 M22 M21 M20 M19 M18 M17 M16 M15 M14 M13 M12 M11 M10 M09 M08 M07 M06 M05 M04 M03 M02 M01 M00 RchDistId T1-009.277 T1-009.041 T1-008.501 T1-008.024 T1-007.549 T1-007.153 T1-006.132 T1-005.698 T1-005.090 T1-004.601 T1-003.870 M-016.351 M-015.673 M-014.899 M-013.968 M-013.247 M-012.397 M-011.877 M-010.587 M-009.711 M-008.559 M-008.038 M-007.278 M-006.440 M-005.176 M-004.444 M-003.863 M-003.169 M-002.598 M-002.101 M-001.414 M-000.986 M-000.638 M-000.000 April 2006 PPtType OutFlow TribId T1 T1 T1 T1 T1 T1 T1 T1 T1 T1 T1 M M M M M M M M M M M M M M M M M M M M M M M SubWSArea 0.070075 0.058722 0.249549 0.628477 0.889277 0.510812 1.604505 1.236342 0.642182 0.363156 0.179034 0.149543 0.344307 0.227179 0.526752 3.055453 2.379931 0.268149 3.309752 3.145203 3.568017 0.400790 0.992884 1.219941 0.985904 4.041336 3.155768 1.496978 0.567072 0.589377 1.034062 0.905158 0.116192 0.415148 DrngArea 0.070075 0.128797 0.378346 1.006823 1.896100 2.406912 4.011417 5.247759 5.889941 6.253097 6.432131 0.149543 0.493850 0.721029 1.247781 4.303234 6.683165 6.951314 10.261066 13.406269 16.974286 17.375076 18.367960 19.587901 20.573805 24.615141 34.203040 35.700018 36.267090 36.856467 37.890529 38.795687 38.911879 39.327027 TotStrmLen 1773.22 1243.57 2852.15 7365.32 2786.80 8896.06 18011.68 18197.00 5190.09 2581.20 3860.49 3670.31 7442.16 4084.82 4920.18 60831.07 28930.81 2744.59 26891.49 42155.61 43594.05 2751.91 19005.38 10948.07 10908.12 42194.01 40879.05 14622.83 10956.83 9085.41 18339.13 16320.62 1833.49 8409.75 ChanlLen 1773.22 1243.57 2852.15 2517.03 2511.95 2090.43 5391.15 2292.33 3207.50 2581.20 3860.49 3670.31 3578.37 4084.82 4920.18 3805.39 4488.66 2744.59 6812.88 4622.77 6082.96 2751.91 4011.58 4422.77 6677.58 3865.71 3064.43 3666.09 3013.28 2622.25 3628.58 2262.59 1833.49 3373.70 ChanlWidth 2.69 3.65 6.26 10.21 14.02 15.79 20.39 23.32 24.71 25.46 25.82 3.94 7.15 8.64 11.37 21.12 26.32 26.84 32.61 37.27 41.94 42.43 43.63 45.05 46.17 50.51 59.54 60.82 61.31 61.80 62.66 63.41 63.50 63.84 Step 10: Data Entry/Review of Reach Point Data DistToStrt 48984.54 47740.96 44888.81 42371.78 39859.83 37769.41 32378.25 30085.93 26878.43 24297.23 20436.75 86334.59 82756.22 78671.40 73751.22 69945.83 65457.17 62712.58 55899.70 51276.93 45193.97 42442.05 38430.47 34007.71 27330.13 23464.41 20399.98 16733.89 13720.61 11098.36 7469.78 5207.19 3373.70 0.00 WSArea 39.327027 39.327027 39.327027 39.327027 39.327027 39.327027 39.327027 39.327027 39.327027 39.327027 39.327027 39.327027 39.327027 39.327027 39.327027 39.327027 39.327027 39.327027 39.327027 39.327027 39.327027 39.327027 39.327027 39.327027 39.327027 39.327027 39.327027 39.327027 39.327027 39.327027 39.327027 39.327027 39.327027 39.327027 Page 158 Part C: Soils, Land Cover and Density Analysis Part A and B of the Tools extension were primarily devoted to data preparation. This part builds upon that data and provides the user with the ability to obtain soils and land cover data for the stream corridors (from Step 09) or for the source sub-watershed theme. To access the processing steps for Part C, click the button labeled Part C: Soils and Land Cover Analysis on the Main dialog for the Tools extension. The dialog for Part C, as illustrated below, will be displayed. To access the dialog for any specific step simply click on the corresponding button. It is important to understand that each step will be performed several times depending upon the requirements of the project. For example, Step 11 can be performed for the following combinations of “input” themes: • • • • Soils data theme with the stream corridors Soils data theme with the sub-watersheds Land Cover/Land Use data theme with the stream corridors Land Cover/Land Use data theme with the sub-watersheds Step 12 would then be performed on each of the themes resulting from the above combinations. Step 13 would be performed if soils and Land Cover/Land Use data is to be analyzed for the entire catchment or drainage area above each reach point. Then, Step 14 would be performed on each of the tables resulting from Step 12 and/or Step 13. Step 15 is independent of the other steps and permits one to obtain densities of features that are located within the sub-watersheds or stream corridors. The densities are calculated on a “per square mile” basis, e.g. number of point (houses), linear footage (roads), square miles (wetlands) per square mile. Clicking on the Done button will return you to the Main dialog for the Tools extension. April 2006 Part C (Steps 11 – 15) Soils, Land Cover & Density Analysis Page 159 Step 11: Clip Theme to Boundary This dialog provides the ability to clip a “data” theme with a “boundary” theme. The boundary theme is used like a “cookie cutter”. Only those areas of the data theme that fall entirely within or cross the area(s) represented by the boundary theme will be placed in the output theme. Those areas from the data theme that fall outside the boundary theme are clipped off at the boundaries. The data themes of particular interest are soils and land cover/land use. The boundary themes are the stream corridors (from Step 09) and the sub-watersheds provided by the user. Examples of the resulting themes will be presented subsequently. To access the dialog for this step click the button labeled Step 11: Clip Data Themes to Selected Boundaries on the Part C main dialog. If a theme has not been registered for either the Soils or the LcLu, the error message shown below will be issued. A similar error will be issued if a theme has not been registered for either the sub-watersheds or corridors. In such cases, the dialog for Step 11 will be displayed; however, the Clip button will be disabled. The dialog for Step 11 is illustrated on the following page. To use this dialog: • • • Click on the radio button to select the type for data theme (e.g. either soils or Land cover/Land use) Click on the radio button to select the Area for Boundary Theme (e.g. sub-watersheds or corridors) Enter a comment/note in the Note text field to describe any conditions, error corrections, etc. that may aid in understanding the process used in developing the assessment data. Once the radio buttons for the type and area for boundary theme have been selected, the remaining controls on the dialog will be filled in. The output theme name will reflect o o o The step number (i.e. “S11”), The first character of the type (i.e. S Æ soils or L Æ LcLu), and The first character of the area for boundary theme (i.e. W Æ sub-watershed or C Æ Corridor.) An example of a name would be S11LC.shp for LcLu within the stream corridors. The area units are displayed on this dialog; however, they cannot be changed. April 2006 Step 11: Clip Theme to Boundary Page 160 Starting the process After the required information has been entered on the dialog, click on the button labeled Clip. Processing may take a few moments depending upon the hardware used. After one clicks on the Clip button, the following message will be displayed. This provides the user with a “bail out” in the event that the button was inadvertently clicked. To continue with the clipping operation click on the Yes button. Note: Refer to the section entitled “Common Dialog Operations in the Stream Geomorphic Assessment Tools” for common error and warning messages. Upon completion Alias of output theme will vary LC (LcLu clipped to stream corridors), LW (LcLu clipped to subwatersheds), SC (soils clipped to stream corridors) or SW (soils clipped to sub-watersheds). Legend file used: -- none -The output theme will be saved in the DerivdData subdirectory under that in which the ArcView project file exists. This theme is added to the user view identified on the Main dialog. The output theme will have all of the attribute fields from the data theme. In addition, the following attributes will be added: RchPtId – Reach point identifiers copied from the Boundary Theme. TribId – Tributary Identifier for the main stem/tributary associated with the reach point for the stream corridor or sub-watershed. Values copied from the Boundary Theme. April 2006 Step 11: Clip Theme to Boundary Page 161 GeoSWArea - Will contain the area of each polygon in the output theme (e.g. the area of each polygon for soil mapping units or LcLu Type). CordrArea - Will be included if the boundary theme is stream corridors (from Step 09). The values for CordrArea will be the area of the stream corridor and will be copied from the Boundary Theme. SubWSArea - Will be included if the boundary theme is the sub-watersheds. The values for SubWSArea will be the area of the sub-watershed and will be copied from the Boundary Theme. Note: The CordrArea or SubWSArea are included to facilitate user-calculations of area percentages following Step 12, Step 13 and/or Step 14. The following fields are added to the theme to verify proper theme selection in subsequent processing steps, and to provide internal documentation as to the derivation of the theme: BndryType - Will indicate the type of boundary theme used, as depicted by the selection for “Area for Boundary Theme” on the dialog, i.e. sub-watershed or corridor. DataType - Indicates the type of data theme used, as depicted by the selection for “Type of Data Theme” on the dialog, i.e. LcLu or Soils. SourceStep - Will indicate which step created the output theme. Value inserted in this step is 11. SumLevel - Identifies the level of aggregation for the data. Field is not used in this step; however, it is created for use in subsequent steps. Value is set to blank. (Possible values are either “Corridor”, “Sub-Watershed” or “Upstream”.) All other data from the source theme (Soils or Land Cover) will be included in the resulting theme. The figure below on the left illustrates the soils theme as the data theme. The stream corridors from Step 09 were used as the boundary theme. The output theme shown on the right below resulted from processing in this step. The figure to the right shows an enlargement of a section of the stream corridor. Each different soil mapping unit is displayed in a different color. April 2006 Step 11: Clip Theme to Boundary Page 162 Step 12: Summarize and Attach Descriptive Data This dialog summarizes data and performs a relational join to acquire descriptive data from another dBase table. This is best described using soils data as an example. In Step 11, the soils can be clipped to the boundaries of the stream corridors. Within each corridor, the same soil mapping unit may be found any number of times. This step, Step 12, creates a dBase table in which only one record is produced for each unique soil type within a given corridor. The total area for each soil type occurring within a given corridor is calculated and entered into the field GeoSWArea. The example cited the use of soils being clipped to the boundaries of the stream corridors. In a similar manner, the soils could be clipped (via Step 11) to the boundaries of the sub-watershed. This step would then summarize the area of soils by soil mapping unit within each sub-watershed. In a like manner, one can use the Land Cover/Land Use (LcLu) theme as the data theme. Step 11 could clip the LcLu theme to either the stream corridor or the sub-watershed. This step would then aggregate the areas by LcLu code (or land cover/land use type) falling within each unique boundary (corridor or sub-watershed) of the selected boundary type. The following table illustrates the various combinations that can result from Step 11: Boundary Theme used in Step 11 Stream Corridors Sub-Watersheds Data theme used as input in Step 11 Soils LcLu X X X X The “X’s” represent a theme resulting from Step 11. This step then takes that theme and summarizes the areas for each of the unique “classifications” found in the “Data Theme” (i.e. soils mapping unit for soils and LcLu type for LcLu) for each of the unique boundaries found in the “Boundary Theme” (i.e. each stream corridor or each sub-watershed). The output table will have one record pertaining to each unique combination of “classification” and “boundary”, as illustrated in the following table: Record 1 2 3 … Boundary (Stream Corridor or Sub-Watershed) 1 1 1 … 2 2 2 … 3 3 … Classification (Soil Mapping Unit or LcLu Type) A B E Area Other Assigned Data Descriptive Data A E F A B Also refer to the figure at the end of this section for a specific example of a table produced by Step 12. April 2006 Step 12: Summarize and Attach Descriptive Data Page 163 After the summation occurs, data from the corresponding “relational table” is appended to each record. This permits one to analyze soils or LcLu within each corridor or sub-watershed. Note: The Top20_05.dbf table is a product from VCGI/NRCS that lists various characteristics of each soil mapping unit. A document published by VCGI/NRCS, which describes that table, is included as Appendix G. Examples of characteristics are indications of flooding, high/low depths to water table, parent geologic material, etc. The LUCodes.dbf table is also a product from VCGI. The table lists a descriptive phrase for each land use/land cover code. It is self-explanatory and can be reviewed in ArcView. Refer to the section “Setup: Required dBase Tables. A version of these tables is provided on the Tools Distribution CDROM. The names of those tables are S00Top20_05.dbf, and S00LUCodes.dbf. Step 12 and Step 13 and Step 14 of the Tools will work only with the version of soil data currently (subsequent to April 2002) provided by VCGI. (Prior versions of soil data and the “Top20” attribute table will not work due to technical format changes.) To access the dialog for this step click the button labeled Step 12: Summarize and Attach Descriptive Data on the Part C main dialog. The dialog is illustrated below. To use this dialog: This dialog is specifically tailored to the themes resulting from Step 11, and to the soils and land use/land cover data for the State of Vermont. • • • Select the type of data (soils or land cover) that is to be summarized. When the type of data is selected, the corresponding relational table and fields will be entered on the dialog. Select the Area for which the data is being summarized (sub-watersheds or corridors). Enter a comment/note in the Note text field to describe any conditions, error corrections, etc. that may aid in understanding the process used in developing the assessment data. April 2006 Step 12: Summarize and Attach Descriptive Data Page 164 Once the radio buttons for the type and area have been selected, the remaining elements on the dialog that are required to perform Step 12 are automatically filled in. These elements are as follows: • The theme that is to be summarized, which will be one produced via Step 11. The theme will correspond to the type and area selected. • The relational field to be used for the theme. This is a field which contains values that relate one-to-one with values in the relational field for the relational table. When the type of data is selected, the field registered for the data theme used in Step 11 will be entered automatically. • The name of the relational table to be used. The name is obtained from the dBase table registered for either the “Soils Top 20 Attributes” or “LcLu Codes/Descriptions”. The particular table will be dependent upon the type of data selected. • The relational field to be used for the relational table. The field displayed will be that which was identified during the registration of the relational table. • The pre-defined name for the output table will be displayed. Note: The output from this step is a table. Note: Refer to the Section entitled “Theme/Table registration and Management” for description of the themes, tables and field registrations required and the procedure for performing registration. The output table name will reflect: o o o The step number (i.e. “S12”), The first character of the topic (i.e. S Æ soils or L Æ LcLu), and The first character of the coverage for boundary theme (i.e. W Æ sub-watershed or C Æ Corridor.) An example of a name would be S12LC.dbf for LcLu within the stream corridors. As one selects the different combinations of radio buttons for the type and area, it is possible that the following error message will be issued. The above error message simply means that the input theme required for the selected combination of radio buttons does not exist, i.e. it has not been created via Step 11. If the data set identified in the message is required, return to Step 11 and select the same combination of radio buttons and perform the Clip operation. When you return to this dialog, the error message for that data set should no longer be issued. Note: The above error message will also be issued if the themes for soils or LcLu or the tables for the Soils Top 20 or the LcLu Codes have not been registered. Refer to the sections entitled “Required Source Themes” and “Theme/Table Registration and Management”. April 2006 Step 12: Summarize and Attach Descriptive Data Page 165 The default (or pre-selected) set of radio buttons for the dialog is LcLu and Corridors. As a result, the above error message may be issued prior to the display of the dialog (i.e. after the button labeled Step12: Summarize and Attach Descriptive Data on the Part C menu dialog is clicked but before the dialog is actually displayed). This occurs because the test for the existence of the theme is also conducted on the open event of the dialog. If the theme representing the LcLu data theme clipped by the corridor boundaries does not exist, the error message will be issued. Simply click on the Ok button in the error message. The dialog will appear and you can then select the desired combination of radio buttons. Starting the process After the required information has been entered on the dialog, click on the button labeled Summarize. Processing may take a few moments depending upon the hardware used. Note: Refer to the section entitled “Common Dialog Operations in the Stream Geomorphic Assessment Tools” for common error and warning messages. Upon completion Alias of output table will vary: 12LC (for LcLu clipped to stream corridors), 12LW (for LcLu clipped to sub-watersheds), 12SC (for soils clipped to stream corridors) or 12SW (for soils clipped to sub-watersheds). Legend file used: -- N/A -The output table will be saved in the DerivdData subdirectory under that in which the ArcView project file exists. This table is added to the user tables area. The output table will have all of the attribute fields from the input theme and the input (relational) table. The following attributes are included in the table created: RchPtId – Reach point identifiers copied from the input theme. TribId – Tributary Identifier for the main stem/tributary associated with the reach point for the stream corridor or sub-watershed. Values copied from the input theme. GeoSWArea -Will contain the sum of the areas for a soil mapping unit or land cover within the given boundary area (stream corridor or sub-watershed). CordrArea - Will be included if the boundary theme used in Step 11 was stream corridors (from Step 09). The values for CordrArea will be the area of the stream corridor and will be copied from the input theme. SubWSArea -Will be included if the boundary theme used in Step 11 was sub-watersheds. The values for SubWSArea will be the area of the sub-watershed and will be copied from the input theme. April 2006 Step 12: Summarize and Attach Descriptive Data Page 166 Note: The CordrArea or SubWSArea are included to facilitate user-calculations of area percentages following Step 12 and/or Step 13. The following fields are included in the table created to verify proper table selection in subsequent processing steps, and to provide internal documentation as to the derivation of the table. BndryType - Indicates the area for which data is being summarized (i.e.the boundary theme used in Step 11). Possible values are: sub-watershed or corridor. Value copied from the Step 11 input theme. DataType -Indicates the type of data theme used (i.e. the data theme used in Step 11). Possible values are LcLu or Soils. Value copied from Step 11 input theme. SourceStep - Will indicate which step created the output table. Value inserted in this step is 12. SumLevel - Will show to which level of aggregation that the data pertains. Field is not used in this step; however is created for subsequent use in other steps. Value is set to blank. (Possible values are either “Corridor”, “Sub-Watershed” or “Upstream”.) SysRelFld identifies the relational field in the input theme used to relate to the descriptive table. Field is used internally only and should not be altered. All other data from the source theme (Soils or Land Cover) will be copied from the input theme. In addition, the data elements in the related record of the input table will be copied into the table created. Click on the button labeled Done to return to the Part C menu dialog. April 2006 Step 12: Summarize and Attach Descriptive Data Page 167 WARNING: Since the resulting table is a dBase table, it can be opened up in either Microsoft Excel or Microsoft Access for further analysis. If those applications are to be used, copy the table into another directory on the hard disk. Open that version of the table with Excel or Access. Then, any necessary changes can be made without impact on the ArcView project. Note: If changes, to a table being used within ArcView, are made to the structure of the table outside of ArcView, it may not be useable within ArcView. This, in turn, could result in corruption of the ArcView project, which could render it unusable. The following figure illustrates a portion of the table produced. Numerous fields to the right are omitted. Of particular note is that for each Reach Point (field RchPtId, which is equivalent to a sub-watershed or stream corridor) only one record is found for each soil mapping unit (field MuSym_c or Muid_c). This is the result of the summation performed in this step where the areas are summed for the same soil mapping unit within a stream corridor or sub-watershed. April 2006 Step 12: Summarize and Attach Descriptive Data Page 168 Possible Error Condition As each soil mapping unit or land cover/land use type is summarized, an attempt is made to find the corresponding record in the relational table. If a record is not found in the relational table, it is maintained in an internal list. At the end of processing, an error message, such as that shown below, will be issued. All missing values will then be written to a file having the same name as that specified for the output table, but with the letters “MIds” appended (referring to Missing Identifiers or missing values). As an example, the output table name for the message above was: S12LC The name of the table containing the missing values (ids) is then S12LCMIds The dBase table containing the missing values will be saved in the DerivdData subdirectory under that in which the ArcView project file exists. The table is also added to the ArcView project. The figure to the right is an example of the “missing ids” table. In this example, a “blank” value for the relational field “Muid_c” was found once in the input theme, i.e. a soil mapping unit was left blank in the soils theme which was clipped in Step 11. These missing values are an indication that either data in the relational table (Top20_05.dbf or LuCodes.dbf) is out-of-date; or there are attribute errors in the source themes used in Step 11. Any missing values should be recorded and investigated with the agency responsible for the data sets, which would generally be VCGI. Make note of the theme which was clipped in Step 11, what if any themes were merged to form that one and the relational table. After you have recorded the information, the tables containing the missing ids can be deleted from the ArcView project and the hard disk. Warning: Soils that were not found in the S00Top20_05.dbf table will not be included in the table created by Step 12. This will cause the sum of the soils areas not to match the corridor or subwatershed area. April 2006 Step 12: Summarize and Attach Descriptive Data Page 169 Step 13: Sum Data to Upstream Watershed Area This dialog utilizes the soils and/or the land cover table produced in Step 12. Step 12 summarizes the area for each unique “classification” (i.e. soil mapping unit for soils and LcLu type for LcLu) found within each unique “boundary” (i.e. each stream corridor or each sub-watershed). This step simply adds another level of aggregation. The area associated with each unique classification (from Step 12) is summed for all boundaries located above a given reach point. This, in effect, represents the catchment or drainage area above a reach point. The areas pertaining to a unique classification for all stream corridors or sub-watersheds located above a given reach point will be summed. This, for example, enables one to determine how much of a specific type of soil lies above a given reach point. To access the dialog for this step click on the button labeled Step 13: Sum Data to Upstream Watershed Area on the Part C main dialog. The dialog for this step is illustrated below. To use this dialog: This dialog is specifically tailored to the themes resulting from Step 12. • The theme representing reach points (created in Step 06) will be displayed. • Select the type of data (soils or land cover) that is to be summarized. • Select the Area for which the data is being summarized (sub-watersheds or corridors). • Enter a comment/note in the Note text field to describe any conditions, error corrections, etc. that may aid in understanding the process used in developing the assessment data. April 2006 Step 13: Sum Data to Upstream Watershed Area Page 170 Once the above radio buttons corresponding to the above have been selected, the remaining elements on the dialog that are required to perform Step 13 will automatically be filled in. These elements are as follows: • The theme that is to be summarized, which will be one produced via Step 12. The theme will correspond to the type and area selected. • The pre-defined name for the output table will be displayed. Note: That the output from this step is a table. The output table name will reflect: o o o The step number (i.e. “S13”), The first character of the topic (i.e. S Æ soils or L Æ LcLu), and The first character of the coverage for boundary theme (i.e. W Æ sub-watershed or C Æ Corridor.) An example of a name would be S13LC.dbf for LcLu within the stream corridors. As one selects the different combinations of radio buttons for the type and area, it is possible that the following error message will be issued. The above error message simply means that the input theme required for the selected combination of radio buttons does not exist, i.e. it has not been created via Step 12. If the data set identified in the message is required, return to Step 12 and select the same combination of radio buttons and perform the Summarize operation. When you return to this dialog, the error message for that data set should no longer be issued. The default (or pre-selected) set of radio buttons for the dialog is LcLu and Corridors. As a result, the above error message may be issued prior to the display of the dialog (i.e. after the button labeled Step13: Aggregate Data to Upstream Watershed Area on the Part C menu dialog is clicked but before the dialog is actually displayed). This occurs because the test for the existence of the theme is also conducted on the open event of the dialog. If the theme representing the LcLu data theme clipped by the corridor boundaries does not exist, the error message will be issued. Simply click on the Ok button in the error message. The dialog will appear and you can then select the desired combination of radio buttons. April 2006 Step 13: Sum Data to Upstream Watershed Area Page 171 Starting the process After the required information has been entered on the dialog, click on the button labeled Sum. Processing may take a few moments depending upon the hardware used. Note: Refer to the section entitled “Common Dialog Operations in the Stream Geomorphic Assessment Tools” for common error and warning messages. A dialog box will prompt the user to verify the action and data for which the summation of data and will done. Upon completion Alias of output table will vary: 13LC (for LcLu clipped to stream corridors), 13LW (for LcLu clipped to sub-watersheds), 13SC (for soils clipped to stream corridors) or 13SW (for soils clipped to sub-watersheds). Legend file used: -- N/A -The output table will be saved in the DerivdData subdirectory under that in which the ArcView project file exists. This table is added to the user tables area. The output table will have one record for each unique combination of classification and boundary. Each record will consist of the following attribute fields: RchPtId – Reach point identifiers copied from the input table. TribId – Tributary Identifier for the main stem/tributary associated with the reach point for the stream corridor or sub-watershed. Values copied from the input table. GeoSWArea -- The sum of the areas associated with each unique classification found above the given boundary. CordrArea -- Will be included as a field if the boundary theme used in Step 11 was the stream corridor theme from Step 09. This field will contain the sum of the area of the stream corridors upstream of the given reach point. SubWSArea will be included as a field if the boundary theme used in Step 11 was the subwatershed theme, and will contain the sum of the area of the sub-watersheds upstream of a given reach point. Note: The CordrArea or SubWSArea is included to facilitate user-calculations of area percentages following Step 12, Step 13 and/or Step 14. The following fields are added to the table to verify proper table selection in subsequent processing steps, and to provide internal documentation as to the derivation of the table: BndryType will indicate the type of boundary theme used in Step 11. Value is copied from the input table. Possible values are: sub-watershed or corridor. April 2006 Step 13: Sum Data to Upstream Watershed Area Page 172 DataType indicates the type of data theme used in Step 11. Value is copied from the input table. Possible values are LcLu or Soils. SourceStep will indicate which step created the output theme. Value inserted in this step is 13. SumLevel will show to which level of aggregation that the data pertains. Value is set to “Upstream”. (Possible values are either blank or Upstream.) SysRelFld identifies the relational field in the input theme used to relate to the descriptive table. Field is used internally only and should not be altered. All other data from the input table will be included in the resulting table. Click on the button labeled Done to return to the Part C menu dialog. The shaded area in the figure below illustrates the sub-watersheds for which data would be summed in this step for reach point M08. # # # # # Shaded area shows Subwatersheds summed to obtain data for Reach Point “M08” # # # # # # # # # Reach Poi nt M08 # # # # # # # # # # # # # # # # # # # April 2006 Step 13: Sum Data to Upstream Watershed Area Page 173 The following figure illustrates a portion of the table produced. Numerous fields to the right are omitted. WARNING: Since the resulting table is a dBase table, it can be opened up in either Microsoft Excel or Microsoft Access for further analysis. If those applications are to be used, copy the table into another directory on the hard disk. Open that version of the table with Excel or Access. Then, any necessary changes can be made without impact on the ArcView project. Note: If inadvertent changes are made to the structure of the table outside of ArcView, it may not be useable within ArcView. This, in turn, could result in corruption of the ArcView project, which could render it unusable. April 2006 Step 13: Sum Data to Upstream Watershed Area Page 174 Step 14: Summarize Area by Field Value (Cross-Tabulate) This dialog summarizes areas based upon values in a field, i.e. cross-tabulation. This is best described by using the soils data as an example. Example Each soil mapping unit is associated with various characteristics. The most frequently used characteristics are those listed in the Top20_05.dbf table. One of those characteristics is “the potential for flooding”. That potential is described by the values for the “Flood” field, which are listed below: • • • • • • Frequent None Not Rated Occasional Rare Water In Step 12, areas were summarized by soil mapping unit within a given stream corridor (or subwatershed). Each of those soil mapping units was assigned a value for its “potential for flooding” from the Top20_05.dbf table. In Step 13, areas were summarized by soil mapping units within the stream corridor (or subwatershed) for the entire corridor (or sub-watershed) upstream of a reach point. The value for “potential for flooding” from the Top20_05.dbf table is carried forward from the input table. In this step, the soil mapping units are “dropped” and areas are summed by the value associated with respect to a soil’s characteristics, i.e. potential for flooding. The summation is performed within the stream corridor or sub-watershed, depending upon which theme was used as the boundary theme in Step 11. The stream corridor is used to continue the example. The table resulting from this step will be the total area within a stream corridor (for a given reach point) associated with a specific potential for flooding. The following table illustrates this cross-tabulation: The field names in the preceding figure are somewhat cryptic due to a ten character limitation. Appendix E and F associate the field names used in the cross-tabulations with the source field names and values from the Top20 and LuCodes source tables. One record will be present in the resulting table for each reach point. This will contain the area summations for a corridor, sub-watershed, upstream corridors or upstream sub-watersheds, as dictated by the area of interest and the input table (i.e. from Step 12 or Step 13). April 2006 Step 14: Summarize Area by Field Value (Cross-Tabulate) Page 175 In the preceding figure, Fld_Freq relates to frequent flooding potential, Fld_None relates to no flooding potential, Fld_NR relates to flooding potential not rated Fld_Occas relates to occasional flooding potential. Fld_Rare relates to rare flooding potential, and Fld_Blnk relates flooding potential not available. The field WaterArea represents the area designated as water bodies in the soils coverage. The values for each of the cross-tabulation fields are in square miles. The field CordrArea represents the area of the corridor for the given reach point. By dividing the WaterArea and each of the values for a given characteristic by the CordrArea, one can then obtain percentages. Using RchPtId m12 in the above figure as an example, the following percentages for the potential for flooding would be obtained: Soil Value for Potential for Flooding Water Area (WaterArea) Frequently Flooded (Fld_Freq) Not Freq. Flooded (Fld_None) Not Rated (Fld_NR) Occasionally Flooded (Fld_Occas) Rarely Flooded (Fld_Rare) No Value (Fld_Blnk) Total (CordrArea = 0.1079474252) Area (from above figure) 0.0001448810 0.0 0.09755830362 0.0 0.0102442380 0.0 0.0 0.107947422 Percentage of Corridor 0.01% 0.00% 90.38% 0.00% 9.49% 0.00% 0.00% 99.88% In the above example, the option (on the dialog) to exclude Water Area From Summary was checked. This resulted in accumulating all areas associated with water into the field WaterArea. If that option had not been used, the areas associated with water would have been accumulated into the field Fld_NR (Not Rated), which is the “value” that is assigned to the soil mapping unit for water in the Potential for Flooding soil characteristic. (For verification, one can review the Top20_05.dbf table for soil characteristics.) To access the dialog for this step click the button labeled Step 14: Summarize Areas by Field Value (Cross-Tab) on the Part C main dialog. The dialog is shown on the following page. April 2006 Step 14: Summarize Area by Field Value (Cross-Tabulate) Page 176 To use this dialog: This dialog is specifically tailored to the tables resulting from Step 12 or Step 13. • Select the type of data (soils or land cover) that is to be cross-tabulated. When the type of data is selected, the corresponding Table containing Field Value Names and available Fields will be entered on the dialog. • Select the Area for which the data is being cross-tabulated (sub-watersheds or corridors). • Select the Aggregate Level for which the data is being cross-tabulated (reach or reach watershed). Note: If the aggregate level is Reach, the table produced from Step 12 will be used as input. If aggregate level is Reach Watershed (or upstream drainage area), the table produced from Step 13 will be used as input. • Select to have the Water values, within the soils theme, excluded from the crosstabulation. If water is to be excluded, any soils with a mapping unit symbol of “w”, will be tabulated separately into a column (or field) named “WaterArea”. This provides a more accurate cross-tabulation of soil characteristics. Note: The Top20_05.dbf table does include a soil mapping unit for water. While this is potentially valuable information for different users, it is recommended that water be excluded from the soils data. • Select one or more of the fields for which areas are to be calculated. Click on the first field. Then, hold the Shift key down while clicking on the additional fields. The list of fields from which you can select may be a subset of those found in the Top20_05.dbf table. Note: Click on the Select Standard Field(s) for Analysis button to choose only those parameters that are evaluated in the Phase 1 Geomorphic Assessment. Once the radio buttons for type, area and aggregate level have been selected, the remaining elements on the dialog that are required to perform Step 14 will automatically be filled in. These elements are as follows: • The theme that is to be summarized, which will be one produced via either Step 12 or Step 13. The theme will correspond to the type, area and aggregate level selected. • The pre-defined name for the output table will be displayed. Note: That the output from this step is a table. The output table name will reflect: o o o o The step number (i.e. “S14”), The first character of the topic (i.e. S Æ soils or L Æ LcLu), The first character of the coverage for boundary theme (i.e. W Æ sub-watershed or C Æ Corridor) and The step number creating the input table (i.e. 12 or 13). An example of a name would be S14SC12.dbf for LcLu within the stream corridors. April 2006 Step 14: Summarize Area by Field Value (Cross-Tabulate) Page 177 As one selects the different combinations of radio buttons for the type, area and aggregate level, it is possible that the following error message will be issued. The above error message simply means that the input theme required for the selected combination of radio buttons does not exist, i.e. it has not been created via either Step 12 or Step 13. If the data set identified in the message is required, return to Step 12 or Step 13 and select the same combination of radio buttons (for type and area) and perform the Summarize operation. When you return to this dialog, the error message for that data set should no longer be issued. The default (or pre-selected) set of radio buttons for the dialog is LcLu, Corridors and Reach. As a result, the above error message may be issued prior to the display of the dialog (i.e. after the button labeled Step14: Summarize Areas by Field Value (Cross-Tab) on the Part C menu dialog is clicked but before the dialog is actually displayed). This occurs because the test for the existence of the theme is also conducted on the open event of the dialog. If the theme representing the LcLu data theme clipped by the corridor boundaries as produced by Step 12 does not exist, the error message will be issued. Simply click on the Ok button in the error message. The dialog will appear and you can then select the desired combination of radio buttons. Starting the process After the required information has been entered on the dialog, click on the button labeled Sum. Processing may take a few moments depending upon the hardware used. Note: Refer to the section entitled “Common Dialog Operations in the Stream Geomorphic Assessment Tools” for common error and warning messages. A dialog box will prompt the user to verify the action and data for which the summation of data and will done. More on Water Area: As one might imagine, the area encompassed by water bodies can be significant. This is especially true when the “boundary type” is corridors. Assume, for example, that the area identified with the soils data for water was one square mile and that the area of the corridor of interest was three square miles. Since the area occupied by water represents 1/3 of the total corridor, any characteristics developed in the cross-tabulation would be significantly biased toward the values associated with water. Continuing with the example, the Soils Top20 table lists the flooding characteristic of water as “Not Rated”. If water is not excluded from the soils data, April 2006 Step 14: Summarize Area by Field Value (Cross-Tabulate) Page 178 then already 1/3 of the corridor area would be associated with the ”Not Rated” value for the flood potential. This obviously would not reflect the actual condition of the corridor. By “excluding water from the summary”, the areas calculated for the fields selected to crosstabulate will reflect the areas for “actual” soils. The area associated with water will be reported in the separate field named “WaterArea”. Reference tables: The reference tables which will be displayed in the area for “Table With Field Value Names” are: • • S00SoilXTabFields_05.dbf -- (For use with soils; refer to Appendix E) S00LcLuXTabFields.dbf -- (For use with land cover; refer to Appendix F) These are described in the appendices and should not be altered without a clear understanding of their use in the Tools. Those who wish to use Land Cover/Land Use and/or soils coverage other than those provided by VCGI will have to create versions of the S00LuCodes.dbf, S00Top20_05.dbf, S00LcLuXTabFields.dbf and S00SoilXTabFields_05.dbf. Upon completion Alias of output table will vary: 14SC12 (reach data for soils clipped to stream corridors) 14SW12 (reach data for soils clipped to sub-watersheds) 14LC12 (reach data for LcLu clipped to stream corridors) 14LW12 (reach data for LcLu clipped to sub-watersheds) 14SC13 (reach watershed data for soils clipped to stream corridors) 14SW13 (reach watershed data for soils clipped to sub-watersheds) 14LC13 (reach watershed data for LcLu clipped to stream corridors) 14LW13 (reach watershed data for LcLu clipped to sub-watersheds) Legend file used: -- N/A -The output table will be saved in the DerivdData subdirectory under that in which the ArcView project file exists. This table is added to the user tables area. dBase files impose a maximum of ten characters for field names. As a result, some of the field names may be cryptic in nature. Refer to Appendix E or F to for a definition of the field names. There will be a field in the table for each unique value, Field Value Name, for those fields selected on the dialog. The values for those fields will be the area (in square miles) within the given corridor or sub-watershed (depending upon the boundary theme used for clipping in Step 11). Refer to the preceding figure showing the resulting table for flood characteristics of soil mapping units. In addition to the cross-tabulation fields, the output table will contain the following fields: RchPtId, TribId, CordrArea OR SubWSArea (depending upon the boundary theme used for clipping in Step 11), BndryType, DataType, SumLevel, and WaterArea. RchPtId – Reach point identifiers copied from the input table. TribId – Tributary Identifier for the main stem/tributary associated with the reach point for the stream corridor or sub-watershed. Values copied from the input table. April 2006 Step 14: Summarize Area by Field Value (Cross-Tabulate) Page 179 CordrArea - Will be included if the boundary theme is stream corridors (from Step 09). The values for CordrArea will be the area of the stream corridor and will be copied from the input table. SubWSArea -Will be included if the boundary theme is the sub-watersheds. The values for SubWSArea will be the area of the sub-watershed and will be copied from the input table Note: The CordrArea or SubWSArea is included to facilitate user-calculations of area percentages. WaterArea - If the user is developing the cross-tabulation for soils and has elected to exclude water from being summed into the areas of the cross-tabulation fields, the WaterArea field will contain the area of water bodies found within the corridor or sub-watershed. The following fields are added to the table to verify proper table selection in subsequent processing steps, and to provide internal documentation as to the derivation of the table: BndryType - Indicates the type of boundary theme used. Possible values are: sub-watershed or corridor. Value copied from input table. DataType - Indicates the type of data theme used. Possible values are LcLu or Soils. Value copied from input table. SourceStep - Will indicate which step created the output theme. This is used in subsequent steps to verify proper input theme selection. Value inserted in the step is 14. SumLevel - Field indicates to which level of aggregation that the data pertains. Value is set to that of the input table. (Possible values are either blank or “Upstream”.) Field Value Name - Is the area represented by each possible value for each user-selected field. WARNING: Since the resulting table is a dBase table, it can be opened up in either Microsoft Excel or Microsoft Access for further analysis. If those applications are to be used, copy the table into another directory on the hard disk. Open that version of the table with Excel or Access. Then, any necessary changes can be made without impact on the ArcView project. Note: If inadvertent changes are made to the structure of the table outside of ArcView, it may not be useable within ArcView. This, in turn, could result in corruption of the ArcView project, which could render it unusable. Possible Error Condition As each value for a soil characteristic or a land cover/land use type is summarized, an attempt is made to find the corresponding record in the reference table (S00SoilXTabFields.dbf or S00LcLuXTabFields.dbf). If a record is not found in the reference table, it is maintained in an internal list. At the end of processing, an error message, such as that shown below, will be issued. April 2006 Step 14: Summarize Area by Field Value (Cross-Tabulate) Page 180 All missing values will then be written to a file having the same name as that specified for the output table, but with the letters “MIds” appended (referring to Missing Identifiers or missing values). As an example, the output table name for the message above was: S14SC12 The name of the table containing the missing values (ids) is then S14SC12MIds The dBase table containing the missing values will be saved in the Tables subdirectory under that in which the ArcView project file exists. The table is also added to the ArcView project. The following figure is an example of that table: In this example, the values “99.9” and “ –1” for the field “WATERSHALL” were omitted from the reference table named “S00SoilXTabFields.dbf”. These missing values are an indication that data in the reference table (S00SoilXTabFields.dbf or S00LcLuXTabFields.dbf) is out-of-synch with the corresponding relational table (S00Top20_05.dbf or S00LuCodes.dbf) used in Step 12. Any missing values should be recorded and investigated. After you have recorded the information, the tables containing the missing ids can be deleted from the ArcView project and the hard disk. Problems can be corrected using ArcView and editing the appropriate reference table. April 2006 Step 14: Summarize Area by Field Value (Cross-Tabulate) Page 181 The following figure illustrates what caused the problem in the example cited above. The records in error are highlighted in yellow. By inspection, you will note that the “99.9 and -1” entry under the field (column) labeled FieldValue appears offset to the right with respect to other entries in that column. In fact, there is a space preceding that value. By editing the table and removing the space before the value, the error was corrected. It may become necessary to add additional records to the table to reflect new values for individual characteristics. Again one can edit the table, and add new records. The entries under FieldValue and AliasName must be unique. Further, there is a 10 character limitation for entries under AliasName. (Refer to Appendix E or F for additional information.) It is recommended that maintenance of the reference tables be performed at a central facility. This would eliminate the need for all users to perform similar updates. New versions of the table could then be forwarded to all users. April 2006 Step 14: Summarize Area by Field Value (Cross-Tabulate) Page 182 Step 15: Calculate Densities This dialog allows one to calculate “densities” of various features that lie totally or partially within either the sub-watersheds or stream corridors. Features can be such elements as structures, roads, wetlands, etc. These features must be represented as points, polylines or polygons in an ArcView shape file. Note: Certain applications that may be used to create data sets representing features may use a subset of the primary classes of features, namely points, polylines or polygons. For example, some applications (of which AutoCAD® is an example) may be used to create roads using the PolylineZ class. Any classes other than the basic ones of Point, Polyline or Polygon must be converted outside of the Tools prior to use in this Step. Two themes are used in processing: A boundary theme and a data theme. The boundary theme will be either the sub-watershed theme provided by the user, or the stream corridor theme created via Step 09. One selects the desired boundary theme by clicking on the corresponding radio button. The data theme can be any theme and is chosen by selecting an ArcView shape file on the hard disk. Unlike other themes, the data theme does not need to be registered. This provides greater flexibility and efficiency. To select the theme, simply browse to the directory in which the shape file is located on the hard disk; and select the shape file. When the data theme has been selected, the units to be used in calculating densities will be displayed. At present, the units are as follows: • • • For point features: Number of units or count. For polyline features: Feet. For polygon features: Square Miles. Once the shape file to be used for the data theme has been selected, one can qualify which features are candidates for use in calculating densities. To accomplish this, one performs the following: 1. Check the Use Feature Selection control; 2. Select the attribute field name for the data theme that contains the values identifying the features to be used; and 3. Select the values of the attribute field that identify features to be used in calculating density. April 2006 Step 15: Calculate Densities Page 183 To access the dialog for this step click on the button labeled Step 15: Calculate Densities on the Part C main dialog. The dialog for this step is illustrated below. To use this dialog: A variety of options that provide a great deal of flexibility are available on the dialog. Specific options are as follows: • Select the radio button identifying whether the densities are to be calculated for the subwatersheds or stream corridors. The registered theme corresponding to the button selected will be shown in the area to the right of the radio buttons. • Select the data theme for which densities are to be calculated. The theme will be selected from the hard disk rather than one which has been previously registered. Refer to the section below entitled “Selecting the Data Theme”. • If a subset of the features in the data theme is to be used in calculating densities, place a “check mark” in the Use Feature Selection control. This enables the control Field Name. • If a check mark precedes the Use Feature Selection control, use the Field Name control on the dialog to select the name of the attribute field to be used to qualify features for calculating densities. • If a check mark precedes the Use Feature Selection control and a field has been selected in the Field Name control, select the data values that identify features to be used. • Enter a comment/note in the Note text field to describe any conditions, error corrections, etc. that may aid in understanding the process used in developing the assessment data. April 2006 Step 15: Calculate Densities Page 184 The output table name will automatically be generated based upon the options and data theme selected. The name will reflect the following: o o o o The step number (i.e. “S15”), The first character of the boundary theme type (i.e. W Æ sub-watershed or C Æ corridor), The name of the data theme, e.g. Esite, and The “dbf” file extension. An example of a name would be S15CEsite.dbf for densities of Esite (structures) within the stream corridors. When the Dialog for Density Analysis is selected from the Part C Main Dialog, the following error message will be issued if themes have not been registered for sub-watersheds and stream corridors. In this case, access to the density analysis function will be prevented. Selecting the Data Theme When the dialog is first opened, “Not Selected” will be shown for the data theme. To select a theme, click on the down arrow on the right side of the control. This will result in the display of “Select Shape File”, as shown in the figure below. To select a shape file from the hard disk, click on Select Shape File. This will result in the display of the File Select dialog, as illustrated below. April 2006 Step 15: Calculate Densities Page 185 Use the right side of the File Select dialog to migrate to the directory in which the shape file is located. Then, use the left side of the dialog to select the actual file. When the shape file has been selected, it will be entered into the data theme control. The Density Units control will be populated based upon the feature type for the selected shape file: units (for Point features), feet (for Polyline features) and sq. miles (for polygon features). If the selected theme is not of the Point, Polyline or Polygon feature class, the following error message will be displayed. If the shape file is of the proper class, then one can refine or qualify the features to be used in calculating the density. To accomplish this, click on the box preceding Use Feature Selection until a check mark appears. This will enable the Field Name control. The Field Name control will contain the list of attribute fields associated with the data theme selected. Scroll down the list of fields until the desired field name is displayed and then click on the field name. Once a field name has been selected, the Data Values control will be enabled. Note: Only fields of type Character or Decimal with no decimal places will be listed in the Field Name control. The unique values for the selected field will be displayed in the dialog control for Data Values. All values that represent features to be used must be selected. To accomplish this, click on the first value; then, hold the Shift key down and click on any remaining values. When through selecting the values to be used, move the cursor to the User Note field and enter any appropriate comment or note for the operation being performed. The following figure illustrates the Use Feature Selection options where the appropriate data values have been selected for the field named Type. April 2006 Step 15: Calculate Densities Page 186 Use Feature Selection The Use Feature Selection, Field Name and Data Values controls permit one to qualify which features to use in calculating density. For example, in the State of Vermont one can obtain an ArcView shape file containing ESite points. These are point features representing locations that are relevant to emergency services. Among the features are dwelling locations, commercial buildings, fire hydrants, telephone booths, etc. In calculating densities for stream geomorphic assessment, it is likely that certain of these features, such as telephone booths or fire hydrants, should not be used. As a result, the values representing those types of features would not be selected; and, therefore would be eliminated from the density calculations. Starting the process After the required information has been entered on the dialog, click on the button labeled Calculate Density. Processing may take a few moments depending upon the hardware used. Note: Refer to the section entitled “Common Dialog Operations in the Stream Geomorphic Assessment Tools” for common error and warning messages. If the output theme already exists, the following warning message will be issued. If the existing table is to be replaced, simply select Yes. Selecting No in response to the preceding message will abort the operation and result in the following message being issued: A dialog box will prompt the user to verify the action and data for which the density calculation operation will be done. April 2006 Step 15: Calculate Densities Page 187 Upon completion Alias of output table: None Legend file used: -- N/A -The output tables will be saved in the DerivdData subdirectory under that in which the ArcView project file exists. This table is not added to the user tables area. Two tables are created for each time you run this step, one for the boundary you selected and the other for the boundary selected summed for the entire area upastream. For example, if you select to sum the mapped wetlands for the sub-watershed than two tables will be created named S15WR_vermont_vswi.dbf & S15WU_vermont_vswi.dbf representing the area of wetlands in the sub-watershed as well as the area within the drainage area (or sub-watersheds summed upstream). All tables from this step start with S15 and end with the name of the input file. The following table outlines the naming convention for distinguishing between corridor, sub-watershed and watershed data: S15WR_themename S15WU_themename S15CR_themename S15CU_themename Data summed for sub watershed area only Data summed for the sum-watershed and summed for drainage area Data summed for corridor area only Data summed for the corridor and summed for upstream corridor area Where R = reach, U = Upstream, W = sub-watershed and C = Corridor. The output table will have one record for each Reach Point Id found in the boundary theme: subwatershed or stream corridor. SourceStep – Processing step within the Tools in which the data set was created, i.e. 15. BndryType – Values will be either “Sub-Watershed” or “Corridor” to reflect the type of boundary theme used. SumLevel – Level to which data has been summarized. Values for this field will be either “Corridor”, “Sub-Watershed” or “Upstream”. If the value is Upstream, then combine with field BndryType to reflect upstream drainage area for either sub-watersheds or corridors. GeoSWArea – Area for which summation has occurred, e.g. reach corridor, reach subwatershed, sum of upstream corridors or sum of upstream sub-watersheds. Units -- The type of units used in calculating densities. Values will currently be Units, Feet or Sq. Miles depending upon whether the feature type of the data theme is point, polyline or polygon, respectively. RchPtId – Reach point identifiers copied from the input table. NumUnits – The density calculated for the given sub-watershed or corridor. Values will be in the units shown in the Units field. April 2006 Step 15: Calculate Densities Page 188 The following is a table resulting from Step 15 in which the point locations for houses within a given town were summarized for sub-watersheds. In the table, reach M08 had 42 dwellings within the sub-watershed. SOURCESTEP 15 15 15 15 15 BNDRYTYPE Sub-Watershed Sub-Watershed Sub-Watershed Sub-Watershed Sub-Watershed SUMLEVEL Sub-Watershed Sub-Watershed Sub-Watershed Sub-Watershed Sub-Watershed GEOSWAREA 0.595887683753 0.395524771699 0.521608079823 1.204915729398 0.951415752595 UNITS Units Units Units Units Units RCHPTID M01 M02 M03 M04 M05 NUMUNITS 0 0 0 0 0 To properly use this Step, one should acquire the data that would cover the entire watershed under study. This data would have to be merged into a single data set. Then, this step would identify the density within each watershed. Using data for a single “town” as was done in the table shown above would provide information on the contribution to “dwellings” (or roads, etc.) by the town. April 2006 Step 15: Calculate Densities Page 189 Part D: Reach Segmentation and Feature Indexing Part D of the Tools extension provides capabilities for the segmentation of reaches and for indexing features to the surface waters. As illustrated in the figure below, access to sub-menus for each of these functions is provided via Part D. April 2006 Part D: Reach Segmentation & Feature Indexing Page 190 Part D: Reach Segmentation The functions within this Part create a new version of the surface water theme resulting from Step 05 that is simplified and tailored to the development of reach segmentation. The resulting theme is then segmented or divided into parts in accordance with a user-provided theme containing segmentation points. The points within that theme, identify the geographic positions at which segmentation of the surface water is to occur. The reach segmentation capability is provided to enable the users to visually display the location of geomorphic segments, as well as be able to link the data back in from the DMS to the segmented surface water theme. The following procedure may be used to create a segmented theme: 1. Register the user-supplied segmentation point theme. To accomplish this go to Setup Dialog Æ Theme/Table Registration and Management Æ Segmentation Points. Then, select the theme and required attribute fields as indicated on the dialog. 2. The following processing steps are included in Part D: Step SEG00: Setup Surface Water Step SEG01: Segment Reaches Access to these steps is provided by clicking on the button labeled “Part D: Stream Segmentatioin” on the Main Dialog. Clicking on that button will display the dialog displayed below. Clicking on the buttons for Steps SEG00 or SEG01 will display the corresponding dialog box for that step. Clicking on the button labeled Done will return you to the Main Dialog. April 2006 Part D: Reach Segmentation Page 191 STEP SEG00: Setup Surface Water Theme This step creates a surface water theme to be used for reach segmentation. The source (input) theme is the surface water theme resulting from Part B, Step 05. This processing step performs the following: 1. Surface water segments that have a non-blank value for the TribId field are extracted from the source theme. 2. A temporary MergeField is created using the RchPtId appended to the TribId. 3. A merge operation is performed that joins all surface water segments having the same MergeField value. 4. Attribute fields are created/updated as follows: • ChanlWidth – Channel width for the reach as calculated in Part B, Step 08. • NumParts – Count of the number of parts of the polyline resulting from the processing. This should always be one (1). • RchPtId – Reach point identifier as calculated in Part B, Step 06. • SWLength – Length in feet of the Tributary or main stem extending through the reach. • SWSegID – A field that will be used to hold a segment identifier if the reach is segmented in Step SEG01. This field is initialized to a single dash (“-“). • TribId – Tributary Identifier assigned by the user in Part A, Step 04. 5. Records containing a zero value for ChanlWidth are deleted. These will be the small segments of tributaries at confluence points. 6. The number of parts that the polyline representing the tributary or main stem is composed of is set in the NumParts field. If any polylines are composed of more than one part are detected, an error message is issued. This represents a disconnected tributary or main stem. If any error messages are issued, the user should address and correct the errors. This step should then be re-run. The iterative process should continue until no errors are detected. To access the dialog for this step click the button labeled Step SEG00: Setup Surface Water Theme on the Part D main dialog. The dialog for this step is illustrated below. April 2006 Part D, Step SEG00: Setup Surface Water Theme Page 192 To use this dialog: • • • The theme representing surface waters clipped to the sub-watershed boundaries (produced in Part B, Step 05) will be displayed. The name of the theme representing the surface waters to be created will be displayed. Enter a comment/note in the Note text field to describe any conditions, error corrections, etc. that may aid in understanding the process used in developing the assessment data. Starting the process After the required information has been entered on the dialog, click on the button labeled Setup. Processing may take a few moments depending upon the hardware used. Note: Refer to the section entitled “Common Dialog Operations in the Stream Geomorphic Assessment Tools” in the SGAT User Manual for common error and warning messages. Upon completion Alias of surface water theme created: SWSEG Legend file used to display surface water theme: None Upon completion the following message will be displayed to summarize the processing that took place. The attribute tables for surface water theme created will be updated as described earlier. Click on the button labeled Done to return to the Part D menu dialog. Possible Error Condition At the end of processing, the number of parts of the polylines resulting from merging those with the same values for TribId and RchPtId is counted. If any polylines are found that have more than one (1) part, the following error message will be displayed. The occurrence of the error message means that the surface waters are not continuous through the reach, i.e. there is a space separating different segments. This is an error which should not occur at this point in the processing steps. All such errors should have been detected early in the processing steps of Part A or Part B. April 2006 Part D, Step SEG00: Setup Surface Water Theme Page 193 Warning: If the above error message is issued, review any records containing a value other than one (1) for the field NumParts and correct the condition causing the error in the source theme, which would normally be the one resulting from Part A, Step 04. Run all steps subsequent to that one, including all steps in Part B and Part C, as well as Step SEG00. April 2006 Part D, Step SEG00: Setup Surface Water Theme Page 194 STEP SEG01: Segment Reaches Processing will take points from a user-supplied theme and project them onto the surface waters for a given reach. The polylines representing the surface waters will then be “broken” at the location of the projected point. The user-supplied shape file must contain point features that define the approximate location at which the reaches are to be broken. There is a limit of 702 to the number of segmentation points that can be associated with a given reach. It is, however, expected that the number would normally be 5 or less. Each point in the user-supplied shape file must have two attribute fields, one containing the Reach Point Id associated with the reach that is to be segmented; and the other is a unique identifier for each segmentation point. The field containing the Reach Point Id is used to ensure that the proper surface water (polyline) is being segmented. The unique identifier for the segmentation points can be a sequential number or letter that restarts with each reach. It is used solely in error messages (if any errors are detected); thus enabling the user to identify which segmentation point is associated with the error. The figure to the bottom left illustrates one segmentation point (labeled “1”) that will be used to segment reach M11. The figure to the right illustrates the themes created or modified via this processing step: The segmentation point at 1 is projected onto the surface waters and the two segments (labeled “A” and “B”) result from breaking the surface water at the projected point. For more examples of how to create the segmentation point shape file refer to section Required Source Themes in this user manual. M12 M12 # Reach Segment un bo ed un bo ed B # Segmentation Point 1 ry da ry da Segmentation Point 1 sh t er wa sh t er wa Surface Water b Su Reach Point b Su Reach Point # ## Reach Segment A M11 April 2006 # Reach Point Part D, Step SEG01: Segment Reaches M11 # Reach Point Page 195 As reach segments are created, they are assigned a sequential identifier beginning at A at the downstream end. The identifier is “incremented” as one moves upstream to B, C, etc. The sequence restarts at A for each reach. This segment identifier is maintained in the attribute field named RchSegId. The combination of the reach point id (RchPtId) and the reach segment id (RchSegId) provides a unique identifier for each segment. If a reach is not segmented, the segment identifier will be a single dash (“-“). Note: The identifier formed by appending the value for the RchSegId field to the value of the RchPtId field is used to form the unique identifier for a reach/reach-segment. This processing step creates one new theme, which will contain the segmentation points as projected onto the surface waters. In addition, the surface water theme will be modified to reflect the segmentation of reaches. To access the dialog for this step click the button labeled Step SEG01: Segment Reaches on the Part D main dialog. The dialog for this step is illustrated below. To use this dialog: • • • • The theme representing the user-supplied segmentation points will be displayed. The theme representing surface waters created in Step SEG00 will be displayed. The theme representing the reach points created in Part B, Step 06 will be displayed. Enter a comment/note in the Note text field to describe any conditions, error corrections, etc. that may aid in understanding the process used in developing the assessment data. April 2006 Part D, Step SEG01: Segment Reaches Page 196 Starting the process After the required information has been entered on the dialog, click on the button labeled Segment. Processing may take a few moments depending upon the hardware used. Note: Refer to the section entitled “Common Dialog Operations in the Stream Geomorphic Assessment Tools” in the SGAT User Manual for common error and warning messages. During Processing The reach numbers assigned to segmentation points in the user-supplied theme are compared with those of the reach number theme created in Part B, Step 06. If any reach numbers are found in the user-supplied theme that don’t exist in the reach point theme, the following error message is issued. If the preceding error message is issued, the user must identify the reach number(s) that are in error and correct the assigned identifiers. To assist in correcting the problems, an additional error message, as illustrated below, will be issued that will list up to ten reach numbers found in the segmentation point theme but not the reach point theme. If the surface water for a given reach, as represented by a polyline, is found to be composed of multi-parts, the error message displayed below will be issued. Note: These errors should also have been detected during Step SEG00 and corrected prior to running this step. Refer to Step SEG00. The occurrence of the error message means that the surface waters are not continuous through the reach, i.e. there is a space separating different segments. This is an error which should not occur at this point in the processing steps. All such errors should have been detected early in the processing steps of Part A or Part B. April 2006 Part D, Step SEG01: Segment Reaches Page 197 Warning: If the above error message is issued, review any records containing a value other than one (1) for the field NumParts and correct the condition in the source theme. The source theme would normally be the one resulting from Part A, Step 04. Run all steps subsequent to that one, including all steps in Part B and Part C, as well as StepSEG00. The error message displayed below would generally indicate improper placement of the segmentation point. Most likely the segmentation point falls before or beyond the beginning or ending point of the polyline representing the surface water. Review the segmentation points identified and correct their location. The following message should never occur as it indicates that in excess of 702 segmentation points exist for a given reach. Upon completion Alias of surface water theme modified: SWSEG Legend file used to display surface water theme: N/A Alias of projected segmentation point theme: SegPtsProj Legend file used to display projected segmentation point theme: N/A Upon completion the following message will be displayed to summarize the processing that took place. The new theme containing the segmentation points projected onto the surface waters will be created; and the surface water theme will be modified to reflect the reach segmentation. Click on the button labeled Done to return to the Part D menu dialog. April 2006 Part D, Step SEG01: Segment Reaches Page 198 Part D: Feature Indexing The functions within this Part enable one to “index features” with respect to the surface waters. As an example, one may have identified a portion of a stream in which significant bank erosion has been and is occurring. To “index” this as a “feature”, one identifies the beginning and ending points of the erosion. These points are “converted” to a series of polylines that represent the length of stream under erosion. The starting and ending points are those established by the user; however, the polylines are extracted from those representing the surface water, i.e. the polylines are coincident with the surface waters. The process of indexing features enables one to establish multiple impacts (e.g. bank erosion) and subsequently relate those impacts to each other or to other conditions, events or perhaps to predictive modeling. The process of indexing features is provided in an interactive manner via step FIT00. One can index two types of features: Point feature which simply defines a location of a specific element such as a grade control (e.g. dam, waterfall, etc.) or a Polyline feature which defines an extent along the surface waters (e.g. erosion, straightening, etc.) The processing of indexing is performed interactively. First, one selects the impact that is to be indexed and then enters the appropriate data for that impact. An impact is simply the definition of “what is being indexed”, e.g. a dam or extent of straightening. Then, • • For a point feature, one selects a point (in the User View). The extension projects that point onto the surface waters; and then, enters the point and associated data into a point impact theme. For a polyline feature, one selects a starting (downstream end) and an ending (upstream end) point (in the User View). The two points define the extent of the impact. The extension projects each point onto the surface water polylines. The portion of the surface water polyline extending downstream of the starting point and the portion of the surface water extending upstream of the ending point are trimmed off. Those polylines and all intervening polylines are extracted and placed into a polyline impact theme. The ability to index features is provided in Part D, Step FIT00. The reach segmentation capability of Step FIT01 provides users with the ability to segment impacts (indexed features) in the identical manner in which surface waters have been segmented (via Part D, Reach Segmentation). This enables one to visually display impacts by reach segments, as well as be able to link to data maintained in the DMS. All impacts (or features) that are indexed are maintained in one of two shape files: FIT00LnImpact.shp (for polyline impacts) and FIT00PtImpact.shp (for point impacts). Since it is possible that multiple impacts may be partially or completely coincident, the ability to extract specific impact types (including sub-impact and location) is provided. One identifies the impacts to be extracted, whether the geographic representation (for polylines only) is to be offset (left or right and offset distance) and the name of the shape file in which the extracted impacts are to be saved. The resulting shape files can be used for cartographic display of impacts on maps, using various offsets, colors and line weights. Finally, the ability to export impacts is provided. The export file is a dBase table that can subsequently be imported into the DMS (data management system used to maintain the tabular data associated with geomorphic assessments). April 2006 Part D: Feature Indexing Page 199 Access to these steps is provided by clicking on the button labeled “Part D: Stream Segmentation and Feature Indexing” on the Main Dialog. The Part D, Main Dialog, as shown below, will be displayed. Click on the button labeled Feature Indexing to reach the main dialog. Clicking on the buttons for Steps FIT00, FIT01, FIT02 or FIT03 will display the corresponding dialog box for that step. Clicking on the button labeled Done will return you to the Part D, Main Dialog. April 2006 Part D: Feature Indexing Page 200 STEP FIT00a: Setup for Feature Indexing “Feature indexing” is a method where real-world features, referred to as impacts, can be geographically located and identified with respect to affected surface waters. For example, one can identify the locations of specific “grade controls” (e.g. dams, water falls, etc.); or lengths of streams along which an impact has been encountered (e.g. straightening, erosion, etc.). This permits a variety of analyses to be performed, as well as permits the development of maps displaying various impacts. To perform indexing of impact features, one must first create a “route” table. This is accomplished via the Setup button on the dialog. First, an extract of the surface water theme will be made. This extract will contain only those polylines for which a value for the tributary identifier (attribute field TribId) has been assigned. The extract theme will be used in creating a “route table” for indexing features and for the actual feature indexing procedure. Note: In the subsequent text within this section, any reference to surface waters or to the surface water theme pertains to the extract containing only those polylines with a non-blank value for the TribId attribute field. The route table identifies the connectivity between polylines and orders the connectivity for stream tracing. In addition, the order of the polyline vertices in the surface water theme is altered (if necessary) to ensure that the order is in the upstream direction, i.e. vertex 0 is at the downstream end of the polyline and vertex n is at the upstream end. The purpose is to facilitate rapid transversal of the stream network. The extract of the surface water theme and the route table are created by clicking on the Setup button. In order to create the route table, the entire surface water theme is traced. Processing times may be somewhat lengthy 10 to 20 minutes (perhaps more in very large watersheds or in watersheds with dense surface waters). So, have patience and plan for the processing time when this function is used. Warning: If any changes to the surface water theme used as an input have been made, or the theme has been re-created, always perform the setup function before indexing any features. Otherwise, unpredictable errors may occur when indexing features, since the route table previously defined may not be coincident with the new surface water theme. The route table will be assigned a name based upon the name of the surface water theme from which it is created. For example, the surface water theme normally used by this step is S05SWFinal.shp. As a result, the output dBase table will be named S05SWFinalTribIdSet.dbf and will be located in the DerivdData directory under that in which the ArcView project file is located. The extracted surface water theme used in creating the route table and for feature indexing will be named S05SWFinalTribId.shp will also be saved in the DerivdData directory. Once the route table has been created, then the button labeled “Index Features” will be enabled. Clicking on this button will result in the Feature Indexing dialog to be displayed. April 2006 Part D, Step FIT00a: Setup for Feature Indexing Page 201 The Setup dialog for feature indexing is illustrated below. To use this dialog: • • • • • The theme containing surface waters created in Step 05 will be displayed. The theme containing the primary pour point for the watershed created in Step 02 will be displayed. The theme to be created or modified that contains the point impact features that have been indexed will be displayed. The theme to be created or modified that contains the polyline impact features that have been indexed will be displayed. Enter a note to be entered into the system log upon completion of setup processing. Starting the Process After the user note has been entered, click on the Setup button. This will create the route table necessary for indexing features. Remember that processing may require 10-20 minutes or more. If the route table has already been created, the Index Features button will be enabled. Click on that button to access the Feature Indexing dialog. Note: Refer to the section entitled “Common Dialog Operations in the Stream Geomorphic Assessment Tools” in the SGAT User Manual for common error and warning messages. April 2006 Part D, Step FIT00a: Setup for Feature Indexing Page 202 During processing When one first clicks on the Setup button, a test is made to determine whether the route table and the extracted surface water theme already exist in the DerivdData directory. If they do, the following message will be issued: This is included in the event that an erroneous click on the Setup button was made. Since this procedure can take a bit of time, one can click on No to cancel the setup procedure. If, however, there have been any changes to the surface water theme created by Step 05 or that theme has been re-created, click on Yes to re-create the route table and theme containing the extract of the surface waters. If the processing continues, a query is made to select only those records that contain a non-blank value for the TribId field, i.e. those stream segments to which the user assigned a tributary Identifier in Step 04. The selected records are saved as the shape file named S05SWFinalTribId.shp in the DerivdData directory. This theme, referred to as the surface water extract theme, will be used in performing feature indexing. Note: The name of the theme is simply the letters “TribId” appended to the name of the surface water theme used. The next step is to trace the surface waters to build the “route table”. The route table simply defines the connectivity using arbitrarily assigned identifiers for the initial and ending vertices of the polylines in the theme. Stream tracing will begin at the outflow or pour point for the overall watershed. Since the outflow point is created in Step 02 as the intersection of the stream network with the overall watershed, it is known that a stream segment will begin at the outflow point. That stream segment is acquired, and the end vertex (opposite end of the stream segment) is used to find the next segment for tracing. With the next stream segment, its end vertex is used to find the next stream segment, etc. Note: A check is made to determine if the vertex order of the polyline is correct, i.e. that the vertex 0 is the downstream end. If the order is reversed, then the vertex order is reversed in the surface water extract theme. In this manner, the tracing then continues upstream from one stream segment to the next. As each new polyline is traced, a sequential number is assigned to the upstream vertex. The downstream vertices of all polylines connecting to that point are assigned the same sequential identifier. The end result is that “connectivity” can be determined simply through the identifiers assigned; thus providing a rapid method for indexing features, i.e. identifying those surface water polylines that connect point “A” to point “B”. When tracing, if a point of confluence is encountered, then the stream segment chosen will be the one forming the “hardest right turn” from the perspective of the direction in which stream network is being traced. April 2006 Part D, Step FIT00a: Setup for Feature Indexing Page 203 If it is found that no other segments are “connected” to an end vertex, stream tracing is then reversed and proceeds downstream. Using the above as an outline, the figure below illustrates the order of stream tracing. Assume that tracing begins at the confluence point in the upper right corner; and the red arrows show the upstream direction and the green arrows show the downstream direction. Tracing occurs in the numerical order shown. Only those stream segments to which tributary identifiers have been assigned are shown. 6 4 1 7 3 8 5 9 10 14 2 11 Upstream Tracing Downstream Tracing 12 13 If one misses assigning a tributary identifier to a segment in the middle of the main stem or a tributary, stream tracing will stop at the ending vertex of the last segment for which the identifiers have been assigned to contiguous stream segments. This vertex will be identified as a terminal point; and any upstream segments beyond the one for which the tributary identifier was not assigned will be ignored. (See section description for Step 04.) Attempt to use Surface Water polylines more than twice Another error may also be encountered during stream tracing. Since stream tracing occurs upstream and downstream, the maximum number of times any stream segment should be encountered is two. As each stream segment is encountered during tracing, the field “SWUsed” in the surface water extract theme is incremented and tested. If the value exceeds two, the following error message is issued. To identify the surface water polyline, query the attribute field named SWUsed for a value greater than 2. This will identify the polyline in error. Usually reviewing the polyline, its vertices and adjacent polylines will reveal the problem. April 2006 Part D, Step FIT00a: Setup for Feature Indexing Page 204 Because the search distance to find connecting polylines is set as 0.25 meters, any surface water polylines less than 0.25 meters in length will cause such a problem. In such cases, one will have to edit the surface water theme to remove the small polylines and connect the others by snapping the end vertices. Upon Completion The surface water extract theme, which will normally be named S05SWFinalTribId.shp will be created and saved in the DerivdData directory. This will be displayed in the user view using the legend file named SWTrace.avl. The legend file must be located in the SysData directory in order for it to be used. The route table, which will normally be named S05SWFinalTribIdSet.dbf will be created and saved in the DerivdData directory. A sample of a route table is displayed below: RECNO FROMID TOID 0 1 2 1 2 3 2 3 4 3 4 5 4 5 6 9 6 7 10 7 8 11 8 9 5 9 10 6 10 11 7 11 12 8 12 13 TOTYPE Term The record number in the surface water theme that is associated with a given polyline is shown in the first column. The second and third columns represent the identifiers assigned to the starting and ending nodes. The last column contains the type of node represented by the ToId. Using the table begins with identifying the To node. Then, using the From node for that row, look for its value in the To column to connect to the next downstream polyline. Note: It is because the record numbers refer directly to records in the surface water theme, that the route table must be kept consistent with the surface water theme. If any changes are made to the surface water theme, then the record numbers will change. And, if the record numbers change, the route table will be referencing incorrect records. A message similar to the following will be issued upon completion of the Setup procedure. Upon completion of the Setup procedure, one can proceed on with indexing features by clicking on the button labeled Index Features. Clicking on Done will return one to the Part D main menu for feature indexing. April 2006 Part D, Step FIT00a: Setup for Feature Indexing Page 205 STEP FIT00b: Feature Indexing This dialog enables the one to index features to the stream network. The process of indexing features is simply defining the location and extent of a real-world feature using the surface waters. Features are referred to as impacts, such as alluvial fan, grade controls, etc. Features are represented by either a point or a polyline geographic entity. This dialog is accessed by clicking on the button labeled Index Features on the Step FIT00a dialog. Once that button is clicked, the following message is displayed. The above message is issued to provide a warning that the surface water theme and the data created via the Setup function must be consistent. If they are not consistent, unpredictable results may occur when indexing features, including infinite loops. As a result, if any changes have been made to the surface water theme or it has been recreated, always run the Setup function before assigning tributary identifiers. Click on “No” to return to the preceding dialog; or “Yes” to continue on. Impacts (features) may also be further defined through the use of sub-impacts. For example, the impact of “Bank Armoring and Revetment” is further subdivided into the following sub-impacts: hard bank, Rip-Rap or Other. The location field, where applicable, enables the user to specify the location of the impact/subimpact. For example, RB (right bank) or LB (left bank) will identify which bank on which the impact/sub-impact is located. Where location terms right and left are used, it is with the observer facing downstream. The dialog for Feature Indexing is illustrated on the following page. April 2006 Part D, Step FIT00b: Feature Indexing Page 206 To use this dialog The dialog was designed to be placed on the computer screen along with the view. To start, move the dialog to the right or left side of the screen. Then, click on the Show View button. This will display the User View. Move and resize the user view to fit alongside the dialog. This will enable you to move back and forth between the view and the dialog. When selecting points to geographically locate impacts, zoom in to the area of interest. Working at a “large scale” of the view enables one to place points accurately alongside of the polylines representing surface waters. Working at “small scale” may cause inaccurate location of the points; and, thus, errors to be generated. This dialog is accessed via the Index Features button on the Feature Indexing Setup dialog. As a result the following registered theme names will be available from the Feature Indexing Setup dialog: • • • • Surface water (S05SWFinal.shp); Primary Pour Point (S02PPt.shp), Point Impact (FIT00PtImpact.shp) and Polyline Impact (FIT00LnImpact.shp). Since a specific impact is associated with either a point or a polyline feature type, it is important to first enter the impact and other data; then, perform feature indexing (i.e. identify location point or points). The following order is recommended: Note: Impacts and related sub-impacts and/or locations are defined and maintained via the system function labeled “Define Impacts for Feature Indexing”. 1. Select the impact. This will establish the appropriate data fields on the dialog; as well as whether the resulting feature will be a point or polyline feature. 2. If applicable, select the appropriate sub-impact. If no sub-impacts are applicable, there will be no entries available in the sub-impact drop-down list. 3. If applicable, select the appropriate location. If no locations are applicable, there will be no entries available in the location drop-down list. 4. Enter the Impact Feature Data: Only the appropriate fields will be displayed for a given Impact; and the name of data required will be displayed as the label to the left of each data entry field. There may be anywhere from zero to two fields displayed. In the preceding figure, only one data field, named Height, is associated with the Erosion impact and is therefore displayed on the dialog. The required data and format of the dialog will be set when one selects the Impact in (1) above. As a result, always select the impact first. April 2006 Part D, Step FIT00b: Feature Indexing Page 207 When entering values for the data elements, be sure to enter numbers; otherwise an error will be issued when you attempt to “Set Impact”. Note: The length of the field name, or label, is restricted to 10 characters; as a result, some of the names may be cryptic. Note: The data fields in the Impact Feature Data panel will be identical for all subimpacts of a given Impact. 5. It is recommended that one enter a description of the impact. This may be the only way to distinguish between similar impacts within the same reach. 6. Enter the values for the Observation Data: Date on which the observation was made, Person making the observation and the Organization to which the Person belongs. 7. Once the data has been defined, click on the button labeled Set Pt Location or Set Start/End Pts (depending upon whether the impact is represented as a point or polyline feature). 8. Click on the title bar of the view to make it the active window. 9. With the view as the active window, use the zoom/pan tools to navigate to the area of the point or starting point. Work at a view scale where one can enter a point that can be associated with a specific surface water polyline. If one works at a very small view scale, incorrect selection of surface water polylines may occur. This will lead to error conditions. 10. When you are zoomed in to an appropriate scale for selecting the point, click on the Feature Indexing tool. This tool is the furthest to the right on the same line as the zoom, pan, identify tools and is represented by the “eyeglasses” icon. With that tool selected, click at a point in the user view where the Point feature or the starting point is to be located. Note: The points entered must be within the search distance set on the dialog of the surface water polylines. If the points are located at a greater distance, no polylines will be found and an error message will be issued. Note: If you are locating the Start/End Points for a polyline feature, you must always locate the downstream point first. 11. If an ending point must be entered, use the zoom/pan tools to navigate to the area where the end point is located. Then, again, select the Feature Indexing tool and click in the view at the point where the feature ends. Note: If beginning and ending points are to be selected, the starting point must fall on the downstream path between the ending point and the outflow point of the watershed. If the starting and ending points do not lie on the same path, an error message will be issued. 12. Click on the dialog to make it the active window. 13. If an error was made in selecting the points, click on the Clear… button. Then, reestablish the points beginning with step (7) above. 14. Once the Point(s) have been established and the dialog is active, the feature can be indexed by clicking on the Set Impact button. This establishes the feature as a pending update to the appropriate Point or Polyline impact theme. Warning: The feature will not be permanently saved until one clicks on the Save button. This permits one to cancel feature definition if an error was made. 15. To cancel pending updates, click on the Cancel button. This will clear all pending updates created since the start of the session or the last Save operation. April 2006 Part D, Step FIT00b: Feature Indexing Page 208 16. To save pending updates, click on the Save button. This will permanently apply the pending updates to the appropriate Point or Polyline impact theme. As indicated in Steps (15) and (16), one must save the impacts. If you attempt to quit the dialog by clicking on the Done button, a check is made to determine whether any changes are pending. If there are pending changes, an error message is issued warning that they will be lost if you continue. Results of Feature indexing For point features, the point will be projected onto the nearest surface water polyline. The projected point will be entered along with the data entered on the dialog into the FIT00PtImpact.shp shape file. For polyline features, the following is performed: 1. The point entered for the downstream point, i.e. the downstream end of the impact being indexed, is projected onto the surface water. The surface water polyline is broken at that point and the segment located upstream of the point is retained. 2. The polylines connecting the downstream point with the upstream point are extracted. 3. The point entered for the upstream point, i.e. the upstream end of the impact being indexed, is projected onto the surface water. The surface water polyline is broken at that point and the segment falling downstream of the point is retained. 4. The resulting “chain” of polylines is merged by reach point id (RchPtId). If all polylines fall within the same sub-watershed, only a single record will be entered into the polyline impact theme FIT00LnImpact.shp. If the polylines cross two or more sub-watersheds, then a polyline record for each sub-watershed (or reach point id) will be entered in to the polyline impact theme. 5. A unique value is assigned to the attribute ImpactId. The same value is assigned to all records associated with a given impact. 6. The data entered on the dialog is associated with each polyline record. If the upstream and downstream points selected are not on the same downstream flow path (from the upstream point to the outflow of the entire watershed), an error message will be issued. Abbreviated Instructions Available from the Dialog. To review an abbreviated set of instructions (similar to those above), click on the Instructions button. This will display a separate dialog box with the instructions listed. The Instruction dialog can be closed; or it will automatically be closed when the primary Feature Indexing dialog is closed. Show View Button on the Dialog The Show View button is simply a short cut for displaying the user view. If the view is already visible, there will be no apparent action when one clicks on the Show View button. April 2006 Part D, Step FIT00b: Feature Indexing Page 209 Modifying features One cannot modify the geographic extent or location of a feature. Instead, one must delete the feature and then re-index it. Deleting a feature should be performed using the dialog provided in Step FIT00c: Feature Data Modification/Deletion. This ensures, for polyline features, that all geographic entities related to the same impact are deleted. Note: If a polyline geographic feature spans more than one reach, there will be one polyline (record) associated with each reach. Since all impacts are saved in either the point or polyline impact theme, it is possible that features may overlay each other. That would be the case for polyline impacts when more than one impact is found along the same section of stream. In such cases, it would be difficult to select the appropriate polylines for deletion if selection were performed via a View. As a result, always use the dialog for Step FIT00c to perform deletions. The dialog for Step FIT00c also enables one to update or modify the attribute data associated with a given impact. It is strongly recommended that one enter a detailed description of the impact in the Description field. This will ensure that one can accurately select features for modification and/or deletion in Step Fit00c. April 2006 Part D, Step FIT00b: Feature Indexing Page 210 STEP FIT00c: Feature Data Modification/Deletion This dialog permits modification of the data associated with impacts during the Feature Indexing of Step FIT00. In addition, one can delete features entirely, which enables one to re-index (via Step FIT00) a given feature to reposition its geographic location. The dialog for this step is illustrated below. To use this dialog: • • • The theme containing point impacts created in Step FIT00 will be displayed. The theme containing polyline impacts created in Step FIT00 will be displayed. Enter a User Note to be entered into the system log upon completion of performing updates. April 2006 Part D, Step FIT00c: Feature Data Modification/Deletion Page 211 The following describes the approach to be used for modifying a given Impact. 1. In the Impact Type panel, select whether the impact is represented as a Point or a Polyline Feature. This identifies which theme the impact will reside in; either the point impact theme or the polyline impact theme. In addition, when the Impact Type is selected, the control labeled Reach Id will be populated with a list of those reaches for which impacts of the selected feature type have been indexed. Note: Only those RchPtId’s for which impacts have been indexed will be listed in the Reach Id control. 2. Select the Reach Id in which the Impact was indexed. In certain cases, an impact of the polyline feature type may cross multiple reaches. All reaches in which a given impact is located will be listed in the disabled (grayed out) field labeled Reaches. When a reach is selected, the Impact Ids assigned to impacts that fall within the reach are listed in the control labeled Impact Id. Note: Only those ImpactId’s for impacts that are located within the given Reach Id will be listed in the Impact Id control. 3. Select the Impact Id. Once an impact id is selected, the data assigned during feature indexing will be displayed on the dialog. Always make sure that the correct impact has been selected prior to making any changes. Using the description field may be the primary means of differentiating between similar impacts on the same reach. Deleting Impacts Once the correct impact has been displayed, one can either delete the impact or make modifications to the data associated with it. To Delete the impact currently displayed on the dialog, click on the Delete button. Following that, a “warning” message similar to that illustrated below will be displayed. If the Delete button was clicked upon accidentally, select “No”. Otherwise, click on “Yes”. In the latter case, all records, if more than one, associated with the impact will be marked for deletion. It is possible that multiple records exist for a given impact represented by a polyline feature. This will occur if the impact crosses sub-watershed (or reach) boundaries. In this case, there will be one record for each reach in which the impact is located. Note: As indicated, the records will be marked for deletion. They will not actually be deleted from the impact theme until one clicks on the Save button. Alternatively, one can click on the Cancel button to remove any modifications made, including marking records for deletion. Once an impact has been deleted, the Cancel and Save buttons will be enabled. April 2006 Part D, Step FIT00c: Feature Data Modification/Deletion Page 212 Modifying Impacts Once the (1) Impact Type (point or polyline), (2) Reach Id and (3) Impact Id have been selected, the data associated with the impact can be modified. Effectively, all data can be modified except the geographic location and/or extent of impact and the following data: • • • • Impact Type, Reach Id(s), Impact Id, and Impact Name. If it is necessary to change any of the above, then the impact will have to be deleted. Then, a new impact indexed via Step FIT00a. All other data can be modified via this dialog. To modify data, type in or select the revised values. Once a change has been made, the Save and Cancel buttons will be enabled. Using the Save and Cancel Buttons The Save or Cancel buttons will be enabled once any changes to data have been made. This includes the deletion of an impact. All changes to data or deletions are pending. To make changes permanent, click on the Save button. To cancel all changes since the start of the session or since the last Save operation, click on the Cancel button. Potential Issues The lists of permissible sub-impacts and locations are maintained in system tables SysSubImpact.dbf and SysImpactLoc.dbf. While it is not likely, it is possible that the lists will be changed. If either a sub-impact or a location is deleted from those system tables, the display of any impact to which the deleted sub-impact or location was assigned will result in the following error being displayed. The above error actually occurred due to the assigning of sub-impacts to an impact that previously had none; thus the value of ‘’ means no value or a blank value. When errors such as the above are issued for either the sub-impact or location fields, one will have the option of “leaving the erroneous sub-impact (or location) as is” or selecting a current value. If a current value is selected, that becomes a change, which can be made permanent by clicking on the Save button. Upon Completion Click on the Done button to return to the Main dialog for feature indexing. April 2006 Part D, Step FIT00c: Feature Data Modification/Deletion Page 213 STEP FIT01: Feature Segmentation This dialog provides the capability of subdividing impacts (indexed via Step FT00a) into reach segments that are defined via the reach segmentation dialogs. For point impacts, this basically assigns the reach segment identifier. For polyline impacts, the polyline will be broken at reach segmentation points. The reach segment identifier will be assigned to the corresponding polyline. To use this dialog: • • • • • • The theme containing point impacts created in Step FIT00a (and potentially modified by Step FIT00c) will be displayed. The theme containing polyline impacts created in Step FIT00a (and potentially modified by Step FIT00c) will be displayed. The theme containing segmented surface waters created in Step SEG01 will be displayed. The theme to be created that will contain the segmented point impact features that have been indexed will be displayed. The theme to be created that will contain the segmented polyline impact features that have been indexed will be displayed. Enter a note to be entered into the system log upon completion of segmentation processing. April 2006 Part D, Step FIT01: Feature Segmentation Page 214 Starting the process After the required information has been entered on the dialog, click on the button labeled Segment. Processing may take a few moments depending upon the hardware used. Note: Refer to the section entitled “Common Dialog Operations in the Stream Geomorphic Assessment Tools” in the SGAT User Manual for common error and warning messages. During Processing Each point impact is assigned the value for the RchSegId associated with the surface water polyline upon which the impact is located. In addition the attribute Ph2SegId value is constructed by appending the value for RchSegId to the value for RchPtId. If the impact does not fall on a reach segment, then the value for Ph2SegId is constructed by appending a dash (“-“) to the value for the RchPtId. Each polyline impact is subdivided into polylines that are consistent with the surface waters for reach segments. The values for RchSegId and Ph2SegId are constructed in the same manner as described for point impacts. The following figure illustrates the process of subdividing polyline impacts. In the figure, a single impact is shown that is located in three sub-watersheds. This impact is originally represented as three polylines; one for each sub-watershed. After the segmentation process, the impact is represented by seven polylines. The “middle” polyline of the original set of three has been subdivided into five polylines consistent with the reach segmentation. Sub-watershed Boundary Original Impact Consisted of 3 Polylines 1 for Each Sub-watershed (Reach) # # # # # # # Polyline for this Reach Subdivided into 5 Polylines (between Reach/Segmentation Pts) 1 for Each Reach Segment Segmentation Pts # Reach Pts April 2006 Part D, Step FIT01: Feature Segmentation Page 215 Upon Completion Alias of segmented point impact theme created: PtImpactSeg Legend file used to display surface water theme: PtImpactSeg.avl Alias of segmented polyline impact theme created: LnImpactSeg Legend file used to display surface water theme: LnImpactSeg.avl Upon completion the following message will be displayed to summarize the processing that took place. Click on the button labeled Done to return to the Main menu dialog for Feature Indexing. April 2006 Part D, Step FIT01: Feature Segmentation Page 216 STEP FIT02: Extract Feature(s) Features indexed via Step FIT00a are placed in one of two shape files: One for point feature types (FIT00PtImpact.shp) and one for polyline feature types (FIT00PtImpact.shp). It is possible, especially with polyline features, that different impacts may overlay each other partially or completely. In addition to the possible overlay of certain impacts, it may be desirable to extract specific features for presentation on a map. This dialog provides the capabilities of extracting features by a combination of impact name, subimpact and location. For polyline impact types, one can also offset the impacts during extraction for cartographic purposes. The dialog for this step is illustrated below. April 2006 Part E, Step FIT02: Extract Feature(s) Page 217 To use this dialog: • • • • • • • • Select the source of the impact themes to be used: Reach created in Step FIT00a or Reach Segment created in Step FIT01. If either or both of the point and polyline impact themes are not present in the DerivdData directory, then the corresponding radio button will not be enabled. The theme containing point impacts created in Step FIT00a (or Step FIT01) will be displayed. The theme containing polyline impacts created in Step FIT00a (or Step FIT01) will be displayed. The impact names that have been indexed in either the point or the polyline impact theme will be displayed in the Impact control. Select the impact of interest to be extracted. When a specific impact is selected, the feature type (either point or polyline) used to represent the impact will be shown in the panel to the right. If “All Impacts” is selected the feature type will not be displayed. Only those sub-impact names that are associated with the selected impact and that have been indexed will be displayed in the Sub-Impact control. If no sub-impacts are present, the phrase “None Available” will be displayed and the control will be disabled. If only a single sub-impact is present, it will be displayed and the control will again be disabled. If multiple sub-impacts are present, select the sub-impact of interest to be extracted. If all sub-impacts for the impact are to be extracted to the same shape file, select All SubImpacts. Only those location names that are associated with the selected impact and that have been indexed will be displayed in the Location control. If no locations are present the phrase “None Available” will be displayed and the control will be disabled. If only a single location is present, it will be displayed and the control will again be disabled. If multiple locations are present, select the sub-impact of interest to be extracted. If all locations for the impact are to be extracted to the same shape file, select All Locations. If the impact selected is represented by a polyline feature, the ability to offset the features during extraction will be enabled. If an offset is desirable, enter the distance and the direction. The direction is based upon facing downstream. A default name for the extraction shape file is entered. The name is constructed of the step id (“FIT02”) and an abbreviation assigned to the given impact. One can over-ride the default name, by replacing the name of the shape file to be created. When the extraction requirements have been established, click on the Extract button. If one selects All Impacts in the Impact control, then all other controls will be disabled. All features for a given impact regardless of sub-impact and/or location will be extracted. All records for a specific impact name will be placed in the same shape file having a name created from the step id (“FIT02”) and the abbreviation for the impact. Note: The abbreviations for the impacts are assigned during definition of the impact in the system functions. To view the abbreviations, click on each impact and review the name of the output shape file. All extract files will be saved in the DerivdData directory under the directory in which the ArcView project is located. April 2006 Part E, Step FIT02: Extract Feature(s) Page 218 Applying Offsets The measurement units used for Offsets are in accordance with the distance units established for SGAT via the System Functions. This is normally feet. The direction of offset will be relative to facing downstream. The method for applying offsets is by taking the first and the last vertices of the polyline representing the impact. A line is calculated between those two points. The offset angle is calculated as + or – 90 degrees depending upon the offset direction. All vertices are then moved the offset distance at that angle to form the offset polyline. This strict definition of offset can result in situations such as that displayed in the following figure. Z $ Z $ Z $ # # # Z $ # # Z $ # In the above figure, the original impact is represented by the heavier magenta polylines; and the offsets are the lighter magenta. Upon Completion Alias of extract theme created: None Legend file used to display extract theme: None Upon completion a message similar to the following will be displayed to summarize the processing that took place. The last line will indicate the offset applied, if any. Click on the button labeled Done to return to the Main menu dialog for Feature Indexing. April 2006 Part E, Step FIT02: Extract Feature(s) Page 219 STEP FIT03: Export Feature Data The intent of this dialog is to export the data associated with impacts that have been indexed. The table resulting from the export will subsequently be used to import impact data in the DMS (Data Management System) used to maintain the data for geomorphic assessments collected throughout the state. To use this dialog: • • • • • The source of the impact themes to be used will automatically be selected. If the segmented versions created via Step FIT01 are available, they will be used. If they are not available, those created in Step FIT00 will be used. If neither version is available, the Export button will be disabled and access to this function will not be available. The theme containing point impacts created in Step FIT01 (or Step FIT00a, as dictated by the source to be used) will be displayed. The theme containing polyline impacts created in Step FIT01 (or Step FIT00a, as dictated by the source to be used) will be displayed. The output dBase table name of FITExport.dbf will be displayed, and cannot be changed. Enter a note to be entered into the system log upon completion of export processing. April 2006 Part E, Step FIT03: Export Feature Data Page 220 Export Table Format The format of the export table is shown in the following table. Field Type Length Precision Phase Number 2 0 Impacttype Impactid Tribid Character Number Character 8 8 32 0 0 0 Ph2segid Character 52 0 Rchptid Character 50 0 Rchsegid Character 2 0 Impact Subimpact Location Date Person Organizatn Descrption Character Character Character Character Character Character Character 32 32 32 10 36 36 127 0 0 0 0 0 0 0 Fld1name Character 10 0 Fld1value Number 16 0 Fld2name Character 10 0 Fld2value Fld3name Fld3value Fld4name Fld4value Swtheme Swdate Entrydate Length Geoswrevu Number Character Character Character Character Character Character Character Number Character 16 10 36 10 36 32 10 10 16 16 0 0 0 0 0 0 0 0 2 0 Description Value of 1 if Phase 1 (or unsegmented) data from Step FIT00a was used to create export; or value of 2 if Phase 2 (or segmented) data from Step FIT01 was used to create export Either “Point” or “Polyline” identifying feature type of impact. Unique numeric identifier for impact. Tributary Identifier of surface water along which impact is located. Combination of RchPtId and RchSegId forming unique identification of surface water along which the impact is located. Reach point id for surface water along which the impact is located Reach segment id, if any (dash if none), along which the impact is located. Name of Impact Name of Sub-Impact, if any. Name of Location, if any. Date of Observation Person making observation Organization responsible for making observation. Detailed description of impact. Name of first Impact Data field, if any; dashes if none. Varies with impact. Data value for Fld1Name Name of second Impact Data field, if any; dashes if none. Varies with impact. Data value for Fld2Name Not currently used Not currently used Not currently used Not currently used Name of surface water theme used during indexing of impact. Date surface water theme was created. Date observation was entered into SGAT. For polylines, length of impact Field used internally within SGAT for error reporting. Upon Completion Upon completion of the export, a message similar to that shown below will be issued. The export table FITSegExp.dbf will be located in the DerivdData directory under the directory in which the ArcView project is located. Note: If the source of the themes used during the export is from Step FIT00a, the name of the export table will be FITRchExp.dbf. April 2006 Part E, Step FIT03: Export Feature Data Page 221 Click on the button labeled Done to return to the Main menu dialog for Feature Indexing. April 2006 Part E, Step FIT03: Export Feature Data Page 222