1
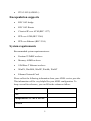
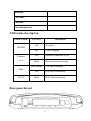
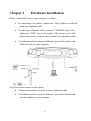
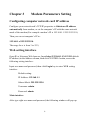
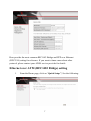
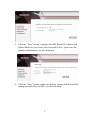
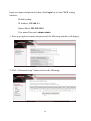
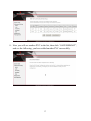
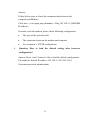
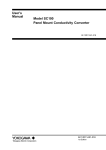
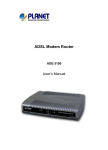
4 PORTS ADSL MODEM
User manual
Ver: 1.0
Important Safety Instructions
Please read these instructions carefully:
1.
Unplug the ADSL2+ Router Ethernet Adaptor from the wall outlet before
cleaning. Do not use liquid cleaners or aerosol cleaners. Use a damp cloth
for cleaning.
2.
Do not use the ADSL2+ Router Ethernet Adaptor near water.
3.
Make sure the working platform is flat. Do not put heavy objects on the
ADSL2+Router.
4.
Use the AC/DC power adapter that matches the ADSL2+ Router.
5.
Disconnect the power supply and all wires from the ADSL2+ Router in
lightning storm, to avoid lightning strike.
6.
Take water proof measures during the storage, transportation and running
of the ADSL2+ Router.
7.
Avoid direct sunlight.
Note: When the ADSL2+ Router is used for a long time, temperature of the
shell will rise. This is normal.
Contents
Chapter 1
Introduction ................................................................................. 1
Features 1
ADSL standard supports ...................................................................................... 1
Encapsulation supports......................................................................................... 2
System requirements ............................................................................................ 2
LED status description ......................................................................................... 3
Rear panel layout.................................................................................................. 3
Chapter 2
Hardware Installation............................................................... 5
Chapter 3
Modem Parameters Setting...................................................... 6
Configuring computer network card IP address................................................... 6
Web setting interface ............................................................................................ 6
Ethernet over ATM (RFC1483 Bridge) setting .................................................... 7
PPP over Ethernet (RFC2516) setting................................................................ 10
PVC Configuration............................................................................................. 13
Chapter 4
Questions & Answers ............................................................ 18
Chapter 1
Introduction
The device is a well-designed high-speed ADSL modem/router.
Features
•
Full rate ADSL router, support Bridge/Router
•
Provides 24Mbps downstream and 1Mbps upstream
•
Maximum transmission range: 5.4 Kilometers
•
Four Ethernet ports, 10/100 Mbps Auto-MDI/MDIX
•
Friendly GUI for web configuration.
•
Configurable as a DHCP Server on Your Network
•
Compatible with all standard Internet applications
•
Industry standard and interoperable DSL interface
•
Simple web-based status page displays a snapshot of your
configuration, and links to the configuration pages.
•
Downloadable flash software upgrades
•
Support up to 8 Permanent Virtual Circuits (PVC)
•
Support up to 8 PPPoE sessions
ADSL standard supports
•
ITU G.992.1 (G.dmt) Annex A
•
ITU G.992.2 (G.lite)
•
ANSI T1.413 Issue 2
•
ITU G.992.3(ADSL2)
1
•
ITU G.992.5(ADSL2+)
Encapsulation supports
•
RFC 1483 bridge
•
RFC 1483 Router
•
Classical IP over ATM (RFC 1577)
•
PPP over ATM (RFC 2364)
•
PPP over Ethernet (RFC 2516)
System requirements
Recommended system requirements are:
•
Pentium 233MHZ or above
•
Memory: 64MB or above
•
10M Base-T Ethernet or above
•
Win9X, Win2000, WinXP, WinMe, WinNT
•
Ethernet Network Card
Please collect the following information from your ADSL service provider.
This information will be very helpful for your ADSL configuration. To
keep a record for reference, you can fill in the column as follow:
VPI
VCI
Encapsulation: VCMUX or LLC
Protocol
2
Standard
User name
Password
Password protocol
LED status description
INDICATOR
STATUS
Description
Off
No power
ON
Power supplied
Ethernet
ON
Ethernet connection is OK
(1-4)
Blink
Ethernet data transferring
POWER
Quick Blink
DSL line is training
DSL
DATA
ON
DSL line is connected
Blink
DSL data transferring
Rear panel layout
3
Interface
Description
SWITCH
Power on/off switch
POWER
Plug in for power adaptor
Modem Reset button
Press and hold around 5~10s to reset the
RESET
hardware. The modem will auto restart.
This action will recover the modem’s
default configuration.
Ethernet(1-4)
LINE
Ethernet interface for connecting to
computer or Switch
ADSL connector for connecting to ADSL
telephone line
4
Chapter 2
Hardware Installation
Please connect the device to you computer as follow:
•
If connecting to the splitter, connect the “Line” splitter to wall jack
using one telephone cable
•
Use the other telephone cable to connect “MODEM” port of the
splitter and “LINE” port of the modem. The “phone” port of the
splitter can be use to connect the telephone by a telephone cable.
•
Use Ethernet cable to connect “Ethernet” port of the modem and
“Ethernet” port of your computer.
If do not need to connect to the splitter,
•
Connect the modem to wall jack with a telephone cable
•
Use Ethernet cable to connect “Ethernet” port of the modem and
network adaptor of your computer
5
Chapter 3
Modem Parameters Setting
Configuring computer network card IP address
Configure your network card’s TCP/IP properties to Obtain an IP address
automatically from modem, or set the computer’s IP with the same network
mask of the modem.(For example: modem’s IP is 192.168.1.1/255.255.255.0,
Then you can set computer’s IP to:
192.168.1.x/255.255.255.0.
The range for x is from 3 to 253)
Web setting interface
Open IE or Netscape Web browser, Input http://192.168.1.1(MODEM default
IP address) in the address column, then click <ENTER> button, access the
following setting interface:
Input user name and password, then click Login key to enter WEB setting
interface.
Default setting:
IP Address: 192.168.1.1
Subnet Mask: 255.255.255.0
Username: admin
Password: admin
Main interface
After type right user name and password, the following window will pop up:
6
Here provide the most common RFC1483 Bridge and PPP over Ethernet
(RFC2516) setting for reference. If you want to know more about other
protocol, please contact your ADSL service provider for details
Ethernet over ATM (RFC1483 Bridge) setting
1.
From the Home page, click on “Quick Setup ”, See the following:
7
2. Unselect the check box to enable DSL Auto-connect process. Set any
PVC channel, Click on VPI/VCI, see the following:
3. Click the “Next” button, and you can set the encapsulation which get
from your ADSL service provider, see the following:
4. Click the “Next” button , select the check box below to enable this
WAN service, see the following:
8
5. Click the “Next” button, configure the DSL Router IP Address and
Subnet Mask for your Local Area Network (LAN) , please use the
default configurations, see the following:
6. Click the “Next” button, make sure that the settings below match the
settings provided by your ISP., see the following:
9
7. Click the “Save/Reboot” button, save your configurations.
NOTICE:
If you select Dial-UP link, after configuring your ADSL modem, please install
the third-party dial up program to access Internet (For example: Ethernet
300/Ethernet 500/WinPoet). If your system is WinXP, you can use its own
Internet access program without any other additional programs.
PPP over Ethernet (RFC2516) setting
PPPoE is also named as RFC 2516. It is a method of encapsulating PPP packets
over Ethernet. PPP or Point-to-Point protocol is a method of establishing a
network connection/session between network hosts. It usually provides a
mechanism of authenticating users.
To configure the MODEM for PPPoE:
1.
From the Home page, click on “Quick Setup ”, see the following:
10
2. Unselect the check box to enable DSL Auto-connect process. This
Quick Setup will guide you through the steps necessary to configure
your DSL Router., and you can set the PVC which get from your
ADSL service provider, see the following:
3. Click the “Next” button , select the type of network protocol and
encapsulation mode over the ATM PVC that your ISP has instructed
you to use, see the following:
11
4. Click the “Next” button, unenable IGMP Multicast, and enable WAN
Service, see the following.
5. Click the “Next” button, Configure the DSL Router IP Address and
Subnet Mask for LAN interface, please use the default configurations,
see the following.
12
6. Click the “Next” button, make sure that the settings below match the
settings provided by your ISP. see the following:
7. Click the “Save/Reboot” button, save your configurations, then finish
the Setting for PPPoE.
PVC Configuration
Open IE or Netscape Web browser, Input http://192.168.1.1(MODEM default
IP address) in the address column, then click <ENTER> button, access the
following setting interface:
13
Input user name and password, then click Login key to enter WEB setting
interface.
Default setting:
IP Address: 192.168.1.1
Subnet Mask: 255.255.255.0
User name/Password: admin/admin
1. After type right user name and password, the following window will display:
2. Click “Advanced setup” button, and see the following:
14
3. If the PVC which provide by your ISP vendor doesn’t match with
VPI/VCI :0/35, you can set another PVC , click on “ADD” button, see the
following, and type the PVC(For example, VPI/VCI:8/35) which get from
your ISP vendor:
4. Click “next” button, and see the following:
5.Don’t change anything, and click on “next” button:
15
6.Then, click “next” button, and see the following:
7. Click the “SAVE” button, and see the following:
16
8.Now you will see another PVC in the list, then click “SAVE/REBOOT”,
and see the following, you have added another PVC successfully.
17
Chapter 4
1.
Questions & Answers
Question: Why all LED indicators are off?
Answer: Check the connection between the power adaptor and the
power socket
•
2.
Check the power switch is on or not
Question: Why Ethernet LED is not lighting?
Answer:
•
Check the connection between the ADSL modem and your
computer or Hub/Switch
•
Check your PC or Hub/Switch running status and make sure
them are working normally.
•
Check your network cable for connecting the Modem with other
device:
For PC, you should use the crossover cable;
For Hub/Switch, you should use straight through cable.
3.
Question: Why DSL LED is not lighting?
Answer: Check the connection between the ADSL “line” port and the
wall jack.
4.
Question: Why cannot visit Internet with DSL LED is on?
Answer: Make sure following information has been input correctly:
VPI/VCI
User/password.
5.
Question: Why cannot open the Modem configuring web page?
18
Answer:
Follow below steps to check the communication between the
computer and Modem:
Click start -> run (input ping demands)-> Ping 192.168.1.1 (MODEM
IP address).
If cannot reach the modem, please check following configuration:
6.
•
The type of the network cable
•
The connection between the modem and computer
•
You computer’s TCP/IP configuration
Question: How to load the default setting after incorrect
configuration?
Answer: Press “reset” button 5s-10s to load the default configuration.
The modem’s default IP address: 192.168.1.1/255.255.255.0,
Username/password: admin/admin
19