1
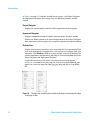
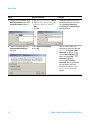
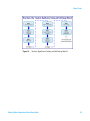
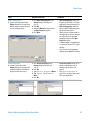
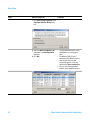
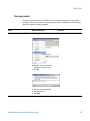
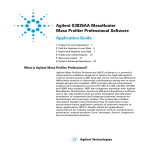
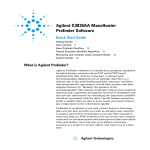
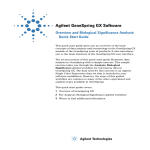
Agilent G3835AA MassHunter Mass Profiler Professional Software Quick Start Guide Getting Started 6 User Interface 10 Basic Tasks 15 Advanced Tasks 24 Acknowledgment and Citations 24 What is Agilent Mass Profiler Professional? Agilent Mass Profiler Professional (MPP) software is a powerful chemometrics platform designed to exploit the high information content of mass spectra (MS) data and can be used in any MS-based differential analysis to determine relationships among two or more sample groups and variables. MPP provides advanced statistical analysis and visualization tools for GC/MS, LC/MS, CE/MS, ICP-MS, and NMR data analysis. MPP also integrates smoothly with Agilent MassHunter Workstation, Spectrum Mill and ChemStation software and is the only platform that provides integrated identification/ annotation of compounds and integrated pathway analysis for metabolomic and proteomic studies. The system also enables Automated Sample Class Prediction that revolutionizes mass spectrometer-based qualitative analysis of unknown samples in many applications. MPP is ideally suited for applications characterized by complex sample matrices such as metabolomics, proteomics, natural products, food, beverages, flavors, fragrances, and environmental analyses. Features of Mass Profiler Professional • Allows differential analysis of two or more sample sets from one or multiple MS analysis platforms in a single project. • Designed for both mass spectrometrists and statisticians, with guided and advanced workflows. • Provides comprehensive statistical tools including ANOVA, PCA, volcano plots, hierarchical trees, SOMs, QT clustering, and five different methods for class prediction. • Generates inclusion lists for subsequent MS/MS-based analyses to facilitate identification of compounds of interest. • The ID Browser allows integrated identification and annotation of compounds using LC/MS Personal Compound Databases (METLIN, Pesticides, Forensics) and GC/MS libraries (NIST and Agilent Fiehn Metabolomics). • Allows import and export of data in several formats e.g. to further extend and customize statistical analysis and visualization capabilities using R-Scripts. • Integrates smoothly with Spectrum Mill to enable TOF/Q-TOF based discovery and QQQ-based verification of protein biomarkers. • Integration with GeneSpring allows the correlation of pathways between MS (metabolomics, proteomics) and microarray data (transcriptomics) in one project, enabling true integrated biology studies. • Class prediction models from GC/MS, LC/MS, CE/MS and ICP/MS data now can be used with the new, standalone Automated Sample Class Prediction software to enable high-throughput routine classification of unknown samples. 2 Mass Profiler Professional Quick Start Guide What’s new in MPP 13.0? • New analytical capabilities • Correlation analysis between pairs of entities or samples in an experiment or in a multi-omic experiment. • Metadata Framework to view sample metadata in conjunction with the clustered experiment results. • Support for KEGG pathways, in single-experiment as well as multi-omic pathway significance analysis. • PLS-DA algorithm displays the R2 and Q2 values. • In PCA scores plot, option to display the Hotelling’s T2 statistic. • Usability enhancements • Ability to export analysis steps as .PDF reports, merge reports with other reports, and share reports in cloud storage. • Ability to merge compounds split in retention time domain while creating Unidentified or Combined Mass Profiler Professional experiments. • Ability to use the clipboard to export data from multiple pathways. • For heatstrips drawn on pathway views, multiple colors to denote the experiment type. • Dendrogram view updated to respond dynamically to changes in the active entity list. • Ability to export images in .SVG and .EPS formats. • MassHunter complementary features • Ability to create Mass Profiler Professional experiments from .CEF files that were generated with the “Find by Integration” algorithm. • MassHunter ID Browser B.07.00 • MassHunter Profinder B.06.00 Service Pack 1 Mass Profiler Professional Quick Start Guide 3 Where to Find More Information Online help Press F1 To get more information about a pane, window, or dialog box place the cursor on the part of the pane, window, or dialog box of interest and press F1. Help Menu Click Help > Documentation Index to access the release notes, quick start guides, and HTML and PDF versions of the Mass Profiler Professional User Manual. Documents Mass Profiler Professional • Mass Profiler Professional Familiarization Guide (p/n G3835-90010) • Mass Profiler Professional Application Guide (p/n G3835-90021) • Agilent MassHunter Mass Profiler Professional User Manual. You can find a PDF copy in the MPP installation folder C:\Program Files\Agilent\MassHunter\Workstation\Mass Profiler Professional\docs\manual. Workflow Guides and Overviews • Agilent Metabolomics Workflow - Discovery Workflow Guide (p/n 5990-7067EN) • Agilent Metabolomics Workflow - Discovery Workflow Overview (p/n 5990-7068EN) • Integrated Biology with Agilent Mass Profiler Professional - Workflow Guide (p/n 5991-1909EN) • Integrated Biology with Agilent Mass Profiler Professional - Workflow Guide Overview (p/n 5991-1910EN) • Class Prediction with Agilent Mass Profiler Professional Workflow Guide (p/n 5991-1911EN) • Class Prediction with Agilent Mass Profiler Professional Workflow Overview (p/n 5991-1912EN) 4 Mass Profiler Professional Quick Start Guide MassHunter Qualitative and Quantitative Analysis • MassHunter Qualitative Analysis Familiarization Guide for LC/MS • MassHunter Qualitative Analysis Familiarization Guide for GC/MS • MassHunter Quantitative Analysis Familiarization Guide Training Road Show Slide Presentation Metabolome Analysis - From Sample Prep Through Data Analysis (Metabolomics Road Show, March 2011) Training Videos Training Courses Training videos can be found on the Supplemental disc. Visit www.chem.agilent.com to view a listing of training courses for MPP. Mass Profiler Professional Quick Start Guide 5 Getting Started Getting Started How do I get started? This Quick Start Guide helps you launch MPP, activate your license, review the MPP user interface, and create a project and an experiment that you import data into and then use to begin your analysis. If you are already familiar with the MPP software, after you install MPP you can immediately start using the preloaded demonstration project called “Malaria.” Start and Explore Mass Profiler Professional 1 Double-click the Mass Profiler Professional icon 2 3 4 5 6 6 located on your desktop, or click Start > All Programs > Agilent > MassHunter Workstation > Mass Profiler Professional > Mass Profiler Professional. Activate your license. The first time you start MPP you are prompted to enter your Mass Profiler Professional Order ID before you can use the software (see “Activating a License” on page 7). Review the following three sections in this Quick Start Guide: “User Interface” on page 10 “Basic Tasks” on page 15 “Advanced Tasks” on page 24 Review the Mass Profiler Professional Familiarization Guide (p/n G3835-90010) (see “Documents” on page 4). This guide helps you quickly create a project, create an experiment, import and organize data, and create an initial differential expression using pre-installed demonstration data - Malaria Demo. Review the Mass Profiler Professional Application Guide (p/n G3835-90021) (see “Documents” on page 4). This guide provides you with more detail about the MPP software and helps you create a project, create an experiment, import and organize data, and create an initial differential expression with your own data. Perform advanced analyses to meet your project needs using the operations available in the Workflow Browser (see “Workflow Browser” on page 13). Mass Profiler Professional Quick Start Guide Getting Started License Management Activating a License The first time you start MPP you enter your Order ID. License activation information is entered in the Mass Profiler Professional License Activation dialog box shown in Figure 1. An Internet network connection is required. 1 Mark Mass Profiler Professional Order ID. If you have additional software product licenses, such as for Pathway Architect or GeneSpring, mark your additional products. 2 Enter your Mass Profiler Professional Order ID. If you have additional software product licenses, such as for Pathway Architect or GeneSpring, enter your additional product Order IDs. 3 Click OK. The Mass Profiler Professional software automatically validates your license and starts Mass Profiler Professional. Figure 1 Mass Profiler Professional License Activation dialog box Mass Profiler Professional Quick Start Guide 7 Getting Started Moving a License MPP licensing is automatically enforced. You may move a license to another computer by surrendering it on the current computer and then activating it on the new computer. If you need to uninstall MPP, it is always best to surrender the existing license before un-installing MPP so that the license is available to be moved to another computer. To surrender your license: 1 Click Help > License Manager in the menu bar. Figure 2 License Manager is available from the Help menu. 2 Click Surrender in the License Manager dialog box. Figure 3 License Manager dialog box 3 Mark Mass Profiler Professional and any additional product Order IDs to surrender. 4 Click OK. 8 Mass Profiler Professional Quick Start Guide Getting Started Figure 4 Order ID surrender product selection dialog box 5 Click Yes in the Confirm Surrender dialog box. Because your license is no longer active on the current computer, MPP software immediately closes when you click OK. Figure 5 Confirm Surrender dialog box 6 Click OK in the Automatic Surrender Operation Successful dialog box. Because your license is no longer active on the current computer, MPP software immediately closes. Figure 6 Automatic Surrender Operation Successful dialog box 7 Activate your license Order ID on the new computer (see “Activating a License” on page 7). 8 (Optional) Click Start > All Programs > Agilent > MassHunter Workstation > Mass Profiler Professional > Uninstall to remove MPP from the current computer. Mass Profiler Professional Quick Start Guide 9 User Interface User Interface Note: Help and detailed information regarding the various fields and statistical treatments are available by pressing F1 or by referring to the Mass Profiler Professional User Manual. Main Functional Areas The main functional areas of Mass Profiler Professional are shown in Figure 9 on page 11. The main MPP window consists of four parts: (1) the Menu Bar, (2) the Toolbar, (3) the Display Pane, and (4) the Status Bar. 1. Menu Bar The menu bar (Figure 7) provides actions that are used for managing your projects, experiments, pathways, and display pane views. Figure 7 Menu bar 2. Toolbar The toolbar (Figure 8) is located below the menu bar and contains five sections of buttons for commonly used tasks: Project section: New project, Open project, and Close project Experiment section: New experiment and Add experiment Entity List section: Create entity list from selection, Inspect selected entity, and Import entity list from file Plots, Statistics, and Pathways section: Scatter plot, Profile plot, Histogram plot, Matrix plot, Venn diagram plot, Box-and-whisker plot, Heat map plot, Data spreadsheet, Summary statistics, Create new pathway, and Select data source for plots. Sidebar section: Hide or show the sidebars that contain the Project Navigator, Workflow Browser, and Legend. Figure 8 10 Toolbar Mass Profiler Professional Quick Start Guide P a n e T h e d i s p l a y p a n e , Mass Profiler Professional Quick Start Guide Note: This figure is rotated on the page for printing. The main functional areas of the MPP software D i s p l a y Figure 9 User Interface 3 . s 11 User Interface ee Figure 9 on page 11, is further divided into five areas — the Project Navigator, the Experiment Navigator, the Desktop Area, the Workflow Browser, and the Legend. Project Navigator Displays the current project and lists all the experiments with the project. Experiment Navigator Displays information related to Samples, Interpretations, Analysis, and My Favorites in folders related to the selected experiment in the Project Navigator. Each experiment within a project has a separate experiment navigator window. Desktop Area Display of one or more interactive views associated with the experiments. Each view in the desktop area is marked with a tab and you can configure each view separately. Click Windows > Tile to arrange multiple views on the desktop. The current experiment, interpretation, and analysis is noted using bold font in the Project Navigator and Experiment Navigator. A right-click anywhere in the active view shows you a menu of options (Figure 10) to customize the view, copy the view to the system clipboard, and export the view as an image file (bmp, jpg, jpeg, png, and tiff) or as an HTML file. Figure 10 The right-click available options within the desktop view automatically adjust to the type of view. 12 Mass Profiler Professional Quick Start Guide User Interface Workflow Browser The Workflow Browser (left) is organized into sequential groups of operations for the analysis of your data: Experiment Setup, Quality Control, Analysis, Class Prediction, Results Interpretations, Pathway Analysis (optional), NLP Networks (optional), and Utilities. Figure 11 Workflow Browser operations Mass Profiler Professional Quick Start Guide 13 User Interface Legend The Legend (Figure 12) shows the key (scale) to the use of color in the active desktop view. Right-click on the Legend window to copy and export the legend as described in the Desktop area. Figure 12 Legend 4. Status Bar The status bar (Figure 13) has three informative areas: the Status Area, the Ticker Area, and the Memory Monitor. Status Area: Displays high-level information of the current view such as the number of rows and columns in table views and the number of entities or conditions selected in plot views. Ticker Area: Displays the coordinates of the cursor in active plot views or the entity identification and value in table views. Memory Monitor: Displays the total memory being used and the total memory allocated by MPP. You can click the Garbage Can icon at any time to reduce the memory usage. Figure 13 14 Status Bar Mass Profiler Professional Quick Start Guide Basic Tasks Basic Tasks Set up a new project A project is a “container” for a collection of experiments, each experiment contains your samples, interpretations, and analyses. A project can have multiple experiments on different sample types and organisms. Create a new project and experiment for your data A new project and experiment is created through four sequential dialog boxes: (1) Startup, (2) Create New Project, (3) Experiment Selection, and (4) New Experiment. The Agilent Malaria Demo data supplied with MPP is used as an example in each step. You may substitute the malaria information with information for your data. Steps Detailed Instructions Comments 1 Start Mass Profiler Professional. a Click the Mass Profiler Professional icon on your desktop, or click Start > All Programs > Agilent > MassHunter Workstation > Mass Profiler Professional > Mass Profiler Professional. • The Startup dialog box helps you quickly set up a new project (this section) or continue your analysis with a previous project (see “Open a recent or existing project” on page 20). 2 Create a new project from the Startup dialog box. a Click Create new project. b Click OK. • Create new project provides you with the option to create a new experiment or import an experiment from an existing project into the new project. • After closing an open project, you may create a new project from the Menu bar, click Project > New Project, or from the Toolbar, click the New project button. Mass Profiler Professional Quick Start Guide 15 Basic Tasks Steps Detailed Instructions Comments 3 Type descriptive information in the New Project Details section of the Create New Project dialog box. a Type Malaria Project in Name. b Type Project containing the Agilent Malaria Demo in Notes. c Click OK. • The project name and notes may be viewed and edited at any time using the Project Inspector by clicking Project > Inspect Project from the menu bar. > 4 Create a new experiment in the Experiment Selection Dialog dialog box. 16 a Click Create new experiment. b Click OK. • You may create or add a new experiment to your project from the Menu bar, click Project > New Experiment, or from the Toolbar, click the New experiment button, or click the Add experiment button. • If you click Open existing experiment, you are prompted for the experiment to add to the project as described in “Open a recent or existing project” on page 20. Mass Profiler Professional Quick Start Guide Basic Tasks Steps Detailed Instructions Comments 5 Type and select information that guides the experiment creation in the New Experiment dialog box. a Type the descriptive name Malaria demo in Experiment name. This name may be different from the project name. b Select Mass Profiler Professional for Analysis type. c Select Unidentified for the Experiment type. d Select Analysis: Significance Testing and Fold Change for Workflow type. e Type Malaria LCMS ESI+ pH 7 in Experiment notes. f Click OK. • Experiment type determines how Mass Profiler Professional manages the data. • Unidentified is the proper Experiment type selection when the compounds have only been identified by their molecular features of neutral mass and retention time. • Identified is the proper Experiment type selection when the compounds have been identified by compound, formula, and/or CAS number. • Combined (Identified + Unidentified) is the proper Experiment type when you are unsure if the data has been identified in full or in part, or when MassHunter Qualitative Analysis has been previously used to identify some of the compound features. > • Your new project is now set up. • You are immediately guided through the steps to import and organize your data followed by the steps to create an initial analysis. Mass Profiler Professional Quick Start Guide 17 Basic Tasks Import your data using the “MS Experiment Creation Wizard” After you set up a project and create an experiment, the “MS Experiment Creation Wizard” guides you through the necessary steps to organize your experiment, import your data, define your experiment variables, and prepare your data for analysis. The “MS Experiment Creation Wizard” flow diagram is illustrated Figure 14. The data preparation includes grouping, filtering, alignment, normalization, and baselining. The Mass Profiler Professional Familiarization Guide (p/n G3835-90010) (see “Documents” on page 4) guides you through importing and organizing the Malaria Demo data. See the Mass Profiler Professional Application Guide (p/n G3835-90021) for details to import non-Agilent data. Figure 14 “MS Experiment Creation Wizard” Perform your initial differential analysis using the Analysis: Significance Testing and Fold Change workflow The “Significance Testing and Fold Change Wizard” guides you through the steps necessary to enter parameters and values that improve the quality of your results and produce an initial differential expression for your analysis. The “Significance Testing and Fold Change Wizard” flow diagram is illustrated in Figure 15. The Mass Profiler Professional Familiarization Guide (p/n G3835-90010) (see “Documents” on page 4) guides you through an initial differential analysis using the Malaria Demo data. 18 Mass Profiler Professional Quick Start Guide Basic Tasks Figure 15 “Analysis: Significance Testing and Fold Change Wizard” Mass Profiler Professional Quick Start Guide 19 Basic Tasks Open a recent or existing project When you start Mass Profiler Professional the Startup dialog box allows you to quickly open a recent project, an existing project on your computer, or import an experiment from an existing project into a new project. The steps presented are recommended if you are already familiar with the operations available in the Workflow Browser. If you are new to using Mass Profiler Professional start with “Set up a new project” on page 15 and then refer to the Mass Profiler Professional Familiarization Guide (p/n G3835-90010) (see “Documents” on page 4). Steps Detailed Instructions Comments 1 Start Mass Profiler Professional. a Click the Mass Profiler Professional icon on your desktop, or click Start > All Programs > Agilent > MassHunter Workstation > Mass Profiler Professional > Mass Profiler Professional. b Go to Step 2, Step 3, or Step 4. • MPP begins with the Startup dialog box to help you quickly open a previous project: a Click Open recent project. b Select Malaria from the Select recent project list. c Click OK. • Open recent project opens the project and the experiment(s) that are stored in the project. If your project is not shown in the Select recent project list go to Step 3 and select it from the list of existing projects on your computer. • A project is a container for a collection of experiments. A project can have multiple experiments on different sample types and organisms. • You can now use the operations available in the Workflow Browser. Open recent project: 2 Open a recent project in the Startup dialog box and select the Malaria project from the recent project list. 20 Open recent project (go to Step 2) Open existing project (go to Step 3) Create new project (go to Step 4) and import an experiment from a previous project Mass Profiler Professional Quick Start Guide Basic Tasks Steps Detailed Instructions Comments Open existing project: 3 Open an existing project in the Startup dialog box and select the Malaria project from the list of all of your existing projects. a Click Open existing project in the Startup dialog box in Step 2 on page 20. b Click OK. c Select the Malaria project row from the Open Project dialog box. d Click Open. • Open existing project allows you to open a project that is no longer displayed in the recent project list. • Open existing project opens the project and the experiment(s) that are stored in the project. • When you have a large number of existing projects on your computer you may have to use the page navigation buttons in the Open Project dialog box. • A selected project is highlighted by a color based on your PC’s system settings. • You can now use the operations available in the Workflow Browser. Create new project: 4 Create a new project in the Startup dialog box and import the experiment stored in the Malaria project into the new project. a Click Create new project in the Startup dialog box in step 2 on page 20. b Click OK. c Type Malaria Project in Name. d Type Import Experiment in Notes. e Click OK. • Create new project allows you to import an experiment from an existing project into the new project. • See “Set up a new project” on page 15 for creating a new project and a new experiment. > Mass Profiler Professional Quick Start Guide 21 Basic Tasks Steps Detailed Instructions Comments f Click Open existing experiment in the Experiment Selection Dialog dialog box. g Select the Malaria LCMS ESI+ pH 7 experiment in the Add Experiment dialog box h Click Add. . 22 • The selected experiment is shown highlighted using a background color. • The Malaria LCMS ESI+ pH 7 experiment in the Malaria project is now imported into your new project and appears as if it was opened using Open recent project. • You can now use the operations available in the Workflow Browser. Mass Profiler Professional Quick Start Guide Basic Tasks Save your project Save your current analysis as a TAR file for archiving, restoration of any future analysis to the current results, sharing the data with a collaborator, or sharing the data with Agilent customer support. Steps Detailed Instructions 1 Export your project to a TAR file. a Click Project > Export Project. Comments b Mark the check box next to the experiment you wish to save c Click OK. d Select or create the file folder. e Type the File name. f Click Save. Mass Profiler Professional Quick Start Guide 23 Advanced Tasks Advanced Tasks The operations available in the Workflow Browser (see Figure 11 on page 13) provide the tools necessary for analyzing features from your mass spectrometry data depending upon the need and aim of the analysis, the experiment design, and the focus of the study. This helps you create different interpretations to carry out the analysis based on the different filtering, normalization, and standard statistical methods. Follow the procedures in the Mass Profiler Professional Familiarization Guide (p/n G3835-90010) and Mass Profiler Professional Application Guide (p/n G3835-90021) (see “Documents” on page 4) for increasingly detailed information to help you use MPP. The Agilent Metabolomics Workflow - Discovery Workflow Guide (p/n 5990-7067EN) and the Agilent MassHunter Mass Profiler Professional User Manual. (see “Documents” on page 4) provide you with techniques and explanations to perform advanced analysis tasks. Acknowledgment and Citations BioCyc Pathway/Genome Databases Includes BioCyc Pathway/Genome databases from the Bioinformatics Research Group at SRI International®, used under license. http://www.biocyc.org/ Citation based on use of BioCyc databases or the Pathway Tools software If you use BioCyc databases or the Pathway Tools software in your research, cite relevant publications as described on the BioCyc website: http://biocyc.org/publications.shtml Citation based on use of KEGG Database KEGG is developed by Kanehisa Laboratories. If you use the KEGG database in your research, cite relevant publications as described on the KEGG website: http://www.genome.jp/kegg/kegg1.html 24 Mass Profiler Professional Quick Start Guide This page intentionally left blank. Mass Profiler Professional Quick Start Guide 25 www.agilent.com In this book The Agilent G3835AA MassHunter Mass Profiler Professional Software - Quick Start Guide presents the first steps to use the MassHunter Mass Profiler Professional Software. Agilent Technologies, Inc. 2014 Revision A, September 2014 *G3835-90019* G3835-90019