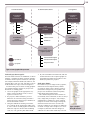
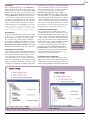
1
Minding your Successful training language materials How do you documentation Developing tailor your tone to to support your audience? courses Communicator The Institute of Scientific and Technical Communicators Summer 2009 Evaluating integration in Adobe TCS 2 Catching up with Doc‑To-Help 2009 Finding out what’s new in Author-it 5.2 Creating the perfect help landing page Contents 10 Communicator The quarterly journal of the ISTC ISSN 0953-3699 Editor Copyeditors 18 Tony Eyre and Nick Robson Mary Ann Howell Tim Joynson, Linda Robins and Jean Rollinson Layout 22 Newell-Porter Limited, www.newellporter.co.uk Advertising Felicity Davie, [email protected] or +44 (0) 1344 466600 Robert Meijer 26 31 Guidelines Back issues www.istc.org.uk/Members_Area/ communicator_archive.htm (ISTC members only) Beyond the barricade Steve Whalley Integrated training materials Warren Singer Fusing varied elements to provide an effective learning experience www.istc.org.uk/Publications/communicator.htm 31 January 21 March 30 April 21 June 31 July 21 September 31 October 21 December Paul Filby Combining the talents of authors and trainers to achieve success ISTC Office: [email protected] or +44 (0) 20 8253 4506 Submissions The perfect help-system landing page Taking visitors to the right web page quickly Subscriptions copy by published copy by published copy by published copy by published Doc-To-Help 2009 version 2 Checking out this year’s update to the oldest commercial Help tool Proofreaders Spring Summer Autumn Winter DocTrain West 2009 Reporting from an event with a theme of moving to structured content Marian Newell, [email protected] or +44 (0) 1344 626895 Deadlines Matthew Ellison Turning the spotlight on the integration between the components 15 Production team Technical Communication Suite 2 36 Author-it 5.2 Amanda Caley Assessing the latest release of this single-source authoring tool 40 The origins of the web CMS James Brice Looking back at the history of this technology 42 Press breakfast @ Quark’s Galyna Key Reporting on an event dedicated to Quark XML authoring solutions The Editor welcomes articles and letters for publication. Opinions expressed by contributors are not necessarily those of the ISTC. All articles are copyright and are the property of the authors, who have asserted their moral rights. For permission to reproduce an article, contact the author directly or through the Editor. All trademarks are the property of their registered owners. Advertisements are accepted on the understanding that they conform to the British Code of Advertising Practice. Acceptance of an advertisement for publication does not imply that a product or service has the ISTC’s endorsement. The Institute of Scientific and Technical Communicators (ISTC) Airport House Purley Way, Croydon, CR0 0XZ E: [email protected] T: +44 (0) 20 8253 4506 W: www.istc.org.uk F: +44 (0) 20 8253 4510 Printed on recycled paper using vegetable inks and low volatile organic compound (VOC) chemistry. 44 Creating DITA content with FrameMaker Andy Lewis Using the DITA-FMx plug-in to create DITA-compliant XML content 47 Editing 48 Book review 49 International standards 50 A day in the life Jean Rollinson Katja McLaughlin Richard Hodgkinson Rachel Potts cover A training course at Convergys (see pages 26–30) © Kate Johnson. Communicator Summer 2009 ISTC news more relevant just now, when the ISTC is hosting the UK’s first national event in our field. Technical Communication UK will take place on 22–24 September at Eastwood Hall near Nottingham and the early bird discount closes at the end of June. Find out more at www. technicalcommunicationuk.com. Recommendations for contributors Editorial Recently, I’ve had some productive recommendations from readers for potential contributors on specific topics. I’d like to use this avenue more often to attract new talent to the publication. If you know someone who you think could write a good article on an aspect of technical communication, or the products and processes used in it, please contact me at the usual address. I’m more than happy to contact people to see if they are willing. In this issue Article writing: tip #11 We have a strong emphasis on tools, including the latest versions of Adobe Technical Communication Suite, Author-it and Doc-To-Help, as well as news from Quark on its XML authoring solutions. Balancing that, we have two major articles related to training course materials, one describing how a company has integrated its documentation and course production processes with award-winning results and the other synthesising practical experience into a series of guidelines on producing material to support training courses. Finally, do take a look at Mary Ann Howell’s report from DocTrain West. She captures the energising effect that attending an event can have, especially in hard times such as these. This is even Work hard on the conclusion of your article. We have been asked for star ratings on reviews and in-short panels alongside articles. Having discussed these suggestions with contributors, I would like to start by enhancing the closing paragraphs of our reviews and articles. If you’re writing a review, be sure to sum up clearly how useful you believe the book or product to be to which kinds of readers or users. If you’ve written an article, summarise your main points (you should be able to extract three or four as the essence of a focused article). Ask yourself what you hope readers will take away from what you’ve said. C Marian Newell FISTC E: [email protected] New meeting format for ISTC Council Over the past year, I’ve been approaching corporate members (that’s Member and Fellow grades) to serve on Council. We need more people to progress initiatives and, just as important, we need our governing body to be truly representative. I’ve found more willingness to stand for election than I perhaps expected, with the main obstacles being lack of time to take on the role and lack of availability to attend the quarterly meetings in London. We can’t give people more time but we can do something about the meetings. At our May meeting, we voted to adopt a new approach from this year’s AGM, which will be held in September near Nottingham. The November meeting will remain a face-to-face meeting in London, although attendance won’t be mandatory and it may be possible for some people to phone in for parts of the meeting. The intention is to give newly elected Council members the opportunity to meet the team and to facilitate detailed discussions of the strategy and budgets for the coming year. After that, meetings will be held online on a weekday evening every two months (January, March, May, July, September). We hope that this will open up Council membership to all corporate members who are interested, irrespective of their locations. You’ll receive nomination forms with the preliminary AGM papers soon. Do contact me, Marian Newell, if you would like to know more about serving on Council or about finding supporters and getting elected. We hope you’ll join us in developing the ISTC for the future. everything we print is green... If you are concerned about ensuring your promotional materials are both costeffective and environmentally friendly, you should be talking to us. As an award winning leader in the field of eco-friendly printing we cut out the waste and the costs to give you a great looking product within your budget with a sustainable approach. tel: 01256 880770 web: www.greenhousegraphics.co.uk Communicator Summer 2009 greenhouse | graphics | TCeurope 9th Colloquium: a charm offensive In late April, Stockholm welcomed 70-odd delegates with an unexpected display of spring sunshine which set the tone for TCeurope’s 9th Colloquium on documentation project trends and methods: charm. For the early arrivals, our Swedish hosts from FTI introduced us to the delights of their capital city with personal insights into the visual, culinary and social attractions of this charming city of islands. During the colloquium, while examining different tools and methods for document ation projects, the overriding criterion for success that emerged was the ability to charm. Throughout the day, speakers reinforced the importance of visibility and good relations with colleagues and customers. Technology offers increases in effectiveness and efficiency but where technology prevails, the human interaction can become less personalised. Hanna Risku, from Danube University of Krems, gave an update of her research into intercultural technical communication and translation. In comparing results from 2002 and 2008, she noted that, as improvements and efficiencies were gained through digitalisation, language and cultural know ledge diminished. In an Austrian company, communications are now conducted in English or German only, and people are being replaced more readily than technology. New tools may lead to higher productivity but securing those tools demands different skills from the technical communicator. Agneta Weisberg cited impressive examples of the savings achieved from content management systems but repeated the need to engage the team, the company, and the Left to right: Brigit van Loggem (STIC), Helena Wäppling (FTI), Ottavio Ricci (COM&TEC), Hanna Risku (tekom), Terhi Sipilä (STVY), Françoise Jouan (CRT), Theresa Cameron (ISTC), Christine Sjörgen (FTI) vendor before attempting to deploy a system. Thomas Kern discovered the consequences of a lack of engagement through hindsight. One year’s work and a brand new tool had no impact within the company until he undertook a ‘charm tour’ to all departments. Now the document ation department has responsibility for all communications — internal and external. Nicholas Hill won cooperation from his engineering colleagues after he compared the building of documentation from multiple sources with the merging of code from different configurations. If other presenters were less emphatic about the human touch in technical communication, the charm element persisted. All the presenters, irrespective of nationality and native language, spoke in English and achieved the admirable feat of bringing humour into their topics. It was a charming revelation that, beyond the cultural differences, we can all laugh together. The day after the colloquium, the delegates from the TCeurope associations met for the 2009 AGM. Of the highlights reported, the InfoPool project about technical communication, to which several ISTC members contributed, is now complete and the results are available at www.stic.nl/ tce-infopool. Our Dutch colleagues at STIC are undertaking the development of a new website for TCeurope, and a new board was elected: Hanna Risku (Austria) continues as President, Françoise Jouan (France) is Treasurer, Terhi Sipilä (Finland) is Secretary and Brigit van Loggem (The Netherlands) is the fourth board member. The location of the 2010 Colloquium and AGM is yet to be confirmed but, as CRT is the probable host, we can hope that Paris in the springtime will be every bit as charming as Stockholm. C Theresa Cameron MISTC ISTC International Representative E: [email protected] www.bedfordtrans.co.uk We’re talking your language Our experienced teams work with technical authors in major companies worldwide, providing a reliable professional language service in all disciplines. 19-19a ST ANDREWS ROAD · BEDFORD MK40 2LL · UNITED KINGDOM TEL: 01234 271555 FAX: 01234 271556 Translation: manuals, patents, documentation Publishing: your preferred application Localisation: software & marketing information Globalisation: your web presence We comply with the new Translation Products Standard BS EN 15038. Communicator Summer 2009 ISTC news Presidential address Ringing the changes Earlier this year, I was diagnosed with Type 2 Diabetes. This was not unexpected as I have a family history of the condition. It’s also no big deal as, currently, I can control it by diet and I do not require any medication. It has, however, required changes to my lifestyle and this got me thinking about other changes that have taken place in my life, particularly in the technical communication profession. When I started writing, back in 1987, technical authors were predominately of the ‘old school’. We used clutch pencils and A4 pads, wrote by hand and passed the handwritten manuscripts to technical typists. The resulting typed documents then passed through several rounds of proofreading, correction, review, editing, re-typing, re-proofreading and so on. I’m sure this must strike a distant memory with some of you, while others will not have a clue what I am talking about. We then entered the computer age with PCs and dedicated authoring software. First of all, we used word processors (some of which are still with us), then more and more sophisticated publication packages, culminating in today’s applications handling XML, SGML and DITA (among other things). The method of delivery also changed, with less emphasis on printed manuals and more on online and other electronic delivery mechanisms. We now even allow users to create their own documentation by supplying information modules that can be ‘mixed and matched’ to suit their requirements. To accommodate these changes, it has been necessary for us, as a profession, to change. We now tend to be referred to as ‘information developers’ and ‘technical communicators’ rather than the traditional ‘writer’ or ‘author’. It is also increasingly common for us to be less concerned with the actual ‘wordsmithing’ and adopting more supervisory roles, with project and quality management responsibilities. This is particularly the case where the authoring function has been delegated to low-cost centres. So, what does this mean? Nowadays, we need to be flexible and adapt to an ever-changing working environment. The rules and practices to which we worked in the past are becoming less and less relevant. We all need to update our skills continually and keep abreast of current trends in our profession. It is one of the UK Technical Communication Awards Closing date 30 June 2009 Five classes: 1. Descriptive 2. Instructional 3. Promotional 4. Graphic 5. Tabular Entry fees: ISTC members £25 Non-members £40 www.istc.org.uk/About_istc/Awards/uk_tech_comm_awards.htm Communicator Summer 2009 best ways to survive the current economic gloom and to grow as professionals. The networking opportunities and access to training courses afforded to us, as members of a professional body such as the ISTC, are, in my opinion, more important now than they have ever been in fulfilling this need. Make the most of the opportunities on offer and let us know if there is anything more that the ISTC could provide for you. Conference 2009 In keeping with my theme of ringing the changes, it seems appropriate to remind you of the Technical Communication UK conference. This event is building on the success of the annual ISTC Conference with an expanded remit. Its aims are to meet the needs of technical communicators, their managers and clients, from every corner of the industry. It is being held on 22–24 September 2009 at Eastwood Hall, Nottingham, the same venue as last year’s very successful ISTC Conference. I strongly recommend that you join us at this event. You will have access to more than 15 learning and professional development sessions and be able to meet plenty of fellow professionals — on a fully residential basis, in a modern hotel with free wi-fi access — all from less than £400 (with the early bird discount). Visit www.technicalcommunicationuk. com for more details and to book your place. See you in September! C Simon Butler FISTC E: [email protected] The Institute The Institute of Scientific and Technical Communicators is the UK’s leading body for people engaged in technical communication. It provides a forum for members to exchange views and represents the profession in dealings with other professional bodies and with the government. The ISTC was formed in 1972 from the Presentation of Technical Information Group (est 1948), the Technical Publications Association (est 1953, later the Institution of Technical Authors and Illustrators) and the Institute of Technical Publicity and Publications (est 1963). To join the ISTC or change your grade, contact the ISTC Office on 020 8253 4506, at [email protected] or at Airport House, Purley Way, Croydon, CR0 0XZ. Council members Photographs at www.istc.org.uk/ About_istc/Governance/istc_council.htm President Simon Butler [email protected] Past President Gavin Ireland [email protected] Treasurer Peter Fountain [email protected] Website John Lee [email protected] Publications Focus group: member benefits At the start of this year, we gathered together more than 20 ISTC members for an online discussion about the benefits of membership. What do people really appreciate? What would people like to see added? It is essential that the organisation continues to be relevant to its members, and we decided that consulting with those members would be a good starting point for finding out how well we’re doing at this. In the discussion, Communicator emerged as one of the most popular benefits, along with the professional recognition that comes with being a member of the ISTC. There were loads of really interesting new ideas too, and Council is now working out which of these are feasible. There will be more updates — and more consultation — as we make progress with this, but here’s a flavour of some of the things we’re considering: Local groups. These are very popular, where they exist, so I’m working out what we can do to support existing groups and get new ones going too. Training: We gathered a whole range of new ideas around training, from improving information about our existing training benefits through to our longer term goal of getting a CPD (continuing professional development) scheme up and running. Building and enlarging our community: We already have a community of technical communicators, but the discussion panel came up with lots of suggestions for things we can do to build on this. Ideas include skills and expertise exchange, member blogs, and a hints-and-tips wiki. Update the salary survey, enhance the website, improve employer awareness of technical communicators and the ISTC, and lots more … Making these things happen relies on volunteers. If you’d like to get involved in any of these projects, contact the ISTC office ([email protected]). It’s a great way to develop new skills and meet new people. We’d also like to hear from you if you’d be interested in contributing to future discussions about member benefits. C Rachel Potts MISTC E: [email protected] www.technicalcommunicationuk.com 22–24 SEPTEMBER 2009 Marian Newell [email protected] HOSTED BY earlybird member price £392+VAT on bookings made by 30 June 2009 Education IN PARTNERSHIP WITH Jim Moore [email protected] Marketing and conference Paul Ballard [email protected] Alison Peck [email protected] International Theresa Cameron [email protected] Membership Iain Wright [email protected] Linda Robins [email protected] Local area groups Rachel Potts [email protected] Documentation lost in translation? 3di can help you provide effective information to your international customers by managing the translation of the information supporting your products, processes and services. InfoPlus+ newsletter Bob Hewitt (layout and artwork) [email protected] Andrew Marlow (content) [email protected] Typical translation projects undertaken by 3di include: • Software user guides • Medical device manuals • EU regulatory information • Compliance documentation • Marketing, white papers & sales information • Process & procedural documents Call us: 01483 211533 www.3di-info.com High Street, Ripley, Woking, Surrey GU23 6AF Communicator Summer 2009 ISTC news Online groups http://finance.groups.yahoo.com/group/ISTC_Discussion http://finance.groups.yahoo.com/group/ISTC_IASIG Scrum in technical communication Scrum is an iterative incremental process of software development (http://en.wikipedia.org/wiki/SCRUM). An organisation is changing to this method. The integration of people such as technical communicators who work on many projects and many products is difficult. Do other members use Scrum, and how does it work for them? One member replied that one development section uses the Scrum method with agile testing. There is no satisfactory method to tell him of the changes, because all the work is based on user stories that have no detailed specifications. (A user story is a require ment that is written in the business language of the user.) He is invited to the sprint reviews, but usually that is too late to meet the release date for the documentation. (A sprint is a period of between two and four weeks, in which development occurs on a set of tasks.) Therefore, he asks the developers and the testers what has changed. Another member supports two teams in a company that has used Scrum for a few years. The important thing is to attend all the daily meetings and to report problems when they occur. Make sure that the definition of ‘done’ includes testing and documentation. There is a release sprint before the company ships a product. The technical authors use this time to build the PDF documentation and to complete the release notes. Overall, the member thinks that agile development is good. One company has used Scrum for six months. The technical authors work on more than one project at once. Authors join the project team early in the project, even if there is not much for them to do except to contribute to the development of the user stories. At the start of each sprint, authors say how much time that they will work on the project during the sprint (for example, two days a week). This influences which user stories are developed during the sprint. Authors attend daily meetings for all the projects on which they work. Most members of a project team work full time on the project. However, the authors work on many projects. To overcome problems, the authors do some rough Communicator Summer 2009 planning, and because know what work they can postpone or abandon, they have some flexibility to adapt. The technical authors are positive about Scrum. They feel that they are part of the team. Because user stories are completed one at a time, the authors can spread their work evenly across the project, instead of squeezing most work into a few weeks before the product is released. Although working on many projects is not ideal, it is no less ideal with Scrum than with other methods. Technical Communication on Twitter There is a new Twitter Group at http:// twittgroups.com/group/techcomms. Tax investigation insurance One member’s accountants sent him a letter about tax investigation insurance. The letter suggested that he should insure, through the accountants, against the professional fees and possible penalties that could occur from an HMRC tax investigation. He thinks that tax investigation insurance is a sensible precaution. However, he thinks that the offer from his accountants is similar to a professional who asks his clients to pay his professional indemnity policy. Therefore, he asked for other opinions. Some members explained that they’d had visits from the Inland Revenue or from Customs and Excise (now combined as HMRC). The visits took a few hours, the investigators were polite, and there were no problems for the members. The members did not think that insurance for tax investigation visits was necessary. Other members think that tax investi gation insurance is useful. HMRC can investigate you for a long time, even if your accounts are excellent. If they decide you are trying to hide something, they can waste much time and money in an investigation, and fees for professional representation are high. When one member had a VAT inspection, she thought the inspector was disappointed because he found only a 15p error. He was unpleasant, and he implied that because she did not have a standard rate for all her clients, the lower-paying clients made partial cash payments. No accountant can prevent that suspicion. C Mike Unwalla FISTC E: [email protected] Member news New members Member David Chapman Middlesex Kate De Groot Surrey Christopher Delf Suffolk Stuart Mendelsohn Cambridge Martin Smith Berkshire Mark Southee Gwynedd Kim Stimpson Surrey Jennifer Wallace Northumberland Michelle West Dorset Associate Nadeem Mustfa Essex Colum McAndrew Surrey Transfers Fellow Galyna Key Sheffield Rejoiners William Hanna Newcastle upon Tyne DON’T FORGET The Australian and New Zealand Journal of Technical Communication Southern Communicator ISSUE 16 ISSN 1832-0120 FEBRUARY2009 What if Your Readers Can’t Read? Language – Past, Present and Future Speketh so Pleyne: A Historical Approach to Plain English Keeping a Project Journal Technical Communication in 1989 The Australian and New Zealand Journal of Technical Communication is available in the Members area of the ISTC website: www.istc.org.uk/Members_Area/ southern_communicator.htm Your career. Your future. Learn the skills you need to go places Technical writing courses Web and e-learning Journalism courses • Introduction to technical authoring • Introduction to Adobe Captivate (2 days, £495) 25-26 Jun, • Various courses for journalists, editorial assistants and press officers (1 day, £350) 5 Jun, 17 Jul, 10 Sep • Advanced technical authoring techniques (3 days, £795) 8-10 Jun, 29-31 Jul, 14-16 Sep • Introduction to online help development (1 day, £350) 19 Jun, 27 Aug • Introduction to Adobe RoboHelp (2 days, £495) 11-12 Jun, 3-4 Aug, 1-2 Oct • Basic and Intermediate Adobe Framemaker (2 days, £495) 22-23 Jun, 24-25 Aug, 19-20 Oct • Advanced Adobe Framemaker (1 day, £350) 24 Jun, 26 Aug, 21 Oct 6-7 Aug, 24-25 Sep, 5-6 Nov • Adobe Dreamweaver - website creation (2 days) 15-16 Oct, 3-4 Dec Business writing courses • Adobe Flash - all levels • Business writing in plain English (1 day) On-demand On-demand Print and design • Writing effective reports (1 day) On-demand • Introduction to Adobe InDesign (2 days, £495) 9-10 Jul, • Writing winning proposals • Introduction to Adobe Acrobat (1 day) On-demand AutoCAD training • Adobe Illustrator - all levels • Autodesk-authorised courses at all levels • QuarkXpress - all levels • AutoCAD Architecture 17-18 Aug, 22-23 Oct On-demand On-demand • Adobe Photoshop - all levels On-demand (1 day) On-demand • Autodesk Inventor • 3ds Max and 3ds Max Design For more info or to book, go to armadaonline.co.uk or call 01527 834783 www.armadaonline.co.uk Armada, 6 West Court, Saxon Business Park, Stoke Prior, Bromsgrove, Worcs. B60 4AD Email: [email protected] tel: 01527 834783 Scheduled courses take place at our training centre in Bromsgrove in the Midlands, close to the M5/M6/M40/M42 motorway network. All courses available on-demand at your venue anywhere in the UK. All prices quoted exclusive of VAT. armada 10 Product review Technical Communication Suite 2 Matthew Ellison turns his spotlight on the integration between components within this suite of popular tools. Introduction Adobe® Technical Communication Suite 2 (TCS2) is a collection of software tools, all of which have been available as standalone products for many years. The point of the suite is not just that it offers a cost-effective way of purchasing all the individual products (although it does), but that it aims to enable a range of possible seamless workflows between a tightly integrated set of component applications. As a result, Adobe claims that TCS2 provides a coherent one-stop solution for technical communicators. This article is not intended to provide an indepth assessment of any of the individual tools within TCS2; rather, it comments on the overall coherence and consistency of TCS2, reviews the extent to which the components have been integrated, and examines some of the potential workflows that result from this integration. Introducing the Technical Communication Suite 2 TCS2 is the second version of the suite and was released in January of this year, just over a year after the release of version 1.0 (which was comprehensively reviewed in the Winter 2007 issue of Communicator). The differences between TSC1 and TCS2 are that each of the main component products has been upgraded by one version number, and one completely new component (Adobe PhotoShop) has been added. Also, because Adobe Presenter is now bundled with Acrobat 9 Pro Extended, Presenter is an added bonus for the suite. As a result, TCS2 consists of the following components: FrameMaker 9: The long-established and robust tool for creating long technical documents, with the option of editing in a structured authoring environment. FrameMaker’s origins are in print-based documentation, but there is a developing emphasis on multi-channel publishing: the ability to single-source from FrameMaker to a range of media, both print and online. RoboHelp 8: A popular authoring tool for creating online Help in a variety of forms from Microsoft HTML Help (.chm) to Adobe’s new AIR (.air) format. Captivate 4: A popular software demonstration and eLearning tool that enables you easily to record tasks in software applications and output them as Flash-based demonstrations and tutorials. Acrobat 9 Pro Extended: The latest premium product in the Acrobat family, this supports a range of video, multimedia and 3D capabilities within the PDF format. It includes several innovative new features, such as PDF Portfolios. Adobe Presenter 7: A plug-in for Microsoft PowerPoint that enables you to convert Communicator Summer 2009 PowerPoint slides into Flash-based multimedia presentations, self-paced courses and quizzes. Adobe PhotoShop CS4: The industry-standard powerful photo- and image-editing application. Overall coherence and consistency One of Adobe’s aims with the most recent release of the components within the suite has been to standardise some of the fundamental aspects of the user interface. Imposing consistency must have been a daunting task since some of the component tools (namely FrameMaker, RoboHelp and Captivate) were originally created by other software vendors and subsequently acquired by Adobe (in the case of RoboHelp and Captivate through its merger with Macromedia). Moreover, the user interfaces of these acquired tools each originally had their own individual characteristics and operating conventions. For example, FrameMaker’s interface in versions 8 and earlier was very distinctive, some might even say quirky, and had very little in common with that of either Captivate or RoboHelp. Figure 1. FrameMaker’s Paragraph Designer pod This has changed in TCS2: the interface for FrameMaker 9 has been given a radical overhaul and is now much more in keeping visually with other Adobe products. Each of its main areas of functionality (for example: Variables, Markers and Cross-References) now has its own ‘pod’, which is a set of controls displayed within a single tab. See Figure 1 for an example. These pods are configurable and may be dragged around the screen, docked into windows and grouped with other pods. This is the same user interface model that was introduced into RoboHelp at version 7. Although Captivate does not share the pods system, there is a sense in which the interfaces of 11 these three products (FrameMaker, RoboHelp and Captivate) have more in common than those of the other products within the suite. For example, they all open with very similar Welcome screens (Figure 2) and they also share a common Help Viewer (the locally installed Adobe Help Viewer 2, which is an Adobe AIR application). As you are viewing the Help for any one of these products, you can easily switch to viewing the Help for either of the other two by means of a drop-down (Figure 3). This serves to reinforce the connection between these three products. Despite the positive progress towards standardisation across the suite, there are still some areas where individual components retain their own legacy approach to the organisation of menus and use of shortcuts. For example, whereas Captivate, Acrobat Pro Extended and Photoshop all make Preferences available as the last item on the Edit menu, FrameMaker still includes this item on the File menu, while RoboHelp retains it on the Tools menu (and named Options rather than Preferences). This probably makes sense for long-standing users of the individual tools, but could be confusing for Figure 3. Selecting the required product within Adobe Help Viewer 2 users coming to the suite for the first time. The remaining sections of this article describe the connections between the various components of the suite, and suggest some possible workflows. Figure 2. Welcome screens for FrameMaker, RoboHelp and Captivate It makes sense... to choose a quality translation The most important element of any translation is that it makes sense. That's why Linguaset always use native speaker, specialist translators to ensure the highest quality translation every time. From the most technical of documents to the simplest sentence, it makes sense to choose quality, it makes sense to choose Linguaset. Linguaset, The Green, Green Street, Macclesfield, Cheshire SK10 1JH www.linguaset.com [email protected] Tel: 01625 617174 Providing Britain's leading companies with quality translations for two decades Linguaset Sense2.indd 1 Linguaset TM T R A N S L A T I O N S 18/08/2008 15:39:21 Communicator Summer 2009 12 Product review Integration between FrameMaker and RoboHelp In my view the relationship between FrameMaker and RoboHelp represents the most interesting and tight integration between any two components within the suite. It provides a powerful single sourcing workflow that enables you to create and maintain high-quality print-oriented documentation within FrameMaker that can be published on demand to fully featured online Help through RoboHelp. This workflow is achieved by adding a FrameMaker book or document to a RoboHelp project, ensuring that it is linked rather than imported. Incidentally the ability to link FrameMaker documents to RoboHelp projects is not available if you have the standalone versions of FrameMaker 9 and RoboHelp 8, and is therefore one of the benefits of purchasing TCS2. When linking a FrameMaker document, several different aspects of the FrameMaker source (including paragraph formats, cross-references, TOC, index markers, and Topic Alias markers that identify context-sensitive links) can be mapped to their counterparts within the RoboHelp project. It is even possible to automatically create DHTML dropdowns and expanding text within RoboHelp from special paragraph formats in FrameMaker. You are also able to specify the way in which the FrameMaker document is split (or paginated) into separate Help topics. Even though the content is actually brought into RoboHelp, what distinguishes linking from a normal import is that the RoboHelp content can be automatically refreshed to reflect ongoing changes in the source FrameMaker document. This paradigm is similar to that used by conversion tools such as WebWorks ePublisher and Mif2Go, and it rather reminds me of the promising but short-lived RoboHelp for FrameMaker product that was killed off by Macromedia in 2004. On the negative side, the design and execution of the actual interface for linking documents and setting up the mappings leaves room for improvement, in my view. The workflow requires you to work with three separate areas of RoboHelp — to link a FrameMaker document successfully, you must: 1. Link the document using File > Link > FrameMaker document 2. Set up the conversion settings, accessed from Project Settings (File > Project Settings > Import tab) 3. Generate the RoboHelp topics from the FrameMaker document by right-clicking the document within the Project Manager pod and selecting Update > Generate RoboHelp’s interface does not make this workflow sequence at all clear, and I would have appreciated better signposting in the form of embedded user assistance or possibly a wizard. Furthermore the meaning of some of the options is somewhat opaque. For example, the Pagination option shown in Figure 4, although extremely important for splitting a long document into separate topics at the headings, is easy to miss due to its unhelpful name and its positioning. As Communicator Summer 2009 a result of these shortcomings in the interface, the process of linking FrameMaker documents is rather unintuitive and susceptible to error on first use. This is a pity, because once you have learned how to use it properly, this functionality is potentially an extremely powerful and useful way to single-source to print and online Help. Integration between RoboHelp and Captivate It is possible to create and insert Captivate movies within RoboHelp projects in a highly streamlined and intuitive way. This could be useful if you wanted to include a short visual demonstration or even an extended interactive tutorial within a software Help system. What makes it so streamlined is that: The commands for creating and editing the Captivate project are available within RoboHelp's own user interface (Figure 5) — there is no need to open Captivate manually and start the project creation process in the normal way. After creating the desired Captivate slides and closing Captivate, the required Flash (.swf) and topic (.htm) files are published automatically and added to the RoboHelp project. Although the published Flash file is located within the RoboHelp project, the source Captivate project (.cp) file remains in its normal location (normally My Documents\My Adobe Captivate Projects) and may therefore not be included within your RoboHelp project’s version control system. However, an advantage of this approach is that the Captivate project is available outside of RoboHelp for other purposes. If you need to edit the Captivate source, you can initiate this process from within RoboHelp by rightclicking the .swf file and selecting Edit — as long as the original location of the project (.cp) file is unchanged, the project will then open automatically within Captivate. And as before, the updated Flash (.swf) file is published automatically on closing Captivate — very neat. Integration between FrameMaker and Captivate The integration between FrameMaker and Captivate is similar to that between RoboHelp and Captivate. It enables you to insert multimedia presentations (that may include interactivity) into FrameMaker documents. Clearly there would be no point in doing this if your intended publishing format was print. However, if you save the document in PDF format and your user has Adobe Acrobat Reader 8 or higher, the embedded multimedia presentations can be played within the document. This offers a way of transforming traditional static manuals into truly interactive experiences that include demonstrations, simulated practice sessions and quizzes. In my experience, FrameMaker’s Captivate integration is somewhat less robust and well developed than that of RoboHelp’s, and FrameMaker has occasionally crashed when I have attempted to use it. Although FrameMaker’s File 13 UA Europe Conference 17-18th September, 2009 Figure 4. Pagination option in RoboHelp’s Conversion Settings Sessions include: Successful User Assistance Traits for the New Economy Architecting UA Topics for Reuse Using DITA for Help Update on Microsoft Help Formats: Present and Future Enabling Feedback and Collaboration Within Help Turning Search into Find Using the STOP Methodology to Reduce User Assistance Creation Times Case Study: UA Design and Implementation for Mobile Applications Case Study: A Community-Driven Design Approach for User Assistance Case Study: Single-sourcing User Assistance and Training Materials Featured speaker: Michael Hughes, User Assistance Architect at IBM and author of the User Assistance column for UXmatters Figure 5. RoboHelp’s menu option for creating a new Captivate demo Other speakers include: Matthew Ellison Joe Welinske Leisa Reichelt Representatives from SAP AG Tony Self Conference venue: The conference venue is the Cardiff Marriott Hotel in Cardiff, Wales. Cardiff is a vibrant city that has many attractions including the redeveloped Cardiff Bay area, and the historic castle. Full Conference Details and Registration: www.uaconference.eu +44 (0)1425 489 263 Figure 6. FrameMaker’s 3D Menu Communicator Summer 2009 Matthew Ellison Consulting 14 Product review Figure 7. Play button screen with image in background Resources Review of Adobe RoboHelp 8 by Matthew Ellison: http://winwriters. com/articles/robohelp_8 What’s New in Captivate 4 by Scott DeLoach: www.writersua.com/ articles/captivate FrameMaker 9 review by Sheila Loring: www. scriptorium.com/white papers/FM9review.pdf PC Pro review of TCS2: http://tinyurl.com/rb6yqp Adobe Technical Communication Blog: http://blogs.adobe. Matthew Ellison MISTC has over 20 years of experience as a user assistance and eLearning professional in the software industry. He provides training and consulting on authoring tools and technologies, and is a visiting lecturer at Portsmouth University for the MA Technical Communication course. Matthew also organises the annual UA Europe Conference (www. uaconference.eu). E: matthew@ ellisonconsulting.com W: www. ellisonconsulting.com Figure 8. Captivate’s options for converting PSD layers to image objects menu contains an Adobe Captivate option with sub-options for creating and editing Captivate demos, interestingly there is no mention of this in FrameMaker’s Help system. Instead, the Help recommends that you insert existing Captivate demos by using the File > Import > File option. I do have a concern that it may not be obvious to users that these embedded Captivate movies can be played. A .swf file is initially represented within FrameMaker as a static image of the first frame, and the movie starts playing when the user clicks this image. In the case of .swf files published from Captivate, I have been unsuccessful in making this image anything other than a blank slide with the same solid colour as the Captivate project’s default background colour. This is despite trying the useful new feature in Captivate 4 that enables you turn off Auto Play and to select a background image for the initial ‘play button’ screen (Figure 6). This feature works very well when you publish directly from Captivate to PDF (a new publishing format in Captivate 4) and means that, when users open the PDF they can clearly see how to start playing the movie. However, in a PDF generated from FrameMaker the Captivate movie continues to be represented as a blank slide until the user clicks the movie. Integration between Captivate and PhotoShop Integration between FrameMaker and Acrobat Pro Extended Conclusion Any technical communicator working with 3D images will be pleased to learn that FrameMaker 9 enables you to import U3D objects that have been created from a CAD file using Acrobat 9 Pro Extended (or any other third-party product). When you save the FrameMaker document as a .pdf file, the 3D image is included as a fully live and editable 3D object that can be viewed and manipulated in Acrobat Reader 9 or higher. In addition to this, FrameMaker provides a 3D context menu that enables you to set the default view, lighting, rendering and background colour for the 3D object (Figure 7). This level of support for 3D images was also available within TCS1. In assessing the overall coherence and integration of TCS2, I suppose you could argue that what is missing is a front-end to the entire suite: a sort of ‘super’ welcome screen that guides you through the appropriate workflow and to the appropriate products within the suite according to your specific technical communication objectives — that would truly establish the credentials of this suite as an integrated and seamless package. That said, this article has described a number of impressive integrations and connections between the various products that enable you to combine their outputs in a neat and seamless way. I believe these justify the description of TCS2 as an ‘integrated solution’. C Communicator Summer 2009 Captivate has always enabled you to import images created from image-editing applications such as PhotoShop. The new innovation in Captivate 4 is that you can import native PhotoShop (.psd) files that include layers, with the option of representing each layer as a separate image object on a single slide within Captivate (Figure 8). This provides a potential workflow for creating animations by having a professional designer create a layered image with PhotoShop, importing it into Captivate and then applying different timing to each layer. Integration between Presenter and Captivate Presenter has an option that enables you to insert a Flash (.swf) movie within a slide. However, there were problems with inserting Captivate 3 movies in this way because of the multiple .swf files that resulted from publishing from Captivate 3. These consisted of the main movie, skin, and a separate file for each Full Motion Recording (FMR) slide. This problem has been solved in Captivate 4 because you now have the option of publishing to a single .swf file that incorporates the movie, skin and all FMR files. As a result, it is much easier to incorporate software demonstrations created with Captivate into Presenter presentations. 15 Event report DocTrain West 2009 Mary Ann Howell reports from this event, which had a theme of moving from unstructured to structured content. In this tight economy, it is challenging to pick which conferences to attend, especially if you are paying out of your own pocket. So it was a difficult decision to pay the hefty fees for a stay at a Palm Springs country club. But once there… ahhh. It was so relaxing — wandering in the lovely spring weather along the garden paths, through clouds of orange-blossom perfume. DocTrain West, held on 17-20 March, was devoted to applying structure to documents, and everyone was immersed in structure. It was everywhere. Nightly, I was awakened from deep sleep by a mocking bird chirping with all his might, snippets of songs stolen from other birds. This bird’s chirp snippets were quite different from those rattled off by my mocking bird at home. I drowsily tried to find patterns in his sequence, and imagined tagging each chirp snippet with an element: <myname>chirp chirp chirp</myname> <mytree>chirp chirp chirp</mytree> <myrange>chirp chirp chirp</myrange> <whaticandoforyou-littlecutiegirlbird>ch irp chirp chirp chirp</whaticandoforyoulittlecutiegirlbird> Perhaps my home bird uses the same element tags, but just different content. In the vendor room of the conference, I hooked up with Thomas Aldous of Integrated Technologies. I gave him a FrameMaker file of a complex chapter from a user manual, and he spent two hours showing me how to build a very sophisticated conversion table. Using the table, he converted my unstructured FrameMaker document to DITA XML. Wow! What a wizard. I learned so much in those two hours I had to go to my room and rest my head. Much of the conference was like that. Every session was just what I wanted, which made it hard to choose which to attend, and, unfortunately, handouts for other sessions were not made available. Following are details of one session that I think covered a lot of territory. Communicator Summer 2009 16 Event report The structured-content technology landscape In this presentation, Ann Rockley describes the key tools needed for working with structured content, and some of the criteria by which she judges them. (She is not linked to any vendor.) The key tools are: Authoring tools Component Content Management Systems (CCMS) Publishing tools. Know what you want ‘What you should do first,’ says Rockley, ‘is build a set of requirements for your company.’ You should ask: What are you trying to? What new direction would you like to take in the future? What are your problems? What are your customers’ information requirements? How can you support them? Put together a possible criteria list for your organisation’s needs. Narrow down your list and weight the importance of each item (must-have and nice-to-have). Tell a story, and put together a use case. Write down where you are now, and where you want to go. Find out about the vendors and their products’ features, attend conferences, join online groups and website conferences, and read blogs. Some of your requirements may not be a good fit with some tools. Develop a list of vendors to investigate and request custom demonstrations from those that interest you. Send a Request for Information (RFI) or a Request for a Proposal (RFP) to the vendors that seem a possible fit. Include your detailed criteria and ask them to respond to your questions. How to evaluate tools Rockley emphasises that before you can evaluate tools, you need to define clearly what it is that you want to do (see panel). When working with XML modular content, your tools need to work well together through the entire process of authoring, managing content and publishing. Criteria for an authoring tool Rockley suggests that you look for an authoring tool with a clean, clear user interface, designed for authors not programmers. She checks to see if tools are easy to use and give a clear indication of what the next step is. She also looks for easy access to their functions. Moreover, since you are authoring in XML, the tool needs to be able to hide or show XML tagging, and to be able to validate the content against its structure rules. Finally, you need to make sure that the tool can integrate with a content management system (CMS). Criteria for a CCMS A CCMS should be designed for managing the reuse of small components not website content. It may have its own authoring tool or it may link to an outside tool. ‘When adopting a CCMS, often tech pubs departments find that FrameMaker is orphaned,’ Rockley says. The User Interface (UI) of the CMS should be clean, friendly, easy to use and, again, be designed for Communicator Summer 2009 authors rather than programmers. ‘The UI is often a big shortcoming, expecting authors to deal with code and command lines that date back decades to SGML,’ Rockley says. See that the interface design is appropriate for multiple audiences, such as editors, subject matter experts, reviewers, authors and information architects. ‘Check the dialog boxes, and see that they are clear,’ she suggests. If you plan to use DITA, make sure that the CCMS is compliant with the relevant standards. ‘Check to see if you can drag and drop topicrefs into a map editor and are not limited to the arrow up and down keys,’ Rockley suggests. You should be able to open and read conrefs without having to read raw XML text. You should also be able to use attributes to filter out versions for different audiences, products or publishing methods. You should be able to assign values to variables at the map level, Rockley says. The CCMS should track derivatives. When core information is changed in an information component, the component becomes a derivative of the original. If changes are made in the original content, the CCMS should send a notification, enabling you to choose whether to apply the changes to the derivatives. The CCMS should report everywhere that a topic is used and allow changes to be made to the topic everywhere, or allow a derivative topic to be created. You should be able to search for and locate reusable components, then drag them into your editor. When authors are not sure if a piece has been written, they should be able to search for similar content. ‘This can help keep translation costs down,’ Rockley says. The CCMS should be able to generate reports such as: Where a topic is used Lists of derivatives and their sources Percentage of reuse for translation metrics. The CCMS should serve as an efficient repository, Rockley says. While you are creating, you should be able to save at least three iterations of drafts, and then choose which version to use in a document. The content should be locked while in use, so that only one author or editor may have it open for changes. Search is extremely important, Rockley says. You need to be able to set up easily an advanced search using metadata, for content that has this and this and not this. Rockley checks to see what type of workflow the CCMS supports. Workflows may be automatically driven by the state of the component, or by a user’s interaction. Rockley says that a CCMS should include sample workflows, with a default in place so you don’t have to start from scratch. The workflow should be easy to change. She checks to see if the CCMS workflow is strictly sequential (for example, write, edit, review) or if it can it support parallel workflows (for example, enabling illustrators and writers to work on a component at the same time). The CCMS should support automatic notification, letting the editor know that a component is ready for edit or the subject matter expert know that it 17 is ready to review. If you use a standard such as ATA (Air Transport Association), Mil-Spec 1000D, SPL (Structured Product Labelling, an XML standard for the pharmaceutical community) or DocBook (an XML standard for narrative without reuse), make sure you look for a CCMS that supports it. If you are translating your components, you may need to have a CCMS that supports XLIFF (XML Localisation Interchange File Format), an XML-based format used to standardise translation. Content from your CCMS should be easily ported into a translation tool, Rockley says. ‘After it’s created, reviewed, and edited, can it be automatically shunted to the translator?’ After content is translated, it should be easily reinstalled. Rockley explains that the CCMS should know, ‘for instance, I’m Japanese and I belong here in the DITA map.’ Rockley also checks to see if the CCMS has a terminology editor that checks for consistent use of English terms. And of course, the CCMS should support fonts for many languages. Criteria for a publishing tool A CCMS may expect you to buy another product for publishing. ‘Some systems will push your content out, but others leave you on your own,’ Rockley says. There are two main types of publishing: rendered content, where the XML is converted into final deliverables, and dynamic delivery, where documents are automatically published to a website. Dynamic publishing should support XQuery (a standard way to query XML information). Rockley said that XQuery ‘can be used to search and deliver a task topic, with this attribute, pull out the customer version, and then deliver it to the web.’ Rockley checks to see if the CCMS can convert content to other XML schemas and change layouts, templates and style sheets. She checks to see what types of publishing the CCMS supports, such as PDF, HTML and help formats. She says that you may also need a CCMS that enables you to edit the FOSI (Formatting Output Specification Instance) and tag content for PDF production. She also checks to see what the CCMS can tie into, such as the DITA Open Toolkit. Vendors Check vendors carefully, Rockley advises. ‘Are they reliable? Are they new, small, innovative companies or have they been around for a while? Will they still be in business after they make the sale?’ she asks. Check to see if the vendor has an online community, such as web conferences, bulletin boards and blogs. Do they have a vision for the future? Are they planning new features and new directions? Or do they seem to be stagnant? Conclusion Setting up your structured-content technology landscape can be daunting. ‘Before you make any decisions’, Rockley advises, ‘Get to know your needs, get to know the tools.’ C Presenter Ann Rockley is a well-known expert in content manage ment systems and her consulting company, The Rockley Group has helped organisations around the world to adopt content management strategies. Rockley is also responsible for the XML Component Content Management (CCM) Report, published through CMS Watch: www.cmswatch.com/ CCM/Report. Mary Ann Howell is a senior member of STC, and the supervisor of Technical Publications at Orthodyne Electronics. E: mary.howell@ orthodyne.com W: www.hikaripub.com Arbortext The 1st Integrated Dynamic Publishing Solution Deliver Content Consistently. Quickly. Precisely. Control content and processes to configure accurate publications: · Compose documents dynamically · Create and author XML based text modules · Produce technical illustrations directly from CAD models · Promote reuse of content · Review and approve content using workflow management · Reduce translation time and costs · Automate publishing of XML content to multiple formats Make the most of your technical publications with DITA and PTC’s expertise and competency PTC is the first provider to fully support the DITA specification. With its integrated, web-based solutions, PTC provides a seamless integration between the product and documentation development process. For more information on increasing efficiencies and streamlining your document creation and authoring using DITA and PTC’s Arbortext products, go to: www.ptc.com/go/ditaad Communicator Summer 2009 18 Product review Doc-To-Help 2009 version 2 Robert Meijer checks out the latest version of the oldest commercial Help authoring tool and finds it up to today’s challenges. Introduction Doc–To–Help is a hypertext word processing utility for Microsoft Word for Windows that will help you write commercial-quality documentation and convert that documentation into Windows on-line Help automatically. That’s how my WexTech brochure started when this first tool of its kind was introduced in 1991. Since that time Doc–To–Help has changed dramatically. As a tool driven by Visual Basic and Word Macro, it saw the end of its technical lifetime with version 2000. ComponentOne took over and created a totally new product without compromising on any of the existing features. The various intermediate editions show that this conversion was quite a job but it resulted in the current version 2009 — an excellent tool indeed! Doc–To– Help still delivers the support for Microsoft Word that made it famous but it has also evolved into a state-of-the-art authoring and publishing tool. Interface Starting Doc–To–Help has become very easy through the introduction of the Getting Started Wizard (Figure 1). Content can be created in Doc–To–Help or imported. Whether it is a manual written in Microsoft Word, a RoboHelp project or an old Help system, Doc–To–Help gives you tools to convert existing content to a Doc–To–Help project. Editing content and configuring the project can be done directly in Microsoft Word, FrontPage or Adobe Dreamweaver using installed Doc–To–Help toolbars (ribbons in Word 2007) without ever needing to convert to a Doc–To–Help format. When authoring in HTML, any other editor can be used, although without the help of Doc–To–Help toolbars. New is Doc–To–Help’s XML-based Editor, which has the ease of Microsoft Word while automatically creating standards-compliant source code. An intuitive style editor helps you with formatting. You can drag and drop items that you want to edit. The editor checks your spelling as you type, indicates misspelled words and suggests changes. It also includes a converter for transforming Word and HTML content to XHTML. The source code of XHTML documents can be validated using Validate and Fix buttons. Doc–To–Help provides a ribbon style gallery much like the one in Microsoft Office 2007 (Figure 2). All settings are easy to find on the ribbons, although some of the buttons could be larger (such as the one on the Home tab leading to the definition screen for the Help targets and the one on the Projects tab leading to the Project settings). All the information that Doc–To–Help needs to process outputs is stored in a special set of styles called Doc–To–Help Markup Language (D2HML). Doc–To–Help provides these styles in Word templates and cascaded style sheets and provides toolbars or ribbons to apply the appropriate styles. Since D2HML is only a set of styles, the use of the content is, therefore, not restricted to any one environment. Dynamic Help An eye–catching feature of the Doc–To–Help interface is the use of Dynamic Help. Some ten years ago, Doc–To–Help introduced HelpXtender, an ActiveX control to let developers integrate online HTML Help into an application thus providing performance support in the context of that application. Now ComponentOne has made available a Dynamic Help Control for embedding Help in .NET applications. It enables developers easily to embed a dynamic Help pane in the application’s interface. Authors use the available visual topic mapping feature to associate topics with the interface elements. Since the help is always present, the information is provided immediately in the context of task performance. As one might expect, this Help window can be removed and activated at will (Figure 2). Doc–To–Help uses Dynamic Help itself to provide user assistance and you should see it at work by downloading a trial version. Publishing formats Figure 1. Getting Started Wizard Communicator Summer 2009 Doc–To–Help can be used to create online Help for software applications in all Microsoft Help formats, including context-sensitive Help. It can be 19 Figure 2. The Rules window used to convert existing Word-based documents to searchable, topic-based content for the web. Creation and conversion of documents related to quality management and training is an important example. Doc–To–Help can be used to publish various standards-compliant formats: HTML Help. Doc–To–Help covers all the features of this compiled Help format (recommended by Microsoft for more than ten years). Web-based Help (also known as browser-based Help or uncompiled HTML Help). Doc–To–Help calls it NetHelp and features the navigation options of HTML Help. NetHelp enables you to create a self-contained, fully customisable website. It can be used for web-based Help, stand-alone sites, intranet sites or blended into existing sites. Doc–To–Help’s own user assistance is delivered in this format. WinHelp. This legacy format has to be supported as it was so widely implemented. MS Help 2.0. Microsoft’s attempt to improve on HTML Help resulted in a Help format to be used only by Visual Studio .NET application. JavaHelp. Supported to cover the whole range of Help formats. Press-ready manuals in PDF or Word formats. Doc–To–Help has long been used to create printed publications in its users’ house-styles. The look and feel of online publishing formats can be customised using editable style sheets and a Theme Designer that allows for creative layouts and appearances. Doc–To–Help has always been a great tool for creating slick-looking printable publications and this version retains this capability, including editable templates. Single sourcing Doc–To–Help’s strong suit has always been its ability to create help and printed documentation from the same source. It is no surprise that the current version enables you to publish to all supported formats from the same content — and with just a single mouse-click! Source content (text or graphics) can be tagged for inclusion in or exclusion from specific outputs with easy-to-use conditional tags. Tags are available to mark for use in different combinations of platforms (online or printable), targets (any of the publishing formats) and custom attributes. Attributes make it possible to assign userdefined build criteria to text, topics, documents and styles, which in turn makes it possible to single source one project in several different ways. For example, you could create both a beginner’s and an expert’s version of a manual and/or help system from the same project. Communicator Summer 2009 20 Product review Doc–To–Help uses information from the source content to automatically create a table of contents (TOC) and an index. Both can be customised or created from scratch. Customised TOCs can even be created for different outputs. Established features Doc–To–Help provides easy addition and sorting of glossary terms. It can automatically create a popup link to the glossary definition every time that term is used in a Help project. Margin notes in print automatically become pop-ups in on-screen outputs. Hyperlinks become cross references in print. A strong point of Doc–To–Help is, and has always been, the provision of tools to create impressive deliverables without design or development expertise. A single click takes you to functions for inserting graphics and videos, creating image maps, defining collapsing sections, creating pop-ups, creating expanding or drop-down text, inserting custom buttons and adding breadcrumbs for navigation. To map topics to an application context, identifiers can be specified or generated automatically. New and improved Robert Meijer has 20 years of experience in the oil industry and an additional 15 years as user assistance professional in the software industry. Since 1991 he has collected information about more than 250 help authoring tools, current and extinct. He runs his own Netherlands-based training and consulting company that specialises in online Help design and technology for clients all over Europe. E: [email protected] I’m very pleased with the introduction of variables that can be used to manage strings of text or formatted blocks of content for reuse across a project. Another great addition is the ability to use the settings of an earlier project in a new one. This will not only save time setting up a project but also ensure consistency over various projects. Of course, full text search can be implemented in all online outputs. A new feature is that searching can be annotated on a topic-by-topic basis. Doc–To–Help automatically creates ‘See Also’ links to related sub-topics based on the style hierarchy. Its Related Topics Editor makes it easy to form these topic relations and to add custom ones. Drag and drop linking of topics, keywords and documents extends the number of ways in which hyperlinks can be created. Expert users and developers will certainly enjoy the support for .NET or XSLT transforms for output, and the support for scripting to create additional features. Reference documentation created with Microsoft’s Sandcastle utility can be integrated into a Doc–To–Help project to create a Microsoft Help 2.0 system for Visual Studio .NET. The user assistance has been extended outside the product as well. Users can see Doc–To–Help live in action by joining one of the regularly scheduled free webcasts. Additionally, a library of video tutorials is available on the Doc–To–Help website. On the Doc–To–Help forum, questions are answered by ComponentOne personnel and other experts. Team authoring Team authoring is a basic source-control feature in which authors work on their own local copy of a Communicator Summer 2009 project on their machine (called the working copy), while the master (or team) project is located on the organisation’s network or on a web server. Doc–To–Help team authoring makes it possible for Help authors to work together on a single project. Project changes are available to the entire team and changes made by one author will not be overwritten by those made by another. Each author works on his or her own working copy. When a document is checked out and is being edited by one team member, it is locked so that others cannot edit it at the same time. Until changes are checked in, they remain local to the author’s machine, appearing only in his or her working copy of the project. Likewise, changes made by other authors cannot be viewed until they are retrieved from the repository. Doc–To–Help provides special commands to check-in changes to the repository and to get other authors’ changes from the repository. Modular TOC facility A separate wizard-type program helps the setup of a modular help system (that is, a Help system consisting of more than one help file, yet appearing to the end user as a single Help system). It can be applied in situations where software is sold as separate modules (each with its own help file), in cases where only parts of the Help system is subject to changes over time (and are delivered separately) and in cases where multiple authors work on parts of a Help system. Modular Help systems can reference Help files that are not installed (for example, Help for a software module that the user has not purchased) and still look seamless. The TOCs and the index simply omit the missing information without displaying error messages. If the user later installs the missing module, the Help will be added in the proper position. Conclusion Doc–To–Help has become an excellent tool once more. Its great user interface and many timesaving features make it easy to work with — so easy, in fact, that only users of Doc–To–Help 2000 and earlier may have a problem because they have to forget their accumulated knowledge. Doc–To–Help is suitable for a wide range of users. Writers who want to concentrate on content can create a perfect Help system without needing much knowledge of the conversion process, whereas users who want to get more deeply in the mechanics of Help creation will find that Doc–To–Help offers every possibility to do so. That makes it a great (and fun!) learning tool as well. Without doubt, Doc–To–Help will become a front runner once more. C print ercial grade online and m m co e at cre to ed ne ilt right in, but Doc-To-Help is all you an XML-based editor bu s ha lp He oc-T Do n. weaver. documentatio Word to Adobe Dream t of os icr M m fro ng hi ding RoboHelp it also supports everyt existing content, inclu of ty rie va a rt po ard im You can even publishing to any stand r fo y ad re ly nt sta in is n projects. The content manuals. All formats ca y ad re ses pr d an lp, ed He Help formats, Web-bas n, Doc-To-Help, ect and one applicatio oj pr e on m fro d te ra be gene . r multiple applications eliminating the need fo www.greymatter.com/referral/componentone +44 (0)1364 654 100 www.qbssoftware.com/componentone +44 (0)8456 580 580 www.componentsource.com/componentone +44 (0)800 581 111 Doc-To-Help Sales 1.412.681.4343 ©1987-2009 ComponentOne LLC. All rights reserved. All products and brand names are trademarks and/or registered trademarks of their respective holders. 22 Design The perfect help-system landing page A good website takes visitors to the right page quickly. Paul Filby passes on some ideas for how to achieve this for web-based help. Introduction The importance of providing a well-designed landing page for a website is widely recognised. It is critical that visitors are immediately presented with the information they need to determine whether it’s worth their while exploring further. Much of the literature that discusses landing pages focuses on the top-level ‘home page’ — the equivalent of the high-street shop window that must entice prospective customers to browse your wares and, ultimately, make a purchase. Another context where landing-page design is frequently discussed is for the marketing landing pages that lie behind banner ads and other web-advertising links. However, there may be other pages on a website — ‘navigational’ landing pages (Kalbach 2007: Sec. 4.2) — that sit at some level beneath the home page and fulfil an important role in informing and directing a large number of visitors. If you place your products’ help systems and associated support materials online, the landing page for this subsection of your website is likely to see a lot of traffic. Users may arrive at the help-system landing page through a variety of routes, and be engaged in attempting to reach various goals. The premise is that it’s well worth spending time designing a navigational landing page carefully — changes here are likely to affect many users, and the effectiveness of the Figure 1. Examples of original web landing pages Communicator Summer 2009 page design may help or hinder users’ search for the most appropriate help materials. This article describes Red Gate Software’s perproduct ‘Learning topics’ landing pages, and how these were redesigned with the aim of improving customers’ success in finding the help they require. Landing pages before redesign As is common in a multi-author environment without firm control over document structures, the original landing pages (generally titled ‘Using Product X’) differed considerably in both their structure and content. Each author put their own spin and style on what the page should offer to the user. Figure 1 shows two examples. In each case, the yellow shading indicates the content that we wanted to redesign. There are some obvious differences between the content and structure for the SQL Compare and SQL Prompt landing pages. Examples include the overall page length, the number of ‘See Also’ links, and the way worked examples are identified and linked to. More generally, in neither case is the content structured in a way that effectively directs the user towards a particular type of help. Before putting pen to paper and sketching out a better design, we decided to analyse how the landing pages fit within users’ work patterns, and how the products themselves (and related help materials) differ. 23 Routes into the landing page and types of users By identifying the possible routes that a user can take to arrive at a product’s help-system landing page, we can start to gain some insight into the possible types of users, and their likely goals. We can then use the contexts within which the users may be viewing the landing page to guide our updates to the landingpage design, and improve the users’ experience. Because access to Red Gate’s web-based Support Centre is completely unrestricted, visitors to the help-system landing page may arrive by many different routes and have very different goals in mind. We identified various routes that a user could follow to reach the landing page (see panel at right). For each route, we identified the types of users most likely to be accessing the landing page in this way and example scenarios that could have led them to the landing page. Figure 2 shows how these routes are related. For each type of user, we can make some intelligent guesses as to the type of material that will be most relevant: Owns product. These users are likely to be using the product for day-to-day work, probably on production systems. They may need to get up to speed quickly or need answers to very specific questions. Task-based material will be pre-eminent, with referencetype material also being important. Trialling product. These users will initially be concerned with understanding what the product does, and how it might be useful to them. Conceptual material and worked examples will be particularly relevant. Researching product. These users are more likely to find the pre-sales material within the Product section of the Red Gate website more relevant. However, by browsing the web-help, they will form an idea of the scope and complexity of the product, and also of the overall quality of the documentation. Routes out of the landing page The purpose of the help-system landing page is to direct users effectively to the most appropriate help materials, so we then turned our attention to possible exit routes: 1. Links to worked examples 2. Links to specific learning topics (either in a procedural workflow context, or ad-hoc links) 3. Links to important reference and conceptual material 4. Links to miscellaneous generic topics (for example, how to license or upgrade the product) 5. Links to help materials for related products 6. Links to the Product page or components thereof (for example, product demos and walkthroughs) 7. Search form (for the product or the entire website) 8. Links to the product forum. Routes 1 to 5 should receive the most attention on the help-system landing page. Other exit routes (such as search and to the product forum) are automatically handled by elements of the Support Centre that surround the landing-page content. Routes by which users may reach product landing pages Pressed F1 or selected the Help > Contents menu option within the product. Red Gate's products are designed to launch an appropriate Support Centre web page when the user requests help within the product. The Help > Contents menu links to the help-system landing page. For F1 context-sensitive help, if a given screen or dialog in the software does not have a more specific help-page link, the help-system landing page is displayed by default. User type: Trialling product; owns product. Scenario: The user doesn’t understand the purpose of a field on a dialog, and chooses Help > Contents on the main menu. Clicked a link in the Support Centre. For example, clicking the ‘Using <Product>’ item in the Learning <Product> table of contents, or clicking a link from another topic. User type: Trialling product; owns product; researching product. Scenario: The user is browsing the web-help system, and clicks the link in the table of contents to return them to the ‘Using <Product>’ page. Clicked a link elsewhere in the Red Gate website. For example, from a case study in the ‘Products’ section or within the product Forums. User type: Owns product; researching product. Scenario: The user has read a pre-sales article describing a particular aspect of the product, and clicked the link through to the web-help. Clicked a link in an external website. For example, from an independent blog post, or from an affiliate website. User type: Owns product; researching product. Scenario: The user has encountered a problem, found a blog post (through a Google search), and been linked through to the help-system landing page. Clicked a link that appears in external search results. For example, a hit from a Google search about a Red Gate product. User type: Owns product; researching product. Scenario: The user has encountered a problem and used an external search (such as Google), which has linked them through to the help-system landing page. Clicked a link that appears in internal search results. Both product-specific search and general search (for the whole Support Centre) is available. User type: Owns product. Scenario: The user has encountered a problem and used Red Gate’s site- or productspecific search, which has linked them through to the help-system landing page. Selected a previously set up bookmark (or typed or pasted the URL directly). Users may have bookmarked the help-system landing page if they refer to the help materials regularly, or want to return to them directly at a later date. User type: Owns product. Scenario: The user has used the help system previously, and has already identified the landing page as a reasonable place to start browsing for help materials. external site (for example, Google search results) Red Gate Support Centre top-level page (all products) product-specific top-level page learning topics Help-system landing page ‘Getting started’ other pages product-specific search table of contents general search Figure 2. Routes to the landing pages product (software) F1 Communicator Summer 2009 24 Design Classifying the product The next step was to consider the nature of the individual products themselves. Given that each product has its own help system and associated Figure 3. Working notes showing ideas for page elements landing page, would it be feasible to create a single landing-page design (or template) that was appropriate for every product? Analysis of the existing help content for each product showed that a simple ‘one size fits all’ approach for the new landing-page design was not going to work. To try to simplify the landingpage design(s), two fundamental dimensions were identified that could be used to classify Red Gate’s products: maturity and workflow. These dimensions are particularly pertinent to the type of information that is provided in the product’s Figure 4. Examples of redesigned web landing pages Communicator Summer 2009 help system, and therefore directly affect the content of the landing page: Maturity describes the age of the product in terms of the number of major releases of the software that have been made. For Red Gate's products, it is sufficient to define the maturity as either Initial Release or Mature. Maturity of the product matters, because it has a direct effect on the amount and type of help materials that are produced for a given software release. Users are likely to expect more comprehensive help content for a mature product (for example, worked examples and in-depth troubleshooting information), than for an initial release. Workflow describes the way in which the product is designed to be used, and can be either Ad-hoc or Sequential. Ad-hoc products do not have a clearly defined workflow, and are likely to be used ‘in the background’ while the user is engaged in another high-level task. SQL Prompt is a good example, providing inline SQL code completion and hints. Sequential products have at their core a workflow or workflows that reflect the step-by-step nature of a number of core tasks. SQL Compare is a good example of a product with a strong workflow integrated with the software. Users follow a well-defined sequence of steps in order to compare the structure of two databases. Defining page elements Finally, with an understanding of the exit routes that we needed to focus on, and a simple model to describe the basic differences between products, we moved on to sketching out landing 25 page designs. The exit routes we’d identified formed the basis of the individual landing-page elements (for example: a particular heading, ‘Using <product>’, followed by a numbered list of actions, each linking to a particular learning topic). The combinations of maturity and workflow dimensions were used to mark-up where a particular element should be included or excluded from the landing page for a particular type of product. At this stage, it was much easier to work with paper prototypes than with any particular authoring tool. Figure 3 shows various ideas for elements, such as titles and content (shaded blue), each marked-up with a combination of maturity/ workflow dimensions (shaded green), along with supplementary notes (shaded yellow). The maturity/ workflow dimensions that apply to each element are indicated using the letters A to D, as follows: Sequential Ad-hoc Initial Release A B Mature C D Having discussed the content, wording, ordering and combination of elements for each type of product, we then created templates for the landing pages within our primary authoring tool, Author‑it. These included sufficient explanation of each element (including whether it was mandatory or optional) for authors to be able to pick up and start using the templates easily. Landing pages following redesign Figure 4 shows the redesigned pages for the SQL Compare and SQL Prompt products. SQL Compare was identified as a Mature/ Sequential product (type ‘C’), and elements were selected from the appropriate template to complete the new landing page. In comparison to the original landing page for this product, the information is more clearly structured and, we hope, a better match to users’ expectations. SQL Prompt was identified as a Mature/Adhoc product (type ‘D’). Again, in comparison to the original landing page, the information is more clearly structured. However, as might be expected, it’s more difficult to structure the landing page information for products that have an ad-hoc usage model, as compared to those products with a well defined workflow. Measuring the performance of redesigned landing pages In this case, we were trying to make it easier for users to exit the product landing pages in the ‘right’ direction, and find the material that would help them continue learning how to use the product. One relatively straightforward way to measure the affect of the redesign, is to use web analytics. Every page in the Red Gate Support Centre includes the necessary code to generate visit statistics for the Google Analytics tool (as described in Rachel Potts’ article in the Spring 2009 Communicator). Table 1 shows selection of statistics from Google Analytics. Of particular interest is the Exit Rate %. For a given page, this is calculated as the number of visits that resulted in the user exiting the Red Gate website at that page, divided by the total number of visits to the page. We would hope to see a reduction in the exit rate if the redesigned help-system landing page is doing its job effectively. A proportion of the users that abandon the site from the landing page will have done so because they couldn’t find what they were looking for there. Modest reductions in Exit Rate % were seen across all products for which the redesigned landing page was implemented. It is also interesting to note that the average Time on Page has not changed markedly between the two landing-page designs. We would hope to continue to see relatively short times here, indicating that the user is not struggling to understand large amounts of information on a page whose primary purpose is References Kalback, J (2007) Designing Web Navigation. O’Reilly Media, Inc. Sample landing page: www.red-gate.com/ sqlcompare/latesthelp Table 1. Statistics for product landing pages before (B) and after (A) redesign Page SQL Compare (B) SQL Compare (A) SQL Prompt (B) SQL Prompt (A) SQL Data Compare (A) SQL Data Compare (B) SQL Packager (B) SQL Packager (A) ANTS Profiler (B) ANTS Profiles (A) Page views 2749 1421 438 1143 1059 1627 740 303 3558 5177 Unique views 2284 1183 383 1010 904 1332 637 240 3091 4115 Time on page (mins:secs) 00:56 00:56 01:13 01:27 01:01 01:08 01:14 01:05 01:07 01:13 Exit Rate % 23.2 20.7 35.6 32.0 22.2 19.0 30.0 21.8 21.3 19.0 Exit Rate change -2.6 -3.6 -3.2 -8.2 -2.3 to redirect them quickly and effectively. Conclusions and further work We can undoubtedly say that providing well structured landing-page templates has made it easier for authors to write and edit this material, and to maintain a higher level of consistency between authors. The process of analysing the routes into and out of the landing pages, and of considering user and product characteristics, gave us a solid framework on which to base our landing-page updates. It’s harder to prove whether the changes made have truly benefited our audience. Google Analytics results (reduced exit rates) suggest that the new landing-page design has improved ‘signposting’ to the rest of the help system for each product. A better idea of how these changes have affected user behaviour would be obtained by performing usability tests (either in person, or using remote monitoring software) on both designs. Such tests would be difficult and timeconsuming to set up, but would nonetheless provide more solid proof of the effectiveness or otherwise of a given design. Thanks are due to Brian Harris for his preparatory work in analysing our existing landing page designs. C Paul Filby MISTC has worked as a Technical Author for the last five years, following ten years’ experience in technical roles ranging from sonar design to database administration. Previous authoring roles encompassed both print and electronic media, documenting hardware and software for a telecoms company. He is now working at Red Gate Software, which produces tools for Microsoft technology professionals. E: [email protected] Communicator Summer 2009 26 Project profile Beyond the barricade Steve Whalley describes how Convergys combined the talents of their authors and trainers to create a successful, unique working practice. Introduction Convergys produces an innovative messaging system called Media Exchange, which provides a state-of-the-art environment for the deployment of multimedia applications (such as messaging, voicemail, videomail, voice recognition and web browser interface) for mobile telephone and fixed line telecommunication network operators. The introduction of Media Exchange provided an ideal opportunity for taking stock and re‑thinking our user documentation structure and design. Simultaneously, our Manchester Customer Training Department was asked to develop training courses and material for the new system. So, especially as the two departments were on the same site, it soon became obvious that collaboration was the way forward. For the creation of both the Media Exchange customer user guide and the training guide, the Manchester Technical Documentation and Training Departments evolved a method of co-authoring. This provides a synergy that enables both documents to be created simultaneously, efficiently and accurately. In addition, because the same tools, templates and house style are used for both the system guide and training guide, they have the same standards of accuracy and presentation. The way we were Until recently, our Manchester Technical Document ation and Customer Training Departments operated differently and in parallel. In the ‘time-honoured manner’, technical authors gathered information for a system’s project user documentation by: Researching system hardware and software design specifications created by software development and project engineers Visually inspecting system hardware Discussing system operator features and requirements with design engineers Using the system’s user interface Consulting generic product user documentation Consulting project user documentation for any previously delivered similar systems. To create the user document suite for a project, the authors used departmental FrameMaker templates and a variety of graphics tools, such as Microsoft Visio, CorelDraw and PaintShop Pro. The FrameMaker files were saved in the appropriate project directory and the graphics files (linked by reference in the FrameMaker files) were saved in a designated graphics directory, also in the appropriate project directory. This traditional methodology worked reasonably well, but there was much duplication of text and graphics. For example, all the graphics files Communicator Summer 2009 (linked to the appropriate FrameMaker file) for a project were contained in a designated artwork subdirectory under that project’s main directory. In other words, there was no unique, central storage. Meanwhile, our colleagues in the Customer Training Department gathered information for a system’s project training course in much the same way as the authors. To create the training guide for a project, the technical trainers used departmental Microsoft Word templates and the same variety of graphics tools as used by the technical authors. The Word files, with graphics files embedded, were saved in the appropriate training project directory. The trainers then created the PowerPoint presentation for their courses using the latest Convergys PowerPoint template. Typically, this involved copying and pasting relevant text and graphics from the training guide, and editing them as necessary. In practice, this methodology resulted in training material which was certainly ‘fit for purpose’, but was sadly lacking in efficiency and cost-effectiveness, as the training material for each project ended up being completely unique. Also, there was no formal house style for training material and the trainers, by their own admission, were somewhat casual in their use of their Microsoft Word templates. The way we are now Introduction At the same time that I was allocated the task of designing and creating the user guide and online help for our new system, my colleague in the Training Department, Brian Morgan FISTC, was allocated the task of designing and creating the customer training course and associated material. Initially, we worked in isolation but soon realised that there was a lot to be gained by pooling our resources and working together on both the user documentation and training material. The amalgamation was further enhanced by the trainers’ desire to move from using Microsoft Word to Adobe FrameMaker for creating training course notes. This was soon agreed and I designed FrameMaker templates for training guides based on existing templates for user guides. In fact, the only difference between the two sets of templates is that the text frame in the training guides is smaller to provide white space for students’ notes. All paragraph and character tags are exactly the same. The essence of our Media Exchange system guide and training guide creation process is building project and new product versions using existing approved and issued product documents as the basis. As far as possible, the same whole chapters 27 and appendices (for example, maintenance, glossary and alarm details), are used in both product and project user guides (including, to a lesser extent, online help) and training guides. Similarly, graphics are created only once and are available for use in any product or project user or training material. The following sections outline the concepts, processes and details involved in creating user documents and training guides for all Media Exchange products and projects. Concept New product and project Media Exchange user documents (including online help) and training guides are initially designed and built from the existing components (that is, chapters and graphics) of product documents. To manage these components we had to think about file management, so we: Devised a central library of graphics (known as PicLib), so that each graphic is unique Devised a central library of common chapters (known as ChapLib). To manage the system technical content and provide the basic ‘building blocks’ for document planning purposes, we also devised the spreadsheet shown in Figure 1. This is used to show the document build structure for existing Media Exchange product releases. It can be used as a source for creating the document build schedule for a new product release or a project (based on an existing product release). Process In practice, we’ve found that the best approach is for both the author and trainer to work first on the system guide for a Media Exchange product release, and use that as the basis for the training guide and course presentation material. Here’s where it could now become contentious, as this approach means that (at this stage) the trainer is acting as an author. Of course, trainers are communicators too and any trainers worth their salt must aim to create technically accurate, well-written training course notes. So far, for us, this approach has worked well as the trainer has demonstrated good authorship skills. Another, perhaps obvious, factor in this success is that the personalities of the author and trainer must be compatible for them to work effectively as a team. While considering the specific requirements for the user document (system guide) and training material (training guide and course presentation material), we devised a structure for most chapters that met the requirements of both user and training documents. Basically, this structure divides each chapter into the following modules: Introduction Description of the application or feature Parameters ‘How to’ (procedures for doing specific tasks). All of these modules are used in the system Figure 1. Media Exchange product generic document build structure Figure 2. Media Exchange project document build schedule guide, whereas the training guide uses only the introduction, parameters and ‘how to’, and refers to the system guide for a detailed description. The Media Exchange product system guide is created by the author-trainer team, edited and technically reviewed. During this process, graphics are filed in PicLib, common chapters are filed in ChapLib and the resultant product system guide is filed in the appropriate ‘product release number’ folder. In parallel, the edited and reviewed system guide is used as the basis for the appropriate product release training guide and presentation material (PowerPoint presentations). This approach ensures that as much common material as possible can be used and that the system guide and training material are consistent. To start creating project system guides and training material, the author and trainer assess the requirement and use the Media Exchange Document Build Schedule, see Figure 2 (referring to the Media Exchange Generic Documentation Plan, Figure 1, as required) to identify all the elements (chapters, appendices and so on) for a particular project’s system and training guides. The author-trainer team then sets up a project folder and assembles the required FrameMaker files. The team uses the document build schedule (see Figure 2) to monitor and record progress throughout the document creation period. Communicator Summer 2009 28 Project profile It is worth noting that for a product or project, one document build schedule is used for system guide, training guide and online help definition. Creating system and training guides Resources FrameMaker www.adobe.co.uk ePublisher Pro for FrameMaker www.webworks.com References Truscott, Richard (2005) ‘Practical single sourcing’, Communicator, Winter 2005, ISSN 0308-6925. Acknowledgements I would like to thank my colleagues, Wendy Coy MISTC and Brian Morgan FISTC, for all their help, patience and cooperation. Depending on particular customer requirements, additional chapters may be included at the most appropriate position in the ordered list of chapters. Some of these chapters cover interfaces and options, for example, AppTigger. If these interfaces or options are not included in a system, the relevant chapters and appendixes are not included in the system guide or training guide. Figure 3 shows the structure of Media Exchange system guides and training guides. Note: the order of the chapters in user documents and training guides is important, as it represents the logical workflow of operating and administrating Media Exchange systems. Any new graphics are filed in the appropriate folder in PicLib. In summary, to create a Media Exchange system guide or training guide, we: 1. Study available design and product/project documentation (such as, functional design specifications, site preparation document, sales proposal and handover minutes) to identify all the applications, features and functions that need to be covered in the system guide. 2. Use the spreadsheet (Figure 1) to determine which chapters to include as the basis of the system guide and complete a document build schedule (Figure 2.) 3. Use the document build schedule to monitor and record progress throughout the document creation period. 4. Referring to the document build schedule, open each required FrameMaker file and, using File > Save As, save each file in the appropriate product/project folder. Ensure that common, single source chapters (such as maintenance and glossary) are identified as such, and (when appropriate) copied into the product/project folder. See ‘Single Source Chapters’. 5. Create a FrameMaker book file for the new product/project and amend the Variable Format information. Ensure that the order of the files in the book follows the structure defined in the document build schedule. Figure 3 shows a typical example of a project book file for a system guide. 6. Modify chapter and appendix files for the new product/project, as appropriate. If any changes or additions are made to single source chapters, a temporary draft file is created until the changes or additions have been edited and technically reviewed. 7. If necessary, create any new chapter and/or appendix files (using FrameMaker template(s)) and add them to the book file in the appropriate position in the structure. 8. Before publishing a guide, prepare the Communicator Summer 2009 Figure 3. Example of a project system guide book file document for checking and request a structure check. This ensures that: A spelling check has been run. All document matter is included and is in the correct order. Number headings are correct for chapters and appendices. Footers are updated to show correct product/project name, document number and issue, and page number. Pages are correctly reflected in the Table of Contents, List of Figures and List of Tables. All chapters and appendices are listed in the Document Description section. The issue record is correct. The copyright details are correct. All change bars are removed. All cross references are correct. A word about file sharing Introduction Increasingly, the same graphics (that is, line diagrams, screenshots and photographs) and, to a lesser extent the same whole chapters (such as maintenance and glossary), are used both in user guides (including online help) and in training guides. This section outlines the concept and details of how common, shared graphics and chapter folders are used as the single source for all graphics and certain common chapters in all Media Exchange user and training guides. Single-source graphics Concept Figure 4 shows how dedicated Central Picture Library folders are used for product and project user documents (and consequently online help) and training guides. All graphics (in all their forms, that is, .cdr, .vsd, .wmf, .tif, .pdf and so on) for the Media Exchange user and training documents reside in two central folders: X:\TechDoc\Man\PicLib\Prod X:\TechDoc\Man\PicLib\Proj 29 X:\TechDoc\Man\ X:\TechDoc\Man\PicLib X:\Trng\Man\ FrameMaker Product System Guides copy FrameMaker Product Training Guides R1.1 R1.2 R2.0 R1.1 Prod (central picture library) products copy R1.2 R2.0 R... R... Applications FrameMaker Project System Guides FrameMaker Project Training Guides Control Center Hardware ... Proj (central picture library) project-specific Key: P2224-02 MX Project = products = projects P2330-01 MX Project Project number ... Figure 4. Central graphics library structure Product and project document graphics The basic folder structure is established, as shown in Figure 5. Original CorelDraw and Visio graphics are filed in their respective folders for each topic (for example, About this Guide\cdr). However, the resultant files (.wmf, .tif, .pdf, .emf and so on) are all filed under the topic, as shown in Figure 6. We follow this process when creating graphics for a Media Exchange product or project user document or training guide: 1. Create the graphic in the appropriate way (that is, using CorelDraw, Visio, a screen capture tool and so on). 2. For projects, under PicLib\Proj, create a folder for our customer (using customer’s name) and project (using project number) in the format: Pnnnn <name>. 3. Using the defined file naming convention, save each file in the appropriate folder (that is, cdr or vsd for created graphics and directly under the topic for all other files including .wmf, .tif, .emf, .gif and .pdf) under PicLib. 4. In your FrameMaker document file, link the anchored frame to the required graphic in the PicLib\Prod folder for products or the PicLib\Proj folder for projects. Single-source chapters In a similar way as for single-source graphics, dedicated Central Chapter Library folders are used for single-source chapters (such as maintenance and glossary) for product and project user documents (and consequently online help) and training guides. The common chapters in these folders are not formally issue-controlled, as there is always only a single file per ‘chapter’. Any changes, amendments or additions to these common chapters are made to this single existing file, which means that the latest version is the only file available. If any changes or additions are made to single source chapters, we create a temporary draft file until the changes or additions are edited and technically reviewed. Figure 5. Graphics library file structure Communicator Summer 2009 30 Project profile Advantages of our approach Reduced duplication of work Improved technical accuracy Reduced overall cost of creating the material Improved efficiency Fast creation of the project’s user and training guides from the product documents Broadened skills for authors and trainers Promotion of effective team working. Disadvantages of our approach Figure 6. Example of graphics library files Conclusions The end-results of our efforts were the Media Exchange System Guide, Media Exchange online help, Media Exchange Training Guide and the Media Exchange training course PowerPoint deck. These were all very well received within Convergys and by our customers. This success prompted my co-author, Brian Morgan, and me to enter the Media Exchange System Guide into the ISTC’s annual Technical Communication Awards and we were pleasantly surprised to win first prize in the Instructional class. From the document creation perspective, we were fortunate that the author’s and trainer’s personalities were compatible and that they proved to be adept at adopting each other’s roles (that is, the trainer writing parts of the user document and the author writing parts of the training material). However, although the somewhat ‘clunky’ approach to file and content management worked for us, there is obviously room for improvement. In hindsight, during the initial document design stages perhaps we should have given more Steve Whalley IEng GCGI FIET FISTC, a founder member of the ISTC, has held technical author and publications management positions in the telecommunications and computing industries for 35 years. For the last 12 years he has been at Convergys in Manchester, where he is now very happy to be a Senior Technical Author. E: steve.whalley@ convergys.com W: www.intervoice.com www.convergys.com Communicator Summer 2009 Using a conventional method of file and inform ation management (that is, Microsoft Windows Explorer) on our network means human memory and ‘searching’ are the only ways of managing the ever-increasing amount of information, as new versions and projects are produced. As more authors and trainers become involved in working on Media Exchange systems, each one’s awareness of the available material content is reduced. If the authors’ and trainers’ personalities are not compatible, it is difficult to make it work well. thought to adopting a single-sourcing solution, such as that advocated by Richard Truscott (page 18, Winter 2005 Communicator). Obviously, (and, you may well think, not before time) we are now investigating the possibility of adopting or creating a Content Management System and employing the Darwin Information Typing Architecture (DITA) approach. However, I suspect that it would be a rather time-consuming ‘nightmare’ to convert all our existing material, but we could consider using a bureau conversion service. The plot thickens! C Brian Morgan, co-author and departmental manager, says: ‘During the early stages of the Media Exchange project, it became apparent that our current working methods needed to change and become leaner. Co-authorship allowed both guides to have a similar “look and feel”, while giving a consistent message to the readers. ‘As a technical communicator, it is relatively straightforward to create text diagrams to explain processes and procedures for a training environment. Working as a technical author forced me to think more about the content and style, and not just the delivery method. ‘Since co-writing the Media Exchange system guide I have moved into a leadership role, managing the department of technical authors and trainers. The experience gained from writing the system guide gave me a thorough understanding of how both teams work. After seeing the advantages of co-working, I have now integrated both departments into one team. This cross-fertilisation of knowledge and skill has produced guides that contain the practical teaching of the trainers and the writing skill of the technical authors. Having three ISTC award winners (Wendy Coy was a previous winner) in the department is a great asset, both for the department and the business.’ 31 Design Integrated training materials Tips for designing well-planned courses that fuse varied elements to provide an effective learning experience, by Warren Singer. This article describes how to put together the documentation for a training course — including presentations, workbooks, demos and tests. It covers planning, tools and important considerations when creating training material. It also discusses practical elements, such as setting up the course, what information should be included in a training course, working with trainers, translation and localisation, printing course material and testing the course. Creating a plan A typical training course consists of a combination of media, such as presentations, course books, exercise books and reference material. Some courses may also include multimedia, interactive training modules and assessment tests. The first step when designing a course is to create a plan that defines the purpose of the course, and ties these elements together. Defining objectives and audience for the course Before starting on the design of your course, obtain answers to the following questions: What are the course objectives? For example, is it to instruct users or introduce a new product to resellers and partners. Who is the target audience? What is their background, experience, level of technical expertise and job function? Who will be presenting the course? Do they have a good understanding of the material and the necessary technical background? For how many days or hours will the course run? Will the course be fixed or modular? Delegates on modular courses can mix and match modules, rather than having to take the whole course. The answers to these questions will determine the scope and content of the course. Figure 1. Example of a course outline Creating a course outline Once you have clarified the objectives and target audience, you can start working on an outline that shows the proposed structure of the course. This should indicate what modules will be included and how long you expect each to take (see Figure 1). If required, provide either alternative or additional options — for example, for beginners rather than experts or technical rather than non-technical users. A course about a product should focus on key aspects that provide delegates with a good foundation to use the product. Select key elements, themes or tasks, rather than trying to cover everything. Avoid rehashing the current technical documentation — use this as reference material or further reading. The course should be meaningful and relevant to the delegates — focus on concepts and tasks that will be of real interest to them. Modules should make use of items created in previous modules to build on the work that delegates have already done. For example, if you are providing a course for a design product, start with the basic elements of making the design and then proceed to explain how to add increasingly complex elements and details to it. Designing presentations Training presentations are usually intended to be used in a classroom environment by a trainer, who can guide delegates through the content. The trainers dictate the pace and emphasis: using the presentation content as a basis, they can expand on some elements or pass quickly through others to meet the delegates’ needs. The writing style used for presentations must suit this combination of verbal and visual media. Design your presentations so that those sitting near the back of the room will be able to see the main text and graphics without eye strain. The optimum text size is affected by factors such as the distance of delegates from the screen. Keep sentences short. Use brief, punchy bulleted phrases that highlight key points and avoid unnecessary punctuation. Avoid full sentences or paragraphs in a presentation. In general: Use active rather than passive constructions. Use simple subject-verb-object sentence structures. Delete unnecessary words, such as adjectives, conjunctions and pronouns. Order bullets logically — either by priority, importance or another specific sequence. Keep to one main idea per slide. Compare these examples: Example A — too wordy for a presentation Overview of the Project window The Project window enables you to view your available projects, create new projects and assign projects to other users. Example B — short and punchy Project window In the Project window, you can: View projects Create new projects Assign projects to users Communicator Summer 2009 32 Design Design principles for different elements of a course Courses Focus on key tasks or topics Start simple and build Keep courses modular Use topics that are relevant and meaningful Presentations Write for a verbal and visual medium Use a font size that can be easily seen Keep bullet points short Put the most important points first Use graphics and examples to illustrate Ensure consistency in style and presentation Avoid lengthy procedures or examples Do not duplicate material provided elsewhere Reinforce key messages Workbooks Keep exercises short Make exercises follow on from conceptual information in the presentations Require users to follow a set procedure to complete a task or objective Use specific values, so that all users obtain the same results Move from simple to more complex task Use logical procedures that reflect typical user work flows Provide additional exercises for delegates who finish before the others Make exercises meaningful and relevant to users A common mistake is to attempt to cram too much detail into one slide. Use ample white space and spread content over two slides if necessary. TIP Selective use of humour through anecdotes and images can help spruce up an otherwise dull presentation. Presentation tools Most presentation tools can incorporate video, flash, audio and other external objects. You may want to select one that enables trainers to tweak the content to their requirements, as well as allowing easy updates. Microsoft PowerPoint is a popular tool and anyone can view the presentations using the free PowerPoint viewer. Open Office is a shareware tool that can create files in PowerPoint, Flash and other common formats. Other options include WINK and Powerbullet Presenter. Adding graphics and animation Slide after slide of monotonous text can quickly bore your audience. Use graphics where possible, to provide contrast, arouse interest and focus attention. A well-designed graphic with callouts can explain more than a page of text. You can add animation to the slide, enabling the trainer to display or hide text or graphics using a mouse click or down button. This is a good technique for a series of bullets, or if you want to bring attention to different areas in a screen shot. However, annotation should not be overdone. TIP ‘Add a signal to indicate to the trainer when the animation series has ended, before the next click moves to the next slide.’ Paul Burnett, GE Trainer Designing with the trainer in mind A good presentation is designed with the trainer in mind. The presentation should provide opport unities for the trainer to fill in missing details verbally and expand on bullet points and graphics. Most experienced trainers will tweak the coursework based on their personal presentation style, preferences and experience with what works and what doesn’t work for a particular course or audience. Adding speaker notes Make use of the speaker notes facility in Communicator Summer 2009 your presentation application to add further explanation. These are internal notes that are normally only visible to the trainer. They provide tips and guidance for presenting the material, as well as further details where relevant. Keep the notes brief — too much information and the course trainer will switch off and not read them. Some trainers like to print off the speaker notes and review them before their course. Most modern workstations and laptops enable trainers to display only the presentation to delegates and the presentation with speaker notes on their own screen. TIP Well designed speaker notes, together with any guidance notes that go with the course, can be an essential aid to trainers who are not familiar with the course or have forgotten parts of it. Structuring your presentation One way to structure your presentations is to use a common training technique: ‘Tell them what you’ll be covering, tell them, then tell them what you’ve covered’. In other words: Provide an introduction at the start of the present ation, outlining what will be covered in the module. Proceed to the body of the presentation At the end, provide a summary of what has been covered. This structure offers the best format for enabling trainers to reinforce key messages and ensure that delegates have understood the objectives of the presentation. It also helps users to remember the course content. Designing with other training media in mind Presentations should be designed for use together with exercises, demonstrations and other training material. References to relevant exercises and reference material can be placed at appropriate points throughout the presentation. For example, a typical course module might consist of a 30-minute class presentation by the trainer, followed by 30 minutes of exercises carried out by the delegates, with assistance from the trainer. Some modules might include demonstrations. Avoid detailed procedures and examples. In general, presentations should focus on conceptual information, with step-by-step procedures covered in workbooks and exercises. Ensure that presentations break after a key idea or concept has been explained, to enable delegates to practise what they have learnt. A good presentation provides a balance of material, covering key concepts interspersed with breaks and exercises, so that delegates are kept interested. For most of us, concentration dwindles after about 20–25 minutes of the same activity. Ensuring consistency Refer to your organisation’s style guide for examples of how to use its brand and the preferred tone for text. If this is not available or is unsuited to your purpose, you may need to create a style guide for training material. Ensure you use the template facility in your presentation tool to define layout, and header and footer elements, so that these are used consistently throughout the slides. 33 Make sure that body text and bullets are consistent in size and type. One of the problems when too much text is added to a slide is that you may need to make it smaller to fit into the available space. Avoid this by spreading the contents over two or more slides. TIP ‘Creating a quality checklist encourages consistency and is useful for auditing. ‘ Lisa Chapman, GE Author Displaying presentations in different environments The type of screen, computer or projector used can affect the way in which the presentation displays. It is worthwhile finding out details of the projectors and workstations currently used by trainers, and experimenting on different equipment, to achieve the optimum layout and font sizes for your presentation. For external courses, the typical scenario might be a trainer with a laptop and projector. For courses held on site, this might be in a room with a dedicated projector and workstation. Design your presentation with these alternative environments in mind. TIP ‘Keep to standard fonts or ensure that fonts are bundled with the training materials and the trainer knows to install them.’ Lisa Chapman, GE Author Designing workbooks Workbooks are typically used to cover detailed procedures and examples. They contain a set of exercises for the user to complete. Always ensure that these are meaningful and relevant to your delegates. If possible, use exercises that they will need to do in ‘real-life’ or work situations. Find out typical working scenarios for your product and ensure that exercises and examples are relevant to users’ real activities. Figure 2. Example of a workbook exercise TIP ‘Use scenarios that show users how they could use the product in a real world environment.’ Lisa Chapman Depending on the course, you can structure your exercises in one of two ways: Guidance approach: Tell delegates up-front the steps they need to complete to perform a task. This is the preferred method for new users or when explaining basic or key steps (see Figure 2) Problem-solving approach: The first part of the exercise is presented as a problem that the user needs to solve. The workbook or trainer then provides the procedure to arrive at the solution. This approach can be used for more experienced delegates — the advantage is that it improves the learning process, as they learn from their mistakes. Ovidius – Systematic Success TCToolbox – The trusted solution for technical content management TCToolbox Webdemonstration Ovidius UK Phone: +44(0)1785 284 984 www.ovidius.com Book your live demonstration by emailing [email protected] Communicator Summer 2009 34 Design Multimedia tools Flash demonstrations can be created using various tools, such as Macromedia Captivate and Camtasia. A tool called WINK is a freeware application for creating multimedia presentations in Flash output. It is simpler to use than Captivate and Camtasia, but does not provide all of their features and functionality. Acknowledgements Thanks to the members of the GE Energy training department for Smallworld products in Cambridge and Exispec Ltd for their advice and contributions to this article. TIP ‘When updating material, make sure that any exercises listed in the your Presentation slides match the exercises listed in the workbooks.’ Lisa Chapman One way to build on complexity within a workbook is to have exercises that use solutions created in previous exercises. For example, in a design product, Exercise 1 might be to create a project and open a new design. Exercise 2 would be to add basic design elements to the project that was created in Exercise 1. The remaining exercises can add more complex tasks, such as views, importing, exporting and printing, using the work created in previous exercises. TIP ‘Check that users are able to complete all exercises on their own and that their data from previous exercises can be saved.’ Paul Dufeu, Exispec Ltd. TIP ‘Have completed exercises saved in a folder with the course materials so the course can be resumed from any point with all users in-sync’ Paul Burnett part of a certification process. Tests may use online multiple choice forms or printed questionnaires, which are marked by the trainer. Macromedia Captivate provides a quiz utility that enables delegates to complete the quiz and view the results immediately. Online tests can also be designed using PHP, ASP, Java or other programming languages. Designing multimedia and online demonstrations For courses run on site, check whether computers hosted on a separate training network can access all required applications and files. Will delegates have access to computers? If so, will trainers be able to set up any prerequisite course software on these computers? A problem may arise for more complex software (for example if it connects to a secure database, if it is unstable or if it uses very large files). Such software may not be suitable to run on a laptop or workstation, or it may require considerable time to set up and install, posing issues for the trainer. Your course should explain how to tackle any such issues, which may impose restrictions on where it can be hosted or what can be covered. TIP ‘If your course requires pre-course setup, make sure you state this in the slides or workbooks. Add Trainer Note prompts at the beginning of the workbook sections. If there are problems, the trainer can quickly identify the issue without having to sift through the trainer notes.’ Lisa Chapman Multimedia encompasses Flash demonstrations, videos, demonstration versions of products, samples, tests and examples that will be presented during the course or used in the exercises. It combines elements such as graphics, text, voice, audio and video to demonstrate or guide users through the features and functionality of a product. Multimedia can be interactive, requiring user input such as clicking the mouse or entering values, or it can be set to play automatically from start to finish (with or without clicking to change slide). Multimedia has the advantage that it can be explored or viewed at delegate’s convenience. It can be included in the training pack, on a CD, or made available on a secure website. Well-designed multimedia is a powerful and effective way of presenting information. However, budget and time constraints may limit its use. Using demonstrations and mock-ups If demonstration versions of a product covered by a training course are available, these can be used during the course. If not, you may decide that users will need to use the full version. An alternative, if funds are available, is to commission the design of a mock-up version that mimics the behaviour of the product, which can be used for training or demonstration purposes. One of the issues that may be faced by trainers is the installation and setup of the software to be used in a course. If your course is designed around the use of such software, you will need to consider carefully how the trainer and delegates will be able to access, install and set up both the product and any prerequisites. For example: What hardware and software is required by the trainer to run the demonstration? Are there any security or firewall issues in accessing the demonstration? Do delegates need special hardware or software to set up or run the demonstration? Using knowledge assessment tests Quizzes or formal tests can be used to verify whether delegates have understood the course or as Communicator Summer 2009 Using webcasts and Internet conferencing Use of webcasts and Internet conferencing by trainers is increasing in popularity. New technology now enables trainers to present courses to remote users over the Internet. Tools such as Microsoft Netmeeting enable Internet conferencing, and include features such as one-to-one audio and video (or multi-party audio), text chat, file sharing, collaboration and whiteboards. Setting up the course Localising and translating the course If the course is to be presented in another country or language, consider localisation and translation issues. Where possible, customise examples and units of measure to reflect the region or country where the course will be held. For example, you might use American spellings and imperial units in a course for the USA. It may be best to keep any examples used in exercises as generic as possible. You may need to work closely with translators in updating screenshots. Ensuring consistency in use of language and termi nology is important. For example, names of windows, dialog boxes, menu options and buttons should be consistent in the presentations and workbooks. It is useful to have a glossary of terminology, to which both delegates and translators can refer. Testing the course Testing should be done in the training environment or in a situation that emulates it. Present the course to colleagues or trainers, for their feedback. Testing can help identify potential problems with the course contents. For example, an exercise that reads well may not work in practice or may take too 35 long. A slide may be confusing when presented. Time and resource constraints can prevent you from evaluating an entire course, especially one that runs over several days. In such cases, select a representative module to test. To test a completed course, ask the trainer to present it to you. If possible, ask colleagues who have not seen the material to attend. Check that your estimated presentation times are accurate. Printing course material without change for an extended period, printing externally can save time and money. Putting it all together Your course will consist of various elements, such as presentations, workbooks, multimedia, tests, resources, samples, examples and reference material. Create a course guidance document that lists the complete contents of the course and explains to the trainer where everything is located. This document should include information about: Course prerequisites and target audience Objectives Duration Delivery method Resources Essential pre-course setup Training components Additional material Distributing material to delegates Course configuration/overview of modules. Once you have done this, you are ready to roll. Many organisations provide delegates with printed copies of presentations and workbooks. If you need to do this, consider layout and printing options: To save space and cost, some organisations include two or three slides per page, printing on both sides of the paper and in black only. Printed presentations often provide space for users to write their own notes. If you are printing in black only, a welldesigned colour cover can make the material look more professional and of higher quality. Page size options include A4 (for the UK and Europe), Letter for the USA and smaller booklet sizes, such as A5 or custom size. The Conclusion latter look like a book and are easy to handle. Designing a training course can be an exciting and You will also need to consider binding and stimulating task. It provides technical communi printing options. Possible bindings include cators with opportunities to use their understanding spiral, ring, punch or glue-bound. If you want to of language, usability, learning styles and be able to update course content easily, consider psychology. An effective course has a clear objective using a loose-leaf ring or spiral binder, as this and target audience in mind, highlights key allows you to print small quantities in-house aspects of the product, and uses a combination only the pages that have changed. exercises, examples, tests and Anz DMSand 09 replace M-ISTC_Com_quer_engl:Layout 1 18.05.2009of presentations, 13:46 Uhr Seite 1 If you intend to use the same course contents demonstrations to instruct or inform delegates. C Warren Singer MISTC is a founding partner of Cambridge Technical Communicators, a consultancy business, based in Cambridge, UK. He has 15 years’ international experience as a technical communicator. E: [email protected] W: www.technicalcommunicators.com www.dms-expo.com Cologne, September 15 -17, 2009 With e and con xtended exhib itio ference program n me: Forum Pro creating duct Informa t managin it – translating ion it g it – pu blishing – it Foru convert m Output Ma ing it – c n reating agement it – disp atching it F Web 2.0 orum Enterpri se 2.0 meets d ocumen t manag ement Better search for a digital solution! Koelnmesse GmbH Messeplatz 1, 50679 Cologne Germany Phone +49 221 821-0 Fax +49 221 821-2574 www.koelnmesse.de Advance registration entitles you to free admission to the fair and the presentation programme. Communicator Summer 2009 36 Product review Author‑it 5.2 Amanda Caley assesses the latest release of this authoring tool and finds the major enhancement to be structured authoring for topics. Introduction Author‑it is a single-source content management system (CMS). You create content for reuse within and across projects to reduce maintenance, minimise errors, eliminate duplication and significantly reduce the time you spend reviewing and reworking your content. You can publish from a single source to print, online help and web formats. In the Spring 2008 issue of Communicator Jane Schofield and I wrote an article reviewing Author‑it 5. There was a big step change from Author‑it 4 to Author‑it 5, providing a new interface with tabs and ribbons for a more intuitive working environment. Initially, it did take me a while to get used to the new interface; however, I can say that I do now prefer it to the old one. Although this is a review of Author‑it 5.2, there was an exciting new addition to the functionality in Author‑it 5.1, namely object variants. Author‑it 5.1 also saw the introduction of a Quick Search feature and the ability to quickly create file objects using drag and drop. The major new enhancement in Author‑it 5.2 is structured authoring for topics, which enables you to use rules and a well-defined process to enforce consistency throughout your documentation. You can control the content in each type of topic. Other minor enhancements include: Pasting and formatting content using an import profile Improvements to the Quick Search feature Creating an e‑mail with a link to an Author‑it object. In addition to these new features, stability and speed has greatly improved since the launch of Author‑it 5. If you are still using Author‑it 4 because your library didn’t pass User Acceptance Testing in an earlier release, I would recommend having another look at it now that most of the issues have been resolved. Object variants This new feature opens up a host of new possibili ties. In addition to setting up the standard variables within topics, Author‑it now enables you to: Have several versions of a topic for different audience groups Maintain live versions of documentation for multiple releases of software. It does require time and effort to work out and plan how you want to use object variants in conjunction with other features such as release states, variables and publishing profiles. However, the opportunities for saving time and money downstream are there if you can afford to invest in the analysis and set-up. Communicator Summer 2009 I will not cover variants in this article. If you are interested in learning more about this new feature, see the Resources list. You can find detailed information in the Author‑it Knowledge Center and Hamish Blunck has written an excellent document that outlines the best practice for using Author‑it variants when documenting multiple releases of software. Important note: There is an issue when creating new release states and new variables in Author‑it Administrator. It is sometimes necessary to log out of the Author‑it Library and then log in again to see the new items in the Library. What is structured authoring? For the benefit of anyone who is new to structured authoring, I thought it would be useful to provide some background history. Structured authoring has been around for many years: it will be 49 years old this summer! According to Wikipedia, ‘structured writing is a form of technical writing that leverages decades of research into documentation best practices’. The term was coined by Robert E Horn in the US, and became a central part of his Information Mapping method of analysing, organising and displaying knowledge in print and in the new online presentation of text and graphics. Horn and colleagues identified dozens of common documentation types, then analysed them into structural components called information blocks. They identified over 200 common block types. These were assembled into information types using information maps. The seven most common information types were: Concept Procedure Process Principle Fact Structure Classification. These types are loosely related to the three basic information types in Darwin Information Typing Architecture (DITA): concept, task and reference. An Information Mapping procedure is a set of steps for a person. A process is a set of steps for a system. If you would like to find out more about the Information Mapping method and its origins, see the Resources list. There are several interesting articles on Horn’s website and he has also written a book, Mapping Hypertext, which is referenced there. In 1967, Horn founded Information Mapping Inc (IMI). Today IMI and its global partner network have brought Information Mapping to hundreds of thousands of individuals in over 30 countries. Andrew Jackson of Pacific Blue Solutions, one 37 of three UK partners, says: ‘The benefits of structured writing are clear for both writers and readers. Research has shown that writers find decreases in development time and document revisions, while readers report increases in learning, retrieval and recall of information.’ What about structured authoring software tools? There are many software tools out there today offering functionality that can help you to create content using a structured writing methodology. However, like all tools, they need to be driven by you and not the other way around. Tools can provide the facility to create content in a structured way but you need to define and set up the rules that you want to use. Many organisations and individuals shy away from using specific software tools to help them with their structured writing, for various reasons including: Cost of purchase Cost of implementation (and the time and technical expertise required) Inability to accommodate their range of content Inflexible rules that cannot be modified by users. Is it possible to have the best of both worlds? When it comes to choosing the best authoring tool to meet your particular needs, one of the big decisions that you usually have to make is whether to opt for a tool that supports structured authoring or creative freedom? The problem with many structured authoring specialised tools (for example, Arbortext) is that they are expensive, require experienced developers to set up complex DTDs (Document Type Definition) or XSDs (XML Schema Definition), and all your content has to be created in a structured environment. You often have to make compromises with content that is not really suited to such an environment. With Author‑it 5.2, you can have the best of both worlds. It gives you the flexibility of working either with or without structured authoring. You can decide that some of your content will benefit from being developed in a structured environment but not all of your content needs to be forced down this route. The structured authoring functionality in Author‑it has been designed so that you don’t have to apply it to all of your content before you can start to reap the benefits. It can be set up and implemented gradually on all or a selected set of your current content. Alternatively, you can leave all of your existing content as it is and apply it only to new content. Easy-to-use interface Good news for the less technically minded authors: you do not need to be familiar with XML to implement structured authoring in Author‑it. It has a clear and easy to use interface. To set up a structured authoring environment in Author‑it, you need to: Create templates Create rules using the Structure Builder (Figure 1) You also have the option of: Choosing the release states to which you want to apply the validation rules Using the publishing profiles feature to prevent publishing if any topics are not in the designated release states. Standard structured authoring templates are not included in Author‑it 5.2. It is up to you to set up your own rules. You can modify your existing templates or create new ones. You may find the standard Author‑it DITA Topic templates useful as a starting point. I understand that Author‑it Software Corporation is planning to include example structured authoring templates in future releases. Validation is based on: Minimum and maximum occurrences of a rule Whether the rule is fixed or flexible Allowable objects for a rule (for example, styles) The running order of the rules. For each of the structured authoring templates that you create, you set up specific rules (for example, Opening paragraph, Numbered tasks, Data table, Notes, Closing paragraph). The fixed or flexible element refers to the sequence of the rules in the Structure Builder. To make a rule optional you need to set the minimum occurrence to 0. Once you have set up your rules you can easily adjust and refine them until they meet your specific requirements. Figure 1. Author‑it Structure Builder The Rules window Using the Rules tab (in the Book Editor view) you can view the rules that have been defined for each paragraph in a topic (Figure 2). You can have the Rules window open while you work on your topic. You can click on the Validate button at any stage to check your topic. Unfortunately, the words ‘ParagraphStyle requires:’ take up valuable space in the Detail column. You have to expand the window to see the rules, losing much of your working window. There is no horizontal scroll bar, which is not good if you have lots of allowable objects in a rule. Pin pointing rule failures is not an easy task in this first release as Author‑it does not Communicator Summer 2009 38 Product review specifically highlight where in the topic it has failed validation. With Author‑it 5.3 the exact point of failure in the topic editor view will be highlighted when you click the Validate button. Example topics Figure 2. The Rules window I think the facility to include example topics with templates is an excellent addition. When I first started using Author‑it, I was thrilled to be liberated from the need to be careful not to damage Word templates and end up with lots of styles with + + or the infamous mutant char char style! It was also great to be able to set permissions on folders and control the workflow of documents through release states. Then I thought: ‘what a shame it doesn’t also have a facility to include our styles and conventions, so that we are guided through what to use rather than always having to refer back to our blueprint document’. You now have this facility; you can include guidelines and instructions to authors in the example topics. Authors just need to click on the Example tab whenever they need to see an example topic (Figure 3). Time to experiment and evaluate this new feature Figure 3. Example topic Figure 4. Rule failure Communicator Summer 2009 Setting up a structured authoring environment in Author‑it is relatively easy and does not require you to have XML knowledge. The difficult part of the task is designing the rules you want to use and planning the implementation. I found the best way to get to grips with it was to play with the functionality in a test library first. If you are new to Author‑it, your best starting point is the Author‑it Knowledge Center (see the Resources list). If you are an experienced Author‑it user upgrading to version 5.2, here’s my 12-step guide for a first-pass evaluation of one type of content: 1. Create a copy of one of your existing template objects. For example, Procedure Template and call it Procedure Template SA. 2. On the Properties > General Tab, select the ‘Make this object a structure template’ checkbox. 3. Close the topic and, with the topic selected but not open, select Manage > Data > Structure Builder. 4. Give the structure a name and description, select an example object and a release state. TIP If you are going to replace a standard template with a structured authoring template (for example, replace all Normal templates with Normal SA) then it is advisable not to apply a release state initially. This is because a message will pop up for each topic that does not validate in the release state selected. 5. Click the Create Rule button and create your first rule, for example, Opening paragraph. 6. Create a few more rules, using the up and down arrows to change the order if required. 7. Go to the book that you want to try it out on and apply the Procedure Template SA to all the Procedure Template topics in your book. TIP Pick a smallish book to run your first test. 8. If your topics are already following the structure, as you apply the Procedure 39 Template SA a green tick will appear in front of the topic title when viewed in the Library Explorer. If not, they will have a blue cross. 9. Assuming you have some topics with blue crosses, open one and select Review > Structure > Validate. The last paragraph to validate will have a green tick. The first paragraph to fail will have a blue cross. For example, if you have two green ticks followed by a blue cross the first paragraph not to validate is paragraph 3 (see Figure 4). 10.Before you validate all the topics, amend the relevant publishing profile on the Applies To tab. Select the release state that you selected in step 4 and select Enforce (to prevent publishing). You will now be able to publish using this profile only after all the content in the selected book has been validated. Try it! 11.Amend the content of your topics until you have validated all the topics in your test book. 12.And, finally, if you think this functionality could be useful within your organisation, the last and most important step to take is to do your analysis and planning before you touch anything at all in your live system. Analysis and planning As ever, the devil is in the detail. The analysis and planning that you do before implementation will make a big difference to whether or not the end result yields the benefits that you are seeking to achieve. You may find that you need to revise the structure of your topics to get the most out of this new feature. You must work out carefully how you want to structure your content and set up the appropriate templates, rules and most importantly permissions. There is no point in setting up rules if everyone can override them — it’s like installing an expensive safe and leaving the door open! It is not about trust: it is about keeping your important assets safe. Consistency and control Using the new structured authoring functionality can help you to increase consistency, especially useful if you have a large team of authors or have a quick turnover of authors, or both. You can keep a tight control of your content by setting up your users’ permissions so that they follow the correct structure and only have access to the relevant styles for the specific type of content they are creating. This is particularly useful if you have inexperienced authors and other departments contributing directly into Author‑it. You can protect all content that is in a draft or review state from being accidentally published and issued. You can use the example topic feature not only to provide authors with an example of how the topic should look but also to describe what should be included in each of the different topic types. Instead of having a blueprint document, you can include all your instructions to the authors at the point of need (Figure 4). Conclusion The stability and speed of Author‑it has greatly improved in version 5.2. If you have not upgraded to Author‑it 5 from Author‑it 4, it is worth taking another look at this latest release. Many of the issues that previously prevented successful user acceptance testing have now been resolved. If you are already using Author‑it and have upgraded to Author‑it 5.2, you have the opportunity of testing structured authoring without the need to buy any additional add-on software. If you are currently evaluating which authoring tool is right for your organisation, Author‑it provides a unique opportunity to implement structured authoring in both a staged and selective way. I like the way that you can implement structured authoring in a staged way. In reality, very few organisations have the luxury of being able to stop production work to do a ‘big-bang’ type of migration. For most of the projects on which I have worked, migration from one system to another usually takes at least six months. How many organisations can stop production work for that length of time? The ability to move content to a formal structure gradually means that you do not necessarily have to touch all of your legacy content; you can incorporate the gradual validation of topics into your business as usual. I particularly like the fact that structured authoring is not an ‘all or nothing’ feature. You have the freedom to choose which content needs to be structured and which content does not. For example, you may decide that the only type of content you want to validate against a set of rules is your processes and procedures. The new structured authoring feature provides additional benefits, even if you do not want to use the structured authoring functionality. I particularly like the example topics that you can now build into templates. These are excellent for including not only an example of how a particular type of topic should look but also guidance and instructions. It is rather like a context-sensitive help facility for your authors. I understand from Author‑it Software Corporation that the new structured authoring functionality has been extended in Author‑it 5.3. This version should include example structured authoring templates, and book objects and topic rules will be enhanced to include items such as character styles and embedded topics. Therefore, to avoid costly re-working, I would strongly recommend not entering into any major analysis and planning until you have fully evaluated the enhancements to structured authoring in Author‑it 5.3. You may find that you can tailor the new example structured authoring templates to meet your requirements. C Resources Author‑it website www.Author‑it.com Author‑it User Group http://tech.groups. yahoo.com/group/ authorit-users Robert E Horn’s website www.stanford.edu/ ~rhorn/a/topic/ stwrtng_infomap/ tocStructrdWriting.html Structured authoring www.Author‑it.com/ kc/42125.htm Using object variants variants www.Author‑it.com/ kc/33352.htm Using object variants for multiple releases http://hamishblunck. com/docs/Using_ Author_it_Variants_for_ Maintaining_Multi.pdf Amanda Caley FISTC, Director of Content Chameleon, has many years of experience in technical communication, training and project management. Content Chameleon delivers complete solutions for complex content to business sectors including finance, government, retail, shipping and telecommunications. Amanda is a qualified PRINCE2 practitioner and an Author‑it Certified Consultant. E: acaley@ contentchameleon.co.uk W: www. contentchameleon.co.uk Communicator Summer 2009 40 Technology The origins of the web CMS James Brice looks back at the history of this technology, in the first of a series of articles on its use in technical communication. The evolutionary forces The term CMS (Content Management System) is one of those rather overworked IT buzzwords and has a number of shades of meaning, depending on the industry sector and type of content being managed. As discussed in this article, the web CMS also does rather more than manage online content. The modern World Wide Web is based on an original concept of web servers delivering HTML (HyperText Markup Language) files, together with JPEG and GIF images, which in turn are converted by web browsers into the pages we see. This worked well with the simpler needs of an earlier era, and for the original technically able author-publishers who were producing (by today’s standards) small numbers of simply formatted documents. Some 20 years on, the same underlying technology, with a few refinements, is still the medium we use for delivering web content. The differences are that sites now often consist of thousands of pages of content, which are maintained by non-specialist staff and interact with the content users in ways unimaginable to the web pioneers. Taking web technology so far beyond its origins has left us with a major problem when it comes to managing a modern website. The way in which the web is used in modern organisations, large and small, makes it imperative that we distribute the different aspects of website management and content updating among a number of organisational roles. ‘Traditional’ websites are based on a separate Enter AJAX Some more recent developments in technology are also enhancing the usability of web CMSs by making essential CMS tools, such as content editors and site management interfaces, more sophisticated and responsive. Hitherto, programs or ‘scripts’ running on the web server (‘server side’) have queried a database and the results used to construct each web page, as it is required. In turn, the web page will also include other scripts that run within the web browser in each user’s PC (‘client side’). These scripts add a range of interactive features and tools to web pages, including CMS content editors and site-management tools. A major limitation of client-side scripts within web pages has been the need to deliver all of the data for use by any interactive features along with the page itself. In many cases, this has meant that useful but data-heavy features have had to be dropped in order for web pages to load reasonably quickly. Over the past few years, a technique known as AJAX (Asynchronous JavaScript and XML) has been widely adopted as it permits client-side features to query the web server database for fresh data, without needing to ‘refresh’ (that is, re-fetch) the entire web page. A good example of this technique, and now a commonly encountered one, is to show a selection of addresses immediately after the user has entered a postal or ZIP code into a form on a web page. A complete national address database is far too large to embed in a web page, but AJAX makes the address selection feature feasible by fetching just the appropriate local list of addresses once the postal code becomes available. Communicator Summer 2009 HTML file for each web page, with these files organised in a folder structure within the server that mirrors the structure of the website. This arrangement is inflexible in a number of ways. Not only are major changes of site design and structure difficult to achieve, but it is not easy to achieve the ideal of fully devolving control of content to multiple editors and workflow schemes distributed throughout an organisation. The latter factor has meant that in many situations there is still the need for a centralised ‘web master’ — or an equivalent — who has to handle all new or updated content across the whole website. Not only does this act as a bottleneck in maintaining site content, but also tends to dilute the sense of responsibility of those whose role should be to draft and maintain site content. The HTML-based approach to publishing web content also fails to cope well with websites that grow significantly in page-count and complexity, or that need to incorporate interactive and social networking features. Faced with these pressures, a new breed of web delivery technology has been emerging and flourishing over the past few years. This takes the form of web CMSs, which generally have some key characteristics: Simplified content editing, which is isolated from site layout and design so that control of online content rests with those responsible for it Built-in or plug-in facilities for adding interactive and social networking features, with the result that wikis, forums, blogs and so on can be added with very little cost or effort Built-in access controls on viewing, editing and contributing content (often incorporating some form of workflow management), so that the generation and publication of content can be closely matched to organisational requirements Ability to manage large numbers of content items effectively and to deliver these to the web using relatively modest server hardware, so that websites can grow with organisational expansion and meet previously unforeseen requirements. The enabling technologies Web CMSs have diverse origins and design philosophies but all share a common underlying architecture. This originally arose out of the desire to have web pages that included content that reacted to user input or other changing data (for example, welcoming users by name). This led web authors to embed short sections of program code (known as scripts) in their web pages. These segments of program code are then set up to modify appropriately the content at that 41 point in the web page each time it is accessed. Although scripted elements are capable of doing many interesting and useful things in a web page, there is a major limitation. This is that the basic web server system is stateless: essentially, there is no provision for the web server to ‘remember’ any form of user-related data from one web page to the next. So, to implement websites that can work with past information — such as the name and address you gave last time you visited the site — web authors started linking the script code in their web pages to a database. The earliest example of generating parts of the content in a web page from a database was a proprietary technology known as Cold Fusion, which was introduced in 1995 (now ColdFusion™ from Adobe). This proved the value of scripted content in web pages, and particularly deriving elements of a page from stored information in a database. This in turn spurred on development of alternative technologies that eventually became the essential components of the full-blown web CMS, namely: An HTML web page server Support in the web server for a scripting language (typically ASP.NET, PHP, or JAVA) A connection in the scripting language to access a database (typically MYSQL, SQL Server, or Oracle). Once this technology was firmly in place within servers, it was a short conceptual step to use it instead as a platform for implementing a web CMS. Up to this point, the scripted web page had consisted predominantly of text content held in an HTML file, with a few variable elements within that content (for example, the user’s address as mentioned above) derived from the contents of the database. In contrast, a CMS holds all of the web page content on the database and constructs all or most of the web page from that database data. In practice, not only is the main web page content derived from the contents of the database, but also the ‘page furniture’ that surrounds it. The latter will consist of, for example, informative side panels and navigational elements such as menus and breadcrumb trails. The payback for increasing the complexity of the web server software in this way comes from several directions. Perhaps the major advantage is that the web page content itself is no longer held as part of an HTML file, but as a separate entity within the database. With the provision of a suitable access-control system and an editing interface, the process of creation and maintenance of web content can be given directly The author will be writing further about CMSs in future issues of Communicator, covering topics from the factors in selecting CMS software to the effective deployment of the technology in an organisational context. He would be interested in hearing from anyone who is willing to share experience in this area or provide case histories of deployments. to whoever is best placed to fulfil that role. It is also easy to store multiple versions of each content item, thus enabling useful features such as complex workflows and rollbacks to earlier versions. Other elements of site structure, such as user access control lists and the site’s navigational structure (from which the on-page menus will be derived) will also be held in the database. As these are now held separately from the page content, they are easily reviewed and modified by someone in an appropriate overall administrative role, such as the website’s technical manager. The emergence of the CMS The essential group of enabling technologies for CMS-like systems emerged about five years ago and spawned a family of web server applications. Along with true CMS systems (which by their very essence are not visible to someone browsing the web), there were more obvious and novel forms of the web page, including forums, wikis and blogs, and that other version of the CMS acronym: web course management systems for use in education. The same technology mix that made the CMS possible also forms the basis of the other manifestations of what is often referred to as Web 2.0, including online auctions, social networking and video publishing sites. CMS-like products have been a productive area for open-source projects; likewise, there is a wide range of commercial and proprietary products vying for corporate web publication budgets. The result is a vigorous ‘ecosystem’ of web publishing technologies, which is showing some early signs of maturing but still undergoing evolution. Like the equivalent biological systems, the products of that evolution can be hard to identify and label clearly and unambiguously. For example, blog site software looks very similar to a simplified CMS, while CMSs themselves often include the option of including blogging and forum pages in a website. This means that CMSs are available to meet just about any need, from putting up a few personal web pages through to maintaining the most complex institutional web presence. However, anyone who has decided to deploy a CMS is faced with a bewildering set of choices, such as whether to go for an open source or a proprietary package, or deciding which set of features in a product best matches the current need. Once those decisions have been made, the success or failure of the introduction of a CMS is more dependent on management and ‘soft’ skills than it is on technical issues. For a CMS to be successful and provide the maximum benefit, it is vital that the implementation plan takes full account of organisational structures, information flows and staff skills. Having overcome those hurdles, it is time to retire the ‘web master’ and enjoy the full potential of the web as a powerful, integrated and responsive organisational tool. C References Enterprise Content Management available at www. contentmanager.eu.com (accessed March. 2009) Wikipedia — ColdFusion available at http:// en.wikipedia.org/wiki/ ColdFusion (accessed March 2009) Wikipedia — Web 2.0 available at http:// en.wikipedia.org/wiki/ Web_2.0 (accessed April 2009) Wikipedia — Ajax (programming) available at http://en.wikipedia.org/ wiki/Ajax_(programming) (accessed April 2009) James Brice MISTC is a Technology Consultant with the University of Exeter, and also a freelance author and trainer. E: [email protected] W: www.linkedin.com/ in/jamesbrice Communicator Summer 2009 42 Event report Press breakfast @ Quark’s Galyna Key reports on an exclusive press breakfast event dedicated to Quark XML authoring solutions. On 25 March, at Strand Headquarters in London, Quark hosted an exclusive press breakfast event for key press and industry experts to discuss Quark’s XML authoring solutions and its product road map for 2009. …there is a distinct ‘difference between good and good for you’ For more information, see http://dynamicpublishing. quark.com/xml_author/ quark_dita_studio_ technical_publishing.html Press breakfast At 9:30, Gavin Drake, Director of Marketing, welcomed everyone and provided a brief corporate overview. Michael Boses, Quark’s Director of XML products and co-chair of the OASIS DITA for Enterprise Business Documents Subcommittee, took the floor from 10:30. He gave a highly engaging speech on the history of XML publishing, all the way back to 1998. His key message was that we are in the ‘golden age of writing’ right now, with the narrative content becoming more and more valuable. In his opinion, though, documentation per se is becoming obsolete and fails to serve as an information source that could be mined successfully. He stressed that creating better search mechanisms is not enough to combat the information overload. What we need is ‘semantically aware sources’, or in other words, intelligent content. He argued that despite a strong XML momentum that peaked around 2004, relatively little progress has been made in the direction of producing structured content. In his experience, it is in the implementation of structured authoring where the problem typically lies. He suggested that the reason for it is the sheer complexity of structured authoring, as well as the lack of user motivation. Far too often users are told that XML authoring is going to be difficult but that their organisation will benefit from their efforts. However, as Boses highlighted, there is a distinct ‘difference between good and good for you’. XML authoring is traditionally seen as difficult and cumbersome. Boses believes that as soon as we give users a narrative authoring environment that does not impact usability and does not result in a steep learning curve, structured authoring will become widespread. So what is Quark’s answer to the hardships of structured authoring? An XML editing tool that is fully functional and yet completely hides its complexity from users. The product, called Quark XML Author 3.0, is a plug-in for Microsoft Word and will appeal to those of us who want Figure 1. Quark’s off-the-shelf Dynamic Publishing Solution for technical publications departments Communicator Summer 2009 43 to create XML documents with no knowledge of XML and very little training. Why? Well, the idea is that XML syntax is presented as Word styles and so users do not need to ‘tag’ content anymore or worry about its validity; instead, they can simply ‘format’ content with styles. Practically, it means the Word Style drop-down list contains all of the valid types of content that the users can insert at the current cursor location. As only the ‘styles’ that can validly be applied at that point are shown, users are automatically restricted to valid content. Boses underlined that this tool is part of Quark’s Dynamic Publishing Solution (DPS), which is aimed at various markets, including media, life sciences, government and, of course, technical publications departments. Finally, Boses reviewed a number of recent deployments of Quark’s XML authoring solution, paying a lot of attention to the successful adoption of XML authoring by the Irish Government (reported in the Summer 2008 Communicator). Product demos At 11:00, Boses showed two product demos: Quark’s XML Author and Quark DITA Studio. The latter is a project explorer that lets content authors access and reuse topics, maps, pictures and other media stored in the centralised data repository (Microsoft SharePoint is suggested as the repository of choice). Translation provider since 1989 Q&A session I had been invited to the press breakfast to represent the ISTC and I took this opportunity to ask a few probing questions about the Quark XML technology and its relevance to us practising technical communicators. In particular, I requested a brief demonstration of an off-the-shelf DPS for technical publications departments (Figure 1). The solution certainly looks very promising, at least for small to medium technical publications departments that are looking for an easy way of implementing DITA. It supports single sourcing into multiple outputs and conditional tagging of content. Unfortunately, there is no provision for localisation workflow or terminology management. This can be a major drawback for organisations that want to adopt the solution as it stands, but require localisation services. It is also worth noting that the key benefits of Quark’s solution, that is ease of implementation and ease of use, could make moving to a different XML-based publishing platform more difficult in future. All in all, it is still early days for Quark’s XML authoring solution and it will be interesting to watch how things progress over the next 12 months. Meanwhile, I shall be testing the software and hope to write a full review for the Autumn 2009 issue of Communicator. C Certified Investor in People Galyna Key MA FISTC is a technical writer at Autodesk, and loves juggling her responsibilities as information designer, project manager, localisation lead and content creator. She is interested in discovering new trends in technical writing and trying out various tools. She gave a presentation on minimalism at the ISTC’s 2008 Conference, and is currently researching agile development practices and ways of applying them to documentation projects. E: [email protected] ISO 9001:2000 Translation specialists in your world � Reflect the quality of your products across all languages � Reduce your localization costs � Improve your time to market � Succeed globally t: +44 (0)1829 730050 e: [email protected] w: www.lloyd.co.uk Technical manuals Software Online help Websites Marketing materials Communicator Summer 2009 44 Tools Creating DITA content with FrameMaker The DITA-FMx plug-in for FrameMaker makes DITA-compliant XML content creation more accessible than ever. Andy Lewis explains how. This article is intended to introduce the DITA-FMx plug-in for FrameMaker versions 7.2 and 8. DITAFMx is significant because it enables you to benefit from all the advantages of structured authoring and content reuse within the DITA environment while still creating your content in FrameMaker. We will discuss how you can use some of the basic functions of the plug-in to create and publish DITAready content from within FrameMaker, including: Creating DITA topics Building a DITA map Using mini-maps Preparing your content for publishing Preserving variables Modifying topic type after creation. Other important operations supported by the plug-in, such as using a ditaval file for managing the conditionalising of text and support for DITA specializations for customising DITA are beyond the scope of this article. Before we begin At the time of writing, the latest released version of DITA-FMx is 1.00.28 (released December 2008). A beta version 1.1 (for installation on FrameMaker versions 7.2, 8, and 9) is currently available for download free of charge, but this article discusses only version 1.00.28 functionality. So what is DITA-FMx? Jointly produced by Silicon Publishing (www. siliconpublishing.com) and Leximation (www. leximation.com), DITA-FMx is a set of plug-ins and structure applications that enable you to create and edit DITA XML files in FrameMaker. Or, more accurately, DITA-FMx is a set of three structured applications (topic, map, book) each consisting of an EDD, a template and a host of read/write rules. DITA-FMx version 1.0 supports DITA version 1.0 and FrameMaker versions 7.2 and 8, and costs $185 per licence (that’s about £120). The upgrade to version 1.1 will be free. A free version of the plug-in (version 0.0) also exists and supports DITA version 1.0 and FrameMaker versions 7.1 and 7.2, but offers a very limited feature set. Importantly, this free version does not include support for DITA maps. A comparison of the features offered by the plugin with those supported natively by FrameMaker version 8 is too lengthy to be included here. The major features provided by DITA-FMx but not by FrameMaker version 8 are as follows: A search facility for content in referenced files The generation of a FrameMaker book (for search and spell check) that contains all referenced XML and DITA files The automatic generation of a topic file name based on the title used in the file The ability to specify a custom template for a new topic or map The creation of a new DITA file from the File menu The generation of reports listing where an element or topic is referenced The conversion of cross-references and links into live hyperlinks in generated PDF files The preservation of FrameMaker variables through the DITA map-to-FrameMaker book conversion process A full comparison with FrameMaker 8 is available at www.leximation.com/dita-fmx/featurecomparison. php. No such comparison is yet available for FrameMaker 9, although Leximation is not aware of it including any DITA-related functionality not already provided by DITA-FMx. Some basic DITA terminology Figure 1. DITA map hierarchy Communicator Summer 2009 Content written in DITA files is referred to as a topic. There are three default types of topic in the DITA environment: concept, task and reference. Generally speaking, you will use concepts for text describing theoretical ideas or providing background information; tasks for spelling out procedural steps; and references for content such as API documentation. You group your topics together in a DITA map — a logical entity representing the hierarchical relationships between topics and, optionally, submaps (referred to in this article as ‘mini-maps’). 45 Creating topics After you install the plug-in, a new DITA-FMx menu appears in the toolbar. You create a new topic from this menu by selecting the New DITA file option and the topic type you require, or by using the native FrameMaker File > New menu and selecting DITA file to indicate your topic type. Once you have named and saved your topic, the result is a valid XML file. You can verify this yourself by right-clicking the file and opening it with a text editor such as Notepad. You will see the following lines at the beginning of the code: <?xml version="1.0" encoding="UTF-8"?> <!DOCTYPE dita PUBLIC "-//OASIS//DTD DITA Composite//EN" "ditabase.dtd" [ DITA or XML files? You can control whether to generate your topics with a .dita or .xml suffix. In practice, it makes no real difference because you can freely mix the two; however, you may prefer to maintain your content as XML files for future use outside FrameMaker. You define the suffix by selecting DITA-FMx > DITA Options > Default “New” type. Remember to do this before you create your topics. Combining topics into a DITA map After creating a collection of individual topics, you need to arrange them in the order that matches the intended structure of your output. You do this by inserting your topics into a DITA map. The DITA map acts as a wrapper around your DITA topics, enforcing the relationships between them. For example, where Topic A contains a title for display as a highest-level heading, and Topic B Figure 3. DITA map with mini-map imported contains a title for display as second-level heading, Topic A should be placed as a parent to Topic B in the DITA map hierarchy, as shown in Figure 1. You create your map by selecting either DITA-FMx > New DITA File > New <map> or File > New > DITA File > New <map>. FrameMaker saves maps with a .ditamap suffix. You insert topics into your map from the map Structure View window using the <topicref> element, as shown in Figure 2. Place the cursor in the required location in the tree to insert a topic in the hierarchy. To modify the location of a topic after insertion, drag and drop the topic to a new location in the tree. From DITA map to published output When you have built your DITA map and are satisfied that all your topics stand in the correct hierarchical relationship to each other, you are now ready to convert your map to a FrameMaker book. Once you have your content inside a FrameMaker book, you can perform all the regular book-level operations that you are used to, including converting your content to PDF, HTML, CHM and so on. To create a FrameMaker book, open and save your DITA map, select DITA-FMx > Generate Book from Map, enter a name and location for the file in the Save Book window and click Save. It is recommended that you include the .book extension as part of the file name. Figure 2. Selecting a <topicref> element Inserting mini-maps in your DITA map There may be cases in which you wish to use a number of topics in the same order and hierarchical relationship to each other on multiple occasions. To facilitate topic handling in such instances, DITA-FMx Figure 4. Mini-map Communicator Summer 2009 46 Tools The trouble with variables Figure 5. Concept topic structure Figure 6. Converting concept to reference The processing of FrameMaker variables presents particular problems for DITA-FMx. The underlying issue is that these variables do not survive XSLT processing. Fortunately however, DITA-FMx provides a workaround that entails ‘preparing’ variables for DITA map-to-FrameMaker book processing, and then ‘rebuilding’ them after the FrameMaker book is generated. In practice, DITA-FMx wraps each variable in a temporary <ph> element and assigns an ID to each variable. For users the workaround requires the creation of a ‘work book’. The workbook is an intermediate step between DITA map and final FrameMaker book which contains all the files in the map, but which is never intended to be published. You perform the preparation and rebuilding of variables at this workbook stage. The full procedure is as follows: 1. Open and save your DITA map. 2. Select DITA-FMx > Build ‘WorkBook’ from Map. 3. Select DITA-FMx > Open All XML Files in Book. 4. With the workbook showing and all files open, select DITA-FMx > Prepare Variables for FM Book. 5. Save and close the workbook. 6. With your DITA map showing, save the map and select DITA-FMx > Generate Book from Map. 7. With the new FrameMaker book showing, select DITA-FMx > Rebuild Variables in FM Book. Your FrameMaker book will now include your converted DITA content with all variables correctly processed. Modifying topic types Figure 7. Reference topic structure Andy Lewis has spent most of the 21st century creating technical content in FrameMaker for RADVISION. E: [email protected] W: www.radvision.com allows you to import any number of topics into a separate map, then import this (usually) smaller ‘mini-map’ into your main DITA map as a single entity, rather than importing each topic individually. Figure 3 demonstrates such a case in which a mini-map has been imported into a main map as a sibling element to two other individual topics. The mini-map itself contains three topics (Figure 4). The hierarchical configuration of the three topics will always be maintained, regardless of the position of the mini-map within the main map. Communicator Summer 2009 Although it is good practice to establish which type of topic your content represents before you create a topic, changing topic type after creation is a relatively simple process. Let’s say you have created a concept topic, as shown in Figure 5, but now wish to change it to a reference topic. Select the <concept> element in the Structure View window, select reference from the Elements list, and click Change at the bottom of the Elements list, as shown in Figure 6. The resulting structure is invalid, but the clean-up us minimal. Using the same method, change the <conbody> element to a <refbody> element, and change the <p> elements to any of the valid options displayed in the Elements list. Figure 7 shows a possible version of the corrected reference topic structure. In conclusion This article has discussed only the most basic functionalities and operations offered by DITA-FMx. We have seen how to create new DITA topics, how to establish the hierarchical relationships between them inside a DITA map, and how to prepare them for publication. Nevertheless, if you are thinking of DITA but tied to FrameMaker, the advantages of DITA-FMx should now be apparent. C 47 Editing Developing a style guide Jean Rollinson summarises the areas that you need to cover when providing style guidance to writers and editors. What is a style guide? A style guide is a document that gives guidance on both the layout of a document and the preferred use of language within it. It should be used by writers, editors and anyone else involved in the production of an organisation’s literature, to ensure consistency in documentation across a range of departments. more than one person has written the documents. The guidance given usually covers the use of: Present or future tense Second or third person in instructions Contractions Metaphors Humour (rarely recommended) Formal or informal language. What should it include? Spelling preferences The style guides that I have used range from a couple of sheets of A4 paper with a list of preferred spellings to a 100-page book. What is included really depends on what is considered important in your organisation and areas where you think problems are likely to arise. In my opinion, a style guide should, as a minimum, include guidance on the following areas: Writing style Spelling preferences Punctuation Presentation of numbers Lists Illustrations Tables Heading levels General formatting. You may also find that your organisation or industry requires other specialist information. This can be added as the guide develops. As well as a list of preferred spellings, the guidance given usually covers the use of: UK or US English (may depend on target audience) -ise or -ize spellings Hyphens. Writing style This section is possibly the most important aid to ensuring consistency across documents. Consistent style can make documents quicker and easier to translate. All writers have their own writing style but good writers can adapt their writing to an imposed house style, so that readers will find it hard to tell that Further reading Oxford Style Manual, Robert Ritter, Oxford University Press The Chicago Manual of Style, University of Chicago Press Punctuation Punctuation is usually less variable than spelling, but it may be important to note whether to use: US or UK punctuation Single or double quotes Serial commas. Presentation of numbers The content of this section will depend on your organisation and industry. The guidance given may include: How to lay out currencies How to format dates When to use words and when to use digits Whether to space or close up units Whether to use ‘%’ or ‘per cent’. Lists Lists appear in most technical documents. What you need to set down in your style guide is what sorts of lists are allowed and how they should be formatted. Numbered lists are essential for any documentation that gives instructions, but are usually used only where order is important. For bulleted lists (unordered lists), it is useful to include an example of how the lists should appear, and whether it is acceptable to have lists within lists. Illustrations This section should include information on preferred formats, size and spacing. In a large organisation that has its own technical illustrators, there should be at least a chapter and possibly a separate style guide for illustrations. Tables There are so many ways to lay out tables that it is important to include an example of how you want them to appear. You may need more than one type of table to display information in the most user-friendly way. If that is the case, then it is useful to give examples of each table and when it should be used. Heading levels Three levels of headings are usually sufficient, unless your subject is extremely complex. You may want to restrict your authors to three levels, with guidance on particular situations when they can use more. You should include a description and an example of each heading style in the style guide. Although you can set up heading styles in a template or style sheet as well, specifying them in the style guide ensures that everyone is working to the same standard, even if different departments use different documentation tools. General formatting This section can contain any amount of guidance to help ensure that your documentation is consistent. It may include: When to use capital letters How to add emphasis When to use bold and italic text How to insert special characters How to format notes, cautions and other paragraphs that you want to distinguish from the main text. C Jean Rollinson FISTC is a freelance technical author, editor and proofreader. She is also an associate of the SfEP. When not gainfully employed she plays the clarinet in an amateur concert band. E: [email protected] W: www.authoring-services.co.uk Communicator Summer 2009 48 Book review Information Architecture for the World Wide Web Designing Large-Scale Web Sites By Peter Morville and Louis Rosenfeld ISBN: 978-0-596-52734-1, third edition, 506 pages, O’Reilly (2007), £30.99. Reviewed by Katja McLaughlin MISTC Information Architecture for the World Wide Web is a popular primer on the subject of information architecture (IA). First published in 1998, it has now reached its third edition. The book discusses the structural design of shared information environments, including organisation, labelling, search and navigation systems within Internet sites and intranets. According to the authors, it is intended for anyone interested in information architecture, from newcomers to experienced practitioners. The third edition includes new material about tagging, folksonomies (collaborative tagging), social classification and guided navigation, as well as general updates. Book structure The book is divided into six main parts, followed by an appendix that lists IA resources; this review will discuss each in turn. To view the full table of contents, follow the link at the end of this review. Introducing IA Defining what the term ‘information architecture’ means is not straightforward, and the book opens with a welcome discussion of what IA is typically taken to involve and why we should care about this subject. This is followed by an equally helpful discussion of the varying disciplinary backgrounds of information architects and of the specialised niches within IA. Basic principles of IA The second part of the book looks at major architectural elements in turn, including systems used for organising, labelling, navigating and searching systems, plus a discussion of vocabulary and metadata controls. In addition to their basic exposure of the subject matter, the authors also provide some critical discussion. For example, they not only outline the differences between global, local and contextual navigation, but also proceed to discuss the relative benefits of supplemental navigation systems such as sitemaps or indexes, and the difficulty of implementing personalisation and Communicator Summer 2009 customisation successfully. In doing this, the authors make a real effort to enable readers to assess what may or may not work well in their specific circumstances. The section ends with a discussion of how to create an EIA unit within your organisation and how to fund it. Process and methodology The discussion of EIA leads the reader into two case studies: 1. MSWeb (Microsoft’s enterprise intranet) The authors outline how a massive organisation — with a lot of IA resource available — got owners of over 8000 intranet sites to bring their sites under the MSWeb umbrella and add consistent metadata to their intranet resources. 2. evolt.org (an online web developer community) Instead of traditional centralised IA, evolt.org has an ‘un-information architecture’ with a ‘throw it against the wall and see what sticks’ approach. The authors suggest that in an environment where traditional centralised IA is too expensive, this is a model that can work well, provided that there is broad participation. The next part of the book covers tools, techniques and methods used for moving from research to design to implementation. In general, the discussion here warns against a ‘one size fits all’ approach. For example, the authors consider whether focus groups are appropriate in IA research, and discuss how large group meetings may be good for brainstorming but not necessarily for designing complex systems. As in the previous section, they continue to present a balanced mix of basic information and critical discussion. IA in practice The fourth part of the book consists of short essays that contain practical tips and philosophical advice on selected subjects, such as IA education, ethics and software. Compared to the other parts of the book, this section is quite brief; however, many of the issues exposed here are also discussed from different points of view elsewhere in the book. IA in the organisation The fifth part of the book addresses enterprise IA (EIA). Having previously covered basic IA principles, processes and methods, the authors now provide insights into the business context of IA. For example, this section provides advice about how to persuade different types of decision makers about the value of IA, and discusses why ROI (return on investment) measurements might be unreliable in the case of IA. The authors compare top-down and bottom-up IA business strategies, and consider whether information architectures are created or revealed. Discussion of practical EIA approaches also includes search tools as an apolitical way to connect content silos, and ‘guerrilla EIA’ where tools such as blogs and wikis are used to encourage sharing of cross-departmental content. Case studies Essential resources The book ends with an appendix that lists a wide variety of IA resources, including books and journals, discussion lists, professional organisations, courses and conferences. Conclusion Information Architecture for the World Wide Web is well worth a read and caters for complete IA beginners as well as those looking for a degree of critical discussion. C About the book’s authors Lou Rosenfeld is an independent information architecture consultant and founder of Rosenfeld Media. Peter Morville is president and founder of Semantic Studios, an information architecture and strategy consultancy. For more information about the book, visit http://oreilly.com/ catalog/9780596527341. 49 International standards PDF universal accessibility Richard Hodgkinson reports on plans for a new International Standard that will address PDF accessibility. Proposed new standard Following the successful development by ISO TC 171/SC 2 (Document management applications – Application issues) and last year’s publication of ISO 32000-1:2008 Document management – Portable document format – Part 1:PDF 1.7, plans are now in place to develop a further standard that will address the accessibility of PDFs. The planned title is Electronic document file format enhancement for accessibility (PDF/UA). So exactly what will this new standard address? I’ve taken the liberty of reproducing in the panel the ‘Introduction’ and ‘Scope’ from the current Working Draft. Please note that they may be modified as work progresses. BSI Committee IDT/1/2 (Application issues) This committee reviews the work of ISO TC 171/SC 2 and coordinates UK input. IDT/1/2 is currently seeking UK experts in this field to review and comment on Extracts from the proposed new standard Introduction PDF is a digital format for representing documents. PDF files may be created natively in PDF form, converted from other electronic formats, or digitized from paper. Businesses, governments, libraries, archives, and other institutions and individuals around the world use PDF to represent considerable bodies of important information. These PDF files need to be made accessible to users with disabilities. Document accessibility depends upon machine-recoverable text presented in a declared language; the inclusion of structure, such as the tagging and logical organization of pages, sections, and paragraphs; and a variety of descriptive metadata, such as alternate text for images. The primary purpose of this International Standard is to define an implementation of ISO 32000-1, known as PDF/UA, that provides a mechanism for representing electronic documents rendered in the PDF format in a manner that allows the file to be accessible. These goals are accomplished by identifying the set of PDF components that may be used, and restrictions on the form of their use, within conforming PDF/UA files. PDF/UA is intended as a companion standard, to be used in conjunction with ISO 32000, ISO 19005, ISO 15930, and other standards as may apply for the purpose of achieving accessibility. By itself, PDF/UA does not necessarily ensure that the visual appearance of the content accurately reflects any original source material used to create the conforming file. For example, the process used to create a conforming file might substitute fonts, reflow text, downsample images, or use lossy compression. Organizations that need to ensure that a conforming file is an accurate representation of original source material may need to impose additional requirements on the processes that generate the conforming file beyond those imposed by this International Standard. In addition, it is important for those organizations to implement policies and practices regarding the inspection of conforming files for correct placement of accessibility information. AIIM (an accredited standards developing organization) maintains an ongoing series of application notes for guiding developers and users of this ISO standard. These application notes are available at www.aiim.org/pdfua/app-notes. AIIM will also retain copies of the specific non-ISO normative references of this International Standard that are publicly available electronic documents. the drafts of the PDF/UA standard. This work should take three years to complete. BSI can provide assistance for experts attending international meetings of ISO/TC 171/SC 2 and representing the BSI. If you are interested, please contact Robert Turpin at the BSI (Robert.Turpin@ bsigroup.com). C Richard Hodgkinson FISTC has participated in the development of ISO, ISO/IEC and European standards addressing icons, symbols, software documentation, pen gestures and ICT accessibility since 1990. He is also an Associate Lecturer to the MA Technical Communications course at the University of Portsmouth. E: [email protected] Scope This International Standard specifies how to use the Portable Document Format (PDF) ISO 32000-1 to produce electronic documents which are accessible. This International Standard does not apply to: Specific processes for converting paper or electronic documents to the PDF/UA format Specific technical design, user interface, implementation, or operational details of rendering Specific physical methods of storing these documents such as media and storage conditions Required computer hardware and/or operating systems. Communicator Summer 2009 50 A day in the life Rachel Potts recalls a typically hectic day as head of tech comms at a software company My day starts, inevitably, with my e‑mail inbox. At the moment it’s generally full of project updates and discussions, as well as CVs and preinterview assessments. Although I always intend just to sift my e‑mail to make sure nothing’s come up that might change my priorities for the day, somehow I can’t resist getting sucked into something that’s not so urgent. Today, the head of Product Support has sent the results of the monthly support survey. This survey goes out to everyone who has raised a support call in the previous month, and one of the questions we ask is ‘How would you rate our help information?’ The answers we get aren’t representative of our entire user-base, of course — only people who’ve had a problem — but they’re interesting, nonetheless. While 75% rate our help as good or excellent, 10% admit to having not looked at it (I suspect this number is a bit low: I imagine there must also be some people sheepishly not admitting that they didn’t look at the help before contacting us). The rest say the help is okay or poor. These results are fairly consistent from month to month, which means that any changes will be a good indicator of how the major changes we’re currently making to our content are received. The most interesting thing about this survey, though, are the comments that some respondents add. This time a couple of people have made suggestions relating specifically to the help, and they’ve Communicator Summer 2009 left their e‑mail addresses, so I contact them to find out more. All this done, I finally make it to the kitchen for my first cup of tea. Then I return to my desk and work through my e‑mails a little more systematically, before I get stuck into the things that I need to do today. At the moment, I’m running a project to move all of our help and other technical documentation onto our website, where it will be combined with the knowledge base articles that our support team write. This involves changing our authoring tool and tweaking the tool that support use, as well as the web development side of things, and all this needs to be coordinated across a project team that includes nine people from right across the business (including technical authors) as well as two external consultants. With this mixture of people involved, I particularly need to check that everyone has whatever they need to get on with their work and make sure people know about any changes or decisions that might affect them. I do this through a combination of phone calls, e‑mails, face-to-face chats and issues logged in our bug-tracking system. In the afternoon, I finally get onto a task that I’ve promised I’ll finish today. I’m going to be doing the authoring on a short project soon, so I need to produce some time estimates. I’ve never used this product before so I install it and have a play to get a feel for it. I look too at the existing online help and the help that’s embedded in the user interface itself. The project manager has a list of features to be added, so I talk through them with her. The usability designer has already begun to work on the user interface and interaction designs for the new features, so I take a look at them and discuss details such as embedded help requirements. I also look at support call logs and statistics on web hits on the online help, and talk with the support engineer and sales team — to find out how the current help is received and whether there’s anything that people are getting particularly stuck on. Taking a break from this, I get chatting with one of the software developers in the kitchen. He tells me about the project he’s about to start work on next week and I realise that this is the first I’ve heard of the project and it’s going to need a technical author. We’ve been working on encouraging better communication at these early stages of development, but every so often a project like this manages to slip through — usually because the project idea started life as bug fixes and then grew to have new features added too. I talk with the project manager and technical authors and work out how to get someone onto the project soon. Back at my desk, I look through everything I’ve learned about the project I’m going to be authoring for and come up with a documentation design and estimates. This is partly guesswork at this stage — the user interface will evolve quite a bit yet before the release — but it’s accurate enough for the project manager to plan authoring into the project. In this project, there’ll be a little bit of work to do on error messages and the embedded user assistance in time for the Beta release. I’ll then follow this up with a couple of new help topics, replace some screenshots and update an article on the website. All this planning goes onto a wiki page — our main way of sharing information about projects. Before I start writing, I’ll get the Technical Communications team together to discuss the documentation design. Although we have some general principles and standards, we don’t have strict rules on exactly what documentation we create for a product. Instead we look at each product as an individual case and work out what’s best for it, based on what people are trying to do with it and the complexity of the product itself. This means that it’s particularly important for other people in the team to be involved in the documentation design process — so that we’re all keeping in touch with what each other are doing. It’s now late afternoon. Today has been unusually lacking in meetings — I have something regular set up most days to keep in touch with my team, other department heads and project managers — but I do have one important meeting at the end of the day. We have a new technical author in the team and it’s company policy to meet with new starters at the end of every day for the first week, then at the end of every week until their probation period ends. Starting a new job is always stressful, so this is a good way to make sure that people aren’t overwhelmed and they’re getting the help they need. At the end of every day there are always various loose ends to tie up and project decisions to confirm before I eventually head off home. I try hard to make my working day end when I leave the office, but occasionally everything seems to need to happen at once and I have to catch up with some of it in the evening. Tonight, though, my workload is under control, so I can head off to the pub for some much needed refreshment. C