1
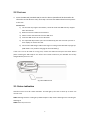
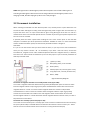
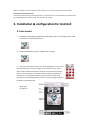
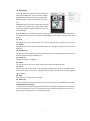
GeoSafe user manual TRACKS YOU & YOUR STUFF EVERYWHERE! 1 1. Product summary ........................................................................................................................... 3 2. How to use ....................................................................................................................................... 3 2.1 Included in the box ................................................................................................................... 3 2.2 First use .................................................................................................................................... 4 2.3 Status indication ...................................................................................................................... 4 2.4 Permanent installation............................................................................................................. 5 3. Installation & configuration for Android ......................................................................................... 6 3.1 Get started ...................................................................................................................................... 6 3.2 Add a new unit................................................................................................................................ 8 4. Installation & configuration för iOS ............................................................................................... 11 4.1 Get started .................................................................................................................................... 11 4.2 Add a new unit.............................................................................................................................. 12 5. Portabel use ....................................................................................................................................... 15 6. Problem solving ................................................................................................................................ 16 7. Product Specifications ...................................................................................................................... 17 8. Text message command .................................................................................................................... 18 9. Notes .................................................................................................................................................. 19 2 1. Product summary GeoSafe is developed for Cars, Caravans, Mobile homes, Trucks Mc:s, etc. or for personal use such as panic alarm or personal security alarm. Thanks to the compact design (61,5x46x22mm) unit is easy to hide for a permanent installation or to put in your pocket or to put in your children’s backpack to use as a personal alarm. By using the relay output you can control ex. a heater or refrigerator (relay is not included in box). GeoSafe can be controlled by app or sms. No separate remote control is available. 2. How to use 2.1 Included in the box GeoSafe unit Mounting bracket Mounting cable for permanent installation USB charging-cable 1x external siren 1x magnetic sensor User manual Super key card (Keep as a valuable document. In case of loss of the Super key card, the device must be sent, along with the sales receipt, to LTC for reset. There is a service charge for the work and a new code.) 3 2.2 First use 3. Insert the SIM-card (standard SIM) to start the device (GeoSafe will be hereinafter be referred to as the device or unit). First step is to insert the SIM-card and connect power to the unit. IMPORTANT: 1) The unit will only support 2G network, cannot be used with SIM that only support 3G or 4G network. 2) Make sure that the SIM-card is activated. 3) Please remove the PIN-code from the SIM-card. 4) Insert the SIM-card in the correct direction. 5) Use a pointed object when you insert the SIM card, push the card until you hear a click. Equally to remove the card. 6) Connect the USB charger cable and charge unit. Charge until LED3 will stop light up. (USB-cable is only used for charging the internal battery). If the unit is not to be used for a long time, remove the SIM card and press the Reset button (after removing the SIM card) to turn off the unit. Please make sure your GeoSafe unit is fully charged before you turn it off. Fig1 The SIM direction 3.1 Status indication Geosafe unit has 3 led for status indication. Led will light up for 5min at start up or when unit receive a call. LED1: GSM-signal status. If led light up GSM reception is OK, if LED is flashing unit is searching for GSM-signal. LED2: Reserved, not in use. 4 LED3: GPS-signal status. LED will light up when GPS reception is OK. If LED is flashing unit is searching for GPS-signals. LED3 is also used as charge indicator and will light up when unit is charging via USB, LED will stop light up when unit is fully charged. 3.2 Permanent installation When installing the GeoSafe unit with external power cord, carefully choose a place where the unit will not be visible. GPS-signal normally passes through wood, plastic and glass but not solid metal. Try to place the alarm unit in an open environment to get a strong GPS-signal. If the alarm is used in a metal boat the alarm unit should be placed close to a window. If you don’t get any GPS-reception then the unit has to be removed. If possible please do status request when holding the unit at the chosen place to see that GPS reception is ok before you do the permanent installation. GeoSafe can work in a moist environment and also handle small water splash, but shall not be placed where there is danger of washdown. It is you as user that choose how you want install the alarm, if you only want to use the GeoFence alarm you only need to connect + & - to the battery. If you want a full scale alarm, connect the included siren, magnetic sensor and if needed complement with more magnetic sensors, ir-detector, level sensor etc. These shall be connected to input 1 normally open or input 2 normally closed due to how they should be used. (1) (1) Red (+ 6-45V) (2) Blue (Relay). Relay is not included. (3) Brown (Siren) (4) White (Input 1 NO, normally open circuit) (5) Gray (Input 2 NC, normally closed circuit) (6) Black (- GND) Fig2 Connectivity diagram Connection of magnetic switches to a normally closed circuit (Input 2 NC) To connect a magnetic switch that detects when eg a door/window/hatch opens connect one cable from the magnetic switch to Input 2 (gray wire) of the GeoSafe device and the other wire from the magnetic switch to + 12volt. To connect several magnetic switches to monitor multiple doors connected them in series. Connect one cable to the first magnetic switch to Input 2 (gray cable), connect the second cable to one cable on the next magnetic switch and the other wire from the second magnetic switch to + 12volt. Remember that all magnetic switches must be closed, or it won´t be possible to arm the device. Connection of a normally open circuit (Input 1 NO) To connect an alarm accessory for a normally open circuit connect one cable from the alarm accessory for Input 1 (white cable) on GeoSafe device and the other wire from the alarm accessory to + 12volt. Also this circuit can activate several alarm accessories in a loop (see above example). 5 Keep in mind that all alarm accessories must be open, or it won´t be possible to arm the device. Connection of the external siren To connect the external siren connect the black (-) wire from the siren to the brown wire marked siren on the GeoSafe device and the red wire on the siren to + 12volt. 3. Installation & configuration for Android 3.1 Get started 1. Start with downloading the app from Google Play, app is free of charge and is used to control your GeoSafe unit/units. 2. Tap the GeoSafe icon on your cellphone to start app. 3. Now you will be asked to enter your “sliding password”. Press at one of the dots and then move your finger to the next dot of your choice, there will be a yellow line between the dots. You need to use at least 4 dots to create a password. You will be asked to repeat the password a second time for confirmation. When you success there will be a osd message with The Sliding Password Success and the first page of app will be shown in the background. Main page See figure 4 6 (1) Mode Setup Here you choose how you want to communicate with your GeoSafe unit. There is 3 preset modes. BT Mode Only: Only communicate via Bluetooth. Bluetooth have a range up to 10meters (in open air). SMS Mode Only: Only communicate with sms/text message. Every sms will cost money, please check with your telephone company what the cost is for a text message. BT & SMS Mode: In this mode the cellphone will first try to communicate with Bluetooth, if the cellphone don’t get any connection with Bluetooth an sms will be sent (this is the preset mode). (2) Arm By tapping this icon you will arm your unit. The icon will light up in red when unit is armed. (3) Disarm By tapping this icon the unit will be disarmed. The icon will light up in green when the unit is disarmed. (4) GeoSafe icon Tap this icon to do a position request for the GeoSafe unit. A map page will be opened and show the position of your GeoSafe unit. (5) Status bar Information about key tappings. (6) Home Tap this icon when you are in setup menu to go to the first page of the app. (7) Setup Tap this icon and you will come to the setup menu page where you do all settings for your unit. You will have to enter your “sliding password” again to be able to enter setup page by safety reasons. (8) Map Press this icon to come to the map page. (9) Device List To choose which unit you want to control if you have more than one GeoSafe unit installed. (10) Parameter Synchronize To synchronize your app with your GeoSafe unit. The app will be updated with all settings from your GeoSafe unit. For ex. If the app have been closed you need to press this icon to get the app to show if the unit is armed or disarmed. 7 4. Go to the Setup page by tapping the setup icon at the bottom of the app to add a new unit and to set master and other users and to make all settings you want for your unit before you can start to use your GeoSafe unit. See fig. 5. Fig 5 Setup You will be asked to enter your sliding password to be able to enter the setup page by safety reason. 3.2 Add a new unit Tap on Device Information to be able to manage your unit/units. You will have 3 choices. Add Device: Tap here to register a new unit. Edit Device: Tap here to make a change in an existing unit. Delete Device: Tap here to delete/remove a unit from app. Frist time you are installing a new unit tap on Add Device. User`s Authority: Start by choosing the Authority for this app, master or user, by tapping the Authority you want. Master can do all settings in app and can delete/remove users. It is only possible to have one master per unit and 5 users per unit. Device`s Name: Enter the name you want for this unit ex. Boat, Caravan etc. If you don’t enter any name the unit will be named default. Device`s SN: Enter the serial number of the unit here. Serial number can be found on a label on the unit. Device`s phone NO: Enter the cellphone number of the GeoSafe unit. Begin with the country code (+46 for Sweden), then remove the first zero of the number. 8 Location`s phone NO: Enter your cellphones number. Begin with the country code (+46 for Sweden), then remove the first zero of the number. Device`s Password: Enter a password for the Bluetooth communication. You can use the preset password if you want. User1`s phone NO: Enter phone number for User 1. Begin with the country code (+46 for Sweden), then remove the first zero of the number. User2`s phone NO: Enter phone number for User 2. Begin with the country code (+46 for Sweden), then remove the first zero of the number. User3`s phone NO: Enter phone number for User 3. Begin with the country code (+46 for Sweden), then remove the first zero of the number. User4`s phone NO: Enter phone number for User 4. Begin with the country code (+46 for Sweden), then remove the first zero of the number. User5`s phone NO: Enter phone number for User 5. Begin with the country code (+46 for Sweden), then remove the first zero of the number. Now you have to tap on Search Device to find the Bluetooth address for the GeoSafe unit. A list of addresses will be shown in your cellphone with all available Bluetooth units within 10 meters. Look for an address with GeoSafe in front of the address, if there is only one address with GeoSafe use this address. If there are several addresses with GeoSafe in front of the address you have to try every address until you find the correct address. Choose the address you want to use. You will be directed to device information page again. Tap on Save and Quit to store these settings in the app. An osd message will ask if you want to save the settings you just made and go back to main page for settings (Device information). Tap Yes. Enter your sliding password to enter the main page for settings (Device Information). You are still under Device Information. Go to the bottom of the page and tap on Register, now the app will send all the made settings to the GeoSafe unit. If all entered data is correct and the Bluetooth address is correct you will receive a message in the INFO bar like this: INFO: Master And User Registred. If you don’t receive this message please check the cellphone numbers and serial numbers again and try a second time. 9 Parameter Setting: Here you make settings for your alarm and configure alarms for your Geosafe unit. GMT: Choose the correct time zone for the place you are located in. (This setting can only be made by Master user). External Low Power: Select the battery voltage the unit is connected to. There are 3 preset values: 6volt, 12volt or 24volt. The unit will send you a text message if external power is below the value that you choose. (This setting can only be made by Master user). GeoFence Radial: Enter the radial for your geological fence. You can choose values between 200m-65536m. If radial is set to 0meters the alarm is deactivated. When you arm your unit it will store the position for the place where you armed it and if unit is moved more than the set value the GeoFence alarm will start. (This setting can only be made by Master user). Siren On Time: Select for how long you want the siren to sound if an alarm starts. Value is set in seconds and can be set between 10-200sec. (This setting can only be made by Master user). Alarm Config: There are 3 types of alarms: Internal (internal siren will sound), External (external siren will sound), Call (unit will call you when alarm starts). Sms will be sent for all alarms. For SOS alarm external siren will not sound. SOS alarm is only possible in portable mode. (This setting can only be made by Master user) Status Enquiry: Here you ask the unit for its status of 7 parameters. This request can be sent by both Master and Users. Armed/Disarme: Lets you know if the unit is armed or disarmed. GeoFence Radius: Will show the radius sat. Relay ON/OFF: Will show if relay output is on or off. GSM Signal: Will show how strong the GSM reception is L=Weak, M=Medium, H= Strong. GPS Signal: Will show how strong the GPS reception is L=Weak, M=Medium, H=Strong. ). In portabel mode Not fixed is shown. Internal Battery: Will show many % of battery that is left. Alarm at around 30%. External Battery: Will show the voltage of the external battery (if unit is connected with a power cord). External Device Control: Here you can activate or deactivate the siren and relay output. 10 Relay Control: Here you can control the relay output, it can be set to ON or OFF. Unit will keep this setting until Master or User change this or if external power is lost. Siren Control: Here you can start the external and internal siren even if no alarm has been started. Siren will sound for 20sec. This can be made by both Master and Users. Security Management: Here are two security settings to make. Password reminder phone: Here you enter the phone number of the phone you want to have the option to receive a text message with the code for the "sliding password" if you have forgotten it. You sends a request on the page where you should enter the "Sliding password" if you do not remember it. You will then be asked to enter the phone number you specified as the destination number. Begin with the country code (+46 for Sweden), then remove the first zero of the number. Sliding Password change: Here you can change your sliding password. You will be asked to enter your old password first, then enter a new password, twice to confirm the new password. 4. Installation & configuration för iOS 4.1 Get started 1. Start by going into the App Store and download the GeoSafe app to control your GeoSafe. The app is completely free. 2. Press the GeoSafe icon on your phone to start the app. 3. Now you will be asked to choose and enter your “sliding password”. Press at one of the dots and then slide your finger to the next dot of your choice, there will be a yellow line between the dots. You need to use at least 4 dots to create a password. You will be asked to enter the “sliding password” a second time for confirmation. When you success there will be a message with Sliding password success and the first page of the app will be shown in the background. 11 Main page figure 4. (1) Arm Activate the alarm. The icon is always red, regardless of whether the alarm is on or off. (2) Disarm Deactivate alarm. The icon is always green regardless of whether the alarm is on or off. (3) The GeoSafe symbol Tap to ask for your devices position. A pop up window will appear asking if you want to send a text message and ask for the position. Click Send and will you come to the normal window for text messages with a predefined text. Click send and wait for a text that answers to your location request. Click on the link in the text and be connected to the map page where the device location is shown. (4) Home Tap this icon when you are in setup menu and you will come directly to the first page of the app. (5) Setup Tap this icon and you will come to the setup menu page where you do all setting for your unit. You will have to enter your “sliding password” again to be able to enter setup page by safety reasons. (6) Unit list Tap this icon to choose which unit you want to control if you have more than one GeoSafe unit installed. You also add new units, delete old units, edit existant units and change your “sliding password” here. This is the first step in the GeoSafe installation of a new unit! 4.2 Add a new unit 1. Tap the unit list (6), see figure 4. Now you will have 4 choices: Add Unit: Press this icon to register a new unit. Edit Unit: Press this icon to change in an existing unit (for example change phone number or units name). Cancel Unit: Press this icon to delete a unit. 12 Change Sliding Password: Press to change your sliding password. 2. Press Add Unit, then a new window will appear where you enter the name you want the unit (GeoSafe) to have, as well as the unit's (GeoSafe) telephone number. Note! Begin with the country code (+46 for Sweden), then remove the first zero of the number. Then press DONE to store the unit in the app. 3. Press the Setup icon to enter the setup page to be able to do settings for master and users and other settings before the unit can be used. See figure 5. You will be asked to enter your sliding password. 4. Press Master and user settings Now you will have 4 choices: Master Register: Here you enter 1 master and maximum 5 users for each unit. Master can do every setting in the app and delete/add users. Users Check: Check if a cellphone number is a user or not. Change The Users: Add/delete user/users. Get Users List: Ask the unit what cellphone number is registered as user/users. You must press the Master Directory, then enter the following: Master Phone: Enter the master phone number, start with country code (+46 for Sweden), then remove the first zero of the number. SN: Write the GeoSafe serial number, it is on the bottom of the unit. User 1 Phone: Write user 1's phone number, start with the country code (+46 for Sweden), then remove the first zero of the number. User 2 Phone: Write user 2's phone number, start with the country code (+46 for Sweden), then remove the first zero of the number. User 3 Phone: Write user 3's phone number, start with the country code (+46 for Sweden), then remove the first zero of the number. User 4 Phone: Write user 4's phone number, start with the country code (+46 for Sweden), then remove the first zero of the number. User 5 Phone: Write user 5's phone number, start with the country code (+46 for Sweden), then remove the first zero of the number. Then press SEND, you'll be taken to the text message page in your phone where these settings are preset. Click on submit, and the settings sends to your GeoSafe unit. You will receive an text message reply that says Register the master smartphone success if you got it right. Now master and users are registered in the GeoSafe unit. Now is the time to set the alarm. 13 5. You do all settings for the alarm in the app under the menu SETUP. Following settings can be made: GMT: Choose the correct time zone for the place you are located in. (This setting can only be made by Master). External Low Power: Select the battery voltage the unit is connected to. There are 3 preset values: 6volt, 12volt or 24volt. The unit will send you a text message if external power is below the value that you choose. (This setting can only be made by Master user). GeoFence Radial: Enter the radial for your geological fence. You can choose values between 200m-65536m. If radial is set to 0meters the alarm is deactivated. When you arm your unit it will store the position for the place where you armed it and if unit is moved more than the set value the GeoFence alarm will start. (This setting can only be made by Master user). Siren on time: Select for how long you want the siren to sound if an alarm starts. Value is set in seconds and can be set between 10-200sec. (This setting can only be made by Master user). Alarm config: There are 3 types of alarms: Internal (internal siren will sound), External (external siren will sound), Call (unit will call you when alarm starts). Sms will be sent for all alarms. For SOS alarm external siren will not sound. SOS alarm is only possible in portable mode. (This setting can only be made by Master user). Status Enquiry: Here you ask the unit for its status of 7 parameters. This request can be sent by both Master and Users. Armed/Disarme: Lets you know if the unit is armed or disarmed. GeoFence Radius: Will show the radius sat. Relay ON/OFF: Will show if relay output is on or off. GSM Signal: Will show how strong the GSM reception is L=Weak, M=Medium, H= Strong. GPS Signal: Will show how strong the GPS reception is L=Weak, M=Medium, H=Strong. In portabel mode Not fixed is shown. Internal Battery: Will show many % of battery that is left. Alarm at around 30%. External Battery: Will show the voltage of the external battery (if unit is connected with a power cord). Relay Control: Here you can enable or disable the device's relay output. You can choose Relay ON (relay on) or Relay OFF (relay denial). The output will keep the setting until you can change it or that the tension disappears. Can be done by both the Master and user. Siren Control: Here you can choose to start the external siren without an alarm has been triggered, to test so that the siren works as it should. Can be done by both the Master and user. 14 5. Portabel use GeoSafe alarm can be used as a personal alarm or tracker. You can put this alarm in your pocket, handbag or your childrens backpack. You can also use it as a panic alarm or security alarm. When unit is used as a portable unit , charge the unit with the included USB cable. (USB cable is only used for charging, not as power supply). LED 3 will light up during charging and will close when unit is fully charged. Important: Please cover the external power input when you use unit in portable mode to prevent dust and other things entering the unit. When the unit is in portable mode and the two SOS buttons are pressed and held for 5 seconds the unit will send a SOS alarm to Master and registered users. You then have to do a position request to receive the position of the unit. Position request is made by choosing the GeoSafe icon on first page of the app. Position request can be made at any time, no need for SOS alarm to be able to do position request. The GPS module is in sleep mode in portable use and will only start up when a position request has been sent to unit. Notice: GeoFence is not possible in portable use. The internal siren can be set to ON/OFF under Alarm configure in SETUP menu, if setting is ON the internal siren will sound if a SOS alarm is sent. Fig7 Cover for Connector 15 6. Problem solving (1) GPS will not receive any satellite signal. Move the GeoSafe unit to open sky and try to do a position request again after 5 minutes. If the problem is not solved then please contact [email protected] Note that the GPS is not active in portable mode except at position request. (2) I have forgotten my sliding password or I want to reset the unit. Send a text message with the super key to reset Master and users for the unit. SMS: SUPERKEY,XXXXXXXXXXXXX,DELETEALL (XXXXXXXXXXXXX = Superkey code included in the package. A uniqe code for each GeoSafe.) Super key is a unique number that is different for every unit, there is a Super key card with every unit. Have you lost your Super key card please contact [email protected] . In case of loss of the Super key card, the device must be sent, along with the sales receipt, to LTC for reset. There is a service charge for the work and a new code. (3) No sms will be sent from the unit. Make sure the PIN code for the SIM card is deactivated. Check the balance on your SIM card. With some prepaid SIM cards, you need to make a call from the SIM card to activate. Check with your operator. (4) The SIM card will not stay in the GeoSafe. Notice that you can only use a standard SIM card. Use a pointed object when you insert the SIM card, push the card until you hear a click. Equally to remove the card. (5) GeoFence does not work. Note that GeoFence is not active in portable mode because GPS is not active. GeoFence only works when the cable for fixed installation is connected with the + & -. (6) Issues & common questions See www.geosafe.se/FAQ for questions and answers. 16 7. Product Specifications GSM Band: Quad Band GSM. GSM850/GSM900/DCS1800/PCS1900. (Does not support 3G. Only works with operators using 2G network.) GPS Chipset: u-blox 7th Generation GPS Chipset. GSM Antenna: Built in GPRS: Klass12/TCP/IP Working Voltage: DC 6V-45V Working Current: 20mA (Working at 12V). 1-3mA in portabel use 3,8V. GPS Chip: u-blox G7020 GPS Channels: 56 Input for GPS antenna: Yes, antenna not included Number of users per alarm: 1 Master & 5 users GPS Fixed Time Cold Start<32s(Open sky) Warm Start<32s Hot Start<1s Battery 800mAh Working temperature: JIS class: Size: Weight: LED indicators: Internal battery backup: External Piezosiren 120dB Outlet for external GPS antenna: Yes, not included GeoFence area: SOS button for emergency (only in portabel use.) SIM card: Standard SIM card. Not included. Recommended prepaid. NOTE! Only 2G coverage! Remote control: Mobile/cellphone, app. IOS/Android Relay control: Yes. Relay not included Magnetic sensor for monitoring doors, engine covers, etc. Alarm monitoring inputs. 1xNormally Closed, 1xNormally Open -20℃~+60℃ JIS3 61.5(h)x46 (b)x22(d)mm 60g LED1-GSM, LED2- Reseved, LED3-GPS 5-8 days 200-65536m We reserve the right to make changes and improvements to the product and the manual. We provide 1 year warranty on GeoSafe. Visit www.geosafe.se for support and service. 17 8. Text message command GeoSafe can also be controlled via text message (SMS) commands. Delete all data (as Master, user, password) SMS:SUPERKEY,XXXXXXXXXXXXX,DELETEALL (XXXXXXXXXXXXX = Superkey code included in the package. A uniqe code for each GeoSafe.) Arm the unit SMS:ARMEDON Disarm the unit SMS:ARMEDOFF Relay on/off SMS:RELAY,X(0/1)# (X=0 to set relay OFF, X=1 to set relay ON. Notice that # is necessary.) Status check SMS:STATUS Position request SMS:POSITIONIOS 18 9. Notes Device’s Name: ……………………………………………………………………………………. ……………………………………………………………………………………. Device’s SN (serial no for the unit): ……………………………………………………………………………………. ……………………………………………………………………………………. Device’s phone NO (phone no for the GeoSafe): NOTE begin with the country code (+46 for Sweden), then remove the first zero of the number. ……………………………………………………………………………………. ……………………………………………………………………………………. Location’s phone NO (phone no to the phone): NOTE begin with the country code (+46 for Sweden), then remove the first zero of the number. ……………………………………………………………………………………. ……………………………………………………………………………………. Device’s Password (password for Bluetooth): ……………………………………………………………………………………. ……………………………………………………………………………………. User1’s phone NO: NOTE begin with the country code (+46 for Sweden), then remove the first zero of the number. ……………………………………………………………………………………. ……………………………………………………………………………………. User2’s phone NO: NOTE begin with the country code (+46 for Sweden), then remove the first zero of the number. ……………………………………………………………………………………. ……………………………………………………………………………………. User3’s phone NO: NOTE begin with the country code (+46 for Sweden), then remove the first zero of the number. ……………………………………………………………………………………. ……………………………………………………………………………………. User4’s phone NO: NOTE begin with the country code (+46 for Sweden), then remove the first zero of the number. ……………………………………………………………………………………. ……………………………………………………………………………………. User5’s phone NO: NOTE begin with the country code (+46 for Sweden), then remove the first zero of the number. ……………………………………………………………………………………. ……………………………………………………………………………………. Other ……………………………………………………………………………………………………………………………………………………… …………………………………..…………………………………………………………………………………………………………………. 19