1
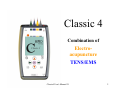
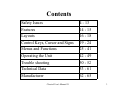
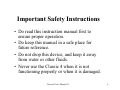
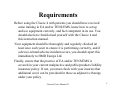
User’s Manual
User’s Manual
English version 2.1
2009-10
Please read this document first
before operate the unit.
Classic4 User's Manual 2.1
1
Unit picture
Classic 4
Combination of
Electroacupuncture
TENS/EMS
Classic4 User's Manual 2.1
2
Contents
Safety Issues
4 - 13
Features
14 - 15
Layouts
16 - 18
Control Keys, Cursor and Signs
19 - 24
Menus and Functions
25 - 41
Operating the Unit
42 - 49
Trouble shooting
50 - 52
Technical Data
53 - 61
Manufacturer
62 - 65
Classic4 User's Manual 2.1
3
Important Safety Instructions
• Do read this instruction manual first to
ensure proper operation.
• Do keep this manual in a safe place for
future reference.
• Do not drop this device, and keep it away
from water or other fluids.
• Never use the Classic 4 when it is not
functioning properly or when it is damaged.
Classic4 User's Manual 2.1
4
Requirements
Before using the Classic 4 with patients you should have received
some training in EA and/or TENS/EMS, know how to set up
and use equipment correctly, and feel competent in its use. You
should also have familiarised yourself with the Classic 4 and
this instruction manual.
Your equipment should be thoroughly and regularly checked (at
least once each year) to ensure it is performing correctly, and if
a device-related adverse incident occurs, you should report this
immediately to HMD Europe Ltd.
Finally, ensure that the practice of EA and/or TENS/EMS is
covered in your current malpractice and public/products liability
insurance policy. If not, you must check with your insurers that
additional cover can be provided for these as adjunctive therapy
under your policy.
Classic4 User's Manual 2.1
5
Safety Warning
This equipment may be affected by electromagnetic interference. Also the Classic 4 may
affect other electrical equipment in the close
vicinity. If such effects are suspected either
switch off the offending equipment or increase
the distance between the affected equipment
and that suspected of causing the interference.
The devise may be sensitive to static
discharge, to avoid risks or damage to the unit,
do connect to patient before turn on.
Classic4 User's Manual 2.1
6
Intended Purpose
The Classic 4 stimulator is intended to be used by
professionals in the disciplines of Physiotherapy,
Acupuncture, Sports Medicine or related. The device
is used for electrical stimulation in a TENS /EMS
(transcutaneous nerve and muscle electrostimulation) or electro-acupuncture protocol, in
conjunction with usage of electrodes or acupuncture
needles.
There could be scope for its use by patients after
having been instructed by their practitioner / doctor,
who should be satisfied of the appropriateness of
this decision.
Classic4 User's Manual 2.1
7
Indications
Indications for EA
In general, EA can be used for any condition for which acupuncture
is indicated, especially when manual stimulation has not brought a
response or when stronger stimulation (reduction) is appropriate.
For example, it has been used to reduce pain, help repair nerve
damage, decrease inflammation, retard muscle atrophy, relax or
strengthen muscle in cases of paralysis, improve microcirculation
and tissue repair, and aid relaxation and drug withdrawal.
Indications for TENS
TENS is used for the symptomatic management of acute and
non-malignant chronic pain. It has also been used for cancer
pain in palliative care, and for nausea.
Classic4 User's Manual 2.1
8
Contra-Indications
Electro-Stimulation Therapy, TENS/EMS
or Electro-Acupuncture should not be used
by anyone with a cardiac pacemaker. It
should not be used in pregnancy or by
people with serious disease unless it is part
of an intended treatment protocol.
Classic4 User's Manual 2.1
9
Contraindications to EA and TENS
a brief checklist
•
•
•
•
•
Undiagnosed pain
Cancer
Epilepsy
Pregnancy
Patient fitted with a pacemaker or other implanted electronic
device
• All patients should be advised NOT to use TENS while driving
or operating hazardous equipment
Classic4 User's Manual 2.1
10
Where not to stimulate
•
•
•
•
•
•
•
Over the front of the neck or the carotid sinus (at the side of the neck)
So that current flows through the brain or heart
Where there are skin conditions such as eczema
Where there is abnormal skin (or muscle) sensation. In this case,
electrodes (or needles) should be positioned elsewhere to ensure
effective stimulation
At contraindicated acupuncture points.
When using the Classic 4 for EA, ensure that you do not apply
currents of more than 20 mA, and that you use the ‘B’ (biphasic) and
not the ‘M’ (monophasic) waveform. Never attempt to use a device
designed solely for TENS for EA.
Please refer to your prior training notes for details. If in doubt, do not
treat in these circumstances, and always liase with a patient’s medical
practitioner or consultant.
Classic4 User's Manual 2.1
11
Parameters to use
For low-frequency, ‘acupuncture like’ stimulation (ALS, 2-10 Hz), it is
generally thought that amplitude should be strong, but not painful. For highfrequency, ‘TENS-like’ stimulation (TLS, 80-175 Hz), stimulation should
be definitely feel able, but not uncomfortable.
There is some agreement in the literature that ALS is more appropriate for
chronic pain and flaccid paralysis, with TLS more often recommended for
acute pain and spasticity.
However, individuals vary in their response to electrical stimulation.
Sometimes it is a matter of trial and error to find which particular
combination of parameters is most effective for a particular patient.
Adjusting the pulse duration may improve results in some circumstances, as
may the use of ‘dense-disperse’ stimulation (alternating low and high
frequencies), or simultaneous application of different parameter
combinations at different locations. The Classic 4 gives much scope for
exploring such variation. For more details, see the references below.
Classic4 User's Manual 2.1
12
Where to position needles and
surface electrodes
EA: Points may be selected from local (ashi or trigger) and
distal points, huatuojiaji and auricular points, and also
from most of the points that you would normally use as an
acupuncturist for systemic or syndrome-based treatment.
TENS: Useful illustrations of electrode placements can be
found at www.harmonymedical.co.uk
• Note that TLS is more effective when used locally or in an
area segmentally related to where the condition is focused,
but that ALS may be effective when applied elsewhere as
well.
Classic4 User's Manual 2.1
13
Features (1)
• Versatile electro-therapy for treatment of a
wide spectrum of TCM patterns or physical
conditions.
• The facility to use different output
parameters within the same treatment
session.
• The ability to use concurrently as an electro
acupuncture stimulator and a TENS/EMS
unit.
Classic4 User's Manual 2.1
14
Features (2)
•
•
•
•
•
3 Output Modes (Single, Paired, Sync)
4 Output Channels
24 pre-set frequency settings
0.5 Hz – 200 Hz
20mA capped, can be raised to maximum of
60mA output current
• 28 pre-set programmes
• 8 user-defined programmes
Classic4 User's Manual 2.1
15
Unit Layout
1. On/Off switch
2. Output channel sockets
3. Communication port
4. Screen
5. Control keys
6. Adaptor socket
7. Battery compartment
Classic4 User's Manual 2.1
16
Screen Layout (1)
• The screen of Classic 4
is divided into a table
with 5 columns and 11
rows.
• Each entry in the 1st
column shows what
parameters are used for
that row in the other four
columns of the table
• The top row shows the
number of channel
Classic4 User's Manual 2.1
17
Screen Layout (2)
• Number of output
channel
• Electrical
parameters
• Low Battery
Indicator
• Working area
• Pop-up menu
Classic4 User's Manual 2.1
18
Control Keys (1)
Esc Key. Cancel action or selection, go back to previous
action.
Menu Key. Choose from a list of actions. The main Menu
includes Start/Stop options, selection of output Modes,
Load and Save programmes, and Reset.
OK key. To CONFIRM and accept selected / changed value.
Up Key. Press to move the cursor Up or Click to
INCREASE value inside and Active Cell.
(Note: keep this key pressed for rapid increase)
Down Key. Press to move the cursor Down or Click to
DECREASE value inside and Active Cell.
(Note: keep this key pressed for rapid increase)
Classic4 User's Manual 2.1
19
Control Keys (2)
Left Key. Move LEFT to previous channel from current
cursor position.
Right Key. Move RIGHT to next channel from current
cursor position.
FN Key. Function key can be used in combination with
other Control Keys for rapid action.
COM Key. Com key can be used in combination with
other Control Keys for external communication and
applications.
(Note. The function of this key is currently under
development and is not available to the user at this
version.)
Classic4 User's Manual 2.1
20
Channel and Cursor
Channel is
Active
Active in
High Current
Channel is
Faulty
When Channel Active sign is turned
ON, it indicates the channel is ready
for treatment use.
When an active channel is operated
beyond 20mA, the icon is changed
from hollow to a solid lighting symbol.
When Channel Faulty sign is turned
ON, the output amplitude of that
channel is automatically shut down.
Cursor Cell
The highlighted Cell is the current
position of your cursor.
Active Cell
An Active Cell is indicated with an
Up/Down arrow sign inside the cell.
You can change the value in the cell by
using the Up / Down Control Keys.
Classic4 User's Manual 2.1
21
Select Output Channel
• The output sockets are located at the top of your unit. When
the unit is turned on, the screen presents a table with 5
columns. The left column lists all available parameters. The
remaining 4 columns, with headings numbered 1 to 4,
correspond to output channel sockets 1 to 4.
• When the cursor is within the chosen Channel (column),
press the Menu Key to apply an option or to activate the
output channel with the Start command.
Classic4 User's Manual 2.1
22
Activated Channel
When the Start key is selected, the activated
channel(s) will be identified by a small lightning
icon next to the channel number(s) and the
treatment time count will start counting down.
Each channel is capped at 20mA for safety
operation in electroacupuncture. To operate a
channel beyond 20mA, press the FN key when
the intensity reaches 20mA, the lightning icon is
changed from hollow to solid.
Classic4 User's Manual 2.1
23
Faulty Channel
• When the X sign appears next to a channel
accompanied by a sound (bleep) this
indicates that there is an error on the
channel.
• The output of that channel is automatically
cut off.
• Read the “Trouble shooting” section of this
manual to rectify problem.
Classic4 User's Manual 2.1
24
The Main Menu
• When the Menu Key is
pressed, the Main Menu
appears if the cursor is on
a channel that is not
activated.
• The Main Menu presents
all the options for
operating your device.
• Use the Up/Down keys to
scroll to desire option,
press the OK key to
confirm.
Classic4 User's Manual 2.1
25
Single Mode
• Selecting this option allows
you to set any parameter for
any for a single channel
independently of those
chosen for the other three.
With the cursor on the
chosen channel, it can be
activated by selecting the
Start option.
• Note: no connecting bars
between the channel
numbers.
Classic4 User's Manual 2.1
26
Paired Mode
• Selecting this option will set the
parameters for channels 1 and 2
as a pair, and those for channels
3 and 4 as a second pair.
• In this mode, the parameters set
for either member of a pair of
channels will automatically be
copied to the other one (except
for the Timer duration, and
amplitude once the channels have
been started). The pulses from
the two paired channels will be
synchronised.
Classic4 User's Manual 2.1
27
Sync Mode
• Selecting this option will set
channels 1, 2, 3 and 4 to run in
synchrony.
• In this mode, the parameters set
for channel #1 will be
automatically be copied to the
other three (except for the Timer
duration, and amplitude once the
channels have been started). The
pulses from the four channels
will be synchronised.
• Sync Mode is the factory pre-set
default.
Classic4 User's Manual 2.1
28
Start
Start – to start the selected
channel after locating the
cursor on its column. The
activated channel(s) will
be identified by a small
lightning icon next to the
channel number(s) and the
treatment time count will
start counting down.
Classic4 User's Manual 2.1
29
Stop/Stop All Menu
• When the Menu Key is
pressed, and the cursor is on
a channel that is activated,
the Stop/Stop All menu
appears on-screen.
• Use the Up/Down keys to
scroll options, and press the
OK key to confirm.
Stop – to stop output to the
selected channel.
Stop All – to stop output to all
active channels
Classic4 User's Manual 2.1
30
Reset parameters
Reset Values - when this option is
highlighted and the OK key is pressed, the
parameters will be reset to the values
previous installed for the selected Channel.
Classic4 User's Manual 2.1
31
Parameters (1)
Output current amplitude in mA
Treatment duration timer
(0 – 90 minutes)
Repetition frequency of 1st set of
pulses
Width of 1st set of pulses in
microseconds
Burst duration for 1st set of pulses in
seconds
Classic4 User's Manual 2.1
32
Parameters (2)
Repetition frequency of 2nd set of
pulses
Width of 2nd set of pulses in
microseconds
Burst duration for 2nd set of pulses in
seconds
The types of change from 1st pulses to
2nd pulses. Ramped or Step.
Waveform: symmetrical biphasic or
monophasic
Classic4 User's Manual 2.1
33
Set the Parameters
The Classic 4 is a versatile and powerful stimulator. You
can set the frequency, pulse waveform, pulse duration, and
timing of each set of pulses and channel according to your
clinical needs. You can fine-tune and modify your settings
rapidly in various ways. The basic methods are:
• Load preset parameters
• Load saved parameters
• Set your own parameters
Classic4 User's Manual 2.1
34
Set your own parameters (1)
The parameters f1 (frequency #1), p1 (pulse width #1) and
t1 (duration of 'on' time #1) refer to an interval of duration t1
during which pulses are emitted at a repetition frequency f1 and
with a pulse width p1.
The parameters f2 (frequency #2), p2 (pulse width #1) and t2
(duration of 'on' time #2) refer to an interval of duration t2 during
which pulses are issued at a repetition frequency f2 and with a
pulse width p2.
At the end of time t1, the characteristics of the pulses (f1, p1, t1)
will change to those of the second set of pulses (f2, p2, t2).
Subsequently, at the end of this second interval (t2) the parameters
will revert to those of the first set for the duration of t1, and so on.
Classic4 User's Manual 2.1
35
Set your own parameters (2)
If t2 is set to zero, the pulses will run continuously with the
settings for the first set of pulses (f1, p1, t1).
To change any of these parameters, position the cursor on the
desired one, and then press the OK key. A small window will
open and the value inside the window can be changed up or down
by pressing the Up key or the Down key. A quick press will
change the value to the next one, whereas keeping the button
pressed will scan through the available values.
Classic4 User's Manual 2.1
36
List of Presets (1)
Presets Name
f1 Hz
p1 us
t1s
f2 Hz
p2 us
t2s
f1-f2
M/B
2 Hz C
2
256
3
2
256
0
Stepped
Bipolar
5 Hz C
5
256
3
5
256
0
Stepped
Bipolar
10 Hz C (Default)
10
128
3
10
128
0
Stepped
Bipolar
10 Hz Short pulse
10
64
3
10
64
0
Stepped
Bipolar
80 Hz C (Gate Control)
80
128
3
80
128
0
Stepped
Bipolar
100 Hz C
100
128
3
100
128
0
Stepped
Bipolar
150 Hz C
150
64
3
150
64
0
Stepped
Bipolar
0.5/1 Hz (Min setting)
0.5
64
3
1
64
3
Stepped
Bipolar
0.5/10 Hz (Unequal pulses)
10
192
5
0.5
256
3
Ramping
Bipolar
0.5/80 Hz Equal pulses
0.5
128
6
80
128
6
Stepped
Bipolar
2/15 Hz (Equal pulses)
15
192
3
2
192
3
Stepped
Bipolar
2/80 Hz (Equal pulses)
2
192
3
80
192
3
Stepped
Bipolar
2/80 Hz (Short pulse)
2
64
3
80
64
3
Ramping
Bipolar
100
128
3
2
192
3
Stepped
Bipolar
2/100 Hz (Unequal pulses)
Classic4 User's Manual 2.1
37
List of Presets (2)
Presets Name
60/80 Hz Stepped
f1 Hz
p1 us
t1s
f2 Hz
p2 us
t2s
f1-f2
M/B
60
64
10
80
64
10
Stepped
Bipolar
2 Hz (Pulse Modulated)
2
256
2
2
64
2
Stepped
Bipolar
80 Hz (Pulse modulated)
80
192
2
80
64
2
Stepped
Bipolar
20 Hz Burst
20
192
5
20
0
3
Ramping
Bipolar
100
128
3
100
0
3
Stepped
Bipolar
10
64
3
10
64
0
Ramping
Bipolar
200 Hz C (R)
200
64
2
200
64
0
Ramping
Bipolar
0.5/10 Hz (R)
0.5
256
3
10
192
5
Ramping
Bipolar
2/80 Hz (R)
80
64
3
2
192
3
Ramping
Bipolar
60/80 Hz (R)
60
64
10
80
64
10
Ramping
Bipolar
80 Hz (Pulse Ramp)
80
192
3
80
64
3
Ramping
Bipolar
50 Hz Burst (R)
50
128
4
50
0
6
Stepped
Bipolar
80 Hz Long Burst (R)
80
64
6
80
0
2
Ramping
Bipolar
200 Hz short burst (R)
200
64
2
200
0
1
Ramping
Bipolar
100 Hz (Burst)
10 Hz short pulse (R)
Classic4 User's Manual 2.1
38
Load Presets
1. Select the channel(s), press the
Menu key, move the Up/Down
keys to select Preset.
2. This option will lead to a new
screen opens, as shown to the left.
Use the Up/Down keys to scroll
through the list of presets. The
preset parameters are shown in the
right column. Press the OK key on
the desired set.
3. This will load the relevant
parameters and copy them over into
your selected channel(s) in the left
column.
Classic4 User's Manual 2.1
39
Load Your Favourite
1. Select the channel where you
want your favourite to be loaded.
2. Press the Menu key, move the
Up/Down keys to select Load.
A new window opens, as shown
in the left.
3. Use Up/Down keys to flick
through your saved favourite as
in User P1 to P8, click OK key
to confirm.
4. The left column shows values of
your existing channel, the right
column shows the stored values.
Classic4 User's Manual 2.1
40
Save Your Favourite
1. This option will lead to a
second screen as shown on
the left. Eight User slots are
available.
2. Use the Up/Down keys to
select which slot you want to
save your parameters.
Existing parameters in the
slot will be over-written with
your new values.
3. The values saved are taken
from the single chosen
channel only.
Classic4 User's Manual 2.1
41
Starting the Treatment
Preparation
•
•
•
•
•
•
Prepare your patient for treatment
– keep your patient calm and relaxed.
Switch ON the Classic 4 stimulator. Check that
the screen lights up showing all channels and the
low battery indicator is not on.
Switch OFF the Classic 4.
Insert output cables in channel sockets.
Connect output cable(s) to your patient.
Turn ON the Classic 4 again. The unit is ready to
use.
Classic4 User's Manual 2.1
42
Instruction for use with
acupuncture needles
1.
2.
3.
4.
5.
6.
7.
Determine the Output mode for your unit.
Populate parameters for each channel you want to use.
Set the treatment timer for each output channel.
Connect output wires to needles/electrodes.
Move cursor to highlight the channel you want to begin, press Menu
key, use Up/Down keys to highlight Start option, press the OK key.
The channel is now active.
An Active cell opens. Use the Up/Down keys to increase the intensity
as appropriate, pressing the OK key to lock the current intensity.
Repeat steps 5 to 6 for the other channels you wish to use. The
treatment timer counts down automatically once the channel is set to
Start, and turns the channel off at this point when it reaches zero. An
audio sound is also emitted.
Classic4 User's Manual 2.1
43
Making adjustments during treatment
1)
2)
3)
•
To adjust the current intensity, go to that channel, press the OK
key so that the cell is Active, use the Up/Down keys to make
your adjustment, and confirm with OK key again.
To increase/decrease duration of the treatment session, move the
cursor to where the channel and treatment timer (row) meet, press
the OK key so that the cell is Active, use the Up/Down keys to
increase/decrease the timer setting, and press the OK key again to
confirm.
Each channel is capped at 20mA for safety in electroacupuncture,
to increase beyond 20mA, press the FN key, and use the Up key
to increase, and confirm with OK key again.
For safety and the patient's comfort, in both Sync and Paired
Output modes only the output current intensity and treatment
timer are adjustable during a treatment session without resetting
the channel. In the more advanced Single Output mode, you can
make adjustments to all parameters. However, there will be a
timed delay before these changes take place.
Classic4 User's Manual 2.1
44
Stop and Resume a Treatment
• To stop or pause a channel or pair of channels,
move your cursor to the channel you wish to pause
or stop, press the Menu key to open the Stop submenu, select Stop to stop the highlight channel, or
Stop All channels. This sets the current of selected
channel gently to zero, and the treatment timer is
set to pause. .
• To resume treatment, press the Menu key, select
Start and adjust the output current again.
Classic4 User's Manual 2.1
45
Treatment Completed
• When a treatment session is completed,
turn off the power.
• Disconnect cables from acupuncture
needles or electrodes. Then remove plugs
from output sockets.
Classic4 User's Manual 2.1
46
After Treatment
• Replace battery if the Low Battery sign
appears during a treatment session.
• Remove the battery from the battery
compartment if the unit is not required for
more than a few days.
• Remove the AC/DC adaptor if an external
adaptor has been used.
Classic4 User's Manual 2.1
47
Storage and Transportation
• Store unit in a dry location free from dust
and contamination, where the temperature
remains constant and within the range of
16ºC to 40ºC (61ºF to 104ºF), humidity
between 15% and 95%.
• Do not drop or mishandle. During
transportation, always secure the unit in its
original case or in a protective container.
Classic4 User's Manual 2.1
48
Care and Maintenance
• Maintenance of the stimulator is limited to periodically
wiping clean the unit using a clean, soft, damp cloth with
mild soap solution or water. Using other cleaning solutions
may damage the unit.
• DO NOT IMMERSE STIMULATOR IN ANY
CLEANING SOLUTION.
• The output leads should be wiped clean with a cloth
dampened with mild soap solution and then wiped dry.
• The unit can be used life-long, unless it develops a
malfunction. It does not have a limited shelf life or a
restricted ‘use by’ date. To have your unit serviced or
repaired contact an authorized dealer.
Classic4 User's Manual 2.1
49
Trouble shooting (1)
• If an X sign flashes in the display on a channel,
accompanied by an audio sound (beep), the
channel is automatically shut down. This may
indicate that the channel has been short-circuited,
or a cable is disconnected or broken.
• If the X sign appears, please investigate the
cause(s) of the problem before the channel is reactivated.
Classic4 User's Manual 2.1
50
Trouble shooting (2)
• When your unit does not respond to any action
with your key pads and your screen freezes, turn
off the unit by switching off the power. Remove
all cables from your unit before turning it on
again. Check that the unit operates correctly
before re-connecting the cables. Start your
treatment again.
Classic4 User's Manual 2.1
51
Trouble shooting (3)
• Check and replace battery if the screen does
not turn on after the unit is switched on.
• If the problem still cannot be resolved, the
unit should be returned for repair. Do not
attempt to repair the unit yourself, but return
it to your local authorized dealer, or contact
the manufacturer for repair or service.
Classic4 User's Manual 2.1
52
Technical Specifications
Frequencies: in Hz.
0.5, 1, 1.5, 2, 2.5, 3, 5, 7, 8, 10
15, 18, 20, 25, 30, 40, 50, 60, 80
100, 125, 150, 175, 200
Pulse duration: 0, 64, 128, 192, 256μs
Timer (t1 / t2): in second:
0, 1, 2, 3, 5, 10, 30, 60, 120, 240,
600, 900
Waveform:
Biphasic symmetrical alternating
rectangular pulses (charge
balanced),
Monophasic rectangular pulses
Output modes:
Constant, Modulated, Burst,
Ramped and User-defined
programmes
Size:
145x88x20mm
Power: 1x9V battery/external
adaptor
Weight: 260 grams
(including battery)
Output channels: 4 channels
Timer:
5-90 minutes
Classic4 User's Manual 2.1
53
Low Battery Indicator
The low battery indicator will begin to flash when
the battery becomes low. You may continue to use
the unit for your current treatment session and
replace the battery for your next session. When the
low battery indicator flashes with ONE bar
showing, please do not start your treatment
session, but replace with a new battery
immediately.
Classic4 User's Manual 2.1
54
Battery
Switch off the unit.
To change a battery, push open the battery compartment
at the back of the unit.
Remove the used battery from the battery compartment.
Insert a new battery according to the diagram. The
device is protected from damage if the battery is inserted
incorrectly, but the device may not function correctly.
Always check the polarity.
Classic4 User's Manual 2.1
55
AC/DC Adaptor
• Only use an AC/DC adaptor which is supplied or
approved by the manufacturer. The adoptor must
suitable for medical devices with the Maximum
output 10 VA.
• Switch off your Classic 4 and disconnect any
connected channel.
• Switch off the power supply of your AC/DC
adaptor before connecting the plug into Classic 4’s
AC/DC socket.
• Turn on the power supply first, before switching
on your Classic 4.
• An adaptor is only supplied as an optional item.
Classic4 User's Manual 2.1
56
Communication Port
• DONOT remove the protective cap from the
Communication Port.
• DO NOT connect to the Communication Port.
• In the current version of Classic 4, the
Communication Port is used by the manufacturer for
programming and diagnostic of the device, and is
not designed to be used by users.
• The communication port will become available for
users as add-on devices and applications are
developed.
Classic4 User's Manual 2.1
57
Standards
Classic 4 Stimulator - complies with:
93/42/EEC
EN60601-1:2008
EN60601-1-2: 2007
Classic4 User's Manual 2.1
58
Main Unit and Accessories
• Main treatment unit
• Connecting cable to electrode
1 pc Art No. MA304
4 pcs Art No. MB113
(in four colour - GBYB)
• Alligator clips to 2 pin jacks electrode cords
4 pcs Art No. MB160A
• User’s Manual (CD)
1 pc Art No. MA3042
• PP3 9 Volts battery
1 pc Art No. MB902
Classic4 User's Manual 2.1
59
Optional Accessories
• Carrying Case
Art No. MB1084
• AC/DC adaptor
Art No. MB1086
• Grip-type connector to 2mm pin Art No. MB120
Classic4 User's Manual 2.1
60
Explanation of Symbols
CE mark of conformity. The device confirms with the Essential
Requirements for Medical Devices Directive 93/42/EEC as supervised
by SGS United Kingdom Limited, Notified Body Number 0120
The manufacturer of the medical device
Attention! Consult accompanying documents.
TYPE BF APPLIED PART
The device is manufactured in the year shown next to the Symbol
Contains electronic parts subject to local / national disposal / recycle
requirements.
IP30
Specification for degrees of protection provided by enclosures (IP code)
according to EN 60529
Classic4 User's Manual 2.1
61
Warranty
This Classic 4 electrical stimulator is warranted to
the initial purchaser against any defects in material
and workmanship for a period of twelve months
from the date of purchase. If the stimulator is found
to be defective within the warranty period, it will be
repaired or replaced if returned prepaid to an
authorized dealer. This warranty does not cover
damage caused by rental, misuse, negligence,
accidents and abuse, or alteration or modification of
the unit. No liability is held in either tort or contract
for any loss or damage, direct, consequential, or
incidental arising out of the use, misuse or inability
to use this product.
Classic4 User's Manual 2.1
62
Declaration of Conformity
HMD Europe Limited declares that the medical device describes
as Classic 4 has been classified as Class IIa and is in conformity
with the essential requirements and provisions of Council
Directive 93/42/EEC and in conformity with the national
standard transposing harmonised standard EN60601-1:2008,
EN60601- 1-2:2007 and is subject to the procedures set out in
Annex V of Directive 93/42/EEC under the supervision of
Notified Body Number 0120, SGS United Kingdom Ltd
London, 6 October 2009.
P.Choy
Director
on behalf of HMD Europe Limited
Classic4 User's Manual 2.1
63
Manufacturer
H M D Europe Ltd
629 High Road Leytonstone
London E11 4PA, UK
Tel: +44 (0)20 8558 8205
http://www.hmd-europe.com
Classic4 User's Manual 2.1
64
Please record this information and keep this
User’s Manual in a safe place for future
reference
Serial No: _________________________
(located on the back of the device.)
Date Purchased: ____________________
Dealer Stamp:
Classic4 User's Manual 2.1
65
Resources
The following books provide further information:
•
•
•
Johnson MI (2008). Transcutaneous electrical nerve stimulation (TENS). In
Watson T (Ed.), Electrotherapy: Evidence-based practice (pp. 253-296).
Edinburgh: Churchill Livingstone
Mayor DF (Ed.). (2007). Electroacupuncture: A practical manual and
resource. Edinburgh: Churchill Livingstone.
For training in the use of EA or TENS, contact your own professional
organisation. If you are an acupuncture practitioner in the UK, the
Acupuncture Association of Chartered Physiotherapists (AACP) and British
Medical Acupuncture Society (BMAS) run courses on EA. For British
Acupuncture Council (BAcC) members or other qualified acupuncturists,
courses can be arranged with David Mayor.
Classic4 User's Manual 2.1
66
Useful websites:
www.electroacupunctureknowledge.com (for information on EA studies)
www.electrotherapy.org (for general information on TENS and electrotherapy)
www.tens4u.co.uk (for illustrations of electrode placement)
www.harmonymedical.co.uk (for supply of medical devices, accessories and
general reference)
www.aacp.uk.com (for the AACP)
www.acupuncture.org.uk (for the BAcC)
www.medical-acupuncture.co.uk (for the BMAS)
www.welwynacupuncture.co.uk (for David Mayor)
Classic4 User's Manual 2.1
67