1
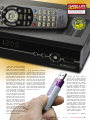
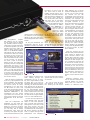
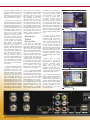
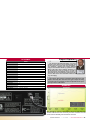
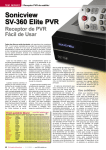
TEST REPORT Satellite PVR Sonicview SV-360 Elite PVR Easy To Use PVR Receiver PVR boxes are becoming more and more popular every day. And with the large variety of channels available via satellite and so much to choose from, it’s easy to see why. Your favorite program could be playing on the night you have to attend a wedding. Or maybe it’s that championship boxing match you simply don’t want to miss. Thanks to PVR boxes, any channel can be recorded for playback at a time convenient to you. Because of this increasing popularity, more and more manufacturers are producing PVR boxes than ever before. Sonicview has also joined this group with their new twintuner SV-360 Elite PVR satellite receiver. Naturally, we wanted to see what this box was made of so when the package arrived a few days ago from Sonicview we knew that we had the opportunity to do just that. USB 2.0 ports. These buttons let you completely operate the receiver should the remote control go missing. They are somewhat recessed into the front panel and because of their small size, someone with larger fingers might have some minor difficulties pushing the buttons sufficiently, especially the ring buttons. The USB port is protected from dust by a rubber flap that easily pops off to reveal the connection. When we opened the package we found a sleek-looking satellite receiver that was completely black in color except for a thin chromecolored stripe that ran horizontally through the center of the front panel. This stripe also wraps around two small buttons (on/off and menu) and a set of ring buttons (left/ right/up/down arrows and OK) on the front panel as well as one of the receiver’s three The rear panel is also very nicely equipped. Since it is a twin tuner box, you’ll find a pair of satellite IF inputs as well as a pair of loopedthrough IF outputs on the left side. Then, of course, there are the typical set of RCA jacks that provide video and stereo analog audio outputs. But for improved video quality, there’s an S-Video output and, better yet, another set of RCA jacks that give you component video TELE-satellite World www.TELE-satellite.com/... Download this report in other languages from the Internet: Arabic Indonesian Bulgarian Czech German English Spanish Farsi French Greek Croatian Italian Hungarian Mandarin Dutch Polish Portuguese Romanian Russian Swedish Turkish ﺍﻟﻌﺮﺑﻴﺔ Indonesia Български Česky Deutsch English Español ﻓﺎﺭﺳﻲ Français Ελληνικά Hrvatski Italiano Magyar 中文 Nederlands Polski Português Românesc Русский Svenska Türkçe www.TELE-satellite.com/TELE-satellite-0811/ara/sonicview.pdf www.TELE-satellite.com/TELE-satellite-0811/bid/sonicview.pdf www.TELE-satellite.com/TELE-satellite-0811/bul/sonicview.pdf www.TELE-satellite.com/TELE-satellite-0811/ces/sonicview.pdf www.TELE-satellite.com/TELE-satellite-0811/deu/sonicview.pdf www.TELE-satellite.com/TELE-satellite-0811/eng/sonicview.pdf www.TELE-satellite.com/TELE-satellite-0811/esp/sonicview.pdf www.TELE-satellite.com/TELE-satellite-0811/far/sonicview.pdf www.TELE-satellite.com/TELE-satellite-0811/fra/sonicview.pdf www.TELE-satellite.com/TELE-satellite-0811/hel/sonicview.pdf www.TELE-satellite.com/TELE-satellite-0811/hrv/sonicview.pdf www.TELE-satellite.com/TELE-satellite-0811/ita/sonicview.pdf www.TELE-satellite.com/TELE-satellite-0811/mag/sonicview.pdf www.TELE-satellite.com/TELE-satellite-0811/man/sonicview.pdf www.TELE-satellite.com/TELE-satellite-0811/ned/sonicview.pdf www.TELE-satellite.com/TELE-satellite-0811/pol/sonicview.pdf www.TELE-satellite.com/TELE-satellite-0811/por/sonicview.pdf www.TELE-satellite.com/TELE-satellite-0811/rom/sonicview.pdf www.TELE-satellite.com/TELE-satellite-0811/rus/sonicview.pdf www.TELE-satellite.com/TELE-satellite-0811/sve/sonicview.pdf www.TELE-satellite.com/TELE-satellite-0811/tur/sonicview.pdf Available online starting from 26 September 2008 46 TELE-satellite & Broadband — 10-11/2008 — www.TELE-satellite.com outputs (Y, Pb and Pr). To go along with that is an optical S-PDIF digital audio output for superb audio quality. Rounding it all out is an RS-232 serial interface, two USB 2.0 ports and a main power switch. The power cord is hardwired into the receiver and comes with a North American plug. The receiver’s power supply is rated at 95-250VAC, 50/60Hz and can therefore be used anywhere in the world; just make sure you have the right adapter plug and you’ll be good to go. A modulator output is not available and since this particular box is meant for the North American market, Scart connectors are also not provided. Unlike the receiver, the universal remote control is mostly silver in color except for a small black portion in the center. The remote sits nicely in your hand and, contrary to the buttons on the receiver, these buttons are not recessed and can easily be pushed by fingers of any size. The ring buttons and the buttons for the numerical keypad glow in the dark so that you can easily see them if you’re watching TV without any lights on! This feature could even help you find the remote in a completely dark room. The remote can also be used to control your other electronic equipment such as your TV, DVD player or VCR. All in all, it is a very versatile remote control. Everyday Use Now that we had a chance to look at this box from the outside, let’s see what it can do when we turn it on. The very first thing we noticed was the Sonicview logo on the left side of the front panel: when the receiver was plugged in (main power switch on), this logo was illuminated from behind. The soft blue color of the logo gives the receiver an elegant look to it. When the receiver is powered up for the first time, the SV-360 Elite PVR asks what on-screen language should be used. You can choose between English, French, German, Spanish, Italian, Russian Turkish, Dutch, Czech and Polish. Don’t take too long to make your choice – if you don’t select a language quick enough, the Sonicview automatically opts for the default language, in this case English. If this happens, it’s not a problem at all to go into the menu and change it to a more suitable language. 10-11/2008 SONICVIEW SV-360 ELITE PVR A family-friendly receiver and easiest to use with a multitude of features 0.54 With the correct language selected, the receiver goes right into channel reception mode. Since there are no channels as yet saved in memory, there was nothing to view. This simply means that we have to go and find the channels we want to watch. You can do this by pressing the Menu button on the remote to access the Main Menu in the receiver. The Main Menu is divided up into four categories (Installation, System Settings, PVR and Advanced Settings) and each of these is further divided up into additional sub-categories. All of these sub-categories can be seen to the right of the highlighted Main Menu category. Of course, the logical first step would be to go into the Installation menu so that you can tell the receiver what you have attached to it. With the Installation menu highlighted on the screen, a click of the OK button let’s you choose from one of the four sub-categories. In the Dish Setting screen, you can set up your receiver to match your antenna configuration. All of the antenna settings are on the left side of the Dish Setting screen. On the right side is a graphical display of the signal strength and quality levels with a green line representing the signal strength and a red line the signal quality. These two levels are also shown in numerical format. Underneath the graphical display is a bar graph representation of the signal strength and quality levels as well. Before you begin, make a mental note of which antenna input on the rear panel you will be using. If you’re using both inputs, make sure to remember which antenna input goes to what satellite antenna. Naturally the first step is to select the satellite or satellites that you want to receive and there is quite an extensive list to choose from: the SV-360 Elite PVR comes to you with a pre-programmed list of 195 (!) satellites. And you can even add five more! This list is fairly up-to-date although there are some satellites in the list that no longer exist or have recently changed names; a few of the newer satellites are also missing. Thankfully, the colored function buttons on the remote control make it easy to add, edit or delete satellites. The Sonicview is DiSEqC www.TELE-satellite.com — 10-11/2008 — TELE-satellite & Broadband 47 1.0/1.1/1.2/USALS compatible allowing you to connect its two tuner inputs to almost any possible antenna configuration from a single antenna to a motorized system. The most popular free-to-air (FTA) satellite in North America would have to be INTELSAT AMERICAS 5 at 97 west. So, naturally, we wanted to start our testing by setting up the receiver for this bird. Since the coax cable was connected to the IF-A input on the receiver, we selected the Tuner 1 input in the Dish Setting screen. The LNB type/ frequency was set to single and 10750 MHz. Of course, if the LNB you’re using utilizes a different local oscillator frequency (LOF), you will most likely find the correct LOF already stored in the list. If the LOF you need is not in the list, simply enter it using the numerical keypad on the remote control. Next we chose a transponder from the preprogrammed list for this satellite. The left/right arrow keys on the remote can be used to select an active transponder or you can press the OK button to view a list of all the transponders stored for the selected satellite. For INTELSAT AMERICAS 5, the transponder list was mostly up-to-date. As it turns out, the same can be said for he stored transponders of all the satellites. With the transponder list displayed, you can select the desired transponder by highlighting it and then pressing the OK button or, if necessary, you can add, edit or delete transponders right from this screen by once again using the colored function buttons on the remote control. Simply refer to the bottom of the on-screen display to find out what function is assigned to each colored button. As we just mentioned, the transponder data for all the satellites is mostly up-to-date. the task in a mere 4 min 38 sec. There was no need to fumble around looking for a stop watch; the total scan time was conveniently displayed on the screen. But a good portion of this time was used to scan from 12.2 to 12.9 GHz; the extra time spent scanning this segment was not necessary for INTELSAT AMERICAS 5 and there was no way to limit the frequency range during the Blind Scan set up. The ability to set up frequency limits would have saved a little scanning time. Naturally, we also wanted to check out the detailed Blind Scan. It turns out that the detailed Blind Scan completed its task in roughly the same Main Menu If you happen to find an error while looking through the transponder list for a satellite, it is a simple matter to edit the data. But if you can’t be bothered with doing that work manually, the Sonicview’s Blind Scan function will do the work of updating the transponder list for you automatically. Simply push the blue function button on the remote while in the Dish Setting screen to get started. You can select a single satellite scan or a multi-satellite scan. For this test we opted for a single satellite scan. We also chose to scan both polarizations (vertical and horizontal) although one or the other could have been chosen. We next selected the Fast scan instead of a Detailed scan. Pushing the OK button started the Blind Scan. It zipped through both polarizations and completed 48 TELE-satellite & Broadband — 10-11/2008 — www.TELE-satellite.com time as the fast scan and managed to find the same number of channels. So, now we have all these new channels in the channel list. Pushing the OK button User Settings while watching one of those channels will display the channel list. As you look through the channel list you will undoubtedly notice that some organization of the list will be necessary. For example, the list may include both FTA and encrypted channels. If you don’t care about the encrypted channels, the now-infamous colored function buttons on the remote control come into play once again. With the channel list displayed, a push of the red function button displays only the FTA channels. Push it again to display only the encrypted channels and then once again to bring back the original list. Sorting the channel list is also just as easy: with the channel list displayed, pushing the yellow function button displays the available sorting criteria (alphabetically, by channel number, by satellite or default). From the channel list you can also easily switch between tuner inputs by pushing the green function button. The SV-360 Elite PVR also comes with a multi-picture mode that displays the still images of 4, 9 or 16 different channels all on one screen so that you can get a quick overview of what is currently on TV. You can use the arrow keys to move around from one image to another and press the OK button when you find something interesting to watch. The receiver will then switch to that selected channel. Switching between channels on the same transponder required almost one second. Going from one channel to another on different trans- ponders needed roughly 1.5 seconds before the picture appeared. These times are something you can live with but it does take some of the fun out of channel surfing. Of course, there may also be channels that you’ll never watch or need to be renamed. In that case you simply go to the Channel Edit screen – the second sub-category of the Installation menu. Once in the Channel Edit screen, the video of the current channel can be seen in a small window on the right side of the screen with the channel list on the left side. Even the signal strength and quality bar graphs are included here. While in the Channel Edit screen, you can switch channels by scrolling to another channel and simply pressing the OK button on the remote. Once again, the colored function buttons on the remote control make it easy to delete, rename or lock out channels. You can even sort channels from this screen as well! Software version information and a factory reset function can also be accessed via the Installation menu. The System Setting screen is broken up into four subcategories and lets you set up the receiver to your personal tastes. For example, from the User Settings screen you can change the menu language, adjust the menu transparency, change how long the Info bar is displayed plus much more. From the A/V Settings screen you can switch between NTSC and PAL, change the aspect ratio (4:3 or 16:9) or select the display mode (letterbox, pan & scan or full screen). The Time Setting screen lets you adjust all of the clock settings. The time can be set manually or automatically, daylight savings time can be turned on or off, etc. And then of course there are those channels that you don’t want your kids to see. The Parental Control screen lets you block out any inappropriate programming. This screen also allows you to put restrictions on receiver access, menu access and encrypted channel access. Personal Video Recorder Yes, this is a PVR box, but if you’re the observant type, you might have noticed something: where’s the hard drive? You do need a hard drive to record programming, don’t you? Well, as it turns out, the SV-360 Elite PVR does not come with a builtin hard drive. Instead, you need to connect an external storage device. This could be an external hard drive but it could also be some other external storage device such as a memory stick. And that’s where the three USB 2.0 ports come into play. For our tests we decided to use a 4 GB memory stick we had lying around. The memory stick can be plugged in to any of the three USB ports. We used the front panel USB port for convenience. Recording a program is as simple as pressing the red Record button on the remote control. When the Record button is pushed, the receiver instantly starts 50 TELE-satellite & Broadband — 10-11/2008 — www.TELE-satellite.com recording the program on the current channel. Simply push the stop button to end the recording. If you want to record a second channel while the first is still recording, simply switch to the channel you want to record and repeat the process mentioned above. Both channels will be recorded at the same time. Pushing the stop button will give you the option to stop recording one of the channels or both channels. To see a list of all the recordings that have been stored thus far, go into the receiver’s PVR menu. You can use the arrow keys to scroll through the list and then push the Play button on the remote control to play back the desired selection. The remote comes with control buttons that let you pause the playback, rewind and fast forward at various speeds and play back in slow motion. There’s also an eightevent timer so you can set the receiver to record your favorite programs while you’re out of the house. There’s even a time shift function to save the day if someone comes knocking at your door while you’re watching that four-star movie. The receiver also comes with a number of other useful features such as picture-inpicture (PIP). It can also be used as an MP3 player and a JPEG viewer so you can show off all those pictures you recently snapped on your last vacation to your relatives and friends. Channel List Dish Setting PVR List PIP Channel List TECHNIC DATA Manufacturer Sonicview USA, Inc., San Diego California, USA Tel +1-760-842-8931 E-mail [email protected] Model SV-360 Elite PVR Function Digital Satellite PVR Receiver with two tuners Channel Memory 6000 Satellites 195 (plus 5 user-settable) Symbolrate 1-45 Ms/sec. SCPC Compatible yes USALS yes Audio/Video Outputs yes Component Outputs yes (Y, Pb, Pr) S-VHS Output yes S-PDIF Output yes USB 2.0 Interface yes, three Power Supply 95-250VAC, 50/60Hz + Expert Opinion The Sonicview SV-360 Elite PVR is one of the easiest to use receivers on the market today. All of the menus are for the most part self-explanatory although a detailed user manual (English only) is also included should any questions arise. Many of the more critical software functions can Ron Roessel be accessed from only one location; no need to TELE-satellite Test Center hunt through all the different menu screens to USA find what you need. It is definitely a family-friendly receiver that comes with a multitude of features that would make any user happy. - The receiver does not have a modulator output but since most modern TVs today have more than one type of input, this really isn’t that much of a problem. It is also not possible to set up frequency limits for a Blind Scan. ENERGY DIAGRAM Apparent Power Active Power Mode StandBy Operation PVR Apparent 24.5 W 26.8 W 27.5 W Active 16.5 W 14.7 W 15.3 W Factor 0.67 0.54 0.55 After Stand-By the receiver is switched on at 10:18. The slight spike from 14.7W to 15.3W occured when the memory stick was inserted. At 11:05 the receiver went into Stand-By, with the harddrive still active. www.TELE-satellite.com — 10-11/2008 — TELE-satellite & Broadband 51