1
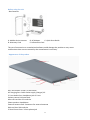
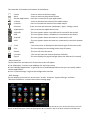
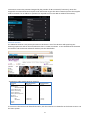
UBISLATE 7Ci
USER MANUAL
1
Contents
Before using the unit
- Box Contents
- Appearance of the product
technical specifications
Quick Start Guide
- Recharge the battery
- Powering
- Power saving mode and screen lock
- Close the device
- Setting the frame orientation
- Use the touch screen
- Use SD cards
Status Bar and icons
- Menu shortcuts
- WiFi Settings
UbiSurfer browser
- Comparison Table Double Browser UbiSurfer
APK Installation
- Uninstalling applications APK
emails
Camera
File Manager
multimedia
- Music
- Super HD player
Setting the language
Setting the date and time
Phone function
Troubleshooting
Important Safety Information
Have your device safely
2
Before using the unit
- Box Contents
A: Mobile device Internet
D: Warranty Card
B: AC Adapter
C: Quick Start Guide
E: Information Card
The use of accessories or unauthorized software could damage the product or may cause
malfunctions that are not covered by the manufacturer's warranty.
- Appearance of the product
ON / OFF button: START / STOP button
AC charging Port: Cable socket supply (charger) AC
3.5 mm Audio Port: Headphone jack 3.5 mm
Volume control: Volume Knob
Micro SD card slot: SD card slot
Phone speaker: Headphone
External antenna Port: Connector for external antenna
SIM card slot: SIM card slot
3.5mm Phone Ports: 3.5mm phone jack
3
Micro USB port: USB Microphone socket
Phone microphone: Microphone
Audio speaker: Loudspeaker
Technical Specifications
LCD Display
7 "TFT LCD Capacitive Multi-touch 800 x 480 pixels
Operating System
Android 4.0.4
Processor
Cortex A8 1GHz
Memory
512MB RAM
Storage
4GB of RAM
Expandable storage up to 32GB via microSD
PC Interface
MicroUSB
Power
Rechargeable 3.7V Li-Polymer
Audio
External audio speakers, 3.5 mm output
Video
GPU video with HD video support
Camera
VGA front camera
Sensor
G-sensor orientation
Connectivity
WiFi 802.11 b / g / n
Software
Supports 30 languages, full Office Suite, 2 mobile browsers compatible
with social networking, games, educational content, etc..
Quick Start Guide
- Recharge the battery
Your device has a built-in battery. Before using the camera for the first time, charge it for a period
of 6 to 8 hours. Use only for this purpose Datawind adapter. If you use other unauthorized adapters,
this may damage your device and / or create an overload or cause an explosion.
When the battery is low, the battery level indicator will be thin. If the battery level reaches a critical
threshold, the unit will automatically turn off. Please recharge the battery to continue using.
Recharge the battery by inserting the charging adapter into the socket provided for this purpose
and plug in an AC outlet. When the charging process is completed, remove the plug from the outlet
and then plug the AC adapter from the camera.
It is best to load cutter device at room temperature. The battery will maintain a longer shelf life if it
is not left without load for a period of more than two weeks.
- Powering
Press and hold the " " button for 3 seconds to turn the unit on. It may take up to a minute and a
half to boot the system. Once the operation completed startup, you can access the Android desktop.
Drag the lock icon "" to the right to unlock the screen and begin using the device.
- Power saving mode and screen lock
To save battery power; you can put the display in standby mode by quickly pressing the "" button.
The screen will then lock mode. Repeat the procedure to reactivate the device.
Note: The camera remains functional as applications when the device is in power saving mode. Only
the screen is in standby mode.
- Close the device
4
Press and hold the "" button for 3 seconds. A menu is displayed to confirm that you want to turn off
the device.
Select the desired option by pressing the corresponding item on the screen or tap
Cancel to return to the previous mode.
Note: When the battery of the device is low, the device will send alerts continuously and
automatically stops when the battery is empty. If the device does not turn on, plug it into an outlet
first and check if the battery is empty. Then recharge the battery for at least one minute before
attempting to restart the device.
- Setting the frame orientation
The device contains a sensor that will automatically change the orientation of most screens as you
rotate the device. The sensor function works best when the device is perpendicular to the ground is
in the vertical position and not on the back.
The function of orientation sensor can be turned on or off in the settings menu:
Settings> Display> Auto-rotate screen. Check this box if you want to activate the sensor or uncheck
the box to disable it. (See image below)
- Use the touch screen
Your device has a capacitive touch screen functions as follows:
- Taper: To enable the function displayed (e.g. application icons, buttons, and headings relevant
menus, and letters / symbols touch screen keyboard), simply press the desired function of the
5
fingertip or using a stylus.
- Double tap / double click: Tap the screen twice on a webpage or other application screen to zoom
(the application must support the double-click/function zoom). In the browser, the fact of doubletap a section of the web page will allow you to zoom in on this section and adjust it to the width of
the screen.
- Drag and Drop: Drag an item on the screen to move its position, for example, the application icon
on the main screen). To drag an item, touch it with your finger or stylus and hold it for a moment.
Then, without lifting a finger or stylus, slide your finger / stylus to the desired location.
- Sweep: Sweep up or down to scroll the screen or menu. On some screens, you will also be able to
swipe left or right. To scan , touch the screen without lifting your finger / stylus , slide it on the
screen up , down, left or right ( if any) . Do not pause on the screen as this would effectively move
an item to another location.
- Press and hold: Some items on the screen can have a particular mode if you press and hold your
finger / stylus on them, for example, open another menu, or activate drag an item action. To
activate the function, press / hold an item, touch the item selected without finger / stylus until the
desired action occurs. Press and hold your finger on an item will allow you to move it once it will
appear in a larger size.
Note: It is important that you do not become dependent on the touch screen with a part of your
body or any other object at the start of your device. This could compromise the proper use thereof.
In addition, to avoid damaging the screen, do not use sharp or pointed objects. Never put the
screen of your device in contact with other appliances or water. To ensure optimal use, please
remove the protective film from the screen before the first use of your device.
- Use SD cards
MicroSD cards are data storage devices used to transfer files from one device to another. This unit
can receive different types of cards that can store up to 32GB of data. However, some models
MicroSD cards are not compatible with this device.
To insert the MicroSD card into the camera, simply push it into the slot for this purpose the memory
card. It can fit in one way or with the gold contacts facing up the side of the touch screen.
To remove the microSD card, you must first go into the system settings (by pressing the "" icon in
your shortcuts ), then tap "Storage”, scroll down to the bottom (right of screen) until you see
“Removing the SD card." Agree to remove the card and then press the card so that it comes out of
the slot and you can remove it.
Status Bar and icons
6
← Status Bar
The status bar is located on the bottom of the desktop.
: Home
- Press to return to the home page
: Back
- Press to return to the previous screen
: Recent Applications - Press for a recent list of open applications
: Volume
- Press to decrease the volume of the audio output
: Volume +
- Press to increase the volume of the audio output
: Shortcut
: Applications
-Press to access the shortcuts ( wallpaper / apps / settings ) menu
- Press to access the applications menu
: MicroSD
- This icon appears when a microSD card is inserted in the camera
:USB
- This icon appears when a USB device is connected to the device
: Android
- This icon appears when the camera is connected to a PC
: WiFi
- This icon appears when the camera is connected to a wireless network
(WiFi)
: Time
- The current time is displayed at the bottom right of the main screen
: Pile
- This icon displays the remaining power level of battery
: Search
- This icon will start the search
: Internet
: Signal
- This icon will start the Internet browser UbiSurfer
- This icon displays the signal strength (when the SIM card is inserted)
- Menu shortcuts
Tap the status bar and menu bar of the main screen will appear.
● Tap "Wallpaper" to select new wallpaper for the home screen.
● Press "Manage Applications" to go to the list of installed applications that you can modify, add or
remove applications.
● Press "System Settings" to go to the configuration interface
- WiFi Settings
On the desktop, press the icon on the main "screen" and press "System Settings" and then
"Wireless & networks" to enter the wireless settings page.
Touch and drag the cursor to the end of the Wi-Fi bar to activate the Wi-Fi or the inverse function to turn off.
Access to Wi-Fi settings to select the appropriate Wi-Fi network in the list of Wi-Fi networks and follow the
7
instructions to enter the password assigned by the provider of Wi-Fi network (if necessary). Enter the
assigned if the selected network requires such information to get their Wi-Fi network (Contact the supplier
of Wi-Fi network if an IP address or password is required to access the WiFi IP address information).
UbiSurfer browser
The UbiSurfer browser is the primary browser on this device. Use of this browser will speed up your
browsing experience and can be used wherever there is a WiFi connection. To see the differences between
the browser and the browser UbiSurfer Android, see the table below.
- Comparison Table Double Browser UbiSurfer
Features
UbiSurfer Browser
Email
Web Surfing
Web Acceleration
Instant Messenger
Social Networking
Online Banking
News/Weather/Sports
Graphics
Attachments
PDF
MS-Office
Audio
Video
√ (Online)
√
√
√
√
√
√
√
Android Browser
√ (Local)
√
√ (Online)
√ (Online)
√ (Local)
√ (Local)
√
√
√
√
√
√
√
To connect to the Internet via UbiSurfer browser, click the Internet icon UbiSurfer on the home screen or via
the menu system.
8
To connect to the Internet via UbiSurfer browser, click the Internet icon UbiSurfer on the home page or via
the menu system. To enter a URL, simply click on the address bar and type in the address and press ENTER.
For example, to direct you to the web page of Google UK, type www.google.co.uk and click GO. The
homepage of Google UK page will appear as shown above. Note that the www is entered by default so if you
want to visit www.facebook.com, you simply have to type Facebook and click GO.
Sometimes you need a few windows open at the same time. The number of open windows is shown in a box
at the top of the screen. If the number is greater than 1, you can close the window by clicking surplus MENU
/ STOP.
To add the address of a web site to your favorite bookmarks, click the favorites at the top right of the screen
right next to the address bar button. Then click Add and give it a name. This menu systems , you can also
organize your favorite bookmarks, access your account (My account) where you can add more time browsing
or roaming time , but you can access My settings where you can , among other things, adjust the level of
image resolution.
Other features found in the menu system
- Exit: Exit: To close a program
- Back: Back: To return to the last web page you were
- Forward: Forward: To go to the next website
- Stop: Stop: To stop loading a web page and close all (pop-ups) pop
- Home: Home: To return to the home page of the browser UbiSurfer
- More: More: To switch from one window to another to show your browsing history and access to system
settings.
Note: If your session is inactive for several minutes, the browser will give you a warning 60 seconds before
interrupting your session. Reduce the size of the window does not mean to close. To exit the page, you must
click EXIT.
APK Installation
This device supports a third-party application program files (. APK). There are hundreds of thousands of
applications (programs) that can be downloaded from the Internet. Some are free and some cost money.
Download the APK file from the Internet and copy it to the device directly or store it inside a MicroSD card
before inserting it into the machine. Use the File Manager application in the folder of the SD card (where you
saved it) and press the. Follow the instructions to install any application compatible with the device.
- Uninstalling applications APK
In the application menu, tap "Settings" and select "Applications" from the list. Tap "Manage Applications"
and you can see a list of installed applications (including applications factory default).
Tap the application you want to uninstall and follow the instructions to uninstall applications.
UbiMail ( Emails )
The advantage of using UbiMail is that this function can be used wherever your mobile phone works and
may allow you to access your email and view schedules and attachments without using a WiFi connection
parts. Note that this is an e-mail system on the web and even if you can see all files and attachments
(attachments), they are downloaded as an image. This service has been designed to offer convenience and
the ability to receive email wherever you are.
This application can be used with most email addresses IMAP/POP3. However, some addresses may require
you to enter more information when registering. Once the implementation is complete, the creation,
monitoring / transfer, editing and sending emails are simplified by using the on-screen menu or menu
systems (Press and hold HOME, while pressing MENU).
9
Camera
This unit has a built-in camera 0.3 Megapixel front for the photo or video.
In the application menu, tap the camera icon
to enter the interface of the camera. Select either the
video or photo mode by tapping on the icon of your choice.
In camera mode, press
to take a picture. In video mode, press
to start recording and
Press
to stop recording. You can leave the camera interface by pressing the back button to return to
the menu of the application.
File Manager
In the application menu, press "File Manager" to enter the list of files on your device, including the file you
just saved or saved with voice recorder or photos or videos from the camera.
Note: You can also open, rename, move, install, delete and email all files stored on the MicroSD card or USB
device or category in the File Manager.
10
Multimedia
There are multimedia applications preinstalled on the device such as:
- Music
Go to the application menu, tap "MUSIC" to enter the interface of music playback. Only music files
that are stored inside the device will be displayed in the file list. You can sort the list of music files:
RECENT, albums, artists, playlists, songs or genres by selecting the appropriate option.
Press the song for 1 second and the menu of options appears. You can select, play, and add to the playlist
(playlist), an artist search, delete, or search.
11
Press "Play" to enter the playback interface and start playing music or you can also type the name
of the song directly. On the interface of playback, you can press the function bar to adjust the
playing time, forward, backward, play, pause, shuffle, and repeat playback.
- Super HD player
Go to the application menu, tap "Super-HD Player" to access the interface super-HD player. Available files
will be displayed.
Tap the video icon; it will display a list of video files into a small icon. Tap the file you want to display to start
playback. You can adjust volume, play / pause, forward, backward, or go back to the submenu for setting
options by pressing the appropriate icon in the function bar.
Function bar
Tap on the camera, it displays a list of recorded video and image files into a small icon. Tap the file you want
to display to start. For viewing photos, the function bar offers options such as enlarge the photo, reduce the
photo slideshow, share, delete, crop, rotate left, rotate right, etc...
12
Setting the language
In the application menu, tap "Settings" and select "Language & input" from the list. Tap "Language" and you
can see a list of supported languages. Tap the language you want and your choice will be recorded. In the
same area, you can also set the keyboard language you want to use when you need an input language on the
screen.
Setting the date and time
In the application menu, tap "Settings" and select "Date and Time" list. Select "Automatic" and the date and
time will be set automatically using the values provided by the network or uncheck "Auto" to adjust the date
and time manually. You can also set the time zone, set in a 24-hour format and / or adjust the date format by
pressing the options provided for this purpose.
Phone
In the application menu, tap "Settings” and select” About phone” to check the status of the device such as
firmware version, the status of the battery consumption, the model number and the version of the Android
operating system.
Troubleshooting
The UbiSlate7Ci is a device with a capacitive touchscreen. It requires a simple connection between your
finger and the screen so that the contact is saved. You can also use a stylus. Do not use sharp objects that
could scratch the surface of the device.
● If you find that the software on the UbiSlate7Ci does not meet all orders, will not turn off or if a hardware
component is not working properly, you may need to do a device reset. This can be accomplished (after
turning off the device) by inserting a pin into the reset button on the underside of the UbiSlate7Ci and
pressing the stem until you hear a click.
● If your device does not turn on, try the following:
- Press the power button until you feel a slight click and hold for 2-3 seconds. Do not force the knob beyond
the click, because you might damage it.
- Connect the charger for at least 20 minutes and try again.
- Perform a hard reset of the device (using a pin in the reset hole)
● If the process of switching does not work, reset the unit and try again.
● When the charge level of the battery is very low, the WiFi module may stop working before the camera. To
continue using the WiFi module, the device must be connected to a charger. If the WiFi has stopped
responding, you may need to connect the device to a power cycle and keep well connected for a period of
one hour.
● If there is no sound from the speakers , check the volume level is not set to 0 and check if the audio file
you are listening to has not been damaged during use on another device . Please try playing other audio files.
● If you are having problems copying files, check if your connection to the PC is properly configured, if the
USB cable is properly connected, or if there is enough memory available on the disc.
● If the unit must be reset, press and hold the ON / OFF button for at least 5 seconds.
13
For problems that can be solved by reading this manual, do not hesitate to contact our team of customer
service.
Important Safety Information
- Please be sure to follow the standards and instructions for use UbiSlate7Ci. Always close the device when
required by you (hospital, airplane, service station).
- All safety rules governing the use of mobile phones will be the same for your tablet UbiSlate7Ci. We
recommend that you follow these safety rules when using your device.
- Keep the unit away from strong magnetic fields to avoid damaging the product.
- Avoid placing UbiSlate7Ci or an accessory on any unstable surface. It may fall and cause injury or serious
damage to the UbiSlate7Ci device or its accessories.
- Avoid using the UbiSlate7Ci or accessories near water, e.g. near a bathtub or a sink or in the pool. Do not
spill liquid of any kind on the UbiSlate7Ci or accessories.
- Never clean the appliance with chemicals or detergents that could cause permanent damage to the device
surface.
- It is recommended not to use the headphones continuously at a high volume. Volume levels should be
adjusted to a suitable level to avoid permanent hearing damage.
- Do not turn off the power abruptly for updates or software when downloading. This could result in data
loss and / or system errors.
- The surge, the pressure exerted on the power cord, bending or compression of the cable by heavy objects is
not recommended to prevent overheating or fire hazard.
- To eliminate the risk of electric shock, do not connect the power cord cable with wet hands.
- Some movies, music and photos are protected under copyright. Unauthorized use is considered a breach of
the laws on copyright (copyright).
- The performance of the receiving wireless device may be affected by equipment and wireless networks.
- Do not use the unit in service stations, where there is fuel and / or chemicals nearby.
- Do not dispose of battery or device in a fire or a heater. (Microwave ovens, stove, and radiator) The battery
may explode if overheated.
- Do not crush or puncture the battery or expose it to high external pressure.
- Please comply with all restrictions and related rules. Do not use the device where blasting is in progress.
- Only qualified personnel may install or repair.
- Please use the accessories and original battery. Do not use incompatible accessories with the device.
- For reasons of data security, please back up all important information on the device or keep a written
record.
- When connecting other devices, please read the user manual for instructions safety. Do not connect the
device to non-compatible devices.
- The UbiSlate7Ci and its enhancements may contain small parts. For safety reasons, please keep out of reach
of children.
- Do not place credit cards or other magnetic storage media near the device, because information stored on
them may be erased.
- Some parts of the appliance can be magnetic in nature. Metallic materials may be attracted to the device.
As a precaution, people with a hearing aid or implant should not hold the device near the implant (< 15cm)
- This product contains components which, when broken glass can be introduced under the skin can crack or
shatter. Please dispose of safely.
Have your device safely
The UbiSlate7Ci should not be disposed of with household waste. Please check local laws regarding the
disposal of electronic products in your area.
14