1
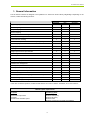
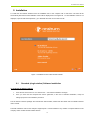
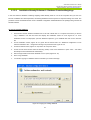
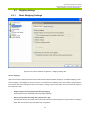
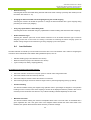
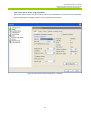
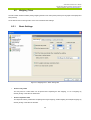
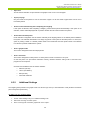
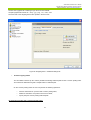
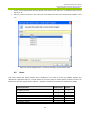
GS TRUCK Software User’s Manual
GS TRUCK User’s Manual
•
Copyrights to this Manual are reserved for the Producer – GS Software Grzegorz Stolarski of Krakow (31-868),
os. 2 Pułku Lotniczego 9/51.
•
GS Software shall not be liable for any print errors and imperfections found in this Manual. In addition, GS
Software disclaims any responsibility for any damage caused by using the GSW software in accordance with or
in violation of instructions contained in this User’s Manual.
•
The contents of this Manual are protected by Polish law (Copyright and Neighbouring Rights Act (Journal of
Laws No. 24, item 83)). Therefore, the Manual shall be treated as any other subject of copyright. The Buyer
does not hold the right to distribute, lend, sell or transfer the Manual in any other way without a written consent
of the Producer.
3rd Version 2009
The author of the Manual used his best endeavours to ensure that its entire body corresponds correctly to the provided
software.
Nevertheless, the author does not guarantee that it is free of errors.
GS Software Grzegorz Stolarski
Os. 2 Pułku Lotniczego 9/51
31-868, Kraków
http://www.gs-software.pl
e-mail: [email protected]
Copyright: GS Software Grzegorz Stolarski
All rights reserved.
2
GS TRUCK User’s Manual
Table of Contents
1.
General Information...............................................................................................................................................5
2.
Installation .............................................................................................................................................................6
2.1
Standard (single-station) Software Installation ......................................................................................................6
3.
Running the Software............................................................................................................................................8
4.
Quick Start ............................................................................................................................................................9
4.1
Weighing ...............................................................................................................................................................9
4.1.1
Single Weighing.........................................................................................................................................10
4.1.2
Double Weighing .......................................................................................................................................11
4.1.3
Multiple Weighing ......................................................................................................................................11
4.1.4
Service weighing........................................................................................................................................12
4.1.5
Taring / Saving Vehicle (Carriage) Tares...................................................................................................12
4.2
Entering New Information to the System .............................................................................................................14
4.3
Weighing Options ................................................................................................................................................14
4.3.1
Information Tables .....................................................................................................................................14
4.3.2
Information Fields ......................................................................................................................................14
4.3.3
Released / Accepted Product ....................................................................................................................15
4.3.4
Scale Selection ..........................................................................................................................................15
4.3.5
Weighing Ticket Printing ............................................................................................................................15
4.3.6
Pollution Handling......................................................................................................................................16
4.3.7
Vehicle Overload Handling ........................................................................................................................18
4.3.8
Messages and Warnings Displayed on the Weighing Screen ...................................................................19
5.
Database.............................................................................................................................................................20
5.1
Tables: ................................................................................................................................................................20
5.1.1
Contractor Table ........................................................................................................................................20
5.1.2
Data Import to Contractor Tables...............................................................................................................20
5.1.3
Data Export from Contractor Tables ..........................................................................................................22
5.1.4
Products Table...........................................................................................................................................22
5.1.5
Additional Tables .......................................................................................................................................23
5.1.6
Transit........................................................................................................................................................23
5.1.7
List of Weighings .......................................................................................................................................23
5.1.8
Printing a Weighing Ticket .........................................................................................................................26
5.1.9
Tares .........................................................................................................................................................26
5.1.10
Proximity cards / Data Sets .......................................................................................................................27
5.1.11
Data Export................................................................................................................................................29
5.1.12
Report........................................................................................................................................................30
6.
Software Configuration........................................................................................................................................33
6.1
Database Server (Network Operation Configuration)..........................................................................................33
6.1.1
Database Server Installation......................................................................................................................34
6.1.2
Copying Database File to a Computer Working as a Server .....................................................................35
6.1.3
GS TRUCK Software Configuration for Network Operation.......................................................................38
6.2
Tables .................................................................................................................................................................40
6.3
Weighing Settings ...............................................................................................................................................41
6.3.1
Basic Weighing Settings ............................................................................................................................41
6.3.2
Additional Settings .....................................................................................................................................42
3
GS TRUCK User’s Manual
6.4
Load Indicator .....................................................................................................................................................43
6.5
Weighing Ticket...................................................................................................................................................45
6.5.1
Basic Settings ............................................................................................................................................45
6.5.2
Additional Settings .....................................................................................................................................46
6.6
Users...................................................................................................................................................................48
6.7
Proximity Card Reader ........................................................................................................................................49
6.8
License................................................................................................................................................................49
6.9
Weighing Export..................................................................................................................................................49
4
GS TRUCK User’s Manual
1. General Information
The GS TRUCK software is designed to be operated on a static truck and/or railway weighbridge. Depending on the
version, it offers the following functions:
Standard
Version
Eco
Automat
Single weighing
¥
¥
¥
Double weighing
¥
¥
¥
Multiple weighing
¥
¥
¥
Service weighing
¥
¥
¥
Proximity card reader handling
¥
¥
¥
Manual vehicle taring
¥
¥
¥
3 load indicators handling
¥
¥
¥
Simultaneous operation of truck and railway weighbridge
¥
¥
¥
List of weighings view
¥
¥
¥
Weighing search
¥
¥
¥
Report generator
¥
¥
¥
Weight report view and print software
¥
¥
¥
Memorizing vehicle tares
¥
¥
¥
Network operation
¥
¥
¥
Configurable database tables
¥
¥
¥
Ticket print in graphic and text mode
¥
¥
¥
Software user management
¥
¥
¥
Data export/import
¥
¥
¥
Data export after each weighing
¥
¥
¥
Memorizing maximum acceptable vehicle mass
¥
Pollution handling
¥
Associating non-standard weighing tickets to selected products
¥
Automatic weighing function
¥
External pixel display handling
¥
In the case of network operation, the GS TRUCK software can work in versions “Standard”, “Eco” and “Automat”.
Minimal system requirements
Computer
Operating system
Intel Pentium 4 processor
512 RAM
100 MB of free hard disc space
Windows 2000 (SP4)
Windows XP (SP2)
Windows Vista
Windows 7 (minimum one serial port installed)
5
GS TRUCK User’s Manual
2. Installation
To install the GS TRUCK software insert the installation disc to the computer CD or DVD drive. The disk will be
automatically launched and the Installation screen will be displayed as in the Figure No. 1. If the Installation screen is not
displayed, open the "Windows explorator", go to CD/DVD drive and run the “start.exe" file.
Figure 1. Installation screen of GS TRUCK software
2.1
Standard (single-station) Software Installation
To install the GS TRUCK software:
1.
Press the left mouse button on “GS TRUCK Eco” – the software installation will begin.
2.
Once you have read and accepted the license agreement, in the case of standard installation, accept all
settings proposed in the installation procedure.
The GS TRUCK software package also includes the GSR software, Adobe PDF file viewer and GS TRUCK software
user’s manual.
The GSR software is used to view and print weight reports. It can be installed on any number of computer stations in the
company under one GS TRUCK software license.
6
GS TRUCK User’s Manual
The “Network installation” on the Installation screen is for installing and configuring a database server. More information
on configuring network operation is included in Section 6 – “Software Configuration – Database Server”
7
GS TRUCK User’s Manual
3.
Running the Software
To run the software, press the truck icon in the Start menu: START → Programs → Rinstrum → GS Truck →
GS Truck.exe or double click on the same icon on the desktop (Figure No. 2).
Figure 2. GS TRUCK Software start icon
Once the program is launched, the Logging in window will be displayed (Figure No. 3). After entering the correct
password the GS TRUCK software is ready to operate.
Figure 3. Logging in window
Proper operation of the GS TRUCK software requires USB activation key. Failure to provide the USB key will disable the
software.
The software in demo version can be operated without the USB key for a period of time specified by the producer.
However, it must not be used for commercial purposes.
8
GS TRUCK User’s Manual
4. Quick Start
4.1
Weighing
The GSW software enables weighing vehicles and/or carriages in the following modes:
•
Single weighing (known vehicle / carriage tare);
•
Double weighing (in / out);
•
Multiple weighing;
•
Service weighing;
•
Taring.
To access the single or double weighing screen:
1.
Press “Weighing” in the main program window.
Figure 4. Truck weighbridge Weighing screen with active proximity card reader handling
9
GS TRUCK User’s Manual
Default software configuration provides for the general use of the weighbridge and assumes the existence of only two
tables: Contractor and Product. When there is a need for associating other information with a given weighing (e.g. Gas
tanker No. or Driver’s name), you can create additional tables and information fields in software configuration. For the
purposes of this Manual it is assumed that there are only Contractor and Product tables and that all the windows refer to
a truck weighbridge (in the case of a railway weighbridge windows will be analogical, except that the field
“REGISTRATION No.” will change to “CARRIAGE No.”).
4.1.1
Single Weighing
Single weighing is performed when the vehicle / carriage tare is known prior to performing the weighing. The operator
enters the vehicle / carriage tare in the Weighing screen or accepts the value proposed by the program. If the vehicle or
carriage was weighted or tarred before and its mass was saved in the tare database (see “Tares” Section), once the
registration no. or carriage no. is entered, the program will fill in the tare field itself. The list of vehicles / carriages for
which the tare is saved in the database can be quickly accessed and viewed. To do this, press the left mouse button on
the button indicated in the Figure No. 5 or press F10 key on the keyboard.
Figure 5. Access to the vehicle / carriage tare list
To perform single weighing:
1.
Enter the vehicle registration No. or carriage No. and press ENTER;
2.
Enter vehicle / carriage tare or accept the tare automatically proposed by the program and press ENTER;
3.
Select a Contractor from the list or add a new one (F1 key) and press ENTER;
4.
Select a Product from the list or add a new one (F2 key) and press ENTER;
5.
Press the DO WEIGHING button;
6.
Once the reading is stabilized press ENTER.
NOTE:
If the database contains a number of similar entries which are used on a regular basis, you can make the search of a
certain entry more efficient by using the Code field. E.g. a company named “Coca Cola" can be associated with the code
CC – entering this code in the text field and pressing ENTER will cause the Name field to be filled in with the name of the
Contractor.
10
GS TRUCK User’s Manual
4.1.2
Double Weighing
Double weighing is taking place when the vehicle or a carriage is weighed twice (e.g. on entering and departing from the
premises). The difference in mass is the net mass. Once the second weighing has been completed, the program
proposes the lower of the two readings to be set as the tare of a vehicle / carriage with a given registration No., which
can be saved in the database (see “Tares” Section) to be used in future as the tare value in single weighing.
To perform weighing No. 1:
1.
Enter the vehicle registration No. of carriage No. and press ENTER;
2.
In the “Tare” field enter 0 kg and press ENTER;
3.
Select a Contractor from the list or add a new one (F1 key) and press ENTER;
4.
Select a Product from the list or add a new one (F2 key) and press ENTER;
5.
Press “DO WEIGHING”;
6.
Once the reading is stabilized press ENTER.
To perform weighing No. 2:
1.
In the “Registration No.” or “Carriage No.” field select a vehicle / carriage; press ENTER; all information will be
filled in automatically;
2.
Press “DO WEIGHING”;
3.
Once the reading is stabilized press ENTER.
4.1.3
Multiple Weighing
1
Multiple weighing is taking place when the vehicle or carriage is collecting or delivering several products at the same
time. In such an event, after each loading or unloading of a given product the vehicle must be weighted. Once the
multiple weighing is completed, a ticket containing the full list of all relevant weighings can be printed.
Operation of Multiple Weighing:
After completing a single or a double weighing the following question is displayed on the Weighing screen (in the case of
a truck weighbridge): “Is this the final weighing for vehicle: XXXXXXXX ?”. Answering “No” will commence multiple
weighing. The differences of subsequent weighings are saved as net mass of an accepted or released product.
1
Multiple weighing is available under appropriate software configuration
11
GS TRUCK User’s Manual
To perform multiple weighing:
1.
Open the measurement window – press “WEIGHING”;
2.
Perform a single weighing or a double weighing;
3.
Answer “No” to the question: “Is this the final weighing for vehicle / carriage: xxxxxxxx ?”; (At that point the
multiple weighing is commenced); points 4 through 8 refer do a subsequent weighing;
4.
Select the vehicle No. or carriage No. and press ENTER;
5.
Select the weighted product and press ENTER;
6.
Press “DO WEIGHING”;
7.
Once the reading is stabilized press ENTER;
8.
Repeat steps 3 through 7 until the last weighing;
9.
After the last weighing, a weighing ticket is printed, which contains a summary of the weighing with all the
component weighings.
4.1.4
Service weighing
Apart from the basic measurement functions the GSW software enables weighing in a simplified weighing mode –
2
service weighing. The Service weighing screen is opened with the use of a relevant button located on the main program
window. The weighing is a service which is not recorded in the database and is used chiefly to weigh vehicles. The
readout value is the total (gross) mass of the vehicle / carriage, which means that it does not indicate the weight of the
transported cargo.
To perform service weighing:
1.
Open the measurement window (press “SERVICE WEIGHING);
2.
Enter the vehicle registration No.; Press ENTER;
3.
Press “DO WEIGHING”;
4.
Once the reading is stabilized press ENTER.
4.1.5
Taring / Saving Vehicle (Carriage) Tares
The GS TRUCK software enables saving vehicle / carriage tares. Under the default software configuration the tare can
be saved only during double weighing, i.e. after completing double weighing the program will ask whether to save the
lower value of the two mass readings as the vehicle / carriage tare. Answering “Yes” will associate the lower value of the
two mass readings in double weighing to the registration No. or carriage No. and save it in the database along with the
date.
The second method to save a tare in the database is the so called “Manual Taring”. This method of taring consists in
saving the current mass reading as the tare of a vehicle / carriage with a given number.
2
The “Service weighing" button is available only under appropriate software configuration
12
GS TRUCK User’s Manual
To perform taring:
1.
Open the Taring window from the main program window (press “TARING”);
2.
Enter the vehicle registration No. or carriage No.; Press ENTER;
3.
Press “PERFORM THE TARE”;
4.
Once the reading is stabilized press ENTER;
5.
The GS TRUCK software does not allow for manual input of mass value to the tare table.
The Manual taring window is presented in the Figure No. 6. The program operator has the option to enter the vehicle
registration No. (carriage No.) manually or to select the number from the vehicle / carriage list.
Figure 6. Manual vehicles / carriages taring window
Figure 7. List of tares saved in the database window
13
GS TRUCK User’s Manual
4.2
Entering New Information to the System
All information concerning contractors, products, etc. is stored in database tables. If during weighing there is no suitable
entry in the database, the operator should create one. Default program configuration assumes the existence of two
tables: “Contractor” and “Product”. Figure No. 8 presents a window for entering a new contractor. The only required piece
of information on the contractor is its name.
Figure 8. Window for entering information on a new contractor
Entering information to other tables is similar. You do not have to fill in the Code field, but when there are several similar
entries in the database thanks to the Code you can search for them more effectively. The Code is used when information
is entered prior to performing a weighing. To open the widow for entering new information press function key F1, F2, F3
or F4.
4.3
Weighing Options
4.3.1 Information Tables
Display of additional information on the Weighing screen is determined by the program configuration. The software
administrator can activate one to three fields, where additional information can be entered (e.g. Gas tanker No., Driver’s
name). Once added, such information is stored in the database (similarly to the Product name) so that it can be retrieved
and used during future weighings. Entering such information is mandatory – if any piece of information is missing, the
weighing will not be possible.
4.3.2 Information Fields
14
GS TRUCK User’s Manual
In the program configuration, the software administrator can activate a maximum of three fields on the Weighing screen,
where the operator enters information which is not saved in the database for future use in other weighings (i.e. it is only
used in current weighing). Entering such information is not mandatory to perform the weighing. The entered information
is saved on the List of weighings and is printed on the weighing ticket.
Figure 9. Weighing screen – types of information
4.3.3 Released / Accepted Product
Under the default program configuration, apart from the information described above, before performing the weighing the
user should select whether the product is released (sale) or accepted (purchase). The procedure does not affect the
weighing itself, but is material for the process of generating reports which specify the amount of accepted and released
cargo. In case an error occurs, the entry can be changed (see List of weighings – Editing a weighing). However, it has to
be born in mind that each change is recorded and ascribed to the currently logged in operator.
4.3.4 Scale Selection
The GSW software is designed to cooperate with three weighbridges at the same time and to simultaneously handle
truck and carriage weighbridge. Switching weighbridges takes place through selecting a desired option button (1 to 3) in
the bottom right corner of the Weighing screen.
4.3.5 Weighing Ticket Printing
Dependant on the software configuration there are three modes of weighing ticket printing available:
•
automatic;
15
GS TRUCK User’s Manual
•
with confirmation;
•
printing on demand.
In the Automatic mode the ticket is printed automatically after each weighing. If the mode of printing with confirmation is
enabled, after each weighing the following question is displayed: “Print ticket?” Answering “Yes” will cause the ticket to
be printed. The number of copies of the printed ticket is dependent on the software configuration.
The Printing on demand function is useful in the case where there is a need to print a non-standard number of ticket
copies for a given weighing or if there is a need to print the last ticket.
To repeat the printing of the last printed ticket:
1.
On the Weighing screen press the left mouse button on the printer icon;
2.
If you want to print the last ticket, press “Print”; If you want to print a different weighing ticket, enter its number
and press “Print”;
3.
Press “Close”.
Figure 10. Print weighing ticket window
4.3.6 Pollution Handling
The GS TRUCK software (in Eco version) enables Pollution handling of the weighed product. If the option is activated,
before performing the weighing a window will be displayed as in the Figure No. 12 and dependant on the configuration
the operator will be able to enter the pollution percentage or a value in kilograms which will be deducted from the net
mass.
16
GS TRUCK User’s Manual
Figure 11. Entering the value of pollution window
Figure 12. Software configuration – activating Pollution handling for Scale 1
17
GS TRUCK User’s Manual
4.3.7 Vehicle Overload Handling
The GS TRUCK software (in Eco version) enables alerting the operator about the vehicle overloading (this function is not
active for railway weighbridge). If the option is activated, before performing the weighing of the vehicle for which the
maximum mass is not yet entered in the database a window as in the Figure No. 13 will be displayed. At this point the
operator can enter the value of mass which will be associated with a given registration No. If during weighing the current
gross mass reading is higher than the mass saved in the database, the computer monitor screen will display a warning
as in the Figure No. 14.
Figure 13. Entering the maximum weight of the vehicle window
Figure 14. Overload warning window
The maximum vehicle mass can be changed in the Tares table.
18
GS TRUCK User’s Manual
4.3.8 Messages and Warnings Displayed on the Weighing Screen
Messages and Warnings which can be displayed on the Weighing screen:
•
No connection with load indicator
In such an event the operator should:
– check for load indicator connection,
– check cable connection between the load indicator and the computer,
– check the software configuration whether the proper indicator model and correct COM port number is
selected.
•
Mass value beyond the scale range
This situation can occur when the current mass on the scale has a value that is beyond the scale range, i.e. is
lower than the minimum or higher than the maximum value of mass acceptable on a given scale.
•
No minimum mass of 400 kg
This situation can occur when the gross mass of the weighed vehicle does not exceed the value defined in the
software configuration (default value of 400 kg).
19
GS TRUCK User’s Manual
5. Database
The GSW software database is divided into tables. The user can view and modify the information contained in the tables.
To access a relevant table use the menu on the main program window.
5.1
Tables:
•
Contractors
•
Products
•
3 additional tables for customized use
•
3 additional information fields for customized use
•
Transit (list of vehicles / carriages for which the first weighing was performed)
•
List of Weighings
•
Tares
•
Proximity cards / Data Sets
To facilitate browsing through long lists containing numerous entries the command buttons were introduced which
appear in every information table window.
•
first
– selects the first entry from the list,
•
prior
– selects the previous entry,
•
next
– selects the next entry,
•
last
– selects the last entry from the list,
•
refresh
– reloads the entire table (useful command during network operation)
•
search
– the search enables queries for information to be searched in all table fields
5.1.1
Contractor Table
This table contains contact details of contractors. Entries in the table can be edited, which means you can add a new
detail, change the contents of an existing detail or delete a selected detail (unless a given contractor has already had a
weighing associated). Adding new information or changing the existing information can be done in a window opened by
pressing “Add” or “Edit”. The only required piece of information during adding a new contractor is its name. The name
does not need to be unique within the table.
Search can be performed by Contractor’s name. To do that, enter the desired text in the Search field. The program will
search all fields in the Contractor table in the database and will return matching entries.
5.1.2
Date Import to Contractor Tables
The GSW software enables data import. To perform a data import the information should be prepared in a csv format file,
i.e. a file containing columns of information separated with a comma or a semicolon. Fields which consist of more than
one word and contain a comma or a semicolon must be put in quotation marks. A standard csv format file can most
easily be prepared in Microsoft Excel program.
20
GS TRUCK User’s Manual
There are two modes of data import available:
1. The imported file contains a Code column
In this mode the imported file must contain information in all fields from Contractor tables or commas / semicolons if a
given field has no value (see the last row in an exemplary import file). The field values must be ordered as follows:
CODE, NAME, ADDRESS, POSTAL CODE, PLACE, TAX IDENTIFICATION NUMBER (NIP). The CODE field cannot
exceed 25 characters and the remaining fields cannot exceed 50 characters. If the field values contain more than the
specified number of characters, the information will be cut to 25 and 50 characters respectively.
Exemplary import file prepared in a correct manner:
ABCD,FHU ABCD,ul. Przykładowa 1,"31-876, Kraków",945-12-12-123
WAGA,P.P.U.H. WAGA,ul. Piłsudskiego 23,"32-050, Skawina",
XYZ,XYZ Sp. Z o.o.,ul. Polna 3,"31-987, Warszawa",987-09-09-098
,Company name,,,
2. The imported file does not contain a Code column
This mode is similar to the one described above, however, the imported file does not contain any information in the
CODE column.
Exemplary import file prepared in a correct manner:
FHU ABCD,ul. Przykładowa 1,"31-876, Kraków",945-12-12-123
P.P.U.H. WAGA,ul. Piłsudskiego 23,"32-050, Skawina",
XYZ Sp. Z o.o.,ul. Polna 3,"31-987, Warszawa",987-09-09-098
Company name,,,
To perform data import to a Contractor table:
1.
In the Contractor table window select “Import” (Ctrl+I);
2.
In the dialog box find the file with data to be imported and press “Open”;
3.
In the Import options window select appropriate options for the prepared file (Figure No. 10) and press “Ok”;
4.
After a successful import the program will display an import summary.
21
GS TRUCK User’s Manual
Figure 15. Import options window
5.1.3
Data Export from Contractor Tables
The Data export is described in Section 5.1.11.
5.1.4
Products Table
The table contains a list of products weighed on the scale. Adding, deleting, modification and search for information is
performed similarly to the same operations in the case of Contractor table. The Product table contains only two columns:
Code and Value. To add a new entry only filling in the Value field is required. The Data import is performed similarly to
the operation in the case of Contractor table with the only difference in the information in the file to be imported.
Exemplary import file containing the CODE column prepared in a correct manner:
MW,MIAŁ WĘGLOWY
PK2,PASEK KAT. 2
PS,PIASEK
WE,WĘGIEL
Exemplary import file prepared in a correct manner, which does not contain the CODE column:
MIAŁ WĘGLOWY
PASEK KAT. 2
PIASEK
WĘGIEL
22
GS TRUCK User’s Manual
5.1.5
Additional Tables
The GS TRUCK software allows for activating up to three additional tables which are structurally identical to the Products
table (i.e. containing Code and Value fields). These tables can be named according to preferences (e.g. Gas tanker No.,
Driver’s name), which allows for customizing the Weighing screen to meet the requirements of individual clients.
Management of data takes place identically as in the case of Products table.
Figure 16. Products table window
5.1.6
Transit
Transit is a table which contains a list of vehicles and / or carriages for which the first weighing has been performed (in
the case of a truck weighbridge these are the vehicles which have already entered the premises), i.e. a list of all
commenced but not completed double weighings (in / out). The transit list cannot be added with any new entries –
entries are created automatically after completing the first weighing. Entries in the transit table can be edited (see List of
weighings – Editing a weighing) or deleted similarly to the weighings in the List of weighings. After selecting an entry and
pressing the Print button, an entry ticket will be printed which will indicate the gross mass of weighing No. 1.
5.1.7
List of Weighings
Each completed weighing is saved in the database under a unique entry number and associated with the operator who is
currently logged in. The List of weighings window is presented in the Figure No. 17. Entries marked with blue colour
indicate single weighings (known vehicle tare at the stage of weighing) whereas black colour indicates double weighing
(in / out). By default the List of weighings window is opened showing all weighings performed during last week.
23
GS TRUCK User’s Manual
The program enables the user to:
•
modify information associated with a given weighing,
•
delete a weighing (reserved for users with administrator’s rights),
•
print a weighing ticket,
•
search a weighing by date, weighing number and contractor’s name,
•
export the list of weighings.
Figure List of weighings window
5.1.7.1
Editing a Weighing
Information associated with a weighing can be edited (with the exception of the weight value, operator’s name and date
of weighing). Each change is recorded in the database and ascribed to the operator who is currently logged in. In the
case of edited weighings, in the top left corner of the List of weighings window there appears a red field with the
message: “Weighing Edited".
To edit a weighing:
1.
On the List of weighings select a line to be edited;
2.
Press “Edit” (Ctrl + E); a Weighing edition window will be displayed as in the Figure No. 18;
3.
Introduce the intended changes and press “Save changes”.
24
GS TRUCK User’s Manual
Figure 18 Weighing edition window
5.1.7.2
Deleting a Weighing
An operator with the GSW software administrator’s rights can delete weighings from the List of weighings. A deleted
weighing is not physically erased from the database but is no longer visible in the list. The operation of deleting a
weighing is ascribed to an operator who is currently logged in.
5.1.7.3
Searching a Weighing
The Search option was designed to enable quick search for a weighing or a group of weighings, e.g. ascribed to a given
Contractor in a specified period of time. Entries can be sorted by the following criteria:
Ticket No. – with the option of sorting by Ticket No. selected, sorting by other criteria at the same time is not possible. In
the event of finding a match, the cursor will move to the relevant row.
The following criteria may be applied in any combination:
period of time when the searched weighing was performed,
Contractor’s name,
type of weighing – single and/or in / out.
25
GS TRUCK User’s Manual
Entries which match the sorting criteria are displayed on the List of weighings below the search box. Once the search
criteria are set, press Search weighing.
5.1.8
Printing a Weighing Ticket
In the main GS TRUCK program window in the “Edit / Print a Weighing Ticket” menu there is a function of quick printing
of a weighing ticket. The quick print window enables printing of the last printed ticket, last performed weighing or a ticket
with a given weighing number. The Print weighing ticket window for quick printing is presented in the Figure No. 10 in
Section 4.3.5.
5.1.9
Tares
The Tares table has two main functions:
•
it is where vehicle or / and carriage tares are saved,
•
it is where maximum acceptable vehicle mass is saved (vehicle overload handling – GS TRUCK in Eco
version).
After each completed double weighing (in / out) or multiple weighing the following question is displayed: “Do you want to
save the XXX weight in the database as the YYY vehicle tare?”. In the case of double weighing the proposed weight
value is the lower of the two weight readings, whereas in the case of multiple weighing it is the lowest value of all the
weight readings. The saved tare can be used in future in a single weighing.
It is not possible for the operator to manually add a tare value for a given vehicle / carriage, however, he or she can
delete it. If a single weighing was performed with the use of a tare retrieved from the database, the weighing ticket will
show information on the date of taring. Otherwise the ticket will show the following message: “Tare entered by the
operator”. If the function of vehicle overload control is activated, the maximum vehicle mass defined by the operator can
be changed in the Tare table with the use of Edit function – Figure No. 20.
Figure 20. Editing the maximum vehicle mass in the Tare table
26
GS TRUCK User’s Manual
Figure 21. Tare of vehicles / carriages table window
5.1.10
Proximity cards / Data Sets
The GS TRUCK software enables proximity card reader handling along with creating data sets. “Data set” is a function
which enables associating all data required for performing a weighing to a given registration No. A data set can be
associated with a proximity card. In the default software configuration a data set should consist of: a vehicle registration
No., contractor’s number, product and type of transaction.
If the reader handling is activated, on the bottom of the weighing window there will appear a screen for proximity card
handling (see Figure No. 4). Entries in the proximity cards table can be deleted and exported exclusively by an operator
with GS TRUCK software administrator’s rights. The software can handle up to 4 proximity card readers.
Procedure of reader handling:
If a proximity card is placed against a reader e.g. No. 1 and there is no data saved in the database for a given
proximity card number:
1.
the proximity card number will be displayed on the weighing screen; press F6 key to open a window for
ascribing the data (Figure No. 22);
2.
Fill in the fields and press “Ok”;
3.
A new entry will be created in the proximity cards table and fields in the Weighing screen will be filled in.
If a proximity card is placed against a reader e.g. No. 1 and the database already contains an entry ascribed to a
given proximity card number:
1.
after pressing F6 key, fields in the weighing screen will be filled in.
Under the default software configuration the only required information to be entered during adding a new entry to the
proximity cards table is the vehicle registration No. (apart from the proximity card number).
27
GS TRUCK User’s Manual
Figure 22. Editing of data associated with a given vehicle window
If the data set servicing is activated while the proximity card readers handling is not activated, after each completed
single or double weighing a question will be displayed as in the Figure No. 22.1.
Figure 22.1 Window with the question whether to save a data set
After answering “Yes” to the question, a given registration No. will be associated with all the data from the currently
performed weighing.
28
GS TRUCK User’s Manual
To load a data set ascribed to a given registration No.:
1.
Enter the vehicle / carriage registration No. on the Weighing screen; press ENTER – the cursor will move to the
Tare field;
2.
Press ENTER again – a question will be displayed on the screen as in the Figure No. 23;
3.
If there exists a data set ascribed to a given registration No., the data will appear on the weighing screen.
5.1.11
Data Export
The GSW software enables data export. The data export can be performed from all windows of each table to files with
the following formats: xls, csv, txt, html. The data export function is available only to an operator with GSW software
administrator’s rights. An exemplary data export will be presented as performed for the Contractors table.
To perform a data export for a Contractor table:
1.
From the drop-down menu of the main program window select Edit / Tables / CONTRACTOR;
2.
In the Contractors table window select “Export” – a data export wizard will open as in the Figure No. 23;
3.
Select columns which you want to export (all columns selected by default) and press “Next”;
4.
Select the export file format and press “Next”;
5.
Press “Export”; If there is a large amount of data, the export may take a few minutes depending on your
hardware performance.
6.
After a successful export the following message will be displayed: "Data export completed";
7.
Press “Finish”.
Figure 23. Data export – step 1
29
GS TRUCK User’s Manual
5.1.12
Report
The Report command from the Edit menu on the main program window opens a report wizard, where the user can define
the contents of the report in three steps. There are two main types of GS TRUCK software reports: summary report and
detailed report. A detailed report consists of a list of weighings meeting the selected criteria whereas a summary report
includes only the net sum of a released or accepted product for specified criteria for creating the report.
To create a standard report:
1.
Select “Report” command from the Edit menu on the main program window;
2.
Select one of the following options: “All contractors”, “Single contractor” or “Registration No. / Carriage No.”; If
the “Single contractor” option is selected, press “Select Contractor” to choose a contractor from the table;
3.
Specify the period of time in which weighings will be searched; Press “Next” to go to step 2;
4.
If the report is to be created only for a single product, select the PRODUCT table, press “Select” and choose a
intended product from the list;
5.
Select any additional information to be seen in the report;
6.
Select the type of transaction: “Release” or / and “Acceptance”;
7.
Depending on the report type, select the results sort order;
8.
Press “Show report”.
Each report can be saved or exported to pdf, xls or rtf file formats. The GS TRUCK software package includes the GSR
software for viewing and printing weighing reports.
Example:
Data for preparing a report:
Contractor
GS Software
Period of time
from January 1 , 2008 to December 7 , 2008
Product
Sand
Any additional information to be seen in the report
Driver’s name
st
30
th
GS TRUCK User’s Manual
Figure 24.
Report creator – step 1
Figure 25.
Report creator – step 2
31
GS TRUCK User’s Manual
Figure 26. Report creator – step 3
32
GS TRUCK User’s Manual
6. Software Configuration
The software configuration is available only to operators with administrator profiles. After installing the software the
default administrator’s password is: Admin.
6.1
Database Server (Network Operation Configuration)
The local database server is a default setting of GS TRUCK software connection to database – after installing the
software, for its proper operation the database does not need any changes in configuration settings. Local database
server enables using the database by only one user at a time. A remote database server is to be configured only when
the GS TRUCK software is to be operated in the network mode. The GS TRUCK software is designed to operate in
network with any number of stations.
In the case of network operation the computer working as a database server may, but does not need to have the GS
TRUCK software installed. The computer is required to have a permanent IP address.
The procedure of linking GS TRUCK software installed on a number of stations into a network consists of three
stages:
1.
Database server installation,
2.
Copying the existing database file (or creating a new database) to the computer working as a database server,
3.
Configuration of GS TRUCK software installed on a number of stations to be operated in network.
The installation version of the database server can be found on the installation disc of the GS TRUCK software.
Figure 27. GS TRUCK software Installation screen – starting the installation of a database server
33
GSW WAGA Software User’s Manual
Copyright 2007-2009 GS Software Grzegorz Stolarski
www.gs-software.pl, email: [email protected]
6.1.1
Database Server Installation
To install a database server:
1.
Insert the GS TRUCK software installation disc to the CD or DVD drive on the computer working as a database
server. The disk will start and display the Installation screen as in the Figure No. 27. If the Installation screen is
not displayed, open the "Windows explorator", go to CD/DVD drive and run the “start.exe" file.
2.
On the Installation screen (Figure No. 27) press the left mouse button on: “Database server” on the “Network
installation” tab – the serve installation will begin.
!!! Important !!!
While installing a database server on Windows 2000 and Windows XP all settings proposed in the
installation windows should be accepted. In the case of Windows Vista or Windows 7 the “Install applet
on the control screen” option must be UNSELECTED – Figure No. 28.
Figure 28. Database server installation window – additional options
34
GSW WAGA Software User’s Manual
Copyright 2007-2009 GS Software Grzegorz Stolarski
www.gs-software.pl, email: [email protected]
Figure 29. Database server installation window informing of a successful serve installation
After successful installation of a database server a window should be displayed as in the Figure No. 29. At that stage,
you only need to copy the database file to the computer working as a server and configure GS TRUCK software installed
on a number of stations to be operated in the network mode.
6.1.2
Copying Database File to a Computer Working as a Server
6.1.2.1
New Installation – database does not contain any data
To create a new empty database:
1.
Insert the GS TRUCK software installation disc to the CD or DVD drive on the computer working as a database
server. The disk will launch and display the Installation screen as in the Figure No. 27. If the Installation screen
is not displayed, open the "Windows explorator", go to CD/DVD drive and run the “start.exe" file.
2.
On the Installation screen (Figure No. 27) press the left mouse button on: “Database configuration” on the
“Network installation” tab – configuration will begin as presented in the Figure No. 30.
3.
On the first wizard screen (Figure No. 30) select “Yes” and press “Next”.
4.
On the second wizard screen select the directory (folder) where the new empty database is to be created
(Figure No. 31). For the purposes of this Manual it is “C:\Database”.
5.
Press “Create new database”.
6.
Successful creation of a new database will be confirmed by a relevant message.
35
GSW WAGA Software User’s Manual
Copyright 2007-2009 GS Software Grzegorz Stolarski
www.gs-software.pl, email: [email protected]
Figure 30. Network operation database configuration wizard window
Figure 31. Creating a new empty database
36
GSW WAGA Software User’s Manual
Copyright 2007-2009 GS Software Grzegorz Stolarski
www.gs-software.pl, email: [email protected]
6.1.2.2
Installation Already Performed – Database Contains Weighings
In the case where a database containing weighing entries already exists on one of the computers and you want it to
become a database for network operation, the existing database must be copied to a computer working as a server. The
procedure can be automated with the use of a database configuration wizard delivered in the package along with the GS
TRUCK software.
To copy an existing database:
1.
Insert the GS TRUCK software installation disc to the CD or DVD drive on a computer from which you want to
copy a database. The disk will launch and display the Installation screen as in the Figure No. 27. If the
Installation screen is not displayed, open the "Windows explorator", go to CD/DVD drive and run the “start.exe"
file.
2.
On the Installation screen (Figure No. 27) press the left mouse button on: “Database configuration” on the
“Network installation” tab – configuration will begin as presented in the Figure No. 30.
3.
4.
On the first wizard screen (Figure No. 30) select “No” and press “Next”.
On the second wizard screen select the directory (folder) of the source database or press “Find” – the wizard
will attempt to find a database file automatically.
5.
Select a target folder to which the database is to be copied (Figure No. 32).
6.
Press “Copy database”.
7.
Successful copying of a database will be confirmed by a relevant message.
Figure 32. Copying an existing database
37
GSW WAGA Software User’s Manual
Copyright 2007-2009 GS Software Grzegorz Stolarski
www.gs-software.pl, email: [email protected]
IMPORTANT !!!
During copying a database file all programs using this database must be closed. Otherwise, attempting to copy the
database file may permanently damage it.
After a successful copying of a database file, a GSW.fdb file should be created in the target folder. This file
should be transferred to a computer working as a database server to an intended directory (for the purposes of
this Manual it is “C:\Database”).
6.1.3
GS TRUCK Software Configuration for Network Operation
The last necessary procedure to be performed prior to commencing correct network operation is the GS TRUCK
software configuration for cooperation with a remote database server.
For the purposes of this Manual it can be assumed that the IP address of a computer working as a database server is
“192.168.1.10” and that the database file is located on a server in the “C:\Database” directory.
To connect the GS TRUCK software to a remote database:
1.
Go to GS TRUCK software configuration (menu Tools\Software configuration) – Figure No. 33.
2.
On the “Database server” tab select the “Remote database server” option.
3.
Enter the IP address of the server: 192.168.1.10
4.
Enter a full path to database file: “C:\Database\GSW.fdb”.
5.
Perform a connection test.
If the test connection has been established, close and launch the program again. After launching, the program will
operate in the network mode.
38
GSW WAGA Software User’s Manual
Copyright 2007-2009 GS Software Grzegorz Stolarski
www.gs-software.pl, email: [email protected]
Figure 33. Example of connection to a remote database server configuration
IMPORTANT !!!
If there is a FireWall installed on the computer working as a database server, it is possible that the connection with a
database will not be established. In such an event, port 3050 must be opened manually as this port is used by a
database server in the GS TRUCK software.
To open port 3050 manually in the Windows XP system:
1.
Go to Control panel and double click on the “Windows Firewall” icon;
2.
Go to the “Exceptions” tab and press “Add Port”. A window for adding a port will open; enter a name (e.g.
scale), Port number: 3050 and select the TCP protocol; press “Ok”;
3.
Press “Ok” in the “Windows Firewall” window;
4.
At this point the connection test to a remote database server should be performed successfully.
39
GSW WAGA Software User’s Manual
Copyright 2007-2009 GS Software Grzegorz Stolarski
www.gs-software.pl, email: [email protected]
6.2
Tables
This tab allows for activating additional data tables (from one to three) which will be seen on the Weighing screen and
maximum of three additional information fields. Under the default software configuration entering the additional
information is not required to perform a weighing (contrary to data tables). The CONTRACTOR and PRODUCT tables
are the main tables, therefore they can neither be unselected nor can their name be changed. After selecting any of the
selectable fields, enter the table or information name in the active box. Field names cannot exceed 20 characters. An
exemplary configuration is presented in the Figure No. 34.
Figure 34. Configuration of data tables and information fields
40
GSW WAGA Software User’s Manual
Copyright 2007-2009 GS Software Grzegorz Stolarski
www.gs-software.pl, email: [email protected]
6.3
6.3.1
Weighing Settings
Basic Weighing Settings
Figure 35. GS TRUCK software configuration – Weighing settings tab
Service weighing
Apart from the basic measurement functions the GS TRUCK software enables weighing in a simplified weighing mode –
service weighing. The weighing is a service which is not recorded in the database and is used chiefly to weigh vehicles.
The readout value is the total (gross) mass of the vehicle / carriage, which means that it does not indicate the weight of
the transported cargo.
•
Single weighing servicing (tare known during weighing)
Activating this function will enable performing single weighings.
•
Give a warning when the taring date is earlier than 1 day
Activating this function will enable warning the scale operator that the taring date of a given vehicle / carriage is
earlier than the number of days specified in the configuration.
41
GSW WAGA Software User’s Manual
Copyright 2007-2009 GS Software Grzegorz Stolarski
www.gs-software.pl, email: [email protected]
•
Double weighing
Activating this function will enable performing double weighings (in / out).
•
Multiple weighing
Activating this function will enable performing multiple weighings (for more information see Section 4.1.3).
•
Vehicle / carriage taring in a separate window
Activating this function will enable performing “Manual taring” (for more information see Section 4.1.5).
•
Recording weight present on scale
Activating the weight recording function (available only in GS TRUCK in Eco version) will enable all stable
weight readings, time of computer operation as well as time of communication and lack of communication
between a computer and a load indicator to be recorded to a database.
•
Automatic weighing
This function enables automatic vehicle weighing (available only in GS TRUCK in Automat version).
•
Standard weighing performed by the scale operator
Activating this function will enable performing standard weighings in the GS TRUCK software in Automat
version.
•
Memorizing tares after the second weighing
Activating this function will enable the program to propose memorizing a given vehicle / carriage tare after
completing a second (out) weighing or after completing a multiple weighing. In the case of a double weighing
the tare will be the lower value of the two weight readings whereas in the case of a multiple weighing the tare
will be the lowest value of all component weighings.
•
Automatic memorizing of tares (without showing a separate window)
Activating this function will enable the program to memorize a given vehicle / carriage tare automatically after
completing a second (out) weighing or after completing a multiple weighing.
6.3.2
•
Additional Settings
Name of computer station
Each performed weighing is added a name of the computer station on which the weighing was performed. This
piece of information is useful in the network operation of the GS TRUCK software. Based on the name of the
computer station it may be determined on which scale the weighing was performed. The default computer’s
name is the one set in the operating system.
42
GSW WAGA Software User’s Manual
Copyright 2007-2009 GS Software Grzegorz Stolarski
www.gs-software.pl, email: [email protected]
•
Data set servicing
Activating this function will enable saving data sets without the need of having a proximity card reader (for more
information see Section 5.1.10).
•
Changing the data associated with the weighing during the second weighing
Activating this function will enable the operator to change the data associated with a given weighing during
performing the second (out) weighing.
•
Using only capital letters in data editing fields
Activating this function will enable using only capital letters in fields for editing data associated with a weighing.
•
Default transaction type
Selecting the “Release” option will set the release transaction to be the default transaction type on both the
Weighing screen and on the screen for creating a new data set. Selecting the “Block changing” option will
disable making changes of the transaction type during weighing by the scale operator.
6.4
Load Indicator
The GSW software can handle up to three scales at the same time. The “Load indicator” tab is used for configuring the
connection with a load indicator and enables setting additional options, such as:
•
Pollution handling (only in GS TRUCK in Eco version)
•
Maximum load check (only in GS TRUCK in Eco version)
•
Type of scale (truck, railway, weighing platform)
To configure a connection with a load indicator:
1.
Select the “Indicator connected to computer” option to activate scale configuration fields.
2.
Select the indicator model from the drop-down list.
3.
Select the COM port number to which the indicator is connected.
4.
Select the weight range and set the minimum weight value for performing weighings (400 kg by default).
•
Pollution handling
This function enables entering the weighed cargo pollution value in percentages or kilograms. If the pollution
handling function is active, before each weighing a window will be displayed where the pollution value can be
entered (for more information see Section 4.3.6). Pollution handling is defined separately for each scale.
•
Maximum load check
This function enables entering the maximum acceptable vehicle mass. The mass value is associated with a
given registration No. and if the gross mass of the weighed vehicle exceeds the mass value saved in the
database, the operator will be informed about the fact by a relevant message.
43
GSW WAGA Software User’s Manual
Copyright 2007-2009 GS Software Grzegorz Stolarski
www.gs-software.pl, email: [email protected]
•
Type of scale (truck, railway, weighing platform)
This function allows to select the type of scale to which a given load indicator is connected. A truck weighbridge,
railway weighbridge and a weighing platform can be operated at the same time.
Figure 36. GS TRUCK software configuration – Scale tab
44
GSW WAGA Software User’s Manual
Copyright 2007-2009 GS Software Grzegorz Stolarski
www.gs-software.pl, email: [email protected]
6.5
Weighing Ticket
The GS TRUCK software enables printing weighing tickets in text mode (matrix printers) and in graphic mode (inkjet and
laser printers).
On the first tab seen in the Figure No. 37 the user can define basic settings.
6.5.1
Basic Settings
Figure 37. Weighing ticket – Basic settings tab
•
Print the entry ticket
The entry ticket is a ticket which can be printed after completing the first weighing, i.e. an in weighing. By
default, printing of this ticket is deactivated.
•
Print the departure ticket
The departure ticket is printed after completing each single weighing, double weighing and multiple weighing. By
default, printing of this ticket is activated.
45
GSW WAGA Software User’s Manual
Copyright 2007-2009 GS Software Grzegorz Stolarski
www.gs-software.pl, email: [email protected]
•
Paper size
The GS TRUCK software can print tickets in the graphic mode on A5 or A4 size paper.
•
Copies per page
Only one ticket can be printed on one A5 size sheet of paper. On A4 size sheet of paper there can be one or
two tickets printed.
•
Print the ticket automatically after completing the weighing
If this option is selected, after completing a weighing a ticket will be printed automatically. If this option is not
selected, a widow will be displayed with a question whether the user wants a ticket to be printed.
•
Print ticket on default printer
Under standard configuration the GS TRUCK software prints weighing tickets on the default printer installed in
the system. The software administrator can assign any printer in the system as the ticket printer. To do that, the
option of printing a ticket on a default printed needs to be unselected and other printer needs to be selected
from the list of printers installed in the system.
•
Print in graphic mode
This mode is designed for laser and inkjet printers.
•
Print in text mode
This mode is designed for matrix printers. A matrix printer must be connected to LPT1 port.
So that the printer can print Polish characters correctly, identical character coding must be set both in the
program and on the printer.
Character sets available in the GS TRUCK software:
6.5.2
•
Mazovia (CP 620)
•
Latin 2 (ISO-8859-2)
•
IBM (CP 852)
•
No Polish characters
Additional Settings
The weighing ticket printed in the graphic mode can show a logo and up to 250 characters of text printed in the bottom
part of every ticket (Footer text).
To add a logo to a weighing ticket:
1.
On the “Ticket settings” tab go to “Additional settings” tab.
2.
Select the “Print logo on ticket” option.
3.
Press “Load logo file” and find a graphic file. Press “Open”.
46
GSW WAGA Software User’s Manual
Copyright 2007-2009 GS Software Grzegorz Stolarski
www.gs-software.pl, email: [email protected]
The size of the graphic file containing a logo cannot exceed 500 KB.
Accepted graphic file formats are: *.bmp, *.jpg, *.png, *.ico, *.wmf, *.emf.
The footer text of the weighing ticket is also printed in the text mode.
Figure 38. Weighing ticket – Additional settings tab
•
Custom weighing tickets
The GS TRUCK software (in Eco version) enables associating selected products with a custom printing ticket.
The software is delivered along with a sample ticket of a material pass.
On the "Custom printing ticket” the user can perform the following operations:
o
Add new association of a product with a custom printing ticket,
o
Delete an association of a product with a custom ticket,
o
Import (add) new custom printing ticket template.
To associate a product with a custom printing ticket:
47
GSW WAGA Software User’s Manual
Copyright 2007-2009 GS Software Grzegorz Stolarski
www.gs-software.pl, email: [email protected]
1.
On the “Custom printing ticket” tab press the left mouse button on the “Add” icon – a window will open as in the
Figure No. 39.
2.
Select a product from the list in the bottom part of the window and select the intended ticket template. Press
“Ok”.
Figure 39. Custom weighing tickets – window for associating a product with a ticket
6.6
Users
This screen enables GS TRUCK software users’ management. Two levels of access are available: Operator and
Administrator. Appropriate status is a crucial element of the user’s profile as certain software operation functions are
limited to the user with Operator status. Table No. 1 presents a comparison of Operator and Administrator profiles.
Software functions
Administrator
All weighing services
¥
¥
Editing entries in data tables
¥
¥
Importing and exporting entries to / from data tables
Deleting and exporting entries from the List of weighings
Deleting and exporting entries from the transit list
Deleting and exporting entries from the List of vehicle tares
Configuration access
¥
¥
¥
¥
¥
48
Operator
GSW WAGA Software User’s Manual
Copyright 2007-2009 GS Software Grzegorz Stolarski
www.gs-software.pl, email: [email protected]
6.7
Proximity Card Reader
The GS TRUCK software enables co-operation with proximity card readers. The software can handle up to 4 readers.
The parameter which must be set when using proximity card readers is the COM port number for each installed reader
as well as the reader model.
The process of cooperation of GS TRUCK software with proximity card readers has been described in Section 3.8.
6.8
License
The license tab is where the registration key is displayed and in the text fields available the user can enter contact details
of the license holder. The information entered is displayed on the Weighing screen as well as printed both in the ticket
and report header.
6.9
Export of Weighings
This function enables saving information on each completed single and double weighing to a text file. This function is
useful when there is a need for cooperation of the GS TRUCK software with e.g. store or accounting software.
Export can be activated for each scale separately. Files containing information on weighings will be saved to a specified
directory on the hard drive or a network directory. It is recommended that export is performed in lines separated with the
following characters: <CR><LF> Exporting information without separated lines is used for compatibility with the PCS
software by Precia Molen.
Export file in lines separated with the following characters: <CR><LF>:
The name of the file is the weighing number, e.g. “102.txt”
Individual lines in the file:
1.
Weighing number
2.
Weighing type (1 – single weighing, 2 – double weighing)
3.
Scale number on which the weighing was performed (1, 2, 3)
4.
Name of the computer station (e.g. scale at the gate No. 1)
5.
Date and time of the first weighing
6.
Date and time of the second weighing (for single weighing 4=5)
7.
Type of scale (S – truck scale, K – railway scale)
8.
Vehicle registration No. or carriage No.
9.
Name of Contractor table
10. Contractor’s name
11. Contractor’s address
12. Contractor’s postal code and city
13. Contractor’s Tax Identification Number (NIP)
14. Name of table No. 1 (generally it is PRODUCT)
15. Value of table No. 1 for a given weighing (e.g. Coal)
16. Name of table No. 2
49
GSW WAGA Software User’s Manual
Copyright 2007-2009 GS Software Grzegorz Stolarski
www.gs-software.pl, email: [email protected]
17. Value of table No. 2
18. Name of table No. 3
19. Value of table No. 3
20. Name of table No. 4
21. Value of table No. 4
22. Name of information table No. 1
23. Value of information table No. 1
24. Name of information table No. 2
25. Value of information table No. 2
26. Name of information table No. 3
27. Value of information table No. 4
28. Mass at the first weighing
29. Mass at the second weighing
30. Net mass difference
31. Was the pollution handling activated during the weighing (0 – no pollution handling, 1 – pollution handling in
percentage value, 2 – pollution handling in kg)
32. Pollution handling in percentage value
33. Pollution handling in kg
34. Net weight after revision due to pollution handling
35. Name of the software license holder
36. Address of the software license holder
37. Postal code and city of the software license holder
38. Full name of the operator performing weighing No. 1
39. Full name of the operator performing weighing No. 2
Figure No. 40 presents an example weighing export file:
50
GSW WAGA Software User’s Manual
Copyright 2007-2009 GS Software Grzegorz Stolarski
www.gs-software.pl, email: [email protected]
Figure 40. Example weighing export file
51
GSW WAGA Software User’s Manual
Copyright 2007-2009 GS Software Grzegorz Stolarski
www.gs-software.pl, email: [email protected]
Notes
52