1
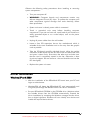
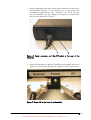
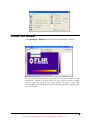
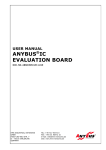
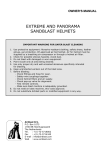
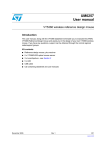
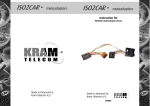
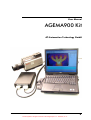
User Manual
AGEMA900 Kit
AT-Automation Technology GmbH
AGEMA900 Kit – User Manual
© FLIR Systems. All rights reserved. Post-assigned publ. no.: T559376, rev. A.
General • 1
Contents
General
3
Introduction.................................................................................3
Copyright....................................................................................3
Warranty.....................................................................................3
Trademark ..................................................................................4
Hardware installation
5
System requirements....................................................................5
Package contents.........................................................................5
PCI-Card installation ...................................................................6
Driver installation ........................................................................7
Windows XP and 2000..........................................................................................7
Windows NT4 .......................................................................................................8
Connection of the camera to the computer ...................................8
Configuration of the Researcher-software
11
Camera selection ......................................................................11
Connect the camera ..................................................................12
Appendix A
14
PowerBox ..................................................................................14
Technical specification........................................................................................14
Document RevNo.
1.0
Date
25.08.2003
Change
Based on IRFlashLink-Kit V1.4
AGEMA900 Kit – User Manual
© FLIR Systems. All rights reserved. Post-assigned publ. no.: T559376, rev. A.
General • 2
General
Introduction
This user manual describes the hardware of your AGEMA900 upgrade Kit
which was developed for connecting infrared-cameras of the series
AGEMA900 LW and SW to a PC. The Kit replaces the obsolete OS9Controller and enables the use of the camera under the latest WindowsTM
operating systems (e.g. WindowsTM XP). The software package Researcher
(FLIR Systems) is included, that enables you to grab and process camera
images in real time. The documentation of the Researcher-software is
delivered with a separate manual.
Copyright
© AT-Automation Technology GmbH, Technologiepark 24, D-22946
Trittau, Germany 1998-2002.
All rights world-wide reserved. Under copyright laws, neither the
documentation nor the software may be copied, photocopied,
reproduced, translated, or reduced to any electronic, magnetic or optic
medium or machine readable form, in whole or in part, without prior
written consent of AT-Automation Technology GmbH.
Warranty
The hardware is completely supplied by AT-Automation Technology
GmbH. To the maximum extend by applicable law, AT-Automation
Technology GmbH and its suppliers shall not be liable for any damages
whatsoever (including, without limitation, damages for loss of business
profits, business interruption, loss of business information, or other
pecuniary loss) arising out of the use of or inability to use the software
product or the provision of or failure to provide support services
(including, without limitation, through negligence), even if AT-Automation
Technology GmbH has been advised of the possibility of such damages.
AGEMA900 Kit – User Manual
© FLIR Systems. All rights reserved. Post-assigned publ. no.: T559376, rev. A.
General • 3
Trademark
Microsoft® and MS-DOS® are registered trade marks and WindowsTM is
a registered trade mark of the Microsoft Corporation. All further
registered trade marks specified in this manual are property of the
respective companies.
AGEMA900 Kit – User Manual
© FLIR Systems. All rights reserved. Post-assigned publ. no.: T559376, rev. A.
General • 4
Hardware installation
System requirements
In the following table, the system requirements are described for your
AGEMA900 Kit
Camera
Infrared
camera
of
the
THERMOVISION900 SW or LW
Computer
PC oder Notebook with x86-based 32-Bit-Microprocessor,
e.g. Intel Pentium VI.
series
AGEMA
1 free PCI-Slot
Operating
system
WindowsTM XP, 2000, ME, 98
WindowsTM NT Workstation oder WindowsTM NT Server
with Service Pack 4 or later installed
Package contents
The AGEMA900 Kit includes the following items :
•
Multifunction-PCI-Board IRFlashLink
•
Power box
•
Cable set
•
User manual
AGEMA900 Kit – User Manual
Hardware installation • 5
© FLIR Systems. All rights reserved. Post-assigned publ. no.: T559376, rev. A.
Figure 1: Package contents of the Agema900 Kit
The PCI-Board is installed in the PC. It serves for grabbing of the digital
image data and control of the camera. Further it includes trigger- and
synchronization functions in order to be able to trigger the image
aquisition exactly on an event.
The PowerBox delivers the power required for the AGEMA900-Camera
and adapts the image signals and communication signals between
camera and PC.
PCI-Board Installation
Figure 2: Multifunction PCI-board IRFlashLink
Please read first the user's guide of your computer regarding the
installation of additional hardware components.
AGEMA900 Kit – User Manual
Hardware installation • 6
© FLIR Systems. All rights reserved. Post-assigned publ. no.: T559376, rev. A.
Observe the following safety precautions when installing or removing
system components :
•
Turn your computer off.
•
WARNING!: Computer boards and components contain very
delicate Integrated Circuit (IC) chips. To protect the computer and
other components against damage from static electricity, follow
these precautions.
•
System unit cover is closed, power cable is connected.
•
Touch a grounded wrist strap before handling computer
components. If you do not have one, touch both of your hands to a
safely grounded object or to a metal object, such as the power
supply case.
•
Unplug all power cables from the wall sockets.
•
Locate a free PCI expansion slot on the motherboard which is
suiteable for the card installation and as far away from the graphic
card as possible.
•
Take the PCI board carefully with both hands. Allign the golden
connectors of the board over the PCI slot. Insert one end of the card
and press it down firmly. Press down the other end and take care
that the card is completely seated in the slot. Otherwise a short
circuit can happen. Do not use force - the card should move into the
PCI slot slightly.
•
Replace the system unit cover.
Driver installation
Windows XP and 2000
•
After the installation of the IRFlashLink PCI board start your PC and
login as administrator.
•
Windows(TM) will detect the IRFlashLink PCI card automatically and
will guide you through the IRFlashLink PCI card driver installation.
•
Put your IRFlashLink CD-ROM in the CD-ROM drive. Windows selects
the suitable drivers from the CD-ROM automatically. Proceed the
driver installation by accepting the Windows message that the driver
has no digital signature. Windows will now identify new devices and
installs the required device drivers.
AGEMA900 Kit – User Manual
Hardware installation • 7
© FLIR Systems. All rights reserved. Post-assigned publ. no.: T559376, rev. A.
Windows NT4
•
After the installation of the IRFlashLink PCI board start your PC and
login as administrator.
•
Put your IRFlashLink CD-ROM in the CD-ROM drive and change the
directory to <CD-ROM drive>\IRFlashLink\NT4.
•
Run the program irfl_install_nt4.bat. The IRFlashLink PCI card driver
installation will proceed automatically.
Connection of the camera to the computer
System Configuration
Agema Thermovision900
IRFlashLink Cable
100 - 240V AC / 47 - 63Hz
Power Box
Scanner
A
Scanner cable
2.5m
Power
102 112 001
PC
PC
B
IRFlashLink
PCI
102 110 055
5m
102 110 001
102 110 056
Extension cable
10m
Extension cable may be
connected at A or B
Figure 3: System configuration
AGEMA900 Kit – User Manual
Hardware installation • 8
© FLIR Systems. All rights reserved. Post-assigned publ. no.: T559376, rev. A.
•
Connect the cable of the AGEMA900 camera to the Scanner
connector of the PowerBox (Figure 4,1).
Figure 4: Front connectors of the PowerBox
•
Connect the supplied cable with the PC connector of the PowerBox
(Figure 4, 2) and the other end with the 15-pin DSUB-Connector of
your multifunction IRFlashLink board (Figure 5, 1).
Figure 5: Camera connector IRFlashLink
AGEMA900 Kit – User Manual
Hardware installation • 9
© FLIR Systems. All rights reserved. Post-assigned publ. no.: T559376, rev. A.
•
Plug the supplied power cable to the power connector on the rear of
the PowerBox (Figure6, 1) and connect it to a wall socket. The
PowerBox can operate from 100 – 240 VAC / 47 -63 Hz. You can
use the PowerBox with AC voltages of european standard (230
VAC) and US standard (110 VAC)
Figure 6: Power connector and On-/Off-switch at the rear of the
PowerBox
•
Switch the PowerBox on with the On-/Off-switch located at the rear
(Figure 6, 2). The power LED (Figure 7) lights and the camera starts.
Figure 7: Power LED at the front of the PowerBox
AGEMA900 Kit – User Manual
Hardware installation • 10
© FLIR Systems. All rights reserved. Post-assigned publ. no.: T559376, rev. A.
Configuration of the Researchersoftware
First install the Researcher- software on your PC as described in the
software handbook and then start the Researcher- software.
Camera selection
In the menu of the Researcher-software select Camera / Select
Camera....
In the configuration window select Thermovision 900 in the frame
Type of camera. Then select the IRFlashLink Grabber in the
frame Type of connection. Finally activate the check box Port
selection to Auto.
Now the configuration of the camera connection is done. Press the
OK button with a mouse click to accept the new configuration.
AGEMA900 Kit – User Manual
Configuration of the Researcher-software • 11
© FLIR Systems. All rights reserved. Post-assigned publ. no.: T559376, rev. A.
Connect the camera
Select Camera / Connect in the menu of the Researcher- software
The live image of the camera is now shown in the main window of the
Researcher- software. At the same time the camera control window
opens, where the type of the used camera, the type of the used
framegrabber and the used serial communication port for controlling the
camera is shown.
AGEMA900 Kit – User Manual
Configuration of the Researcher-software • 12
© FLIR Systems. All rights reserved. Post-assigned publ. no.: T559376, rev. A.
Now your camera is ready to work with the Researcher-program. A
detailed description of the operation and functions of the Researcherprogram can be found in the Researcher software manual.
AGEMA900 Kit – User Manual
Configuration of the Researcher-software • 13
© FLIR Systems. All rights reserved. Post-assigned publ. no.: T559376, rev. A.
Appendix A
PowerBox
Technical specification
Input voltage
85 – 264VAC / 47 – 63Hz
Input current
1.0A typ. bei Vin = 115VAC
0.6A typ. bei Vin = 230VAC
Power rating
•
•
•
Max. total power
Temperature
60W
0oC - 70oC
+5.0VDC / 7.0A
+12.0VDC / 3.5A
-12.0VDC / 1.0A
AGEMA900 Kit – User Manual
© FLIR Systems. All rights reserved. Post-assigned publ. no.: T559376, rev. A.
Appendix A • 14