1
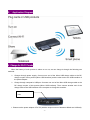
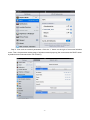
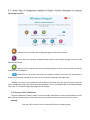
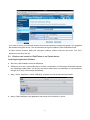
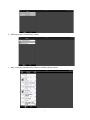
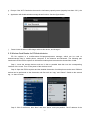
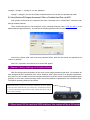
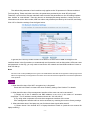
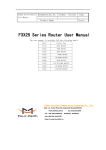
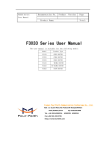
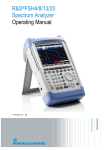
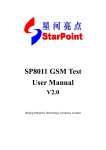
Wifi USB & Multi Card Reader Quick installation WIFI_COMBO is a portable wireless flash drive to stream media to other devices. It stores your files , documents, movies, music, photos and share them with your computer, phone, media player, netbook wirelessly. Wi-Fi combo can be used with any Apple series, PC, Android, etc and it enables you to have additional storage space on the devices. With apple authentication supporting software, with Wi Fi combo, you can store and stream videos/files from your pocket. We used Taiwan chipset for card reader and Hub. It can read/write 5 cards( CF,SD or TF,MS or M2)and 3 USB flashes at the same time. We can share Wi-Fi together in 15m range,1500mah built-in battery can last 2~3 hours for use. Wireless network storage: Supporting U-disk and USB portable hard disk file reading and sharing as well as online play; Please Note: May not work with all 3G dongles 3G router: Supporting WCDMA / CDMA 2000 / TD-SCDMA system’s 3G wireless network card dial-up and bandwidth sharing; Repeater: extend the Wi-Fi receiving signal range; 1. Parts List 1. Mainframe 2. USB charging cable 3. Quick installation guide; 2、2. Diagram -1- 3、 Application Diagram 4. Charge for Wi-Fi Combo When the battery of such product is about to run out, we can charge it through the following two methods: Charger through power supply: Connect one end of the Micro USB charge cable to the DC charge coupler of this product (Micro USB interface) and the other end to the USB interface of the power adapter. Charge through computer’s USB port: Connect one end of the Micro USB charge cable to the DC charge coupler of this product (Micro USB interface). Then connect another end of the charge cable to the USB interface of the computer to charge this machine. Micro USB interface for cable 1. Please use the power adapter of DC 5V (with the output current of between 600mA and 1000mA). -2- Common iPhone and iPad power adapters can also be used. 2. Charging period: Charge for about 2 to 3 hours if 5V 1000mA charge connector is used Charge for about 5 hours if 5V 600mA charge connector is used Charge for more than 5~6 hours if computer USB is used for charge directly 3. When such machine is being charged, do not charge other equipment with such machine in order to protect the battery and prolong the life of the battery 5、Function and Configuration of Wi-Fi Combo Wi-Fi combo can be accessed and configured through web browser. We can log into the combo through common IE of Microsoft, Safari of Apple Inc and built-in browser of Android operating system, to browse the contents of movable storage device and parameters of the device. Below is the introduction of its operation. ’ 5.1、W ireless Client Device needs to be connected to the W ireless Router First (Take iPad for Example) Step 1: Open the main interface of iPad and select “Settings” and then “WLAN” to enter the Wi-Fi settings page. Turn on the wireless switch, the iPad will then automatically scan the surrounding wireless network. Find router of SSID named “Cloud WIFI-XXXX”. Double click for connection. Step 2: During connection, please enter the Wi-Fi password according to the back of the router shell for connection (the password can be changed). Initial password is 12345678. Upon a successful connection, a small tick “” will appear on the left of router’s name. At the same time, a sign icon“ ” will appear on the top left corner of the screen, which indicates successful connection. If prompt is given that the network cannot be joined, please confirm whether your wireless password has been entered correctly. -3- Step 3: View and set network parameters. Click the “>” button on the right of connected wireless router. Then, the parameter setting page of wireless network pops up (the router starts the DHCP server by defaults and recommends the use of DHCP). -4- 5. 2. Home Page of Configuration Interface of Router: Function Description of Common Operating Interface : When this icon is clicked, the configuration page of 3G can be entered. : When this icon is clicked, multimedia files stored in the movable storage devices can be browsed and played. : When this icon is clicked, the security settings interface of Wi-Fi can be entered to finish the change of Wi-FI password. : When this icon is clicked, the advanced settings interface of the router can be entered to realize more functions settings of the router such as firmware upgrades and status view. Besides, for users of ios equipment such as iPhone and iPad, there are quicker ways to enter the router configuration page. We can enter the two characters “wd” in the address bar of the Safari browser. Then click “Go” and the configuration page can be entered. 5.3 Change of W i-Fi Password The WIFI password of factory setting of router is simple. Remember to change the password of WIFI during first use of this product to ensure the security of the data, because the initial password is simple. Method: Click the “WIFI security” icon to enter the WIFI security settings page. -5- a) In order to ensure your wireless network will not be accessed by unauthorized person, it is suggested that wireless encryption be set. The recommended encryption method is WPA-PSK/WPA2-PSK. b) After wireless network SSID and encryption settings, please reconnect the router. The Wi-Fi password is the newly set one. 5.4 W ireless card reader for iPad/iPhone or ios System device Install Apple Application Software: a. We have a APP software named as WDplayer ; b. WDPlayer is not only a local media player, but also a combination of “video player, download manager and streaming media player” as long as the shared media files are transmitted to iOS equipment through Wi-Fi, they can be played immediately. c. Step 1: Enter “App Store”, search “WDPlayer” program, as well as download and install it. d. Step 2: Open WDPlayer, this application start to look for CLOUD Wi-Fi device. -6- e. WDPlayer find the CLOUD Wi-Fi device: f. Step 3: Click the “Wireless Drive” blank, it will list the share content. -7- g. Prompt: If the Wi-Fi Combo device enter the low battery capacity status (capacity less than 10% ), the h. Application will disable wireless storage share function. See the figure below: i. j. Pease insert the Micro-USB charge cable to this device, and charge it. 5. 5 W ireless Card Reader for PC/Android device ES file explorer is a multifunctional file/program/process manager, which can be used to browse/manage files in mobile phone, computer, in the distance and Bluetooth .The following part introduces how the ES file explorer in the Android mobile phone accesses the shared files of LAN. Step 1: Insert the storage devices such as U disk or portable hard disk into the corresponding interface of the router. Turn on the power of the wireless router. Step 2: Open the ES file explorer and the detailed directories of mobile phone can be seen. Different actions can be performed on the directories and files such as “copy” and “Delete”. Switch to the second tag, i.e. share function. Step 3: Click “Local”menu, then “New” and then “Sever” and input position. The IP address of the -8- Wi-Fi is “192.168.168.1”. Enter use name and password (both of them are “admin” by default). Prompt: Or directly click “Menu”, then “Create” and then “Scan”. Or search the shared folders in the LAN. Click to enter and then input the user name and password. Step 4: After settings are finished, “192.168.168.1” can be found in the share list. Click it and “storage”, “storage 1”, “storage 2”, etc are displayed. storage 1, storage 2, etc are the names of shared folders in the U disk or portable hard disk. Step 5: Open “Share” and then “storage”, “storage 1”, “storage 2” etc, support the play of media -9- (audio/video), support the opening of various texts/images, and support the view of zip files. Click a single file and actions such as “copy”, “delete” and “rename” can be performed on it. FTP server: The following part introduces how the ES file explorer in the Android mobile phone accesses the shared files in the ftp server. Step 1: Open the ES file explorer, switch to the third tag, i.e. remote function. Step 2: Click “Local”menu, then “new” and then “FTP” and input position. The IP address of the router is “192.168.168.1”and the default port number is 21. Enter user name and password (both of them are “admin” by default). Prompt: Parameters such as the server’s FTP server port number and anonymous access permission can be changed by entering the WEB configuration interface of the router. Change them in the “Network Sharing” and then “FTP Server”. Refer to the user manual for wireless router. Step 3: After settings are finished, “192.168.168.1” can be found in the share list. Click it and - 10 - “storage”, “storage 1”, “storage 2”, etc are displayed. storage 1, storage 2, etc are the names of shared folders in the U disk and portable hard disk. 5.6 How W indows PC/Laptop Accesses U Disk or Portable Hard Disc via W IFI First, please confirm that your computer has been connected to the “CLOUD WIFI” wireless router through wireless network. Then, double click the icon “My Computer” on the computer desktop. Enter “\\192.168.168.1” in the address bar and press Enter key. You will see the following password hint interface. At this time, please enter user name and password (Note: both the user name and password are “admin” by default). After “Ok” is pressed, the contents to be shared will appear. 6. Restore Factory Settings of Wireless Router After we change some parameters of the router, some usage problems might arise. For example, we have changed the Wi-Fi password of the router. However, after a period of time, we forget the password . As a result, we are not able to enter the password when the connection router of terminal equipment gives prompts. In such case, please manually restore the factory defaults of parameters of the wireless router. The specific operating steps are as follows: Insert small needle e.g. paper clip into the hole indicated by the arrow. When it touches the switch inside the hole, press it hardly for 5 seconds before releasing it. Then the blue indicator light will flash, which indicates that factory settings are restored successfully. 7. When insert 3G Air card into USB interface, this combo will be a 3G router - 11 - 7.1 When the user inserts the 3G USB dongle into the USB interface of the router, the router will automatically begin dialing up progress. During 3G dial-up, some configuration information needs to be invoked. Please configure such information in 3G configuration page before the 3G wireless network card is inserted. Click “3G” icon to enter the 3G setting interface. During dial-up settings, 7.2 Setting of 3G Network Parameter When the user inserts the 3G USB dongle into the USB interface of the router, the router will automatically begin dialing up progress. During 3G dial-up, some configuration information needs to be invoked. Please configure such information in 3G configuration page before the 3G wireless network card is inserted. Click “3G” icon to enter the 3G setting interface. During dial-up settings, select the dial mode. Enter the dial parameters provided by 3G ISP and click “OK”. The default mode is an automatic identification model, i.e. plug and play and does not need to be changed. Normally, if SIM card in the 3G usb dongle is provided by ISP of Chinese mainland, so it is not necessary to change settings in the 3G configuration page. See the figure below: - 12 - The default dial parameter of such machine only applies to the 3G operators in Chinese mainland. For Hong Kong, Taiwan and other countries, the parameters provided by the local ISP will prevail. Therefore, users not from Chinese mainland need to set the dial parameters on the 3G setting interface from “default” to “user-defined”. Then they should, on the displayed setting interface, continue to fill out information such as the dial number, APN user name and password provided by the local ISP, and finally Click “Ok” to finish the settings. See the figure below: In general, the user only needs to select “Auto Detect” as the model of USB 3G dongle on the interface shown in the figure above, to automatically set information such as dial number, APN user name and password. In this way, you only need to connect the 3G network card and USB interface of router to finish 3G dial-up. Note: We cannot rule out the possibility that: the types of 3G USB network cards able to be supported currently might not be able to be supported by such equipment in the future due to the manufacturers’ adjustment of the internal parameters of the products. 8. FAQ 1. What should be done if the WIFI encryption key is forgotten? Press and hold “Reset” to restore the router to factory settings. See Section 7 for details. 2. What should be done if the management interface of the router can not be accessed? 1) Please see if the IP address and DNS address is set to be in the status of “automatic acquisition”. The IP address normally obtained should be “192.168.169.X”. 2) Try using other computers to access the management interface of the router. If the management interface still can not be accessed, try restoring the router to factory settings. 3. What should be done if the laptop can not find the wireless signals after search? 1) Please check if the internal Wi-Fi of laptop has been turned on (read the user manual for laptop carefully). - 13 - 2) Check, in the device manager of the computer, if the wireless LAN driver has been installed successfully and started. 3) Check if the wireless service of the computer has been activated (if the status of “Wireless Zero Configuration” in the service options is set to be “started” and if the starting type is set to be “automatic”). 4) Try if wireless signals can be searched in a distance of 1m to 2m. 5) Please use the wireless network cards of other computers to see if wireless signals can be searched. If wireless signals still can not be searched, try restoring the router to factory settings. 4. How can Windows 7 and Ipad clear previous network configuration? Windows 7: Network and sharing center – Manage wireless network, select corresponding wireless network names, and delete them. Ipad: Setting – WLAN – corresponding wireless network name, Ignore such network options above the blue arrow on the right; click “Ignore”. 5. How can the router software and hardware versions of the router be viewed? Click the “Advanced Settings” button on the management interface to view them. - 14 -