1
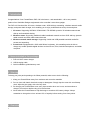
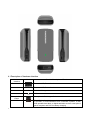
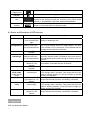
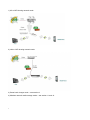
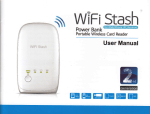
Manual P2R-100 By 2 FCC Compliance Statement Hereby, Hitchhiker Designs declares that this device is in compliance with the limits for a Class B digital device, pursuant to part 15 of the FCC Rules. This equipment has been tested and found to comply with the limits for a Class B digital device, pursuant to part 15 of the FCC Rules. These limits are designed to provide reasonable protection against harmful interference in a residential installation. This equipment uses and can radiate radio frequency energy. If not installed and operated in accordance with the instructions, it may interfere with radio communications. There is no guarantee that interference will not occur in a particular installation. If this equipment does interfere with radio or television reception, the user may be able to correct the problem by one or more of the following measures: Reorient or relocate the receiving antenna. Increase separation between equipment and receiver. Use equipment on a circuit to which the receiver is not connected. Consult your dealer or an experienced radio/TV technician for help. WARNING: Only peripherals complying with the FCC class B limits may be attached to this equipment. Changes or modifications made to this equipment, not expressly approved by us or parties authorized by us could void the user’s authority to operate the equipment. This device complies with part 15 of the FCC Rules. Operation is subject to the following two conditions: (1) This device may not cause harmful interference, and (2) this device must accept any interference received, including interference that may cause undesired operation. Notice for customers: The following information is only applicable to equipment sold in countries applying EU Directives. EU Declaration of Conformity Hereby, Hitchhiker Designs. declares that this device is in compliance with the essential requirements and other relevant provisions of Directive 2004/108/EC. The manufacturer of this product is 315 Outram Road #15-08, Tan Boon Liat Building, Singapore (169074). The Authorized Representative for EMC and product safety is 315 Outram Road #15-08, Tan Boon Liat Building, Singapore (169074). For any service or warrantee matters, please refer to the addresses given in separate service or warranty documents (do not use the above address). For customers in Europe Disposal of Old Electrical & Electronic Equipment (Applicable in the European Union and other European countries with separate collection systems) This symbol on the product or on its packaging indicates that this product shall not be treated as household waste. Instead, it shall be handed over to the applicable collection point for the recycling of electrical and electronic equipment. By ensuring this product is disposed of correctly, you will help prevent potential negative consequences for the environment and human health, which could otherwise be caused by inappropriate waste handling of this product. The recycling of materials will help to conserve natural resources. For more detailed information about recycling of this product, please contact your local Civic Office, your household waste disposal service or the shop where you purchased the product. 3 1. Introduction Congratulations! Your Power2Roam P2R-100 is the latest – and remarkable! – all-in-one portable product from Hitchhiker Designs engineered to be a traveller’s must-have gadget. The P2R-100 functions like 3G router, wireless router, ADSL dial-up networking, wireless network media storage, and power bank charger, thus enabling you to enjoy mobile devices at any time and place. 1. 3G router: Supporting WCDMA / CDMA 2000 / TD-SCDMA system’s 3G wireless network card dial-up and bandwidth sharing 2. Wireless router: Supporting traditional cable broadband network such as ADSL dial-up, dynamic cable network and static cable network access 3. Wireless network media storage: Supporting U-disk and USB portable hard-disk media file access and streaming. 4. Power bank: Equipped with a 5200 mAh lithium-ion battery, this versatile product is able to charge any mobile portable digital devices such as iPhone, iPad, Android Smartphone, and tablet computer. 2. Items included in the package 1. P2R-100 WIFI router charger 2. USB charging cable 3. Quick installation guide/warranty card 3. Warning To keep your juice pack operating to its fullest potential, make sure to do the following: 1. Keep your Power2Roam away from moisture and corrosive materials. 2. Do not clean with harsh chemicals, soaps or detergents. Simply wipe the case with a soft damp cloth. Wipe the pins gently with a soft dry cloth. 3. Re-charge your Power2Roam once every three months when not in use, and remember to charge it for one hour before using it for the first time. 4. Never allow the Power2Roam to fully discharge or remain at 0% battery charge. Always remember to charge the unit to at least 15% of capacity before storing for a short period. 4. Overview 4 4.1 Description of Hardware Interface Hardware Interface Power switch Mark Detailed Description of Function Turns on WIFI, Router functions R Turns on WIFI, Router functions C Extended Charger Off Battery indicator button USB Port 5 Battery level. Full charge will show as 4 bars. The USB interface can be used to connect 3G USB network cards of WCDMA, EVDO/CDMA2000 and TDSCDMA systems, U-disk, USB portable hard disk, or digital terminals such as smart phone, panel computer and PSP for battery charging. Micro-USB Charging Port Charge indicator RJ45 Ethernet port Input power of DC 5V for charging. 1A-2.1A Restore factory settings Reset button: This button will reset the router to factory settings. Press for 5 seconds while in R (Router) mode. Indicator when the unit is charging RJ45 port: Under dynamic IP/static IP/PPPoE mode, this port serves as the WAN port and can connect to any DHCP wired network, LAN broadband, and xDSL Modem/Cable Modem. 4.2 Status and Description of LED Indicator Action Indicator Status Detailed Description Start Up Indicator on top will show constant blue light Blue LED light flashes once every 0.5 seconds interval. When in Router mode, the LED shows that router is in startup or sleeping mode. USB pluggable storage device Insertion of 3G USB dongle Insertion of ADSL cable (under PPPoE mode) RJ45 LAN cable When blue LED does not flash. Blue LED light flashes once every 0.5 seconds interval. Blue LED light flashes at 1.5s interval. When blue LED does not flash. Green LED indicates constant light Green and blue LED light flashes at 1.5s interval. Green LED indicates constant light. Green LED light flashes at 1.5s interval. 5. Application P2R-100 Application Modes 6 Insert USB storage device: Thumb drive, portable hard disk or USB storage device into USB interface. The blue LED will flash in 8 to 10 seconds. This indicates that the storage device has been connected. Storage device fails to load successfully. Insert the 3G USB network card and wait for about 30 seconds. When the blue LED flashes every half-second, this indicates that the router is trying to connect to the 3G internet. This indicates that the router 3G dial-up has been successfully connected with the 3G internet 3G Dial-up is not successful. When a RJ45 cable is connected to the router, A green LED will light after 5 seconds. This means that the LAN cable is working properly. If LED do not lights up, please contact your provider. When green flashes after connecting the LAN cable, it shows that Internet has been successfully connected. When a RJ45 cable is connected to the router, a green LED will light after 5 seconds. This means that the LAN cable is working properly. If the LED does not light up, please contact your provider. When green LED flashes after installing the LAN cable, it shows that Internet has been successfully connected. 1) 3G to WiFi sharing network mode 2) LAN to WIFI sharing network mode 3) Power bank charger mode – see section 6. 4) Wireless network media storage mode – see section 11 and 12. 7 6. Checking the status of the stored battery charge. The P2R-100 comes with a 5200mah lithium-ion battery capable of powering any USB chargeable device such as IPhone, IPad, mobile phones, MP3 players, android or other devices of 5V (volt) input up to 1A (ampere). You can check the amount of stored charge in your power bank by pressing the button on the side of the device. There are 4 total LEDs. When the button is pressed the LEDs will illuminate for several seconds. The 4 LED indicators will show the amount of Stored charge left in the P2R-100 battery. Battery level indicator Indicator Status Zero LED lights Description There is no immediately. One LED lights Less than 25% Two LED lights 25% and 50%. Three LED lights 50% and 75%. Four LED lights 75% and 100%. Battery level indicator 8 power. Charge Press the T button to determine remaining battery power 7. Charging other devices Power2Roam does not include any output adapters for charging. For this you must provide your own cables or those supplied by your device manufacturers. In order to charge your device, you will need to have a USB cable compatible with your device. Charge various devices via USB 8. Charging the Power2Roam Connect your Power2Roam using the included or any standard Micro-B plug USB cable. You can also charge the P2R-100 by using your computer or a third-party standard USB wall adaptor with 5V ~ 1.02.1A. You can even use your iPad wall adaptor, which is the fastest method currently available. (The LED power indicator will light up when charging. When the Power2Roam becomes fully charged the LED will turn off. Charging has stopped to prevent overcharging. Insert the smaller end of the Micro USB charging cable into this port 2. Charging period: 9 3 to 5 hours using 5V 2100mA 5 to 8 hours using 5V 1000mA 11 hours using 5V 600mA 12 hours via computer USB 9. Function and Configuration of P2R-100 Wireless Router The P2R-100 router can be accessed and configured through a GUI web browser. You can log into the router through common Microsoft IE, Apple Safari or built-in browser of Android operating system in order to browse the contents in the storage device and set up the router. Instructions below: 9.1 Wireless Client Device needs to be connected to the Wireless Router First (iPad for example) Step 1: Go to Settings -> General –> Wi-Fi. Step 2: under Choose a Network, select Power2Roam and enter password 012345678 for default. Note: you can set a different SSID name and password when you are in the Power2Roam GUI menu. Upon a successful connection, a small tick “ ” will appear on the left hand side of the router’s name. An icon“ ” will appear on the top left corner of the screen, indicating a successful connection. If your prompted network connection fails, check that your SSID selection is correct or that the password was entered correctly. If this is unsuccessful, do a hardware factory reset and re-do the connection in Step 1. 10 9.2 Configuring the P2R-100 Router Turn on the Safari browser and enter http://192.168.100.1 in the address bar. Select the Go button and the router The home page will show on your Web browser screen. For users of Apple products such as iPhone or iPad, there are quicker ways to enter the router setup menu. Enter wd in the address bar of your Safari browser and select Go. 11 9.3 Quick setup Menu v The first row of icons: Depending on your requirements, these icons connect you to the Internet. Advanced settings are for users with advanced networking skills. For Dynamic or Static IP connection: 12 In most cases – in a hotel, home or office – you normally connect to the Internet via a RJ45 LAN cable with Dynamic IP address assigned randomly. If a Static IP was assigned, see below for instructions. Insert the LAN cable and wait for the router to connect to the LAN. Select the DHCP (Auto config) icon. A small window will pop up at the bottom of the page. Once you gain access to the Internet through cable (a method often used in hotels), an IP address is usually assigned to the P2R-100 router. Select OK to finish the settings. Otherwise, Select Cancel. Wait for 15-30 seconds for the router to restart and achieve an Internet connection. Sometimes it takes longer due to authentication before a connection can be made. For a static IP address usually pre-assigned by your provider, select the Static (Fixed IP) icon. A window will pop up. Input the information that is given to you by your provider. Select OK to end the setup. Otherwise, select Cancel. Wait for 15-30 seconds for the router to restart and get an Internet connection. Sometimes it takes longer due to authentication before a connection can be made. For ADSL connection: Connect the ADSL cable direct to the router and select PPPoE (ADSL) icon. A window will pop up at the bottom of the page. Enter your user name and password in the windows provided by your Service Provider. Select OK to end the setup. Otherwise, select Cancel. Wait for 15-30 seconds for the router to restart and get an Internet connection. Sometimes it takes longer due to authentication before a connection can be made. For Repeater (Wi-Fi signal) booster: In some locations when you achieve a WI-FI internet connection the signal appears to be weak. If so, try a signal boost of the WI-FI signal to get a better Internet connection. Select Repeater and a window will pop-up below. Select Scan all APs and the router will show all Wi-Fi signals near you. Select SSID and key in your provided password to Select OK to end the setup. Wait for 15-30 seconds for the router to restart and get an Internet connection. Sometimes it takes longer due to authentication before a connection can be made. 6.4 Wi-Fi Password 13 The factory default Wi-Fi password is 012345678. For security, always change your Wi-Fi password before initial use of the router. Should you forget your password, you will need to do a hardware reset on the router to its initial factory settings. All configurations and parameters on the router will be lost. Method: Select the Wi-Fi security icon to enter the Security menu. Note: a) In order to ensure unauthorized access, it is suggested that a higher level of encryption be set. You should use our recommended encryption, WPA-PSK/WPA2-PSK. b) Once you have change the password and SSID, remember to reconnect the device to the router. Should the device fail, turn the router off and on. 6.5 Setting of 3G Network Parameter Before setting up a 3G internet connection, you may need to input certain information into the router provided by the 3G Service provider. Please check your service provider’s menu before inserting the 3G USB dongle. Select 3G in the Quick Menu and enter the configurations. Select the dial mode. Enter the dial parameters provided by 3G ISP and select OK. The default mode in the automatic identification model requires no configuration by the service provider provided that the 3G dongle does not require an initial configuration. Only certain USB dongles and 3G SIM cards are compatible. Once you have completed the 3G setup, insert the 3G USB dongle into the USB port. The router will automatically initialize and connect to the service provider. 14 In general, the user needs only to select Auto Detect as the model of USB 3G dongle on the interface shown in the figure above in order to automatically set information such as a dial number, APN user name or password. In this way, you need only to connect the 3G network card and the router’s USB interface to complete the 3G dial-up. Note: Not all 3G USB network cards are supported by the P2R-100. Check our website www.power2roam.com for supported models and updates of the latest firmware. 15 9.6. Setting of Wired Broad Band Network Parameters When wired to WiFi mode, P2R-100 is equal to a wireless router. The Ethernet interface serves as the WAN interface. All wireless terminals can only be connected to the router through WIFI. Select Network Settings and then WAN. Determine networking according to the broadband line. The router supports three common kinds of wired networking modes: static IP, dynamic IP and PPPoE. a) Static IP If the Internet accessing method offered by the network provider is static IP, you need enter the IP address, subnet mask, gateway, along with the IP address of the primary DNS server and the IP address of the secondary DNS server. b) Dynamic IP If the Internet accessing method offered by the network provider is dynamic IP, you do not need to set anything. Simply select OK. Dynamic IP is the commonly use method in motels, guesthouses, homes, hotels etc. c) PPPoE If you get access to Internet through the ADSL dialling mode, you need only to enter the account information provided by the ISP for you in the input boxes of User Name and Password. After settings are completed, select OK. 16 9.7 Basic Setting of WI-FI Wireless Network Select the menu bar on the left, Wireless Network Setting, and then Basic Setting. You can then achieve basic wireless network settings such as network model, SSID and wireless channel. 9.8 Firmware Upgrades of Wireless Router Constantly upgrading firmware is not always recommended unless features or functions that were not available in the past are now available. You can download from www.power2roam.com into a USB drive or to your PC/MAC, tablets or smartphones to accomplish your upgrading. 17 The firmware can be upgraded through the following two methods: 1) Firmware upgrades through LAN by selecting the file from your computer and select Apply to uploading the file. 2) USB method. WARNING! While uploading firmware, make sure that all connected devices for upgrading and the P2R-100 are plugged into a power socket to prevent the P2R-100 from permanent firmware damage. During firmware upgrading, the LED lights will blink constantly. When they are blinking, DO NOT TURN OFF or TOUCH the router and the uploading device until the LED lights have stopped blinking. When the new firmware is fully uploaded, the router will restart. You might need to reconnect your WI-FI. 18 19 10. Restore Factory Settings of Wireless Router After changing the router’s configurations, certain problems might arise: losing your password, SSID, IP address, etc. If these problems occur, try manually restoring the factory defaults settings. The specific operating steps are as follow: Insert a needle or paper clip into the hole indicated by the arrow. When you feel the switch inside the hole, press for 5 seconds before releasing while router is in R mode. The blue LED will flash for few seconds and the router will restart at the factory default settings. 11. Accessing USB drive via APPLE IPHONE and IPAD The P2R-100 provides a USB interface for connection with U disk or portable hard disk/card reader as well as providing support for shared access to storage contents via wireless methods. Third-party streaming media software can be used to play, upgrade and download the shared files in the USB storage device, e.g., WDplayer, Goodplayer, OPlayerHD, and TIOD Aceplayer. The router provides three methods to access the U disk, portable hard disk and other storage devices. The steps are as follow: 11.1 Streaming Media Online Play Step 1: Insert the USB storage device (such as U disk and portable hard disk) into the router’s USB interface. Step 2: Turn on the router’s power. Observe the router’s blue LED status indicator. Step 3: Open the Wi-Fi setting page of the iPad, select SSID to achieve your wireless network connection. (Refer to the last section.) Step 4: Select the Safari browser and enter in the address bar http://192.168.100.1 or wd. Select the Go button. Then Select the icon Multimedia Browse and the file’s browse page in the router’s movable storage device. This allows for quick access to the files stored in the U disk or portable hard disk, e.g., pictures, videos and music. 20 storage 1, storage 2, etc., are the names of shared folders in the U disk and portable hard disk. 11.2 IOS Client Application The IOS client APPs developed for the P2R-100 router is available on our App Store. The following sections describe how to use the iPad to share the files in the router FTP server. The WDPlayer is not only a local media player, it is also a combination of video player, download manager and streaming media player. As long as the shared media files are transmitted to the app via Wi-Fi, they can be played immediately. Step 1: Enter App Store, search the WDPlayer program, and download and install it. 21 Step 2: Open the WDPlayer. This application looks for the P2R-100 device. The WDPlayer find the P2R-100 device: 22 Step 3: Select the Wireless Drive blank. It will list the shared content. 23 Prompt: If the P2R-100 shows a low battery status (capacity less than 10% ), the application will disable wireless storage share function. See the figure below: Insert the Micro-USB charge cable to this device and charge it. 12. Accessing USB drive via Android Mobile Phone/Tablets The ES file explorer is a multifunctional file/program/process manager that can be used to browse/manage files on your mobile phone and computer via wireless and Bluetooth. The following explains how the ES file explorer in the Android mobile phone can access the shared files of LAN. Step 1: Insert the storage devices such as U disk or portable hard disk into the corresponding interface of the router. Turn on the power of the wireless router. Step 2: Open the ES file explorer where directories of mobile phone can be seen. Different actions can be performed on the directories and files such as Copy and Delete. Switch to the second tag, i.e., the share function. 24 Step 3: Select the Local menu, then New and then Sever and the input position. The IP address of the router is 192.168.100.1. Enter user name and password (both are admin by default). Prompt: Select Menu, then Create and then Scan, or search the shared folders in the LAN. Select to enter and then input the user name and password. 25 Step 4: After settings are completed, 192.168.100.1 can be found in the share list. Select it and storage, storage 1, storage 2, etc. (storage 1, storage 2, etc., are the names of shared folders in the U disk or portable hard disk.) Step 5: Opening Share and then storage, storage 1, storage 2, etc. support the play of media (audio/video), the opening of various texts/images, and the view of zip files. Select a single file. Actions such as copy, delete and rename can be performed on it. 26 FTP server: The following explains how the ES file explorer in the Android mobile phone accesses the shared files in the ftp server. Step 1: Open the ES file explorer, switch to the third tag, i.e., remote function. Step 2: Select Local menu, then New, and then FTP and input position. The IP address of the router is 192.168.100.1 and the default port number is 21. Enter user name and password (both are admin by default). Prompt: Configurations such as the server’s FTP server port number and anonymous access permission can be changed by entering the WEB configuration interface of the router. Change them in the Network Sharing and then FTP Server. Refer to the user manual for wireless router. 27 Step 3: After settings are finished, 192.168.100.1 can be found in the share list. Select it. storage, storage 1, storage 2, etc., are displayed. (storage 1, storage 2, etc., are the names of shared folders in the U disk and portable hard disk.) 13. Accessing USB drive via Windows First confirm that your computer has been connected to the P2R-100 wireless router through the wireless network. Then select the icon My Computer on the computer’s desktop. Enter \\192.168.100.1 in the address bar and press the Enter key. You will see the following password hint interface. A window will pop up. Enter user name and password (both are admin by default). Press OK. See the figure below. 28 Changing Network file sharing name and password Go to Administration in Advance Settings -> Management. 29 14. FAQ What should be done if the WIFI encryption key is forgotten? 1) Press and hold Reset to restore the router to factory settings. See Section 7 for details. What should be done if the management interface of the router cannot be accessed? 1) See if the IP address and DNS address is set for automatic acquisition. The IP address normally obtained should be 192.168.100.X. 2) Try using other computers to access the management interface of the router. If the management interface still cannot be accessed, try restoring the router to factory settings. What should be done if the laptop cannot find the wireless signals after searching? 1. Check if the internal Wi-Fi of laptop has been turned on (read the laptop’s user manual carefully). 2. Check the computer’s device manager to see whether the wireless LAN driver has been installed successfully and started. 3. Check to see whether the wireless service of the computer has been activated if the status of Wireless Zero Configuration in the service options is set to be started and if the starting type is set to be automatic. 4. Check to see whether you are connected to the right Wi-Fi SSID or are lacking in signal strength. If so, use another device to try and connect to the router. If wireless signals still cannot be searched, try restoring the router to factory settings. 5. How can previous Wi-Fi networks SSID in Windows 7/8 and IPad configuration be cleared? Windows 7/8: Network and sharing center – Manage wireless network, select corresponding, wireless network names, and delete them. IPad: Setting – WLAN – corresponding wireless network name, Ignore such network options above the blue arrow on the right. Select Ignore. 6. How can the router software and hardware versions of the router be viewed? Select the 30 Advanced Settings button on the management interface to view them. 15. Terms and Conditions Warning! Read all instructions and warnings prior to using this product. Improper use of this product may result in product damage, excess heat, toxic fumes, fire or explosion, for which damages you (Purchaser), not Hitchhikers or Power2roam (collectively Manufacturer), are responsible. Do not store battery in an excessively hot environment, including direct sunlight. Do not place battery in a fire or other excessively hot environments. Be careful not to drop, bump or abrade the battery. If there is damage to the battery such as dents, punctures, tears, deformities or corrosion, discontinue use and contact manufacturer, or dispose of it in an appropriate manner at your local battery recycling center. Do not disassemble the battery or attempt to repair or modify it in any manner. Do not expose this battery to moisture or submerge it in liquid. Keep battery dry at all times. Do not attempt to charge battery using any method, apparatus or connection other than the device’s USB connector. For questions or instructions for the various ways to charge the juice pack, refer to this manual’s Charging your juice pack and Use Summary sections. Do not attempt to replace any part of the battery. If the battery is intended for use by a minor, the purchasing adult agrees to provide detailed instructions and warnings to the minor prior to use. Failure to do so is the sole responsibility of purchaser, who agrees to indemnify the Manufacturer for any unintended use/misuse by a minor. All batteries have gone through a thorough quality assurance inspection. If you find that your battery is excessively hot, or emitting odor, or deformed, abraded, or cut, or is demonstrating abnormal behavior, stop all battery use and contact the Manufacturer. For extended storage, first charge your battery for one hour. Never dispose of batteries in the garbage. Such disposal is unlawful under state and federal environmental laws and regulations. Always take used batteries to your local battery-recycling center. Legal This Battery is meant for use only in conjunction with the appropriate mobile entertainment device. Please consult your device packaging to determine whether this Battery is compatible with your particular re-chargeable mobile devices. The Manufacturer will not be responsible for damage to any other device incurred through the use of this product. 31 The Manufacturer shall not in any way be liable to you or to any third party for any damages you or any third party may suffer as a result of use, intended or unintended, or misuse of this Battery in conjunction with any device or accessory other than the appropriate re-chargeable mobile devices for which this battery is designed. The Manufacturer will not be responsible for any damage you or any third party may suffer as a result of misuse of this Battery as outlined above. If you are responsible for battery use with an unintended mobile entertainment device and damage results from such use, you agree to indemnify the Manufacturer for any resulting injuries to any third party or parties. This device complies with part 15 of the FCC Rules. Operation is subject to the following two conditions: (1) This device may not cause harmful interference, and (2) this device must accept any interference received, including interference that may cause undesired operation. NOTE: This equipment has been tested and found to comply with the limits for a Class B digital device, pursuant to part 15 of the FCC Rules. These limits are designed to provide reasonable protection against harmful interference in a residential installation. This equipment generates uses and can radiate radio frequency energy and, if not installed and used in accordance with the instructions, may cause harmful interference to radio communications. However, there is no guarantee that interference will not occur in a particular installation. If this equipment does cause harmful interference to radio or television reception, which can be determined by turning the equipment off and on, the user is encouraged to try to correct the interference by one or more of the following measures: • Reorient or relocate the receiving antenna. • Increase the separation between the equipment and receiver. • Connect the equipment into an outlet on a circuit different from that to which the receiver is connected. • Consult the dealer or an experienced technician for help. CAUTION: To comply with the limits of the Class B digital device, pursuant to Part 15 of the FCC Rules, this device is compliant with Class B limits. All peripherals must be shielded and grounded. Operation with noncertified peripherals or non-shielded cables may results in interference to radio or reception. MODIFICATION: Any changes or modifications not expressly approved by the grantee of this device could void the user’s authority to operate the device. 15. Certifications FCC Class B, CE and WI-FI. 32 Hitchhiker Designs One (1) Year Limited Warranty Hitchhiker Designs’s Limited Warranty and Limitation of Liabilities ADDITIONAL RIGHTS FOR CONSUMERS, WHO ARE COVERED BY CONSUMER PROTECTION LAWS OR REGULATIONS IN THEIR COUNTRY OF PURCHASE OR, IF DIFFERENT, THEIR COUNTRY OF RESIDENCE, THE BENEFITS CONFERRED BY THIS WARRANTY ARE IN ADDITION TO ALL RIGHTS AND REMEDIES CONVEYED BY SUCH CONSUMER PROTECTION LAWS AND REGULATIONS. THIS WARRANTY DOES NOT EXCLUDE, LIMIT OR SUSPEND ANY RIGHTS OF CONSUMERS ARISING OUT OF NONCONFORMITY WITH A SALES CONTRACT. SOME COUNTRIES, STATES AND PROVINCES DO NOT ALLOW THE EXCLUSION OR LIMITATION OF INCIDENTAL OR CONSEQUENTIAL DAMAGES OR ALLOW LIMITATIONS ON HOW LONG AN IMPLIED WARRANTY OR CONDITION MAY LAST, SO THE LIMITATIONS OR EXCLUSIONS DESCRIBED BELOW MAY NOT APPLY TO YOU. THIS WARRANTY GIVES YOU SPECIFIC LEGAL RIGHTS, AND YOU MAY ALSO HAVE OTHER RIGHTS THAT VARY BY COUNTRY, STATE OR PROVINCE. THIS LIMITED WARRANTY IS GOVERNED BY AND CONSTRUED UNDER THE LAWS OF THE COUNTRY IN WHICH THE PRODUCT PURCHASE TOOK PLACE. LIMITED WARRANTY For a period of ONE(1) YEAR from the date of retail purchase by the original end-user purchaser (“Warranty Period”), Hitchhiker Designs warrants (i) this product against defects in materials and workmanship, and (ii) that each Product, unmodified and under normal use and conditions, will substantially comply with Hitchhiker Designs’ applicable written technical documentation for the Product. Hitchhiker Designs reserves the right to make substitutions and modifications from time to time in the specifications of Products sold by Hitchhiker Designs, provided that such substitutions or modifications do not materially affect overall Product performance. If a hardware defect exists and a valid claim is received within the Warranty Period, at its option and to the extent permitted by law, Hitchhiker Designs will (1) repair the hardware defect at no charge, using new or refurbished replacement parts, (2) exchange the product with a product that is new or which has been manufactured from new or serviceable used parts and is at least functionally equivalent to the original product, or (3) refund the purchase price of the product. Hitchhiker Designs may request that you replace defective parts with user-installable new or refurbished parts that Hitchhiker Designs provides in fulfillment of its warranty obligation. A replacement product/part assumes the remaining warranty of the original product or ninety (90) days from the date of replacement or repair, whichever provides longer coverage for you. When a product or part is exchanged, any replacement item becomes your property and the replaced item becomes Hitchhiker Designs's property. When a refund is given, your product becomes Hitchhiker Designs's property. OBTAINING WARRANTY SERVICE Deliver the product to any Hitchhiker Designs Authorized Importer in the country where you purchased the product. Be aware, however, that not all countries have Hitchhiker Designs Authorized Service Providers (‘NASP’) and not all Authorized Service Providers outside the country of purchase have all parts or replacement units for the product. If the product cannot be repaired or replaced in the country it is it may need to be sent to a different country or returned to the country of purchase at your expense for repair or replacement. If you seek service in a country that is not the country of original purchase, you will comply with all applicable import and export laws and regulations and be responsible for all custom duties, V.A.T. and other associated taxes and charges. Where international service is available, Hitchhiker Designs may repair or exchange defective products and parts with comparable products and parts that comply with local standards. 33 Hitchhiker Designs may send you user-installable new or refurbished replacement product or parts to enable you to service or exchange your own product (“DIY Service”). Upon receipt of the replacement product or part, the original product or part becomes the property of Hitchhiker Designs and you agree to follow instructions, including, if required, arranging the return of original product or part to Hitchhiker Designs in a timely manner. When providing DIY Service requiring the return of the original product or part, Hitchhiker Designs may require a credit card authorization as security for the retail price of the replacement product or part and applicable shipping costs. If you follow instructions, Hitchhiker Designs will cancel the credit card authorization, so you will not be charged for the product or part and shipping costs. If you fail to return the replaced product or part as instructed or the replaced product or part is not eligible for warranty service, Hitchhiker Designs will charge the credit card for the authorized amount. 34 EXCLUSIONS AND LIMITATIONS This Limited Warranty applies only to hardware products manufactured by or for Hitchhiker Designs that can be identified by the "Hitchhiker Designs" trademark, trade name, or logo affixed to them. The Limited Warranty does not apply to any non-Hitchhiker Designs hardware products or any accessories, even if packaged or sold with Hitchhiker Designs hardware. Non-Hitchhiker Designs manufacturers, suppliers, may provide their own warranties. Other accessories distributed by Hitchhiker Designs under the Hitchhiker Designs brand name are not covered under this Limited Warranty. This warranty does not apply: (a) to damage caused by accident, abuse, misuse, misapplication, liquid contact, fire, earthquake, non-Hitchhiker Designs products, or other external causes; (b) to damage caused by service performed by anyone who is not a NASP; (c) to a product or a part that has been modified without the written permission of Hitchhiker Designs; (d) to consumable parts, such as batteries, or protective coatings designed to diminish over time unless failure has occurred due to a defect in materials or workmanship; (e) to cosmetic damage, including but not limited to scratches, dents, and broken plastic on ports; (f) to defects caused by normal wear and tear or otherwise due to the normal aging of the product; or (g) if any Hitchhiker Designs serial number has been removed or defaced. Important: Do not open the hardware product. Opening the hardware product may cause damage that is not covered by this warranty. Only Hitchhiker Designs or a NASP should perform service on this hardware product. THIS WARRANTY AND REMEDIES SET FORTH ABOVE ARE EXCLUSIVE AND IN LIEU OF ALL OTHER WARRANTIES, REMEDIES AND CONDITIONS, WHETHER ORAL OR WRITTEN, EXPRESS OR IMPLIED. HITCHHIKER DESIGNS SPECIFICALLY DISCLAIMS ANY AND ALL IMPLIED WARRANTIES, INCLUDING, WITHOUT LIMITATION, WARRANTIES OF MERCHANTABILITY AND FITNESS FOR A PARTICULAR PURPOSE. IF HITCHHIKER DESIGNS CANNOT LAWFULLY DISCLAIM IMPLIED WARRANTIES UNDER THIS LIMITED WARRANTY, ALL SUCH WARRANTIES, INCLUDING WARRANTIES OF MERCHANTABILITY AND FITNESS FOR A PARTICULAR PURPOSE ARE LIMITED IN DURATION TO THE DURATION OF THIS WARRANTY. No Hitchhiker Designs reseller, agent, or employee is authorized to make any modification, extension, or addition to this warranty. HITCHHIKER DESIGNS IS NOT RESPONSIBLE FOR DIRECT, SPECIAL, INCIDENTAL OR CONSEQUENTIAL DAMAGES RESULTING FROM ANY BREACH OF WARRANTY OR CONDITION, OR UNDER ANY OTHER LEGAL THEORY, INCLUDING BUT NOT LIMITED TO LOST PROFITS, DOWNTIME, GOODWILL, DAMAGE TO OR REPLACEMENT OF EQUIPMENT AND PROPERTY, ANY COSTS OF RECOVERING, REPROGRAMMING, OR REPRODUCING ANY PROGRAM OR DATA STORED IN OR USED WITH HITCHHIKER DESIGNS PRODUCTS, AND ANY FAILURE TO MAINTAIN THE CONFIDENTIALITY OF DATA STORED ON THE PRODUCT. HITCHHIKER DESIGNS SPECIFICALLY DOES NOT REPRESENT THAT IT WILL BE ABLE TO REPAIR ANY PRODUCT UNDER THIS WARRANTY OR MAKE A PRODUCT EXCHANGE WITHOUT RISK TO OR LOSS OF PROGRAMS OR DATA. Some states and provinces do not allow the exclusion or limitation of incidental or consequential damages or exclusions or limitations on the duration of implied warranties or conditions, so the above limitations or exclusions may not apply to you. This warranty gives you specific legal rights, and you may also have other rights that vary by state or province. Proof of purchase in the form of a bill of sale or receipted invoice which is evidence that the unit is within the Warranty period must be presented to obtain warranty service. REPLACEMENT AS PROVIDED UNDER THIS WARRANTY IS THE EXCLUSIVE REMEDY OF THE CONSUMER. HITCHHIKER DESIGNS SHALL NOT BE LIABLE FOR ANY INCIDENTAL OR CONSEQUENTIAL DAMAGES FOR BREACH OF ANY EXPRESS OR IMPLIED WARRANTY ON THIS PRODUCT. EXCEPT TO THE EXTENT PROHIBITED BY APPLICABLE LAW, ANY IMPLIED WARRANTY OF MERCHANTABILITY OR FITNESS FOR A PARTICULAR PURPOSE ON THIS PRODUCT IS LIMITED IN DURATION TO THE DURATION OF THIS WARRANTY. Hitchhiker Designs, the Hitchhiker Designs and Power2Roam logos are trademarks or registered trademarks of Hitchhiker Designs Pte Ltd. 35