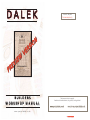
1
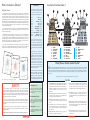
DALEK
W
E
I
V
E
R
P
Version 6.0 , May 2006
Preview sample only
N
O
I
S
R
E
V
BUILDERS
This document is subject to copyright.
Unauthorised sale and distribution, in any format, is strictly prohibited.
WORKSHOP MANUAL
www.projectdalek.co.uk
www.forum.projectdalek.co.uk
www.projectdalek.co.uk
2 PREVIEW VERSION
WANT TO BUILD A DALEK?
Contents...
Well, here’s how...
These guidelines are intended to give newcomers a general idea of what materials
and techniques are required when building a full size Dalek, using any of the plans
currently available from Project Dalek. The bulk of the measurements are given in
imperial sizes. This is because Daleks were originally designed using feet and inches
and these measurements often don’t translate well into centimetres. You will find that
the plans booklets for the 1960’s Daleks (both TV and movie) are presented in inches,
whereas the plans for the 2005 Series Daleks are in centimetres. Centimetres have been
used on the modern Dalek plans as they are most likely to have been used during
construction of the new props.
For many years the most popular plans were the ones published in the ‘Radio Times’
back in 1973. While these are a good starting point, they are often inaccurate and
should be used with caution.
Building Daleks is a serious business and there are many issues to consider. Before
you jump right in and start building, it is important to do plenty of background
research. We all have our favourite Dalek story and more often than not, wish to create
our Dalek to that specification and colour scheme. Memory tends to play tricks, so try
and find as many pictures of ‘your’ Dalek type as you possibly can. This will give you a
good idea of what build variations you need to watch out for.
If you haven’t already, please join the Project Dalek Forum (see page 2 for the web-site
address). You will be able to obtain the plans shown below as well as lots of help and
information. Our members will be only too happy to try and help if you get stuck!
When building a Dalek it is best to
break it into sections. Construction will
be covered one section at a time,
starting at the top and working down...
Section 1 . . . . . . . . . . . . . . . . . . . . . .Dome, page 6
Section 2 . . . . . . . . . . . . . . . . . . . . . . .Neck, page 8
Section 3 . . . . . . . . . . . . . . .Shoulders, page 10
Section 4 . . . . . . . . . . . . . . . . . . . . . . .Skirt, page 14
Section 5 . . . . . . . . . . . . . . . . . . . . . . . .Base, page 16
Section 6 . . . . . . . . . . .Appendages, page 18
Section 7 . . . . . . . . . .Finishing Off, page 23
Section 8 . . . . . . . . . . . . . . . . .Painting , page 25
Section 9 . . . .Ring Modulators , page 26
Section 10 . . . . . . . . . . . . .Advanced , page 27
Section 11 . . . . . . . Colour Guide , page 32
7
5
11
12
Essential tools...
19
14
18
20
22
1.
2.
3.
4.
5.
6.
7.
8.
Dome
Dome lights
Eye cowl
eye-stalk
Eye disks
Eyeball
Iris
Neck Mesh
9.
10.
11.
12.
13.
14.
15.
16.
Neck struts
Neck rings
Neck blocks
Shoulders
Shoulder mesh
Slats
Gun box
Ball joints
17.
18.
19.
20.
21.
22.
23.
24.
Gun
Plunger & arm
Claw
Collars
Skirt
Hemispheres
Base
Fender
What flavour Dalek should I build?
D
aleks changed throughout their BBC (and film) history. Some of the obvious changes are the adoption and subsequent
removal of large fender bases and “antenna” dishes. The variations range from these major changes to smaller, more
subtle alterations such as the number of disks used on the eye-stalk. This document isn’t about comprehensively listing these
changes, it is simply here to help you with the mechanics of putting the thing together, it is up to you, dear builder, to do your
homework.
Having said that, here is a top ten of popular Dalek variations to get you started...
Top Ten
1. The whole Dalek: The Imperial Daleks in ‘Remembrance
of the Daleks’ are of an entirely different ‘build’. They are
slightly narrower and have their collars moulded into the
shoulders. The Daleks from the 2005 series have totally
different shoulders, along with a host of other
differences.
Never use professional spray paints without the recommended safety gear.
Some paints are useable with masks whereas others, particularly two pack paints,
require specialist breathing equipment. Misuse of these paints can kill - so please,
be careful!
Circular saw, scroll saw, band saw, router,
electric bench drill press, electric sander,
electric cordless screwdriver, hot glue
gun, staple gun.
3. Shoulder slats: Early Daleks (TV and first film) do not
have mesh or slats around their shoulders, just simple
collars.
4 PREVIEW VERSION
17
24
Recommended tools....
Remember, losing your patience is only one step away from losing your fingers...
13
23
2. The base: Film Daleks and TV Daleks in ‘Invasion Earth’
have larger ‘fender’ style bases. Also, standard bases
tended to get taller in later Dalek stories.
Air compressor, radial arm saw, vacuum
forming table, welding equipment, sheet
metal guillotine.
16
15
Jigsaw, electric drill, hacksaw, hammer,
chisel, mallet, screw drivers, tenon saw,
files, assorted clamps, workbench/vice,
hole cutting set.
Luxury items (I wish I had) ....
1
8
10
Dalek building requires a varied number of tools and materials.
It is essential that the manufacturer’s instructions are always followed. Protective
clothing, masks and goggles should always be used when there is any danger of
injury. Also, some of the materials, particularly fibreglass should be used in well
ventilated areas. Keep stray family members and pets well away from materials
and situations which may cause them harm.
If things aren’t going to plan put down the chainsaw (or whatever you are
using) and go and have a nice cup of tea. Problems are often easier to overcome
after a short break.
4
6
2
9
21
Don’t feel that you have to follow these
instructions to the letter, improvise and
if you can think of better ways of doing
something, or you have other materials
that are suitable, use them. Remember,
above all, Dalek building should be fun.
SAFETY
3
Materials for each section are listed
within that section in order to keep
things simple. It is recommended that
readers should familiarise themselves
with the construction methods listed in
all sections before starting to build their
Dalek.
Some builders may consider the
fibreglass construction of the dome a
little daunting as the first step in Dalek
building. In this case, start with an
easier section. Pick a section that you
feel comfortable with, given your
expertise and the tools/materials to
hand. Once you have made a good job
of one of the easier sections you will feel
more confident at attempting something
a little more adventurous.
Above: The plans currently available from Project Dalek.
So which bit is that, then...?
4. eye-stalks: These vary dramatically throughout the
whole of Dalek history. Film ones are often longer than
TV ones and the number of disks and the design of the
iris changes too.
5. Dome lights: Bulbs, drinking beakers, egg-cups and
beehive style car lights have all been used.
6. Gun: Larger bore on film Daleks and sporting octagonal
‘mantles’ on early TV Daleks - not to mention special
‘projectile weapons’ guns used in the 1970’s. For the
latest Daleks, the gun has become angled and chunky.
8. Neck struts: They have a “clover leaf” cross section on
early Daleks but simplify into straight round struts on
later Daleks.They develop corners and little blocks on the
2005 design!
9. Plunger arm: Any number of different plunger sizes and
shapes plus the addition of ‘claws’ on some film Daleks.
Also, the number of telescopic tubes changes from three
to two on some later Daleks.
10. Gun box design: Some gun boxes slope backwards, some
are level. Later ones have an oval plate between the two
ball joint holes.
5 PREVIEW VERSION
The Skirt, Part 3, Panels...
Sitting down...
Skirt panels should be made from thin wooden
sheet, 4mm MDF is ideal, though hardboard or
other materials could be used. Try to avoid wood
that has a grain as this will be difficult to hide
when painting the skirt later on. If your plans
give individual panel dimensions, use these but
double check before cutting. If you don’t have
a set of pre-defined panel shapes, don’t panic,
proceed as follows...
Some would say that the whole point of
having a Dalek is to get inside it and threaten
lesser mortals with imminent extermination.
This is best done from a seated position, so
you must add a seat to the inside of the skirt.
Working one panel at a time, cut out a
slightly over size rectangle then lie it
against the skirt frame so that it covers the
whole area that the final panel will cover.
Clamp it into place, then, using a pencil and
ruler, draw lines on the back of the rectangle starting at the top corners of the
frame and ending at the lower corners. Repeat this for the horizontal lines so the
final shape of the panel is marked out on it’s rear. Cut the panel and test fit it.
Remember the sides of each panel will need to be cut with, or sanded to, an
angle or cut in order for the next panel to butt up to it snugly. It is recommended
that you only fit a panel when you can offer up each adjacent panel to check the
way they fit together. The front two panels have a distinct twist according to most
plans, including those available from Project Dalek - don’t panic, this is normal.
Depending on the plans you are following, other panels may have a slight twist
too.
Secure the panels with wood glue and panel pins (punch in the heads so they
can be hidden with filler). When all the panels are fitted, run strips of fibreglass up
the inside panel joints and around the top and bottom where the panels meet the
frame. This will stop the panels moving around and add great strength. Fill up
any exterior imperfections with car body filler.
If you are fitting the hemispheres from inside you must mark out and cut the
holes (see plans for positioning). Use a drill with a hole cutting attachment and
remember that the lower shoulder collar fits over the skirt by approximately half
an inch so take this into account when positioning the top row of holes. If you are
fitting the hemispheres from the outside (a must for 2005 Series Daleks which
include a black ring around the base of each hemisphere), you must mark out the
centre positions and drill the holes through which the fixing bolts will be fitted
later on. Prime the finished skirt with at least three coats of primer and then sand
using the methods detailed under shoulder construction (Section 3).
Four vertical timber struts should be run from
the top of the frame to the bottom and be
firmly secured. These are positioned near the
rear of the Dalek, leaving enough clear space
to insert hemispheres if needed. Now work
out the height that you want the seat to come
to. Sit on an adjustable office type chair and
move it up and down until your feet can
wheel it around the room (we’ve all done that
before, haven’t we).
This is the height that your seat should be set
to. Cut four further timber struts to this length
and drill/bolt them to the sides of the other
struts you just fitted so that a seat base can be
slid in on top of them (round edged kitchen
worktop is ideal). Secure the seat base to the
long uprights with right angled brackets.
If you are adding a separate base section,
it may be worth
considering the
attachment of the
seat to this, rather
than the skirt. Be
sure to take the
additional height
of the base into
account when
setting the
seat height.
Section 5: The Base...
The 2005 series
Dalek base
As mentioned in the previous section, you have a choice of how to make
the base. You can either make it as a separate unit or build the skirt up onto
it. If you intend to do this you may wish to consider splitting the base/skirt
for ease of transportation. In either case, the base should first be made up as
one section and then cut, if necessary, once completed. A cut base can be
joined back together and the two skirt halves built on top in the usual way (refer
to Section 4). The large fender bases used on Movie Daleks/MK2 Daleks and the
base section on the 2005 series design are not suitable for splitting. These bases
should be constructed as complete units, bolted to the skirt once both sections are
complete.
For a standard Dalek base you will need a large piece of 18mm MDF for the main base structure.
The perimeter should be marked out and cut using a jigsaw. Remember, measure twice, cut once. You will also
need an ‘inner’ hole cutting, through which your feet can go in order to propel the Dalek into unsuspecting crowds.
When deciding on the size of the inner hole, consider the positioning of the wheels and the seat frame - you need enough board left
over to accommodate these essentials. If in doubt, leave the inner hole until last, when the wheels and skirt are in place.
Using further strips of 18mm MDF, double up the depth of the base edge by attaching a layer of strips to its underside. This will
give you 36mm which should be enough to attach the rubber to. If you wish to build a Dalek with a further, rebated underside, like
the imperial kind, add a second layer of wood to the desired thickness, stepped in from the previous layer.
Movie fender bases are more difficult to construct due to their curved edges. The top of the fender should be made first from
MDF/ply using a jigsaw to cut out the basic shape. The curved edges can be made by building up layers of wood underneath the top
section. These should be glued and screwed together. Once the basic shape has been achieved, the curved edges can be made by
sanding back the built up areas using an electric sander. The sides of the fender can then be made from either wood or rubber
sheeting, depending on which style of Movie Dalek you are making.
16
PREVIEW VERSION
2. Locate: The Plunger Arm...
The plunger arm is made from two or three lengths of aluminium tube. The quantity
depends on which era of Dalek you are building, do your research and refer to your
chosen set of plans. The tubes are different diameters and are therefore able to slide
together creating the desired telescopic effect.
First of all cut the tubes to the correct lengths and then tidy up the cut surfaces.
You now need to ‘bush’ the tubes so that they don’t rattle or fall apart when extended.
This is done by adding layers of PVC insulating tape to either the inner, or outer
surfaces, depending on the tube (see illustration). When the tubes are assembled a plastic
‘cap’ should be added to the end of the large tube (cut a hole in it’s centre for the pole to
pass through). Any suitably sized bottle cap will do (a good tight fit is desirable). This
stops the inner tubes from pulling out backwards. Further bushing may be required
where the tubes connect, depending on the style of Dalek. Small ‘washer’ shaped disks
made from wood, plastic or metal are ideal for this.
Bush, outer
edge of 2nd tube.
Inner wooden pole.
Bush, inner
edge of 2nd tube.
Shopping list...
3x (2x on some Daleks) different
thicknesses of aluminium tube - see
your plans for exact specification.
Wooden pole.
PVC tape.
P40 car body filler.
Can of expanding foam filler.
A plunger (preferably a hemisphere,
not ‘bell’ shaped).
Plunger screwed to inner pole.
P40
ball joint
Plastic end cap.
Bush, outer edge of 3rd tube.
Bush, inner edge of 3rd tube.
The inner most tube needs a wooden dowel threading through it, which extends a
little further than the back of the outer tube when the arm is fully extended - enough to
provide a control handle. The outer end of the wooden pole provides a good surface on
to which the plunger can be screwed. This also prohibits the inner tube from being fully
pulled through the outer tube when the arm is retracted. If available, a longer length of
aluminium tube may also be used. In this case, take care with the measurements when
cutting the thinnest tube. The end of the tube can be plugged with a wooden insert or a
nut can be glued into position, ready to attach the plunger.
To make the ball joint, follow the instructions in Section 4 on building a hemisphere
from P40 car body filler. You will need two of these to make the ball joint. Glue them
together using epoxy resin and then fill and sand to a fine finish. Drill a small pilot hole
all the way through the ball from front to back and then increase the size until the outer
arm tube can be threaded through. Position and fix into place with epoxy resin.
Drill a small hole in the back half of the ball joint and use it to fill the ball with
expanding foam filler. Once dry, seal the hole with car body filler or epoxy putty
(Milliput). Prime and paint the ball joint with the appropriate colour. Thread the arm
into the Dalek from the inside and attach the plunger to the end.
If you are lucky, you may be able to track down some 4” (hollow) steel or aluminium
spheres. These are ideal as ball joints but drilling the holes for the tubes can be tricky.
Wrap the sphere in masking tape to protect it, then clamp it firmly in a drill press before
attempting to cut the holes. Run the drill on a slow speed using a metal cutting hole saw.
Cool the surface with oil as you gradually cut through. Make sure you get both holes
lined up or your arm will be wonky!
The 2005 series plunger is a far more
complicated assembly. In order to create it you
will have to use a hemisphere made from a
stiffer material (not rubber).
The various detail parts can be
cut from flexible plastic or
card, glued on to
the inside and
outside surfaces.
The disks to the
rear of the
plunger (and the
plungers rim) can
be made from
wood or plastic, glued into
position.
The completed ‘sucker’ should then be
filled, sanded and painted black. Note that this
style of plunger has detailing on both the
inside and outside of the suction cup.
Wave it about...
What you put on the end of your
Dalek’s arm will depend on which style
of Dalek you are building. Most Daleks
have a standard plunger attachment
while some Movie Daleks have a claw.
Other ‘specialist’ arms have also been
used from time to time, including a
cutting torch and cutting claw. Do your
Dalek homework to find out more
about these custom attachments.
Although the plunger is the simplest
solution, modern plungers are often the
wrong shape (bell shaped). You may
have to hunt around the shops to find
one with a reasonable shape and
diameter.
If you have an original plunger from
the 1960s or 1970s, let me know!
The Movie Dalek claw can be made
quite easily from MDF. Cut the two
basic sections out with a jigsaw
and then sand them to a smooth
finish. In order to make both
sections identical, clamp them
together, one over the top of the
other, when sanding the edges.
The rest of the mechanism
can be made from off-cuts of
steel or aluminium fixed with
couple of pivot bolts. A working
claw can be produced with a
little extra effort by adding two
flat springs to the rear of the
central pivots. these push the
claw into the open position.
Pulling back a central rod (inside the
arm) closes the claw.
20 PREVIEW VERSION
Section 10: Advanced Dalek Building...
Motivation...
This section covers the aspects of Dalek building which you may wish to
considers after you have gained a little experience. Later we’ll take an in-depth
look at fibreglassing techniques. First, lets look at motorising the Dalek by
adding the running gear from an electric wheelchair...
Daleks are fun to play around in but
after a while they can make your leg
muscles cry for mercy. It’s at this point
that many Dalek builders look for
salvation in the form of ... motorisation.
Part 1: Motorisation.
An ideal source of the parts you need to
motorise a Dalek can be found on that
‘robot wars’ favourite, the electric
wheelchair.
What bits do I need?
Purchasing a complete second hand chair is by far the best option when looking for
the parts you require. A complete chair is guaranteed to have all the parts and, if the
batteries are good, it can be seen running before you part with your hard earned cash.
Second hand chairs with ‘good’ batteries are few and far between. The batteries are so
often degraded due to either age of lack of charging/use. Whatever price the chair is,
always budget for new batteries. If the batteries with the chair turn out to be serviceable,
so much the better.
I’ve got my chair, now what?
It is possible to actually fit a whole chair assembly into a Dalek. This is best done when
you are building the Dalek ‘around’ the chair as opposed to ‘retro-fitting’ an existing
Dalek. This has been done successfully but it is not easy and can cause headaches when
trying to find suitable mounting points for the base/skirt section.
If you are aiming to just build around the chair, then its basically a case of using
whatever mounting opportunities your chair has to fix the Dalek in position. Remember
that all that metal work does add weight to the finished article, so if anything can be
removed (steps, leg plate etc), then remove it.
Most Dalek builders will opt to strip the chair down completely and just use the
electrical items. This makes it easier to build a chassis for ‘new’ Daleks and is absolutely
essential when retro fitting into an existing Dalek. Note: It is next to impossible to ‘retrofit’ a full working wheelchair into an existing Dalek.
Battery box.
Joystick unit.
Control box(es).
Drive wheels.
Motors/gearboxes
Front wheels.
Make a note of which plugs go in which sockets as you disassemble the parts - get
these connected up wrong, later on and you could end up going backwards (or in
circles).
Under normal circumstances it shouldn’t be necessary to disconnect the wheels from
the motors, however some chairs have small brackets for kerb lifting etc which are
mounted between the motors and the wheels. Removal of these can sometimes mean that
the wheels have to come off in order to access the fixing bolts.
If you are lucky enough to have the user manual for your power chair, there is usually
information on wheel removal and replacement contained therein. If you are working
blind then you may have to poke around to find out how the wheels are fixed in place.
Those electric buggies that you often
see in the streets (and in supermarkets)
are less than ideal for Dalek use. This is
because of the method used for steering
the vehicle, which is usually done by
turning the front wheels via handle
bars. This sort of setup is going to make
a Dalek difficult to manoeuvre and also
tie up both of the operators hands.
An electric wheelchair is usually
controlled by one small joystick. The
steering is achieved by the rear drive
wheels being turned at different speeds.
For example, when the joystick is
pushed left, the right hand wheel turns
faster than the left and wheel, causing
the chair to turn in the desired
direction.
Smooth mould
interior surface
Separated
flange
A similar technique should be used on the larger sections, introducing small
wedges in the problem areas until the sections separate. If all else fails, try
introducing water into the wedged gaps, this will dissolve the release agent and
help the releasing process. Warm water is best as it will work quickly and cause
expansion of the parts.
Once your mould sections are released, you can trim away any excess
matting from around the flanges and generally tidy up the edges. Use a
jigsaw (with a metal cutting blade) to trim the fibreglass and a surform or
wet and dry sandpaper (used wet) to smooth over sharp corners. Always
wear a mask when performing these activities.
Rough interior
surface
The skirt mould sections after
separation from the plug.
The mould sections should be thoroughly washed and dried before any attempt is made
to use them. They can then be bolted together (where required) and thoroughly waxed. The process for
producing the final parts is exactly the same as for producing the moulds. Refer back to the beginning of this
section for the required information. The only minor difference is in the thickness of the laminate and gel-coat,
they needn’t be as thick on the final Dalek sections.
Section 11: Colour and detail quick reference guide...
This has the additional advantage of
allowing the chair (Dalek) to be able to
turn around almost ‘on the spot’
without needing forward motion to
help with the turn - an effect that is
ideal for genuine Dalek manoeuvres!
Power chairs come in several different
makes, shapes and sizes. The most
modern chairs will run of 24v DC
electrics. These 24v motors are the kind
you need for adding motive power to
your Dalek. In general terms, the bigger
the motors, the better.
Story: The Daleks (a.k.a. The Dead Planet/The Mutants)
Story: The Dalek Invasion of Earth
Story: The Dalek Invasion of Earth
Silver and bare aluminium with a grey shoulder section.
Note the lack of slats and mesh plus the number of eye discs.
Slight detail changes including a choice of black or silver eye-ball and
the addition of larger bases and a rear dish.
This is the ‘Saucer Commander’ complete with alternate black and
silver panels and a black dome.
Story: The Dalek Invasion of Earth
Story: The Chase
Story: The Chase
The Dalek Supreme with black dome, shoulders and skirt. Original
dome lights and gun ‘mantles’ are still in situ.
The first story to see the appearance of mesh and slats. Also the first
appearance of ‘egg cup’ style dome lights.
The Dalek Supreme regained his grey shoulders. A darker blue was also
used for the hemis’ from this story onwards.
Story: Mission to the Unknown (a.k.a. Dalek Cutaway)
Story: Mission to the Unknown (a.k.a. Dalek Cutaway)
Story: The Daleks’ Master Plan
Silver Dalek as per ‘The Chase’ complete with three part plunger arm
which remained until the 1970s.
The Dalek supreme wasn’t updated from his “Chase” livery and like all
previous Daleks, had a blank stare with no pupil.
Standard silver and grey Dalek. In some scenes the plunger arm was
replaced with a pyroflame arm or seismic detector.
Most power chairs which are designed
to carry adults will happily pull along
an average size human in an average
weight Dalek. Some of this depends on
how heavy your Dalek is. If you have
already built a Dalek and made it out of
heavyweight materials, you may cause
the motors to struggle.
If you are scratch building the Dalek
onto a motor assembly it is worth
bearing the weight aspect in mind,
choosing materials carefully.
Bits to keep...
The usual method of wheel attachment uses a large nut and a ‘lock washer’ which
stops the nut from unscrewing as the wheels turn. These are normally hidden behind
plastic (or rubber) covers at the hub of each wheel. Remove the covers and asses the
method by which the wheels are attached. If you find a nut and locking tab assembly
proceed as follows...
Motors complete with gearboxes,
wiring and wheels.
Control box.
Use a screwdriver to lever the ‘closed’ locking tabs away from the nut so that the nut
will be free to turn. A locking washer will usually have an arm bent up over one of the
‘flats’ of the nut and one bent in the opposite direction, gripping a recess in the gearbox
body.
Battery boxes.
27 PREVIEW VERSION
If this is not enough to prize the sections apart, you will need to use small wooden wedges.
The wooden stirring sticks you can buy from automotive paint suppliers are ideal for
this. In the case of the dome, a stick can be introduced between the mould and the
plug (or mould and final dome) and then gently tapped until it curves around
the chamfer, all the way to the top of the dome. The wood is thin enough and
here is enough flexibility to allow it to do this. On most occasions the two
sections will separate. If this does not happen, introduce a second wedge at the
other side. This will almost certainly lever the two sections apart.
Joystick box.
Seating upholstery.
Associated cables.
32 PREVIEW VERSION
The author’s Dalek, created using
the techniques detailed within this guide.
I hope this guide has been of some use to you,
and I wish you many happy hours of Dalek building.
Remember, be careful, stay safe, and always
know where your hands are in relation to that blade!
John Darley
This guide has been produced for anyone wanting to build a Dalek for their own personal use.
It is not this guide’s intention to encourage any commercial activity regarding the selling of Daleks.
The Dalek name and image © B.B.C./Terry Nation 1963.
At the time of writing, the BBC copyright for the licensing and
selling of the full size Dalek form is held by This Planet Earth Ltd., Crewe, Cheshire.
This document © 2006 John Darley. All rights reserved.
35 PREVIEW VERSION
W
E
I
V
E
PR
N
O
I
S
R
E
V