1
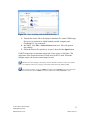
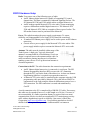
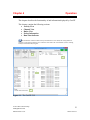
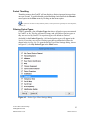
Appendix A GenFIT Software Version 2.10 600-2.10.0-JJ.1 1/17/2014 © 2014 The Genesis Group All Rights Reserved Printed in the U.S.A. 2 600-2.10.0-JJ.1 Trademarks The following are registered trademarks of Motorola: SmartZone, SmartNet, ASTRO®. Any other brand or product names are trademarks or registered trademarks of their respective holders. The Genesis Group Trademark Information GenWatch3® is a registered trademark of GenCore Candeo, LTD., a subsidiary of Burks GenCore Co., Inc. D.B.A. The Genesis Group and Phil Burks. Copyright Copyright © 2014; Burks GenCore Co., Inc. D.B.A. The Genesis Group and Phil Burks. All rights are reserved. No part of this publication or the associated program may be reproduced, transmitted, transcribed, in whole or in part, in any form or by any means, whether it is mechanical, magnetic, optical, electronic, manual or otherwise, without the prior written consent of Burks GenCore Co., Inc. D.B.A: The Genesis Group and Phil Burks 5800 Eagles Nest Blvd Tyler, Texas 75703. Includes technology licensed from Motorola. Disclaimer The GenWatch3 User’s Manual is printed in the U.S.A. Burks GenCore Co., Inc. D.B.A. The Genesis Group and Phil Burks believe that the information included in this manual is correct; however, Burks GenCore Co., Inc. D.B.A. The Genesis Group and Phil Burks reserves the right to alter, revise and make periodic changes to the manual and its contents. Burks GenCore Co., Inc. D.B.A. The Genesis Group does not assume responsibility to notify any person of such revisions or changes. While we have taken strides to carefully examine our software and documentation and believe that it is reliable, the Genesis Group and Phil Burks assume no responsibility for the use of the manual, or GenWatch3 software, nor for any patent infringements or other rights of third parties who may use the manual or the GenWatch3 software. Burks GenCore Co., Inc. D.B.A. The Genesis Group and Phil Burks make no representations or warranties with respect to the contents or fitness for a particular purpose beyond the cost of the software paid by the end-user. The software contains valuable trade secrets and proprietary information. Unauthorized use of the manual or software can result in civil damages and criminal prosecution. As an end user, you agree to abide by and heed these statements. License Title to the media on which the program is recorded and to the documentation in support of the product is transferred to you, but title to the program, and all subsequent copies of the program, despite the form or media in or on license is not a sale of the original or any subsequent copy. You assume responsibility for the selection of the program to achieve your intended results, and for the installation, use, and results obtained from the program. Refer to the GenWatch3 Manual Overview for your full license. All license information contained on pages 4-7 (Book 600-2.10.0-AA.1) are to be considered as contained herein. Support Customer satisfaction is our number one priority at Genesis. We are here to provide you with the best software possible, and we want to know when you have any questions, concerns or problems with GenWatch3 so that we can make it a better product for everyone. Refer to the Troubleshooting & Support section of the GenWatch3 Manual Shell (Book 600-2.10.0-AA.1) for complete support and contact information. © 2014 The Genesis Group All Rights Reserved Printed in the U.S.A. 3 600-2.10.0-JJ.1 Document History Revision 2.0.3 Description Initial Release Author CBH 2.0.4 2.0.5 2.0.6.6 2.1 2.2 2.4 2.5 2.5 Updates for 2.0.4 Release revisions Revision before release Revision before release Document reviewed Revisions Before Release Revisions Before Release Added License Agreement screen JPS JAW CLB WRK WRK CWF CWF KIH 2.6 2.7 2.8 2.9 2.10 Revisions Before Release Revisions Before Release Revisions Before Release Revisions Before Release Revisions Before Release CWF CWF ATG REB ATG © 2014 The Genesis Group All Rights Reserved Printed in the U.S.A. 4 600-2.10.0-JJ.1 Table of Contents Trademarks ........................................................................................................................................... 3 The Genesis Group Trademark Information ......................................................................................... 3 Copyright .............................................................................................................................................. 3 Disclaimer ............................................................................................................................................. 3 License .................................................................................................................................................. 3 Support .................................................................................................................................................. 3 DOCUMENT HISTORY ................................................................................................................................. 4 TABLE OF CONTENTS ............................................................................................................................. 5 ABOUT THIS MANUAL ............................................................................................................................ 7 GOALS ........................................................................................................................................................ 7 WHO SHOULD READ THIS MANUAL? ......................................................................................................... 7 HOW THIS MANUAL IS ORGANIZED ........................................................................................................... 7 CHAPTER 1 OVERVIEW ..................................................................................................................... 9 WHAT IS GENFIT?...................................................................................................................................... 9 HOW IS GENFIT USED?............................................................................................................................... 9 CHAPTER 2 INSTALLATION ............................................................................................................11 INSTALLATION ...........................................................................................................................................11 CHAPTER 3 GETTING STARTED ....................................................................................................15 CREATING A GW_RSP25 CONNECTION ....................................................................................................15 VERIFYING CONNECTIVITY .......................................................................................................................16 CREATING A LICENSE ................................................................................................................................16 RSP25 HARDWARE SETUP ........................................................................................................................18 STARTING GENFIT ....................................................................................................................................19 DISCONNECTING ........................................................................................................................................21 CHAPTER 4 OPERATION ..................................................................................................................23 ACTIVITY VIEW .........................................................................................................................................24 ACTIVITY FILTERING .................................................................................................................................24 Suppressing Duplicate Packets ............................................................................................................24 Packet Throttling .................................................................................................................................25 Filtering Packet Types .........................................................................................................................25 CHANNEL VIEW .........................................................................................................................................26 BUSIES VIEW .............................................................................................................................................26 MESSAGE PANEL .......................................................................................................................................26 PACKET INFORMATION ..............................................................................................................................27 RUN-TIME INDICATOR ...............................................................................................................................28 © 2014 The Genesis Group All Rights Reserved Printed in the U.S.A. 5 600-2.10.0-JJ.1 © 2014 The Genesis Group All Rights Reserved Printed in the U.S.A. 6 600-2.10.0-JJ.1 About this Manual Goals This manual describes the role and function of the GW_GenFIT tool in the GenWatch3 solution. Who Should Read This Manual? This manual is written for the intended audience of novice to mid-level Motorola trunked radio system users and novice to mid-level PC users. This manual assumes the audience knows how to start GenWatch3 and open the GW_LaunchPad, logged in as the Admin user. How This Manual Is Organized This manual is organized as follows: Overview: Describes briefly what GenFIT is and its intended use. Installation: Describes how to install GenFIT. Getting Started: Describes how to license GenFIT for use. Operation: Describes how to utilize GenFIT’s functionality. This manual contains the following images, used to indicate that a segment of text requires special attention: Additional Information: Additional information is used to indicate shortcuts or tips. Warning: Warnings are used to indicate possible problem areas, such as a risk of data loss or incorrect/unexpected functionality. © 2014 The Genesis Group All Rights Reserved Printed in the U.S.A. 7 600-2.10.0-JJ.1 © 2014 The Genesis Group All Rights Reserved Printed in the U.S.A. 8 600-2.10.0-JJ.1 Chapter 1 Overview This chapter briefly describes GenFIT, its functionality and its intended use. This chapter contains the following sections: What is GenFIT?: Describes GenFIT’s purpose and functionality. How is GenFIT used?: Describes GenFIT’s intended use. What is GenFIT? The name GenFIT stands for Genesis Field Investigation Tool. GenFIT is a standalone diagnostic tool, designed to provide basic “in-the-field” functionality similar to that of GenWatch3 modules GW_Activity and GW_Channel. How is GenFIT used? GenFIT’s compact design enables it to be installed on a laptop (or similar device) and used out in the field as a convenient diagnostic resource. GenFIT operates on a license for a single site for a set length of time. GenFIT is used in conjunction with an RF-modem and an RSP25 device in order to receive data. © 2014 The Genesis Group All Rights Reserved Printed in the U.S.A. 9 600-2.10.0-JJ.1 © 2014 The Genesis Group All Rights Reserved Printed in the U.S.A. 10 600-2.10.0-JJ.1 Chapter 2 Installation This chapter covers the process of installing GenFIT and contains the following sections: Installation: Describes the procedure for installing GenFIT. Installation The GenFIT Installation package contains the following file: GenFITInstaller.msi: Contains the GenFIT installation files. Double-click GenFITInstaller.msi to launch the GenFIT installation. The installation will first verify that the Microsoft .Net Framework 4.0 has been installed on the machine. GenFIT cannot be installed if this prerequisite is missing. The first installation window is the Welcome window as shown in Figure 2.1. Click Next to continue. Click Cancel on any window to exit the installation. Figure 2.1 – Welcome Window © 2014 The Genesis Group All Rights Reserved Printed in the U.S.A. 11 600-2.10.0-JJ.1 The License Agreement window, shown in Figure 2.2, displays the end user license agreement for GenFIT. After reviewing the agreement, select I Agree and click Next to continue. Figure 2.2 – License Agreement Window The Destination Folder window, shown in Figure 2.3, displays the installation folder. If you would like to change this folder, click the Change... button. Click Next to continue. Figure 2.3 – Destination Folder Window © 2014 The Genesis Group All Rights Reserved Printed in the U.S.A. 12 600-2.10.0-JJ.1 Figure 2.4 – Change Destination Folder Dialog The Ready to install GenFIT window is shown in Figure 2.5. Click Install to proceed with the installation. Click Back to change installation options. Figure 2.5 – Ready to install GenFIT Window © 2014 The Genesis Group All Rights Reserved Printed in the U.S.A. 13 600-2.10.0-JJ.1 The Installing GenFIT window, shown in Figure 2.6, is displayed while program files are being transferred. Figure 2.6 – Installing Window Figure 2.7 shows the Completed the GenFIT Setup Wizard window. GenFIT program files have been installed and are ready to use. Click Finish to exit the installation. Figure 2.7 – Installation Complete Window The GenFIT Installer package places a shortcut on the desktop for convenience. © 2014 The Genesis Group All Rights Reserved Printed in the U.S.A. 14 600-2.10.0-JJ.1 Chapter 3 Getting Started This chapter describes how to properly license, start and connect GenFIT to an RSP25 packet source. This chapter contains the following sections: Creating a GW_RSP25 Connection: Describes how to start the GW_RSP25 module and configure a packet source. Verifying Connectivity: Describes how to ensure a connection works. Creating a License: Describes how license to GenFIT for a connection. Starting GenFIT: Describes how to start and connect GenFIT. Disconnecting: Describes how to disconnect from a packet source. In order to complete the steps listed and license GenFIT, the user must be logged in as the Admin user in GenWatch3. If not logged into GenWatch3 as the Admin user, the user will not be able to generate a GenFIT license. Creating a GW_RSP25 Connection To receive packets from a packet source, you must add a connection. To load the GW_ RSP25 GUI and add a GW_ RSP25 connection, take the following steps: 1. Locate the GW_RSP25 module icon in the Modules list. 2. Double-clicking the GW_ RSP25 icon will load the GW_ RSP25 GUI. 3. Click the Add button: GW_ RSP25 will show the default settings for a new connection and a Connection Alias value of something similar to new connection 1. 4. Change the connection properties to the desired values. 5. Click the Update button. © 2014 The Genesis Group All Rights Reserved Printed in the U.S.A. 15 600-2.10.0-JJ.1 Verifying Connectivity Since a connection cannot be changed or updated in GenFIT itself, it is important to verify the connection works now, before heading out into the field. 1. Verify there is a green activity icon ( ) in the system tray (bottom-right corner of windows, next to the time). In case you have multiple connections, hover over the icons to verify the packet source you intend to use for GenFIT is connected. A red activity icon ( ) in the system tray indicates the connection has not received packets within the last 5 seconds, so return to Creating a Connection and double-check each connection property. See the GW_RSP25 manual for more details. 2. Locate the GW_Activity module icon in the Modules list. 3. Double-clicking the GW_Activity icon will load the GW_Activity GUI. 4. Click the Select All button in the top-right corner of the GW_Activity GUI. 5. Verify packets are being received from the desired system, zone, and site. Scroll to the right, if necessary, to see all fields of data for each packet in the activity list. If no packets from the desired site are being displayed, return to the previous section, Creating a GW_RSP25 Connection and double-check each connection property. Creating a License GenFIT supports multiple connections. In GW_RSP25, notice the Generate GenFIT License button (Figure 3.1). Take the following steps to license an installation of GenFIT for use: 1. Click the Generate GenFIT License button. Figure 3.1 – The Generate GenFIT License button 2. Save the license file in a convenient location, such as the desktop. Do not modify the default filename (GenFIT.FitLicense.lic) in any way (see Figure 3.2). © 2014 The Genesis Group All Rights Reserved Printed in the U.S.A. 16 600-2.10.0-JJ.1 Figure 3.2 – Save As dialog with the default filename 3. Transfer the license file to the laptop or notebook PC with a USB Storage Device or via a network to which both the portable computer and GenWatch3 PC are connected. 4. In GenFIT, click File -> Select License menu item. This will open an Open dialog. 5. Select the license file copied over in step 3, then click the Open button. GenFIT licenses have a maximum usage time of one week, or 168 hours. The usage time of the license decreases for each hour GenFIT is used. When the lifespan expires, the license can no longer be used. GenFIT licenses can be thought of as batteries, which are drained as GenFIT is used. To use GenFIT more, or for a different connection, recharge by re-licensing GenFIT in the GW_RSP25 module. Prior to licensing GenFIT, an entry for TRBO will appear in the Connection menu. Once GenFIT has been licensed for the first time, the TRBO entry will be replaced with a Start Connection... entry. © 2014 The Genesis Group All Rights Reserved Printed in the U.S.A. 17 600-2.10.0-JJ.1 RSP25 Hardware Setup Radio: You can use one of the following types of radio: An EF Johnson digital transceiver capable of outputting P25 control channel data. This data is contained in Outbound Signaling Packets. The EF Johnson RS-5300 and 53SL mobile radios are digital transceivers. An RF-modem capable Motorola XTL series radio. System monitoring requires a Millennium-enabled digital transceiver. The Motorola XTL 2500 and Motorola XTL 5000 are examples of these types of radios. The RF-modem feature must be purchased from Motorola. Power: The radio determines the power supply requirements. To ensure reliability, an Uninterruptible Power Supply (UPS) should be considered. A standard EF Johnson power supply can be used to power an EF Johnson transceiver. Genesis offers a power supply for the Motorola XTL series radios. This power supply includes a place to mount the Motorola XTL series radio. Antenna: The radio must be installed within range of the Trunk System. A high gain, Yagi style directional antenna is recommended for all installations. Good coax design is required between the antenna and the radio. In order to minimize phasing interference in a Simulcast trunking system, the use of a Yagi directional antenna is of utmost importance. Connection to the PC: The radio determines the connection requirements. An EF Johnson digital transceiver is connected via serial port. The EFJ Remote Programming Interface (RPI) can provide a PC connection through the PTT port on the front of the transceiver. At least one Remote Programming Interface is required to program the transceiver. A Motorola XTL series radio is connected to the computer using the USB programming cable provided by Motorola. This cable allows GenFIT to communicate to the radio using the Motorola Millennium protocol over a PPP connection. The PPP connection is created and maintained by GenFIT. A serial connection to the PC is completed by a DB9 RS-232 cable. If necessary, this cable may be extended; however, a cable length over 50 feet (15 meters) is not recommended. If a farther separation distance is required, there are many companies that offer devices that can extend an RS-232 connection up to many miles with no degradation in speed or reliability. One source is Black Box Corporation, http://www.blackbox.com. Use good data standards to decide if shielded cable is required for a particular situation and RF environment. © 2014 The Genesis Group All Rights Reserved Printed in the U.S.A. 18 600-2.10.0-JJ.1 Starting GenFIT To start GenFIT, take the following steps: 1. Double-click the GenFIT shortcut located on the desktop by default. 2. On the main menu, navigate to and check Connection Start Connection from the menu as shown in Figure 3.3. An unchecked menu item indicates an inactive connection. Figure 3.3 – Unchecked Start Connection menu item 3. If GenFIT was licensed for more than one connection, you will be presented with the Choose a Connection dialog box (Figure 3.4). Choose a connection from the dropdown list and click OK. If GenFIT was only licensed for a single connection, this dialog will not be displayed, and you may skip to step 4 below. Figure 3.4 – Choose a Connection dialog 4. On the RSP25 Settings dialog that appears, select “Serial” and the serial port on which the site feed is connected to the laptop, or choose Millennium. 5. Click OK on the RSP25 Settings dialog as shown in Figure 3.5. © 2014 The Genesis Group All Rights Reserved Printed in the U.S.A. 19 600-2.10.0-JJ.1 Figure 3.5 – RSP25 Settings dialog Activity on the site GenFIT is licensed for will now appear as packets, scrolling in the Activity view. After licensing GenFIT for the first time the Connection menu will be enabled only while GenFIT has a valid license. © 2014 The Genesis Group All Rights Reserved Printed in the U.S.A. 20 600-2.10.0-JJ.1 Disconnecting To disconnect from a packet source, navigate to and unselect Connection Start Connection, as shown in Figure 3.6. A checked menu item indicates an active connection. Figure 3.6 – Checked Start Connection menu item © 2014 The Genesis Group All Rights Reserved Printed in the U.S.A. 21 600-2.10.0-JJ.1 © 2014 The Genesis Group All Rights Reserved Printed in the U.S.A. 22 600-2.10.0-JJ.1 Chapter 4 Operation This chapter describes the functionality of and information displayed by GenFIT. This chapter contains the following sections: Activity View Channel View Busies View Packet Information Run-Time Indicator The information visible in both the activity and channel view is archived, but closing GenFIT or stopping a connection then starting a new connection will result in all visual elements (such as scrolling activity or channel blocks) being lost. 2 3 1 4 Figure 4.1 – The GenFIT GUI © 2014 The Genesis Group All Rights Reserved Printed in the U.S.A. 23 600-2.10.0-JJ.1 Activity View The Activity view, shown as area 1 in Figure 4.1, scrolls system activity packets in real-time, displaying the following fields of information for each packet received on the licensed packet source: Description: Broad category of the activity (i.e. Affiliation, Status, Message, etc.). Group: Target group (if any) of the activity. Radio ID: Originating radio ID (if any) of the activity. Type: Activity subcategory. Further describes the type of activity. Target ID: This will contain one of the following values, if the value is provided in the packet: o Target Radio ID: For call alerts, private calls, etc. o Target Supergroup: For dynamic regrouping. o Diagnostic Condition Description: For system diagnostics. o Message Number: For messages. o Status Number: For statuses. o Reason: For rejects, corruption, etc. Channel: The frequency of the channel the activity took place on. For multisite data, this column will be empty. Timestamp: The date and time when the activity was received or originated. This will be the packet timestamp for packets that include a timestamp. Otherwise it will be the date and time the packet was received by the input module. Elapsed Time: The duration of the activity. Only calls and busies provide an elapsed time value. Use the pause feature in the activity view to immediately stop the scrolling of packet data and leave existing data in the activity list. Activity Filtering Suppressing Duplicate Packets Some input sources echo activity packets in triplicate and quadruplicate. Showing more than one instance of each of these activities is rarely desired. To enable/disable duplicate packets, check/uncheck the Suppress Duplicates menu option in the Filter menu by clicking on that menu option. This option has no effect on many multisite packets, as these packets are generally not sent in duplicate, triplicate, etc. © 2014 The Genesis Group All Rights Reserved Printed in the U.S.A. 24 600-2.10.0-JJ.1 Packet Throttling Throttling ensures that GenFIT will not display a distinct input packet more than once per second. To enable/disable packet throttling check/uncheck the Throttle menu option in the Filter menu by clicking on that menu option. This option has no effect on many multisite packets, as these packets are generally not sent in duplicate, triplicate, etc. Filtering Packet Types GenFIT maintains a list of Packet Types that shows all packet types encountered by GenFIT so far. This list will start off empty and will add new packet types as they are received by GenFIT. New packets types will default to checked (Included) in the Packet Types list. All checked packet types will appear in the Activity List as they are received. Packet types that are unchecked will not be shown in the Activity List. To open the Packet Type Filter Settings dialog, shown in Figure 4.2, click By Packet Type in the Filter menu. Figure 4.2 – Packet Type Filter Settings dialog © 2014 The Genesis Group All Rights Reserved Printed in the U.S.A. 25 600-2.10.0-JJ.1 Channel View The Channel view displays decoded channel activity and call information for each channel at a given site, shown as area 2 in Figure 4.1. The following fields of information for call activity are displayed on the appropriate channel block: Radio ID: Originating radio ID (if any) of the activity. Talkgroup ID: Group (if any) on which the busy or call took place. Elapsed Call Time: The duration of the activity. Only calls and busies provide an elapsed time value. Note that calls with extremely short durations, such as those consisting of a single data packet, may not appear on the channel block until they are over. Channel: The frequency of the channel the activity took place on. For multisite data, this area will be empty. Busies View The Busies view, shown as area 3 in Figure 4.1, displays a history of busy packets. The following fields of information for busies are displayed from each busy packet: ID: Originating radio ID (if any) of the busy. Group: Group (if any) on which the busy call took place. Type: Activity subcategory. Further describes the type of activity. Timestamp: The date and time when the busy was received or originated. This will be the packet timestamp for packets that include a timestamp. Otherwise it will be the date and time the packet was received by the input module. Elapsed Time: The duration of the busy. Message Panel The Message panel, shown as area 4 in Figure 4.1, displays messages for errors, and to indicate when a connection is started or stopped. © 2014 The Genesis Group All Rights Reserved Printed in the U.S.A. 26 600-2.10.0-JJ.1 Packet Information In either Activity view or Channel view, it is possible to see additional information about a call or event by double-clicking on a list item or channel, respectively. Figure 4.3 – Packet Information window This window provides a list of all information that GenFIT knows about a decoded data packet. When opened in Channel view, information is shown pertaining to the current (or last known) activity happening on the double-clicked channel. © 2014 The Genesis Group All Rights Reserved Printed in the U.S.A. 27 600-2.10.0-JJ.1 Run-Time Indicator The run-time indicator located in the top-right corner of GenFIT displays at all times the remaining percentage of run-time for the license currently being used. The run-time indicator begins at 100% and decreases as time passes (see Figure 4.4, indicating 99% of original run-time remains). Figure 4.4 – Run-Time Indicator When the Run-Time Indicator shows 10%, the current license has just less than 17 hours of run-time remaining. At 1%, less than 2 hours remain. © 2014 The Genesis Group All Rights Reserved Printed in the U.S.A. 28 600-2.10.0-JJ.1