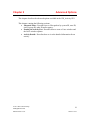
1
GenWatch3® GW_Activity Software Version 2.3 Module Book 600-2.3.0-E.1 4/8/2011 © 2011 The Genesis Group All Rights Reserved Printed in the U.S.A. 2 600-2.3.0-E.1 Trademarks The following are registered trademarks of Motorola: SmartZone, SmartNet, ASTRO®. Any other brand or product names are trademarks or registered trademarks of their respective holders. The Genesis Group Trademark Information GenWatch3® is a registered trademark of GenCore Candeo, LTD., a subsidiary of Burks Gencore Co., Inc. D.B.A. The Genesis Group and Phil Burks. Copyright Copyright © 2011; Burks Gencore Co., Inc. D.B.A. The Genesis Group and Phil Burks. All rights are reserved. No part of this publication or the associated program may be reproduced, transmitted, transcribed, in whole or in part, in any form or by any means, whether it is mechanical, magnetic, optical, electronic, manual or otherwise, without the prior written consent of Burks Gencore Co., Inc. D.B.A: The Genesis Group and Phil Burks 601 Shelley Dr., Suite 202 Tyler, Texas 75701. Includes technology licensed from Motorola. Disclaimer The GenWatch3 Users Manual is printed in the U.S.A. Burks Gencore Co., Inc. D.B.A. The Genesis Group and Phil Burks believe that the information included in this manual is correct; however, Burks Gencore Co., Inc. D.B.A. The Genesis Group and Phil Burks reserves the right to alter, revise and make periodic changes to the manual and its contents. Burks Gencore Co., Inc. D.B.A. The Genesis Group does not assume responsibility to notify any person of such revisions or changes. While we have taken strides to carefully examine our software and documentation and believe that it is reliable, the Genesis Group and Phil Burks assume no responsibility for the use of the manual, or GenWatch3 software, nor for any patent infringements or other rights of third parties who may use the manual or the GenWatch3 software. Burks Gencore Co., Inc. D.B.A. The Genesis Group and Phil Burks make no representations or warranties with respect to the contents or fitness for a particular purpose beyond the cost of the software paid by the end-user. The software contains valuable trade secrets and proprietary information. Unauthorized use of the manual or software can result in civil damages and criminal prosecution. As an end user, you agree to abide by and heed these statements. License Title to the media on which the program is recorded and to the documentation in support of the product is transferred to you, but title to the program, and all subsequent copies of the program, despite the form or media in or on license is not a sale of the original or any subsequent copy. You assume responsibility for the selection of the program to achieve your intended results, and for the installation, use, and results obtained from the program. Refer to the GenWatch3 Manual Overview for your full license. All license information contained on pages 4-7 (Book 600-2.3.0-AA.1) are to be considered as contained herein. Support Customer satisfaction is our number one priority at Genesis. We are here to provide you with the best software possible, and we want to know when you have any questions, concerns or problems with GenWatch3 so that we can make it a better product for everyone. Refer to the Troubleshooting & Support section of the GenWatch3 Manual Shell (Book 600-2.3.0-AA.1) for complete support and contact information. © 2011 The Genesis Group All Rights Reserved Printed in the U.S.A. 3 600-2.3.0-E.1 Document History Revision 2.0.2 2.0.3 2.0.4 2.0.5 2.0.6 2.0.6 2.0.6.6 2.2 Description Initial Release Revisions before Release Changed to reflect new Advanced Filter options Revisions before Release Updated screenshots with F1 help image Update Activity Values details Revisions before Release Revision before release © 2011 The Genesis Group All Rights Reserved Printed in the U.S.A. Author JAW JPS JAW TDW REB CLB JAW CWF 4 600-2.3.0-E.1 Table of Contents Trademarks ........................................................................................................................................... 3 The Genesis Group Trademark Information ......................................................................................... 3 Copyright .............................................................................................................................................. 3 Disclaimer ............................................................................................................................................. 3 License .................................................................................................................................................. 3 Support .................................................................................................................................................. 3 DOCUMENT HISTORY ................................................................................................................................. 4 TABLE OF CONTENTS ............................................................................................................................. 5 ABOUT THIS MANUAL ............................................................................................................................ 7 GOALS ........................................................................................................................................................ 7 WHO SHOULD READ THIS MANUAL? ......................................................................................................... 7 HOW THIS MANUAL IS ORGANIZED ........................................................................................................... 7 CHAPTER 1 OVERVIEW ..................................................................................................................... 9 WHAT IS GW_ACTIVITY? .........................................................................................................................10 MONITORING CHANNEL ACTIVITY ............................................................................................................10 Activity Values .....................................................................................................................................11 Maximizing the Activity List .................................................................................................................13 CUSTOMIZING CHANNEL ACTIVITY ...........................................................................................................13 Changing Activity List Font and Size ...................................................................................................13 Enabling/Disabling the Green Bar ......................................................................................................14 Showing/Hiding Columns ....................................................................................................................14 Reordering Columns ............................................................................................................................15 Adding a Little Color to Your Life .......................................................................................................16 Disabling Packet Throttling .................................................................................................................16 Filtering Packet Types .........................................................................................................................16 Selecting All Packets ............................................................................................................................17 Unselecting All Packets .......................................................................................................................17 Suppressing Duplicate Packets ............................................................................................................17 CHAPTER 2 ADVANCED OPTIONS .................................................................................................19 ADVANCED FILTERS ..................................................................................................................................20 System Filter ........................................................................................................................................20 Group Filter .........................................................................................................................................22 Radio IDs Filter ...................................................................................................................................22 Agencies Filter .....................................................................................................................................23 PAUSING THE ACTIVITY LIST.....................................................................................................................24 Pause Window Options ........................................................................................................................25 Opacity (available in menu only) .................................................................................................................... 25 Print (available in menu and right-click) ......................................................................................................... 25 Select All… (available in right-click only) ..................................................................................................... 25 ACTIVITY DETAILS ....................................................................................................................................26 © 2011 The Genesis Group All Rights Reserved Printed in the U.S.A. 5 600-2.3.0-E.1 © 2011 The Genesis Group All Rights Reserved Printed in the U.S.A. 6 600-2.3.0-E.1 About this Manual Goals This document describes the role and function of the GW_Activity module and GW_ Activity GUI (Graphical User Interface) within the GenWatch3 solution. Who Should Read This Manual? This document is written for an intended audience of novice to intermediate trunked radio system users and novice to intermediate PC users. How This Manual Is Organized This manual is organized as follows: Overview: Describes the basic function of the GW_Activity module and GUI. Advanced Options: Describes the function of the advanced GW_Activity options. This manual contains the following images, used to indicate that a segment of text requires special attention: Additional Information: Additional information is used to indicate shortcuts or tips. Warning: Warnings are used to indicate possible problem areas, such as a risk of data loss, or incorrect/unexpected functionality. © 2011 The Genesis Group All Rights Reserved Printed in the U.S.A. 7 600-2.3.0-E.1 © 2011 The Genesis Group All Rights Reserved Printed in the U.S.A. 8 600-2.3.0-E.1 Chapter 1 Overview This chapter defines the GW_Activity module and GW_ Activity GUI and gives instructions on filtering and color-coding packets. This chapter contains the following sections: What is GW_Activity?: Defines the GW_Activity module and GUI. Monitoring Channel Activity: Describes how to interpret the data in the activity list. Customizing Channel Activity: Describes how to customize the GW_Activity GUI. Figure 1.1 –GW_Activity View Screen © 2011 The Genesis Group All Rights Reserved Printed in the U.S.A. 9 600-2.3.0-E.1 What is GW_Activity? The GenWatch3 GW_Activity GUI shows real-time activity from each GenWatch3 input connection. These input connections can vary from single-site connections monitoring a control channel to multi-site connections receiving data from a data stream. Through this screen you can: Monitor channel activity. Filter the packet types. Assign colors to specific packet types. Customize the font and column order of the activity list. Suppress duplicate packets. Pause the activity list. Print the activity list. Monitoring Channel Activity The GenWatch3 GW_Activity GUI provides the activity list. This list allows you to view control channel or multi-site stream activity in real time. For a description of the type of information that can be received for a particular input type, refer to the module book for the input module. Refer to the Troubleshooting & Support section of the GenWatch3 Manual Shell (Book 600-2.3.0AA.1) for complete support and contact information. © 2011 The Genesis Group All Rights Reserved Printed in the U.S.A. 10 600-2.3.0-E.1 Activity Values The activity list contains the following columns: Description: Broad category of the activity (i.e. Affiliation, Status, Message, etc.). Group: Target group (if any) of the activity. Group Alias: Alias of the target group (if there is a group). If the multisite stream includes a group ID alias, this alias will be used. See note on aliases below. ID: Originating radio ID (if any) of the activity. ID Alias: Alias of the originating radio ID (if there is a radio ID). If the multi-site stream includes a radio ID alias, this alias will be used. See note on aliases below. Type: Activity sub category. Further describes the type of activity. Target ID: This will contain one of the following values, if the value is provided in the packet: o Target Radio ID: For call alerts, private calls, etc. o Target Supergroup: For dynamic regrouping. o Diagnostic Condition Description: For system diagnostics o Message Number: For messages o Status Number: For statuses o Reason: For rejects, corruption, etc. o Longitude: For GPS Location info o Latitude: For GPS Location info Target ID Alias: This will contain one of the following values, if the value is provided in the packet. o Target Radio ID Alias: For call alerts, private calls, etc. If the multi-site stream includes a Target Radio ID Alias, this alias will be used. See note on aliases below. o Target Supergroup Alias: For dynamic regrouping. If the multisite stream includes a Target Supergroup Alias, this alias will be used. See note on aliases below. Ch. #: This column will contain o For Control Channel-based Data: The Channel Number that the activity took place on. o For Multi-site Based Data: Comma-separated pairs of <Site Id><Channel Number> for each site channel included in the activity. If the activity includes slot data, comma-separated pairs of <Site Id>-<Channel Number>-<Slot Number> for each site channel slot included in the activity. Busy sites are shown in B-<site1>,<site2> format. Incapable sites are shown following in I-<site1>,<site2> format. See notes below. © 2011 The Genesis Group All Rights Reserved Printed in the U.S.A. 11 600-2.3.0-E.1 Ch. Freq: This column will contain the frequency of the channel the activity took place on. For multi-site based data, this column will be empty. Ch. Alias: This column will contain the alias of the channel the activity took place on. For multi-site based data, this column will be empty. See note on aliases below. Time Stamp: The date and time when the activity was received or originated. This will be the packet time stamp for packets that include a time stamp. Otherwise, it will be the date and time the packet was received by the input module. Elapsed Time: The duration of the activity. Only calls and busies provide an elapsed time. System ID: The system on which the activity originated. System ID Alias: The alias of the system on which the activity originated. See note on aliases below. Zone / RFSS ID: The zone on which the activity originated. Zone / RFSS ID Alias: The alias of the zone on which the activity originated. See note on aliases below. Site ID: The site on which the activity originated. For multi-site data, if the activity is Console-based, this column will contain the first (in numerical order) site of all sites involved in the activity. Site ID Alias: The alias of the site on which the activity originated. See note on aliases below. Incapable sites are sites whose hardware could not support the call type; such as analog sites for digital calls. Busy sites are sites that could not support a channel grant at the time of the call. This could be due to a lack of available channels. You can view the details of an activity by double-clicking on an entry in the activity list. This will result in a dialog box showing every property that GenWatch3 knows about the selected activity. This functionality is also available in the Pause window. Aliases (ID, Group, Target Radio ID, Supergroup, Channel, System ID, Zone / RFSS ID, Site ID) can be changed in the GW_Alias GUI. If the alias has not been changed it will appear in the appropriate column using the respective GenWatch3 default GW$[ID], GW$[Group ID], GW$[System ID], etc. format alias. © 2011 The Genesis Group All Rights Reserved Printed in the U.S.A. 12 600-2.3.0-E.1 Maximizing the Activity List The GW_Activity GUI allows you to resize the activity list. To resize the activity list, follow the steps below: 1. Hover over the slider bar between the Packet Types list and the activity list: This will show a resize mouse pointer. 2. Hold down the left-click button and move the mouse up and down to resize the activity list. 3. You can also double-click on the slider bar to maximize the activity list and hide the Packet Types List. To show the Packet Types List again, double-click on the slider bar. This can also be done by checking/unchecking the Packet Types menu option under the Filter menu. Customizing Channel Activity The visual appearance of the data shown in the activity list can be customized in various ways. Features such as the font, font size, columns, column order, packet type colors, and more can be changed. These allow you to customize the look of the data to fit your needs. Changing Activity List Font and Size The font used in the activity list to display data can be customized to make certain the data is easily readable. The size and types of monitors used to display the GW_Activity GUI can necessitate different fonts or font sizes to make using and watching the GW_Activity GUI easily readable. To change the font or size, click the Font menu option in the View menu. You can also display the Font window by right-clicking on the activity list and choosing the Font menu option from the menu that appears. This will display the Font window allowing you to choose the Font, Font style (italic, bold, etc), Font Size, among other options. Make any changes desired and click the OK button to immediately see your changes in the activity list. Click Cancel in the Font window to cancel any changes you made since opening that window © 2011 The Genesis Group All Rights Reserved Printed in the U.S.A. 13 600-2.3.0-E.1 Figure 1.2 – Font Window Enabling/Disabling the Green Bar Another feature that can be enabled is the Green Bar. When enabled, the background of the rows in the activity list is alternately colored green and white. This allows you to easily distinguish between consecutive packets and not confuse the data on adjacent lines. To enable/disable the Green Bar, either select the Green Bar menu option from the View menu or right-click anywhere on the activity list and select the Green Bar option from the menu that appears. Notice that the Group and Radio ID columns may not change to the green background color. If a Group or Radio ID’s background color has been changed in the GW_Alias GUI, those colors assigned will be used instead. See the GW_Alias module book for more details on changing foreground and background colors for groups and radio IDs. Showing/Hiding Columns The columns shown in the Activity List can be customized to hide or show only certain columns. To select which columns you wish to see in the Activity List, click the Select Columns menu option under the View menu. You can also display this window by right-clicking on the Activity List and choosing the Select Columns menu option from the menu that appears. This will show the Select Columns window allowing you to check or uncheck the columns you wish to see in the Activity List. By default, all columns will be checked and thus will appear in the Activity List. Unchecking any columns in this window will hide that column in the Activity List once you click the OK button. © 2011 The Genesis Group All Rights Reserved Printed in the U.S.A. 14 600-2.3.0-E.1 Figure 1.3 – Select Columns Window Reordering Columns The order in which the columns are shown in the Activity List can be customized simply by dragging and dropping the column headers. This allows you to choose which columns contain the most important information or to group the information in a manner that is best for your needs. To change the location of a particular column, take the following steps: 1. Click and drag the column header (column title) of the column you wish to move. 2. Drag to the left or right until you have reached the desired position. As the column is being dragged, the column you are currently over will be highlighted. 3. Release the mouse button when you have reached the desired position. The column you dragged will be placed at the position of the currently highlighted column. The highlighted column and all columns to its right will now be to the right of the dragged column. All those to the left will continue to be to the left. © 2011 The Genesis Group All Rights Reserved Printed in the U.S.A. 15 600-2.3.0-E.1 Adding a Little Color to Your Life The GW_Activity GUI allows you to color-code each packet type. To assign a color to a packet type, take the following steps: 1. Right-click on the packet type in the Packet Types list that you wish to assign a color to. This will result in a color dialog box. 2. Select the color that you wish to assign to the packet type. 3. Click OK. This will change the color of the selected packet type to the chosen color. All activities of this packet type in the Activity List will also change to the selected color. Notice that the Group and Radio ID columns did not change to the selected color. This is because these columns use the colors assigned to them in the GW_Alias GUI. See the GW_Alias module book for more details on changing foreground and background colors for groups and radio IDs. Disabling Packet Throttling By default, the GW_Activity module throttles packets to send a distinct input packet no more than once per second. For diagnostic purposes, a user that has the DisableThrottle privilege can disable this packet throttling. To enable/disable packet throttling check/uncheck the Throttle menu option in the Filter menu by clicking on that menu option. This option has no effect on many multi-site packets, as these packets are generally not sent in duplicate, triplicate, etc. Throttling is used to reduce network bandwidth between the GW_Activity module and the GW_Activity GUI. When throttling is disabled, GW_Activity uses up to 10 times more network bandwidth. Filtering Packet Types The GW_Activity GUI contains a Packet Types list that shows all known packet types. This list will start off empty and will add new packet types as they are received by GenWatch3. New packets types will default to checked (Included) in the Packet Types list. All checked packet types will appear in the Activity List as they are received. Packet types that are unchecked will not be shown in the Activity List. Figure 1.4 – Two Checked (Included) Packets © 2011 The Genesis Group All Rights Reserved Printed in the U.S.A. 16 600-2.3.0-E.1 Selecting All Packets Click the Select All button to select all packet types in the list. This will show all activity for all known packet types. Unselecting All Packets Click the Unselect All button to unselect all packet types in the list. This will exclude all activity for all known packet types, thus stopping the scrolling activity. Suppressing Duplicate Packets This option is only available to users that have the DisableThrottle privilege (see the GW_Security module book for a detailed description of privileges). Some input sources echo activity packets in triplicate and quadruplicate. Showing more than one instance of each of these activities is rarely desired. To enable/disable duplicate packets check/uncheck the Suppress Duplicates menu option in the Filter menu by clicking on that menu option. This option has no effect on many multi-site packets, as these packets are generally not sent in duplicate, triplicate, etc. © 2011 The Genesis Group All Rights Reserved Printed in the U.S.A. 17 600-2.3.0-E.1 © 2011 The Genesis Group All Rights Reserved Printed in the U.S.A. 18 600-2.3.0-E.1 Chapter 2 Advanced Options This chapter describes the advanced options available in the GW_Activity GUI. This chapter contains the following sections: Advanced Filter: Describes how to filter packets by system ID, zone ID, site ID, group ID, radio ID and/or agency. Pausing the Activity List: Describes how to create a Pause window and the Pause window options. Activity Details: Describes how to view the detailed information for an activity. © 2011 The Genesis Group All Rights Reserved Printed in the U.S.A. 19 600-2.3.0-E.1 Advanced Filters The GenWatch3 GW_Activity GUI, by default, accepts activity from all connected systems, zones/RFSSs, sites, groups, radios and agencies. The sections below describe how to filter the activity. If your activity is filtered by groups, radios or agencies, the GW_Activity GUI will show a filter count and type on the right side of the menu bar. For example, if your activity is filtered by 2 groups, 3 radios and 2 agencies, the menu bar will read: Filtered by: 2 Groups, 3 Radios and 2 Agencies. System Filter If you wish to filter the GW_Activity GUI, based on System, Zone/RFSS or Site, take the following steps: 1. Click on the Advanced… menu option of the Filter menu. This will load the Advanced Filters screen. 2. Click on the System tab. 3. Uncheck the nodes of the Systems, Zone/RFSSs and/or Sites that you wish to exclude. Filters are applied to the scrolling data as you check/uncheck nodes. 4. Click the OK button: This will return you to the GW_Activity GUI. Figure 2.1 – Advanced Filters – System Tab This tree only contains system IDs, zone/RFSS IDs and site IDs received by the GenWatch3 GW_Activity GUI. This screen does not reference the GenWatch3 Alias database for a list of these IDs. For single-site systems, the Advanced Filters options tree will contain a single system, zone/RFSS and site entry. If you operate a multi-site system, then the Advanced Filters options tree could contain multiple System IDs, Zone/RFSS IDs and Site IDs, depending on your system infrastructure. © 2011 The Genesis Group All Rights Reserved Printed in the U.S.A. 20 600-2.3.0-E.1 For multi-site systems, if activity contains a Site ID List and one of the sites in the Site ID List is marked as Allowed, GW_Activity will show this activity. You can see an activity’s Site ID List via the Activity Details window. See the Activity Details section below. © 2011 The Genesis Group All Rights Reserved Printed in the U.S.A. 21 600-2.3.0-E.1 Group Filter If you wish to filter the GW_Activity GUI, based on group, take the following steps: 1. Click on the Advanced… menu option of the Filter menu. This will load the Advanced Filters screen. 2. Click on the Groups tab. 3. Click the Filter Activity by Group option. 4. Click the Add button to add one or more groups. 5. Click the OK button: This will apply your filter and return you to the GW_Activity GUI. Figure 2.2 – Advanced Filters – Groups Tab Radio IDs Filter If you wish to filter the GW_Activity GUI, based on radio ID, take the following steps: 1. Click on the Advanced… menu option of the Filter menu. This will load the Advanced Filters screen. 2. Click on the Radio IDs tab. 3. Click the Filter Activity by Radio option. 4. Click the Add button to add one or more radio IDs. 5. Click the OK button: This will apply your filter and return you to the GW_Activity GUI. Figure 2.3 – Advanced Filters – Radio IDs Tab © 2011 The Genesis Group All Rights Reserved Printed in the U.S.A. 22 600-2.3.0-E.1 Agencies Filter If you wish to filter the GW_Activity GUI, based on agencies, take the following steps: 1. Click on the Advanced… menu option of the Filter menu. This will load the Advanced Filters screen. 2. Click on the Agencies tab. 3. Click the Filter Activity by Agency option. 4. Click the Add button to add one or more agencies. 5. Click the OK button: This will apply your filter and return you to the GW_Activity GUI. Figure 2.4 – Advanced Filters – Agencies Tab © 2011 The Genesis Group All Rights Reserved Printed in the U.S.A. 23 600-2.3.0-E.1 Pausing the Activity List You may wish to pause the Activity List to view a snapshot of activity data or to make double-clicking on a particular activity easier. To pause the Activity List, click the Pause menu button. This will result in a new window. This window contains the data in the Activity List at the time of the pause. Figure 2.5 – Activity Pause Screen © 2011 The Genesis Group All Rights Reserved Printed in the U.S.A. 24 600-2.3.0-E.1 Pause Window Options Opacity (available in menu only) Opacity measures how close a window is to solid (not transparent). You can adjust the opacity of an Activity Pause screen (making it more transparent) to allow you to see real-time activity while viewing the Activity Pause screen. Print (available in menu and right-click) Prints the Activity Pause screen. This screen will print in a landscape format (longer horizontally than vertically). You may need to adjust the column widths of the Activity Pause screen to print the desired data. Select All… (available in right-click only) Contains the following options for selecting like activity in the pause window. Activities on the selected group: Selects all activities with the same Group as the topmost selected activity. Activities from the selected radio ID: Selects all activities with the same ID as the topmost selected activity. Activities of the selected type: Selects all activities with the same Description and Type as the topmost selected activity. Activities in the selected conversation: Selects all activities within the same conversation as the topmost selected activity. This generally involves packets that share a common Conversation Number or Call Index. © 2011 The Genesis Group All Rights Reserved Printed in the U.S.A. 25 600-2.3.0-E.1 Activity Details Each activity shown in the activity screen contains much more information than what is shown in the columns of the Activity List. To view this additional information, take the steps below: 1. Click the Pause button: This will open an Activity Pause window. 2. Double-Click on the desired packet: This will show the Packet Details window, shown below. Figure 2.6 – Packet Information Window © 2011 The Genesis Group All Rights Reserved Printed in the U.S.A. 26 600-2.3.0-E.1