1
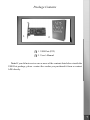
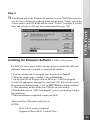
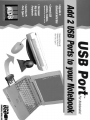
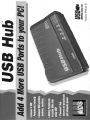
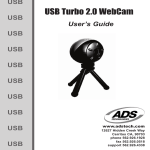
USB Port (PCI)
Users Guide
© 2001 ADS Technologies. All Rights Reserved
First Edition: Revision 2.0 June 2001
Microsoft, MS-DOS, Windows, and Windows 95 and Windows 98 are
registered trademarks of Microsoft Corporation. IBM is a registered trademark of International Business Machines, Inc.
ADS is a registered trademark of ADS Technologies Inc.
ADS Technologies (ADS) makes no warranty of any kind with regard to
this material, including but not limited to, the implied warranties of merchantability and fitness for a particular purpose. The information furnished
within this written document is for information purposes only and is subject to change without notice. ADS Technologies assumes no responsibility or liability for any errors or inaccuracies that may appear herein.
ADS makes no commitment to update or to keep current information
contained within this document.
Table of Contents
A Letter from the President of ADS
Introduction
System Requirements
Package Contents
5
6
6
7
USB Port (PCI)
Installation Guide
9
Installing the USB Port
10
Installing the Software Drivers for Windows 14
Installing the Extension Software for MAC
15
Using Your USB Port
16
Appendixes
Appendix A
How to Contact ADS
Service and Warranty
19
20
Appendix B
FCC Information
4
22
A Letter from the President of ADS Technologies
“Making your Ordinary PC, Extraordinary”
At ADS Technologies we bring the best and latest multimedia technology to
your PC. Whether you want to watch TV on your PC, give a great multimedia
computer presentation on any TV, surf the web from your couch, receive data
broadcast via TV/radio, or connect peripherals efficiently, ADS allows you to do
it…Today. While others wait for these technologies, you can have them right now.
What’s more, all this innovation is reasonably priced. This means that, finally,
it makes sense to upgrade your ordinary PC into an Extraordinary, Multimedia
PC.
ADS products are easy to use. Most of our products are Plug-and-Play and
rarely require any software installation, you simply plug them in. And once they’re
plugged in, they’re easy and simple to use. Now, you can look like a computer
“guru” using the latest multimedia technology, without actually being one.
Finally, all ADS products are backed by a great customer support team and a 1year warranty.
This combination of innovation, affordability, simplicity, and support have made
our products award-winners in the press and at conventions, and best-sellers around
the world. In closing, I wish to thank you for choosing ADS Technologies, and I
hope you enjoy your new multimedia experience.
Sincerely,
Michael McCoy
President
5
Introduction
Add a USB device to your PC!
Instantly add USB peripherals to your PC. Never open your computer case again
after you have your USB Port (PCI) installed. Say good-bye to confusing cables.
The USB Port (Universal Serial Bus) allows you to instantly connect USB devices
to your computer. The USB Port will allow you to attach 2 USB devices instantly.
You never have to worry about running out of slots in your computer or those
confusing IRQ’s again. You can also “Hot Swap” your USB devices. What does
this mean? You never have to power down your PC to install hardware again.
Gamers can switch joysticks on the fly without interrupting their game. Users can
switch their Mice on the fly. Welcome to the USB Revolution.
USB Port Features:
∗
Connect 2 USB devices Instantly
∗
Supports full 12 Mbps and 1.5 Mbps low speed devices
∗
Auto detect speeds and connections of devices
∗
Full compliance with USB Specifications
∗
Plug and Play
∗
Fully Compatible with USB OHCI specification
System Requirements
• Windows 98 or MAC OS (8.6 or later)
• Windows 98 CD or Internet connection for MAC (for
software installation)
• 1 Available PCI Slot
6
Package Contents
1.
2.
r 1.
r 2.
USB Port (PCI)
User’s Manual
Note: If you did not receive one or more of the contents listed above inside the
USB Port package, please contact the vendor you purchased it from or contact
ADS directly.
7
8
9
Installation Guide
Installing the USB Port (PCI)
In this section we will explain how to install your USB Port (PCI) into your PC.
Next to each step there is a check box for your convenience. After each step has
been completed, simply mark the check box and move to the next step.
Step 1
r
Power off the computer, then disconnect the power cord.
Step 2
r
10
Remove each screw found on the back of the computer and remove the shell
from the computer.
Step 3
r With the power cable disconnected from your computer, touch the metal part
of the case to ground yourself. This will discharge any static electricity which
can damage your computer.
Step 4
r Locate an available PCI expansion slot. This will be in the area of your computer where other cards that look similar to the USB Port are installed.
Step 5
r Visually confirm that the USB Port will fit into the available slot you have
chosen.
11
Step 6
r If necessary, remove the knockout on the back of the PC which corresponds to
the PCI slot you have confirmed as your selection. If there is a screw, place it
in a safe spot as you will be using it to attach the USB Port.
Step 7
r Push the USB Port card firmly into the PCI slot. Apply pressure as needed
until the edge connector is completely sealed.
Step 8
r Once the USB Port is fully seated, the gold edge connectors are completely in
the slot.
12
Step 9
r
Mount the USB Port in place with a screw. Make sure the screw is firmly
tightened so the USB Port does not slide out of its seated position.
Step 10
r
Replace the computers shell and screw it in place.
Step 11
r Now that your USB Port card is installed and the shell is in place, you can
safely connect the power cable and move on to the next page for setting up the
software for the USB Port.
13
Installing the Software Drivers (For Windows 98/ME/2000)
Note:
For Windows ME/2000, it may self install with out your intervention. You can verify if the card is installed properly by checking the Device
Manager. The card will appear under the category “Universal Serial Bus
Controller”. It should have an entry for a “USB Open Host Controller” and
the “USB Root hub”
When you initially connect your USB Port, Windows will automatically
detect you have a new device and thus request the Windows 98 CD. To follow
are step by step instructions on how to install the software drivers.
Step 1
r Below is a picture of the dialog box that will notify you that Windows has
detected your new hardware.
Step 2
r Windows will then ask you to insert the Windows 98 CD-ROM. Once you
have inserted the CD-ROM into the CD drive, left mouse click one time on the
button that says “OK.”
14
Step 3
r If the default path to the Windows 98 directory on your CD-ROM is incorrect,
you will see a dialog box as shown in the picture below. Simply type in the
correct path to your CD-ROM and the word “WIN98” (example d:\win98)
drive and left mouse click one time on the button that says “OK.”
Installing the Extension Software (For MAC OS 8.6 or later)
For MAC OS users, please follow the steps below to enable the USB card.
(Internet Connection is required to download the enabler)
1.Visit the website http://www.apple.com, then click on Support
2. When the support page is loaded, click on Download
3. On the right side of the page click on Go to for “USB Card Support”
4. Select the appropriate language for your MAC OS, this will take you to
the appropriate download page. Click on MAC Binary to begin download.
5. After download, double on the new USB file on your desktop
6.Then double click on “USB Card Support” icon in your desktop to begin
the installation.
7.When installation is completed, restart your MAC.
After restart the USB card is ready for use.
NOTES:
MAC OS 8.6 or later is required
Supports all Power MAC’s with PCI bus
15
Using Your USB Port (PCI)
Initializing USB Devices
When you first connect a USB device to your USB Port, Windows
will automatically detect the presence of new hardware. It will request
software drivers. The installation of these software drivers are very similar to the driver installation for your USB Port, so you can use the driver
installation of this manual as a reference.
Adding Additional USB Port Cards
You can add additional USB Port cards to your PC as you may need
them. When installing more than one in a session, be sure to completely
install one card at a time. If you do not install one USB Port card at a
time, you may run into installation problems.
General Troubleshooting
Windows
Q:
The USB card is not detected, how do I fix it?
A:
Reinstall the USB card to another PCI slot.
MAC
Q:
fix it?
My USB device is not being detected, how do I
A:
Make sure that you installed the latest extension/
softwarefor your USB device. You can obtain the latest
extension/software from the manufacturer’ s website.
For more support information, you can visit http://www.adstech.com
and click on SUPPORT
Driver Notes:
USB Card is supported directly by built-in drivers in Windows
98, ME, and 2000 operating systems, as well as by the Apple MAC OS
8.6 or better. USB is not supported under Windows 95, and no drivers
are available to add that support
16
17
18
Appendix A
How To Contact ADS
The ADS team has tried their hardest to make the USB Card as trouble free as
possible. However we know problems may still arise or you may simply have
questions. There are a couple of ways to contact ADS.
Sales:
Phone Number:
562-926-1928
Fax Number:
562-926-0518
E-Mail Address:
[email protected]
Internet Web Site:
http://www.adstech.com
Technical Support:
Phone Number:
562-926-4338
Fax Number:
562-926-0518
Support Website:
http://www.adstech.com and click on SUPPORT
Phone Support Hours:
Monday - Friday (except major holidays)
8:00am - 5:00pm PST
19
Appendix B
Service and Warranty
Service:
If you require assistance with the installation, operation, or application of
your ADS Technologies, Inc. product there are several options available
to you as described in the technical support section of this manual. Your
primary source for information and assistance is always your computer
store or computer parts dealer. If your ADS product needs repair or
replacement, contact your dealer for on-site repair service.
The ADS Technologies technical support and customer service staff can
aid in solving many problems. Our technical support department is
available to repair any ADS Technologies product. Products must be
returned by you or your dealer to our factory for repair or warranty
replacement.
Return/Replacement:
If you need to return your ADS Technologies product you should return
the product directly to the dealer or store where you purchased the
product. Product return policies are set by each individual computer store
or dealer. ADS Technologies, Inc. cannot be responsible for the actions
or policies set by our dealers. If your desire to return the product for a
refund, you must get the refund from the dealer or store you purchased
the product from. If you purchased the product directly from ADS please
see the “Terms and Conditions of Sale” on the reverse side of your sales
invoice.
Returns to ADS Technologies, Inc. are for repair or warranty replacement
only. If you need to return product to ADS Technologies, Inc. for repair or
replacement you must follow these steps:
1. Call our Technical Support department at (562) 926-4338 to obtain a
Return Merchandise Authorization (RMA) number.
2. The RMA number is valid for 30 days.
3. Ship the product to the ADS factory with the RMA number marked on
the inside and outside of the package. If there is no RMA number on
the package or the RMA number has expired, the shipment will be
refused. ADS will not be liable for lost or mis-shipped products.
4. Replacement product cannot be shipped to you until the defective
product has been received by ADS.
20
5. Once the product is received at the factory it will be
tested and then repaired or replaced.
6. Turn around time is approximately one week. A repaired or replacement product will be shipped back to you.
Warranty:
This ADS Technologies, Inc. product comes with a One (1) year hardware warranty. ADS Technologies, Inc. (ADS) warrants this product
against defects in material and workmanship for a period of One (1) year
from the date of original purchase from ADS or an authorized ADS dealer.
This warranty applies only to the original purchase of the product and is
not transferable. This warranty does not cover any incompatibilities due
to the user’s computer, hardware, software or other related system
configuration in which the product interfaces. Proof of purchase will be
required before any warranty consideration by ADS occurs.
This warranty does not cover any damage caused by negligence, nonauthorized modifications, or parts installed without prior written permission from ADS.
This warranty does not apply if the product has been damaged by accident, abuse, or misapplication, nor as a result of service to the product by
anyone other than ADS.
If your ADS product is not in working order, your only recourse is repair or
warranty replacement, as described above. UNDER NO CIRCUMSTANCES will ADS Technologies, Inc. be liable for consequential damages, including but not limited to any lost savings, lost profits, or any
other damages, caused by the use of any ADS Technologies, Inc.
product or inability to use the product, even if the dealer or ADS Technologies, Inc. has been advised of such liability or other claims. This
includes damage to property and, to the extent permitted by law, damages for personal injury. This warranty is in lieu of all other warranties
including implied warranties of merchantability and fitness for a particular
purpose.
21
FCC Information
Federal communications Commission Radio Frequency Interference
Statement
Note: This equipment has been tested and found to comply with the
limits for a class B digital device, pursuant to Part 15 of the FCC
Rules. These limits are designed to provide reasonable protection
against harmful interference when the equipment is operated in a
residential installation. This equipment generates, uses and can radiate radio frequency energy and if not installed and used in accordance with the instruction manual may cause harmful interference to
radio communications. However, there is no guarantee that interference will not occur in a particular installation. If this equipment
does cause harmful interference to radio or television reception which
can be determined by turning the equipment off and on, the user is
encouraged to try to correct the interference by one or more of the
following measures:
* Reorient or relocate the receiving antenna.
* Increase the separation between the equipment and receiver.
* Connect the equipment into an outlet on a circuit different from
that to which the receiver is connected.
* Consult the dealer or an experienced radio TV technician for
help.
Notice:
22
(1)
The changes or modifications not expressly approved by the
party responsible for compliance could void the user’s authority to operate the equipment.
(2)
Shielded interface cables and AC power cord, if any, must be
used in order comply with the emission limits.
23
ADS Technologies
12627 Hidden Creek Way
Cerritos, CA, 90703
Corporate: 562.926.1928
Technical Support: 562.926.4338
Fax: 562.926.0518
Web Address: www.adstech.com