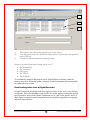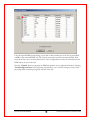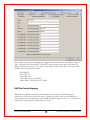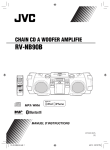
1
Version
2
Dataworxs Systems Limited
PersonalCompanion
UserGuide
DATAWORXS SYSTEMS LIMITED
Personal Companion
Personal Companion™ User Guide
Thank you for purchasing Personal Companion, a Dataworxs software-based
transport solution, which combines professional power with your personal touch.
The contents of this manual are based on version 2.01.049 of Personal Companion.
The material provided in this manual is provided for informational purposes only
and is subject to change without notice. Dataworxs Systems Limited assumes no
responsibility for any errors, which may appear in this manual. Dataworxs welcomes
your comments and inquiries. Address comments to:
Dataworxs Systems Limited
3391 Juneberry Road
Mississauga, Ontario, Canada
L5N 7E8
www.dataworxs.com
Phone: (905) 824 8739
FAX: (905) 824 8739
E-mail: [email protected]
Dataworxs Systems Limited may use or distribute any information you supply in any way it believes
appropriate without incurring any obligations whatsoever.
Copyright © 2002-2007, 2009 Dataworxs Systems Limited. All rights reserved.
Audioworxs, Personal Companion and AudioWav are trademarks of Dataworxs Systems Limited
Microsoft and Windows are registered trademarks of Microsoft Corp.
Pentium is a registered trademark of Intel Corp.
Sound Blaster is a registered trademark of Creative Technology Ltd.
Acrobat is a registered trademark of Adobe Corp.
All other product and brand names are trademarks or registered trademarks of their respective
holders.
Introduction
Welcome to Personal Companion, a product that can help you integrate the work of
authors and transcriptionists scattered across the globe.
Personal Companion reads dictations from a variety of fixed or portable audio
recording devices, and converts the information into standard “wave” audio files.
Personal Companion provides automatic download and conversion of audio either
directly from a digital portable using a USB cable or external reader and can deliver
the audio using e-mail, FTP or secure socket transfer. Features include auto-naming,
archiving of original audio, searching multiple directories, auto sensing of incoming
audio and verbal confirmation of download and conversion. All audio can be
converted to a specific audio format prior to transport allowing you to choose the
best format to use when high-speed Internet access is not available. Secure transfer
provides encrypted point-to-point transfer of data.
Feature Overview
•
•
•
•
•
•
•
•
•
•
•
Monitors fixed, network, removable folders.
Local, Network, and Virtual Private Network file transfer.
MAPI or SMTP e-mail file transfer.
Internet "FTP" file transfer.
Secure transfer – point-to-point 128 bit encryption file transfer.
Automated download of audio from digital portables (Olympus, Philips,
Sanyo, Norcom).
Auto-reconnect file transfer.
Enhanced demographics input.
Delivery reporting log.
Stand-alone or server-based licensing.
Multiple audio formats supported:
o Sanyo/Norcom/Microsoft ADPCM
o Microsoft Network Audio
o Microsoft PCM and GSM 6.10
o DSP Group TrueSpeech®
o Windows Media
o Voxware
Proprietary Formats w/ Demographics
o VoiceIQ/BCB/PC-DART® proprietary audio formats
o Dictaphone® Walkabout audio files
o Digital Voice proprietary audio formats
o UHER Portable audio files
o Olympus/Grundig/Philips DSS/DS2 audio
ii
Table of Contents
INTRODUCTION................................................................................................ II
Feature Overview .......................................................................................................................... ii
KEY SOFTWARE COMPONENTS AND SYSTEM REQUIREMENTS ..... 5
Personal Companion ..................................................................................................................... 5
PCLauncher................................................................................................................................... 5
License Administrator................................................................................................................... 5
File Transfer Server (Optional) ..................................................................................................... 5
System Requirement ..................................................................................................................... 6
LICENSE INSTALLATION ............................................................................... 7
Overview....................................................................................................................................... 7
Automated On-Line Registration .................................................................................................. 8
Running License Administrator .................................................................................................... 8
Installing a Default License........................................................................................................... 8
Obtaining an Activation Key......................................................................................................... 9
Sample of E-mail Response to Activation Request..................................................................... 10
INSTALLATION................................................................................................ 13
Software Installation ................................................................................................................... 13
Additional Steps .......................................................................................................................... 18
Uninstalling Personal Companion............................................................................................... 19
USING PERSONAL COMPANION................................................................. 20
Logging In................................................................................................................................... 21
Main Screen ................................................................................................................................ 22
Downloading Audio from a Digital Recorder ............................................................................. 23
Direct Downloading .................................................................................................................... 24
Indirect Downloading.................................................................................................................. 24
Entering Demographics............................................................................................................... 25
Detection of Small Audio Files................................................................................................... 26
Confirmation of Download ......................................................................................................... 27
SETUP.................................................................................................................. 28
Program Options ......................................................................................................................... 28
Folder Selection ................................................................................................................................................................28
Archive Options ................................................................................................................................................................29
Source Options..................................................................................................................................................................30
Transfer Selections............................................................................................................................................................32
Email Options ............................................................................................................................. 32
FTP Options ................................................................................................................................ 34
Socket Transfer/Download Options ............................................................................................ 35
SMTP Note Attachment (v2.00.012+) ........................................................................................ 37
File Conversion Options ............................................................................................................. 38
Conversion Options: .........................................................................................................................................................38
Report Options ............................................................................................................................ 39
Daily Report......................................................................................................................................................................39
Event Log ..........................................................................................................................................................................40
Demographics (v2.01+)............................................................................................................... 42
iii
Interface Options......................................................................................................................... 44
Philips Digital Recorder Options ................................................................................................ 47
Philips DPM Digital Portables..........................................................................................................................................47
Portable Input Field Mapping (v2.01+)...................................................................................... 49
Text File Mapping (v2.01+) ....................................................................................................... 51
DSS File Priority Mapping.......................................................................................................... 52
Priority Mapping (2.01.010+)...........................................................................................................................................53
Olympus Job Prioritization (2.01.016+) ...........................................................................................................................53
eCDocs/LegalDocs (v2.01.032+)................................................................................................ 54
Other ........................................................................................................................................... 55
Automatic Updates............................................................................................................................................................55
Restricting Access to Setup Options.................................................................................................................................56
Philips Portable Time/Date Update ..................................................................................................................................56
Licensing ...........................................................................................................................................................................56
DIGITAL PORTABLES .................................................................................... 57
Installation................................................................................................................................... 57
Philips DPM Digital Portables..........................................................................................................................................57
Olympus Digital Portables................................................................................................................................................57
Norcom Digital Portable Installation................................................................................................................................60
Sanyo ICR-B150 Digital Recorder...................................................................................................................................60
FREQUENTLY ASKED QUESTIONS............................................................ 64
INDEX.................................................................................................................. 65
iv
1
Chapter
CHAPTER
1
Key Software Components and System Requirements
Personal Companion
Personal Companion provides automatic download and conversion of audio either
directly from a digital portable using a USB cable or external reader and provides
transport of the audio via e-mail, FTP or secure socket transfer.
PCLauncher
Personal Companion (PC) Launcher is a component that allows an author to login to
Personal Companion using an existing Audioworxs author number without the need for
the Personal Companion computer to be specifically licensed. The use of PCLauncher is
best suited for an environment where there is more than one Personal Companion
station “feeding” an Audioworxs system. Using a central Audioworxs system to
authenticate the Personal Companion login allows for centralized licensing management
and eliminates the administration time associated with stand-alone application licensing.
License Administrator
License Administrator is used to manage the licensing of various Dataworxs products,
including Personal Companion. See chapter 2 for details on licensing Personal
Companion.
File Transfer Server (Optional)
The Dataworxs File Transfer Server provides the server-side (i.e. destination) socket-level
transfer of files across a WAN or the Internet. An integral component of Audioworxs
and other Dataworxs applications, the File Transfer Server allows for the secure transfer
of audio and text files using 128-bit key encryption.
Dataworxs Olympus Device Detector
A separate utility that runs minimized in the system tray to detect the connection and
disconnection of supported Olympus digital recorders. This utility is automatically run
by Personal Companion if it is not already running.
Currently the following devices are supported:
DS-5000/5000ID/4000/2/2300/2400/3300/3400
Document #3.00.000.20090709
5
© 2002-2007,2009 Dataworxs Systems Limited
System Requirement
Minimum
•
•
•
•
•
•
Recommended
•
•
•
•
•
Available USB Port
Windows 2000 / XP /Vista
Pentium 500 MHz/256 MB RAM
50 MB Free Hard Disk Space
Supported Digital Recorder with USB
Connection Cable or External Card
Reader
SoundBlaster 16 Compatible Sound
Card
•
•
•
Document #3.00.000.20090709
6
Available USB Port
Windows XP
Pentium 800 MHz+/512+MB RAM
500+ MB Free Hard Disk Space
Supported Digital Recorder with USB
Connection Cable or External Card
Reader
SoundBlaster 16 Compatible Sound
Card
Windows Media Player Base Install
(for additional CODECs)
Internet Connection (DSL or better)
© 2002-2007,2009 Dataworxs Systems Limited
2
Chapter
CHAPTER
2
License Installation
Overview
Personal Companion requires licensing in order for an author to use the features that it
provides. Personal Companion can be run using a stand-alone licensing model, by receiving
tokens from a token server, or using an Audioworxs-integrated licensing model.
In the normal stand-alone licensing model, Personal Companion is licensed on a perworkstation basis and requires that you obtain an Activation Key to enable various features
available. An Activation Key is a unique string of characters that is created by Dataworxs
based on the computer-specific Request Key. In this model License Administrator is used to
manage the license on each workstation running Personal Companion. If the Personal
Companion computer is upgraded or rebuilt due to a system crash or operating system
change, a new Activation Key must be obtained from Dataworxs.
An alternative to licensing individual workstations is to use Dataworxs’ token-based
licensing. In this licensing model, a workstation or server is designated as the token server
and is licensed to provide a certain number of licenses/tokens. Personal Companion running
on an individual workstation connects to the token server and obtains an available license. In
this model workstations can be replaced as needed without having to be re-licensed. This
model is recommended when 5 or more Personal Companions will be in use.
In the integrated licensing model, Personal Companion itself is not licensed. Instead, Personal
Companion authenticates the login by connecting to an Audioworxs system. If the ID used is
a valid Audioworxs user and has been assigned the role “PC Author”, Personal Companion
runs normally. Using this model, Personal Companion can be installed on any number of
workstations with no specific workstation licensing required.
The remainder of this chapter explains the steps involved in normal stand-alone licensing of
Personal Companion.
Document #3.00.000.20090709
7
© 2002-2007,2009 Dataworxs Systems Limited
Automated On-Line Registration
Personal Companion supports on-line registration. Therefore it will, after starting for the first
time, automatically install a default license and prompt you to enter registration information
and a valid certificate.
If you were provided with a certificate enter the necessary information including your
certificate number and press Register. If you are not connected to the Internet or the
registration fails for some other reason press “Cancel” to return to the Personal Companion
main window. You can register your product at a later time by clicking on the “Register”
button found in Personal Companion’s About window or by running License Administrator.
Running License Administrator
After installing an application (as described in chapter 3) you must run a program called License
Administrator before the application will run. From the Windows task bar click on
StartÆProgramsÆDataworxs SystemsÆLicense Administrator and choose License
Administrator to launch the program. If no shortcut exists launch the program
LicenseAdministrator.exe from the install_folder\Dataworxs Systems\License Administrator
folder.
Installing a Default License
Document #3.00.000.20090709
8
© 2002-2007,2009 Dataworxs Systems Limited
License Administrator’s main screen provides a list of available Dataworxs applications that may
be licensed. Select the appropriate application by clicking on the application name. The radio
button to the left of the application’s name will indicate that the application has been selected.
Click on the Install Default License button. This will install a default license allowing the
application to operate in a feature and/or time limited manner. To view the current license status
click on the “Administer…” button. A window will display the current license status including
features that are enabled and the current expiry date.
1. Select Application
2. Install Default License
Obtaining an Activation Key
To obtain an Activation Key complete the registration form obtained by selecting Personal
Companion and then pressing the “Register…” button. After filling the required information
select from MAPI or SMTP e-mail and press the Register button to have the information emailed to Dataworxs. Alternatively, if e-mail is unavailable, select “Create Text File” to create a
file with the necessary registration information. Send this file containing the 16-digit Request Key
to Dataworxs Systems or your authorized dealer.
In response, you will be given one or more Activation Keys that will activate one or more
features. The Request Key and Activation Keys are your ** receipt **. Please print and keep in a
safe place (i.e. not the computer for which they were issued).
Document #3.00.000.20090709
9
© 2002-2007,2009 Dataworxs Systems Limited
Sample of E-mail Response to Activation Request
In response to your recent request for product activation Dataworxs Systems
Limited is pleased to provide the following Activation Key.
Product: Personal Companion
Request Key: 14720a5c295a0000
Ref: PO# 0717020001
Use License Administrator to install the activation keys in the order
provided.
===========================
Product: Personal Companion (7)
When the Current Request Key shows 14720a5c295a0000
use the Activation Key: x04mdJtQsIQaW48gmkFkq5++ohQ
(Expiry: 200311-20 Counts: 1000:0:0 Features: 0)
Typing Aid: x<zero>4mdJtQs<EYE>QaW48gmkFkq5++ohQ
Please make note of these keys as they will be required if the product must
be reinstalled on the same computer for any reason and may be required in
order to verify your qualification for support.
Thank you for your purchase of a Dataworxs product.
This is your unique activation key.
Alternatively, you may have been provided with a Dataworxs product certificate.
A certificate is a 24 character string, 6Dz4N!cq@j9vQvCajfhFU6eJ for example, that contains
information about a Dataworxs product including the product name, the expiration date, and
features.
Certificates represent a pre-paid purchase of a Dataworxs product and can be redeemed for an
Activation Key by going to the Dataworxs Customer Services web site. Go to
www.dataworxs.com and choose the link labeled “Redeem Certificate”. This service is available
365 days a year, 7 days a week, 24 hours a day, and bypasses the waiting necessary when
obtaining an Activation Key via e-mail or call-in.
Document #3.00.000.20090709
10
© 2002-2007,2009 Dataworxs Systems Limited
Select Administer to add
activation (license) keys.
From the main screen press Administer to add Activation Keys. Enter the Activation Key into
the edit field labeled “Activation Key”. Click on the “Add New License” button to add or update
the current license. Repeat for each Activation Key that you have received. The order that the
Activation Keys are given to you is important. If an error message indicates that the license was
not installed successfully first check that you have entered the keys in the correct order. If you
still get the error check that you have entered all the activation key characters correctly. Because it
is sometimes hard to tell the difference between a capital “OH” and a zero and a lowercase “el”
and a one, it is best to cut the activation key from the response document and paste it into the
appropriate field. The response document provides a typing aid that expands ambiguous
characters in case you cannot perform a cut and paste. Do not add spaces before or after the
activation key.
Once the new licenses have been installed successfully the current status should reflect the
features and expiry date that you have purchased.
Document #3.00.000.20090709
11
© 2002-2007,2009 Dataworxs Systems Limited
Enter supplied activation keys here
in the order provided.
Select Add New License to
enter key. A message will
appear if successfully entered.
Make note of the Current
Request Key to verify that you
are using the proper
Activation Key. The order
with which you enter
Activation Keys is important.
After successful licensing of Personal Companion install the program following the instructions in
Chapter 3 or, if already installed, launch Personal Companion.
Document #3.00.000.20090709
12
© 2002-2007,2009 Dataworxs Systems Limited
3
Chapter
CHAPTER
3
Installation
Important!
You should log in as Administrator or as another user that has administrator rights when
installing the software. Setup information is stored in the Windows registry and must be
accessible by all subsequent user logins that will be accessing the application. Make sure that
sufficient rights and permissions to the registry key
HKEY_LOCAL_MACHINE\SOFTWARE\Dataworxs Systems and the folder
install_folder\Dataworxs Systems are assigned to all potential users.
Software Installation
To install Personal Companion insert the CD into your CD drive - the installer should launch
automatically. Or, if your setup was downloaded as a single EXE then double click on the
setup program to begin. Answer the questions as they appear in the setup instructions.
Selecting the default locations is preferred unless you are an experienced user.
Insert the Personal Companion CD into the CD-ROM drive or run the setup program.
1 If using a CD the installer should launch automatically.
Note: If the installer does not launch automatically, follow these steps:
Assuming that the CD-ROM drive is assigned drive letter D:
(1) Click the "Start" button and choose "Run."
(2) Type "D:Setup.exe" in the "Open" field and click "OK."
The "Welcome…" dialog box opens.
Document #3.00.000.20090709
13
© 2002-2007,2009 Dataworxs Systems Limited
2 Exit all applications, except for the installer and then click "Next."
Note: If you are running Windows XP or Windows 2000, you need to log in as Administrator or use a
user name that has administrator rights.
Confirm acceptance of License Terms.
3 You must accept the License Terms to install Personal Companion. If you accept them, click
"Yes."
Document #3.00.000.20090709
14
© 2002-2007,2009 Dataworxs Systems Limited
Select where to install Personal Companion.
4 Specify the folder in which to install Personal Companion. Click "Browse" to change the
installation folder. To accept the default folder, click "Next."
Note: If the installation folder does not exist, a folder creation confirmation dialog box opens. Click
"Yes" to confirm creation of the new folder.
Select a program menu folder.
5 You may change the program menu folder to another one, such as "Startup". To accept the
default folder, click "Next".
Document #3.00.000.20090709
15
© 2002-2007,2009 Dataworxs Systems Limited
Confirm the start of file copying.
6 Choose the folder where you want Personal Companion’s working folders to be created and click
"Next". By default the working folders are created in the same folder that you selected to install the
program to.
Note: To change the program menu folder or installation folder, click "Back".
Document #3.00.000.20090709
16
© 2002-2007,2009 Dataworxs Systems Limited
Copy files.
7 Wait while Personal Companion is installed on your PC.
Later versions of Personal Companion setup will also install drivers necessary to add support for
Philips DPM digital recorders including an update to required InstallShield setup files.
Respond appropriately to any additional setup screens that appear.
8 You are then asked to select between a stand-alone or integrated version of Personal
Companion. In a stand-alone installation, user IDs and passwords are defined and stored on the local
computer. When asked to login to Personal Companion the entered ID and password is authenticated
against the list of valid IDs on the local computer. In an integrated installation the entered ID and
password is authenticated by connecting to an Audioworxs system. The ID and password supplied
must exist and be valid within the Audioworxs system in order to use them to login to Personal
Companion. See chapter 4 for more details on the difference between a stand-alone and integrated
login.
Document #3.00.000.20090709
17
© 2002-2007,2009 Dataworxs Systems Limited
Additional Steps
Note: Additional programs are included with the basic setup allowing the installation of CODECs to
provide support for additional audio “wave” formats. To install one or more of these additional
CODECs select Start (on your Windows Task bar), then ProgramsÆDataworxs SystemsÆPersonal
Companion and then the appropriate Norcom or Rhetorex CODEC setup (SetupCC.exe and
Rhet_setup.exe respectively). These programs only need to be run once to install the CODEC.
These CODECs must be installed if you want Personal Companion to recognize DVI, VIQ, Norcom,
Sanyo, Dictaphone or Crescendo audio file formats.
You are also reminded at this stage that you may need to run License Administrator to license
Personal Companion for use. License Administrator is installed by the Personal Companion Setup
and can be found by selecting StartÆProgramsÆDataworxs SystemsÆLicense
AdministratorÆLicense Administrator. See chapter 2 for more information.
Setup Complete.
9 Setup is now complete. Don’t forget to run License Administrator if you haven’t already – see
chapter 2 for more information.
Document #3.00.000.20090709
18
© 2002-2007,2009 Dataworxs Systems Limited
Uninstalling Personal Companion
The process of removing software installed on your PC is called uninstalling. To uninstall Personal
Companion when it is no longer needed follow these steps:
1.
2.
3.
4.
5.
6.
7.
8.
Click "Start", point to "Settings", and choose "Control Panel".
Double-click "Add/Remove Programs".
A list of applications that have been installed is displayed. Choose "Personal
Companion".
Click "Add/Remove” (in Windows 2000, "Change/Remove").
The "Modify, Repair, or Remove the program" dialog box opens. Make sure that Remove
is selected and then click "Next".
A file deletion confirmation dialog box opens. Click "Yes" to start removing Personal
Companion.
Note: An additional message may appear. If so, read it carefully and do as instructed.
Exit Uninstall. The program has been uninstalled. Click "Finish".
Document #3.00.000.20090709
19
© 2002-2007,2009 Dataworxs Systems Limited
4
Chapter
CHAPTER
4
Using Personal Companion
Personal Companion is designed to automate the download, importing and transport of
audio from various sources. User definable demographics can be added to any
downloaded audio. User defined demographics include user ID, work type and priority.
Personal Companion is designed to run as a minimized application with a “flash light”
icon visible in the Windows system tray. During installation the Personal Companion is
added to the computer’s Startup folder and will be launched automatically whenever you
start your computer.
Important!
Personal Companion is designed to always be running on your computer. It should be
started automatically by placing it in the computer’s Startup folder. For best results it
should always be left running and NOT be shutdown.
Once running, Personal Companion continuously monitors folders that you specify for
new audio files. When a new audio file is recognized the file is converted (if necessary)
and moved to a destination folder from where it is transported to a remote location for
storage or transcription via e-mail, FTP, or secure socket connection.
Personal Companion also will recognize when a supported digital recorder is connected to
the computer and automatically download and then delete the audio from the recorder,
convert the audio (if necessary) and then move it to the destination folder for
transportation to a remote location for storage or transcription.
Document #3.00.000.20090709
20
© 2002-2007,2009 Dataworxs Systems Limited
Logging In
Personal Companion is licensed in one of three ways: for a single-user stand-alone use,
multi-user stand-alone use, or for single-user use integrated with an Audioworxs system.
Single-User Login:
If licensed for single user use Personal Companion requires that a user ID be provided
when it first starts. The ID that is provided at start-up is used to identify all audio files
regardless of the ID that may already be associated with the audio file or digital recorder.
To make startup easier or to automate startup by placing a shortcut in the Startup group,
create a shortcut to Personal Companion (AWCPC.exe) and add the required login ID as a
command line parameter in the form –U####, where #### is the login ID. For example,
the Target field in the shortcut’s Properties dialog might look like the following:
"C:\Program Files\Dataworxs Systems\Personal Companion\AWCPC.exe" -U1234
Multi-User Login:
When Personal Companion is licensed for multi-user use there is no initial login required.
Instead the ID associated with a processed audio file is determined by either the ID
contained in the digital recorder or by the ID selected by an author in the Demographics
Input dialog.
Integrated Login:
When an integrated login is selected when Personal Companion is installed, and the shortcut to Personal Companion is clicked, a special login screen is displayed.
Document #3.00.000.20090709
21
© 2002-2007,2009 Dataworxs Systems Limited
The ID (and password if necessary) supplied in the integrated login dialog must be a valid
Audioworxs user assigned the role of “PC Author”. To login press OK. If the ID and
password are validated by the Audioworxs system Personal Companion will run normally.
Before logging in the first time you may need to press “Setup…” and configure the
connection information required to connect to the Audioworxs system.
Main Screen
Personal Companion’s main screen contains the main menu, a tool bar for quick access to
common tasks, and an activity log.
Tool Bar Functions:
View Today’s Socket
Transfer Session Report
View Today’s
Session Report
Edit Note
Launch Setup
Dialog
“Hide” Window to
System Tray
Display Version
Information
Activity Log:
A running activity log is constantly updated as Personal Companion performs various tasks while
importing, converting, and moving files.
Document #3.00.000.20090709
22
© 2002-2007,2009 Dataworxs Systems Limited
1
2
3
(1)
(2)
(3)
This indicates that a file has been placed in the e-mail outbox.
A file has been moved to the destination folder, where it is delivered to the specified email or FTP site.
A file has been downloaded from a digital portable.
Entries in the Action Performed column can be one of:
• File Downloaded
• File Converted
• File Copied
• File FTP’ed
• File E-Mailed
To automatically minimize the program select “Hide Window on Startup” under the
Options menu item. When this option is selected, Personal Companion will automatically
be minimized when it starts.
Downloading Audio from a Digital Recorder
Personal Companion downloads audio from digital recorders in one of two ways: directly
or indirectly. Direct downloading is only possible for certain digital recorders that provide
specific interface drivers that Personal Companion uses to “talk” to the specific unit. For
other digital recorders Personal Companion must use an indirect approach to recognizing
and retrieving audio files.
Document #3.00.000.20090709
23
© 2002-2007,2009 Dataworxs Systems Limited
Direct Downloading
Personal Companion supports direct downloading from many models of portable digital
recorders from Olympus and Philips. Drivers provided by the recorder manufacturer allow
Personal Companion to detect when a unit is connected and then to identify, download,
and delete audio files by talking directly to the unit. Detection, downloading and audio
file deletion are much faster when using a unit for which Personal Companion supports
direct downloading.
The detection of Olympus devices (DS-5000, DS-4000, DS-2, and others) requires the use
of the Dataworxs Olympus Device Detector (DODD). The DODD is a separate program
that is launched automatically when Personal Companion. When it is running – as
indicated by the Dataworxs logo in the Windows system tray – the connection and
disconnection of supported Olympus devices is recognized and communicated to Personal
Companion. The DODD also provides the ability to synchronize the computer’s date/time
with the Olympus recorder.
Indirect Downloading
For other digital recorders, such as those made by Sanyo, that do not provide support for
direct downloading, Personal Companion uses indirect downloading. In this method
Personal Companion relies on the fact that when the unit is connected to the computer it is
recognized by Windows as a removable drive. Personal Companion polls the appropriate
drive letter and folder (as setup in the Program Options tab of the setup dialog) at a
specified interval and, upon detecting a new file, is able to download the audio file. In this
method Personal Companion instructs Windows to delete the file when the download is
complete.
The detection of audio files and the time it takes for a file to be deleted are longer when
using a digital portable that Personal Companion cannot use direct downloading. For
example, it can take Windows as long as 20 seconds to completely delete files from a
removable drive even though the file no longer appears in Windows Explorer. If the unit
is removed before the file is completely deleted it will remain on the unit and be
downloaded again the next time the unit is connected. (Note: the delete delay is far less
when using Windows XP, Vista or 2003 than it is when using Windows 2000.)
Document #3.00.000.20090709
24
© 2002-2007,2009 Dataworxs Systems Limited
Entering Demographics
When Personal Companion recognizes an audio file that needs to be downloaded from a
digital recorder (either directly or indirectly) a Demographic Input window is displayed
prompting the user to enter appropriate values for up to 10 input fields and to select a
priority level. In the following example the user is prompted to enter 3 input fields and is
able to select values from a pre-defined list of valid values.
Configuring what input fields a user will be prompted for and preparing a list of default
values from which to select from, is done in the setup dialog’s Demographics tab.
If the audio file(s) being processed by Personal Companion will be imported into an
Audioworxs™ system you have the option of flagging the Audioworxs Import Priority
for specific files as Normal or High. Flagging a file as High priority tells the Audioworxs
Import Manager to import the file before those flagged as Normal.
Audioworxs™ is Dataworxs’ full-featured audio management system for dictation and
transcription.
Document #3.00.000.20090709
25
© 2002-2007,2009 Dataworxs Systems Limited
After entering values for the required input fields the user has the option of applying the
same values for all audio files remaining to be processed by checking the checkbox
identified by “Use the above values for all files found on handheld device” or “Use the
above values for all files found in folder…”, depending on whether a supported recorder
or folder is being processed.
Pressing the Play button allows the author to preview the audio file currently being
downloaded as an aid in determining the appropriate demographic information to select.
The Play feature is only available when downloading DSS/DS2 format of audio files.
When the “Always On Top” option is enabled (i.e. checked), each time the Demographic
Input dialog is triggered it is forced on top of all open windows and remains on top until
OK is pressed. Normally this option should be enabled.
Detection of Small Audio Files
While downloading files Personal Companion checks to make sure that the file being
downloaded is more than 2000 bytes long (or at least 0.5 seconds long, approximately). A
file that is less than 2000 bytes long could indicate a problem with the recorder – a bad
memory card for example – or indicate that the user has inadvertently erased dictation. In
either case corrective action may need to be taken.
If the file being downloaded is less than 2000 bytes long a warning message is displayed
and you are given the opportunity to abort the download.
If you select No the downloading and processing continue normally. If you respond by
selecting Yes then the file that has been downloaded to the Fixed Source folder is deleted,
the file on the recorder is left intact, and further processing is halted.
Whether you select Yes or No, if the option to create a daily report is enabled, the
following lines are added to indicate that a possible problem was detected.
Document #3.00.000.20090709
26
© 2002-2007,2009 Dataworxs Systems Limited
File Name: C:\Program Files\…\Fixed Source\4 - 20041229-161255 .dss
Action Performed: File Downloaded
Action Time: 2004/12/29-16:12:55
Action Status: File Downloaded Possible Error - File Size: 1536
If you abort the download the following lines are also added to the daily report to indicate
that the downloaded file was deleted from the Fixed Source folder on your local drive.
File Name: C:\Program Files\…\Fixed Source\4 - 20041229-161255 .dss
Action Performed: File Downloaded
Action Time: 2004/12/29-16:12:55
Action Status: Downloaded file deleted due to abort request
The original file on the recorder or removable drive is NOT deleted if processing is
aborted.
Confirmation of Download
When one or more files are downloaded from a supported portable digital recorder or
from a specified folder, a confirmation window is displayed (when enabled). The window
can be closed immediately by pressing the OK button. If you do not press the OK button it
will close itself after approximately 5 seconds. If an audio prompt is enabled, the prompt
will play at the same time as the confirmation window is displayed. Both visual and audio
confirmations of download are enabled in the setup dialog’s Program Options tab.
Document #3.00.000.20090709
27
© 2002-2007,2009 Dataworxs Systems Limited
SETUP
Select “Setup…” under the Options menu item or the setup toolbar icon
to define
folders and other program parameters. Most setup parameters are maintained in a file called
AudioPC.ini. In versions of Personal Companion prior to version 2.01.049 the AudioPc.ini
file can be found in the C:\Windows folder. Starting with version 2.01.049, a separate
AudioPC.ini file is maintained for each Windows user and can be found in the C:\Documents
and Settings\login_name\My Documents\Personal Companion folder.
Program Options
Choose the Program Options tab to configure working folders and other program parameters.
Folder Selection
Source Folder (Removable/Fixed): Where Personal Companion looks for files to import.
Document #3.00.000.20090709
28
© 2002-2007,2009 Dataworxs Systems Limited
Destination Folder: Final destination location of downloaded (from a digital recorder) and
imported files. Files for remote delivery will be selected from this location.
Archive Folder: Where a copy of the original file found in a source folder or downloaded from a
digital recorder is put. The original file is stored in the Archive folder may be in an encrypted
format and must be decrypted if it is to be re-imported (see the sections “Archive Imported Files”
and “Re-Importing Archived Files” later in this chapter). Note: the original file name may be changed
if a file with the same name already exists in the Archive Folder.
Warning: DO NOT choose a folder used to store any of your personal files. All files are
subject to ageing and deletion from the Archive folder regardless of where they came
from.
Audio Prompt (Fixed/Removable): Name and location of a WAVE file that is to be played
after the corresponding source folder is scanned and at least one file is successfully imported.
Inter Process Control Folder: Location of user created ID and work type list
(PCDemographics.xml) – see explanation under Interface Options tab.
Archive Options
Archive Imported Files:
When enabled, all files downloaded and imported into the Personal Companion will be automatically
encrypted (if “Encrpyt Files” is enabled) and stored in the Archive Folder location. The “Delete
archived files after…” setting adjusts the amount of time a file will remain in the archive folder
before it is purged from the system. Audio files are generally large files and unless absolutely necessary
should be removed from the computer after a relatively short period of time to conserve disk space.
“Search for archived files every…” defines how often the program will check the archive folder to
remove files that are older than the retention time specified.
Note
If encryption is enabled, all files stored in the Archive Folder are encrypted to prevent unauthorized
access. In this way audio files can be downloaded from a workstation off-site without leaving
sensitive information exposed on the workstation. In order to re-import an encrypted audio file it
must be decrypted.
To turn on encryption of archived files “Encrypt Files” must be enabled (i.e. the check box
checked). Because this feature is designed to prevent unauthorized access to protected
information you must provide a password to change the status of this feature. By default, the
password is “12345678”. To ensure audio is protected, this password should be changed after the
software has been installed and setup.
Document #3.00.000.20090709
29
© 2002-2007,2009 Dataworxs Systems Limited
Warning: DO NOT choose an archive folder used to store any of your personal files. All
files are subject to ageing and deletion from the Archive folder regardless of where they
came from.
Re-Importing Archived Files:
If encryption is enabled, files stored in the archive folder are encrypted to prevent unauthorized access
to the files. These files are only playable or able to be listened to after they have been decrypted.
Dataworxs provides a program for decrypting the files and transporting them into the source folder of
Companion. The program is only available upon request from an authorized dealer. Its use and
possible distribution to users of Personal Companion should be in accordance with any applicable
policy related to the confidentiality of, and access to, protected information.
The decryption program requires two folders: the Source folder is where encrypted files are placed and
the Destination folder is where the resulting decrypted files are written. Use the browse button to
select the appropriate folders. Files requiring decryption can be moved from the archive folder to the
designated Source folder. The Decrypter program will examine the file(s) and if the file is encrypted,
move the file to the Destination folder. The program will not move files that are not encrypted. The
Destination folder (decrypted folder) can be mapped to the Source folder of Companion to be
automatically re-imported and transported to the final destination.
The Dataworxs File Decrypter program is activated by selecting the “On” button and stopped by
selecting the “Off” button. Selecting the Auto Start option will automatically activate the decryption
process whenever the Decrypter program is launched.
Source Options
Delete Source Files (fixed/removable drives) – This option deletes the source file from the import
source location. A copy of the file is automatically backed up in the archive location provided the
archive option is selected. This option should always be selected otherwise the file may be imported
multiple times. The import location is scanned by the program every few seconds as determined by
the “Search source every XX seconds” setting. All files that remain in the source location will be
imported again every time the program re-searches the location.
Document #3.00.000.20090709
30
© 2002-2007,2009 Dataworxs Systems Limited
Delete Source Files (DPM/Olympus devices) – This option deletes the source file from a
supported digital recorder after the audio file has been downloaded from the unit. This option should
normally be selected otherwise the audio file may be downloaded more than once if it isn’t manually
deleted from the unit.
Audio prompt when import finished (fixed/removable) – When selected, an audio prompt
(WAVE file) is played when a file(s) is imported successfully from the corresponding Source
Folder. The corresponding WAVE file is specified in the Folder Selection group.
Visual confirmation of downloads - should be selected if a visual notification on the screen is
desired after every download. This is especially useful when audio confirmation is not available.
Search all subdirectories – when enabled Personal Companion will check subdirectories of the
source folders for audio files to be imported. If not enabled only audio files found in the source
folders will be imported.
Don’t use DPM or DM1 service – check this option to tell Personal Companion not to use
Philips (DPM) or Olympus (DM1 Service) device drivers to detect and communicate with
corresponding digital recorders.
Search source every XX seconds – Tells Personal Companion how often it should check the
source folders for audio files to be imported.
Note: Although Personal Companion will search the folder every XX seconds some files
may not be imported right away if they have not “aged” enough. To prevent import
errors that can occur if audio files are imported before they are completely copied into
the Source Folder, Personal Companion makes sure the file has been in the Source
Folder for a certain length of time before importing it. The amount of aging is specified
by “File Aging” (described below).
NOTE
If you are using the Olympus digital portables, there is no pre-configured search time. Personal
Companion will search the portable for audio as soon as it is plugged into the computer via the
USB cable.
Search destination every XX seconds – Tells Personal Companion how often it should check
the destination folder for audio files to be transported via e-mail, FTP, or secure socket transfer.
File Aging – Tells Personal Companion how many seconds old an audio file must be before it is
processed. This aging process is necessary to prevent premature processing of a file. If the audio
file is being downloaded from a recorder or from a different location on a slow network, for
example, Personal Companion may recognize the appearance of a new file before it is even
finished being created. To prevent premature processing, Personal Companion makes sure that
Document #3.00.000.20090709
31
© 2002-2007,2009 Dataworxs Systems Limited
the file has not changed for a certain length of time. By default, the file must be 30 seconds old
before it will be processed. Use this setting to adjust the aging requirement. This setting applies
to all audio files in the removable and fixed source folders as well as audio downloaded from a
supported digital recorder.
NOTE
Audio files originating from a digital recorder or computer that do not have the correct date
and/or time may take longer than the aging time to be processed. If an audio file is taking an
unusually long time to be processed check the Created and Modified dates and times.
Transfer Selections
Choose what transfer mechanism is enabled. Files found in the Destination Folder by Personal
Companion will be transferred (transported) to a pre-defined location or recipient if Socket, Email, or
FTP is selected. Selected None tells Personal Companion to do nothing with the files it finds in the
Destination Folder. When Socket, Email, or FTP is selected you must setup the appropriate transfer
parameters in the Socket Transfer/Download Options, Email Options, or FTP Options tab
respectively.
Email Options
Email Options allows you to setup email method of file transport.
Document #3.00.000.20090709
32
© 2002-2007,2009 Dataworxs Systems Limited
A list of e-mail addresses is maintained in this section. A new e-mail address is added to the list
by typing in a valid e-mail address in the field labeled “Email Address” and then pressing “Add
Email”. To add or modify the subject line associated with that e-mail address first highlight the
e-mail address in the list and then press “Add/Mod Subject”.
Use E-mail: When a check mark appears in this check box the e-mail transport mechanism is
enabled. Enabling this feature automatically disables the Socket and FTP transport options. You
must have an active e-mail address to use the e-mail option. To make an e-mail address active
highlight the e-mail address in the address list and press the “Make Active” button. Files will
only be e-mailed to the active e-mail address.
Use MAPI Email: Select MAPI e-mail when you want to make use of the services provided by
Outlook or Outlook Express already installed on your computer. When available and this option
is selected e-mails will be sent without you having to know what SMTP Server you are
connecting to. Using MAPI Email in a computer that has Outlook installed may require user
intervention to authorize its use each time a file is e-mailed. This is due to security features in
recent versions of Outlook.
Use Non-MAPI Email: Choosing to use non-MAPI e-mail tells Personal Companion to
connect directly to a SMTP (Simple Mail Transfer Protocol) server and send the e-mail. If this
option is selected you must specify a valid SMTP server and port.
Return Email Address: If the recipient of the e-mail Personal Companion sends chooses to
“reply” to the e-mail, this is address to which the reply will be sent.
Document #3.00.000.20090709
33
© 2002-2007,2009 Dataworxs Systems Limited
Encrypt: When enabled audio files that are e-mailed are automatically encrypted. The e-mail
recipient must have Dataworxs’ Decrypter utility to decrypt the e-mail before they will be able to
play the audio file.
SMTP Port: If using the non-MAPI email option you must specify a valid SMTP port. The value
should typically be 25.
SMTP Server: If using the non-MAPI email option you must specify a valid SMTP server in this
field. (For example: smtp1.yourprovider.com or mail.yourprovider.com. Check with your
Internet Service Provider for the name of the SMTP server you should be connecting to.)
Local Domain: Some SMTP servers require a valid domain name. Check with your Internet
Service Provider.
Authentication Required: If the SMTP server you are connecting to requires authentication
check the Authentication Required checkbox and enter the username and password provided by
your Internet Service Provider.
FTP Options
FTP Options allows you to setup the FTP method of file transport.
Document #3.00.000.20090709
34
© 2002-2007,2009 Dataworxs Systems Limited
A list of FTP addresses is maintained in this section. A new FTP address is added to the list by
typing in a valid FTP address in the field labelled “FTP Address”, specifying the required
username and password, and then pressing “Add FTP”. To delete an existing entry highlight the
entry to be deleted and press “Del FTP”. To modify an entry, first highlight the entry, make the
necessary changes in the FTP Address, Username, and Password edit fields, and then press
“Mod FTP”.
Use FTP: When a check mark appears in this check box the FTP transport mechanism is
enabled. Enabling this feature automatically disables the Socket and Email transport options.
You must have an active FTP address to use the FTP option. To make an FTP address active
highlight the address in the address list and press the “Make Active” button. Files will only be
sent to the active FTP address.
Socket Transfer/Download Options
Socket Transfer/Download Options allows you to setup a secure socket method of file transport
featuring 128-bit encryption.
Using the socket transfer feature allows you to both send and receive files. Your transcription
service provider, for example, can receive dictations from you and then send you finished
transcripts. Files sent in both directions are encrypted to ensure confidentiality of the content.
Also, a unique ID and password ensures that only you can receive files stored in your “private
upload folder”.
Note: Using the Socket Transfer transport mechanism requires connection to a Dataworxs File
Transfer Server.
Document #3.00.000.20090709
35
© 2002-2007,2009 Dataworxs Systems Limited
Remote Path: Folder where files transported by Personal Companion are to be stored on the
remote server. (The person administering the File Transfer Server to which you will be
connecting will usually provide the folder name.) Using the Create, Modify and Delete buttons
allows you to create multiple destination folders. Select the active path by using the down arrow
located to the right of the remote path field. (Remote Path information is stored in a file called
PCRemoteDirs.xml located in the IPC folder. This file must exist otherwise and error will occur
when attempting to create a new remote path.)
Local Path: Folder where files downloaded to your computer from your “private upload folder”
are stored. Using the Create, Modify and Delete buttons allows you to create multiple folders and
ID/Password combinations. Select the active combination by using the down arrow located to
the right of the local path field. (Local Path information is stored in a file called PCLocalDirs.xml
located in the IPC folder. This file must exist otherwise and error will occur when attempting to
create a new local path.)
File Server IP Address/Port Number: IP Address and Port number of remote File Transfer
Server. The IP and port will be provided by your transcription service provider or by the remote
system’s administrator.
Connection Speed: Select the Internet connection speed that most closely matches your
connection by selecting one of Cable/DSL, ISDN, or Modem.
Use ST: When a check mark appears in this check box the socket transfer transport mechanism
is enabled. Enabling this feature automatically disables the Email and FTP transport options.
Document #3.00.000.20090709
36
© 2002-2007,2009 Dataworxs Systems Limited
SMTP Note Attachment (v2.00.012+)
Configuring this option allows a custom note to be sent to a pre-defined e-mail address ever time
a batch of audio is downloaded from a digital recorder.
To enable the feature put a check mark in the “Send note to address listed when files are
uploaded” check box. You will also need to provide the destination e-mail address (who will receive
the note), return address (your e-mail address), a valid SMTP server name, and a subject line. The
actual message to be sent is entered into the large message area.
When enabled, every time a batch of audio files in the Source folder is processed an e-mail note will be
sent. Note: When audio is downloaded from a digital recorder it is put into the Source folder.
Therefore one note will be e-mailed for each batch of files downloaded from a digital recorder.
Unlike with the E-mail Transport option you do not have the option of choosing MAPI or non-MAPI
e-mail. This feature requires that you provide a valid SMTP server name, port, local domain (if
required) and username and password (if required).
Document #3.00.000.20090709
37
© 2002-2007,2009 Dataworxs Systems Limited
To facilitate quick changes to the note or the e-mail address before doing a download you can
quickly access this setup tab by pressing the SMTP Note Attachment toolbar button from the main
screen.
File Conversion Options
The File Conversion Options allow you three conversion options:
•
•
•
Upload file in original state – audio files will be moved to the destination folder
without any changes to the original audio file.
Convert file to standard wav format - audio files will be converted to the format
specified in the Conversion Options group and a standard wave header will be added to
it. Demographics such as User ID and work type contained in the original audio will be
lost if this option is chosen (unless the option to Create XML document for each
audio file is selected in the Interface Options tab).
Convert file to standard wav format and add Dataworxs demographics - audio files
will be converted to the format specified in the Conversion Options group and a
standard wave header will be added to it. Demographics such as User ID and work type
contained in the original audio will be maintained in the converted audio file.
Conversion Options:
Press the “Select Format” button to view a dialog box with all the audio CODECs
(CODER/DECODERs) installed on the PC. Select the desired format and sample rate. The
Document #3.00.000.20090709
38
© 2002-2007,2009 Dataworxs Systems Limited
higher the sample rate selected the higher the audio quality will be, but, at the cost of a larger file
size.
Recommended conversion formats are DSP TrueSpeech, GSM and ADPCM (Rhetorex).
TrueSpeech provides the smallest file size but the resulting audio quality is highly dependent on
the quality of the original audio and the author’s speech characteristics. GSM is a good
compromise when TrueSpeech is not acceptable as it provides a small file size and generally good
quality audio. ADPCM is the industry standard format for telephone dictation audio and
provides good quality audio with reasonable file sizes. Confirmation of the selected format will
appear in the selected format boxes. Check the box left of the “Use selected wav format” to
enable the conversion format.
Report Options
Choose this option to create daily reports of activity. Use the “Browse” button to change the default
folder that the reports will be created in.
Daily Report
Document #3.00.000.20090709
39
© 2002-2007,2009 Dataworxs Systems Limited
If “Create daily report” is enabled, a new report containing the filename, action, and status of
each file imported by Personal Companion will be created each day.
To view the session report for the current day click on the View Session Report tool bar
icon. To view the session report from previous days use Windows Explorer to view the contents
of the folder specified in the Report Folder field. Double click on the appropriate report file to
view the report in your computer’s default text editor.
As well as a daily Session Report, Personal Companion will create a Socket Transfer Session
Report if the option to transport files via secure socket connection is enabled. This report can be
used as a diagnostic tool to help in setting up and maintaining a socket connection to the File
Transfer Server.
To view the Socket Transfer Session Report for the current day click on the View Socket
Transfer Session Report tool bar icon.
Event Log
Document #3.00.000.20090709
40
© 2002-2007,2009 Dataworxs Systems Limited
If “Create event log” is enabled, a new event log will be created in the folder specified by
“Event Log Folder”. You must specify how often a new log file is created.
If “Send event log” is enabled, every time a new empty log file is created a copy of the previous
log file is made in the Destination folder. If FTP or socket transfer is enabled the event log will
then be moved to the specified remote location. A unique Station Name should be provided to
ensure that the event can be traced back to the correct workstation.
The event log is different than the Session Report and the socket Transfer Session Report in that
it is formatted in a comma delimited format and is less human “readable”. The purpose of this
format is to make it suitable for automated event log importing at the destination server location.
The following sample entries were generated when a DSS audio file was processed from the
Fixed Source Folder and sent via socket transfer to a remote destination.
2006-01-03 16:59:35,7,5006,STATION_NAME,1234,Audio moved (1234__20050713-160252.dss ->
1234__20050713-160252.dss) 163840 bytes
2006-01-03 16:59:36,7,5002,STATION_NAME,1234,Audio archived (1234__20050713-160252.dss ->
1234__20050713-160252.dss) 163840 bytes
2006-01-03 16:59:46,7,5008,STATION_NAME,1234,Audio uploaded (1234__20050713-160252.dss) 163840 bytes
2006-01-03 16:59:47,7,5008,STATION_NAME,1234,Audio uploaded (1234__20050713-160252.xml) 1356 bytes
Document #3.00.000.20090709
41
© 2002-2007,2009 Dataworxs Systems Limited
Demographics (v2.01+)
The Demographics tab is where you tell Personal Companion what to do if certain demographics
are not found in an audio file being downloaded or imported.
Personal Companion supports up to ten demographic input fields. For each field, numbered 0
through 9, you have three options. You can select one of the following:
1) Always use this value when none is found
When this option is selected Personal Companion will use the value shown in the “Assigned
Values” field. For completely unattended operation you must specify the “Always use…” option
for all ten demographic input fields. You can also temporarily choose this option if you want to
set a specific value within a list as the default. See “Setting a default value” below.
2) Ignore value and prompt for new one
This option instructs Personal Companion to prompt for a new value for the specified input field
whether or not an existing value was found in the audio file being processed.
3) Always prompt for value when none is found
Document #3.00.000.20090709
42
© 2002-2007,2009 Dataworxs Systems Limited
This option instructs Personal Companion to prompt for a new value for the specified input field
only if a corresponding value is not found in the audio file being processed.
Lists are maintained using the “Create”, “Modify” and “Delete” buttons. New values must be
less than 32 characters long. The lists are stored in a file called DefDemographics.xml in the folder
specified in the Inter Process Control (IPC) Folder field in Setup’s Program Options tab. If the
option to “Interface with eCDocs/LegalDocs” has been selected in the Setup’s Interface
Options tab, lists are stored in a file called eCDocs.xml or LegalDocs.xml.
HINT
Once the input lists are created on one station the DefDemographics.xml (or
eCDocs.xml or LegalDocs.xml) file can be copied to other Personal
Companion stations rather than having to re-create the lists at each station.
Setting a default value:
Once a list is created for an input field you can set one of the entries in the list to be the default
value shown to the author. To set a value as the default, first choose the desired default value
from the “Assigned Values” drop down list. Next click on the “Always use this value when none
is found” radio button. Doing this causes the default to be set by Personal Companion. Finally,
click on the radio button that best describes the action that you want taken for this specific input
field (which may in fact be the same radio button).
Selecting an Author ID:
In a multi-user Personal Companion you must map one of the ten input fields to an “Author ID”
value. Do this in the “Always use <selected input field> for ID when none is found” section
of the programmable Demographics section. The value assigned to the selected field or entered
in the selected field will be used as the Author ID for the audio file being processed. This option
is not applicable if Personal Companion is licensed for single-user use. This is because in singleuser configuration all audio files imported by Personal Companion are assigned the login ID
regardless of the ID in the digital recorder or audio file.
Other Demographics Settings:
Never prompt for demographics: Enable this feature to prevent the demographics entry dialog
from popping up when an audio file is being imported by Personal Companion.
Demographic audio prompt: If a standard Windows supported WAVE file is selected and the
option labeled “Play wav prompt when demographic input is required” is checked, the prompt
will play each time the demographics entry dialog pops up. The prompt can be used to alert the user
who may not be looking at the monitor that Personal Companion is expecting user input.
Document #3.00.000.20090709
43
© 2002-2007,2009 Dataworxs Systems Limited
Note
The “Demographics” setup tab is not visible when the “Interface with eCDocs/LegalDocs” option is
enabled in the “Interface Options” setup tab.
Interface Options
In the Interface Options tab you specify whether or not a Job Descriptor (XML) or (TXT) file
will be created for each imported file and you create and maintain a list of Author IDs, work
types, and patient/client IDs.
Note
The TXT file option requires separate licensing and will not be enabled if the appropriate license
is not installed. This option is used for integration with DVI or Lanier VXP systems.
When “Create XML document for each audio file” is selected a Job Descriptor file will be
created for each imported file (job). The Job Descriptor contains information about the imported
audio file and has the same name as the imported audio file but with an “xml” extension.
Because the XML Job Descriptor file is in an XML format its contents can be viewed using
Internet Explorer and is ideal for integrating with a custom application. This option should be
enabled when audio files imported and transported by Personal Companion will be imported into
Document #3.00.000.20090709
44
© 2002-2007,2009 Dataworxs Systems Limited
an Audioworxs system. This option is also required when importing audio from a supported
digital recorder AND demographics are being prompted for. In this case, not enabling this
option may cause Personal Companion to prompt for demographics twice.
When “Create TXT document for each audio file” is selected a file - formatted like an INI
file - will be created for each imported file (job). The file created has the same name as the
imported audio file but with a “txt” extension.
If “Create TXT document…” option is enabled you must also configure the contents of the
TXT file by going to the Text File Mapping tab. See the section Text File Mapping for
additional information on the format of the text file and how to configure its contents.
The “Use Audioworxs Job Prioritization” feature tells Personal Companion…
If AudioWav Mic is being used in conjunction with eCDocs/LegalDocs ensure that the option labeled
“Interface with eCDocs/LegalDocs” is selected. When this option is selected the “Demographics”
and “Portable Input Field Mapping” setup tabs will not be visible the next time you enter the setup
dialog.
When enabled, an additional setuyp tab labeled “eCDoc/LegalDocs” is added to the demographics
input screens as indicated by the red circle in the following image.
Document #3.00.000.20090709
45
© 2002-2007,2009 Dataworxs Systems Limited
Pressing the ? button launches the eCDocs/LegalDocs browser for selecting a client/matter that
describes the dictation being created.
When the option “Allow Attachments” is enabled in the Interface Options setup tab, Personal
Companion allows the author to “attach” related documents to a dictation file. A related document
might be an x-ray image file, for example. When enabled, a “Select Attachments” button is made
available in the demographics input dialog when an audio file is being imported.
Attached documents are transferred to the destination along with the downloaded audio file.
Document #3.00.000.20090709
46
© 2002-2007,2009 Dataworxs Systems Limited
Philips Digital Recorder Options
In versions of Personal Companion prior to version 2.01.049, this setup tab was titled “Portable
Digital Recorder Options” and provided utilities for configuring supported Olympus and Philips
digital recorders. The “Philips Digital Recorder Options” tab now only provides a utility for
configuring supported Philips DPM devices.
Starting with version 2.01.049, Olympus device configuration is provided by an Olympus
provided utility. It is installed when Personal Companion is installed.
For more detailed configuration options on your digital portable refer to the instruction manual
provided with your unit.
Philips DPM Digital Portables
To add or modify the 5 configurable fields (called keywords) within a Philips DPM digital recorder
first make sure that the DPM unit is connected to the computer via its USB cable and then press the
“Configure” button in the Philips DPM Unit group.
Note: Personal Companion should be running before you connect the DPM unit to the computer. If
the DPM unit is connected before Personal Companion, choosing this option may fail.
Document #3.00.000.20090709
47
© 2002-2007,2009 Dataworxs Systems Limited
Using the Upload DPM Options dialog you are able to add or modify any of the five keyword fields
available in the connected DPM unit. The Usage row provides a name for the keyword field. Each
keyword can have up to 10 values defined for it. Once configured these values are selectable from the
DPM unit by the user of the unit.
Press the “Upload” button to program the DPM unit with the new or updated information. Selecting
“Lock Settings on Device” before pressing Upload allows you to lock the changes you have made
preventing them from being changed by the user of the unit.
Document #3.00.000.20090709
48
© 2002-2007,2009 Dataworxs Systems Limited
Portable Input Field Mapping (v2.01+)
When downloading audio from a supported portable digital recorder you must map the demographic
fields native to the portable to one of the ten input fields supported by Personal Companion. Personal
Companion provides full support for Olympus and Philips portables.
Supported Philips portables have 5 demographic fields that are programmable (see setup tab Portable
Digital Recorder Options for programming and other information). These fields are called
Keyword1 through Keyword5. In a Philips digital recorder Keyword1 doubles as the Author ID field.
In the Portable Input Field Mapping tab select the Philips radio button and then map the 5 Philips
keywords to one of the appropriate input fields supported by Personal Companion. When you have
finished mapping the fields press the Apply button to save the changes BEFORE doing anything else.
Supported Olympus Portable Digital Recorders have 2 fields that can be mapped to a Personal
Companion input field: work type and ID. When you have finished mapping the two fields press the
Apply button to save the changes BEFORE doing anything else.
Document #3.00.000.20090709
49
© 2002-2007,2009 Dataworxs Systems Limited
Note
The “Portable Input Field Mapping” setup tab is not visible when the “Interface with
eCDocs/LegalDocs” option is enabled in the “Interface Options” setup tab.
Document #3.00.000.20090709
50
© 2002-2007,2009 Dataworxs Systems Limited
Text File Mapping (v2.01+)
When the option to “Create TXT file for each audio file” is enabled in the Interface Options tab,
a file is created that has the following format.
Header
Keyword0=IF0
:
Keyword9=IF9
Author Time Long=1127672897
Author Time=Tue Dec 28 15:07:47 2004
Footer
You must configure the value for the Header and Footer in the fields provided. You also must
configure the fields that will be written to the text file when it is created. Do so by adding a keyword
descriptor to the input fields that you need to be written to the text file. If no keyword descriptor is
provided (i.e. the field is left blank) the line will not be written in the text file.
For compatibility with a DVI/VXP system the header should be “[CMP DESC]” and the footer left
blank.
Document #3.00.000.20090709
51
© 2002-2007,2009 Dataworxs Systems Limited
In the sample above, the text file mapping is configured such that input field 1 (identified by “Report
Type”) and input field 2 (identified by “Author ID”) will be written to the text file. If the audio file
being processed has a work type of 12 and was created by an author with an ID of 1234, the text file
created will have the following contents:
[CMP DESC]
Work Type=12
Author ID=1234
Author Time Long=1127672897
Author Time=Tue Dec 28 15:07:47 2004
DSS File Priority Mapping
When importing DSS files using Personal Companion for the purposes of distributing to an
Audioworxs system use this setup tab to map (i.e. change) the priority value set in the DSS file to a
value recognized by the Audioworxs system. A DSS file supports a priority value of 1 to 15 whereas an
Audioworxs system supports a priority value of 0 to 100.
Document #3.00.000.20090709
52
© 2002-2007,2009 Dataworxs Systems Limited
Priority Mapping (2.01.010+)
To map a DSS priority value you must first provide one or more (up to 4) ranges of values using
numbers between 0 and 15. Then, for each range, map to a value between 0 and 100. Use the
dropdown list of default Audioworxs priorities to quickly set a mapped priority and use the up and
down arrows to fine tune the setting.
Olympus Job Prioritization (2.01.016+)
When creating a dictation on an Olympus digital recorder the author has the ability to flag the dictation
as a priority. The priority flag is independent of the priority value (0 to 15) that can also be set on the
digital recorder.
Enabling “Link Olympus job prioritization to priority mapping” tells Personal Companion to
override the priority value in the DSS audio file with the one specified if the priority flag has been set
by the author. Personal Companion will then use the new priority value override when mapping to an
Audioworxs priority value (0 to 100).
You may also instruct Personal Companion, upon recognizing that the Olympus priority flag is set, to
mark the DSS audio file such that it will be given priority status when being imported by Audioworxs
Import Manager. To do so, enable the option “Link Olympus job prioritization to Audioworxs
job prioritization”.
Document #3.00.000.20090709
53
© 2002-2007,2009 Dataworxs Systems Limited
eCDocs/LegalDocs (v2.01.032+)
The “eCDocs/LegalDocs” tab is only available when the option to “Interface with
eCDocs/LegalDocs” is enabled in the Interface Options tab.
Use this setup tab to manage the Work Type list used by eCDocs/LegalDocs. See the
“Demographics” tab for a more complete description of maintaining demographics lists.
Select the appropriate “Version” in use: either eCDocs or LegalDocs. Choosing the proper version is
important to ensure that Personal Companion knows how to communicate with eCDocs/LegalDocs.
Document #3.00.000.20090709
54
© 2002-2007,2009 Dataworxs Systems Limited
Other
The “Other” tab setting is used to setup Personal Companion for automatic setting updates and allows
the ability to set a password for access to the setup options. Token-based licensing is also configured
here.
Automatic Updates
Automatic Updates is a feature of Personal Companion that can be used by a transcription service to
ensure that their clients’ Personal Companions are always setup with the latest setup information. By
using the automatic upload feature (setup in the “Local Path” group in the Socket Transfer/Download
Options tab) the Personal Companion’s setup options can be updated by simply “dropping” a setup
configuration file into the Personal Companion owner’s private upload folder. This feature requires
that Socket transfer is enabled and a private upload folder is setup at the File Transfer Server.
To allow remote updating you should make the “Local Path” and the “Automatic Setup Options
Folder” the same.
A setup configuration file (.WAM) can be created by choosing the menu item “Options->Save
Personal Companion Setup Options”. A text editor such as Notepad can be used to make custom
changes to the setup configuration file before sending it to a remote Personal Companion.
Document #3.00.000.20090709
55
© 2002-2007,2009 Dataworxs Systems Limited
Enable automatic updates by checking the option “Enable automatic setup options updates” and
choosing the number of seconds that Personal Companion will check for a new setup configuration
file. Alternatively, a setup configuration file can manually be applied to a Personal Companion station
by choosing the menu item “Options->Update Personal Companion Setup Options” and then
browse to the appropriate setup configuration file.
Restricting Access to Setup Options
Once a password is entered into the password field access to the setup options is restricted, and only
those knowing the password will have the ability to change or update any settings.
Philips Portable Time/Date Update
When enabled, whenever a Philips recorder is newly detected the date/time on the recorder will be
synchronized to the computer’s date/time.
Licensing
If Personal Companion is to be licensed using Dataworxs’ server-based token licensing, enable it by
checking “Enabled server-based licensing” and provide the IP and port of the license server. The
Connect button can be clicked to test that Personal Companion can communicate with the License
Server using the provided IP and port.
The License Code tells the license server what feature set is required by this specific Personal
Companion. Usually, license code 0 is used to obtain a single-user license/token and license code 1 is
used to obtain a multi-user license/token.
Document #3.00.000.20090709
56
© 2002-2007,2009 Dataworxs Systems Limited
5
Chapter
CHAPTER
5
Digital Portables
Note: If you are running Windows 2000 on a network, you need to log in as Administrator or
use a user name that has administrator rights when installing a CODEC and connecting digital
portables.
Installation
Philips DPM Digital Portables
Recent versions of Personal Companion setup automatically install drivers necessary to support
auto detection of Philips DPM digital recorders. Alternatively, files necessary for Philips DPM
support can be installed by installing Philips DPM software. If Philips software is installed before
or after Personal Companion you must ensure that the Philips DPM Download software is not
running at the same time as Personal Companion.
Olympus Digital Portables
Note: If you are using the Olympus brand of digital recorders the installation is not complete
until you have installed the Olympus drivers onto your workstation. Windows 98SE installs
require the drivers supplied on the Olympus CD.
Make note of the information dialog box during installation, as Windows will only prompt you
once during the initial connection between the digital recorder and the PC’s operating system. If
you disregard this process a manual install will be required. This may require additional technical
support.
The DS-4000/3000/2000/330 models work with Personal Companion. Please note the dialog
box as shown when the initial installation is complete if you are planning on using the Olympus
digital portables with AudioWav Player and Import Manger.
.
Document #3.00.000.20090709
57
© 2002-2007,2009 Dataworxs Systems Limited
Notes
•
•
Make sure you finish installing Personal Companion before connecting the DS4000/3000/2000/330. If you connect the DS-4000/3000/2000/330 before installing Personal
Companion software, the "Add New Hardware Wizard" dialog box will open. If this happens, click
"Cancel" to exit the wizard and install Personal Companion first.
Before connecting the USB cable to the DS-3000/2000/330, make sure that theDS3000/2000/330 is in the stop mode, with its rear-panel POWER/LOCK switch ON and that the
HOLD switch is not set to the HOLD position.
Olympus DS 4000
Connecting to Your PC Using the USB Cable
Attach connector B of the USB cable to the digital recorder unit.
Connecting Recorder to PC
1
2
3
Turn ON the recorder
Insert end A of the USB cable to your PC’s USB port or
USB hub.
Make sure the recorder is in STOP mode before attaching
end b of the USB cable to the terminal port of the recorder.
If “REMOTE” is displayed on the recorder,
it indicates proper connections.
REMOTE
................................................................................................................................................................
Notes
• NEVER remove the card or disconnect the USB cable while the record/play indicator lamp
is flashing. If you do, the data on the card will get destroyed.
• Some PCs and USB hubs may not supply sufficient power and the recorder fails to
connect. Refer to your PC User’s Manual regarding the USB port or USB hub on your PC.
• When using a USB hub to connect the recorder, always use a self-powered (AC adapter)
USB hub.
Document #3.00.000.20090709
58
© 2002-2007,2009 Dataworxs Systems Limited
• Make sure to push the cable connector all the way in. Otherwise, the recorder may not
operate properly. Once you connect the recorder to your PC, the recorder will be powered
through the USB cable. The batteries and/or AC adapter will not be in use. Be sure to
install the AudioWav Player software before connecting the recorder to a PC. However, if
you do connect the recorder before or during the software installation, the “Add New
Hardware Wizard” appears. In this case, cancel the wizard by pressing the [Cancel] button
in the wizard screen and then install or continue the installation of AudioWav Player
software. You can directly connect the recorder’s USB terminal to your PC, or use the
cradle included in the package (desktop holder).
Connecting Recorder to PC using the cradle
Place the recorder in the cradle
1
2
3
Insert end A of the USB cable to your PC’s USB port or USB hub.
Connect end b of the USB cable to the cradle.
Turn ON the recorder, then set the recorder in the cradle.
If “REMOTE” is displayed on recorder, it
indicates proper connection.
…….............................................................................
Notes
Connecting to Your PC Using the Cradle
Disconnecting Recorder from PC
•
•
Never touch the contact points at the bottom of the cradle, as
that may cause bad connection.
To avoid data corruption or loss, make sure that the
recorder’s record/play indicator lamp isn’t flashing, before
removing the recorder from the cradle or disconnect the cable
from the recorder terminal.
Insert connector A USB cable into the PC's USB port.
Document #3.00.000.20090709
59
© 2002-2007,2009 Dataworxs Systems Limited
Attach connector the USB cable to the DS-3000/2000/330.
Windows will automatically detect that “New Hardware” has been added the first time
you connect the recorder to the PC.
When the PC recognizes the DS-3000/2000/330 and asks for the location of the
appropriate driver direct it to the appropriate Olympus driver directory located on the
Personal Companion install CD. Your choices are Olympus 2000 or Olympus 98. Use
the Olympus 98 directory for Windows 98 installs only and Olympus 2000 directory
for all other Windows Operating Systems. The drivers are located in the install setup
directory or supplied CD, depending on how the software was originally obtained.
Notes
•
•
For information about your PC's USB ports, refer to the user's guide supplied with the PC.
Never remove the USB cable while a communication session is in progress. Data files could be damaged if
you do.
Norcom Digital Portable Installation
The Norcom portable uses an external reader for downloading
audio from the MMC card. Insert the USB connector on the reader into the PC. Windows 2000
and XP will automatically install the needed drivers. Windows 98SE will require the use of the
supplied Mini CD install program. Check to see if the reader is installed correctly by using
Windows Explorer and see if you can locate the reader, it should appear as a Removable media
drive with an assigned drive letter ( F: for example). In the Setup for Companion under Program
Options select the Source Drive (Removable) folder and browse to the location of the reader.
Make sure to select the “DICT” directory, Select OK. The Companion program will now look to
that removable drive for audio files to be downloaded whenever a MMC card is inserted.
Sanyo ICR-B150 Digital Recorder
Installing the Sanyo CODEC
Before connecting the Sanyo recorder to the PC the Sanyo audio CODEC and drivers must be
installed. Check with your dealer about obtaining the Sanyo CODEC (LDADP32.inf) and drivers
necessary for your Sanyo recorder.
Document #3.00.000.20090709
60
© 2002-2007,2009 Dataworxs Systems Limited
To Install:
Select the file called LDADP32.inf.
Using your mouse “right” click and select “Install”.
The Sanyo LDADPCM CODEC is now installed
Connecting the Sanyo to the PC:
1. Slide the POWER switch to the OFF position.
2. Connect the unit to the PC using the USB cable (supplied) as shown in the illustration.
3. If the “Wizard” appears on the display, follow the instructions on the screen. (There is a driver
file in the place that you installed the software.) If your PC is running Windows XP, the screen
shows:
Document #3.00.000.20090709
61
© 2002-2007,2009 Dataworxs Systems Limited
1) Click [Next].
2) Click [Continue Anyway].
Document #3.00.000.20090709
62
© 2002-2007,2009 Dataworxs Systems Limited
3) Click [Finish].
4) Operate your PC. (Follow the instructions on the CD-ROM.) When the “Companion”
program is properly started on the PC, “PC CONNECT” appears on the display of the recorder
unit, and the control buttons on the unit will not function.
Files recorded on the Sanyo recorder can also be downloaded using an external reader similar to
how audio files from the Norcom 2700 are downloaded.
NOTE: Select the download location in the Setup Program Options. The Sanyo requires the
same type of setup as the Norcom. Select the appropriate drive letter for the external card reader
(The Sanyo when connected looks like a removable drive on your PC) and select the “Author”
directory as the source location for the audio files.
Document #3.00.000.20090709
63
© 2002-2007,2009 Dataworxs Systems Limited
Frequently Asked Questions
Known issues when using Olympus 2000/3000/4000 digital recorder units and the Personal
Companion software:
Q. What do I do if I have forgotten the path to the Olympus drivers?
A.
If you are running Windows 98, the required hardware drivers are installed by default to
the C:\Windows\System32\Drivers\Win98 folder. If you are running Windows 2000, the
required drivers are installed to the C:\WinNT\System32\Drivers\Win2000 folder.
Q. How do I install the Olympus hardware drivers?
A. After installing the AudioWav Personal Companion software, simply plug the USB cable
(which comes with the DS2000/3000/4000/330 unit) into the USB port on your computer
(usually located in the back of your computer), then turn on the Olympus unit and plug the other
end of the USB cable into the Olympus unit (the cable will only plug in one way for each).
Follow the Windows Hardware Wizard instructions (using the driver file location specified
above).
Q. When installing on a Windows 2000/XP computer, what rights should I have?
A. You should always install software and hardware drivers while logged in as a user with
administrator rights so that other users logged in to the computer can use the application.
Q. When should I install the Olympus drivers?
A. You should always fully complete the installation of both software and hardware before
changing the user currently logged into the system.
Q. Why does the same file get downloaded over and over again from the Olympus unit?
A. The Olympus unit(s) uses a “Flash” card to store the digital audio on. It is not uncommon for
these cards to become corrupt. Once the File Allocation Table (FAT) of the Flash card has been
corrupted, the digital dictation can’t be deleted using any software. To fix this problem, format
the Flash card using an Olympus DS-2000/3000/4000 unit.
Q. Can Olympus/Philips software co-exist with Personal Companion?
A. Olympus and/or Philips download software can be installed on the same computer as
Personal Companion but cannot be running at the same time.
Document #3.00.000.20090709
64
© 2002-2007,2009 Dataworxs Systems Limited
INDEX
A
M
Activation, 8, 9, 10
Administrator, 8, 9, 10, 64
Archive, ii, 29, 30
AudioWav Player, 29, 57, 64
Audioworxs, 25
Automatic Updates, 55
Minimize, 28, 29, 30, 32
Multi User. See Logging In
N
Norcom, ii, 18, 60, 61, 63
O
C
Olympus Device Detector. See Device Detector
Olympus DSS Format, ii, 31, 57, 60, 64
Olympus Priority Flag, 53
Options, 23, 28, 29, 30, 32, 33, 44, 47, 60, 63
Certificate, 8, 10
CODEC, 6, 18, 38, 60, 61
D
Daily Report, 40
Dataworxs, 0, i, 5, 8, 9, 10, 18
Default, 5, 9, 10
Delete, 29, 30
Demographics, ii, 42
Device Detector, 5, 24
directories, ii, 28
DSS Priority, 53
DVI/VXP, 51
P
Password, 56
PC Author, 7, 22
PCLauncher, 5
Philips DPM Digital Recorder, 17, 47
Portable Input Field Mapping, 49
Priority (DSS File), 52
Priority (Import), 25
Prompts, 29
E
R
eCDocs/LegalDocs, 45, 54
Encryption, 29, 30, 34
Event Log, 41
Registration, 8
Remote Path, 36
Report, 39
Reports, ii
F
File Conversion, 38
File Transfer Server, 5, 36, 55
S
Sample, 9, 10
Sanyo, ii, 18, 60, 61, 63
Session Report, 40
Setup Configuration File, 55
Single User. See Logging In
SMTP, 33
SMTP E-Mail, 37
Source, 28, 29, 30, 31, 60
Status, 9, 11, 20
G
Group, ii
I
Import Manager, 25, 28, 29, 31
Installation, 7, 13, 57, 60
Login, 21
Internet, ii, 5
IP Address, 36
T
Telephony, 39
Text File Mapping, 51
L
LegalDocs/eCDocs, 45, 54
Local Path, 36, 55
Logging In, 7, 17, 21
Login, Integrated, 17
Login, Stand-Alone, 17
Document #3.00.000.20090709
W
WAM File. See Setup Configuration File
Windows 98SE, 57, 60, 64
65
© 2002-2007,2009 Dataworxs Systems Limited