1
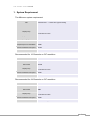
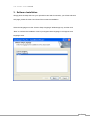
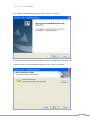
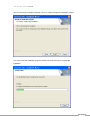
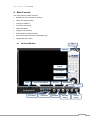
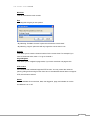
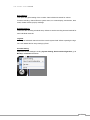
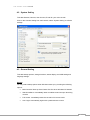
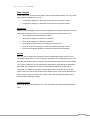
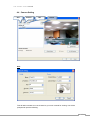
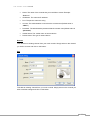
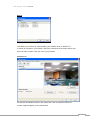
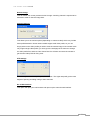
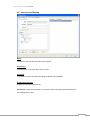
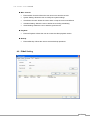
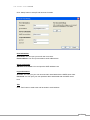
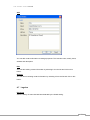
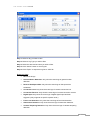
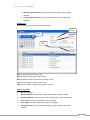
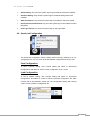
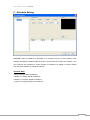
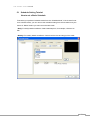
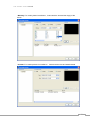
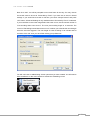
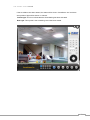
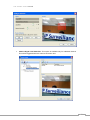
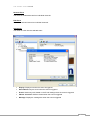
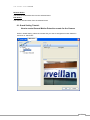
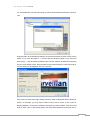
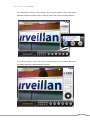
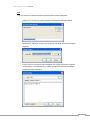
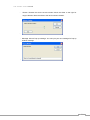
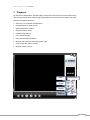
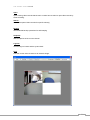
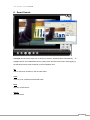
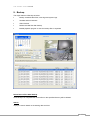
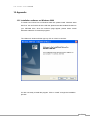
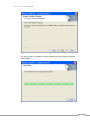
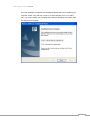
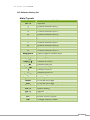
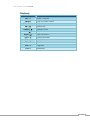
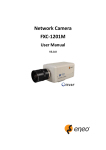
Central Management Software Cam Viewer Plus User Manual Version 1.0 Cam Viewer Plus Manual Table of Contents 1. SYSTEM REQUIREMENT ................................................................................3 2. FEATURES ..........................................................................................................4 3. SOFTWARE INSTALLATION ...........................................................................5 4. MAIN CONSOLE ..............................................................................................10 5. 4.1 Console Window ................................................................................................ 10 4.2 System Setting ................................................................................................... 14 4.3 General Setting................................................................................................... 14 4.4 Camera Setting................................................................................................... 16 4.5 User Account Setting ........................................................................................ 20 4.6 E-Mail Setting ..................................................................................................... 21 4.7 Logview ............................................................................................................... 23 4.8 Save/Load Configuration .................................................................................. 26 SCHEDULE SETTING .....................................................................................27 5.1 6. Schedule Setting Tutorial: ................................................................................ 28 GUARD SETTING ............................................................................................32 6.1 Guard Setting Tutorial: ............................................................................................. 35 7. PLAYBACK........................................................................................................41 8. SMART SEARCH .............................................................................................43 9. BACKUP ............................................................................................................46 10. APPENDIX .....................................................................................................48 10.1 Installation software on Windows 2000 .......................................................... 48 10.2 Software Hot-key list ......................................................................................... 51 2 Cam Viewer Plus Manual 1. System Requirement The Minimum system requirement CPU Intel® Pentium 4 3.0GHz with Hyper-threading RAM 1 GB Video RAM 128MB nVIDIA GeForce 8500GT Display Chip ATI Radeon HD 4350 Display Resolution 1024X768 24bits Operating System Windows2000 SP4 / Windows XP Pro SP2 /Windows 2003 /Vista DirectX 9.0c Required space for installation 100MB Recommended HD free space 160 GB Netware Wire: Ethernet 100 BaseT Recommended for 16 Channels on CIF resolution CPU Intel® Core™2 Duo E7400 RAM 2 GB Video RAM 256 MB nVIDIA GeForce 8600GT Display Chip ATI Radeon HD 4670 Recommended HD free space Netware 160GB Wire: Ethernet 100 BaseT Recommended for 64 Channels on CIF resolution CPU Intel® Core™2 Quad Q8200 RAM 4 GB Video RAM 1GBB nVIDIA GeForce 9500GT Display Chip ATI Radeon HD 4850 Recommended HD free space Netware 500GB Wire: Ethernet Gigabit LAN 3 Cam Viewer Plus Manual 2. Features • • • • • • • • • • • • Real-time Intelligent 64CH Video Surveillance Software Selection of 1/4/6/9/10/13/16/25/36/49/64 divided screen in Main Console Quick Search and Event List Search in Playback Real Time Status Display and Notification Support PTZ Control and Setting Smart Guard Detection: Including General Motion, Missing Object, Foreign Object, Obstruction, Focal Loss, Camera Tampering, Camera Signal Loss detections. Intelligent video analysis (Smart Search): Including General Motion, Missing Object, Foreign Object Event Alert Instant Response: On Screen Display, E-mail, Sound Alarm, Window Vibration, Pop-up Message User management for secured viewing and administration Real Time Status Display and Notification: System, Video, Event, Alarm, network connection and backup status can be seen immediately Main program execution actions can be configured System and Event can be recorded and browser 4 Cam Viewer Plus Manual 3. Software Installation Simply place the setup disc into your optical drive and wait for seconds, you will see welcome web page, please click the Cam Viewer Plus to start the installation. Select the language once the “Choose Setup Language” Windows pop-up, and then click “Next” to continue the installation. Now is just support three language, it will support more languages soon. 5 Cam Viewer Plus Manual The “Welcome” window will then pop-up, click on “Next” to continue. You may choose where to install the program. Click on “Change” button to browse your computer. Once you have specified the directory, click on “Next” to continue. 6 Cam Viewer Plus Manual You are now ready to install the program. Click on “Install” to begin the installation process. You will now see the installation progress. Please wait a few minutes to complete the installation. 7 Cam Viewer Plus Manual Click on “Finish” to exit the InstallShield wizard. You will now be prompted to create an administrator account. This account allows full control of Cam Viewer Plus Pro. Enter a password for this administrator account in the “Password” field and re-enter it in “Password Confirm” field. 8 Cam Viewer Plus Manual You will then be prompted to login by the administrator user name and password. Enter “administrator” in the “User Name” field. Enter the password you just created in the “Password” field. You have successfully entered Cam Viewer Plus Pro. 9 Cam Viewer Plus Manual 4. Main Console The major features of Main Console. • Monitors up to 64 channels of cameras • Video recording schedule • Cycling surveillance • Full screen monitoring • Status indications • Supports PTZ cameras • Event based recording and alert • Browser and export the event and system logs • Support Hot Key control 4.1 Console Window Exit Minimize Keypad Page Navigator PTZ Control Status Channel View Options Services Guard Setting Logview Cycle Slides Full Screen Playback Schedule Setting Console Setting 10 Cam Viewer Plus Manual Minimize This will minimize the main console Exit Selecting this will give you two options • By selecting “Exit Main Console” option this will exit the console itself • By selecting “Logout” option this will only logout the current user in use Keypad This allows you to enter the channel number for the current view. For example if you have 20 channels active, enter “4” to go to channel 4. Page Navigator This allows you to navigate in page mode, if you have more than one page active. PTZ Control If the channel that is selected supports PTZ function. You may control the camera’s panning, tilting and zooming function from here. If the selected channel does not support PTZ, this will not be actived. Status This will indicate the current time, date, user logged in, page, and whether or not the surveillance is on or off. 11 Cam Viewer Plus Manual Channel View Options There are 7 viewing options for the main console. • Single Channel • 2x2 Grid Channels • 3x3 Grid Channels • 4x4 Grid Channels • 5x5 Grid Channels • 6x6 Grid Channels • 7x7 Grid Channels • 8x8 Grid Channels • 1 Main Channel + 5 Secondary Channels • 2 Main Channel + 8 Secondary Channels • 1 Main Channel + 12 Secondary Channels Cycle slides This will cycle through individual slides. Full screen This will view the console in full screen. Services Two options will be available when selected • By selecting “Start Surveillance” all the preset functions from “Guard Setting” and “Schedule Setting” will be activated. • By selecting “Lock System”, all accessible buttons will be disabled until unlocked. Playback This opens the playback window portion of Cam Viewer Plus Pro. Find history of video records including individual channels. Search by events detection within the video records. Set up the backup intervals. Create snapshot(s) of video records and save them as .bmp or .jpg. 12 Cam Viewer Plus Manual Guard Setting This opens the guard setting of the console. Sets individual channels for various functions including: channel Events, system event, on screen display, sound alarm, alert email, vibrate window, pop-up message. Schedule Setting This enters the recording schedule setup. Allows to set the recording time and method for each individual channels. Logview View logs of individual channels and the console system itself. Allows exporting the logs into .CSV based files for easy viewing by Excel. Console Setting Adjust the console settings including: System Setting, Save/Load Configuration, go to Backup, and About information. 13 Cam Viewer Plus Manual 4.2 System Setting This edits General, Camera, User Account, E-mail for your main console. Click on the Console Setting from mail console, select “System Setting” to edit the settings. 4.3 General Setting This edits startup options, storage locations, status display, and OSD setting and language settings. Startup You may select startup options when Windows starts up by checking the following options: • Main Console: Boots up Cam Viewer Plus Pro when Windows OS started • Start Surveillance: Immediately starts surveillance services upon launching console • Full Screen: Immediately starts the console in full screen mode • Auto Login: Automatically logins with a preferred user account 14 Cam Viewer Plus Manual Status Display These options are for the lower left portion of the console status indicator. You may check these options to display them or not: • Current Date: Displays or hides the current date in the console’s status • Current Time: Displays or hides the current time in the console’s status OSD Setting OSD (On Screen Display) are the information displayed on individual channels – this also effects the recording as well. You may check these options to display them or not: • Show Translucent: Allows translucent effect • Show Date: Displays or hides the current date • Show Time: Displays or hides the current time • Show Channel Name: Displays or hides the channel name • Show Channel FPS: Displays or hides the channel’s frame per second • Show Channel Bitrate: Displays or hides the channel’s current bitrates Storage Here you can set where you would like to store recorded files/images. It allows you to add multiple directories, so if the top directory disk space hits the disk space mark, it will go to the next directory down on the list. The “Recycle Recording and free” option allows you choice of whether or not to automatically delete the recorded files when disk space exhausted. You can specific the amount of released disk space when disk space exhausted. The “Reserve Disk Space” option allows user to mark the amount of disk space to left over. The “Preserve Files” option allows user to store the recorded files for a certain amount of days if they would only like to store the recorded files temporarily to reduce massive disk space usage. Language Setting Select a language you preferred to use. Click “OK” button to change the language right away. 15 Cam Viewer Plus Manual 4.4 Camera Setting Add Remove Edit Search Add This will add a camera as a new channel on your main console for viewing. You will be prompted to input the following. 16 Cam Viewer Plus Manual • Name: The name of the channel that you would like to create. Example: “Bedroom”. • IP Address: The camera’s IP address • Port: The port the camera is using • Account: The administrative account that the camera uses (Default value is “admin”) • Password: The administrative password that the camera uses (Default value is “password”) • Vender Name: The vender name of camera device • Device Name: The type of camera device Remove This removes an existing channel from your main console. Simply select on the channel you wish to remove and click on this button. Edit This edits an existing channel from your main console. Simply select on the channel you wish to edit the settings and click on this button. 17 Cam Viewer Plus Manual Search This allows you to search for cameras within your network. Click on “Refresh” to re-search for cameras in your network. Check any cameras that you wish to add to your list for the main console. Click “OK” once you’re finished. Channel List You will find all available devices in the channel list. Click on the device name, the camera image will display on the preview area. 18 Cam Viewer Plus Manual Refresh Image This will refresh the current preview window’s image. A working channel is required to be selected in order to view the image here. Channel Settings This allows you to set various options (depending on camera model), which may include video profile/resolution. Some camera model support multi video profile, so you can simply select on the video profile you wish to view the camera image. If the camera mode only support single video profile, you have go to the web page of IP Camera to change the video profile first, and then Cam Viewer Plus Pro will auto reconnect the camera to get the new video profile for living view. PTZ Settings This allows you to set the steps for pan, tilt and zoom. The higher steps will get the more degree of panning and tilting it will go when executed. Go to Web Interface This option will open your web browser and opens up the camera’s web interface. 19 Cam Viewer Plus Manual 4.5 User Account Setting Name The name of the user account that’s being created Description The description of the user name of the account Password The password for the account that’s being created or being modified Disable User Account Disables the selected user account Permission: Check the permission to control how many function(s) can be performed by the existing user account 20 Cam Viewer Plus Manual Main Console • Execute Main Console: Allows the user account to start the console • System Setting: Allows the user to modify the system settings • Surveillance Control: Allows the user to start or stop the current surveillance • Schedule Setting: Allows the user to define the recording schedule(s) • Guard Setting: Allows the user to start the guard service Playback • Execute Playback: Allows the user to access the video playback section Backup • Execute Backup: Allows the user to execute backup operations 4.6 E-Mail Setting 21 Cam Viewer Plus Manual Click “Setup” button to setup E-mail account of sender. User Information User Name: You can input your email user name here. E-mail Address: You can input a sender’s email address here. Server Information SMTP Server Address: You can input the SMTP address here. Login Information Account: You can input your user account that’s associated with the SMTP server here. Password: You can input your user password that’s associated with the SMTP server here. Test Click “Test” button to send a test mail to sender’s email address. 22 Cam Viewer Plus Manual Add You can add contact information for storage purposes. This includes name, email, phone, address and description. Edit You can edit existing contact information by selecting it from the list and click on this button. Remove You can remove existing contact information by selecting it from the list and click on this button. 4.7 Logview Event Log View the history of event that had been detected by the Guard setting. 23 Cam Viewer Plus Manual Step 1: Select a day you wish to view. Step 2: Select a Log Type you wish to filter. Step 3: Select the start and end time you wish to filter. Step 4: Click “Search” button to view log list. Step 5: Click “Export” to export the log list as .CSV file. Event Log Type • All: Show all logs. • General Motion Detection: Only show the event logs of general motion detection. • Reserve Disk Space Met: Only show the event logs of disk space has exhausted. • Connection Lost: Only show the event logs of camera connection lost. • Connection Recover: Only show the event logs of camera connection recover. • Digital Input: Only show the event logs of digital signal input has been triggered. (Only supports on specific capture cards.) • Focal Loss Detection: Only show the event logs of focal loss detection. • Obstruction Detection: Only show the event logs of obstruction detection. • Camera Tampering Detection: Only show the event logs of camera tampering detection. 24 Cam Viewer Plus Manual • Missing Object Detection: Only show the event logs of missing object detection. • Foreign Object Detection: Only show the event logs of foreign object detection. System Log View the history of system that had been modified. Step Step Step Step Step Step 1: Select a day you wish to view. Step 2: Select a Log Type you wish to filter. Step 3: Select the start and end time you wish to filter. Step 4: Click “Search” button to view log list. Step 5: Click “Export” to export the log list as .CSV file. System Log Type • All: Show all logs. • System Startup: Only show the system logs of main console is started. • System Shutdown: Only show the system logs of main console is shutdown. • User Login: Only show the system logs of user login. • User Logout: Only show the system logs of user logout. • System Setting: Only show the system logs of system settings have been modified. 25 Cam Viewer Plus Manual • Guard Setting: Only show the system logs of guard settings have been modified. • Schedule Setting: Only show the system logs of schedule settings have been modified. • Start Surveillance: Only show the system logs of surveillance has been started. • Preserved Files Delete Failed: Only show the system logs of auto delete recorded files failed. • User Login Failed: Only show the system logs of user login failed. 4.8 Save/Load Configuration The Save/Load Configuration function allows users to save any settings as an .ocf configuration file. You may save up several different configuration file at any time. Save Configuration To save a specific setting, click Console setting and select of “Save/Load Configuration” and select of “Save” to save configuration as an .ocf file. Load Configuration To load a specific setting, click Console setting and select of “Save/Load Configuration” and select of “Load” to load the previous configuration file. Main Console will be automatically change the new configuration setting after clicking “Open” button to load the configuration file. 26 Cam Viewer Plus Manual 5. Schedule Setting Overview: When surveillance is activated, it is basically running on the schedule mode settings (The default schedule mode will be set as Daily when the channel was created.). You can customize the schedule for certain periods of surveillance or based on events created from the guard settings for individual channels. Schedule Mode • Daily: For daily based surveillance • Weekly: For weekly based surveillance • Monthly: For monthly based surveillance • Custom: For longer periods of surveillance 27 Cam Viewer Plus Manual 5.1 Schedule Setting Tutorial: How to set a Basic Schedule First select your preferred schedule mode from the “Schedule Mode”, if the channel is set as a schedule mode, you can remove this schedule setting from the schedule list by the button of “Delete” before you add a new schedule mode. • Daily: For daily based surveillance. Select start/stop time, for example, 5 PM and 12 PM. • Weekly: For weekly based surveillance. Select both the time and day(s) of the week. 28 Cam Viewer Plus Manual • Monthly: For monthly based surveillance. , Select both the time and the day(s) of the month. • Custom: For certain periods of surveillance. Select both the time and start/end date. 29 Cam Viewer Plus Manual Next click “Add”. You will be prompted to set a time frame for the day. You may choose the record mode to be set to “Recorded by Event” if you have set an event in Guard settings. If you would like to record for full time, just check “Always Record” and press “OK” button. Advanced Settings is only available when “Recorded by Event” is selected. If you would like to record the image before the event occurs, set the second number in “Pre-recording when event occurs”. The max pre-recording length is 10 seconds. The control of “Recording interval after event occurs” is allows you to decide the record length when the event be triggered. The max length of event recording is 59 minutes and 59 seconds. Click “OK” once you have finish setting your preferences. You will now have an added listing of time queue that you have created. You will need to start surveillance on the main console to activate the scheduling record. 30 Cam Viewer Plus Manual If the surveillance has been started, the status will be shown “Surveillance On” and there are symbols of light will be shown on channel. Yellow Light: This is to indicate that the Guard Setting has been activated. Red Light: This symbol is the scheduling record has been started. 31 Cam Viewer Plus Manual 6. Guard Setting Add Event Remove Event Add Action Edit Event Remove Action Edit Action Overview: The Guard settings are to setup events and actions. For example, if you wish to have a certain channel to take action (such as Sound Alarm) when an event occurs (such as General Motion detected), you would set it up through here. Add Event This adds an event to individual channel • General Motion Detection: This option is available only for individual channel. This will set the channel to trigger an event when motion is detected by this particular channel. 32 Cam Viewer Plus Manual • Camera Signal Lost Detection: This option is available only for individual channel. This will be triggered when the camera connection lost. 33 Cam Viewer Plus Manual Remove Event This removes a selected event from individual channels. Edit Event This edits a selected event from individual channels. Add Action This adds an action into the selected event. • Display: Displays text when the event is triggered • Sound Alarm: Plays a sound when the event is triggered • E-mail: Sends out email, based on the E-mail settings when the event is triggered • Vibrate: Console’s Window vibrates when the event is triggered • Message: Displays a message box when the event is triggered 34 Cam Viewer Plus Manual Remove Action This removes a selected action from the selected event. Edit Action This edits a selected action from the selected event. 6.1 Guard Setting Tutorial: How to create General Motion Detection events for the Camera While in Guard Setting, select the camera that you want to add general motion detection and click on “Add Event” Add Event 35 Cam Viewer Plus Manual An “Event Selection” window should pop up, select “General Motion Detection” and click “OK” Drag the slider on the Sensitivity setting to choose how sensitive for each motion area to detect. If you move the slider to “+”, this will set the sensitivity higher. If you move the slider to the “-”, this will set the sensitivity lower. Choose “Default” to detect for everything that is on the camera screen. Drag the slider on the Interval setting to chose how long for the next event can be triggered. The unit is second. Click “Clear” to remove the region setting, and click “Add” to set specific area to detect for motion, for example, you only want to detect motion from a portal. To use “Add” for Region Definition, you’ll need to define the areas that you want to detect. First you would click on “Add”. Then, in the preview panel, click and hold to drag an area that you wish to 36 Cam Viewer Plus Manual detect. Click on “Remove” and click on the area you created to remove it. Click on “Clear” to remove all areas created in the preview panel. Click “OK” once you’ve completed. Click on the “General Motion Detection” that you have just created to see “Action”. By default, it should already have “Display” action added. Click “OK” to complete. 37 Cam Viewer Plus Manual You should now be back in main console. Try moving an object in front of the motion detected configured camera. Click on “Service” button and choose “Start Surveillance” Try moving an object in front of the motion configured channel. You should be able to see a message displaying “General Motion Detected” 38 Cam Viewer Plus Manual Tips • You can add more customized actions into the event for better notification: - Display: You can input your own message for display by editing the default - Sound Alarm: Alerts you through your computer’s speaker when the event gets triggered - E-mail: Alerts you through e-mail messaging with custom messaging (requires configuration). If checked the box of “Attach a snapshot”, the mail will attach a snapshot of motion detection. - 39 Cam Viewer Plus Manual - Vibrate: Vibrates the whole console window. Move the slider to the right for longer vibration. Move the slider to the left for shorter vibration. - Message: Show a Pop-up message. You can input your own message for Pop-up window message. - 40 Cam Viewer Plus Manual 7. Playback To open the recorded video, view the videos, search the events from the current opened video files, backup recorded files, view the logs, take snapshot, and print channel images. The major features of Playback as below. • Views up to 16 channels simultaneously • Playback speed controls up to 6x • Status information indicator • Enhanced search mode • Capture image frames • Print channel images • Easy access to back up videos • Browser and export the event and system logs • Voice switch and volume controls • Support Hot Key control Open Smart Search Backup Logview Snapshot Print 41 Cam Viewer Plus Manual Open Open existing video records that the main console has recorded or open video records by event recording. Search Search the opened video records for specific action(s) Backup Set scheduled backup operations for safe keeping Snapshot Take a snapshot of the current channel Logview View the logs of events and the system itself Print Print the current active channel or all channels image. 42 Cam Viewer Plus Manual 8. Smart Search Overview: Smart Search helps user to detect for events in recorded videos automatically. To highlight specific event detected areas by holding down the left mouse button and dragging in the Playback window area will speed up the investigation time. All Search events for all areas on the recorded video. Clear Clear any user created event detected areas. Stop Stop the current search. Search Start the search. 43 Cam Viewer Plus Manual Alarm Event Type There are some event types for users choosing. - Genera Motion Detection Detect any physical movement in the specific area. - Missing Object Detection Detect the remove of object of interest in the specific area. - Foreign Object Detection Detect the presence of foreign objects in the video. - Focal Loss Detection Detect the loss of image quality or out of focus in the video. - Obstruction Detection Detect the presence of objects obscuring the observed scene. - Camera Tampering Detection Detect changes in camera positioning in the video. Sensitivity Drag the setting to the right for high sensitivity; drag the setting to the left for lower sensitivity Interval Drag the setting to the right for more frequent snapshot intervals; drag the setting to the left for less frequent snapshot intervals 44 Cam Viewer Plus Manual Stop when found The searing action will stop when event has been found. Search Result Save the image to your file directory. Clear of Search Result Clear all the results in the search. 45 Cam Viewer Plus Manual 9. Backup The major features of Backup as below. • Backup recorded video files, event logs and system logs. • Set date and time intervals • Video Preview • Delete recorded files after backup • Bundle playback program to view the backup files in anywhere Delete Record Files After Backup Once backup has completed the current files on the specified directory will be deleted. Search Inquiry the search based on the starting date and time. 46 Cam Viewer Plus Manual Directory Where the backup files you would like to store under. Play Play the current selected video for previewing purposes. Backup To start backup recorded files to the specific folder. Exit Exit the Backup program. 47 Cam Viewer Plus Manual 10. Appendix 10.1 Installation software on Windows 2000 To install Cam Viewer Plus on Windows 2000 OS, please install “Windows 2000 Kits” first. You can find this kit in the CD disk, please insert the bundled CD disk into your CD-ROM drive, when the welcome page appear, please select “Install Windows 2000 Kits” to install the programs. The “Welcome” window will then pop-up, click on “Next” to continue. You are now ready to install the program. Click on “Install” to begin the installation process. 48 Cam Viewer Plus Manual You will now see the installation progress. Please wait a few minutes to complete the installation. 49 Cam Viewer Plus Manual Once the installation completes, the InstallShield Wizard will ask for restarting your computer. Check “Yes” and click “Finish” to re-start computer now. If you select “No”, you have to restart your computer later otherwise installing Cam Viewer Plus Pro will get some troubles. 50 Cam Viewer Plus Manual 10.2 Software Hot-key list Main Console Hot Key Ctrl + 2 Function Playback 1 Channel number input 1 2 Channel number input 2 3 Channel number input 3 4 Channel number input 4 5 Channel number input 5 6 Channel number input 6 7 Channel number input 7 8 Channel number input 8 9 Channel number input 9 0 Channel number input 0 Backspace Enter Up (↑) Clear Channel number input Enter the Channel number Camera Tilt Up Down (↓) Camera Tilt Down Left (←) Camera Pan Left Right (→) Camera Pan Right + Camera Zoom in - Camera Zoon out Page UP Page Down Previous Page Next Page Home Go to the first Page End Go to the last Page Ctrl + G Start Surveillance/Stop Surveillance Ctrl + S System Setting Ctrl + L Logview Ctrl + F Full Screen Display ESC Normal Screen Display Tab Change Display Pattern 51 Cam Viewer Plus Manual Playback Hot Key Function Ctrl + 1 Main Console Space Play or Pause video Ctrl + Enter Stop video Up (↑) Speed Up Down (↓) Left (←) Right (→) Speed Down Step Backward Step Forward Ctrl + O Open Records Ctrl + M Smart Search Ctrl + P Print Ctrl + L Logview Ctrl+ I Snapshot 52