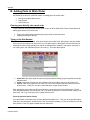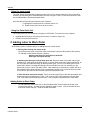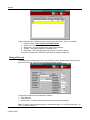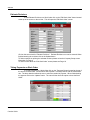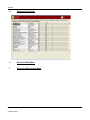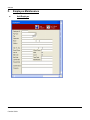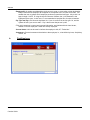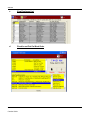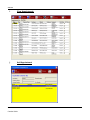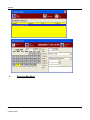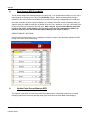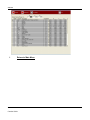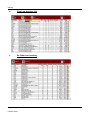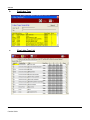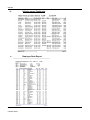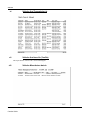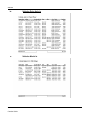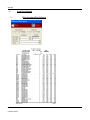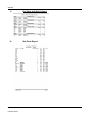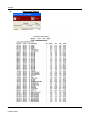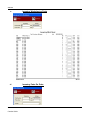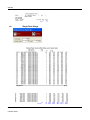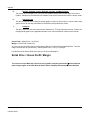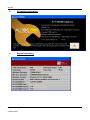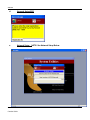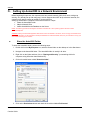
1
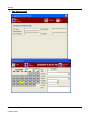
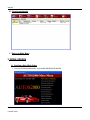
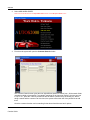
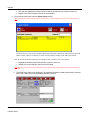
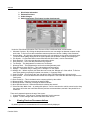
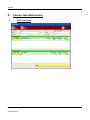
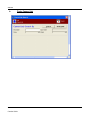
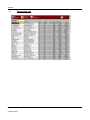
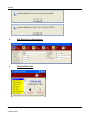
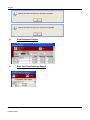
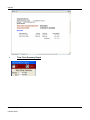
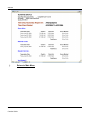
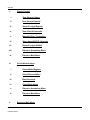
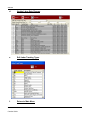
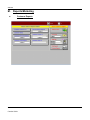
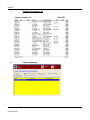
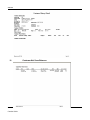
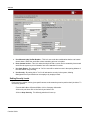
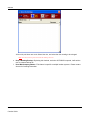
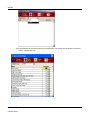
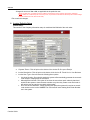
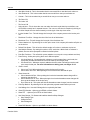
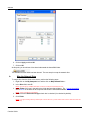
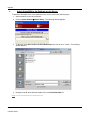
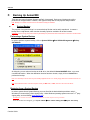
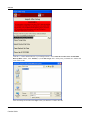
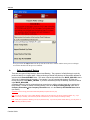
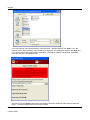
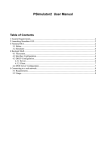
Dedicated to your Business Success AUTOS2000 Reference Manual AMCOM I. WORK ORDERS/ESTIMATES ______________________________________________ 6 A. ALL OPEN TICKETS ______________________________________________________________________ 6 B. OPEN W ORK ORDERS____________________________________________________________________ 6 C. OPEN QUICK ESTIMATES __________________________________________________________________ 7 D. ADD W ORK ORDER______________________________________________________________________ 7 E. ADD QUICK ESTIMATE ____________________________________________________________________ 8 F. DELETE OPEN W ORK ORDERS _____________________________________________________________ 8 G. CLOSED W ORK ORDERS __________________________________________________________________ 9 H. CLOSED W ORK ORDERS W/BALANCE _________________________________________________________ 9 I. OVER THE COUNTER SALES ______________________________________________________________ 10 1. Ring Up New OC Sale _______________________________________________________________ 10 2. View List of Paid OC Sales ___________________________________________________________ 11 3. View List of Unpaid OC Sales _________________________________________________________ 12 4. Delete Counter Sale ________________________________________________________________ 13 5. Return to Main Menu ________________________________________________________________ 13 6. Return to Work Orders ______________________________________________________________ 13 J. ADD APPOINTMENT _____________________________________________________________________ 14 K. VIEW APPOINTMENTS ___________________________________________________________________ 15 L. RETURN TO MAIN MENU _________________________________________________________________ 15 II. WORK ORDERS __________________________ ERROR! BOOKMARK NOT DEFINED. A. CREATING A NEW W ORK ORDER ___________________________________________________________ B. ADDING PARTS TO W ORK ORDER __________________________________________________________ C. ADDING LABOR TO W ORK ORDER __________________________________________________________ D. ADDING NEW CUSTOMERS/VEHICLES _______________________________________________________ E. EDIT W ORK ORDER SCREEN ______________________________________________________________ F. VIEWING PREVIOUS RECOMMENDATIONS _____________________________________________________ G. Customer Warnings, Internal Comments, and Pop II. CANNED JOBS MAINTENANCE __________________________________________ 25 A. ADD CANNED JOB______________________________________________________________________ B. FIND A CANNED JOB ____________________________________________________________________ C. CANNED JOB LIST ______________________________________________________________________ D. DELETE A CANNED JOB __________________________________________________________________ E. RETURN TO MAIN MENU _________________________________________________________________ F. RETURN TO W ORK ORDERS MENU _________________________________________________________ III. 15 18 19 22 22 23 25 26 27 28 28 28 EMPLOYEE MAINTENANCE _____________________________________________ 29 A. ADD EMPLOYEE _______________________________________________________________________ B. FIND EMPLOYEE _______________________________________________________________________ C. VIEW EMPLOYEE LIST ___________________________________________________________________ D. CLOCK IN AND OUT ON W ORK ORDER _______________________________________________________ E. EDIT PAYROLL TYPE DESCRIPTIONS ________________________________________________________ F. CLOCK IN/CLOCK OUT __________________________________________________________________ G. VIEW EMPLOYEE PUNCHES _______________________________________________________________ H. EMP TIME CLOCK SUMMARY REPORT\ _______________________________________________________ I. TIME CLOCK SUMMARY REPORT ___________________________________________________________ AUTOS200 Manual - Version 11.0 Concise Guide 2 REV. 2/28/127/27/2013 29 30 31 31 32 32 33 33 34 AMCOM J. RETURN TO MAIN MENU _________________________________________________________________ 35 IV. CUSTOMER MAINTENANCE _____________________________________________ 36 A. VIEW CUSTOMER DETAIL ________________________________________________________________ B. ADD CUSTOMER _______________________________________________________________________ C. ADD CUSTOMER W ITHOUT VEHICLE _________________________________________________________ D. FIND CUSTOMER ______________________________________________________________________ E. VIEW CUSTOMER LIST___________________________________________________________________ F. TRANSFER VEHICLE ____________________________________________________________________ G. CUSTOM CUSTOMER REMINDERS __________________________________________________________ H. VIEW CUSTOMER REMINDERS _____________________________________________________________ I. VIEW APPOINTMENTS ___________________________________________________________________ J. ADD APPOINTMENT _____________________________________________________________________ K. RETURN TO MAIN MENU _________________________________________________________________ V. 36 37 38 38 39 39 40 40 41 41 42 ACCOUNTING DETAIL __________________________________________________ 43 A. ACCOUNTS RECEIVABLE _________________________________________________________________ 1. View Accounts Receivable List ________________________________________________________ 2. View Customer AR Detail ____________________________________________________________ 3. Age Accounts _____________________________________________________________________ 4. Detail Aging Report _________________________________________________________________ 5. Summary Aging Report ______________________________________________________________ 6. Print Statements ___________________________________________________________________ 7. Return to Accounting Menu ___________________________________________________________ 8. Return to Customers Menu ___________________________________________________________ 9. Return to Main Menu ________________________________________________________________ B. ACCOUNTS PAYABLE ___________________________________________________________________ 1. View Accounts Payable List___________________________________________________________ 2. View Vendors AP Detail _____________________________________________________________ 3. Add AP Transaction _________________________________________________________________ 4. Detail AP Report ___________________________________________________________________ 5. Summary AP Report ________________________________________________________________ 6. AP Purchases _____________________________________________________________________ 7. Return to Accounting Menu ___________________________________________________________ 8. Return to Vendors Menu _____________________________________________________________ 9. Return to Main Menu ________________________________________________________________ C. GENERAL LEDGER _____________________________________________________________________ 1. View General Ledger ________________________________________________________________ 2. Print General Journal ________________________________________________________________ 3. General Ledger Reports _____________________________________________________________ 4. View Chart of Accounts ______________________________________________________________ 5. Manually Enter Transaction ___________________________________________________________ 6. Setup Autos2000 GL Accounts ________________________________________________________ 7. General Ledger Utilities ______________________________________________________________ 8. Return to Accounting Menu ___________________________________________________________ 9. Return to Main Menu ________________________________________________________________ D. CHECK W RITER/LEDGER _________________________________________________________________ 1. Check Writer/Register _______________________________________________________________ 2. Check Reconciliation ________________________________________________________________ 3. Bank Accounts_____________________________________________________________________ 4. Check Book Setup __________________________________________________________________ 5. Return to Accounting Menu ___________________________________________________________ 6. Return to Main Menu ________________________________________________________________ E. RETURN TO MAIN MENU _________________________________________________________________ AUTOS200 Manual - Version 11.0 Concise Guide 3 REV. 2/28/127/27/2013 43 43 43 43 43 43 43 43 43 43 44 44 44 44 44 44 44 44 44 44 45 45 45 45 45 45 45 45 45 45 45 45 45 45 45 45 45 45 AMCOM VI. VENDOR MAINTENANCE________________________________________________ 46 A. ADD VENDOR _________________________________________________________________________ 46 B. FIND VENDOR_________________________________________________________________________ 46 C. VIEW VENDOR LIST _____________________________________________________________________ 47 VII. PARTS MAINTENANCE _________________________________________________ 47 A. ADD PART ___________________________________________________________________________ B. FIND PART ___________________________________________________________________________ C. VIEW PARTS LIST ______________________________________________________________________ D. UPDATE PARTS PRICING _________________________________________________________________ E. ADD/EDIT PARTS GROUPS _______________________________________________________________ F. UPDATE PARTS GROUPS MARKUPS _________________________________________________________ G. PARTS GROUPS BCD PRICE MATRIX ________________________________________________________ H. UPDATE PARTS GROUPS MARKUPS BCD _____________________________________________________ I. RETURN TO MAIN MENU _________________________________________________________________ 47 48 48 49 49 50 51 51 52 VIII. INVENTORY MAINTENANCE _____________________________________________ 53 A. VIEW INVENTORY LIST___________________________________________________________________ B. VIEW LOW INVENTORY LIST _______________________________________________________________ C. RE-ORDER LOW INVENTORY ______________________________________________________________ D. VIEW INVENTORY ON ORDER _____________________________________________________________ E. RECEIVE INVENTORY ON ORDER ___________________________________________________________ F. INVENTORY GROSS/NET W ORTH ___________________________________________________________ G. RETURN TO MAIN MENU _________________________________________________________________ IX. LABOR MAINTENANCE _________________________________________________ 56 A. ADD LABOR TYPES _____________________________________________________________________ B. FIND LABOR TYPE______________________________________________________________________ C. VIEW LABOR TYPE LIST__________________________________________________________________ D. UPDATE LABOR RATE CHARGES ___________________________________________________________ E. EDIT LABOR TRACKING TYPES _____________________________________________________________ F. RETURN TO MAIN MENU _________________________________________________________________ X. 53 54 54 55 55 56 56 56 57 57 58 58 58 REPORTS/MARKETING _________________________________________________ 59 A. CUSTOMER REPORTS ___________________________________________________________________ 1. Complete Customer List _____________________________________________________________ 2. Customer History ___________________________________________________________________ 3. Customer Not Seen Between _________________________________________________________ 4. Customer Seen Between _____________________________________________________________ 5. New Customers Between ____________________________________________________________ 6. Customer Source of_________________________________________________________________ 7. Customer Type Of __________________________________________________________________ B. VEHICLE REPORTS _____________________________________________________________________ 1. Vehicles Next Service Date ___________________________________________________________ 2. Vehicles Last Service Done ___________________________________________________________ 3. Vehicle Make is ____________________________________________________________________ 4. Vehicles owner Postal area ___________________________________________________________ 5. Employee Parts Report ______________________________________________________________ 6. Vehicles that Transmission is _________________________________________________________ 7. Vehicles that have Air (Yes/No) ________________________________________________________ 8. Vehicles Manufacture date is__________________________________________________________ 9. Vehicles Drive Axle is _______________________________________________________________ 10. Vehicles Model is ___________________________________________________________________ AUTOS200 Manual - Version 11.0 Concise Guide 4 REV. 2/28/127/27/2013 59 60 60 61 62 63 63 64 65 65 66 66 67 67 68 68 68 69 69 AMCOM C. INVENTORY REPORTS ___________________________________________________________________ 1. Print Inventory/Part Selector __________________________________________________________ 2. Print Parts with High Volume __________________________________________________________ 3. Stale Parts Report __________________________________________________________________ 4. Parts Usage History_________________________________________________________________ 5. Inventory Worksheet w/Costs _________________________________________________________ 6. Inventory Parts On Order ____________________________________________________________ 7. Single Parts Usage _________________________________________________________________ 8. Print Low Parts on Shelf by Vendor _____________________________________________________ 9. WO Parts by Part Number and Type ____________________________________________________ 10. Non-Inventory Parts Sold on WO ______________________________________________________ 11. Core Detail by _____________________________________________________________________ 12. Parts Purchased ___________________________________________________________________ D. REPAIR ORDER REPORTS ________________________________________________________________ 1. Employee Summary Report___________________________________________________________ 2. Labor Used Detail __________________________________________________________________ 3. Labor Tracking Detail _______________________________________________________________ 4. Canned Job Usage _________________________________________________________________ 5. Finished Jobs Detail ________________________________________________________________ 6. Repair Order Totals _________________________________________________________________ 7. Profit Detail _______________________________________________________________________ 8. Warranty Work Performed ____________________________________________________________ 9. Deleted Work Orders ________________________________________________________________ 10. Sublet Detail ______________________________________________________________________ E. AUTOS2000 FINANCIAL REPORTS __________________________________________________________ F. AUTOS2000 PROFIT PRODUCER ___________________________________________________________ G. CUSTOM REMINDERS ___________________________________________________________________ H. CUSTOM LABOR REMINDERS ______________________________________________________________ I. RECOMMENDATION REMINDERS ___________________________________________________________ J. RETURN TO MAIN MENU _________________________________________________________________ XI. 70 70 71 71 72 73 73 74 75 75 77 77 77 78 78 78 79 80 80 81 82 82 82 83 83 84 84 84 84 84 SYSTEM UTILITIES _____________________________________________________ 84 A. COMPANY INFORMATION _________________________________________ ERROR! BOOKMARK NOT DEFINED. B. REGISTRATION INFORMATION _____________________________________________________________ 91 C. SYSTEM INFORMATION __________________________________________________________________ 91 D. UPGRADE AUTOS2000 __________________________________________________________________ 92 E. NETWORK SETUP ______________________________________________________________________ 92 F. LOGIN AS NEW USER ___________________________________________________________________ 96 G. LOGOUT OF AUTOS2000 _________________________________________________________________ 96 H. DATA UTILITIES MANAGEMENT_____________________________________________________________ 96 I. UTILITIES PROGRAMS ___________________________________________________________________ 97 J. EDIT DROP DOWN LISTS _________________________________________________________________ 98 K. RETURN TO MAIN MENU _________________________________________________________________ 98 XII. EXIT AUTOS2000 _________________________ ERROR! BOOKMARK NOT DEFINED. AUTOS200 Manual - Version 11.0 Concise Guide 5 REV. 2/28/127/27/2013 AMCOM I. Work Orders/Estimates A. All Open Tickets B. Open Work Orders AUTOS200 Manual - Version 11.0 Concise Guide 6 REV. 2/28/127/27/2013 AMCOM C. Open Quick Estimates D. Add Work Order AUTOS200 Manual - Version 11.0 Concise Guide 7 REV. 2/28/127/27/2013 AMCOM E. Add Quick Estimate F. Delete Open Work Orders AUTOS200 Manual - Version 11.0 Concise Guide 8 REV. 2/28/127/27/2013 AMCOM G. Closed Work Orders H. Closed Work Orders w/Balance AUTOS200 Manual - Version 11.0 Concise Guide 9 REV. 2/28/127/27/2013 AMCOM I. Over the Counter Sales 1. Ring Up New OC Sale AUTOS200 Manual - Version 11.0 Concise Guide 10 REV. 2/28/127/27/2013 AMCOM 2. View List of Paid OC Sales AUTOS200 Manual - Version 11.0 Concise Guide 11 REV. 2/28/127/27/2013 AMCOM 3. View List of Unpaid OC Sales AUTOS200 Manual - Version 11.0 Concise Guide 12 REV. 2/28/127/27/2013 AMCOM 4. Delete Counter Sale 5. Return to Main Menu 6. Return to Work Orders AUTOS200 Manual - Version 11.0 Concise Guide 13 REV. 2/28/127/27/2013 AMCOM J. Add Appointment AUTOS200 Manual - Version 11.0 Concise Guide 14 REV. 2/28/127/27/2013 AMCOM K. View Appointments L. Return to Main Menu II. WORK ORDERS A. Creating a New Work Order 1. From the AUTOS200 Main Menu, select WORK ORDERS/ESTIMATES AUTOS200 Manual - Version 11.0 Concise Guide 15 REV. 2/28/127/27/2013 AMCOM 2. Select ADD WORK ORDER. Note: This can also be done from the Open Work Orders screen and the All Open Tickets screen. 3. From here the system will open the Customer Search window. The Customer Search screen gives the user eight different options to search from. All the search fields use what is called a fuzzy search. For example, searching for the last name "Spiker", the user can type in "Sp" or "ik", press the “TAB” key and still be able to find the customer they are looking for. When doing a search and the customer can’t be found, the system will ask the user if they would like to add them. Once the customer that the user is searching for has been found the user has 2 options: AUTOS200 Manual - Version 11.0 Concise Guide 16 REV. 2/28/127/27/2013 AMCOM The user can highlight the customer they are looking for and use the “Continue” button. Or, Double click on the customer in the list to move forward. 4. From here the system will open the Select Vehicle screen. Note: If searching for a customer via the “License”, “VIN Number”, or “Vehicle Tag Number” the user will not be taken to this screen. The Select Vehicle screen is a list of all the vehicles that a particular customer has. This screen also gives the ability to add a vehicle to a customer if it is not currently listed by clicking on the Add Vehicle button. Once the user has found the vehicle they are looking for, they can choose one of two options: Highlight the selected Vehicle and use the “Continue” button. Or, Double click on the Vehicle in the list to move forward. Note: Before the user continues on to the Work Order, they can also enter the vehicles mileage here or enter it into the Work Order itself. 5. The actual Work Order will be displayed. The following information should help the user in entering parts, labor, sublet, discounts, and adding estimate revisions. AUTOS200 Manual - Version 11.0 Concise Guide 17 REV. 2/28/127/27/2013 AMCOM B. Adding Parts to Work Order AUTOS200 gives the user 3 different options on adding parts into a work order. Directly to the Work Order screen Parts Search Parts Quick List Entering parts directly into a work order To the center-left of the work order screen is the section for Work Order Parts. There are two options to adding parts directly to the work order: Typing in the part number and having the system enter all the information. Entering a Description Directly Typing in the Part Number In this section there is a blank line. Click into the blank part number field. Start typing in the part number. If the part is in the system it will find it. If this is a new part number to the system, the user will receive a message box asking if they would like to search the Alternate Part numbers in the system. If the part is not in the system, the “Add Parts Screen” will come up. There are three options: 1. Quick Add—this option adds the part to the system without making you go though the entire parts add procedure. 2. Setup—this option will allow the user to add the part into inventory and set up all options for it. 3. Cancel—after using cancel the user must click “ok” to select another part and return to the Work Order Screen. Press “Esc” 2 times to clear that part or retype the part number. After entering the part number into the Work Order the system will tab to the Part Description. Please enter the part description, and then press “Tab” to go to the quantity field. Please enter the quantity, and then press “Tab” to go to the price field. Please enter the price. Enter the part description directly If no part number is associated you can enter the part description only. “Tab” over to the part description field, type in the description, and then press “Tab” and enter the quantity, hit “Tab” and enter the price and then press the “Tab” key again to update the work order total. AUTOS200 Manual - Version 11.0 Concise Guide 18 REV. 2/28/127/27/2013 AMCOM Using the parts search The "Part Search" gives 9 different options to search from. All the search fields use a fuzzy search IE: If searching for the Description "Serpentine Belt" the user can type in "Serb" or "Belt" then press the “TAB” key and still be able to find the part searched for. Once the desired Part has been found there are 2 options: A. Highlight the Part that use the “Continue” button. Or, B. Double click on the Part in the list to select. Using the Parts Quick List The “Parts Quick List” is a current list of all parts in AUTOS200. From here there are 2 options: Highlight the Part that you are looking for and use the “Continue” button. Or; Double click on the Part in the list. C. Adding Labor to Work Order AUTOS200 provides 3 different options on adding labor into a Work Order: 1. Entering labor directly into a work order On the bottom left corner of the work order screen please notice the Work Order Labor section. To add labor to this section there are 2 options: Selecting the labor type from the drop down list. Entering a description directly. 2. Selecting the labor type from the drop down list -Point the cursor to the blank “Labor Type” field and click. Start typing in the labor type ID or use the down arrow and scroll through the list, as the user types the system will bring up matching labor types. If this is a new labor type ID to the system there will be a message box asking if the user would like to add. By selecting yes, the system will go to the “Labor Type Add” screen. Now a labor type is selected, the system will go to the mechanic field to allow selection of who is assigned to do the work. It will then ask for the total for the labor or just enter the time and the system will calculate the total. 3. Enter the labor description directly -If there is no labor type ID go to the labor description field directly and type in the description. Press “Tab” to move to the select mechanic field, and then “Tab” to the enter total field and then press the “Tab” key again to update the work order totals. Adding Sublet to Work Order To add sublet to a Work Order click on the “Edit Work Order” button located at the top of the screen on the tool bar. This will open the “Edit Work Order” screen. Click on the third tab over that reads “Sublet Charges”. Enter the Sublet information. AUTOS200 Manual - Version 11.0 Concise Guide 19 REV. 2/28/127/27/2013 AMCOM Under sublet there are 4 fields across the top and 1 large one below. They are as follows: 1. Company Name - Does not print on the Work Order. 2. Sublet Cost - This is what is paid to the sublet company. 3. Sublet Price - This is what the shop is charging the customer. 4. Taxable - This signifies whether it is taxable or not. 5. Description - This is the description that will print out for the customer. To find out more about the “Edit Work Order Screen” please see Page 19. Giving a Discount To add discounts to a Work Order click on the “Edit Work Order” button located at the top of the screen on the tool bar. This will open the “Edit Work Order” screen. In the second column the last 3 fields are as follows: 1. Parts Discount 2. Labor Discount 3. Discount Amt - To enter a total discount amount for the entire Work Order. Note: To type in a discount amount type it in as a decimal figure. For a 10% discount type .1 or for a 15% discount type .15. 20 AUTOS200 Manual - Version 11.0 REV. 2/28/127/27/2013 Concise Guide AMCOM Estimate Revisions To add Estimate Revisions to a Work Order click on the “Edit Work Order” button located at the top of the screen on the tool bar. This will open the “Edit Work Order” screen. Click on the second tab for “Estimate Revisions”. Estimate Revisions can now be entered. When finished entering the revisions click on the Update button. To find out options on printing the estimate revisions please review the Company Setup screen information on Page 4. To find out more about the “Edit Work Order” screen please see Page 19. Taking Payments on Work Order To accept payments for a Work Order click on the “Payments” button located at the top of the screen on the tool bar. Please notice that Payment 1 is already filled in with the total amount due. The drop down box allows the user to select the method of payment. When finished taking the payment click on the “Update” button. The user will then have the option to close the Work Order. AUTOS200 Manual - Version 11.0 Concise Guide 21 REV. 2/28/127/27/2013 AMCOM Closing a Work Order When applying a payment, the system will asked you if you would to close out this work order. D. Adding New Customers/Vehicles The “Add Customer” screen is where all options are set up for any customer. Notice that there are 4 different tabs on this screen and they are as follows: Personal Information: On this tab there are 26 different fields to give the ability to enter any and all the prudent information pertaining to this customer. Notice that there are a few special fields on this screen and they are as follows: 1. Resale Number - This is for corporate customers. 2. Credit Limit - This is so you can set credit limits for your accounts receivable customers. 3. Default Pricing - This is for when you use scalable pricing for different customers and it will carry over the parts and labor pricing. 4. Source - This is for tracking where the customers are coming from so the shop can tell what type of marketing works best. 5. Customer Type - This is for setting up what type of customer they are IE: retail, wholesale, etc. 6. Tax Exempt - this is for tax exempt customers so it will create new work orders as non taxed. Vehicle Information: This is where the user can add all the customer vehicles. Notice that there is a big field for "Comments". This area is for making notes pertaining to this vehicle IE: "left front fender has a large scratch which was there when vehicle came in". Alternate Customer Names: The alternate customer names is intended for multiple people under one account. The following are a few examples on how this can be used. 1. A fleet account with multiple vehicles and each one has a driver assigned to it. and you want to be able to bill XYZ Fleet is billed for the services, but the drivers name prints out on the work order. Under the personal information tab the user can setup all the company information and then list all the drivers and their vehicles. 2. A family that has multiple vehicles and each vehicle has only has one driver. The entire family can be set up under one account to track their spending habits. a. Edit Work Order Screen While in an Open Work Order the user will notice the button “Edit Work Order” at the top of the screen. Clicking on this will open the “Edit Work Order” screen. There the user will find 4 tabs: AUTOS200 Manual - Version 11.0 Concise Guide 22 REV. 2/28/127/27/2013 AMCOM 1. 2. 3. 4. Work Order Information Estimate Revisions Sublet Charges Safety Inspections (This feature is under development). Under the "Work Order Information Tab" The user will find 18 different fields, as listed below: 1. Alternate Customer - By clicking the drop down arrow the user can assign an alternate customer to this work order. To find out more about alternate customers please see section “Adding a New Customer”. 2. Service Writer - By clicking the drop down arrow the user can assign a service writer to this work order. To find out about adding employees to the system please see the section “Adding a New Employee”. 3. PO Number - If a Purchase Order is associated with this Work Order, it can be entered here. 4. Date Received - This is the date the shop received the vehicle. 5. Date Required - This is the date promised to the customer. 6. Tax Exempt - This designates the customer as Tax Exempt. 7. Warranty Work - This designates the work order as being warranty work. 8. Parts Discount, Labor Discount - This is where discounts are entered. 9. Mileage - This allows entry or editing of the “Mileage in” of the vehicle. 10. Mileage Out - Where required, this allows the user to enter the “Mileage out” of the vehicle. To find out more about options on printing this please; see section 1 “Company Setup”. 11. Sales Tax Rate - This is where the user can edit the Sales Tax Rate assigned to this work order. 12. Date Finished - This is the date that the vehicle was completed. This is also the date that will print on the final invoice. 13. Date Picked Up - This is the date that the customer picked up the vehicle. 14. Warranty Miles - Warranty coverage as stated in Miles 15. Warranty Months - Warranty coverage as stated in Months. 16. Work Declined Amount - Where declined service dollars are entered. 17. Show Rec Next Work Order - by setting this option to "Yes" the next time the vehicle comes into the shop the system will let the user know that there are previous recommendations, and ask if they would like to view them. There are 2 separate buttons at the top of the screen : 1. Custom Reminder: This will set a "Custom Reminder" for this customer. 2. Update: To save changes and exit the Edit Work Order Screen. b. Viewing Previous Recommendations By default, previous recommendations will not be automatically displayed. AUTOS200 Manual - Version 11.0 Concise Guide 23 REV. 2/28/127/27/2013 AMCOM c. Customer Warnings, Internal Comments, and Pop-Ups AUTOS200 Manual - Version 11.0 Concise Guide 24 REV. 2/28/127/27/2013 AMCOM E. a. Canned Jobs Maintenance Add Canned Job AUTOS200 Manual - Version 11.0 Concise Guide 25 REV. 2/28/127/27/2013 AMCOM b. Find a Canned Job AUTOS200 Manual - Version 11.0 Concise Guide 26 REV. 2/28/127/27/2013 AMCOM c. Canned Job List AUTOS200 Manual - Version 11.0 Concise Guide 27 REV. 2/28/127/27/2013 AMCOM d. Delete a Canned Job e. Return to Main Menu f. Return to Work Orders Menu AUTOS200 Manual - Version 11.0 Concise Guide 28 REV. 2/28/127/27/2013 AMCOM F. a. Employee Maintenance Add Employee AUTOS200 Manual - Version 11.0 Concise Guide 29 REV. 2/28/127/27/2013 AMCOM Employee ID—A number, an abbreviation of the person’s name, or some other unique designation. Keep in mind that the Employee ID will appear on a dropdown list in an open work order. This enables the user to indicate which employee performed a particular labor type. Key to this is to keep it simple. NOTE: IF using the import to Amcom Software, the 1st 6 characters in the Employee ID are used. In this case, it is recommended to keep the ID to 6 unique characters. Pay Type and Pay—Pick from the dropdown list. If you do not find it in the list, type it in, and the system will ask if you want to add it. Pay is the amount that person is paid. Fill in all the employee’s contact and personal information, and indicate with the check boxes, whether or not the employee is male and actively employed. Current Status—this can be used to indicate the employee’s title, IE: “Technician”. Comments—Personal comments that relative to the employee; i.e., what skills they have, disciplinary actions, etc. b. Find Employee AUTOS200 Manual - Version 11.0 Concise Guide 30 REV. 2/28/127/27/2013 AMCOM c. View Employee List d. Clock In and Out On Work Order AUTOS200 Manual - Version 11.0 Concise Guide 31 REV. 2/28/127/27/2013 AMCOM e. Edit Payroll Type Descriptions f. Clock In/Clock Out AUTOS200 Manual - Version 11.0 Concise Guide 32 REV. 2/28/127/27/2013 AMCOM g. View Employee Punches h. Emp Time Clock Summary Report\ AUTOS200 Manual - Version 11.0 Concise Guide 33 REV. 2/28/127/27/2013 AMCOM i. Time Clock Summary Report AUTOS200 Manual - Version 11.0 Concise Guide 34 REV. 2/28/127/27/2013 AMCOM j. Return to Main Menu AUTOS200 Manual - Version 11.0 Concise Guide 35 REV. 2/28/127/27/2013 AMCOM G. a. Customer Maintenance View Customer Detail AUTOS200 Manual - Version 11.0 Concise Guide 36 REV. 2/28/127/27/2013 AMCOM b. Add Customer AUTOS200 Manual - Version 11.0 Concise Guide 37 REV. 2/28/127/27/2013 AMCOM c. Add customer Without Vehicle d. Find Customer AUTOS200 Manual - Version 11.0 Concise Guide 38 REV. 2/28/127/27/2013 AMCOM e. View Customer List f. Transfer Vehicle AUTOS200 Manual - Version 11.0 Concise Guide 39 REV. 2/28/127/27/2013 AMCOM g. Custom Customer Reminders h. View Customer Reminders AUTOS200 Manual - Version 11.0 Concise Guide 40 REV. 2/28/127/27/2013 AMCOM i. View Appointments j. Add Appointment AUTOS200 Manual - Version 11.0 Concise Guide 41 REV. 2/28/127/27/2013 AMCOM k. Return to Main Menu AUTOS200 Manual - Version 11.0 Concise Guide 42 REV. 2/28/127/27/2013 AMCOM H. Accounting Detail a. Accounts Receivable i. View Accounts Receivable List ii. View Customer AR Detail iii. Age Accounts iv. Detail Aging Report v. Summary Aging Report vi. Print Statements vii. Return to Accounting Menu viii. Return to Customers Menu ix. Return to Main Menu AUTOS200 Manual - Version 11.0 Concise Guide 43 REV. 2/28/127/27/2013 AMCOM b. Accounts Payable i. View Accounts Payable List ii. View Vendors AP Detail iii. Add AP Transaction iv. Detail AP Report v. Summary AP Report vi. AP Purchases vii. Return to Accounting Menu viii. Return to Vendors Menu ix. Return to Main Menu AUTOS200 Manual - Version 11.0 Concise Guide 44 REV. 2/28/127/27/2013 AMCOM c. General Ledger i. View General Ledger ii. Print General Journal iii. General Ledger Reports iv. View Chart of Accounts v. Manually Enter Transaction vi. Setup Autos2000 GL Accounts vii. General Ledger Utilities viii. Return to Accounting Menu ix. d. Return to Main Menu Check Writer/Ledger i. Check Writer/Register ii. Check Reconciliation iii. Bank Accounts iv. Check Book Setup v. Return to Accounting Menu vi. Return to Main Menu e. Return to Main Menu AUTOS200 Manual - Version 11.0 Concise Guide 45 REV. 2/28/127/27/2013 AMCOM I. Vendor Maintenance a. Add Vendor b. Find Vendor AUTOS200 Manual - Version 11.0 Concise Guide 46 REV. 2/28/127/27/2013 AMCOM c. J. a. View Vendor List Parts Maintenance Add Part AUTOS200 Manual - Version 11.0 Concise Guide 47 REV. 2/28/127/27/2013 AMCOM b. Find Part c. View Parts List AUTOS200 Manual - Version 11.0 Concise Guide 48 REV. 2/28/127/27/2013 AMCOM d. Update Parts Pricing The Unit Price and Retail Price fields represent the percentage by which you want to change the price of a part. If you only want to change one field, then put a “0” (zero) in the other field. e. Add/Edit Parts Groups This is used to create a parts group. When creating the parts group, you can assign up to five price ranges for markups and margins. You don’t have to use all five ranges; you may only use one if you so desire. Note that the Markup % column is really a Margin column if you specify that you want to use margins in the Invoice default tab of Company Information. AUTOS200 Manual - Version 11.0 Concise Guide 49 REV. 2/28/127/27/2013 AMCOM f. Update Parts Groups Markups This is used to change the markup/margins of part groups, with an option to do so over five price ranges. Note that only one price range is required. The other four are optional. This represents the “A” price level. The functionality provided by this tool can also be found within the part detail by clicking on the =… button to the right of the Group field. AUTOS200 Manual - Version 11.0 Concise Guide 50 REV. 2/28/127/27/2013 AMCOM g. Parts Groups BCD Price Matrix This is used to assign BCD markups/margins to a part group. You can also select whether or not to use a markup/margin by selecting Yes or No in the Use Markup column. Note that resulting BCD pricing is based off of the Unit Price and not the Retail Price, and the BCD pricing is independent of the retail price. Also note: remember to select “Use Auto Markup” (in Company InformationInvoice Defaults) when you want the retail price AND prices BCD to be based on the unit cost. Otherwise, if you use “Use Retail Price”, BCD pricing levels are based off of the retail price. Wait a second. If you use Auto Markup, then BCD pricing is not used!! In this situation, you just put in a unit cost and it automatically marks it up based on what you put in the Update Price Group Markups (see section F above). REWRITE ABOVE 2 SECTIONS. Note that when the BCD pricing is 0%, updating the retail price (when in the part detail) updates the BCD pricing to the same as the retail pricing. h. Update Parts Groups Markups BCD This function is the same as Parts Groups BCD Price Matrix above, except that it allows you to modify multiple groups at the same time (although each group would have the same BCD markup/margin). AUTOS200 Manual - Version 11.0 Concise Guide 51 REV. 2/28/127/27/2013 AMCOM i. Return to Main Menu AUTOS200 Manual - Version 11.0 Concise Guide 52 REV. 2/28/127/27/2013 AMCOM K. a. Inventory Maintenance View Inventory List AUTOS200 Manual - Version 11.0 Concise Guide 53 REV. 2/28/127/27/2013 AMCOM b. View Low Inventory List c. Re-Order Low Inventory AUTOS200 Manual - Version 11.0 Concise Guide 54 REV. 2/28/127/27/2013 AMCOM d. View Inventory On Order e. Receive Inventory On Order AUTOS200 Manual - Version 11.0 Concise Guide 55 REV. 2/28/127/27/2013 AMCOM f. Inventory Gross/Net Worth g. Return to Main Menu L. a. Labor Maintenance Add Labor Types AUTOS200 Manual - Version 11.0 Concise Guide 56 REV. 2/28/127/27/2013 AMCOM b. Find Labor Type c. View Labor Type List AUTOS200 Manual - Version 11.0 Concise Guide 57 REV. 2/28/127/27/2013 AMCOM d. Update Labor Rate Charges e. Edit Labor Tracking Types f. Return to Main Menu AUTOS200 Manual - Version 11.0 Concise Guide 58 REV. 2/28/127/27/2013 AMCOM M. a. Reports/Marketing Customer Reports AUTOS200 Manual - Version 11.0 Concise Guide 59 REV. 2/28/127/27/2013 AMCOM i. Complete Customer List ii. Customer History AUTOS200 Manual - Version 11.0 Concise Guide 60 REV. 2/28/127/27/2013 AMCOM iii. Customer Not Seen Between AUTOS200 Manual - Version 11.0 Concise Guide 61 REV. 2/28/127/27/2013 AMCOM iv. Customer Seen Between AUTOS200 Manual - Version 11.0 Concise Guide 62 REV. 2/28/127/27/2013 AMCOM v. New Customers Between vi. Customer Source of Possible Sources: Newspaper flyer Catalog Magazine Referral Walk-In AUTOS200 Manual - Version 11.0 Concise Guide 63 REV. 2/28/127/27/2013 AMCOM vii. Customer Type Of Types include: Charge Account Commercial Retail Wholesale AUTOS200 Manual - Version 11.0 Concise Guide 64 REV. 2/28/127/27/2013 AMCOM b. Vehicle Reports i. Vehicles Next Service Date AUTOS200 Manual - Version 11.0 Concise Guide 65 REV. 2/28/127/27/2013 AMCOM ii. Vehicles Last Service Done iii. Vehicle Make is AUTOS200 Manual - Version 11.0 Concise Guide 66 REV. 2/28/127/27/2013 AMCOM iv. Vehicles owner Postal area v. Employee Parts Report AUTOS200 Manual - Version 11.0 Concise Guide 67 REV. 2/28/127/27/2013 AMCOM vi. Vehicles that Transmission is vii. Vehicles that have Air (Yes/No) This report doesn’t seem to work. Put it on the bug list. viii. Vehicles Manufacture date is AUTOS200 Manual - Version 11.0 Concise Guide 68 REV. 2/28/127/27/2013 AMCOM ix. Vehicles Drive Axle is x. Vehicles Model is AUTOS200 Manual - Version 11.0 Concise Guide 69 REV. 2/28/127/27/2013 AMCOM c. Inventory Reports i. Print Inventory/Part Selector AUTOS200 Manual - Version 11.0 Concise Guide 70 REV. 2/28/127/27/2013 AMCOM ii. Print Parts with High Volume iii. Stale Parts Report AUTOS200 Manual - Version 11.0 Concise Guide 71 REV. 2/28/127/27/2013 AMCOM iv. Parts Usage History AUTOS200 Manual - Version 11.0 Concise Guide 72 REV. 2/28/127/27/2013 AMCOM v. Inventory Worksheet w/Costs vi. Inventory Parts On Order AUTOS200 Manual - Version 11.0 Concise Guide 73 REV. 2/28/127/27/2013 AMCOM vii. Single Parts Usage AUTOS200 Manual - Version 11.0 Concise Guide 74 REV. 2/28/127/27/2013 AMCOM viii. Print Low Parts on Shelf by Vendor ix. WO Parts by Part Number and Type AUTOS200 Manual - Version 11.0 Concise Guide 75 REV. 2/28/127/27/2013 AMCOM AUTOS200 Manual - Version 11.0 Concise Guide 76 REV. 2/28/127/27/2013 AMCOM x. Non-Inventory Parts Sold on WO xi. Core Detail by Doesn’t work. xii. Parts Purchased Doesn’t work. AUTOS200 Manual - Version 11.0 Concise Guide 77 REV. 2/28/127/27/2013 AMCOM d. Repair Order Reports i. Employee Summary Report ii. Labor Used Detail AUTOS200 Manual - Version 11.0 Concise Guide 78 REV. 2/28/127/27/2013 AMCOM iii. Labor Tracking Detail AUTOS200 Manual - Version 11.0 Concise Guide 79 REV. 2/28/127/27/2013 AMCOM iv. Canned Job Usage v. Finished Jobs Detail AUTOS200 Manual - Version 11.0 Concise Guide 80 REV. 2/28/127/27/2013 AMCOM vi. Repair Order Totals AUTOS200 Manual - Version 11.0 Concise Guide 81 REV. 2/28/127/27/2013 AMCOM vii. Profit Detail viii. Warranty Work Performed Doesn’t work. ix. Deleted Work Orders AUTOS200 Manual - Version 11.0 Concise Guide 82 REV. 2/28/127/27/2013 AMCOM x. e. Sublet Detail Autos2000 Financial Reports Daily Closing (Date Range) Employee Parts and Labor Daily Deposit (Date Range) Cash Drawer Closing (Today) Month to Date Sales (Graphical) Cash Drawer Closing (Date Range) Sales by Quarter (Graphical) Year to Date Sales (Graphical) Completed Work on Active WO’s Tax Detail (Date Range) AUTOS200 Manual - Version 11.0 Concise Guide 83 REV. 2/28/127/27/2013 AMCOM f. Autos2000 Profit Producer g. Custom Reminders h. Custom Labor Reminders i. Recommendation Reminders j. Return to Main Menu N. System Utilities a. Company Information Setup The Company Information screen is accessed through Main MenuSystem UtilitiesCompany Information. This screen can also be accessed through SystemEdit Your Company Information. The company information screen has 9 different tabs: Your Company Information Invoice Defaults Estimate, Invoice, Warranty, Counter, and More Policies Company Logo Interfaces i. Your Company Information This tab contains all the basic company information and then has a few custom options: AUTOS200 Manual - Version 11.0 Concise Guide 84 REV. 2/28/127/27/2013 AMCOM a. Use Alternate Label for Bar Number—This is for use under the consideration that the user's state doesn’t have a "BAR" but would like to have something print out in its place. b. Have Custom Invoice—This is for when the shop has had a custom invoice created by Amcom and would like the system to print it instead of one of the standard 3 invoices. c. Use Cash Drawer—By setting this to “Yes” the user will be asked to enter in the opening balance of the cash drawer every morning. d. Use Security—By setting this to "Yes" it will activate the security in the system, allowing Management to set permissions on an employee by employee basis. Setting Security Levels Each user in the system can be given specific access to the areas they need to perform their job duties. To set Security options: From the Main MenuSystem Utilities, click on Company Information. Click on the pull down next to Use Security and select Yes. Click on Setup Security. The following window will come up. AUTOS200 Manual - Version 11.0 Concise Guide 85 REV. 2/28/127/27/2013 AMCOM Click on the pull down next to the Select User box, and select the user needing to be changed. NOTE: If not on the user list, please see Section I.B.1 Adding a New User. e. Keep a Rotating Backup—By having this checked, each time AUTOS200 is opened, it will ask the user to create a backup file. f. Have Mult Company Names—This feature is specific to multiple location systems. Please contact Amcom for licensing information. AUTOS200 Manual - Version 11.0 Concise Guide 86 REV. 2/28/127/27/2013 AMCOM Once the desired user has been selected, the administrator can modify user passwords, set Access control, or Delete the user. AUTOS200 Manual - Version 11.0 Concise Guide 87 REV. 2/28/127/27/2013 AMCOM Change the access to Yes or No, as applicable to the particular user. NOTE: The Main Titles, as defined as the line justified to the left of the column (example: Work Orders, Estimates, Counter Sales) are not affected by the Y/N access points; only the items underneath are affected by the individual settings (example Delete Work Order, Work Order Profit). Exit to save the changes ii. Invoice Defaults Setup Invoice Setup: This section of the Company Information setup is considered the lifeblood of the work order. a. Payment Terms—This will print on the bottom of the invoice IE: Due upon Receipt. b. Invoice Description—This will print on the bottom of the invoice IE: Thank You for Your Business c. Invoice Num Type—User will have the following three options: Use Auto Number—By using this option the system will automatically generate the next work order number, keeping them in succession Manually Enter Number -This option is for when the user writes repair orders by hand and would like the system to have the same number every time they create a new work order. It will ask the user to enter the next work order number. Don’t Use Invoice Numbers - When selecting this option the system will not print out a work order number on the invoice? NOTE: The user must still set a Starting Work Order Number set in the system. AUTOS200 Manual - Version 11.0 Concise Guide 88 REV. 2/28/127/27/2013 AMCOM d. Start Work Order # - This is the number that the user would like to start their work orders on. e. Start Estimate # - This is the number that the user would like to start your estimates on. f. Counter - This is the number that you would like to start your counter sales on. g. Tax Parts Y/N h. Tax Labor Y/N i. Tax Cores Y/N j. Select Invoice - This is where the user can select the invoice style that they would like to use. AUTOS200 currently has 3 separate formats. The user can view invoice samples by clicking on the View Sample Invoices button located just to the right of the drop down arrow. k. Invoice Header Font - This will change the font style of the company name on the invoice print out. l. Disclaimer Font Size - Change the size of the fonts for all disclaimers. m. Disclaimer Font - This will change the font style of the disclaimer font. n. Printer Header Info - By selecting No on this option none of the company information will print out on the invoice. o. Default Print Quant - This will set the default number of invoices or estimates to print out. p. Use Multiple Printers - By setting this option to YES, each time a Work Order or estimate is printed, the user will be prompted to select the desired printer. q. Print Est. Revisions - This will tell the system whether or not to print out any estimate revisions) r. s. t. Parts Pricing - Under parts pricing there are 2 different options: Use Auto Mark Up - By selecting this, whenever a part is entered into a work order, the system will calculate the Retail Price from the mark-up and margin setup. Use Retail Price - Whenever a part is added to the work order it will always use the retail price setup for that part. For more information on adding parts, see Pages 12-15. Show in Labor: Show Just Total - When printing the invoice the hours will not print. Show Hours and Total - When printing the invoice the hours and total will print. Show Hazard As Show Hazard with Part - When printing the invoice the hazardous waste charge will be printed on the parts line. Show Hazard Just as Total - When printing the invoice the hazardous waste charges will show up at the bottom of the invoice only. Don’t Show at all - This option will hide the Hazardous waste charges from the customer. u. Print Pay Method - By selecting NO on this option the payment method will not print out. v. Use Mileage Out - Use this if Mileage Out is required by the State. w. Show EPA Number - Option to print EPA # on Work Orders. x. Show FET - Option to print FET # on Work Orders. y. Use Shop Charge - For States and localities that allow Shop Charges. z. Shop Charge Type Charge Amount Show Charge As Show BAR Number - Option to print BAR # on Work Orders. AUTOS200 Manual - Version 11.0 Concise Guide 89 REV. 2/28/127/27/2013 AMCOM iii. Policies - Estimate, Invoice, Warranty, Counter, and More Policies. This section of the Company info is to set up the standard shop policies as they apply to the user's location. Samples are provided with the installation and can be customized to meet the shop's needs. iv. Company Logo This tab will allow the site to either put special graphic or logos on work orders, or can be used to help 'space' the text for the shop information on the header of the printed work orders. v. Interfaces This tab is where the user sets up the various interfaces for 3 rd party information sources. Please see the appropriate guide for the applicable interface in the "Import Interfaces" section of this manual. Gross Profit = (Retail Price – Unit Price) Margin = Gross Profit / Retail Price So if the unit price is $10.00 and you sell the part for $40.00, the Gross Profit would be $30.00. Then the margin would be $30.00 (Gross Profit) / $40.00 (Retail Price) = 75% (0.75) margin. Use this formula to find the Retail Price given a Unit Price and Margin %: Retail Price = Gross Profit / Margin You cannot use Auto Mark-Up in the Parts pricing field in Company InformationInvoice Defaults when using margins as the Part Mark Up Option field in Company InformationInvoice Defaults. AUTOS200 Manual - Version 11.0 Concise Guide 90 REV. 2/28/127/27/2013 AMCOM b. Registration Information c. System Information AUTOS200 Manual - Version 11.0 Concise Guide 91 REV. 2/28/127/27/2013 AMCOM d. Upgrade Autos2000 e. Network Setup AUTOS200 Manual - Version 11.0 Concise Guide NOTE: See Network Setup Below: 92 REV. 2/28/127/27/2013 AMCOM O. Setting Up Autos2000 in a Network Environment Before beginning this process, the customer must have a basic network (NICs, hub, router, workgroup security, etc.) already set up and configured. Amcom Support does NOT set up customer networks; the customer may need to contact an outside IT person to do this. Setting up Autos2000 in a network environment consists of 3 steps: Share the Autos2000 Folder Map the Network Drive Attach Autos2000 to the Database on the Server NOTE: The following procedures and diagrams are based on Windows XP. Other operating systems will have a similar procedures/diagrams. WARNING: Although the Autos2000 application itself doesn't need to be installed on the server, Amcom strongly recommends that it IS installed. Otherwise, you will not be able to backup the database from within Autos2000; rather, the you would have to set up your own method of backing up the software. a. Share the Autos2000 Folder To share the Autos2000 folder, perform the following steps: 1. Double-click on the My Computer icon, which is located either on the desktop or in the Start button. 2. Navigate to the Autos2000 folder. The Autos2000 folder is usually in C: drive. 3. Right click on the folder and then click on "Sharing and Security" (or something similar for computers using OSs other than Windows XP). 4. Click on the radio button called "Share this folder". 5. Click on the Permissions button and check the check box labeled Full Control. AUTOS200 Manual - Version 11.0 Concise Guide 93 REV. 2/28/127/27/2013 AMCOM 6. Click on Apply, and then OK. 7. Click on OK. At this point, you should see a blue hand underneath the Autos2000 folder. This indicates that the folder has been shared. The next step is to map the network drive. b. Map the Network Drive To map a drive from the client to the server, perform the following steps: 1. Right-click on the My Computer icon and the click on Map Network Drive... 2. In the Drive field, enter Z:. NOTE: You can use any available drive letter, but Amcom usually recommends the Z: drive. 3. In the Folder field, type in the path to the folder that was shared above. E.g., \\server\Autos2000, where server is the name of the computer that hosts the Autos2000 database. NOTE: "server" can also be an IP address. 4. Confirm that the Reconnect at logon check box is checked (it is checked by default). 5. Click Finish. NOTE: If you get a message that says that the path could not be found, you will need to make sure the network has been set up correctly. AUTOS200 Manual - Version 11.0 Concise Guide 94 REV. 2/28/127/27/2013 AMCOM c. Attach Autos2000 to the Database on the Server To attach an Autos2000 client to the database on the server, perform the following steps: 1. Start Autos2000 on the client computer. 2. Click on System UtilitiesNetwork Setup. The following window appears: 3. To the right of the New Location of AUTOSData.mdb field, click on the =... button. The following window appears: 4. Navigate to the Z: drive and then double-click on the AutosData.mdb file. NOTE: If you can't find the Z: drive, then the drive has not b AUTOS200 Manual - Version 11.0 Concise Guide 95 REV. 2/28/127/27/2013 AMCOM d. Login as New User In the company information, use security, answer Yes, will have an option called Setup Security, where you can setup users with access levels. e. Logout of Autos2000 For the security levels for each user to logged off and on f. Data Utilities Management Daily Backup: If you check the “Keep rotating backup” checkbox, in order to be reminded (upon logon) to do a daily backup, you must check the “Keep a rotating backup?” check box under System UtilitiesCompany InformationYour Company Information. Otherwise, it will do a daily backup and then NOT remind you to do another one the next day. Backups on a network must be done from the machine hosting the database. AUTOS200 Manual - Version 11.0 Concise Guide 96 REV. 2/28/127/27/2013 AMCOM g. Utilities Programs AUTOS200 Manual - Version 11.0 Concise Guide 97 REV. 2/28/127/27/2013 AMCOM h. Edit Drop down Lists i. Return to Main Menu AUTOS200 Manual - Version 11.0 Concise Guide 98 REV. 2/28/127/27/2013 AMCOM P. Backing Up Autos2000 There are two types of backups: System and Daily (Automated). Both types of backups should be performed on a regular basis. However, each type of backup has its own purpose and procedure. Note: Backups on a network must be done from the machine hosting the database. a. System Backup The purpose of a system backup is to create a backup file that can be easily transferred. It creates a backup file in a .zip format, which can then be easily copied or emailed to an off-site location. WARNING: Amcom strongly recommends that a System Backup be performed at least 1/week and then moved to an off-site location. Performing a System Backup In order to perform a system backup, click on System UtilitiesData Utilities ManagementBackup AUTOS2000. At this point, you can select to backup to the A: drive, the default C:\Autos2000\BKP folder, or to some user-defined location. When the destination location has been chosen, simply click on Create File to perform the backup. Note: You can backup to the A: drive only if the resulting zipped file can fit on it. Usually, floppy drives have a maximum limit of 1.44 MB. Note: The destination location of the second option is really the BKP folder; not BK, as show in the screen shot above. Restoring from a System Backup In order to restore from a System Backup, you must first find the desired backup and then unzip it. Windows XP comes with a build-in zipping utility. Other Windows operating systems must use a 3 rd party zipping utility, such as WinZip (www.winzip.com). WARNING: In a network environment, before restoring make sure no client computer is running Autos2000. Once the file has been unzipped, go to System UtilitiesData Utilities ManagementImport After Setup. AUTOS200 Manual - Version 11.0 Concise Guide 99 REV. 2/28/127/27/2013 AMCOM Click the =… button and then browse to your backup location. In the Select the Location of the AUTOS2000 Back-Up Data window, select All Files(*.*) in the Files of type field. At this point, you should see a window that looks similar to this: Select the backup file and then click Open. Then you should see a window like this: AUTOS200 Manual - Version 11.0 Concise Guide 100 REV. 2/28/127/27/2013 AMCOM Now just click on the Import button at the top-left side of the above window and the restore process will begin. You will be notified when the process is finished. b. Daily (Automated) Backup There are two types of Daily Backups: Normal and Rotating. The purpose of a Daily Backup is to quickly perform a backup on a regular basis. When performing a Normal daily backup, the Autos2000 database is saved to the C:\Autos2000\BKP folder. The name of the backup takes this form: BKUP_XXX.ADB, where XXX is the 3-characted day of the week. For example, if you do a normal daily backup on Friday, the backup file will be called BKUP_FRI.ADB. If you do a normal daily backup on Monday, then the file will be called BKUP_MON.ADB. A Rotating backup is just like a Normal backup except that you will be reminded each day to perform the Daily Backup. In order to enable a Rotating backup, click on the Keep a rotating backup check box in Company InformationYour Company Information tab, or in the Back Up AUTOS2000 Data window (see below). WARNING: Amcom strongly recommends that a Daily Backup be performed every day. Note: You can only keep up to 7 days of Daily Backups. Beginning on the eighth day, the first day will be overwritten. E.g., if you perform a backup on Tuesday, then this backup will be overwritten when you do a backup the following Tuesday. Note: A Daily backup (Normal or Rotating) can only be performed 1/day. If you want to perform another backup, you must perform a System Backup (see above) instead. AUTOS200 Manual - Version 11.0 Concise Guide 101 REV. 2/28/127/27/2013 AMCOM Performing a Daily Backup To perform a Daily Backup, from the Main Menu go to System UtilitiesData Utilities ManagementDaily Back-Up. The following window will appear: Restoring from a Daily Backup In order to restore from a Daily Backup, go to System UtilitiesData Utilities ManagementImport After Setup. Click the =… button and then browse to your backup location. In the Select the Location of the AUTOS2000 Back-Up Data window, select All Files(*.*) in the Files of type field. At this point, you should see a window that looks similar to this: AUTOS200 Manual - Version 11.0 Concise Guide 102 REV. 2/28/127/27/2013 AMCOM If you are restoring from a Normal backup, select the BKUP_.ADB file and then click Open. If you are restoring from a rotating backup, select the day of the week you are interested in and then click Open E.g., if you want to restore the Friday backup, select BKUP_FRI.ADB; for Monday, select BKUP_MON.ADB. Then you should see a window like this: Now just click on the Import button at the top-left side of the above window and the restore process will begin. You will be notified when the process is finished. AUTOS200 Manual - Version 11.0 Concise Guide 103 REV. 2/28/127/27/2013