1
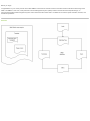
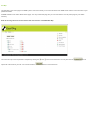
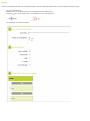
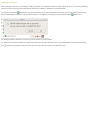
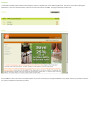
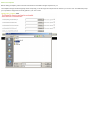
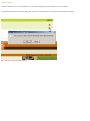
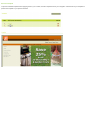
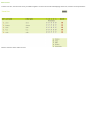
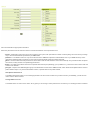
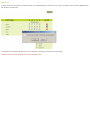
The WMS 3.0 - User Manual
Table of Contents
Before you begin
Structure
Login
Site Map
HTML & web publishing primer
FCKEditor HTML editor
Add Page
Edit Page
Show in Navigation
Delete Page
Get URL
Publish to Website
Re-Arrange Site Map
Menu
Templates
Add a New Template
Edit a Template
Delete a Template
Preview a template
Users and Permissions
Add a new user
Edit a User
Delete a user
Logout
Before you begin
Congratulations on your recent puchase of the ADG WMS3. This document contains sections to describe and demonstrate the best usage of the
WMS. The WMS is a multi-user, multi-permission Content Management System (CMS). Features include advanced template design, an
auto-generated public website navigations system and an advanced inline HTML editor. The WMS can be used for public websites, intranets, and
document repositories.
Structure
Login
The WMS installs with the following default login enabled:
Login : admin
Password : admin
Please update this right away with your own private login information. Leaving the default information in the system is a security risk.
Your administrator may have assigned you a username and password, you may enter it here to login to the system. The Username and Password
are case-sensitive and must be entered exactly as they were created. Please contact your administrator if you have problems accessing your
WMS.
The login screen features a 'Remember me' checkbox. Selecting this checkbox on computers that have cookies enabled in their web browsers will
allow that username to be saved to the computer for easy login.
NOTE: when you use the 'Remember me' feature, anyone who has access your computer will be able to login.
Click the Sign in button to proceed. If the username and password are incorrect, the system will return a 'Login Incorrect' message.
Site Map
The Site Map is your home page in the WMS system. This screen allows you to access all areas of the WMS and to view the current structure of your
published website.
All WMS websites come with a default 'Home' page. You may rename this page, but you can never delete it. It is the parent page of your webite
heirarchy.
Refer to the image below to become familiar with the structure of the WMS Site Map.
The entire site map can be expanded or collapsed by clicking the
expose all of the nodes in your site. You can also click the
and
icons next to each item. You may also click the
button to close all of them.
icon to
HTML & Web Publishing Primer
Publishing your own content to the World Wide Web can be as rewarding as it can be frustrating. When working with HTML and web publishing tools,
you will find a range of flexibility and compatibility that for the most part is standardized across tools and computer environments, but there are also
incompatibilites and problems that can arise.
Some of the most common problem scenarios have been listed below. Please remember that these are only basic examples. Using HTML is a skill,
and we encourage people to explore as they find appropriate. All of the tools in the WMS are fully HTML compliant and are compatible with external
HTML editors.
FCKEditor HTML editor
We have chosen to embed a third party HTML editor into the WMS system to provide the best option for a live web editing tool. This editor has proven
compatibility across a large number of computer configurations.
We do recommend the following system settings for best performance:
Mozilla Firefox ( latest stable release )
64 MB free memory
High speed internet connection
Here is a breakdown of the tools available in the WMS HTML Editor:
Source
will let you view the raw HTML source code that the editor is generating or editing
will remove the text and store it in your computers clipboard memory to be pasted later
will copy the selected text into your computer clipboard to be pasted later
will open a dialog box , that will allow you to paste text selected from other another source, into the editor. Note: you will
lose any formatting from the original source.
will allow you to paste contents that were copied from a MS Word document, doing the necessary cleanup to make
Word content ready for web publishing. Note: some formatting may not transfer.
will paste text that has been copied or cut
undo your most recent change
redo your most recent undo
will open a find tool that you can type in the word you are seeking. If there is a match , it will be highlighted in the editor
window
will open a find and replace tool that will let you search for a word and enter the replacement, allowing you to replace
one instance or all of them.
selects all text in the editor ( but not the source code )
will clean out all the html formatting under the selected item.
bold the selected text items
emphasis on the selected text items
underline the selected text items
draws a line through the selected text items
subscripts the selected items
superscripts the selected items
starts the formating for a numbered list. Note: only those items that have been seperated with a break (enter) will
auto-number
starts the formating for a bulleted list. Note: items must seperated with a break (enter)
will move the indentation of selected indented items one indent unit out
will indent the selected item(s)
will align the selected text to the left
will align the selected text to the center
will align the selected text to the right
will align the selected text to the left and the right for full justification
will open a dialog box with a pulldown menu with a listing to all published items in your sitemap including documents,
select a item to link to and click OK.
will open a dialog box that allows you to insert links to other sites. The following link types and parameters are available:
URL
Anchor
Email
You can also Target different windows with this tool.
select an existing hyperlink, and click 'remove link' to remove it
click to name and insert an anchor on the page. Use
to link some text or image to jump to this anchor
will open a dialog box that will allow you to upload and store images on the server.Click Browse Server to view the File
manager. All images are shared in one location for the entire WMS. We recommend you maintain a naming and file
organization convention policy that you share with users before they access their accounts.Upon selecting an image,
you can edit it attributed before inserting the image.
inset a flash movie. You may browse and store the flash movies on your wms server, and them edit some attributes
before inserting
will open a dialog box asking for table information. Add or edit details as required and click OK to save and insert the
table, click the table and the insert/edit table icon at any point to edit the tables properties. NOTE: This is one way
advanced HTML designers control the layout and look of their web pages.
inserts a horizontal line in the page
opens a dialog box, with a special characterset library. Select your special characted and click OK to insert it.
insert a page break. The browser will then move all content below this, to a new page
opens a dialog box with a keyboard, that allows you to select languages and displays the special characters available
for them
If your WMS administrator has enabled CSS for the writers, you will be able to apply styles to your text selections. Click
the text, and then click the style from the menu. To undo a style, select the styled text, click the pulldown, select the
matching style, and it will undo the applied style
open a small colour chooser. Select your colour and it will be applied to the the text. 'Choose More' colours to enter a
custom colour code
open a small colour chooser. Select your colour and it will be applied to the the background of the selected text.
will allow you to check the spelling in your document
this will open a dialog box that explains the FCKeditor version, and some contact information for donating to this
products development community. If you wish to upgrade your version of the FCKEditor, please contact your WMS
vendor.
Add Page
To add a new page that will appear in your Site Map (which can then be optionally published to your public website), follow these steps.
1.Go to the Site Map page
2.Decide where you would like to have the new page appear in the Sitemap Tree
3.Click the
icon next an existing item in your Sitemap Tree ( for example Home ).
4.The Add Page Screen will now appear.
5.Enter new link information:
6.Link Title - Enter the name of the link item that will appear on the public website when published
7.Show in Navigation - All items that are created in your Site Tree can be automagically published to your public websites
navigation. This can be changed anytime later.
8.Choose link type - This creates links that appear in your public website navigation menu:
9.New content - This is to create a link for brand new blank webpage.
10.Document - This will create a link with a document attached to it (supported documents are .doc, .txt, .xls, .ppt )
11.Link - This creates a link that will let a website visitor click to link to an external address
12.E-mail - This creates a link that will link to an email address. You can also link to email addresses from your published
webpages as well
13.Not clickable - This will produce a label that will appear in your sitemap that is not clickable, you will be returned to the
Site Map with the new item added
9.
Click one of the
buttons, you will be inserting the new item in that location on your site map.
Edit Page
To edit a page that is existing in your sitemap, click the
icon next to the item in your sitemap.
Using the "Edit" page, you will be able to change the item's title as well as whether that item appears in your public website navigation.
Depending on what type of item it is, you will be directed to the appropriate screen to edit any other information.
Show in Navigation
All items in your sitemap that don't have this
If you see the Show in Navigation icon
icon are show in the public websites navigation
then the item is not in the public websites navigation, click the
To turn off an item from appearing in the navigation, click the
to Show this item in your navigation
edit icon next to the item and then Choose 'No' for 'Show in Navigation'.
Delete Page
To delete an item, go to your Site Map. Open your site tree and locate the item that you wish to delete.
Click the
it's node.
delete icon of the item you wish the delete. You will be prompted to ensure you wish to delete this item and all sub-items that are under
NOTE : All deleted item are permanent. There is no undoing this operation, you will have to restore a backed up version of your entire WMS database to
retreive any deleted items
Get URL
You may be required to get the exact address to one of the items in your public website. By clicking the 'Get URL' icon , you will be able to retreive the
exact location to this item in your database. This can be useful when providing links to partner sites, or other places that require direct links.
Publishing Your Content
When creating any new item in your Site Map or editing existing items, the WMS pushes these through a publishing queue. The role of the publishing
Queue is to ensure only those content items that are approved for publishing , will appear on the public website.
The Publish to website icon
only appears on those items that are new or have received edits. The publish icon also only appears to those users
that have publishing permissions ( see Users and Permissions ). To publish the your changes to the live website click the
publish icon.
You will be prompted to click OK if you are sure you want to publish to your live website.
You will also have the option to Delete the changes while retainng the original published version on your public website. Click the Discard changes
icon
to remove the changed version of an item in your site map. This does not affect your published version.
Re-Arrange Site Map
From the Site Map screen, Click on
to change the order of your pages in your site.
Note the buttons at the bottom of the screen:
To save your changes, you must click the"Save" button after re-arranging your menu items (and before you leave this screen) or your changes
will not be saved.
By clicking the 'Back to Site Map' Button, you are exiting this screen WITHOUT saving your changes.
All of your web pages will be displayed on the Re-arrange Site Map screen. All items that have subitems will display with a
the
to expand the sub-items.
icon next to them. Click
To move an item from one part of the menu to another, click and drag that item
to the desired destination. You will notice that a dotted line will appear hinting
for you the location the mouse is presently at. When the dotted line is above
the
icon of your destination, release the mouse button...
... the item will appear where you have 'dropped' it. If it has not moved, try
again. The drag and drop can be tricky until you get the hang of it.
To drag an item into a part on the sub-menu, expand the folder of your desired
destination. Then follow the same drag and drop procedure as above.
If you are happy with your changes, don't forget to click the 'Save' button. If you
wish to discard your changes, you can do that at any time by clicking the 'Back
to Site Map' button.
Menu
From the Site Map screen click on Menu in your navigation.
Users that have Designer Permissions ( see Users and Permissions ) can access the Public Website Menu designer tools. The WMS comes with
default Menu settings that are used if your Public websites Template has the menu include enabled ( see Templates ).
The menu designer screen looks like this :
You are on the Main items Configuration screen. At the top is an option to click to the Sub Menu Configuration.
You may also choose a parent item from your existing Site Map and customize the settings for that item in the menu.
The bottom of the screen offers a preview window to the new menu changes. All changes are live.
Templates
To Add, Edit or Delete public website output templates, click the Templates link on the WMS navigation bar. Only those users with the Designers
permissions ( see Users and Permissions ) will have access to this area of the WMS. The page should look similar to this :
All new WMS accounts come with an example template. If you have received a pre-configfured WMS account, please contact your provider to discuss
any custom templates that have been provided.
Add a new Template
Before adding a template, please read and understand how the WMS manages templates for you.
The template manager will Automagically detect and prompt you for all images and objects that are linked in your source code. The WMS will prompt
you to upload the images that are locally pathed in your source code.
To add a new template, that can be made available for public website output, click on 'Add Template'.
In the Template Name field, enter the name of the template as it will appear to users in the system when they are choosing a template to push their
content out into.
To paste the code for your template, select all of your source code from the application your developed your public websites HTML code in, and then
copy to the clipboard, paste all of your source code including the opening <html> and closing </html> tags into the template html text field.
Remember to include the following WMS tags in your HTML code so that WMS knows where to place your menu, page title and content:
~menu~
~body~
~title~
In the example below, the template was created in an HTML editor program. The tags (highlighted in red) were then added in to tell the WMS where to
place the page title, menu and body content. Be sure to type the WMS tags exactly as they are shown here.
Here is what your finished, published webpage will look like with this template applied. The tag areas are highlighted in red.
If your template uses an external Style Sheet, which we do recommend, you can paste the contents of this file in the text field below the template.
Click "Save" at the bottom of this screen. The next screen will prompt you for any images required for your template, that need to be stored in the
WMS. Browse and select images as required.
Edit a template
To edit an existing template in your WMS, click the Template link, and then click the edit icon next to the template you want to edit.
You will then be prompted to update the code and images in the same screens as when adding a new template to the system. The WMS automatically
detects changes in your source code and prompt you for any new images and remove ones that are not being used anymore.
Delete a template
To delete a template. Click on the Templates link in your WMS navigation and click the delete icon for the template
You will be prompted with a confirmation dialog box, asking you to confirm deletion. Click YES to confirm deletion of template.
Note : This action is final and cannot be undone.
Preview a template
To preview a loaded template before applying them to your content, Click the Templates link in your navigation. Click the title of your template to
preview the template in your preview windows
Users and Permissions
All users in the WMS can be created with or assigned permissions to be restricted or access parts of the system. Users can be assigned to multiple
groups and therefore inherit that groups permissions. Please review the groups below to understand what functionality is enabled for each permission
group. You may change these permissions at any point in the future by editing the user.
The WMS installs with the following default login enabled:
Login : admin
Password : admin
Please update this right away with your own private login information. Leaving the default information in the system is a security risk.
Add new user
To add a new user, click the Users link in your WMS navigation. The Users screen will load displaying all the users, and their current permissions.
Click the 'Add User' link to add a new user.
Fill in the fields with the appropriate information.
Select the permissions this user will have. Below is a list and breakdown of each permission level:
Admin - Adminstrator users have access to everything in the system, with permissions to delete or add anything. We recommend you assign
only 1 user with administrator permissions per WMS install.
Statistics - The statistics users can only access the view of the WMS that outputs the traffic statistics view of your WMS Site map. This is
intended for marketing staff, executives or other users that will find traffic visitor information important.
Writer - Users that have the writer permissions, will be able to add and edit all written content in the Sitemap. They will also be able to upload
documents, but they do NOT have publishing permissions.
Editor - The editor group allows these users to publish items that require publishing ( pic of publish icon ), These users cannot add or edit new
content to the website
Designer - People in the WMS designers group can edit the Menu section of the WMS and add, edit or delete the templates that are used for
public website output. They cannot add website content, or publish items to the public website,
Item Specific Permissions
The WMS is designed to allow you to sub-assign permission to each section created. As you add content to your SiteMap, you will can then
restrict users to those sections.
Change Status of a user
The default status of a user is set to Active. At any point you can change a users permission to not active by un-checking the active checkbox.
Edit a User
To edit existing WMS users permissions, click the Users link in your WMS navigation. Locate the user who's permissions you wish to edit. Click the
edit icon next to this users name
The Edit user screen will load, with all the users information populated into the fields,make changes as you require, and click the save button to update
the users profile. All changes take effect immediatly.
Delete a user
To delete a user from the system, click the Users link in your WMS navigation. Locate the user you wish to completely remove from the WMS and click
the delete icon for their name.
A confirmation box will appear prompting for your confirmation, click YES to remove this user permanently.
This action cannot be undone, please be sure you wish to remove this user.
Logout
To logout from your WMS session, go to a screen that has the WMS navigation. There will be a link that says Logout, click this to logout from the
WMS, you will be sent to the login screen. Please logout when not using the WMS, this allows your user profile to become available at another
computer for when you need to login next.
Your session is automatically expired after 10 minutes of inactivity.